")
You already know that WordPress is a powerful platform for content, but were you aware that it’s also one of the best eCommerce solutions? This guide will walk you through each step to create a successful eCommerce website with WordPress and Divi. We’ve got you covered, from domain selection to hosting, installation, and essential plugins.
- 1 Why Use WordPress to Make an Ecommerce Website?
-
2
How to Setup Shop with WordPress (5 Steps)
- 2.1 1. Choose a WordPress Ecommerce Hosting Provider + Domain Registrar
- 2.2 2. Configure WordPress
- 2.3 3. Pick a WordPress Ecommerce Theme
- 2.4 4. Make Your WordPress eCommerce Store
- 2.5 4. Design Your WordPress eCommerce Website
- 2.6 5. Boost Your WordPress eCommerce Site with Plugins and Integrations
- 3 Ecommerce Made Easy with WooCommerce and Divi
- 4 Frequently Asked Questions (FAQs)
Why Use WordPress to Make an Ecommerce Website?
WordPress shines as the premier content management system (CMS) used to build websites of all kinds.
The software is open-source and free to use, developed by and supported by a large community of volunteers. This makes the platform extremely flexible, giving you more control over your website functionality and allowing you to build an online store using countless eCommerce plugins and themes, such as Easy Digital Downloads, available. Although WordPress is free, there are common website expenses outside WordPress, including hosting, domain registration, premium plugins, and themes. While WordPress is great for creating versatile websites, it’s worth considering other eCommerce platforms to find the best fit for your online store, as prices and features vary.
WooCommerce: A Powerful Ecommerce Solution for WordPress
What makes WordPress equipped to handle your next eCommerce website? WooCommerce.
WooCommerce is the go-to WordPress solution for eCommerce. The WordPress editor is seamlessly integrated with WooCommerce and includes all the WooCommerce Blocks needed to build your store with a drag-and-drop interface. And it is simple enough for novice web admins to learn how to use it. It also has a plethora of add-ons available to help you achieve anything you need from it. It also gives users detailed dashboards and a convenient mobile app that allows you to keep tabs on your store’s performance from anywhere at any time.
Other benefits of using WooCommerce include:
- WordPress Hosting providers like SiteGround are tailored to WooCommerce sites for easy setup and optimal performance.
- More customization and control with various plugins to add the functionality you need.
- More cost-effective than other solutions that require recurring monthly payments and additional fees (top choice for those wanting to create a money-making website).
- More control over security than other solutions with built-in security that cannot be optimized.
WooCommerce Alternatives to Compare
Selecting the ideal eCommerce platform is a pivotal decision. Some may benefit from using other website builder platforms (outside of WordPress) like Shopify, 10Web, Squarespace, or Wix. And there are WordPress membership plugins like MemberPress that offer standalone options for eCommerce. To help you decide, we’ve created comparison guides between WooCommerce and other leading website builders for eCommerce that you can dig deeper into.
- WooCommerce vs Shopify
- WooCommerce vs Squarespace
- WooCommerce vs Adobe Commerce
- WooCommerce vs Magento
- WooCommerce vs Duda
- WooCommerce vs Wix
But we’ll assume that you’ll see the exceptional value in WordPress + WooCommerce and proceed to the next step of building an eCommerce site with WordPress.
How to Setup Shop with WordPress (5 Steps)
1. Choose a WordPress Ecommerce Hosting Provider + Domain Registrar
Selecting a hosting provider specializing in WordPress is pivotal for your eCommerce website’s performance and security. SiteGround is a top choice, finely tuned for WordPress and WooCommerce platforms.
Dive into our in-depth SiteGround analysis to explore its myriad features. SiteGround offers complimentary CDN, no-cost SSL, and email account governance in its hosting packages.
For alternative hosting solutions, consider our roundup of the fastest WordPress hosts or the best all-around hosting services. Quality hosting becomes doubly important when running a WordPress eCommerce site since it needs to be fast with around-the-clock uptime. If SiteGround isn’t your cup of tea, consider partnering with an equally reputable host, such as Cloudways, Pressable, or Flywheel instead.
Install WordPress
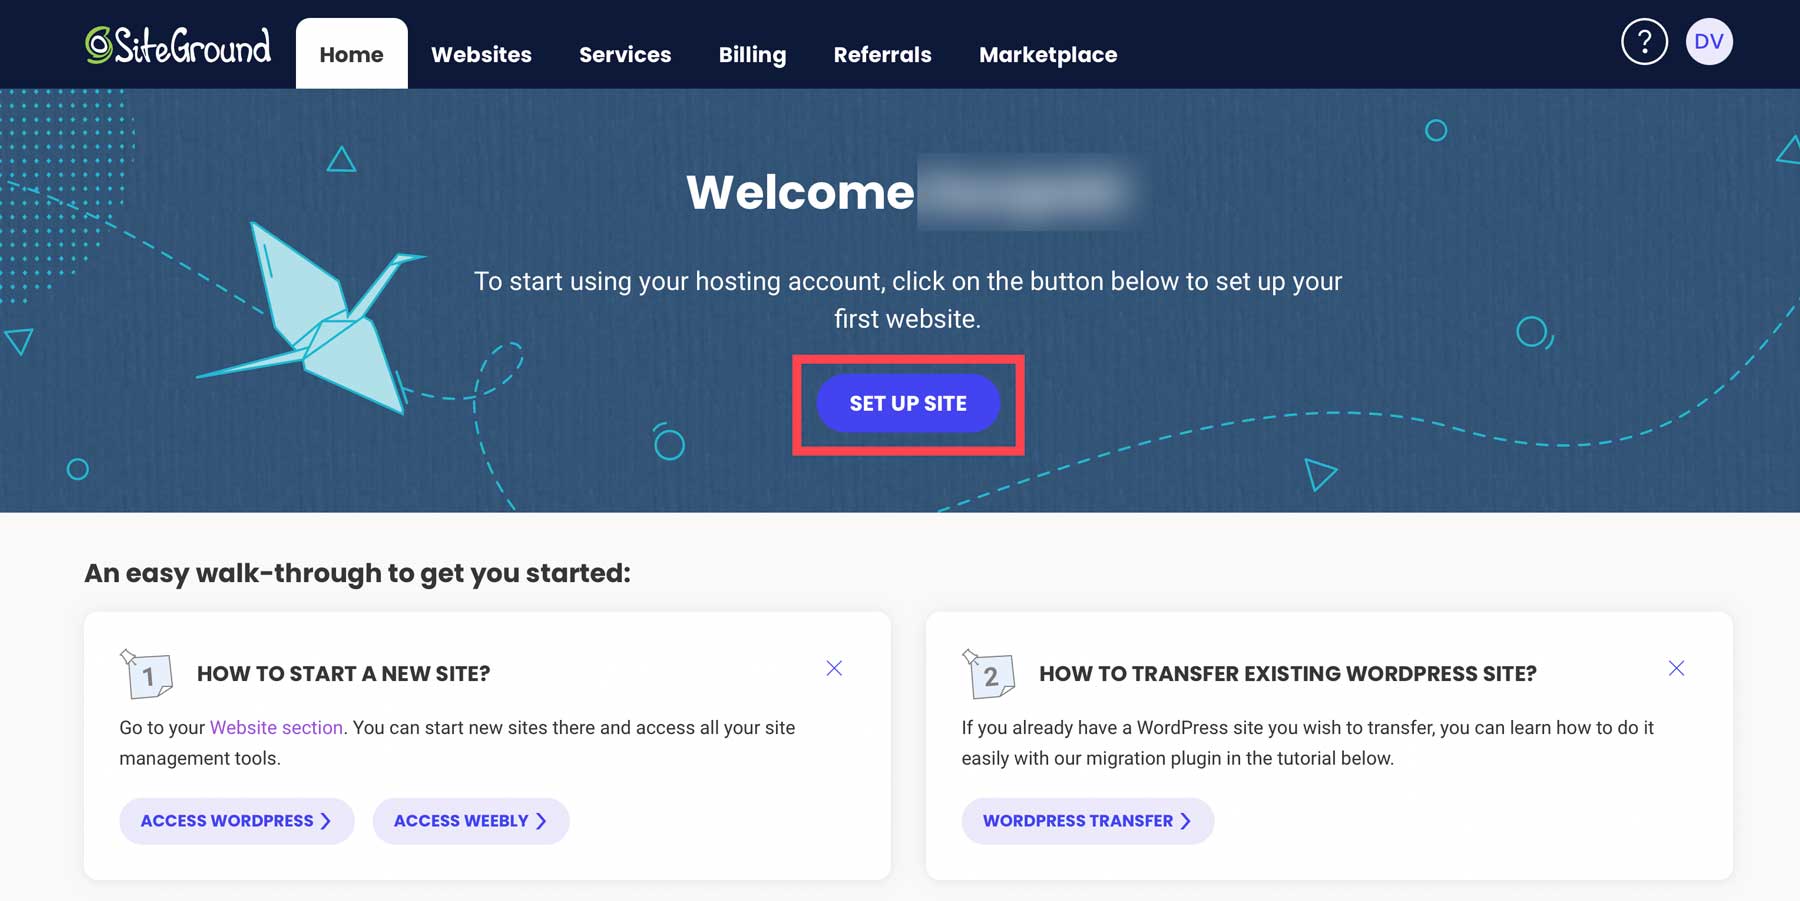
Navigate to SiteGround’s Site Tools dashboard. For other ways to install WordPress, read our definitive WordPress installation guide.
After signing into your SiteGround account, start the installation by clicking the “Set Up Site” button on your dashboard.
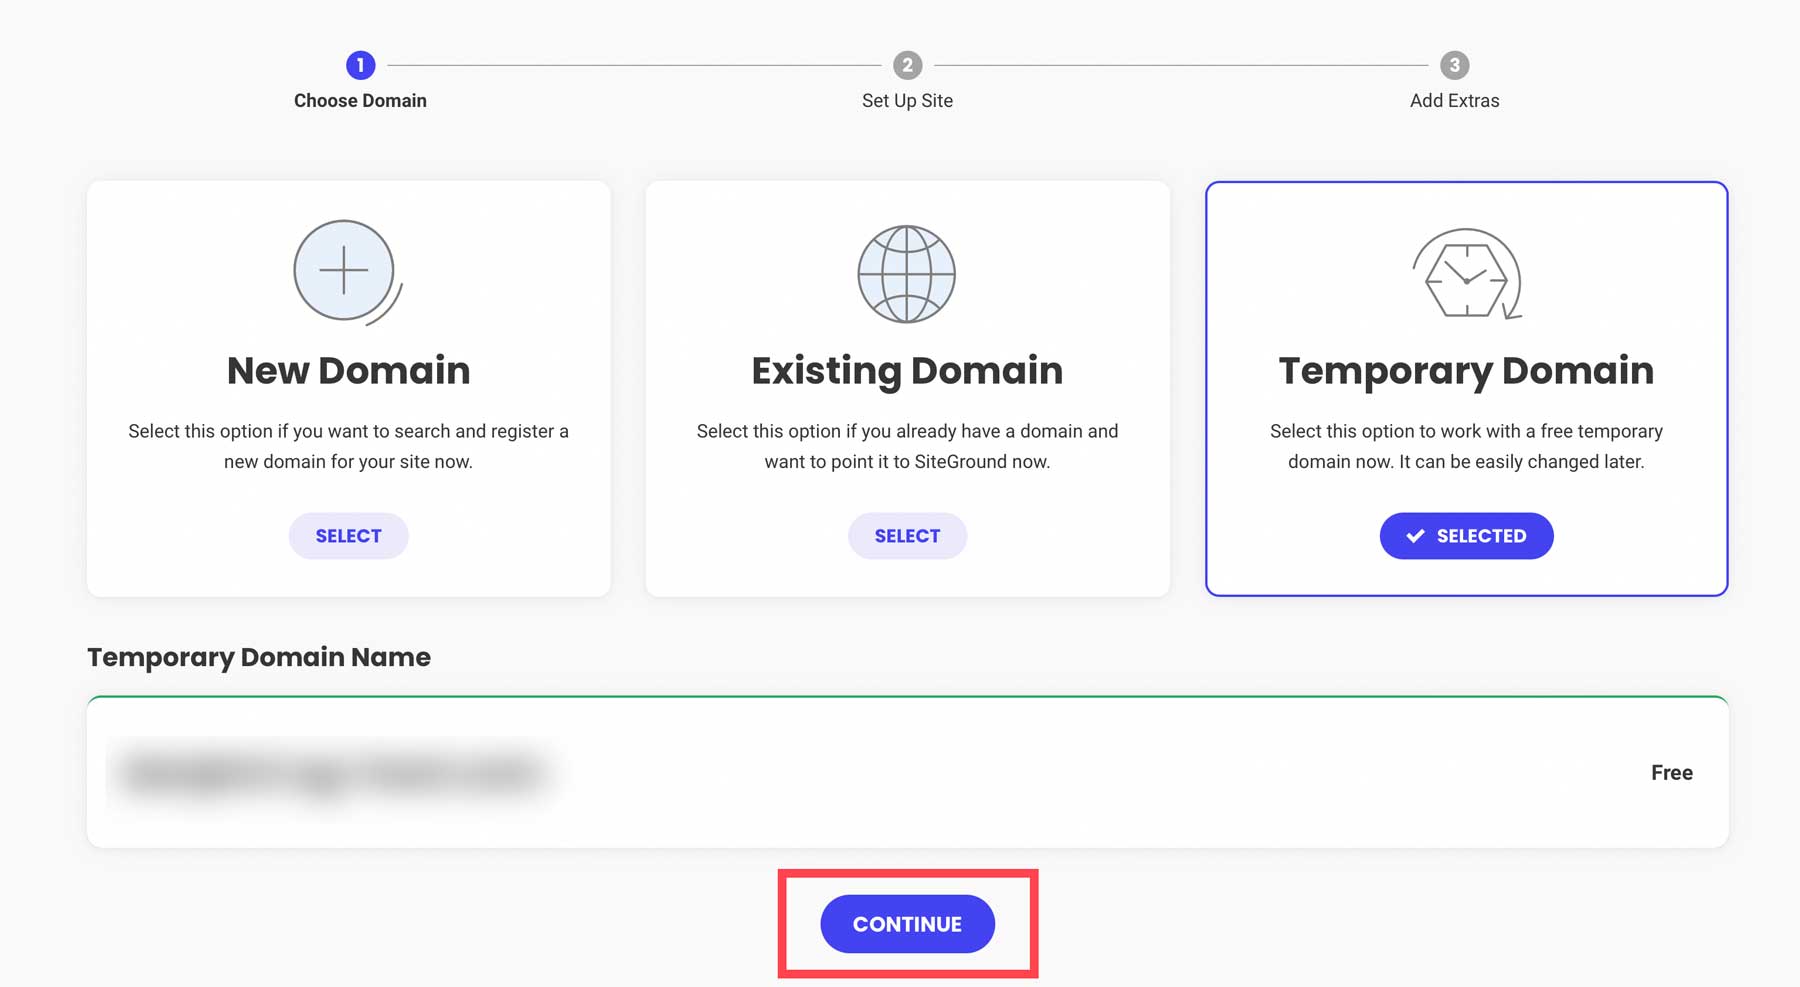
Choose the domain type for your WordPress eCommerce site. If you wish to build before buying your domain, opt for a Temporary Domain.
For those eager to secure a domain upfront, follow this guide to register a domain. Click New Domain, find your ideal domain name, and proceed with the WordPress setup.
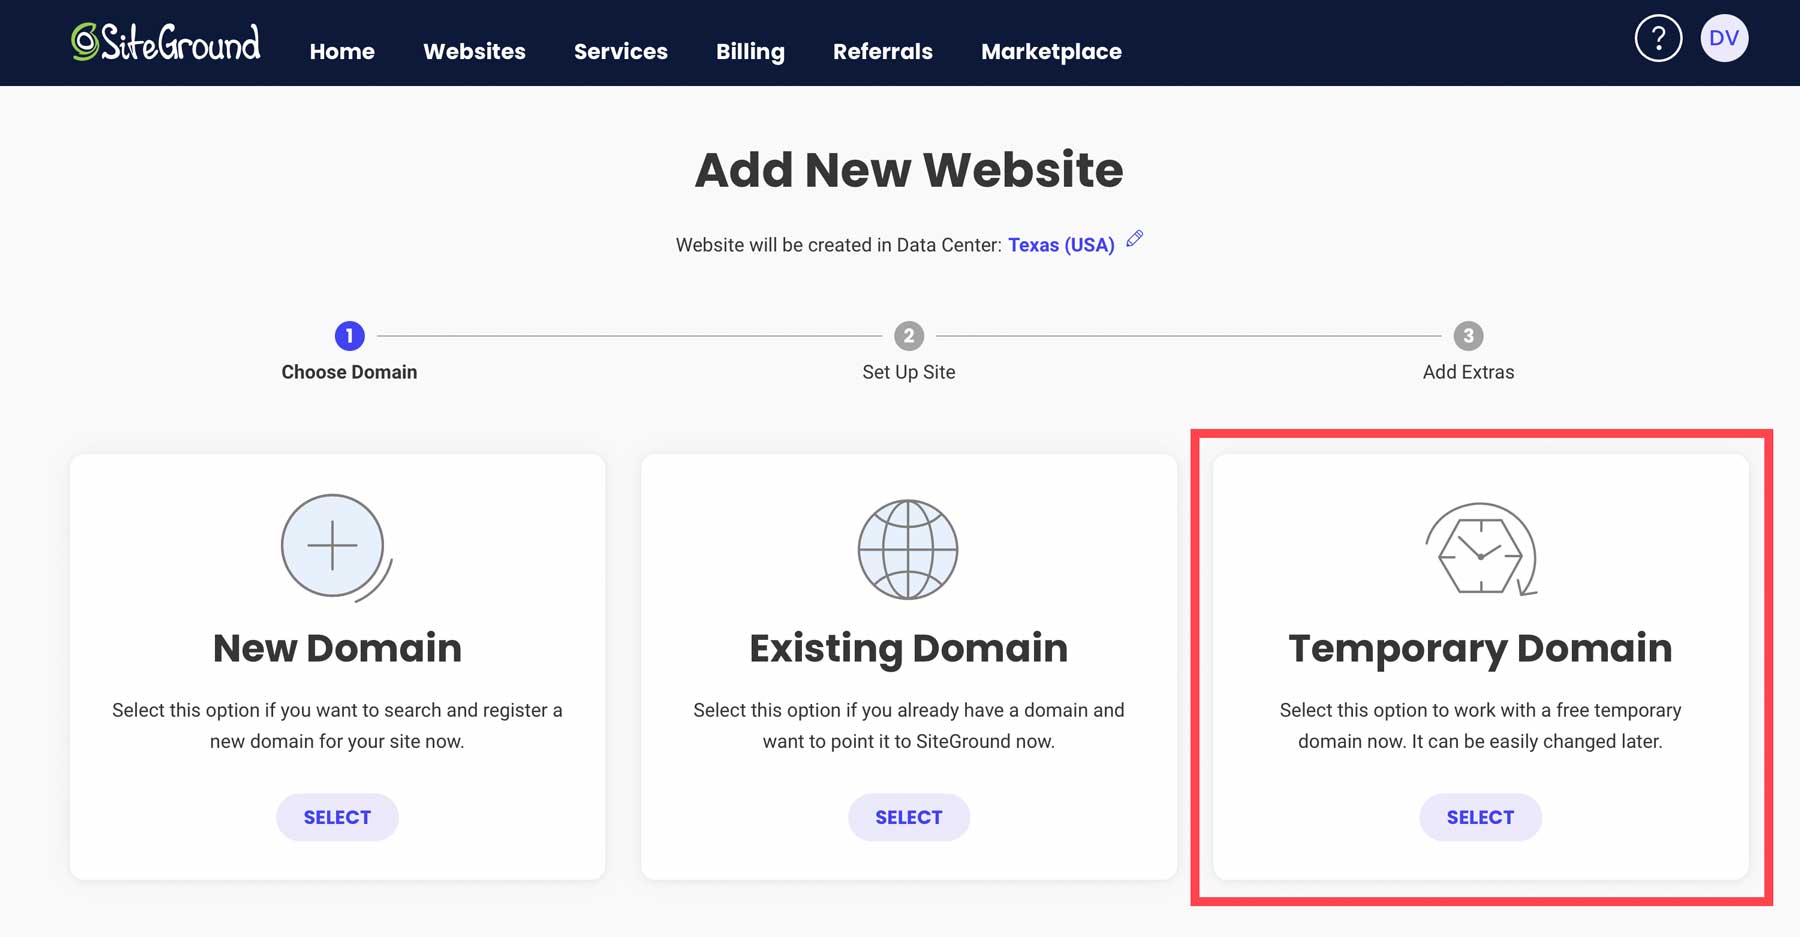
Click “Continue” to advance with the domain option that you’ve chosen.
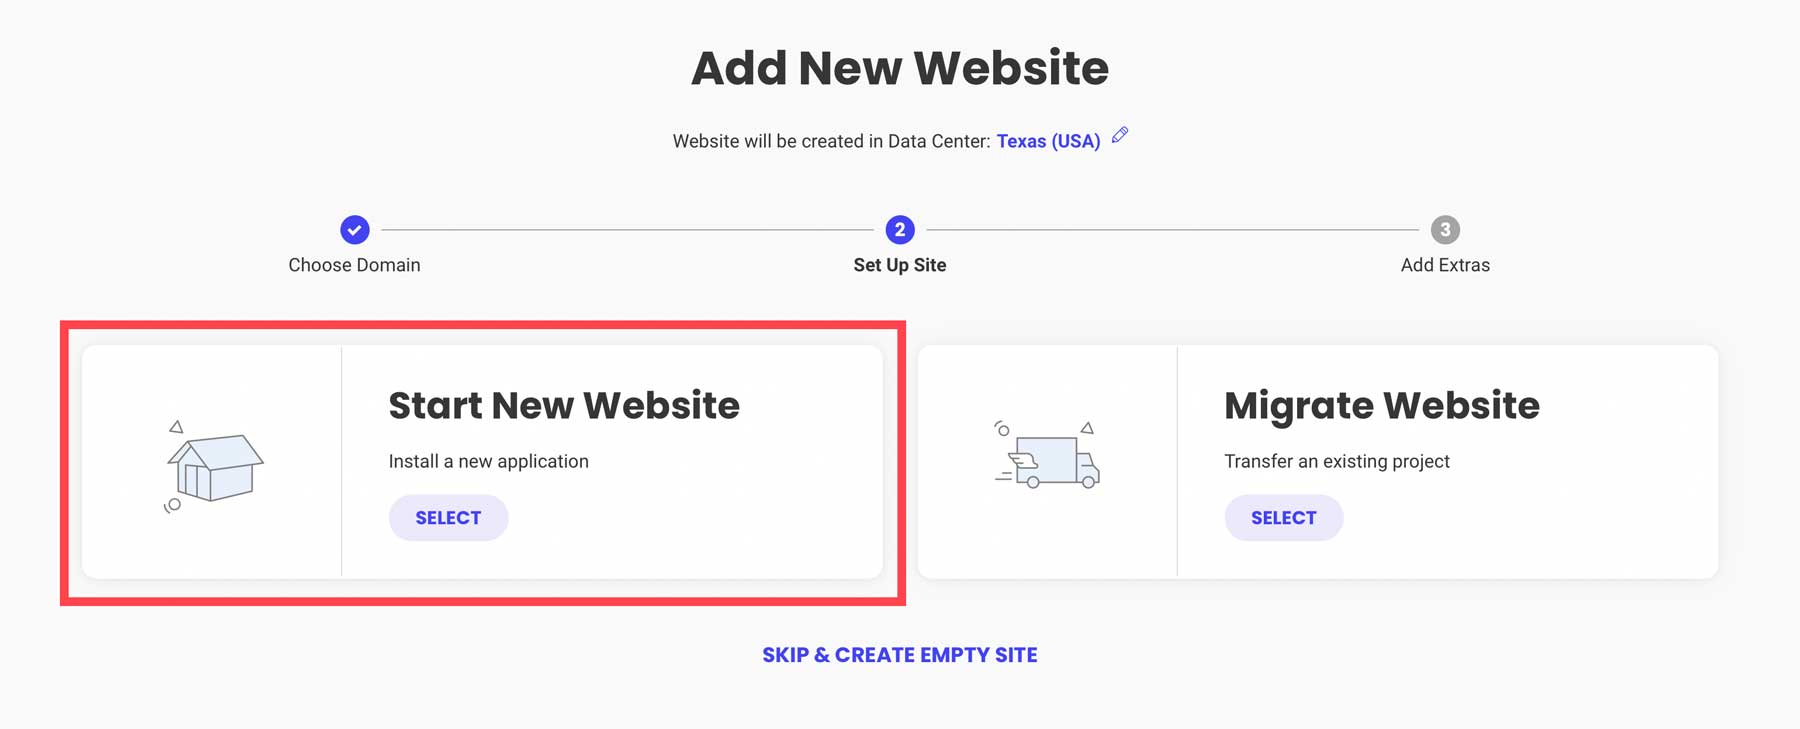
Then, select “Start New Website” to continue.
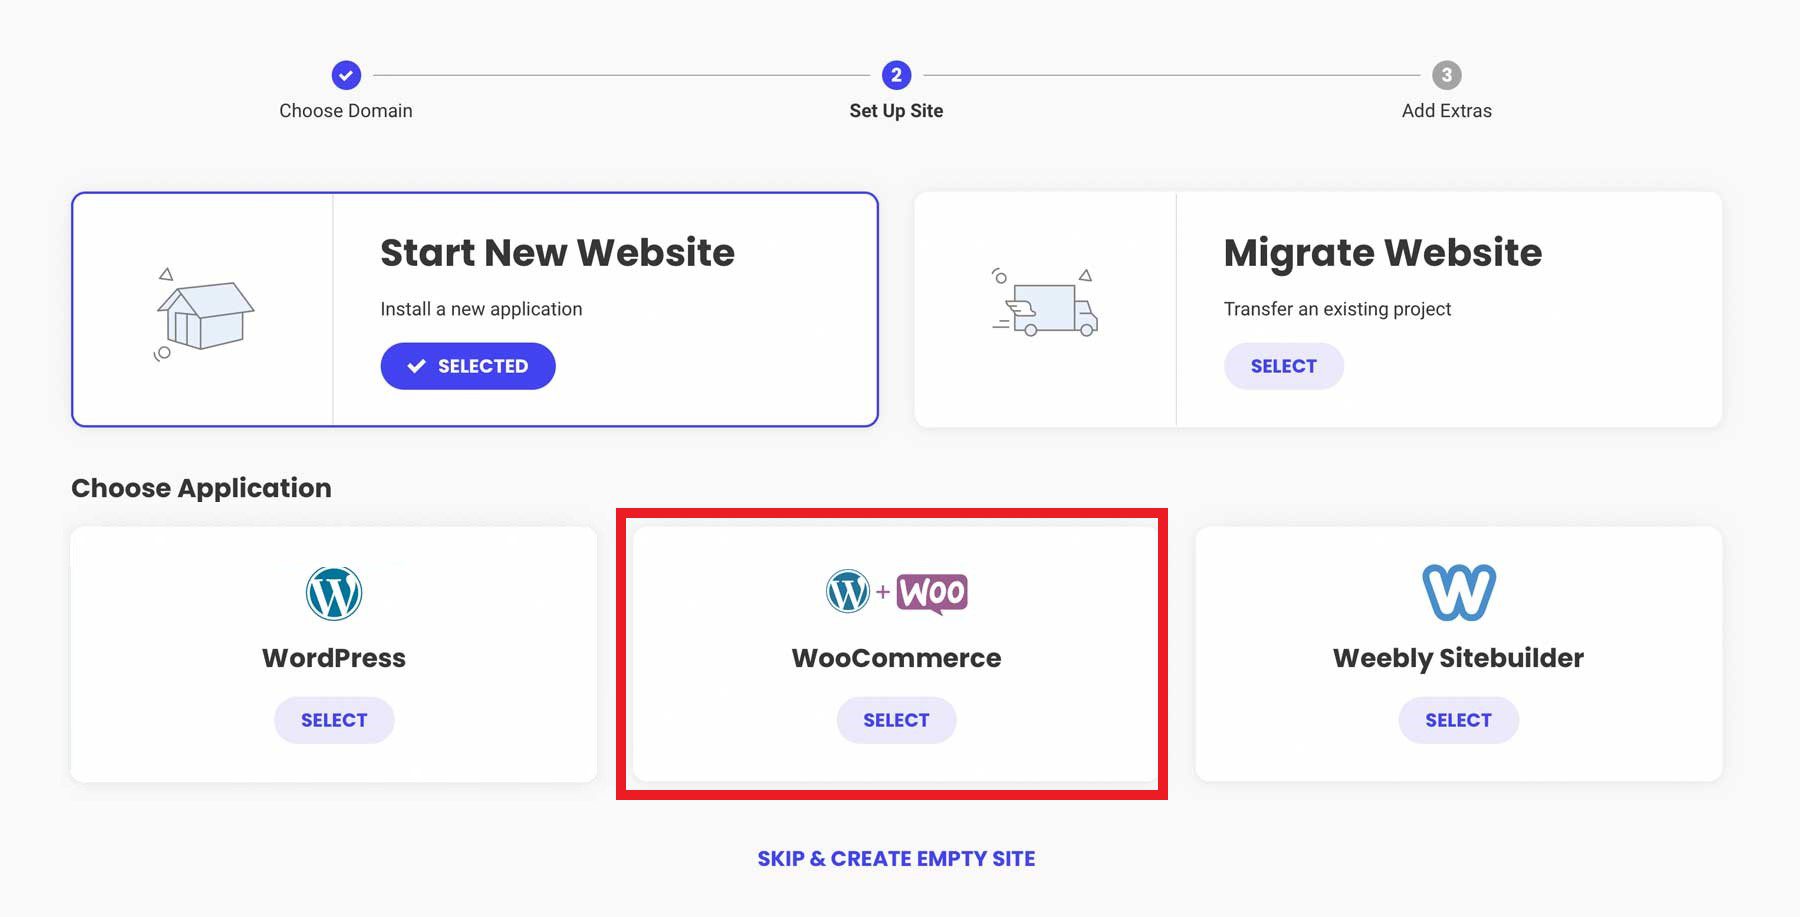
Choose “WooCommerce” to ensure WordPress comes pre-installed with WooCommerce to make setup a bit quicker.
Configure your admin login credentials. Keep this information secure by following our password management tips. Click “Continue” to move forward.
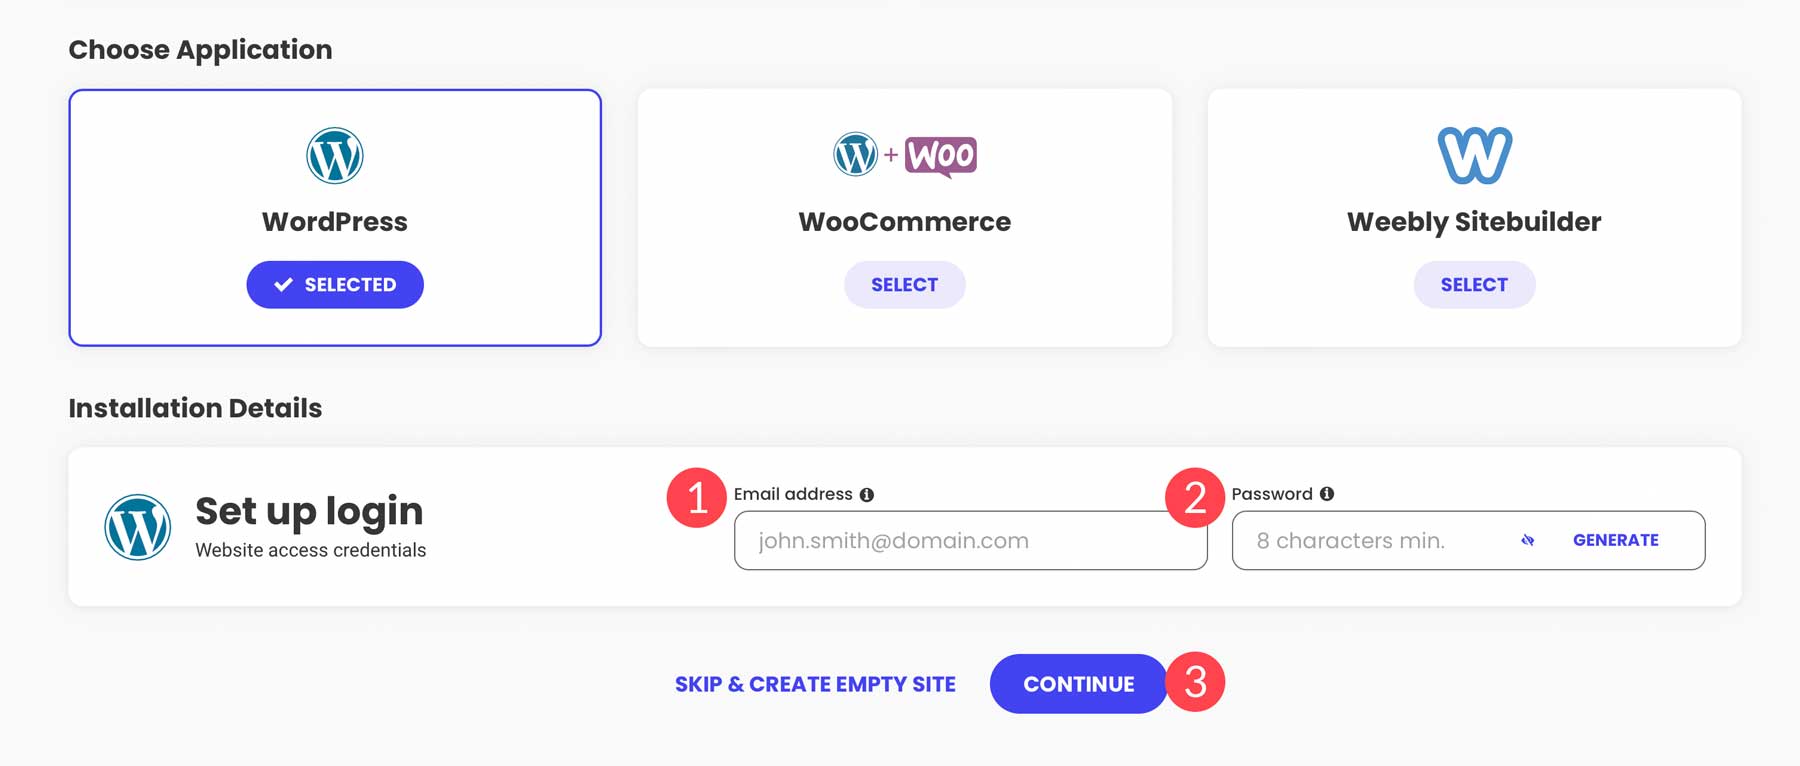
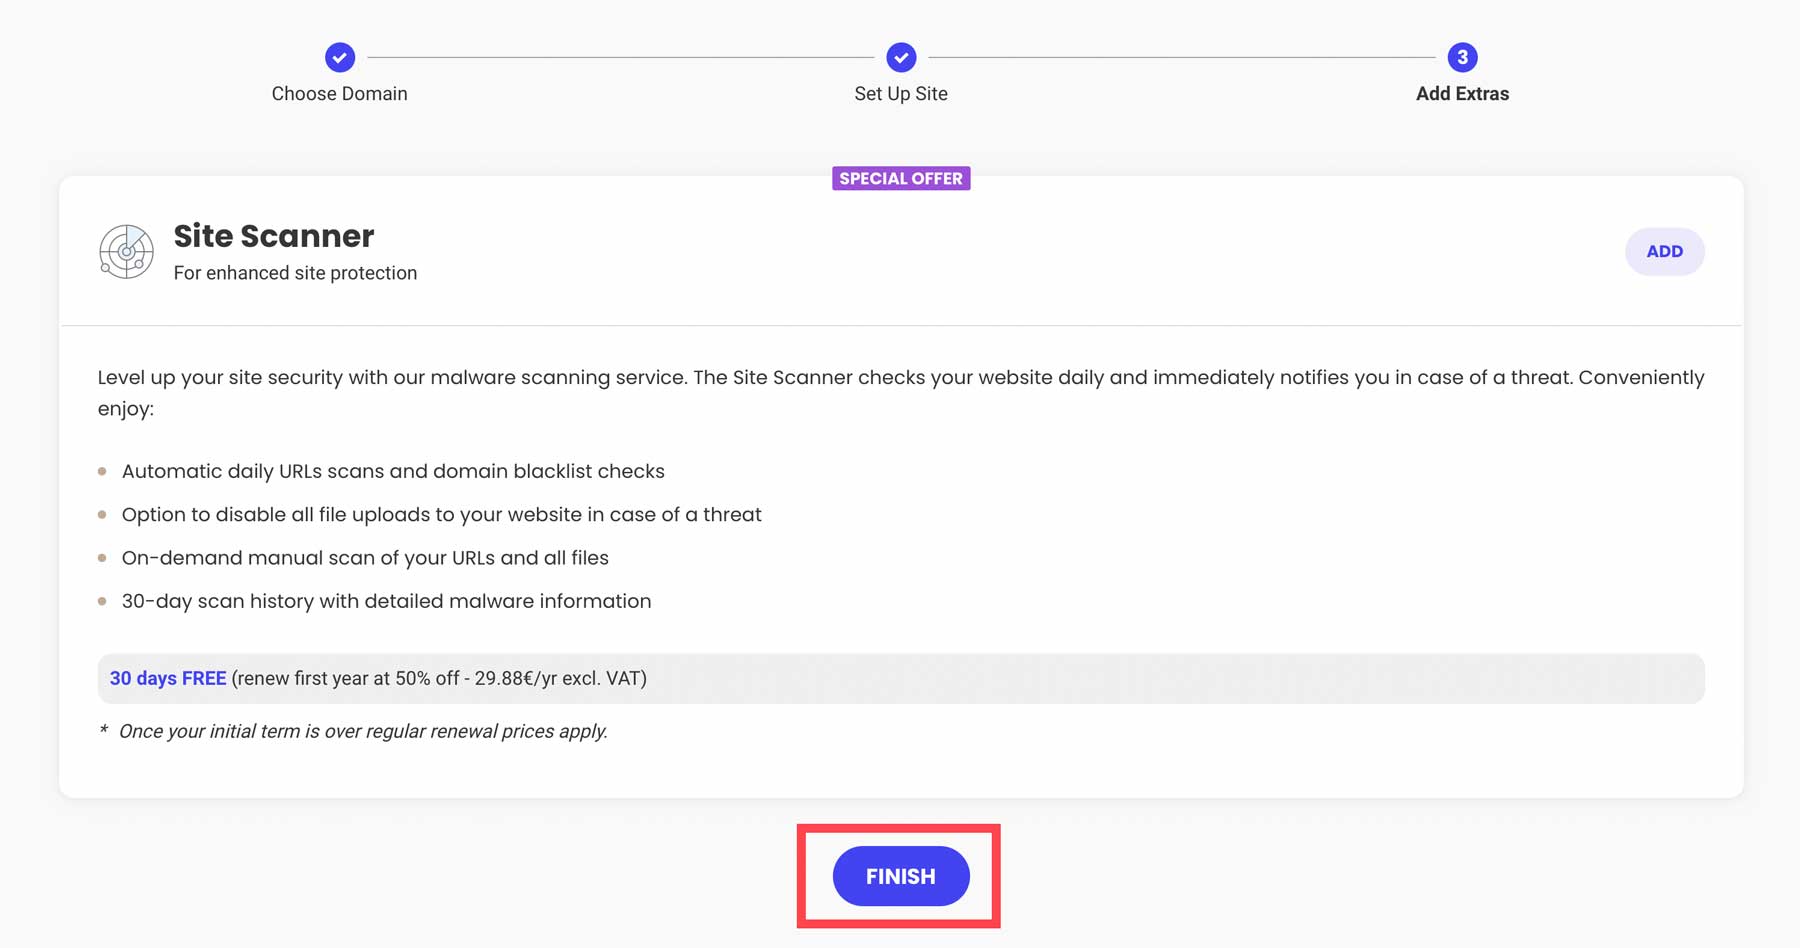
Finally, hit the Finish button to set up WordPress + WooCommerce for your new WordPress eCommerce website.
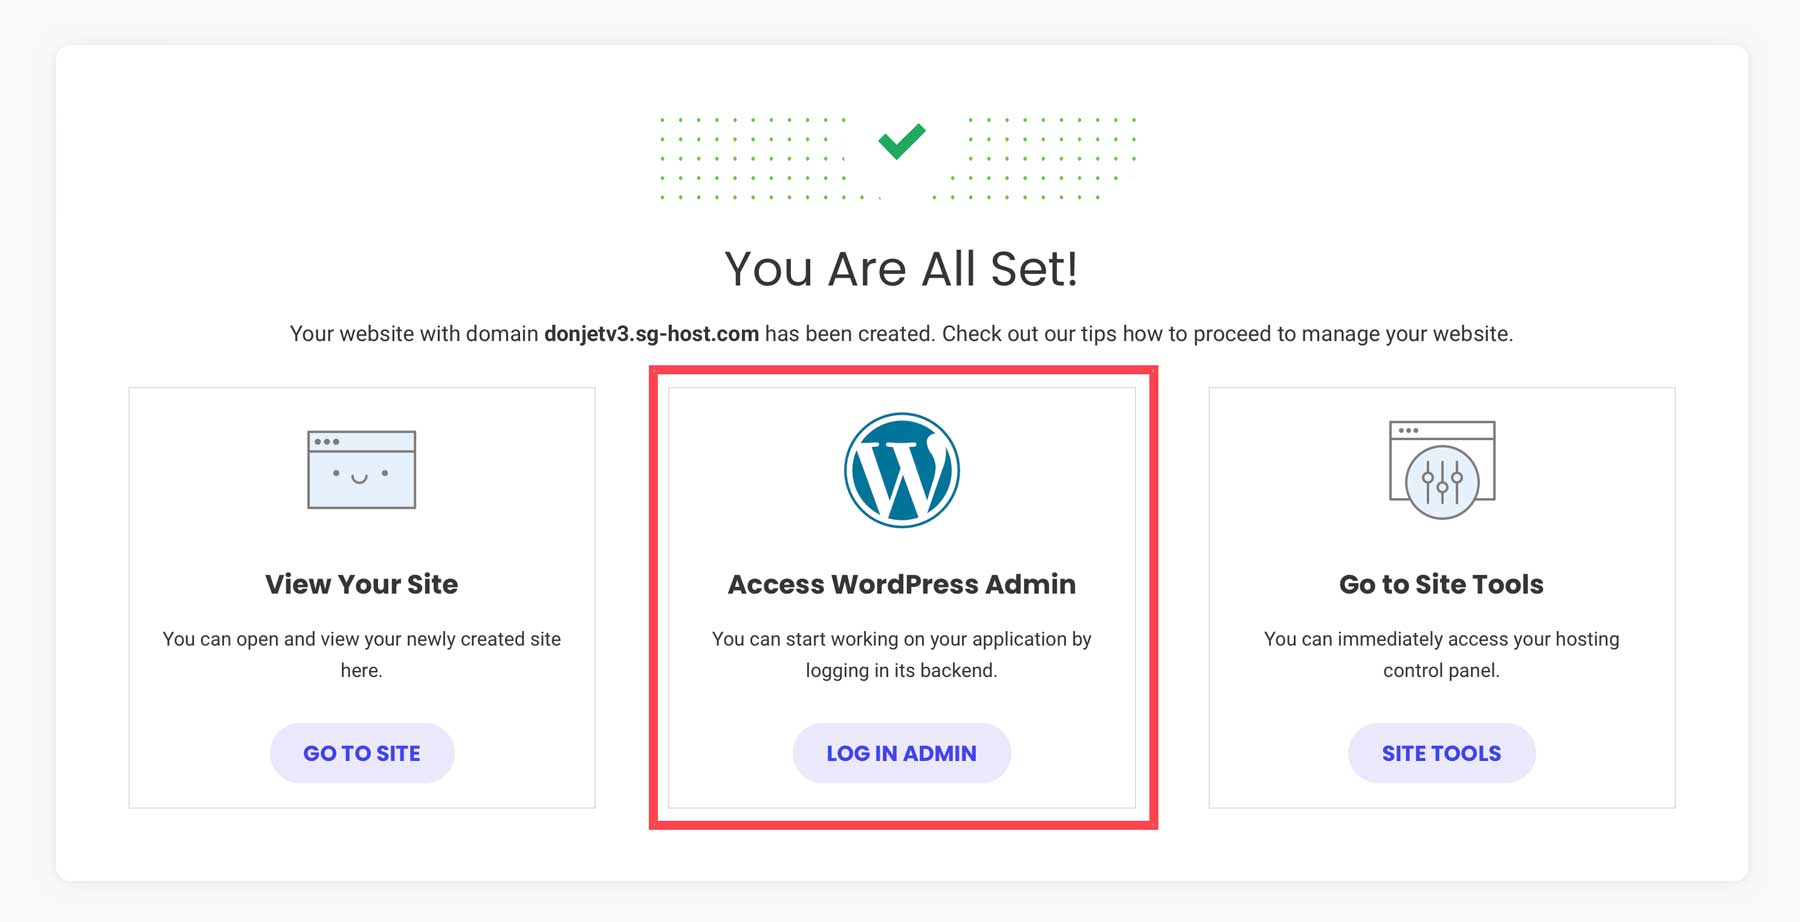
Access your new WordPress dashboard by clicking “Log in Admin.”
2. Configure WordPress
You’ve got your hosting and maybe even a domain. Now, let’s set up your WordPress site for eCommerce.
Adjust WordPress Settings
You’ll find the settings you need under Settings in the sidebar of your admin dashboard.
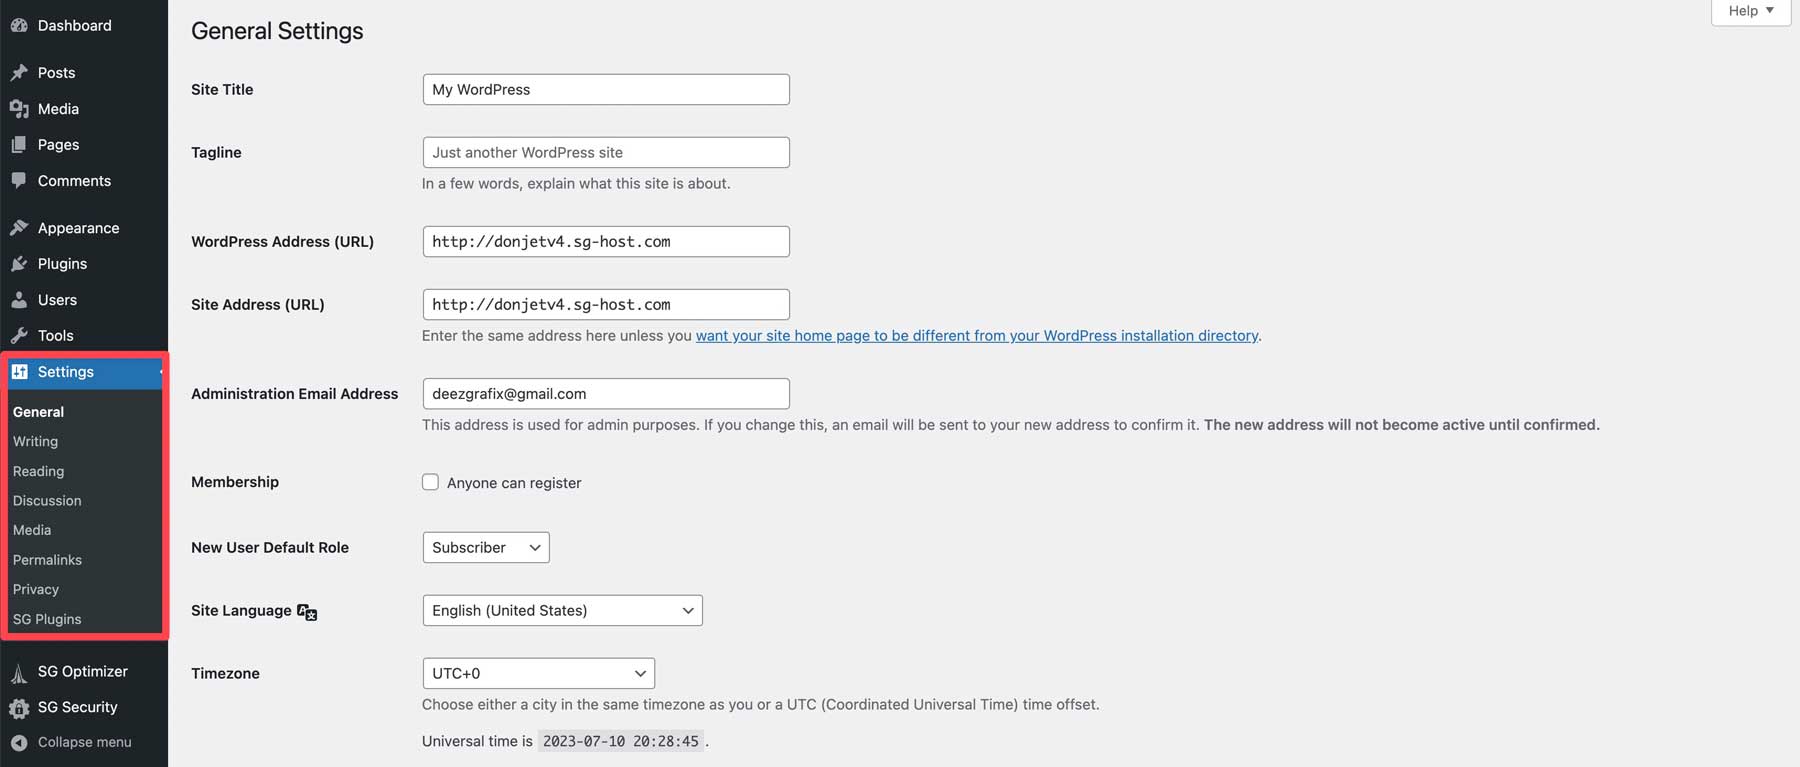
Need more help? Check out these guides for each settings page to configure your eCommerce website the way you need it:
- General WordPress settings (where you turn on HTTPS)
- Writing settings
- Reading settings (where you make a static homepage)
- Comments settings
- Media settings
- Permalink settings (SEO tip – how permalinks help SEO)
- Privacy settings
3. Pick a WordPress Ecommerce Theme
Now, let’s choose a WordPress theme that’s great for eCommerce. We recommend using our Divi Theme. Divi is a top pick because it is a powerful page builder that works seamlessly with WooCommerce. It’s easy to use and makes your store look good.
Why Divi is a good choice:
- It has native WooCommerce Modules to customize the design of your store fully.
- Divi has ready-to-use store templates
- Easy design tweaks with Divi’s Visual Builder
- Boost your store with Divi’s marketing tools
- Good customer support when you need help
- Divi and WooCommerce work well together
- Optimize product images and descriptions or create eCommerce page layouts with Divi AI (separate charge)
For other options, you can check out these top WooCommerce WordPress Themes.
How to Add Divi to Your WordPress Store
First, get Divi from your Elegant Themes membership account after buying a membership. Log in and go to Themes & Plugins to download Divi.

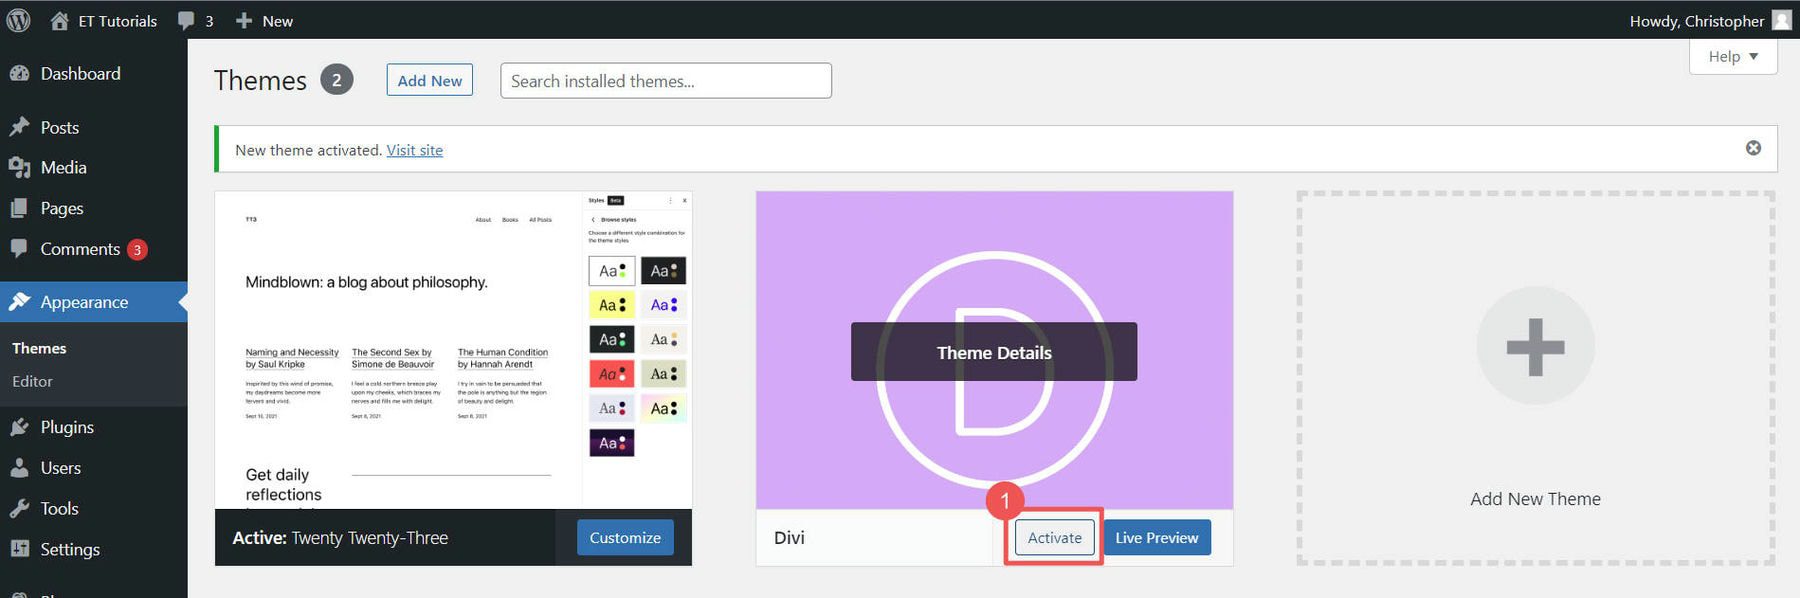
In your WordPress dashboard, go to Appearance > Themes. Click Upload Theme and pick the Divi file you downloaded. Then click Install Now.

Click Activate to make Divi your theme.
Last step: add your Elegant Themes API Key. This keeps Divi updated with new features and security fixes. Grab the Username from your account in the API Key section.
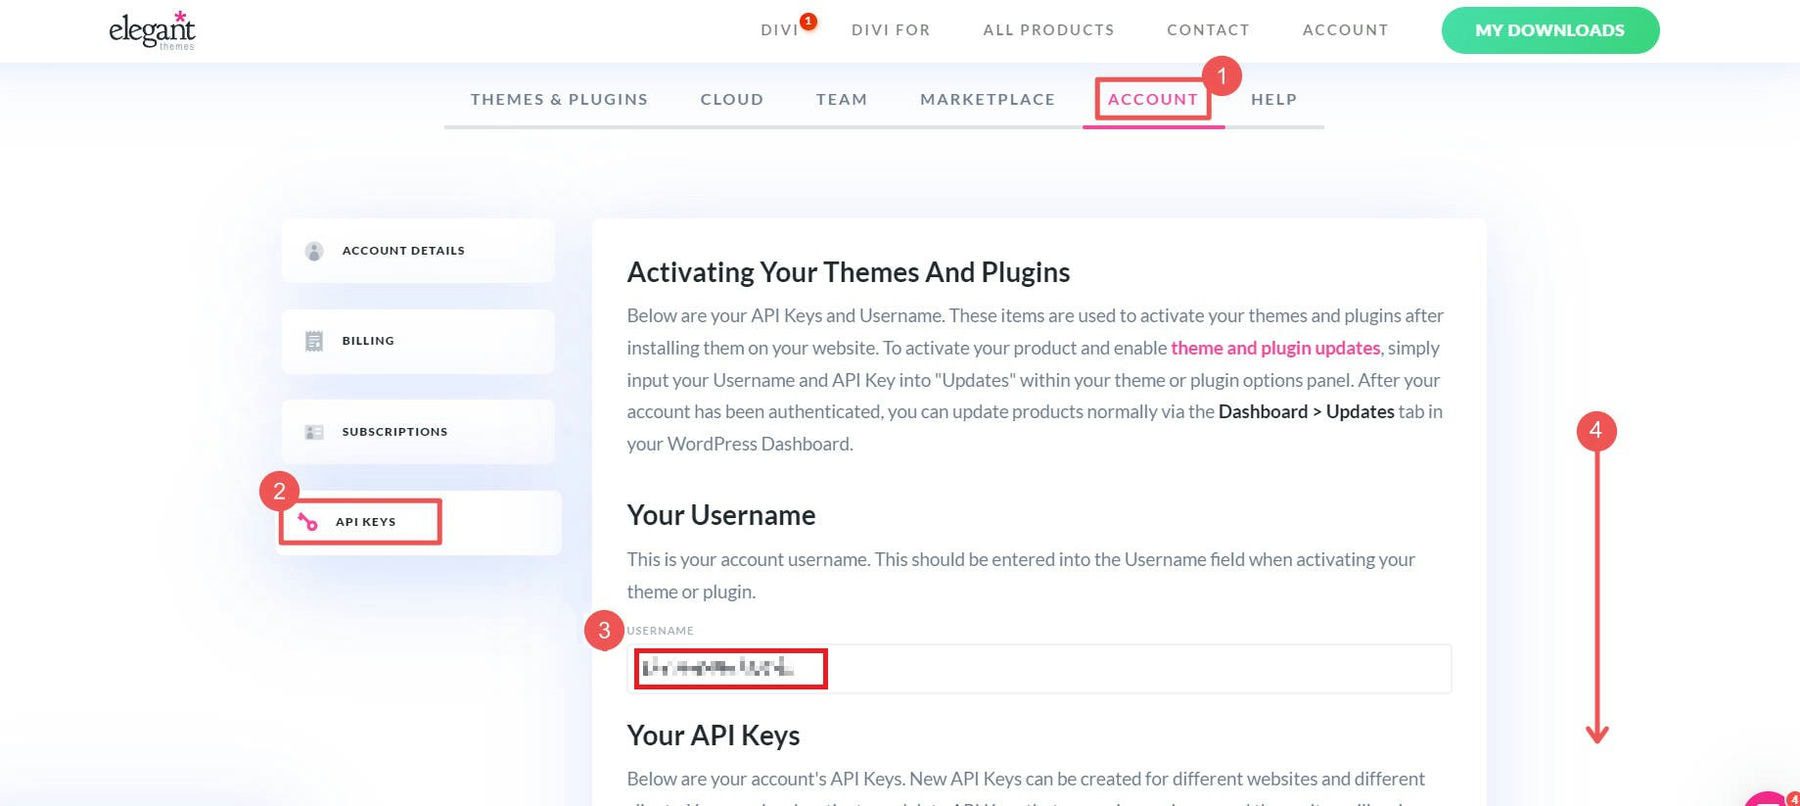
Generate a New API Key for your site. Label it so you know which site it belongs to. Copy the Key.

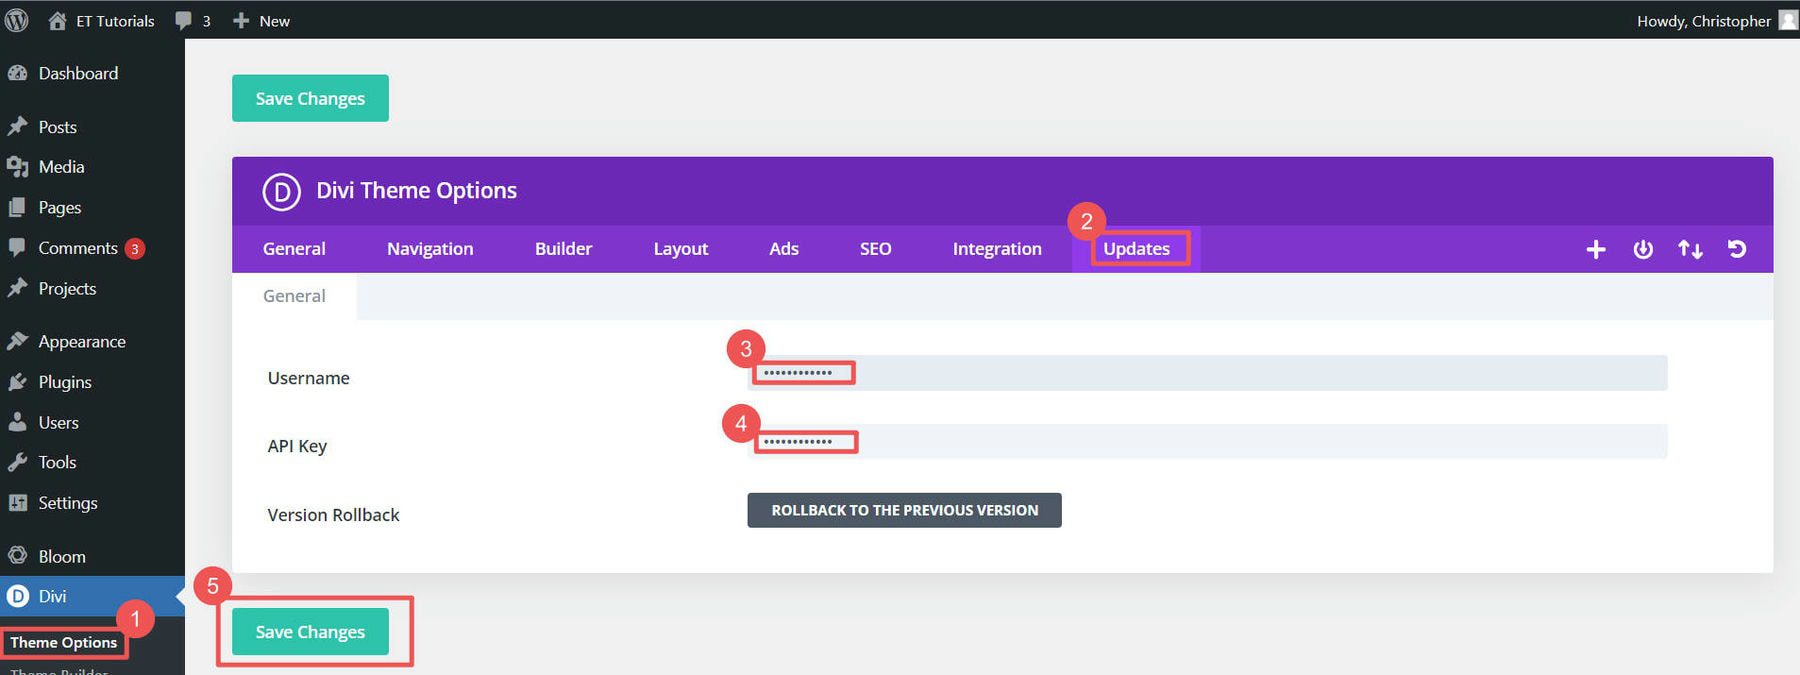
To add the API Key, go to Divi > Theme Options > Updates. Put in your Elegant Themes API Key (generate a new key for each site you create) and Username, then click Save Changes.
If you want to learn more about adding themes, check out this theme installation guide. But we think you’ll like using Divi for your WordPress eCommerce website.
4. Make Your WordPress eCommerce Store
You’ve done the basic setup. Now, let’s dig into creating your WordPress eCommerce website. This means setting up WooCommerce, adding products, and choosing how people will pay you.
This is where the fun starts!
WooCommerce Setup Wizard
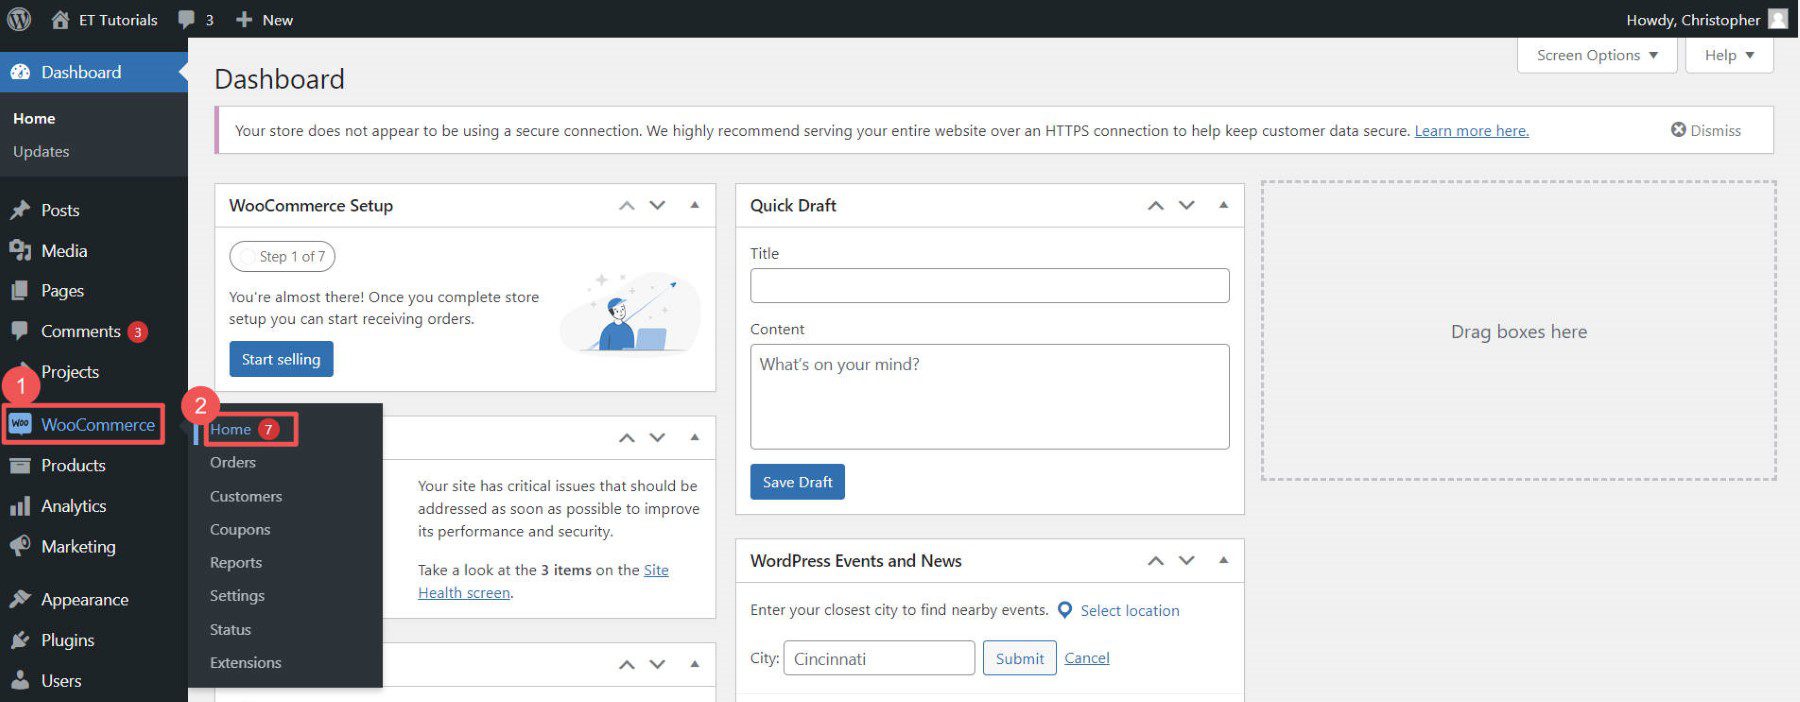
The WooCommerce setup wizard makes getting your WordPress eCommerce site ready easy. If your host didn’t install WooCommerce for you (Step 1), check out our WooCommerce setup guide to get it added to your website.
Click Home under WooCommerce to start the wizard.
The wizard will ask for your store info, like your address and email.
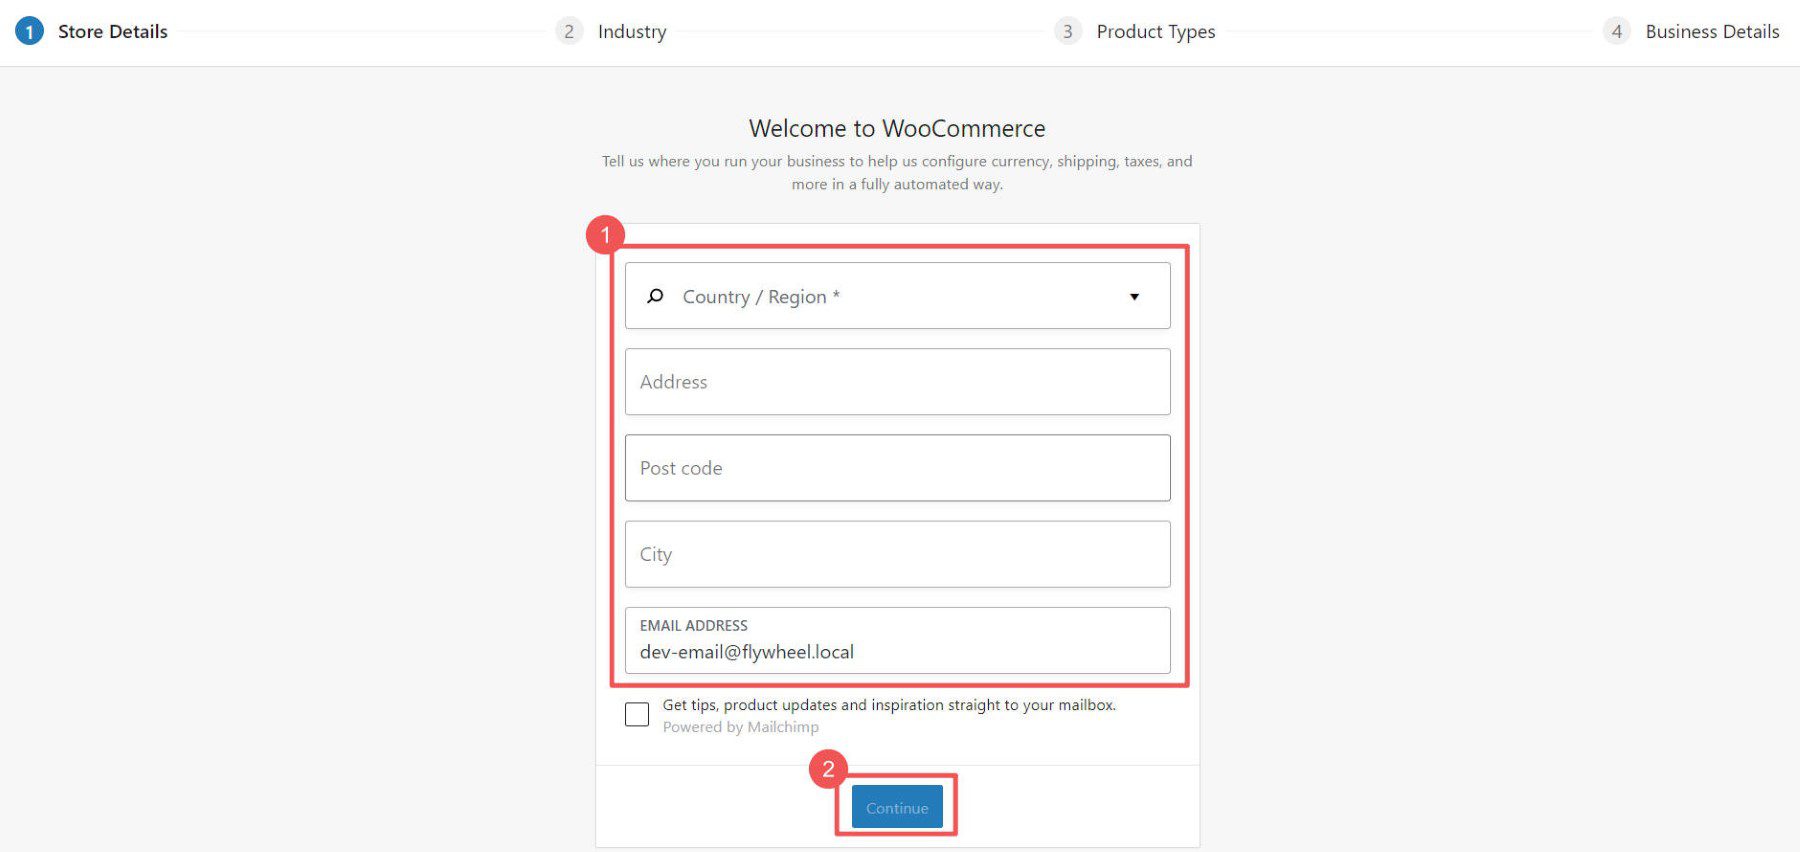
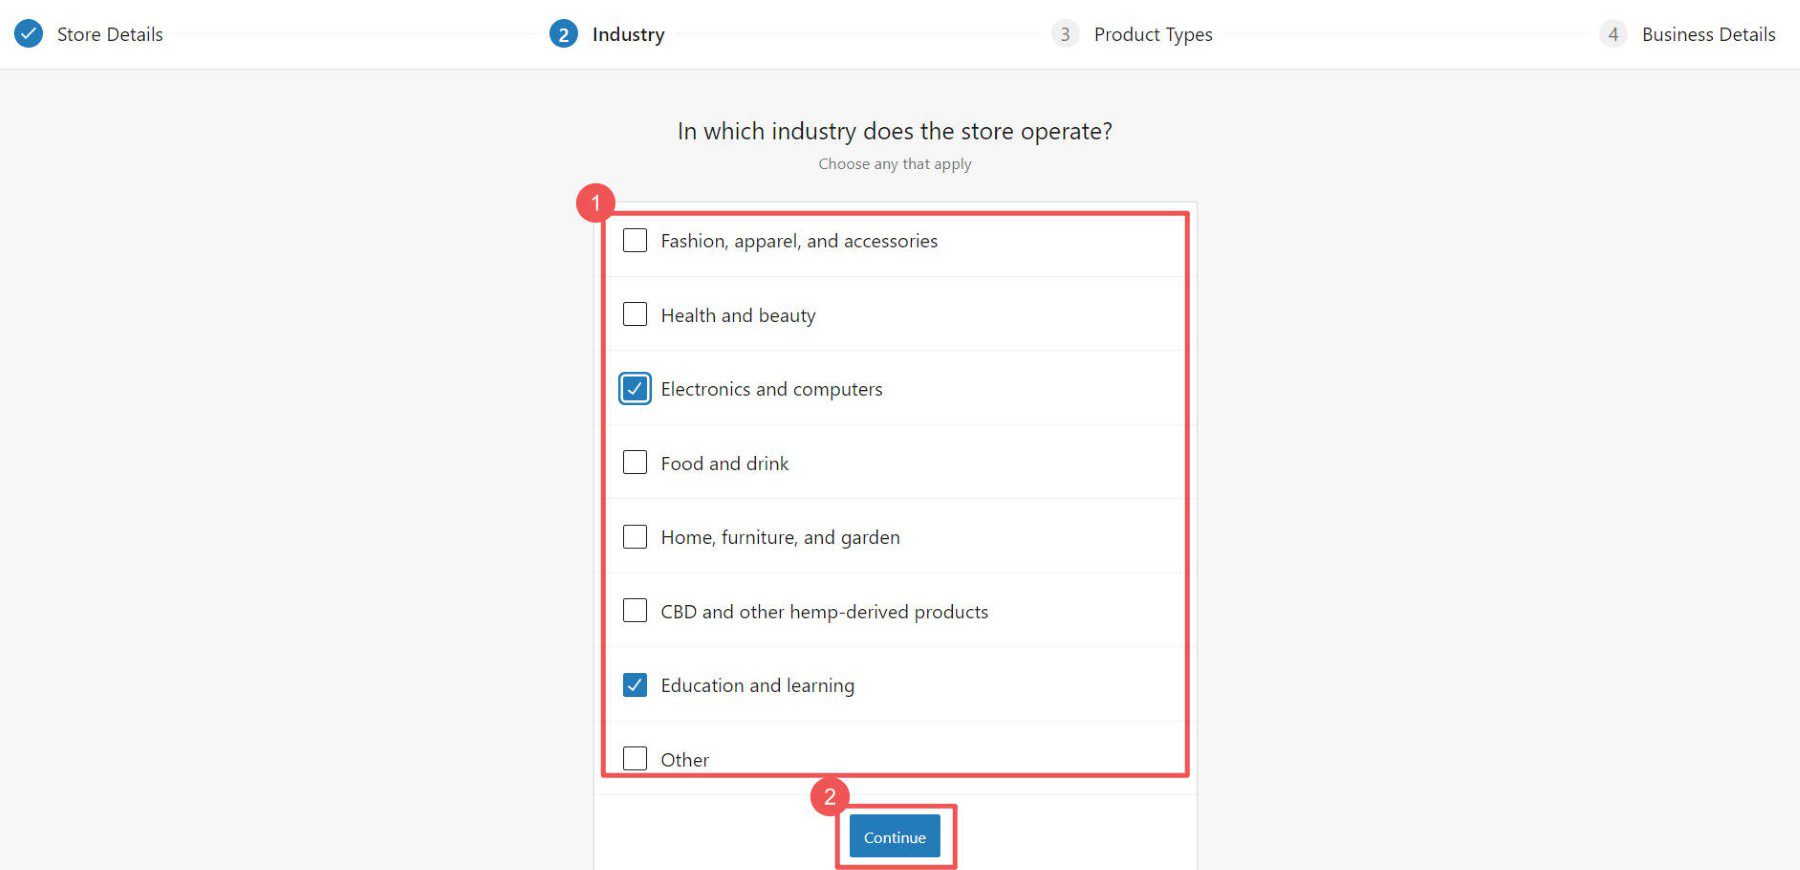
Select the industry and product types that best describe your store.
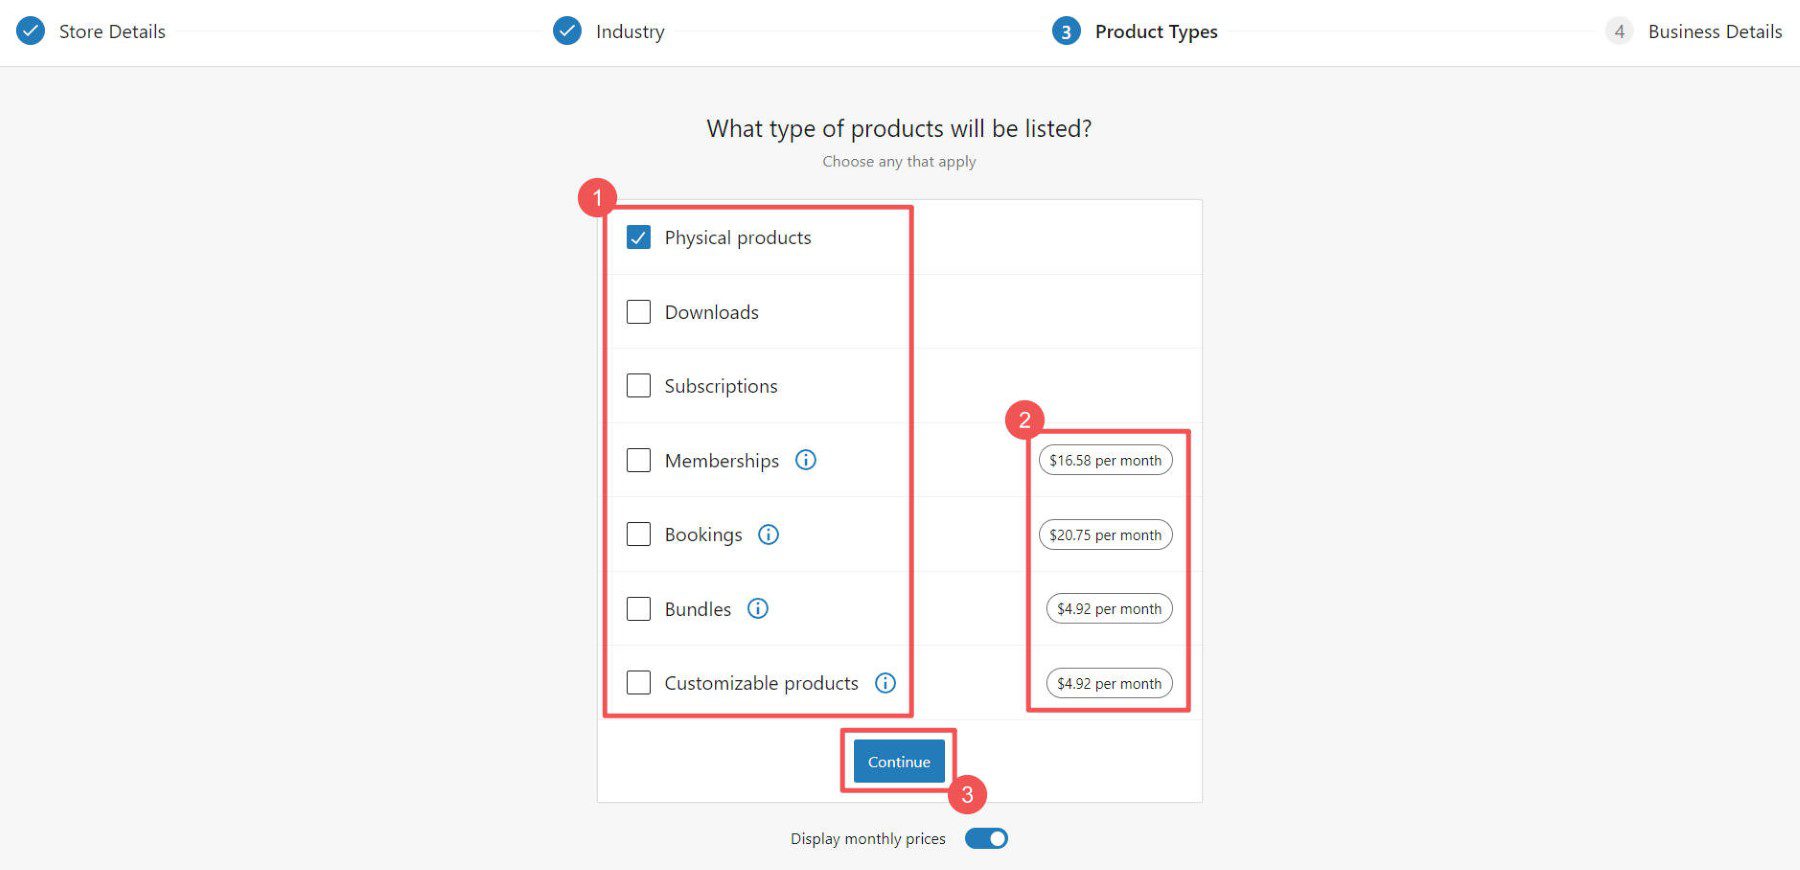
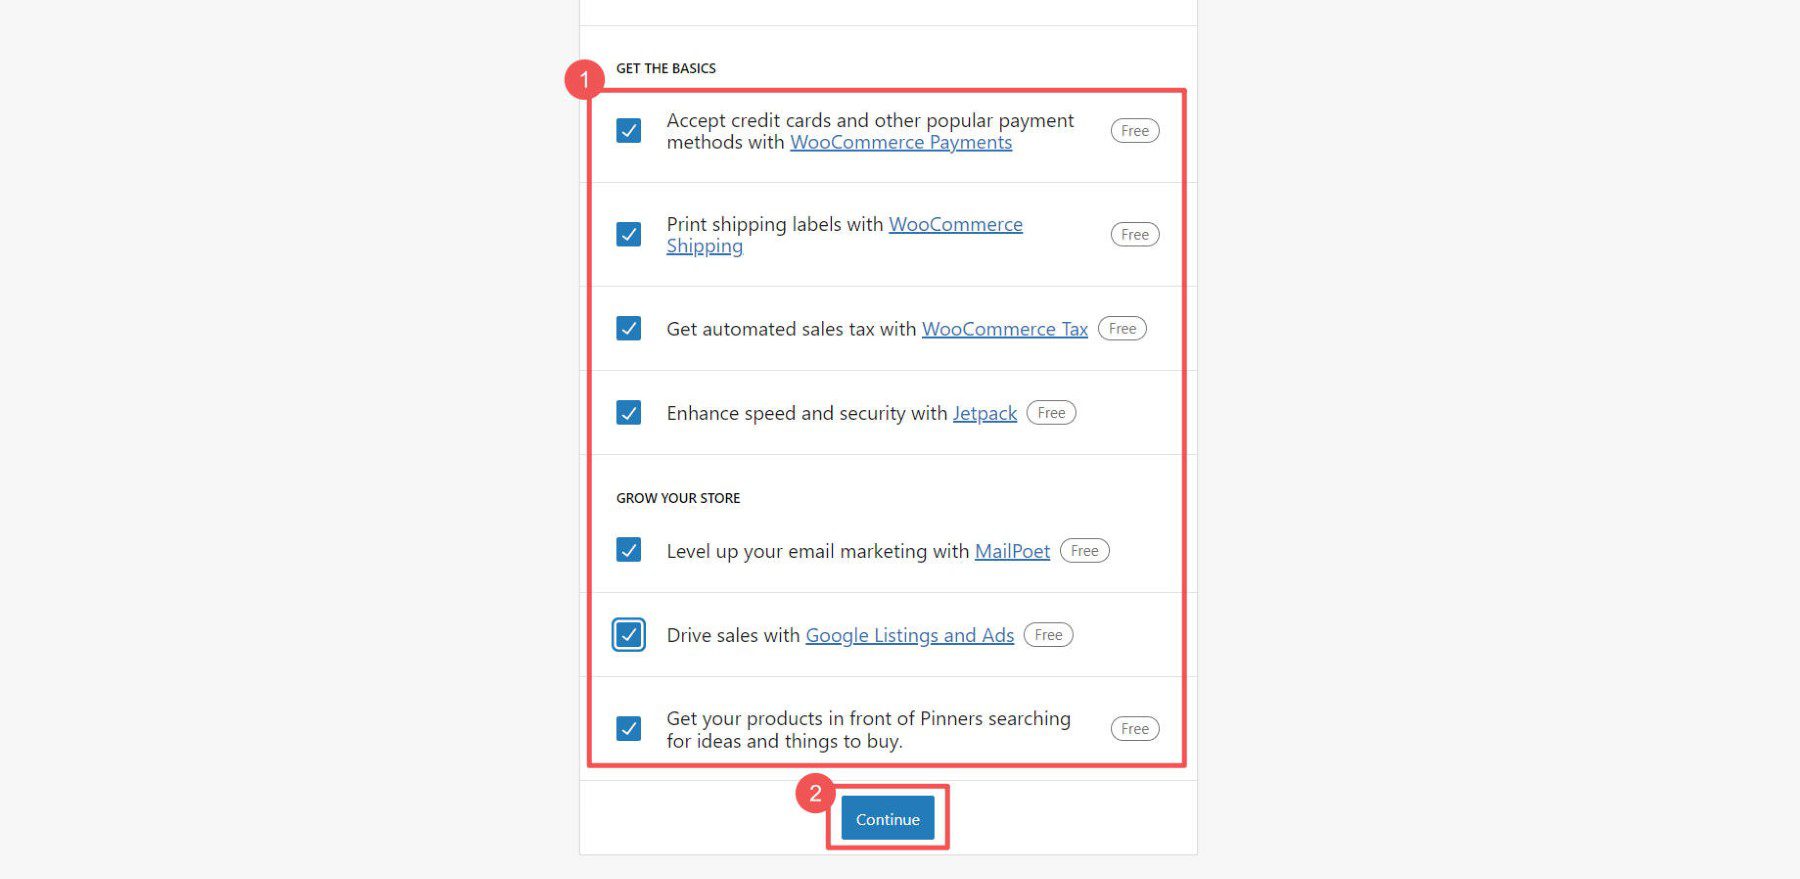
Choose what your store needs. Checking certain boxes might add extra plugins to your site.
Note: Some plugins cost money. There are also free ones available. Check out our list of the best membership, booking, and free WooCommerce plugins to see how plugins can extend your eCommerce site. Plugins, such as Memberpress or Paid Memberships Pro can help you create an ecommerce store for subscriptions or memberships, complete with various payment methods. You can also make a robust booking site with a plugin like Amelia to add a calendar for visitors to search for and book appointments.
The wizard will ask a few more questions about your store.
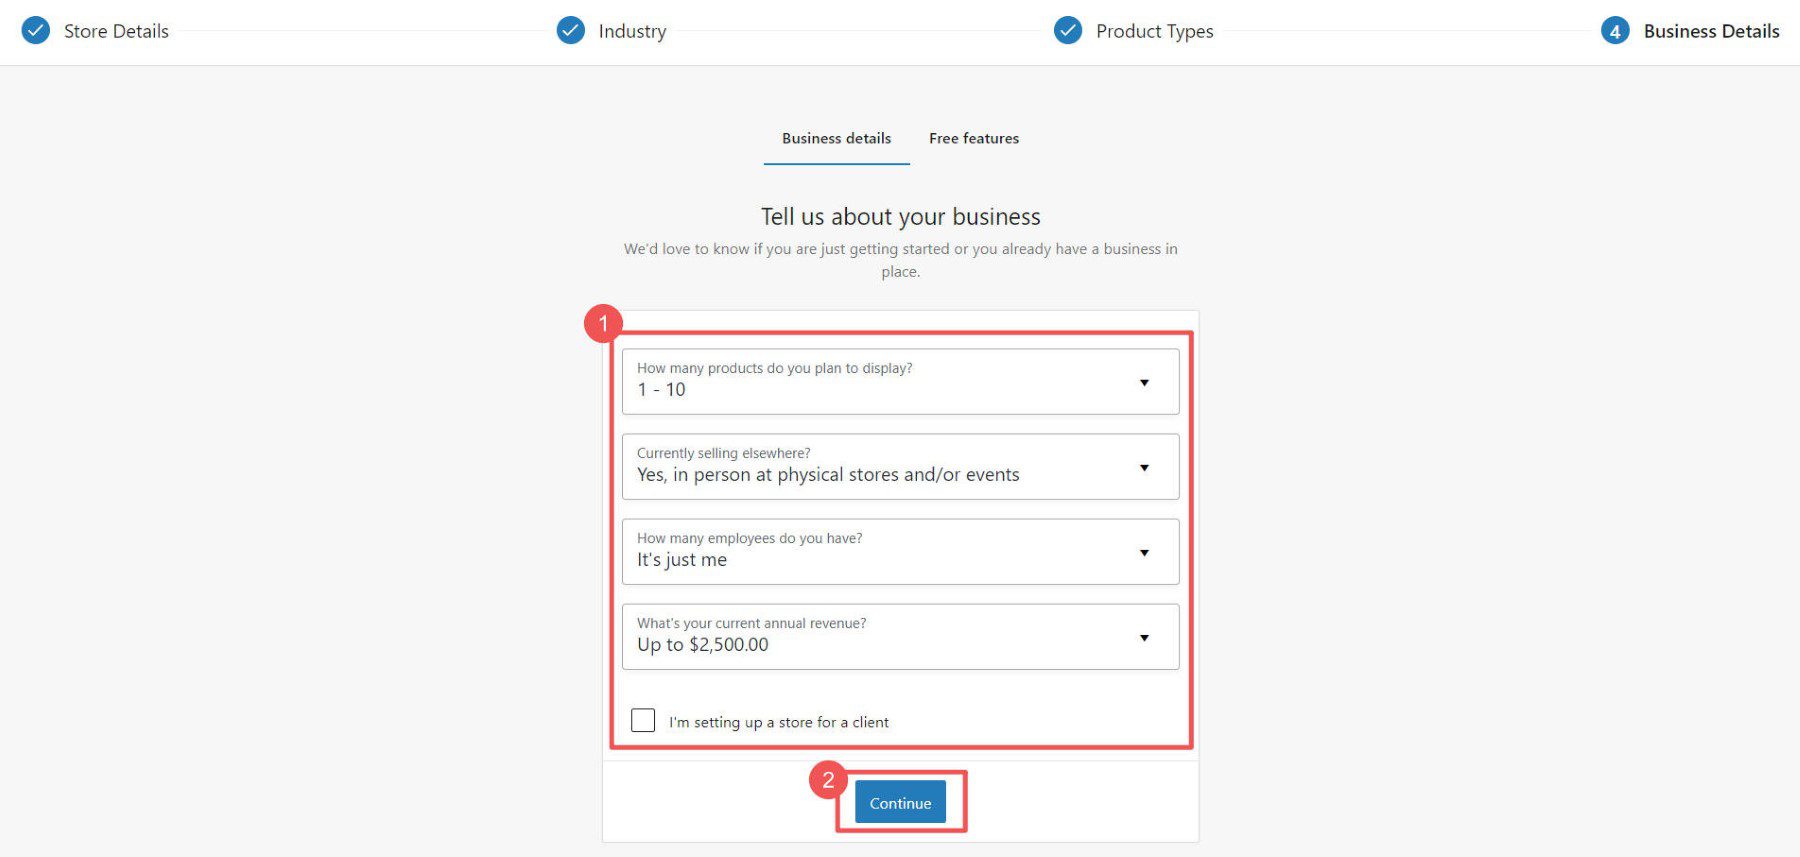
Last step: pick any extra plugins you may want. See our Jetpack and MailPoet reviews to see if those tools are worth it for you at this point. But if you anticipate needing to collect taxes, take credit card info, and handle shipping, those free plugins are worth it.
Now, you can tweak more settings in WooCommerce.
WooCommerce Settings
Ecommerce settings can be tricky. But WooCommerce makes it easier. You can control:
- General Settings for money, products, and checkout
- Product Settings for how items look and stock levels
- Shipping Settings for delivery choices and costs
- Payment Settings for how customers pay
- Account Settings for signups and privacy
- Email Settings for messages from your store
- Advanced Settings for special tweaks
For more help, see our WooCommerce settings guide, which will walk you through each of these important pages.
Add Product Categories
Categories help people find what they want in your store. For example, if you sell clothes, you could have categories like Men, Women, and Kids. We suggest you make these before adding products.
To add categories, go to WooCommerce > Products in your dashboard. Then click Categories. These work just like categories and tags for WordPress posts.
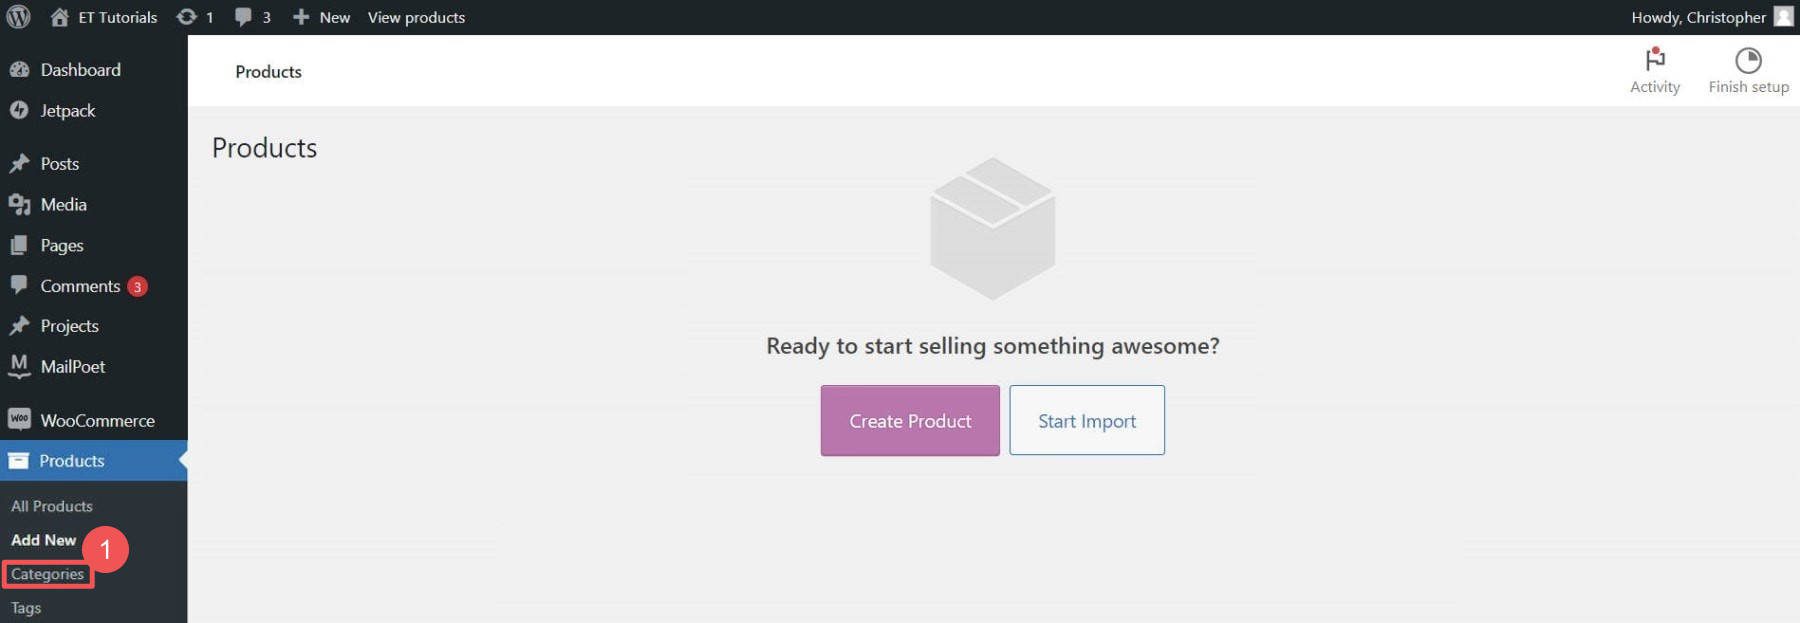
If placeholder categories exist, you can edit or delete them. When choosing categories and tags, keep your customers in mind. Use intuitive and easy-to-understand terms.
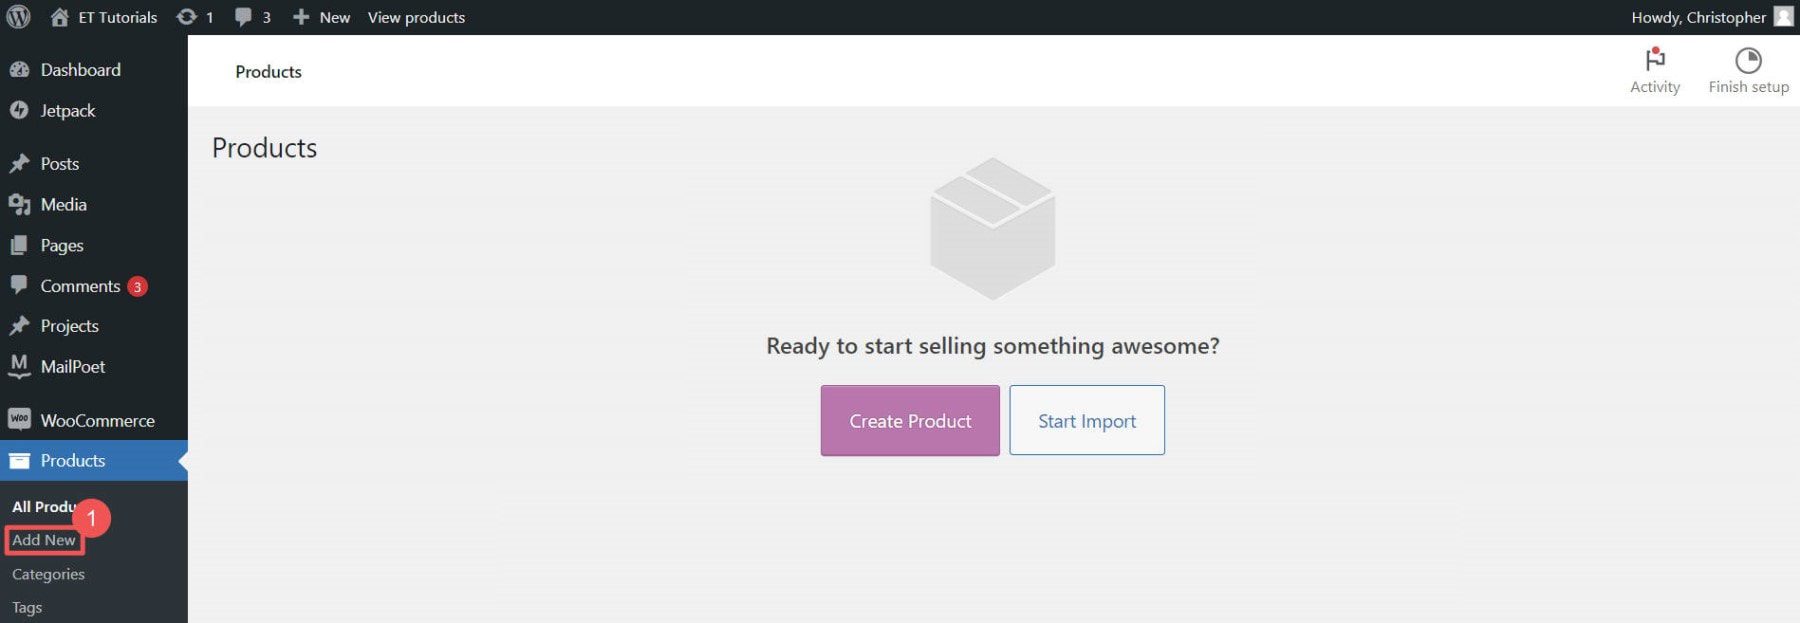
Add Products to Your WordPress eCommerce Store
You can add products individually or all at once with a CSV file.
To add them individually, go to Products > Add New.
Enter the product name.
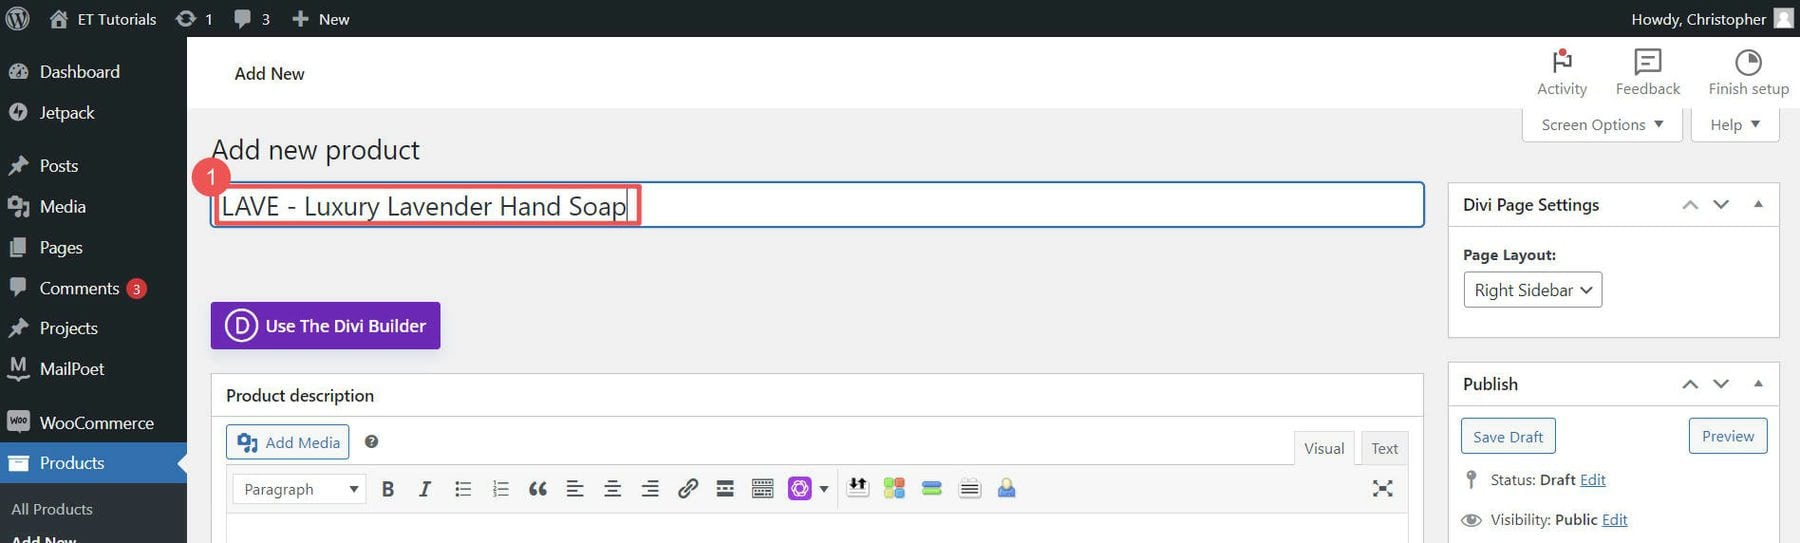
Add a product description and upload your product image.
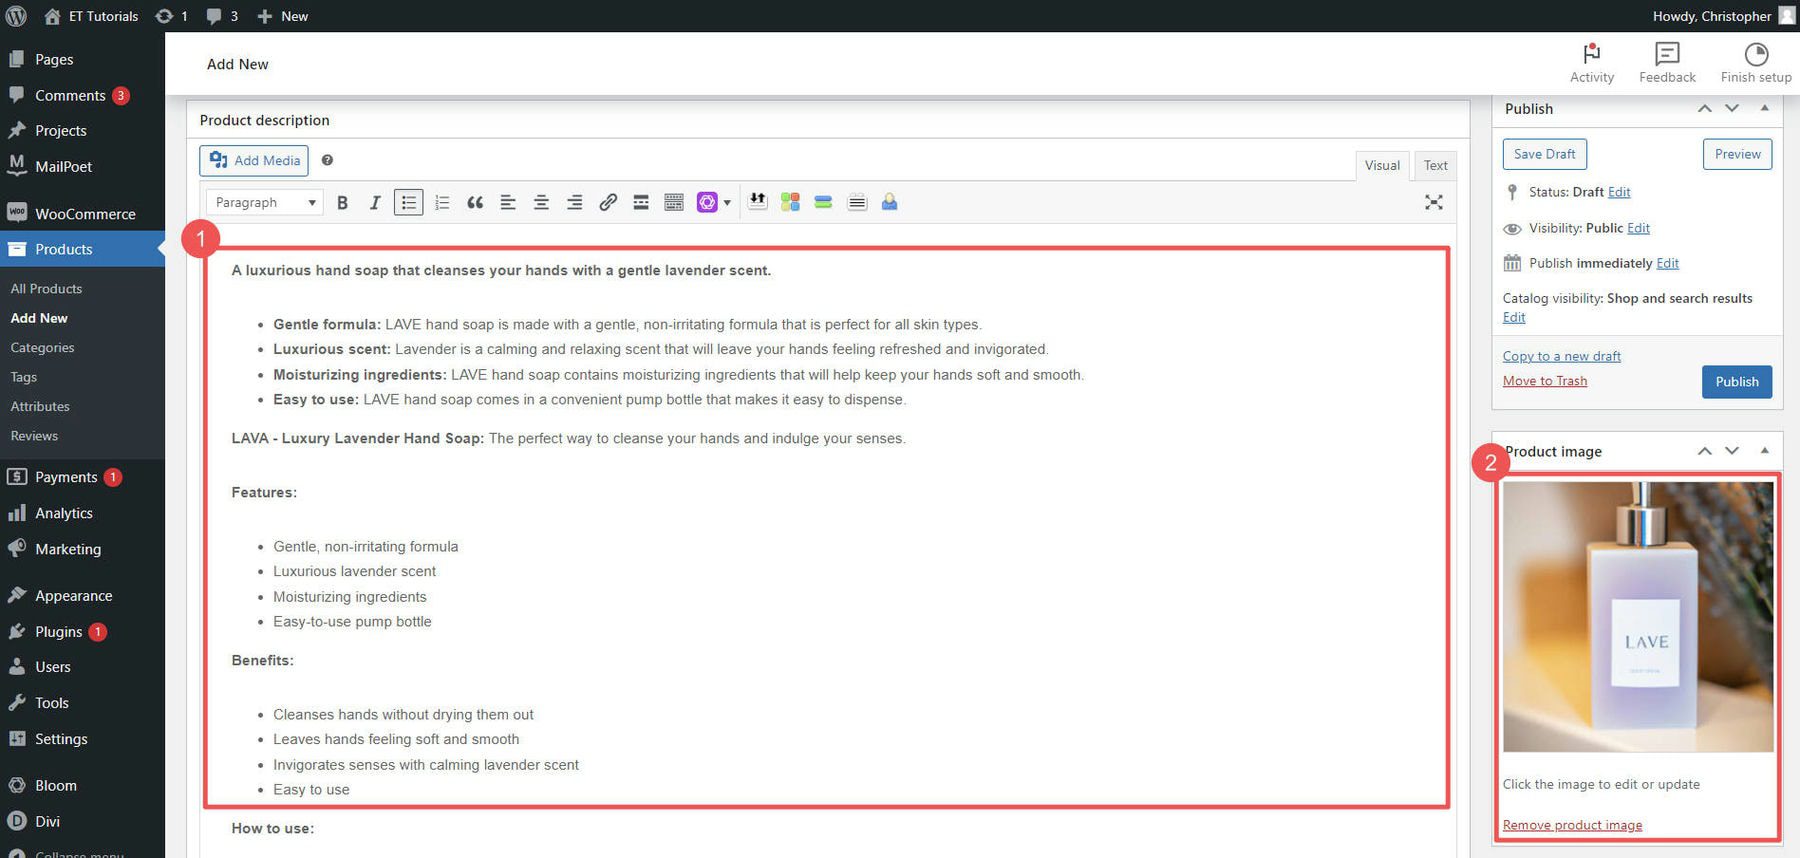
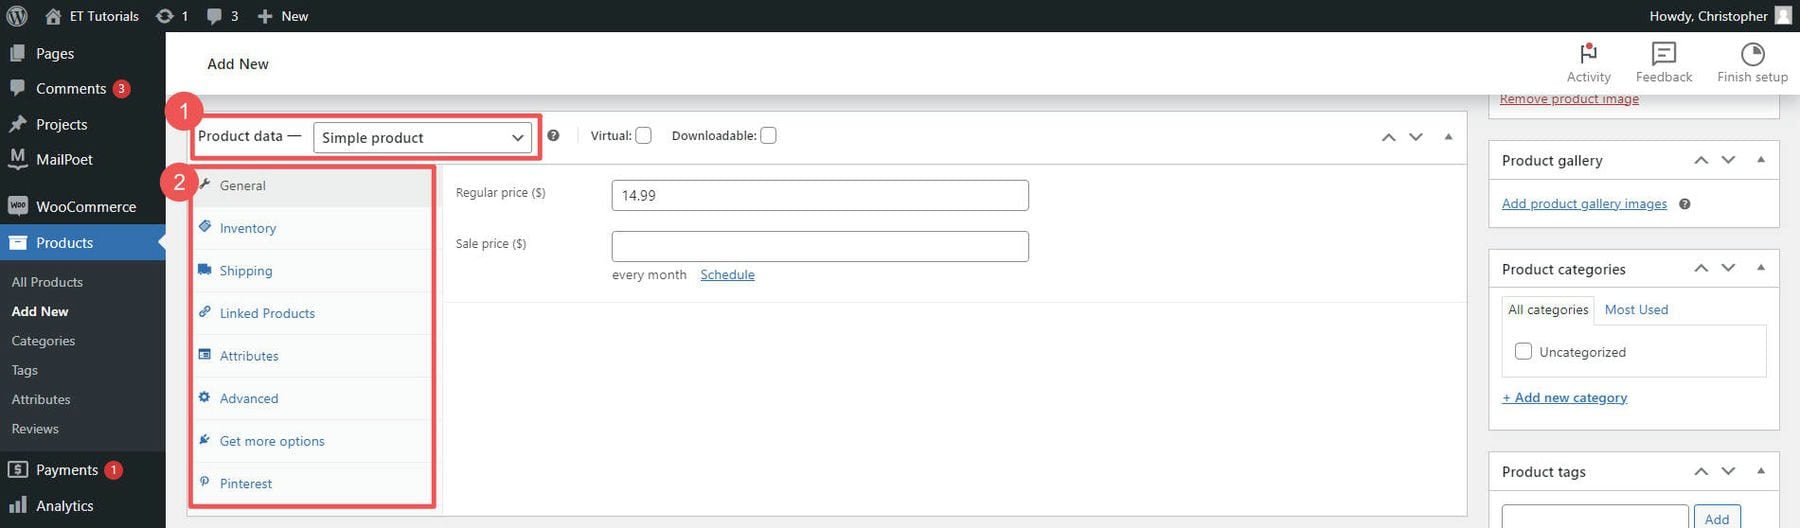
Next, select a product type. Then, set your item’s price and set your inventory levels. You can also set individual product shipping options. On the right-hand sidebar, set product categories and tags.
When you’re happy, click Publish. Add as many products as you want to your store.
Track your product stock with WooCommerce inventory management, and visit our detailed guide about setting up shipping in WooCommerce.
4. Design Your WordPress eCommerce Website
Since you’ve got Divi installed, let’s design your WordPress eCommerce site. Divi is one of the best page builders for WordPress, so you can design your site without touching code. This includes your product pages, cart, checkout, homepage, and blog. Divi’s WooCommerce modules are your go-to tools for building your WordPress store pages.
Add Product Modules to a Page with Divi
Divi has 2000+ pre-made layouts and 300+ website layout packs you can use, making setting up your WordPress eCommerce site quicker.
Open your homepage in Divi and click Browse Layouts to see your options.
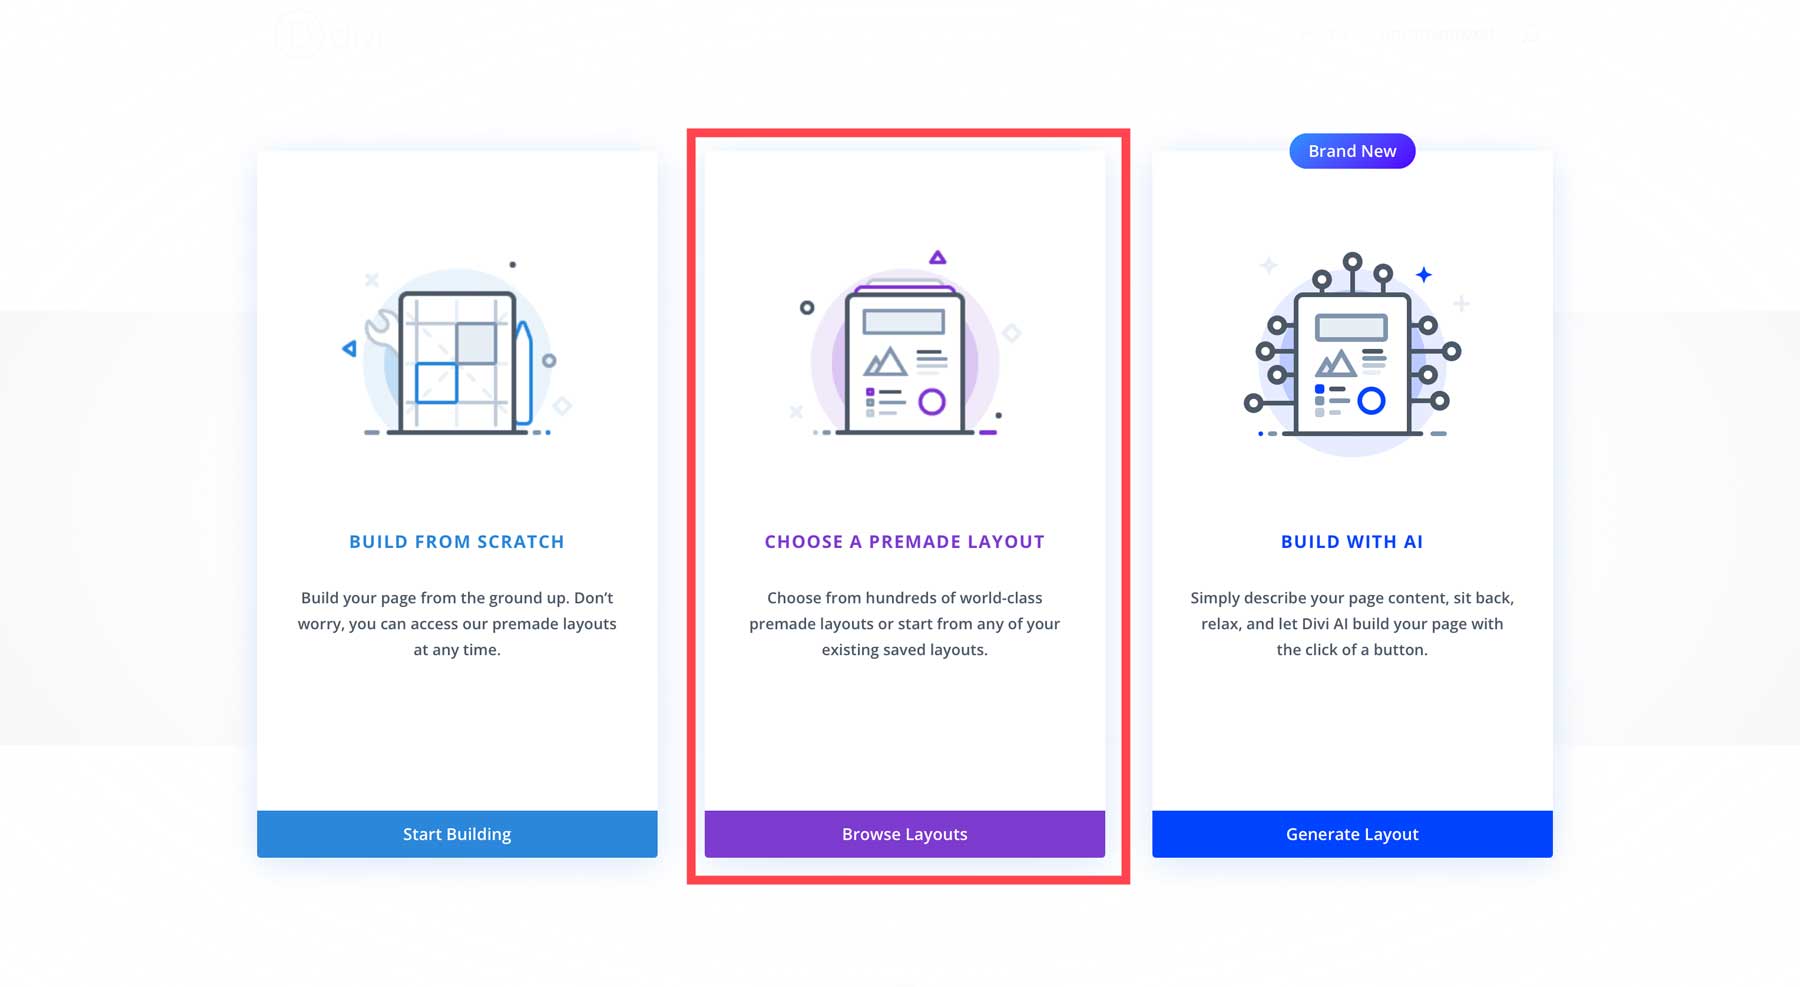
You’ve got thousands of layouts to pick from. To make it easy, look for ones that say Shop Page. Click Use this Layout to add it to your page.
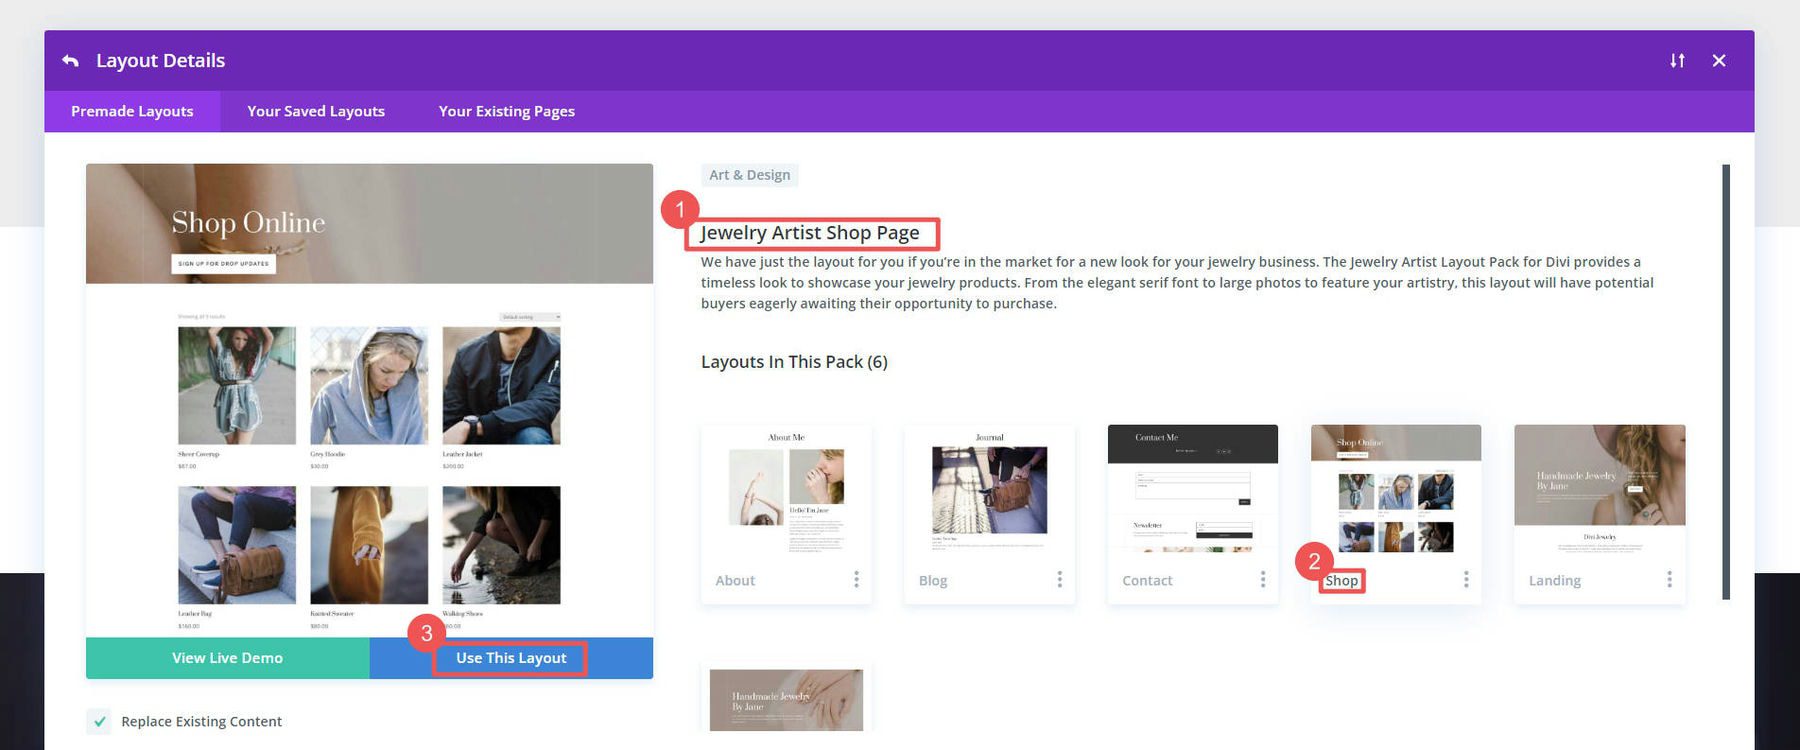
The layout will show your products immediately (inside the Woo Products module). You can change how many show up, how they’re sorted, and much more.
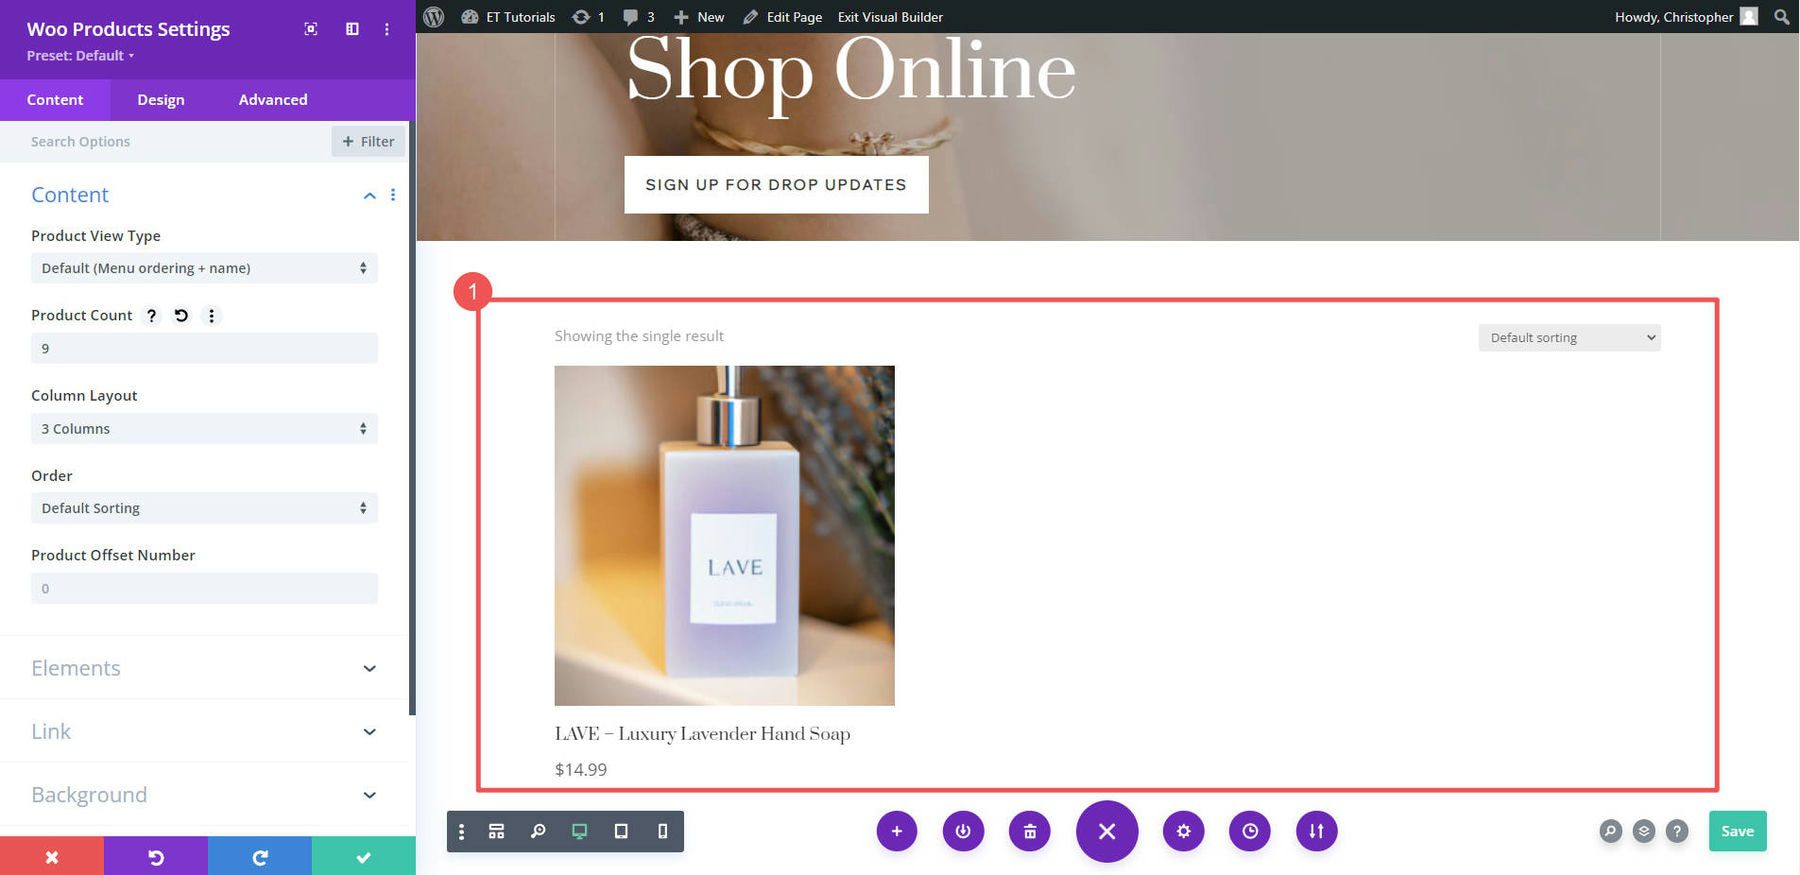
What if you want to show only one product? Add a new row and pick Woo Products from the WooCommerce modules list.

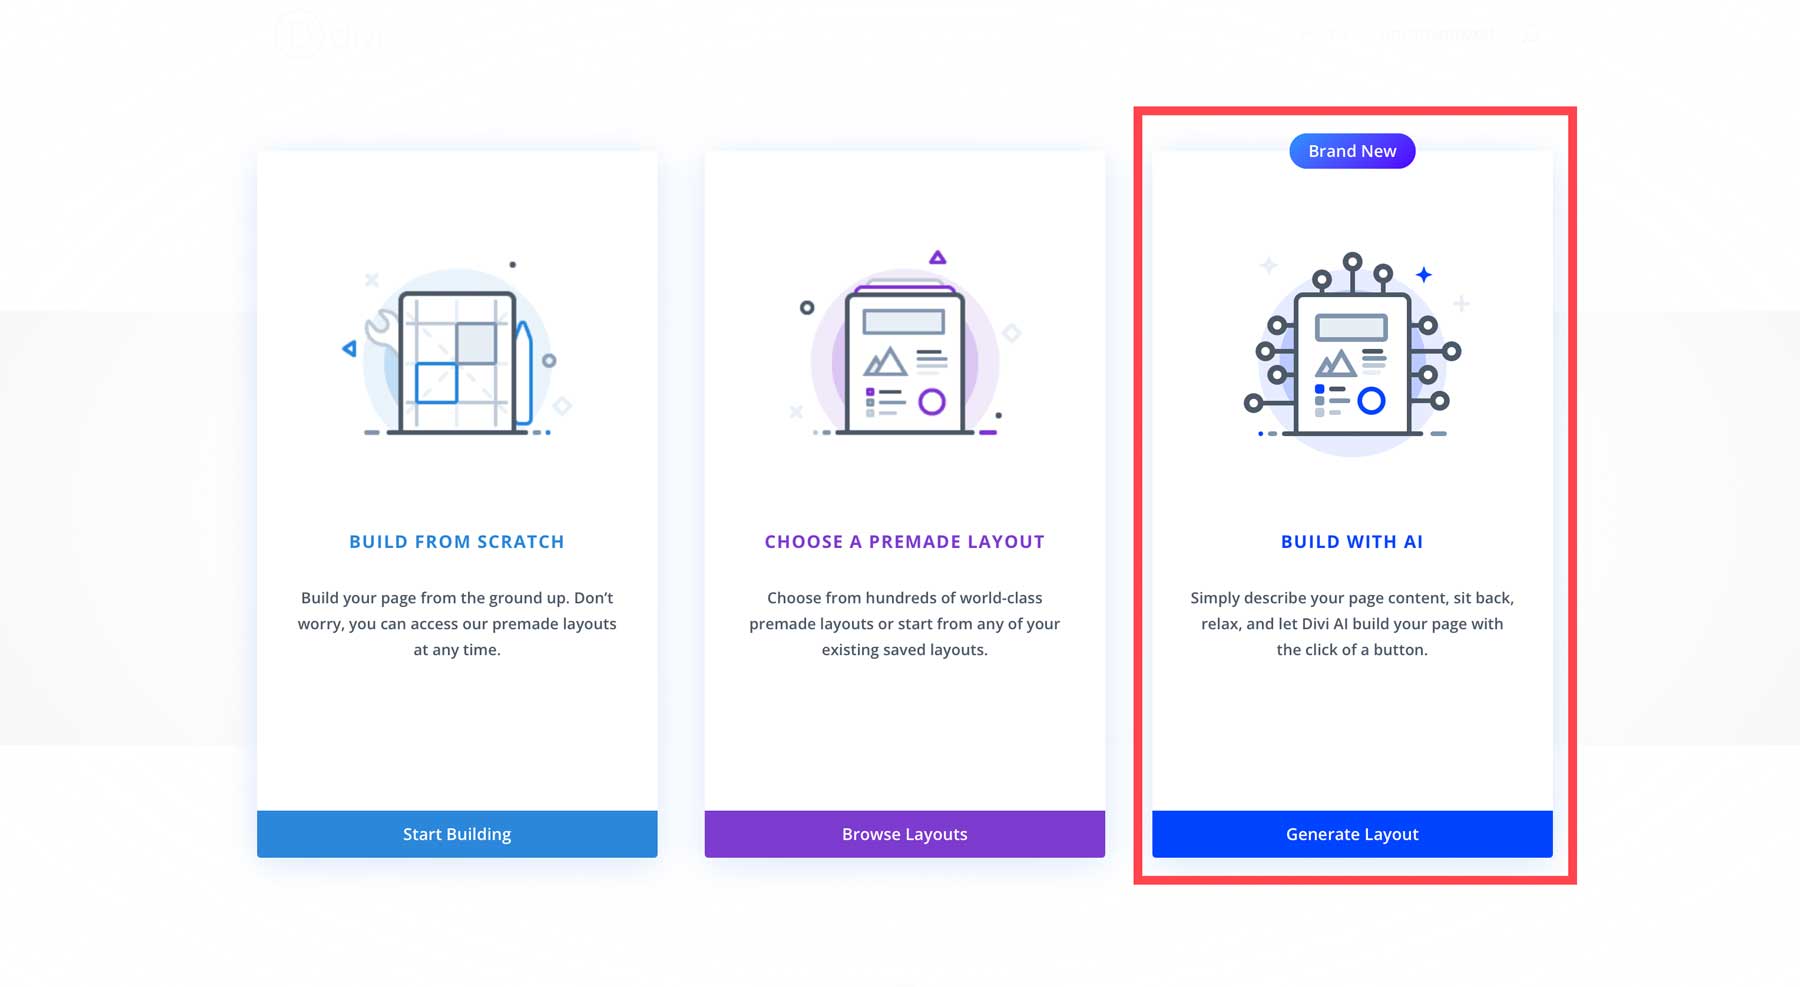
Create A Shop Page With Divi AI
In addition to pre-made layouts, Divi offers the ability to generate web pages with Divi AI. Think of it as Divi’s creative design assistant. It can create any layout you want for your shop and can be completely customized with Divi and WooCommerce modules (just like in the previous step). Rather than choosing browse layouts when creating a new page, select the Generate Layout option.
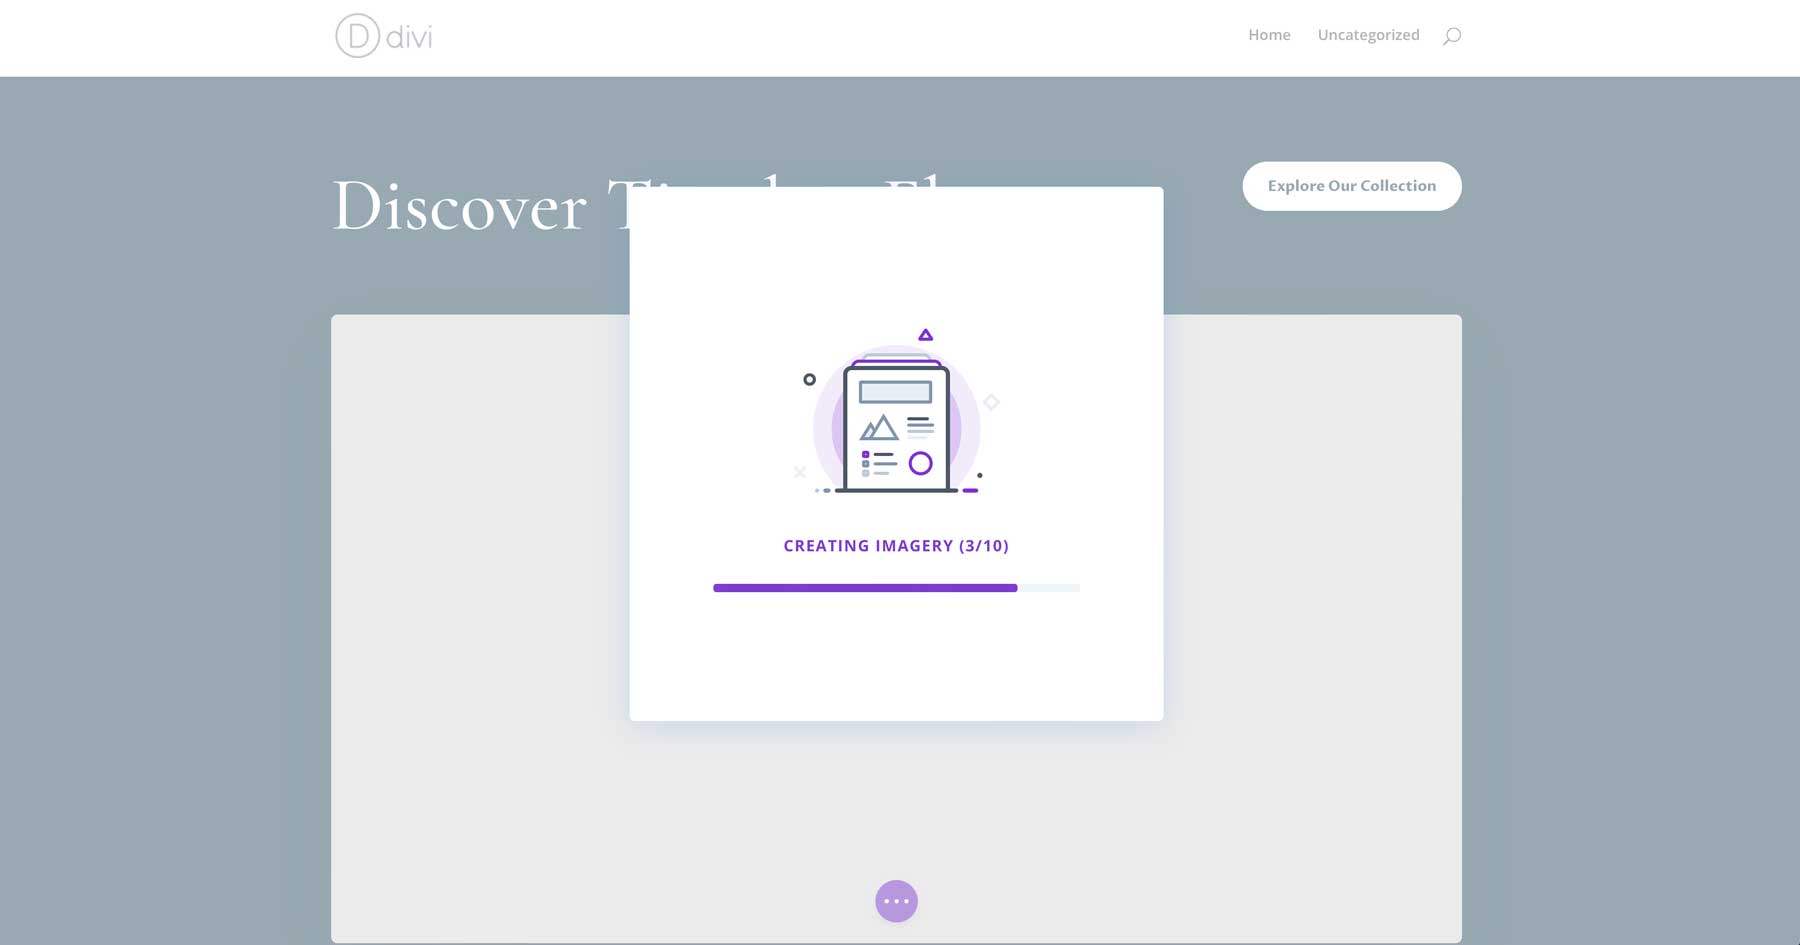
Next, you’ll describe the page you want Divi AI to create. You can also provide additional details, such as the sections you want to see on the page or a brief business description. Divi AI can also assign custom fonts and colors to your layout. You can choose specific fonts and colors, use the website’s default settings, or allow Divi AI to select them. Once the description and styling choices are ready, click the Generate Layout button to allow Divi AI to begin building the page.

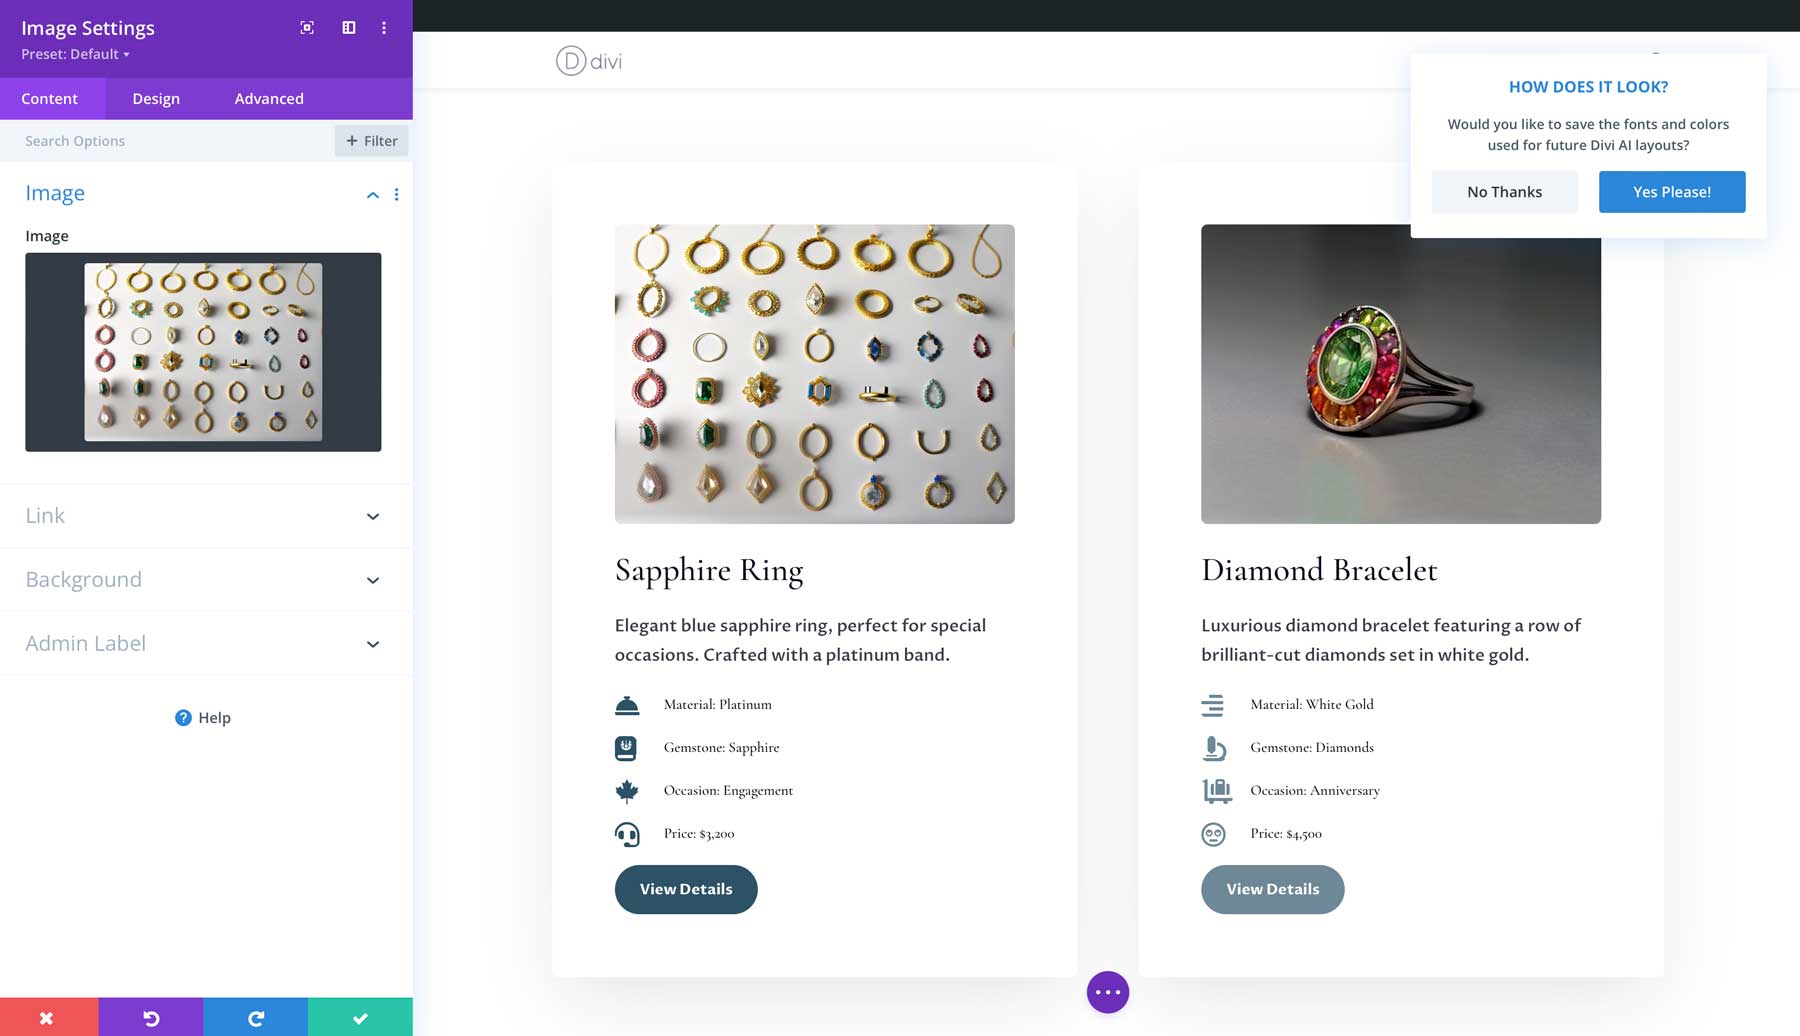
Divi AI will construct the wireframe, add Divi design modules, write copy, and generate images.
Once the page is completed, you can add, edit, or delete design modules like you would with a premade Divi layout.
Design WooCommerce Pages
WooCommerce sets up some basic pages for you that Divi can help you customize:
- Shop page (where all your products show up)
- Cart page (shows what’s in your cart)
- Checkout page (where you pay)
- My Account page (to manage your account)
- And more, like pages for product categories and tags
Divi lets you edit each of these page templates on each page using the Divi Builder, or you can create a custom template for these pages using the Theme Builder.
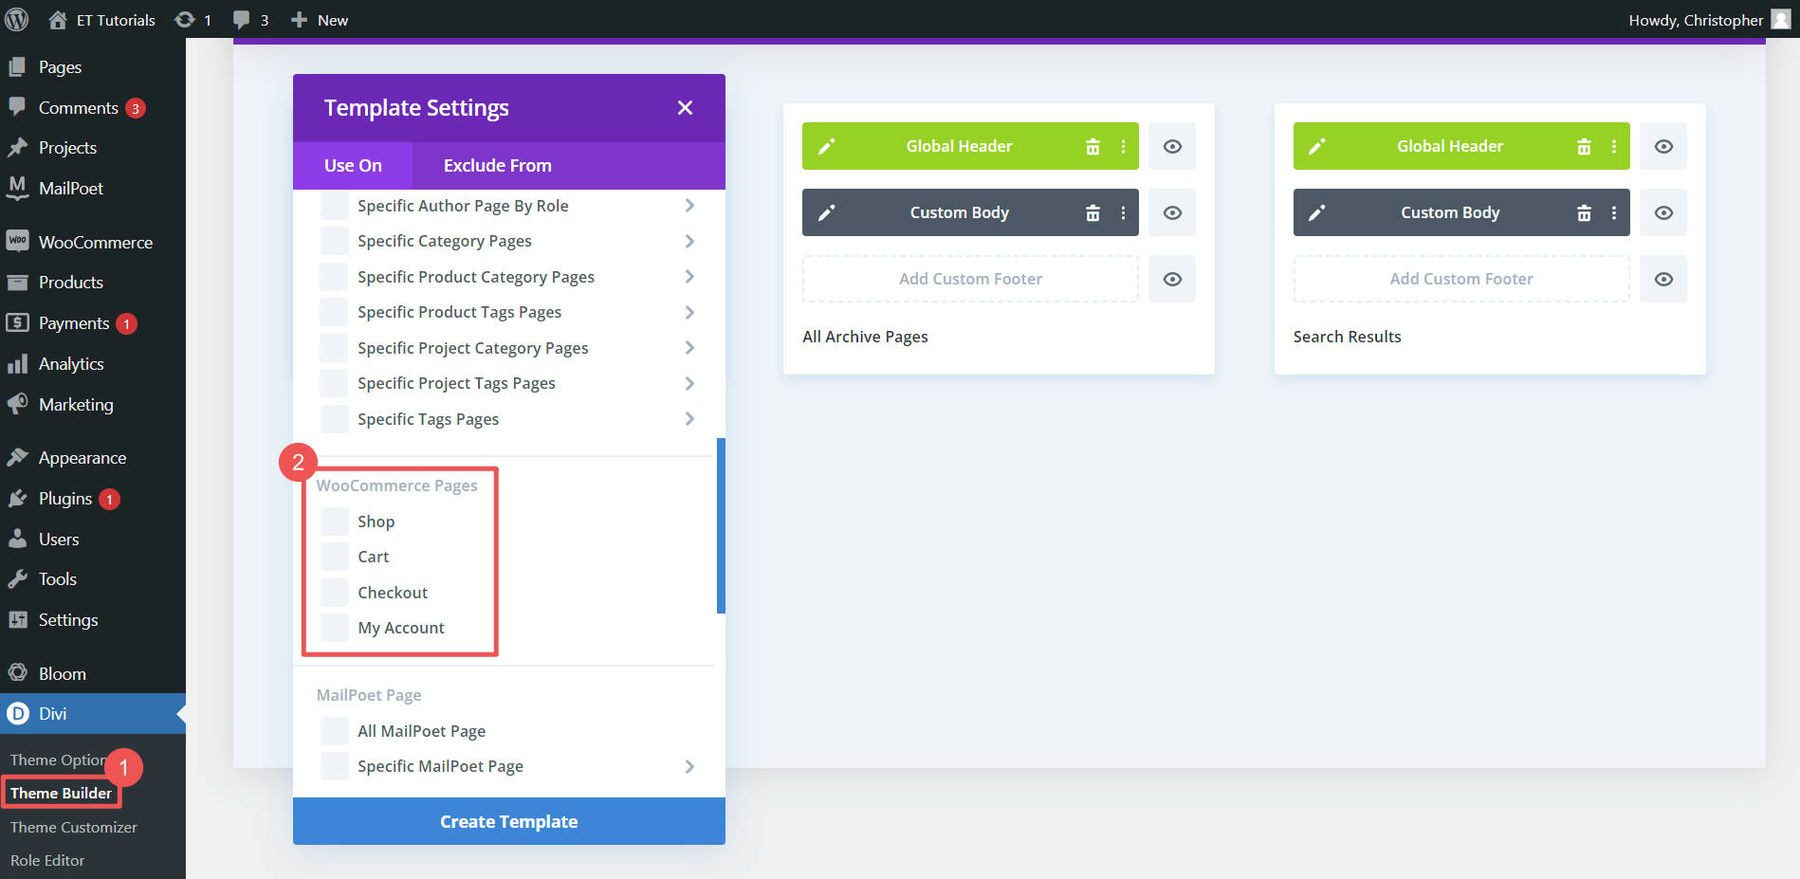
Using the Divi Theme Builder is particularly useful for designing templates for your product pages, product category pages, and other site-wide design elements.
For example, you could download one of our free product page templates from our blog (like this Clothing Store Product Page Template) and add it to the theme builder to have a stunning global template for all your products. Or you can easily create your own product page template from scratch
For more help, check out our guides on making a cart page, setting up a checkout page, and using Divi for WooCommerce pages.
5. Boost Your WordPress eCommerce Site with Plugins and Integrations
Want to know the beauty of WordPress and WooCommerce? With thousands of possible plugins, you can add hundreds of features. Free and paid plugins can make your WordPress eCommerce site even better. Let’s look at some must-know categories of WooCommerce plugins.
SEO Plugins
Getting people to your WordPress eCommerce site is important. That’s where SEO plugins like Rank Math SEO and All In One SEO come in. They help you make your site more search-engine friendly by adding schema markup, XML sitemaps, and other SEO best practices. There are even WooCommerce SEO plugins that ensure ideal compatibility and functionality.
![]()
For a deep dive, check out our WooCommerce SEO guide. If you’re feeling adventurous, explore these AI-driven SEO tools.
Email Marketing Plugins
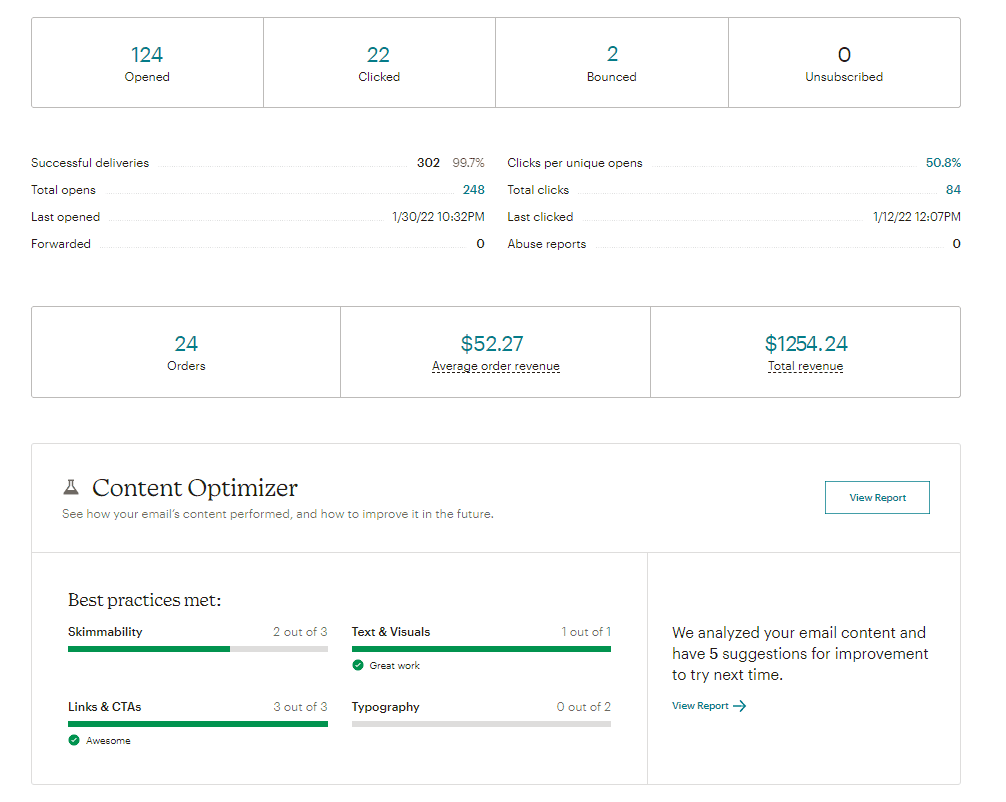
Email marketing remains an essential tool for growing an eCommerce store. External services like Mailchimp for WordPress and plugins like MailPoet help you build and manage your email lists.
Use Mailchimp’s WooCommerce Integration to Increase Sales
You should have a plan for sending normal emails and eCommerce-specific email campaigns with coupons or abandoned cart emails.
Conversion Rate Optimization
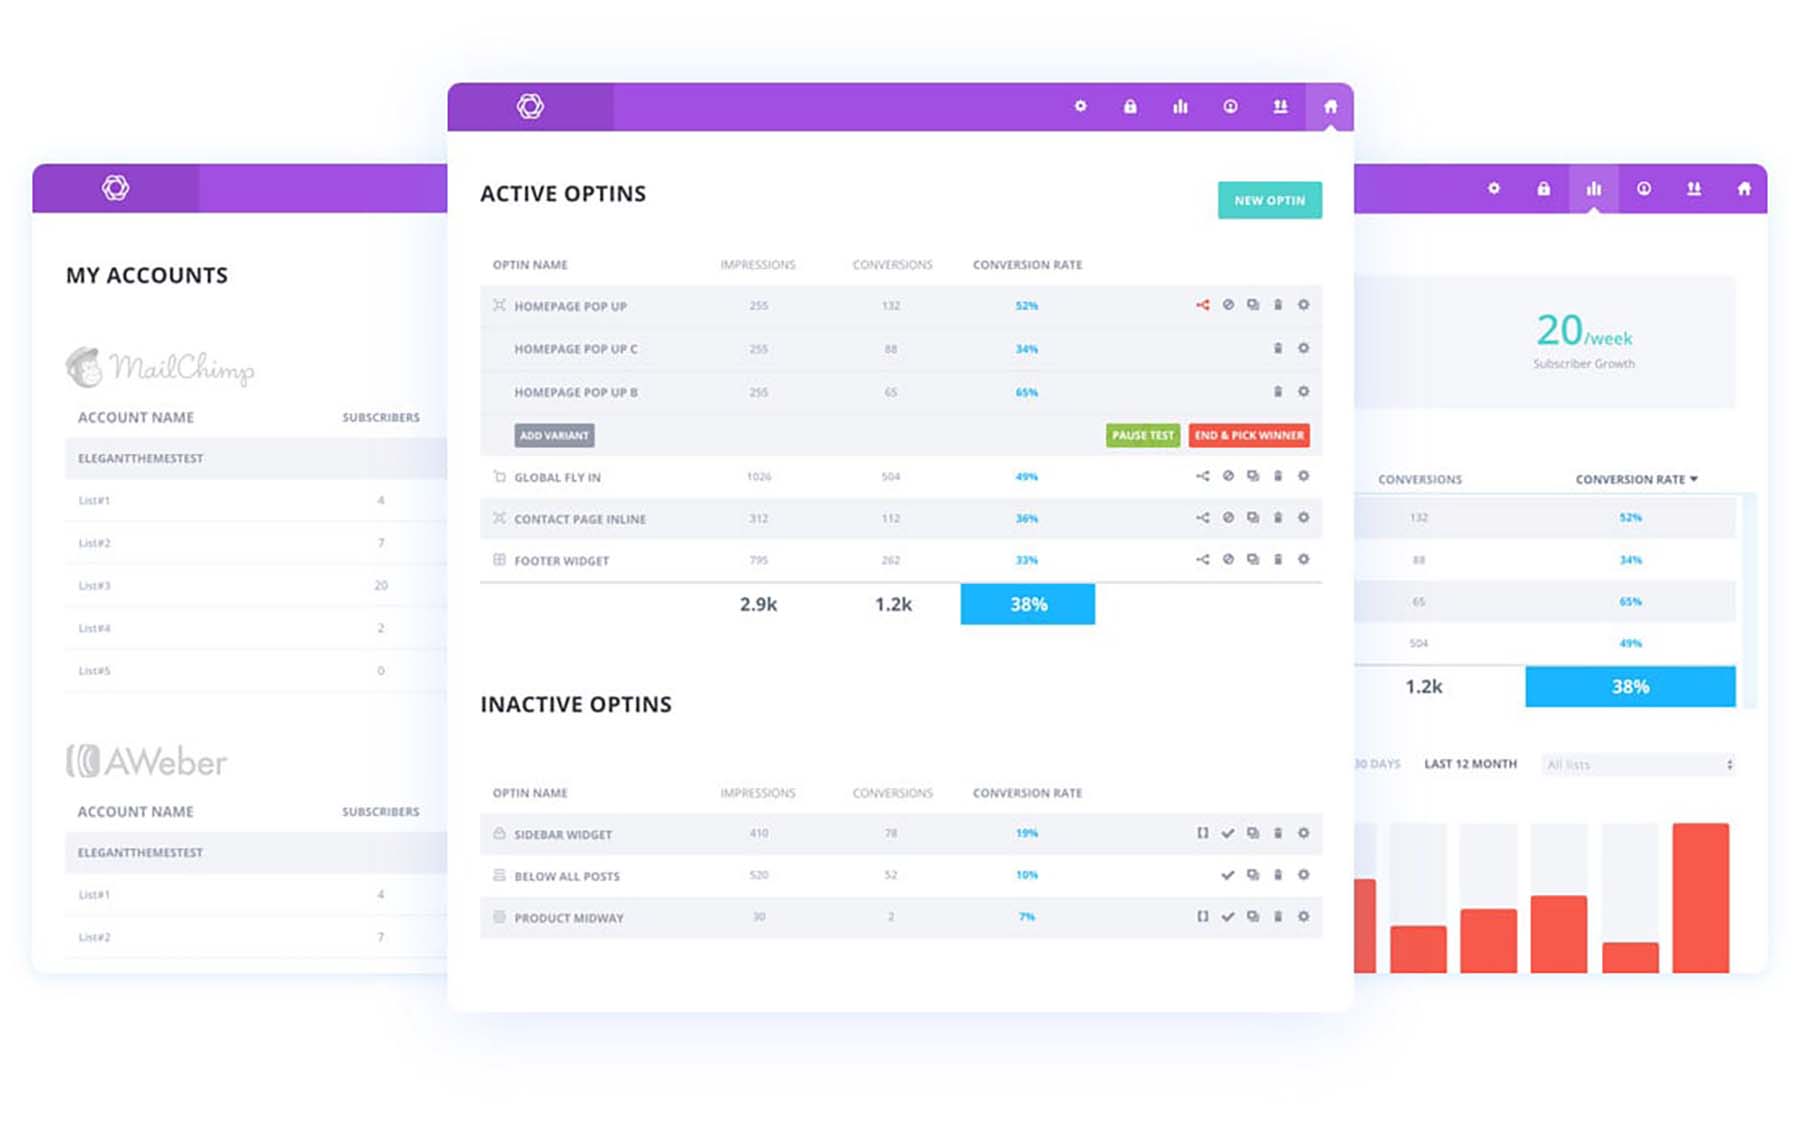
Conversion is king in eCommerce. Tools like OptinMonster and Bloom can help you get the most from your site by making email signup conversion easier. Simple, rules-based popups can help you capture contacts so you can sell to them on an owned marketing channel.
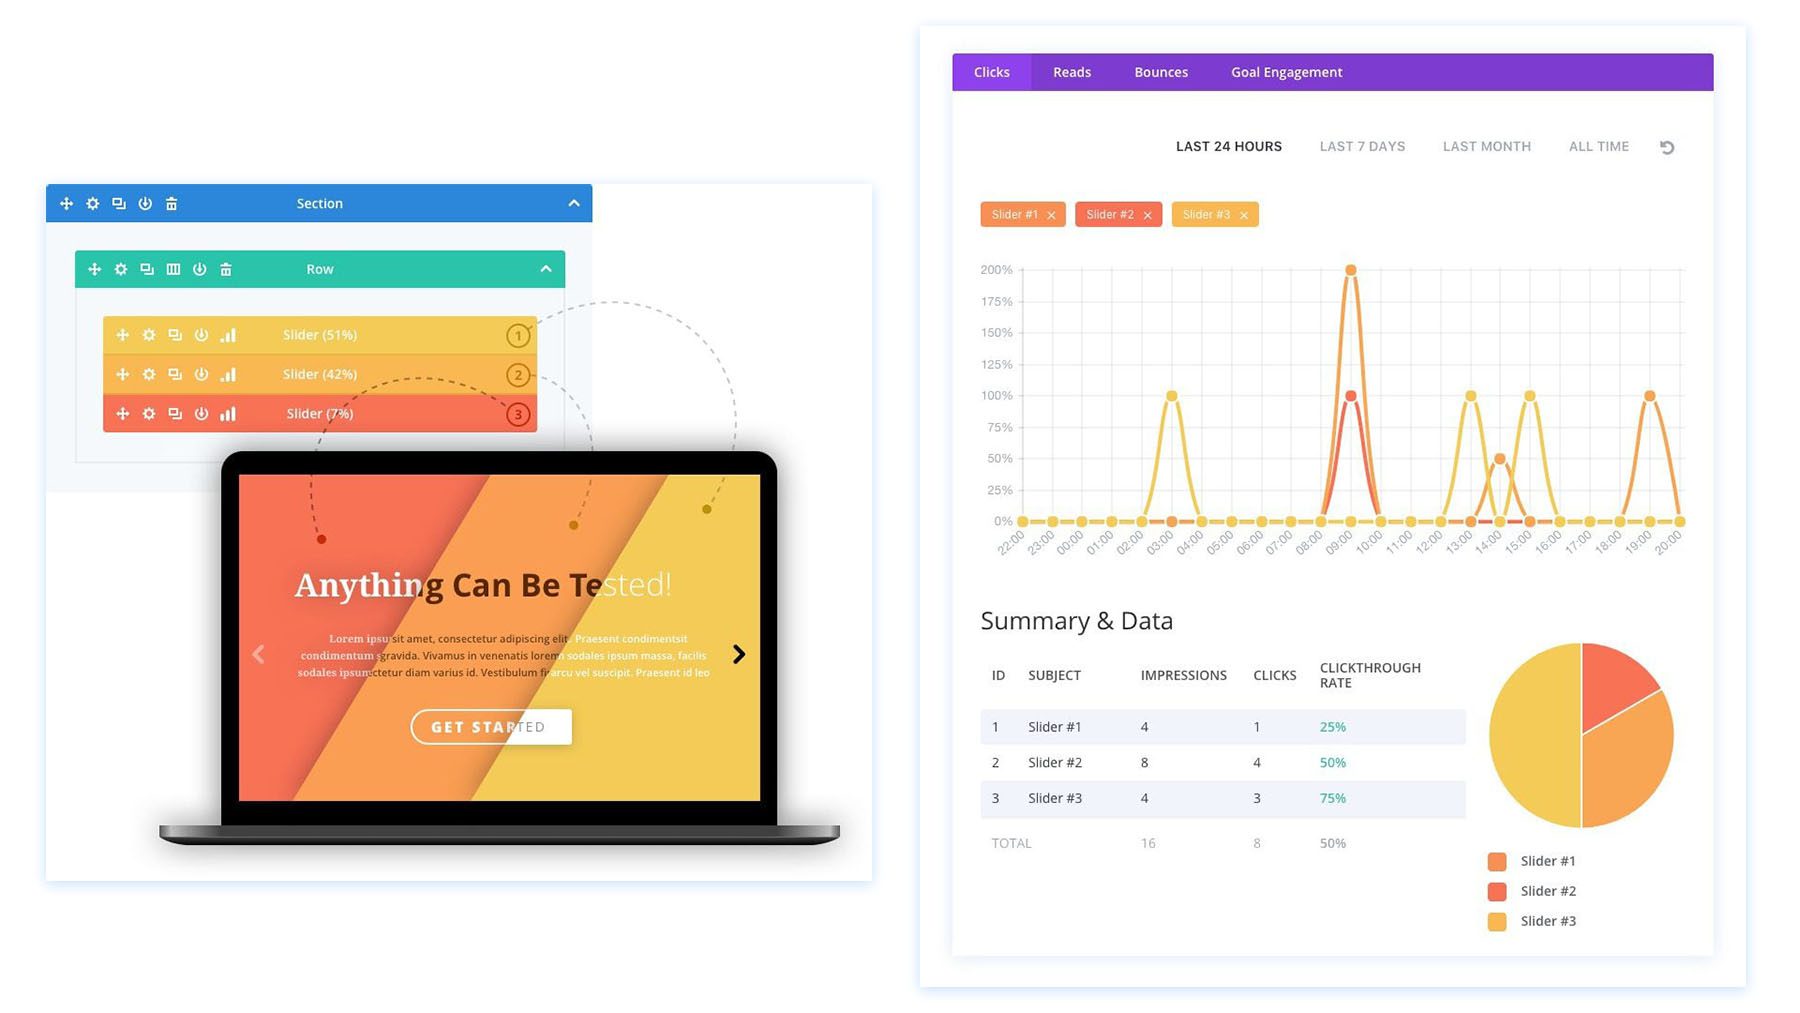
While staying focused on your website, you can use Divi’s marketing tools to create A/B campaigns and strengthen each landing page or product page over time. Run targeted campaigns to see which of your ideas converts better. The winner gets the prize of sticking around and making your eCommerce store more successful. Not bad.
Advertising Plugins
Advertising plugins can integrate seamlessly with platforms like Google Ads and Facebook to drive more traffic. Check out Advanced Ads or Ads by WPQUADS for more control over your advertising campaigns.
Divi Marketplace Extensions
Ecommerce store owners prefer Divi for designing their website over many other alternatives. It gives plenty of design flexibility through its Theme Builder, which we discussed makes building an online store easy. Pairing the intrinsic benefits of using Divi with extensions for the Divi Marketplace is a solid way to make an even better store for yourself. There are two Divi products worth mentioning, though there are plenty of others.
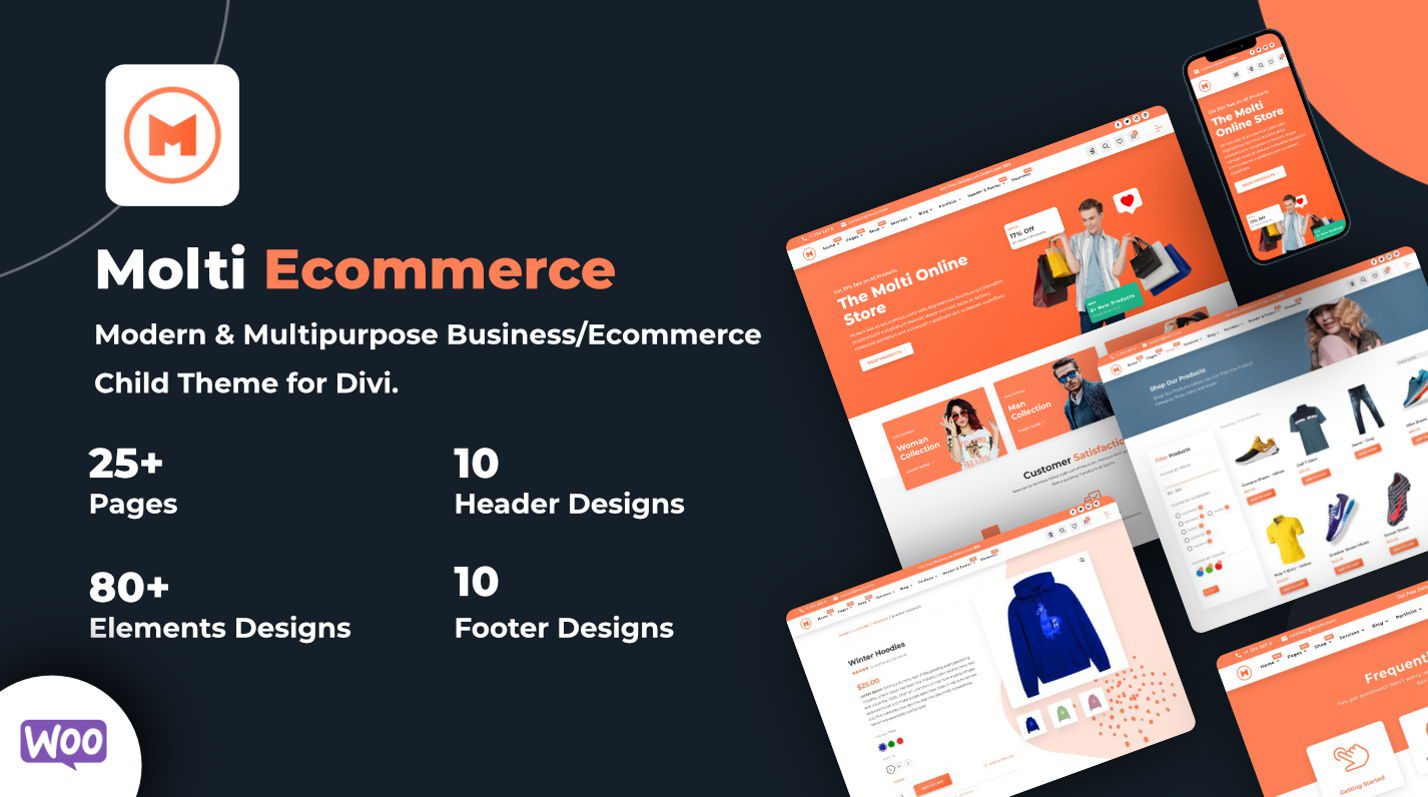
The Molti Ecommerce Child Theme is one of the fastest ways to design a high-converting website. Its child theme makes building with WooCommerce even faster, as it incorporates certain settings and design choices essential to online store building. Specifically, it includes 10 predesigned headers and 10 footers perfect for eCommerce sites. It also includes 25+ page layouts (product, cart, account pages, and more).
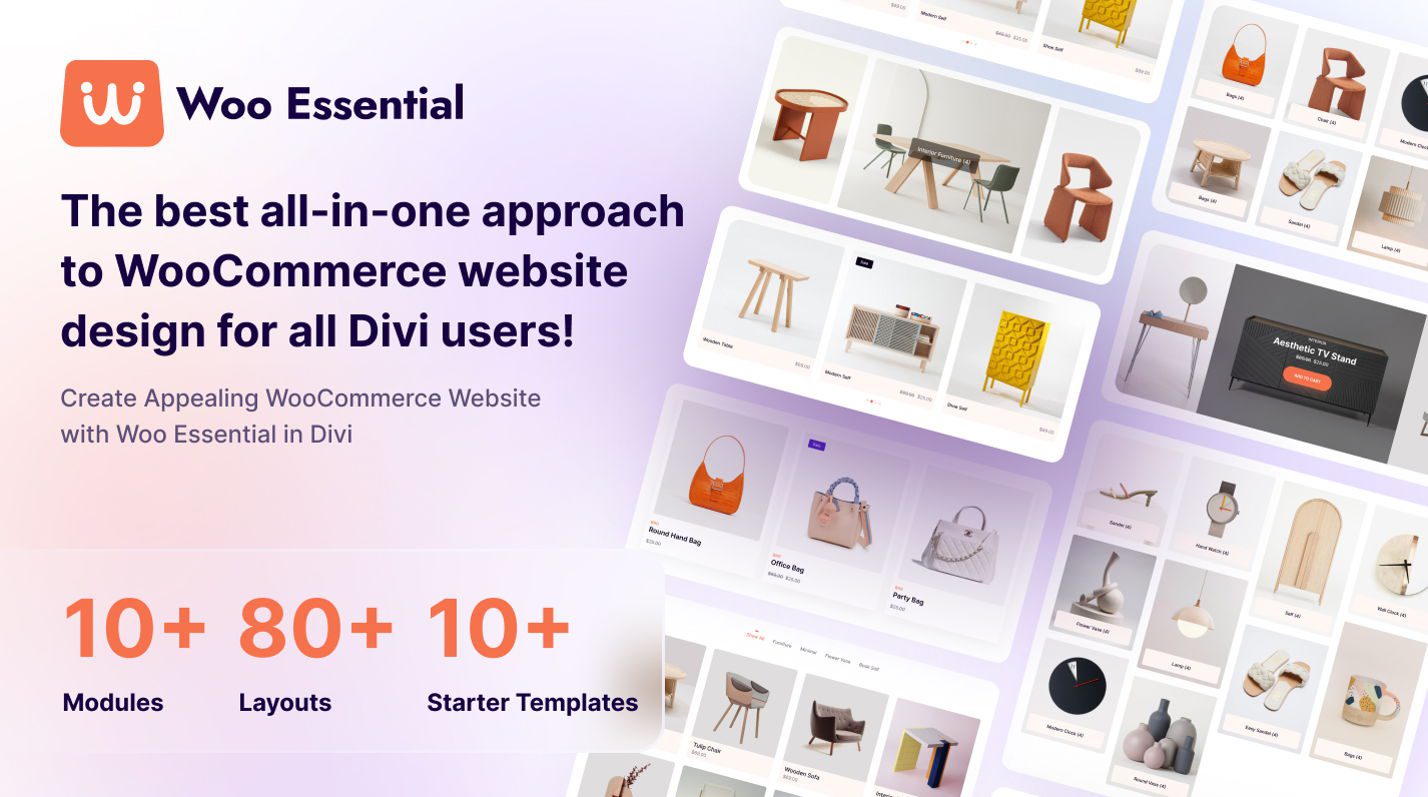
Woo Essential boosts your Divi eCommerce website with plenty of templates, section layouts, and WooCommerce-specific modules to extend Divi’s already amazing eCommerce functionality. If you need a little extra help with designing your store or need a little more power (Mini Cart, Product Quick Popup, and more), Woo Essentials delivers.
For more WooCommerce plugins, consider looking at Barn2 and Yith. And don’t forget to check the Divi Marketplace for solutions that work well with Divi for any use case that you find yourself needing.
Ecommerce Made Easy with WooCommerce and Divi
At this point, you’ve gone through the ins and outs of setting up a WordPress eCommerce website. From selecting a hosting provider to configuring WooCommerce and optimizing your site for search engines, you’ve laid the groundwork for a successful online store.
WordPress and WooCommerce offer a powerful, flexible eCommerce platform. They allow you to customize every aspect of your store, from product listings to payment options. With an array of plugins and the right themes (like Divi), your store’s functionality can expand and grow as your business flourishes. Speaking of expanding your store—here’s a list of all the themes, plugins, products, and tools that we’ve mentioned throughout this guide for quick reference.
| Products Mentioned | Starting Price | Description | Action | |
|---|---|---|---|---|
| 1 | WordPress | $2.99/month | Content Management System | Get |
| 2 | Easy Digital Downloads | Free, $99.50/year | eCommerce Plugin | Get |
| 3 | WooCommerce | Free | eCommerce Plugin | Get |
| 4 | Hostinger | $2.99/month | Hosting Provider | Get |
| 5 | Shopify | $29/month (billed annually) | eCommerce Platform/Website Builder | Get |
| 5 | 10Web | $14/month (billed annually) | AI Website Builder | Get |
| 6 | Squarespace | $16/month (billed annually) | eCommerce Platform/Website Builder | Get |
| 7 | Dreamhost | $16.95/month (billed annually) | eCommerce Platform/Website Builder | Get |
| 8 | Wix | $17/month | eCommerce Platform/Website Builder | Get |
| 9 | Cloudways | $12.00/month | Hosting Provider | Get |
| 10 | Pressable | $37.50/month (billed annually) | Hosting Provider | Get |
| 11 | Flywheel | $13.00/month (billed annually) | Hosting Provider | Get |
| 12 | Divi | $89/year | WordPress Theme | Get |
| 13 | Divi Design Modules | Included with Divi | Design Modules | Get |
| 14 | Divi Marketing Tools | Included with Divi | Marketing Tools | Get |
| 15 | Visual Builder | Included with Divi | Page Builder | Get |
| 16 | Divi Support | Included with Divi | 24/7 Customer Support | Get |
| 17 | Divi eCommerce | Included with Divi | eCommerce Tools | Get |
| 18 | Divi AI | $16.08/month (billed annually) | AI Website Builder | Get |
| 19 | Paid Memberships Pro | Free, $247/year | Membership Plugin | Get |
| 20 | Amelia Booking | $49.00/year | Booking Plugin | Get |
| 20 | Divi Layout Packs | Included with Divi | Layout Packs | Get |
| 21 | Theme Builder | Included with Divi | Full Site Editing | Get |
| 22 | Rank Math | $6.99/month (billed annually) | SEO Plugin | Get |
| 23 | All In One SEO | Free, $49.60/year | SEO Plugin | Get |
| 24 | Mail Poet | Free, $11.00/month | Email Marketing Provider | Get |
| 25 | OptinMonster | Free, $15.00/month | Email Opt-in Plugin | Get |
| 26 | Bloom | Included with Divi | Email Opt-in Plugin | Get |
| 27 | Advanced Ads | €59 / year | Advertising Plugin | Get |
| 28 | Ads by WPQUADS | Free, $89/year | Advertising Plugin | Get |
| 28 | Molti Ecommerce Child Theme | $35/year | Divi Ecommerce Child Theme | Get |
| 29 | Woo Essential | $79/year | Divi WooCommerce Pack | Get |
| 30 | Divi Marketplace | Included with Divi | Extensions, Child Themes, and Layouts for Divi | Get |
As your business scales, our extensive library of guides and reviews is here to support you every step of the way. Dive into our essential guides on how to sell online and master the best website marketing strategies. For tech-savvy insights, explore our reviews of top hosting companies, prime business tools, and standout WordPress plugins.
Frequently Asked Questions (FAQs)
How do I set up an eCommerce website with WordPress and WooCommerce?
- Get hosting and a domain set up.
- Install WordPress on your host.
- Add the WooCommerce plugin.
- Choose an eCommerce-capable theme.
- Add your products to your store.
- Configure your store settings.
What are the costs involved in running a WordPress eCommerce site?
Can I create a free eCommerce website using WordPress?
What is the best WordPress theme for an eCommerce site?
What are the essential eCommerce plugins for WordPress?
- WooCommerce
- Easy Digital Downloads
- Ecwid
- WooCommerce Product Reviews Pro
- WooCommerce Variation Swatches
- Product Slider for WooCommerce
- WooCommerce Wishlist
- WooCommerce Deposits
Is WordPress a good platform for eCommerce compared to Shopify?
- WordPress is more versatile than Shopify. It can be used to create any type of website, including eCommerce stores. Shopify, on the other hand, is specifically designed for eCommerce.
- WordPress is more customizable than Shopify. You can change the look and feel of your WordPress site to match your brand, while Shopify offers a more limited range of customization options.
- WordPress is more affordable than Shopify. WordPress is free to use, while Shopify charges a monthly fee.
Featured Image by Julia Tim / shutterstock.com


Leave A Reply