WordPress’ flexibility sometimes means that its settings can be a bit overwhelming. This is especially true of the General Settings page, which houses a long list of seemingly unrelated options. However, the features here are more straightforward than they may first appear.
In this article, we’ll walk through the options available on the WordPress General Settings page, and show you how to configure each one for best results.
Let’s get started!
Subscribe To Our Youtube Channel
An Introduction to the WordPress General Settings
Unlike the other settings pages in WordPress, which are usually focused on a specific category, the General Settings page contains a wide array of options for basic aspects of your site, such as the date format, time zone, site title, and language. Although this page may seem like a dumping ground for settings that have no other home, they’re actually very important for your site’s operation, security, and User Experience (UX).
You can access these options from your WordPress dashboard by navigating to Settings > General:
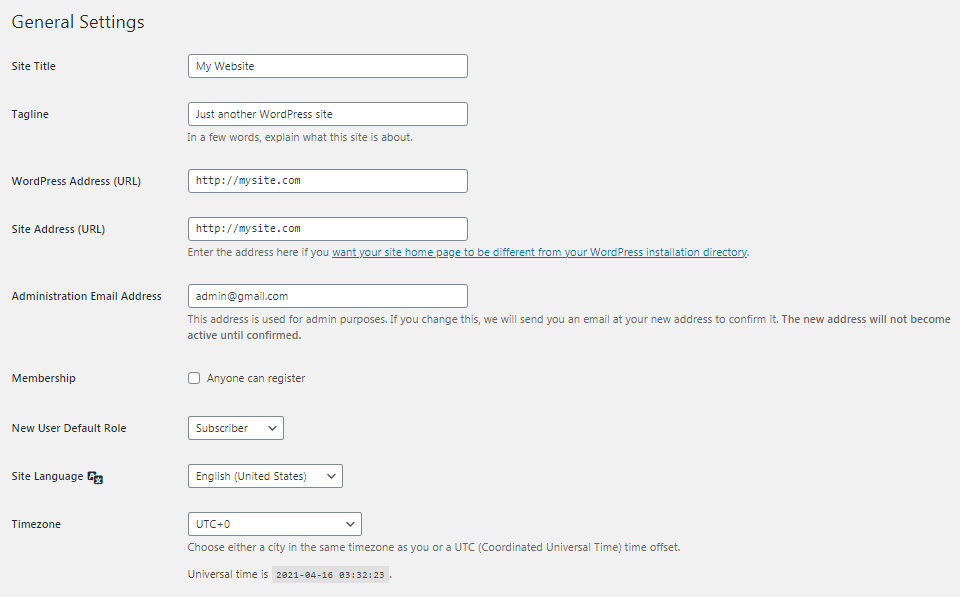
Many of the options here are straightforward, but some ask you to make a choice without offering much in the way of explanation. To help remedy that, we’ll go through each one, explain what it does, and offer some configuration tips.
How to Configure Your WordPress General Settings
There are 12 options on the WordPress General Settings page, which can be roughly broken down into five different types. In the following sections, we’ll explore them and elaborate on how to configure them for your site.
Site Identity
The Site Title field is the name of your website or blog. It’s typically displayed in the title bar of web browsers. Many themes also place it in the header, so that it shows up at the top of every page:

Your site’s title plays an important role in branding and Search Engine Optimization (SEO). If it’s displaying incorrectly, you can fix that on the General Settings page.
Another site identity element you can customize here is your tagline. This is often thought of as your website’s slogan, but it may be more effective to think of it as a description of your site and its content. Most themes display the tagline near the title, either beside or below it:

Like the title, you can put whatever you want here. However, there’s a lot of room for optimization with your tagline, and getting it right can be a big boost to your SEO.
As such, it’s smart to incorporate keywords that your audience might be searching for, while still keeping the line catchy and readable. If you refer to the screenshot above, you can see that the Ahrefs tagline is informative and contains several key phrases the target audience might be searching for, such as “SEO pro,” “rank higher,” and “get more traffic.”
WordPress Address (URL) and Site Address (URL)
Your site’s WordPress Address is the full URL of the directory that contains your WordPress core installation. In the vast majority of cases, this is simply the URL of your website. However, if you’ve installed WordPress in its own directory, you would specify that here.
The Site Address is, as the name implies, simply the URL of your website. Unless you’ve specifically installed WordPress in a different directory, this will be the same as the WordPress Address field above it:
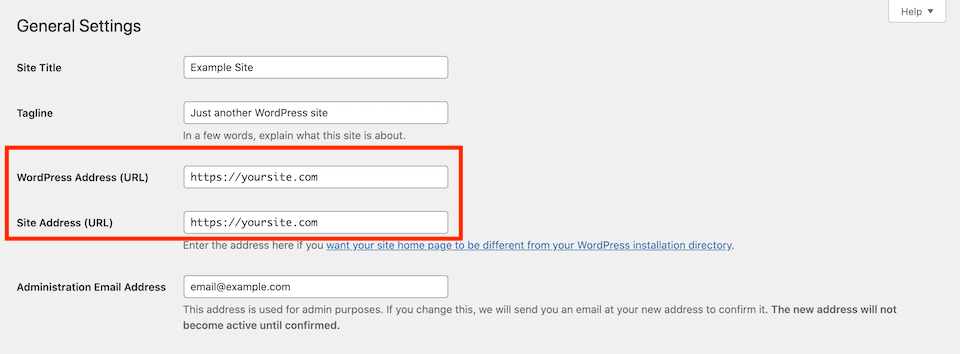
On most installations, these fields are populated automatically. You should only change them if you’re modifying the file structure of your site, or you’re trying to resolve certain errors.
Administration Email Address
This is the email address WordPress will send automated notifications to. These messages can be about a variety of administrative topics, such as new user registrations, new comments, and plugin updates. The contact information you enter in your WordPress general settings will never be displayed publicly on your site, so feel free to use whatever address you like.
However, if your email address ever changes or if you want to deliver notifications to a different admin, it’s important to change the information in this field. WordPress will periodically remind you to check your administration email address, and make sure it’s still the best way to reach the most relevant person with key updates.
User Registration
Under Membership, you’ll find a checkbox labeled Anyone can register. This option determines whether visitors can sign up for accounts on your site. This can be useful if you want to require users to log in to leave comments or access particular areas.
Below this setting, you’ll find the New User Default Role drop-down menu. This setting becomes extremely important if you’ve enabled registration on your site. It determines the initial permissions given to all new users.
There are five default choices:
- Administrator: Has full access to all functions on the site.
- Editor: Can publish and manage posts for all users on a site.
- Author: Can publish and manage their own posts, but not those of other users.
- Contributor: Can write and manage their own posts, but can’t publish them.
- Subscriber: Can only manage their user profiles.
Depending on the plugins you’ve installed on your site, you might have additional roles available to choose from. For example, WooCommerce adds the Customer and Shop Manager roles, which would also be listed in this drop-down menu.
For the most part, the default role should always be Subscriber, unless you have other safeguards in place to control who can register on your site. Customer is also a secure option for e-commerce sites.
Language, Date, and Time Settings
The last group of WordPress general settings includes your site’s language, date, and time options.
Note that the language you select from the Site Language drop-down menu will be used within the WordPress dashboard only. It does not translate your site’s content, theme, or plugins. As such, you should set this to whatever language the majority of your contributors use.
The date and time settings are useful for scheduled actions. For example, if you set a new post to go live at a certain date and time, those specifications will be based on these options.
Choosing your time zone will also adjust the site’s clock, which affects timestamps on posts and comments. To set it, you can select a city within your time zone from the drop-down menu.
If you can’t find one or aren’t sure, you can also choose the correct Coordinated Universal Time (UTC) offset, such as UTC -4 for Eastern Standard Time. The current UTC is listed below this option if you need to reference it.
You can also control the format of the dates displayed on your website. Either choose one of the predefined formats, or create your own using the Custom field:
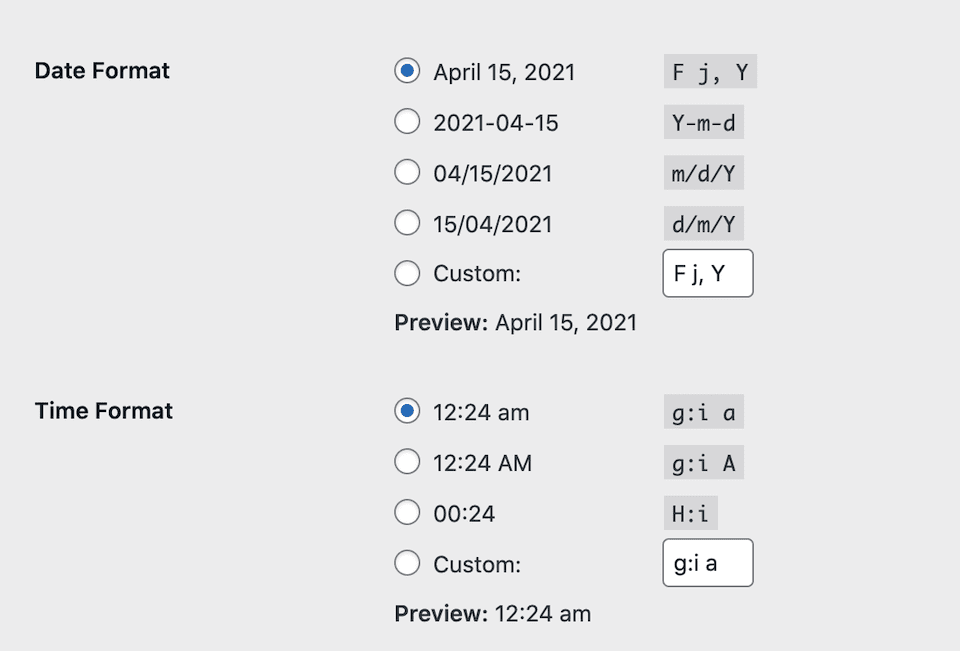
If you want to use the custom option, you can consult the official WordPress documentation for information about how to format it. This option only controls the format of the date as displayed on the front end of your site. It won’t change the display in your admin dashboard.
The time format setting is the same as above – it controls the front-end time display, but not the format in the dashboard. As with the date, you can create your own custom display if you don’t like any of the predefined options.
The final setting on the page controls which day of the week appears first in any calendars displayed on your site. The default is Monday, but you can select any day you like.
Conclusion
All the options available in WordPress can sometimes be daunting to newcomers and experienced users alike. There are multiple pages of settings just for a basic installation, and that’s before you start adding plugins. However, there’s no need to worry – once you know what you’re looking at, these options become much more manageable.
In this article, we looked at the options available on the WordPress General Settings page and explored each in detail, from date and time to site language and even the title of your website. You should now be able to customize your WordPress installation to better meet your unique needs.
Do you have any questions about the WordPress general settings? Let us know in the comments section below!
Featured Image via VVadyab Pico / shutterstock.com






Hello! Thanks a lot for the post. Just one question related to this… is it possible to indicate different e-mails for technical notifications and for received comments? That would be really useful.
Hello Jose. Unfortunately, there is not a way (that I know of, at least) to do what you propose in WordPress out of the box. However, there are some plugins that might help.
Customize WordPress Emails and Alerts enables you to set up email notifications based on user roles.
Profile Builder Pro has a free add-on that lets you add multiple admin emails in your General Settings, but I don’t believe you can customize which notifications go to which address – all the admins listed will receive all notifications.
Hope this helps – good luck!
To me it’s amazing how often this step gets overlooked in website development! For me personally I was guilty of it when I first started designing websites, but now that I realize just how important it is, its almost always the first thing I do once creating my WordPress dashboard.
Taking it one step further though, do you have any recommendations on best plugins to limit login attempts or hide the WordPress login page too?
Hi Patrick – thanks for sharing your experience!
To answer your question, WPS Hide Login is one of the most popular plugins for moving the Login page to a different URL. There are many free plugins that can limit login attempts, the most popular being Limit Login Attempts Reloaded. If you’re willing to invest in a premium solution, iThemes includes features to do both.