
WordPress includes user roles and permissions settings that allow you to specify the capabilities that users have access to on your website. This gives you more control over your website and improves your security. In this article, we’ll look at each of the WordPress user roles to help you decide how to set up your WordPress website for growth. We’ll also see several ways to edit them and add your own.
- 1 What are WordPress User Roles and Permissions?
- 2 Why Manage WordPress User Roles and Permissions?
- 3 A Look at the WordPress User Roles and Permissions
- 4 Assigning User Roles
- 5 Edit WordPress User Roles and Permissions with Plugins
- 6 Edit WordPress User Roles and Permissions with Code
-
7
Tips for Setting WordPress User Roles and Permissions
- 7.1 1. Set the default user role as low as possible.
- 7.2 2. Select the role for each user based on the level of access they need.
- 7.3 3. Have the fewest number of Administrators possible.
- 7.4 4. For a one-person website, create an Editor role for yourself.
- 7.5 5. Fine-tune user roles with code or plugins.
- 8 Ending Thoughts on WordPress User Roles and Permissions
What are WordPress User Roles and Permissions?
A role is a user with certain capabilities. Permissions are the capabilities. WordPress has 6 pre-defined roles and over 70 capabilities. Each role adds to the capabilities of the roles under them. There are also ways to add new user roles and capabilities.
Why Manage WordPress User Roles and Permissions?
There are many reasons why it’s important to specify user roles.
User roles help improve your website’s security. Someone who contributes content to your website shouldn’t have the ability to change your theme, add or remove plugins, perform updates, or even moderate comments. You want those capabilities to be restricted to as few users as possible.
Utilizing the various user roles gives you a lot of control over the options each user has access to. They allow you to build a team and limit their access, so no one uploads media, posts content, or makes changes you haven’t authorized.
Limiting user access can also streamline your workflow. Since users can only perform certain tasks, they’re not distracted or confused by features they don’t need.
Some plugins, such as security or eCommerce plugins, check the capabilities of users to restrict the actions they can perform. Certain user roles would not see the settings screen, for example.
Content can be restricted to certain user roles. This includes menu links, widgets, posts, etc.
A Look at the WordPress User Roles and Permissions
There are over 70 capabilities built into WordPress. There are two types:
- Primitive – these capabilities are assigned to the premade roles, so users have them automatically.
- Meta – these capabilities are applied to primitive capabilities based on checks that WordPress performs.
There are 5 roles built into WordPress, plus 1 that’s only seen in multisite installations, for a total of 6 user roles. The roles are:
- Subscriber
- Contributor
- Author
- Editor
- Administrator
- Super Admin (multi-site only)
The only user role that your WordPress website must have is Admin. This role is created automatically when WordPress is installed (unless it’s a multisite, then the Super Admin is created).
You can add more with custom post types, such as students, teachers, shop vendor, shop worker, customer, etc., by installing plugins such as WooCommerce, LifterLMS, and lots more.
Each of the roles has a specific set of permissions (the features they have access to). Let’s look at each user role from the lowest level to the highest.
Subscriber
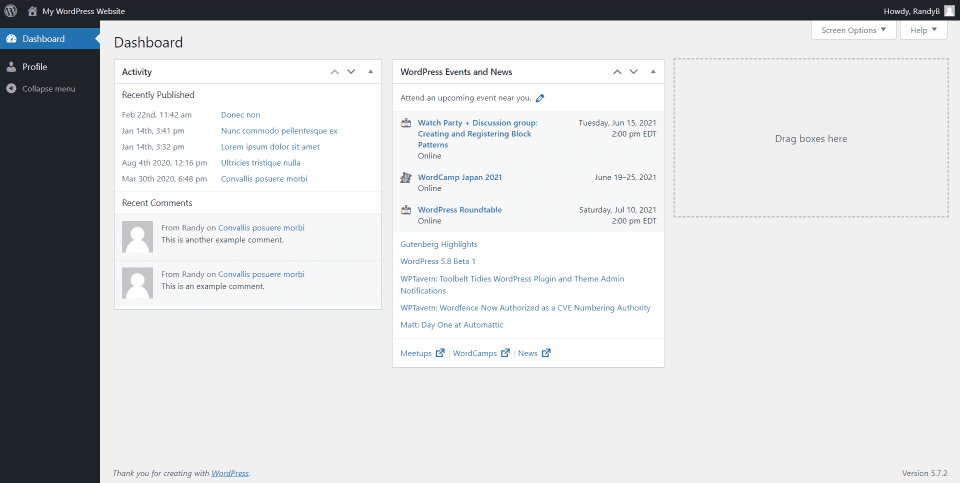
Subscribers can create a user profile, access private content, leave comments without having to re-enter their information, change their password, and receive notifications. Subscribers cannot create content. They do have access to the dashboard, but it’s limited.
This is the most limited role and it’s useful if users have to log in to see the content or leave a comment. The Subscriber role is especially helpful for membership sites where users must sign in to see the content.
As you can see in the example above, Subscribers have access to their profile in the dashboard. The dashboard will also show them Activity (what was recently published and recent comments) and WordPress Events and News.
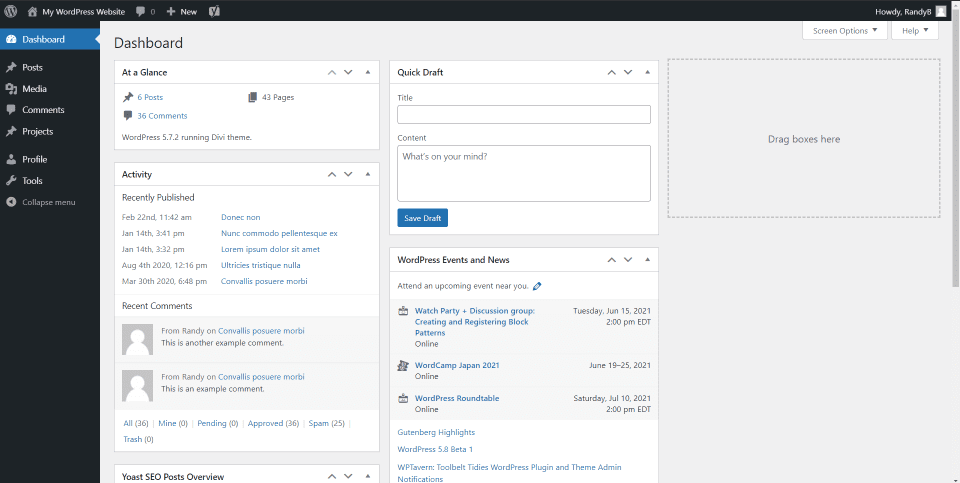
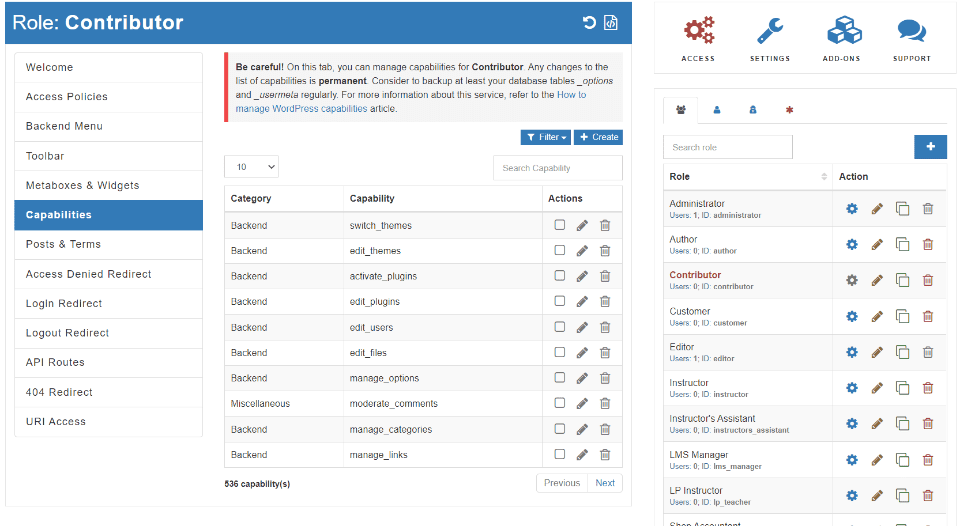
Contributor

Contributors include the same permissions as Subscribers, and they can edit or delete posts and read re-usable blocks. They can’t upload media or publish posts, but they can choose from existing categories and add tags.
They can view pending comments, but they can’t moderate them. The Contributor role can be a little inconvenient since they can’t upload images for their content. This role is ideal for new and guest writers.
As you can see in the example above, the dashboard for Contributors shows posts, comments, projects, profile, and tools.
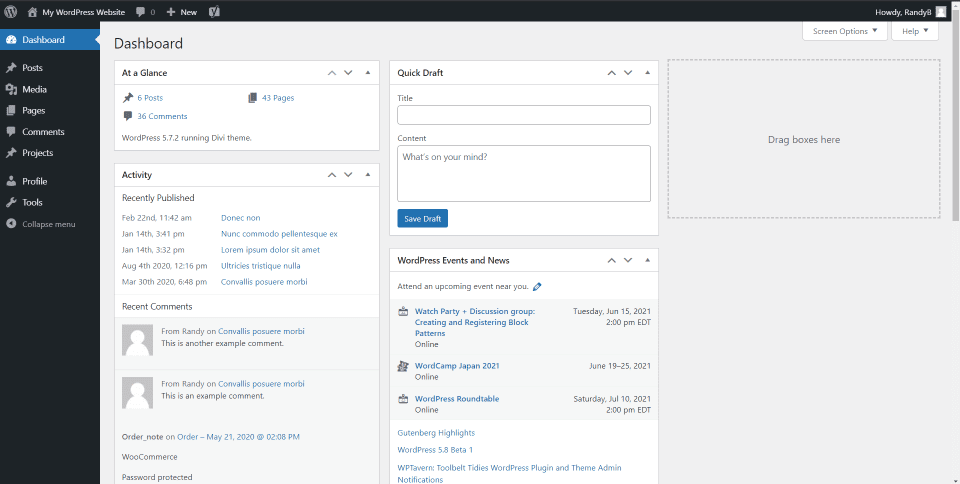
Authors include the same permissions as Contributors, but they can upload media, publish, edit, or delete their own posts. They can also create reusable blocks and edit or delete their own blocks.
They have control over their own content. This makes them much more convenient since an admin doesn’t have to upload media for them. It can be a little risky, though, because they can delete their posts even after they’ve been published. Other than that, this is a safe role.
The example above shows the dashboard for Authors, which includes posts, media, comments, projects, profile, and tools.
Editor
Editors have the same permissions as Authors, but they can edit and publish posts by other users. They have full access to the content sections of your website and can edit or publish pages including private pages and posts created by others.
Editors can manage categories and moderate comments. They cannot access website settings, themes, or plugins.
The example above shows the dashboard that Editors will see. Menu items include posts, media, pages, comments, projects, profile, and tools.
Administrator
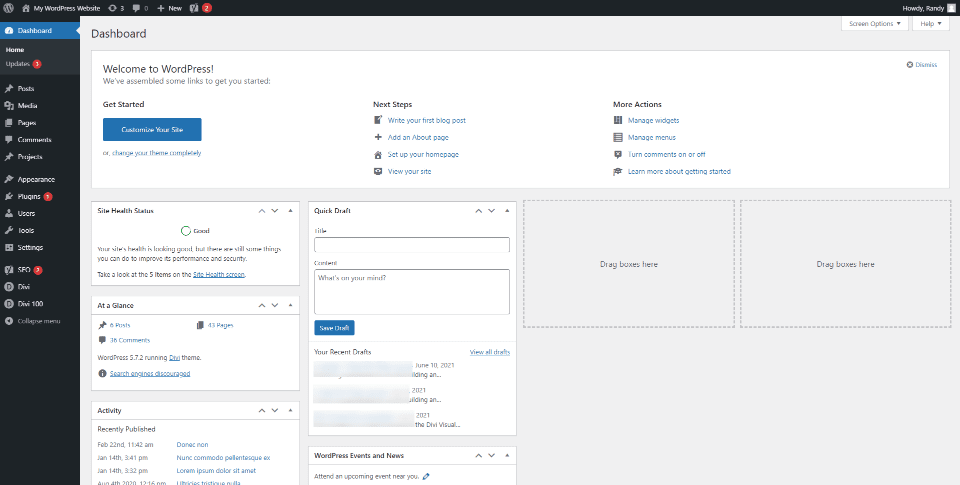
Administrators have full access to the backend. This is the most powerful of the WordPress User Roles for the standard WordPress installation. They can create and edit pages and posts, adjust WordPress settings, install themes and plugins, edit code, control user permissions, and more. They can import and export content, manage the website options, and edit the dashboard.
An Admin can change the user role of other admins, including deleting them. This role is typically reserved for the site owner or manager.
The image above shows the Administrator has access to everything from the WordPress dashboard. This is the only image so far that shows updates are available, and all examples are from the same test website.
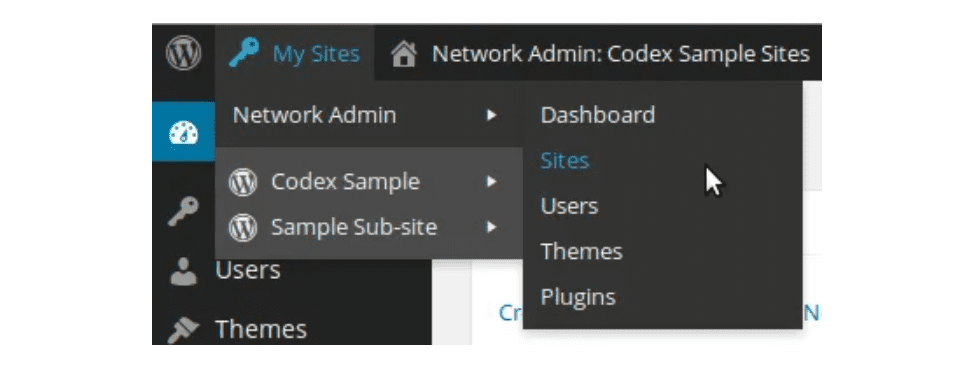
Super Admin
The Super Admin is only available for multisite networks and it’s the most powerful WordPress role. A multisite is a WordPress website that controls multiple websites on the network. This means Super Admins have control over multiple WordPress websites at once, including their Administrators.
Super Admins have the same permissions as an Administrator, but they have control over the entire network. They can create, edit, and delete websites on the network.
Several of the Administrator tasks are moved to the Super Admin. Regular Administrators no longer have access to upload, install, or delete plugins or themes. Also, Administrators no longer have access to modify user’s information.
They have control over which sites on the network have access to which themes and plugins. They can perform updates across the network simultaneously. Super Admins install plugins and themes, and the Administrators of each WordPress website on the network have control of activating them.
Multisites have an additional admin panel that only Super Admins have access to. As you can see from the image above (taken from the WordPress glossary), the Super Admin dashboard includes a Network Admin menu that shows the sites on the network, users, themes, and plugins. Everything else matches the Administrator dashboard.
Assigning User Roles
When assigning user roles, use the Principle of Least Privilege (PLoP). This gives users only the permissions they need to perform their tasks and ensures they don’t have access to features they shouldn’t.
The ability to assign user roles fits this principle well because you can assign them based on each person’s job description. You can have senior staff, junior staff, interns, guest authors, etc., and each has the specific access they need for their job.
This gives you more control over your WordPress website and keeps users from making changes you don’t want them to make. This also keeps users from changing the settings by accident or performing an update that you were not ready for.
If you run a website with a team of content creators, the site should have one Administrator that manages the website, have an Editor to help manage writers, and the other users as Authors. This allows them to upload media and is a good choice if you publish articles with lots of images. New writers and guests should be Contributors. This gives you the best balance of control.
Manually Add New Users
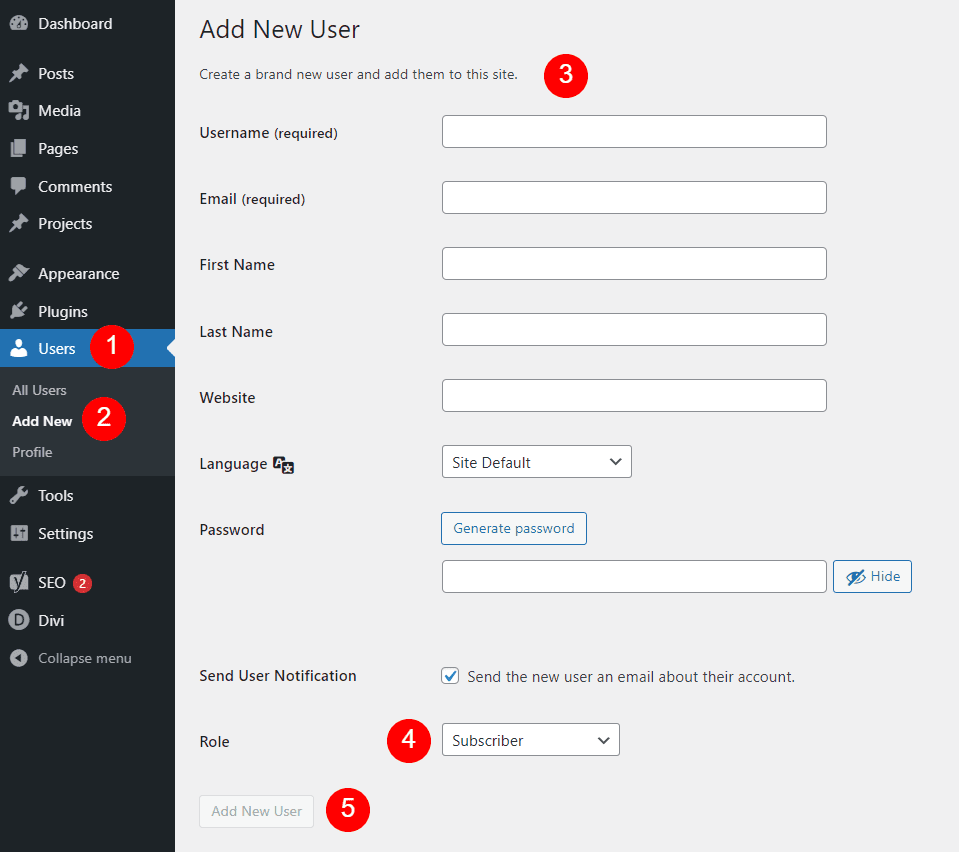
The Administrator can add new users to the website. In the dashboard menu, go to Users > Add New. Fill in the user’s information, select a language (if you’re not using the default language), generate a password, check the box to send them an email notification, and select the user’s role from the dropdown box. When you’re ready, click Add new User.
The user will receive an email at the address you entered for them. The email will include login information.
Changing User Permissions
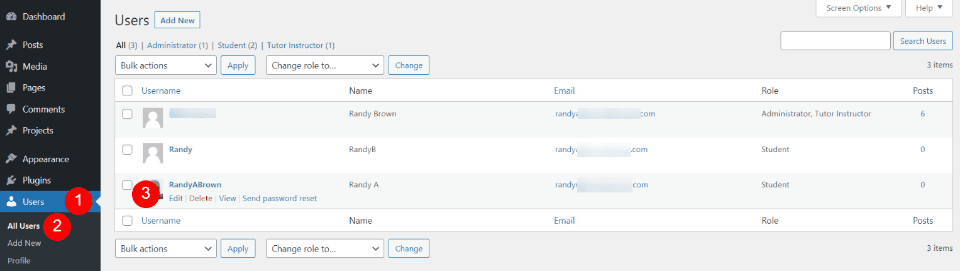
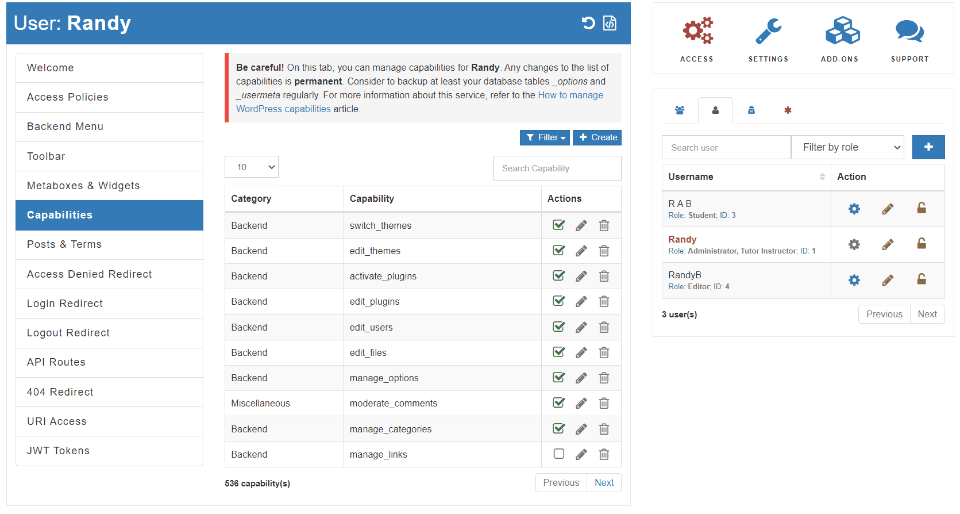
The Admin can also change the permissions of current users. Go to Users > All Users in the WordPress dashboard. You’ll see a list of users. This list works the same as any post type. Here, you can edit, delete, view, perform bulk actions, add new, etc. Hover over the user you want to edit and click Edit in the menu items that appear.
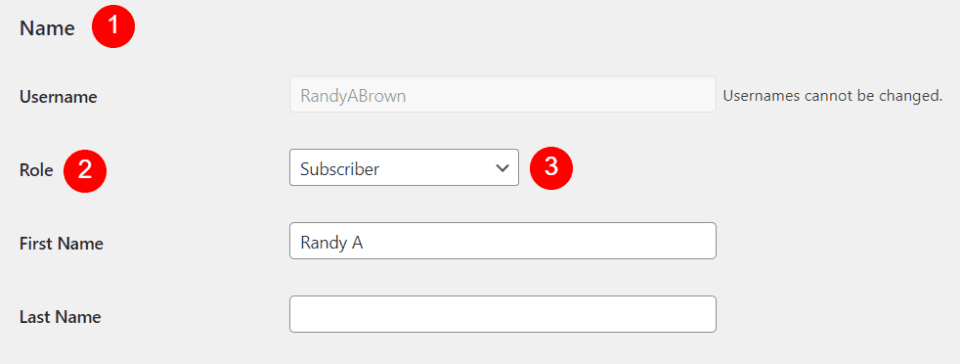
Scroll until you see a section called Name. You’ll see a dropdown box labeled Role. The box will show the current level for that user. Select this box to open it.
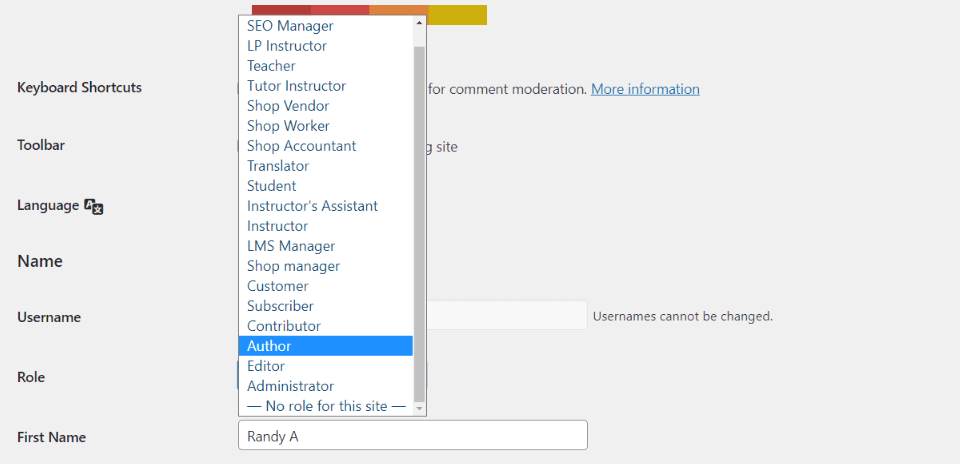
Select the user level you want to assign to that user. Every role you’ve installed on your website from third-party plugins will be available to choose from, so your choices might look different from mine. Scroll to the bottom of the page and click Update User.
User Registration and Default User Role
There are times when you want users to be able to register to your website. This is helpful for eCommerce, LMS plugins, membership sites, and more.
You can allow users to register and set the default user role for them. In the dashboard menu, go to Settings > General. Check the box labeled Anyone can register. Under this is a dropdown box where you can choose the default role that will be assigned to all new users.
Subscriber is the default setting, but you can set this to any role you want, such as student, member, etc. I don’t recommend setting the default to anything above Subscriber (or the equivalent for your website). You don’t want to provide access to your website to anyone you don’t know.
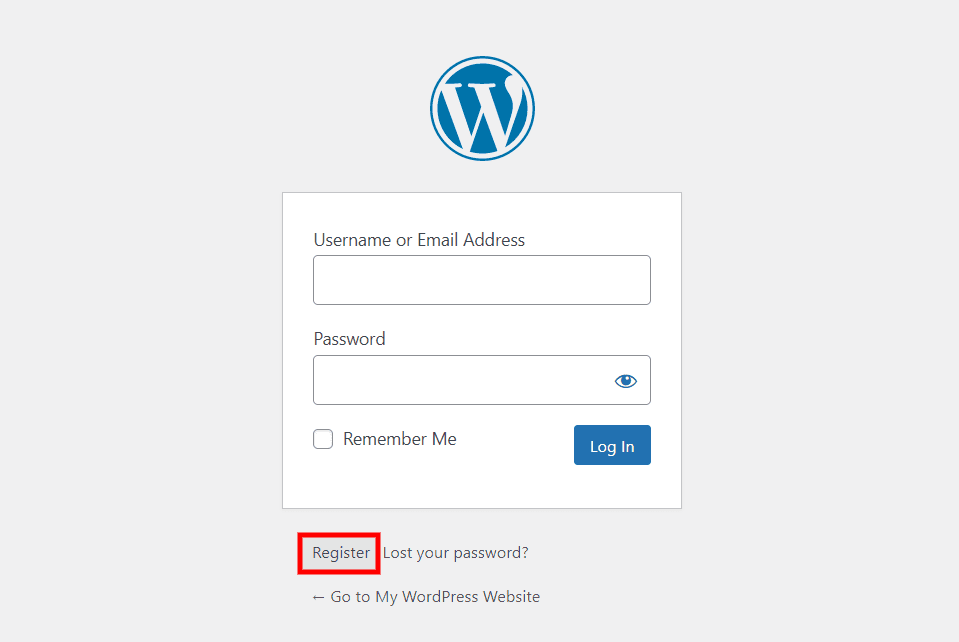
Register is now an option at the login screen.
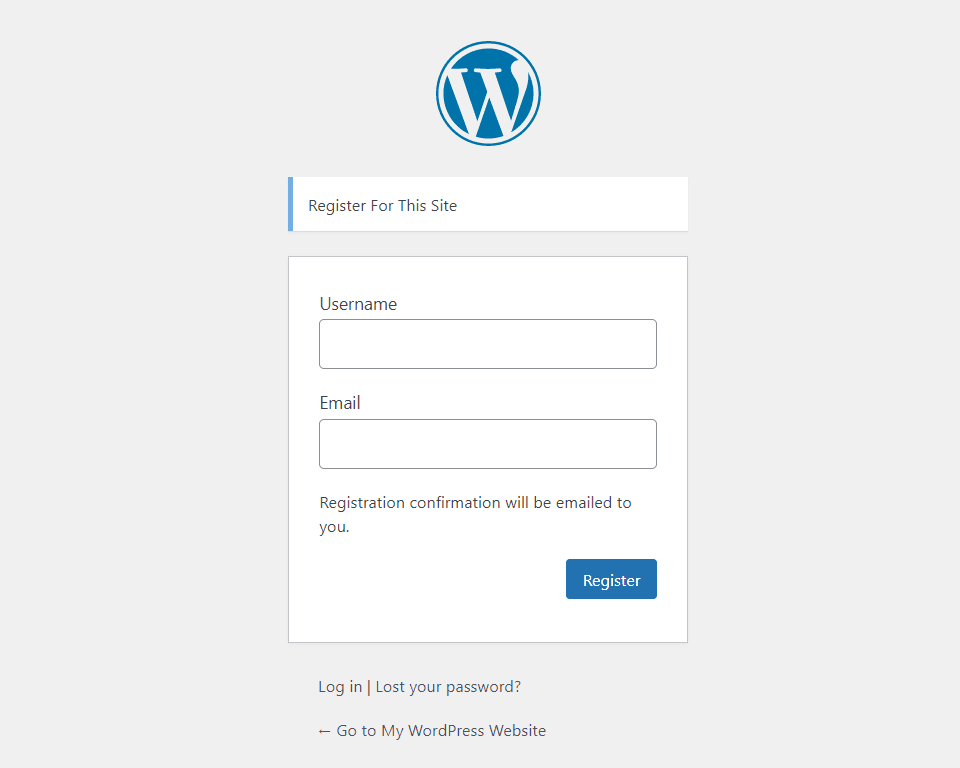
Once your visitors click Register, they’ll see the login form where they can enter a username and email. Once they click Register, the confirmation will be sent to the email they entered. They’ll be registered with the default user role.
If you want users to register, you might consider placing a link as a call to action in your menus or on your website to inform your visitors that it’s an option.
Edit WordPress User Roles and Permissions with Plugins
There are a few concerns with some of the abilities certain user roles have. For example, Contributors can’t upload images and Authors can delete all their content. Fortunately, it’s possible to fine-tune user’s capabilities by using plugins. Let’s look at a few of the most popular options.
1. Members
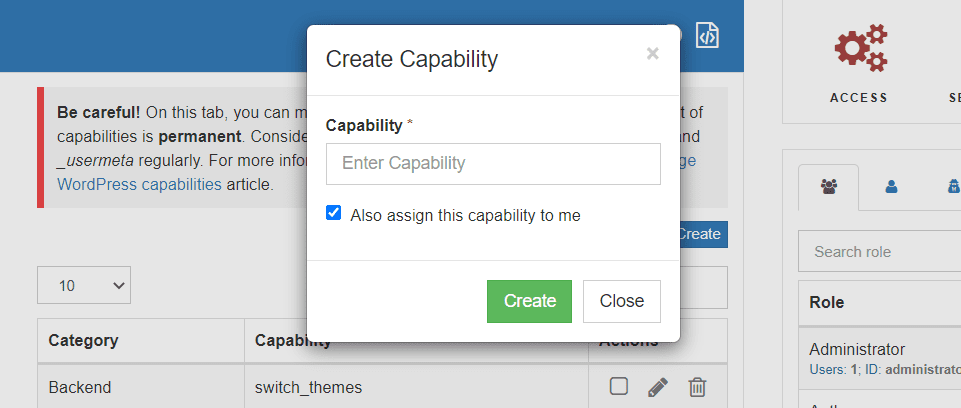
Members gives you the tools to edit the capabilities of roles and create new roles. You can also delete roles. Users can be assigned more than one role. Content restrictions allow you to specify which roles can access the content.
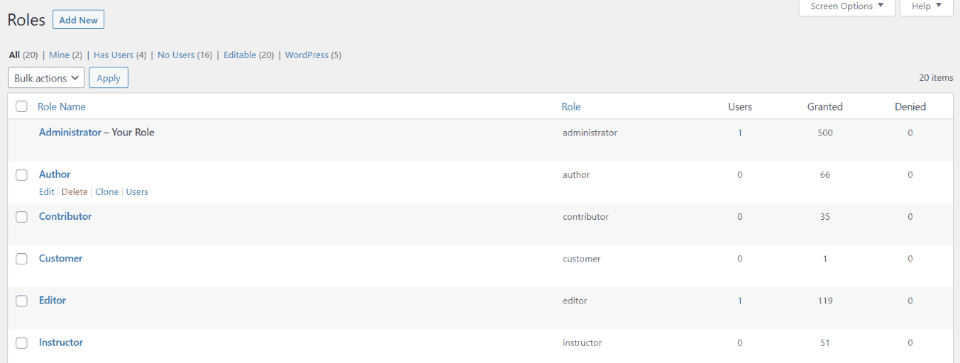
Roles displays each of the roles on your website. You can edit, delete, clone, and view the users with each role.
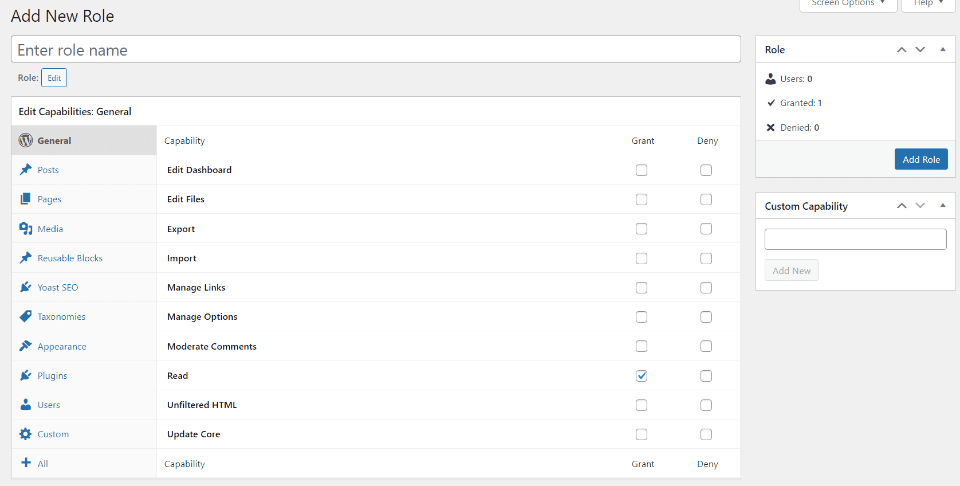
Creating new members gives you an editor where you can select every capability for every task. It includes plugins that you have installed, such as Yoast in the example.
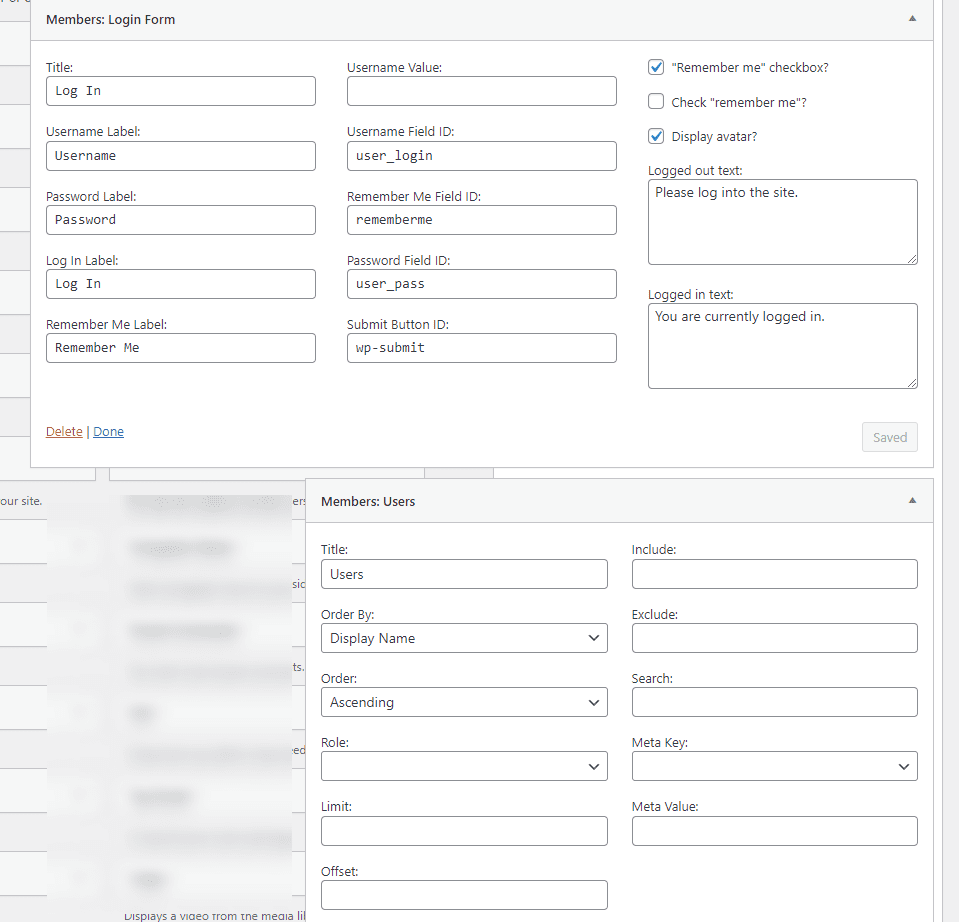
Two widgets are included for your sidebars where you can show a login form and a user’s list. You have control over the form and information that displays.
Price: Free | More Information
2. Ultimate Member

Ultimate Member gives you lots of customization options for frontend forms and profiles. Design with the drag-and-drop builder and add conditional logic and conditional navigation menus. Customize user roles and create user directories. You can restrict content based on user roles. Create a membership site and display member search in the sidebar.

Creating new user roles provides you with detailed options that include administrative and general permissions, profile access, homepage options, login, logout, and delete options.

The list of capabilities is massive. Select the capabilities you want the user role to include.
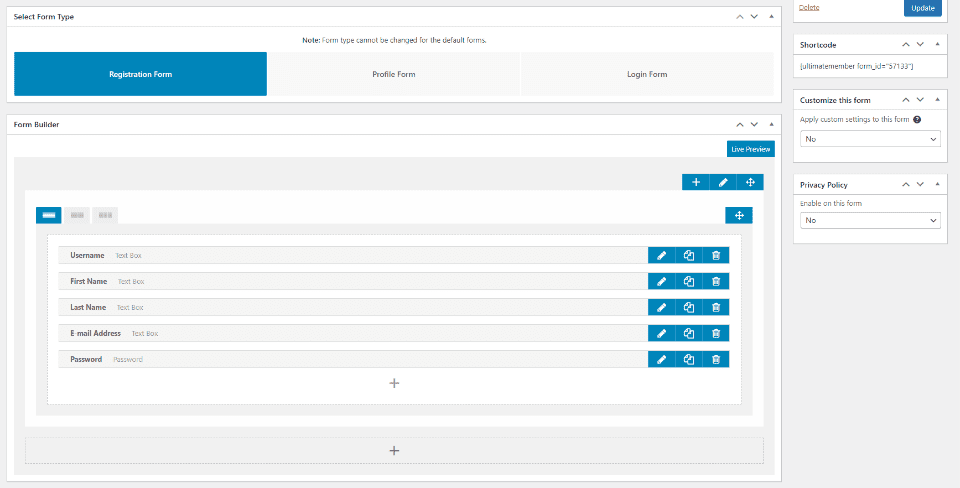
The drag-and-drop form builder includes several forms to get you started.
Price: Free | More Information
3. User Role Editor

User Role Editor provides a single dashboard to customize and create new roles and capabilities. All options are selected with checkboxes. You can assign capabilities for each user and you can assign multiple roles to each user. This plugin is also considered a top plugin for multisite installations with various custom user roles, making your system administration tasks easier across multiple sites.
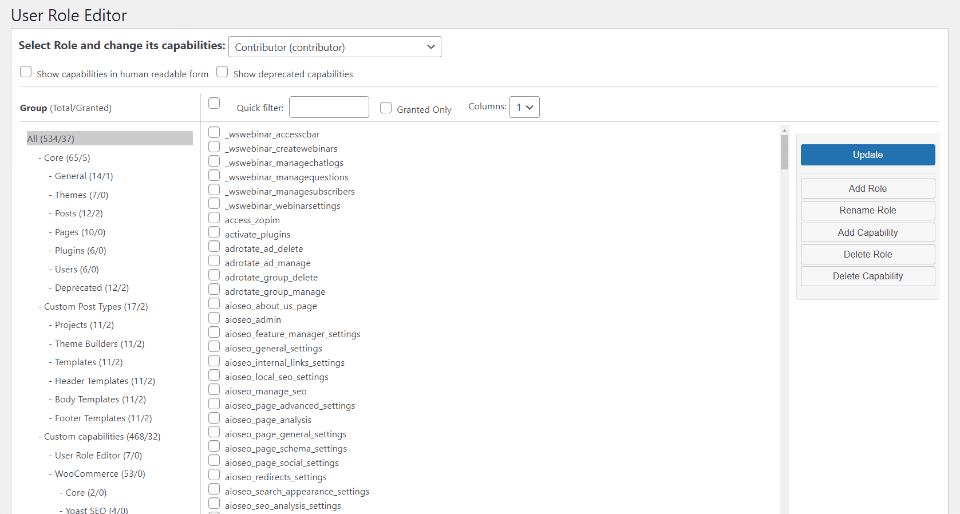
The editor makes it easy to edit the capabilities of any role. Select the options you want by clicking them.
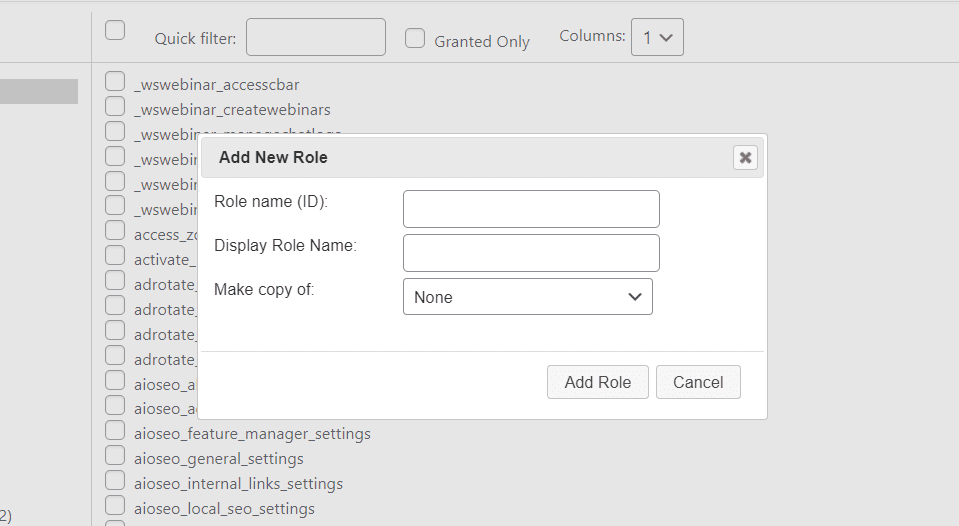
Add a role by creating it from scratch or copying another role.
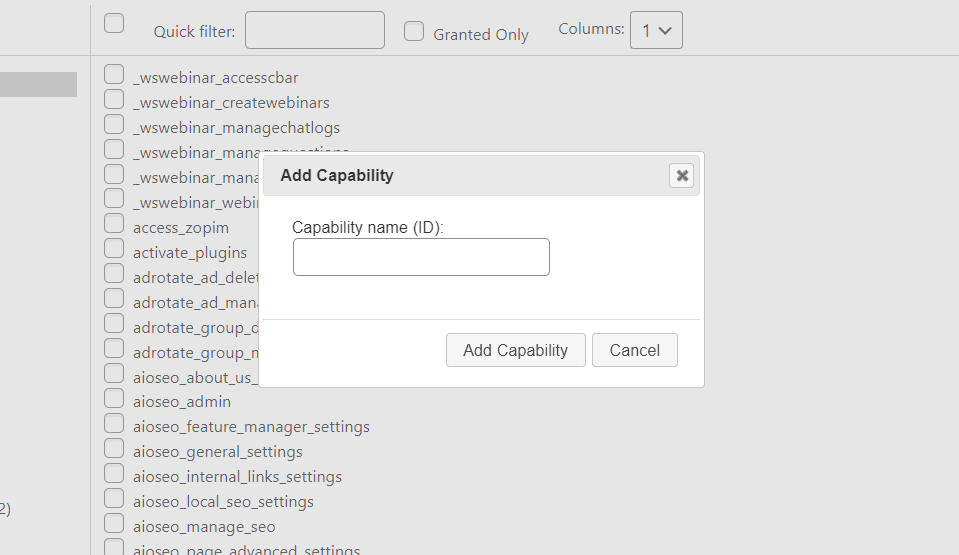
Add new capabilities that any role can use.
Price: Free | More Information
4. PublishPress Capabilities

PublishPress Capabilities lets you create custom user roles and select the capabilities for each role by choosing them from a list. You have full control over every permission. You also have control over taxonomies. Create new roles from scratch, clone a role, or edit a current role.

Select the capabilities you want each role to have. Choose editing, deletion, reading, other WordPress core, and additional capabilities. The additional capabilities provide a massive list of options. You can add a capability, set them as type-specific, taxonomy-specific, etc.
Add a new role just by entering the name. You can then edit the capabilities of that role.
Price: Free | More Information
5. Advanced Access Manager

Advanced Access Manager lets you manage access to your content for any role, This includes individual users and visitors. You can also define the default access to pages, posts, categories, custom post types, and custom taxonomies.
The access settings screen provides the list of users and actions. Manage, edit, clone, or delete any role. Select user roles, individual users, visitors that are not logged in, and default access.
You can adjust the capabilities of each user individually.
Create new capabilities for any role.
It includes a custom login widget for your sidebars.
Price: Free | More Information
Other WordPress Roles and Permissions Plugins
Here are a few more to consider:
Edit WordPress User Roles and Permissions with Code
Even though the six roles have pre-defined capabilities you can add or remove those capabilities manually with code. I only recommend using code if you’re comfortable with using PHP. I recommend most WordPress users use a plugin for this.
Controlling WordPress roles and permission with code can be cleaner and lighter weight than plugins and you don’t have to worry about updates.
Adding, Removing, and Cloning Roles
Rather than customizing a current role, it’s sometimes more beneficial to create a new role.
Roles can be created and removed using the add_role() and remove_role() functions.
For example, this code adds a role called Guest Contributor along with the capabilities:
add_role(
  'guest_contributor',
  'Guest Contributor',
  array(
    'read'         => true,
    'edit_posts'   => true,
    'delete_posts' => true,
  )
);
This code removes the Contributor role:
remove_role( 'contributor' );
To clone a current user role, use this code:
add_role(
  'clone',
  'Clone',
  get_role( 'user_role_name' )->capabilities
);
Replace ‘clone’ with the name you want the new user role to have. Replace ‘user_role_name’ with the role you want to clone. This provides you a new role that matches the capabilities of another role. You can then modify the capabilities of the new role.
Add or Remove Role Capabilities
You can customize existing role capabilities with the add_cap() and remove_cap() methods of WP_Role class object.
This code gives the Editor the capability to activate plugins:
// Get the editor role object.
$role = get_role( 'editor' );

// Add ability to activate plugins.
$role->add_cap( 'activate_plugins' );
This code removes the capability of deleting posts from the Author user role:
// Get the author role object.
$role = get_role( 'author' );

// Remove deleting posts capability.
$role->remove_cap( 'delete_posts' );
Add or Remove Specific User Capabilities
You can also customize capabilities for specific user with the add_cap() and remove_cap() methods of WP_User class object.
For example, this code gives the user the capability to switch themes and remove the capability to manage categories:
// Get the user object by user ID. You can also get user object by slug, email address, or login name.
$user = get_user_by( 'id', 1 );

// Add ability to switch themes.
$user->add_cap( 'switch_themes' );

// Remove manage categories capability.
$user->remove_cap( 'manage_categories' );
Tips for Setting WordPress User Roles and Permissions
Here are a few tips for setting WordPress user roles and permissions.
1. Set the default user role as low as possible.
It’s set to Subscriber by default. I don’t recommend changing it unless it’s completely necessary for your specific website’s needs, such as a custom post type. Even then, I recommend using the lowest role possible.
2. Select the role for each user based on the level of access they need.
Give users the lowest level possible. This reduces the number of users with higher levels of access, which streamlines their jobs and increases security.
This also keeps users from making unauthorized changes such as deleting content, customizing code, changing themes, adding or deleting plugins, etc.
It’s much safer to give users a lower role and increase it as you need to than to give them a higher role and regret it because of a mistake or something worse. Only give higher roles to those you fully trust.
3. Have the fewest number of Administrators possible.
The fewer people that have access to themes, plugins, and other settings the better. Ideally, a WordPress website would have one Administrator.
Also, have a few Editors with the rest assigned as Authors or Contributors. The Author role is great for those you’ve worked with long enough to trust their work. The Contributor role is a great choice for new content creators.
4. For a one-person website, create an Editor role for yourself.
Creating an editor role keeps the administrative tasks separate from the daily blogging role. The Administrator username wouldn’t be as visible on the site, which helps keep it safe from hackers. Even if the Editor role is hacked, the Administrator role remains safe.
5. Fine-tune user roles with code or plugins.
The standard user permissions are helpful for most websites, but you may need to customize a role or create new roles. For example, you might want someone to have access to upload media, but not be able to publish or delete their content.
This can be done with code, but plugins make this as easy as possible. The plugins we’ve covered in the article provide the best options. I recommend looking at each one to see which has the features that best fit your needs.
Use code only if you’re comfortable with PHP. Code does have the advantage of streamlining the code to the exact features you want. This makes the code lighter. Also, you never have to worry about updating a plugin, the plugin’s features changing, or the plugin no longer being supported.
Ending Thoughts on WordPress User Roles and Permissions
WordPress user roles and permissions are an important part of your website’s settings. They give you more control over who has access to what features. This helps you manage your team and opens the possibility of growing your team so others can perform certain actions, create content, etc.
Since the user’s only have access to certain features, user roles help streamline each user’s work. These restrictions also improve your website’s security because it limits what each user can do.
WordPress user roles and permissions can be customized with plugins or code, giving you even more control over each user.
User roles are easy to understand and use. Having a good understanding of WordPress user roles and then choosing those roles carefully will help your website be more efficient and secure. If you have a WordPress website with more than one user, you should set up WordPress user roles.
We want to hear from you. Do you utilize WordPress user roles and permissions on your website? Let us know about your experience in the comments below.
Featured Image via olesia_g / shutterstock.com


I use Divi for my user roles but I would like to see a better explanation of exactly what each ‘tab’ actually does. It’s not that obvious.
Hey Randy,
It is really one of the best guides I found today on WordPress user-role capability. I wanted to provide specific user permission to a few writers and now I’m sure how I can do it on my website.
Keep posting articles like this on your blog 🙂
Thanks for publishing the guide. i just added a new user to my website with the hel of thos guide.
This guide is very comprehensive. It is very important to know how to manage roles and permissions with divi.
You have to be careful not to put just anyone with the administrator role, for example.
And then, when you have a team, it allows you to better manage your business by distributing roles to each.