
You put months into building your website. You spend even more time learning about SEO and how to create valuable, meaningful content for your users. Then you find out that, while people find your site all the time, they don’t stay. Sometimes they leave within seconds. A huge factor in users bouncing is site speed. Luckily, SiteGround users have a number of options and features that are easy to access (and even free) that will speed up your website — SuperCacher to SiteGround CDN and a free version of Cloudflare, just to name a few.
In this post, we’ll cover everything you need to know to get your site up to speed (literally).
Site Tools, SiteGround CDN, and Other Speed Features
In 2019, SiteGround replaced cPanel with a new, streamlined hosting portal complete with an assortment of Site Tools. The features and services offered here are easy to find, work with and understand, even for beginners.
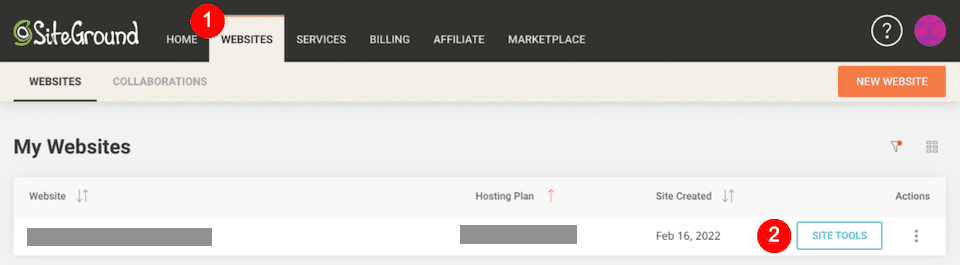
- Log in to your account at SiteGround.com.
- Click Websites.
- To the right of the website that you’ll be working with, click Site Tools.
- You’ll see the Site Tools in the lefthand sidebar.
An Overview of Site Tools
There are nine main Site Tools options. Clicking one will expand a menu underneath with more options.
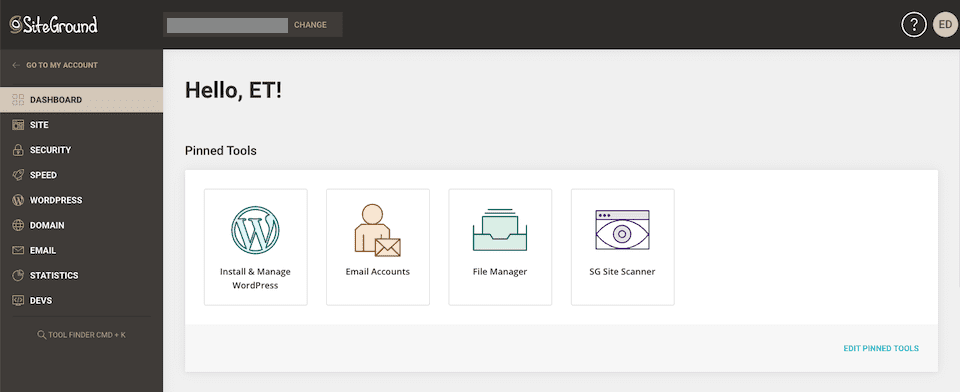
Here’s an overview of the Site Tools:
- Dashboard: Welcome message, announcements from SiteGround, Pinned Tools (which you can change), site information (disk usage, name servers, etc.), and some statistics.
- Site: File manager, accounts for other users, and database access.
- Security: Backups, SSL certificates and HTTPS enforcement, protected URL and blocked IP management, and the Site Scanner to detect malware.
- Speed: SuperCacher options, CDN service, and SiteGround Cloudflare configuration.
- WordPress: Install and manage WordPress websites, create staging environments, migrate an existing website, auto-update your site and use Search and Replace to change WordPress strings.
- Domain: Set up parked domains, subdomains, and redirects, and access the DNS Zone Editor.
- Email: Create email accounts for your domain name, forward email to another address, create autoresponders, filter messages, authenticate messages, limit spam and connect your account with Google Workspace. We have a full tutorial on SiteGround email here.
- Statistics: View an assortment of statistics, including traffic, sources, and behavior, as well as error and access logs.
- Dev: Several developer-level tools, including automating commands and scripts, PHP management, and app installation.
Learn more about Site Tools in our complete guide to the SiteGround dashboard.
An Overview of the Speed Options in SiteTools
The three components of the Speed section are Caching, CDN and Cloudflare. In the Caching section, you’ll see the SuperCacher and its three website-optimization options. SiteGround’s CDN (which stands for Content Delivery Network) is in beta, and it’s best for optimizing performance for sites with global traffic. There’s also an option to use the Cloudflare CDN. We’ll talk more about all of these options throughout this article.
What is the SiteGround SuperCacher?
When pages take too long to load, visitors have a higher likelihood of leaving (bouncing) instead of sticking around. WordPress cache plugins such as WP Rocket improve performance by speeding up your website so this doesn’t happen. (If you’re interested in how caching works, check out this How Stuff Works article.) At SiteGround, the company’s server optimization experts have created SuperCacher, which is designed to handle hits to your site and improve loading speed. There are three options to choose from (see below), and you can mix and match as you see fit.
However, note that it’s not recommended that you also enable caching with a WordPress plugin if you’re using SiteGround’s caching. You may want to use a caching plugin along with SiteGround’s caching services if it has other features you’re interested in — but even then, it’s best to turn off the caching function in the plugin. Using more than one caching solution can cause compatibility issues and prevent users from accessing your site.
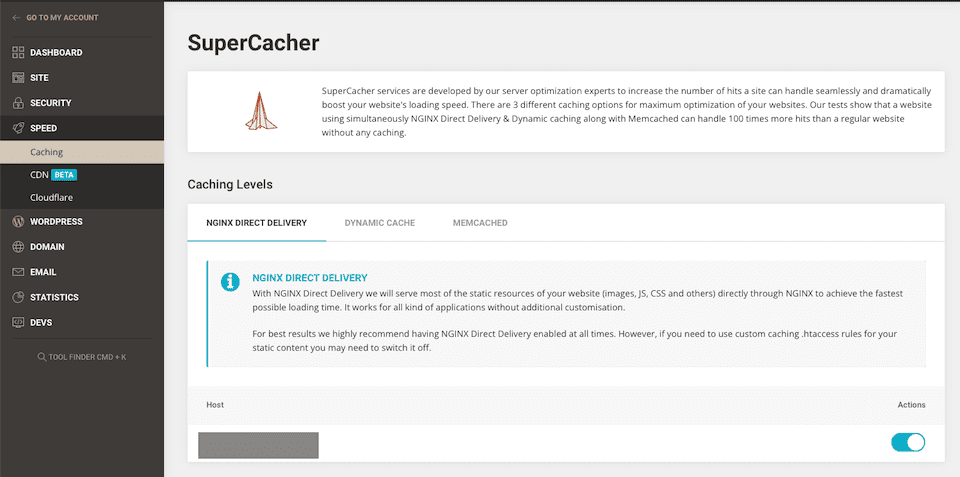
1. NGINX Direct Delivery
NGINX Direct Delivery replaced Static Cache around the time Site Tools launched. Instead of serving CSS, images, JS files, and other types of static content from server memory, the NGINX web server software direct-loads the files from the server drives. This change means improved browser caching and CDN usage. Also, NGINX frees up RAM space that can be used by dynamic content caching without impacting the load speed of static content.
SiteGround recommends having NGINX Direct Delivery enabled all the time, unless you’re using custom caching .htaccess rules for static content. In the lefthand Site Tools sidebar, select Speed > Caching > NGINX Direct Delivery (under Caching Levels) and toggle it on to the right of the domain name.
2. Dynamic Cache
The second tab under Speed is Dynamic Cache, and it is also powered by NGINX architecture. It’s enabled by default on SiteGround servers (so you don’t have to do anything to turn it on). Whereas NGINX Direct Delivery handles caching for static content, Dynamic Cache handles caching for dynamic content to improve load speed. WordPress websites will have the best results possible if the SG Optimizer plugin is installed to work in tandem with Dynamic Cache.
3. Memcached
And finally, the Memcached tab is for object caching. While you can learn more about WordPress object caching here if you’re interested, it basically handles caching for dynamic content that can’t be served by Dynamic Caching. According to SiteGround,
Our tests show that a website using simultaneously NGINX Direct Delivery and Dynamic caching along with Memcached can handle 100 times more hits than a regular website without any caching.
So, you may want to use all three simultaneously (just without a WP cache plugin enabled, remember). To enable the feature, go to Site Tools > Speed > Caching > Memcached (under Caching Levels) and toggle it on to the right of the domain name.
How to Use the Free SiteGround CDN Services
The SiteGround CDN is another tool that you can use to make your website faster. It’s particularly useful if you have traffic coming from different continents and countries. The way a CDN works is it caches your site content and then distributes it to various data centers around the globe. Whenever someone visits your website, the server that’s located closest to them is used to deliver content.
Whether or not to use a multi-CDN solution for your WordPress website is up for debate. On the one hand, using multiple CDN services means you’re not depending on just one, which makes your overall CDN solution more available. On the other hand, some plugins run into compatibility issues — the SiteGround Optimizer and Jetpack don’t always play well together, for example.
So it’s up to you which solution you think is best, and then monitoring website performance will help you see if it’s positively or negatively impacted after a change.
SiteGround CDN
Right now, SiteGround’s CDN service is in beta, which means it hasn’t been officially rolled out yet. But you can still try the beta version for free if you’re interested. If you keep the CDN service active throughout the beta period, you’ll get three months of premium service free when it fully launches. SiteGround’s Premium CDN service costs $12.49 per month, and we’ll go over the premium features a little later in this section.
To access the SiteGround CDN tool, go to Site Tools > Speed > CDN. Tick the Terms of Service box and then click Proceed to CDN Tool.
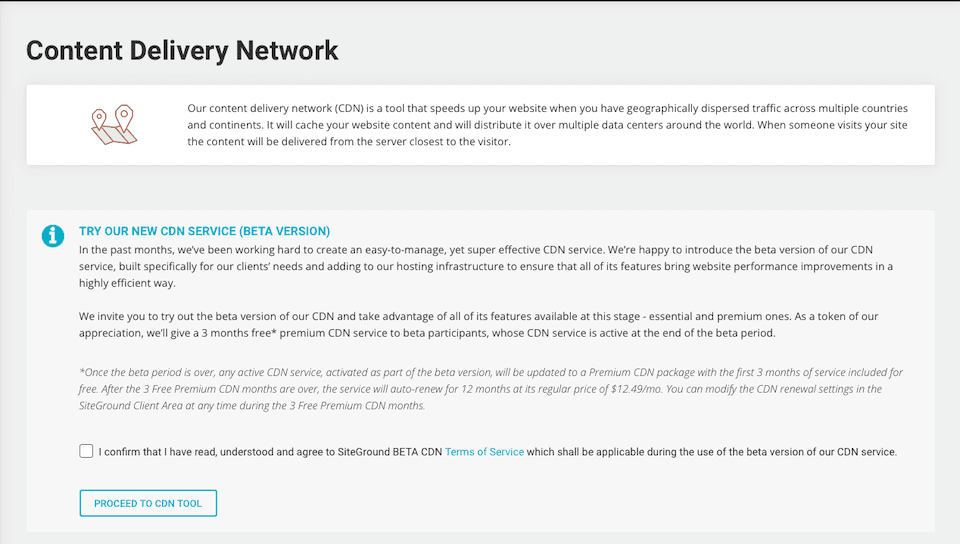
You’ll be brought to a page where you can manage your CDN settings:
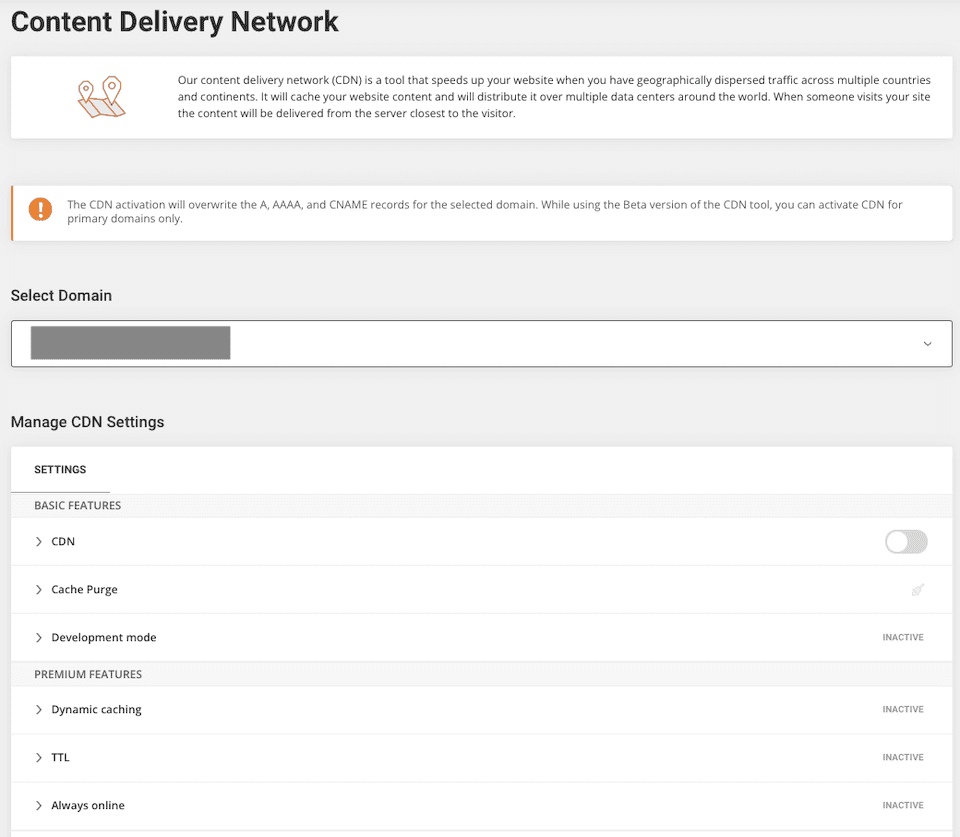
First, make sure that the correct domain is chosen. Then, head down to the Manage CDN Settings section. Until you toggle CDN on, the other options won’t be available. Once CDN is enabled, these are the other settings available:
Basic Features
- Cache Purge: This deletes cached versions of your website — but doing this too often can slow down your website, so it’s not maintenance to perform daily.
- Development Mode: If you’re making changes to cache-able content, like CSS or images, turning this on will suspend the caching features temporarily. That way, you’ll be able to see the changes right away. This mode stays on for 30 minutes before being automatically disabled.
Premium Features
- Dynamic Caching: This tool provides full-page caching for non-static resources; it speeds up your site by preventing actions like unnecessary page processing and database queries.
- TTL: Or Time to Live, this is how long your dynamic resources are cached — or how long until the cached version goes back to the live version. The default is 12 hours, but you can also choose six or 24 hours.
- Always Online: If the server isn’t accessible or your site has an error message, cached copies of the site will be shown so that it can stay online while the issue is being sorted.
Note that if your site isn’t using SiteGround’s name servers, you won’t be able to enable the CDN. You’ll be given a warning if this is an issue, so it will definitely not go unnoticed. Also, if you activate the CDN and then change the name servers, the CDN service will be disabled. You will just need to turn it back on.
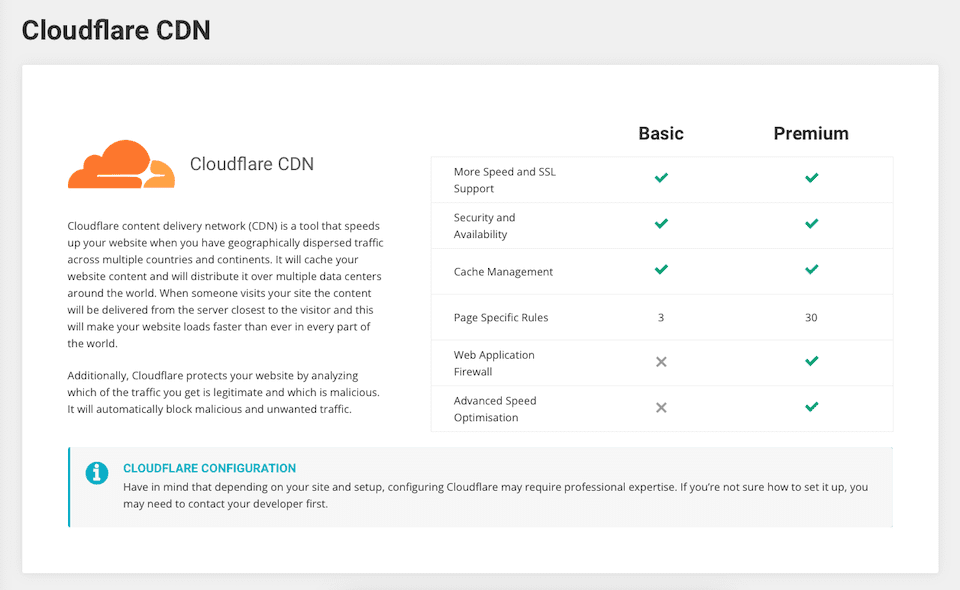
Cloudflare CDN
In addition to offering their own CDN option, SiteGround also has a partnership with Cloudflare. If you prefer to use Cloudflare CDN, you can start by going to Site Tools > Speed > Cloudflare. This is what you’ll see, and this page also shows you the differences between the Basic and Premium services:
Setting up and managing Cloudflare is a bit trickier than working with SiteGround’s native CDN.
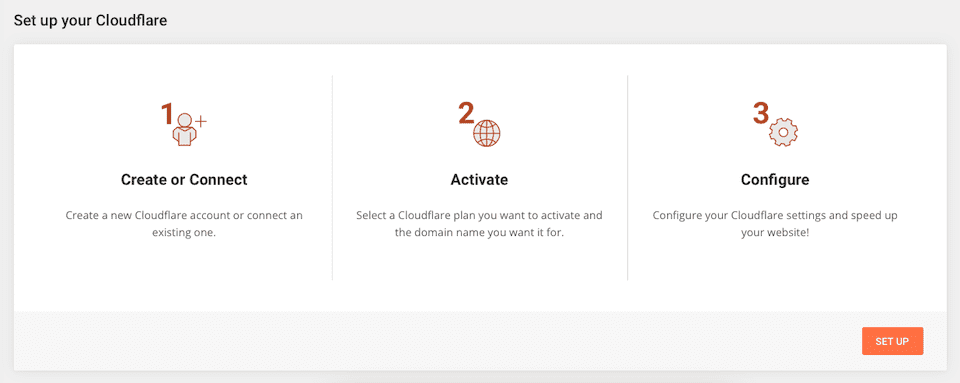
Luckily, there’s a lot of help on the SiteGround website to walk you through it all.
- Point your domain to SiteGround
- Enable Cloudflare via Site Tools
- Redirect your URLs to WWW (recommended)
- Activate Cloudflare for subdomains
- Cloudflare’s Basic and Premium settings
- Manage allowed/blocked IPs
Final Thoughts About SiteGround CDN and Other Speed Settings
SiteGround makes it pretty easy to get around the many tools at your disposal to control your hosting service and website. And if you have trouble with any of it, they have a pretty great knowledge base, too. If you notice your site scoring lower on loading-related elements of Core Web Vitals, the Speed section of the SG Site Tools will definitely help improve that.
If you’re an Elegant Themes member, you can also get additional performance improvements through Divi Hosting by SiteGround. Not only will you get the benefit from the free CDN and caching options, but you will have access to Divi-optimized server environments for every site on your plan.
What has been your experience with SiteGround’s free CDN services? Let us know in the comments!


I have used SiteGround for a number of years but they recently hid their support contact information (chat, email, phone number) and their instructions on how to wade through their support system to get to this information is inaccurate. Their website touts their 24/7 availability and quick response time. That’s a lie. I’ll probably switch to a host that I can actually call when I have an issue.
Buyer beware.
Nice blog. keep doing amazing work.
First of all thanks for the wonderful article. I found your article via google search. Its been very useful and help for our business. once again thanks a lot. Keep writing and inspiring! thank you
Thank you for the informative and comprehensive post about caching and site speed. Since this is on the Elegant Themes blog, I would be very curious to know your thoughts about how these SiteGround options can/should combine with the site performance options in the Divi. For example, with the SiteGround Dynamic Caching, does it make a difference if Divi’s Dynamic CSS is turned on or off — or the sub-option of Load Dynamic Stylesheet inline? Thanks for any insights you can share about best practices for managing these two different performance tools for best results.
Wow! Really interesting. I didn’t know SiteGrounds’ free CDN services and I have some websites designed on WordPress that are rather slow to load.
Thank you:) I will try and implement this today.
I was not aware that SiteGround has those powerful features available. Site Speed is crucial in modern SEO. I will definitely look into SiteGround’s services.
Thank you a lot ! Always helpful !
It’s not free. It’s a paid service.
Your post is very informative for me. excellent article, I really like this post, and thanks for sharing.