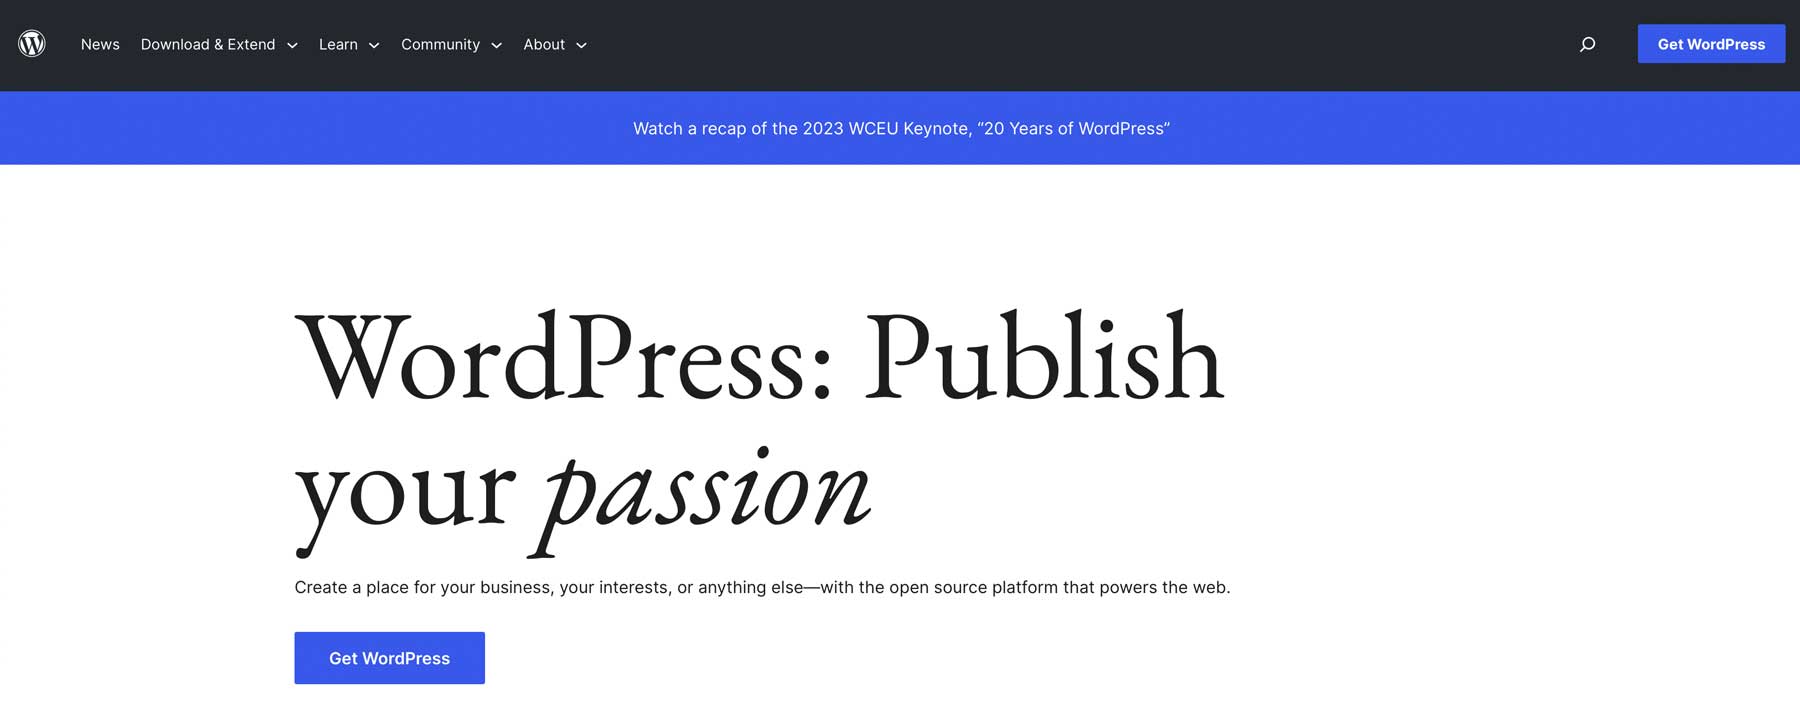
WordPress is one of the world’s most popular content management systems (CMS). With over 44% of the internet built on it, WordPress allows users of any skill level to create a website quickly. There’s no intensive coding to learn; rather, it works much like old word processors.
In this WordPress for beginners guide, we will explore the benefits of using WordPress, provide a step-by-step guide to its dashboard, and walk you through creating pages and taking your site live using the Divi theme.
Let’s dive in.
- 1 What is WordPress?
- 2 The Benefits of Building a Website with WordPress
- 3 Setting Up Your Hosting Plan
-
4
Setting Up WordPress
- 4.1 Step 1: Installing WordPress
- 4.2 Step 2: WordPress for Beginners – the Dashboard
- 4.3 Step 3: WordPress for Beginners – Themes
- 4.4 Step 4: WordPress for Beginners – Plugins
- 4.5 Step 5: WordPress for Beginners – Adding Content
- 4.6 Step 6: WordPress for Beginners – Customization
- 4.7 Step 7: WordPress for Beginners – Taking Your Website Live
- 5 Build Your Dream Website With WordPress
- 6 Frequently Asked Questions (FAQs)
What is WordPress?
WordPress got its start way back in the 90s as a blogging platform. Since then, it has evolved into a complex CMS capable of building any website, from a membership site to a forum to an online store. WordPress comes in two iterations: .com and .org. While the core platform is the same, there are quite a few differences. The main difference between the two is how they are hosted. With .org, it’s considered a self-hosted platform, which means you’ll need to purchase a separate hosting plan to use it. Alternatively, the .com version of WordPress is an all-in-one platform with built-in hosting.
In this guide, we’ll focus on .org rather than .com primarily because of its extra benefits.
The Benefits of Building a Website with WordPress
Subscribe To Our Youtube Channel
There are plenty of reasons to love WordPress. First and foremost, it’s free. Well, sort of. The platform is entirely free, but hidden costs include hosting, a domain, plugins, and a theme, which can add up quickly. However, cost concerns are overshadowed by how easy it is to learn WordPress. It’s relatively straightforward once you get past the learning curve, and if you get stuck, tons of tutorials and documentation are available from hundreds of sources.
Another benefit of WordPress is how easy it is to customize. Whether creating a blog, ecommerce site, or a huge online community, a wide range of themes and plugins are available to help you craft a unique browsing experience for your visitors. WordPress is for beginners, so you can easily change the layout, colors, fonts, and other design aspects. If you’re a seasoned developer, you can use custom code snippets and webhooks to make WordPress function any way you want.
As your website grows, WordPress can handle the additional traffic and additional content like a champ. Plus, it’s SEO-friendly, meaning it’s optimized for search engines, which helps your website rank higher in search results ranking pages (SERPs) and attract more organic traffic.
Setting Up Your Hosting Plan
Before we dive into the details of the WordPress dashboard, we’d be remiss if we didn’t explain the importance of picking a good hosting provider. Choosing the right hosting partner is essential to your website’s success. In fact, it can make or break it. You want your web host to be fast, reliable, scalable, and secure. Plus, it needs to fit within your budget. That may seem like a tall order, but plenty of amazing WordPress hosts are out there, and we recommend a perfect choice for anyone: SiteGround.
SiteGround offers three plans that appeal to WordPress beginners and experts. It’ll fit within any budget, with prices ranging from $15 – $40 monthly. SiteGround runs specials often, so there’s an excellent chance of getting a killer deal. It’s more than just affordable, though. You’ll get a lot of bang for your buck with SiteGround. With features like free emails, SSL, CDN, and migration, you’ll have all the tools to keep your website running smoothly.
They are strict on security, too. They offer one of the best security packages in the business, with a web application firewall (WAF) keeping nasty hackers away. Additionally, you won’t have to worry about malware, DDoS attacks, or other security issues.
Thought SiteGround is the perfect choice for most people, other excellent options exist. Providers, such as Hostinger, Pressable, Cloudways, or Flywheel are all excellent options to consider.
Setting Up WordPress
In the following steps, we’ll instruct you on how to install WordPress, explore the tools within the dashboard, and walk you through the steps to create content, style your site, and push it live. Once you complete these steps, you’ll see why WordPress is perfect for beginners.
Step 1: Installing WordPress
There are a few ways to install WordPress, including using a hosting provider, manually installing it yourself, or locally using Local by Flywheel or MAMP Pro. In this tutorial, we’ll show you how to install WordPress using SiteGround’s Site Tools dashboard. If you’d like to learn other ways to install WordPress, read our definitive guide.
Install WordPress via SiteGround
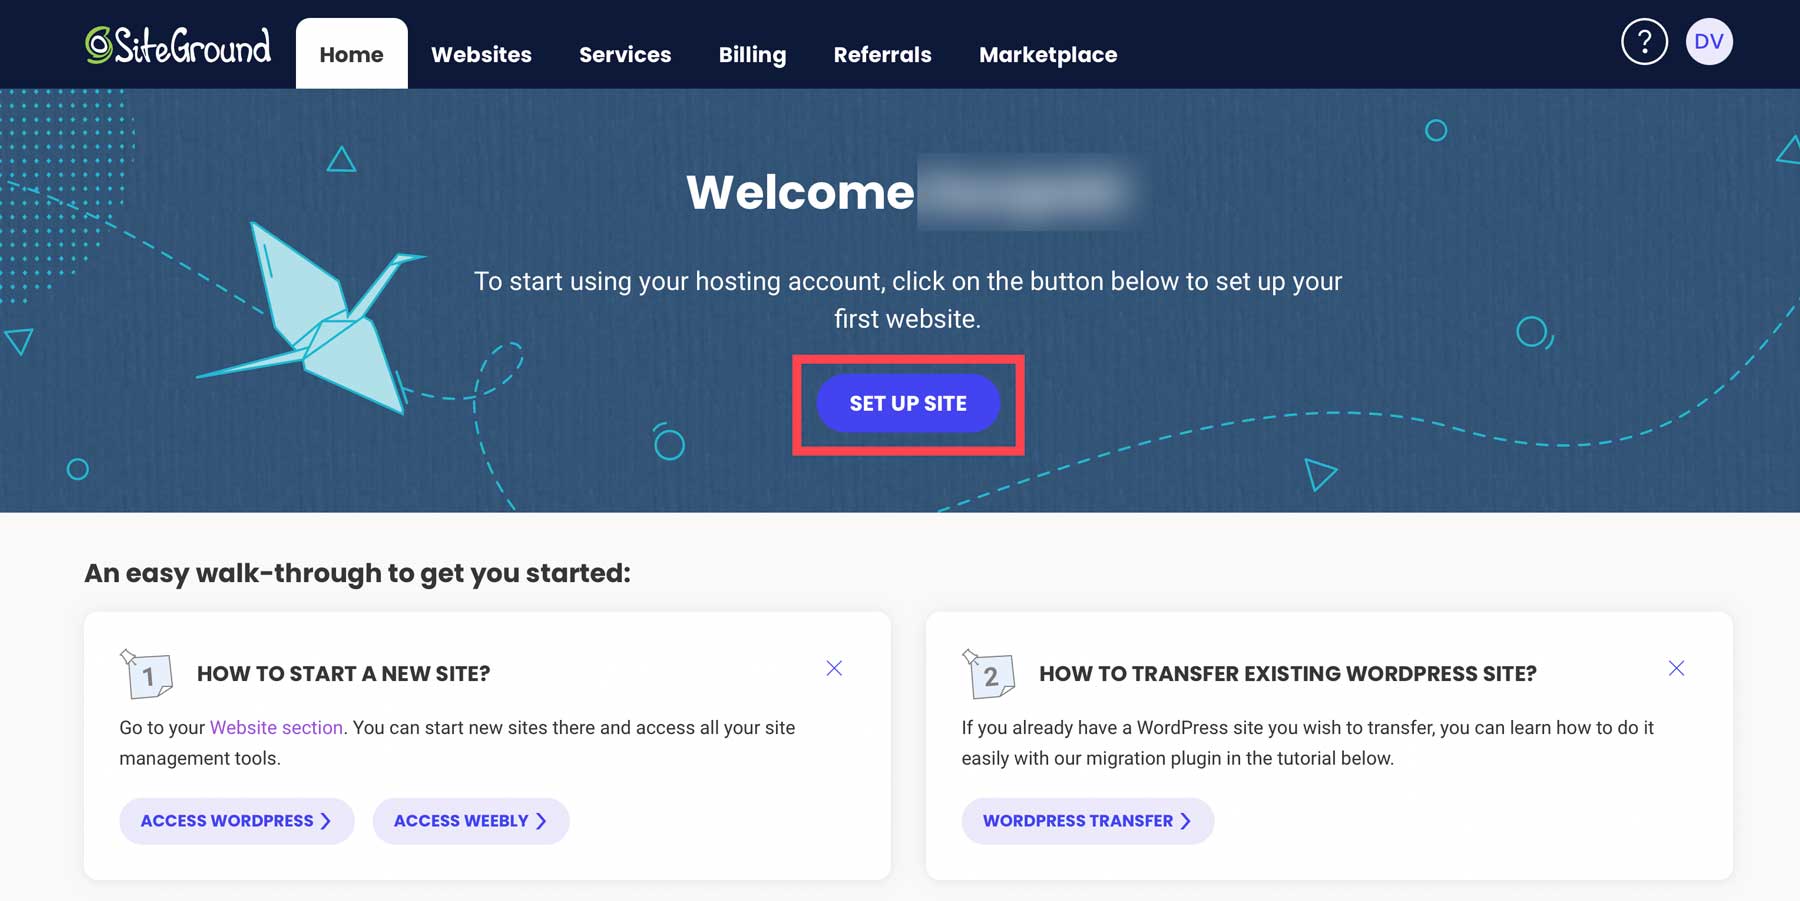
After signing up for a SiteGround account, you can easily install WordPress in just a few clicks. Start by clicking the set up site button at your screen’s top center.
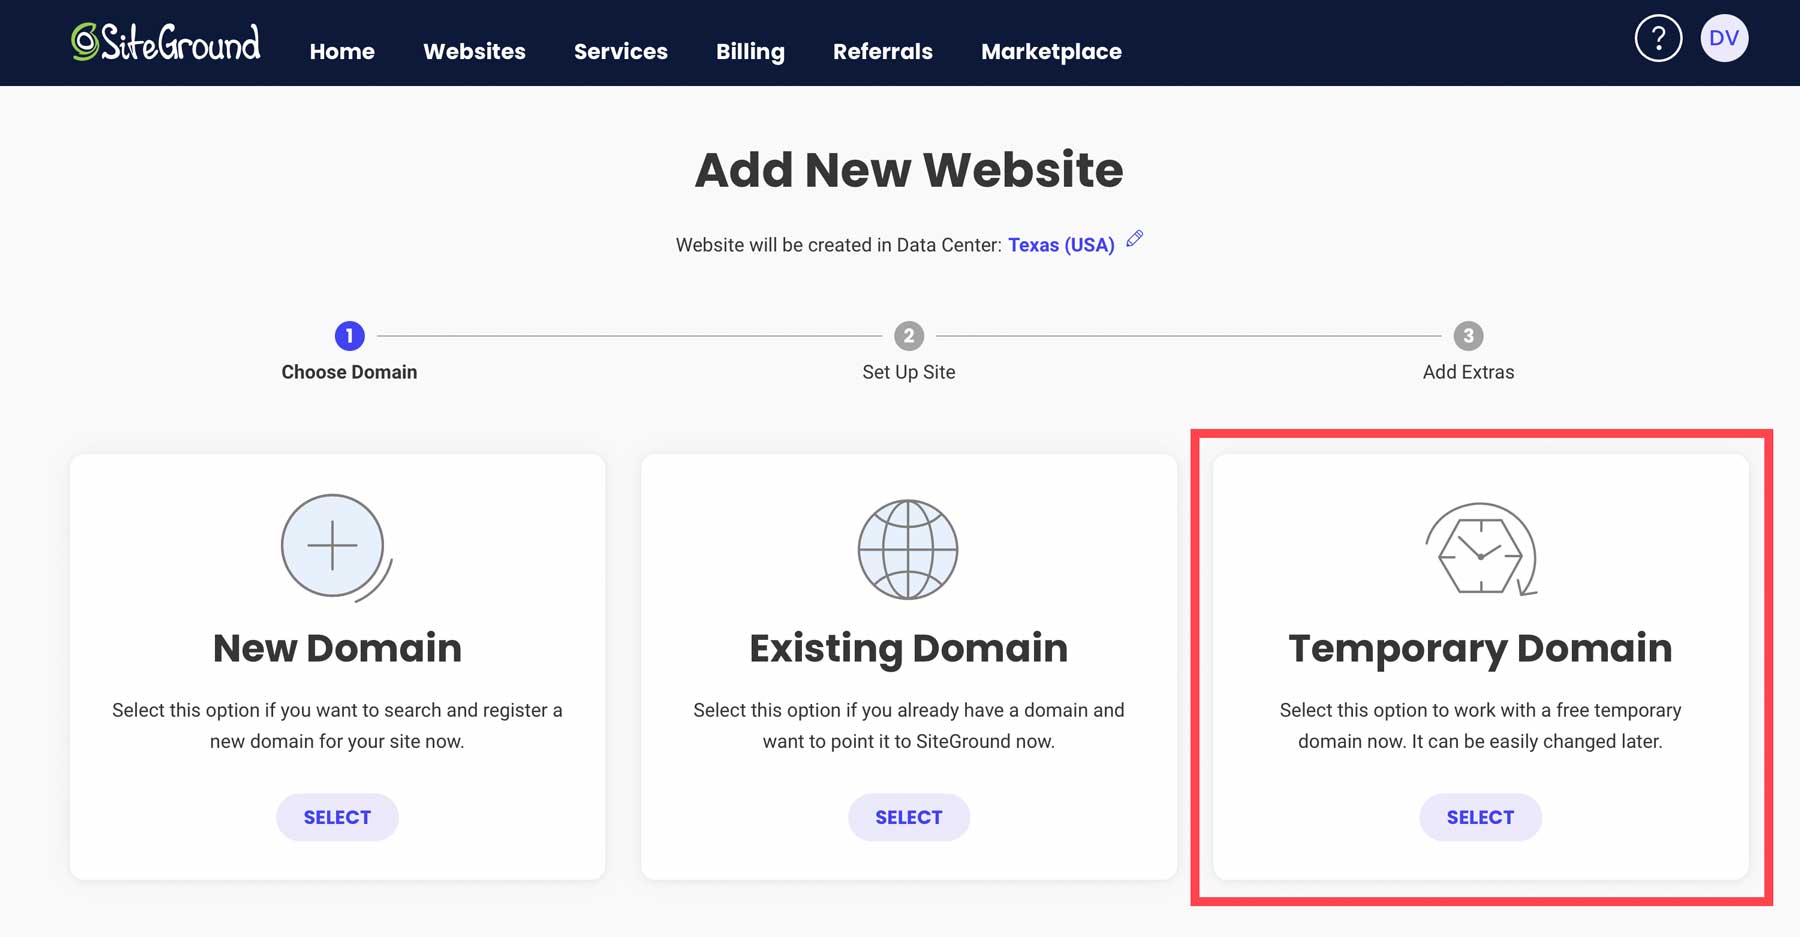
Next, choose whether to set up your site on a new, existing, or temporary domain. Select temporary domain, then click continue.
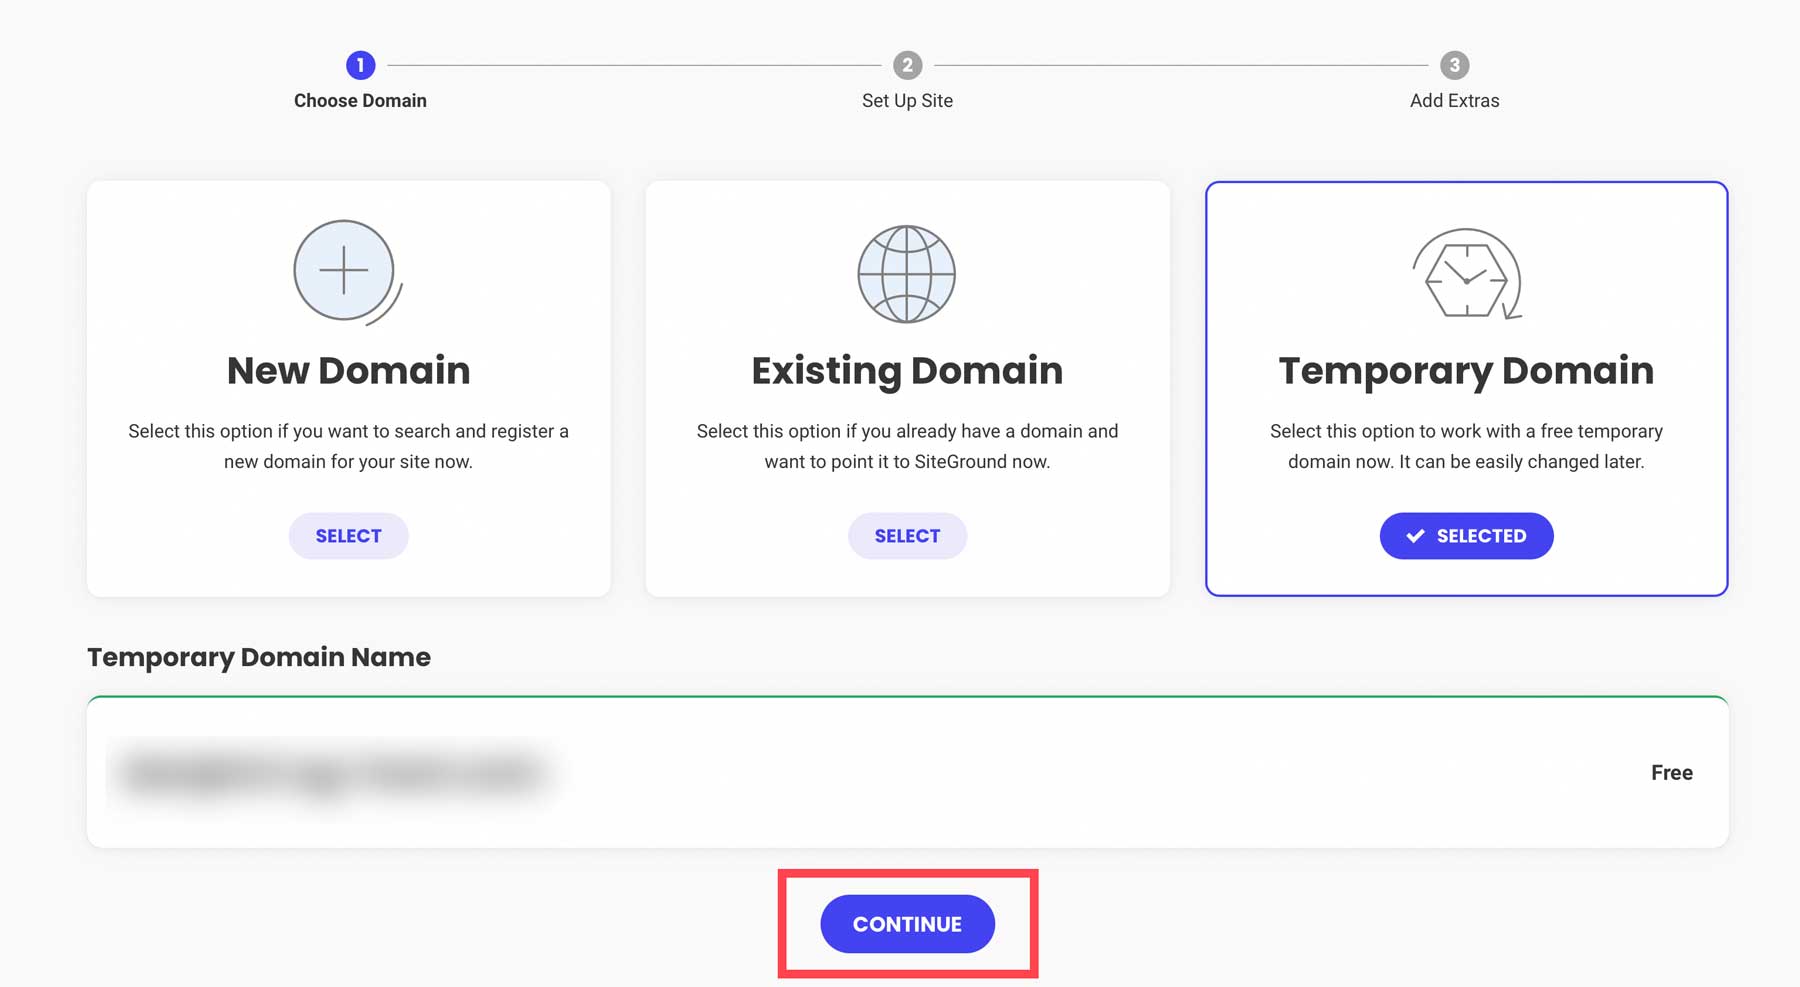
SiteGround will assign a temporary domain to your WordPress install. To proceed, click continue.
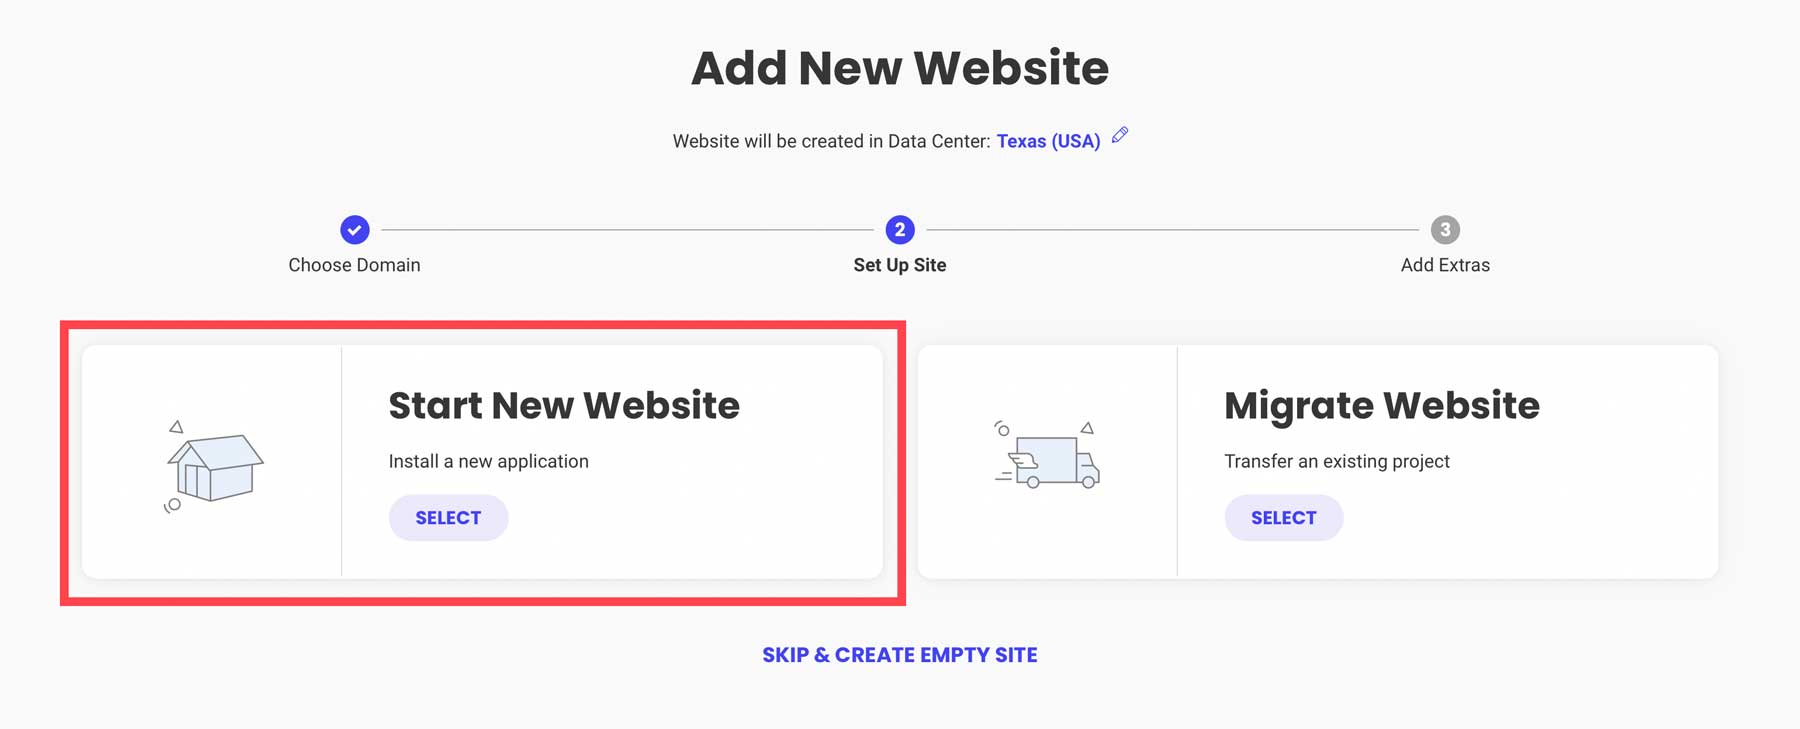
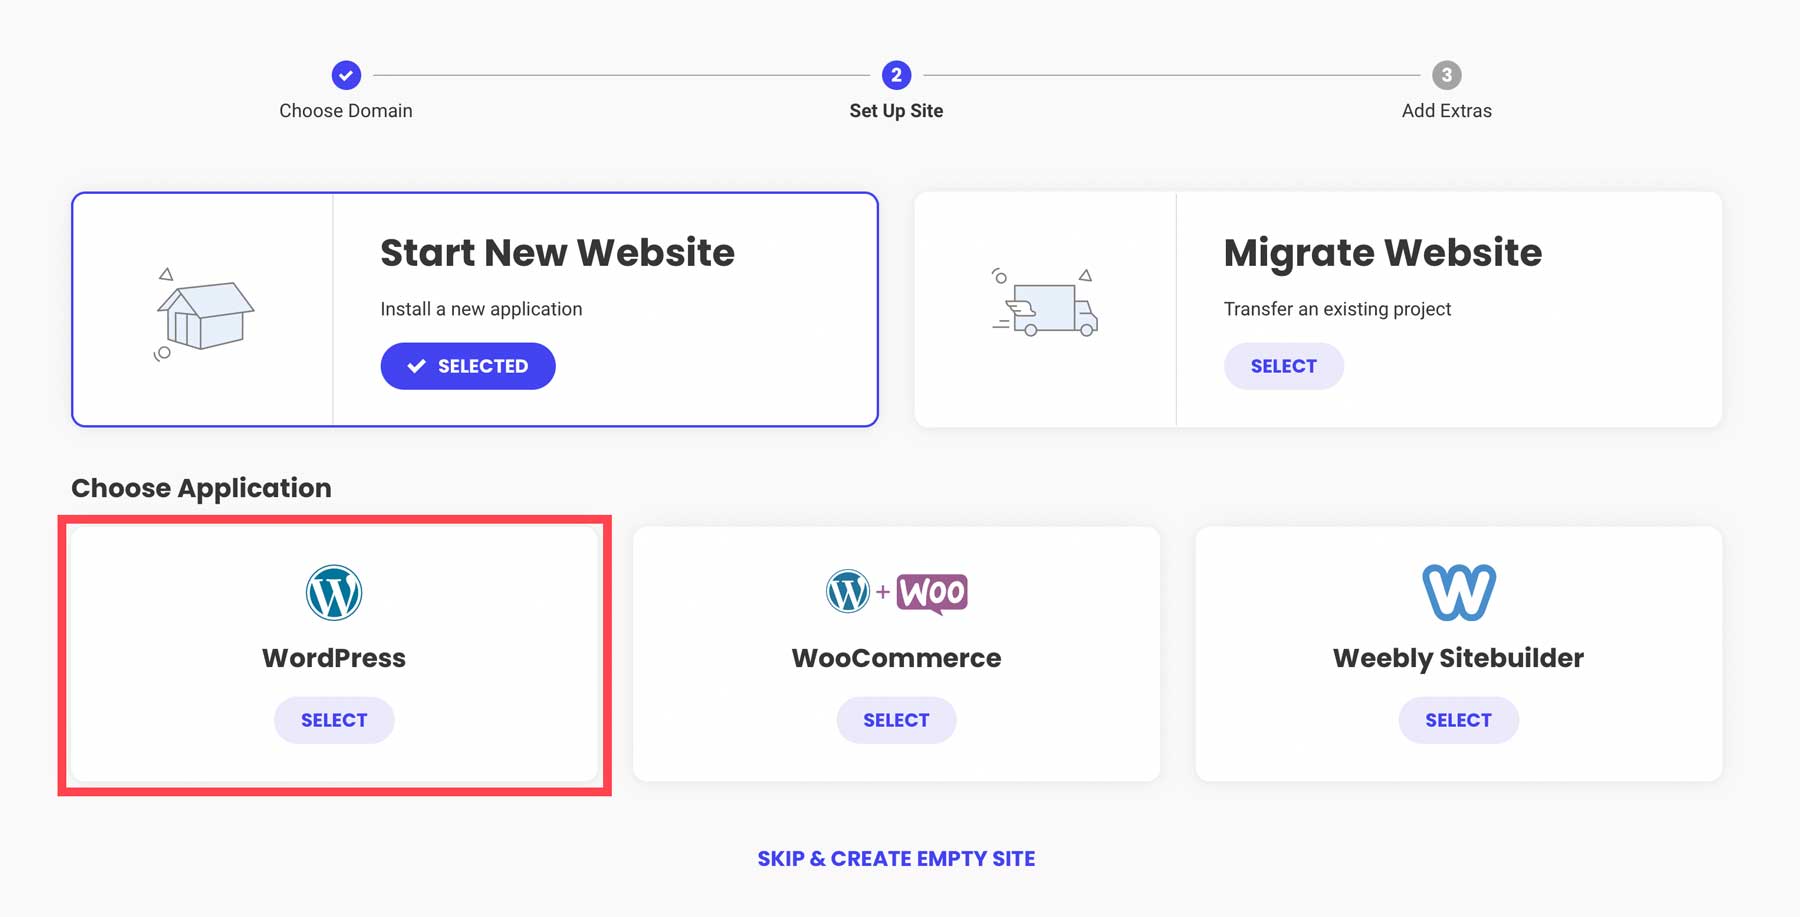
Next, click start new website.
Choose WordPress.
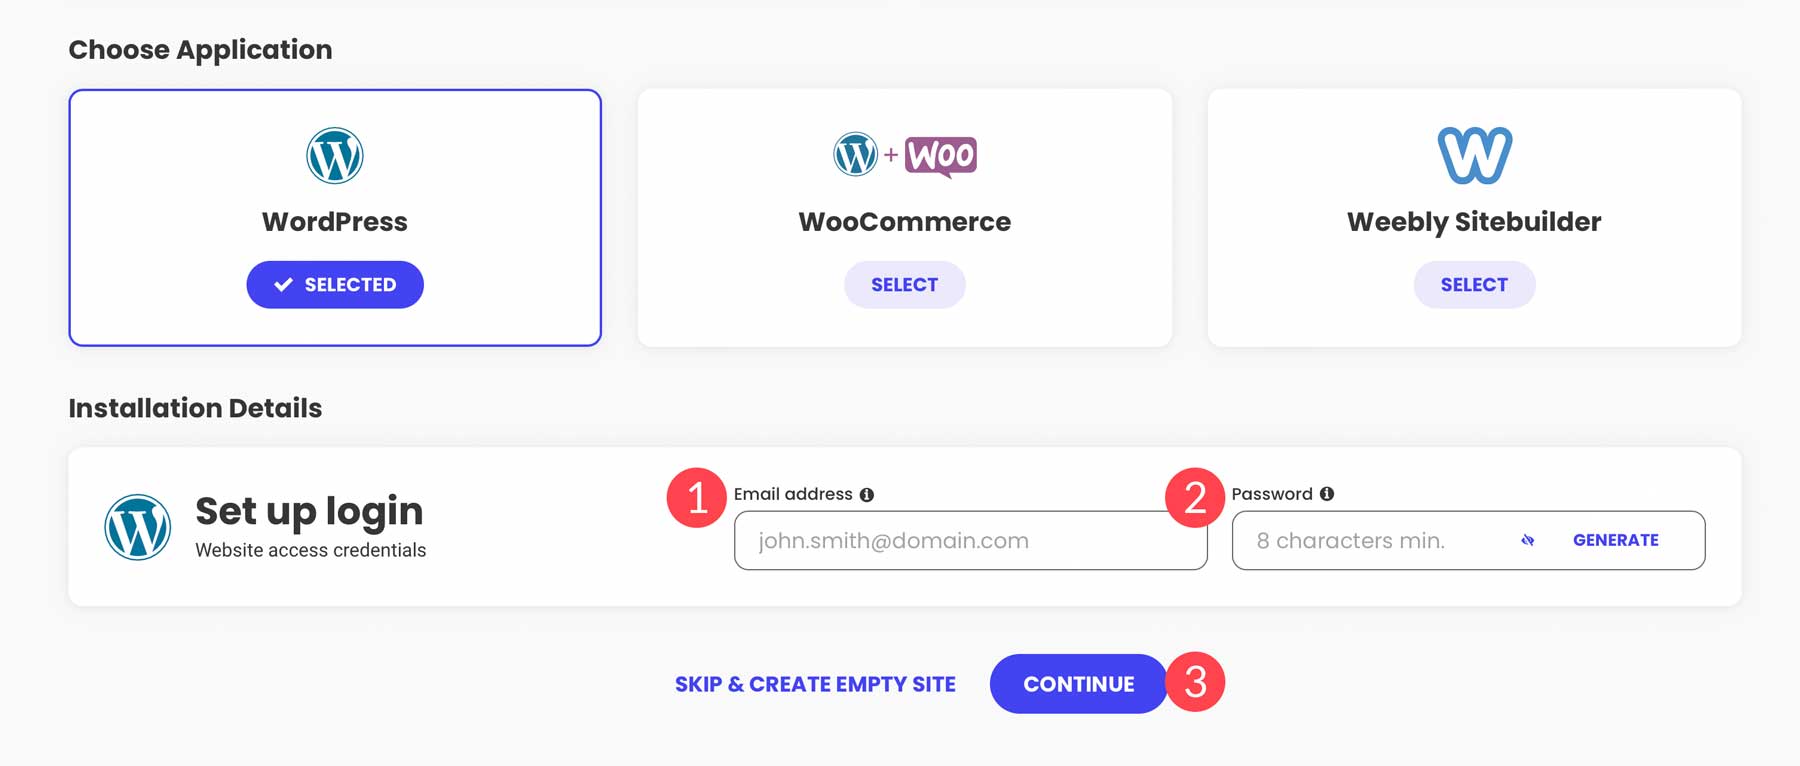
The next step allows you to create your login credentials. This is how you’ll log in to your WordPress dashboard when working on your site. Be sure to write down or save your login information for reference. Click continue to proceed to the next step.
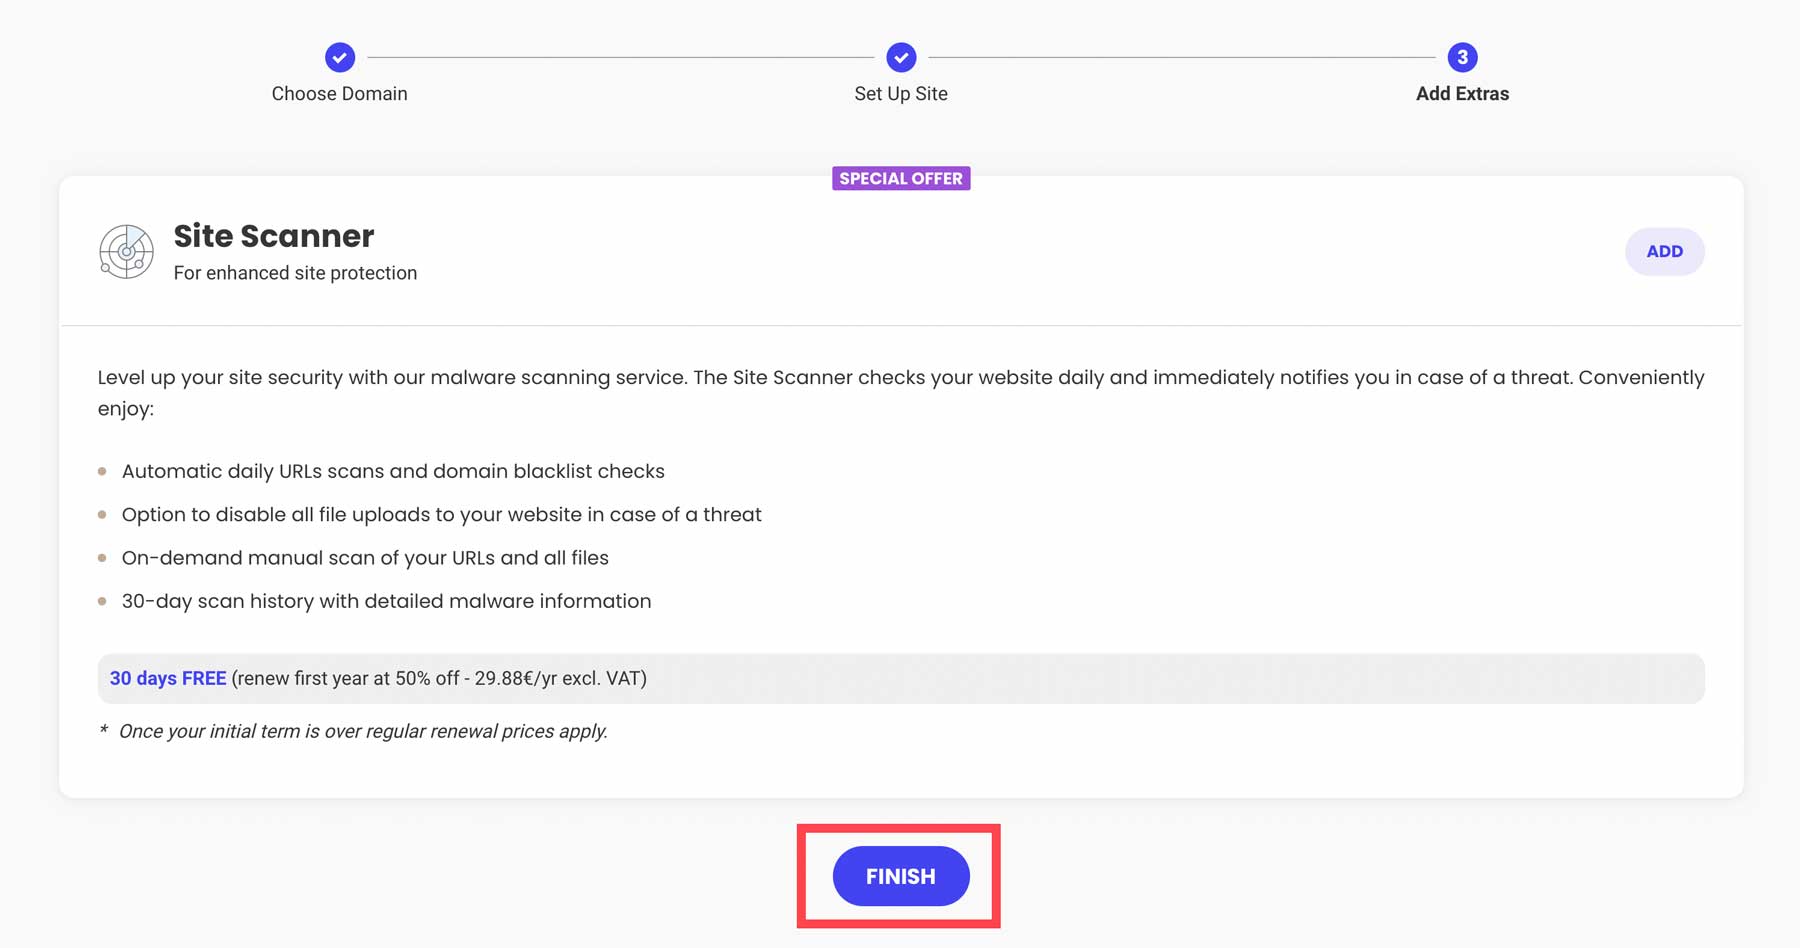
Finally, click the finish button to install WordPress.
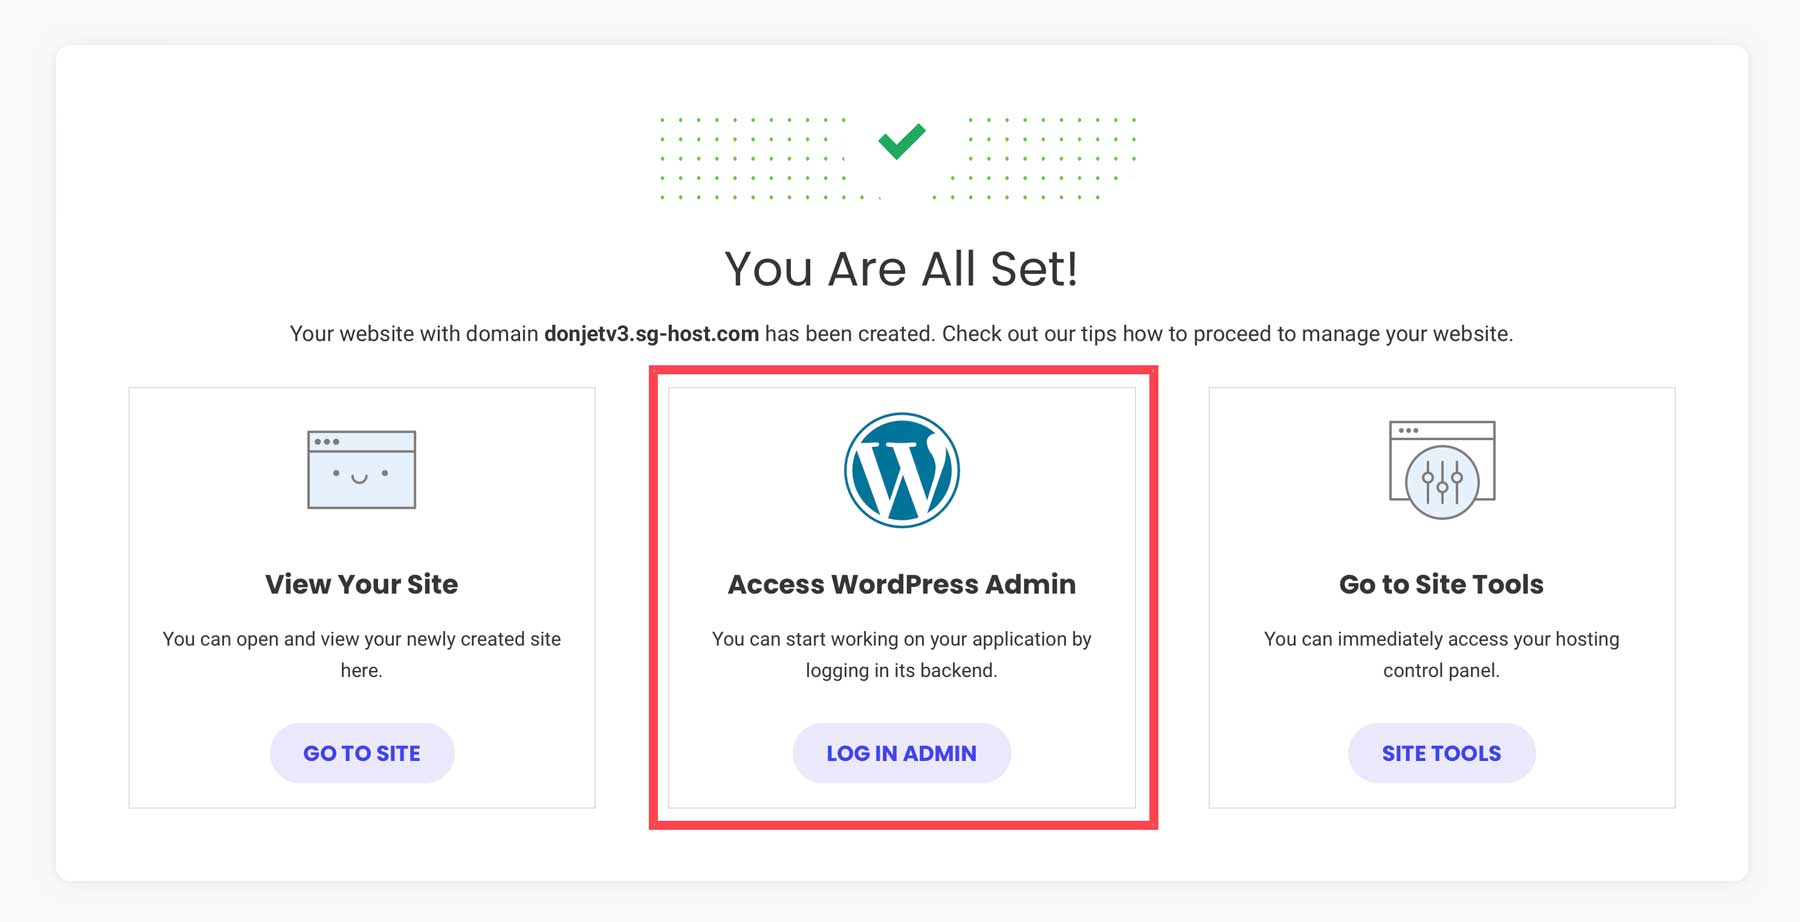
You have two choices in accessing the WordPress dashboard. Through SiteGround, you can click on the log in admin button.
Another way to log in to WordPress is through the CMS by navigating to www.yoursite.com/wp-admin in your browser. Be sure to replace www.yoursite.com with your unique domain.
Step 2: WordPress for Beginners – the Dashboard
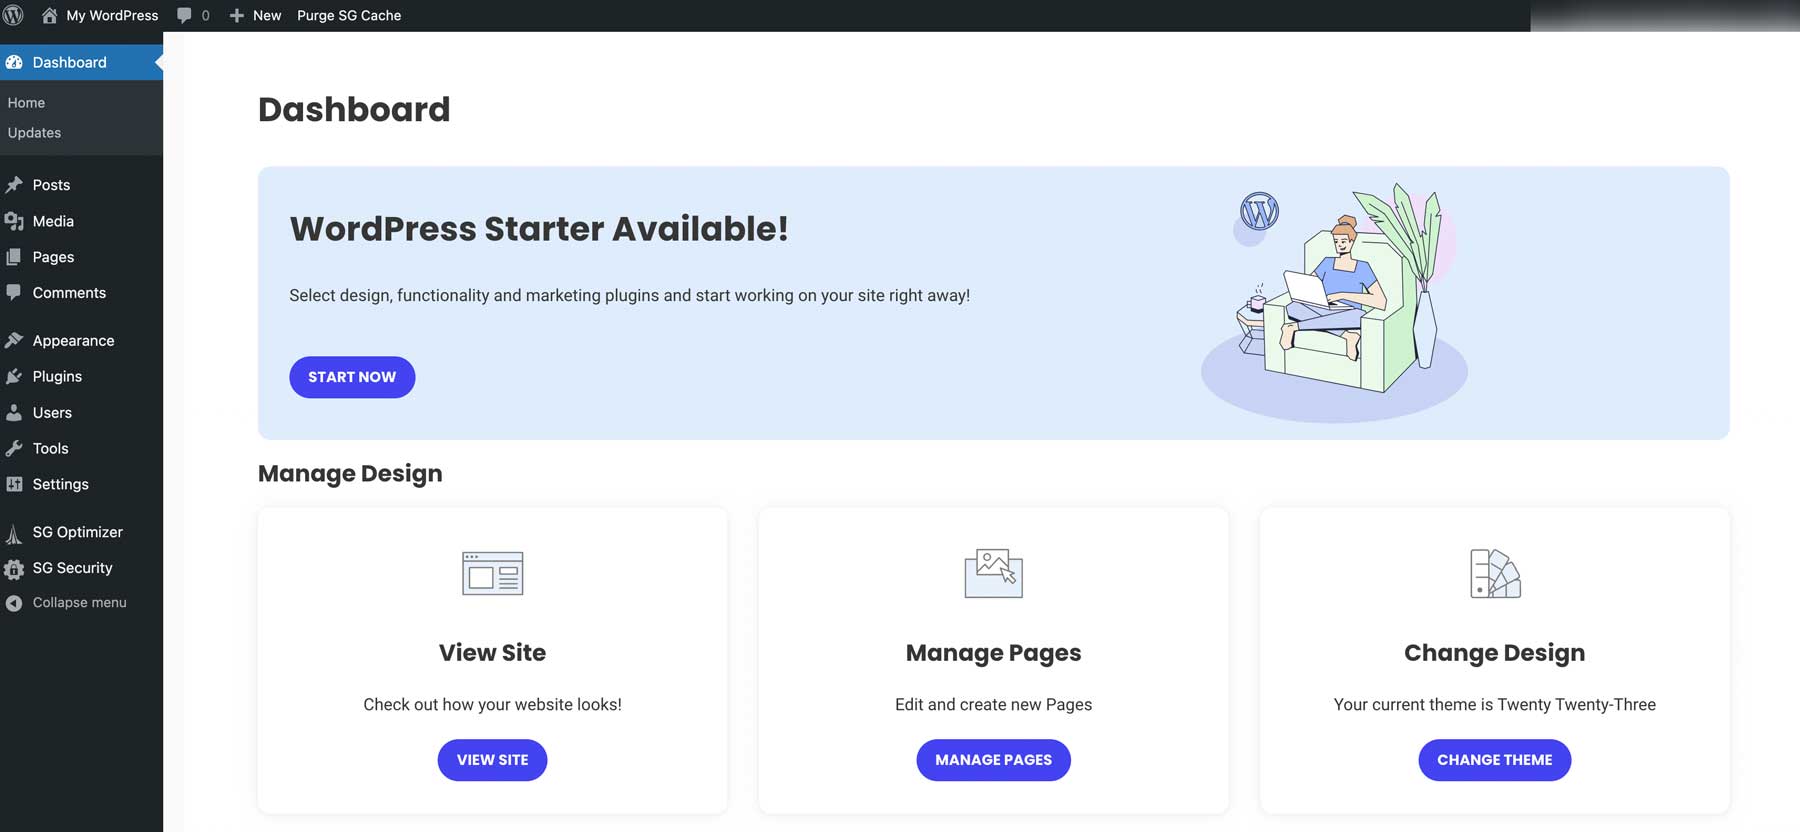
Upon logging in for the first time, you’ll notice the WordPress toolbar on the left-hand side of the screen. It contains all the tools and settings you’ll need to begin building your site. The main dashboard screen contains quick links for viewing or managing pages, editing the design of your site, useful links, and WordPress-related blog posts.
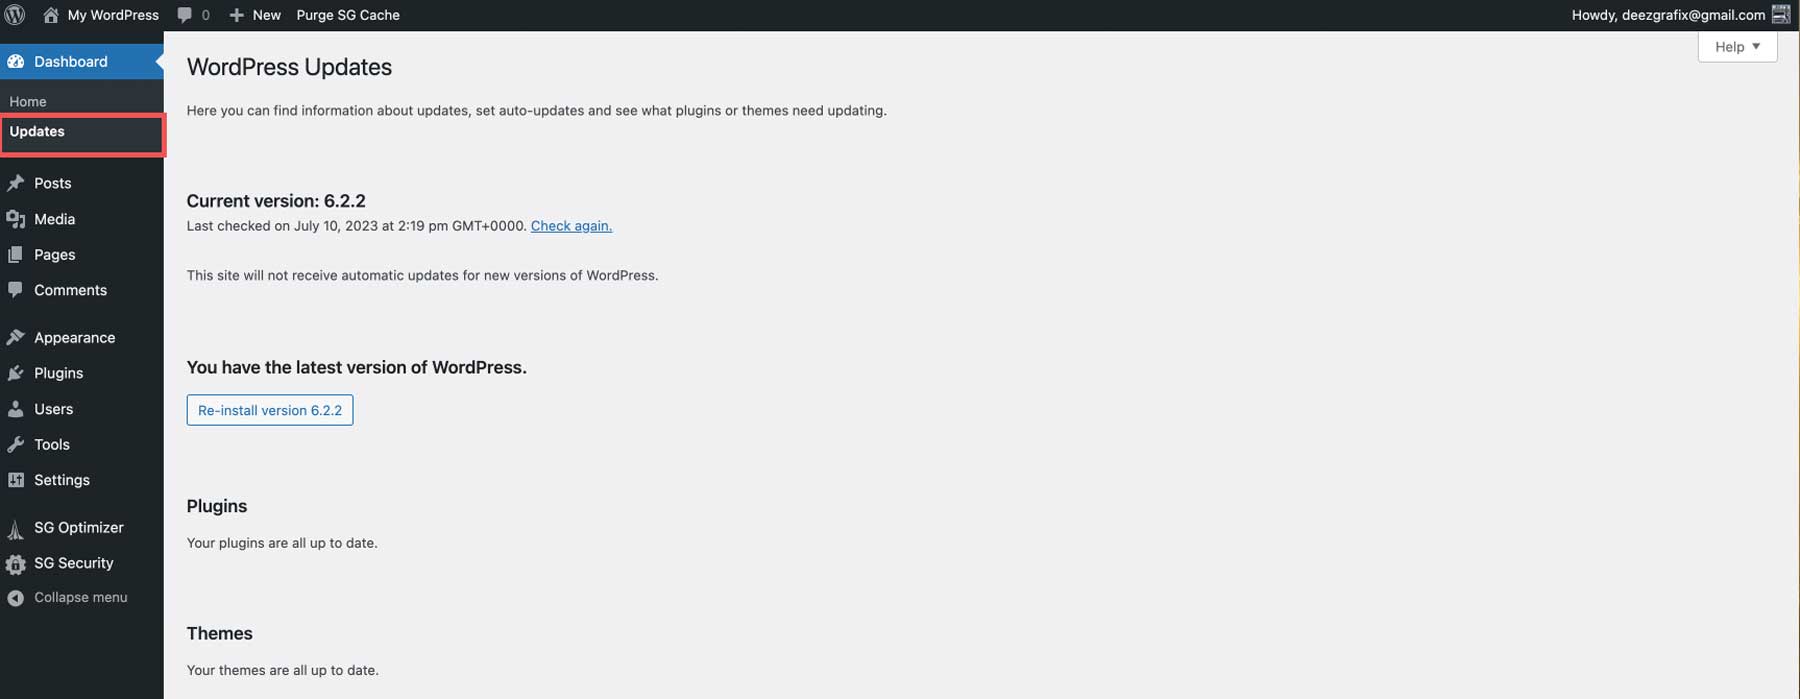
The next tab, Updates, allows you to review any plugins, themes, or core files that need to be updated. You need to keep the software updated for functionality and security. Otherwise, your site could fall victim to hackers, or at the very least, break. When embarking on updating plugins, themes, or WordPress core, be sure to make a backup of your website in case you counter any issues. Most reputable hosting providers offer free backups. However, depending on the host you choose, you may need to install a plugin. Consider a good backup plugin, such as UpdraftPlus, to create backups daily or weekly to avoid losing your website’s files.
Posts
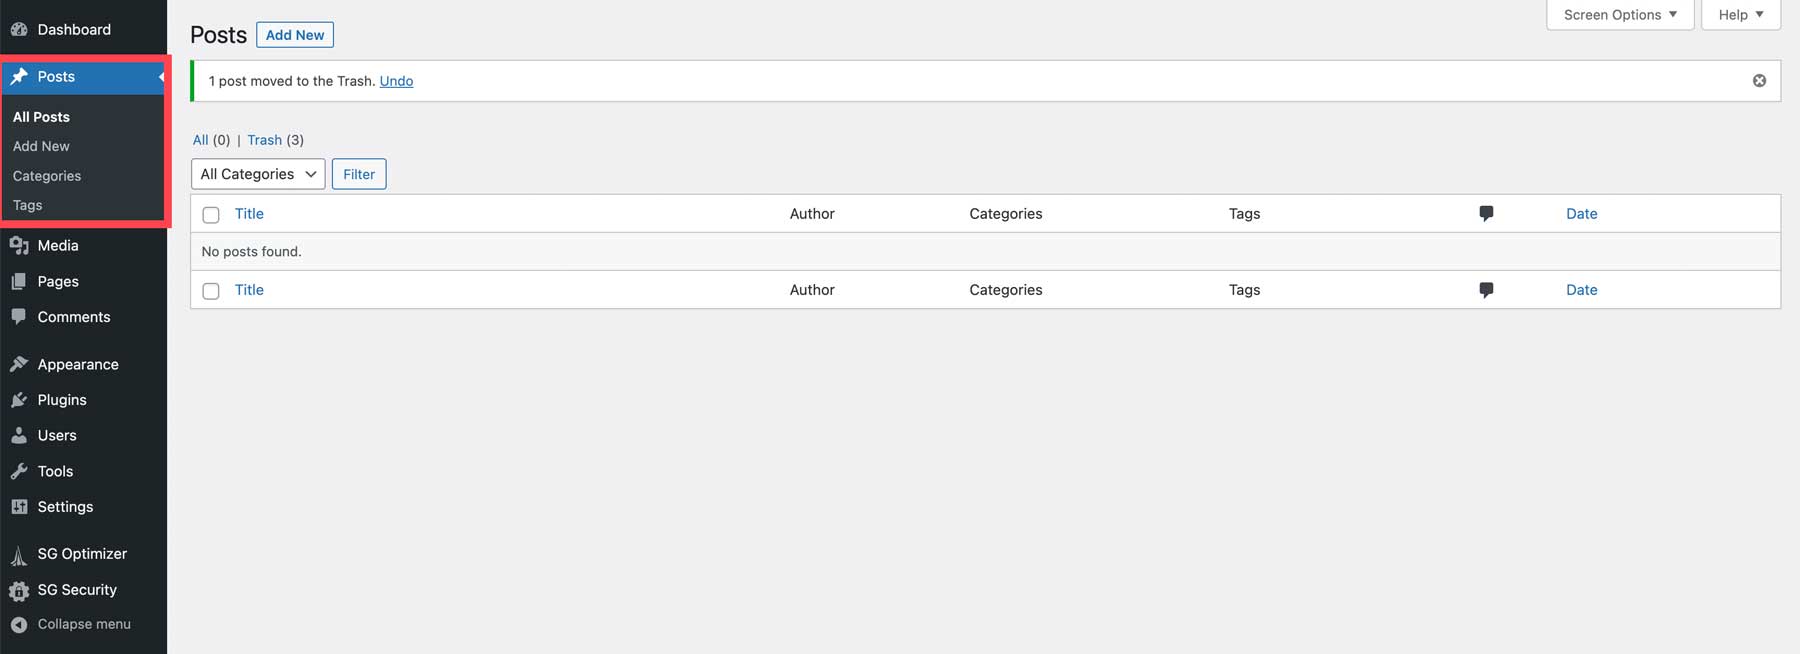
The next tab is for posts. Here you can create new posts or edit existing ones. You can also set up your blog’s categories and tags, which is great for keeping your content organized, helps with SEO and makes it easy for your users to find what they are looking for.
Media
WordPress comes with its own media library, where you can add and edit images for your website.

Pages
The next set of tools allows you to add pages to your website. Although pages are created much like posts, there are some differences. These pages will appear in the main navigation, allowing visitors to browse your content easily. Another difference is that posts enable categories and tags, whereas pages do not.

Comments
The next setting for WordPress is comments. When you publish posts on your website, WordPress automatically provides a comment section to each post. Your site’s visitors can add remarks to your posts, providing interest for other readers and an opportunity for you to boost engagement. However, comments are only beneficial if you take the necessary steps to moderate them effectively.

Appearance
Some of the most beneficial tools in WordPress are contained within the Appearance tab. Here, you can install themes, customize them, add widgets to display important information, create navigation menus, and more. Depending on which theme you choose to use, these tools will vary. If using a full site editing block theme like Twenty Twenty-Three, you are limited to themes and editor. Premium WordPress themes, such as Divi, generally have more options, including the ability to edit your theme’s files.

Plugins
WordPress offers extendability of its platform through the use of plugins. They allow you to add functionality, such as chatting with visitors, tracking your site’s performance, or hundreds of other tasks. The plugins tab reveals a list of plugins currently installed (1) on your website. You can view, manage, or delete plugins as needed. The Add New (2) option enables you to search for and install new plugins available in the WordPress repository or install new ones in a few clicks. Depending on the theme you have installed, a plugin editor option allows developers to make coding changes to activated plugins.

Users
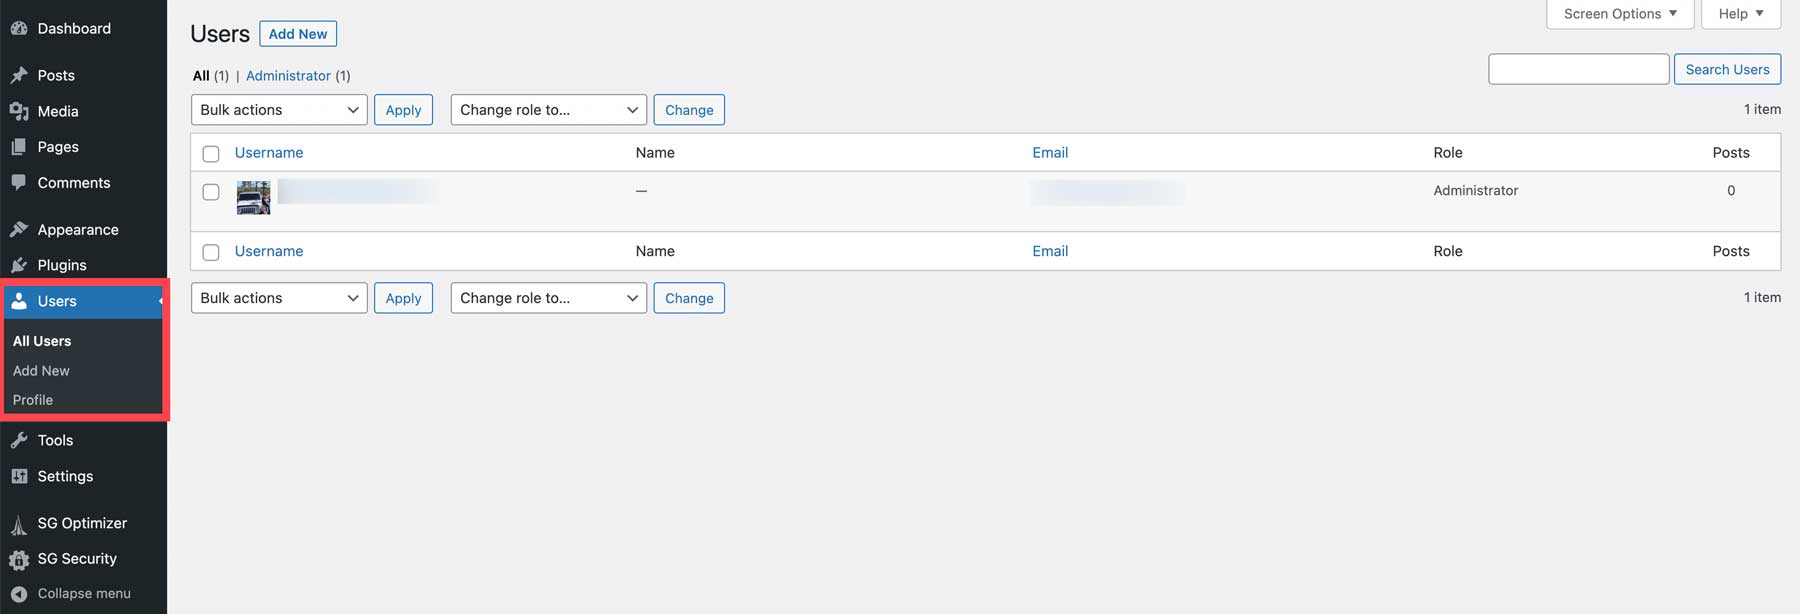
The all users section of the WordPress dashboard allows you to manage your site’s users. You can add, edit, or delete users and specify their roles and permissions. The profile option lets you edit each user’s gravatar image, bio, and contact information. A quick tip: users can also be extended with membership plugins, like Memberpress, that enable you to restrict content based on membership level.
Tools
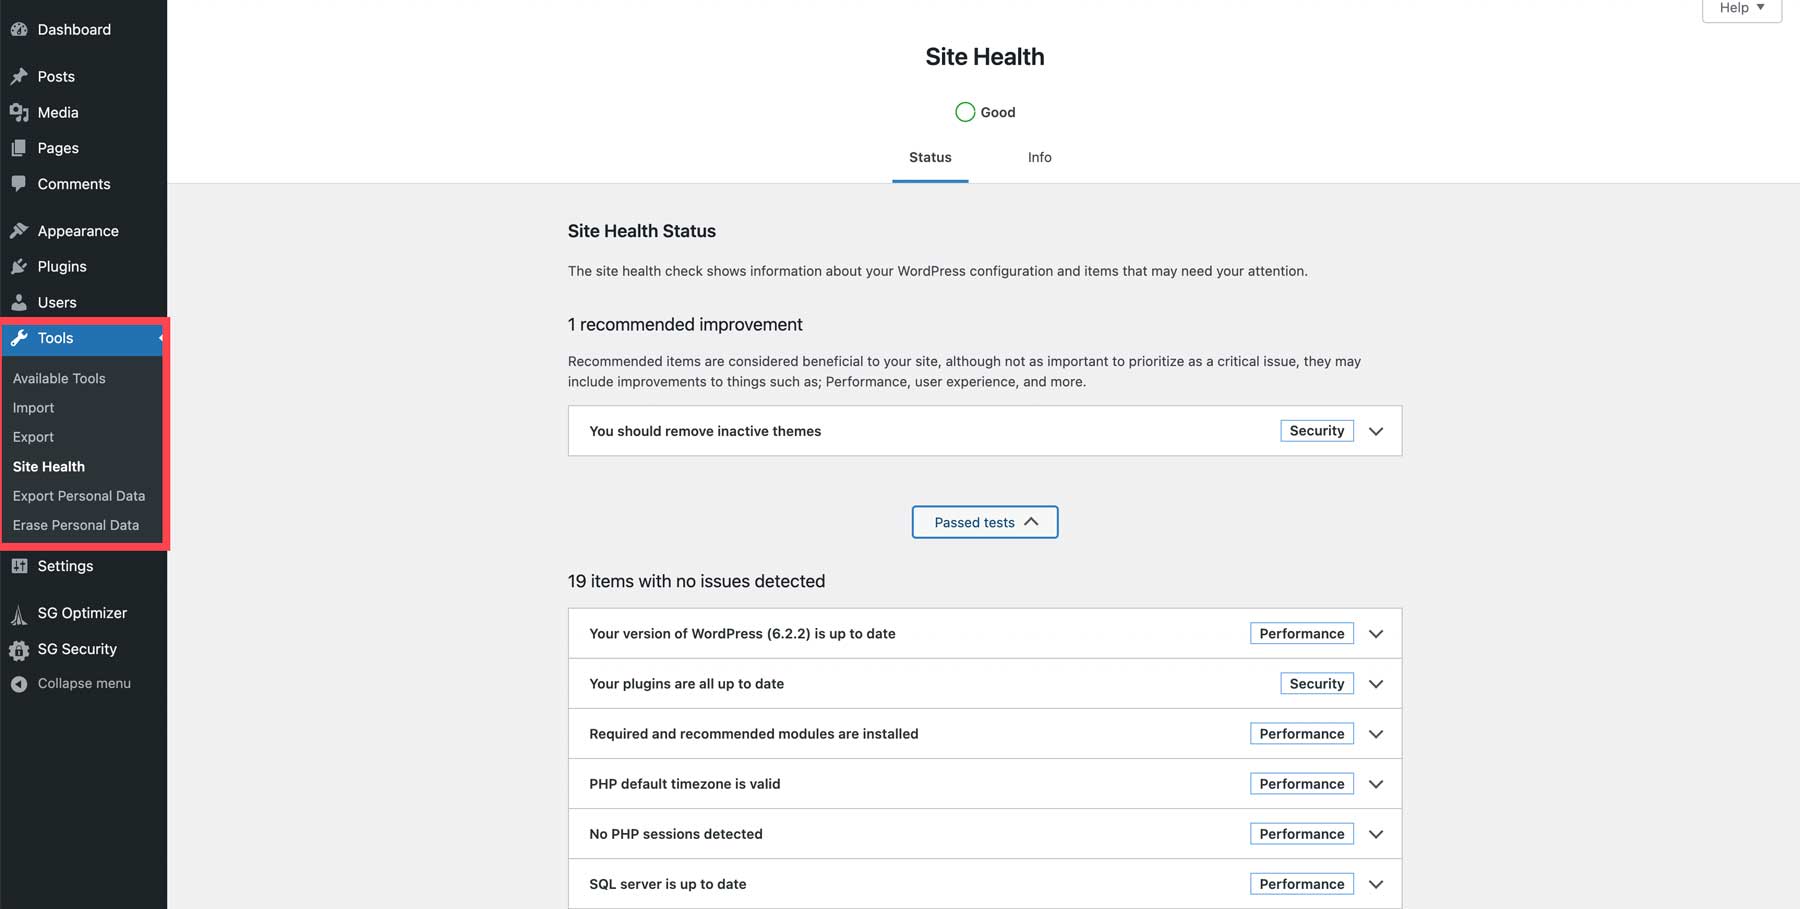
The tools section of the dashboard offer features to manage and maintain your site. You can browse available tools, import or export WP posts, pages, and media through an XML file, monitor your site’s security and performance, and export or erase users’ personal data to maintain GDPR compliance.
Settings
The WordPress settings section allows you to set your site’s title and tagline, set a home page, set default media sizes, set privacy, and more. These settings are too complex to go into here, so we’ve linked some helpful articles below to walk you through the steps.
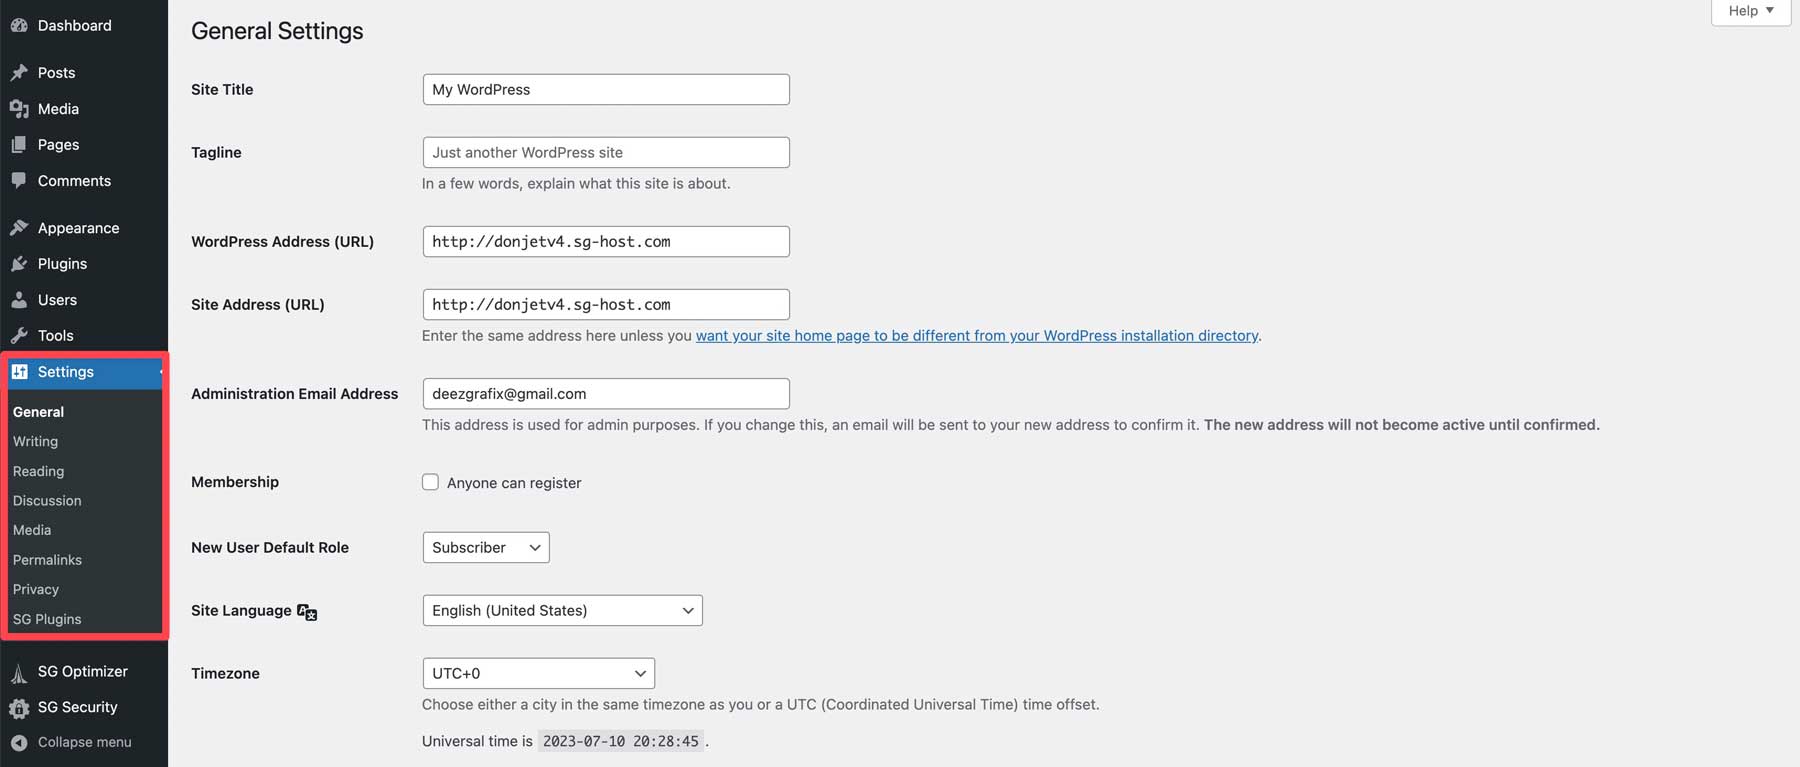
- General: How to configure WordPress general settings
- Writing: Configure your writing settings
- Reading: How to configure WordPress reading settings
- Discussion: Configure comments settings
- Media: Configure media settings
- Permalinks: How to configure WordPress permalinks
- Privacy: How to configure WordPress privacy settings
Step 3: WordPress for Beginners – Themes
A WordPress theme is your website’s face. When a potential customer (or reader) lands on your site, you want them to find the information they’re looking for and be engaged visually. That’s why finding the best WordPress theme for your overall needs is important. Once you find the perfect companion, there are two ways to install your new theme. You can search for and install a free theme from the WordPress directory or upload a premium theme, such as Divi.
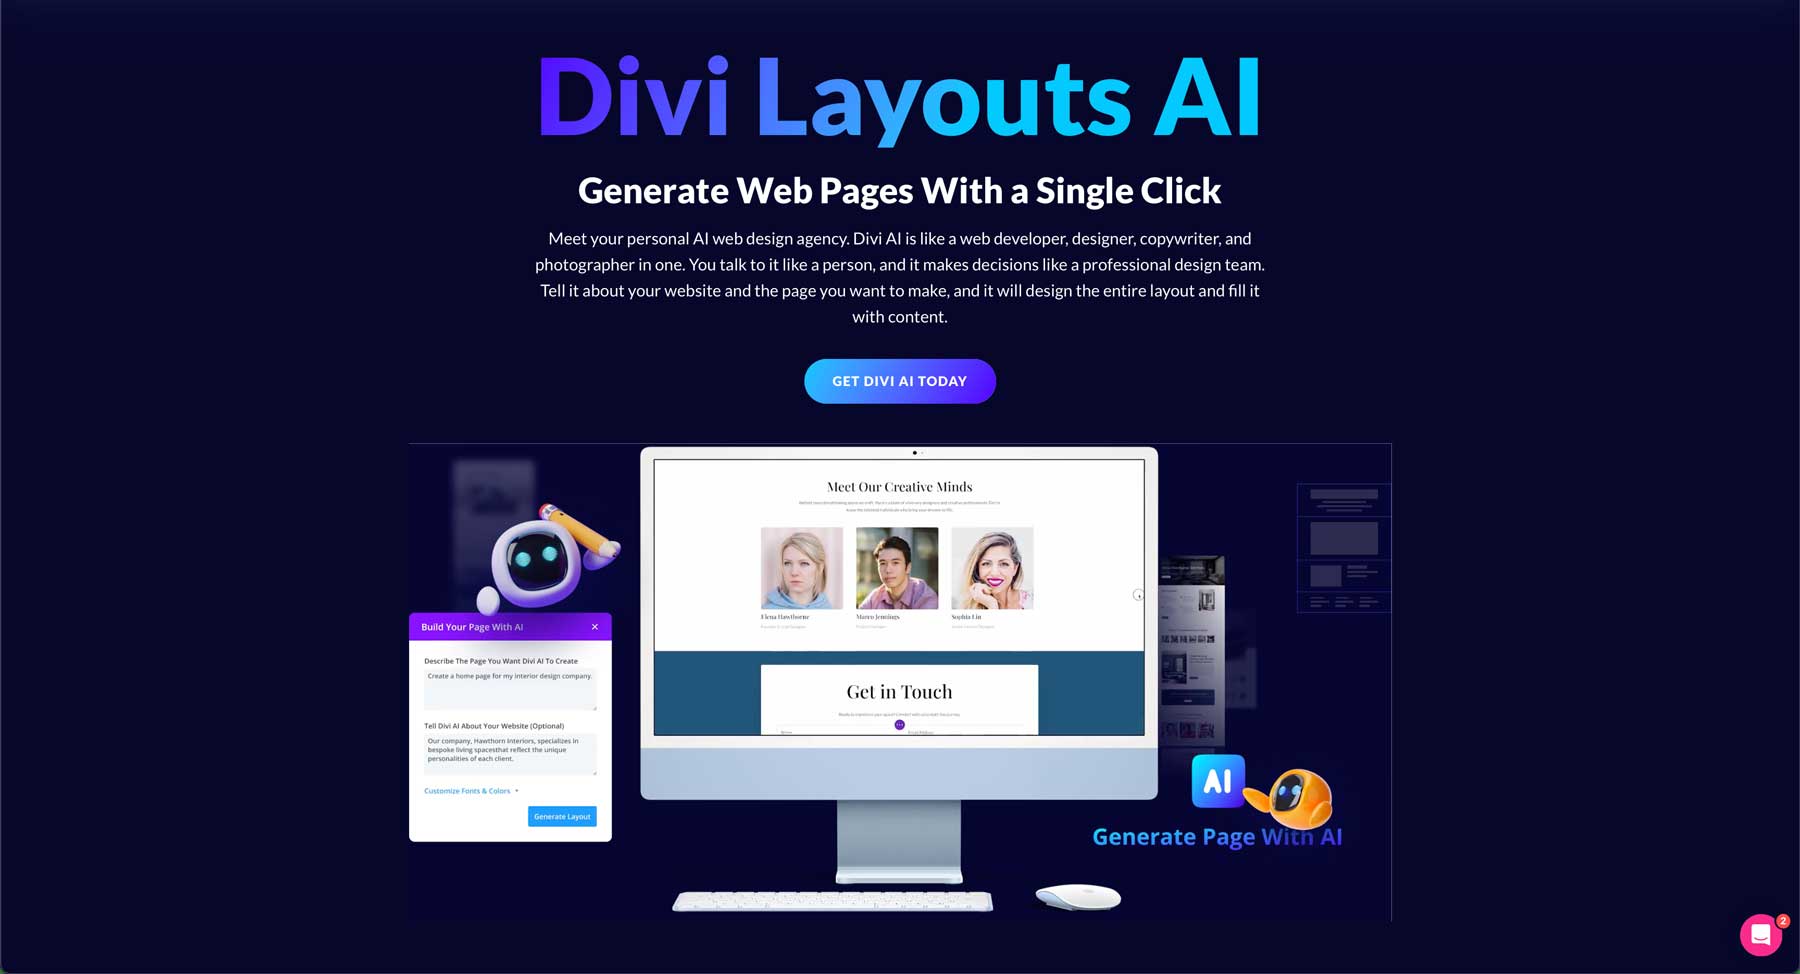
Divi is an excellent choice for most WordPress users due to the amount of features it possesses. You can install one of more than 2000 premade layouts to build your website or generate layouts with the help of Divi AI. Divi also has the Theme Builder, which lets you create templates for your header, footer, ecommerce pages, search results, and more.
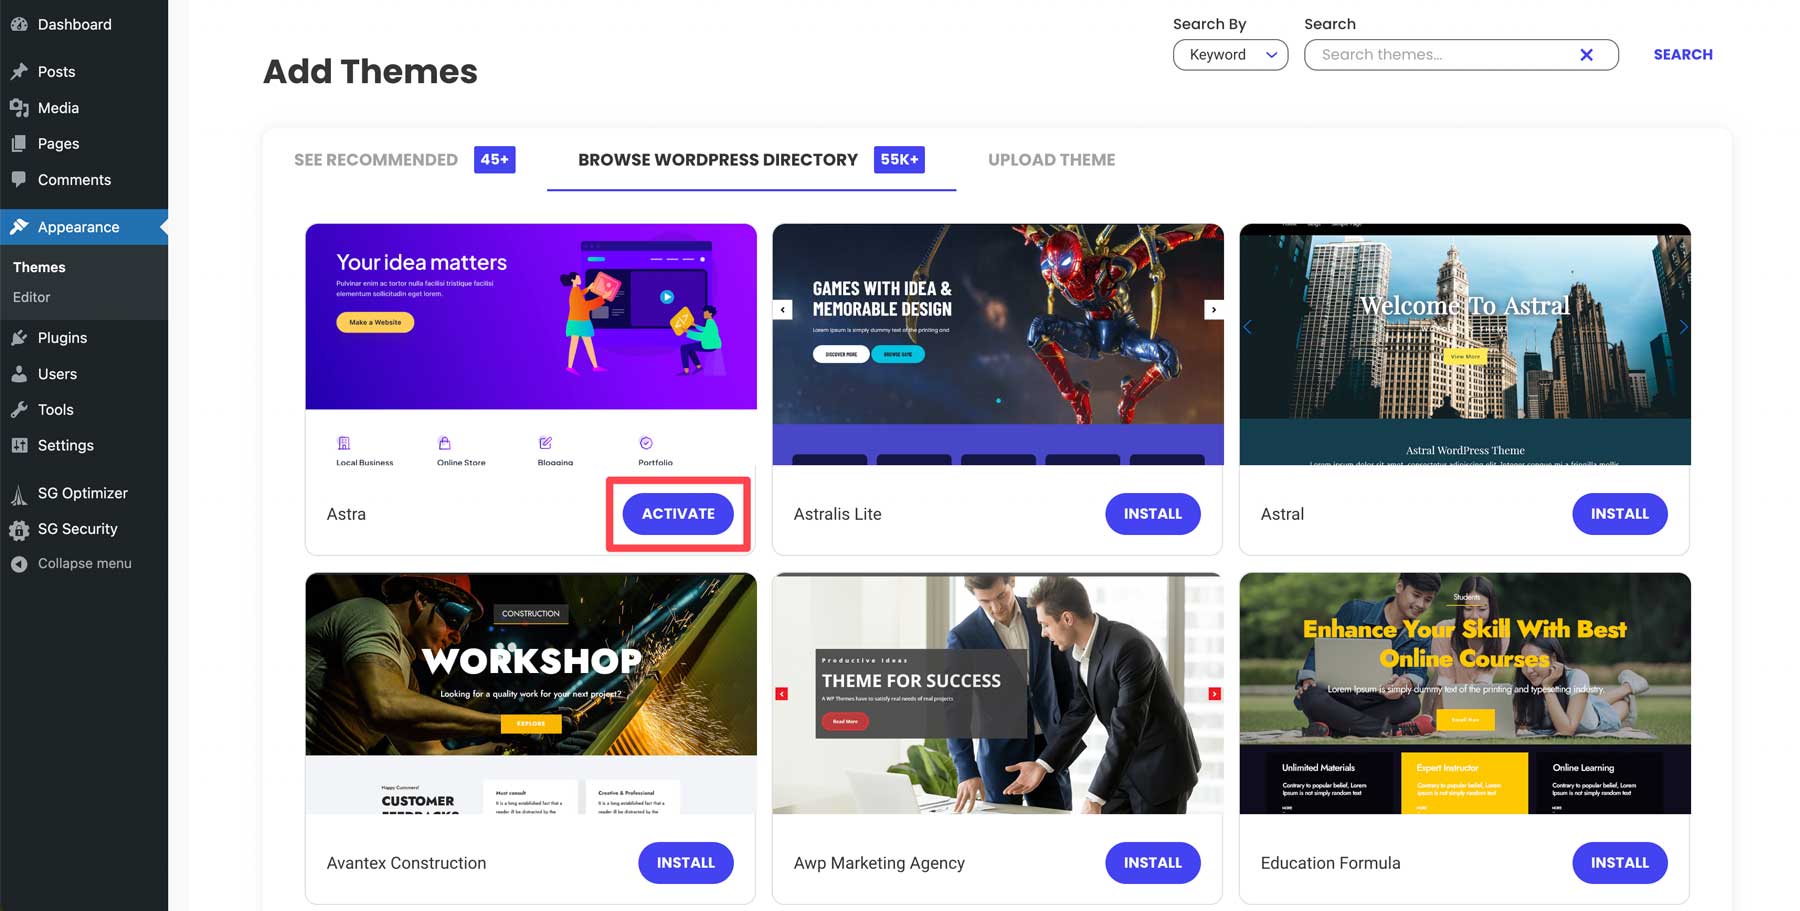
Start by navigating to Appearance > Themes in the WordPress dashboard. Click on Add New Theme.

When using SiteGround, you’ll be offered a choice from recommended themes (1), browsing for WP directory themes (2), or uploading a theme (3). Depending on your hosting provider, those options may appear different but function similarly. If you wish to search for a theme by keyword, you can enter search terms into the search bar (4).
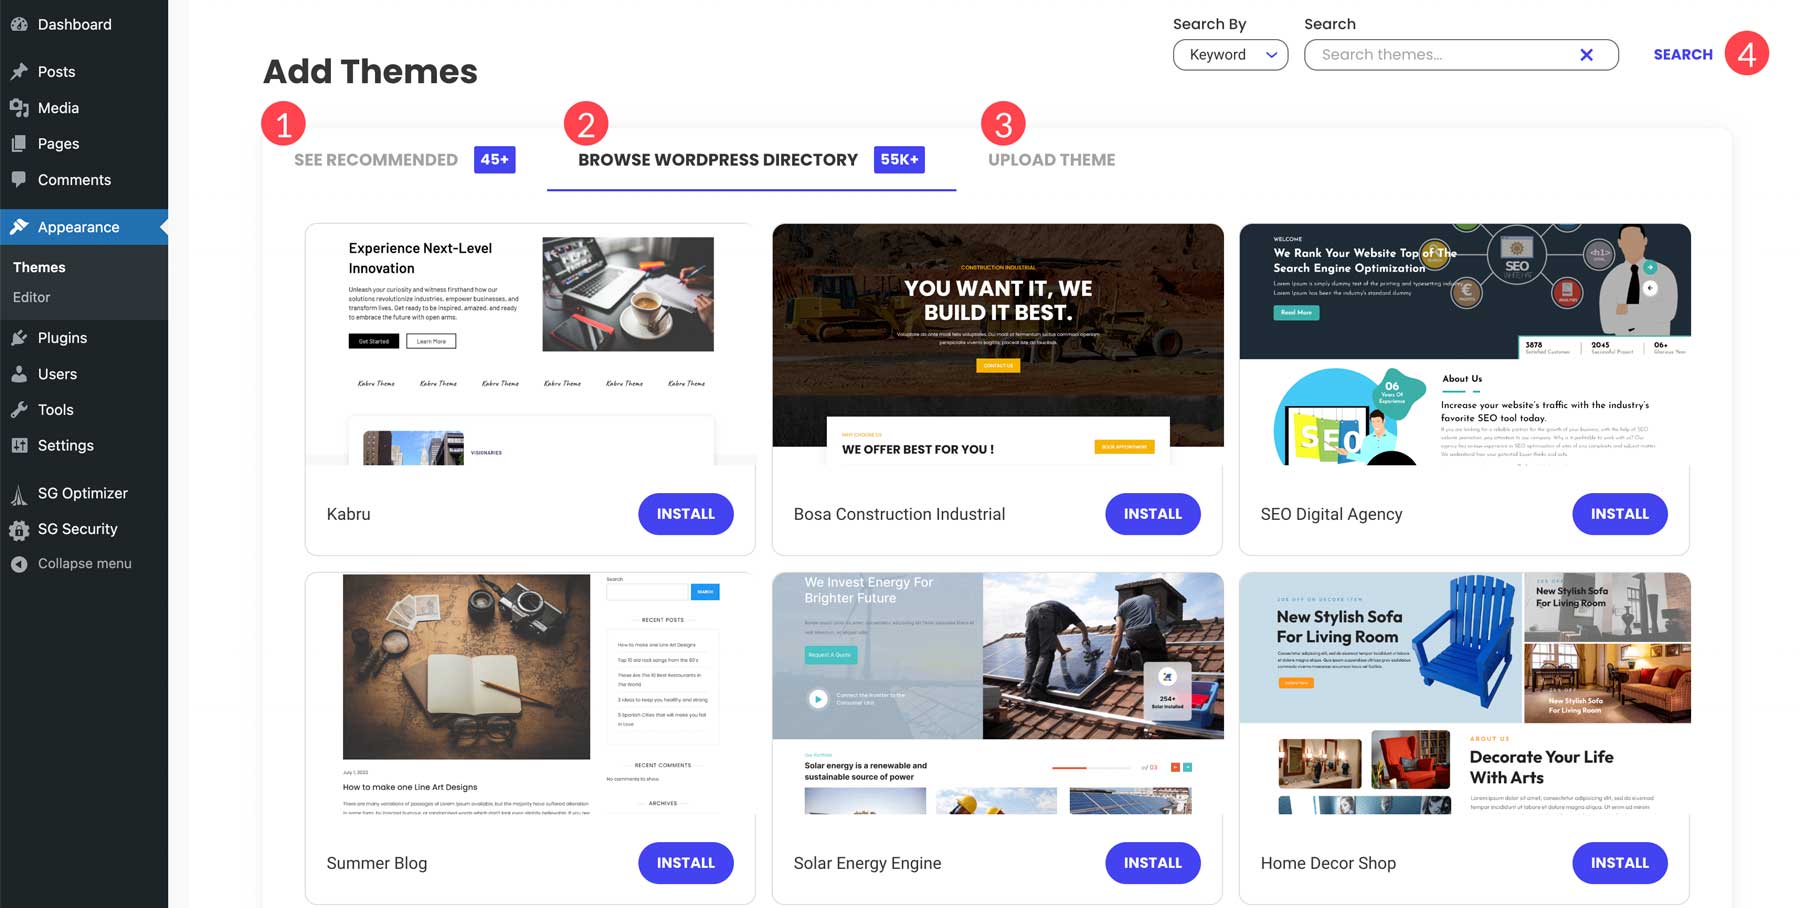
Once you select your choice, click the install button.
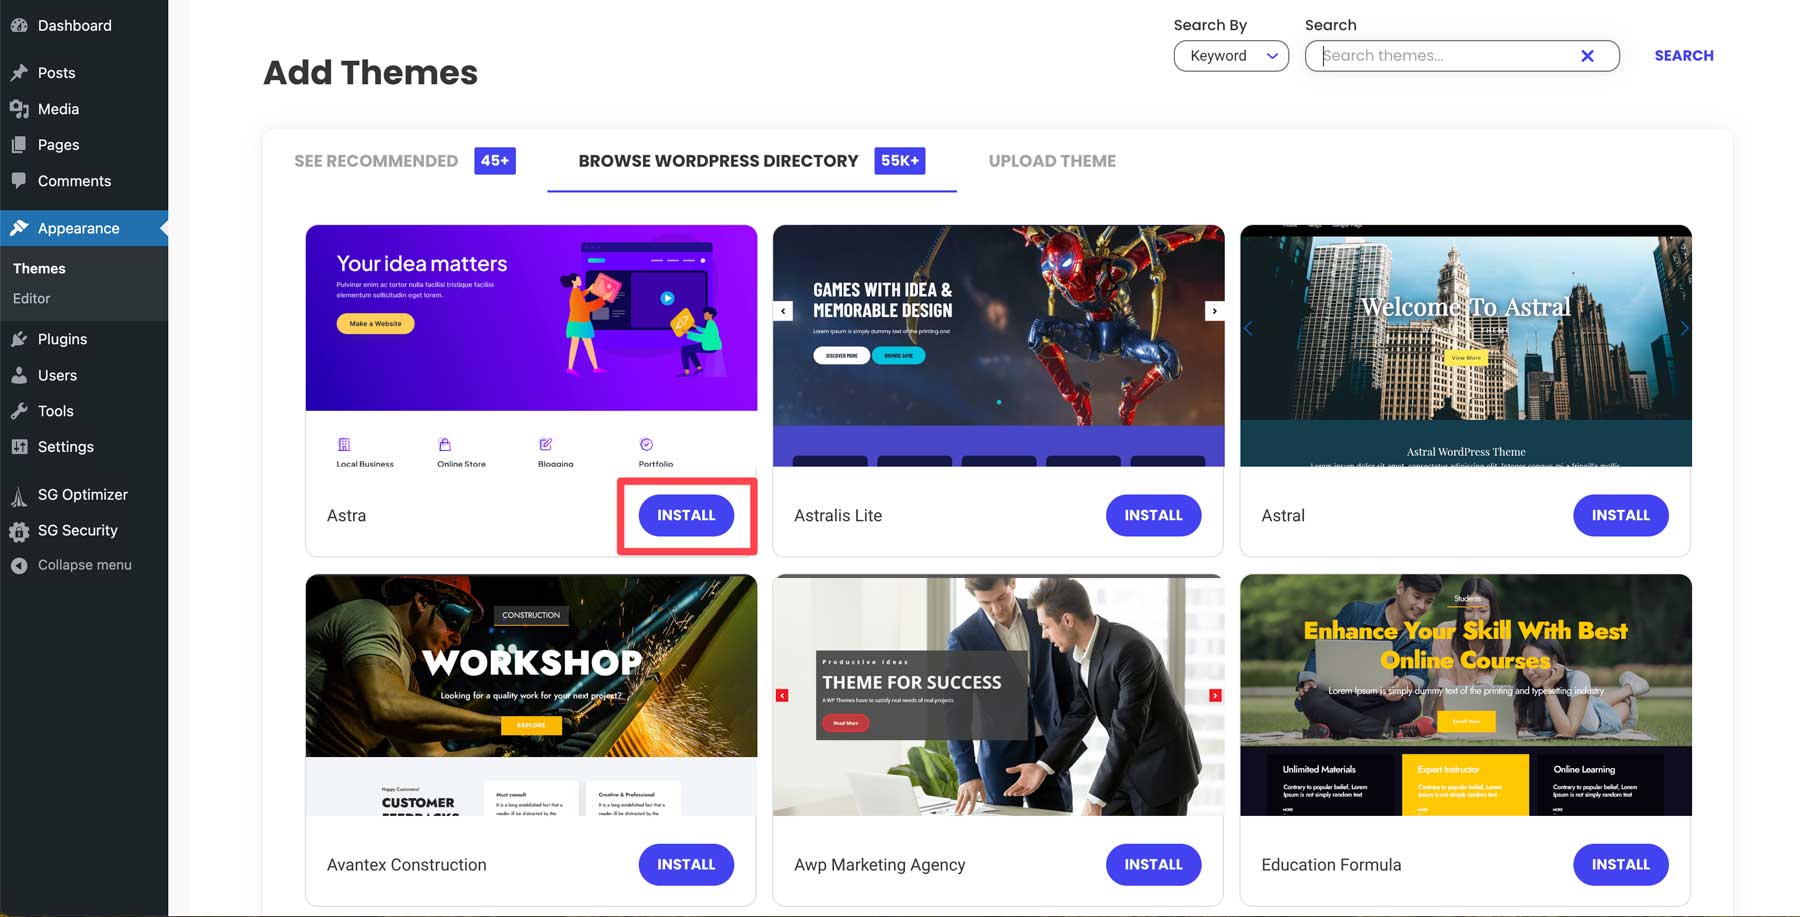
When the screen refreshes, click the activate button to make your theme live.
Step 4: WordPress for Beginners – Plugins
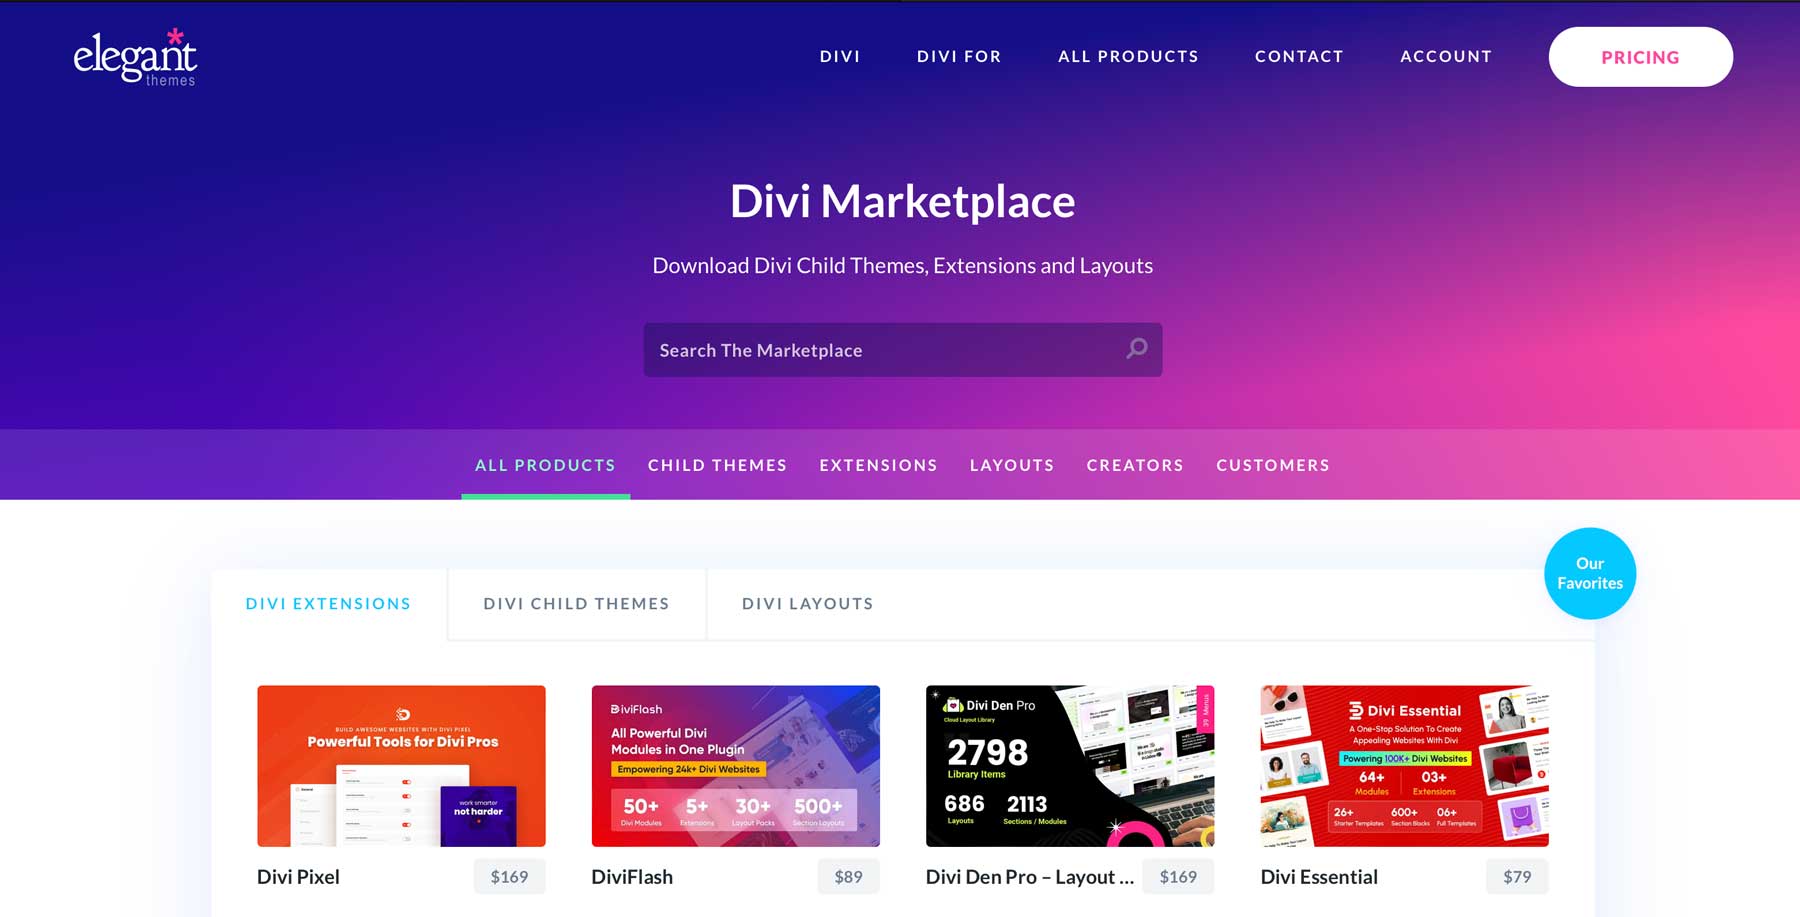
The next step in the process is installing some plugins. How many you need or what they will do depends on the niche you’re going for. Thousands of plugins are available through the WordPress repository and third-party vendors, such as the Divi Marketplace, so the sky is the limit.
As a Divi user, the Divi Marketplace adds functionalities, such as child themes, layouts, and extensions, specifically for the Divi theme. For example, some popular choices include Divi Plus, for adding WooCommerce modules, Divi Supreme Pro, which includes design modules, extensions, and layouts, and Divi Essential, which includes starter templates, modules, and extensions. Either of those plugins are $79 per year and can be used on unlimited Divi websites.
In addition to plugins for Divi, every website should have a few crucial plugins in place to ensure the safety and security of its customers. That’s why there is an essential list of plugins that will give you everything you need for your WordPress website on our blog. Consider installing a few important plugins, such as WP Forms for creating signup or contact forms, All In One SEO for search engine optimization, WP Rocket for speed optimization, and EWWW for image optimization, to name a few.
Installing a WordPress Plugin
Similar to themes, there are two ways to install a plugin: searching within WordPress or uploading a premium theme. First, navigate to Plugins > Add New.
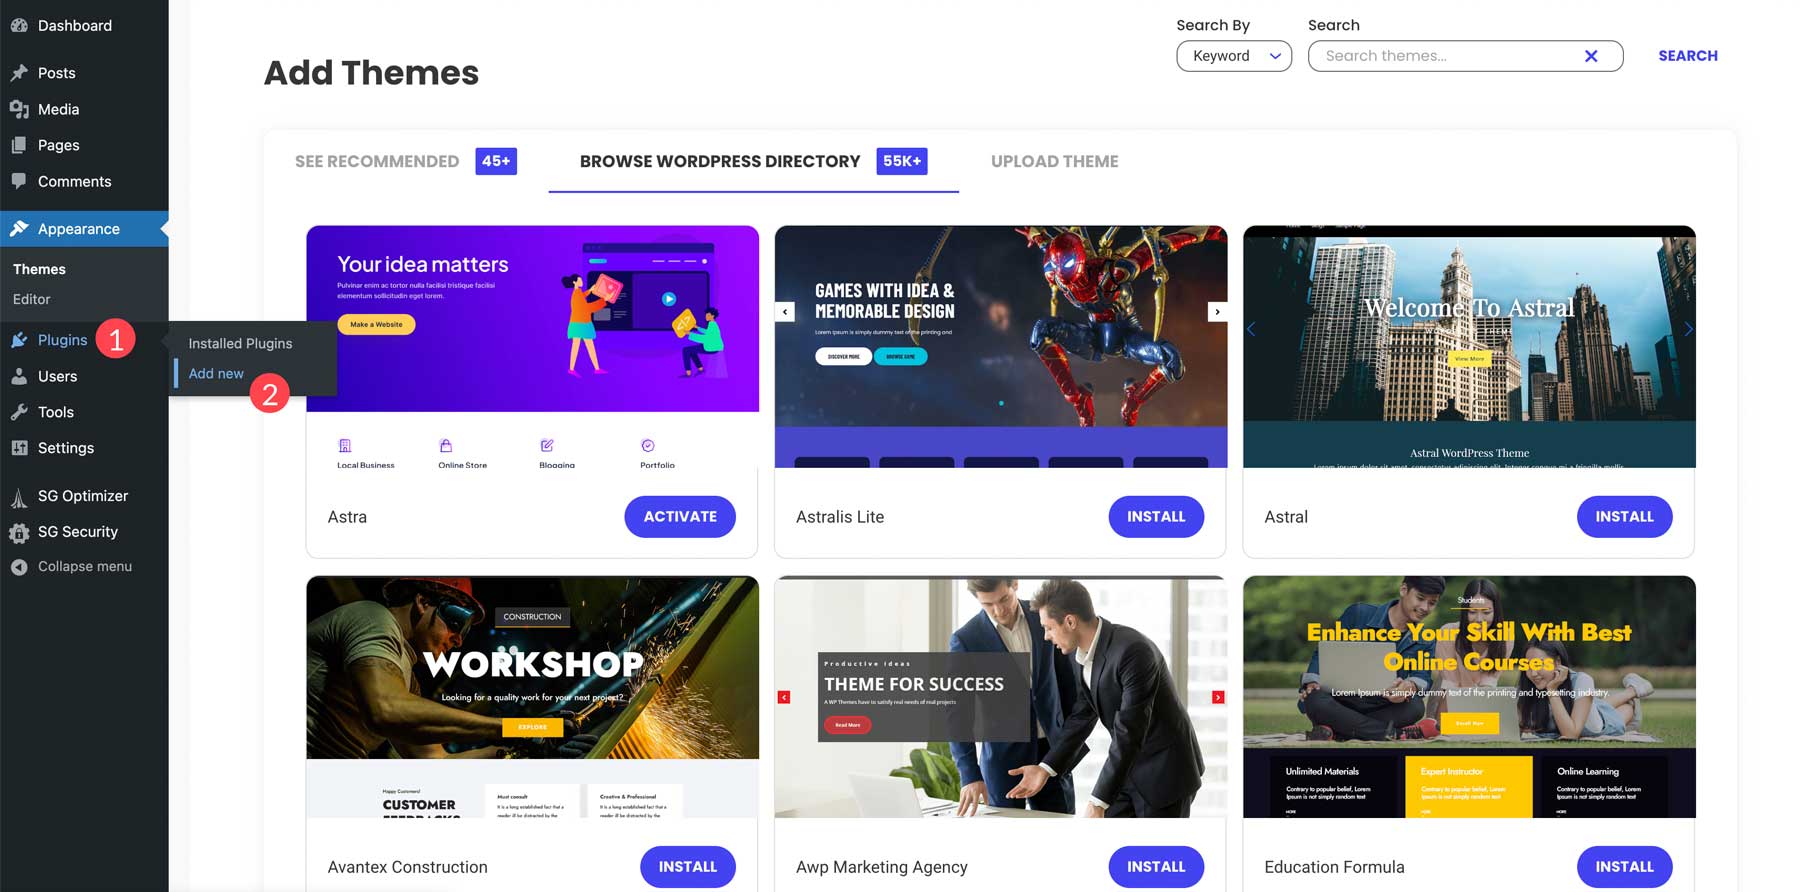
The steps to installing a plugin from the WP directory are similar to installing a theme. Search or browse for the plugin of your choice, then click install to download the plugin.

Click the upload plugin tab to upload a plugin, then choose file.
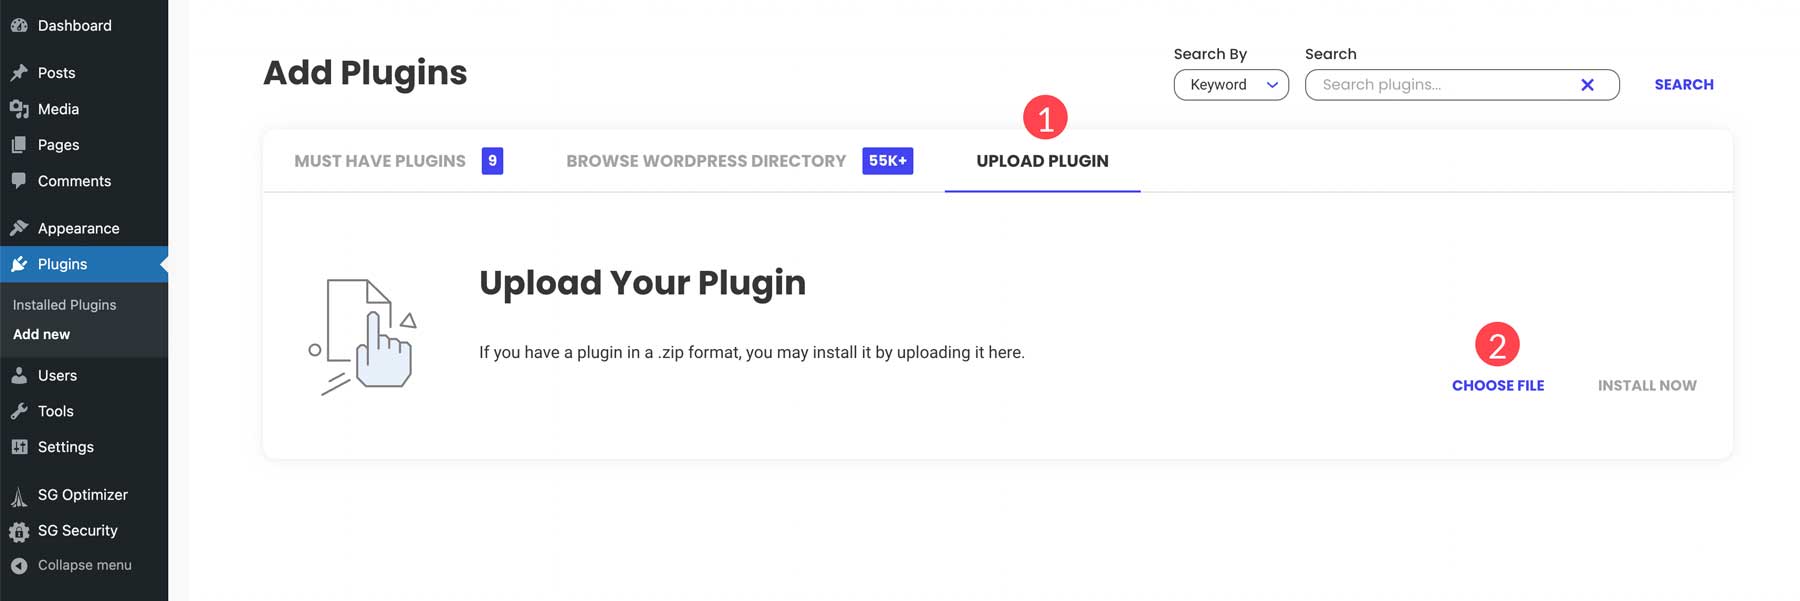
We’ll choose the Divi Builder plugin from our computer and upload it to WordPress. Once uploaded, click install now.

To complete the installation, activate the plugin.
Step 5: WordPress for Beginners – Adding Content
Now that our theme and plugins are installed, we can add content. We’ll need to concentrate on a few areas: posts, pages, and media.
Add a Post to WordPress
When creating posts in WordPress, you can add content using the Gutenberg block editor or use one of many page builder plugins, such as Divi.
Here’s a quick overview to show you how to create posts in WordPress:
Click the Add New button to add a new post.
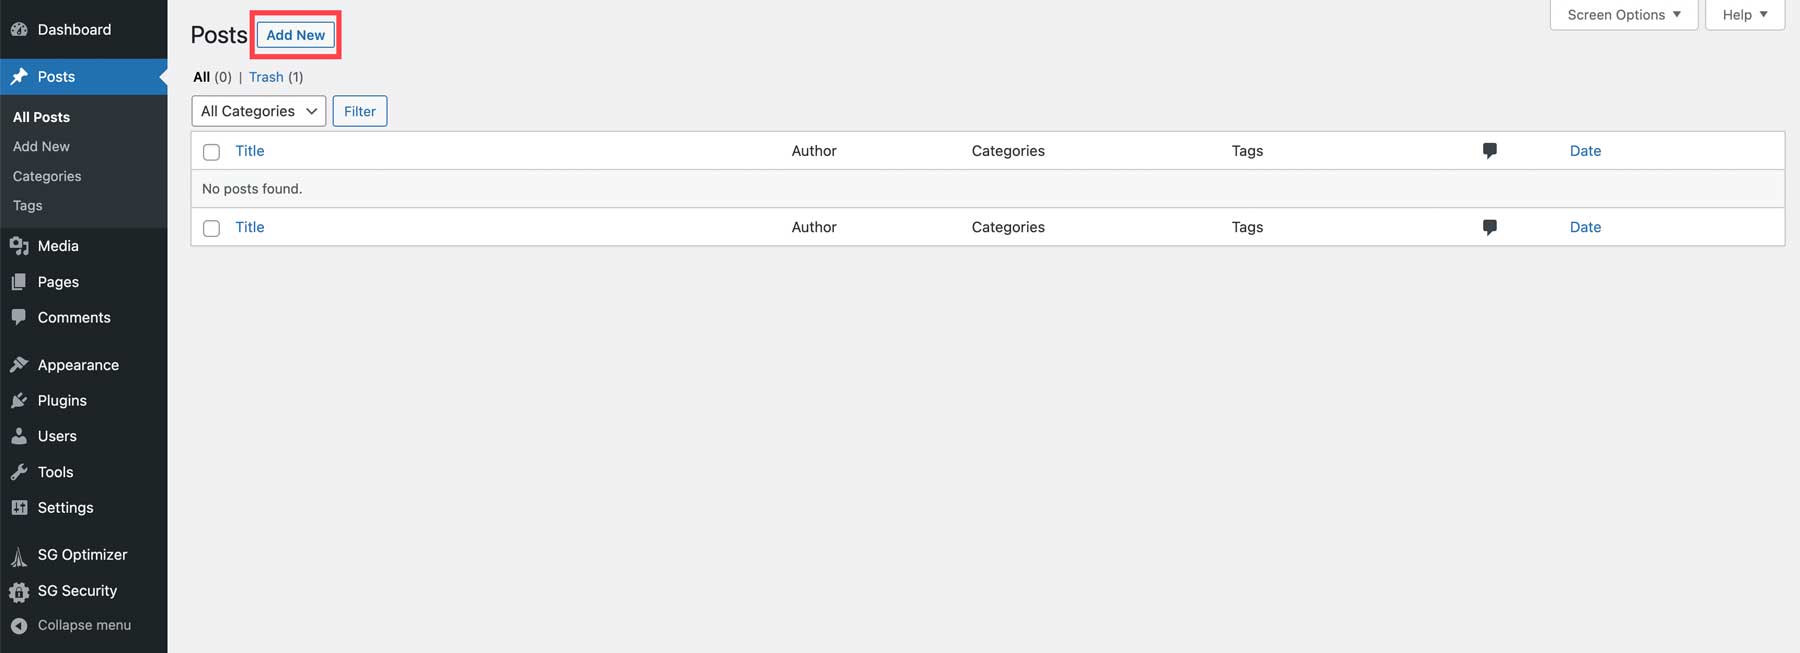
Next, you’ll give your post a title. Click on it and add the text.
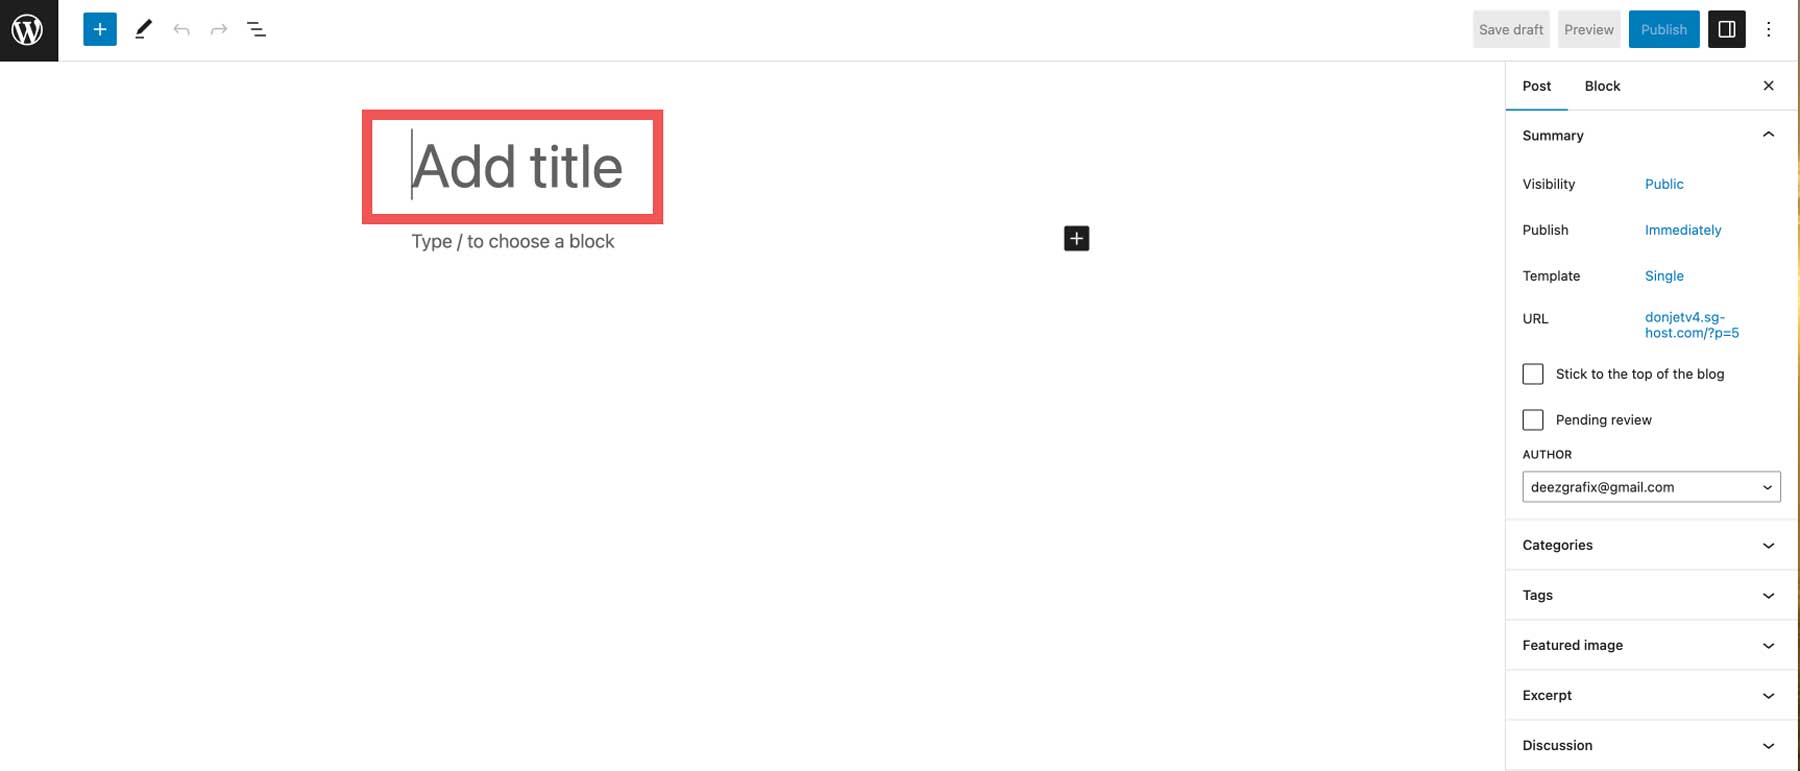
To add content, click the plus icon at the top left of the screen (1) or in the page editor (2).
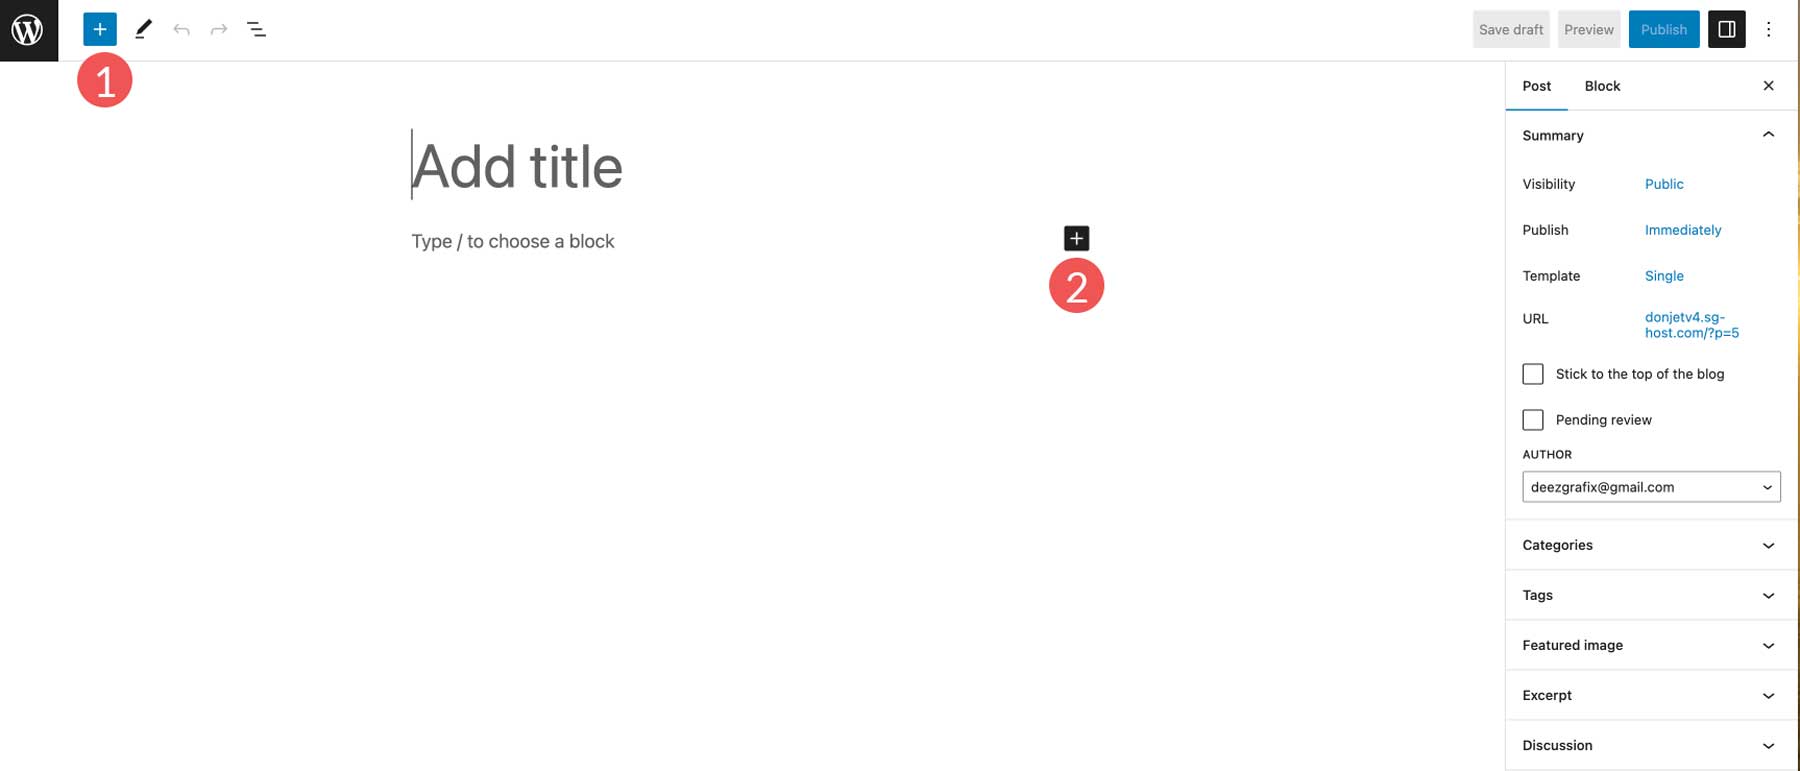
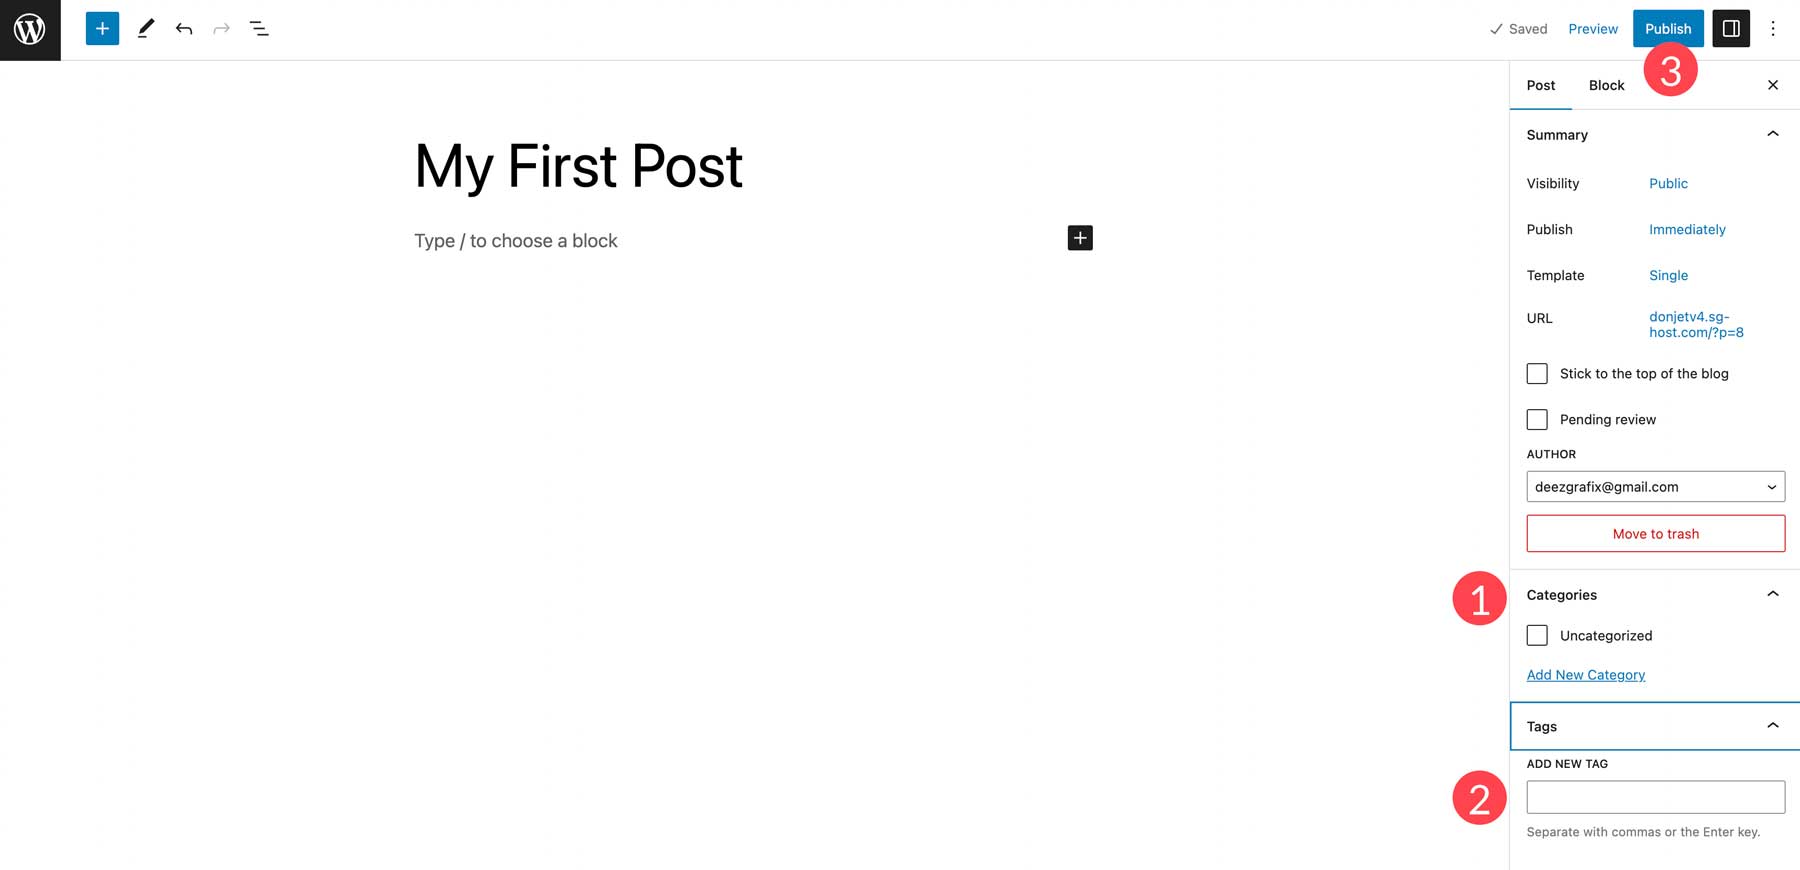
Once you’ve added content, assign it to a category (1), add any relevant tags (2), then click the publish button to make your post live (3).
Add a Page to WordPress
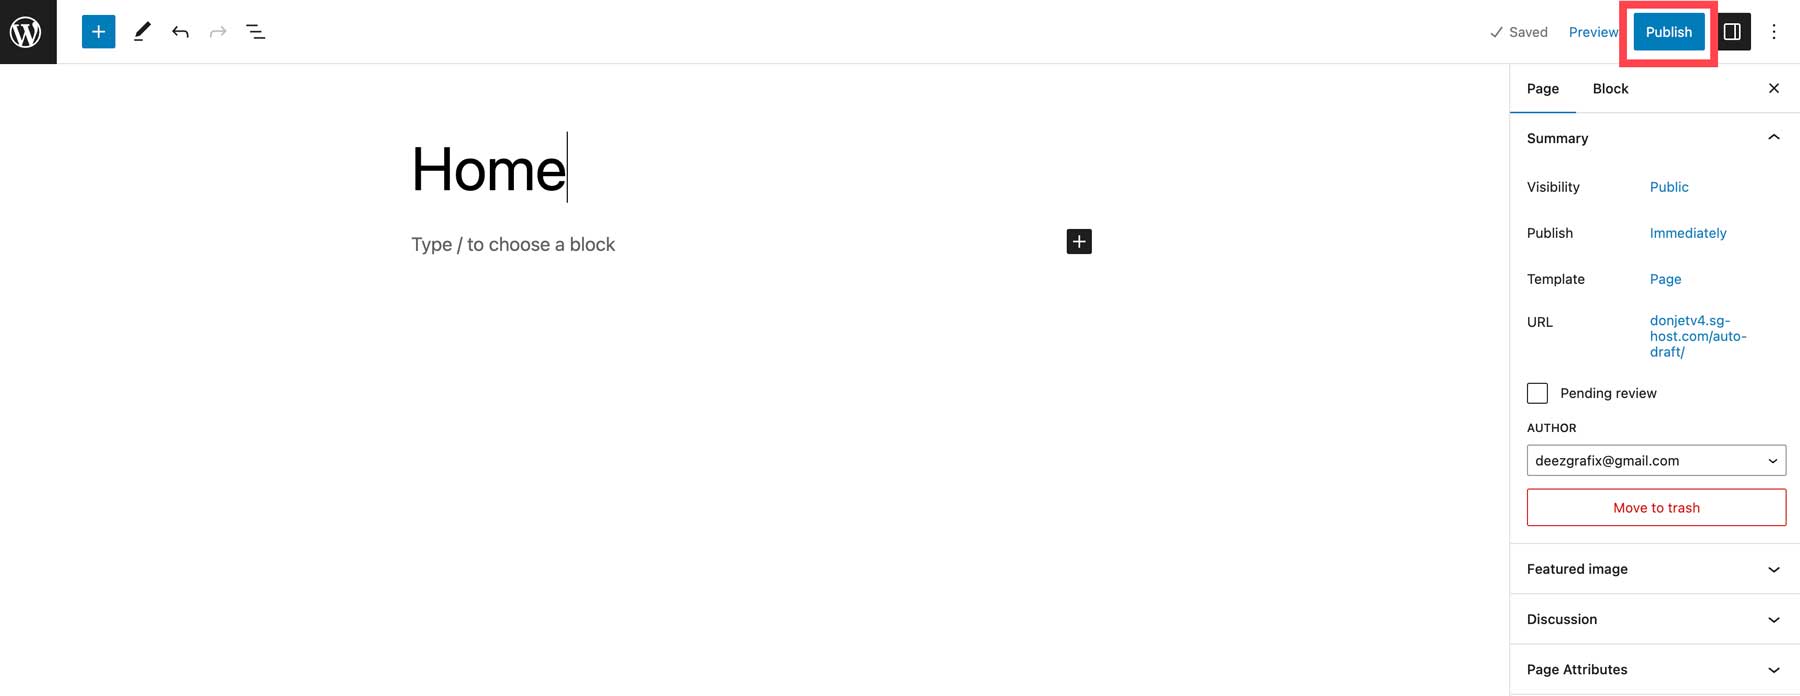
To add a new page to your site, navigate to Pages > Add New.

As with posts, give your page a title (1) and add content (2).
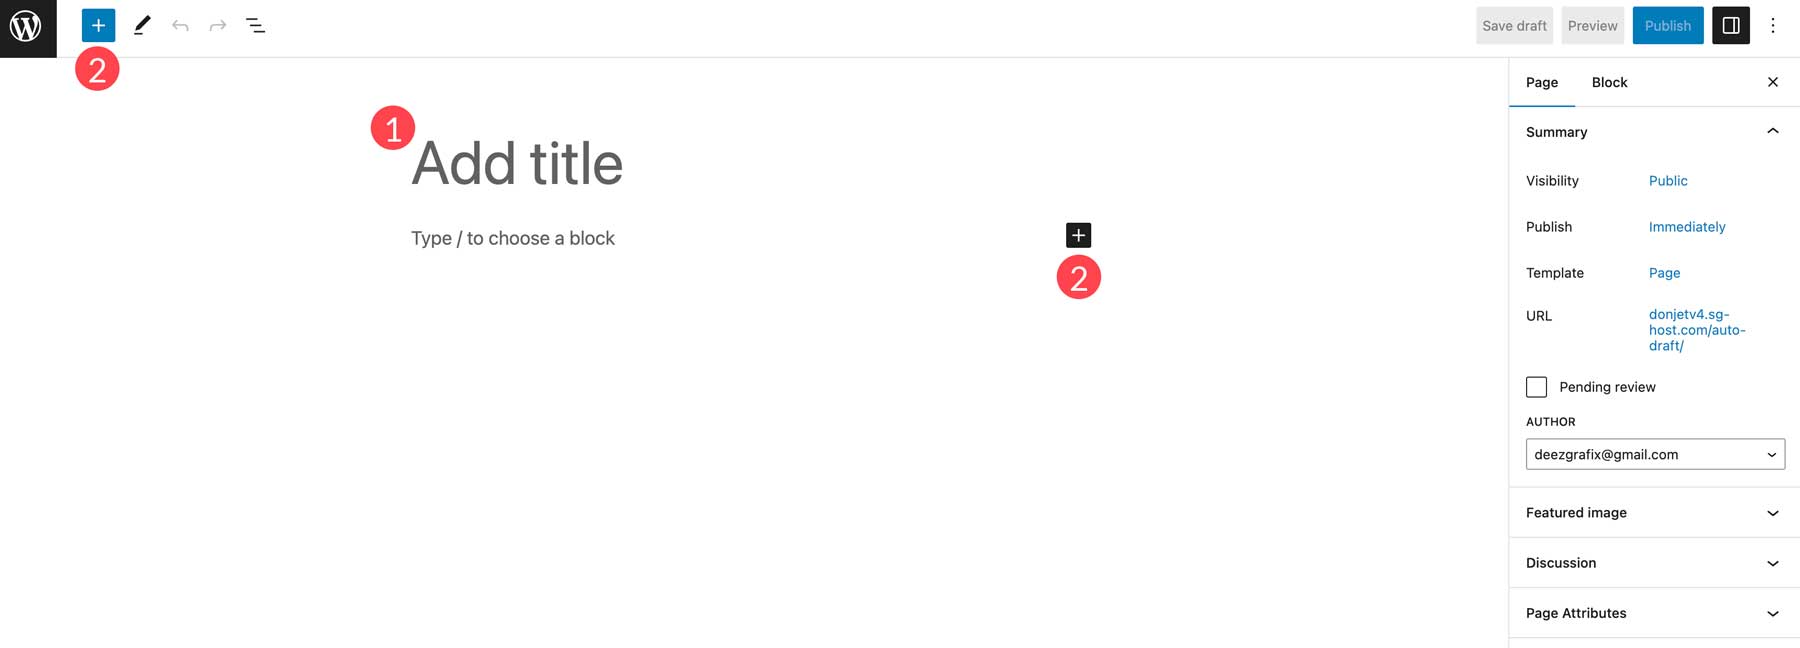
Once all content has been added, click publish to make your page live.
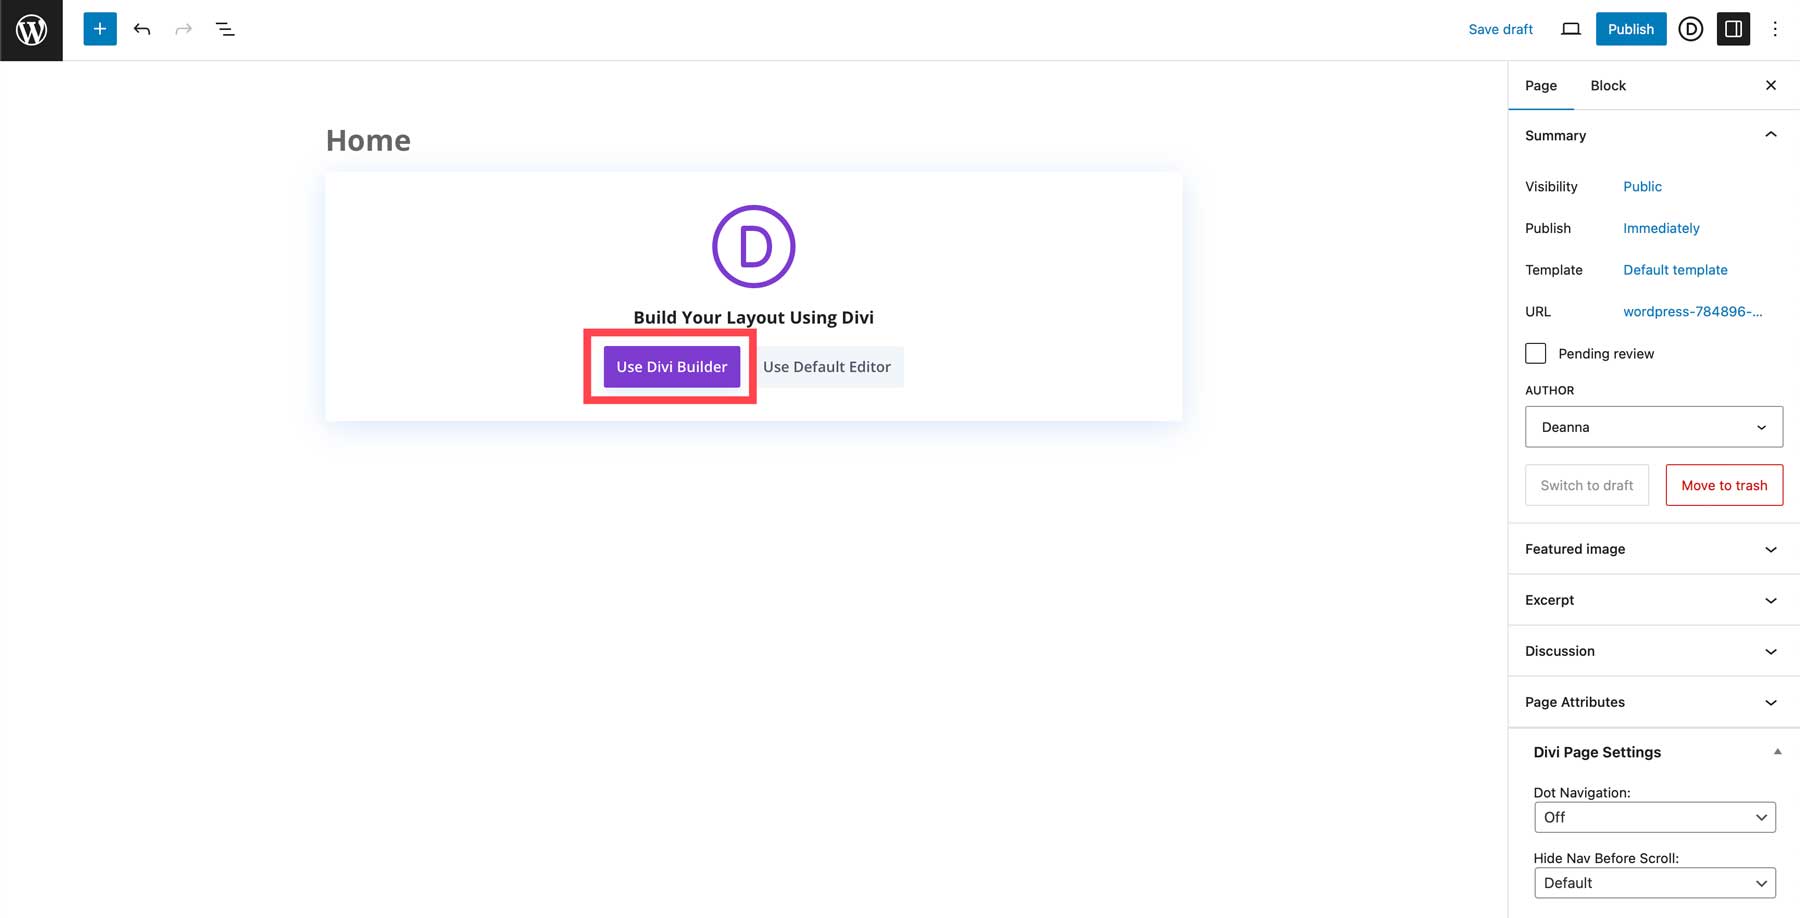
Add Content With Divi AI
When using Divi or the Divi Builder Plugin, you can take advantage of over 200 design modules to design your web pages. You can also use Divi AI to generate layouts. It offers an easy way for WordPress newbies or those without web design experience to create beautiful layouts with ease. Once your page is created, you can use the Divi Builder to add content to your page. Click the Use Divi Builder button to get started.
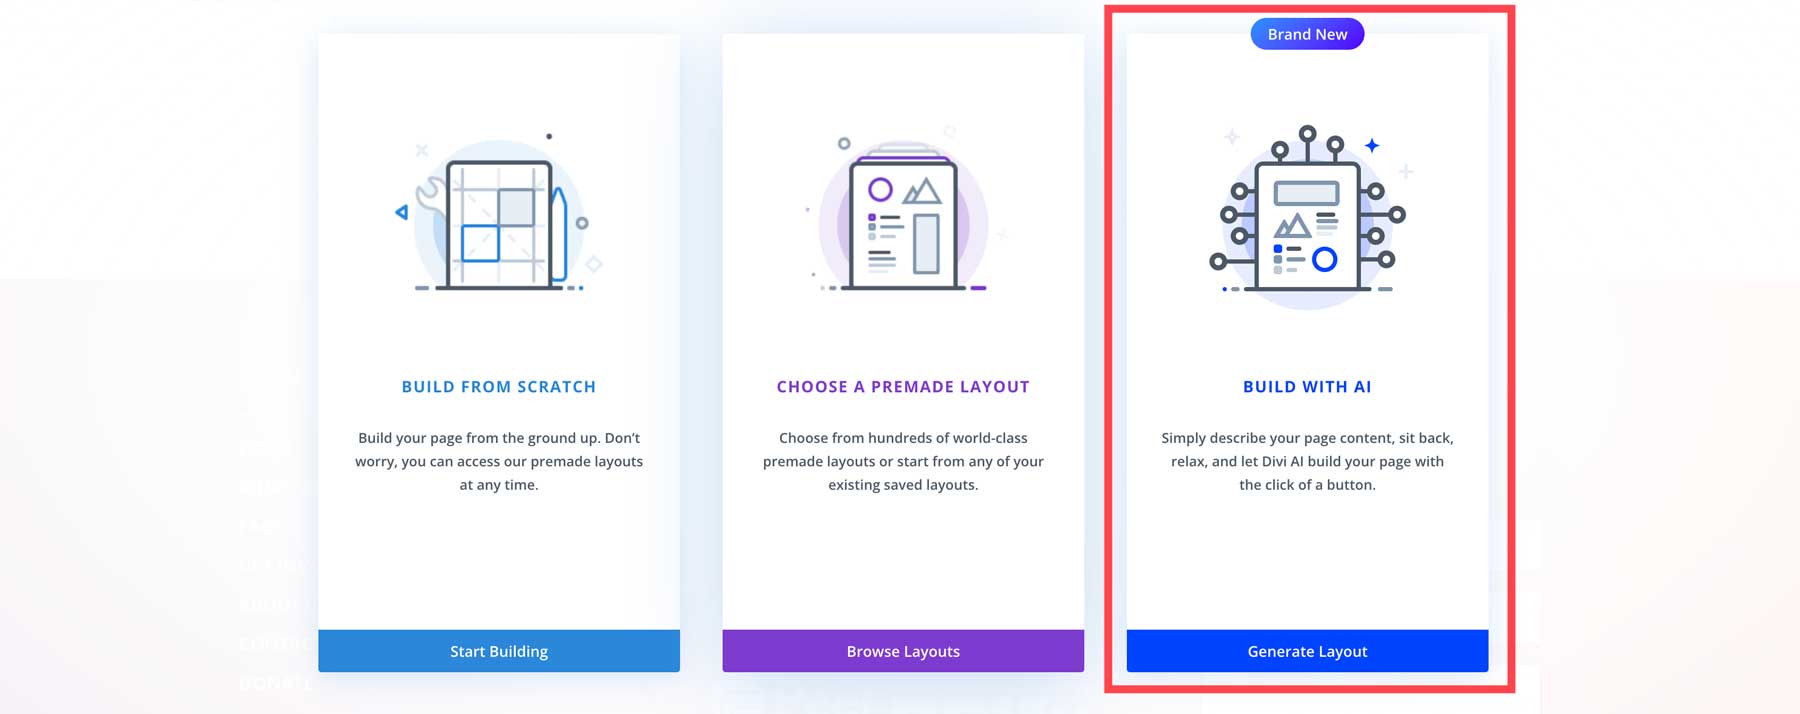
When the page refreshes, you’ll be presented with three options: to build a page from scratch, choose a premade layout, or build with AI. Select Generate Layout to use Divi AI to build a web page.
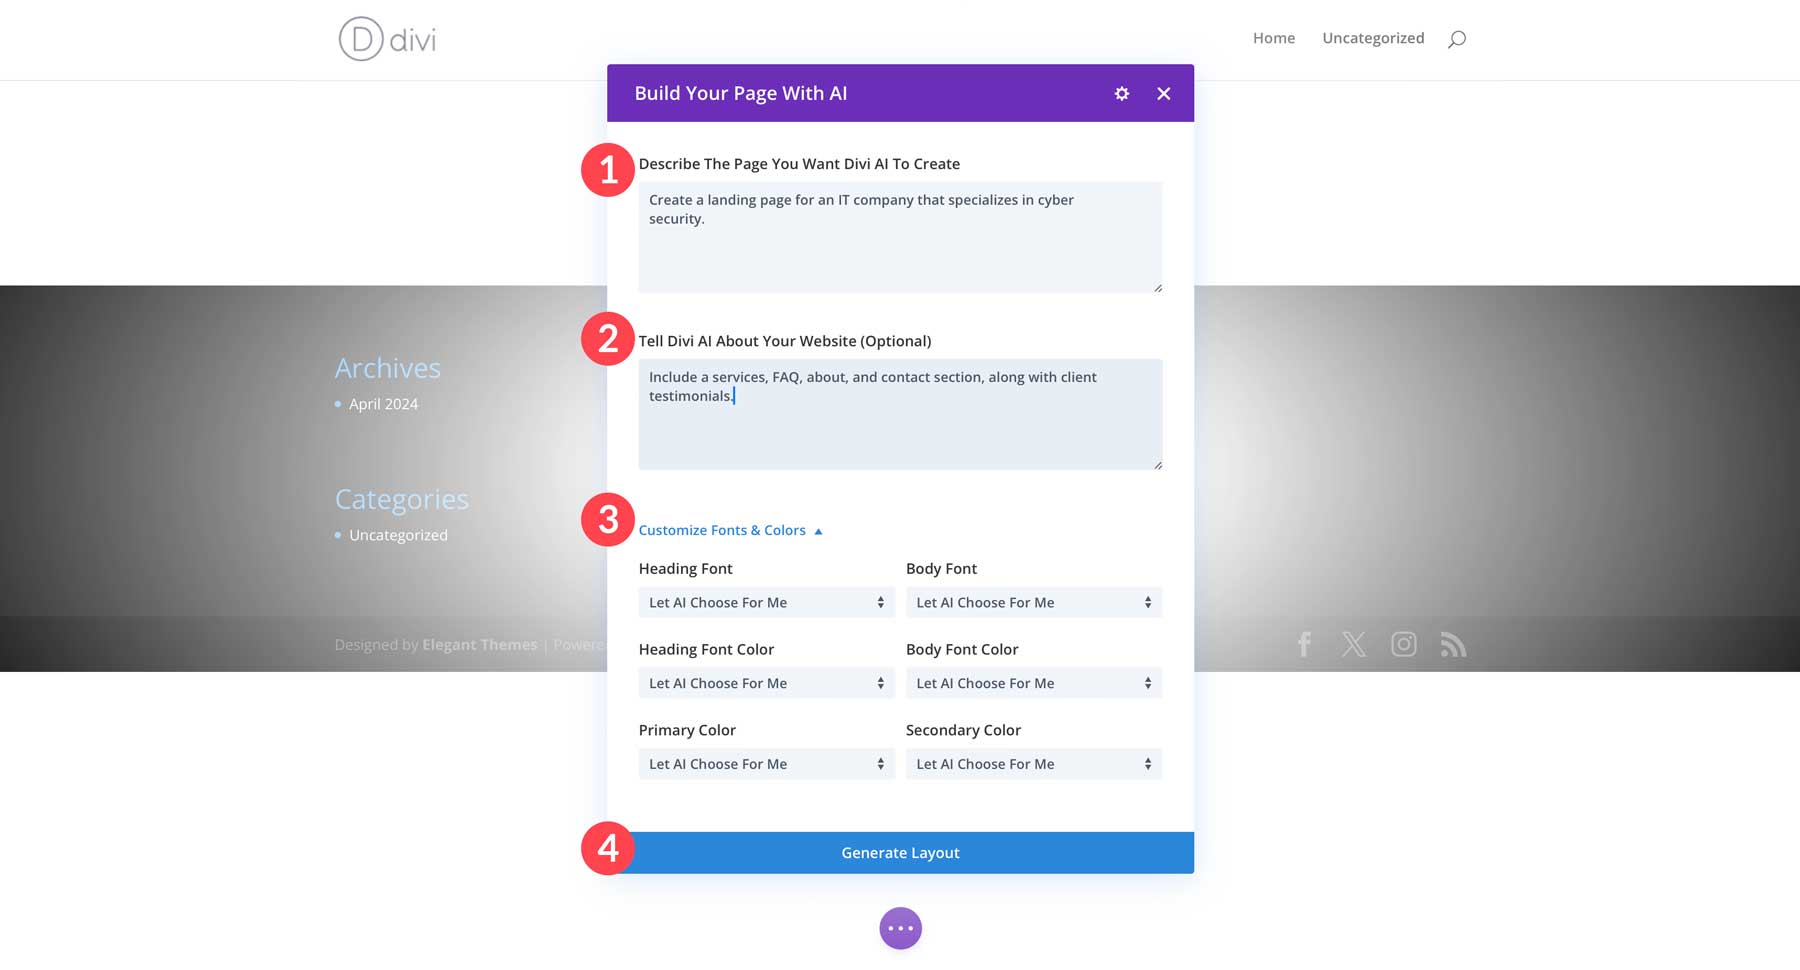
Next, you’ll describe the page you’d like to create (1), provide Divi AI with any additional information (2), and choose fonts and colors (3). You can let Divi AI choose fonts and colors for you or specify them yourself. Once your settings are complete, click the Generate Layout button (4) to create a page.
Divi AI will get to work generating your web page. It will add the wireframe, including Divi design modules, write all copy, and generate images.
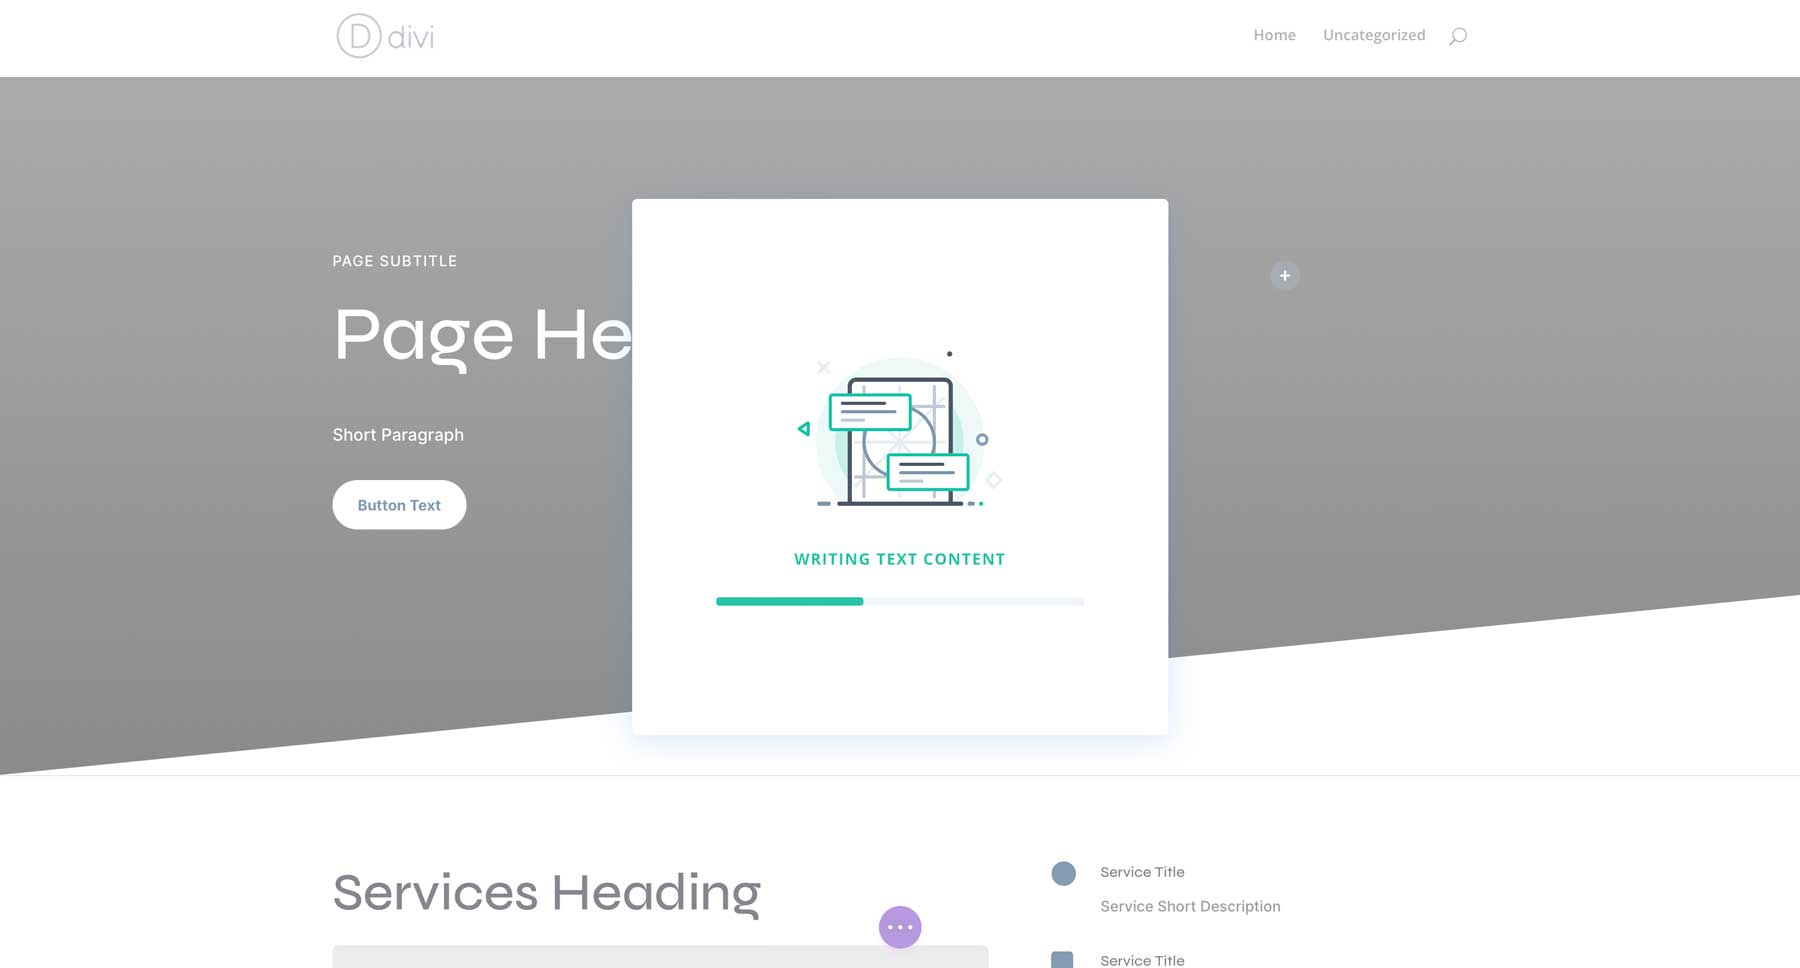
Once the page is created, you can use the Visual Builder to edit or add design modules or regenerate copy and images as necessary with Divi AI. When all changes are made, click the purple ellipsis menu at the bottom center of the page.

To publish the page, click the green publish button.

Step 6: WordPress for Beginners – Customization
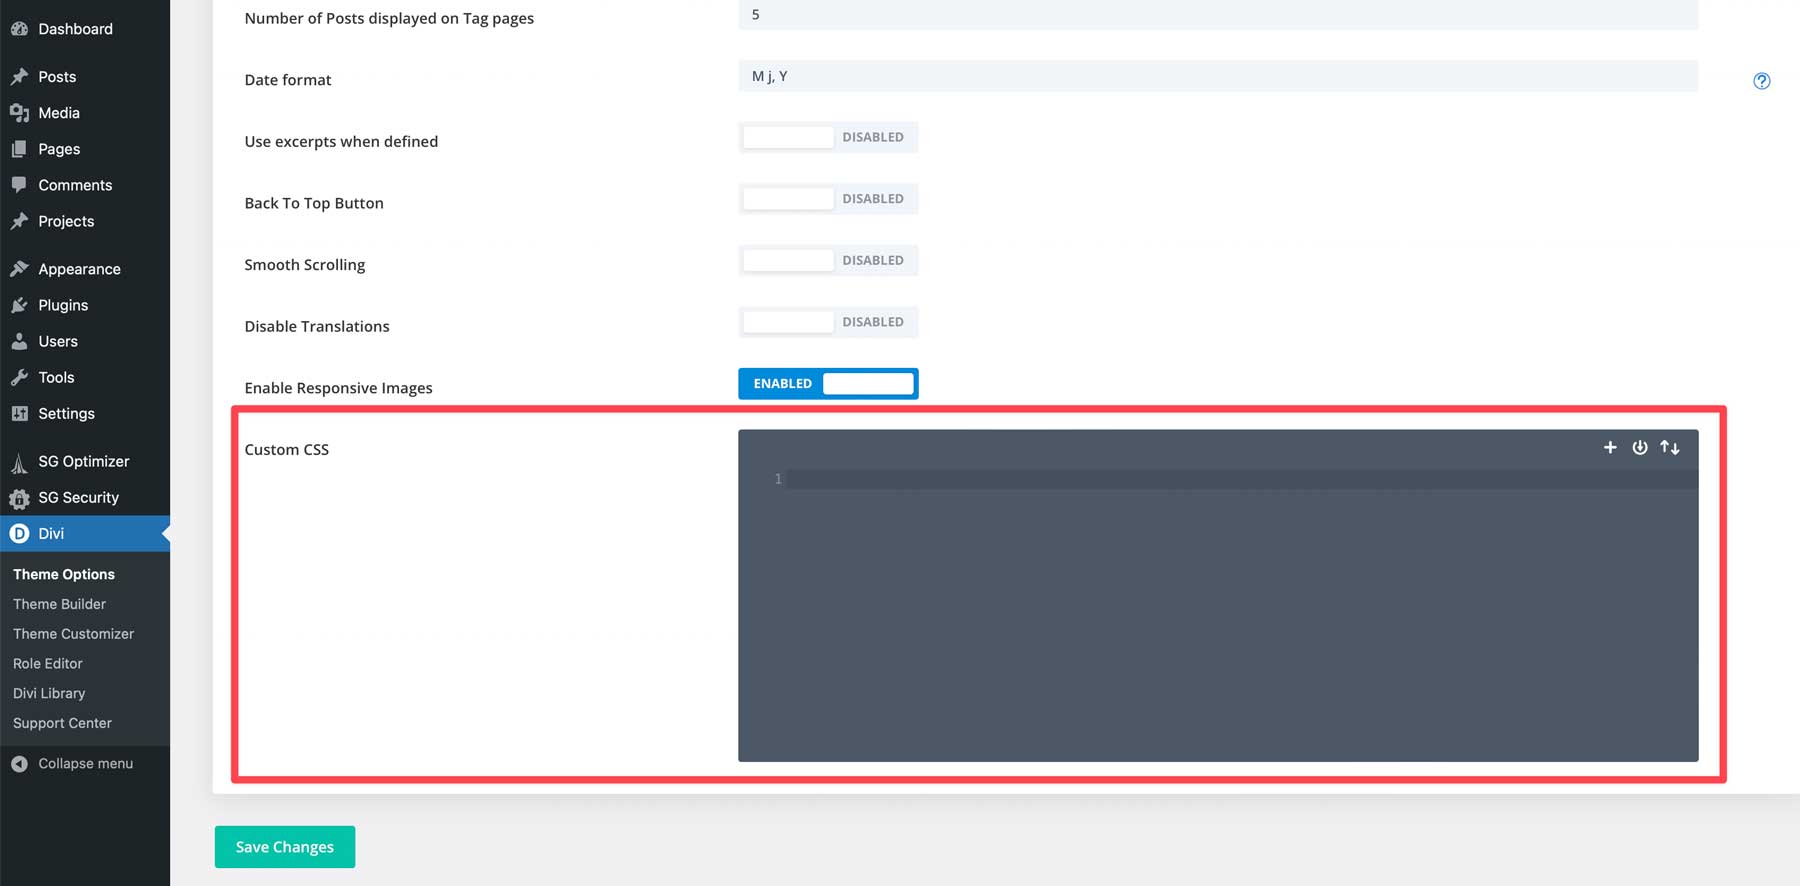
Before you take your site live, there are a few last-minute details that you should take care of, including adding any custom CSS, configuring SEO, adding social media, and configuring your theme’s settings. These options will vary depending on the theme installed.
Adding Custom CSS
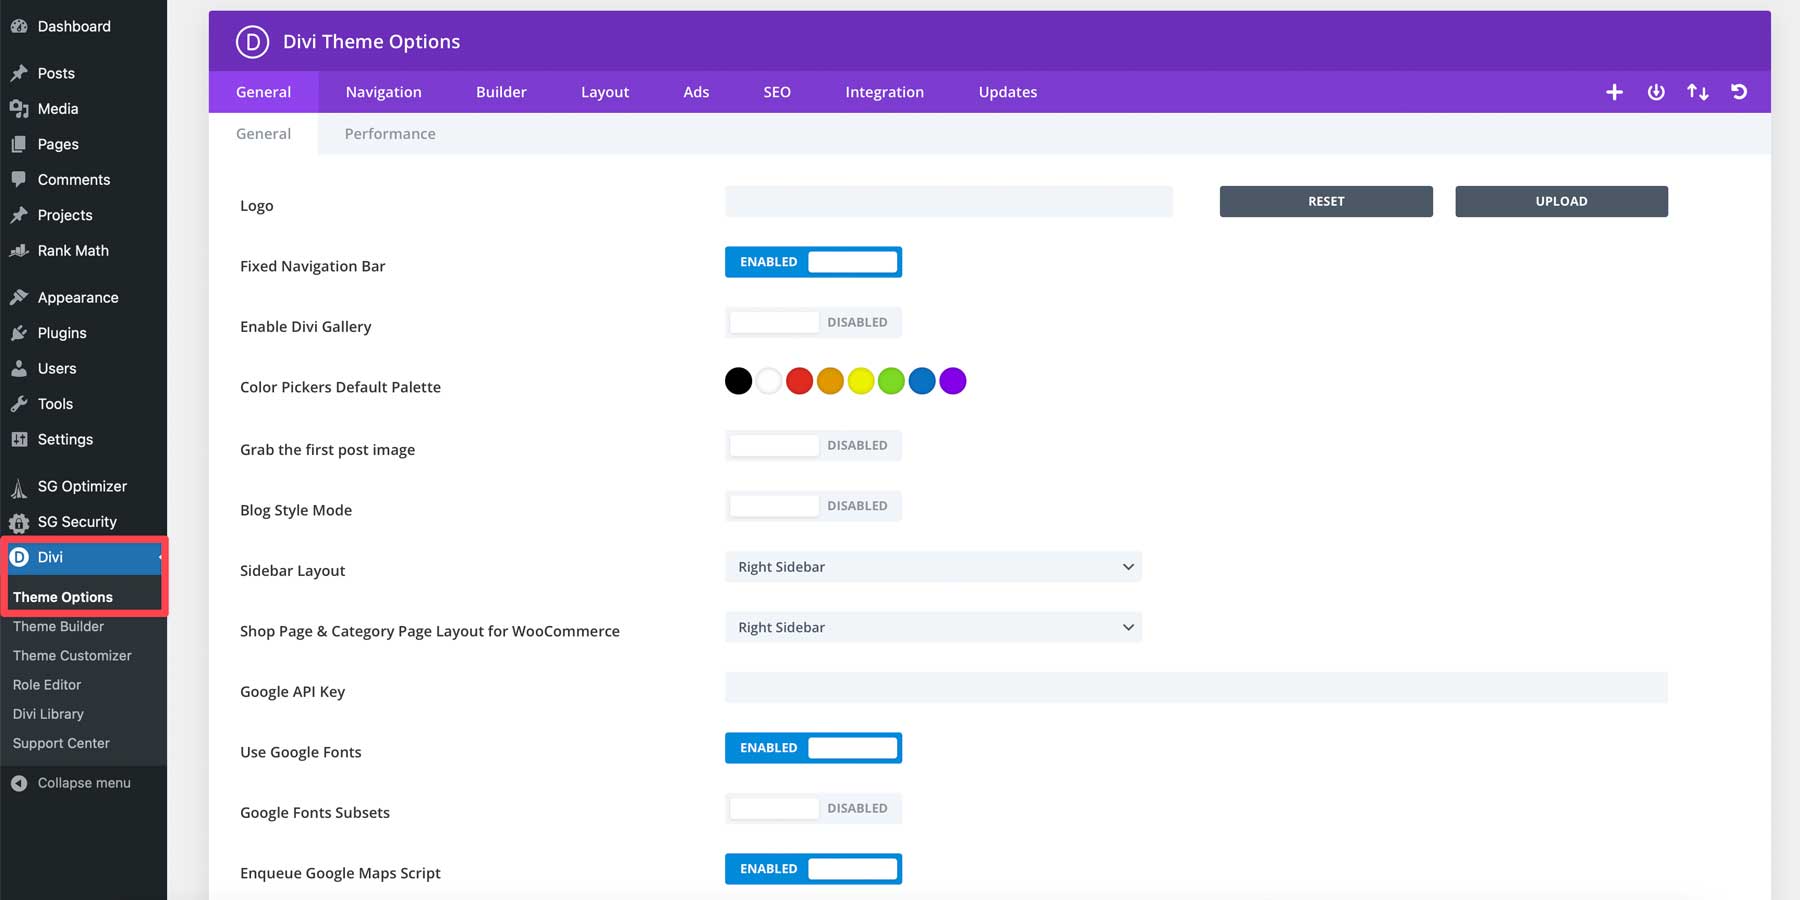
You can add custom CSS to style different elements of your website. Depending on the theme, there are a few places to add your snippets. The first way is through the WordPress customizer. More basic themes will offer this option in Appearance > Customize. For premium themes like Divi, you can add custom CSS in Divi > Theme Options.
Auto-Update Plugins
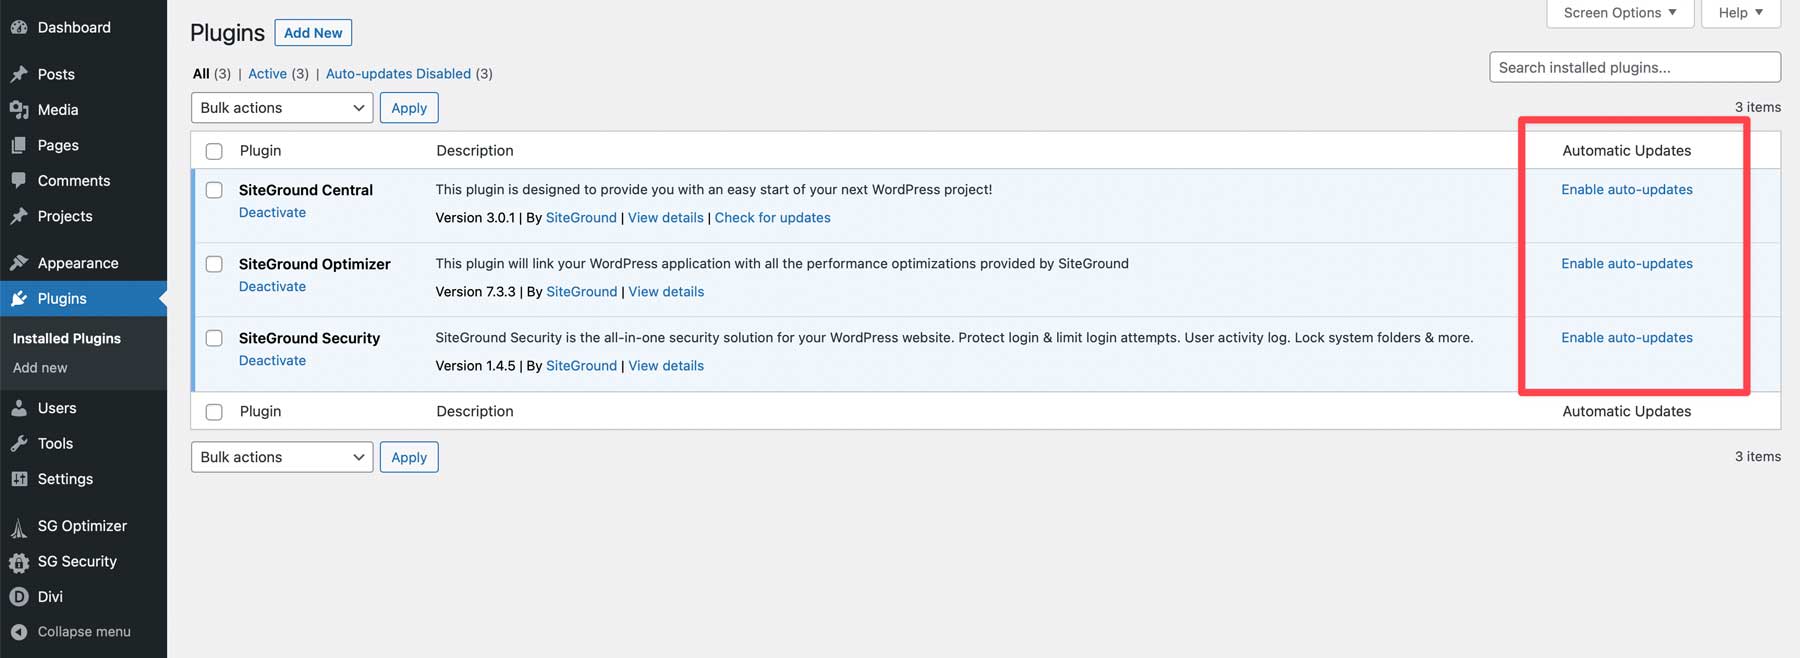
WordPress has built-in functionality that allows you to turn on automatic plugin updates. The downside to this is encountering an issue during a plugin update. You might not know what went wrong if you aren’t handling updates yourself. Using an activity log plugin, such as WP Activity Log, will give you more clarity into what went wrong so you can troubleshoot the issue easier.
To enable auto-updates, navigate to the WordPress dashboard’s plugins section. Click enable auto-updates on any plugin you’d like to update.
Configure Your SEO
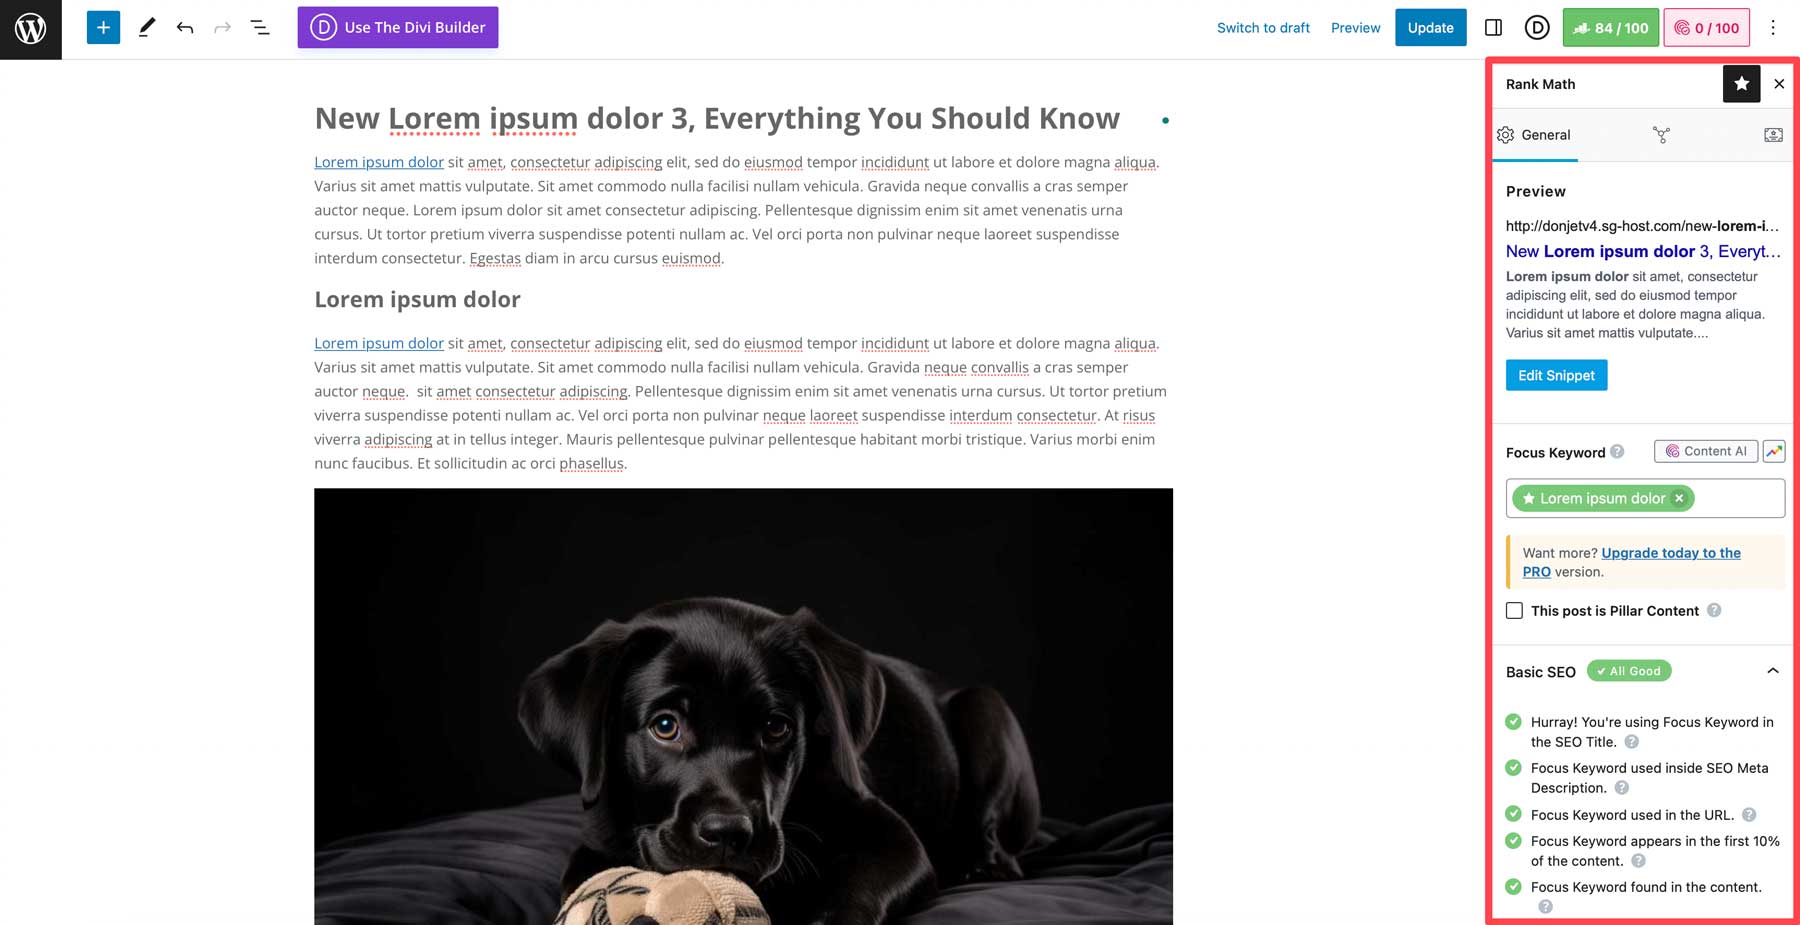
One of the most important last steps before launching your website is configuring its SEO settings. Using an SEO plugin such as Rank Math is an excellent option. It offers a step-by-step process that guides you in achieving better SEO scores using helpful tips and suggestions.
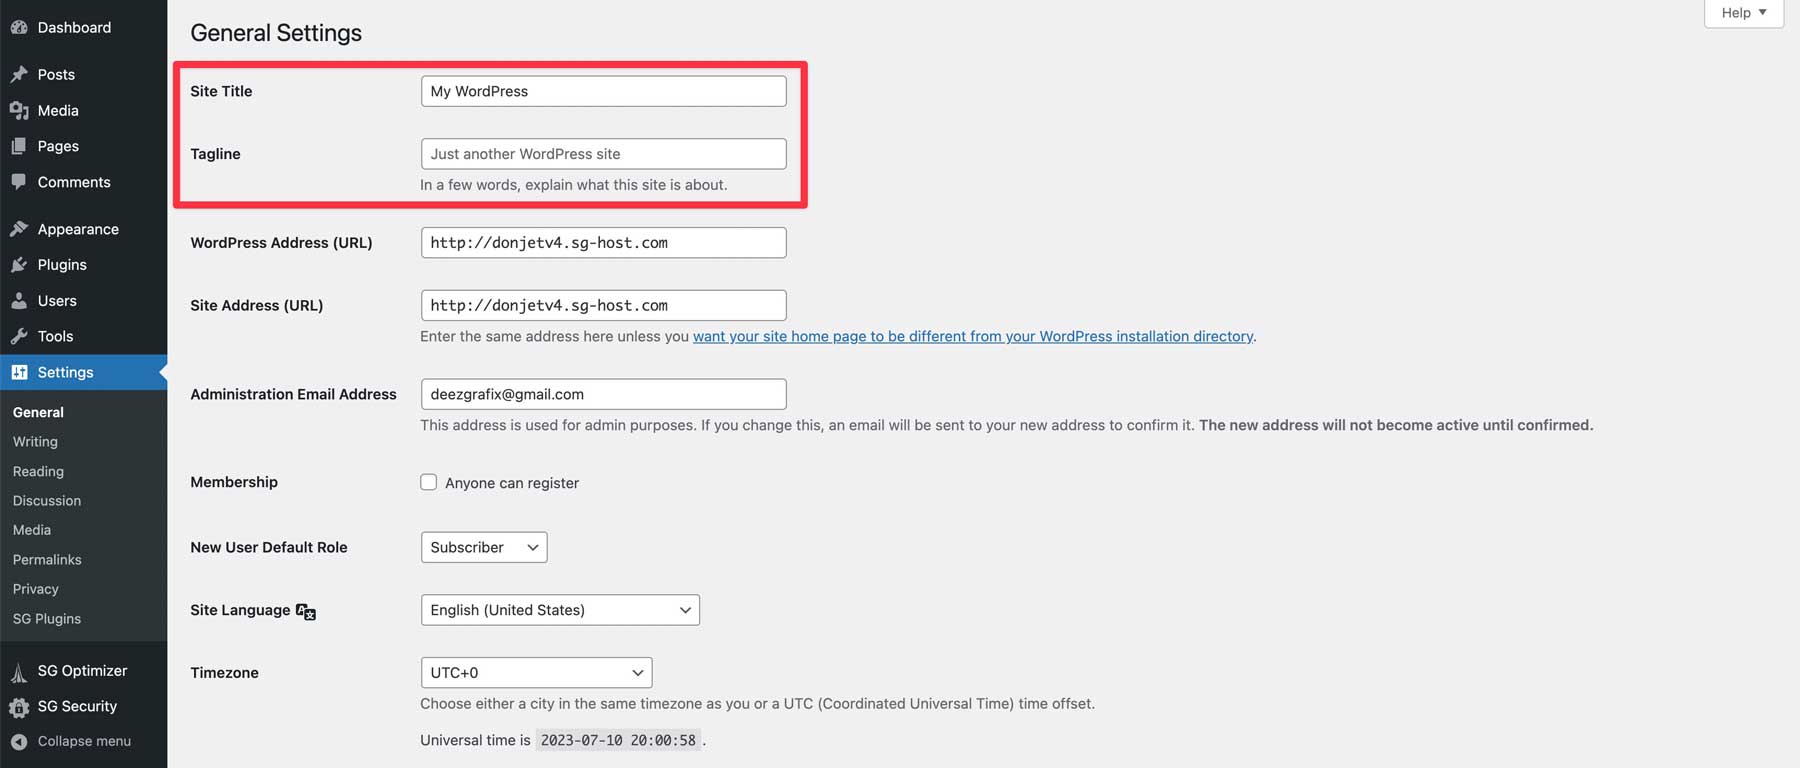
Add a Site Title and Tagline
Your site’s title is used to help visitors identify the website they are browsing. The tagline is a short description of your website. It’s best to use a unique title and tagline rather than repeating the title, as it provides a more accurate depiction of what your website is about. To change these, navigate to Settings > General. From there, input your desired title and tagline, then save your changes.
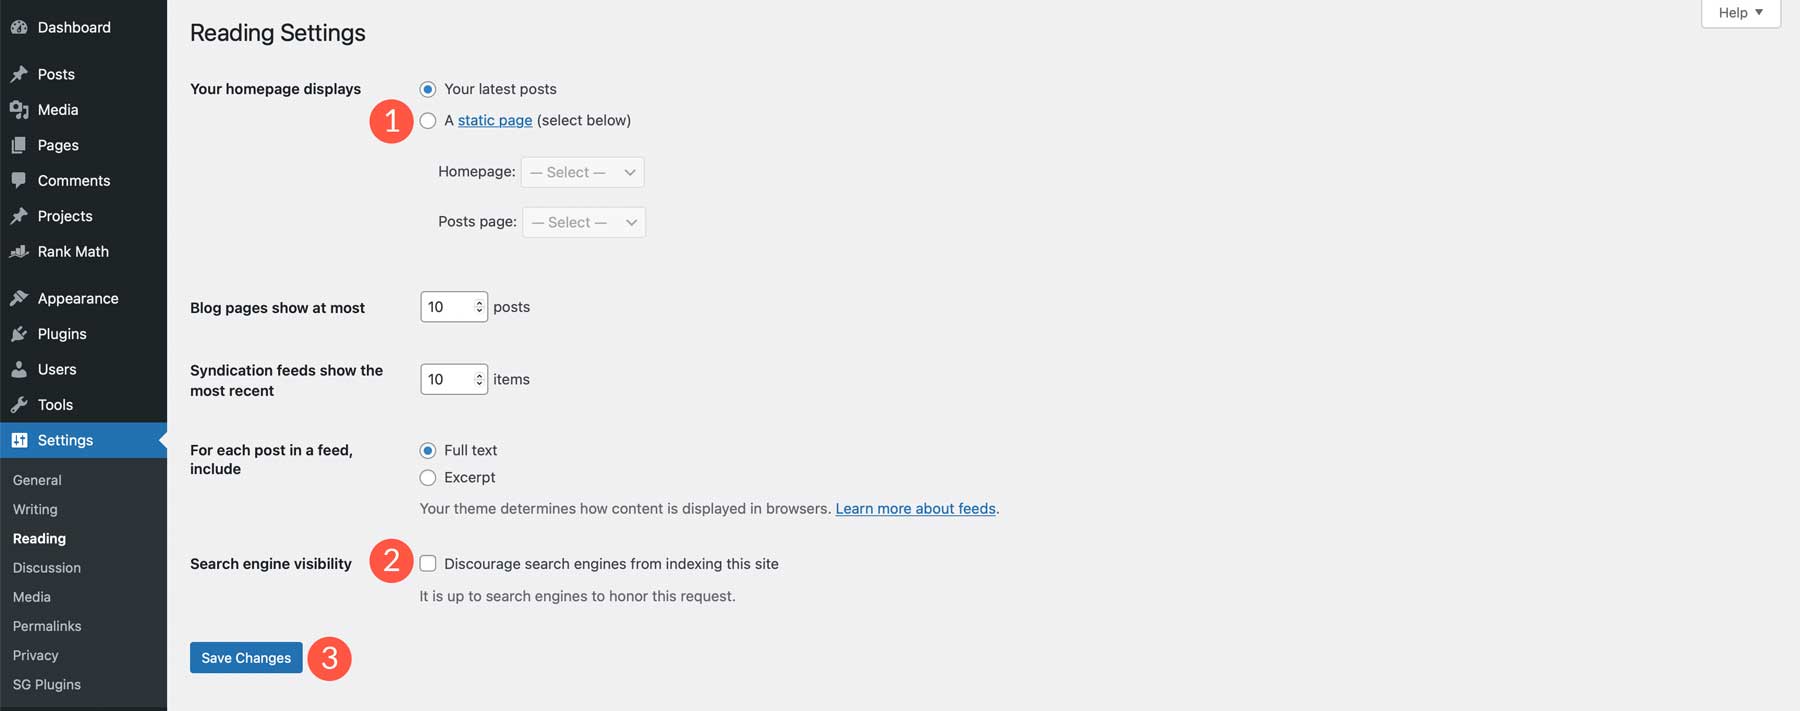
WordPress Reading Settings
There are two important things that you should do here, including setting a home page (1) and ensuring the Discourage search engines from indexing this site checkbox is unchecked (2). You can show your latest posts on the home page or choose a static post or page. When the discourage checkbox is ticked, search engines block your site from being indexed, so you’ll want to leave that unchecked before launching. Save your changes when finished (3).
Configure Theme Settings
Before taking your site live, you want to represent your business properly. Add your logo, social media accounts, color, and fonts. Every theme is different; most allow you to complete these tasks in their theme settings. Using Divi, navigate to Divi > Theme Options. Here, you can add all necessary branding elements and make other necessary changes. Check out our documentation for tips on how to use Divi’s theme options.
Back Up Your Site
The last and most important step before pushing your site live is to back up your website. By making a backup, you’ll preserve your site’s files in case of a misstep in the launch process. Most managed hosting providers, such as SiteGround and WP Engine, offer backups in their hosting plans. However, depending on the host, you might need to install a good backup plugin.
Step 7: WordPress for Beginners – Taking Your Website Live
The last step in the process is to take your website live. Since we built our site on a temporary domain using SiteGround, you’ll need to add a domain first. If you built your site in a development environment, there are different steps to take.
Regardless of your hosting provider, there are a few items to check once your site is live:
- Conduct a speed test for your website, and make any necessary speed enhancements.
- Test all forms. If you are having issues with notifications, you may need to install an SMTP plugin like WP Mail SMTP and then set up a free or paid SMTP service.
- Make a post-launch backup of your site to ensure the most recent iteration is secured.
- Secure your website with an SSL certificate. If using SiteGround, follow these steps.
- Submit your XML sitemap to Google.
- Double-check all SEO metadata.
- Set up analytics and integrate it into your website using an analytics plugin like MonsterInsights.
Build Your Dream Website With WordPress
WordPress is a powerful and versatile CMS that can create various websites. Although there is an initial learning curve to overcome, it’s easy for beginners to learn and master. With a vast community of third-party developers, tutorials, and plugins available, you can customize your WordPress website to make it your own. To get the most out of WordPress, opt for a quality WordPress host, such as SiteGround, so you can easily install and manage your WordPress site. Also, make sure to invest in a premium theme, such as Divi, so you can make your website one-of-a-kind.
Are you curious to learn more about the products we mention in this post? Check out the table below to find pricing and links:
| Products Mentioned | Starting Price | Description | Action | |
|---|---|---|---|---|
| 1 | WordPress | $2.99/month | Content Management System | Get |
| 2 | SiteGround | $2.99/month | Hosting Provider | Get |
| 3 | Hostinger | $2.99/month | Hosting Provider | Get |
| 4 | Pressable | $37.50/month (billed annually) | Hosting Provider | Get |
| 5 | Cloudways | $12/month | Hosting Provider | Get |
| 6 | Flywheel | $13/month | Hosting Provider | Get |
| 7 | UpdraftPlus | Free, $70/year | Backup Plugin | Get |
| 8 | MemberPress | $179.50/year | Membership Plugin | Get |
| 9 | Divi | $89/year | WordPress Theme | Get |
| 10 | Divi Layouts | Included with Divi | 2000+ Pre-Made Layouts | Get |
| 11 | Divi AI | $16.08/month (billed annually) | AI Design Assistant / AI Website Builder | Get |
| 12 | Theme Builder | Included with Divi | Full Site Editing | Get |
| 13 | Divi Marketplace | Included with Divi | Third-Party Extensions, Child Themes, and Layouts for Divi | Get |
| 14 | Divi Plus | $79/year | WooCommerce Modules for Divi | Get |
| 15 | Divi Supreme Pro | $79/year | Design Modules, Extensions, and Layouts for Divi | Get |
| 16 | Divi Essential | $79/year | Templates, Modules, and Extensions for Divi | Get |
| 16 | WP Forms | $49.60/year | Form Plugin | Get |
| 17 | AIOSEO | $49.60/year | SEO Plugin | Get |
| 18 | WP Rocket | $59/year | Speed Optimization Plugin | Get |
| 19 | EWWW Image Optimizer | $7/month | Image Optimization Plugin | Get |
| 20 | Visual Builder | Included with Divi | Page Builder Plugin | Get |
| 20 | Divi Design Modules | Included with Divi | Design Elements | Get |
| 21 | WP Activity Log | Free, $139/year | Activity Plugin | Get |
| 22 | Rank Math | Free, $6.99/month | SEO Plugin | Get |
| 23 | WP Engine | $13/month | Hosting Provider | Get |
| 24 | WP SMTP | Free, $49/year | SMTP Plugin | Get |
| 25 | MonsterInsights | Free, $99.60/year | Google Analytics Plugin | Get |
Frequently Asked Questions (FAQs)
Before we wrap up, let’s answer some of your most common questions regarding WordPress. Did we miss one? Leave a question below, and we will respond!
Is WordPress beginner-friendly?
Can I learn WordPress for free?
Can you learn WordPress by yourself?
How long does it take to learn how to make a WordPress website?
Does learning WordPress require coding skills?
What are the best resources to learn about WordPress?
Why should I learn WordPress?
What other skills should I learn with WordPress?
Is WordPress still relevant?
Is WordPress a viable source to make a living?
Need more tutorials? If you’d like a more comprehensive look into WordPress, check out our complete guide on how to make a website from scratch.
Featured Image via olesia_g / Shutterstock.com




Leave A Reply