
Knowing how to Push a WordPress development (dev) site live is crucial for maintaining uptime while updating your site. This is particularly helpful for agencies who manage and update a large number of websites as well as website owners looking to make a significant update to their current website. Using a development site lets you make changes to a site without affecting the live site. When you have your changes dialed in, you can simply push those live.
In this article, we will show you three methods (in detail) for taking a development or staging site live. But first, let’s clear up some terms.
While there can certainly be differences between these terms, we will use “development site” (or “dev site”), “staging site”, and “local site” synonymously. These are all test environments that allow users to make changes to their WordPress websites in a way that won’t affect the live site. Similarly, a “live site” or “production site” is a Website that you want visitors to see on the web.
What to Do Before Going Live
There are a few things you can do to set yourself up for success before you officially start pushing your development site to production.
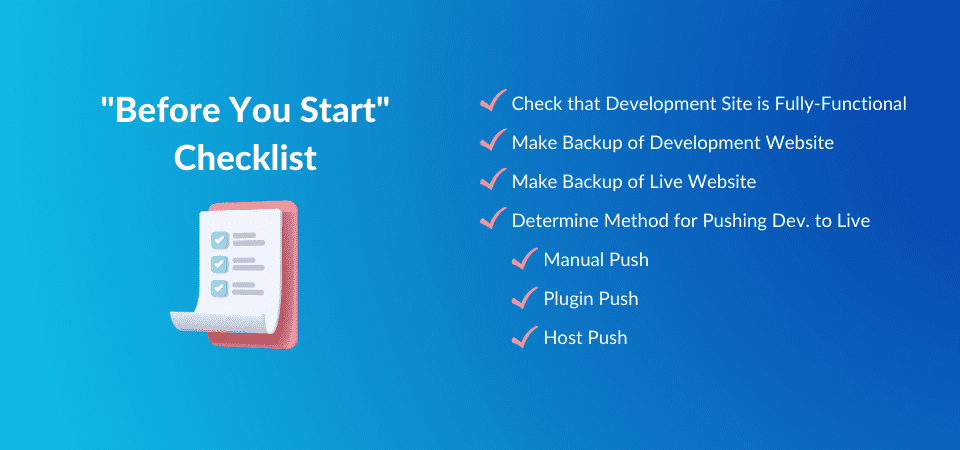
Image by Vector Stock Pro / shutterstock.com
- Make sure the dev site is fully functional – You will want to make sure your dev site is fully-functional before we push it to your live site. This is the whole point of working in a sandbox or staging environment—you can ensure that the changes you are making work correctly before letting them loose on a live website.
- Backup the both websites – You will want to backup your website(s). It is safest to go ahead and backup both your development site and your live site, though the live site is the most important of the two since it is the site you are trying to protect. There are some great WordPress backup plugins out there that can help. Aside from plugin backups, a good hosting provider may offer some sort of service for backups. Go to your host’s knowledge base to see what they do offer in the way of backups.
- Determine the right method. – Once your dev site is functional and your sites are backed up, you can start deciding on which option for pushing the development site live works best for you. We’ll cover three methods in detail below.
- Install an Under Construction Plugin – While you are working on your site, you could potentially run into some roadblocks that may cause your site to look slightly different. In this case, having an under-construction plugin in place can put your website visitor’s mind at ease as you are making these changes to your site. These plugins allow you to display a message, add your branding and in short prevent users from navigating your site while you are working on pushing your WordPress dev site live.
How to Push the Dev Site Live
There are three ways that we’ll explore pushing a WordPress dev/staging site to a live website. The options for you to choose from are:
- Use a WordPress Migration Plugin
- Manually Push your Dev Site
- and Use a Hosting Provider Migration Tools
All major Staging/Migrating plugins on the market use a freemium pricing model where some options are not usable unless you pay for them. It is worth looking at what is offered in the free versions of major migration and staging plugins to see if they meet your needs. In this article, we’ll be using the WP Migrate Lite plugin by Delicious Brains. The Pro version makes this process much simpler and pushes more than just the database of the dev site (the Lite version does not push Plugin, Media, or Theme files to the Live Site).
The Manual method is for those who are familiar with phpMyAdmin and cPanel. This approach is very hands-on and there are many steps. It is very worth your time if you are trying to learn more about how WordPress works on the backend. But, it will take you a good while to complete.
We’ve found that some cheap hosting providers have Staging Tools built into their platforms. That offers the easiest option for pushing a dev site to a live site. We will cover how Siteground’s Staging Tools make this a breeze.
Push Dev Site to Live with WP Migrate (Plugin – Free Version)
To push a staging site to your live website with a plugin, we’ll be using WP Migrate. It is one of the best WordPress migration plugins out there that has a free version. Plus, the pro version makes the process even easier.
*Note: Most Staging/Migrating plugins offer a free version but do more with a paid version
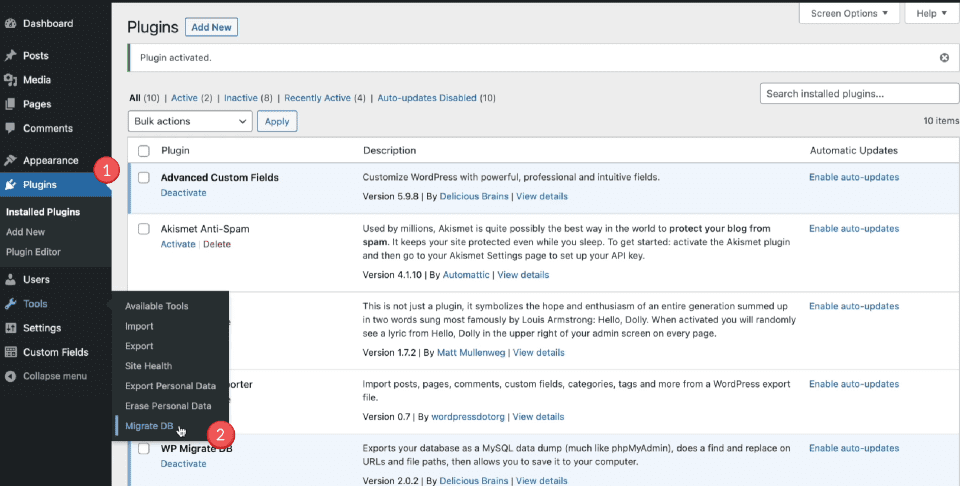
After downloading and activating WP Migrate to both your WordPress development site and your live site, navigate to your development site (keep both open in separate tabs). Inside Tools click Migrate DB.
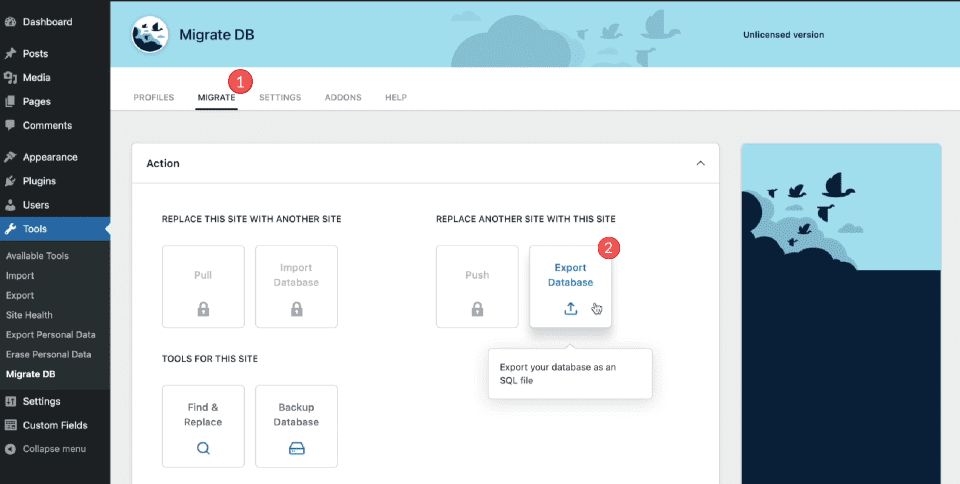
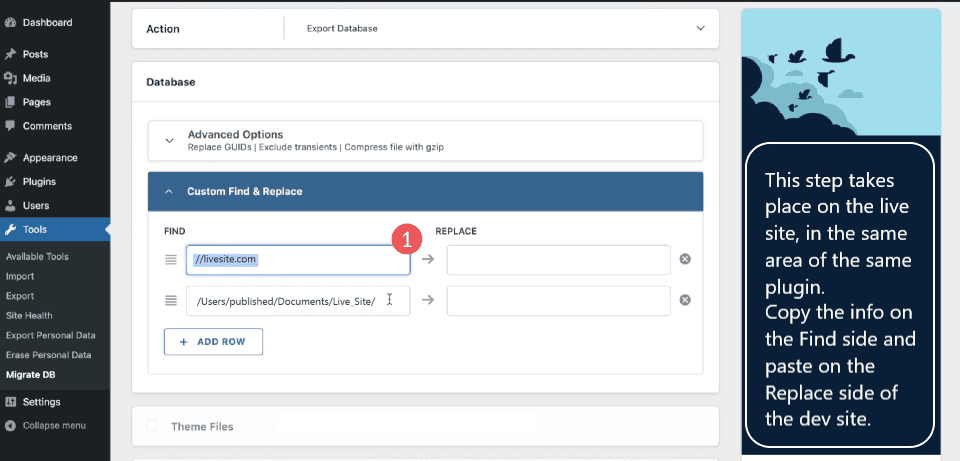
Near the top, click Migrate, and then under “Replace Another Site with this Site” click Export Database.
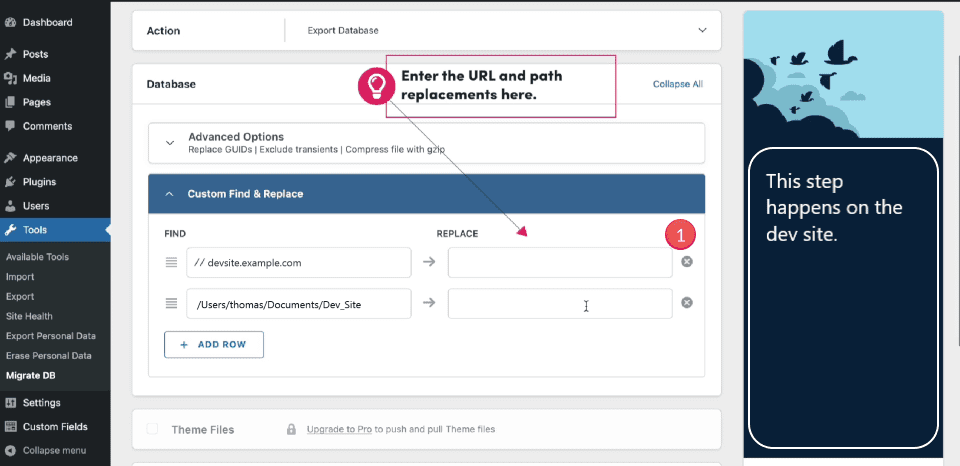
Then we get to a screen where we’ll replace strings within our database to match the strings on our live site. This ensures that when we import the migrated/pushed information from the dev site to the live site the site will not go down.
Notice on the right side the two Replace text boxes that will need to be filled in.
Next, we will go to the open tab that has our Live Site. We are going to the same place in the same plugin. We are referencing and copying what the live site has in the Find Column . These will be pasted back on the Dev Site.
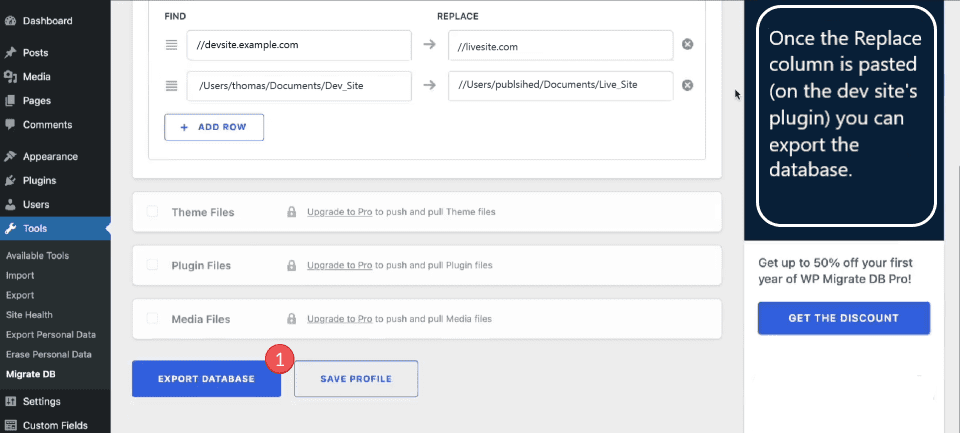
Once we’ve pasted the items from the Live Site onto the Dev Site (reference the previous 2 images if you get turned around) we are ready to Export Database on the Dev Site. This will download an exported file of the Dev Site’s database (Theme, Plugin, and Media files will not be included in this and need the Pro version of WP Migrate to push and pull easily between your sites).
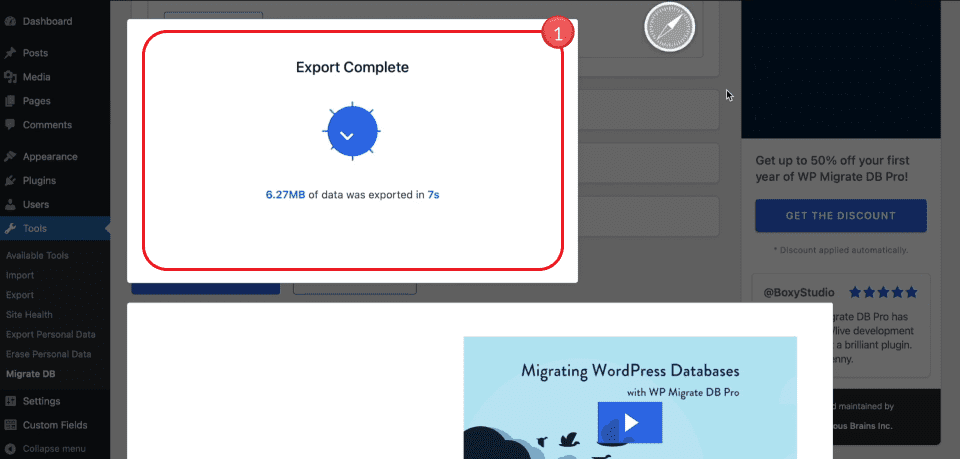
You should see an Export Complete prompt.
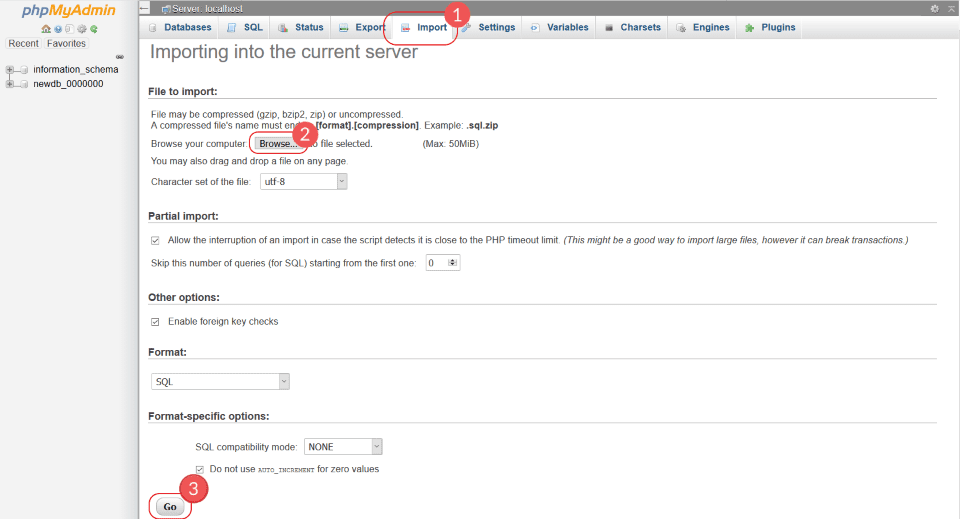
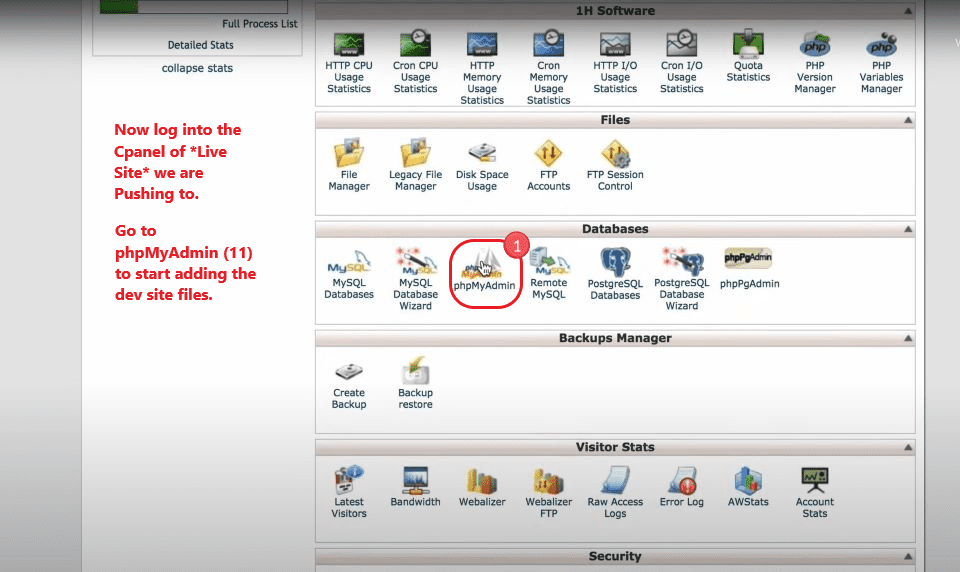
Now that we have the exported .sql file we need to do something with it. You will navigate to your Live Site’s C-Panel and under the “Databases” section click on phpMyAdmin.
Now that we have the exported .sql file we need to do something with it. You will navigate to your Live Site’s C-Panel and under the “Databases” section click on phpMyAdmin.

Near the top-center click on Import. On the page that loads, you will Browse for the file that was downloaded to your computer and then start the import by clicking Go on the bottom-left of the page. This will import the databases from the dev site to your live site.
Once this has happened, check your live site to make sure it is up and running and that the changes you made on the dev site are reflected on the live site.
Push Dev Site to Live Manually
It is entirely possible to Push a Development Site to your Live Site manually. This is not for the faint of heart but is really good knowledge for those trying to familiarize themselves with WordPress databases and the cPanel. These steps work with any hosting provider that still uses cPanel.
Download Necessary Files from Dev Site
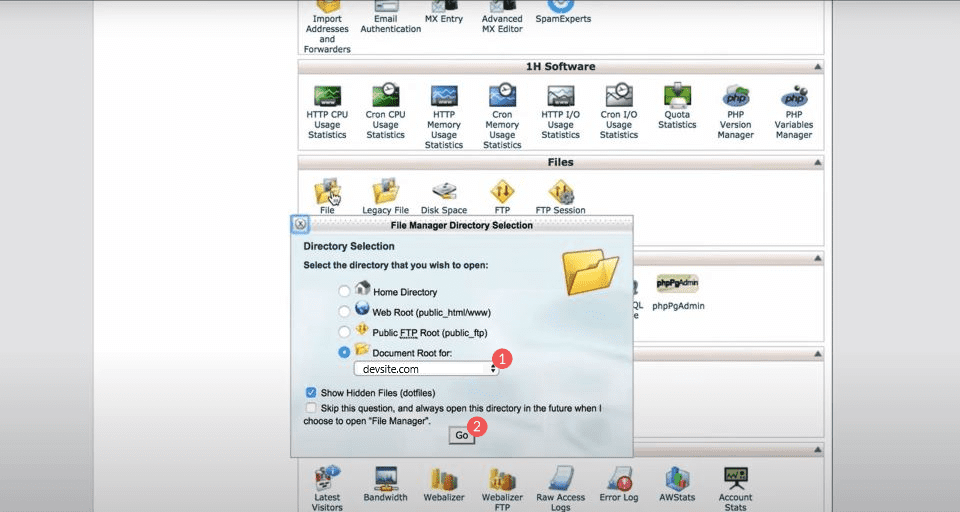
The first thing that we will do is navigate to your cPanel on your Development Site. From there, we will find File Manager and open the Document Root directory for your Dev Site and then click Go.
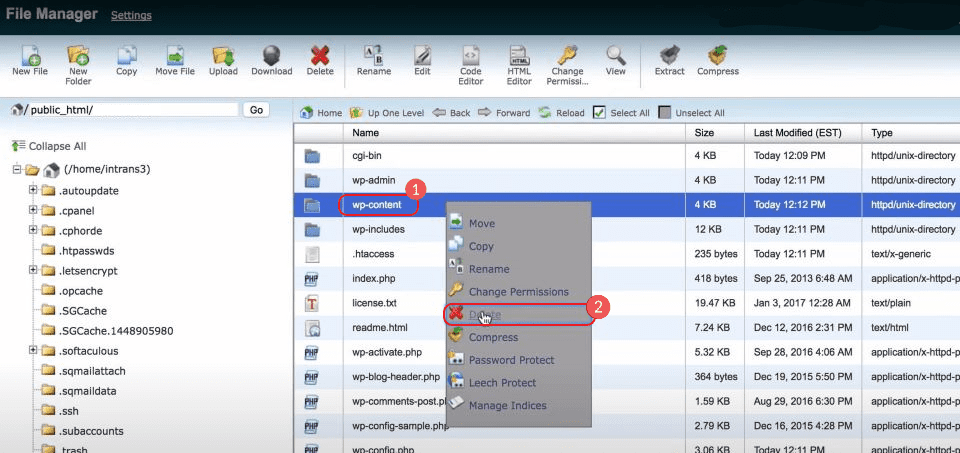
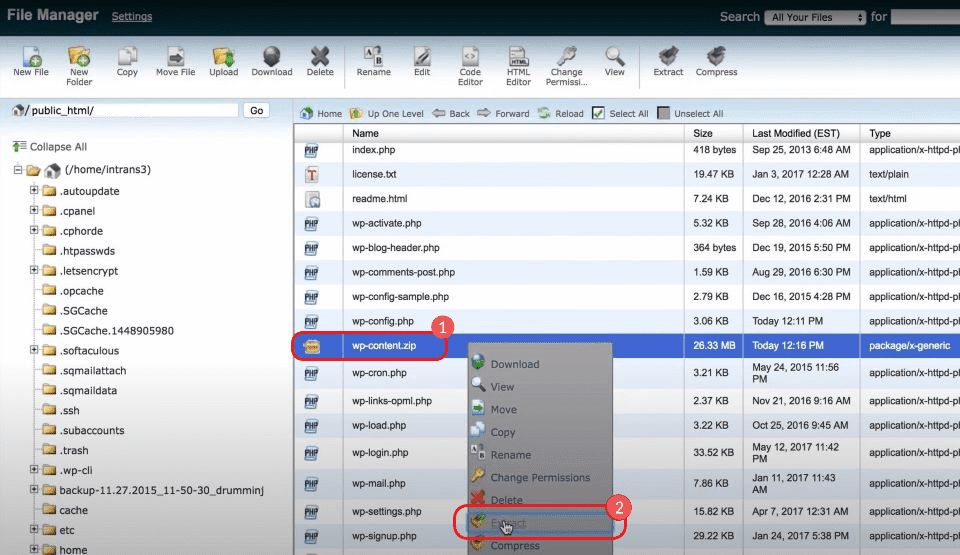
From there we want to click on wp-content and Compress that folder.
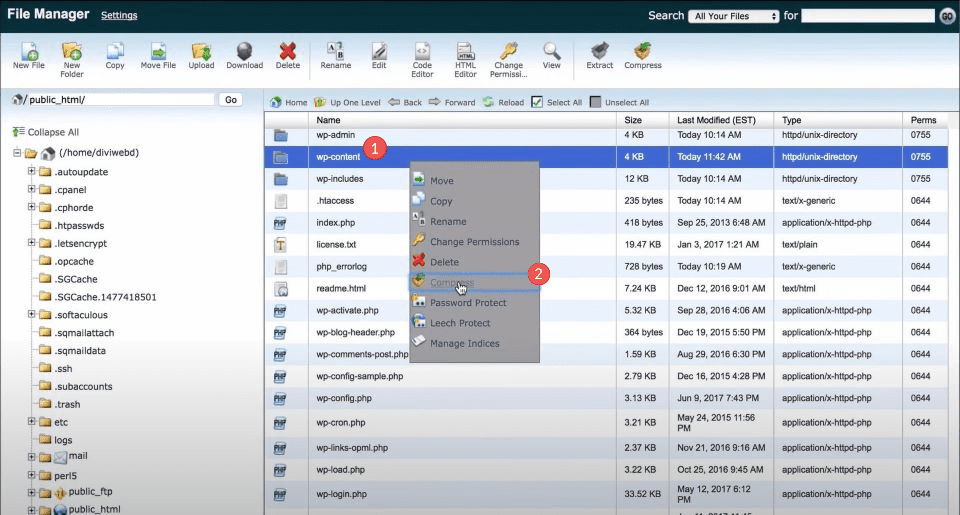
This creates a new compressed wp-content.zip file. Click the new zip file and select download.
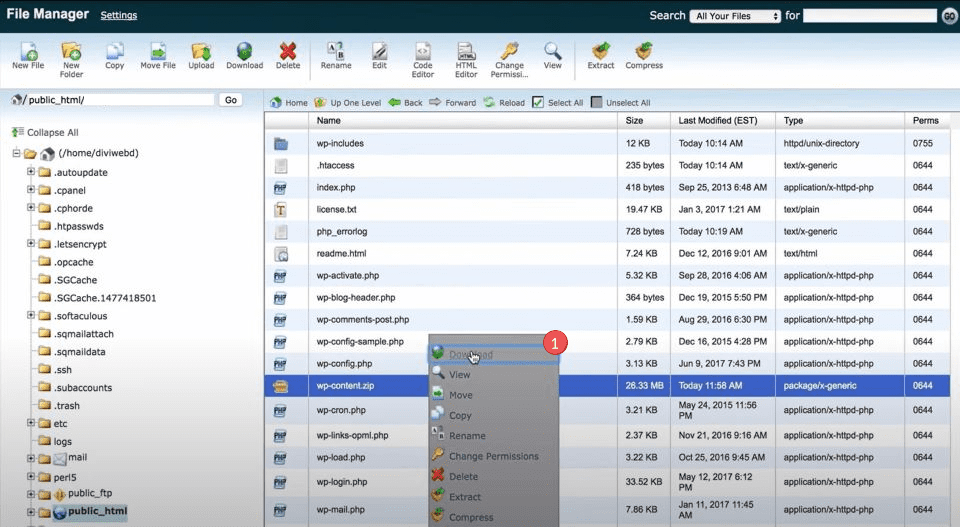
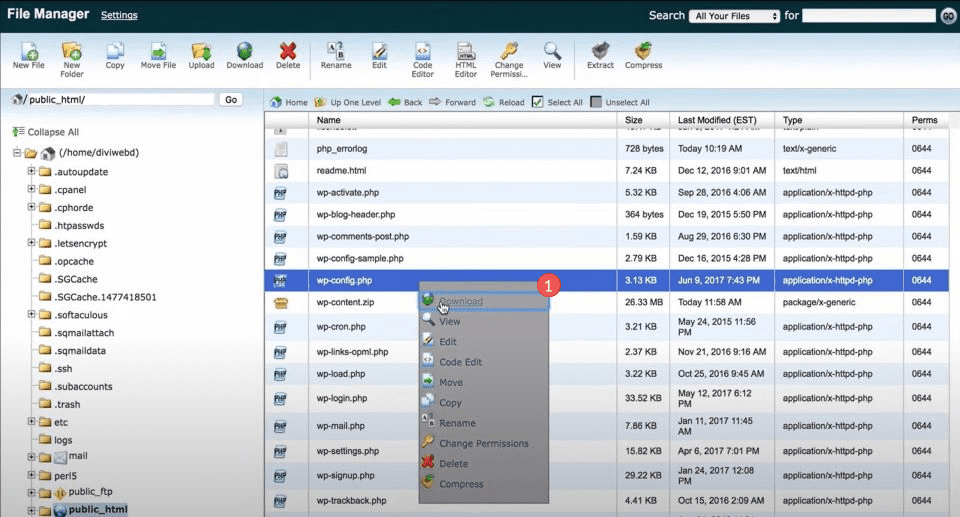
Next, we want to find the dev site’s wp-config.php file and download it to your computer as well.
Export Database from Dev Site
Next, go back to your cPanel; under Databases click on phpMyAdmin.

On the left-hand sidebar, click on the database that corresponds with the database for your WordPress dev site. Click Check All and then Export using the dropdown menu.
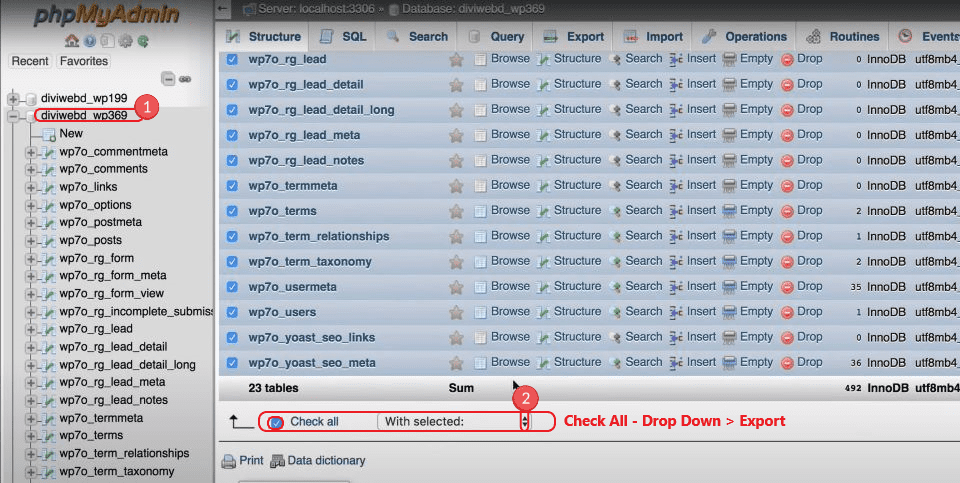
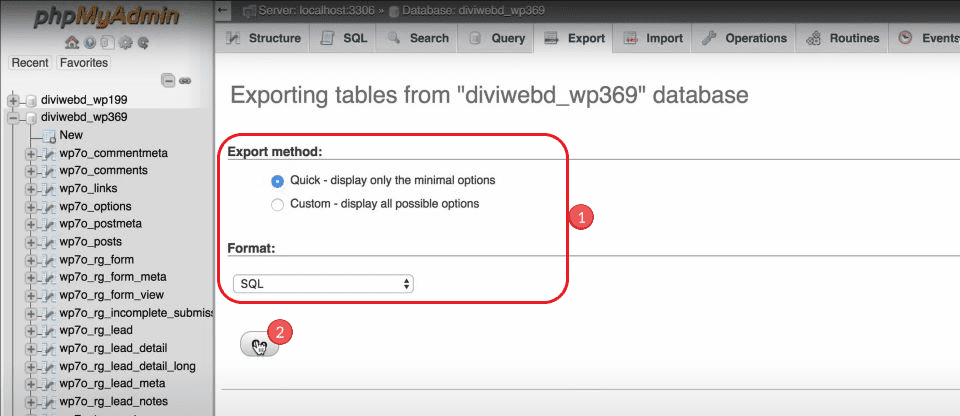
On the next screen, simply make sure the export method is set to quick and the format is SQL. Then click Go.
What we’ve done is download the critical files of your development site that we will upload and configure on your live site. This will give the live site the configuration you set up on your dev site while you were testing and building.
Import Database to Live site
Now, go to the cPanel of the Live Website (NOT the dev site). Click on phpMyAdmin.
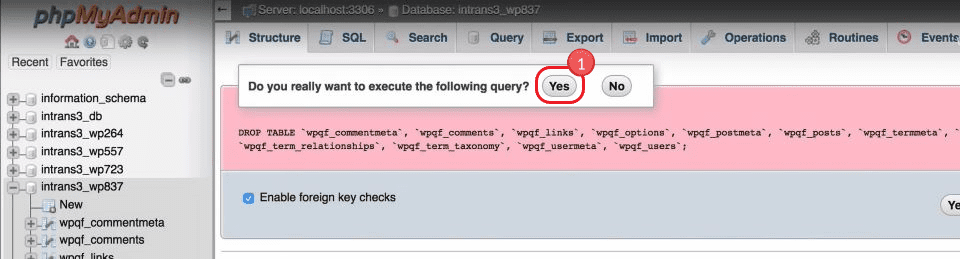
On the left-hand sidebar select the database for your live site. Then check all rows in the table. In the dropdown menu, choose ‘Drop’. This deletes the tables from your Live Site so we can replace them with the database we downloaded earlier.
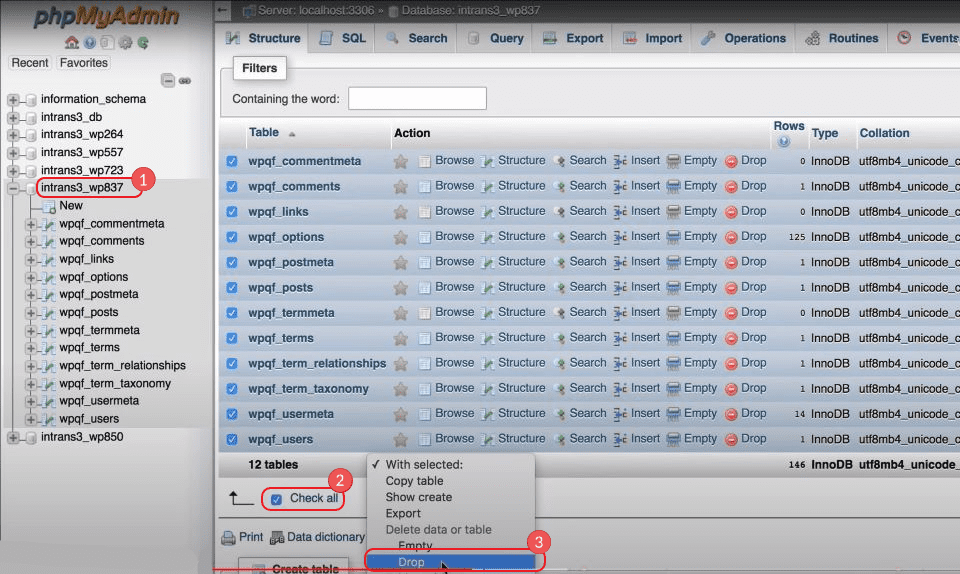
Confirm your choice to “Drop” the table by clicking Yes.
Next, quickly select Import from the menu above and click on Choose File.
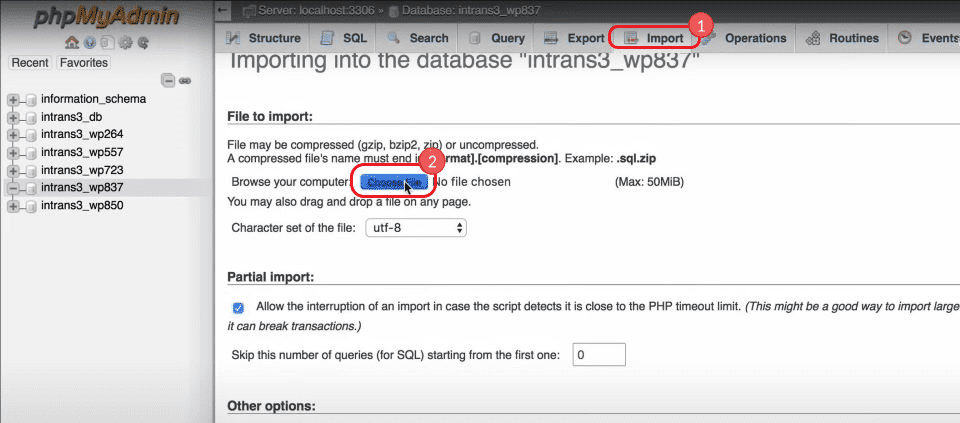
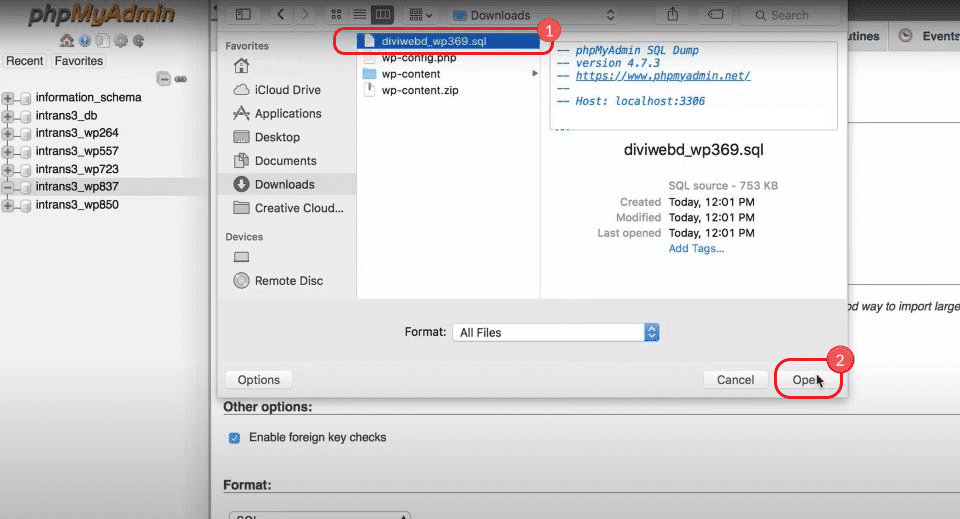
Next, follow the prompt to upload a file. Select the .sql file that we previously downloaded and click Open.
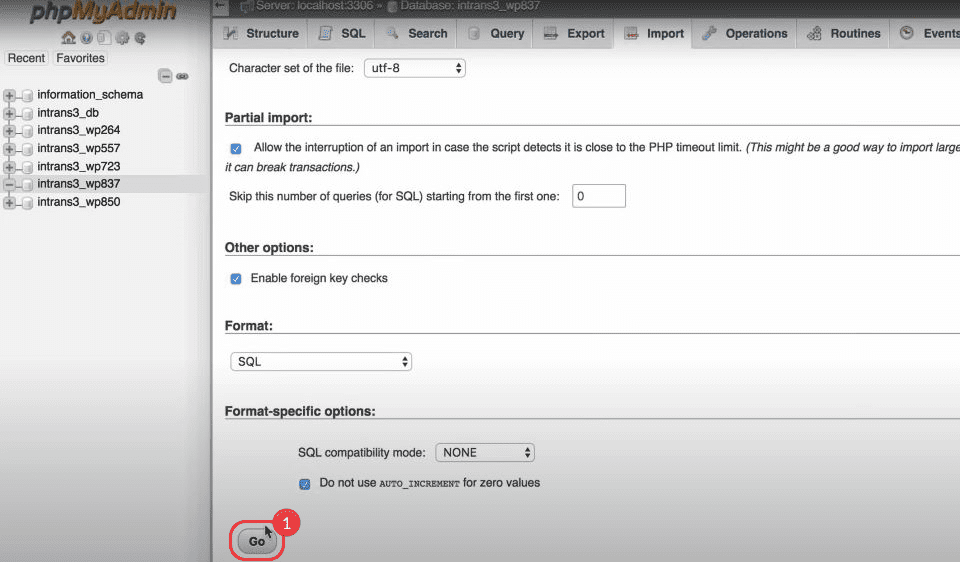
To finish uploading the database, click Go.
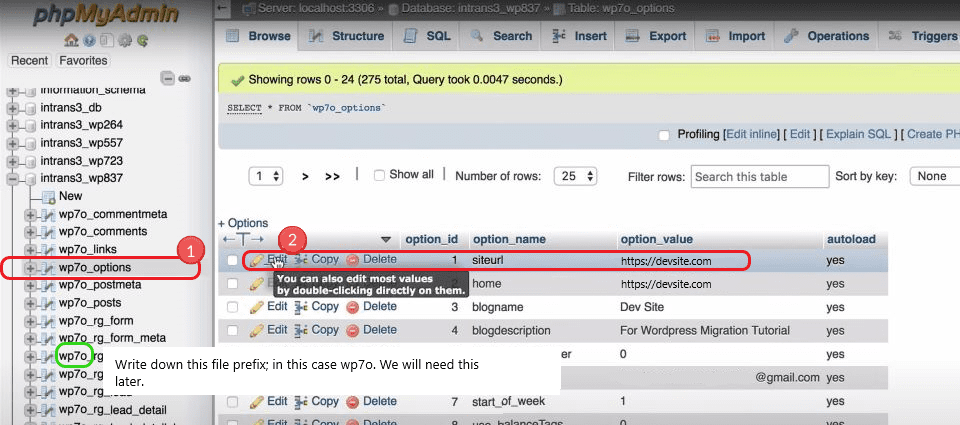
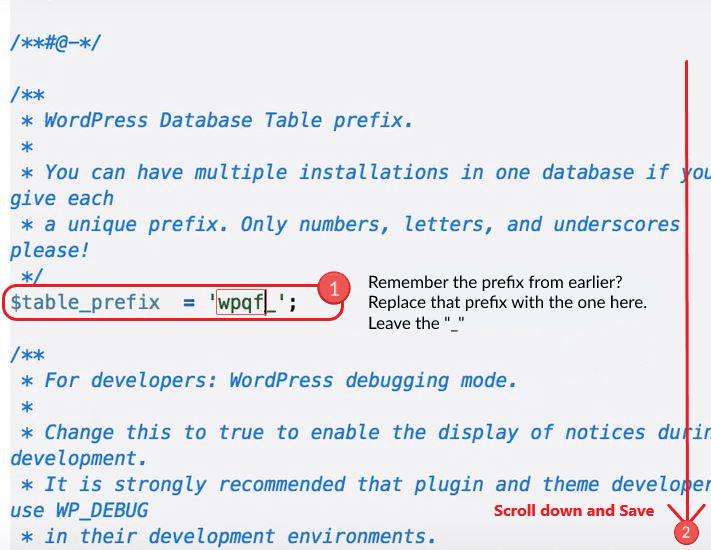
In this newly uploaded database, you will need to take note of the prefix of the files on the left-hand sidebar. We will need this in a future step.
Update Database with URL of Live Site
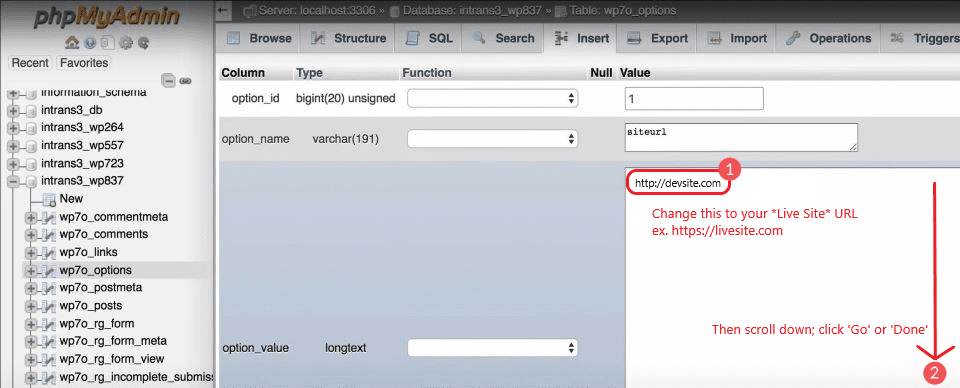
In the same database, select the _options table in the left sidebar. Under the list of available options, select Edit on the option with siteurl in the option_name column. *Also, make note of the database prefix for later.
Under the Insert tab within the database table’s siteurl options, We want to update the option_value of the siteurl. To do this, replace the existing dev site URL with the URL of the live site inside the value box on right. Then scroll down and click Go/Done.
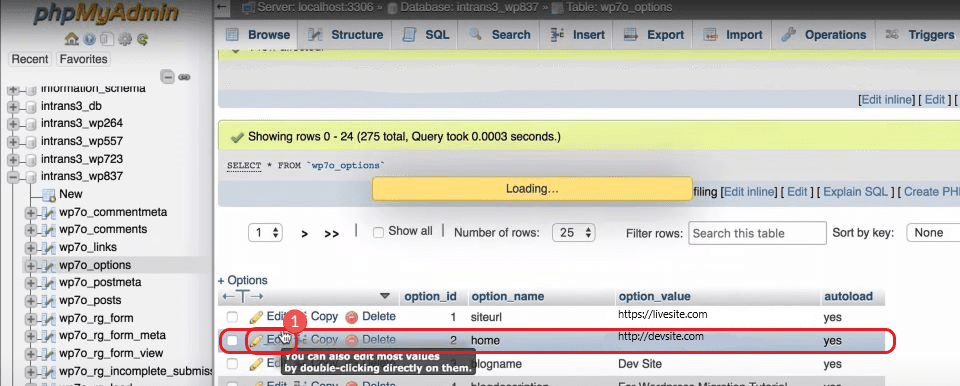
Once done, go back to the same options list for the _options table. Under the list of available options, select Edit on the option with home in the option_name column. Then repeat the same process as before (for the siteurl) and replace the dev site URL of home option_value with the live site URL.
Update Site Files (wp-content) on Live Site
At this point, we are done uploading and configuring our database! But, we aren’t out of the woods quite yet. We still have to replace some of the Live Site’s files from the dev site.
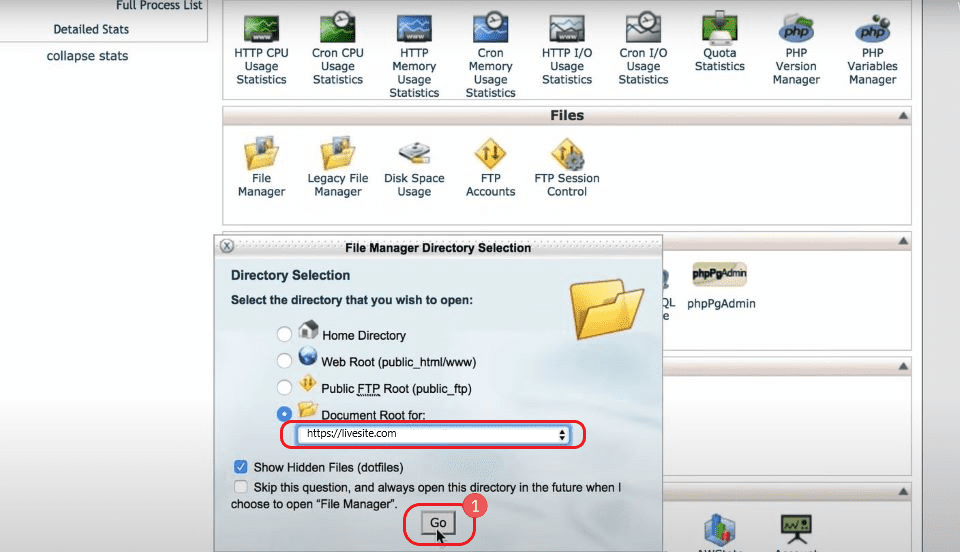
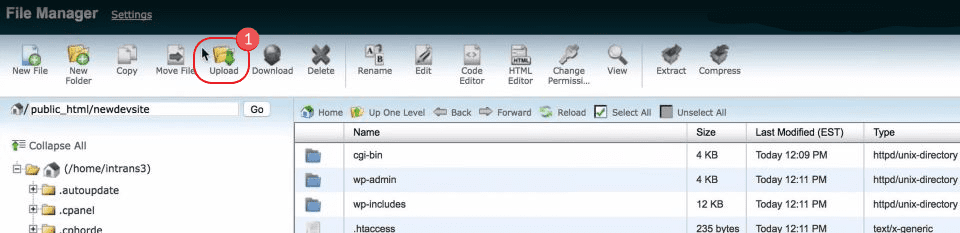
To do this, go back to the Live Site’s cPanel, click on File Manager, choose the live site, and click Go.
Click the wp-content folder and then delete it.
Next, click Upload at the top menu of the file manager.
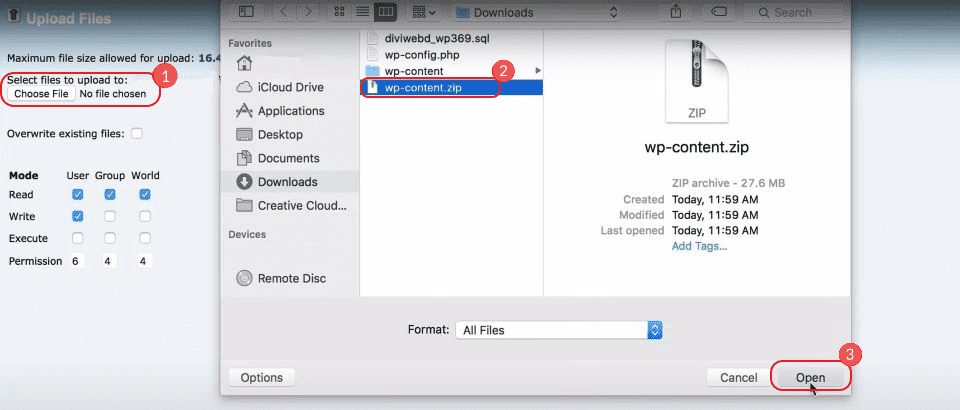
Click Choose File. Then select the wp-content.zip file and click Open.
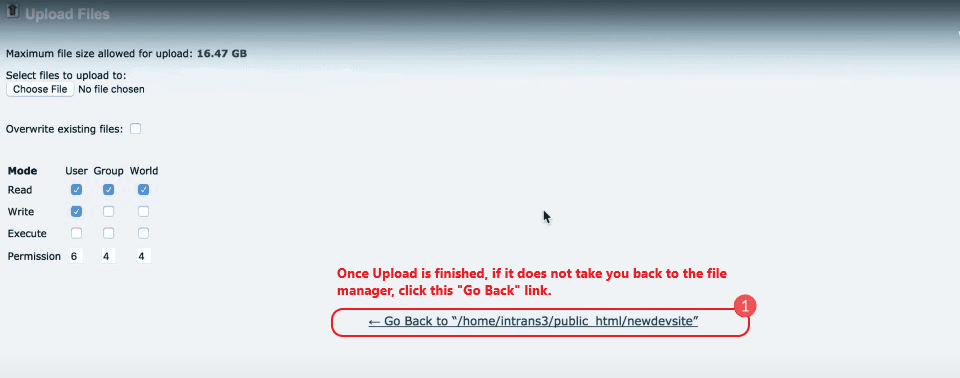
Wait for it to upload. If it finishes the upload but does not take you back to the file structure, click the Go Back to… link.
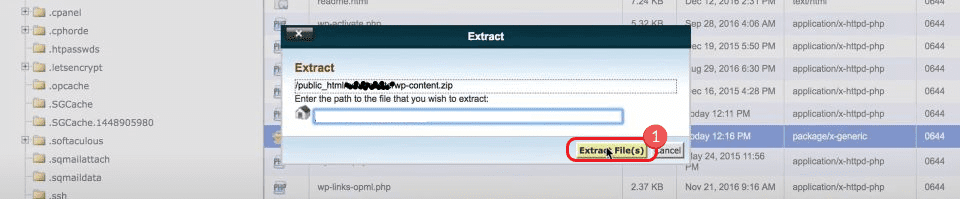
Find and click on the wp-content.zip file that you just uploaded and select extract from the dropdown menu.
In the Extract popup, click Extract Files. Once the extraction is done, you can delete the compressed wp-content.zip file as it can get confusing if you are doing this often.
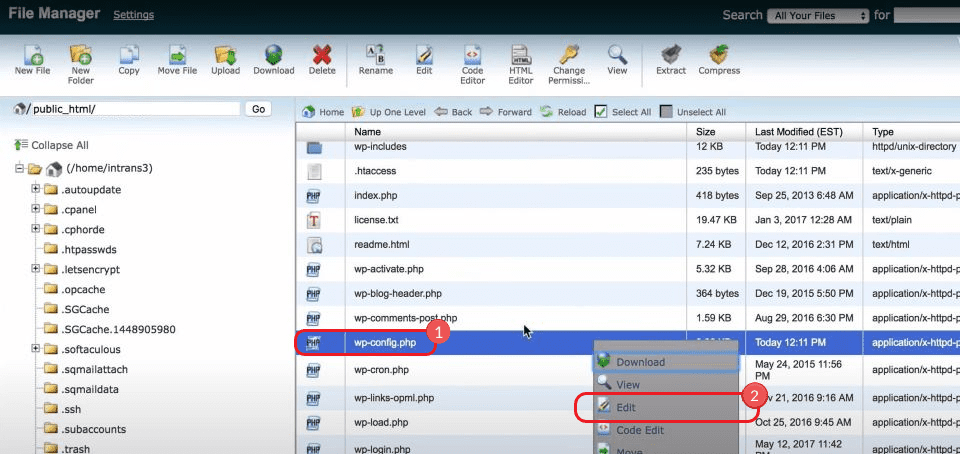
Update the wp-config.php File for Live Site
Once the wp-content folder is in place, select the wp-config.php file and click edit.
Search the document for table_prefix and replace the table_prefix with the prefix of the dev site database tables noted earlier. Then, simply scroll down and click Save.
That’s it! View the live site to see the changes we brought over from the WordPress dev site.
If that was one too many steps for you, many modern hosting companies that prioritize WordPress hosting offer robust (and easy to use) staging/migrating tools.
Next, we’ll show you how Siteground makes it easy to push a dev site to a Live Site.
Push Dev Site to a Live Site with Siteground Staging Tools
Hosting providers who specialize in WordPress installations have been getting better at creating tools for pushing dev/staging sites to a live website. One such hosting company is Siteground which happens to be one of our Divi Hosting partners. To push a dev site live using Siteground, you will need to have built your staging site using Siteground’s Site Tools.
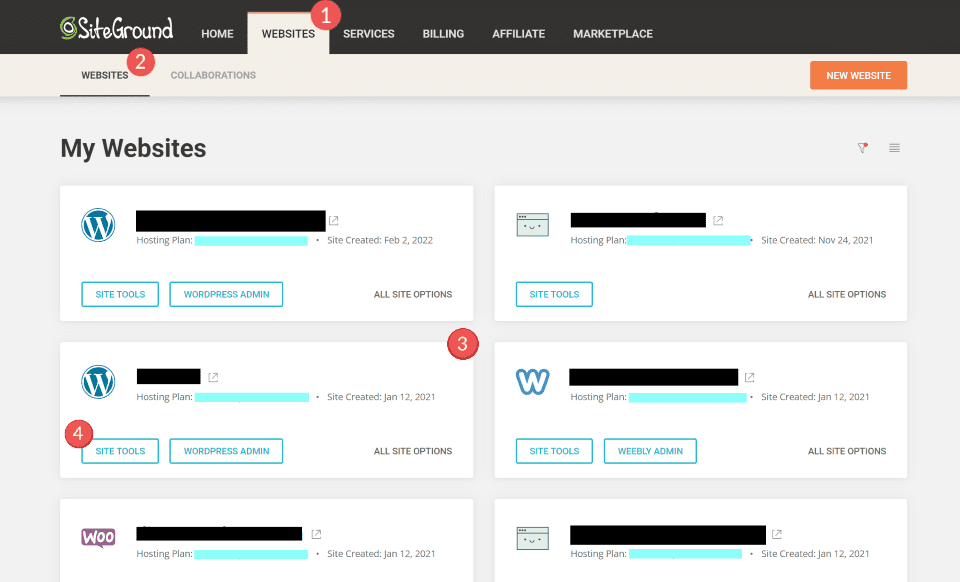
Once your site is up and running on Siteground, log into your Siteground account. Then click the Websites tab near the top. Select the sub-tab Websites as well. From there, choose the website you have in mind which is represented by each box on the page. Click on that site’s Site Tools button.
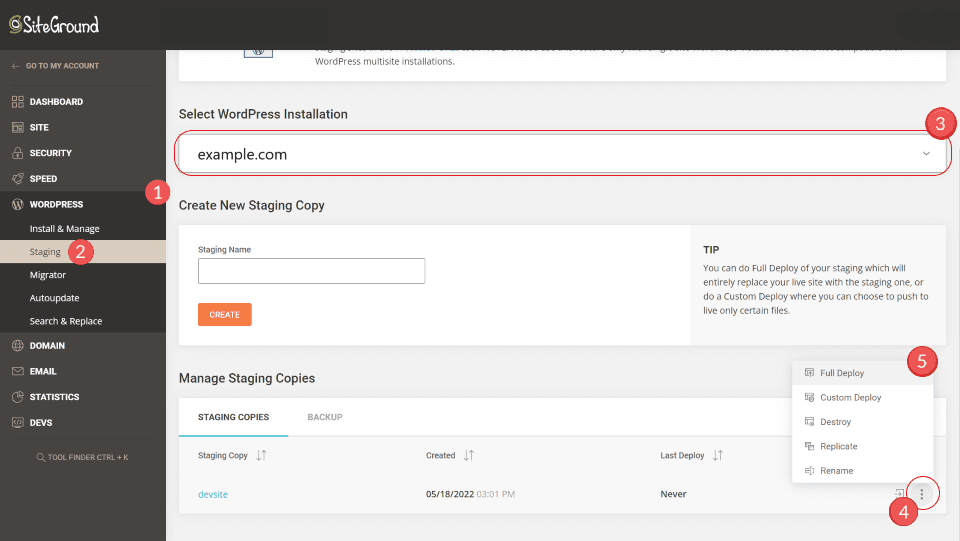
In the left sidebar menu, navigate to WordPress > Staging. From there, select the exact live site we have in mind in the Select WordPress Installation which usually is a list of subdomains for the particular TLD.
Under the “Manage Staging Copies” section near the bottom, find the staging copy you want to deploy and click the three-dots icon (⋮) to expand the options for the staging copy. Select Full Deploy from the list to deploy the whole staging site. You can also select Custom Deploy if you only had part of the staging site you wanted to be deployed.
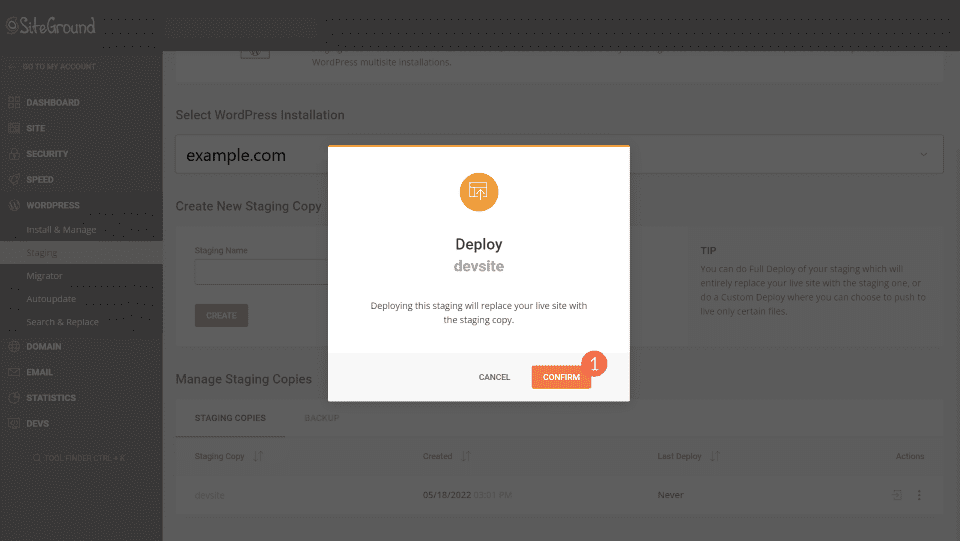
Finally, in the Deploy confirmation popup, click Confirm.
We’re all done after that! You should see a Success message in the top right corner.
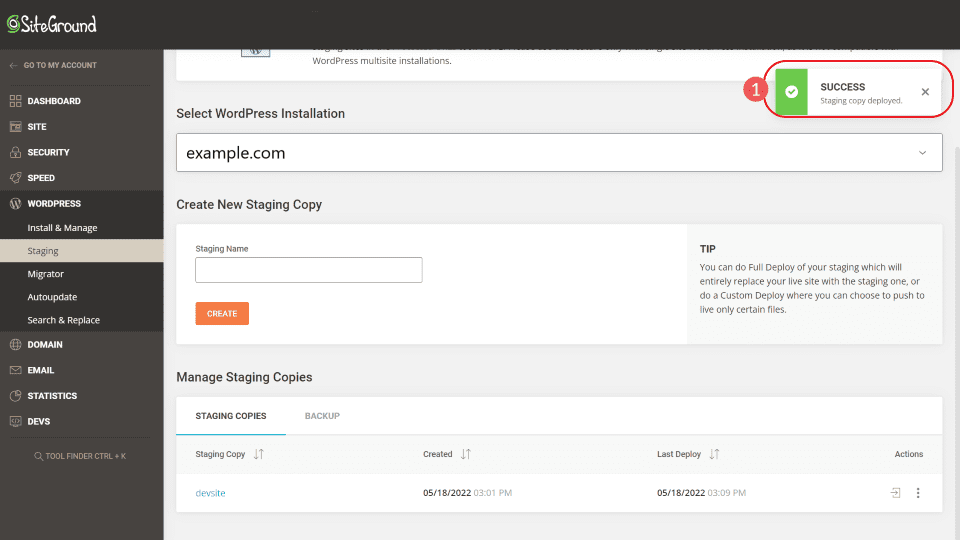
If you don’t see the success dialogue, you can reach out to Siteground support for troubleshooting.
What to Do After Dev Site is Pushed Live
All three of our methods for pushing a WordPress dev site to a live site are excellent options. But, with each, there are risks of temporarily breaking your site. While hopefully, the steps in this article got you to the desired result, here is something to look out for when you’ve finished your staging site push.
Once you’ve finished the steps you chose to take, open the Live Site and look through its pages. Make sure everything is loading and what you expected it to be. Then, go to your Admin dashboard and log in. You shouldn’t have any errors while logging in.
If there do seem to be database issues, you need to figure that out quickly. You can look at our How to Fix a Database Connection Error article to find some common areas to double-check. If push comes to shove, you can revert to the backup you created before starting and try the steps again.
- Check www and non-www versions of the site as well as HTTPS and HTTP. (Are the redirects happening as expected?)
- Check Main Navigation links as well as dynamic pages such as categories, posts, and custom post types. (Are your most recent changes from the dev site on your live site?)
- Ensure images render properly on newly updated pages.
- Monitor 404 broken links daily for a few days afterward.
Which Method Should You Use?
Each of the three methods covered in this article will get the job done. However, depending on your site or your hosting provider, some options will be a better fit than others. Here are some suggestions:
- If your hosting provider has staging tools, it is well worth your time to learn how to use those. These tools make the job as easy as it can be.
- Migrating/Staging plugins are the next best route. The Pro versions will cost some money but they will do the trick for you every time.
- Manually pushing a dev site to a live site might is not the best route for beginners since will require more time and technical knowledge and may end in you breaking your site. However, if you know what you are doing, this method does give you more control over the process which is preferred for some developers.
Conclusion
Knowing how to migrate a staging site to your live site is a powerful skill set to have. It allows you more freedom in experimentation on your sites without the worry of crashing the live site your visitors are actively on. Whether you are managing your own sites or those of clients, knowing how to push updates makes you a much more reliable webmaster.
Featured Image via Aleksandr_a / Shutterstock


I think there should be better tools to maintain staging and production ecommerce wordpress sites versions.
Currently it is super difficult to maintain a staging version of a highly used and grand turnover generating live site with constant traffic and many orders flowing into the database.
There should be separate woocommerce tables within the wo db to be able to better exclide those db parts from staging push to live…
I’m not aware of anything like that either. Staging sites are especially important with what you’re working on so I’m glad your thinking through advanced solutions for keeping your site up and up-to-date!
just what i have been looking for. thank you
Glad it was a help Harry. Best of luck migrating and staging!
Two extremely popular & reliable plugins are not mentioned in the article – Duplicator & All in on WP Migration.
You’d be correct! It was difficult to include all the examples that could have been included. It is a wide world out there for dev and staging sites.