
Have you ever made changes to your website and had it completely crash? It’s horrifying! Sometimes your site can break from a routine theme or plugin update. Or a site can crash without you having any idea what you did. That’s why it is important to have a staging site. Staging sites allow you to test those updates and changes beforehand, so your site doesn’t crash unexpectedly.
Creating a staging site for WordPress isn’t as hard as you might think. In this post, we’ll cover the basics of a WordPress staging site: what it is, different ways to make one, managing it, and why you need one in your life right now. Seriously, you do.
What is a WordPress Staging Site?
A WordPress staging site is an exact copy of your live website. It allows you to make changes to your site in a safe environment without worrying about putting your site into maintenance mode. While using a staging site, your live site is chugging along for you, making money, or providing users with the excellent content they expect from you. Additionally, you can use a staging site to tinker with your site to your heart’s content. You won’t have to worry about disturbing anything on the live version of the site that the rest of the world sees. Once you have finished updating your staging site and confirmed that everything is working correctly, you can push those changes to the live site without disruption.
Finally, a WordPress staging site can enable you to test new functionalities without breaking anything. Well, you might break something, but it’s a copy of your site, so break away!
Who Needs a WordPress Staging Site?
Staging sites are for anyone who wants to avoid the risk of downtime on their live site while making updates. This could be a web developer, a content writer, a large corporate website, a small business owner, or a blogger who wants to maintain their own website. A staging site is a MUST for anyone with a website they want to keep up-to-date and functioning properly.
The Difference Between a Staging Site and a Development Site
A development site is a new WordPress install where you can test out different themes, designs, plugins, or custom features. It’s a site that is in the development (planning) stages. A staging site, on the other hand, is a site that you’ve already launched and need to update. These updates usually include adding new pages, plugins, or performing system updates safely.
With a WordPress staging site, you make a copy of your live site to test out some new things. You can add new content or troubleshoot any issues that may have come up since the last time you worked on it.
How to Set Up a WordPress Staging Site
Before we learn how to set up a staging site, let’s go over the ways that you can create one. There are three ways that you can create a new staging site.
- With a Plugin – You can create a staging site with a plugin such as WP Staging.
- With a Hosting Provider – You can use a host-provided staging environment on Bluehost, Flywheel, WPEngine, or others that allow you to make staging sites in just a few clicks.
- Manually – You can always create a staging site manually. This requires more technical expertise, of course, but not as much as you might think.
Each of these methods varies in required expertise, so let’s go over each one. Then you can make an informed decision on which option is best suited to you.
Creating A WordPress Staging Site with a Plugin
For this example, we’ll show you how to make a WordPress staging site with WP Staging. WP Staging is a versatile plugin that will allow you to create a staging site in a short amount of time. It creates a folder or subfolder on your main WordPress install, then places all database tables, media, pages, posts, and plugins into the new folder creating a copy of your site.
WP Staging is a great plugin to use with easy steps to get your staging site up and running in no time. Let’s cover the steps to create a staging site with the WP Staging plugin.
1. Install and Activate the WP Staging Plugin
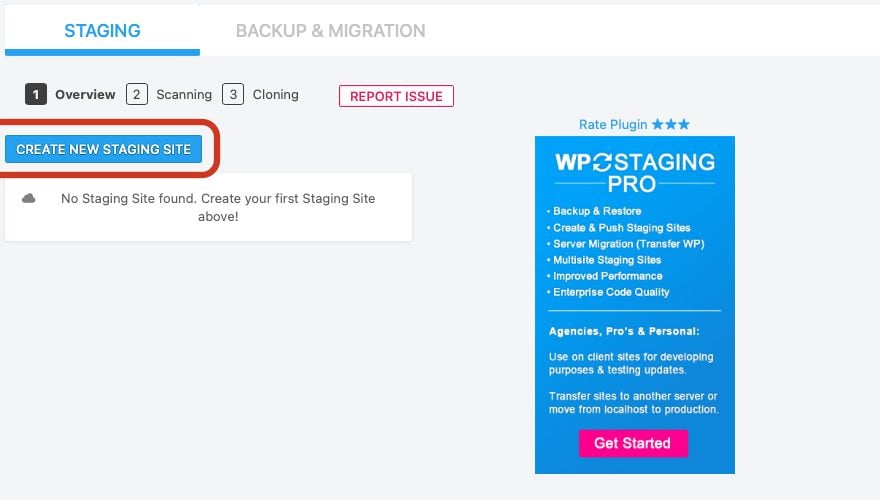
Install WP Staging into your WordPress website. Once installed, look for the WP Staging tab on the left side of your WP Admin panel. Click on Staging sites, then create a new staging site.
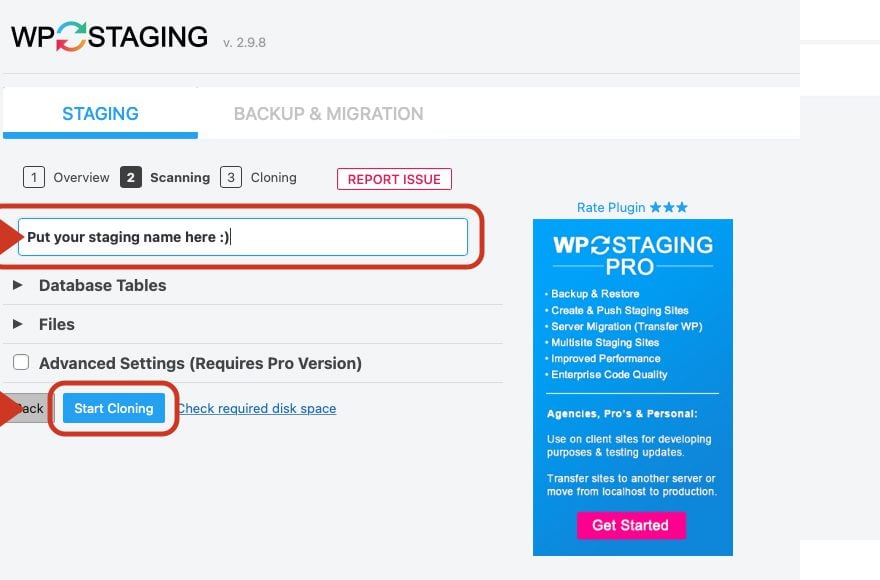
2. Name Your New Staging Site
You’ll want to name your new staging site (it can be anything you like), then click the Start Cloning button.
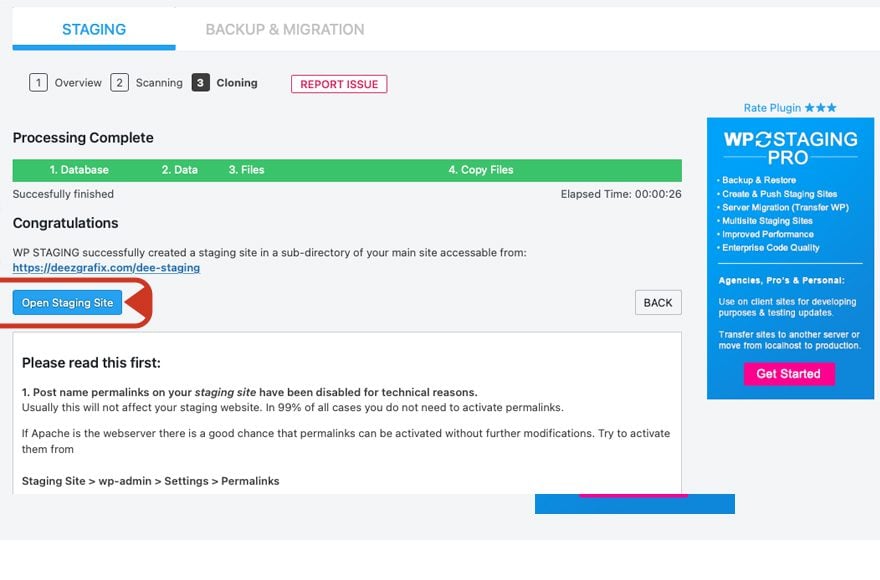
3. Clone Your Website
The cloning process can take some time depending on the size of your site. During the cloning process, WP Staging will copy your database tables and files and change all links to the new site name you used in step 2. Once the process is wrapped up, you’ll have the option to open your new staging site which will require you to log in (using your WordPress username and password).
WP Staging makes it easy to tell that you’re working on your staging site because they alert you with a bright orange-colored panel at the top of your screen.
![]()
Although WP Staging makes it simple to create a WordPress staging site, there are some limitations to what it can do. To be able to merge your staging site with your live site in one click, you’ll need the Pro version of the plugin. Additionally, you’ll only be able to clone smaller sites with WP Staging (free version) because there is a file size limitation with the basic version of the plugin.
If you choose not to update to the Pro version of WP Staging, you can push your staging site live, but it will require additional steps to accomplish. Below you’ll find the steps required to push your staging site live with the basic version of WP Staging. Please note that if you proceed with the manual process of pushing your staging site live, your database will be overwritten during the process. If you have errors, you’ll need to either restore your staging site from a backup or create a new one.
1. Backup Both Your Live and Staging Sites
The first thing that you’ll want to do is complete backups of both your live and staging sites – preferably with a plugin – before pushing your cloned site to the live environment. This is an important step that ensures you can recover one or both of them should an error occur. Caution: If you have a large site, it might make things easier on you to purchase the Pro version of WP Staging. If you’re feeling like a WordPress superhero, and want to proceed, let’s press on.
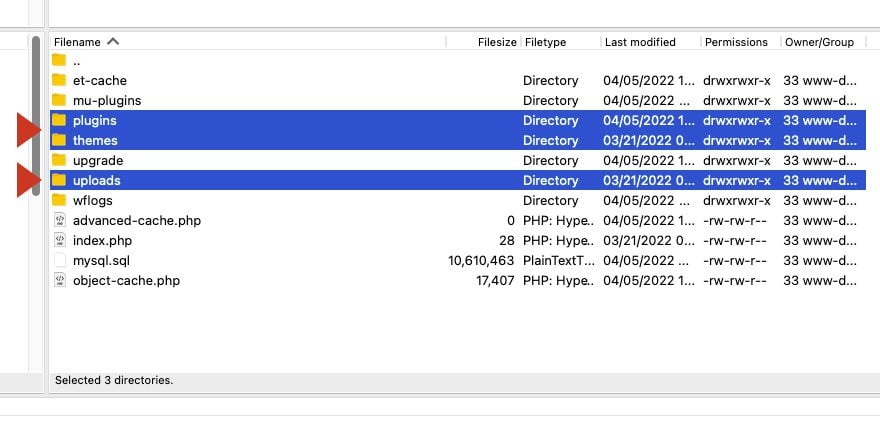
2. Copy Your Files
For this step, you’ll need to have FTP access. You can use an FTP program such as FileZilla to copy the folders wp-content/uploads, wp-content/plugins and wp-content/themes from your staging site to your live site.
3. Migrate Your Database
The Pro version of WP Staging is the easiest route to take here. But, if you’d like to use the free version of the plugin to accomplish this step, you can perform manual search-and-replace operations in your staging database. To do this you’ll need to use a plugin like Better Search Replace. Install and activate Better Search and Replace. Once activated, navigate to Tools/Better Search Replace in the WordPress admin panel.
For this example, let’s use this site structure to illustrate: https://yoursite.come/staging.
Type in the following into the Search For input field: yoursite.com/staging.
Next, enter the following into the Replace With input field: yoursite.com.
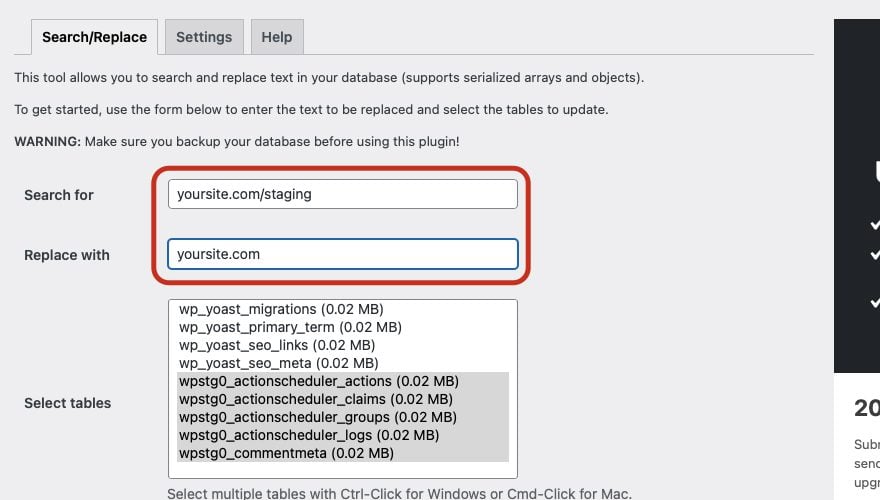
Make sure to enter your information carefully.
You’ll want to avoid using any prefixes (HTTP) in your search. If you do, errors will most assuredly occur. Check your spelling carefully before proceeding. And if you haven’t already, make sure you have an active plugin for database optimization and backups just in case.
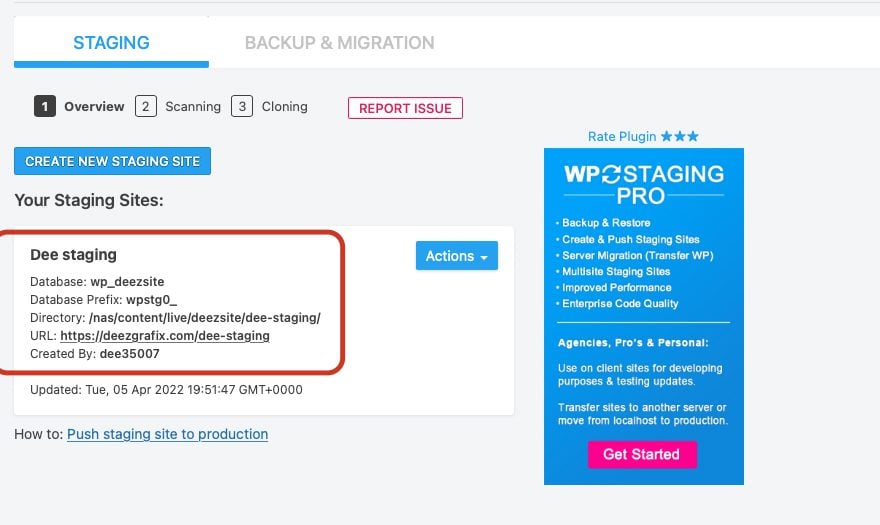
Be sure to select all database tables that begin with wpstg0_(the prefix listed in the WP Staging overview screen). To find the correct database prefix, you can check your staging site overview on the main screen for WP Staging. Make sure not to copy any other tables except the ones that begin with your site’s database table prefix located in the WP Staging overview screen.
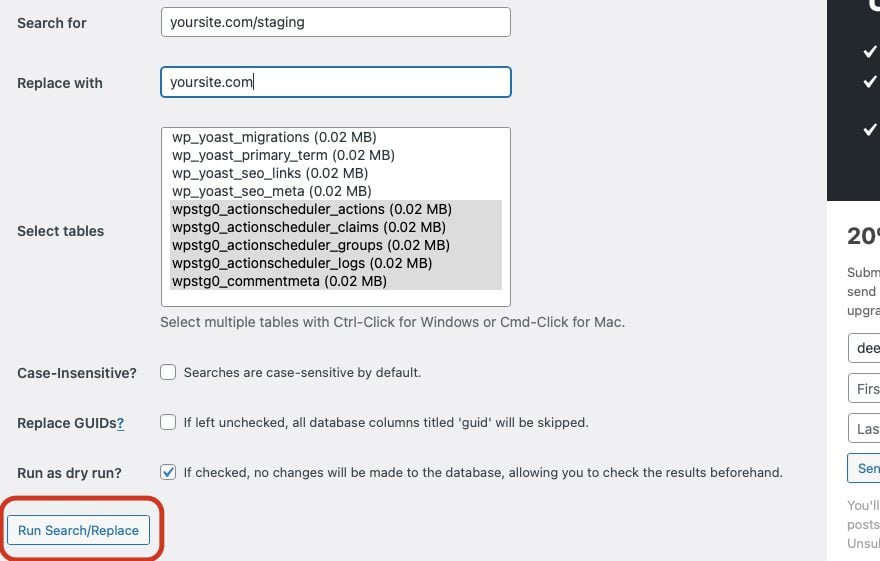
Once you have all database tables with the proper prefix selected, click the Run Search/Replace button to start your search and replace operation.
Note: It’s a good idea to do a dry run before proceeding with this step. This will alert you to any potential errors that may occur during the operation.
Once you do a dry run and everything seems to have proceeded successfully, click the Run Search/Replace button to start replacing your tables. Make sure to deselect the “dry run” checkbox this time.
4. Use phpMyAdmin to Delete the Last Value for the Staging Environment
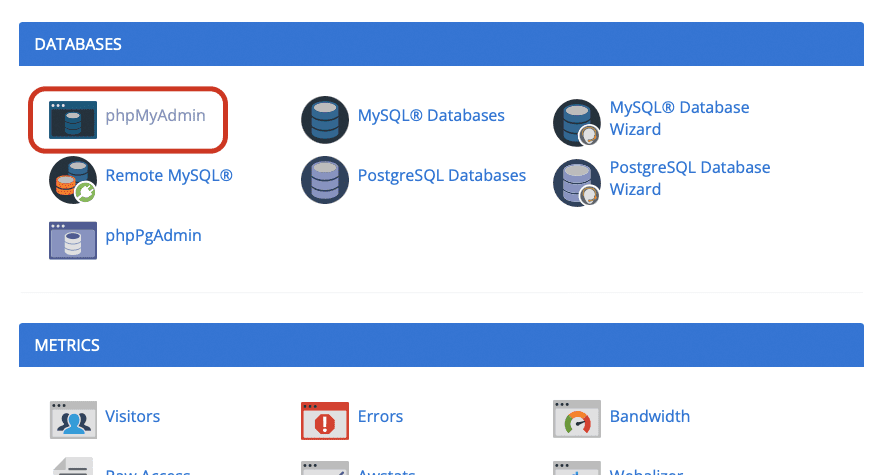
The next thing that you’ll do is to replace the database’s value, which tells WordPress whether your site is live or staging. This is the special value that WP Staging uses to show the authentication screen at login. To accomplish this, you’ll need to use a database administration tools such as phpMyAdmin to delete this value: wpstg_is_staging_site.
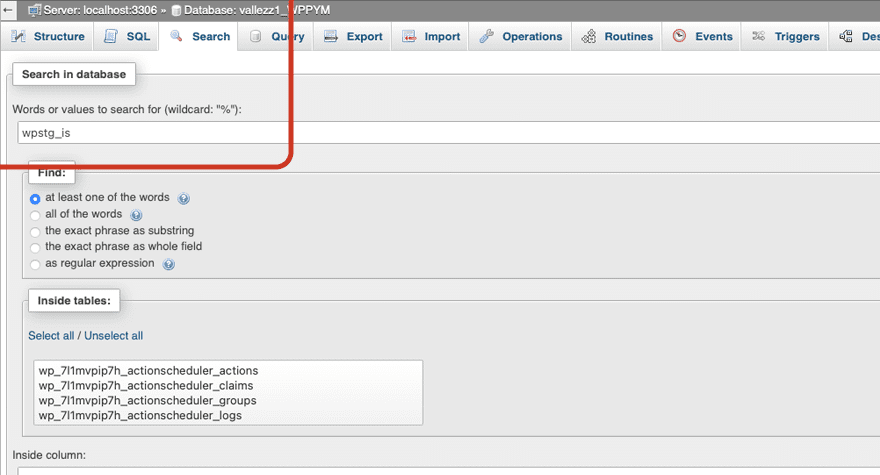
To find the value, log in to CPANEL, navigate to PHPMyAdmin, then click on it to launch the tool:
Click the “SEARCH” tab, then enter wpstg_is in the search field:
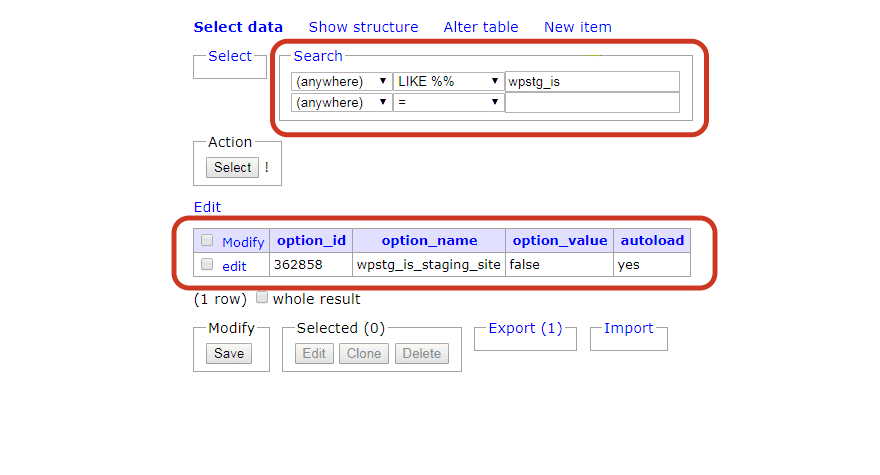
You can either delete the value or set it to false.
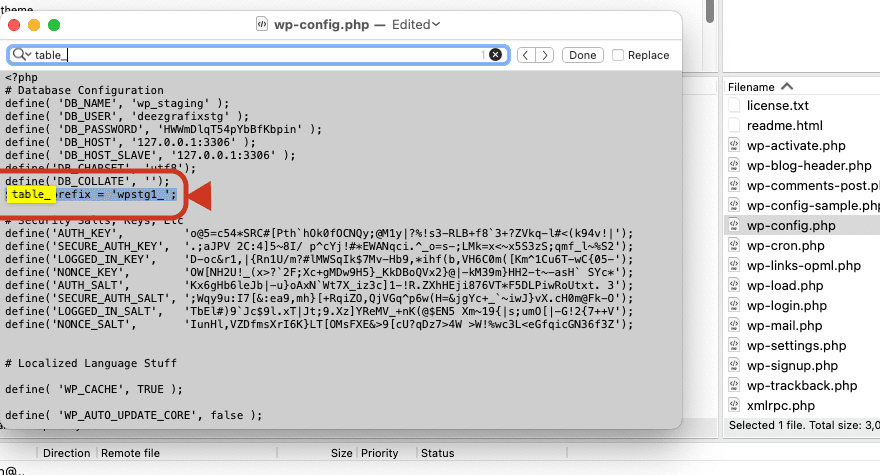
5. Change Your wp-config.php File:
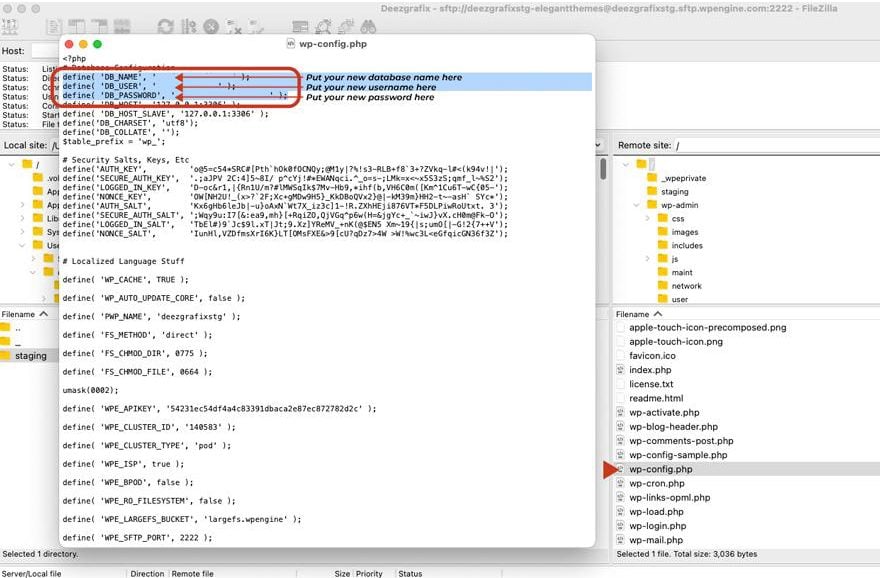
This is the final step required to successfully copy your staging environment to your live site using the basic version of the WP Staging plugin. For this, we’ll go back to the FileZilla program. Log back into your FTP client program and open the wp-config.php file on your live site. This file is located in your main WordPress folder. Open the file with FileZilla by right-clicking on it and clicking “view/edit”. Change the value of the table prefix from wpstg0_ to wp_ to tell WordPress to use all of the database tables of your staging site.
Once you save the changes to your wp-config.php file, you can open your live site in your browser to see that your site is now displaying the contents of your WordPress staging site.
Finally, after you have confirmed all of the changes you made on your staging site, you can safely go back into FileZilla and delete the subfolder for your staging site if you choose not to keep it.
As you can see, there are a few steps to creating a WordPress staging site with a plugin, but it isn’t complicated as long as you follow the steps closely and take your time pushing the site live.
Next, we’ll go over how to create a WordPress staging site with a Host such as Bluehost, Flywheel, or WPEngine.
Creating a WordPress Staging Site With Your Site’s Host
Many companies that host WordPress sites offer the option of a staging environment. Good managed hosts such as Bluehost, Flywheel, and WPEngine are great options to use if you’d like the ability to create a WordPress staging site in just a few steps. Let’s take an in-depth look at each of these host providers to learn how to create a staging site within each platform.
Bluehost
Recently, Bluehost began offering the ability to create a staging environment within your WordPress admin panel. This is a very important development that many Bluehost users may not be aware of. The steps to create a staging environment with Bluehost are ridiculously easy. Let’s take a look at what is necessary successfully create a staging site with Bluehost.
1. Logging In
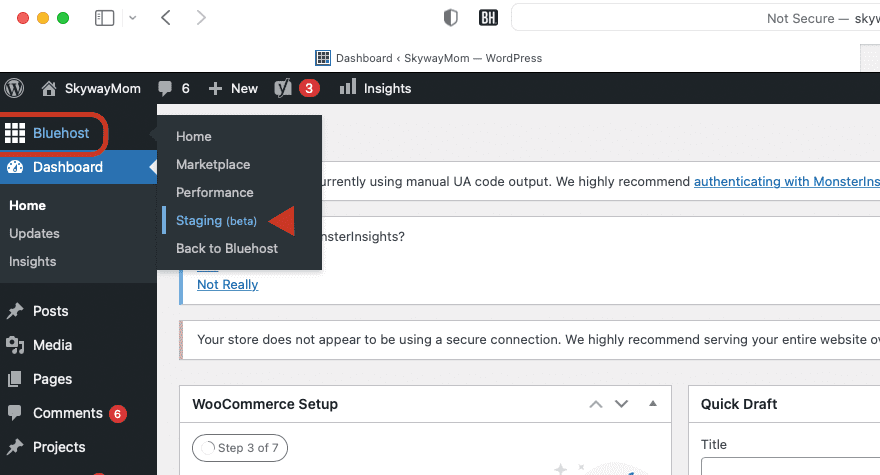
Log in to your WordPress site and click Bluehost, then Staging (beta) in the admin panel. Note: The staging feature with Bluehost is still in the developmental stages but performs quite well.
2. Click on Create Staging Site
Click Create Staging Site. It may take a few minutes to create your site.

Your screen will refresh when the staging site is successfully set up. You’ll have the opportunity to log in to your staging site by clicking Go To Staging Site.
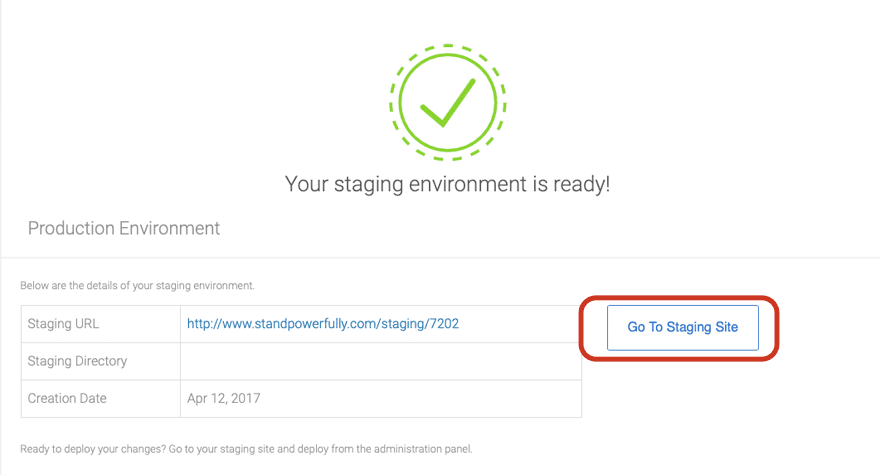
Once you click the Go To Staging Site button, you’ll be redirected to the staging site where you can make any changes that you’d like to your site while the live version is visible to your users.
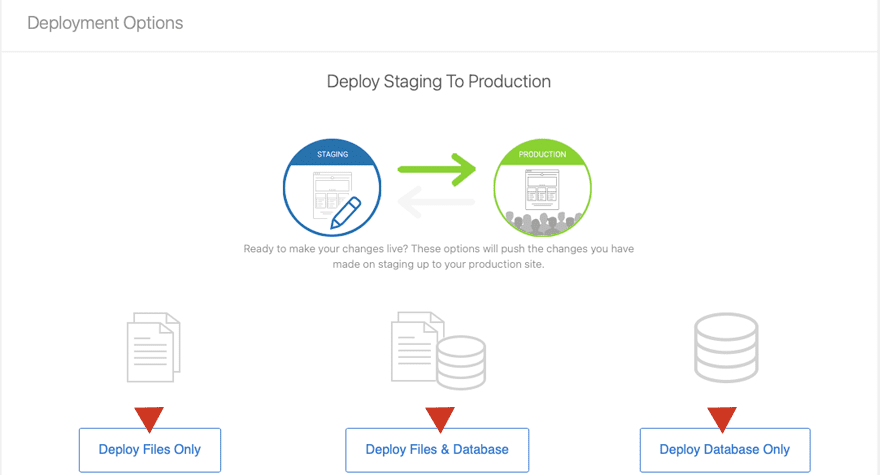
After making your changes, Bluehost makes it easy to deploy your staging site to overwrite your live site. There are a few options for you to choose from. Deploy Files Only, Deploy Files & Database, or Deploy Database Only. Choose your option and click the corresponding button.
The process may take a few minutes depending on the size of your site and its contents. Once the process is complete, you have successfully deployed your staging site to production, overwriting your live site. Simple, right? Now that we’ve learned how easy it is to create and deploy a staging site with Bluehost, let’s take a look at the steps to create one with Flywheel.
Flywheel
Creating a staging site is a bit different from Flywheel. To create a staging site, you’ll want to first locate the site you wish to work in by searching your sites if you have more than one. Use the search area at the top of your Flywheel dashboard to locate the site for which you want to create a staging environment.
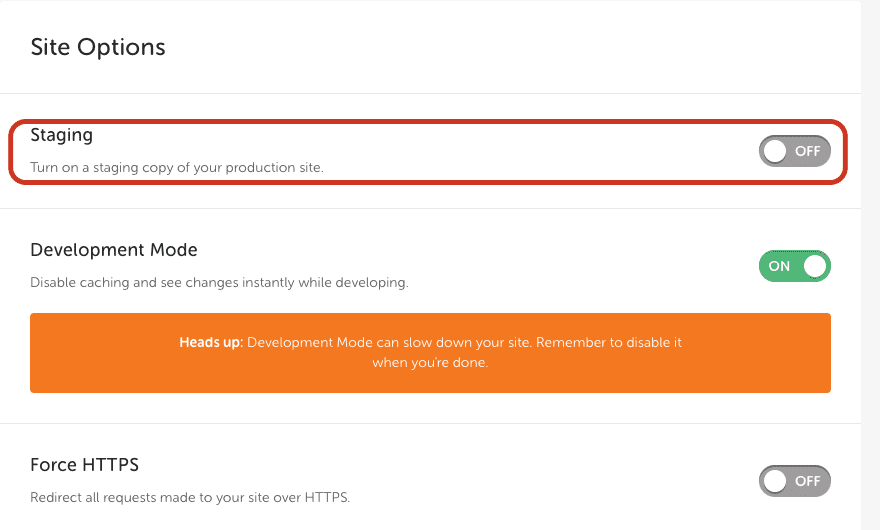
From there, click on the Advanced tab, then scroll down and locate Site Options. Toggle Staging to On.
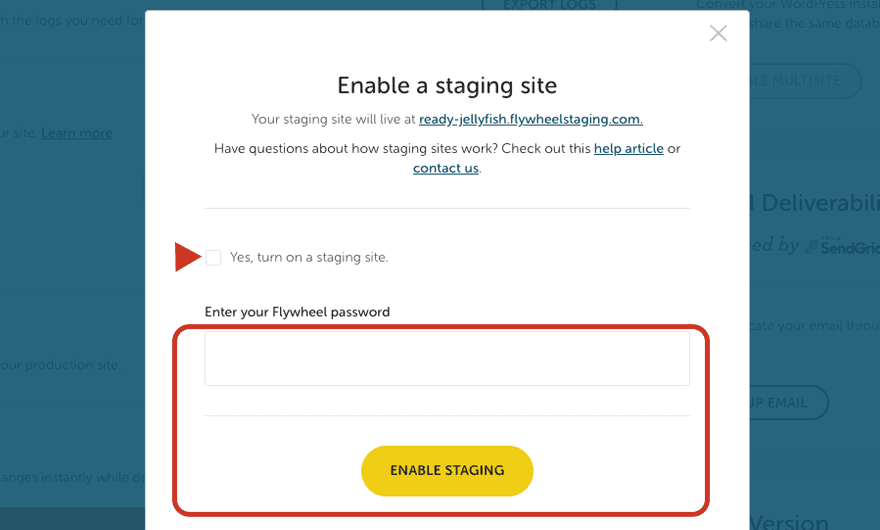
Once you switch your staging on, you’ll be prompted to click the “Yes, turn on a staging site” radio button, and enter your Flywheel password. Finally, click the ENABLE STAGING button.
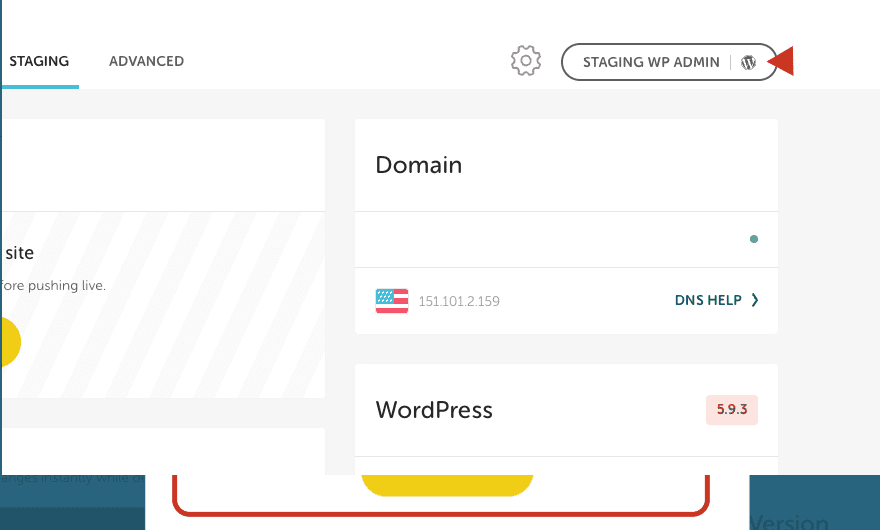
The process to create your staging site will take some time, depending on the size of your site. Once your staging site is complete, you can click the STAGING WP ADMIN button to log in to your staging site from the Flywheel dashboard.
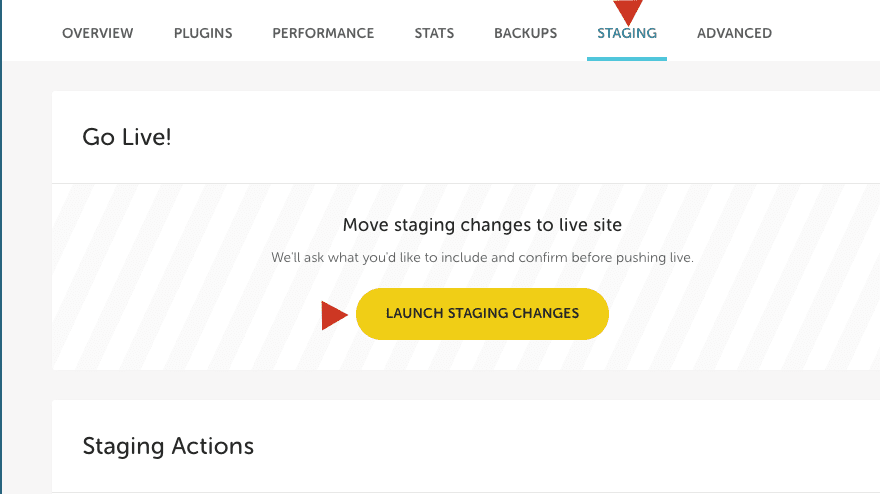
When you have made the changes to your site that you wish to complete, launching your staging site is easy. Return to the Flywheel dashboard, navigate to the staging tab, and click the LAUNCH STAGING CHANGES button.
That’s it! Your staging site is now live. An additional optional step is to flush the cache for your site, but it isn’t necessary to do so.
Next, let’s take a look at the process of creating a staging site with WPEngine.
WPEngine
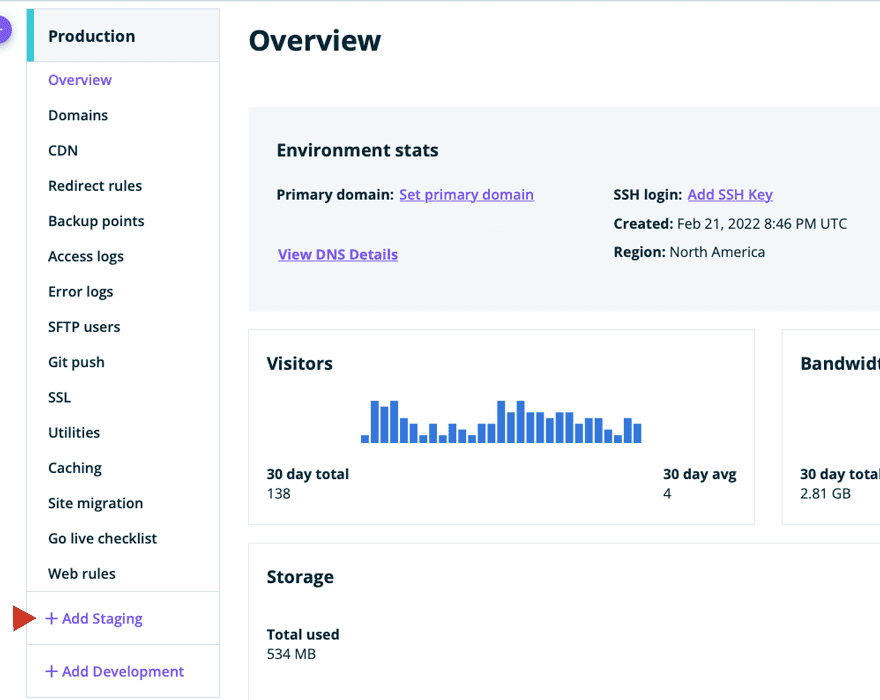
Like Bluehost and Flywheel, WPEngine makes it easy to create a staging site. First, you’ll log in to your WPEngine dashboard, then click on Sites. Locate the site you wish to create a staging environment for and click on the name of the site. Scroll towards the bottom of the page and click on Add Staging.
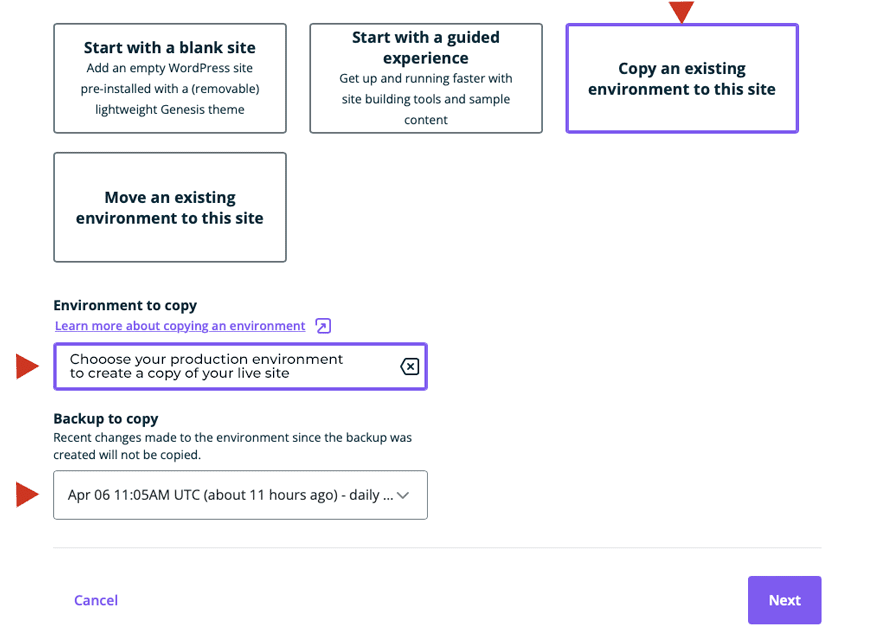
The new screen will give you several options to choose from. You can Start with a blank site, Start with a guided experience, Copy an existing environment to this site, or Move an existing environment to this site. For this example, we’re going to copy an existing environment to this site.
WPEngine will prompt you to choose the environment that you wish to copy. You’ll select your Production environment, then choose the most recent backup, then click next.
The next step is to give your staging site a name, then click Add Environment.

WPEngine will notify you that your staging site is being built. It will usually only take a few minutes to create a staging site but can take longer depending on the size of your site. Once the process is complete, you can log in to your staging site and make any necessary changes.
To launch your staging site in WPEngine, you’ll navigate to your staging site by clicking on its name in your site list. From there, you’ll click the Copy environment button at the top right of the screen.
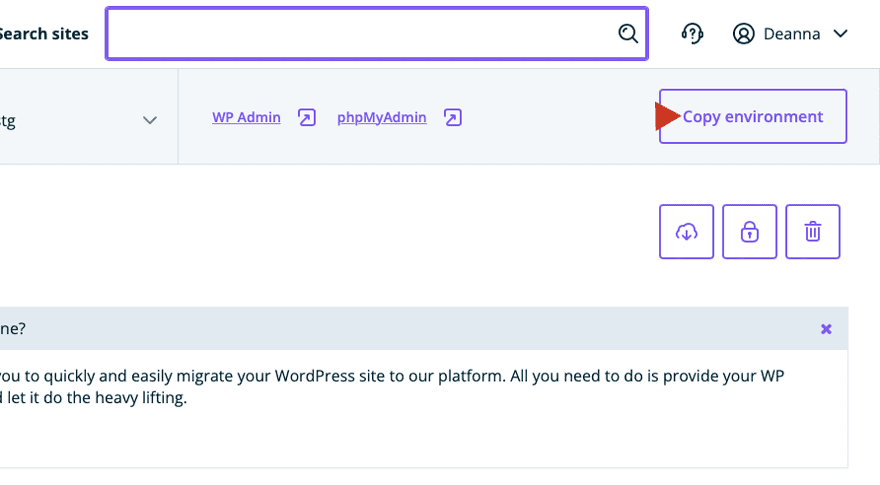
Copying the Environment
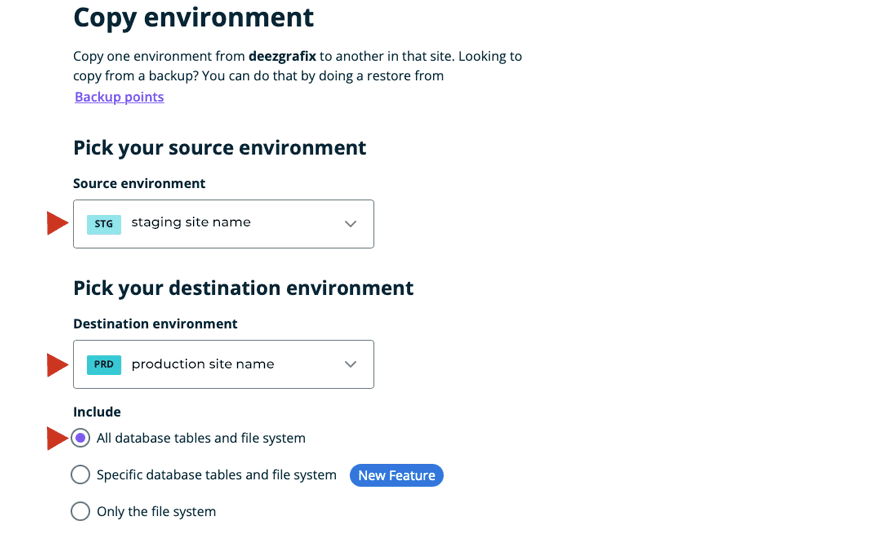
The next screen will ask you to pick your source environment. This is the staging site where you’ve created new changes. Next, you’ll pick your destination environment. This is typically your production environment. Next is to choose whether to include all database tables and file systems, specific database tables and file systems or only the file system. For this example, we will choose all database tables and file systems. Once you’ve made your selections, click the Review and confirm button at the bottom left of the page.
Once that process is complete, your staging site will overwrite your live site. WPEngine makes the process simple and takes only a short time to complete.
Now that we’ve gone over a few examples of Hosts who provide a staging environment option to their customers, let’s delve into manually creating a staging site.
Manually Creating a Staging Site
Our last option for creating a staging site is the most involved, so it might not be the best option for the WordPress beginner. That being said, if you are quite familiar with using FTP clients, phpMyAdmin, MySQL, and the core of WordPress structure, this step won’t be too difficult. Creating a staging site manually has both benefits and caveats.
One of the benefits of creating a staging site manually is having more hands-on control over your environment. It allows you to control each step as you proceed through the process, which can take the potential problems out of using a plugin or host. By creating the staging site yourself, you don’t have to worry about any problems that may occur using a plugin or host. On the flip side of this argument, creating the staging site manually will increase the likelihood of an error if you are not accustomed to working in cPanel programs or FTP.
Let’s discuss the steps you’ll need to take to be successful with creating a WordPress staging website manually.
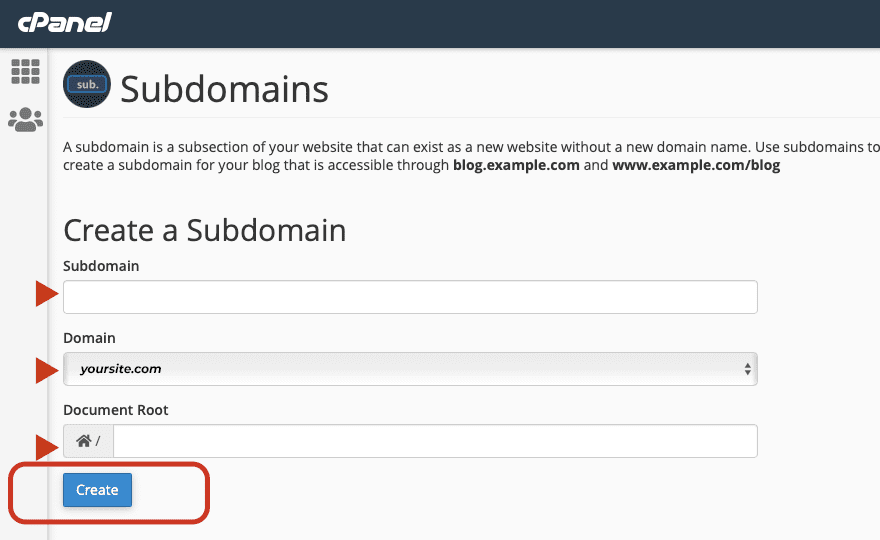
1. Set up a Subdomain
Using your hosting platform, head to cPanel and click Subdomains. This step will ensure that no one can access your staging site from within your live site. It will also enable you to keep things separate from your live site. Give your subdomain a name, choose the domain for your subdomain to be housed under, choose Root folder (or leave blank), then click create.
2. Create a Subfolder in Your WordPress Install
This step is fairly simple provided that you are familiar with the overall structure of WordPress folders. This is a very reliable way to begin the process for your new staging website. There are two methods available to you for this step.
- Create a subfolder by utilizing the File Manager in cPanel
- Use an FTP client such as FileZilla to create a new subfolder.
To create the subfolder using File Manager in cPanel, first, log in to your cPanel and navigate to File Manager. Create the subfolder in your main WordPress folder and name it.
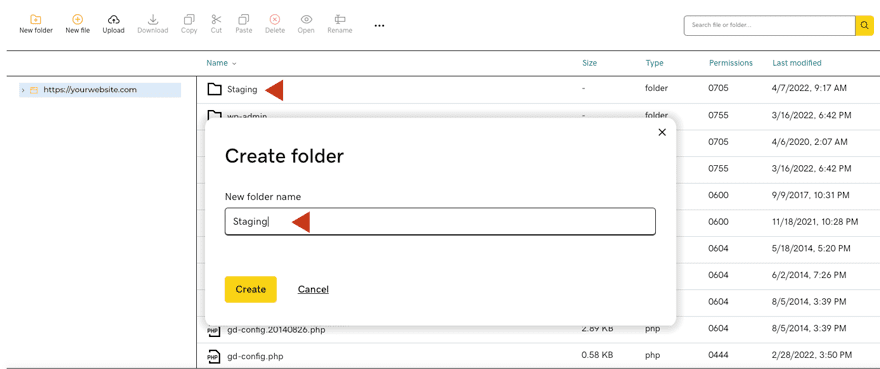
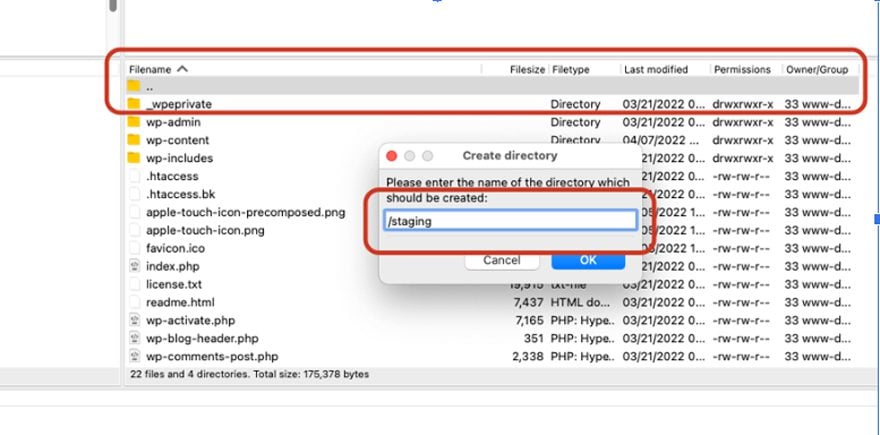
The second method involves using FTP to create your subfolder. Open Filezilla and connect to your website using your FTP credentials. Once in the main WordPress folder, right-click and choose create directory. Name your new folder.
For this tutorial, we will proceed with using FTP as it is the most reliable way of achieving our goal of manually installing a staging site.
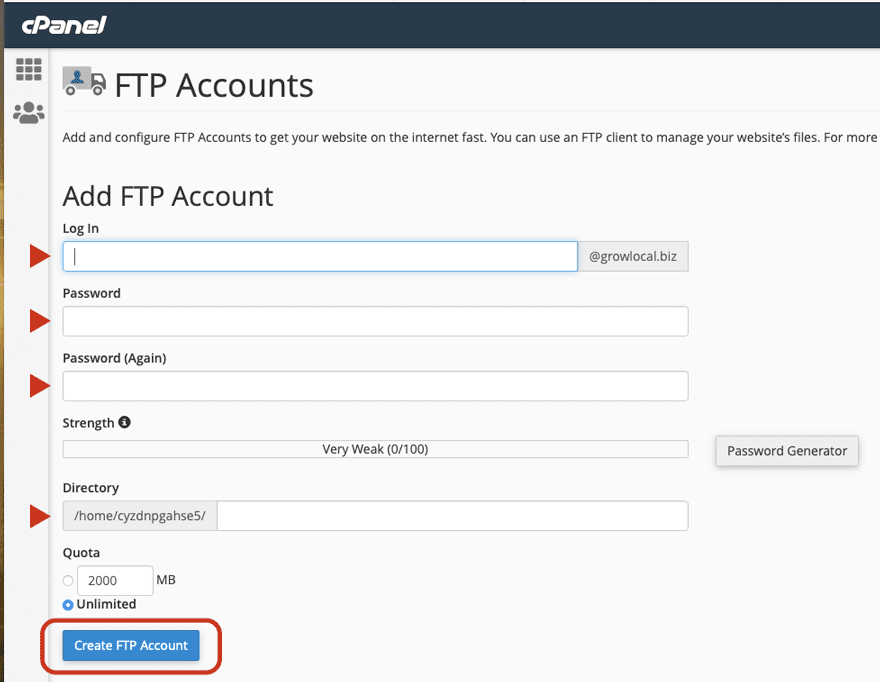
3. Create an FTP User for Your Staging Site
You’ll need to create an FTP user for your new staging site. To do this, log in to cPanel and find FTP Accounts. For this example, we’re using the GoDaddy cPanel, but even the most budget-friendly hosting providers have a very similar setup. Create a new FTP account by creating a name, password, specify a directory, then click the Create FTP Account button.
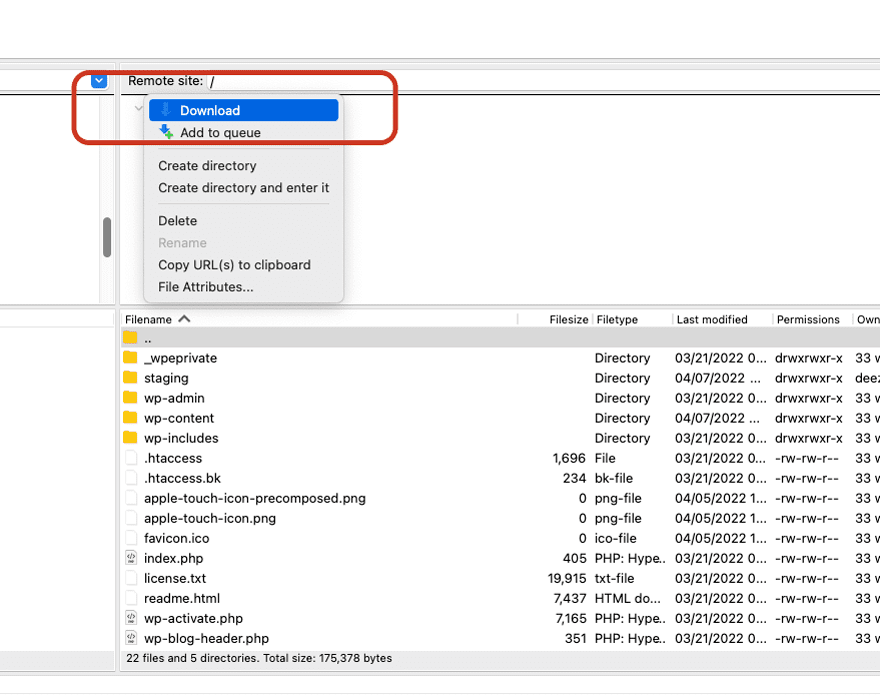
4. Download Files From Your Live Site
You’ll want to download the root folder or the public_html folder that houses all of your WordPress files. Right-click on public_html and select Download.
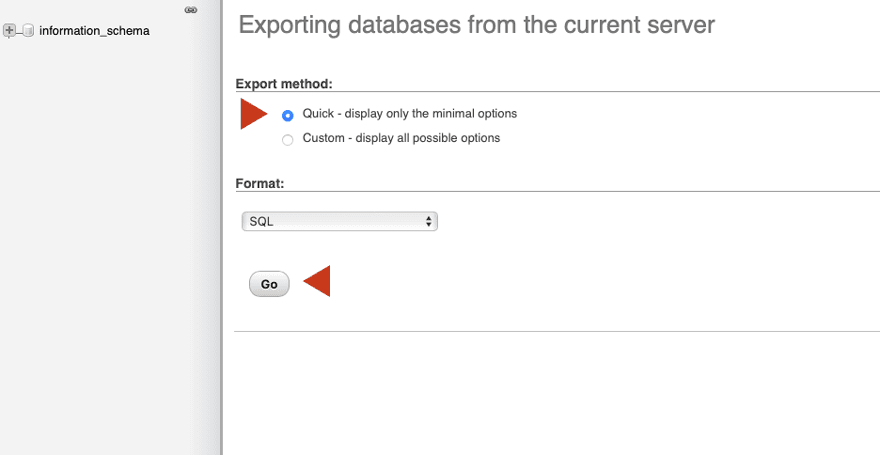
Once your files have been downloaded, the next step is to log in to your hosting cPanel and navigate to phpMyAdmin to export your database. Navigate to Export, select the quick option, and click go.
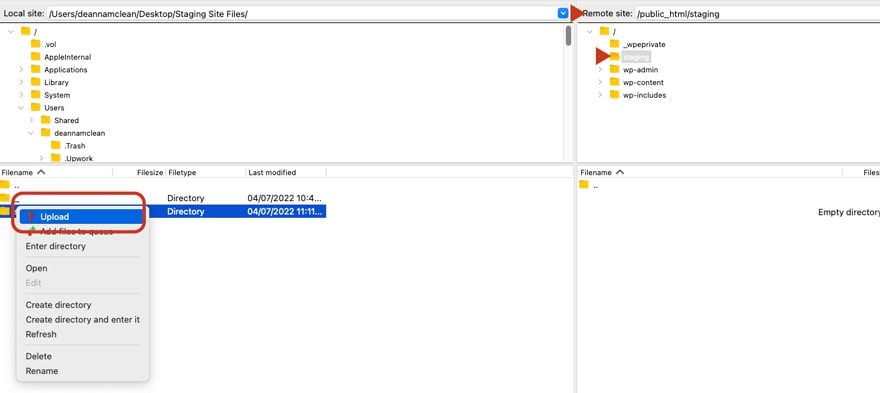
5. Upload Your Files to the Staging Folder Using FTP
Using the FTP account that you created in step 3, log in to your staging site server through FTP. Upload the files you downloaded in step 4 to your staging folder.
6. Create a New Database, Database User, and Upload Your Database From the Live Site
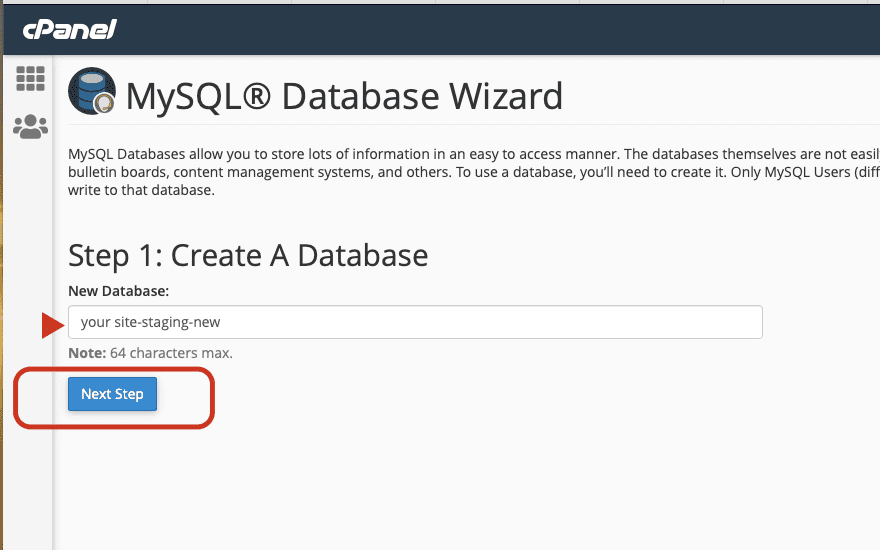
Head over to MySQL Database Wizard in cPanel to create a new database for your staging site. Give your new database a name, then click Create Database.
Once you have created your new database, click the next step button.
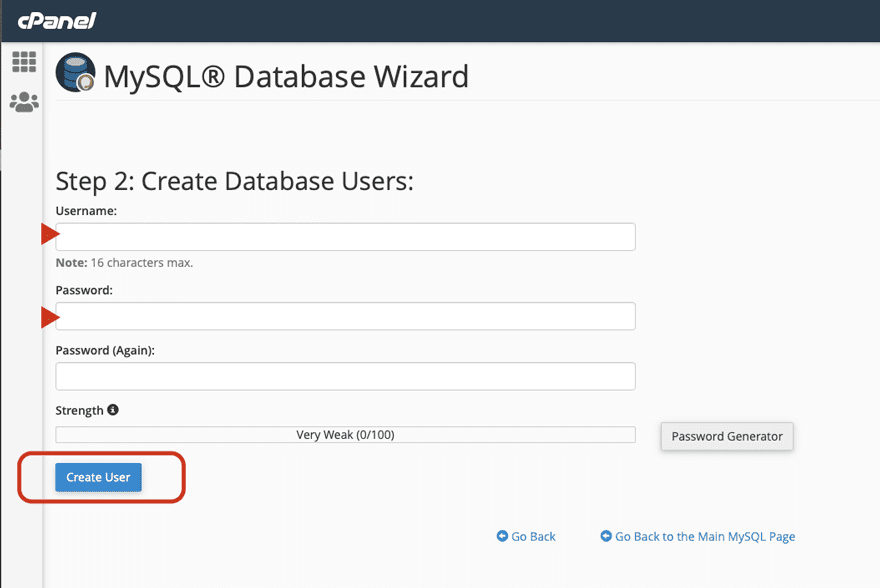
Next is creating a new database user. Add a username and password, then click Create User. Be sure to use a secure password and a unique username. Jot this information down somewhere so that you remember what you input here. You’ll need it in the following steps.
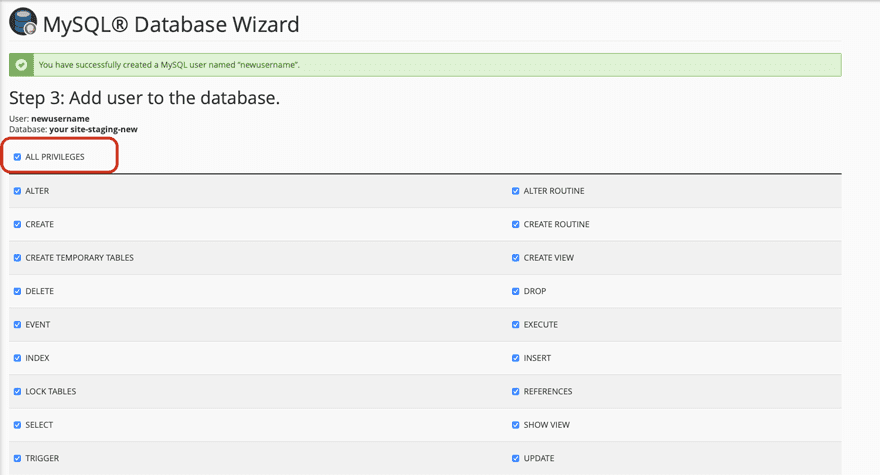
On the next screen, check the checkbox for ALL PRIVILEGES, then scroll down to click Next Step.
Next, head back over to phpMyAdmin to upload your database file from your live site into your new database for your staging site. Select the database name on the left side of the phpMyAdmin panel, then click the Import tab. From there, click Choose File to import the sql file that you exported in step 4. Once your SQL file is attached, click GO.

7. Modify Your wp-config.php File
This step requires you to modify your wp-config file to connect your new database to your staging site. Using FileZilla, navigate to your staging site files and find the wp-config.php file. Right-click on the file and select edit. Once opened, you’ll see that your wp-config.php file is still pointing to your live site. To change this, you’ll need to replace the database name with the new one you just created, then assign the new username and password. Once you’ve made those necessary changes, click save.
Once you have changed your wp-config file, you should be able to see your new staging site! Navigate to yoursite.com/staging/wp-admin (or whatever you named your staging subdomain) and log in with your live site’s credentials.
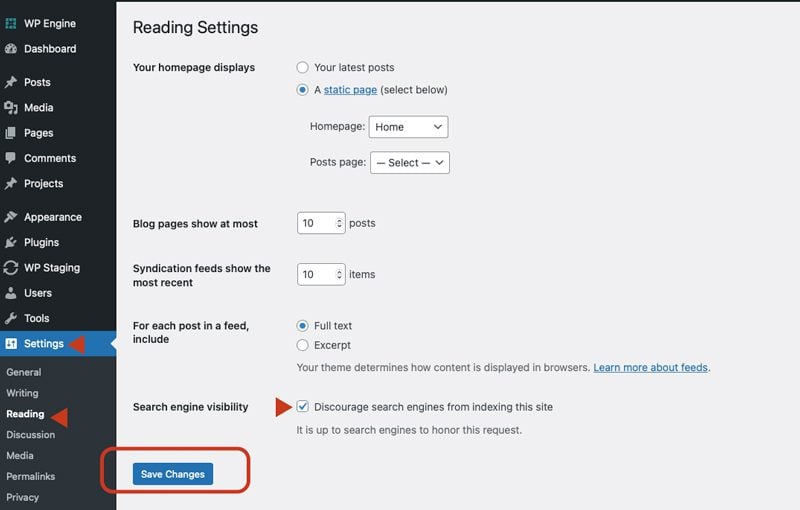
An additional step you should take is to hide your staging site from search engines while you work on it. To do this, log in to your WordPress admin panel, then navigate to settings. From there, enable the checkbox for Discourage search engines from indexing this site, then click Save Changes.
Ta-da! You’ve successfully created a staging site manually.
Pushing Your WordPress Staging Site Live Manually
To accomplish this task, you’ll repeat the steps, moving your files and database from staging to live:
- Download all files from your staging site using FileZilla.
- Download your staging site’s database file in phpMyAdmin.
- Using Filezilla, upload the staging site’s files to your live site.
- With phpMyAdmin, select your live site’s database, click Import, then choose your staging site’s SQL file, then click GO.
- Using FileZilla, navigate to your live site’s wp-config.php file and edit the database name, database user, and database password using the staging site credentials.
- In the WordPress admin panel of your live site, navigate to settings/reading and ensure that Discourage search engines from indexing this site isn’t enabled.
How to Create a Local Development WordPress Environment Manually
One of the best things you can do is set up a local environment for your website and use it like a staging environment. This is a great way to make changes to your live site on your local machine, then upload it to your host using FTP.
There are basically two ways that you can go to establish a local environment to work on.
- Using a local server software such as MAMP.
- Use a Virtualized Environment such as Desktop Server, WP Stagecoach, or Local by Flywheel.
For this tutorial, we will use MAMP to set up a local WordPress environment on an Apple computer, but the steps for Windows are almost identical.
Setting Up a Local Server With MAMP
MAMP is a local server environment that is free for Mac OS and Windows users. It allows you to set up a WordPress environment on your local hard drive so that you can test and implement features without having to interfere with your live site. To use MAMP, you’ll need to use your FTP client, such as FileZilla to download your website files. Let’s go through the steps to set up a local server using MAMP.
- Download and Install MAMP.
- Navigate to your applications folder (My Computer on Windows) and double-click it to run the program.
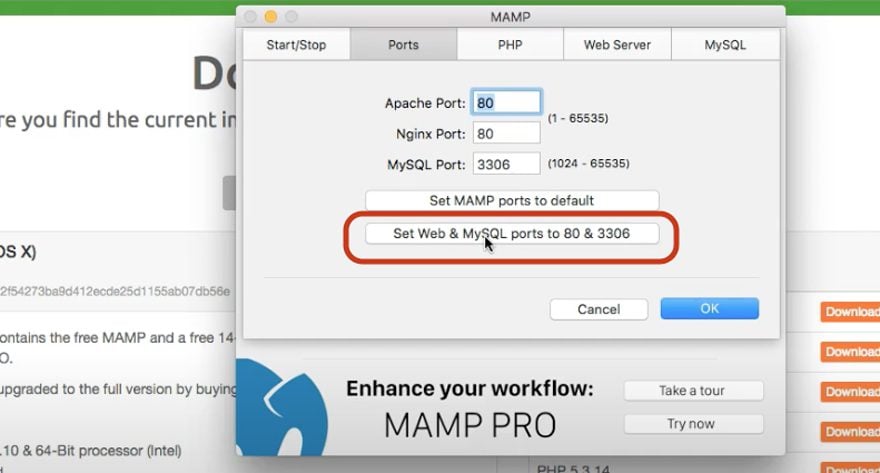
- Click the Ports Tab to view the Port Settings.
Choose Set Web & MySQL ports to 80 & 3306 to be able to view your local site in your web browser by typing localhost in the browser. This will eliminate the need to put in localhost:8888 every time you want to view your site.
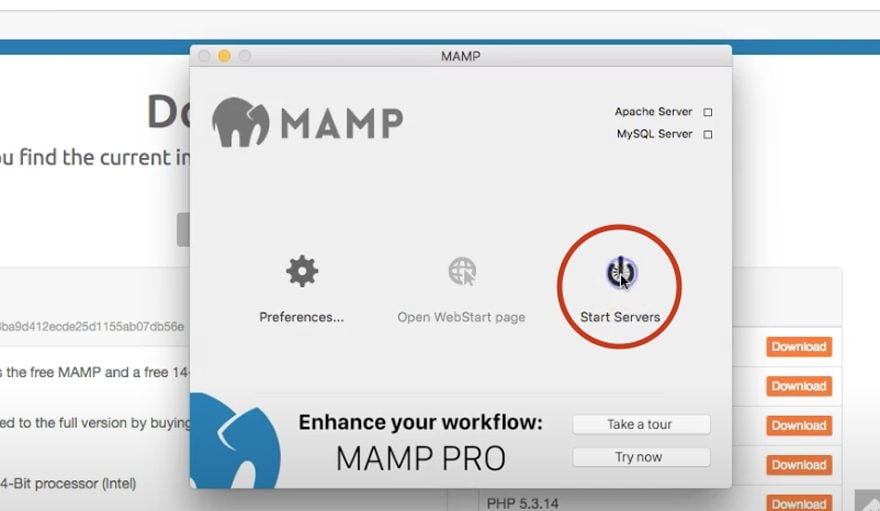
4. Click the Start Servers button on the MAMP Start/Stop screen.
5. Viewing Your Site
To View your site, type in localhost in your browser. You’ll see something like Index of/. This will tell you that MAMP is working properly, but that the directory is empty.
6. Download and Unzip WordPress
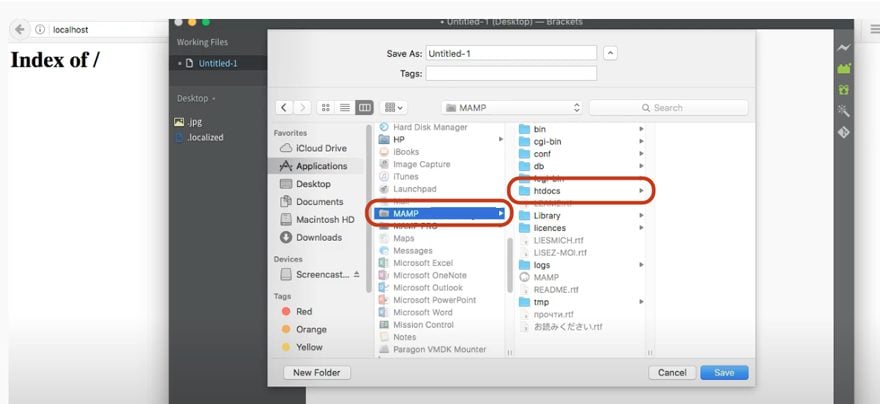
If you want to install a new version of WordPress, download and unzip WordPress into the htdocs folder in your MAMP directory. If you want to install a copy of your live site, move the files you downloaded in FileZilla into the htdocs folder.
7. Set A Database
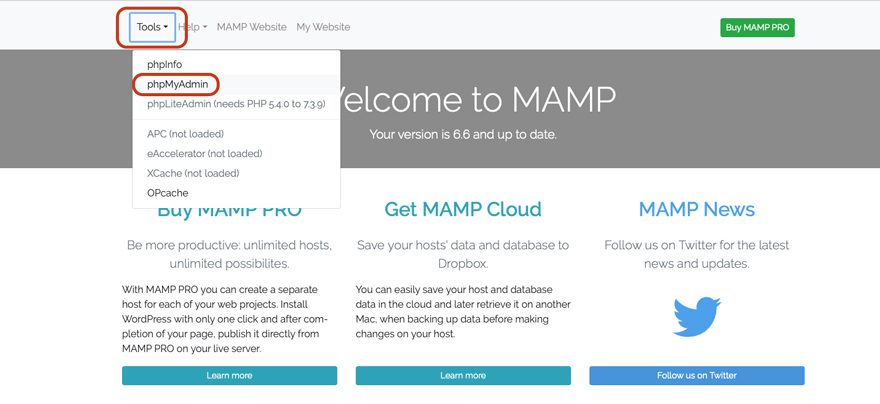
Next, you’ll need to set up a database. To do this, open localhost in your browser and hover over Tools, then select phpMyAdmin.
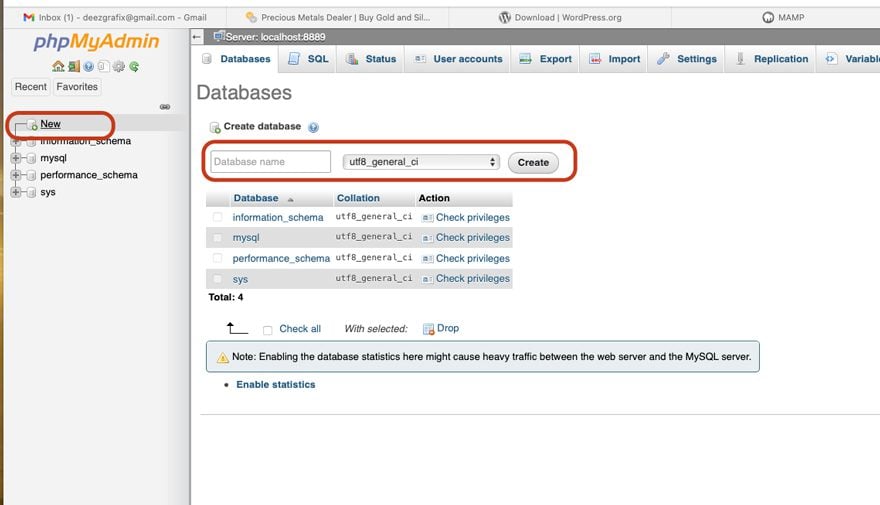
8. Click New to add a new database for your installation.
Give the database a name and click create.
9. View Your WordPress Install
To do this, click on WebStart on the MAMP application home screen. Then click My Website at the top of the screen. If WordPress is installed correctly, you should see the install screen for WordPress (if you chose to do a new install). If you want to have a copy of your live site, skip step 12.
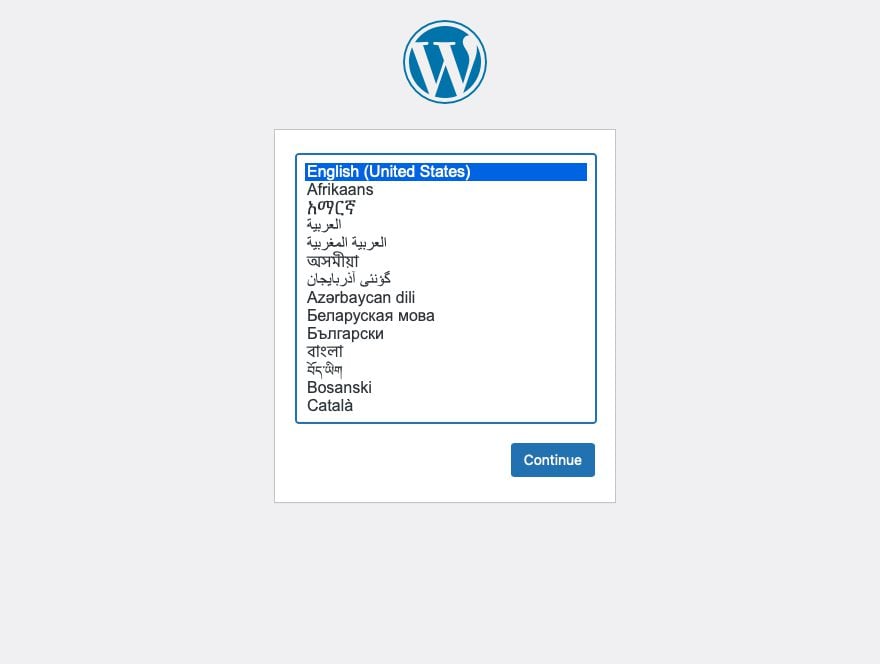
10. Choose English for your language.
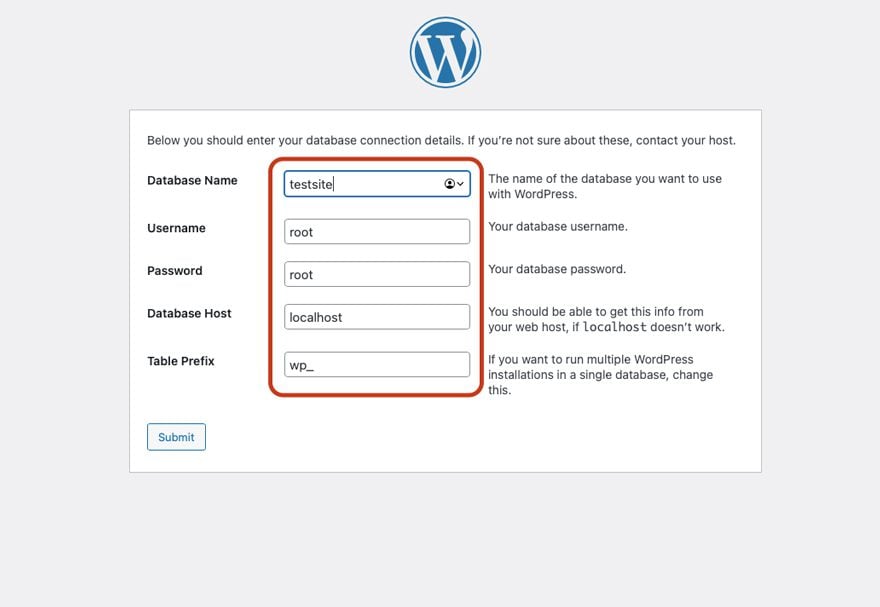
Next, it will prompt you to input the database information you created in the previous steps. Type in your database name, then root for the username, and root for the password. The hostname is entered by default, as is the database prefix.
11. WordPress will now go through the installation process.
Once completed, you’ll have a fully functional local test environment to play with.
12. Copying Your Live Site Into MAMP
If you want to copy your live site into MAMP, drag your site’s files into the folder you created on your local machine, then import your live site’s database SQL file into the new database you created in step 8.
13. Alter Your Wp-Config File
An additional step will be needed for your site to display properly. You’ll need to alter your wp-config.php file referenced in the last section, Manually Creating a Staging Site.
That’s it! You’ve successfully installed WordPress on your local machine. Here you can make changes to your site, design a new one without having to be connected to the internet, or risk errors on your live site.
Now that we’ve gone over how to create a staging site with a plugin, your site’s host, or using the manual method, we’ll discuss how you should manage your staging site.
Managing and Using a WordPress Staging Site
Once you have mastered the creation of a WordPress staging site, you’ll want to be able to maintain both your staging and live sites to use them successfully. We’ll answer a few questions regarding a WordPress staging site. What are the best practices for using a staging site? When should you push your staging site live? How often should you back up your site? Lastly, how can you use GitHub as a collaboration tool to manage multiple environments?
Reasons for Using a Staging Site
There are a few reasons that you would want to use a staging site for your website. First, it improves your overall workflow. This is especially true if you have a site with a lot of information, manage multiple sites, or get a lot of traffic. Your site can’t make money for you if visitors come to the site only to find a maintenance screen. This can cause people to bounce off of your site and never return, costing you site traffic and potential revenue if you have an eCommerce platform installed on your site.
You Use Automatic Updates
Another bonus of a staging site is to reduce the number of potential errors that may arise after any updates are made. Perhaps you have a hosting plan with automatic updates enabled. Your site is busy working for you until your host updates your plugins, which causes an incompatibility with another installed plugin. If you have a staging site enabled, you can quickly push your staging site live to restore your site. From there, you can troubleshoot on the staging site to find out what went wrong without causing a costly amount of downtime.
Using a Developer
Perhaps you pay someone to maintain your site, perform updates, or add new features. Staging sites ensure peace of mind that the developer you’re trusting is taking steps to show your visitors a polished error-free website. This is especially important while running ad campaigns, releasing a new product or service, or creating posts that you want to promote across multiple social media platforms. It’s much easier to do these things in a staging environment where you can see the progress and make revisions before the site goes live.
Making a Costly Error
Finally, what if you’ve spent countless hours designing and developing your website only to have something go wrong in the launch process? With a staging site enabled, if there is a problem when going live, even if your files are damaged or lost, you have that staging environment to fall back on.
Let’s review:
- Staging sites improve your workflow by ensuring your visitors don’t get the annoying “Maintenance Mode” screen.
- They protect plugin updates gone wrong.
- Staging sites ensure that your site’s visitors see the most recent iteration of your website.
- A staging site can help protect you against failures when launching your brand-new website.
Now that we’ve given you a few reasons to have a staging site, let’s go over some best practices when utilizing your staging environment.
When to NOT Use a Staging Site:
Now that we have a good grasp on situations where you would want to use a staging site, let’s discuss some situations when it isn’t necessary to use a staging site. If you have a website where you update content rarely, it’s probably not necessary to use a staging website. If you have an online store and you want to update a couple of product prices, you probably don’t need to enable your staging environment.
Generally, it isn’t necessary to use a staging site to do a few text changes. The reason for this is simple. If you are only adding new text content to your site or blog regularly, the process of using a staging site can become tedious. You’d need to go through the steps to deploy your staging site every time you make a text change or add a blog post. That seems daunting and time-consuming, doesn’t it?
Ok, so if you don’t need to use a staging site for text changes, when should you use one? Ideally, if you are updating your content consistently, it’s a good idea to make weekly backups rather than utilize a staging site. A staging site is more beneficial for technical changes rather than text changes. Additionally, adding or editing blog posts doesn’t usually necessitate a reason to enable a staging site.
Here are some additional reasons you wouldn’t need to use a staging site:
- Adding a new user to your website.
- Deleting some products, posts, or pages.
- Making small text changes.
Best Practices to Follow While Using a Staging Site
Since we’ve determined that staging sites should be utilized for doing technical things like plugin changes or updates, let’s go over a list of best practices if you are going to utilize a staging environment. First, it’s important to note that a staging environment should only be enabled when major changes are going to be implemented.
Some of those major changes can include situations such as the following:
- Making major design or functionality changes to pages.
- Swapping your theme for a different one.
- Adding or removing plugins.
- Plugin or theme updates.
- Performing a WordPress core update.
- Creating new theme templates such as a 404-page template, a search results template, a blog post archive template, or other related page templates.
Let’s outline a few scenarios when you would want to use a staging site.
Staging Site Use Case Scenario #1
You have a website with eCommerce functionality. You’ve noticed that sales are a bit stagnant, and the bounce rate from your shop page is higher than it’s been in the past. To increase your sales, you would like to try a new shop page layout and a new product page layout.
Factors to consider: You’re going to need a new design, as well as two new page templates (one for products, and one for your shop page).
Process: To begin with, you will want to go through the design process for these pages first. Whether you design in real-time or mock up a layout in a program like XD or Photoshop, you will want to do this on a staging site when it comes time to implement these new page layouts. With a site with eCommerce functionality enabled, you don’t want to change a product or shop page in real time on a live site. In this case, enabling a staging site will allow you to tinker with your new pages until you get them to your liking, then push them from your staging site to your live site.

Staging Site Use Case Scenario #2
You are a web developer whose client wishes to update the text content on two existing pages: about us and services. The changes to the about us page aren’t extensive, just replacing a few paragraphs of text. The changes to the services page are a bit more complicated. Your client has asked you to add new service offerings to the page, as well as new service blurbs, and apply some animated effects. The services page will require some restructuring to accomplish this client’s requirement.
Factors to consider: You’ll only need to make a few changes to one page, but the other page requires some animation that your current theme doesn’t natively offer, so you’ll need to implement some javascript to achieve the desired result.
Process: You’ll need to explore using javascript for the animation, and change the layout to the services page. Additionally, you’ll be adding new content by way of service offerings that will require you to alter the design. For this scenario, it seems simple enough to do on the live site, but what if you implement the javascript and it makes content on some of your other pages display incorrectly? In this case, it seems to be the safest option to pull the live site into staging, test your javascript, develop your new look for the services page, then push the site live when everything looks as it should and functions properly.

Staging Site Use Case Scenario #3
You’ve decided that you want to install a new plugin on your site that will allow you to chat with your site visitors. The plugin you’ve chosen is compatible with your current version of WordPress and has excellent reviews on WordPress.org. Should you install and activate the plugin on your live site or pull your site into staging to test the new plugin extensively?
Factors to consider: Installing a new plugin can be hit or miss. You could install it and configure it with little effort and be on your merry way, or it could cause a conflict with another plugin that you use on your site causing you to get the dreaded “this site has experienced a critical error” message.
Process: When installing new plugins that will enable new functionality, they should be installed in a staging environment to ensure that conflicts don’t occur with other plugins currently installed. Additionally, you may want to test out some of the top WordPress chat plugins to find the plugin that will best suit your needs. In this case, it’s better to enable your staging environment to avoid any plugin conflicts that may arise.

When to Push Your Staging Site Live
When you have created your new content or implemented your new functionalities successfully, and you are confident that you don’t need to make any additional changes, it’s safe to push your staging site live. It’s important to note that you want to make a backup of both your live site and staging site before proceeding. Once you have pushed your staging site live, it’s good practice to disable your staging site. Leaving your staging site enabled leaves you susceptible to human error. If you forget to toggle off the “Discourage search engines from indexing this site”, you leave yourself vulnerable to duplicate content on the internet, which is not a good idea for SEO purposes.
How Often to Back Up Your Site
If you don’t update your content regularly, it may only be necessary to back up once every few weeks to a month. However, if you have a host that performs automatic updates, the backup frequency should increase. Every time a plugin is updated, you run the risk of an incompatibility issue. Therefore, you should perform a backup on a regular basis, such as daily or weekly.
If you update content multiple times a week, you may need to back up daily to be safe. If not, you run the risk of losing valuable content should an error occur. You don’t want to be put in the situation where you have published multiple blog posts during the week and later learn that an issue will force you to restore from a much earlier restore point, wiping out all your fresh, exciting content.
If you have a lot of features installed that you require your users to interact with daily, that should also be taken into consideration. Daily backups would keep all of your form entries, post comments, product purchases, or product reviews safe from being lost forever if you do a daily backup. Keep in mind that when you have these functionalities enabled, your website’s database changes to reflect that new content. It’s imperative to perform regular backups so that nothing is lost in the internet abyss.
What is Git and How Can I Use it With My Website?
Git is a free open-source control system that can be utilized to handle any web project you are working on, regardless of its size. Git allows you to keep track of any change you make to any file within your website. If you are looking for more hands-on control, or are troubleshooting changes you made on your site and don’t want to start over completely, Git can be a very useful tool for you.
If you have Git installed on your server, it can keep a total history of every file installed on your server. This means that if you make changes to a file, Git will do you a solid and save the old version of that file and record every change made thereafter.
This will allow you to go back to any given point where you encountered a problem on your website. That’s a very handy asset to have especially if you are doing things the manual way with your live and staging environments. This tool can keep you from having to scrap your entire staging site, and allow you to roll back to a previous version of an altered file when it was functioning as it should.
Using Git For Testing
Here is a scenario where Git is useful in the testing phase. Let’s say you decide to implement new functionality on your site. You’d create a branch of your main website to which you can make changes. If you were that development rockstar you knew you could be, once you’ve completed your testing, you’d simply merge the new iteration of your site with the old one. On the other hand, if you didn’t do such a stellar job in your testing, you can simply trash the branch you created and create another branch to undergo further testing. No harm, no foul.
Git can also be useful if you are working in a team environment where more than one developer is working on a site. If you are a developer who frequently has to make changes to a site that another person has worked on, Git can save your sanity and make it so much easier to figure out who did what and when.
To learn more about Git, read our post Git and GitHub: A Beginner’s Guide for Complete Newbies. To learn how to deploy your staging site to your live environment, read our post – Git Push: Deploying WordPress from GitHub to Your Web Host.
Wrapping Things Up
Staging sites are an important tool to implement when you are making more than just a few text changes to your website. They ensure that you can avoid costly downtime when performing updates, help you enable new features or functionalities for your website to keep it working for you and your business, and make your life genuinely easier when you want to change the look and feel of your site. Bottom line? A staging site is a smart way of making sure that your website continues to perform well for you, whether you are a small business owner, blogger, or have a website with lots of traffic that is crucial to your company’s success.
Hero photo courtesy of Campaign Creators: Unsplash
Image courtesy of: Igor Miske: Unsplash, KOBU Agency: Unsplash, Charanjeet Dhiman: Unsplash


Thank you very much, sir, for giving us with the details on how to set up and utilise a WordPress staging site.
That was a great article
Great explanation on the formatting of the lists as well – thank you!
Thank you very much sir for providing us the information about How to Create and Use a WordPress Staging Site.
Very interesting an thorough article. But, I would imagine that a staging site would only be needed if you had a very popular, worldwide site. Whenever I make significant changes, I usually do it early morning or late at night to hopefully avoid inconvenience to my three regular readers.
Any business site as well as sites with consistent daily traffic would benefit from the additional uptime using staging sites offers. I don’t do staging sites for my smaller sites unless I’m doing a major redesign. But, it is important for bigger ones. Thanks for the comment Jeff.
Thanks for sharing wonderful tricks, much helpful to me.