
If you’ve been a WordPress developer long enough, you probably see the value in creating websites locally. You can avoid costly hosting fees (unless you use a good free hosting provider) during development, especially if you plan to develop more than one site at a time. Developing locally with MAMP Pro is a popular way to build your site – allowing for a private environment to tweak your design and functionality before revealing it to the world. Hosting providers have also recognized this trend. For example, hosts such as Flywheel offer services that work alongside MAMP to assist you in pushing your site live once it’s built.
In this article, we’ll tell you why using MAMP Pro, rather than its free version, could make your life easier when using local environments. We’ll walk you through all of the features of MAMP Pro, and show you how to use it. Let’s get to it.
What is MAMP Pro?
MAMP is a solution stack, or software stack that includes Mac OS, Apache, MySQL, and PHP to create a complete software platform for building WordPress websites. Originally, MAMP only supported Mac OS (hence the first “M” in MAMP) but it is now available for both Mac OS and Windows operating systems (with a few limited features for Windows users). It is most widely used to develop WordPress sites, but also can build other CMS sites, such as Drupal and Joomla.
MAMP has been utilized for over a decade to allow developers to build websites on their local machines. With the release of MAMP Pro 6, they have improved the features of MAMP Pro, giving users more incentive to take the $99 upgrade plunge.
What is the Difference Between MAMP and MAMP Pro?
Hand down, it’s the features. With MAMP, you can create a local host on either Apache or Nginx, which is great, but you’ll have to literally do every step of the setup manually — from installing WordPress, down to editing configuration files. With MAMP Pro, it’s done for you in just a few clicks. You don’t need to create a database in PHPmyAdmin, or manually install your WordPress files. Plus, you’ll get a plethora of features with the pro version that might convince you to upgrade.
Features of MAMP Pro
MAMP Pro offers an incredible list of features that aren’t offered with the free version. Cloning hosts, improved WordPress support, snapshots, and blueprints are among the many amazing new features available with the latest version. Additionally, things like code editing capability, FTP for pushing your local site live, email setup, cloud storage, and site migration are included. They even offer the MAMP Viewer app that will allow you to test your local sites on your iOS or Android mobile device. Let’s dive into the features to show you the power that comes in their $99 package.
Multiple Installations of WordPress
With the pro version, you can have as many posts as you would like. Each host can be configured to your liking, using different web servers. For example, you could have one WordPress install on Apache, and another on Nginx. With the ability to run multiple versions of PHP, you could have one site on 7.4, and yet another on 8.0.
SSL Certificates
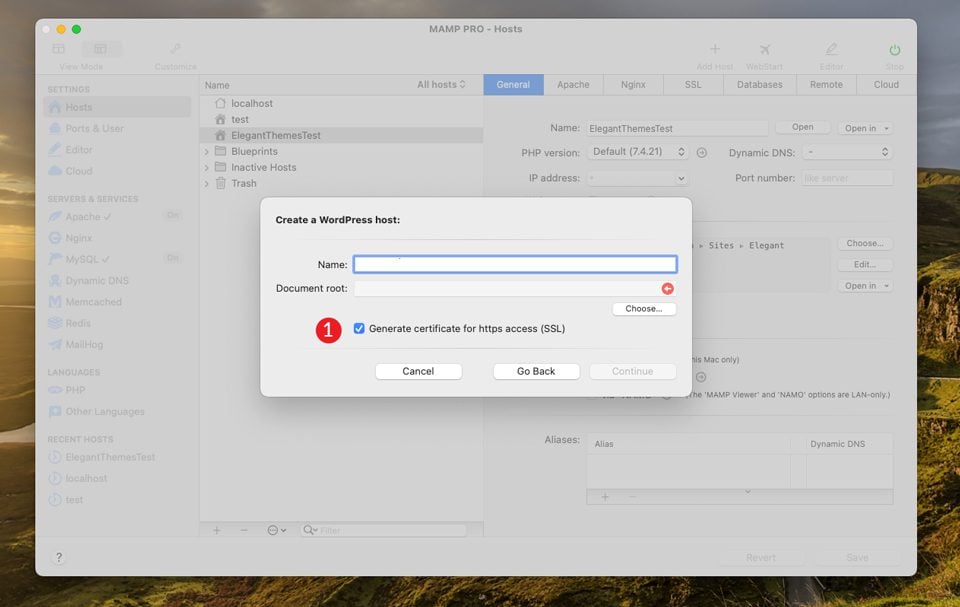
Having an SSL certificate isn’t possible in the free version of MAMP without editing configuration files. That’s fine if you are experienced in that sort of thing, but beginners might consider that daunting. Luckily, MAMP Pro allows for SSL certificate creation with the mere tick of a checkbox. Plus, web browsers won’t balk at it. You won’t have to worry about getting any SSL error warnings. We’ll go more in-depth on how to install SSL certificates when we walk through the steps of setting up a new host.
Site Blueprints
Similar to services offered by some hosting providers, blueprints allow you to set up a WordPress installation the way you like, then reuse it on additional builds. This allows you to save time on new sites using your dedicated setup processes. Themes, plugins, and customizer settings are all saved, allowing you to skip those details on every new website you create.
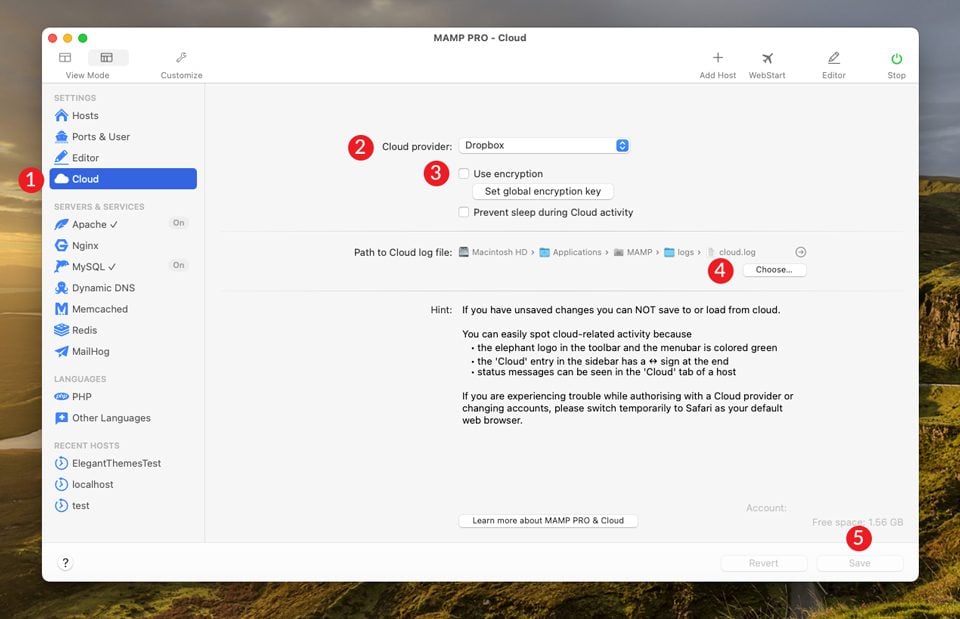
Cloud Storage
If you don’t want to store your files on a local machine, you don’t have to. MAMP Pro allows you to store your files in the cloud via Dropbox or OneDrive. You can store one, or all of your hosts in the cloud. This is a great way to protect you from accidentally deleting files on your projects, and allows you to work on sites on different computers. Setting up the cloud feature is a simple process.
Navigate to the Cloud tab. Using the cloud provider dropdown menu, choose your storage option. A new browser tab will open asking for you to log in. Once linked, choose whether to use encryption or to prevent sleep during cloud activity. Next, click the choose button to tell MAMP where to save your cloud log. Finally, click the save button.
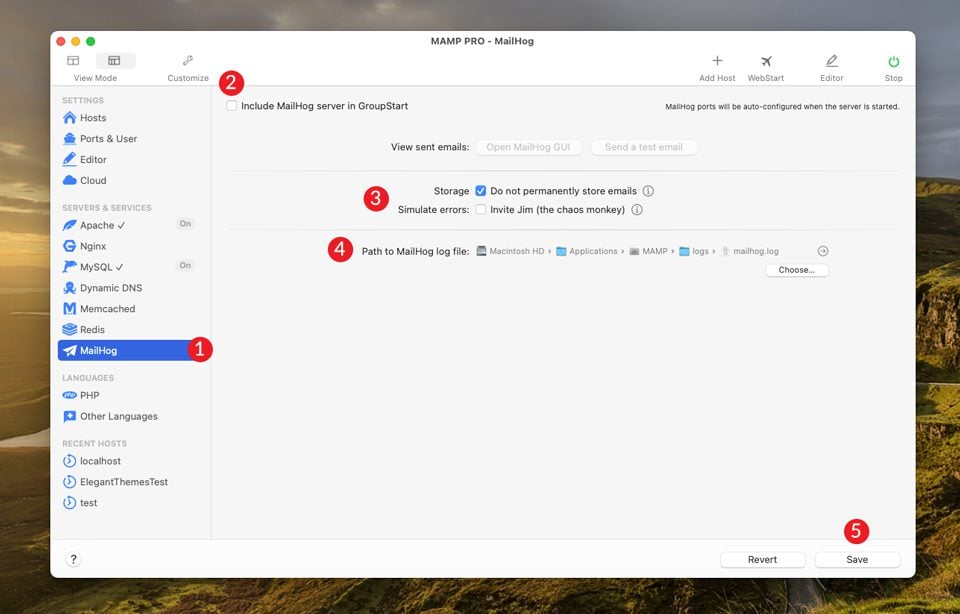
Mail Servers with MailHog
MailHog is a great tool that allows for PHP mail() email testing. SMTP ports will be automatically assigned for you so that no port conflicts occur. You can also view your email logs with their GUI web interface to verify that emails are being sent and received correctly. This handy setting will allow you to get in front of any problems that may arise before you launch your site.
To set up email testing, click the MailHog tab. Next, tick the include MailHog server in GroupStart checkbox. Choose whether to permanently store emails, as well as simulate errors. Finally, save your settings.
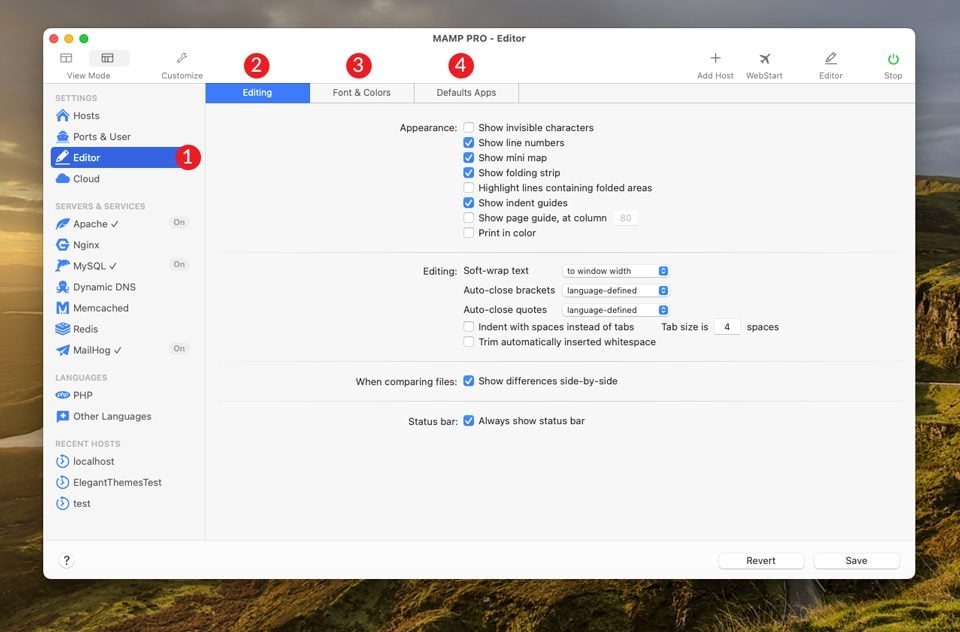
Built-In Code Editor
If you need to make changes to your files, there’s no need to leave the interface. You can make code changes on the fly using MAMP Pro’s built-in code editing feature. In addition, you can change the look and feel of your editor by modifying colors and fonts. Finally, you can choose your own default applications for text, images, PDF, and video if you already have your favorites.
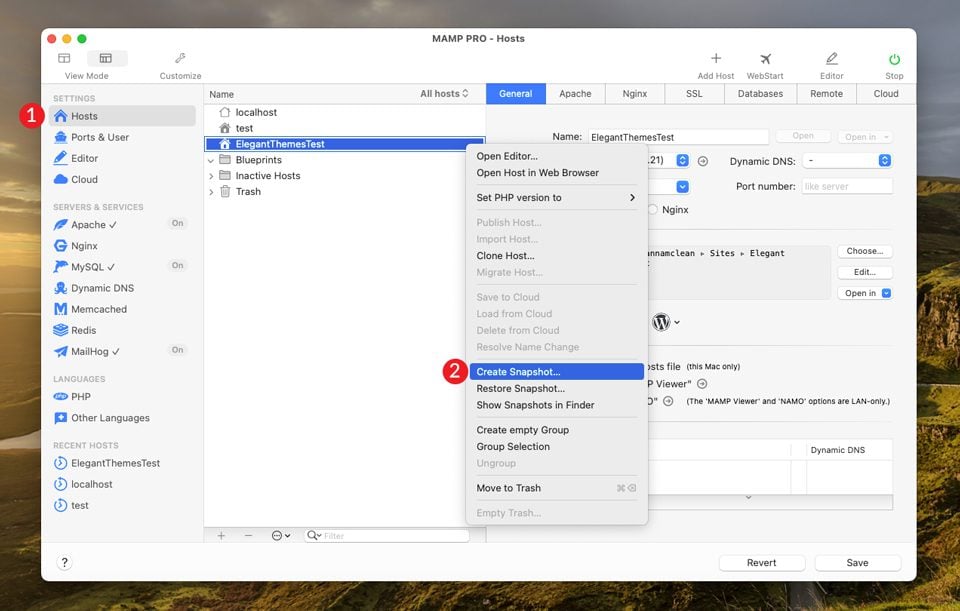
Snapshots
Snapshots work sort of like backups, except with a snapshot, you take an image of a host at any point during the development process, saving them on the fly. This comes in handy if you’ve just worked through a lengthy coding session and want to save your progress. You can also share snapshots with team members when you need help identifying a problem since snapshots aren’t tied to a particular MAMP Pro installation.
To take a snapshot, navigate to the hosts tab. Right-click on the host you wish to take a snapshot for, then select create snapshot.
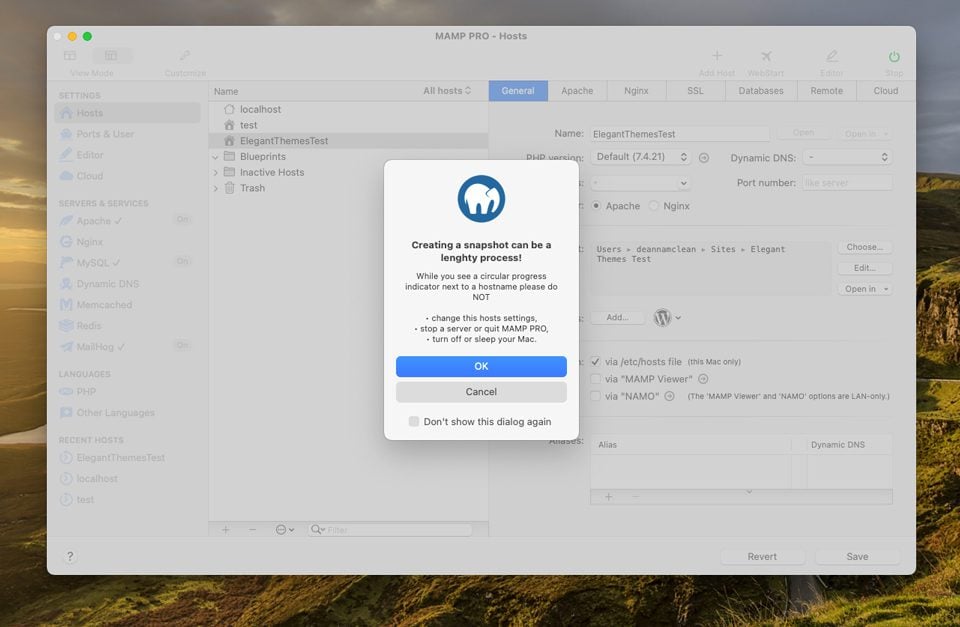
A dialog box will appear letting you know that it might take some time to create. Click ok to confirm.
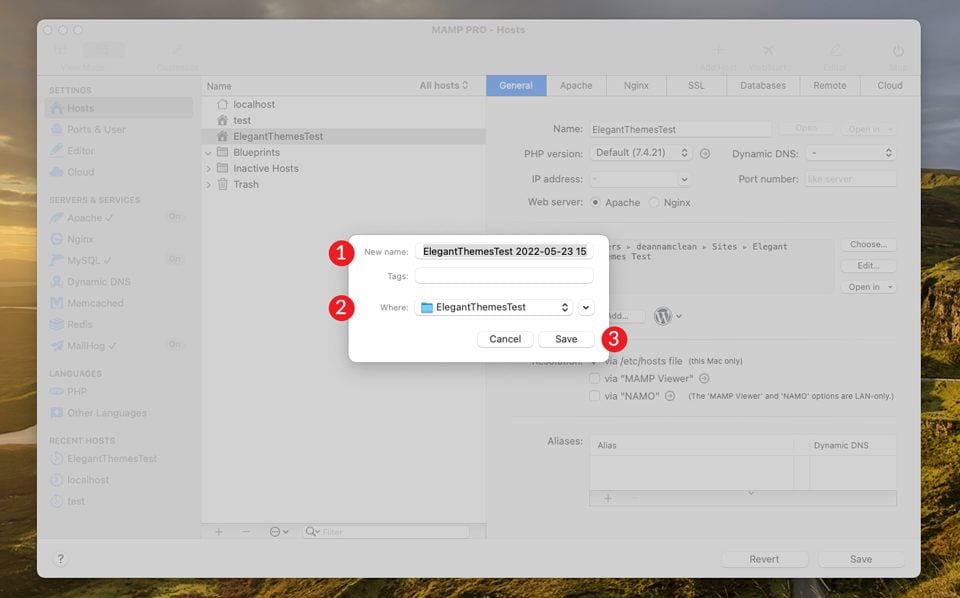
Another dialog box will appear. You’ll give your snapshot a name, assign a tag (if you choose to), select a location to save the snapshot, then click the save button.
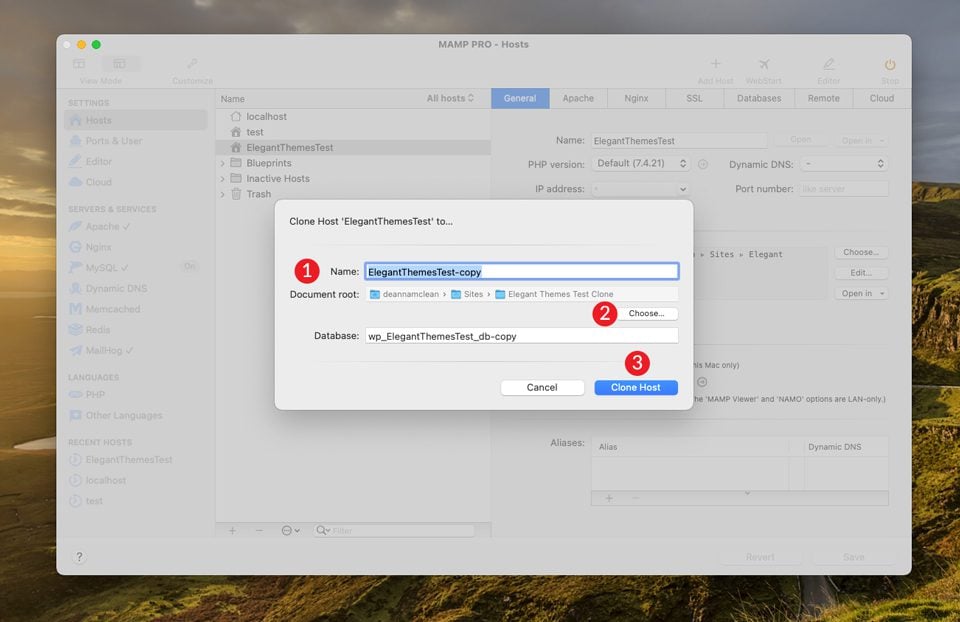
Cloning Hosts in MAMP Pro
As WordPress developers, we know there can be issues sometimes. Implementing new plugins, code, or themes can break your site — especially when you least expect it. With cloning, you can copy your site and test an unlimited amount of variables to determine what will happen when you want to implement more than a few text changes on your site.
Cloning is an easy task within MAMP Pro. Start by navigating to hosts. Next, right-click on the host you wish to clone. Click clone host.
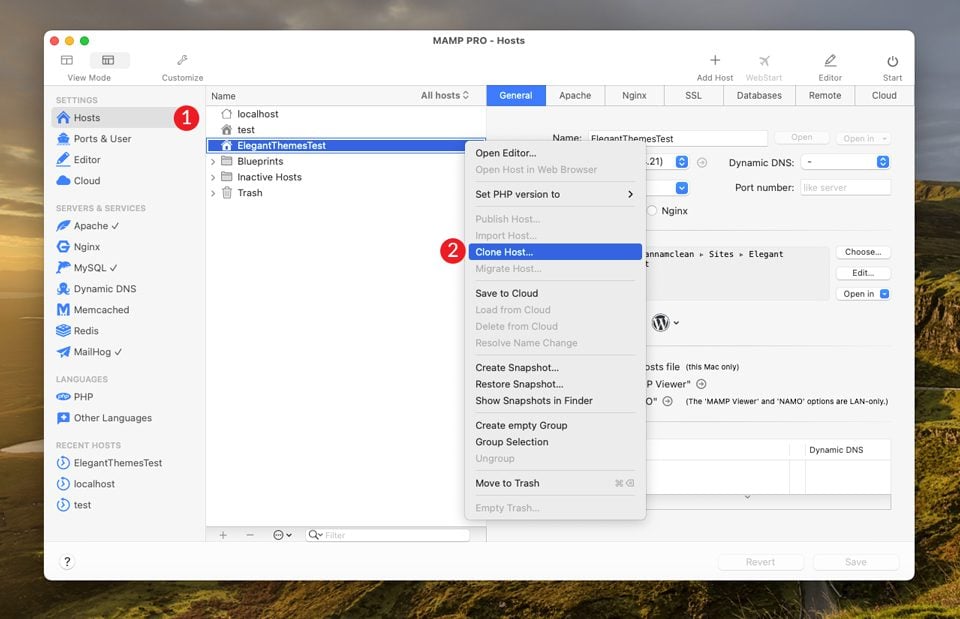
Next, you’ll name your cloned site, then choose the location for your directory to be created. It’s best to create a folder within your root hosts folder to store your files. Dumping your site’s files directly into the root folder will cause issues. Lastly, click the clone host button.
Additional Programming Languages
The main reason people use MAMP is to be able to run PHP applications on their local machines. That being said, there is so much more under the hood. If you are an aspiring game developer, you might be pleased to know that MAMP Pro can run Python. You can go beyond the capability of PHP-based WordPress sites by using Ruby on Rails to develop your next web project. Lastly, if Perl is your jam, MAMP Pro has you covered. Whatever type of web project or application you’re looking to build, you have options beyond PHP and MySQL at your disposal.
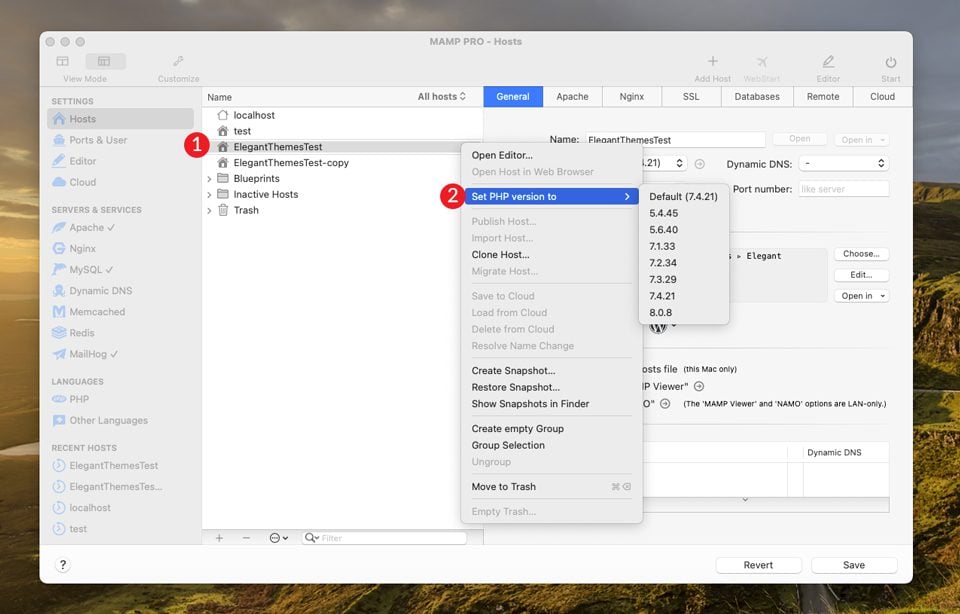
Endless PHP Configurations
MAMP Pro can run in CGI mode, which enables you to run a different version of PHP on any given host. As previously mentioned, this is great if you have a WordPress site with plugins that aren’t compatible with PHP 8.0 just yet. Additionally, it’s easy to switch the version of PHP installed. For example, module mode allows you to easily switch from one version to another, which is great for testing different configurations. This will come in handy when it is time to update PHP for a WordPress site.
To switch the version of PHP installed on your host, first navigate to the hosts section. Next, select the host you want to change. Right click on it, then click set PHP version to. You can choose between the default version of PHP 7.4.21 or any version from 5.4.45 to 8.08.
Additional Features
In addition to all of the previously mentioned features, MAMP Pro gives you the ability to cache your servers using Memcached. Memcached is open-source software that will take a picture of your server and save it in the cloud, allowing for your site to load faster.
Another feature to mention is the ability to set up dynamic DNS. If your router isn’t capable of handling dynamic DNS (most modern ones do though), you can use MAMP Pro to tell the internet when there are any changes to your IP. We’d like to mention that if you use dynamic DNS, you’ll need to sign up for one of their partners: DNS-O-Matic, No-IP, dyn.com, or easydns.com.
Lastly, with MAMP Pro, you’ll have a more optimized experience with WordPress than with the free version. Not only does MAMP Pro make installing WordPress simple, but it’s also faster and more stable. Doing things like switching ports, renaming your installation, or assigning an SSL certificate won’t require any setting changes. It keeps WordPress intact so that you can continue designing your site without hassle.
There are two dashboard interfaces to choose from in MAMP Pro. Standard view and extended view. The standard view is more suited for users who want to work in the most simplistic way. It includes default settings that will allow you to install WordPress with a few clicks without any customizations. The extended view is for hard-core WordPress developers that want to take complete control over their setup and aren’t afraid to get their hands dirty configuring ports, PHP settings, managing multiple databases, and more.
Let’s take a look at the standard view first to show you how to get around in the dashboard.
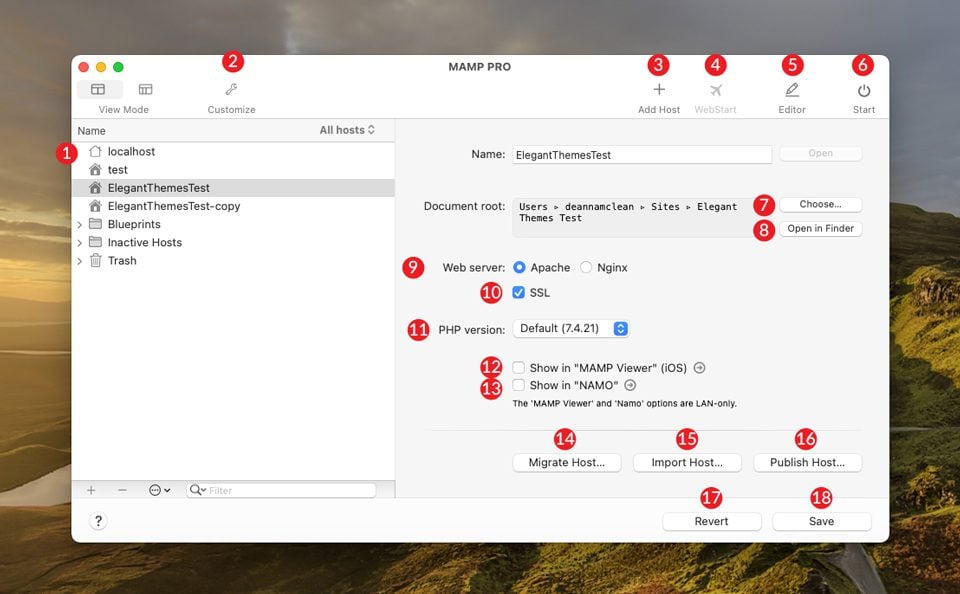
MAMP Pro Standard View
You can find everything you need to build a WordPress site in MAMP Pro using the standard view. You can create a host, customize your dashboard, edit files, and choose between Apache and Nginx web servers. Additionally, you can migrate, import, or publish your host from this mode.
Here’s a complete breakdown of what the standard view includes, and where to find it:
- Host list
- Customize view
- Add host
- Open MAMP Pro web interface
- Edit files
- Start the server
- Choose path location
- Open server file folder
- Choose between Apache and Nginx
- Assign an SSL certificate
- Choose version of PHP
- View your site on mobile with the MAMP viewer app
- Show in NAMO (optional add on)
- Migrate your host
- Import a host
- Publish host
- Revert changes to host settings
- Save changes to host settings
MAMP Pro Extended View
The extended view goes beyond that of the standard view by providing you with ultimate control over your web projects. Experienced WordPress developers who prefer a more hands-on approach with server settings, program languages, and PHP settings will love the extended view’s list of options.
The extended view options are vast, so we’ll show you where to find them:
- Host list
- Port and user settings
- Code editor
- Cloud storage options
- Apache webserver settings
- Nginx webserver settings
- MySQL options
- Dynamic DNS settings
- Memcached settings
- Redis settings
- MailHog
- PHP settings
- Additional programming languages (Python, Ruby, Perl)
- Add new host
- MAMP Pro start page
- Code editor
- Start server
- Host name
- PHP version
- Dynamic DNS
- IP address
- Port number
- Web server
- Document root
- Extras
- Resolution settings
- Revert host settings
- Save host settings

Extended View Apache Settings
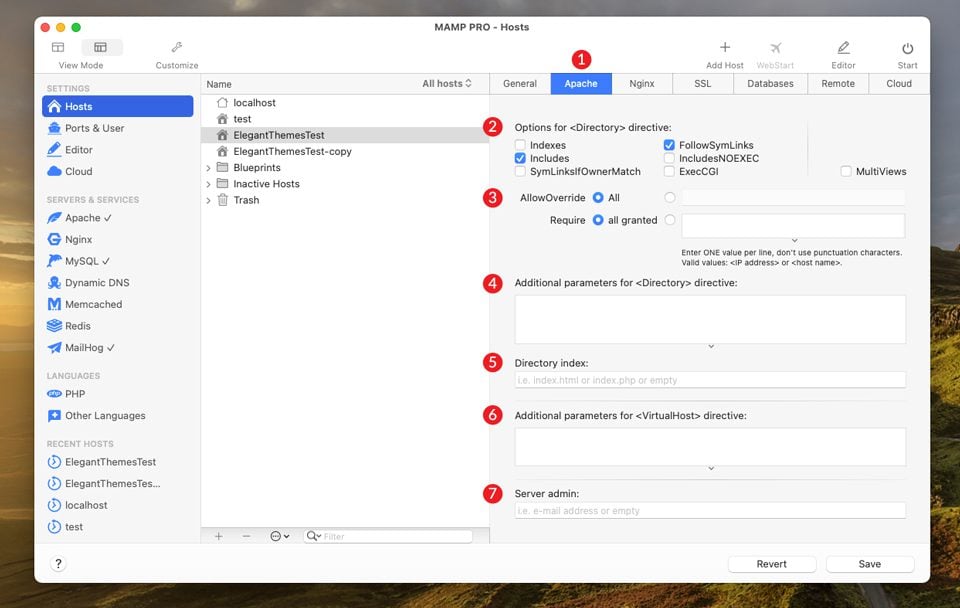
If you choose Apache for your web server, there are additional setting options that you can choose. You can choose directives for your directory, set AllowOverride parameters, set a directory index, define additional parameters for VirtualHost directives, and specify an admin email address.
Extended View Nginx Settings
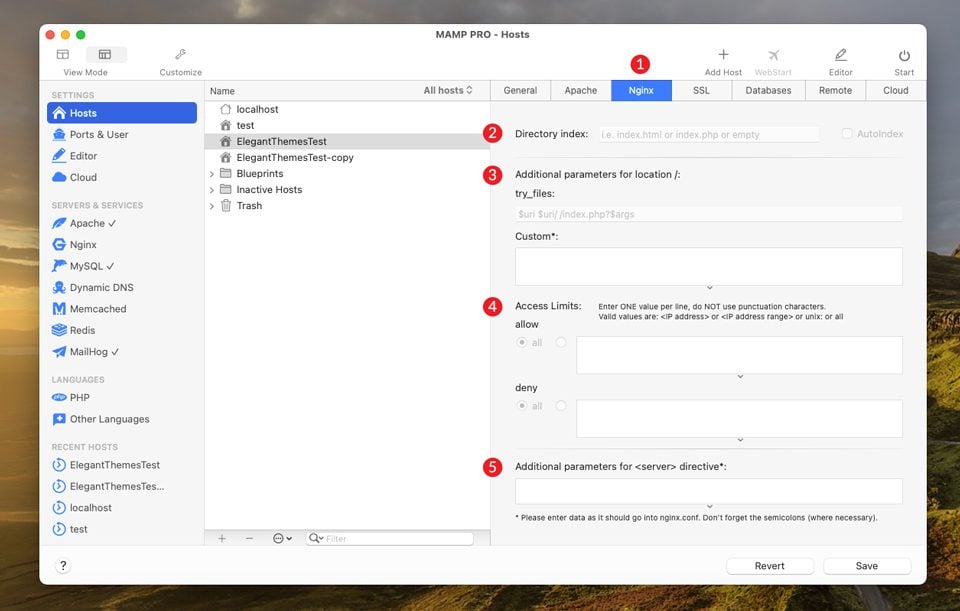
When you choose Nginx as your web server to host WordPress, you’ll have some additional settings that you can define. You can choose your directory index and decide whether to AutoIndex it. You can also define any additional parameters for the directory, set access limits, and allow or deny certain limits.
Extended View SSL Certificate Settings
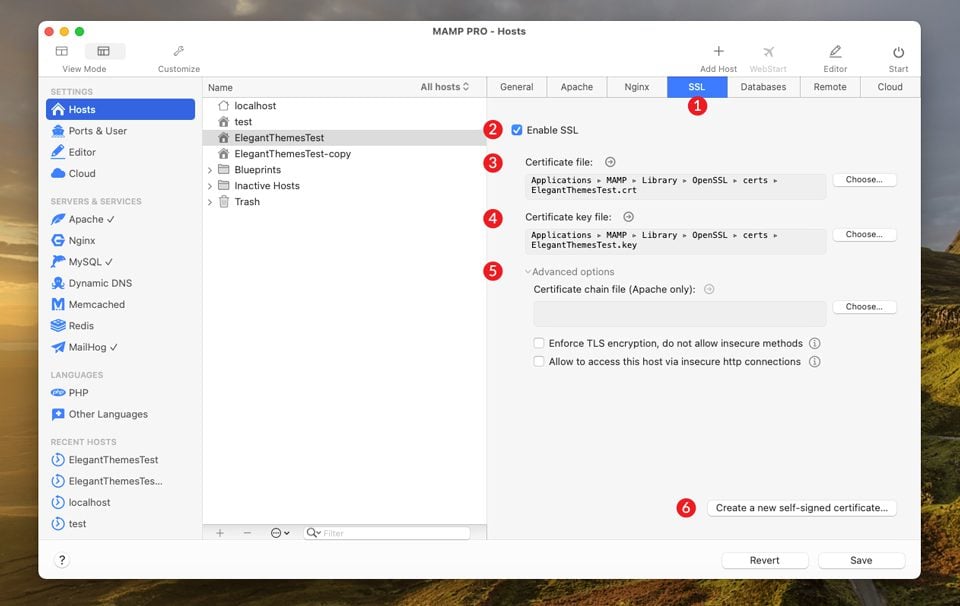
Here you can choose whether to enable or disable your SSL certificate. When you create a WordPress host, MAMP Pro automatically generates one when you tick a checkbox (more on this later). In addition to being able to disable it here, you can also put in a custom certificate and key files, set a certificate chain file, enforce TLS to only allow the latest versions, or create a new self-signed certificate.
Extended View Database Settings
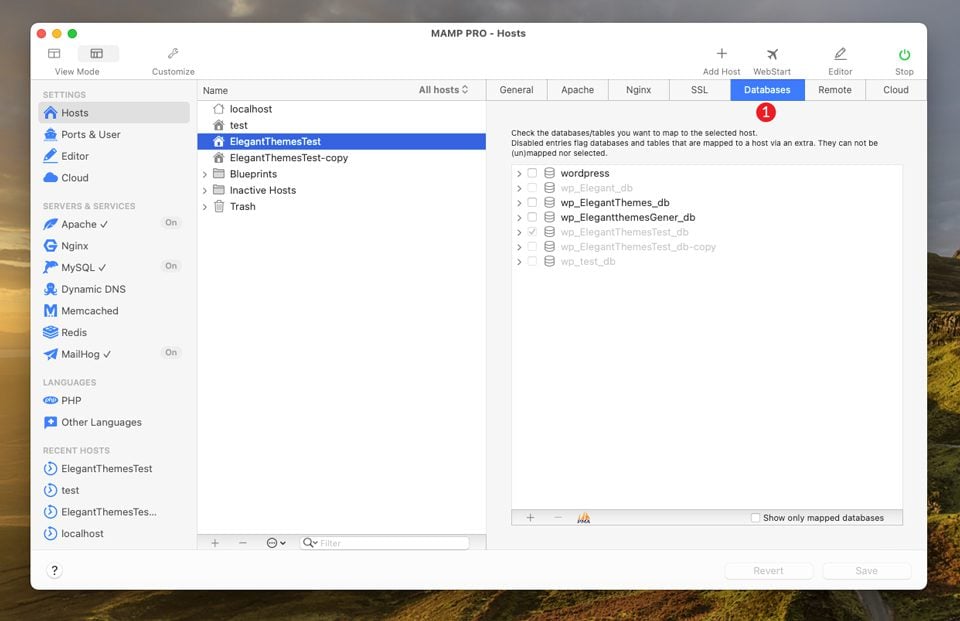
In the database settings, you can choose which databases to assign to each host. This is useful for sites that require more than one database to function. For example, if you’ve created a custom search functionality on your site based on certain parameters, you most likely will require a separate database. You can assign that here.
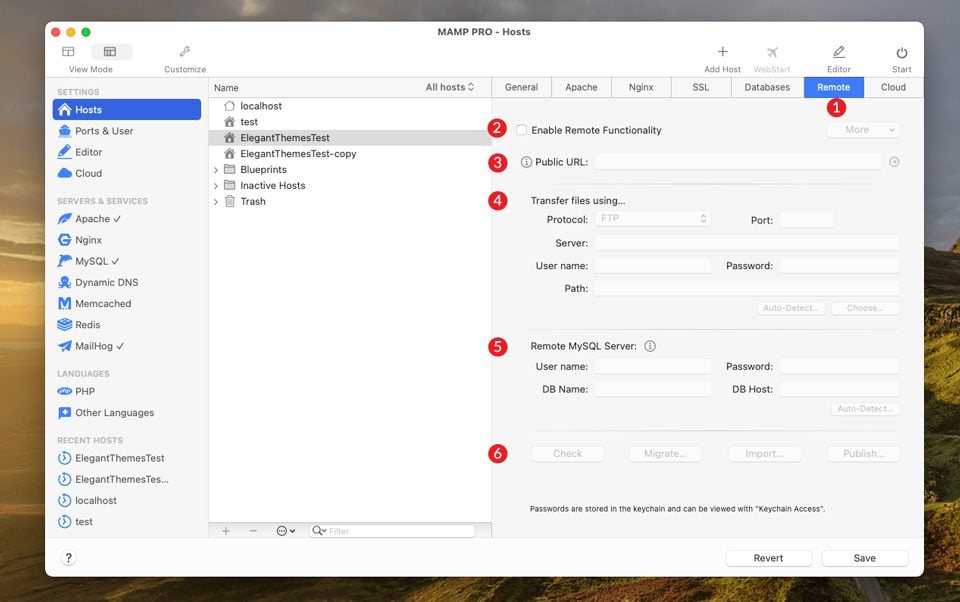
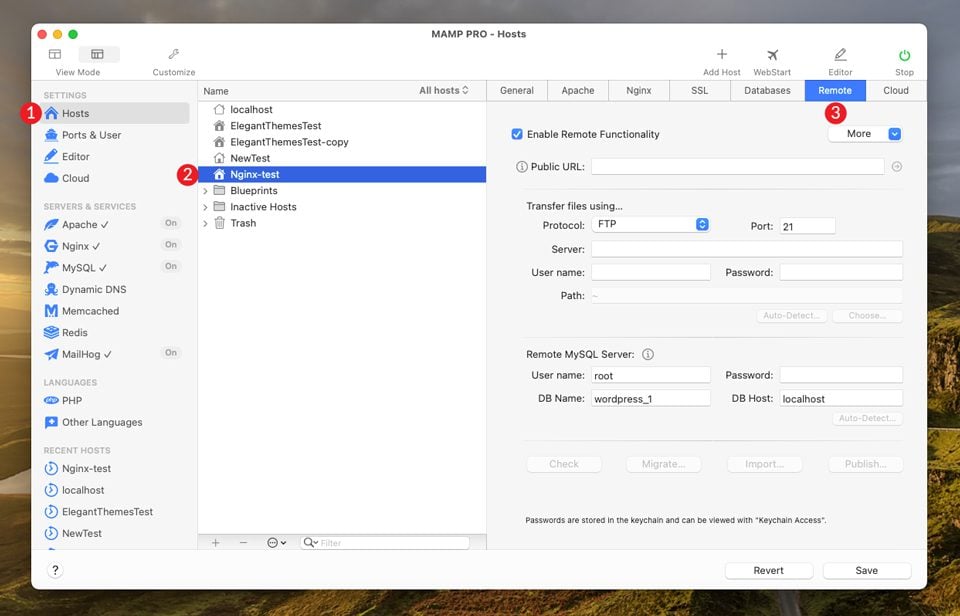
Extended View Remote Settings
When it comes time to transfer your local site to a live environment, you’ll use this screen to set things up. In remote settings, you’ll have the following options available to you.
- Enable remote functionality
- Enter a public URL
- Set your FTP or SFTP connection
- Establish a connection to a remote MySQL server
- Check your settings, migrate, import, or publish your site
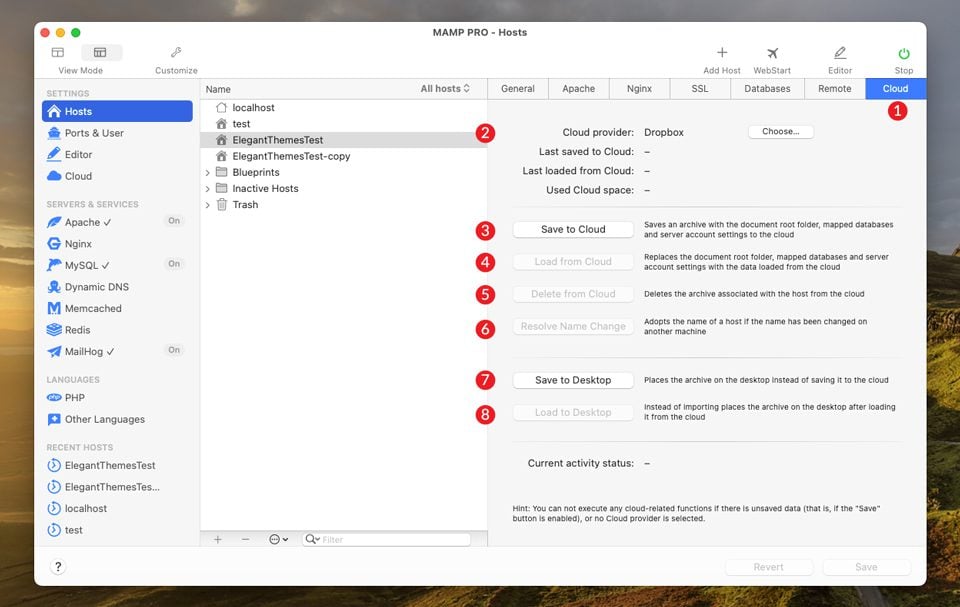
Extended View Cloud Settings
In the cloud settings tab, you can connect to your cloud server, then save your files. You can also load files from the cloud, delete them, and resolve name changes. Additionally, you can save or load your files to the desktop.
Getting Started With MAMP Pro
If you are familiar with MAMP, you know that setting up a WordPress site isn’t exactly a straightforward process. That isn’t the case with MAMP Pro. WordPress can be created in just a few steps. You don’t have to manually install any WordPress files. MAMP Pro will take care of that for you. Additionally, if you choose Nginx as your web server, you won’t have to make changes to your webserver’s configuration files. MAMP ensures that Nginx is ready to go out of the box. Before we get into installing Nginx, let’s go over the steps to install WordPress using Apache.
For this tutorial, we’ll be working in standard view. Open MAMP Pro and click the start button to start the server.
Next click the + Add Host button.
When the dialog box appears, click the WordPress icon, then click continue.
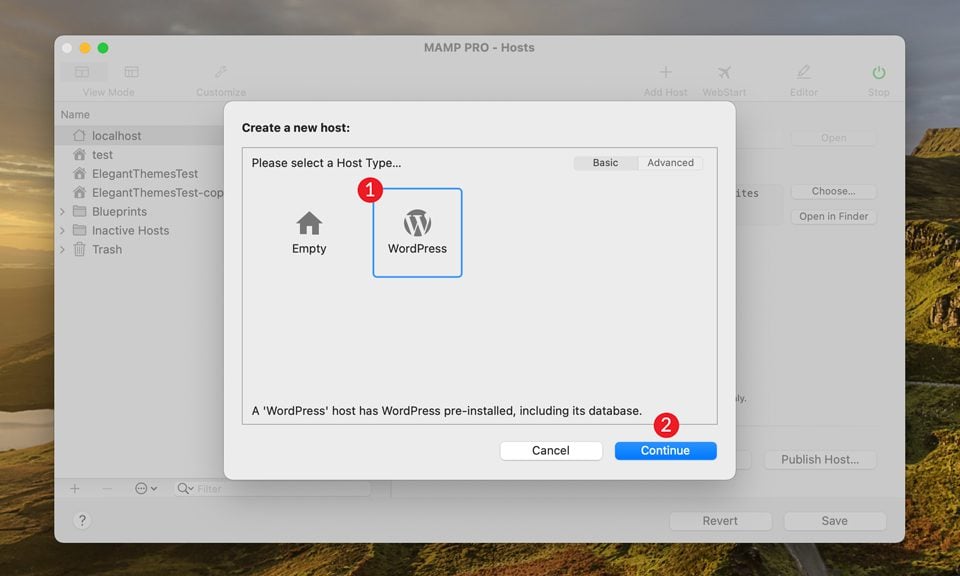
Give your host a name and choose a destination folder. When you click the choose button, MAMP will ask you to create a folder within the destination folder. This is an important step to avoid errors. In fact, if you try to drop the files directly into your root folder, MAMP will discourage you. Once you’ve created your folder, click continue.

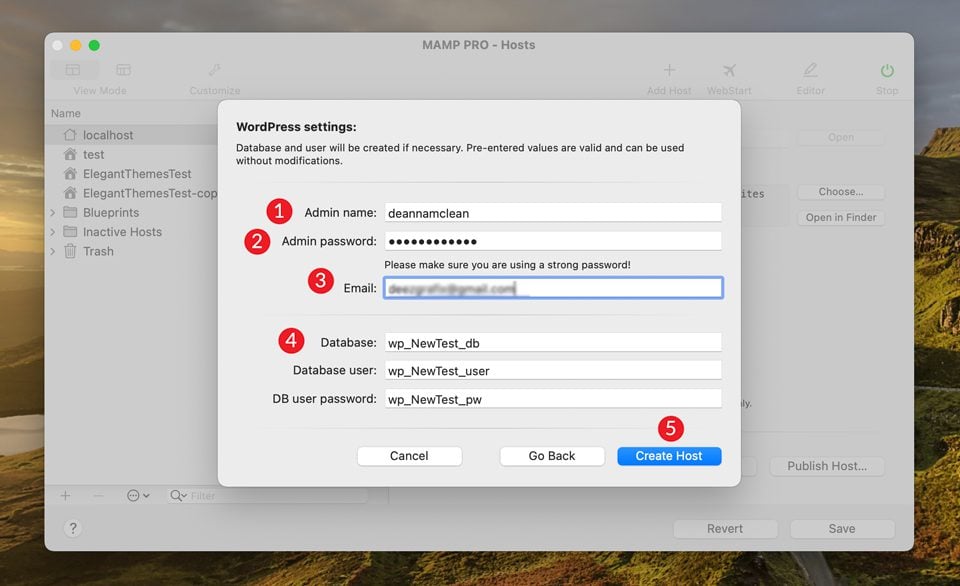
When the final screen appears, you’ll be prompted to create your admin credentials. Enter the admin name of your choice, followed by a password. Then you’ll enter your email, and provide database information. It’s fine to leave those defaults. If you choose to change the database, user, and password, be sure to begin each with wp_.
Which Webserver Should You Use?
Apache was introduced in 1995, so naturally, it’s a popular choice given that it’s been around a long time. Roughly 67% of WordPress installs are built using Apache. That being said, over the last few years Nginx has been gaining in popularity.
Nginx was created by a Russian programmer named Igor Sysoev back in 2002. His primary reason for creating Nginx was that Apache struggled with large numbers of clients simultaneously. He wanted to create a web server capable of higher speeds that would require fewer resources. After several years of testing, the first Nginx release was made public in 2004. Since then, the Nginx fanbase has grown exponentially.
WordPress works wonderfully on Nginx, and it has a 33% share of websites hosted on the internet. Several popular hosting providers now utilize it. Companies such as SiteGround, InMotion Hosting, and Cloudways use Nginx webservers for their hosting plans.
Given that Apache and Nginx are both one of the best web servers out there, choosing the right one largely depends on how big your site is. If you have a purely informational site that doesn’t host a lot of files, you’re fine with using tried-and-true Apache. However, larger sites would probably be best served by using Nginx because of its speed advantages alone. Companies such as Uber, Instagram, Instacart, and Airbnb are all built on Nginx.
Setting Up WordPress on Nginx with MAMP Pro
It is entirely possible to run WordPress on Nginx in MAMP Pro. However, there are a few additional steps that you’ll need to take to make that happen. First of all, Nginx does not use an .htaccess file, which WordPress generally requires. Because of that, you’ll need to install WordPress a bit differently.
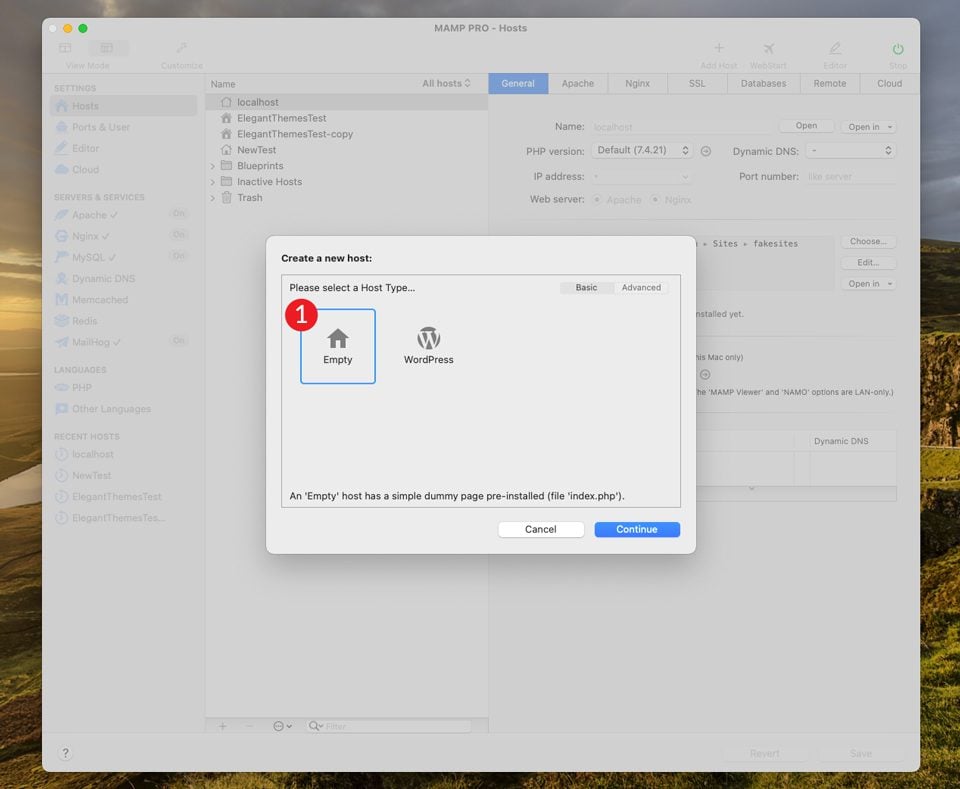
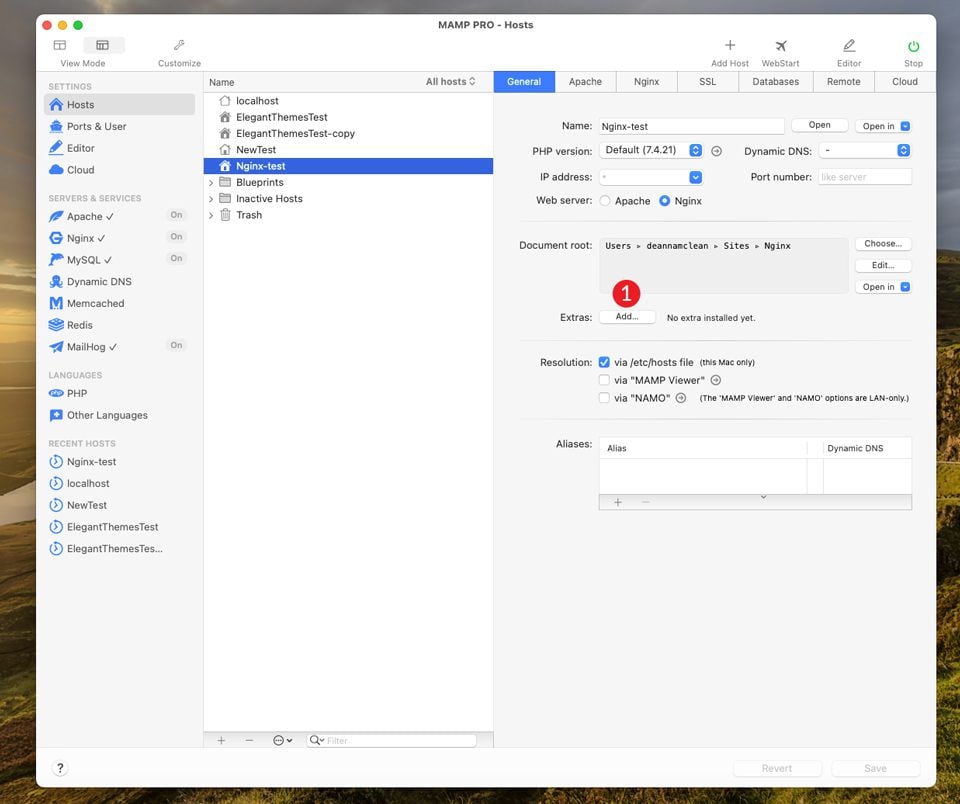
For this example, we’ll create a new test site using the extended view. We’ll need to create a host without WordPress this time. If we choose WordPress, Apache will automatically be installed. In MAMP Pro, navigate to the general tab under hosts. Click the + Add Host button. This time, we’ll click the empty button to create our host.
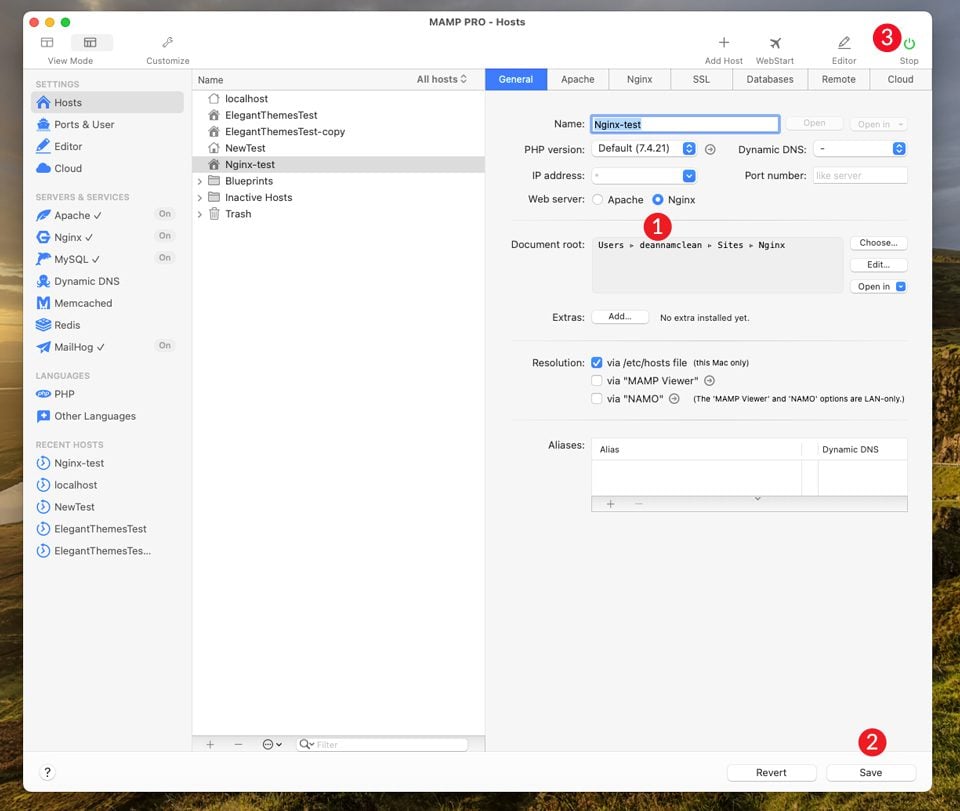
We’ll name our host Nginx-test. Set the location folder for your host, then click continue. Once our new host is created, we’ll want to make sure Nginx is selected under the general tab. Next, click save. It’s a good idea to restart your server to ensure the change was made. To do that, click stop at the top right of the screen. Wait a few seconds, then click start.
Under the general tab in the extras section, click the add button.
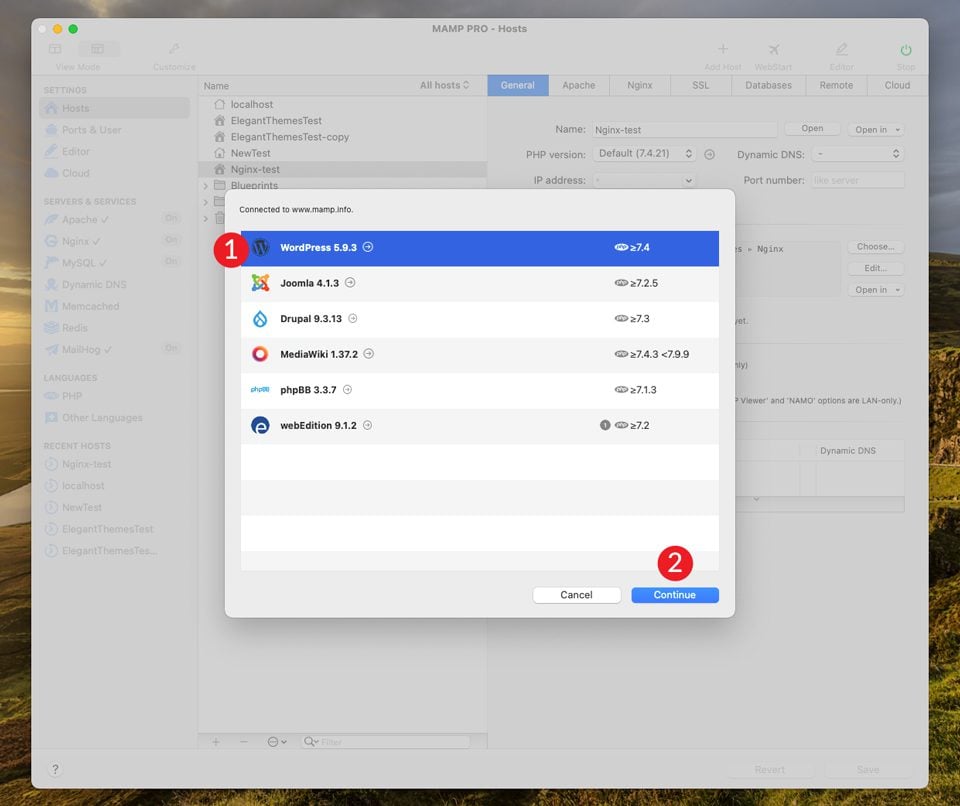
A dialog box will appear. To install WordPress, select WordPress (the latest version), then click continue.
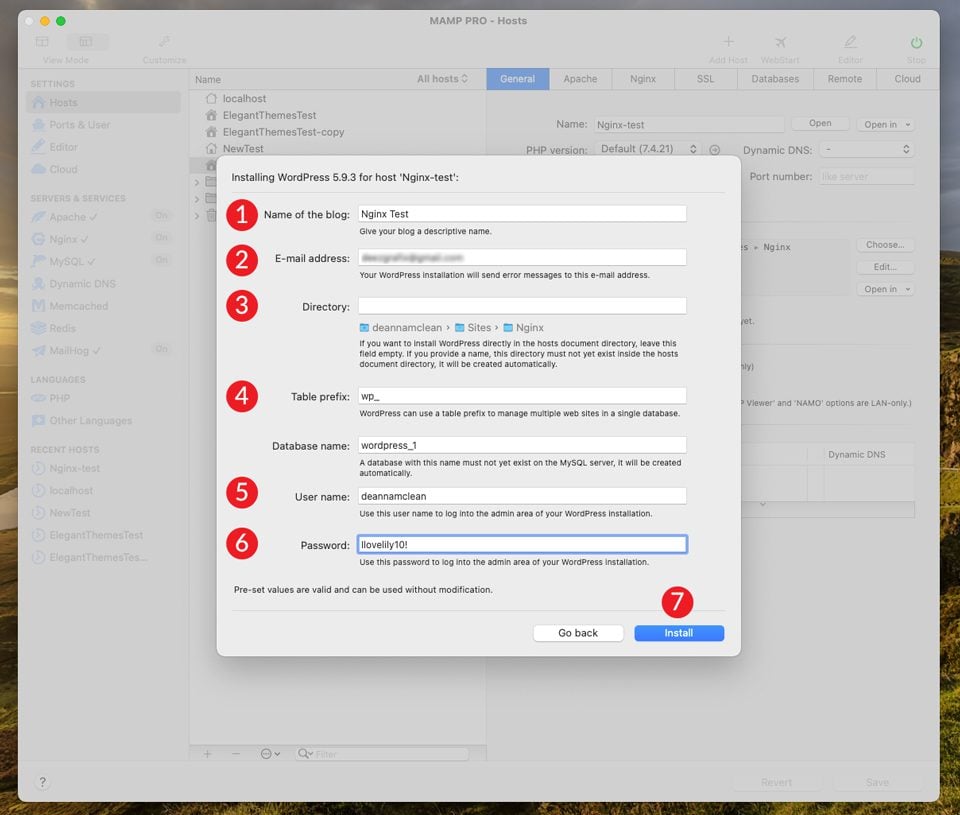
Give your blog a name and enter your email address. Next, take note of your table prefix and database name. Add a username and password, then click install.
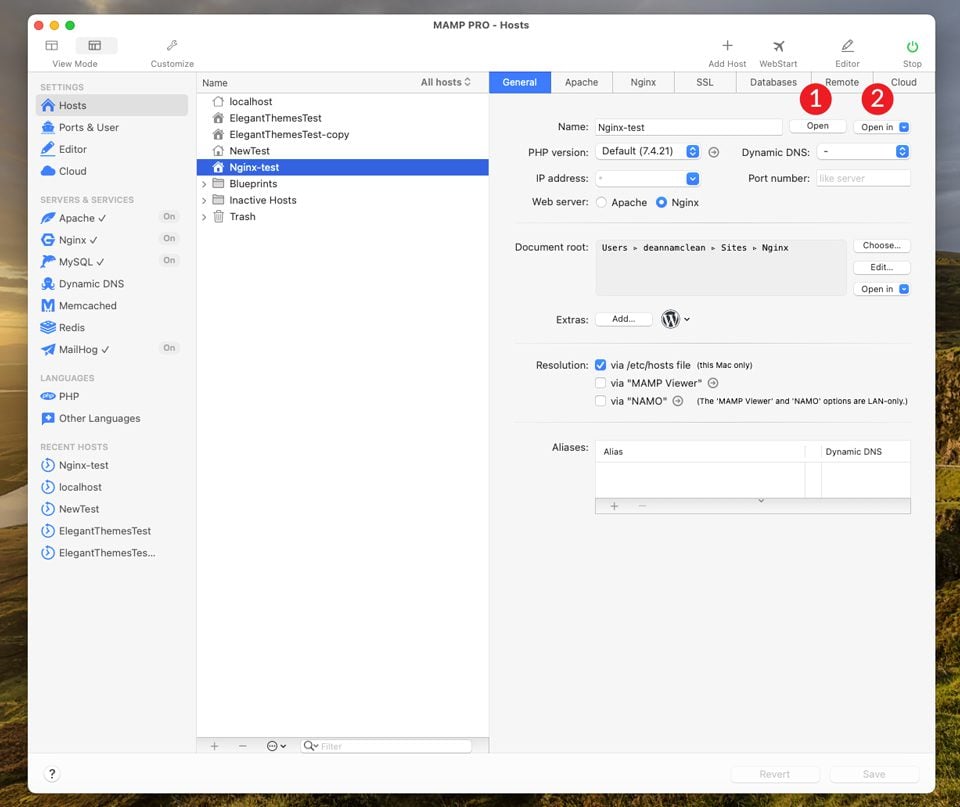
To view your site, click open under the general tab. Your site will open in your default browser. If you want to see your site in other browsers, click the open in button.
Pushing Your Site Live
We’ve demonstrated how simple it is to create a WordPress site in both Apache and Nginx. Next, let’s go over how to push your site live. There are basically two ways to do this. One is through the FTP settings in MAMP, the other is with a WordPress migration plugin such as UpdraftPlus or Backup Buddy. Before we get to that though, we’ll discuss the importance of backing up your site before moving it to a live environment.
How to Backup/Restore Your Site
Backing up and restoring your site in MAMP Pro is an important step you should take before pushing your site live. Creating a backup saves you from costly errors that could occur during the transfer process. MAMP Pro has made it a simple task that only takes a couple of steps to complete. To back up your site, you’ll follow these easy steps.
Backup your Host and Database Files
Before backing up your host(s) make sure that your server isn’t currently running. From the file menu, select backup.
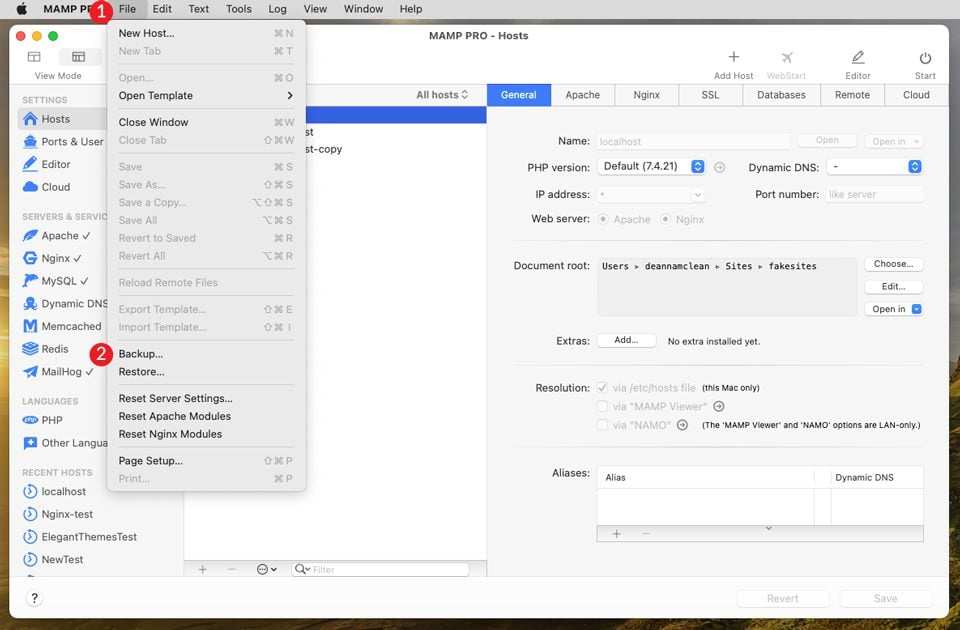
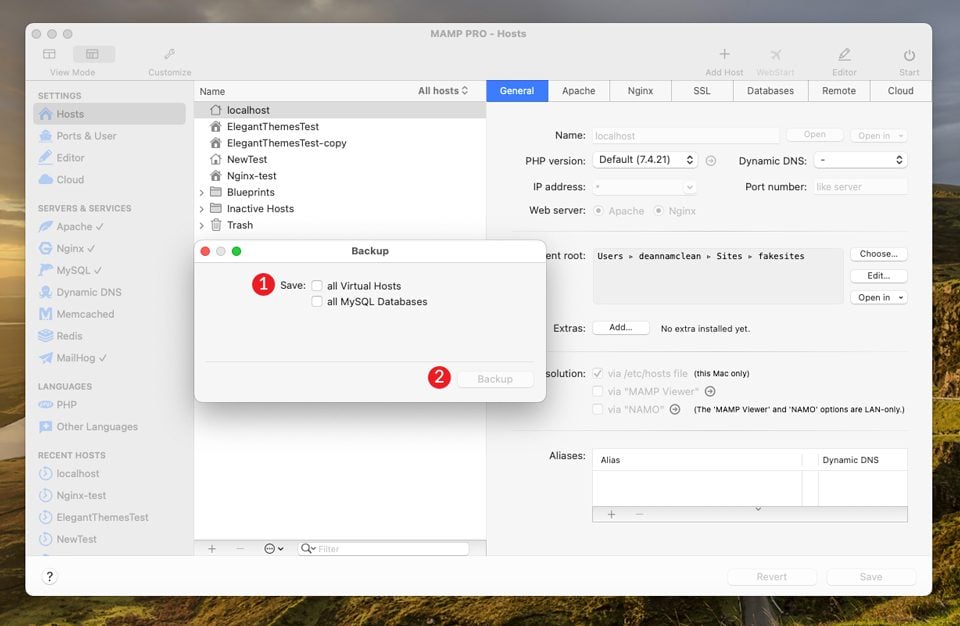
When the dialog box appears, choose either all virtual hosts or all MySQL databases, or both.
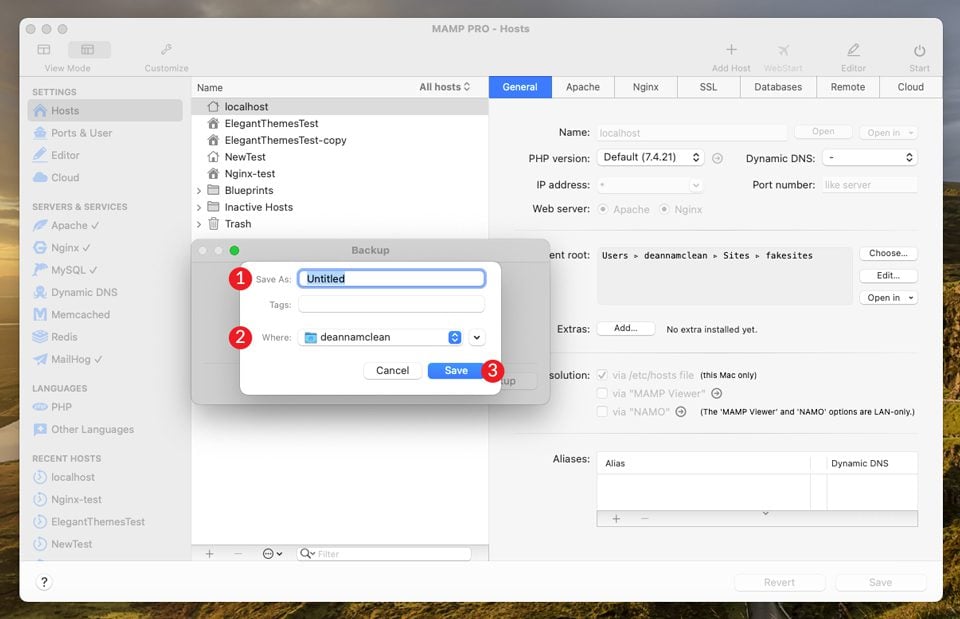
Next, you’ll name your backup and choose a location to store the files. Finally, click save. The process may take a few minutes depending on the size of your host and database files.
Restoring Your Backups
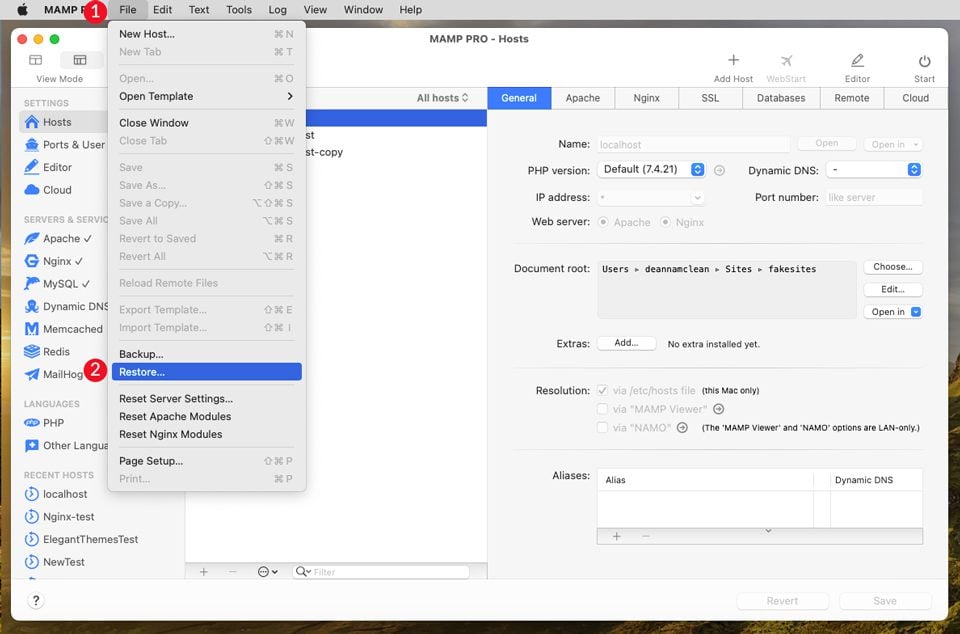
Restoring your files is as simple as backing them up. Be sure that your server isn’t currently running before you begin. From the file menu, choose restore.
Next, select the location where your files are saved, then click restore.
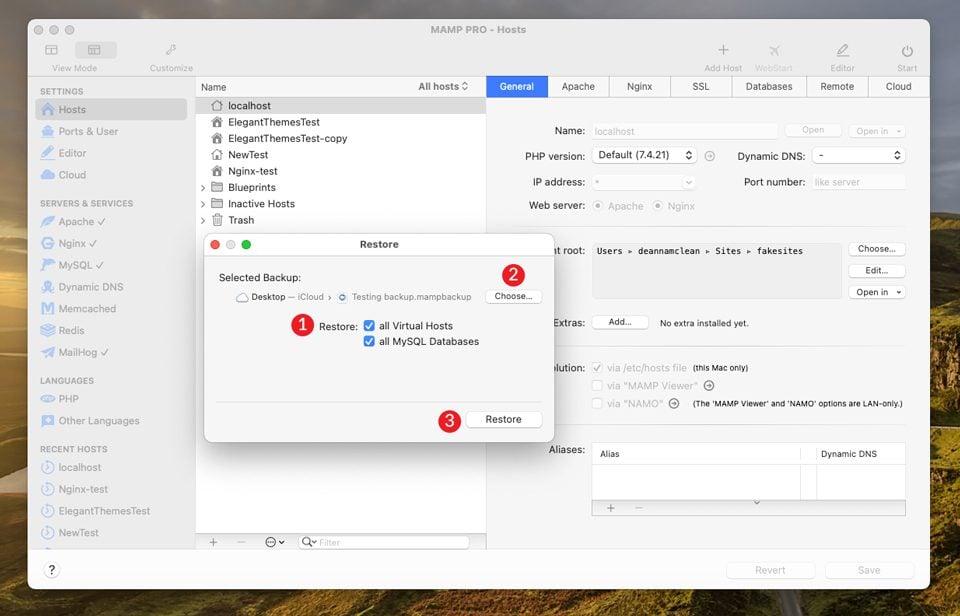
A warning dialog box will appear stating that your current MySQL database and virtual host files will be replaced. Click ok.
Connecting To A Remote Server
When it comes to pushing your site live, MAMP Pro couldn’t make things any easier on you. It’s a matter of connecting to your host via FTP or using a migration plugin. For this tutorial, we’ll focus on using FTP to give you a better understanding of the process. Be sure to have your URL and FTP connection information for your hosting provider ready to go.
Note: At present, MAMP Pro only supports the remote transfer of WordPress sites. If you need to push other CMS sites such as Joomla or Drupal to a live host, this will need to be done manually.
Next, make sure that your server has been started. Click on the host you wish to push live, then navigate to the remote tab.
Next, tick the enable remote functionality checkbox, and enter the URL for your site’s destination. Next, specify whether you want to transfer your files via FTP or SFTP. We recommend using SFTP because of the increased security that it provides. Input your port, host (server), username and password. Enter the username, password, database name, and the database host name for your remote MySQL server. Finally, test your settings by clicking the check button. Once you confirm that your settings are correct, click the publish button to push your site live. Once you confirm your settings, click save.
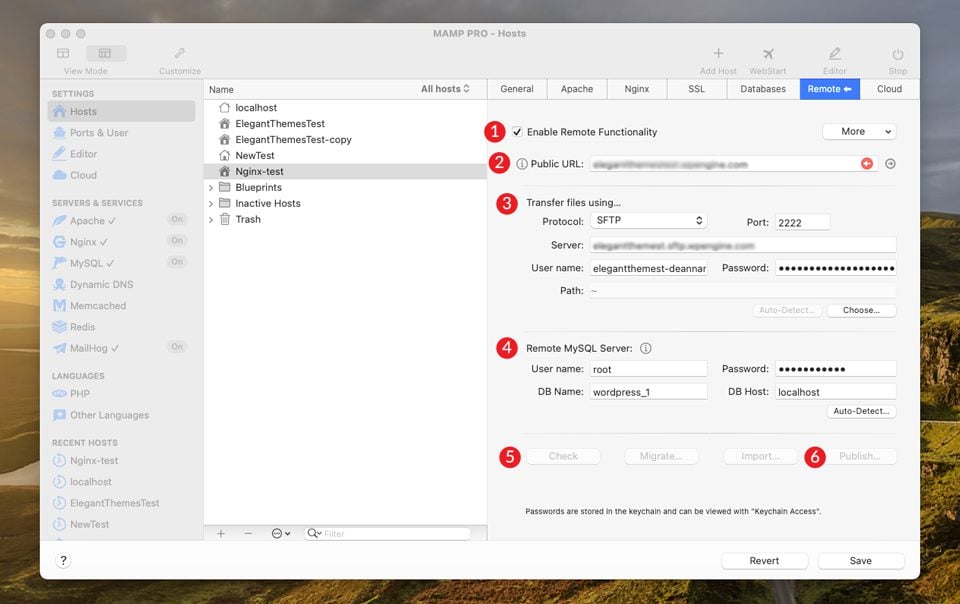
In addition to pushing your site live through MAMP Pro, you can pull your live site into your local environment. To accomplish this, repeat the steps outlined above, but instead, click the import button.
MAMP Pro is a Full Solution for Local Development
Having the ability to develop WordPress sites locally is important for some WordPress developers. With support for multiple hosts, one-click installs, and both Apache and Nginx web server capabilities, you can’t go wrong with MAMP Pro. The free version of MAMP is a good option for WordPress development if you need a simple solution. However, if you require more options like setting up SSL certificates, email testing, dynamic DNS, or the ability to run multiple programming languages, MAMP Pro is the way to go.
Do you use MAMP Pro for local website development? If so, give us your thoughts in the comment section below.


Thank you for this very interesting post.
Is it possible to choose a database other than Mysql ?
Unfortunately, it seems to only support Mysql.