")
Are you looking to create your own website but feel overwhelmed by the technical jargon? You’re not alone. Setting up a website can seem scary, but with the right tools and guidance, it’s much easier than you think. Thanks to a powerful content management system (CMS) called WordPress, you can easily build any website you want, from a blog to a business website. Powerful themes like Divi allow you to create a brand-new website in no time.
In this post, we’ll walk you through the steps of getting started with WordPress. Let’s get to it!
What Is WordPress?
WordPress is a popular CMS platform that makes building a website easy. It’s like the engine behind your website, letting you easily add content, customize the design, and publish your work online – all without needing to be a coding master. Originally created for building blogs, WordPress has evolved into a versatile tool for making any type of site, from personal portfolios and business sites to ecommerce stores and online communities. WordPress is also open source, meaning its core software is free to use and modify. This fosters a large and active community that contributes to its ongoing development and offers a wealth of resources for its users. It’s also widely popular, making up roughly 43% of all websites on the internet.
What Are the Benefits of Using WordPress?
WordPress is a powerful and versatile platform that allows you to create the website you envision without restrictions. It’s a great choice for anyone who wants full control, customization options, and the ability to grow their website.
WordPress provides a wealth of benefits, including:
- Complete Design Freedom: With WordPress, you have complete ownership and control over your website. You can customize it any way you want, unlike some hosted website builders, like Wix or Squarespace, that have limitations.
- Make Money: You can monetize your website however you see fit, whether through advertising, selling products, or offering membership plans.
- Flexibility: WordPress offers unmatched flexibility in terms of customization. There are thousands of free and premium WordPress themes, like Divi, that allow you to create any look you want. Plus, thanks to must-have plugins like Rank Math and WP Rocket, your site will be screaming fast and rank higher in the search engine ranking pages (SERPs).
- Open-Source and Free: The core WordPress software is free and open-source, allowing you to avoid license fees. That said, you’ll need to pay for web hosting and a domain name, but there are many affordable options, such as Namecheap, for securing a cheap domain, and SiteGround for hosting WordPress.
- SEO Friendly: WordPress is known to be very search engine friendly, meaning your website has a better chance of ranking higher in search results. This is primarily because it offers excellent content organization and structure, and there are plenty of good SEO plugins, such as AIOSEO, available to enhance it further.
How To Get Started With WordPress
Getting started with WordPress does take a few steps, but the process is easy. Between choosing the version of WordPress and adding plugins, we’ll walk you through all the steps needed to get your WordPress website up and running.
Subscribe To Our Youtube Channel
Step 1: Choose Your Platform
WordPress offers two ways to build your website. WordPress.com and WordPress.org. Understanding the key differences between these options will help you pick the platform that best suits your needs.
WordPress.com Is A Hosted Platform
One of the best aspects of using a hosted platform is that you don’t have to secure a hosting provider or use a domain registrar. Signing up for a WordPress.com plan provides you with both. They also take care of server maintenance and performance optimization so you can be sure your site will run fast and smoothly for your visitors. A free version will also allow you to start a basic website. This is a great option for hobbyists or anyone experimenting with WordPress.
However, there are some downsides, especially with the free plan. There are restrictions on design and functionality, with limited plugins available compared to WordPress.com‘s self-hosted counterpart. The free version also displays ads on your site, doesn’t allow you to monetize your blog, and has a WordPress.com subdomain. To secure a domain of your choice, you must subscribe to a paid plan.
WordPress.org Is A Self-Hosted Platform

On the other hand, WordPress.org is a self-hosted platform. The software is free, but you must purchase a domain and hosting plan separately. With WordPress.org, you have complete control over every aspect of your website, from design and functionality to monetization options. There’s also a robust WordPress repository full of free plugins and themes you can use. Using WP’s self-hosted option, you can display ads, sell products directly, or offer paid subscriptions through various plugins, such as MemberPress.
That said, there are some cons to consider. Self-hosted WordPress requires more technical knowledge compared to WordPress.com. You’ll need to choose a good WordPress hosting provider and install the software yourself. However, some hosting providers will take care of that for you. Providers, such as SiteGround, Cloudways, and WP Engine all offer one-click WP installs, making things easier for beginners. Another potential con is you’ll be responsible for maintaining your website’s security, backups, and software updates. That is unless you opt for a managed hosting provider, which comes with a steeper price tag than shared WordPress hosting.
Pick The Version of WordPress That Makes The Most Sense To You
For those prioritizing ease of use and a quick start, WordPress.com‘s free plan is a great option. However, if you envision a website with extensive customization, advanced features, and full monetization potential, self-hosted WordPress.org is the way to go. When making a decision, consider your technical comfort level, budget, and future website goals.
For most people, WordPress.org is the better choice. You just have more freedom with it. In this tutorial, we will walk you through the steps to get started with WordPress using the .org version. The sheer number of options with plugins and themes makes it worth the effort.
Step 2: Choose A Domain Name
Before you can build your WordPress websites, you’ll need to purchase a domain name. As mentioned, a domain name is your website’s unique online address. It’s what users type into a browser to visit your site. When selecting a domain name, it should be memorable, relevant to your website’s niche, and easy to spell. You should also strive to keep it short, catchy, and brand-relevant. Check for availability and consider registering multiple variations to avoid conflicts. Some popular domain registrars include GoDaddy, Google Domains, and Namecheap.

When choosing a registrar, consider price, ease of use, customer support, and available domain extensions. Namecheap, for instance, is known for its competitive pricing and user-friendly interface. They also offer a variety of domain extensions and frequently run promotions for even better deals. For example, you can get a .com extension for as low as $5.98 per year.
Every domain name purchase through Namecheap comes with a few benefits. You’ll get free security and privacy, the ability to configure your DNS records, and purchase optional add-ons like SSL certificates at a great price. Namecheap has a robust domain name search engine, ensuring you’ll find the best domain name for your business with little effort.

Once you find the perfect domain name, Namecheap will walk you through setting it up in a few easy steps.
Step 3: Select A Good WordPress Hosting Provider
Now that you’ve secured a domain, we must purchase hosting for our WordPress website. As previously mentioned, a web host is the place that will house all of your website’s files. For those just starting out, shared hosting is likely fine. However, if you want to grow your website, you should plan for that. For instance, purchase a hosting plan from a provider that can grow with you as your business grows.
When choosing a WordPress hosting provider, there are a few things you should insist upon, including good security, freebies such as an SSL certificate, site migration, and backups. Other considerations, including bandwidth, customer support, and uptime should be taken into account. There are plenty of popular options, including Bluehost, HostGator, and others, but for the most bang for your buck, we recommend SiteGround.
SiteGround is an excellent choice for several reasons. Firstly, it’s an optimized WordPress hosting provider, meaning that the server and its settings are specifically tailored for WordPress. Plus, SiteGround offers one-click installs, so you won’t have to figure out how to install WordPress yourself. Every SiteGround plan has many features, including free SSL, site migration, business email, and a content delivery network (CDN). Prices are affordable, too, starting at just $2.99 per month.
Step 4: Install WordPress
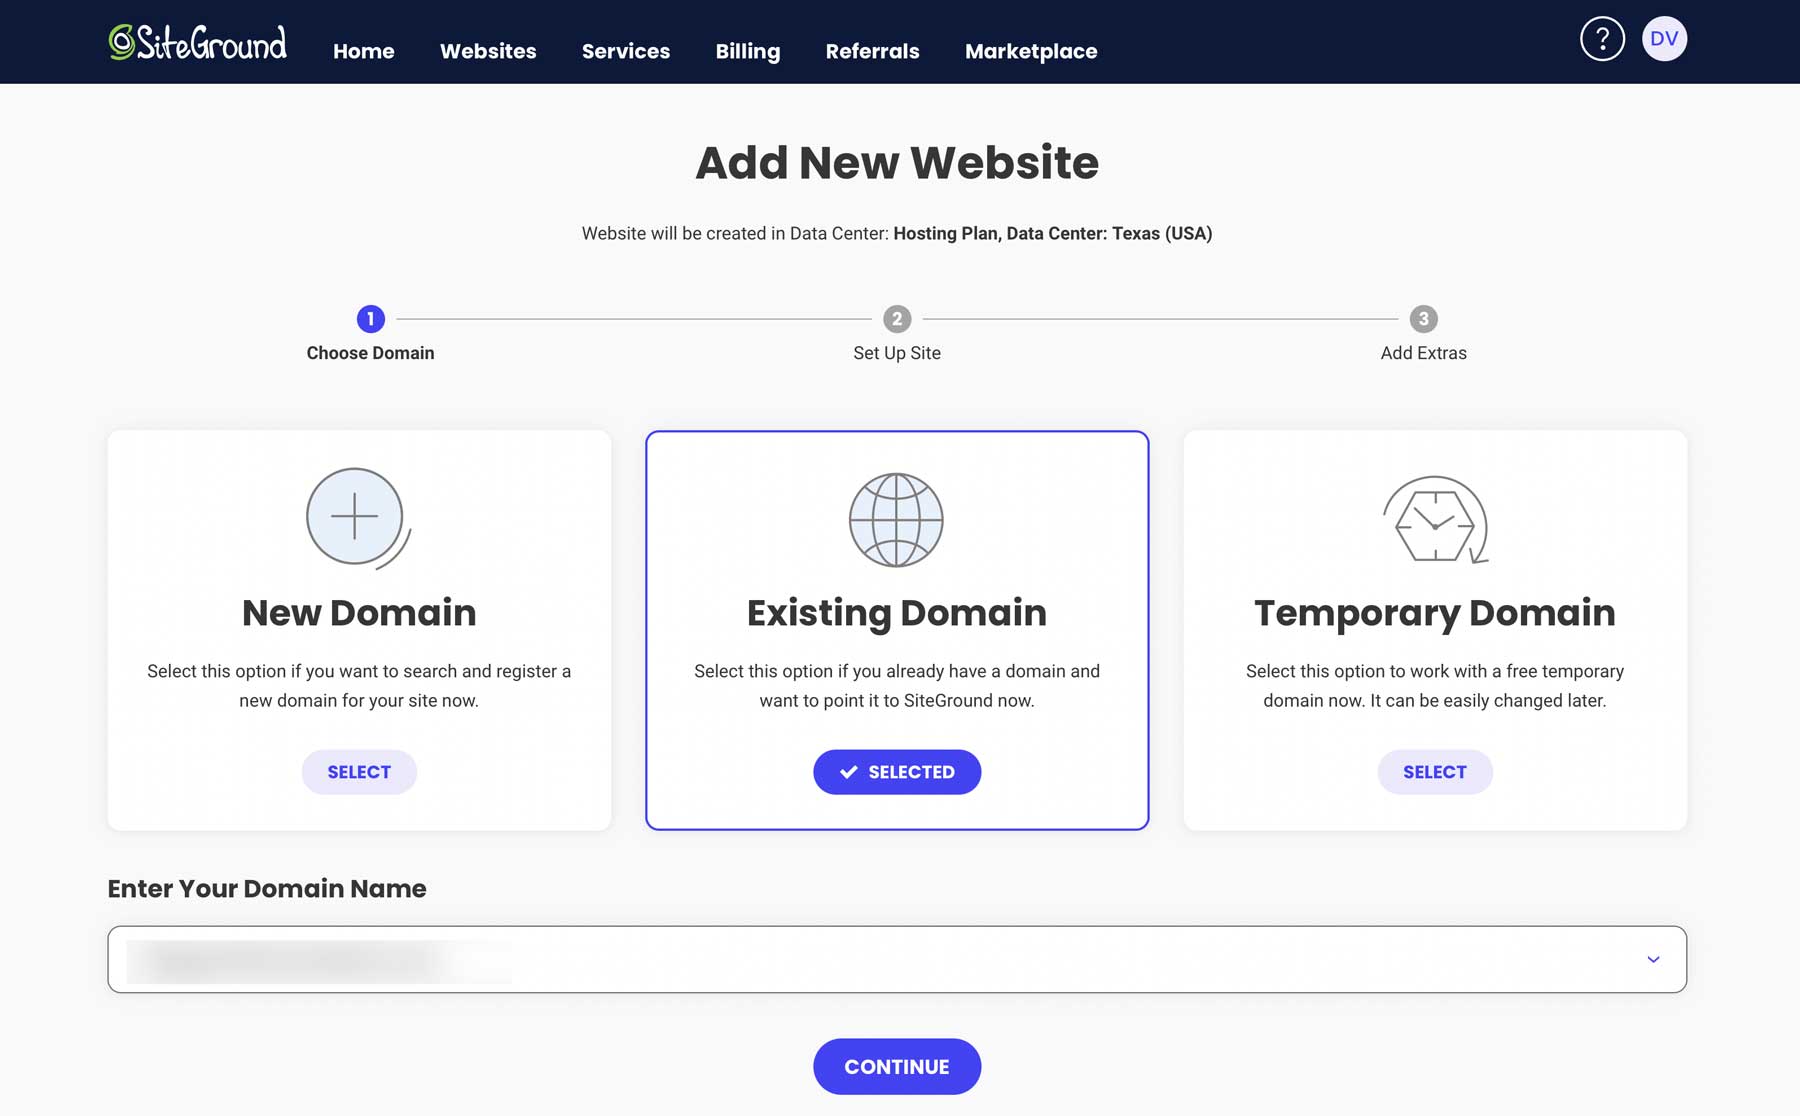
There are several ways to install WordPress, but the best option is to choose a hosting provider that provides one-click installs. Providers such as Bluehost, Hostinger, Kinsta, Cloudways, and SiteGround are all over that option. For this step, we’ll emphasize installing WordPress with SiteGround, as they make it easy to get started with WordPress. After purchasing a plan, you can install WordPress in under two minutes. Log in to your SiteGround account and click the Set Up Site button to begin.

In the next step, you’ll choose whether to choose a new, existing, or temporary domain. We assume you purchased a domain in the last step, so we’ll select existing domain.
Then, select Start New Website.
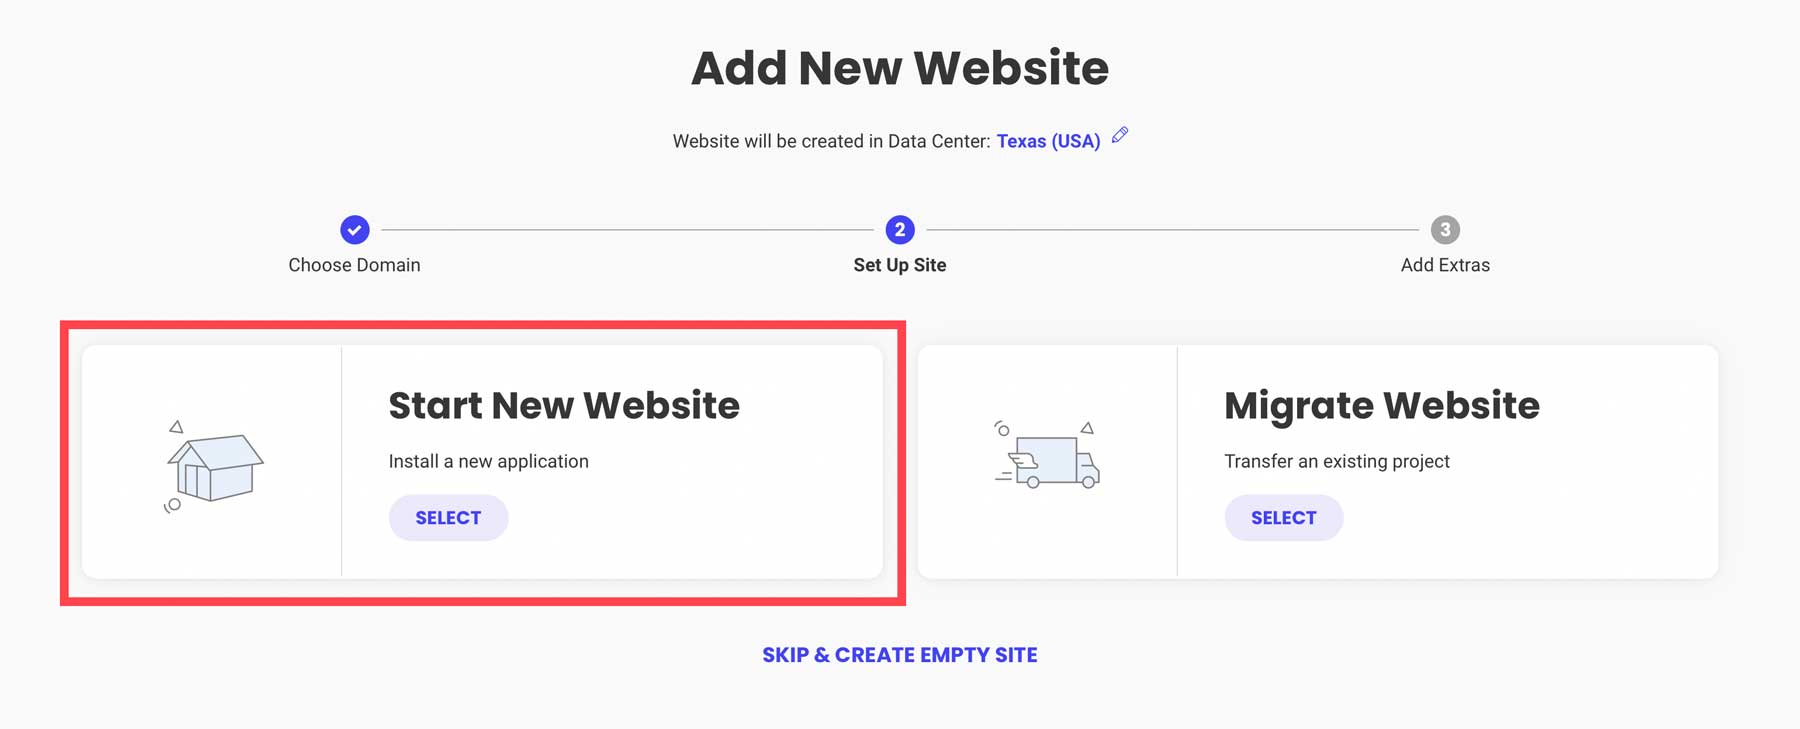
Choose WordPress for the application, add an email address and password (these will be your login credentials), and click Continue.
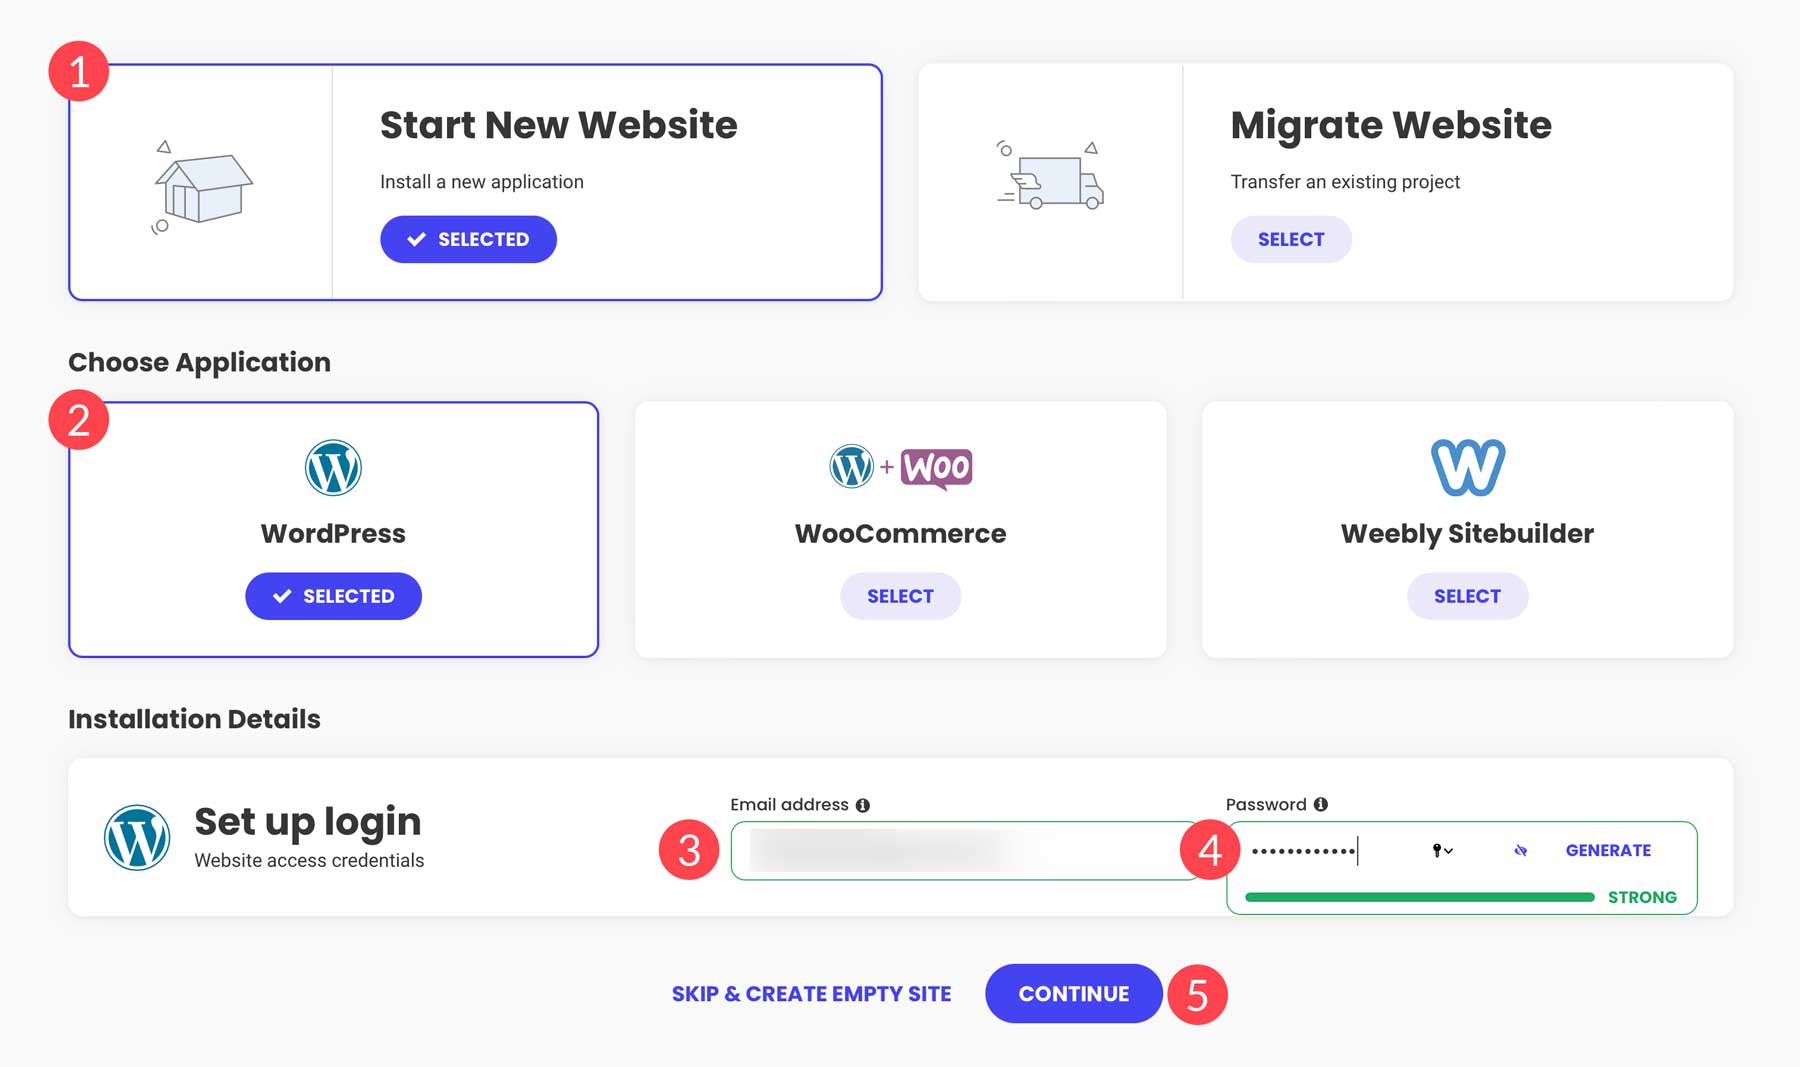
SiteGround will start the process of creating space on its server for your website, optimizing WordPress settings, and installing plugins like the Speed Optimizer plugin.
Step 5: Setting Up Your WordPress Site
Now that WordPress is installed, you’ll see the dashboard for the first time, familiarize yourself with its settings, and install a WordPress theme.
Login And Dashboard
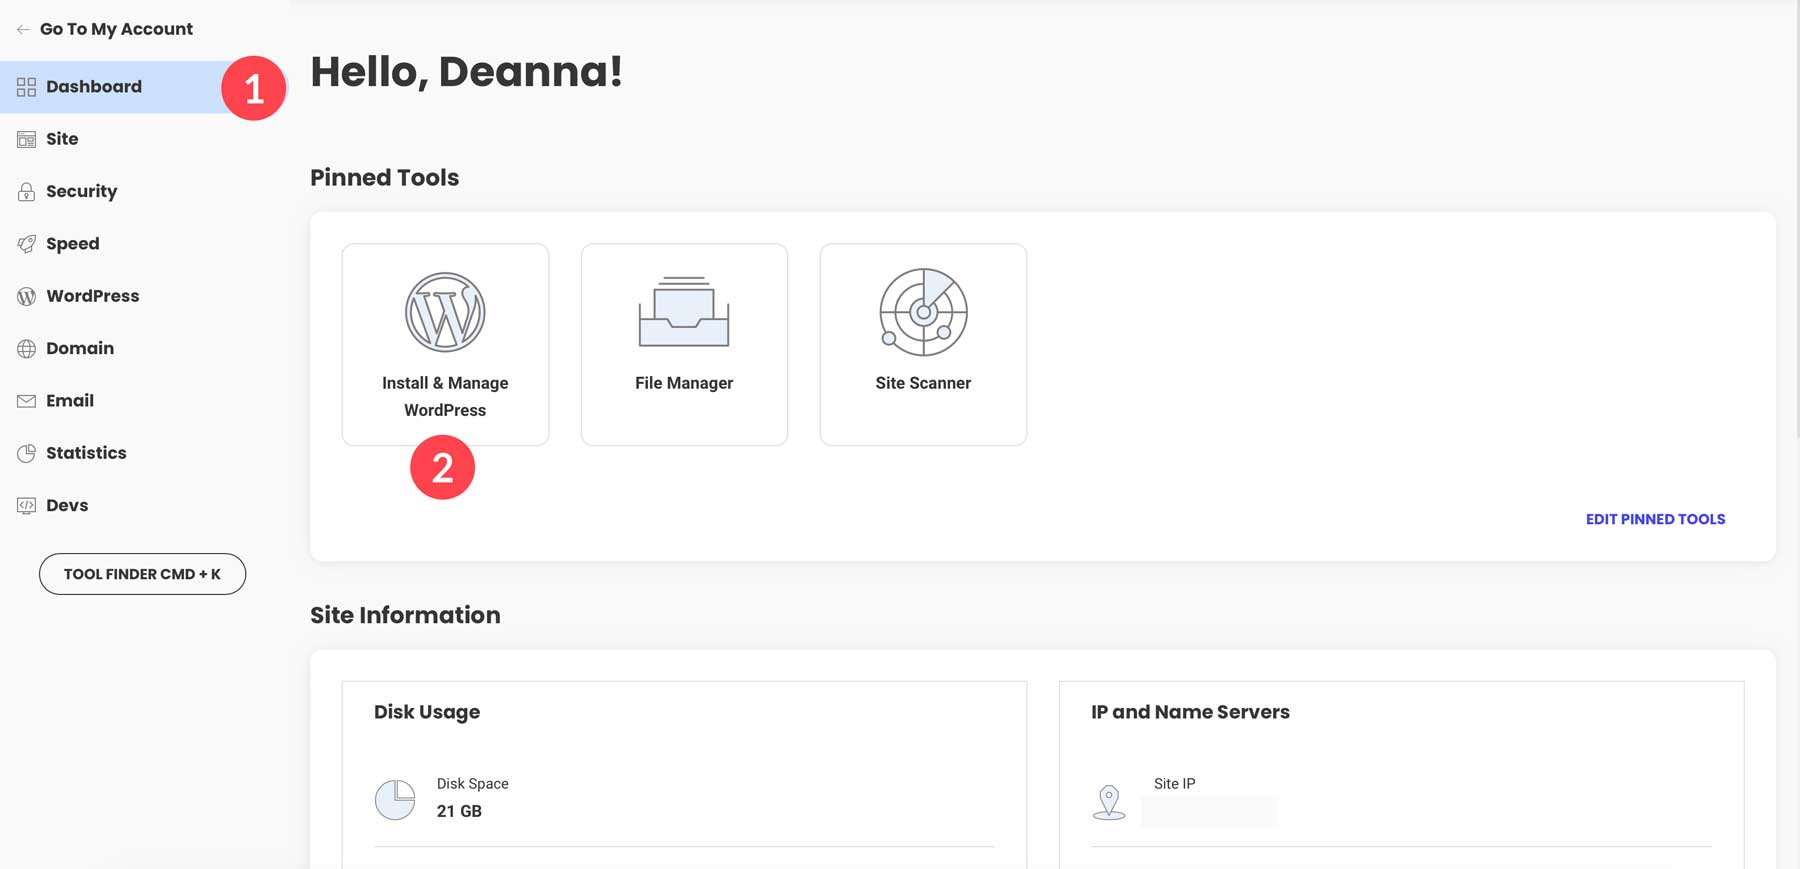
There are a couple of ways to access the WordPress dashboard. Using SiteGround, you can use the Site Tools dashboard to access WordPress, manage your domain, add email addresses, and install your SSL certificate, to name a few. To access the WP dashboard, log in to your SiteGround account. Under the Dashboard tab, click Install & Manage WordPress.
Within Install & Manage, click the icon under the Actions tab to access the WordPress admin dashboard.

Alternatively, you can type in your website’s address, followed by wp-admin to access your website, like this:
www.yourwebsitename.com/wp-admin
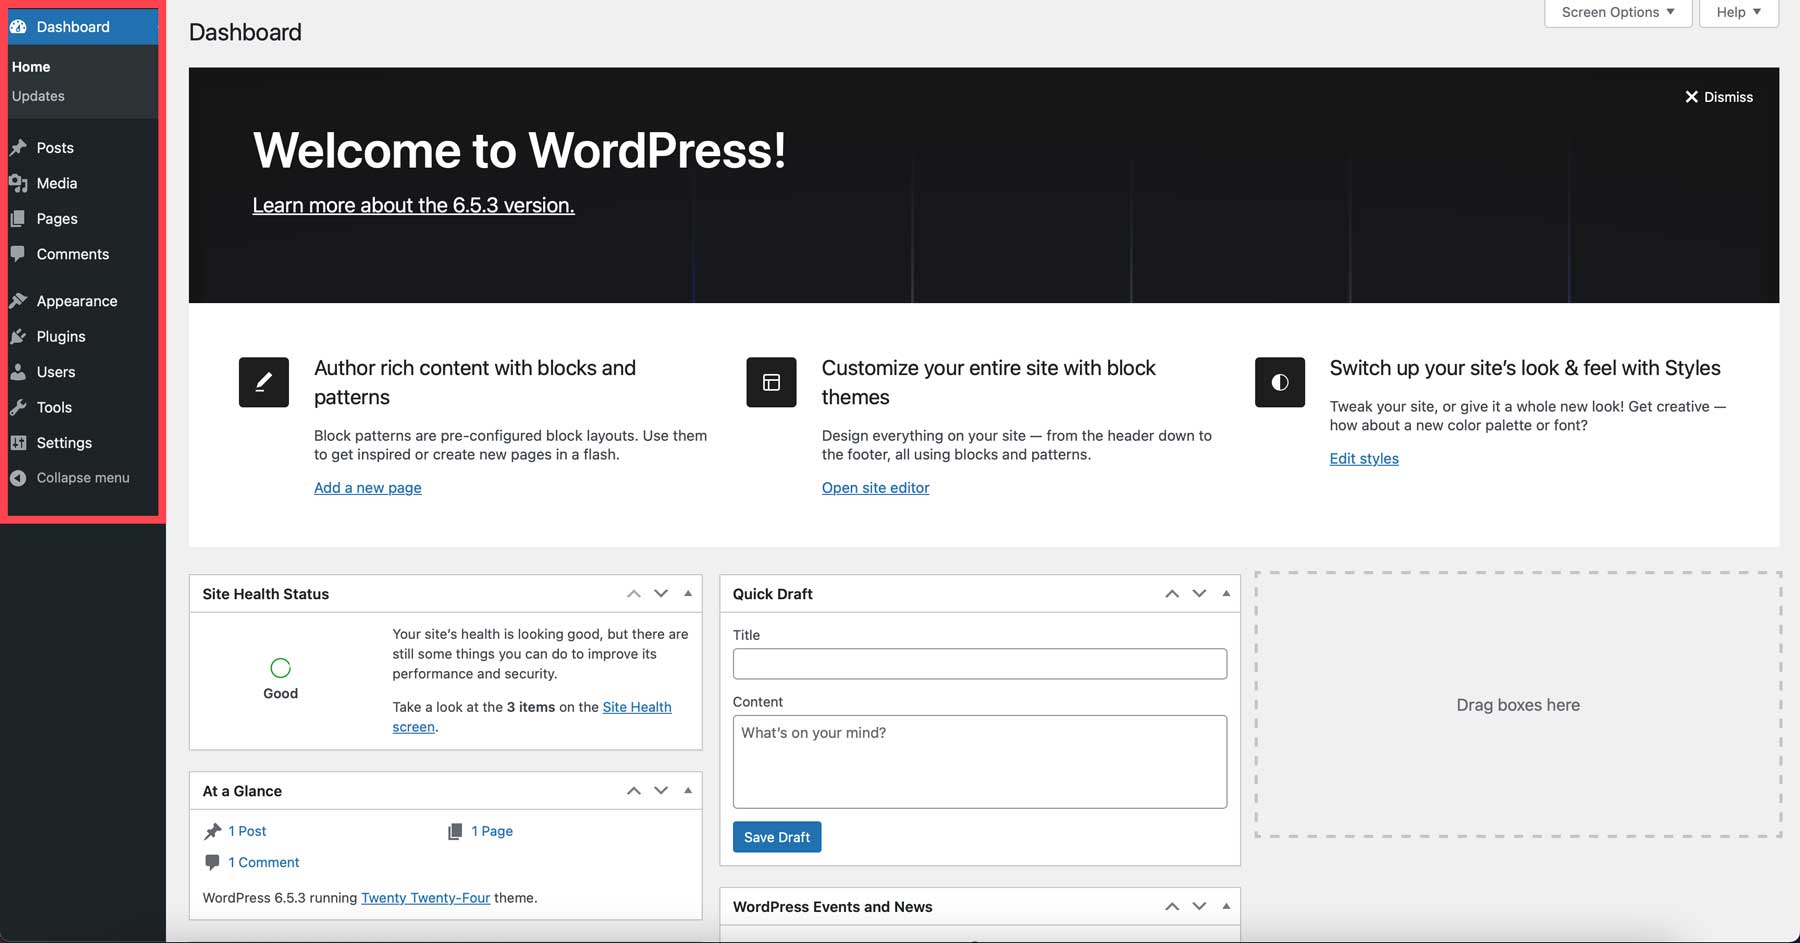
When you first log in, you’ll land on the main dashboard page, where you’ll see a few links on the left-hand side. We’ll provide a brief overview for each section so you’ll understand what each one does.
- Home: Here, you’ll see your website’s overall status. You can also get a glimpse at its health, draft a post, and peruse events.
- Posts: A WordPress post is a piece of dynamic, time-based content that appears on your website in a blog format. Think of it like an individual article or entry in a digital newspaper.
- Media: Manage all of your attachments, images, and videos with WordPress’s built-in media library.
- Pages: WordPress pages house all of your static content. Think home, about, or services pages. This content generally doesn’t change, unlike posts, which are used to display changing content.
- Comments: Manage and moderate comments in the built-in WordPress commenting system. You can even import and export comments, disable them, and more with a comment plugin, such as Disable Comments.
- Appearance: Add a theme, edit theme files, customize your WordPress theme, and more.
- Plugins: Install new free or third-party premium plugins for added functionality.
- Users: Add new users, assign permissions, and customize your user profile.
- Tools: Export or import WordPress settings and XML files, get up-to-date about your website in the Site Health tool, and more.
- Settings: Here, you can configure your site’s home page, discussion settings, writing settings, reading settings, permalinks, and more.
Essential Settings
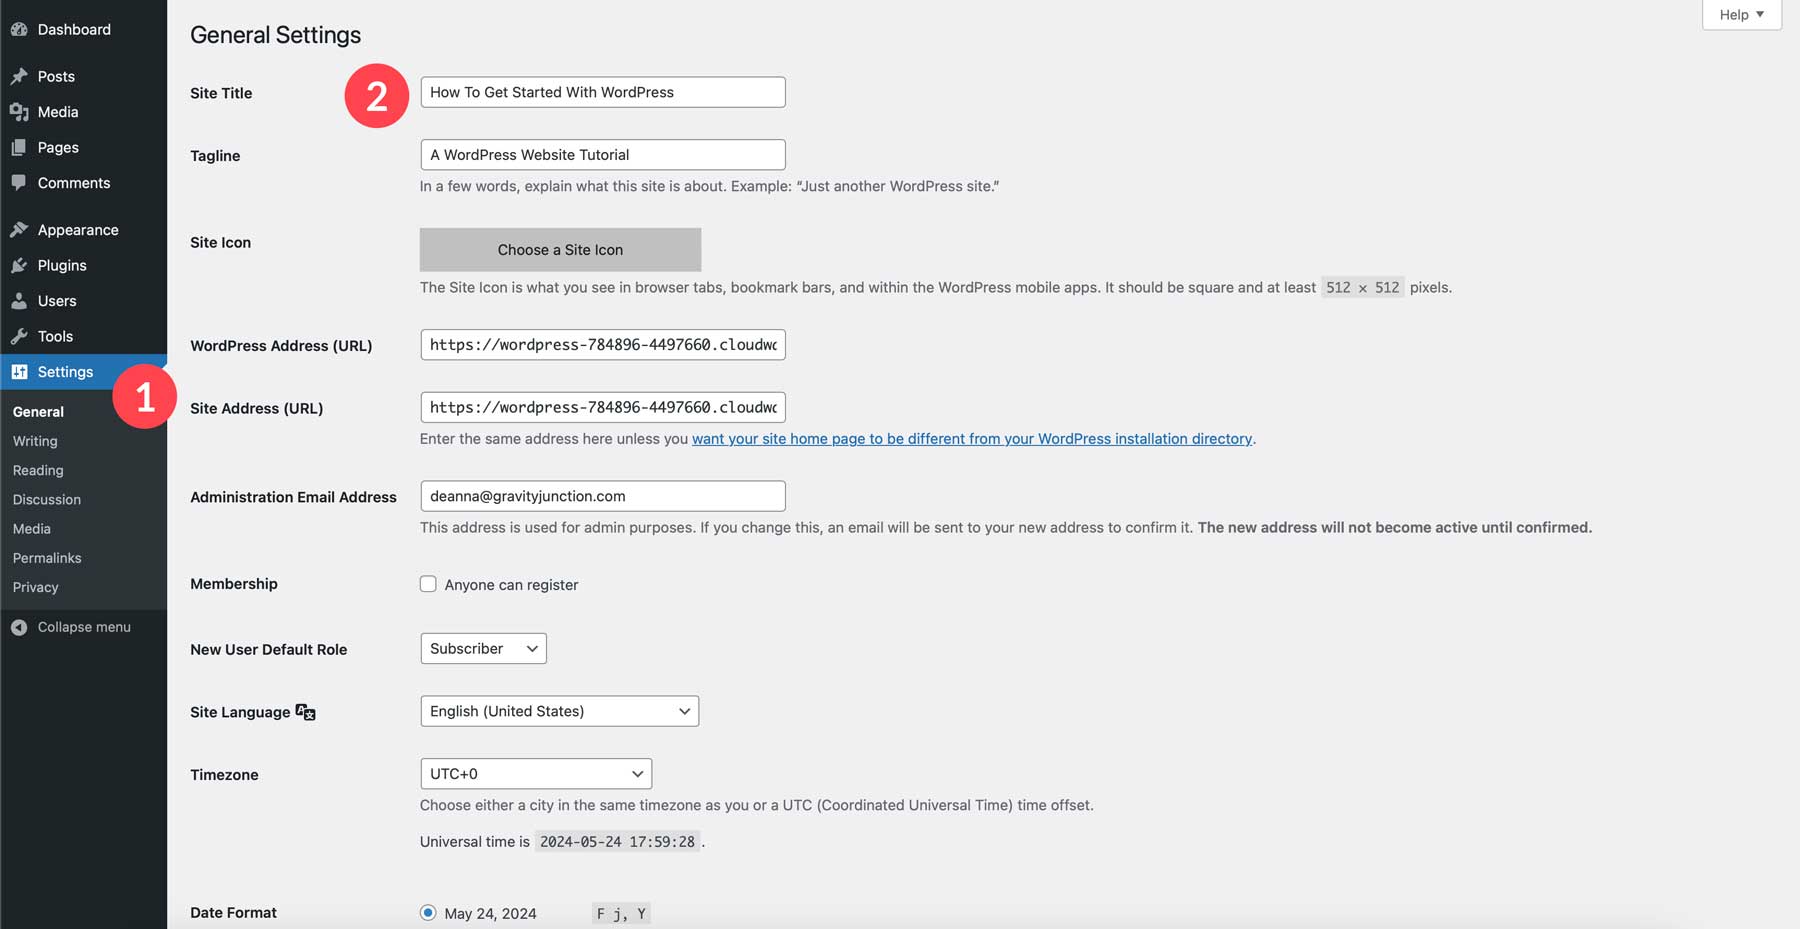
Once you understand where all the tools are located in the WordPress dashboard, there are a few essential settings to configure. The first is your Site Title. This is the name displayed at the top of your website and search engine results. Choose a clear and concise title that reflects your website’s purpose or brand identity. To change your site’s title, navigate to Settings > General and add a site title. You should also add a tagline, a short site description, or your business tagline.
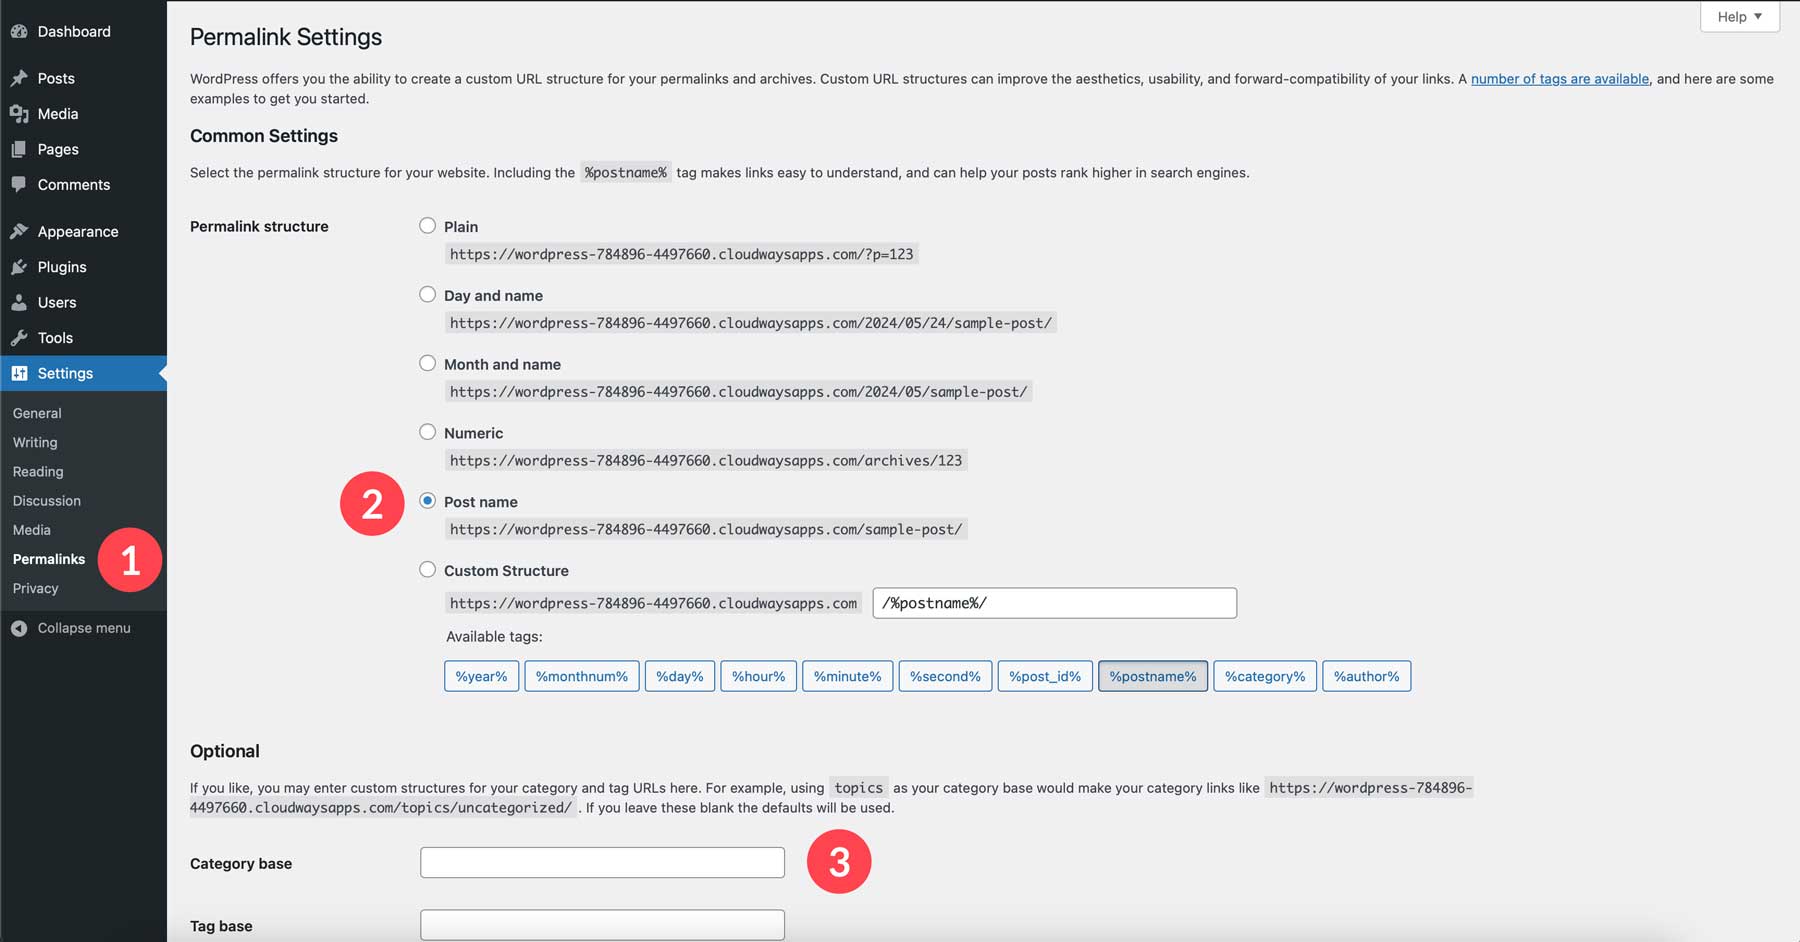
You should also update your permalinks. The permanent URLs (web addresses) are assigned to your posts and pages. Permalinks with relevant keywords can improve SEO and the user experience. There are several permalink structures, with the most SEO-friendly option typically including the post name. To change permalinks, navigate to Settings > Permalinks and select post name. Alternatively, you can change the title of categories and tags to a custom one in the optional fields.
Here are some additional settings you might want to explore in the WordPress dashboard:
- Date & Time: Ensure your website displays the correct time zone and date format for your audience.
- Reading Settings: Control how many posts appear on your homepage and choose whether to display a full post or just a summary.
- Discussion Settings: Decide if you want to allow comments on your website and moderate them before they become public.
Remember, you can always revisit and adjust these settings as your website evolves. Don’t hesitate to explore the options within your WordPress dashboard to customize your website’s settings.
WordPress Themes
A WordPress theme is essentially the outfit for your website. It controls the layout, design elements, and overall look and feel of your website without affecting the core functionality of WordPress itself. While themes provide a pre-designed layout and style, most offer some degree of customization. You can often change colors and fonts and add custom layouts to personalize your website within the theme’s framework.
There are thousands of free and premium WordPress themes available, catering to a vast range of styles and functionalities. Whether you’re building a personal blog, a business website, or an online store, there’s a theme to match your needs. One of the most versatile options out there is Divi.
It’s one of the most customizable WordPress themes on the market, thanks to a no-code drag-and-drop page builder, the Visual Builder. It has over 200 design modules in which to customize web pages, including accordions, blog modules, image galleries, and more. Divi also has a powerful Theme Builder that allows you to design every aspect of your site, including headers and footers, and page templates for posts, archives, search results, categories, amongst others.
Divi also houses an incredible AI website builder, Divi AI. It can easily generate web copy, images, code, and full web page layouts. Think of it as your personal AI assistant who can craft on-brand copy and relevant images by knowing your site’s title and tagline. Divi AI is integrated deep within Divi’s codebase, so it understands Divi like the back of its hand. With Divi AI, you can create full websites in a fraction of the time it would take to code by hand. That, and it’s user-friendly, too.
Purchase An Elegant Themes Subscription
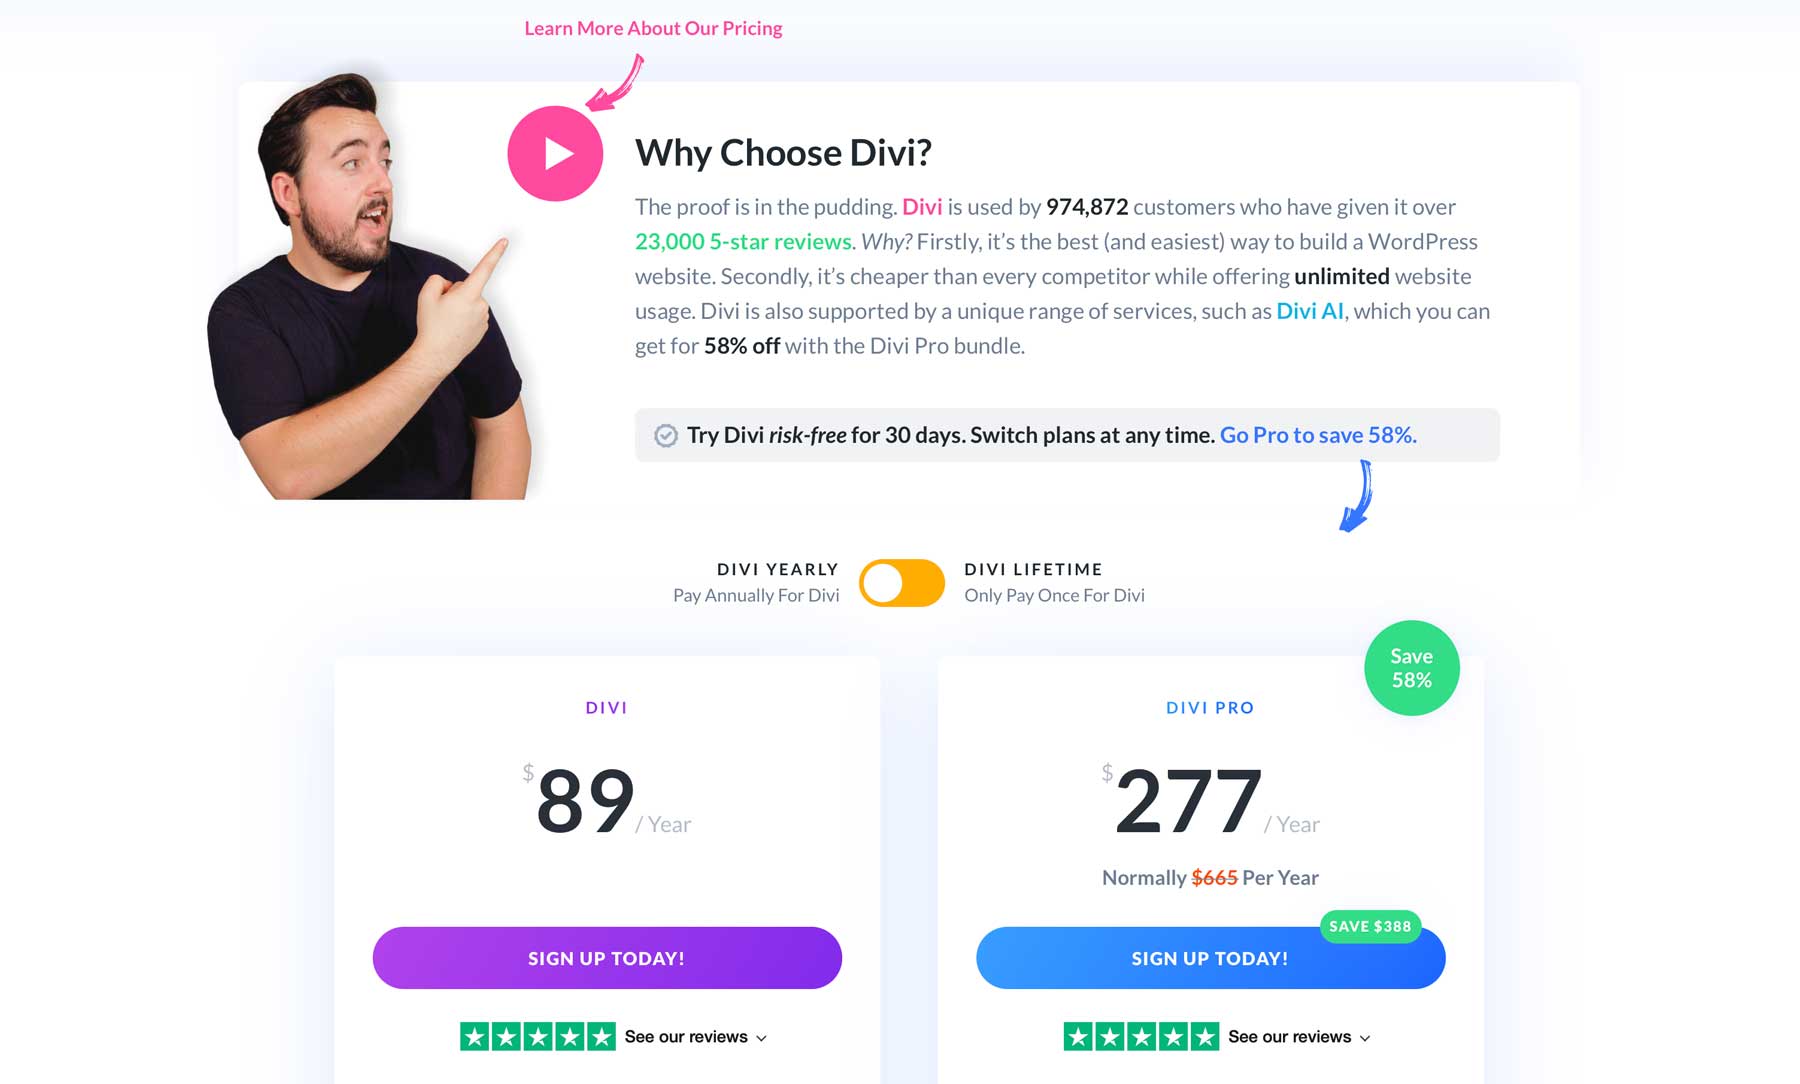
To use Divi, you’ll first need to purchase a subscription. Divi has affordable pricing, especially compared to its competitors. Most WordPress themes offer yearly subscriptions for their themes, but they typically only provide one website per license. With Divi, you’ll pay a flat $89 per year to use it on as many websites as you’d like. There’s also Divi Pro, which grants you access to everything in the Divi ecosystem for a cool $277 per year. It gives you access to Divi Teams for collaboration between co-workers and clients. There’s also Divi Cloud, which provides cloud storage for all of your Divi layouts, and Divi VIP, a white-glove support suite for tech assistance within 30 minutes, guaranteed.
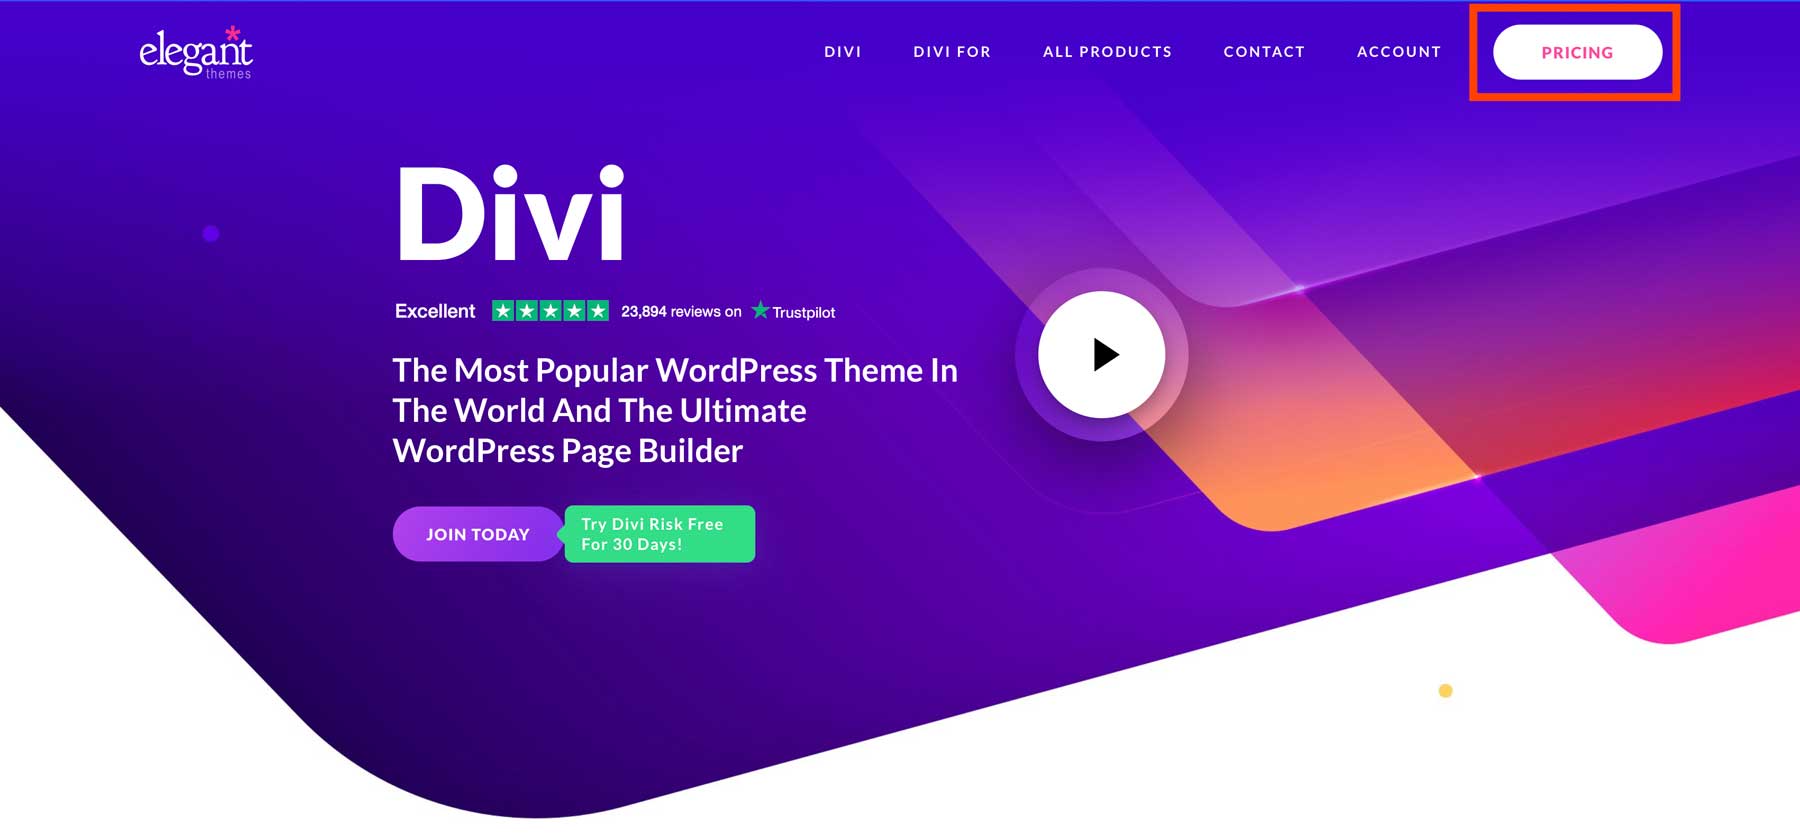
Getting started with Divi is super easy. Visit the Elegant Themes website and click the Pricing button at the top right.
Choose an Elegant Themes plan and click the Sign Up Today button to continue.
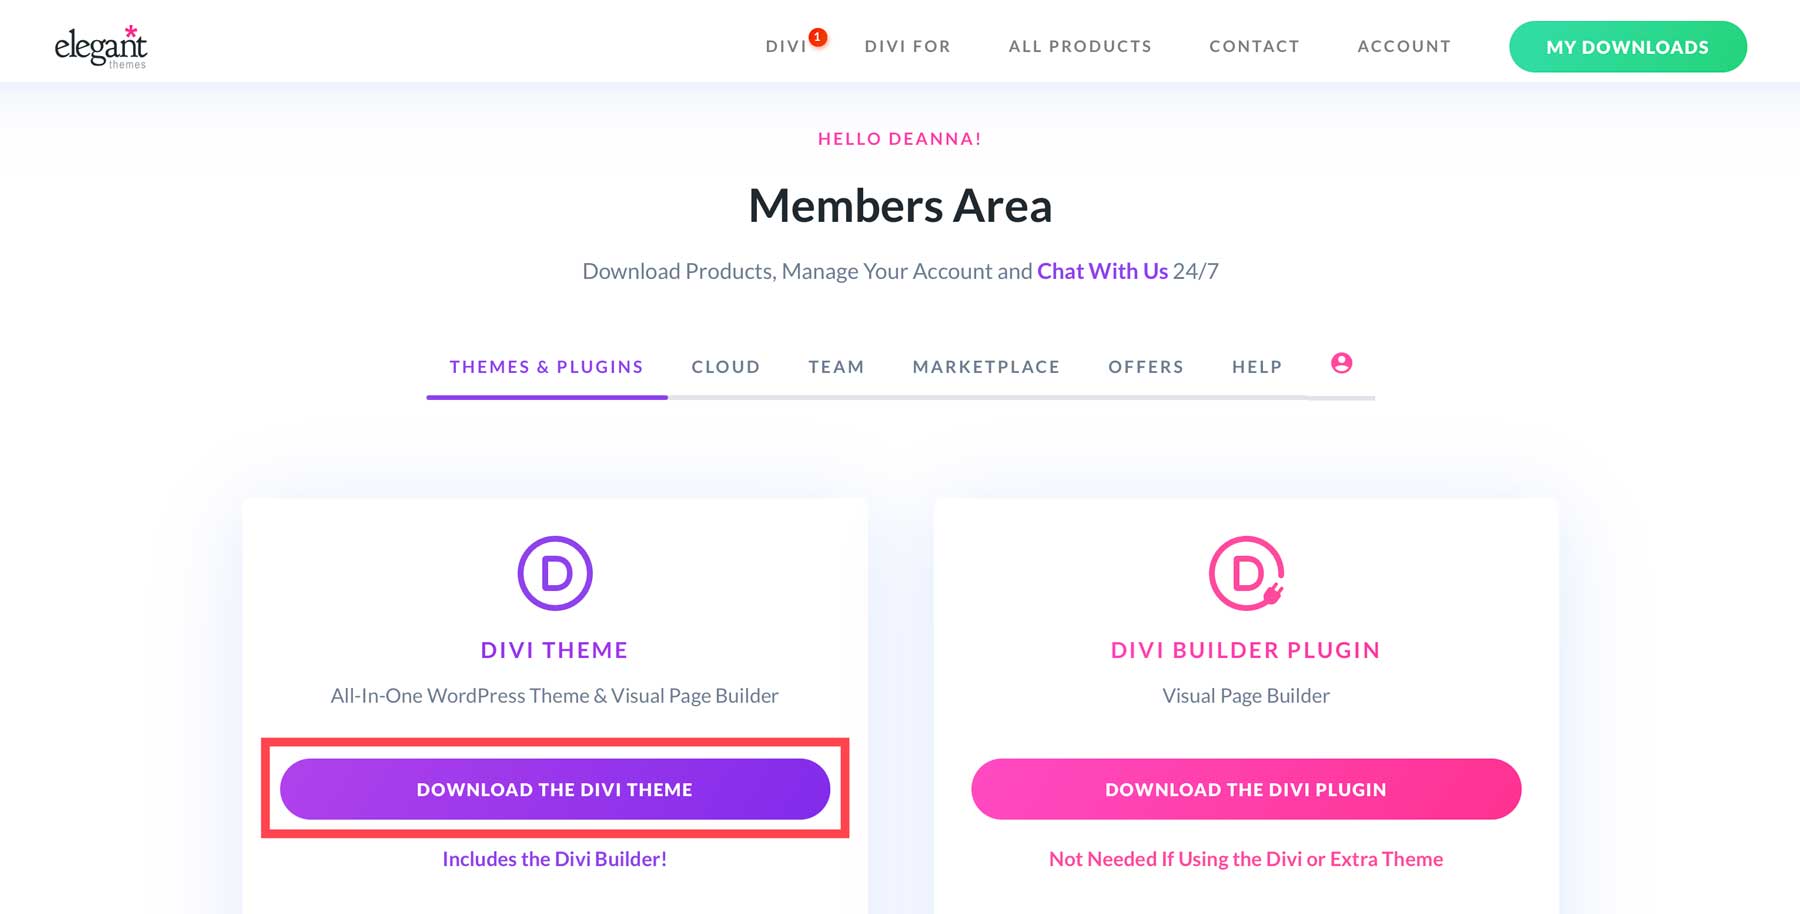
Once you complete your purchase, you can download the Divi theme to install on your website.
Generate an Elegant Themes API Key
Before installing Divi, you must generate an API key in the member’s area. API keys are important for a couple of reasons. First, to keep Divi’s framework running optimally, you’ll want to be sure that it is running the latest release. Plus, an API key grants access to all the Divi products you buy, including Divi AI, for generating layouts.
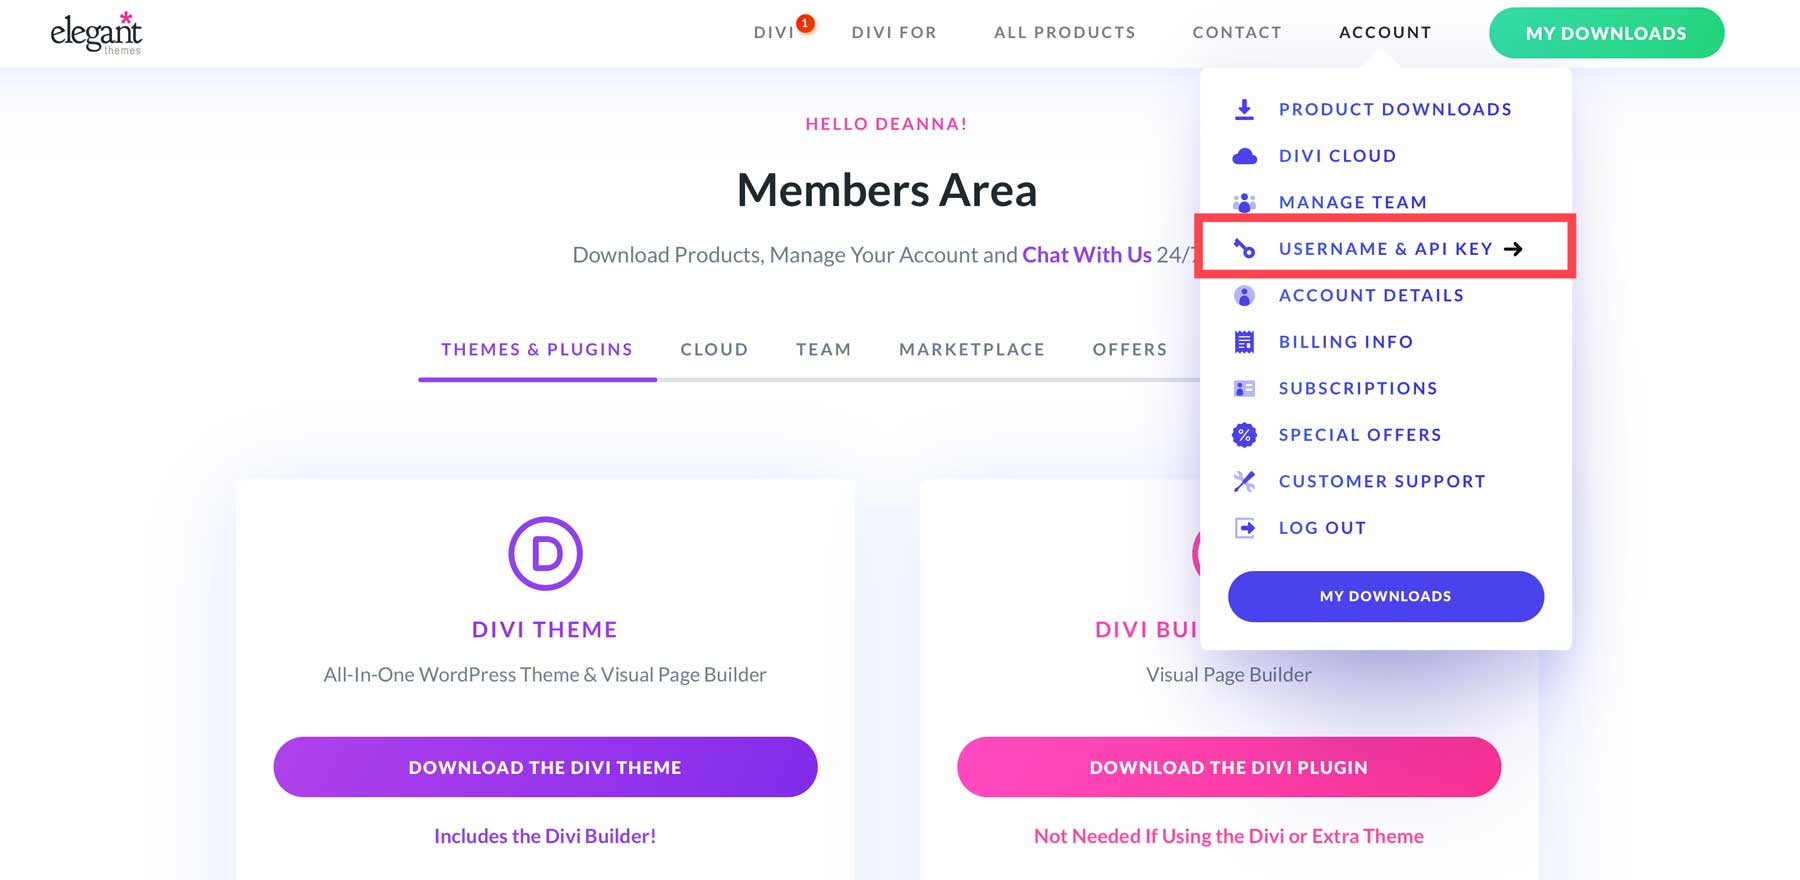
To generate a new key, head to the Account tab and click Username & API key in the dropdown menu.
Scroll down the page and click Generate New API Key.
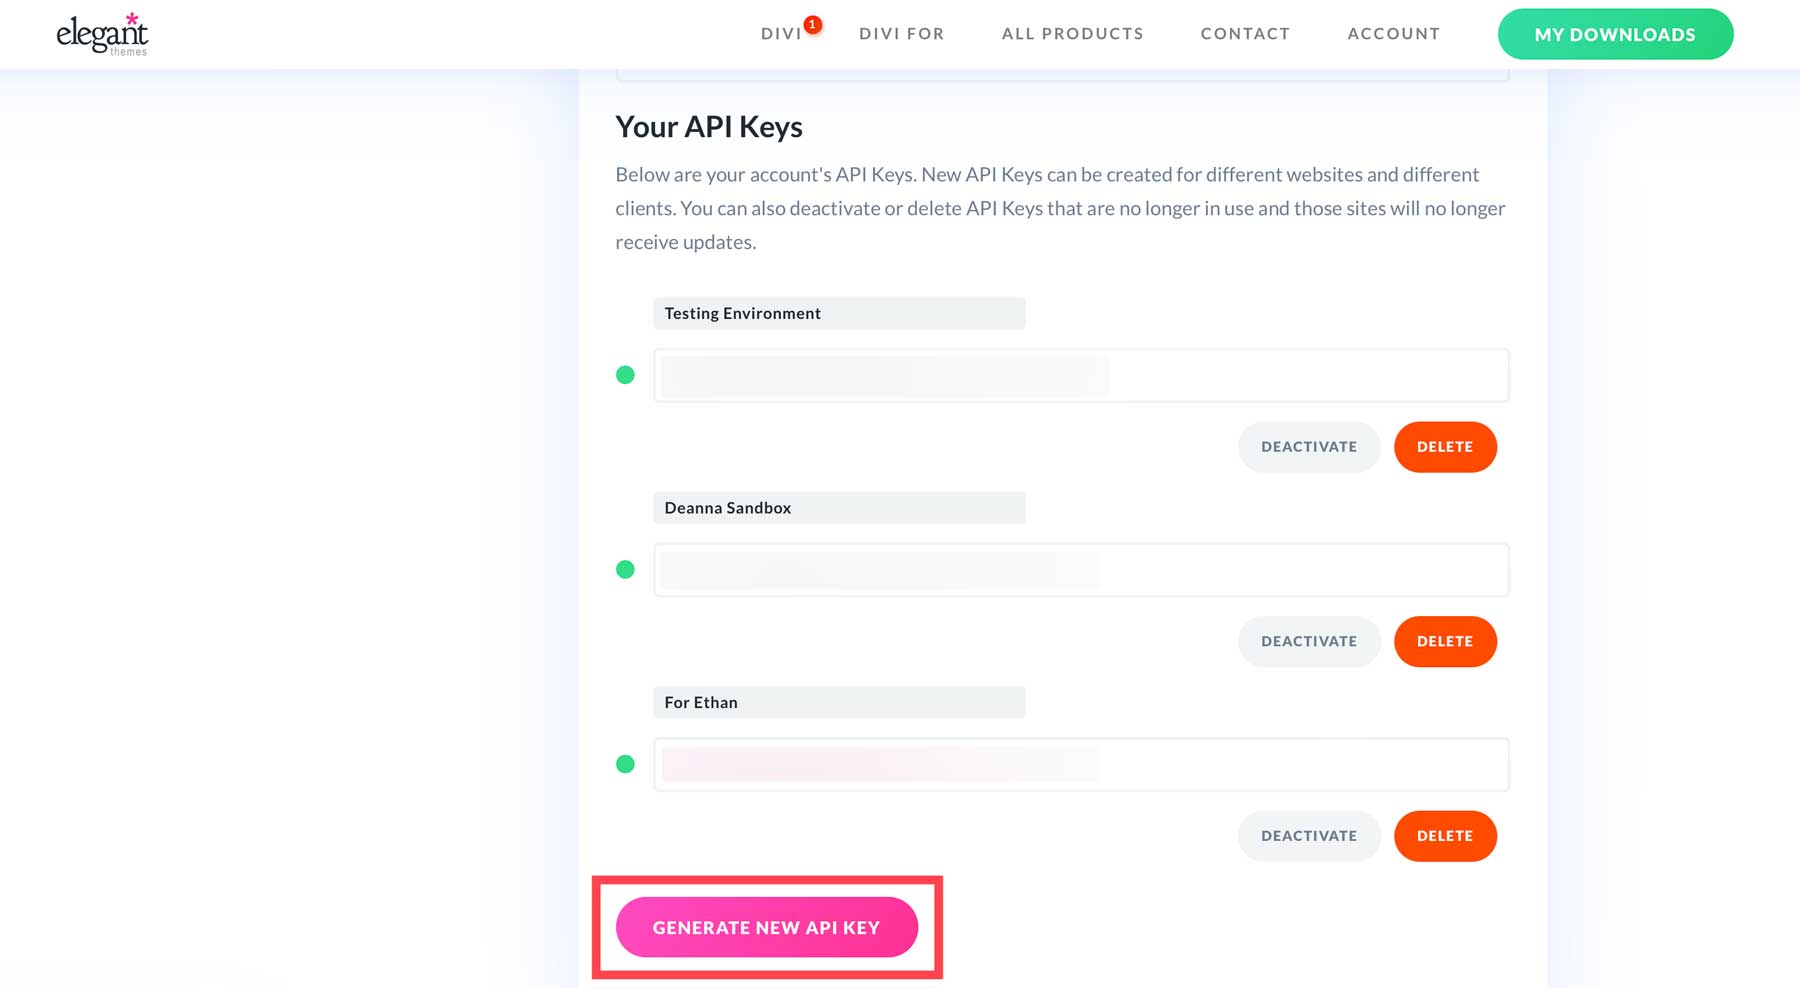
Be sure to give the key a unique name and hover over the key field to copy it. Save both your username and new API key in a safe place, as you will need them when it’s time to install Divi.

Install The Divi WordPress Theme
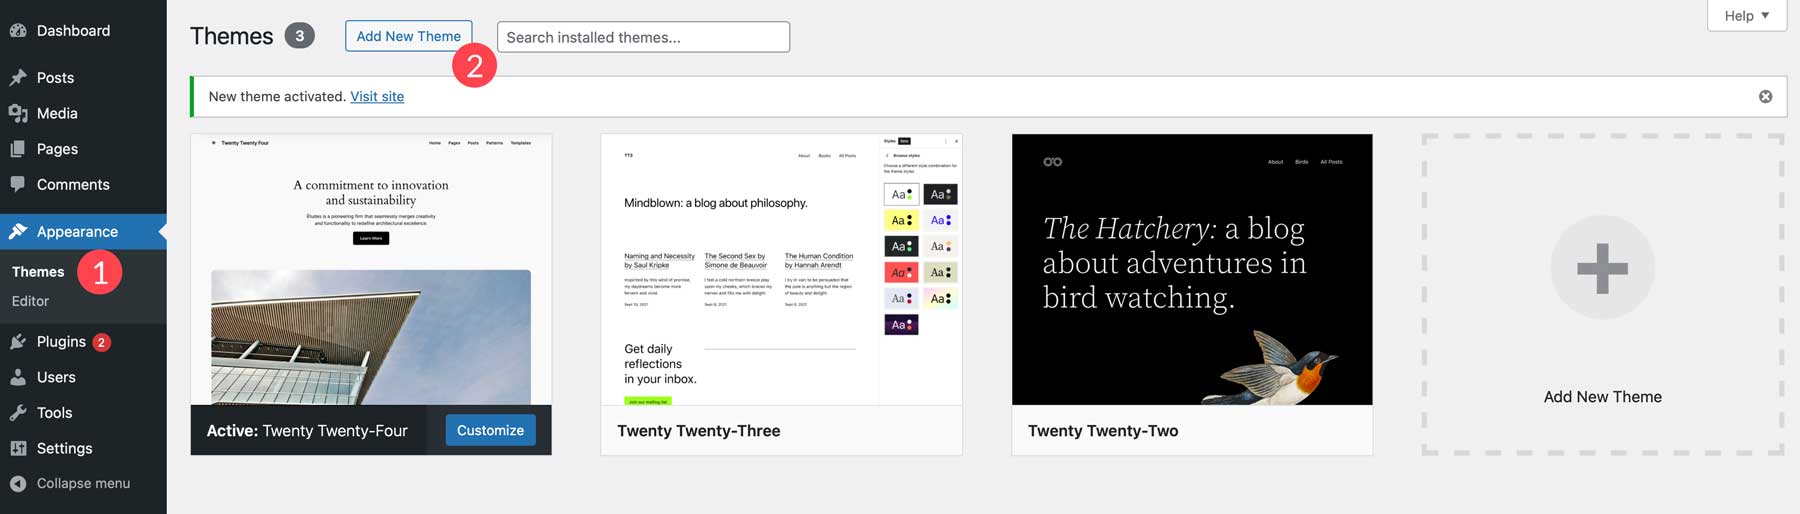
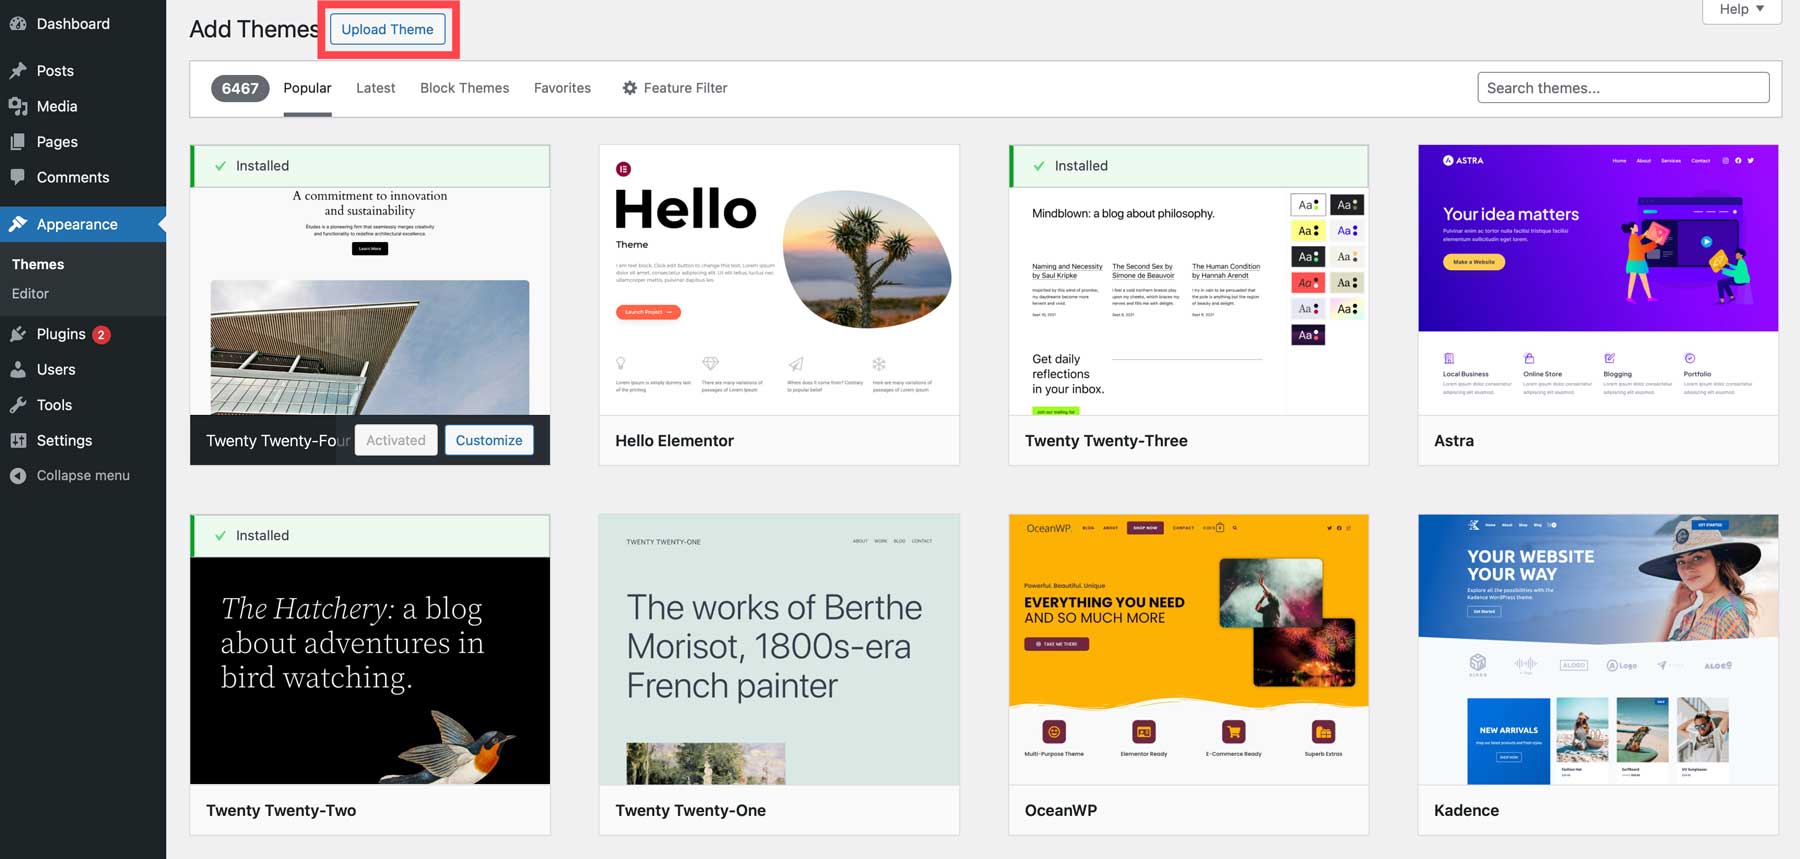
We’ll need to install Divi before adding content. Navigate to Appearance > Themes > Add New Theme.
Next, click the upload theme button.
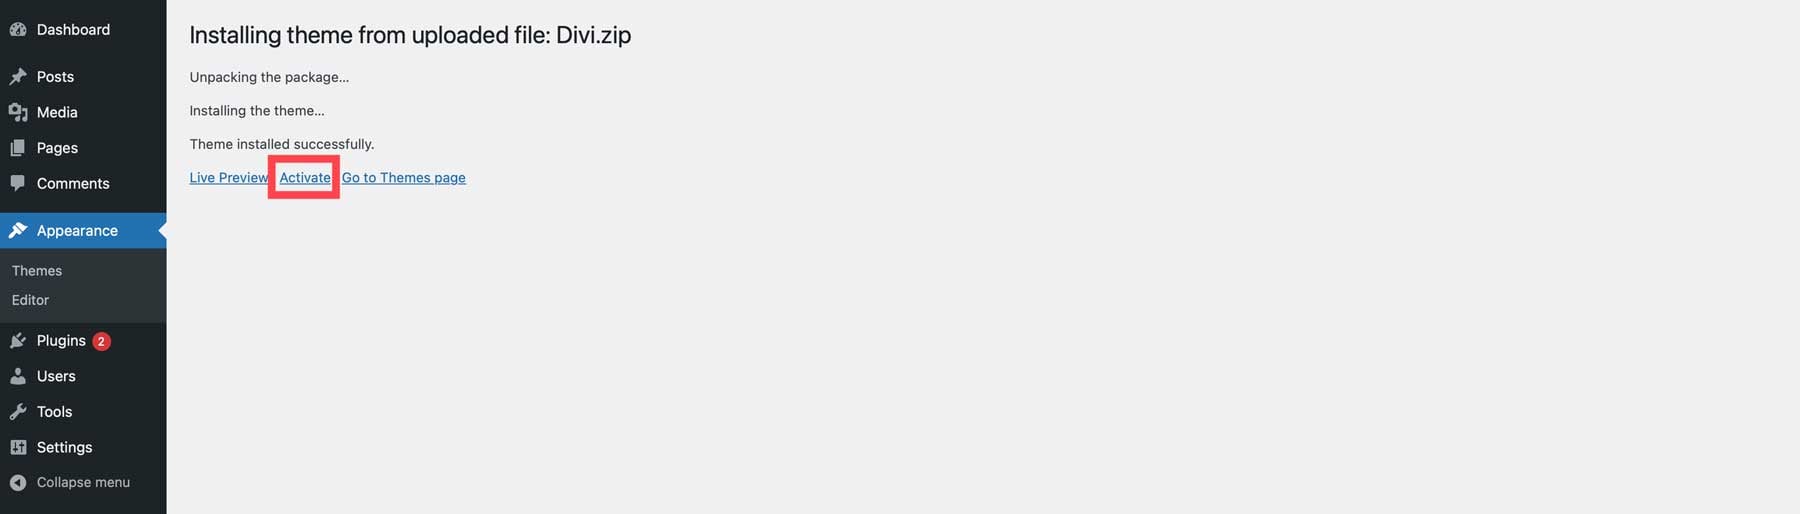
To install Divi, click the choose file button, locate the zipped Divi file on your hard drive, and click the upload button.

Next, click Install Now.

Click the Activate link to install Divi on your WordPress website.
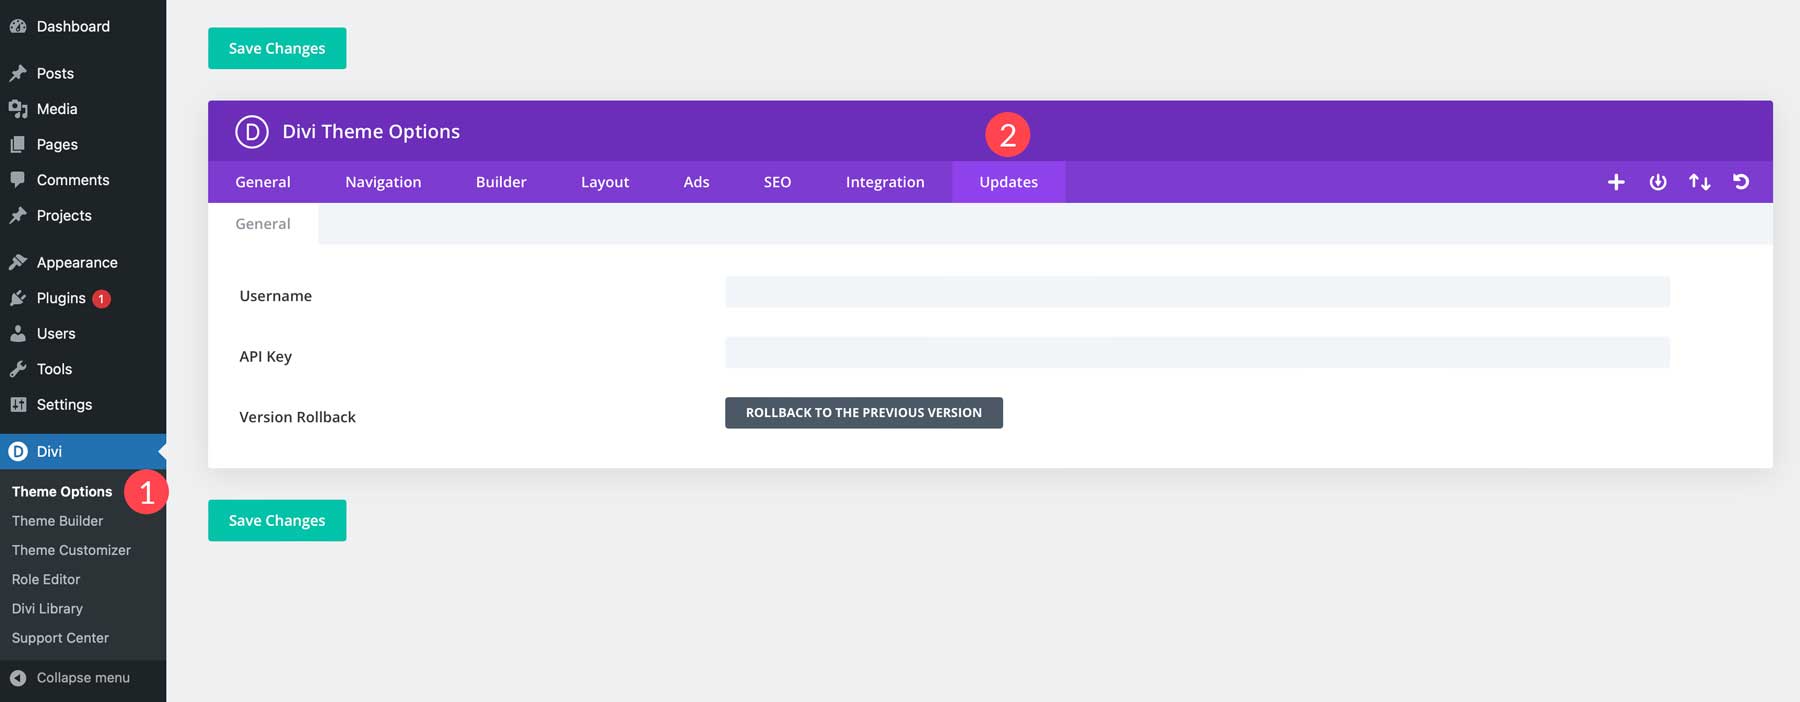
Install The Divi API Key
The last step in installing Divi is to add the API key we generated in the previous step. Navigate to Divi > Theme Options > Updates.
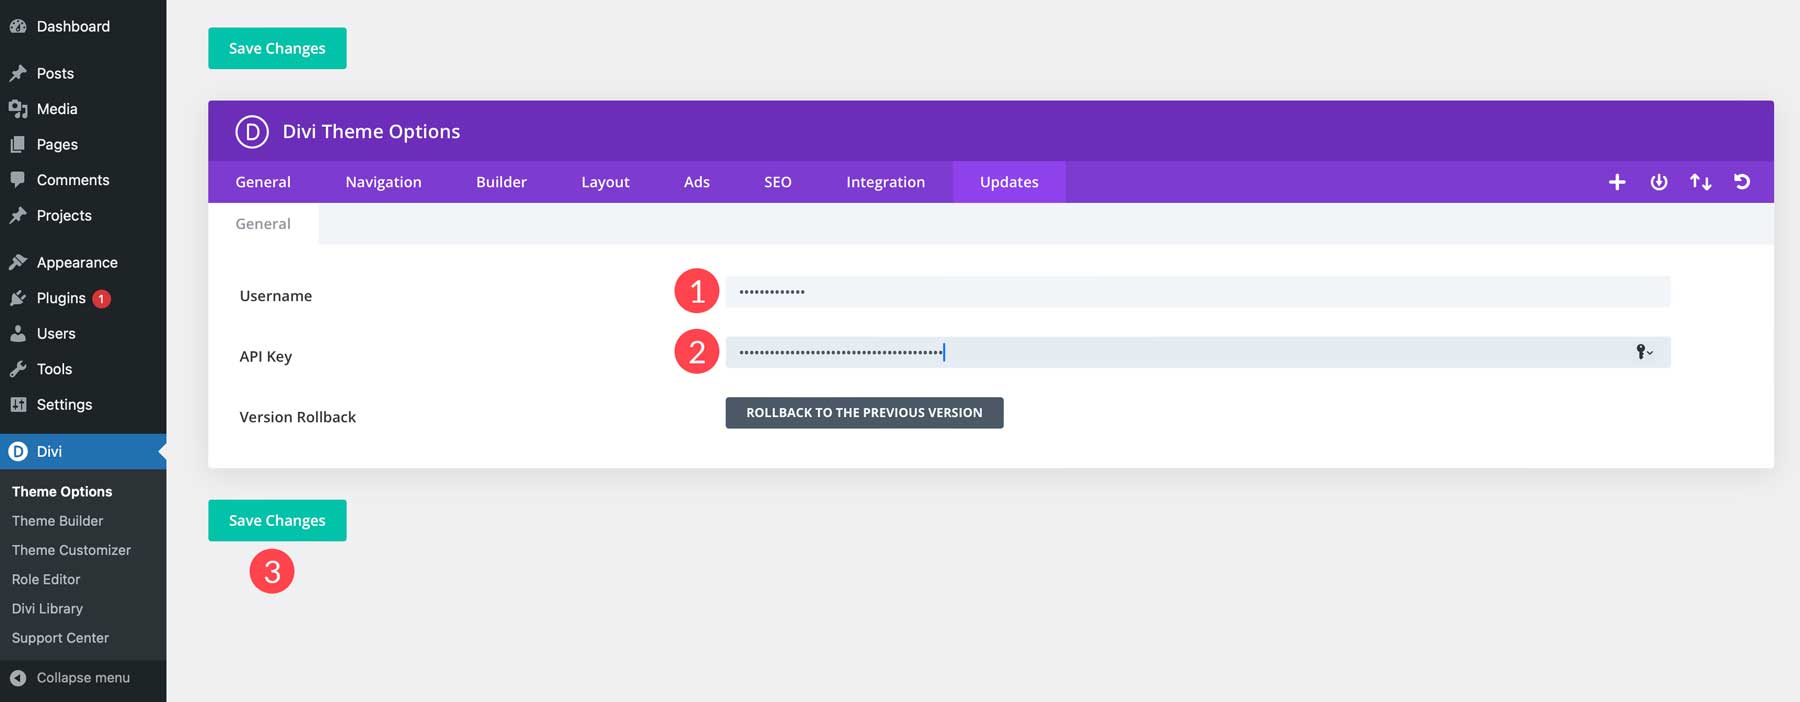
Finally, paste the username and API key into the fields and click the save changes button.
Step 6: Creating Your Website Contents
The next step in our guide on how to get started with WordPress is to add some content. We’ll outline how easy it is to add a new page and create your first post. But before we do that, you need to understand the difference between pages vs posts. Pages typically display content that doesn’t change (static), such as a contact or home page. On the other hand, posts are considered dynamic because their content changes regularly. For example, using the Divi theme, you’d use the Theme Builder to create a post template and the Gutenberg editor to add content to that template. Posts are usually articles, recipes, or similar and are assigned to categories.
Creating a Post With WordPress
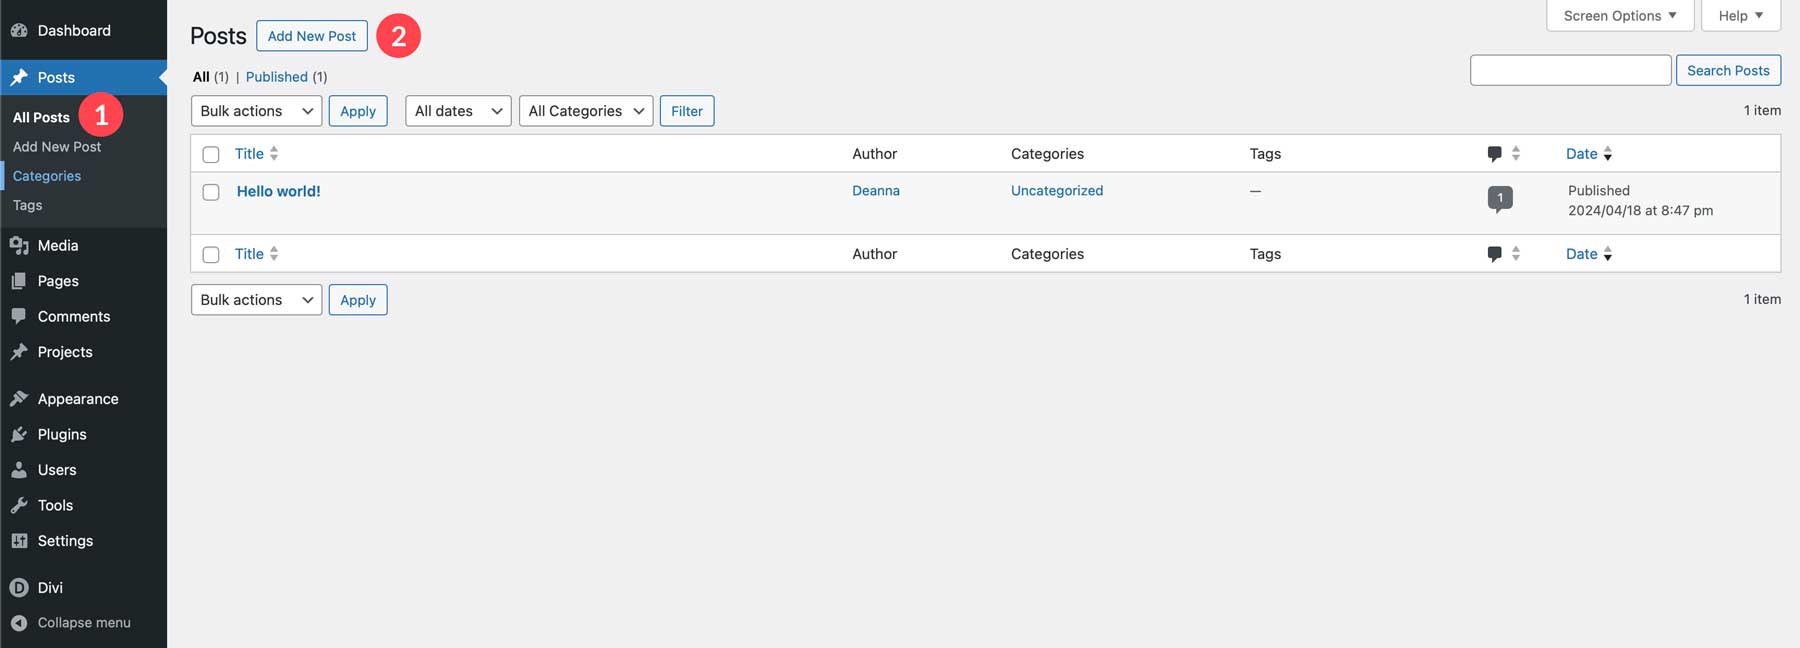
There are a couple of ways you can create a post in WordPress. You can use the Gutenberg editor or, if you’re using the Divi theme, the Divi Builder. Creating a new post for your website is easy. Navigate to All Posts > Add New Post.
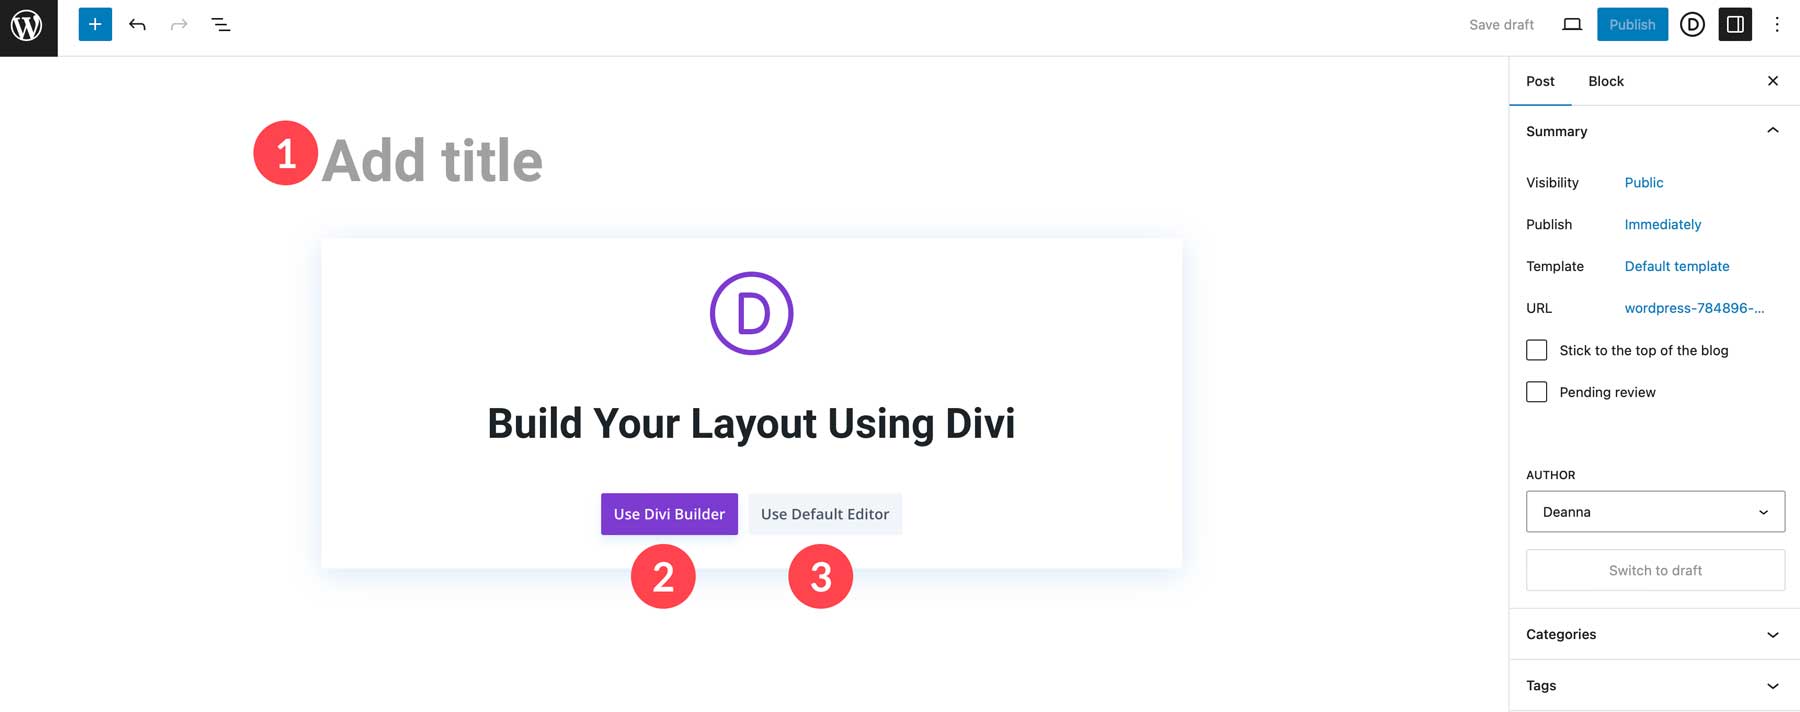
Next, give your post a title and either select the Divi Builder or the default editor.
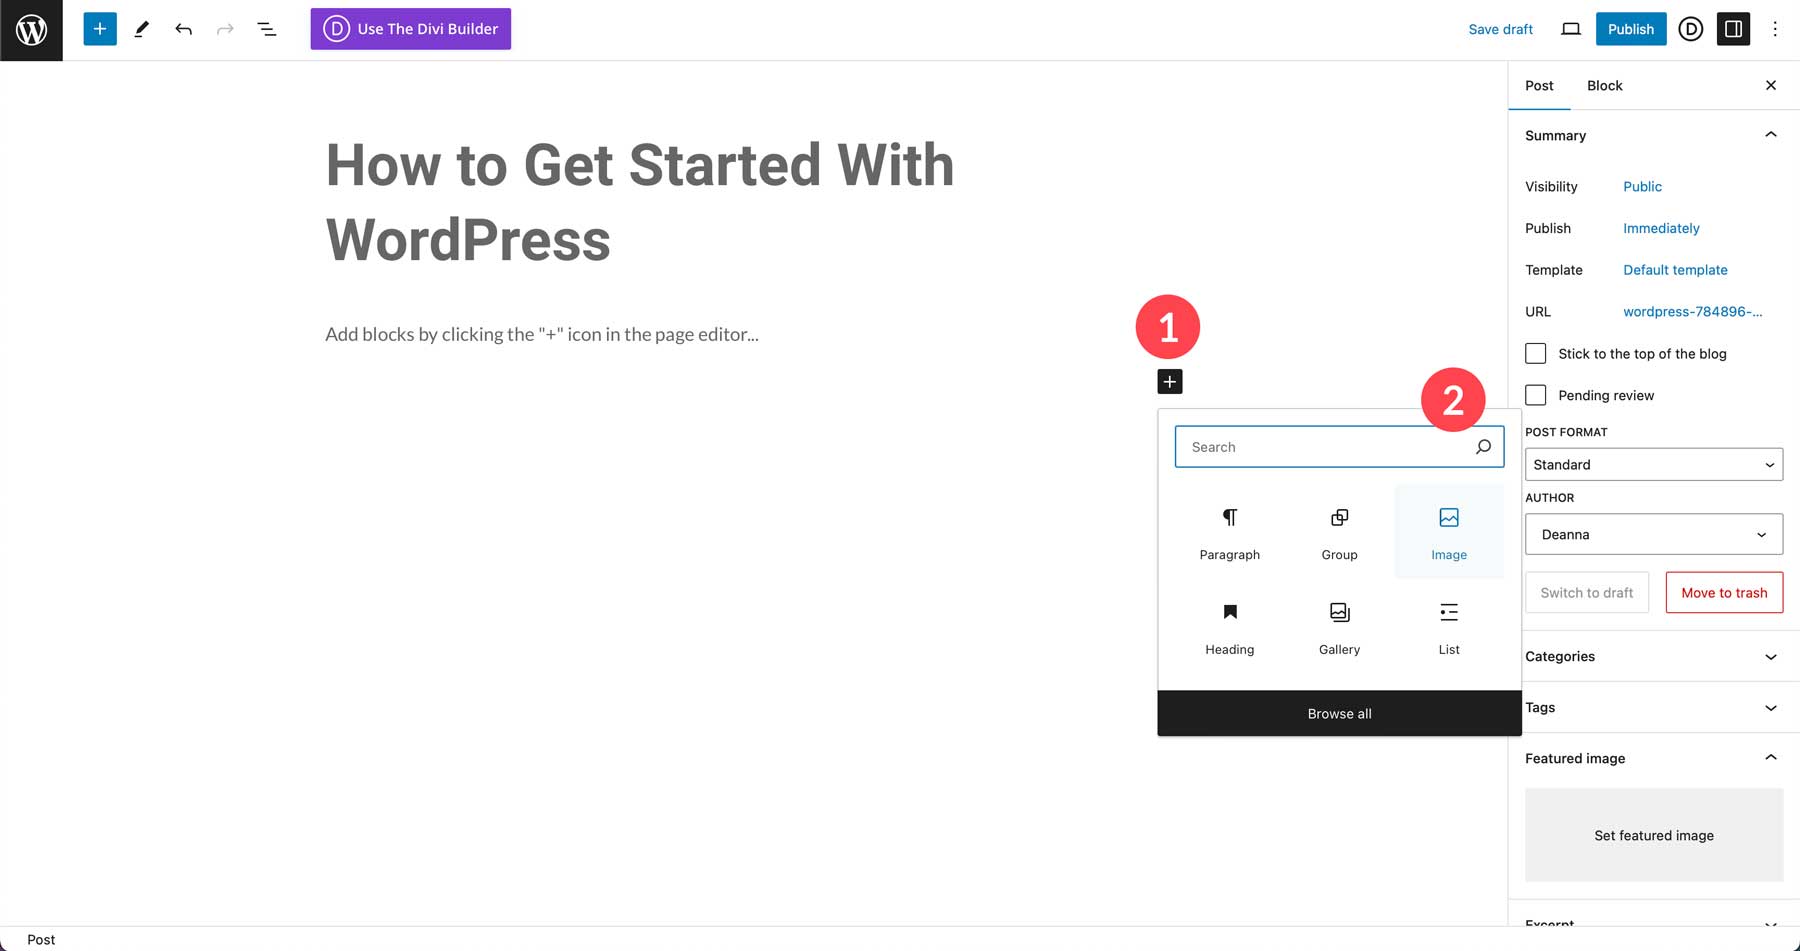
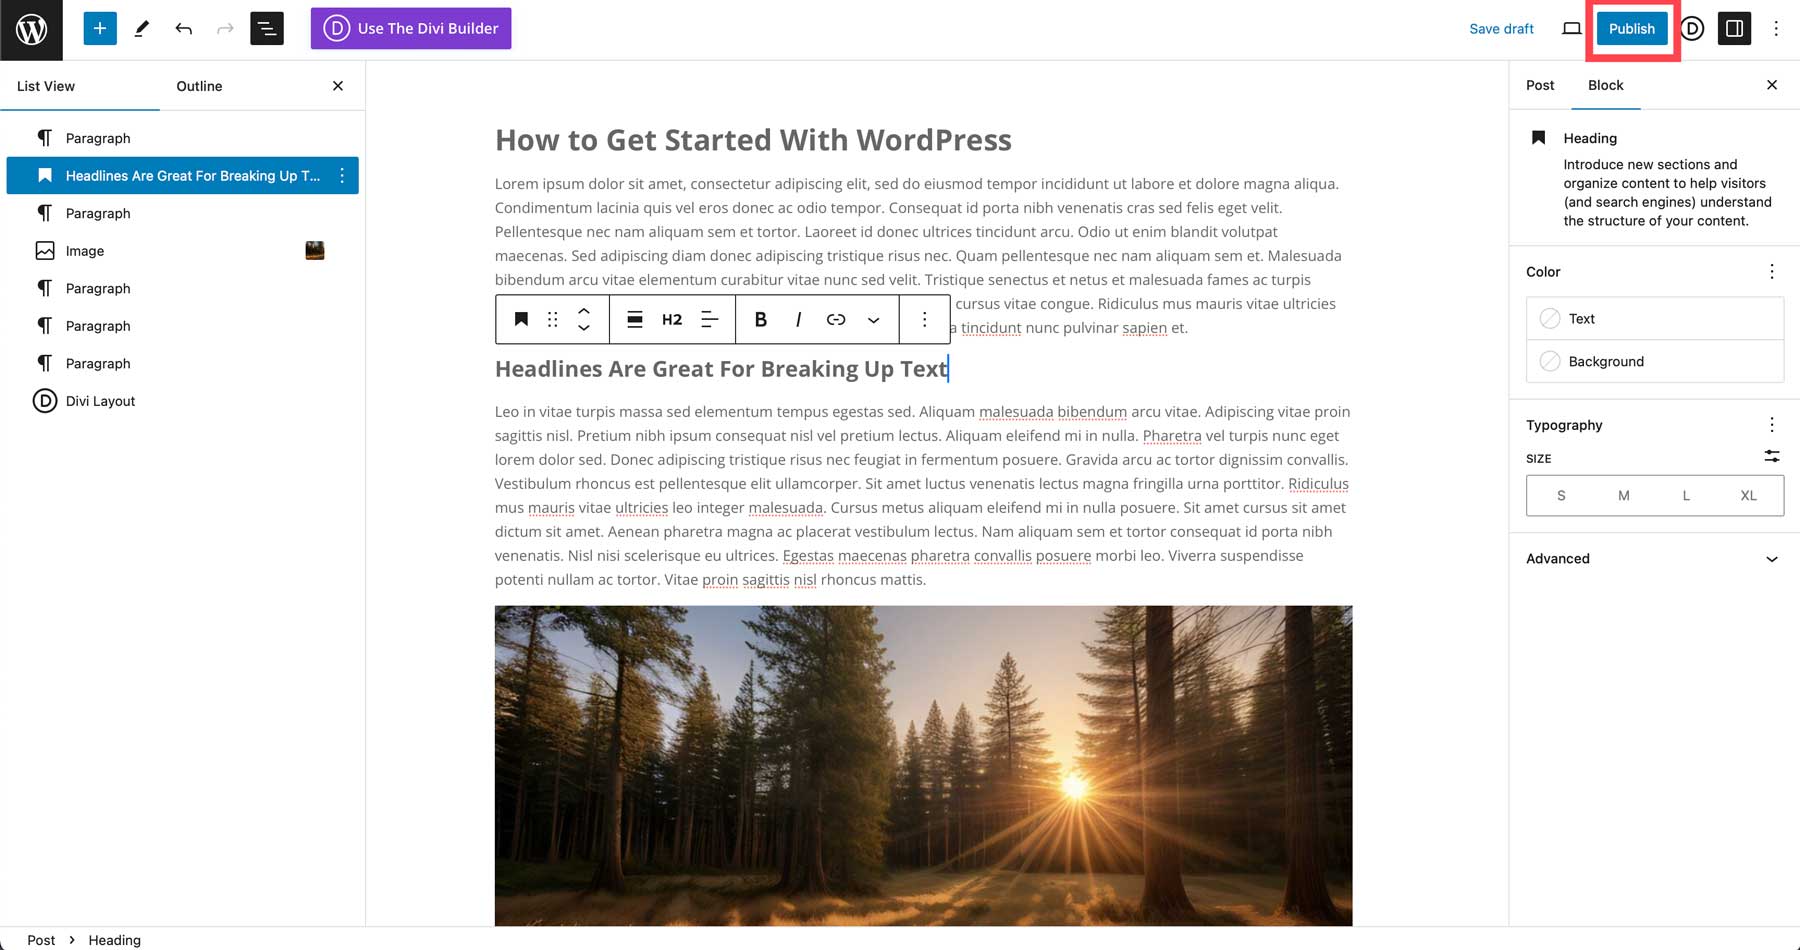
You build your post with blocks when using the Gutenberg editor to create a post. You can easily add the paragraph block for writing content and the image block for adding in impactful photos to support your content. To add blocks to the post editor, click the black + icon and either search for a block or scroll to see the options.
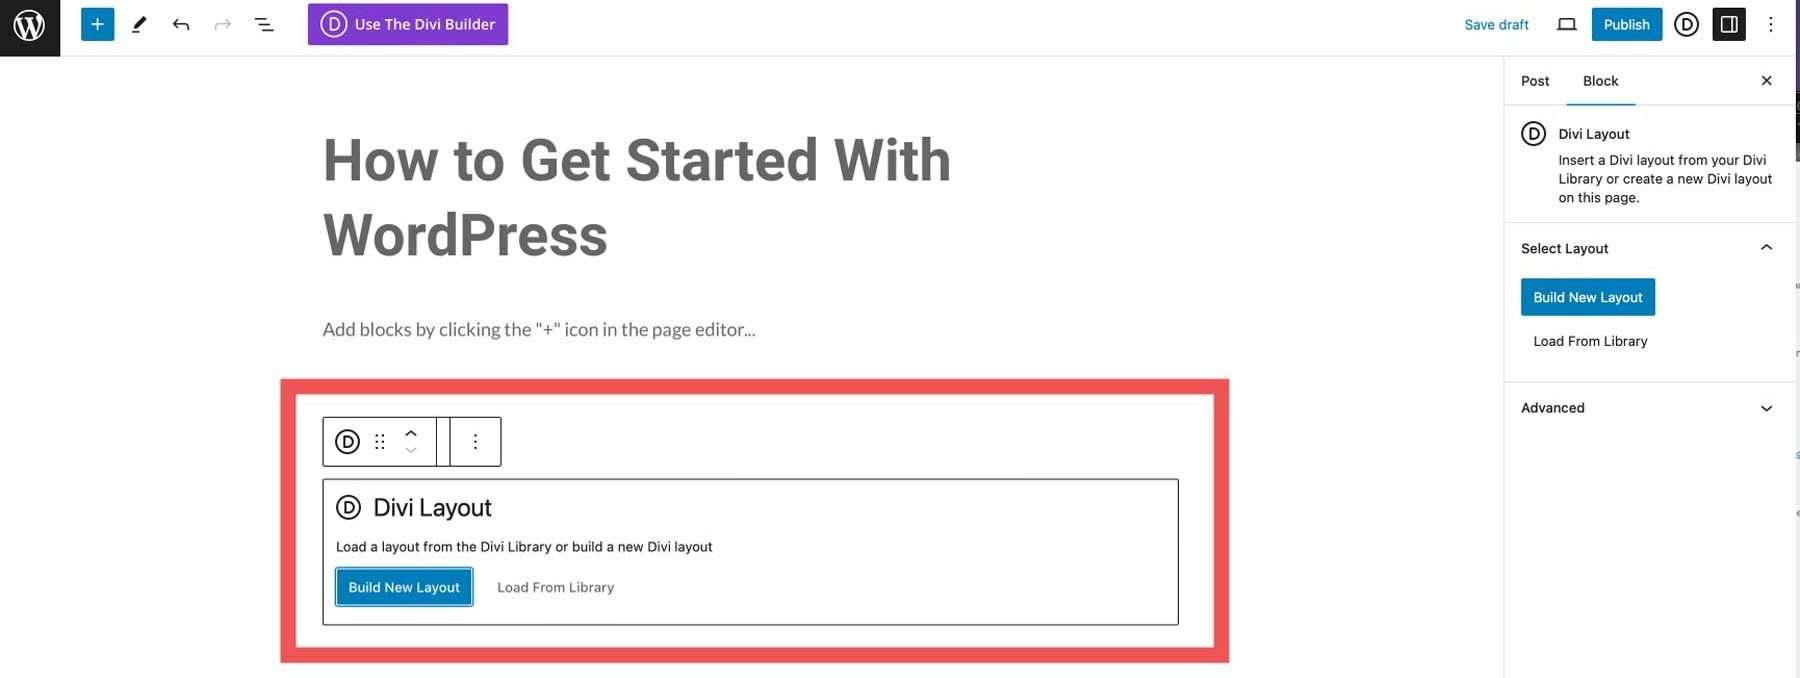
When using Gutenberg with Divi, you can use the Theme Builder to design a post template and still easily draft your posts with the default editor. Thanks to the Divi Layouts block, you can also use a mix of Gutenberg and Divi. This allows you to create new layouts or import saved ones you’ve already created with Divi, allowing for extended compatibility between the two.
Once you’ve drafted your post and added images and text, click the Publish button to push your post live.
Creating a Page With Divi AI
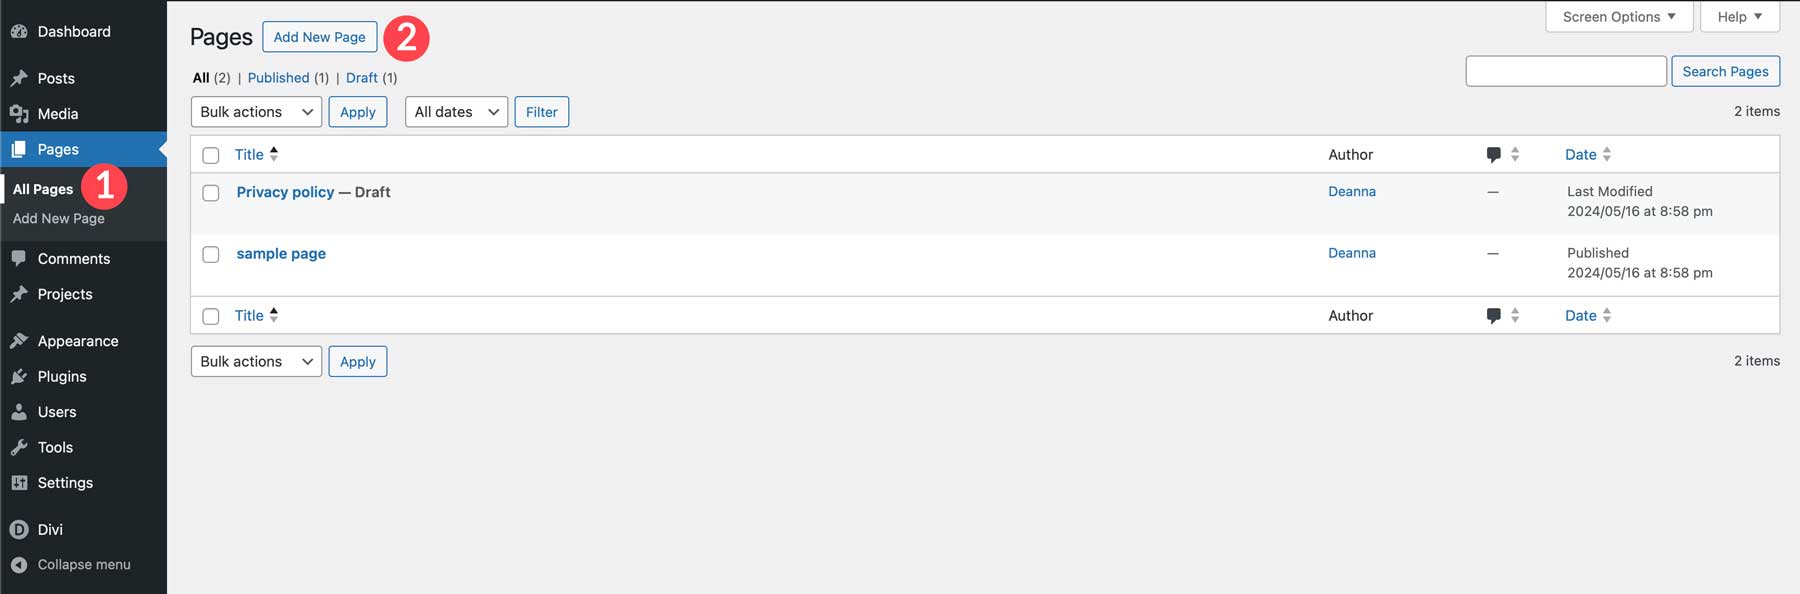
Now that you’re familiar with creating blog posts, the next step is to generate a web page with Divi AI. With Divi AI, you can write content, create images, generate code snippets and Divi modules, and make complete web pages with a text prompt. To create your first page, navigate to All Pages > Add New Page.
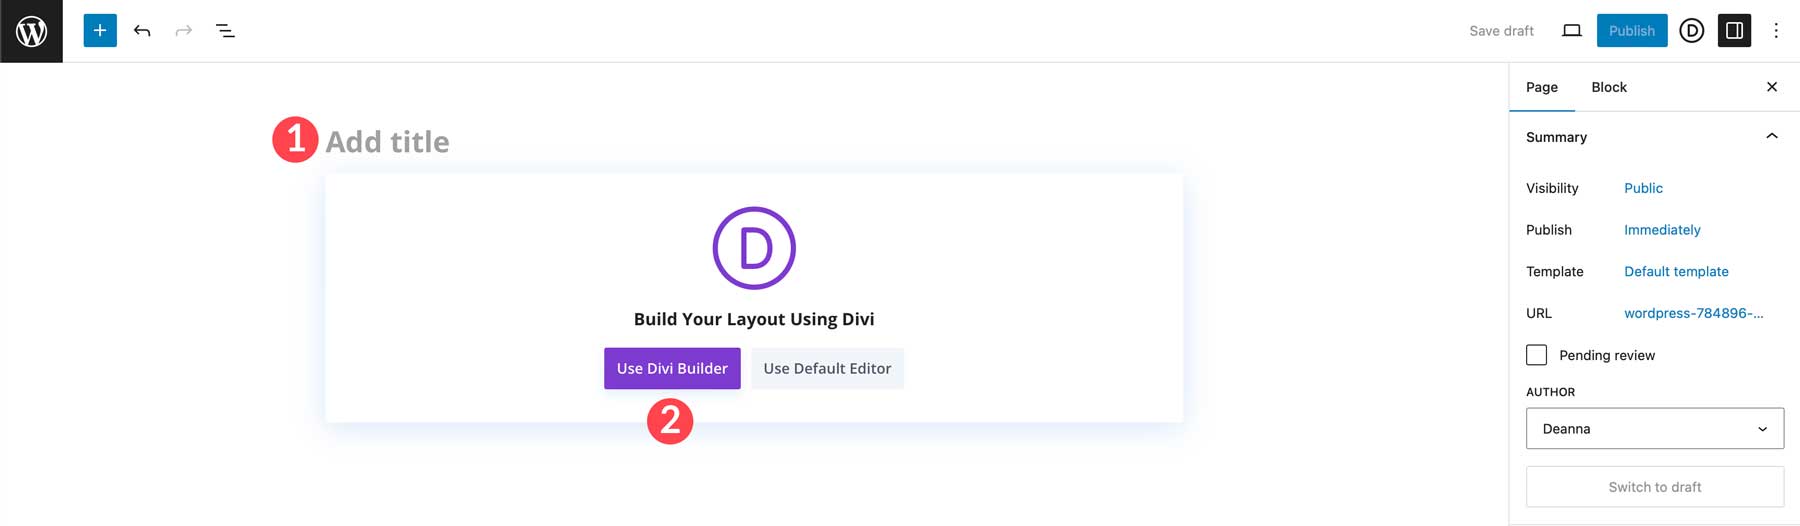
Like creating a post, give your page a name. However, we’ll use the Divi Builder instead of the default editor this time.
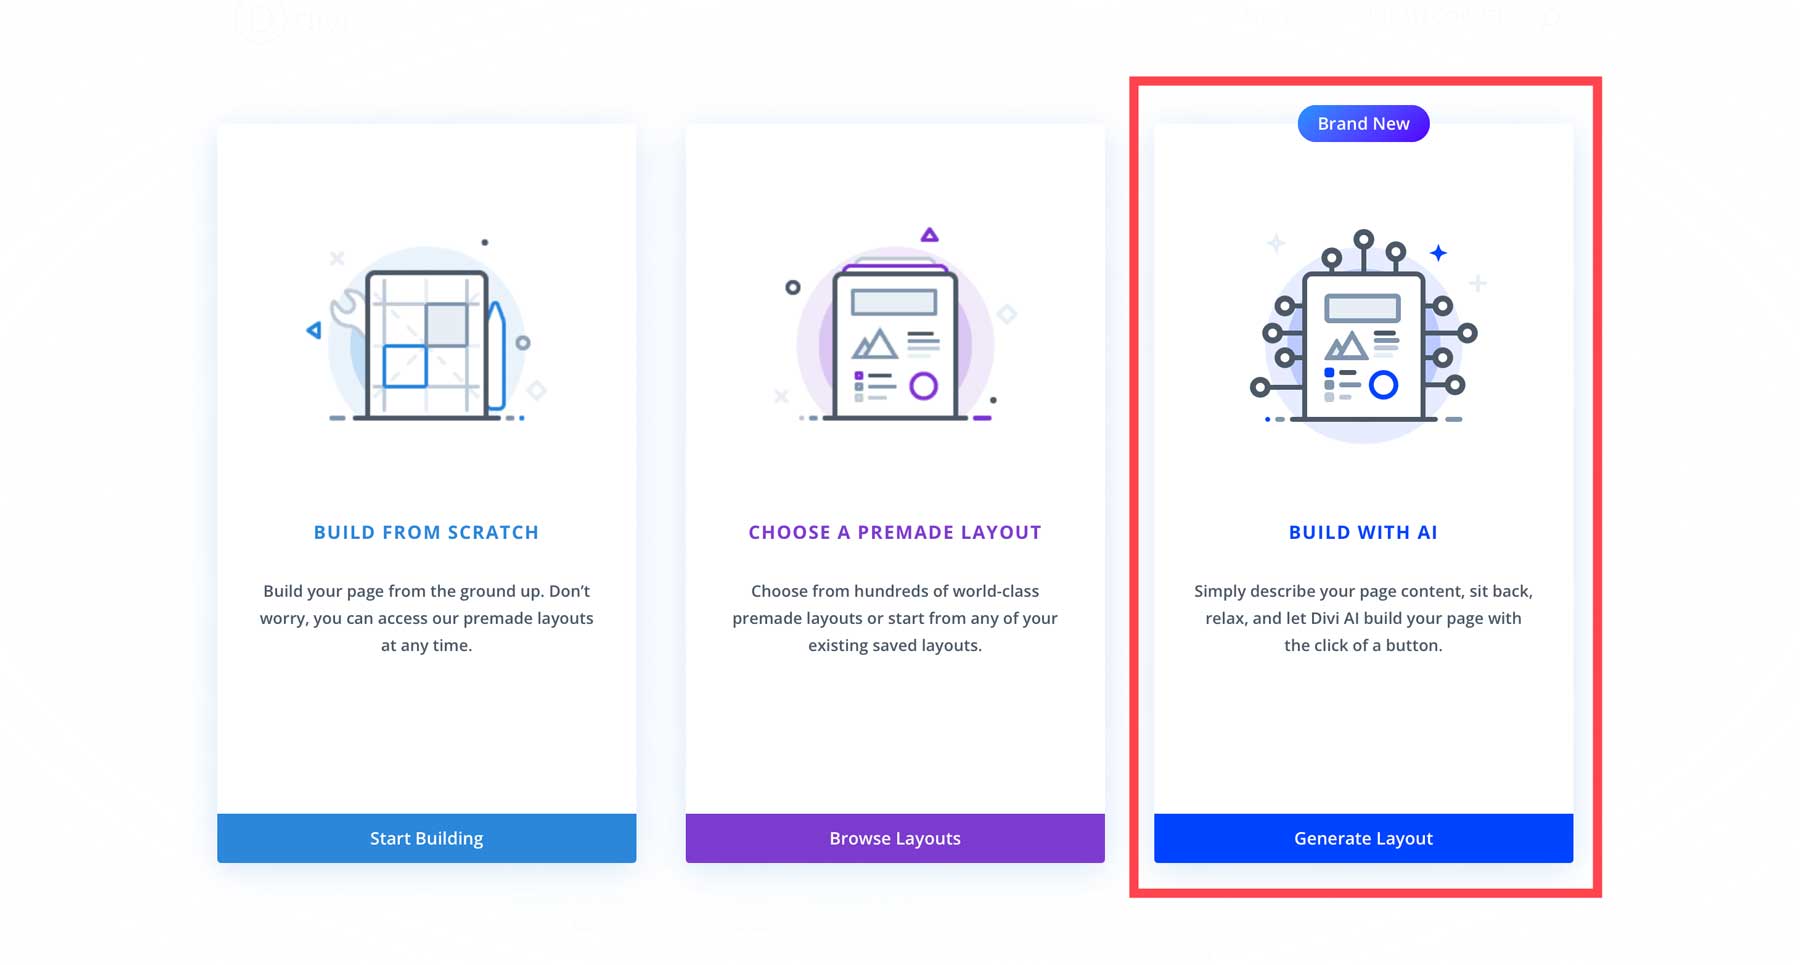
When the page refreshes, you’ll have three options. You can build a page from scratch, choose a premade layout, or build with AI. Select Build With AI.
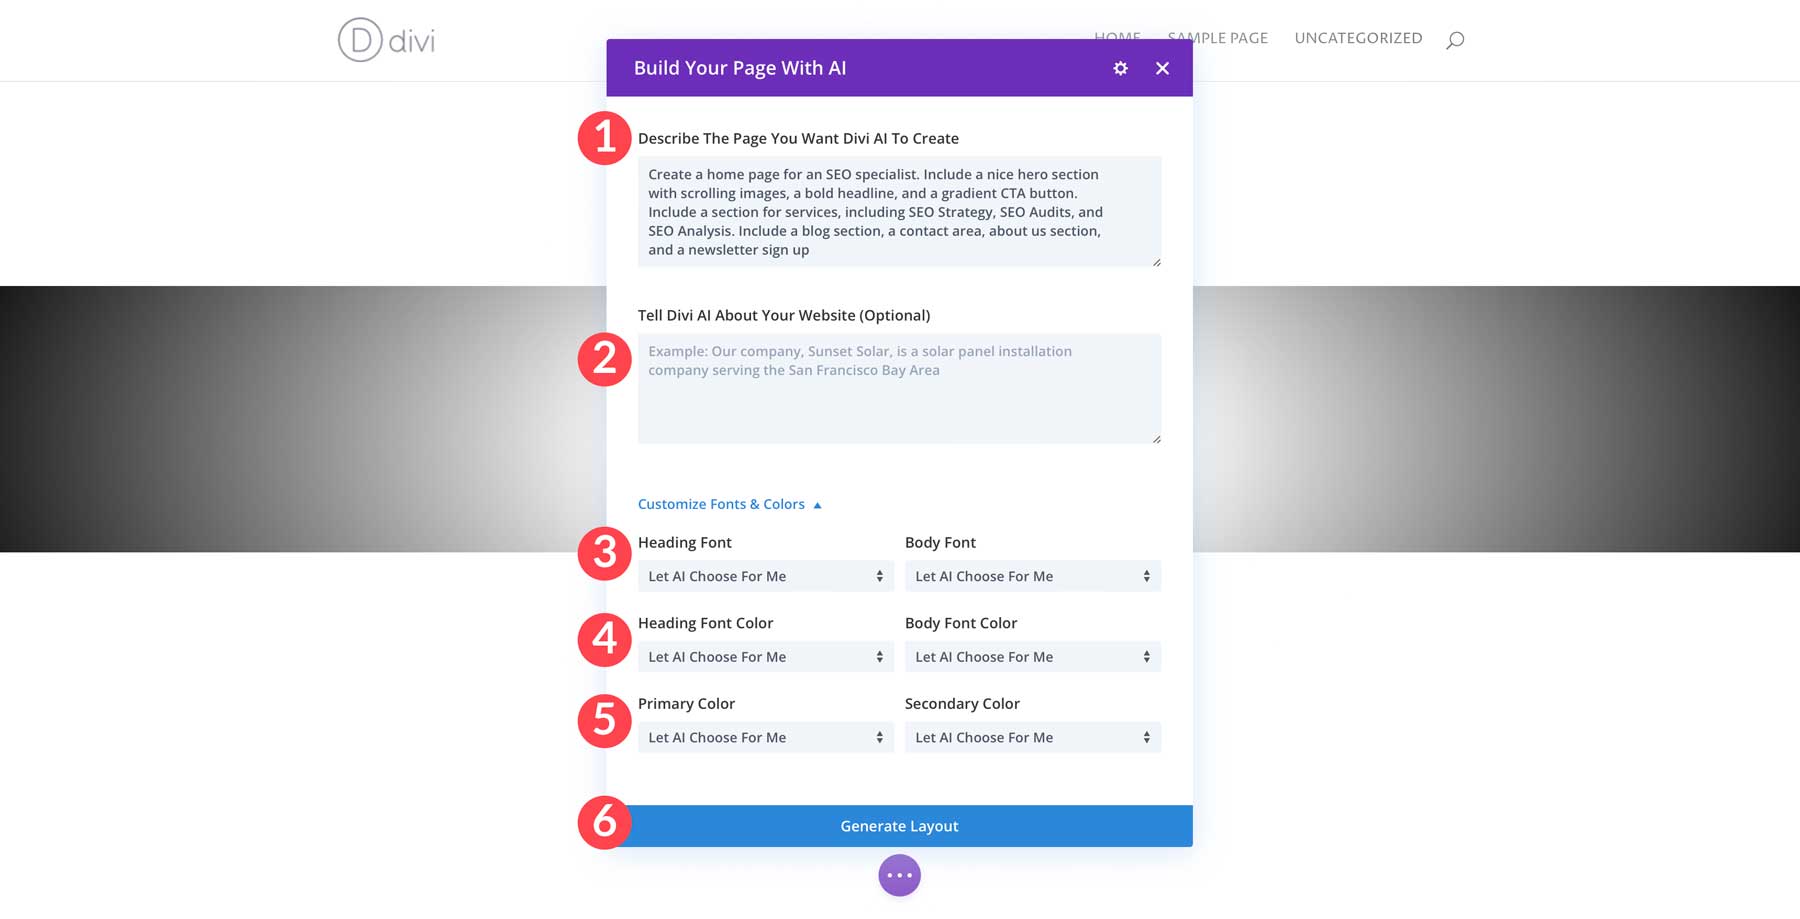
You’ll have a few fields to fill out when the Divi AI dialog box appears. First, enter a description for the type of page you’d like to create. You can also add any additional details you’d like the AI to know, including a summary of what your business does, your mission statement, or your business name. Under Customize Fonts & Colors, choose the heading and body font you’d like to use. You can select a custom font, use the website default, or let AI choose them. Finally, you’ll select the colors for your headline and body copy, along with a primary and secondary color. Like font selection, you can let the AI choose them or specify your preferences. Once you’ve filled out all fields, click the Generate Layout button to continue.
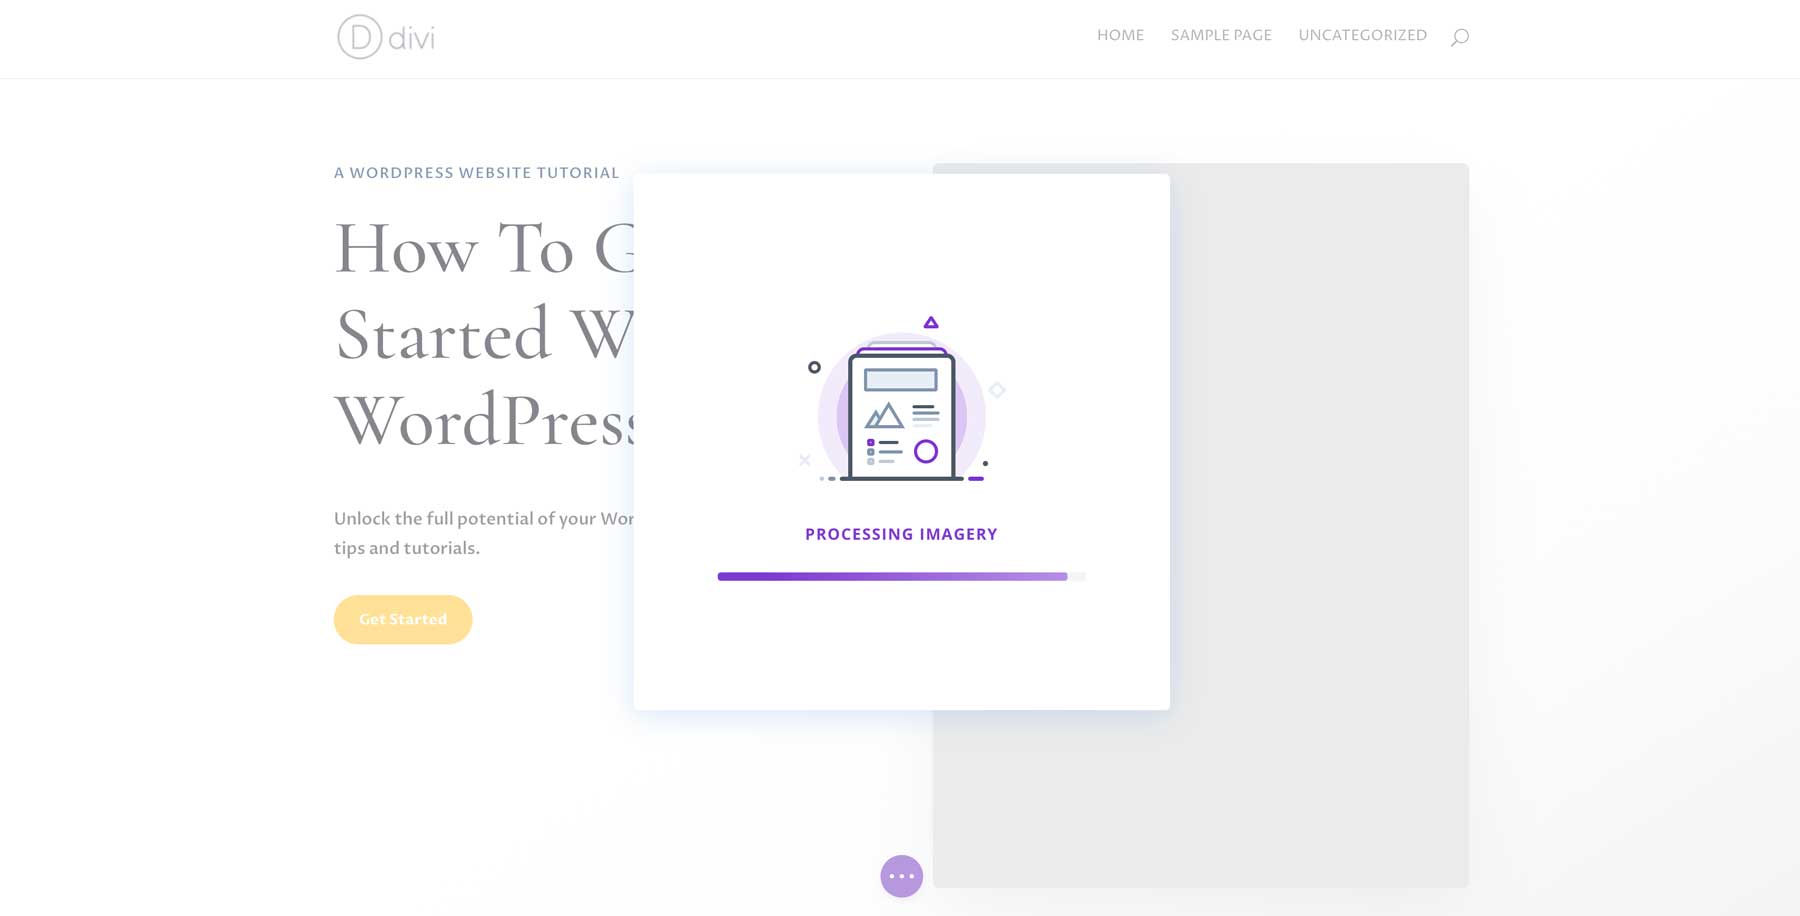
Divi AI will start on your page. First, it will create the wireframe, then fill it in with Divi modules complete with text and images and assign custom fonts and colors.
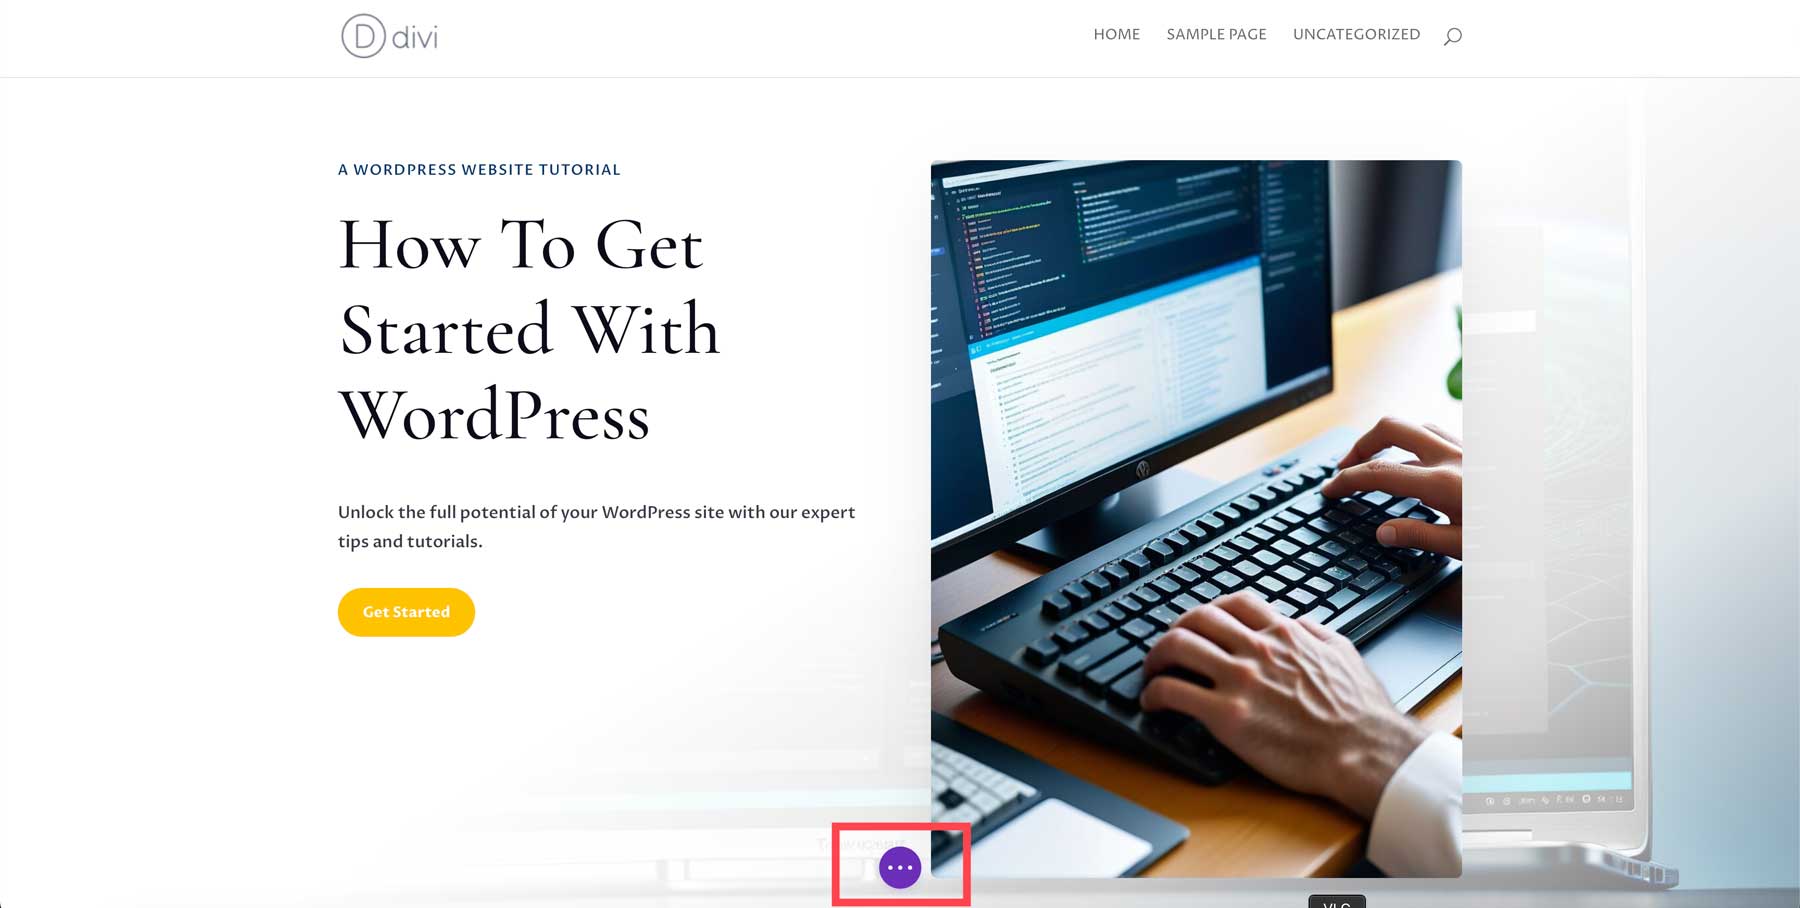
Once your page is complete, you can use the Divi Builder to add more content, edit images and text with AI, and customize it in any way you see fit. To save your page, click the ellipsis menu at the bottom center of the page.
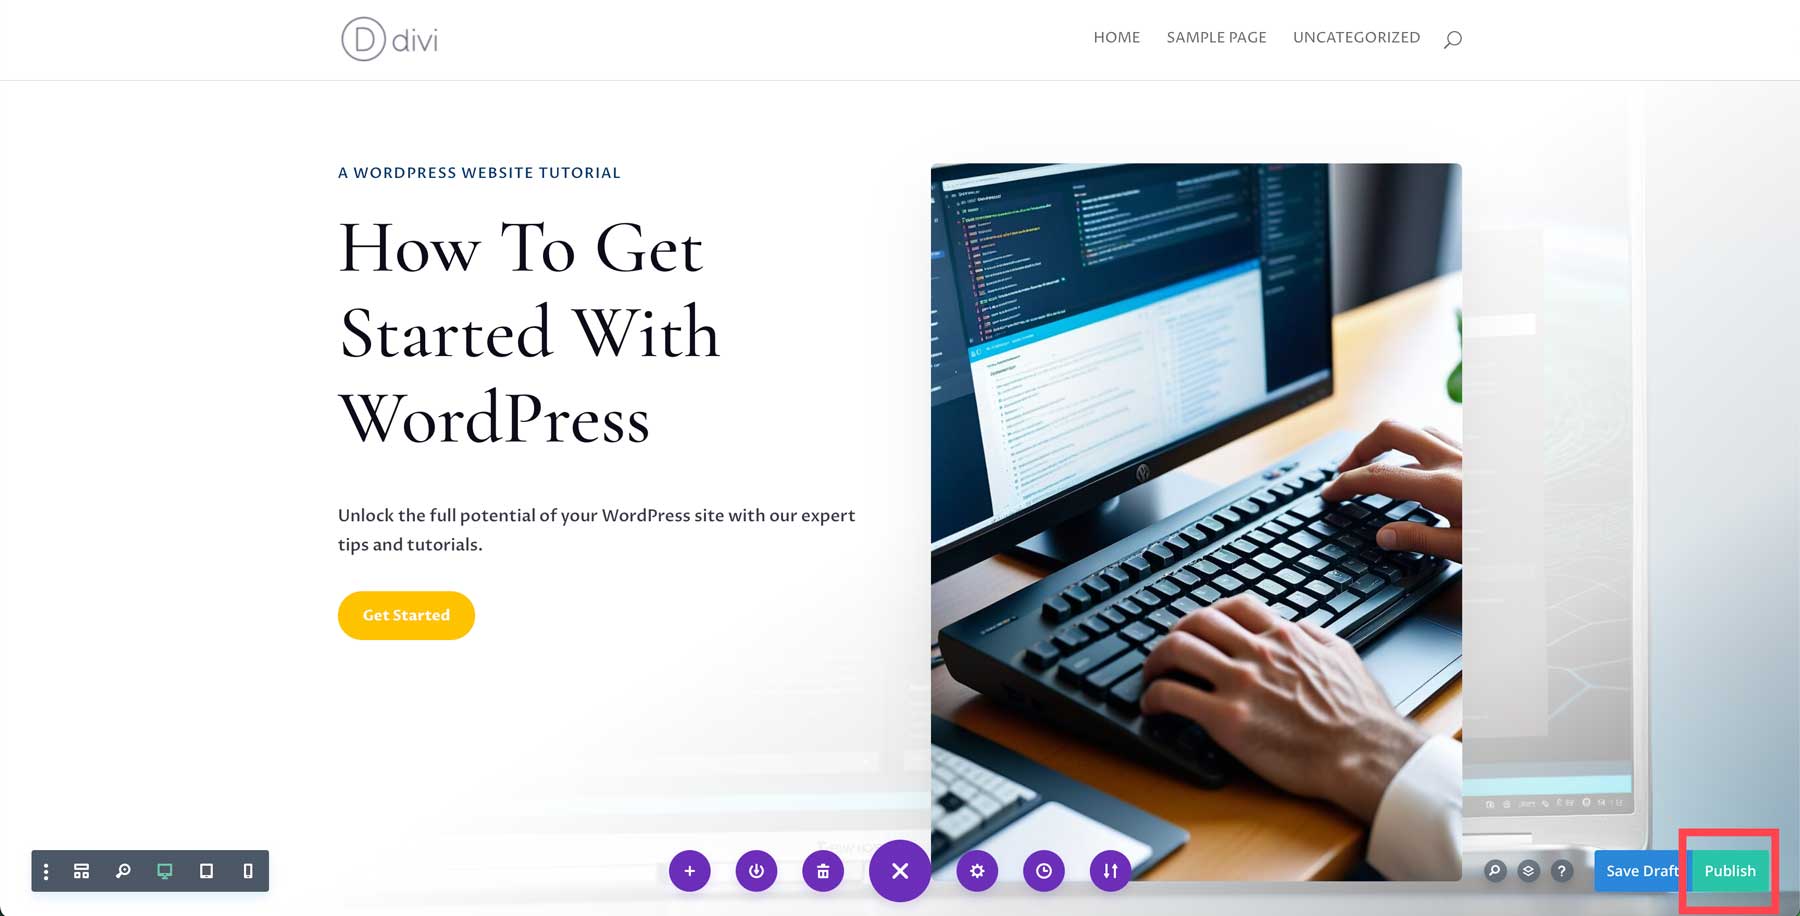
Finally, click the green publish button to make your page live.
Repeat the steps above to create the rest of your pages with Divi.
Step 7: Adding Functionality With Plugins
There’s no doubt that WordPress is an amazing tool for building all kinds of websites. However, its true potential lies in its plugin ecosystem. Plugins allow you to extend the power of WordPress by adding new functionalities, such as chatbots, improving SEO, securing your website, creating backups, and more. WordPress has its own repository of free plugins, and some extensive third-party developers have made some great options for WordPress.
Here are just a few examples of must-have plugins you can use with WordPress:
- SEO Plugins: Give your site a good chance of ranking high in search engines with plugins, such as Rank Math
- Backup Plugins: Backup or restore your site daily to avoid losing important files or other content on your website with plugins such as UpdraftPlus
- Image Optimization Plugin: Improperly sized images can slow WordPress way down. Take steps to ensure your images are optimized as you upload them, keeping WordPress fast for your site’s visitors. A great plugin for this is EWWW Image Optimizer
- Speed Optimization Plugins: Keep WordPress fast and light with plugins like NitroPack and WP-Optimize. Speed optimization plugins help with caching, image optimization, database cleanup, and more.
- Security Plugins: Protect against DDoS attacks, hackers, and malware with plugins like Solid Security or Sucuri.
- Social Media Plugins: Add social media feeds, social sharing buttons, or post blog posts to social platforms automatically with plugins like Monarch and Blog2Social.
- Marketing Plugins: Increase readership, create email opt-ins, or start a podcast with plugins like Seriously Simple Podcasting and PublishPress Planner
Extend Your Divi Theme With Third-Party Extension In The Divi Marketplace
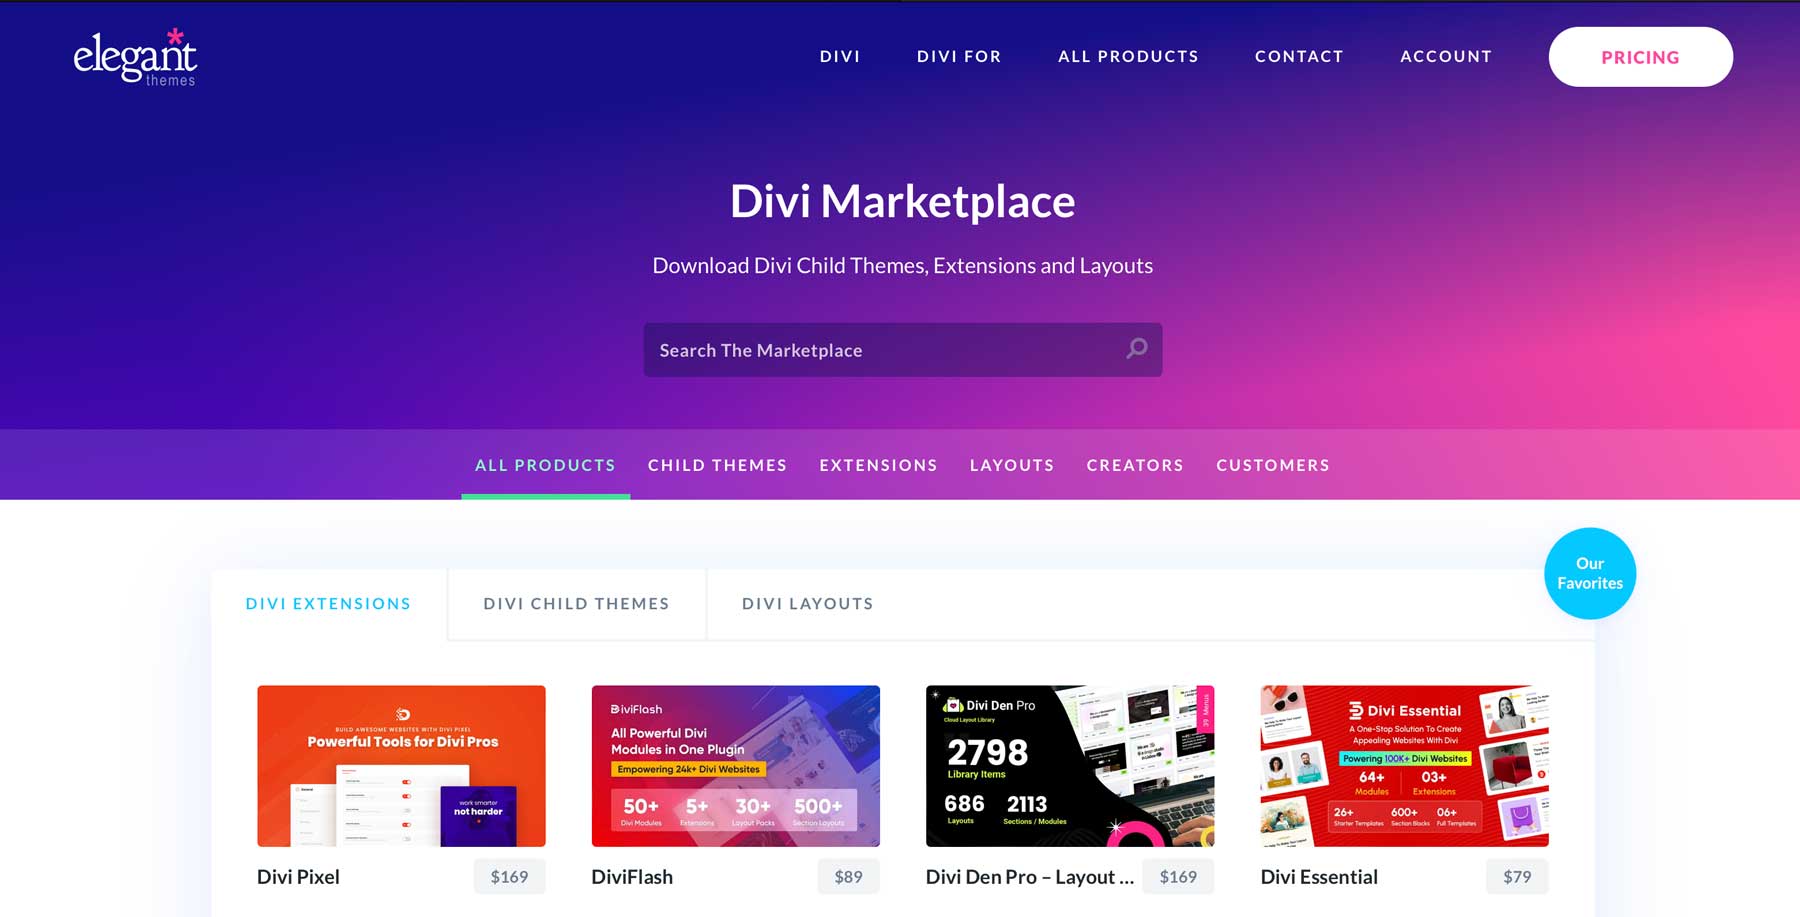
In addition to free and third-party premium plugins that work with WordPress, some theme developers also create extensions, child themes, and pre-made layouts. This is the case with Elegant Themes and its Divi Marketplace. It offers thousands of extensions and other goodies for the Divi theme. You can easily create mega menus with Divi Mega Menu Pro, a mega menu builder that allows you to create gorgeous menus with icons, images, buttons, and more. Looking for the ultimate Divi bundle to make Divi rock? Look no further than The Ultimate Divi Utility Bundle. It provides nine products in one, including conditional display options, the ability to create various pop-ups, new modules, extensions, and so much more.
Whether you’re looking for an eye-catching child theme like Molti Ecommerce for creating beautiful online stores or a collection of layouts like DiviMade, the Divi Marketplace is certainly not short on options.
Conquer WordPress With Divi
Getting started with WordPress isn’t hard. Once you understand the basics, from choosing a domain with Namecheap to hosting your website with SiteGround, building a website takes no time at all. This is especially true if you opt for a powerful, beginner-friendly theme like Divi. It allows you to create beautiful websites from one of 2000+ templates or by crafting a webpage with Divi AI.
If you’re looking for more help with WordPress, check out one of our many articles in the WordPress category. With countless tutorials, software suggestions, and tips, you’ll be a WordPress expert in no time.
Want to learn more about the products we mention in this post? Check out the table below for pricing and links to each.
| Products Mentioned | Starting Price | Description | Action | |
|---|---|---|---|---|
| 1 | Namecheap | $5.98/year | Domain Registrar | Get |
| 2 | WordPress.org | $2.99/month | CMS | Get |
| 3 | WordPress.com | Free | CMS | Get |
| 4 | SiteGround | $2.99/month | WordPress Hosting Provider | Get |
| 5 | Rank Math | Free, $6.99/month | SEO Plugin | Get |
| 6 | WP Rocket | $59/year | Speed Optimization Plugin | Get |
| 7 | AIOSEO | Free, $49.60/year | SEO Plugin | Get |
| 8 | Wix | Free, $17/month | Website Builder | Get |
| 9 | MemberPress | $179.50/year | Membership Plugin | Get |
| 10 | Squarespace | Free, $16/month (billed annually) | Website Builder | Get |
| 11 | Cloudways | $12/month | Hosting Provider | Get |
| 12 | WP Engine | $13/month | Hosting Provider | Get |
| 13 | GoDaddy | $11.99/year | Domain Registrar | Get |
| 14 | Bluehost | $2.95/month (billed annually) | Hosting Provider | Get |
| 15 | HostGator | $3.75/month (3-year term) | Hosting Provider | Get |
| 16 | Hostinger | $2.99/month | Hosting Provider | Get |
| 17 | Kinsta | $30/month | Hosting Provider | Get |
| 18 | Divi | $89/year | WordPress Theme | Get |
| 19 | Visual Builder | Included with Divi | Page Builder Plugin | Get |
| 20 | Divi Design Modules | Included with Divi | Page Builder Plugin | Get |
| 21 | Divi Theme Builder | Included with Divi | Full Site Editing | Get |
| 22 | Divi AI | $16.08/month (billed annually) | AI Website Builder | Get |
| 23 | Divi Teams | $1.50/month | Team Collaboration | Get |
| 24 | Divi Cloud | $6/month | Cloud Storage | Get |
| 25 | Divi Layouts | Included with Divi | Premade Templates | Get |
| 26 | Divi VIP | $6/month | VIP Support | Get |
| 27 | NitroPack | $17.50/month (billed annually) | Speed Optimization Plugin | Get |
| 28 | WP-Optimize | Free, $49/year | Speed Optimization Plugin | Get |
| 29 | Sucuri | Free, $199.99/year | Speed Optimization Plugin | Get |
| 30 | Monarch | Included with Divi | Social Media Plugin | Get |
| 31 | Blog2Social | Free, $7/month | Social Media Plugin | Get |
| 32 | Seriously Simple Podcasting | Free, $19/month | Marketing Plugin | Get |
| 33 | PublishPress Planner | $129/year | Marketing Plugin | Get |
| 34 | Divi Marketplace | Prices Vary | Third-Party Extensions, Child Themes, and Layouts for Divi | Get |
| 35 | Divi Mega Menu Pro | $79/year | Mega Menu Plugin | Get |
| 36 | The Ultimate Divi Utility Bundle | $282.09/year | 9 Divi Extensions | Get |
| 37 | Molti Ecommerce | $35/year | Child Theme for Divi | Get |
| 38 | Divi Made | $28.99/year | Premade Templates for Divi | Get |
Frequently Asked Questions
Do you still have some questions left about WordPress? Let’s take a look at some of the most frequently asked questions.


Leave A Reply