")
A blog post template is probably the most important template you can add to a blog site. It provides a structure and design that is “magically” applied to all blog posts on the front end, while bloggers only need to worry about writing the post on the backend. This drastically saves time by streamlining the creation process to get your post out on the web quickly. And with the Divi Theme Builder, you won’t have to settle for a boring post template that looks like every other blog post on the web. You can create countless authentic designs (visually) and add different combinations of static and dynamic content throughout your template easily.
In this post, we’ll be covering everything you need to know in order to build a blog post template using the Divi Theme Builder. We will cover a lot of content, but I think you will be surprised how easy these templates can come to life before you eyes.
Now let’s get started!
- 1 Sneak Peek
- 2 Download the Blog Post Template for FREE
- 3 Download For Free
- 4 What is a Blog Post Template and Why Do You Need One?
- 5 Building Blocks of a Blog Post Template
- 6 What You Need to Get Started
- 7 How to Build a Blog Post Template in the Divi Theme Builder
- 8 Final Result
- 9 Using the Divi Builder to Create a Blog Post with a Blog Post Template in Place
- 10 Final Thoughts
Sneak Peek
Here is a quick look at the blog post template we will create in this tutorial.
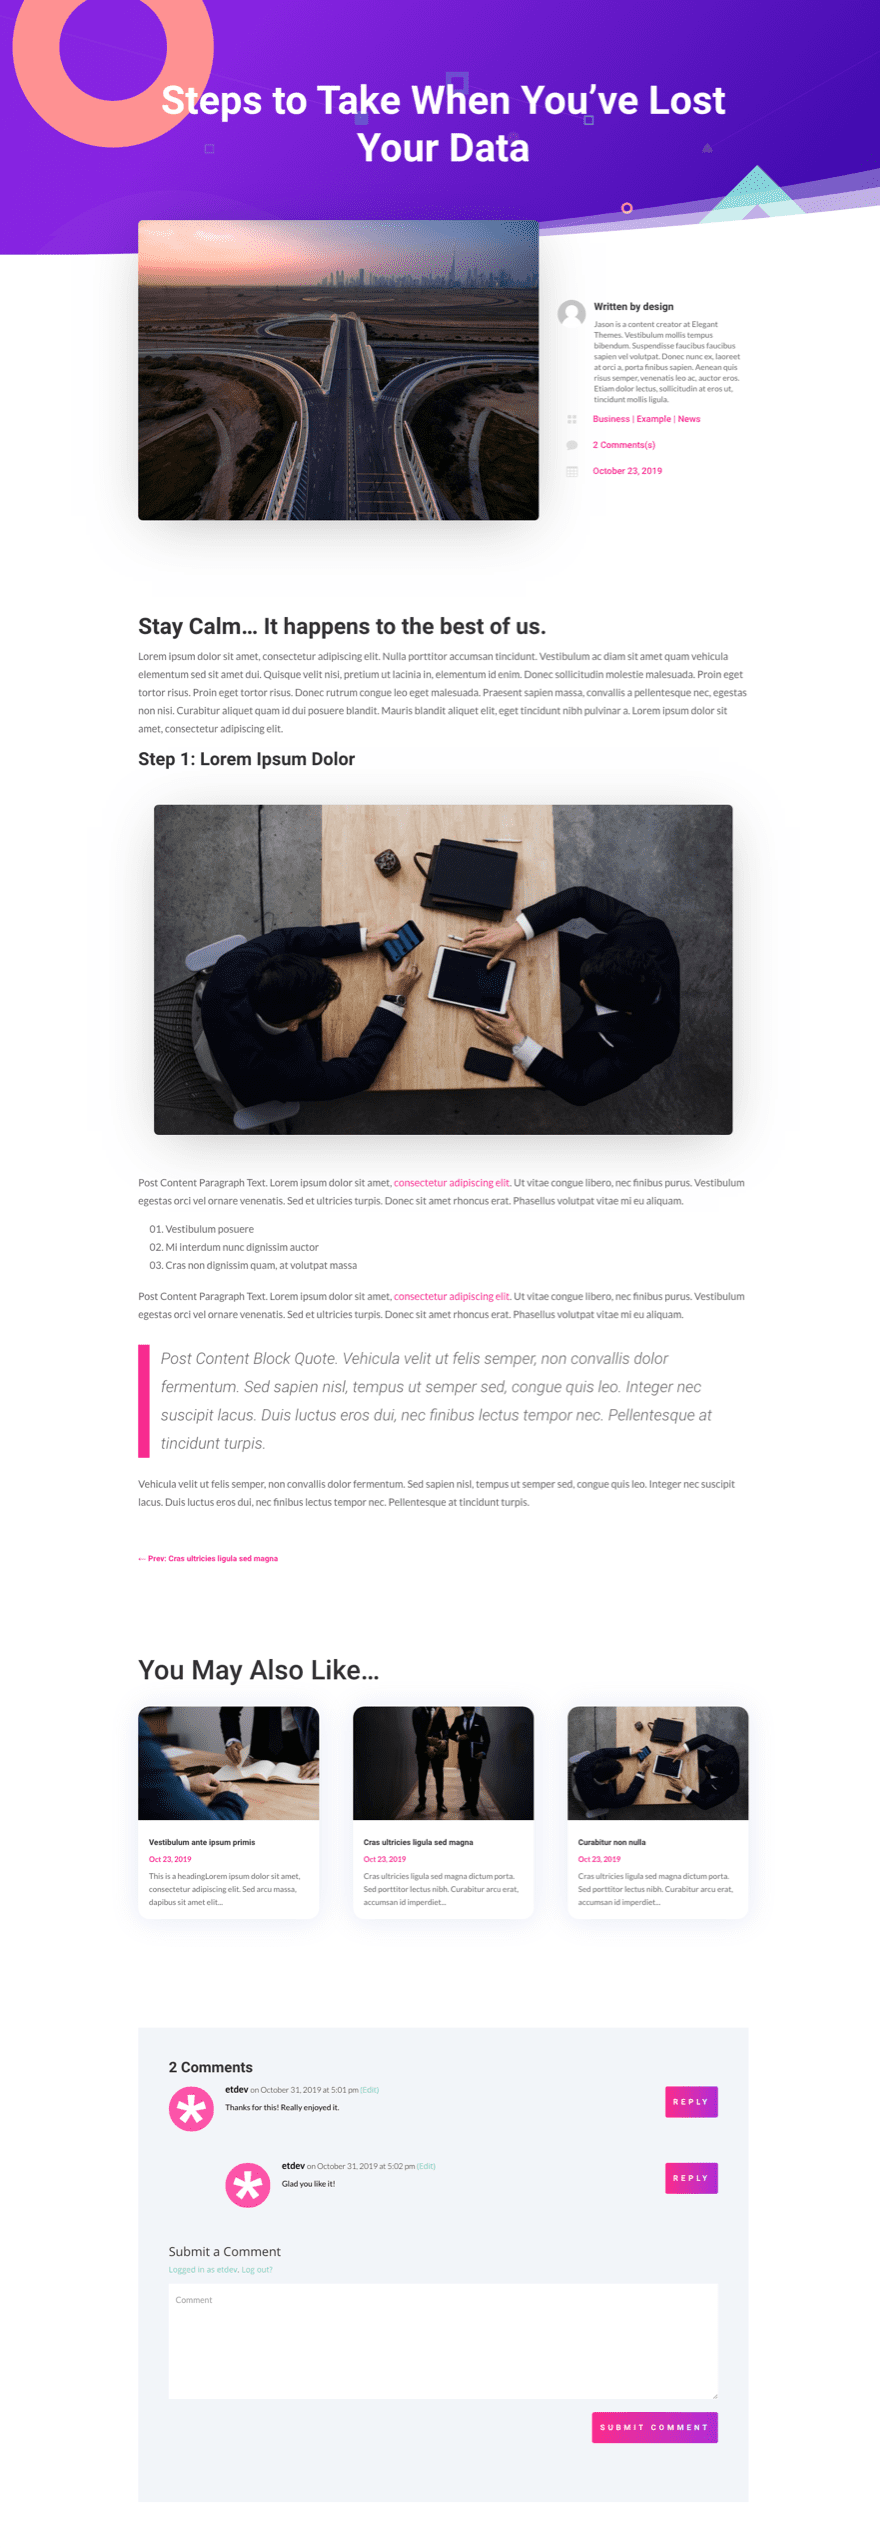
You may have noticed the similarity of this design from our Digital Marketing Layout Pack. This post template was created to match the layout so that you can use it in combination with the Digital Marketing Layout Pack.
Enjoy!
Download the Blog Post Template for FREE
To lay your hands on the template from this tutorial, you will first need to download it using the button below. To gain access to the download you will need to subscribe to our newsletter by using the form below. As a new subscriber, you will receive even more Divi goodness and a free Divi Layout pack every Monday! If youíre already on the list, simply enter your email address below and click download. You will not be ìresubscribedî or receive extra emails.

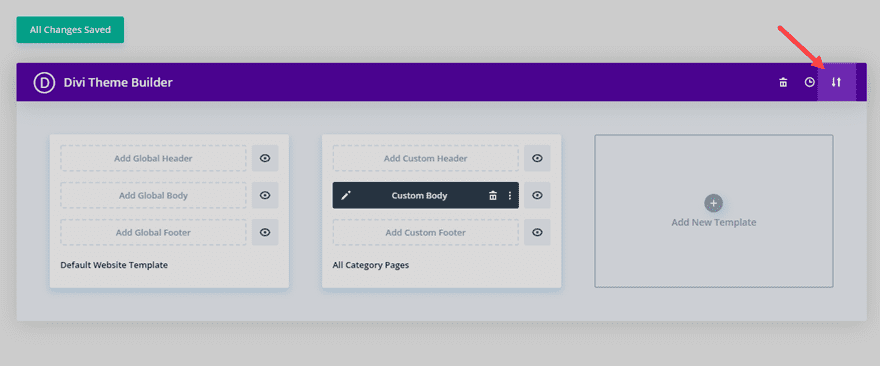
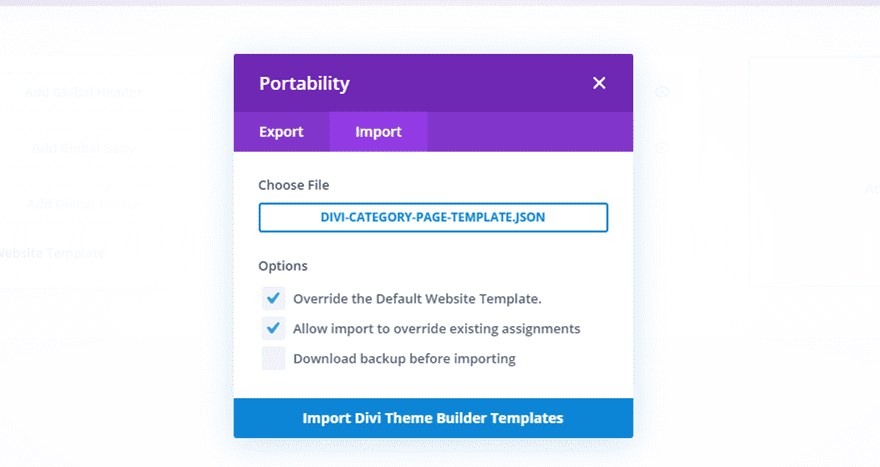
To import the template layout to your website, you will need to go to the Divi Theme Builder and use the portability option to import the .json file to the theme builder.
What is a Blog Post Template and Why Do You Need One?
A blog post template is a site-wide template used for all (or some) of your single blog posts on your website. It is a predesigned template built with dynamic content so that any new or existing post will automatically inherit the layout and design of the assigned template.
There are a few compelling reasons to use a blog post template. The primary reason to use a blog post template is for streamlining the blogging process. Having a ready made template already designed for your posts can drastically speed up the creation process by eliminating the need to design the elements of the post on the fly and leaving bloggers with more time to do what they do best – write content. But that’s not all! A blog post template can incorporate extra elements (like comments, share buttons, and email optins) to the post in order to increase user engagement and increase conversions.
With the Divi Theme Builder, creating a blog post template is surprisingly easy. The secret to building a blog post template in Divi is understanding what Modules to use and how to incorporate dynamic content elements into the template effectively.
Before we jump into building a blog post template together, let’s first go over some of the tools available to build one.
Building Blocks of a Blog Post Template
Blog Post Templates can vary depending on the needs of the blog. But typically, a blog post template will consist of the following structure:
- Heading – The top area of the post that usually includes the Post Title, Featured Image, and Post Metadata (categories, tags, author, post date, etc.)
- Post Content – The main content of the article.
- Related Posts – Links to other articles that readers may be interested in.
- Comments – A section for users to add and reply to comments about the post.
- Call to Action – Usually an email optin form, social sharing icons, or a promotional offer of some kind.
Divi Modules and Dynamic Content
A Blog Post Template can be created in the Divi Theme Builder by using Divi’s built-in dynamic content capabilities inherent within Divi Modules. There are some Divi Modules that are built specifically for posts. However, most Divi Modules will have the capability of pulling in available dynamic content related to a post. Here is a breakdown of some of the options available to you when designing a blog post template in Divi.
- Divi Modules Built for Post Templates
- Post Navigation Module – helpful for providing navigation links to previous and next posts.
- Post Slider Module – helpful for providing a gallery of posts organized by most recent or by category.
- Post Title Module – helpful for displaying the title of the post with a featured image in one convenient module.
- Post Content Module – a necessary module for the post template for displaying the content of a post. The post content module also includes design options that can be used as a default design for site-wide post content.
- Dynamic Content Elements for Post Template Available within All Divi Modules
- Post/Archive Title
- Post Excerpt
- Current Date
- Site Tagline
- Author Bio
- Post Author
- Post Link
- Post Categories
- Post Comment Count
- Post Publish Date
- Custom Fields
Now that you have a good idea of the tools available, let’s jump in to how we can build a blog post template in Divi from scratch.
What You Need to Get Started
To get started, you will need to do the following:
- If you haven’t yet, install and activate the Divi Theme (or the Divi Builder Plugin if not using the Divi Theme).
- Make sure you have at least a few blog posts created in order to view the results of the blog post template we will build. Make sure to include as much content in each post as possible (ie. featured image, categories, etc.) so that you will have a good example of a real post.
After that, you are ready to start building a new template for your blog posts in Divi.
How to Build a Blog Post Template in the Divi Theme Builder
Subscribe To Our Youtube Channel
Like all templates, a blog post template is created in the Divi Theme Builder which will allow you to build the template completely from scratch with the power of the Divi Builder.
Creating a New Template
From the WordPress Dashboard, navigate to Divi > Theme Builder. Then click the “add new template” empty square.

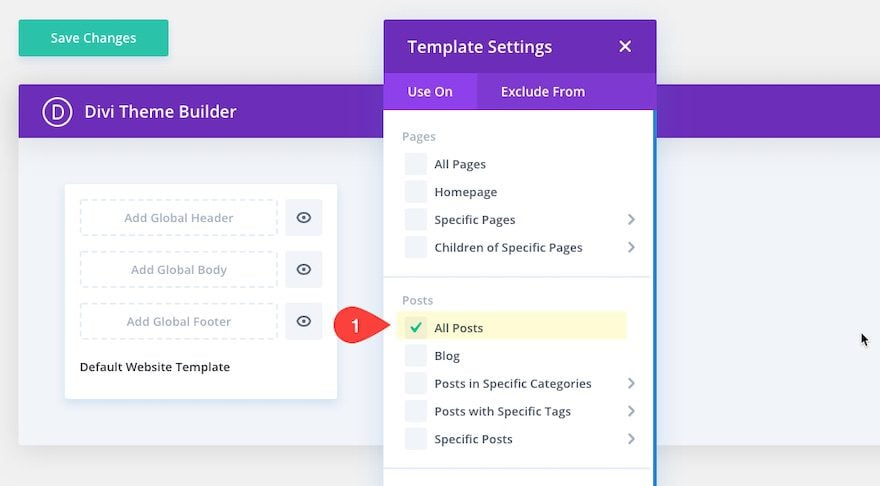
Assigning the Template to All Blog Posts
Once you add a new template, the template settings box will pop up allowing you to assign the template to pages and/or posts throughout your website. Since we want to create a blog post template for all of the blog posts site-wide, select “All Posts” and click the create template button.
Creating a Custom Body Area Layout
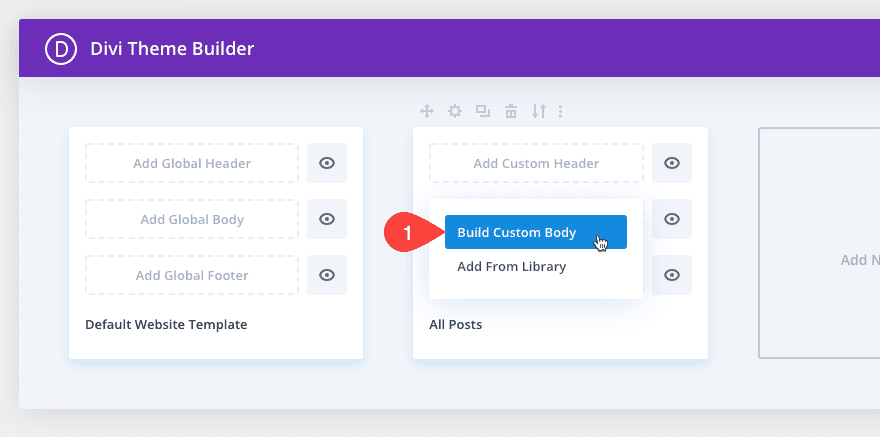
Next, click the “Add Custom Body” area of the template to create a new body area for the post template. Then select “Build Custom Body”.
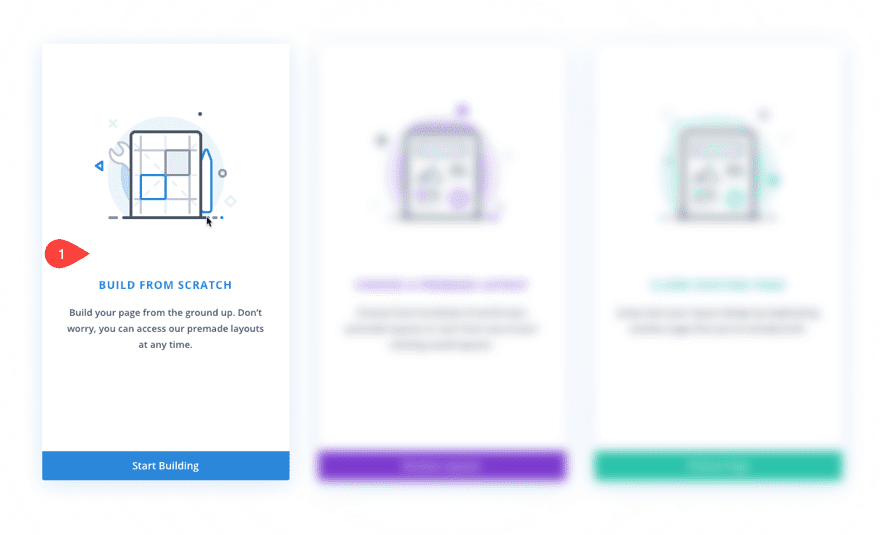
Select the “Build From Scratch” option to start the building process.
Building the Custom Body Layout for the Post Template
Once the Template Layout Editor is launched, you have the freedom to build the entire body of your blog post template from scratch using the Divi Builder.
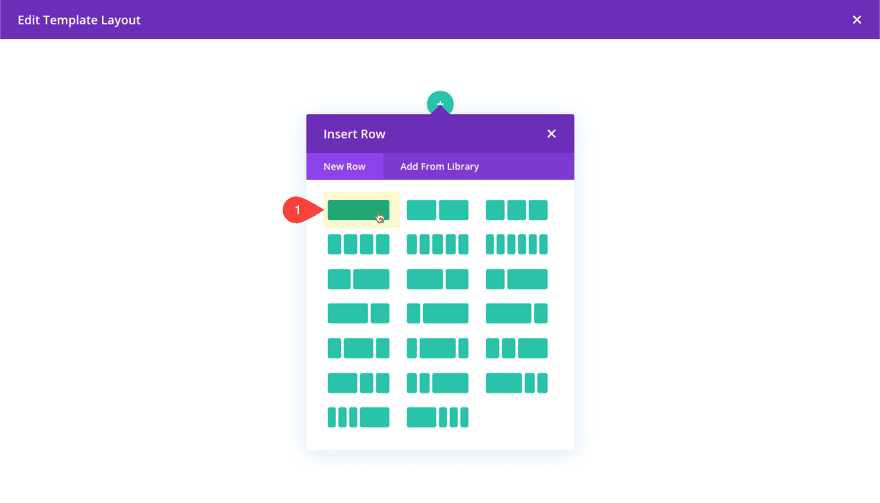
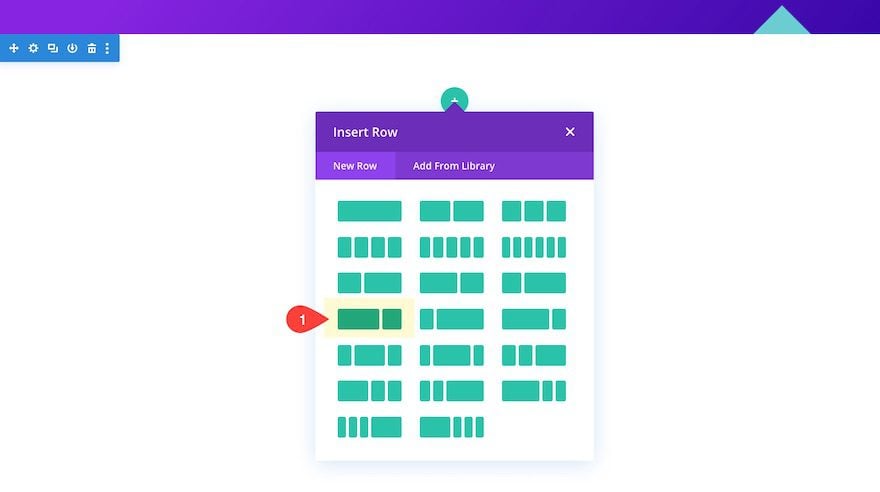
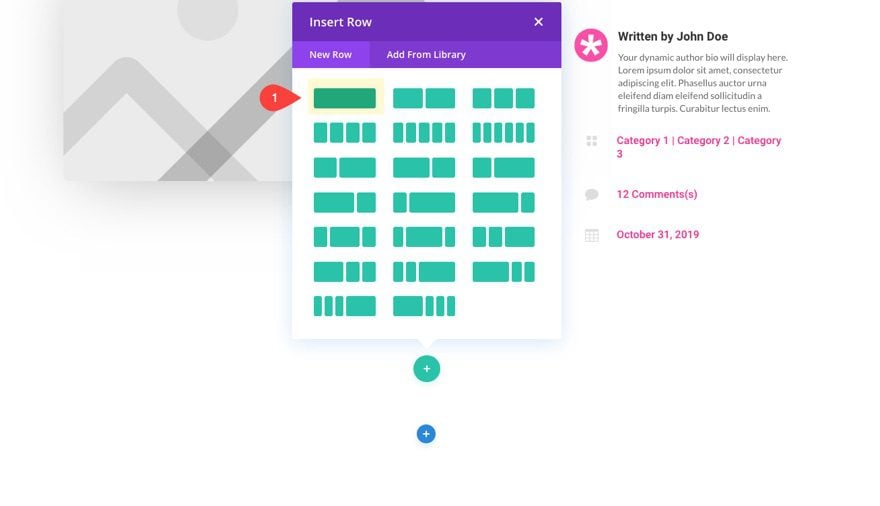
To start, add a one column row to the default regular section.
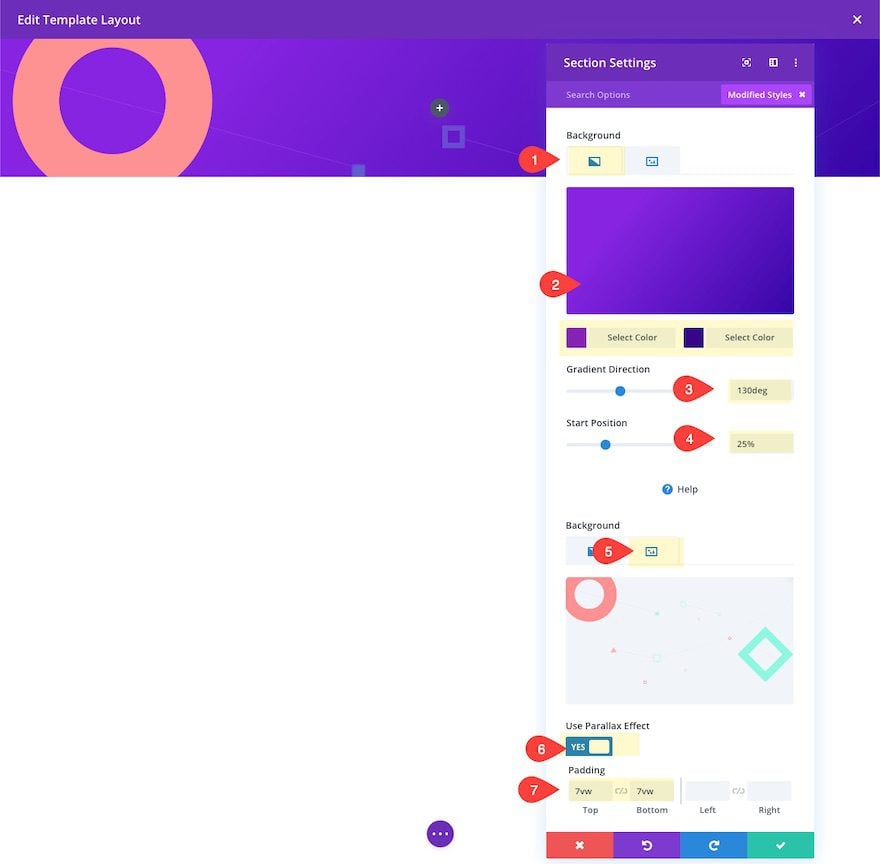
Then, before adding a module, update the section settings with a background design and some padding as follows:
- Background Gradient Left Color: #8624e1
- Background Gradient Right Color: #3607a6
- Gradient Direction: 130deg
- Start Position: 25%
- Background Image: insert image
- Use Parallax Effect: YES
- Padding: 7vw top, 7vw bottom
Creating the Post Title Heading as Dynamic Content with Text Module
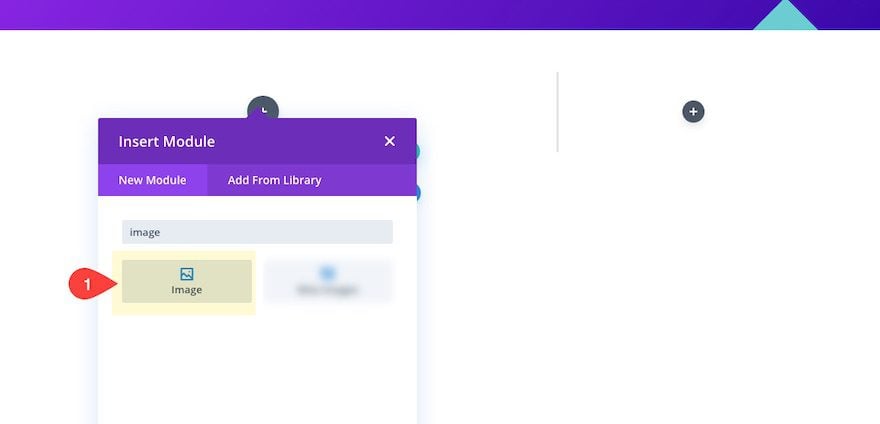
Inside the one-column row, add a text module.
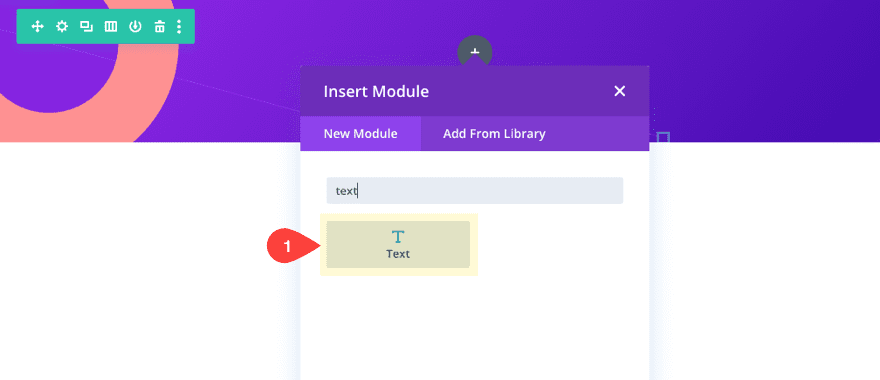
Then click the dynamic content icon when hovering over the body content area.
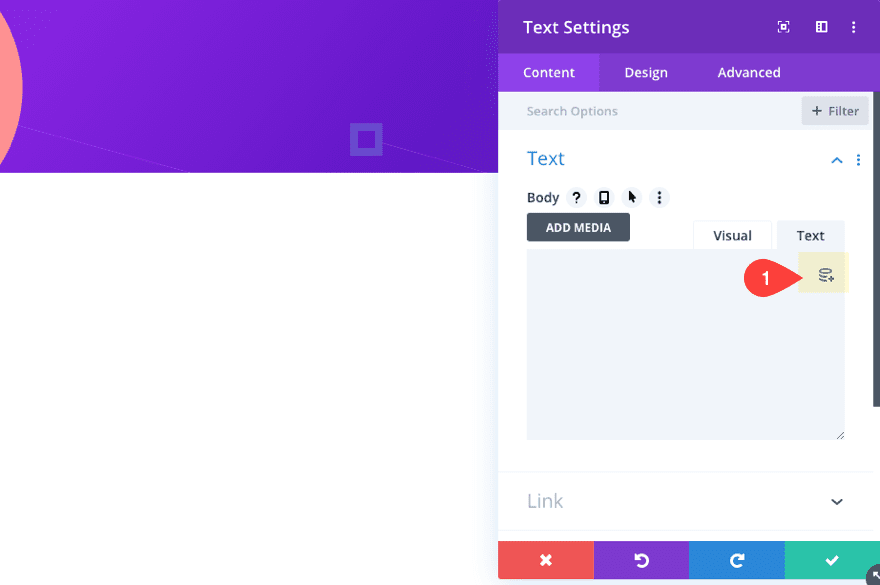
Select the Post/Archive Title element from the list.

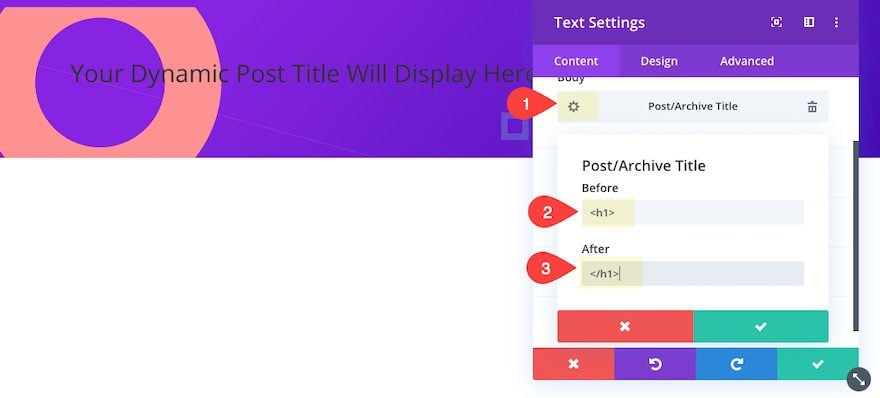
Then, click the gear icon on the Post/Archive Title element and update the before and after input areas with h1 tags as follows:
Before:
<h1>
After:
</h1>
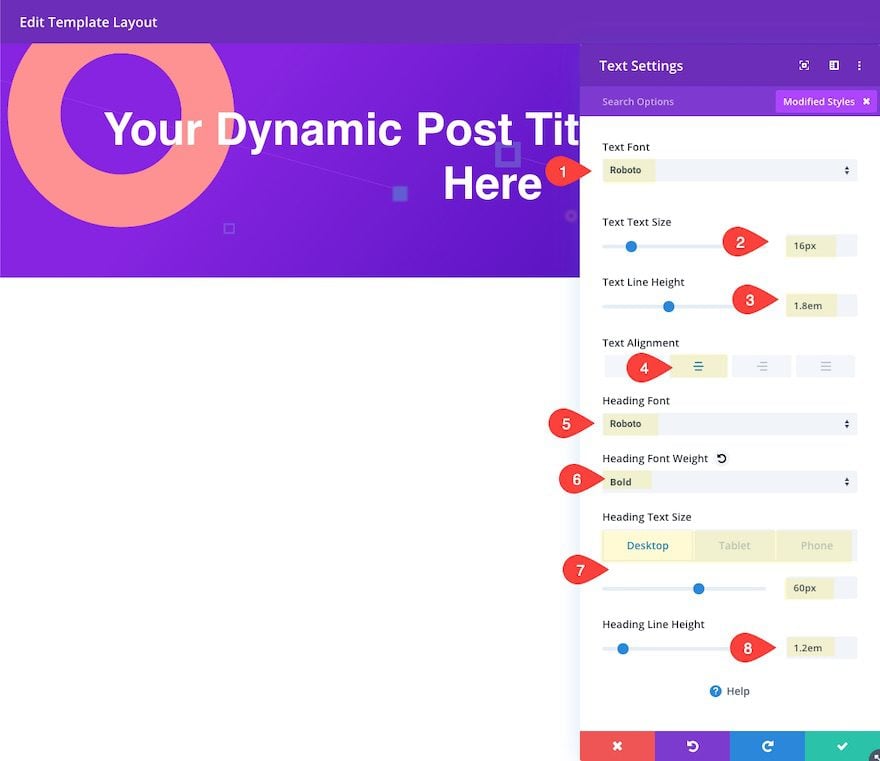
Now design the title with the following design settings:
- Text Font: Roboto
- Text Text Size: 16px
- Text Line Height: 1.8em
- Text Alignment: center
- Heading Font: Roboto
- Heading Font Weight: Bold
- Heading Text Size: 60px (desktop), 40px (tablet), 32px (phone)
- Heading Line Height: 1.2em
Adding the Featured Image Using an Image Module as Dynamic Content
After the title section is in place, let’s add the featured image for the post template. To do this, add another regular section with a two-thirds one-third column layout.
Then add an image module to the left column.
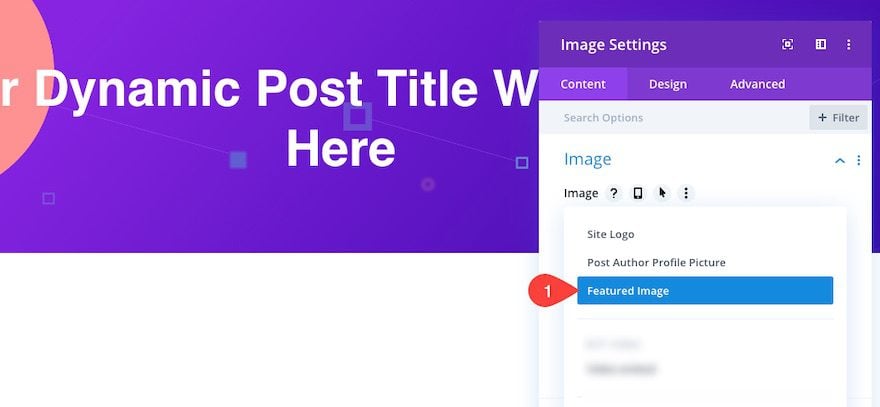
Then add the featured image dynamic content element for the image.
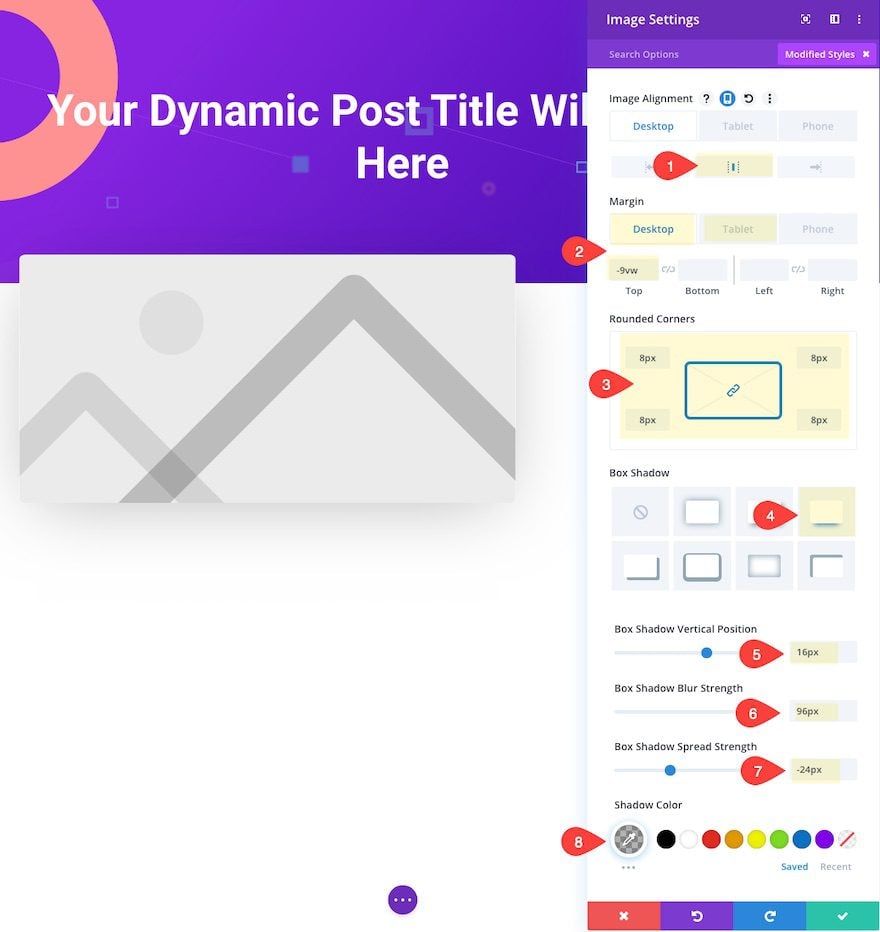
Designing the Image Module
Jump over to the design tab and customize the image as follows:
- Image Alignment: center
- Margin: -9vw (desktop), 0vw (tablet)
- Rounded Corners: 8px
- Box Shadow: see screenshot
- Box Shadow Vertical Position: 16px
- Box Shadow Blur Strength: 96px
- Box Shadow Spread Strength: -24px
Add Post Author and Author Bio to Blurb Module as Dynamic Content
Next, we are going to add a Post Author and Post Author Bio using a blog module. So, go ahead and add a blog module to the right column.

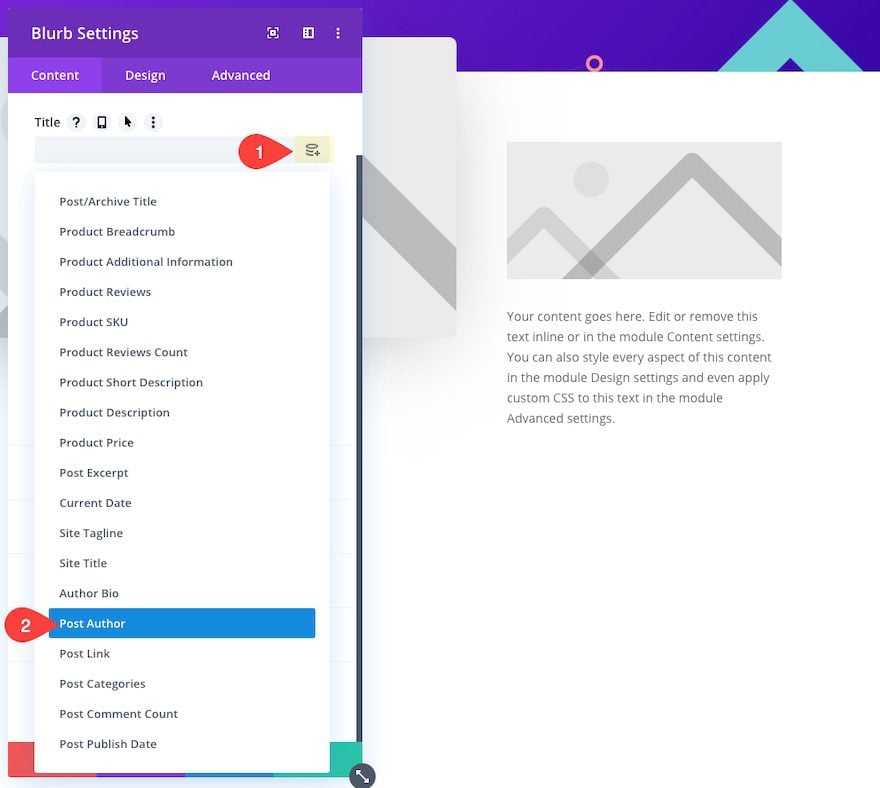
In the blurb settings, hover over the Title input box and click the dynamic content icon. Then add the Post Author dynamic content element for the Title content.
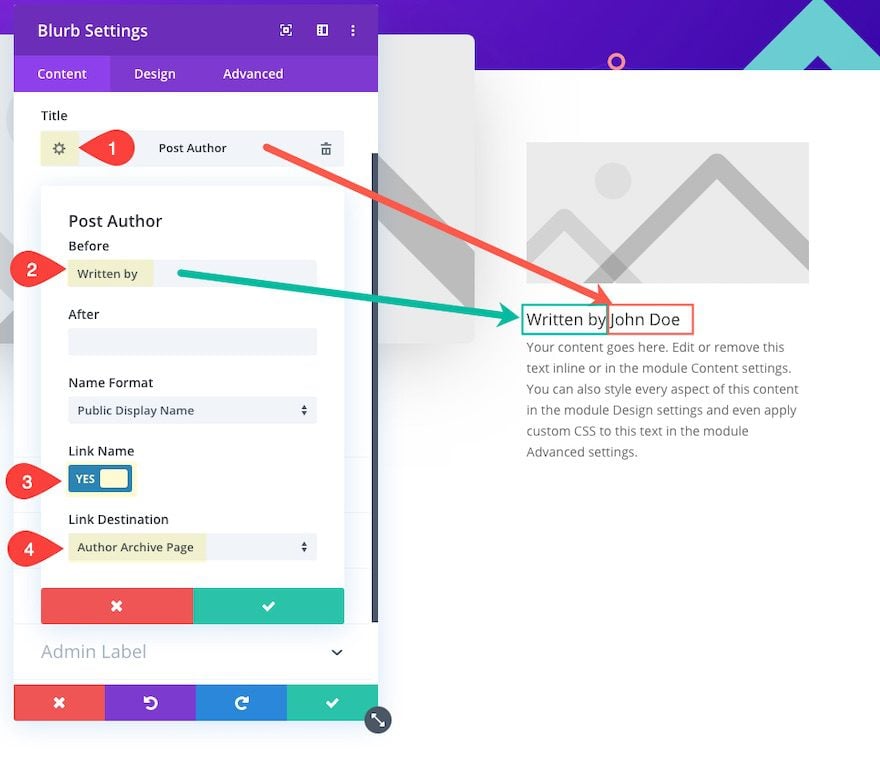
Next, open the Post Author settings and update the before input as follows:
- Before: Written by
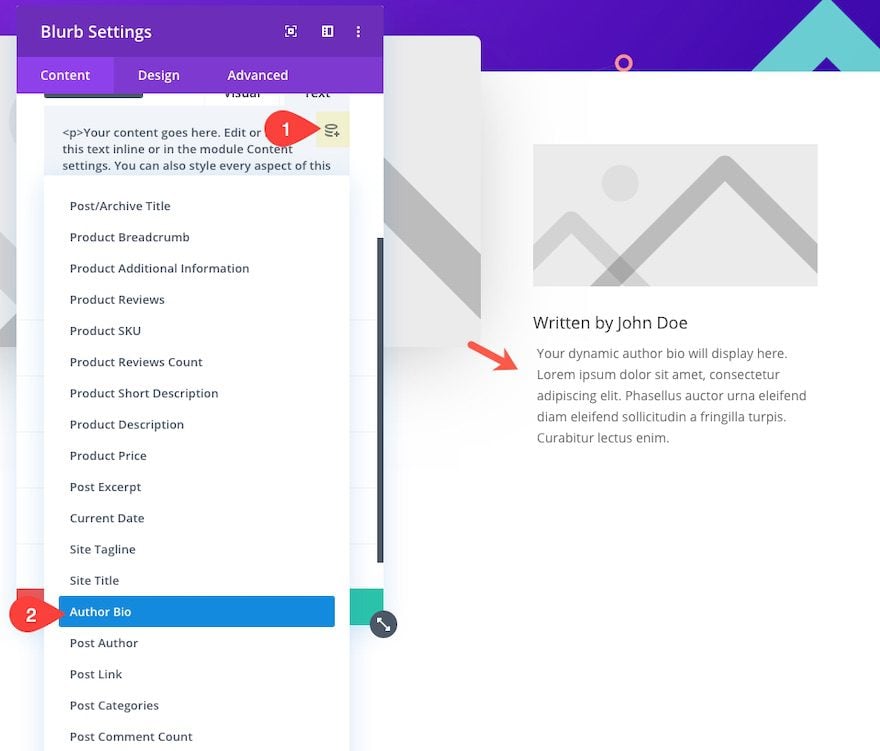
For the body content of the blurb module, click the dynamic content icon and select the “Author Bio” dynamic content element from the list.
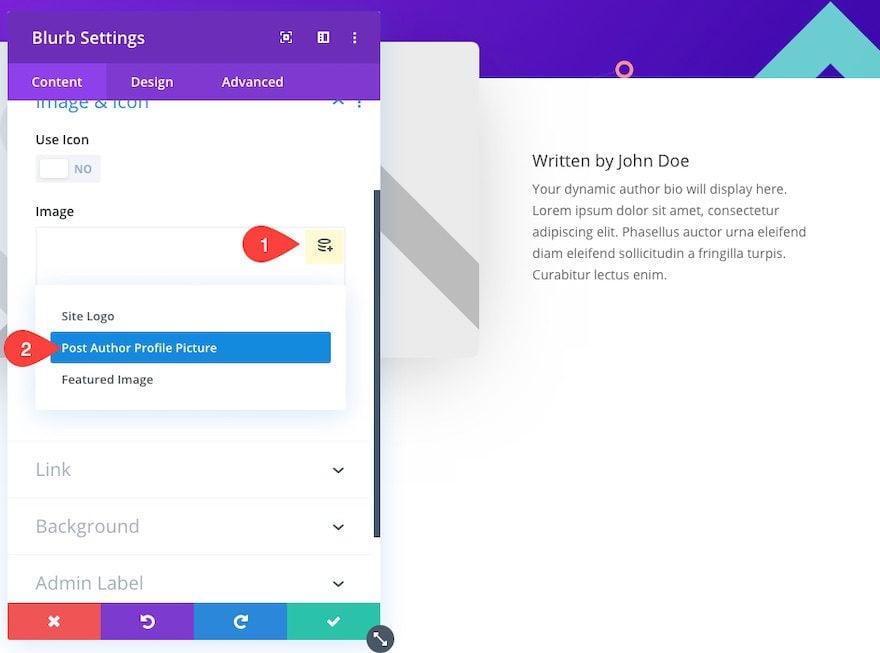
For the Image of the blurb module, add the “Post Author Profile Picture” as dynamic content.
Design Post Author and Bio Blurb Module
Now optimize the design of the image as follows:
- Image/Icon Placement: Left
- Image Rounded Corners: 50%
- Title Font: Roboto
- Title Font Weight: Bold
- Title Line Height: 1.3em
- Body Font: Lato
- Body Line Height: 1.4em
- Image Width: 50px

Add Post Categories to Blurb Module as Dynamic Content
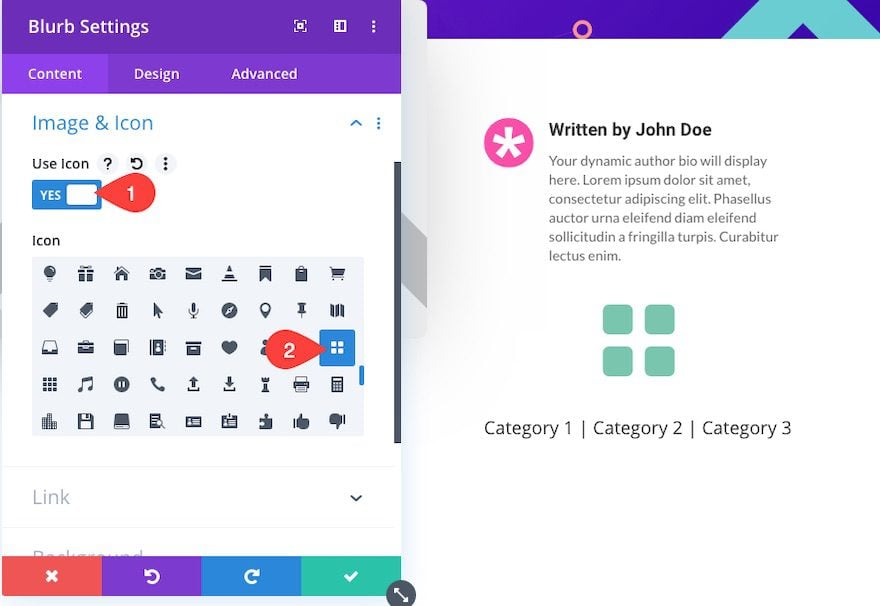
Under the Author and Author Bio Module just created, add another blurb module under it and select the Post Categories dynamic content element for the Title.

Then update the blurb with an icon as follows:
- Use Icon: YES
- Icon: see screenshot
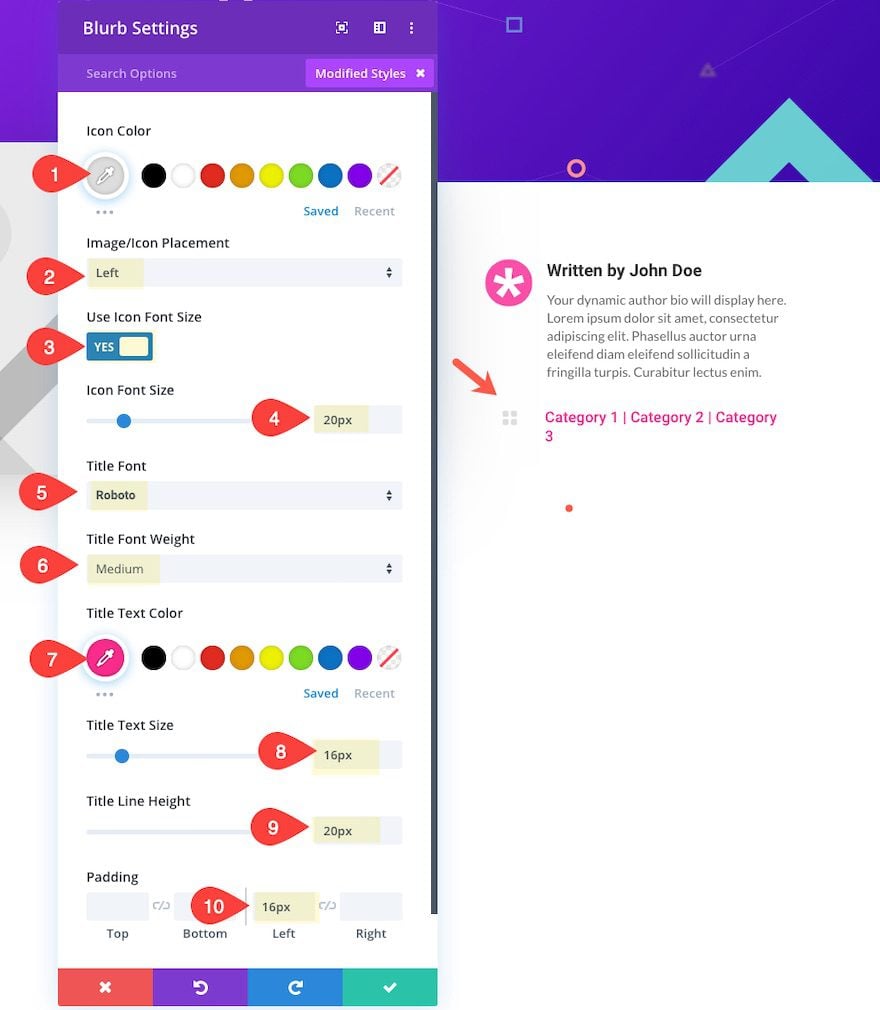
Design Post Category Blurb Module
Update the design settings as follows:
- Icon Color: #dddddd
- Image/Icon Placement: Left
- Use Icon Font Size: YES
- Icon Font Size: 20px
- Title Font: Roboto
- Title Font Weight: Medium
- Title Text Color: #f92c8b
- Title Text Size: 16px
- Title Line Height: 20px
- Padding: 16px left
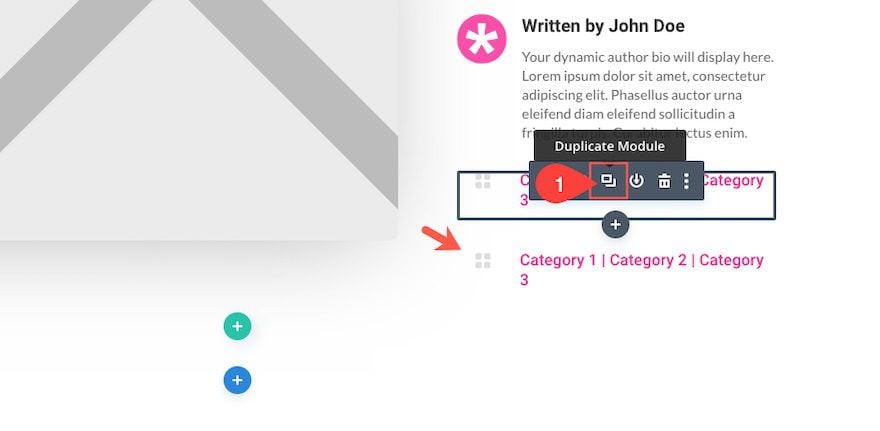
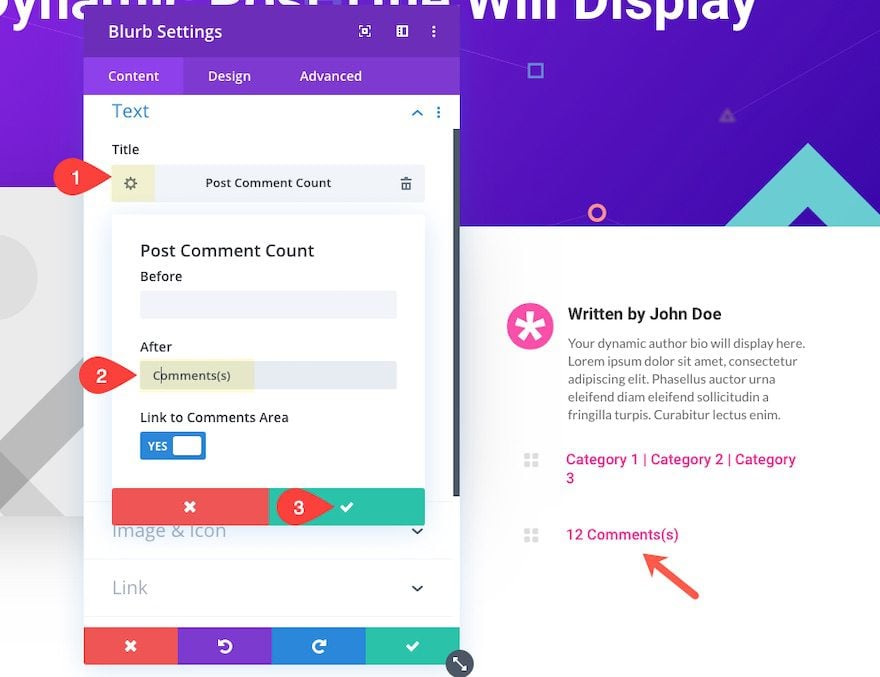
Add Comment Count to Blurb Module as Dynamic Content
To add the post comment count for the blog post template, duplicate the blurb module just created.
Then update the Title content with the Post Comment Count dynamic content element.
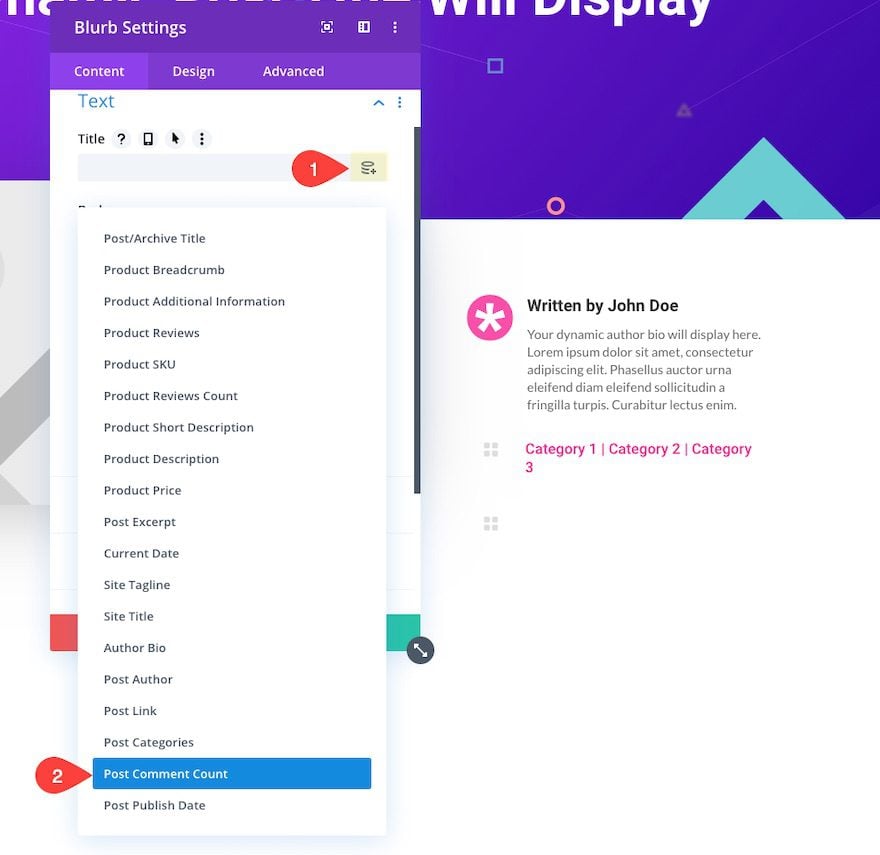
Since the comment count only displays a number, we need to supplement the number with some addition text after the number. To do this, open the Post Comment Count settings and update the following:
After: Comment(s)
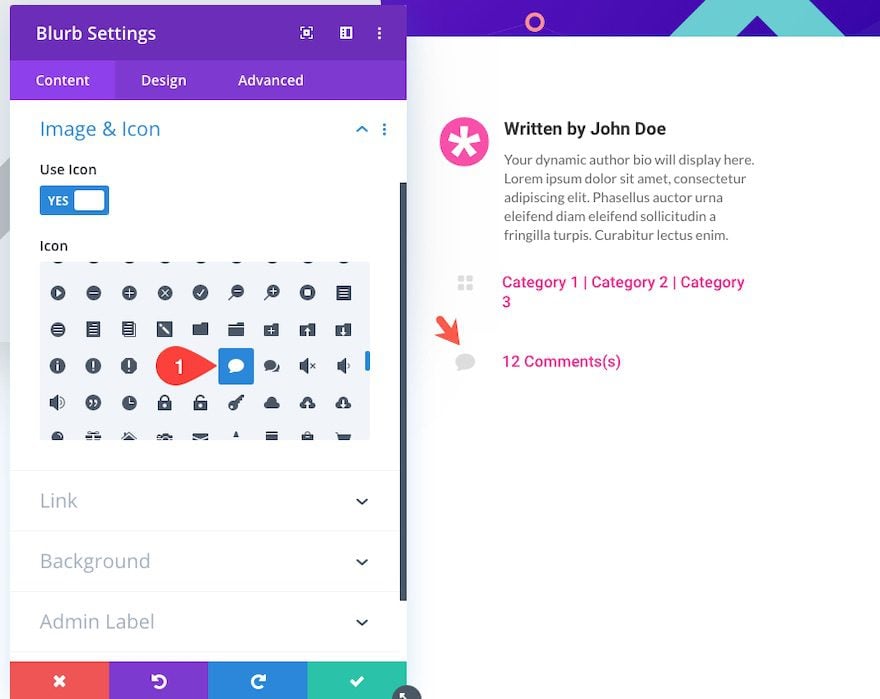
Then update the icon as follows:
- Use Icon: YES
- Icon: see screenshot
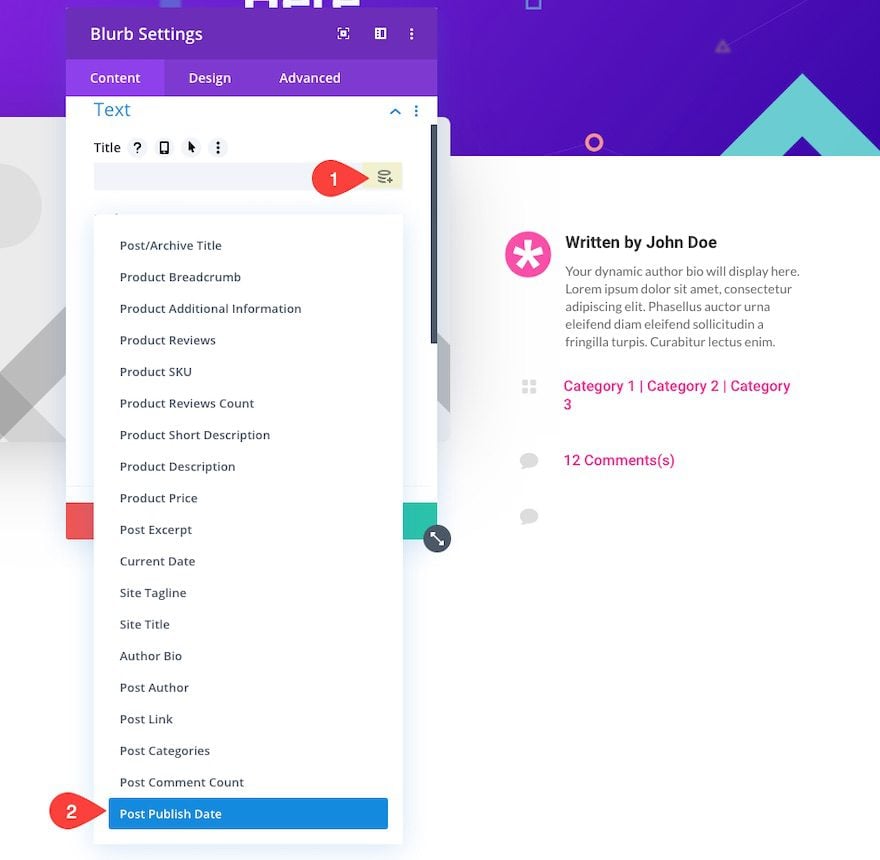
Add Post Publish Date to Blurb Module as Dynamic Content
For the last piece of metadata, duplicate the blurb module with the comment count. Then update the Title content with the “Post Publish Date” dynamic content element.
Tip: You can always open the settings of the Post Publish Date dynamic element to change the format of the date display.
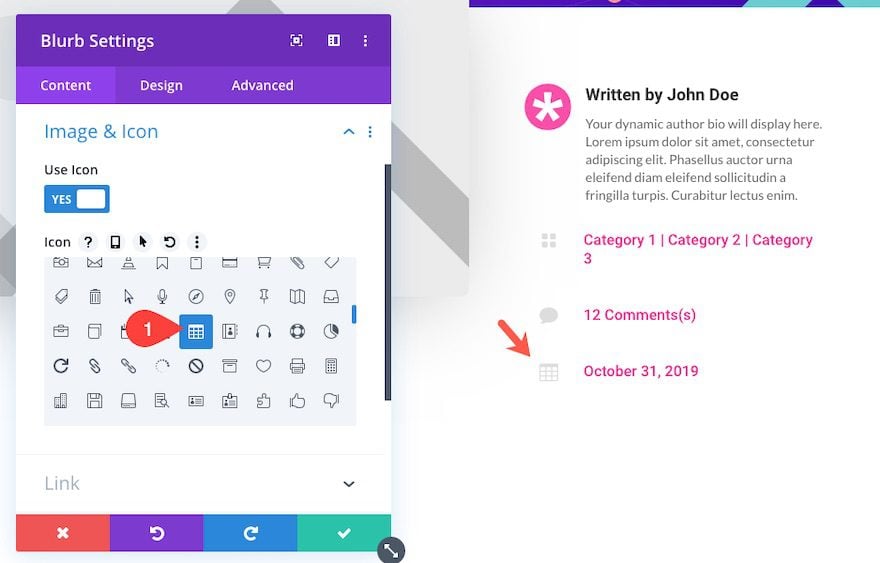
Then update the icon as follows:
- Use Icon: YES
- Icon: see screenshot
Add Post Content Module with Design Settings for Content
With the post title, featured image, post author, and metadata in place, we are ready for the main post content.
Add a new row with a one-column layout.
Then add a post content module to the row.
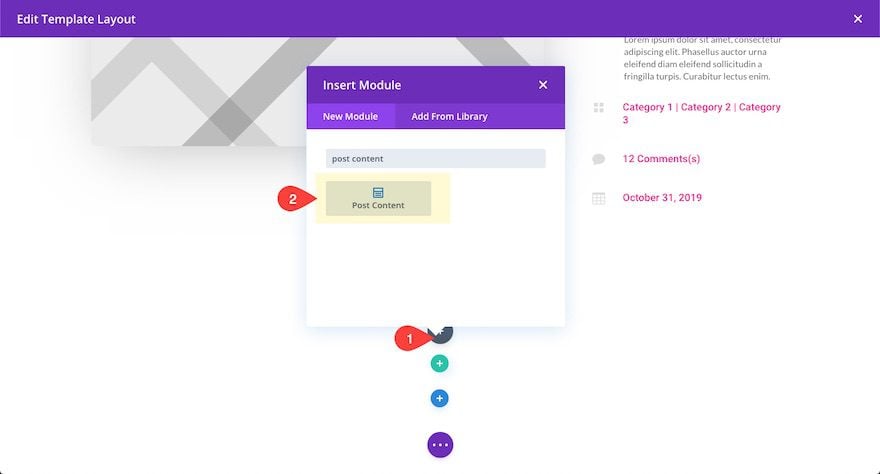
This post content module is where the main content of the post will be displayed. Furthermore, we can update the design settings in order to establish the default design of all post content entered using the default editor. We can update the settings for the Post Content Module just as we would any other module. And we can view the mock content provided by the module as we update the module.
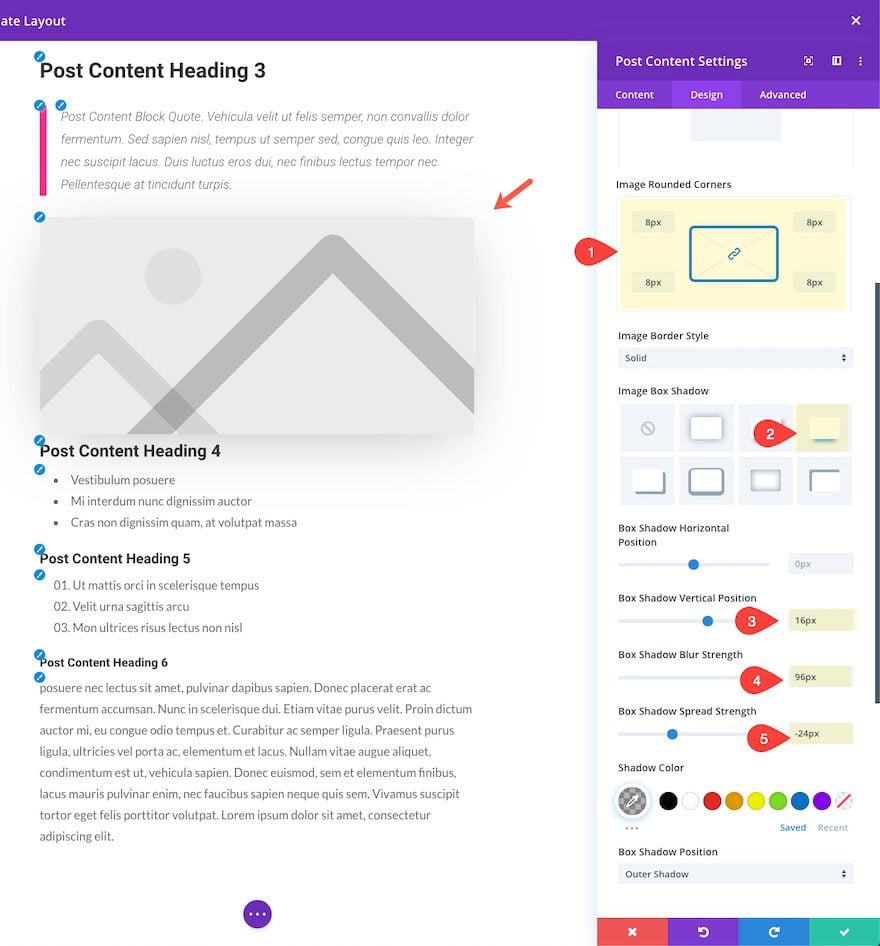
Open the post content module settings and update the following Image settings:
- Image rounded Corners: 8px
- Image Box Shadow: see screenshot
- Box Shadow Vertical Position: 16px
- Box Shadow Blur Strength: 96px
- Box Shadow Spread Strength: -24px
Next we need to set the design for all possible text content elements for when a user creates a blog post using the default editor. Open the text option group toggle to reveal the 5 different tabs of types of text designs – paragraph, link, unordered list, ordered list, and blockquote.
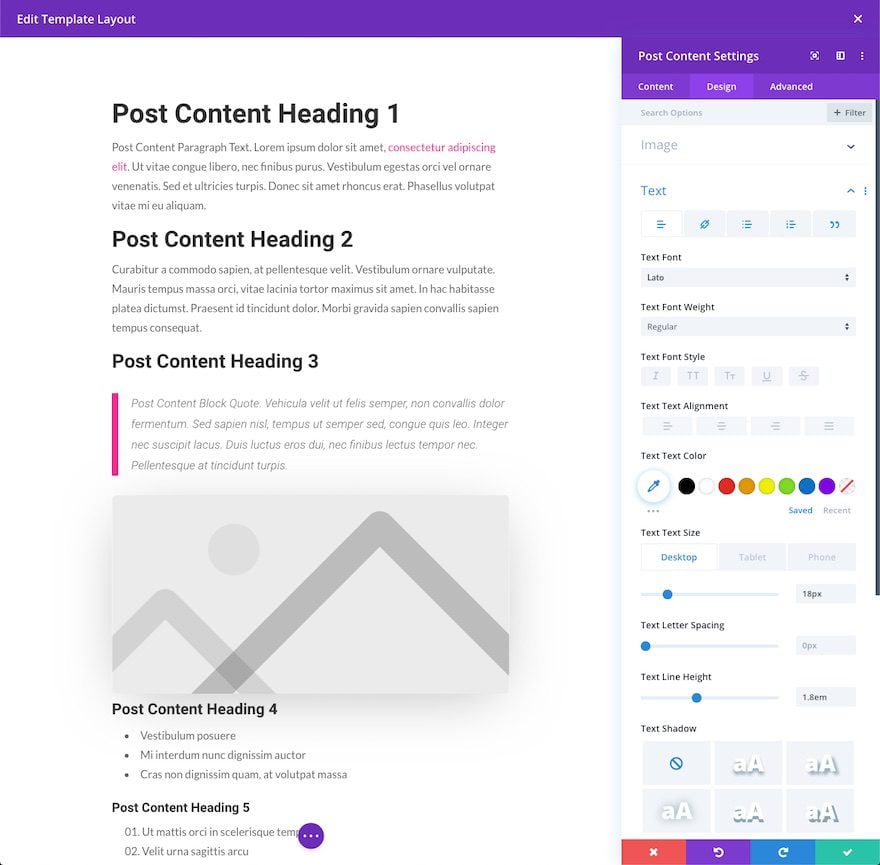
Then update the following options under each of the tabs.
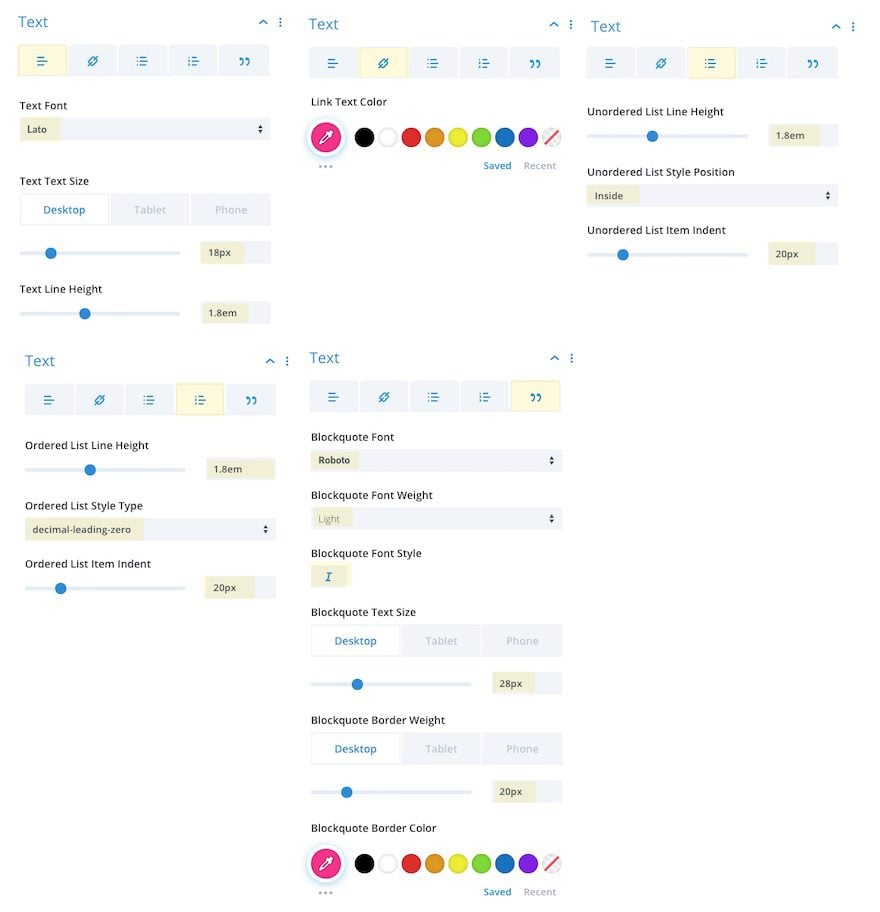
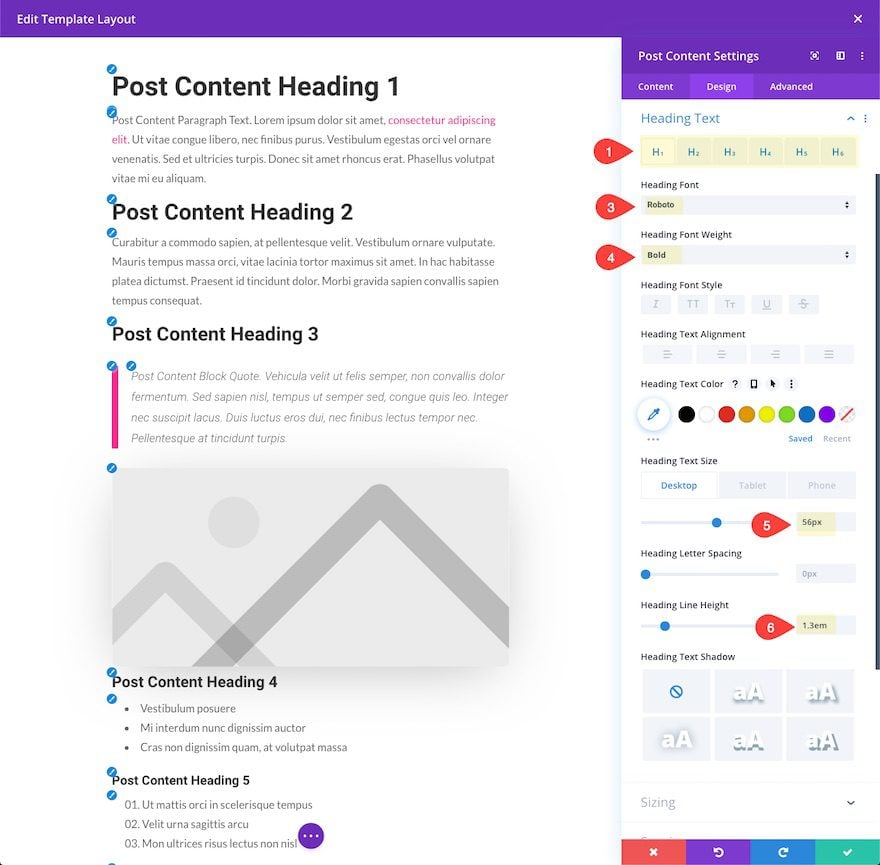
Continue to update the heading text settings for each of the heading levels – h1, h2, h3, h4, h5, h6.
- Heading Font: Roboto
- Heading Font Weight: Bold
- Heading Text Size (h1): 56px (desktop), 42px (tablet), 28px (phone)
- Heading Text Size (h2): 45px (desktop), 35px (tablet), 24px (phone)
- Heading Text Size (h3): 40px (desktop), 30px (tablet), 20px (phone)
- Heading Text Size (h4): 32px (desktop), 24px (tablet), 18px (phone)
- Heading Text Size (h5): 28px (desktop), 20px (tablet), 16px (phone)
- Heading Text Size (h6): 24px (desktop), 18px (tablet), 14px (phone)
Add Post Navigation Module
Under the Post Content Module, add a new one-column row with a Post Navigation Module.

Update the Previous and Next Link text as follows:
- Previous Link: Prev: %title
- Next Link: Next: %title

Then update the post navigation design as follows:
- Links Font: Roboto
- Links Font Weight: Bold
- Links Text Color: #f92c8b

Add Related Posts Section
After the post navigation, we are ready to add a “related posts” section to our blog post template. This will be helpful for giving the user suggested posts based on the current category of the post being viewed.
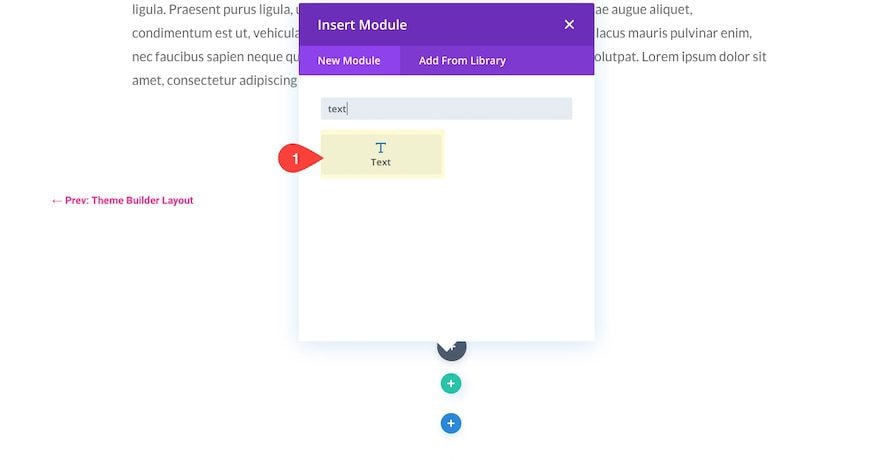
Add Related Post Title Using Text Module
Before adding the Blog Module to pull in the related posts, we need to create a static Title for the section. To do this, create a new section with a one-column row. Then add a text module to the row.
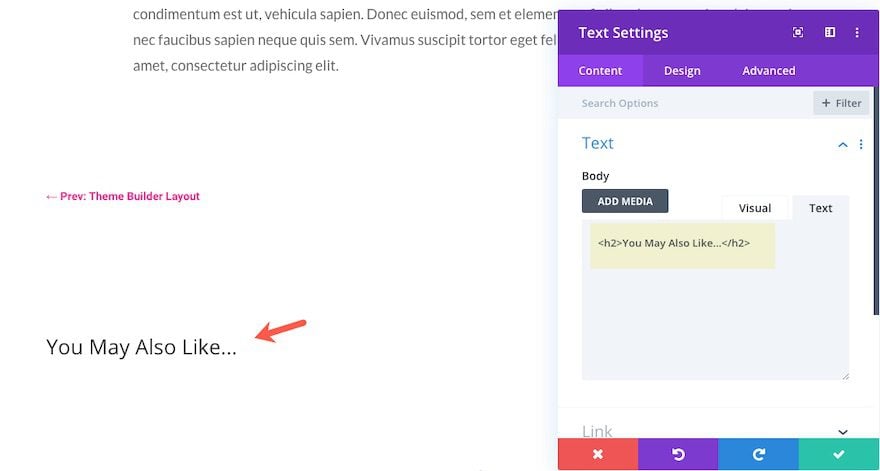
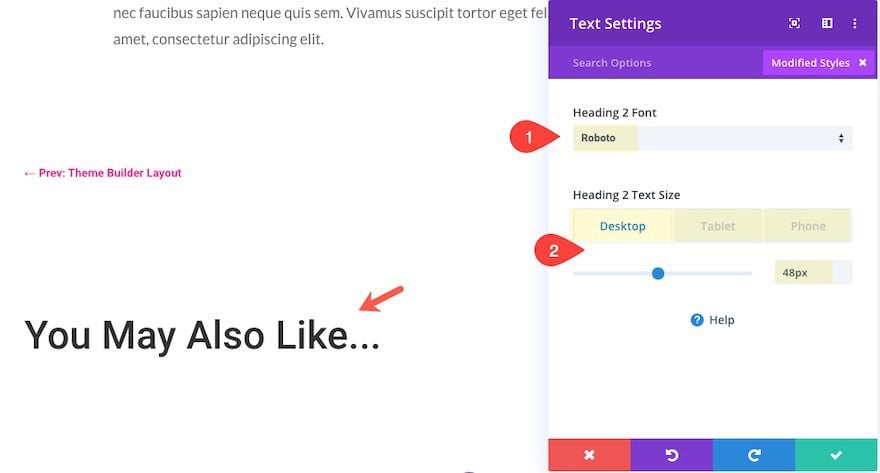
Update the text content with the following H2 heading:
<h2>You May Also Like...</h2>
Then update the heading text design as follows:
- Heading 2 Font: Roboto
- Heading 2 Text Size: 48px (desktop), 38px (tablet), 28px (phone)
Now that our title is in place, we are ready to add our related posts.
Add Related Posts Using Blog Module with Posts of Current Category
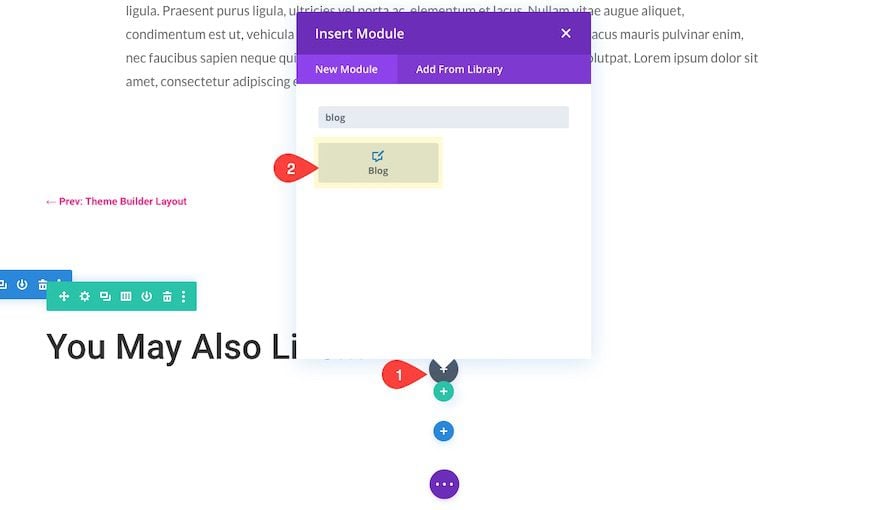
Under the text module containing the title, add a new Blog Module.
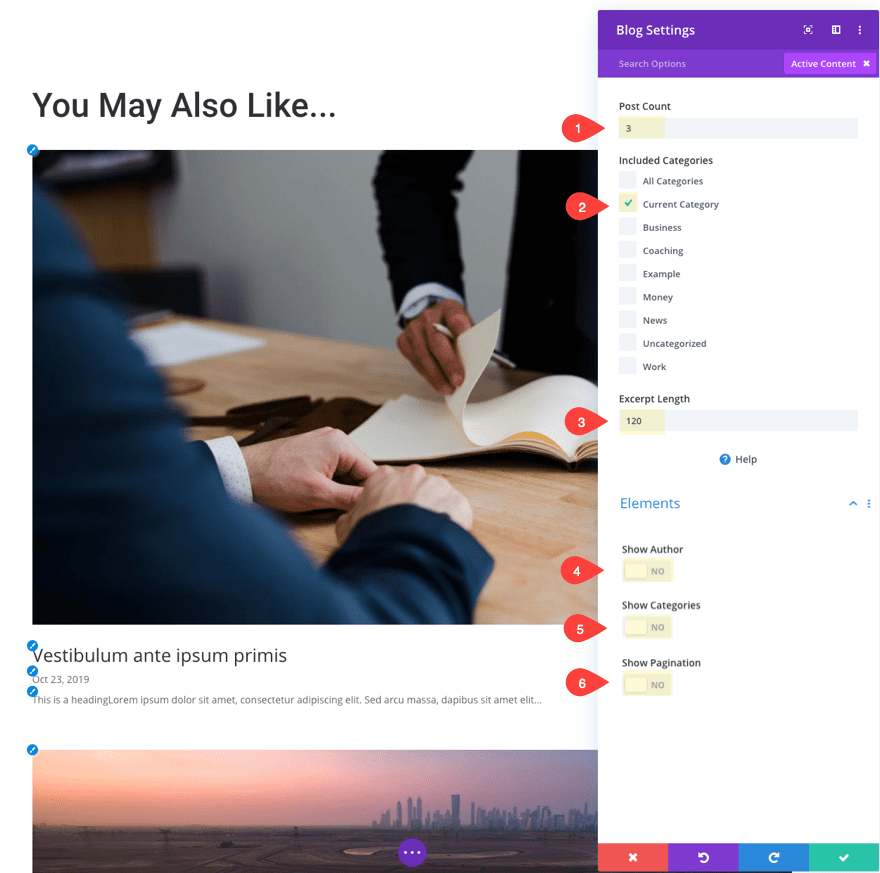
Then update the blog module content as follows:
- Post Count: 3
- Included Categories: Current Category
- Excerpt Length: 120
- Show Author: NO
- Show Categories: NO
- Show Pagination: NO
The most important aspect of these settings is “current category” selection. This will allow the post template to pull the most recent posts that share the same category of the current post.
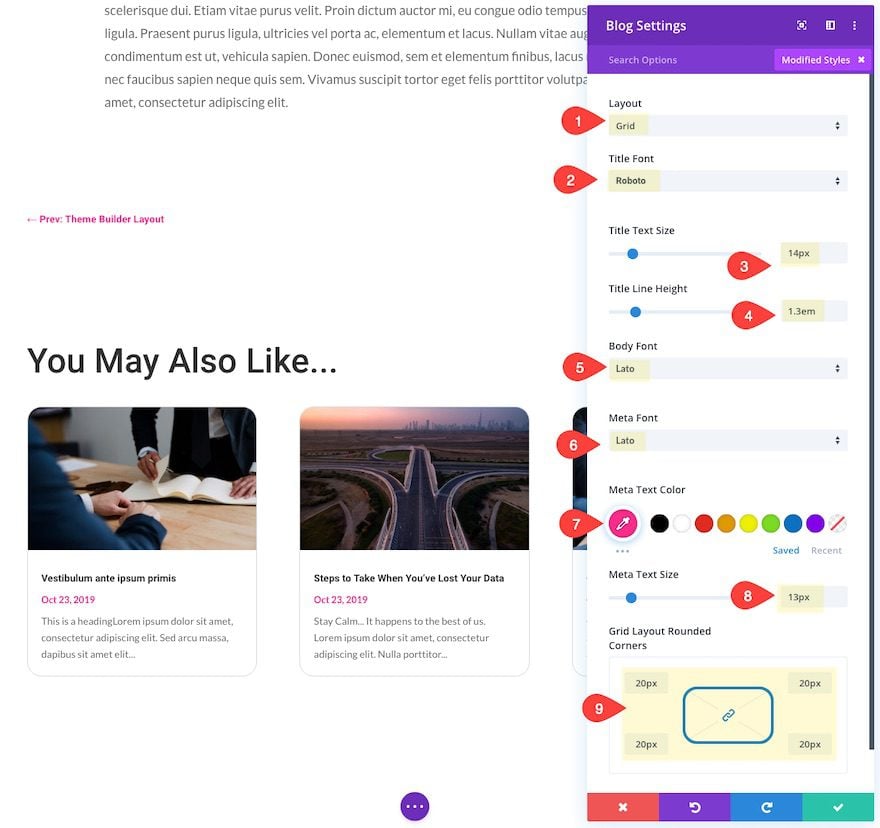
With the blog module content settings in place, jump over to the design settings and update the following:
- Layout: Grid
- Title Font: Roboto
- Title Text Size: 14px
- Title Line Height: 1.3em
- Body Font: Lato
- Meta Font: Lato
- Meta Text Color: #f92c8b
- Meta Text Size: 13px
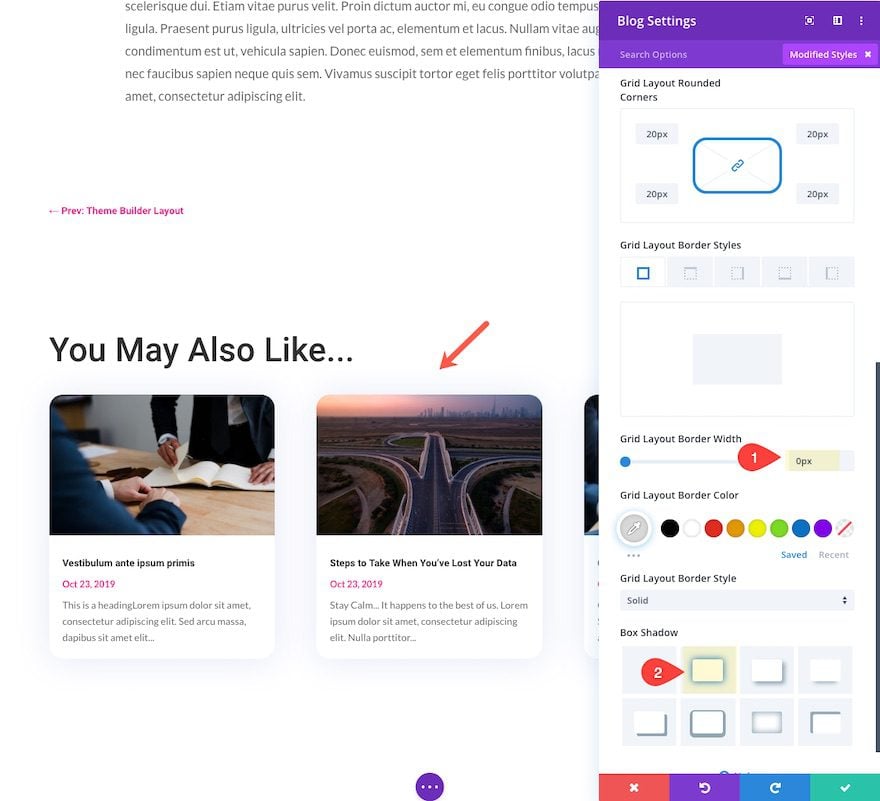
- Grid Layout Rounded Corners: 20px
Continue to update the design with a box shadow as follows:
- Grid Layout Border Width: 0px
- Box Shadow: See Screenshot
- Box Shadow Vertical Position: 16px
- Box Shadow Blur Strength: 96px
- Box Shadow Spread Strength: -24px
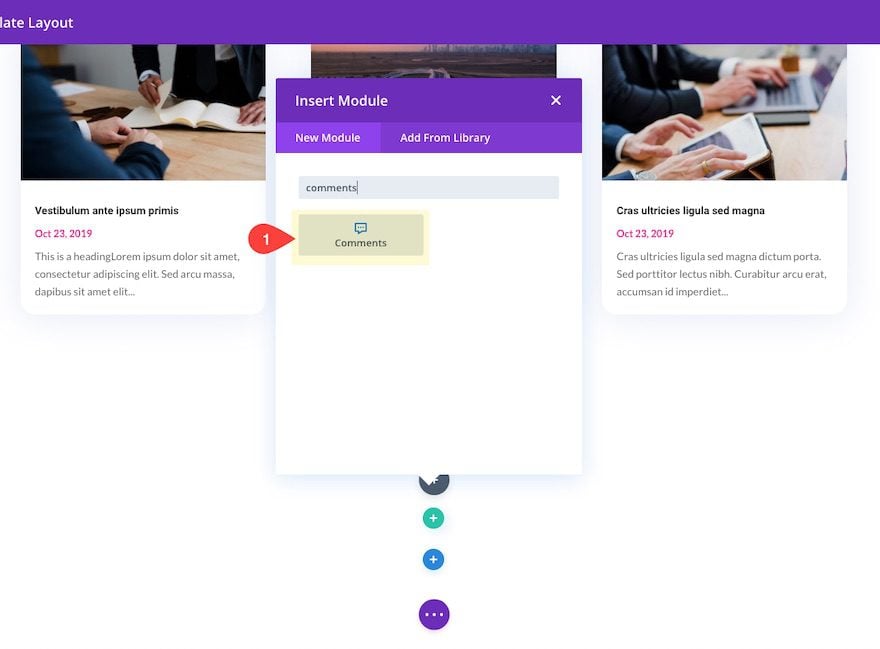
Add Comments Module
The final section of this blog post template will contain the comments. To add comments to the post, simply create a new one-column row and place the comments module inside.
Design Comments Module
All there is left to do now is to customize the design of the comments module to match our template. Update the following design settings:
- Background Color: #f2f5f9
- Fields Background Color: #ffffff
- Fields Focus Background Color: #ffffff
- Fields Focus Text Color: #222222
- Fields Margin: 3px bottom
- Fields Padding: 18px top, 18px bottom
- Fields Font: Lato
- Fields Text Size: 16px
- Fields Line Height: 1.4em

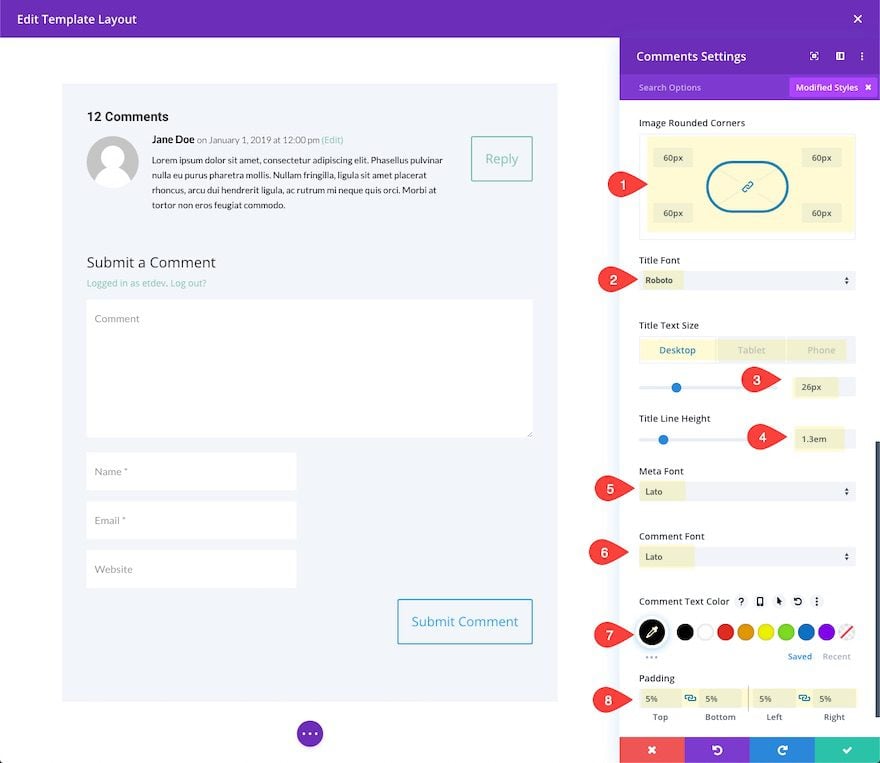
Continue to update the settings as follows:
- Image Rounded Corners: 60px
- Title Font: Roboto
- Title Text Size: 26px (desktop), 20px (tablet), 15px (phone)
- Title Line Height: 1.3em
- Meta Font: Lato
- Comment Font: Lato
- Comment Text Color: #222222
- Padding: 5% top, 5% bottom, 5% left, 5% right
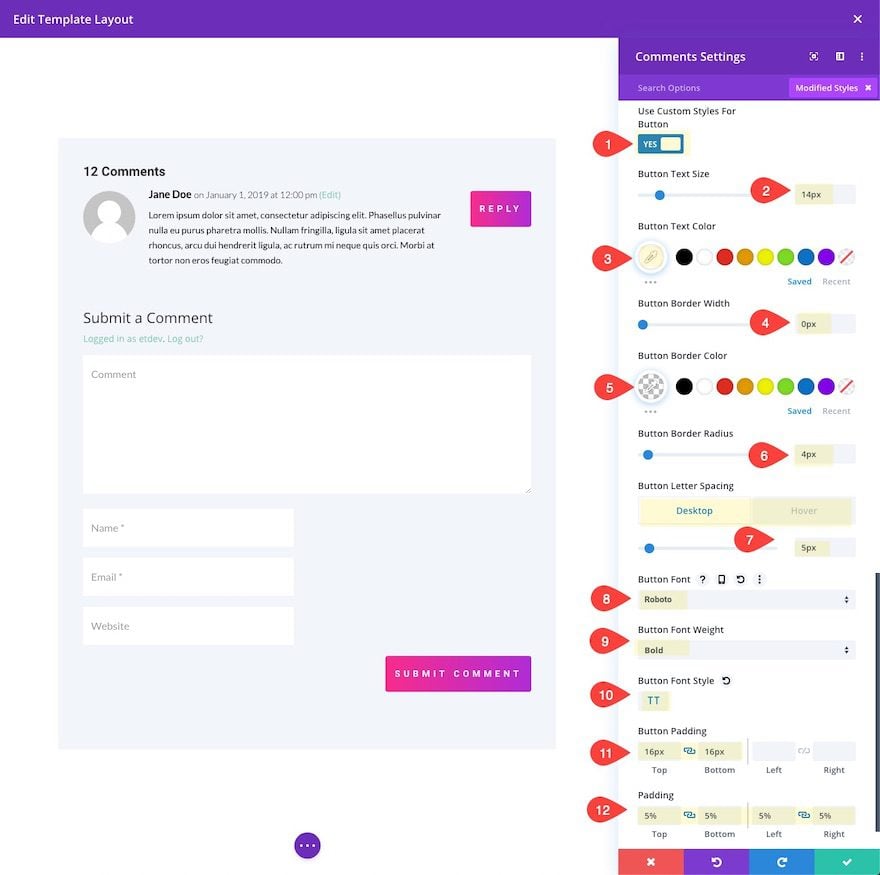
Finally, customize the button style for the comments as follows:
- Button Text Size: 14px
- Button Border Width: 0px
- Button Border Radius: 4px
- Button Letter Spacing: 5px (desktop), 5.5px (hover)
- Button Font: Roboto
- Button Font Weight: Bold
- Button Font Style: Uppercase (TT)
- Button Padding: 16px top, 16px bottom
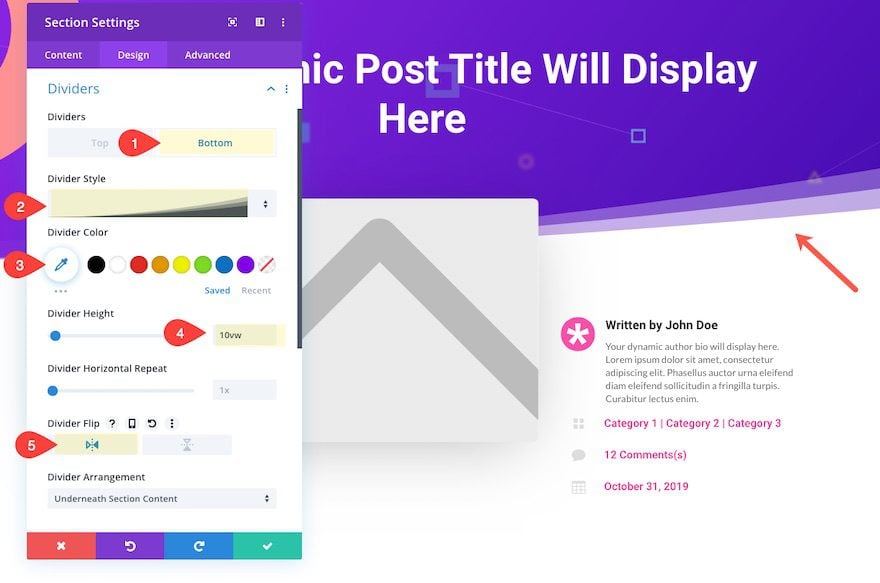
Add Section Divider to Header
Don’t forget about all of the amazing design options at your disposal when designing the post template. For example, we can give the header section a divider design. To do this, go back to the top of the page and open the settings for the top section containing the header. Then update the following:
- Bottom Divider Style: see screenshot
- Divider Color: #ffffff
- Divider Height: 10vw
- Divider Flip: horizontal
Don’t forget to save your settings for the layout and also for the Theme Builder so that your changes will be saved.

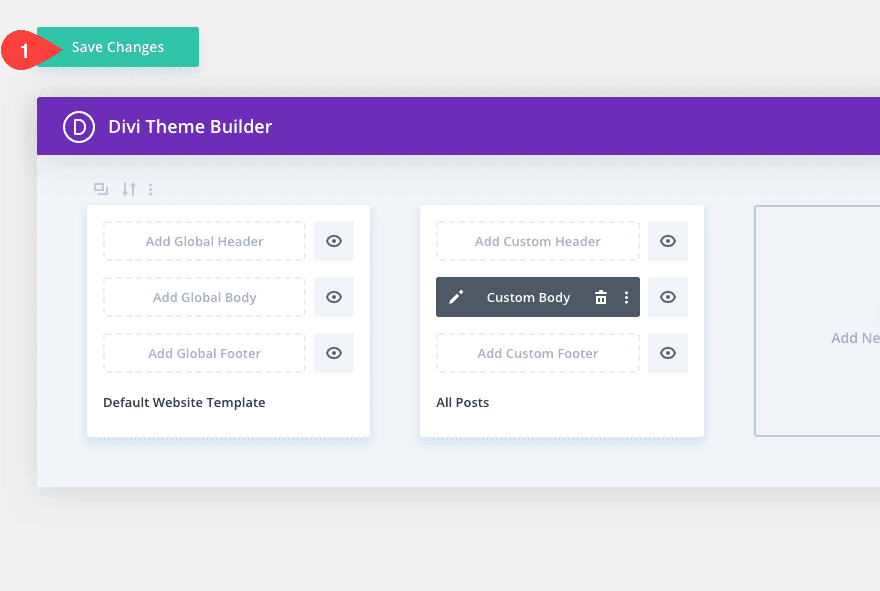
That’s it! Let’s check out the final result.
Final Result
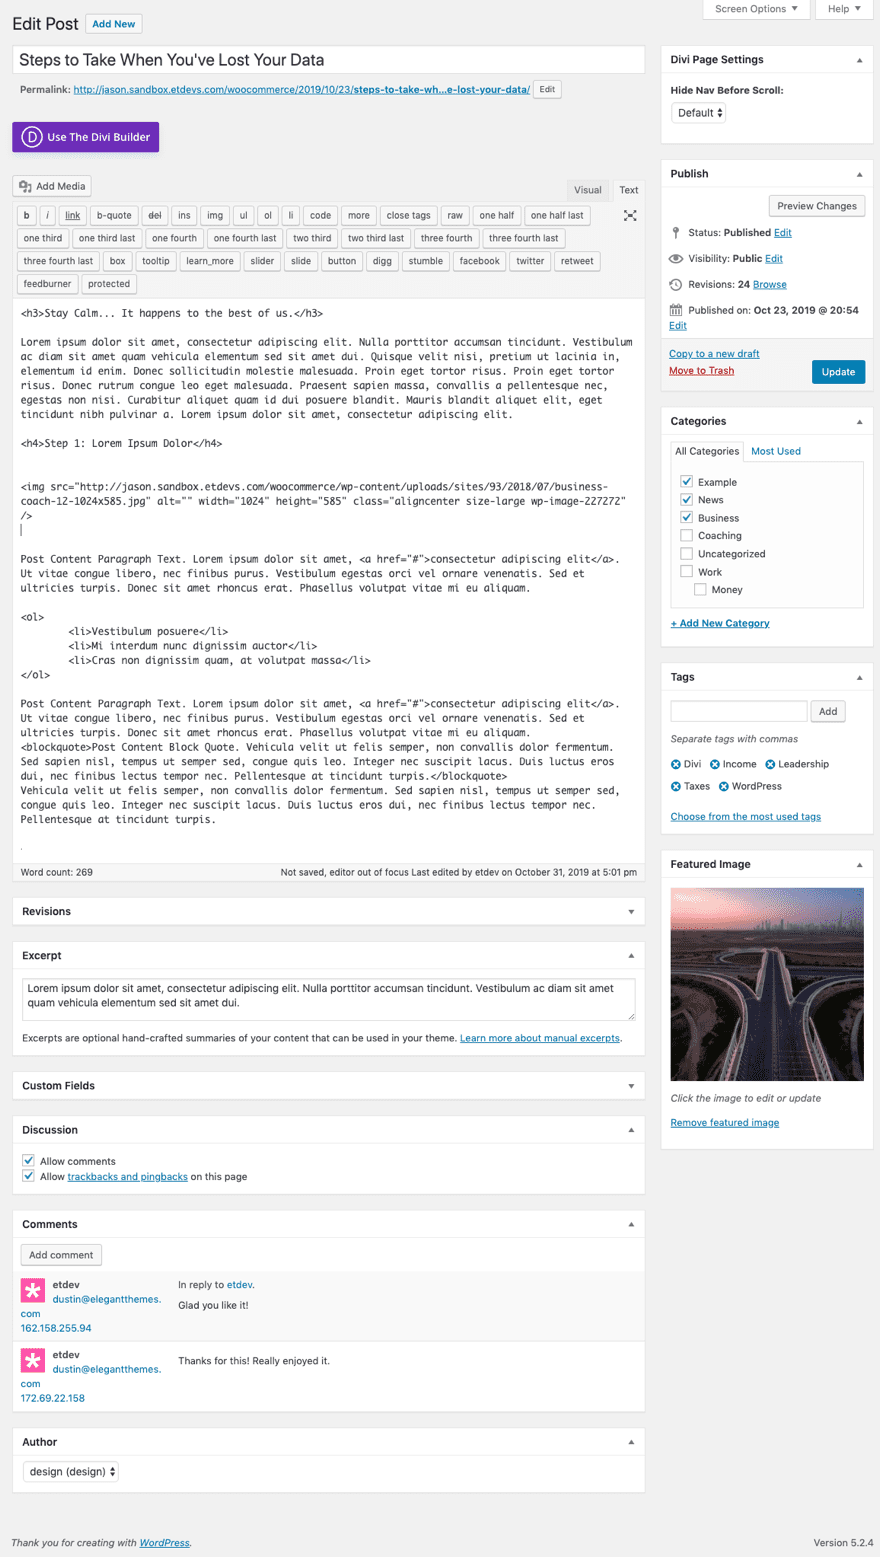
To view the final result, we can open any blog post within our Divi site (since the template has been assigned to all blog posts).
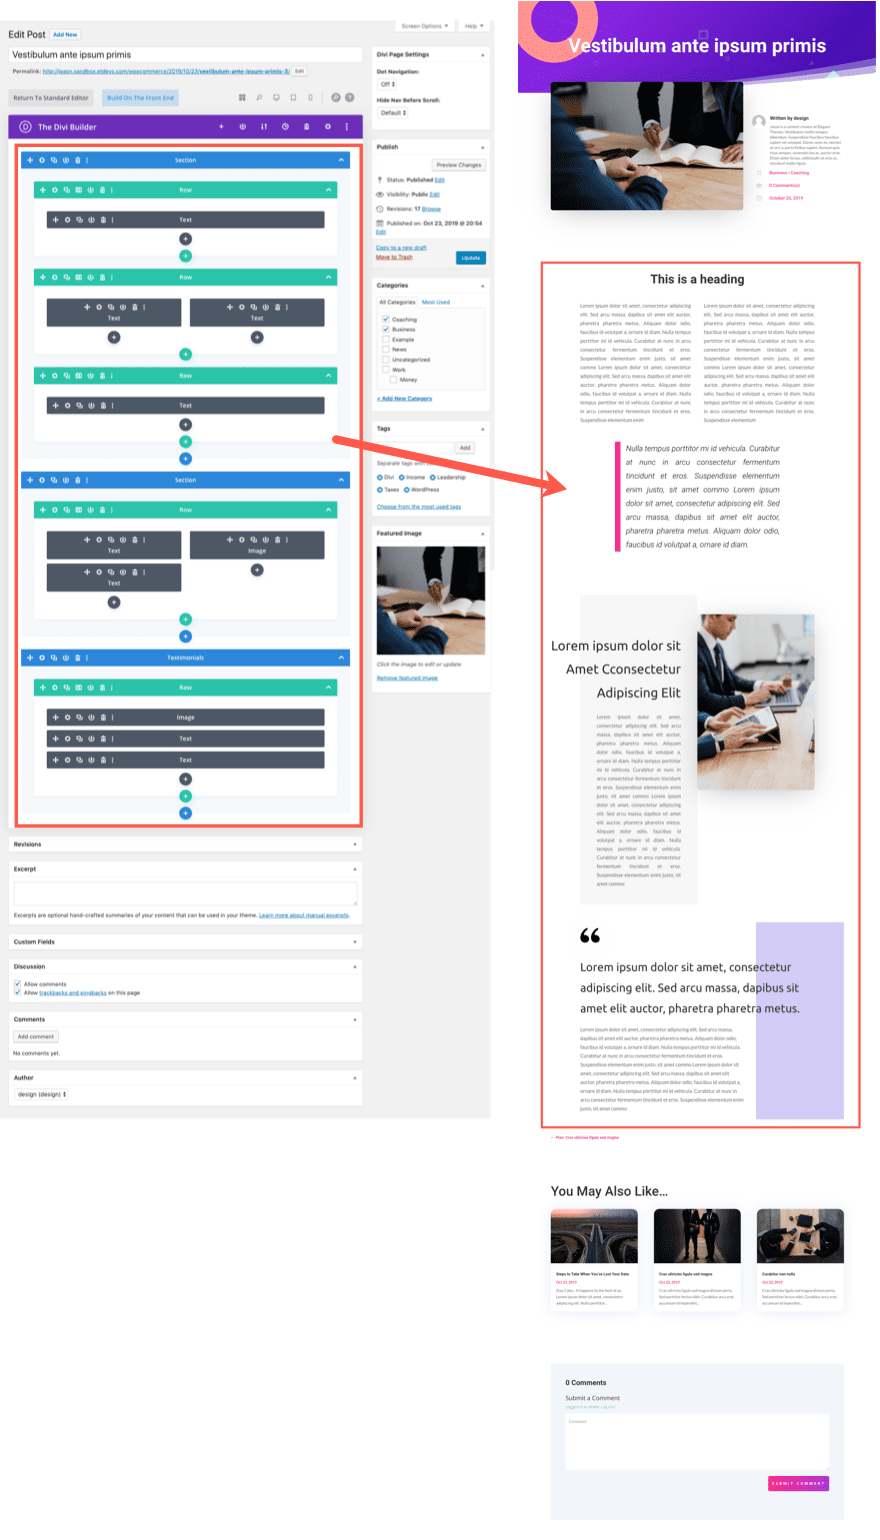
Here is an example post when viewing it from the post editor on the backend.
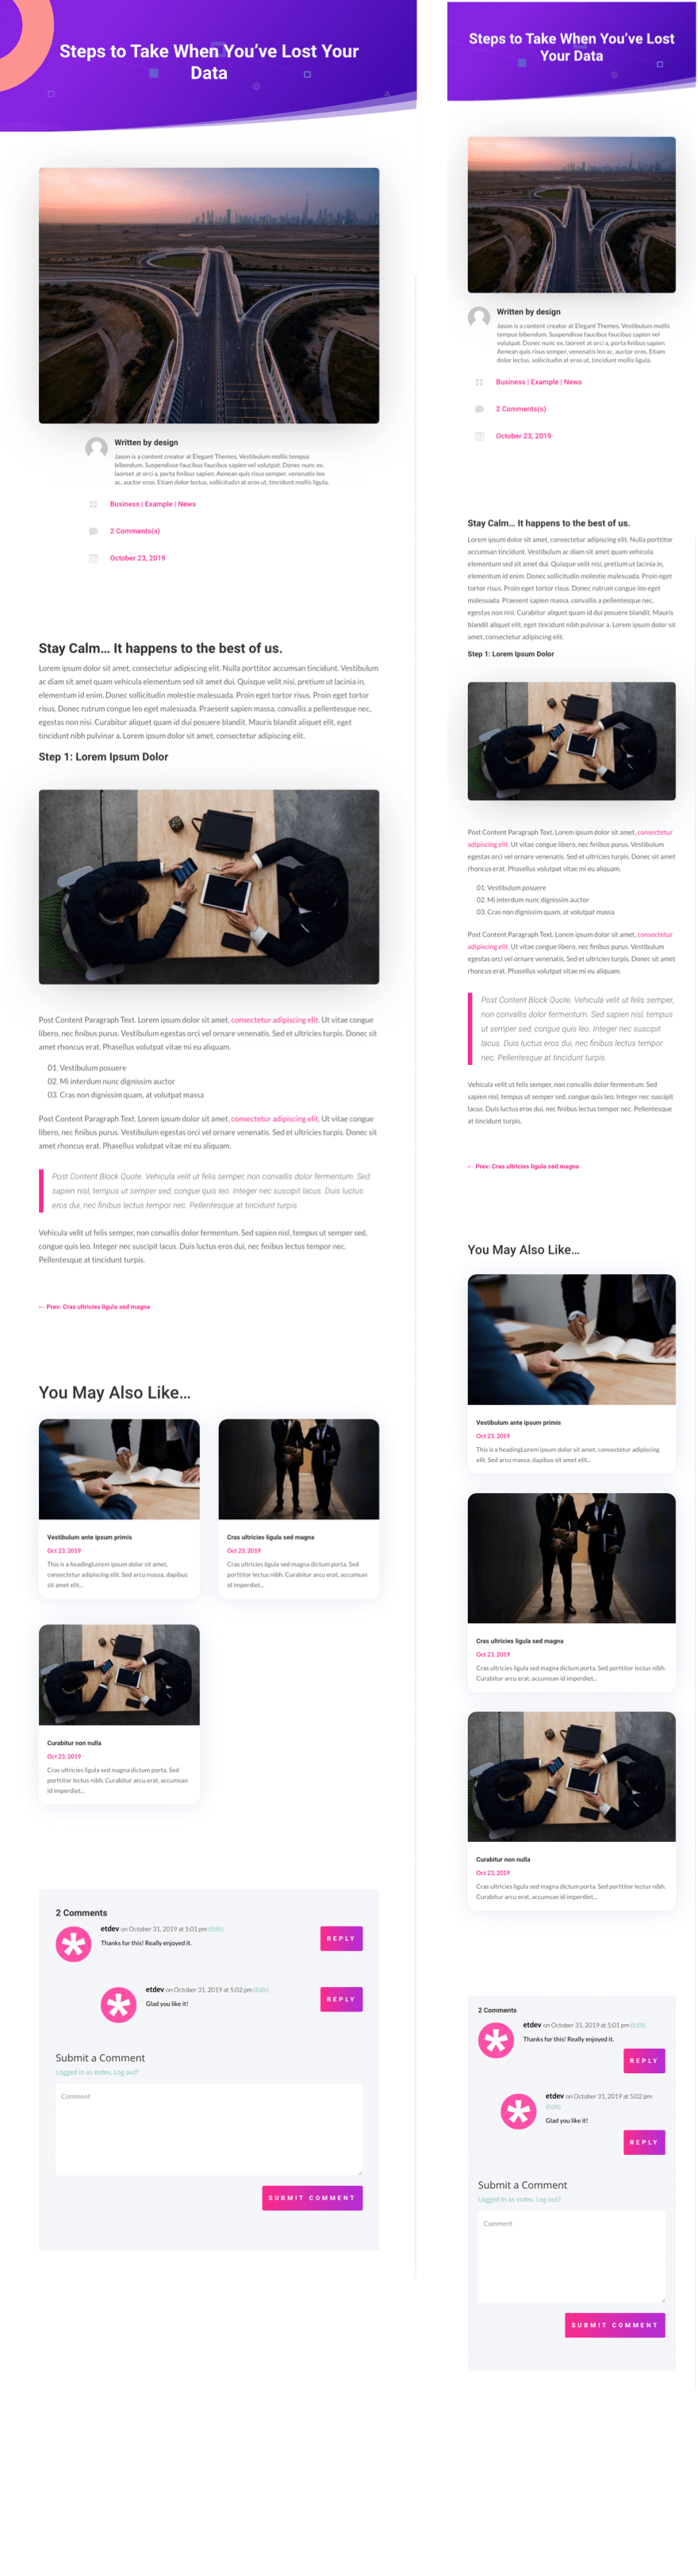
And here is the post on the front end with our blog post template in place.
And here it is on Tablet and Phone display:
Using the Divi Builder to Create a Blog Post with a Blog Post Template in Place
If you choose, you can easily deploy the Divi Builder to design a blog post using a blog post template like this one. Any content created and designed with the Divi Builder will be displayed inside Post Content Module area of the template.
Final Thoughts
I hope this tutorial serves as a nice starting point for creating your own blog post template from scratch using the Divi Builder. Don’t forget to take the time to consider all of the tools available as well as how you want to structure the post template layout. It is always important to use as much dynamic content elements throughout the blog post template in order to better streamline the creation process involved with blogging. With a beautiful template in place, a blogger can really concentrate on content creation while the template does all the heavy lifting of the design automatically.
Have you built a blog post template using the Divi Theme Builder? Let us know what you think.
I look forward to hearing from you in the comments.
Cheers!


Hi there! I already have hundreds of existing blog posts. If I create a new template and save it, will it alter all my previous posts? And if so, what elements will be changed? If I create a template with dynamic content that doesn’t exits for those older posts, what will it do?
Yes.👍
if you assign that Theme Builder template to all blog posts and save the Theme Builder changes, it will apply to your existing posts too, not just new ones. Hope this clarifies! 😊
I got tripped up because the Blog template downloads as a .zip file. It wouldn’t import for me and I couldn’t figure out why at first. You have to unzip it first. Might be worth mentioning that.
Hello. When I import the template, does it not appear in my theme builder? Also, the above instructions must be for an older version when I try to follow the instructions or the video not every step has the described settings, some are there but not all.
The layout can be imported by going to Divi > Theme Builder and using the Portability Option here:
https://prnt.sc/oJANN3_ueC2h
https://prnt.sc/xqLcrntNagJW
The instructions there also works in the latest version of Divi. If you need further help with the article, feel free to reach out the Support Team by starting a conversation on our website
Hi, the template download is not working. Thanks
It’s working when I tried it. Check this screen recording, https://bit.ly/49Lpybx. I suggest trying on a different browser.
Hi! Great post and thanks for this pre-made layout! Is there a way to set max and min dimensions of the image inside the Blog Post module? In the Blog post content I have a text+media paragraph but in that case the picture is too big and I would like to reduce the dimensions
Thanks
Hi. I’ve uploaded the template and created one using your instructions. When I create a blog post, only parts of the layout are available and the written by defaults to the left topside of the page. What am I missing?
Is there a way to create the related blog section to use tags rather than just the most current posts?
great post, curious to try this and to see how the H1 tags work (not on the blog post page) but on archive pages… I suspect those will be changed to suit on an archive page or the /blog page with whatever styling goes there.
I’ve built those the old divi way with the blog module and creating templates to be looped and such, this looks like it gives us more control and hopefully less unintended consequences!
Jason,
This is very helpful. Thank you!
Quick question. Under author bio on this template, how do you add a social media follow where the user’s social media information in their profile on the back-end of WordPress under user profile will show up?
Dave
The part about adding other blog posts doesn’t match the experience I’m seeing. When i add a blog part and set it to grid and 3 posts they are using 100% of the size so touch each other unlike the screenshots and video. is there custom CSS applied that isn’t mentioned?
The design will only show the nice spacing we see in the demo if the module is in a separate row below the main blog post module row.
Related posts: I’ve been using a plugin to pull in related posts. This builder setup seemed to fix it without using (yet another) plugin. However, it only pulls the three most recent posts. I would like to promote random posts, and even posts from different categories. The present configuration is too static, and admittedly quite boring to the reader.
Comments section: I close the comment field on posts older than xx days. If there are no comments on a post, the builder just leaves a mark of it. I would like to completely remove the section if there are no comments to show.
Please add blog post image slider…
I’ve uploaded the file to the theme builder. I cannot figure out how to access it when setting up the blog page?
How do I get it into the Divi builder so I am able to use it on a page? What am I missing?
The site is not live yet.
Terry
why are my share buttons, via jetpack, no longer showing?
Hey Jason, can we find this template on the premade layout library?
It isn’t. Sorry. You will need to add it to your library manually. But it does fit well with the Digital Marketing Layout Pack!
There doesn’t appear to be the option to use speciality sections in the theme designer. So how do you put sidebars on things?
Dan,
You should be able to add specialty sections to any layout within the Theme Builder Template Editor. Not sure why it isn’t working for you.
Thanks so much – very useful and I can see how you can make separate category pages for each post by extending this.
We are preparing to change our website. Using the “Divi theme builder”.
This article really helped us.
But we are still trying to find the best way to build a “WordPress theme” that suits our needs.
Especially for customizing the appearance of local news websites
Madura,
Glad it was helpful. Have you checked out our large collection of layouts available. You can easily convert those layouts to templates if you wanted to. https://www.elegantthemes.com/layouts/
Nice, but there is a bug in the Blog module in that excerpt length ONLY works on the content not if you have entered an excerpt.
Peter,
Thanks for the heads up. I’ll check that out.
Thank you for bringing back the video format to your blog/tutorial. I have missed that 😉 It is very helpful.
I also want to thank you guys for all the hard work you put in to creating great resources for us Divi users. AND also many thanks for the constant development of Divi. I LOVE the theme builder!
All love <3
/Rikke
Thanks for the LOVE, Rikke!
Actually we add videos to all of our blog posts. Only most of the time, the videos are added a few days after the written article is published. For future, make sure you subscribe to our YouTube Channel to recieve notifications when we publish these videos. https://www.youtube.com/elegantthemes
Cheers!
Thanks for informing me of the late video updates of the blog posts – I wasn’t aware of that. But I have noticed the videos on YouTube – great channel 🙂 I hang around ET like a crazy groupie 😉
Best, Rikke
Nice tutorial, thanks.
If you add an image to a template like this, you can’t add the image alt/title attribute anymore.
Can you please automatically retrieve these attributes for the selected image out of the media library by default, unless the values are manually specified? Or alternatively, add a dynamic content option to get the attributes of the selected image?
Thanks
JP
John-Pierre,
Thanks for the suggestion. I can see how that would be helpful.
Thank you this is great for blogs hopefully more industries will be available soon
Hi! Great timing, I was just working on this 🙂 My question is how to adjust (or lower) the white space (margin bottom) between the separate blog posts on tablet and mobile?
Kind regards,
Chris
Aside from adjusting the gutter width, I don’t think there is a built in setting to do what you are asking. I think you will need to add external CSS.