Creating a content marketing funnel is a challenge. You have to figure out who your audience is, create great content for your audience, and then get it out there for them to see it. That’s not an easy task in the busy online world and that’s only the beginning. But if you do it right, in time you will find that it was definitely a challenge worth taking.
Setting up a content marketing funnel for your website using Divi does make the process a lot easier. Divi has tons of pre-made layouts and templates that you can use to design blog post templates and landing pages with ease. Plus, Divi has built-in features that make the process of setting up a funnel much easier.
In this tutorial, we are going to show you how you can use Divi and other tools to get a content marketing funnel up and running with minimal cost. This should be extremely helpful for those starting their content funnel for the first time without having to pay crazy amounts of money for software.
- 1 What is a Content Marketing Funnel?
-
2
Building a Content Marketing Funnel with Divi
- 2.1 The Tools you Need
- 2.2 Step 1: Create Content Your Audience will Love
- 2.3 Step 2: Email Automation
- 2.4 Step 3: Design Blog Post Template with Email Opt-In
- 2.5 Step 4: Design Squeeze Page with Divi’s Premade Layouts
- 2.6 Step 5: Create Other Content/Pages that Educate Leads to Buy Your Product
- 2.7 Step 6: Create Forms with Email Opt-In Integration
- 2.8 Step 7: Create Custom WooCommerce Pages with Divi
- 2.9 Step 8: Use Cart Flows with Divi to Customize the WooCommerce/Sales Part of the Funnel
- 2.10 Step 9: Extend the Funnel
- 2.11 Make Your Funnel Even Better
- 3 Recap: Putting it All Together
- 4 Final Thoughts
What is a Content Marketing Funnel?
A content marketing funnel uses content to sell a product using a strategic process. It can look a lot different depending on the needs of the company, but generally speaking, a content marketing funnel is a marketing strategy that uses content targeted to a specific audience to drive leads to your website in order for them to buy your product or service. The funnel is really the customer’s journey or the journey you set up for the customer to experience. This usually involves creating valuable content through various means (blog posts, videos, podcasts, etc.) and using free offers (like eBooks) to capture new leads with some sort of form like an email opt-in. Then once they are on your email list, you can nurture those leads using automated emails with more valuable content and links that eventually bring them to the checkout page.
Why Content Marketing?
You don’t have to be a marketing expert to know that writing great content is a whole lot harder than buying an ad. The good news is that if you are willing to do the work, writing your own content is a whole lot cheaper and, in many ways, more effective. Here are a few good reasons to use a content marketing funnel:
- It is cheaper than paying for ads.
- You get more organic search traffic via SEO (although it may take a while to accrue).
- You get more qualified leads which can be converted into more sales and higher-value customers.
The Stages of the Content Marketing Funnel
If you research content marketing funnels or sales funnels, you will get different versions of the same basic 3 stages of the funnel.
Top of the Funnel
The top of the funnel is where you capture your audience’s attention with great content (blog posts, videos, social media sharing).
Middle of the Funnel
The middle of the funnel is where you capture leads with a valuable FREE offer (email opt-in, contact form, free ebook, free estimate); The lead is then nurtured (usually with email automation) to go to the bottom of the funnel which is all about the money (buying the product).
Bottom of the Funnel
The bottom of the funnel is where you capture New Clients using content that urges them to buy or take action. The kind of content used at this stage usually includes sales pages that have great CTAs, Case Studies, Testimonials, Free Trials, Demos, etc… that lead visitors to click buy.
Extending the Funnel
Although this is more specific to a sales funnel, it is important to note that an effective content marketing funnel shouldn’t end. There should always be more for the customer to learn and buy after the first purchase. You can extend the funnel for existing clients by creating custom thank you pages with up-sells and new email sequences to put them in so that the journey starts over.
Building a Content Marketing Funnel with Divi
The Tools you Need
- Divi – A Powerful Visual Page Builder for creating any kind of content (blogs, videos, case studies, squeeze pages, etc…)
- Divi Layouts and Templates – Divi gives access to over a thousand FREE pre-made page layouts that you can use to jumpstart the design of your pages or posts. (Free with ET Membership)
- MailerLite – Email Marketing Platform which provides the email automation we need and integrate with Divi’s Email Opt-in Module, Bloom, and WooCommerce. (Free plan includes 1000 subscribers and 12k emails per month).
- WooCommmerce – use this with Divi to create custom product pages that include upsells and cross-sells. (Free)
- WooCommerce MailerLite Plugin – this is optional, but it would come in handy for making it easy to add/update subscribers after a purchase.
- CartFlows – You can also extend the sales funnel by using CartFlows for abandoned cart recovery and to create a custom WooCommerce Thank You page. (Free with limitations)
- Typeform – This will give you another avenue to capture more qualified leads while at the same time adding new subscribers to your list. (Free to create 3 forms total and get 100 responses per month)
- Zapier – This is helpful for integrating forms with your email lists in ways not offered between the two directly. For example, a customer who fills out a form can be put on a specific email list. This is where tagging contacts comes in handy. (Free for what we need)
- Bloom – (and Email Optin Module) Email Optin Lead Generation plugin (Free with ET Membership)
- Monarch – our social media sharing plugin that will help get your content and brand to your audience. (Free with ET Membership)
More Resources to Consider…
- Custom Thank You Pages for WooCommerce
- Other Email Marketing Platforms like Mailchimp or Active Campaign. For more, check out how to choose the best email marketing service for you.
- Other Online Form options like Gravity Forms will integrate well with your email marketing provider. It is important that the form integrates well with your email marketing platform and wooCommerce.
Many of the plugins, and more, are referenced and explained in our best marketing plugins for WordPress article.
Step 1: Create Content Your Audience will Love
The first step in the funnel is to create the content for your audience. Depending on your audience, the content will usually consist of the following:
- Blog Posts
- Videos
- Podcasts
- Curated Content (Sharing on Social Media)
Since we will be concentrating on creating the content funnel, there isn’t much I can do right now to help you with creating the content you need for your audience. But I can point you in the right direction with some of our own content:
- What your Email Marketing Messages Actually Look Like
- What your Abandoned Cart Emails Should Say
- A Beginner’s Guide to Content Curation with WordPress
And, if that doesn’t help, you can always hire a content creator.
Step 2: Email Automation
At this step, we need to sign up for an email marketing platform that offers Email Automation Sequences. We will use this to nurture leads to bring them farther down the funnel.
Sign Up for Service
For this tutorial, we are going to use MailerLite because it offers automation capabilities with the free version which is unique and awesome.
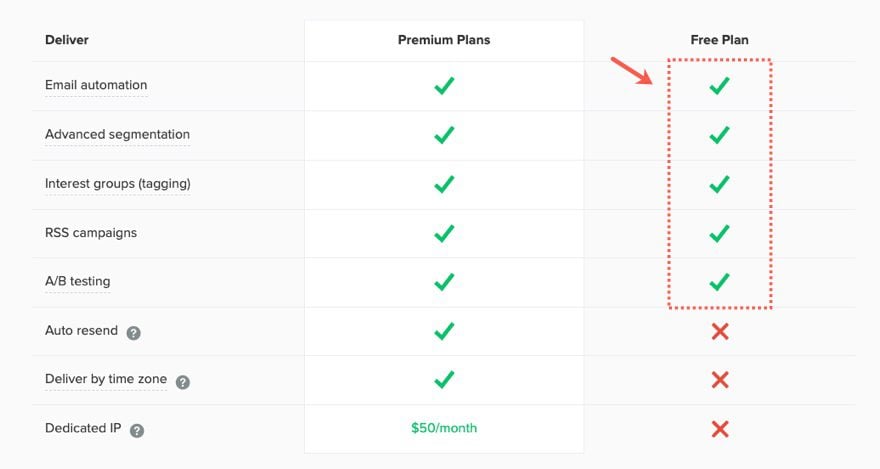
And it also integrates with WooCommerce (with a plugin) and Divi’s Email Opt-In Module and Bloom Plugin.
Create a Group for Subscribers
To help organize your subscribers, it helps to create a group to put them in based on what form they entered. For example, if you have an email Opt-In form that offers them 5 secrets for weight loss, you could put them in a group called secrets.
To add a new group, go to the MailerLite dashboard and…
- Select Subscribers
- Under Subscribers, select Groups.
- Click the Create Group button to create a new group.

Create an Automated Sequence for your List
Next, we need to create an automated email sequence that will be delivered to new subscribers within our group.
First you need to create a new workflow (which is an email sequence). To do this…
- Click Automation in the top menu
- Select Create Workflow Button
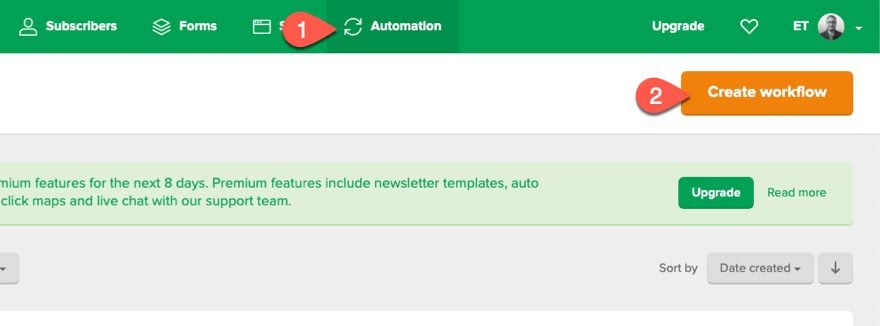
Next, you need to add a workflow trigger, emails, and time delays to the workflow.
The Trigger
We want the email sequence automation to trigger when a person joins the group Secrets. So fill in the fields as follows:
- Workflow Name: New Subscribers to Secrets
- Workflow trigger: When a subscriber joins a group
- Subscriber Group: Secrets
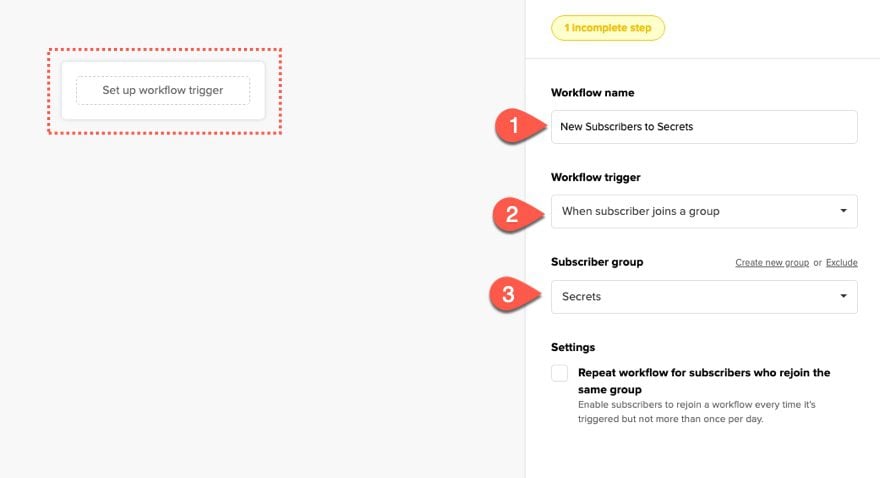
The Email
Next, add an email to the workflow.
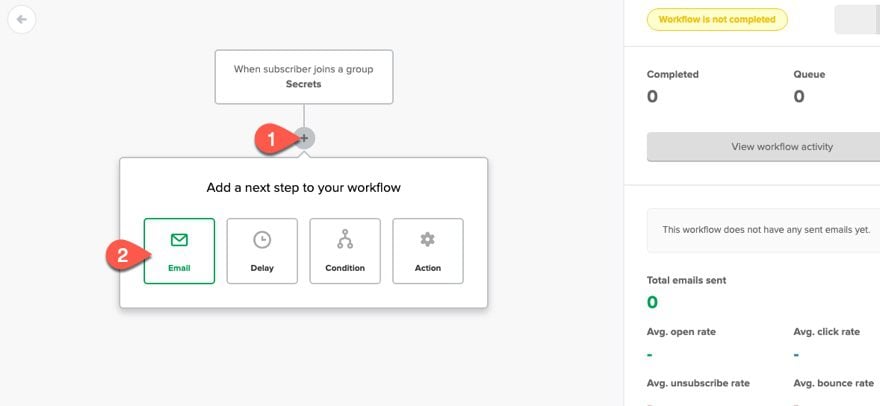
Then enter the information for the email and design it using their visual email designer tool.
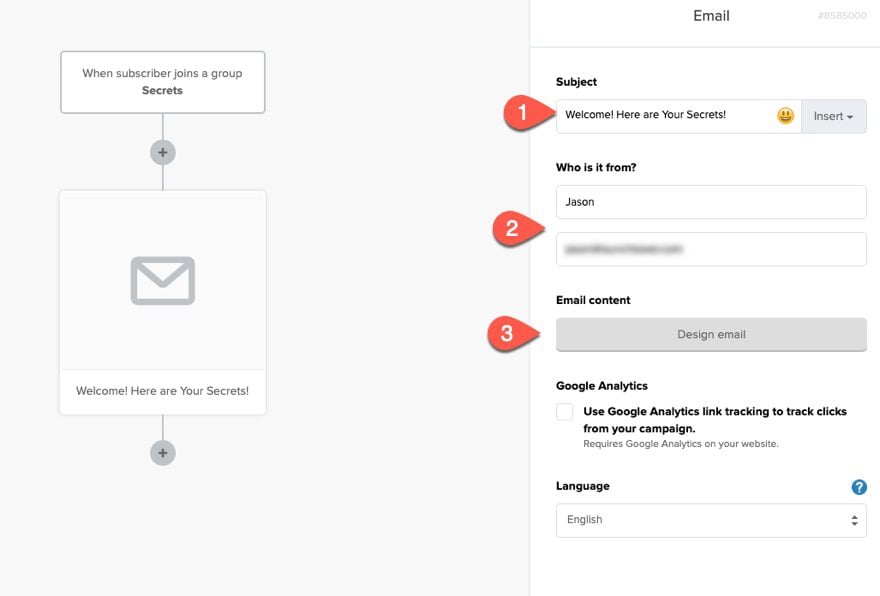
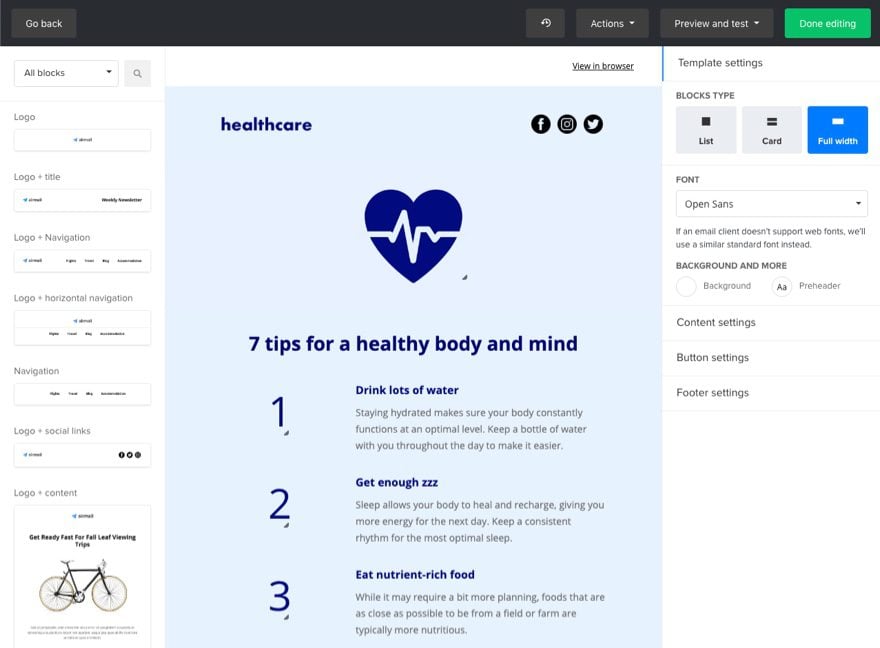
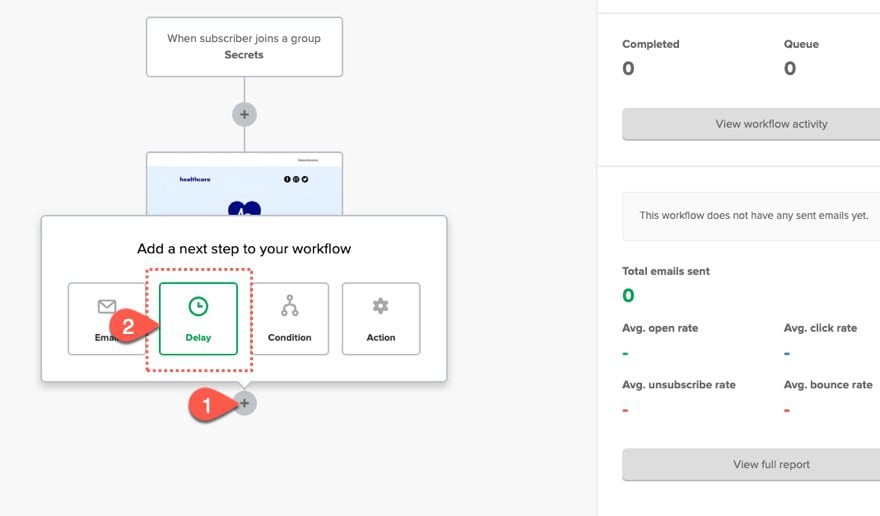
Next, add a time delay to the automation workflow.
Set the delay for any number of days.
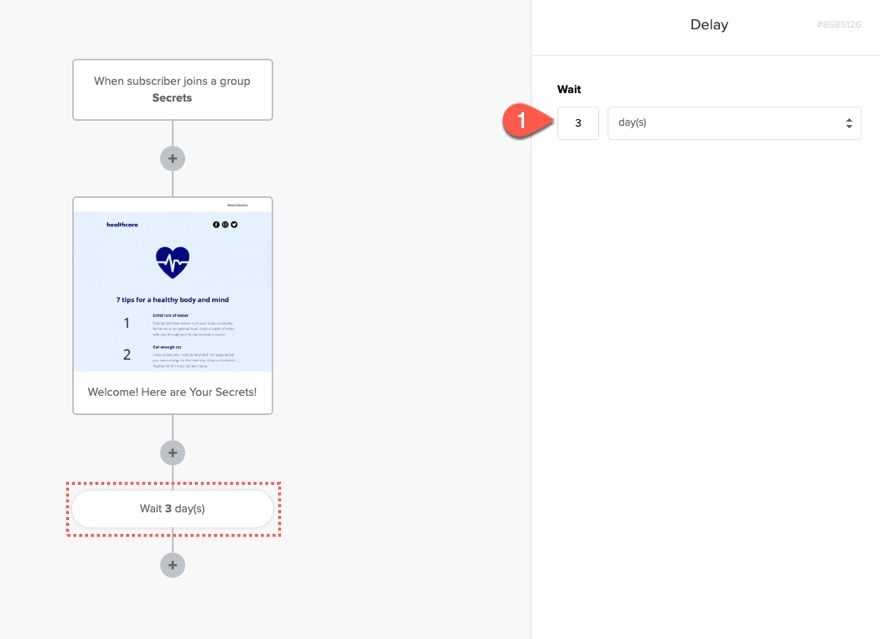
Then repeat this process until you have all emails and delays needed in the sequence.
When you are ready, turn the workflow on so that it will be active.
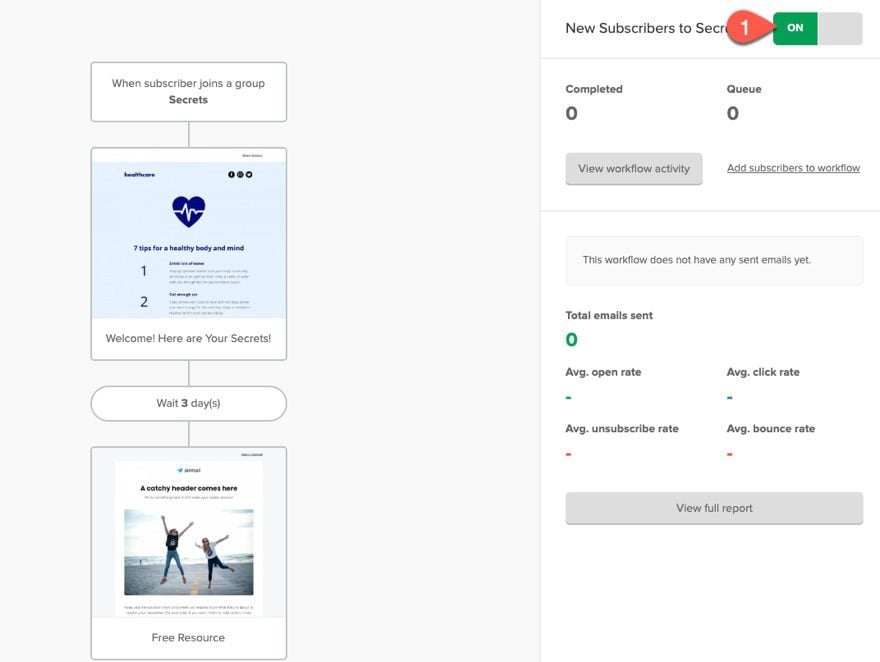
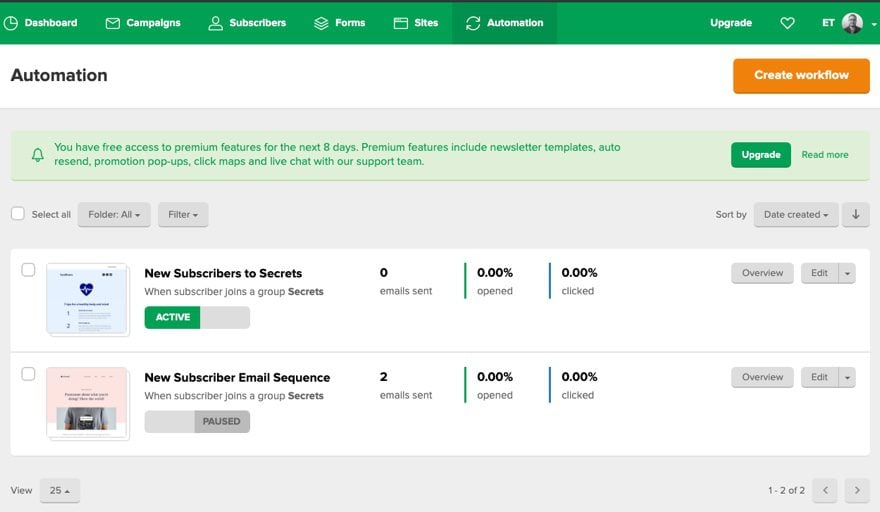
You can have more than one automation workflow to help lead your subscribers to the right type of email content.
Email Content
These emails should bring valuable content to the user and should link to pages on your website that are specific to their need. For example, if a user subscribes to your list for a 15% discount on their first purchase, the first welcome email in the sequence should probably explain how to enter the discount code and then provide a link to your shop page. Subsequent emails in the sequence can include more promotional offers and discounts every week. For another example, you could offer a FREE e-book download for new subscribers. Once the user subscribes using the email opt-in, the first welcome email they receive should contain the download link for the ebook, or a link to a page with a download link and an upsell CTA.
The emails that follow the first welcome email could include links to additional content that leads them down the funnel. For example, you could send an email with a link to a case study that has more targeted information that will lead them to buy your product.
Step 3: Design Blog Post Template with Email Opt-In
One of the first things you need to do is design a blog post template to showcase the content of your blog in a strategic manner. It’s important that the blog post template includes links to related posts so that your audience keeps getting access to valuable content.
One of the primary goals of a content marketing funnel is to capture leads primarily by getting them to submit their email address. So it is important that you have email opt-in forms on your blog template as well.
You can visit our post on How to Build a Blog Post Template if you want to start from scratch. But for now, I thought it best to take advantage of a premade post template from our blog.
Upload the Template
To upload the template, navigate to the Divi Theme Builder in the backend of your WordPress website.
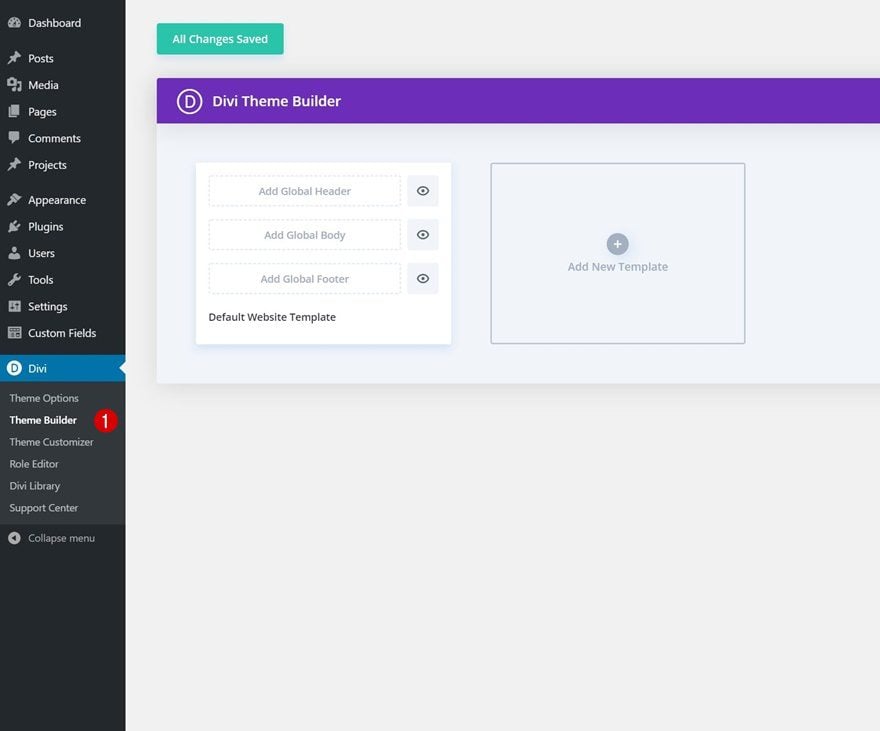
Then, in the top right corner, you’ll see an icon with two arrows. Click on the icon.

Navigate to the import tab, upload the JSON file which you were able to download in this post, and click on ‘Import Divi Theme Builder Templates‘.
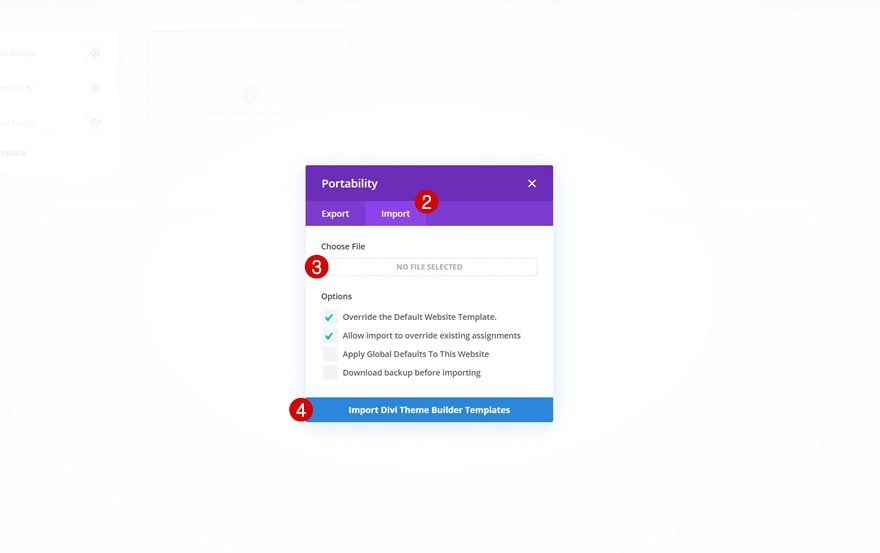
Once you’ve uploaded the file, you’ll notice a new template with a new body area that has been assigned to All Posts. Save the Divi Theme Builder changes as soon as you want the template to be activated.
Integrating the Email Account with Email Opt-In
Now you are ready to link your Email Optin to the MailerLite Email List so that each new subscriber is added to the list.
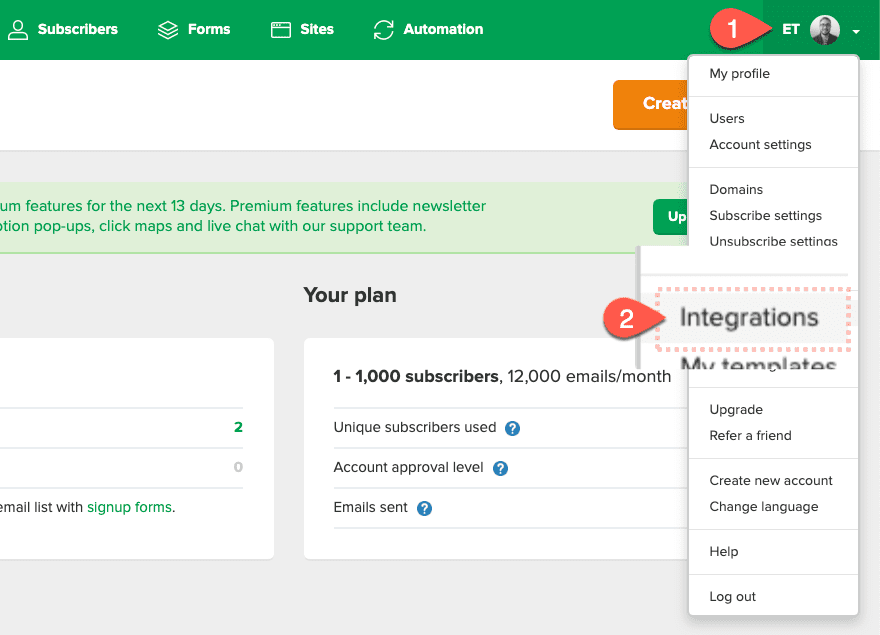
Before we update the email opt-in on the post template, first, open a new browser window and go to your MailerLite dashboard and open the menu at the top right. Then select “Integrations”.
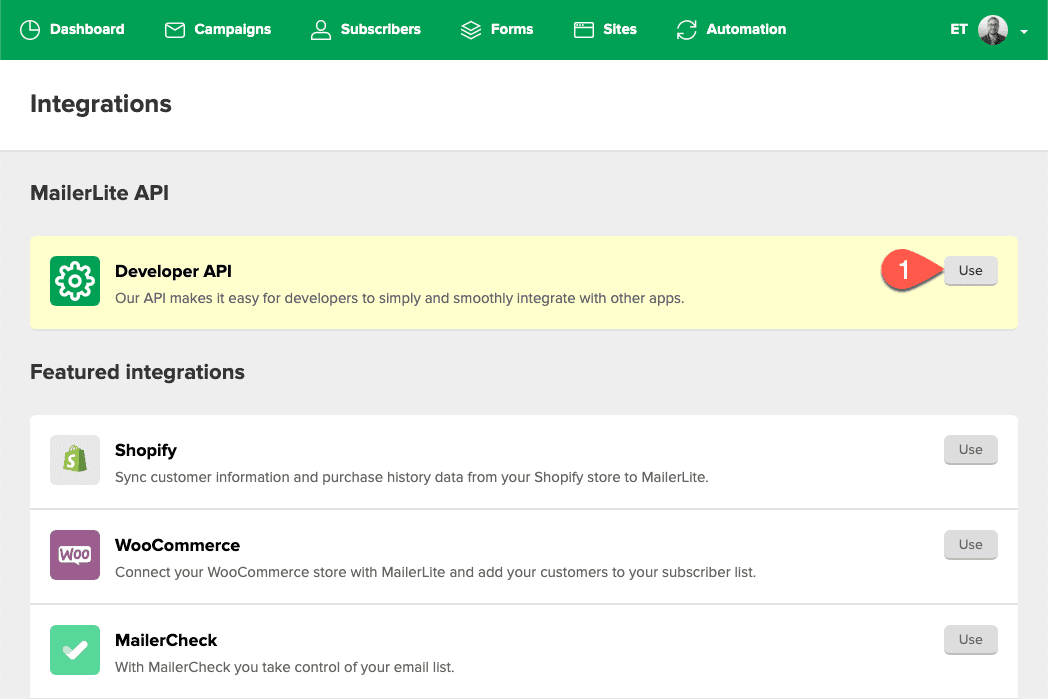
Then select to use the Developer API.
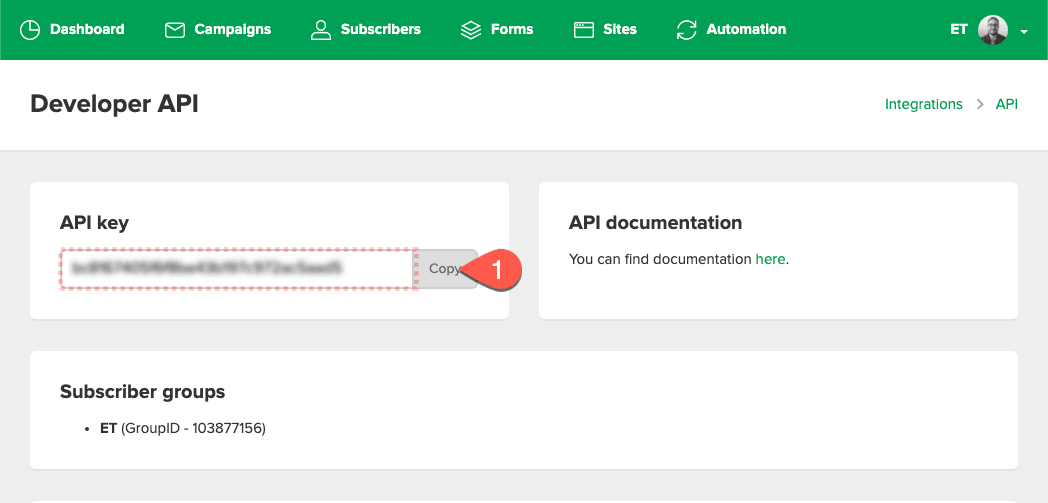
There you can copy the API key needed to integrate Divi’s Email Opt-in form.
Now go back to the Divi Theme Builder.
To modify the template’s elements, start by opening the template.
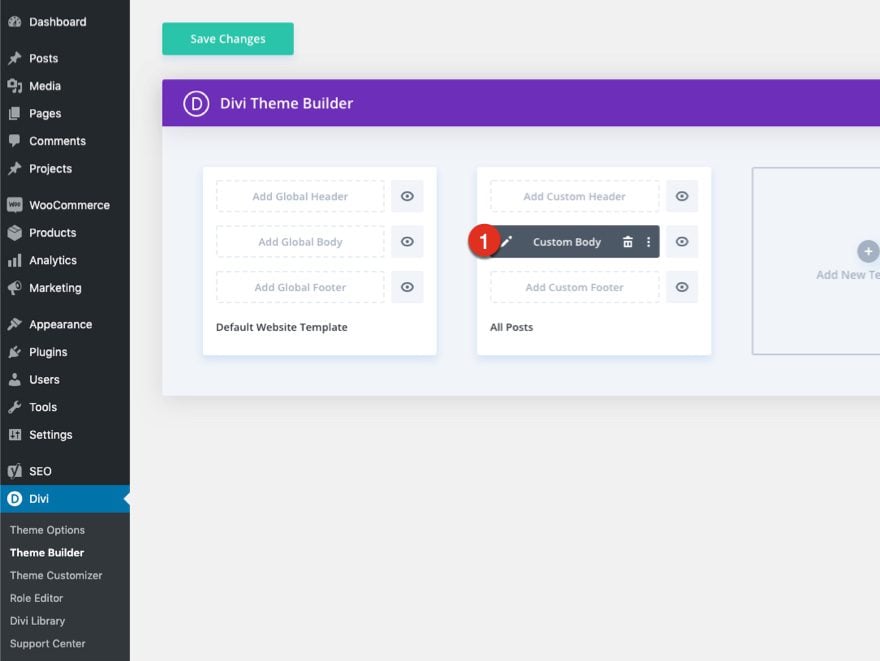
Inside the Body Layout Editor, you can edit the design on the front end using the Divi Builder just like you would with a normal Divi page.
Go to the email opt-in form and open the settings.
Under the Email Account toggle, select MailerLite as the service provider.
Then click the add button to add a new account.
Give the account a name and enter the API key you got from MailerLite.
Then select the list (or email group) you want the subscribers added to.
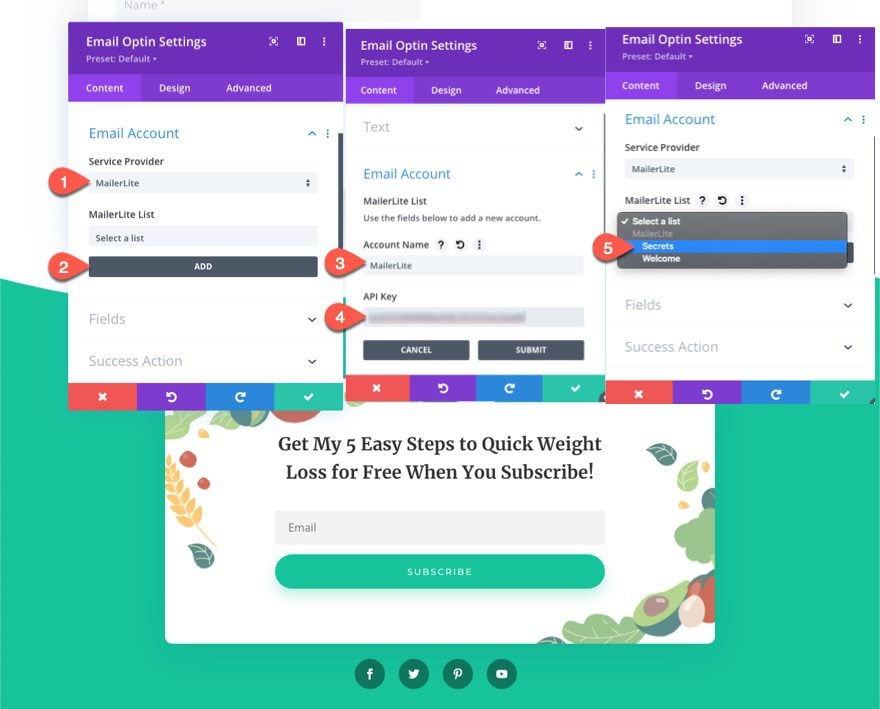
Now you have a blog post template that looks great and is ready to capture new subscribers!

Step 4: Design Squeeze Page with Divi’s Premade Layouts
In addition to having the email opt-in module on your post template, you may find it helpful to create a squeeze page for new visitors. A squeeze page is like a sales page except the product you are offering is FREE and instead of asking for money, you are asking or an email address. A successful squeeze page usually has a strong call to action describing a free offer and what you get in return, along with an email opt-in above the fold.
There are tons of layouts to choose from for creating a squeeze page that is right for you. One thing I would suggest is finding a section of a layout that includes a CTA and an Email Opt-In. Then tweak the design a bit to build your squeeze page.
For this example, we are going to use the Nutritionist Landing Page Layout. Not only does it match our blog post design, but it has a lot of design elements we can use to build a squeeze page in minutes.
Create a new page using Divi to build on the front end.
Then add the Nutritionist Landing Page Layout to the page.
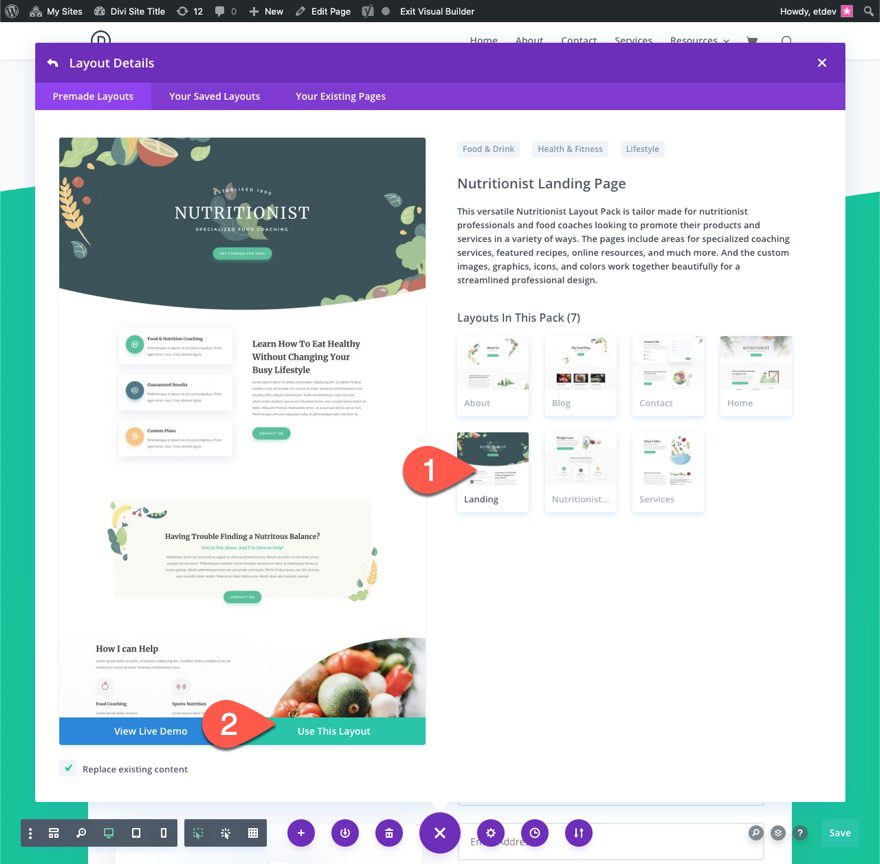
There use the sections in the layout to build a short and sweet squeeze page.
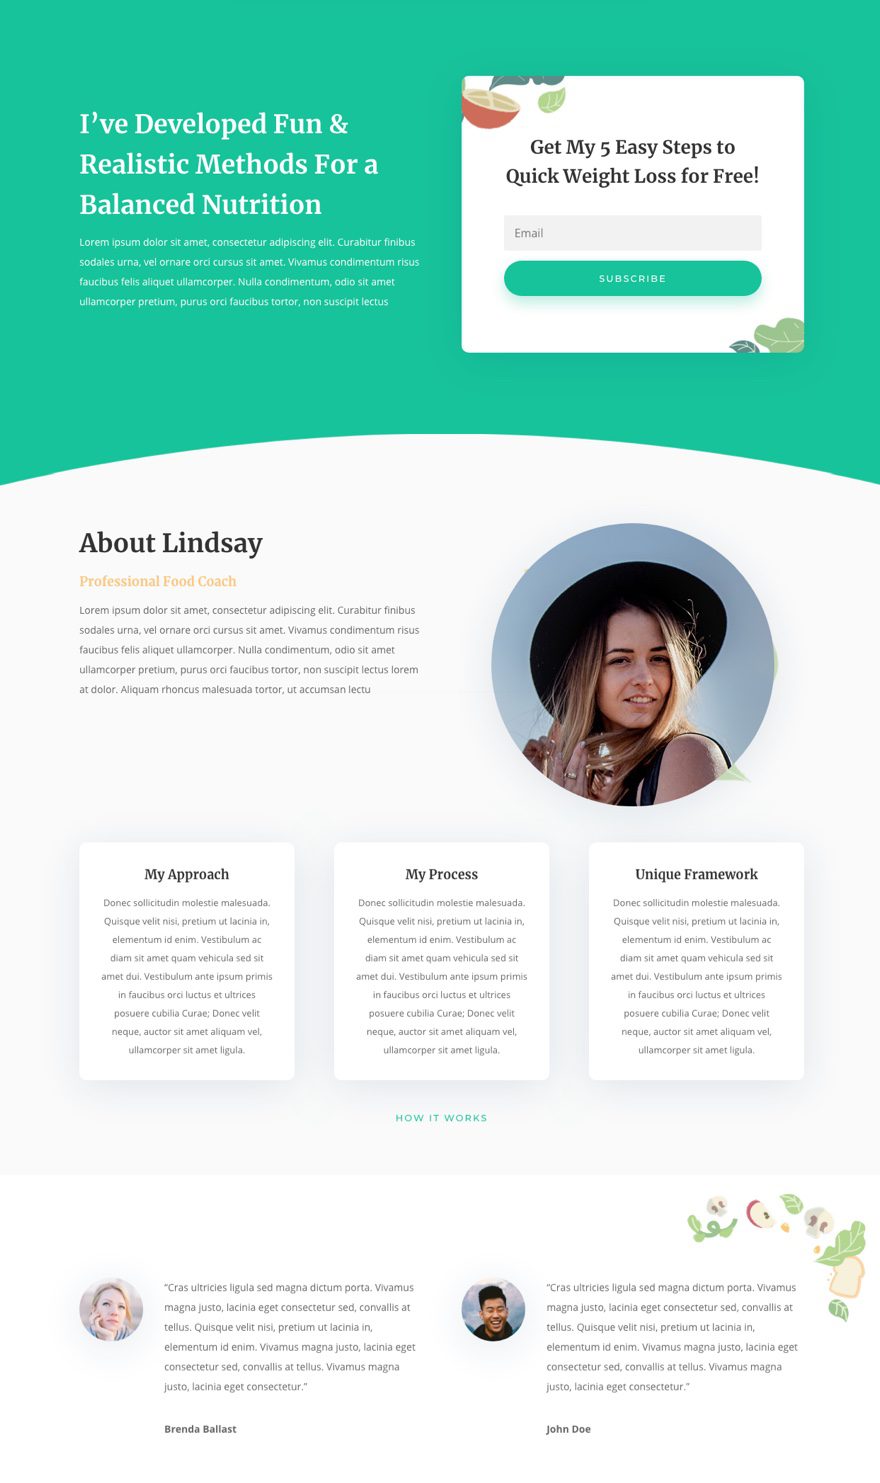
Move the section with the email Opt-In CTA to the very top of the page and delete the other info in the section. Then under that top section, you can add the about section and testimonial section. Delete everything else.
Here is what it looks like…
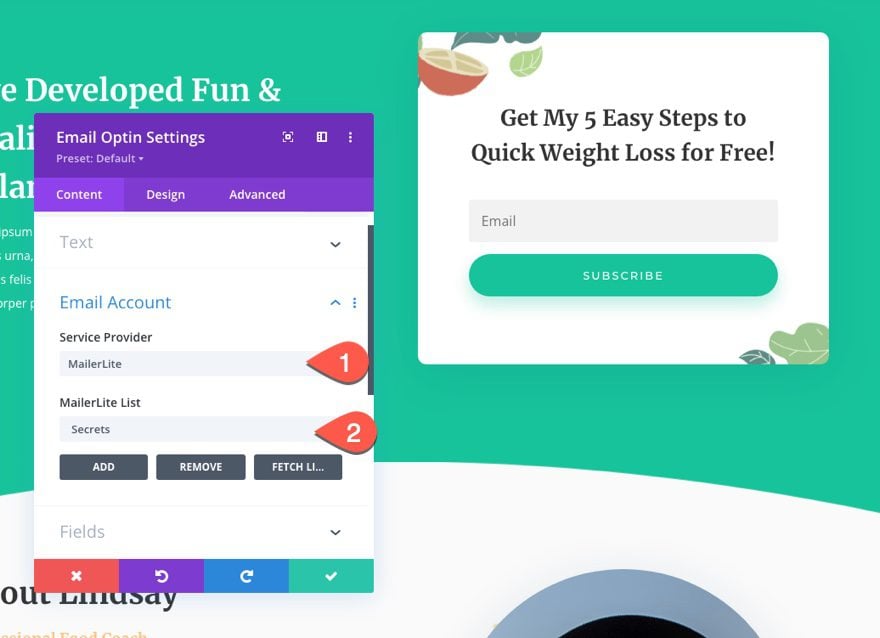
Don’t forget to integrate the email opt-in module with your email list.
Step 5: Create Other Content/Pages that Educate Leads to Buy Your Product
The bottom of the funnel is all about turning subscribers into customers. So you will need to have adequate pages of content that urge them to buy. This type of content could include a sales page with a great call to action, a case study page about how your product helped a customer, or a page featuring a free trial offer to get started.
Again, you can use Divi’s premade layouts to jumpstart the design of these pages. Here are a few examples of page types and layouts that would be good to add to your funnel. The links to these layouts are to the live demos but these layouts are all available within the Divi Builder.
- A Case Study with Testimonials.
- A Pricing Page with an explanation of different packages (maybe a free trial offer as well).
- The Software Marketing Pricing Page Layout has a great call to action for a free trial at the bottom.
- A Sales Page with clearly explained information on the product(s).
Step 6: Create Forms with Email Opt-In Integration
When creating pages for your content marketing funnel, you may need to collect more information than an email opt-in form (which is simply a name and email). For this, it is important to use a form that integrates with your email marketing platform so that new entries can be added to your automated email sequences.
There are companies like Gravity Forms and Typeform that have made this process really easy. Typeform has a free version that integrates with MailerLite (among others) using Zapier.
Create a Typeform
Here is a quick overview of how to create a Typeform form and integrate it with MailerLite using Zapier.
First, sign up for a Typeform account (free).
Under the default workspace, create a new Typeform.
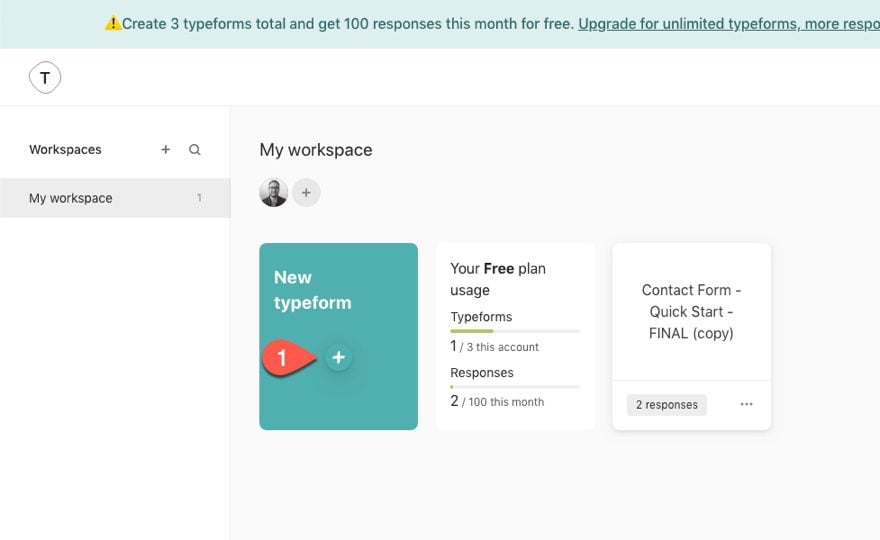
Use premade form templates to build the form or create one from scratch. Keep in mind that the free version will have limited features.
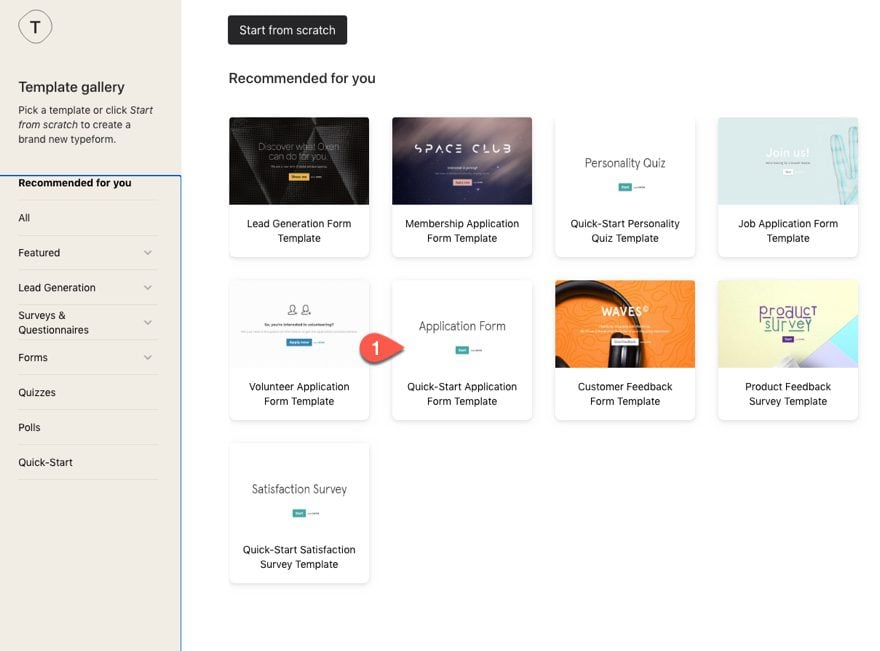
Make sure the form has a question that asks for an email address. This is necessary to add or update the user to MailerLite.

Add Form to Divi Page
When you are finished building the form, click the share link at the top menu. Then choose to embed the form and copy the embed code.

Add the code to your website page using Divi’s code module.

Connect the Form to MailerLite with Zapier
To connect the Typeform with MailerLite, we can use a zap
Sign Up with Zapier (free).
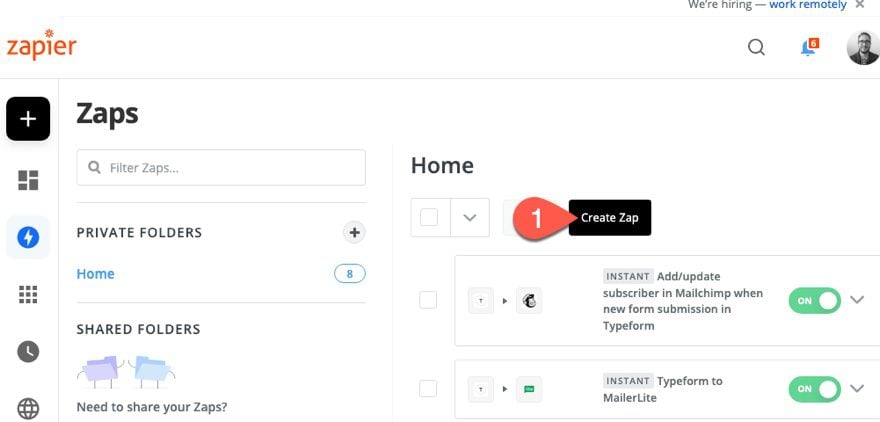
Create a New Zap.
Choose Typeform App as the first Event.
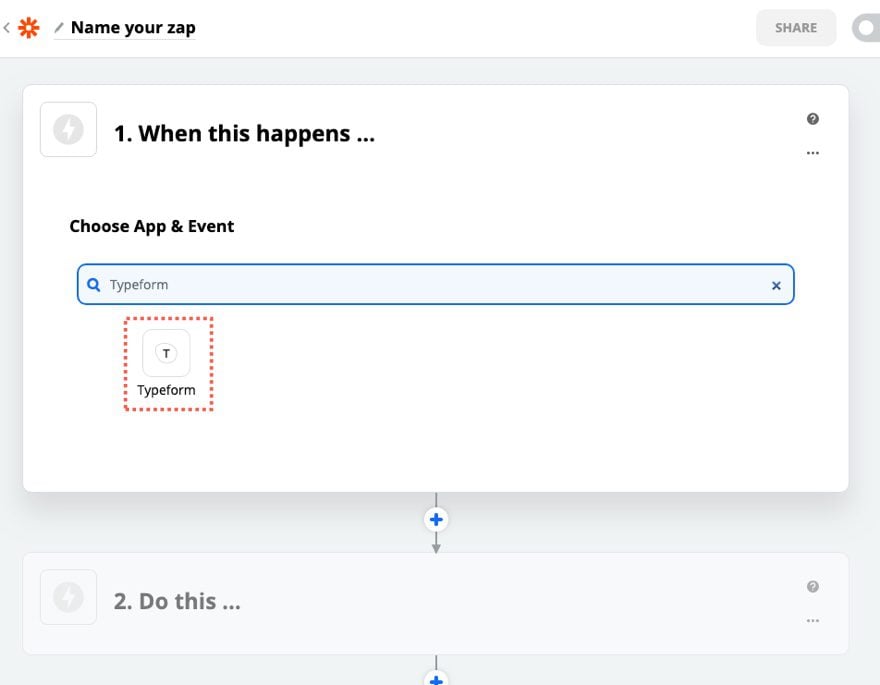
Then follow the steps to link your Typeform account (and Typeform) with Zapier so that it triggers the next event whenever there is a new form entry.
After that, choose MailerLite as the second App.
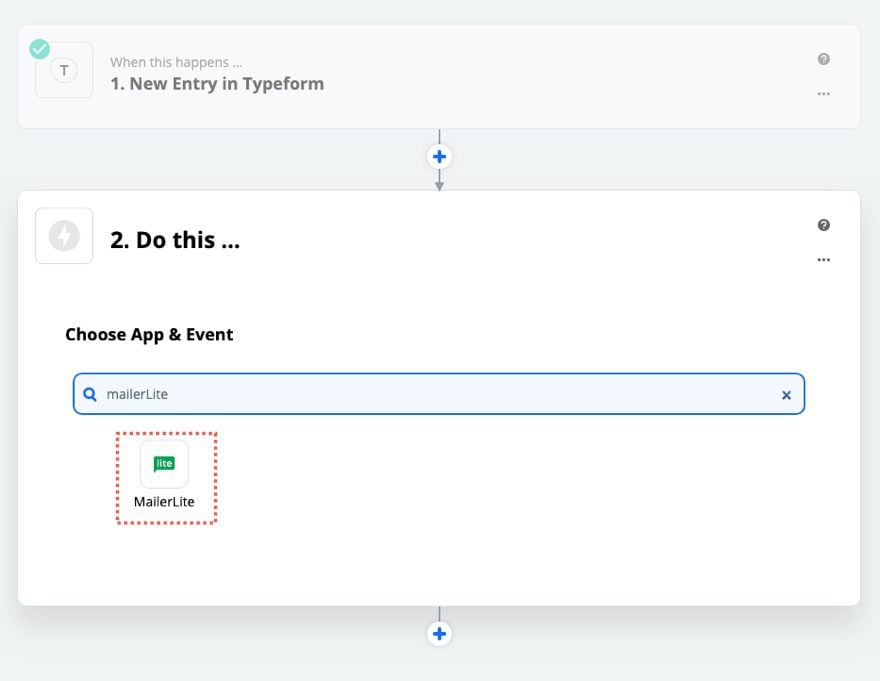
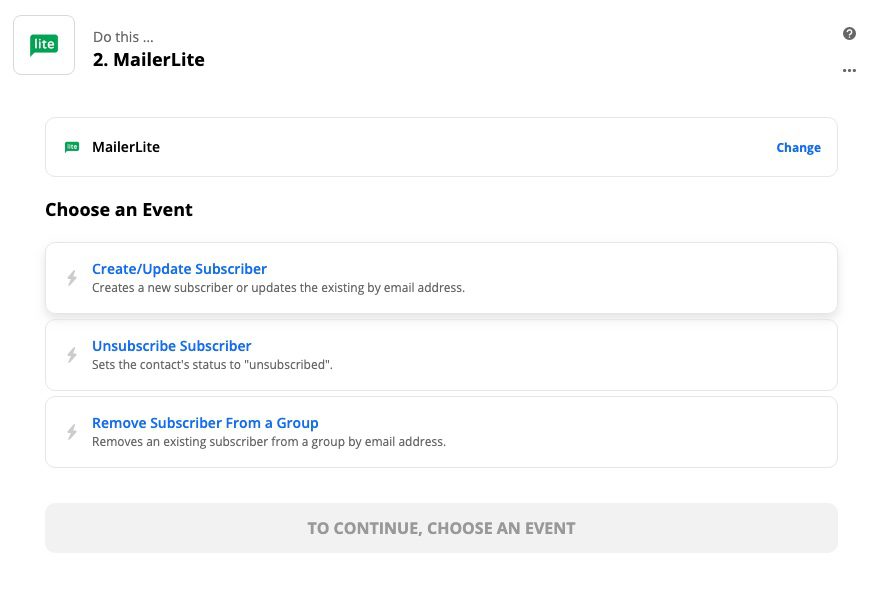
And choose “Create/Update Subscriber” as the event.
then follow the steps to link your MailerLite account with Zapier so that a new subscriber is added to a particular subscriber group (or email list) based on the email entry of the Typeform.
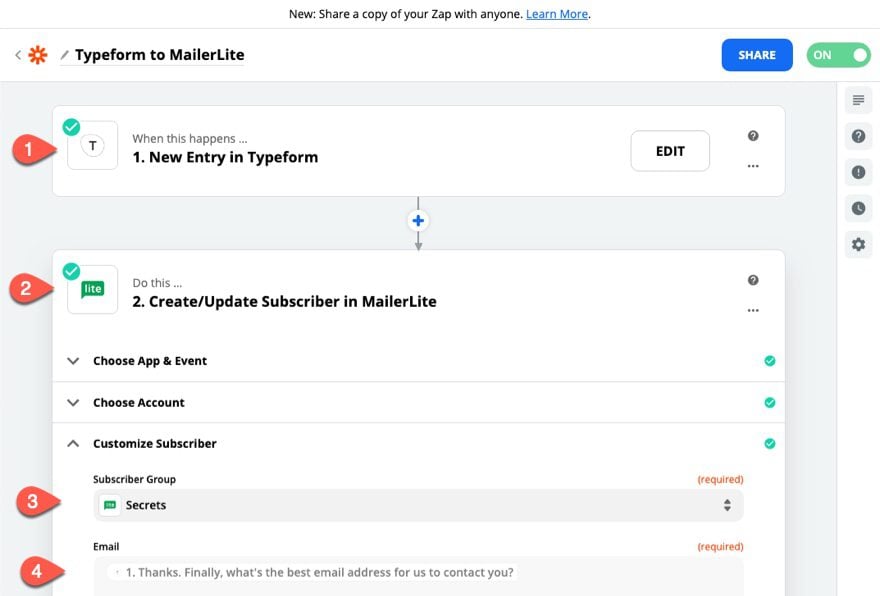
And if you have MailerLite setup to start an email automation sequence when a subscriber is added to that group, they will start to receive the automated emails in the sequence.

Step 7: Create Custom WooCommerce Pages with Divi
A good content marketing funnel will eventually end with your customer buying your product or service. That is why it is important for you to have WooCommerce Pages that continue to lead visitors where you want them to go. Product page templates should include content that encourages the sale (product info, reviews, testimonials, etc.). Cart pages should be easy to understand and could also have upsells or downsells for customers to add more to the cart. Checkout Pages should have content that brings assurance to the buyer (secure checkout, testimonials, money-back guarantees, etc.). And a custom thank you page should have one or more upsells or downsells.
Divi has built-in WooCommerce integrations that allow you to customize WooCommerce pages and product templates.
Cart, Checkout, and Account Pages
Some of the WooCommerce pages can be generated with a shortcode. These include…
- Cart Page
- Checkout Page
- Account Page
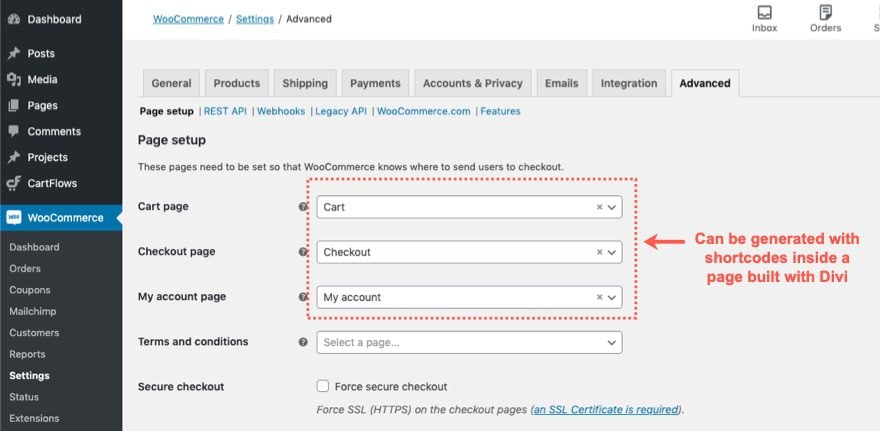
We have a tutorial on how to use WooCommerce shortcodes in Divi to build a custom Account page. You can apply the same concept to create custom checkout and cart pages as well.
Shop Page
The actual WooCommerce Shop page template is not customizable by default in Divi. However, you can use Divi’s Shop Module and other Divi WooCommerce Modules to create a custom dynamic shop page that is more targeted to your audience.
Product Pages
In addition to pages, you can also send visitors to actual product pages that can be customized with Divi’s WooCommerce Modules. You can build these product pages completely from scratch for each product. Or, you can choose to build a product page template using the Theme Builder. can use one of our free product templates to jumpstart the design process.
Here are a few product templates you can download and use.
You can also find product page templates along with other helpful templates in our free theme builder packs. Here are six free ones you can download.
- First Theme Builder Pack
- Second Theme Builder Pack
- Third Theme Builder Pack
- Fourth Theme Builder Pack
- Fifth Theme Builder Pack
- Sixth Theme Builder Pack
Customizing the Thank You Page
By default, WooCommerce customers are sent to an “order received” page which displays information about their successful order. If you want to replace this user experience by sending customers to a custom thank you page, you can use this premium WC plugin to create custom thank you pages. But, if you don’t want to spend money, CartFlows allows you to create a custom thank you page using the Divi Builder for Free! (See Below)
Step 8: Use Cart Flows with Divi to Customize the WooCommerce/Sales Part of the Funnel
The free version of CartFlows has some surprisingly helpful features to help build a sales funnel in Divi.
Here are some things CartFlows can help you do.
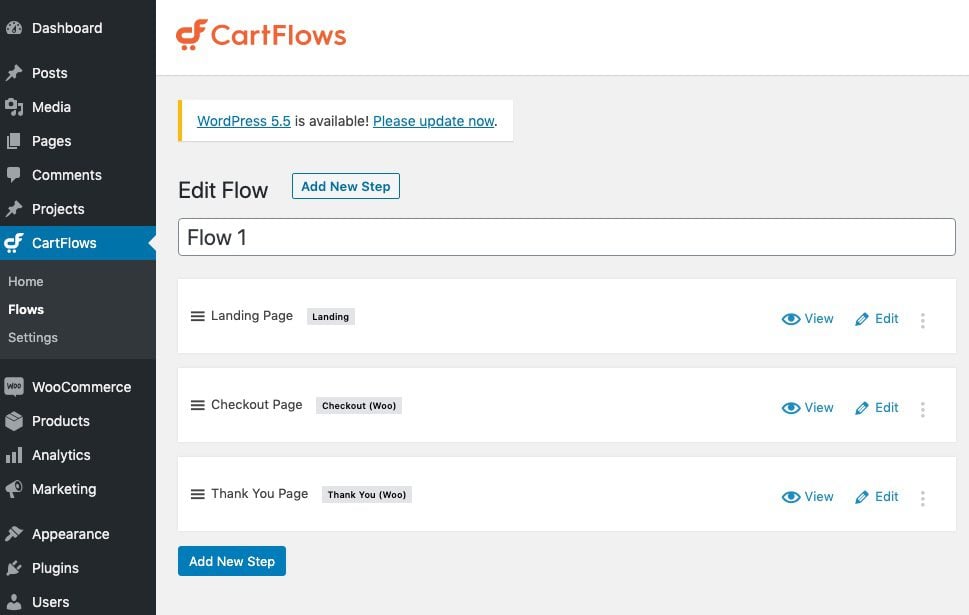
Set Up a Sales Funnel
CartFlows will simplify the process of creating a sales funnel for your WooCommerce products (landing page, checkout page, and Thank You page, etc.)
Build Custom Pages with Premade Templates
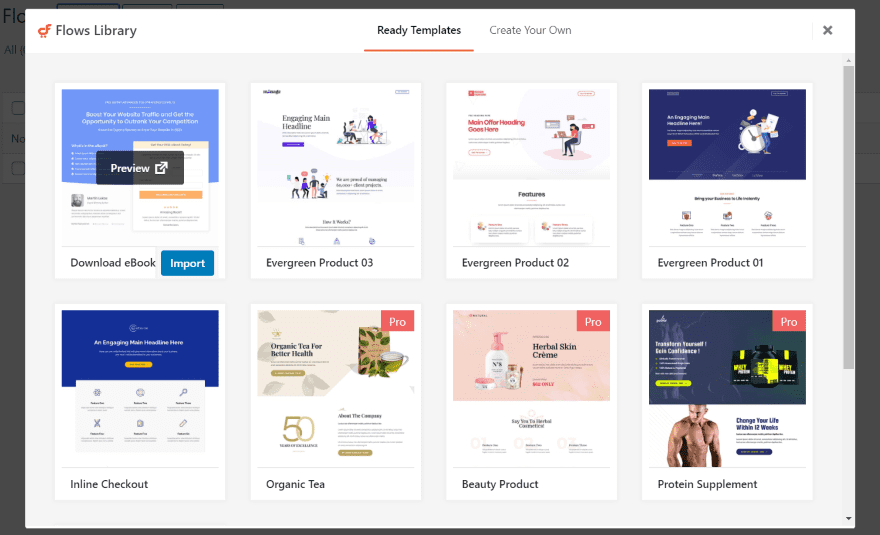
CartFlows comes with premade templates that work seamlessly with the Divi Builder so you can customize visually with ease (and without knowing any code). These include…
- Landing Page Templates designed for Lead Generation
- WooCommerce Checkout Page Templates and Customization
- Email Optin Template with Built-In Opt-In Form
- Thank You Page Templates and Customization (probably worth getting the plugin just for this!)
- Upsell and Downsell templates (pro version)
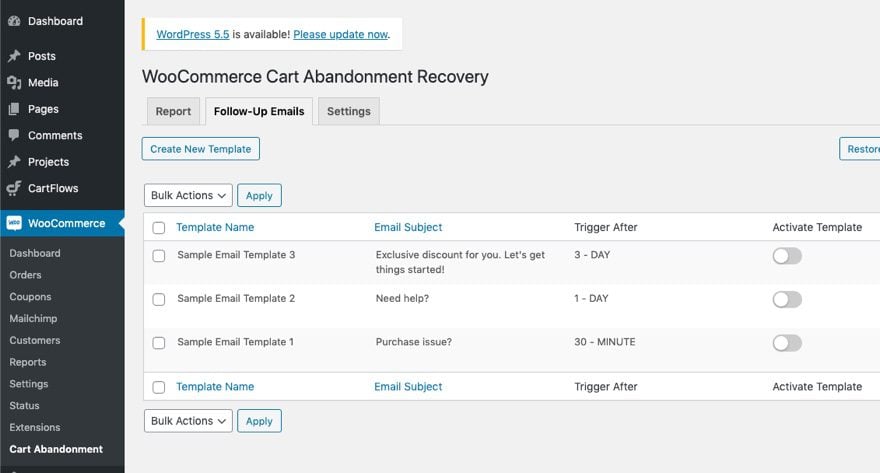
Abandoned Cart Recovery
CartFlows also comes with the ability to manage abandoned cart recovery for WooCommerce. You can even send customizable email sequences to customers who have abandoned their carts.
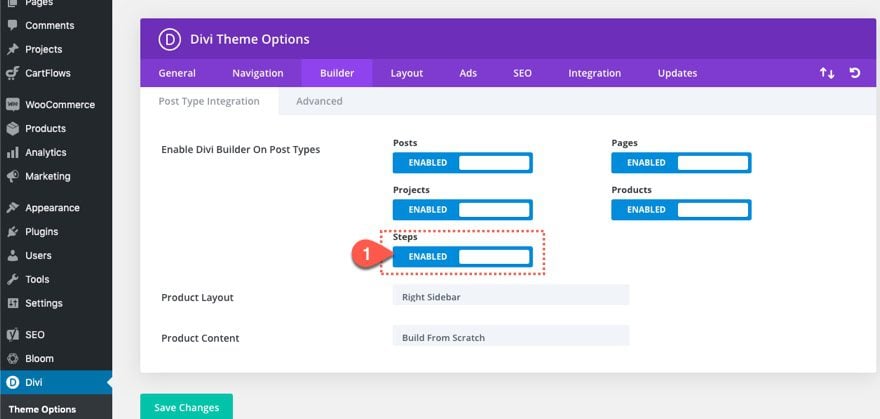
Keep in mind that in order for Divi to work with CartFlows, you must enable the “Steps” custom post type under Divi > Theme Options > Builder > Post Type Integration.
For more info on how to get started with CartFlows and Divi, check out our post on how to create a 3 step Sales Funnel with CartFlows and Divi.
Step 9: Extend the Funnel
When the user completes a purchase, the funnel doesn’t have to end. In fact, you can use this as an opportunity to put customers in a new funnel to start the process all over again.
Here are a few things you could do:
Create/Update Subscribers after WooCommerce Purchase
Using a plugin, you can add new customers to your email list or update that subscriber to be put on another email list after purchasing a product.
For example…
- WooCommerce has a plugin for MailChimp integration.
- MailerLite has this plugin that might work (haven’t tested it) to add WC customers to an email sequence in MailerLite.
- Zapier can also be used to integrate WooCommerce with various other Email Marketing Platforms, although you may have to pay for the WooCommerce Zapier plugin for integration.
Add Upsells or Forms to a WooCommerce Thank You Page
Using CartFlows, you can send customers to a custom Thank You page after the purchase. That thank you page could include an upsell or a form that collects valuable information and puts them in a new email automation sequence.
Make Your Funnel Even Better
Here are a few additional ways you can improve your content marketing funnel.
Add Sitewide Email Optin Popups with Bloom
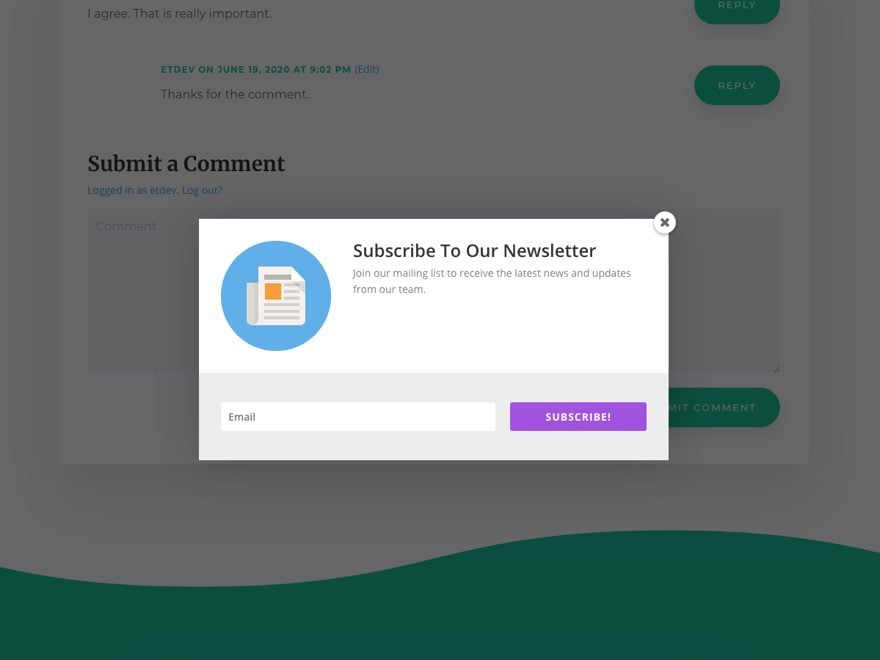
MailerLite Integrates directly with Bloom so that you can have smart email opt-in popups in addition to the Divi Email Opt-in forms on your pages and templates.
Add Sitewide Social Sharing to Blog Posts with Monarch
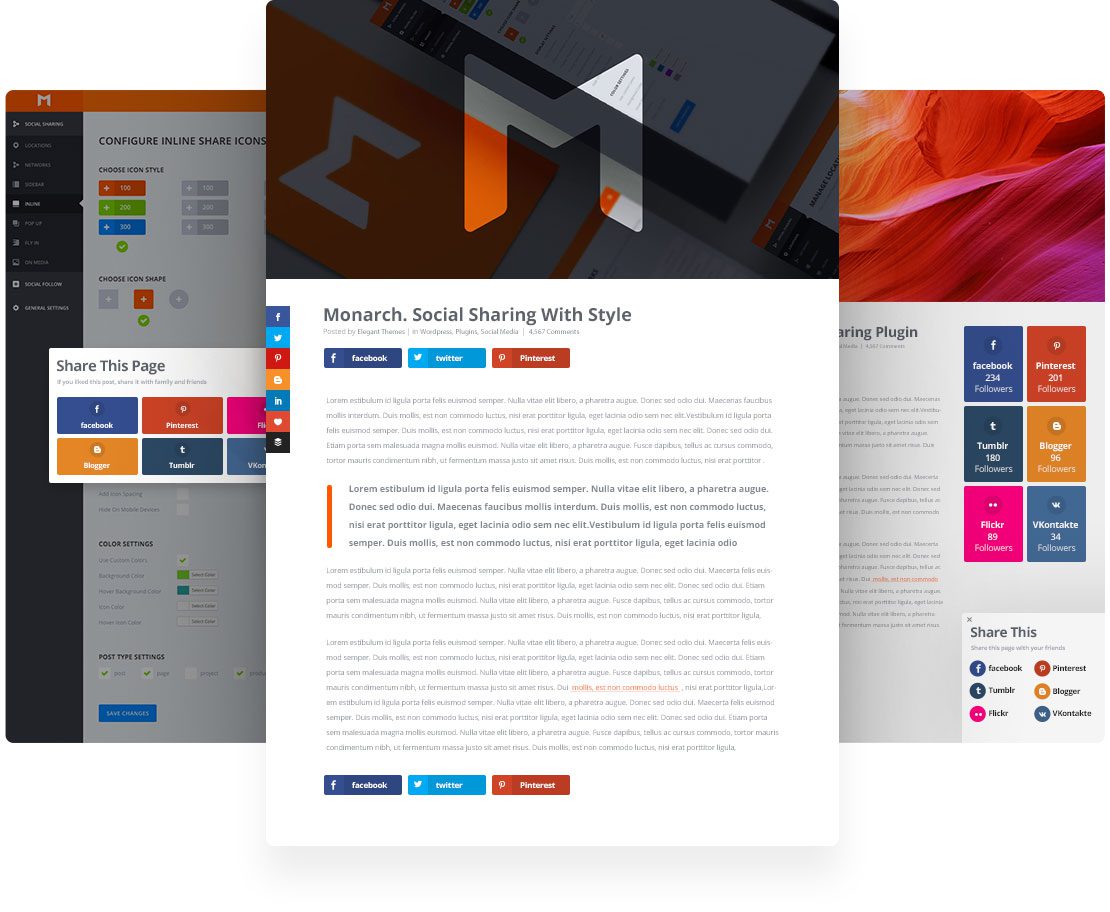
Use our advanced social sharing plugin, Monarch to add Social Links to all Posts so content can be shared. This is great for capturing the attention of your audience and spreading recognition of your brand at the top of the funnel.
Split Testing
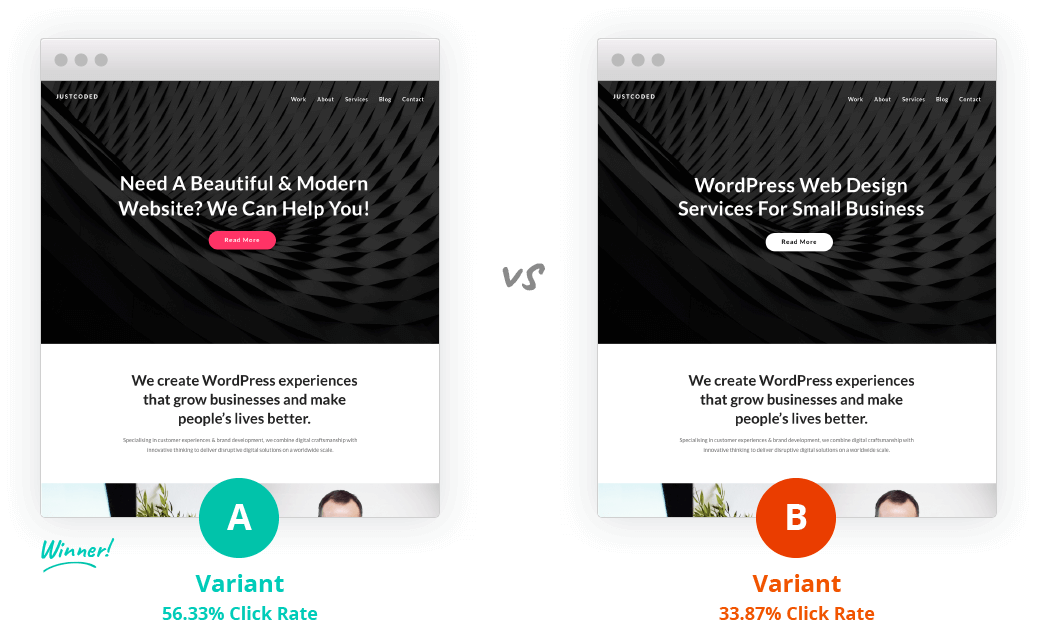
All pages designed with the Divi Builder are able to be split tested using the built-in Divi Leads feature. This is a great way to split test different email opt-in form designs or different squeeze page designs to figure out which one is getting more leads into your funnel.
You can even use split testing with CartFlows as well.
Recap: Putting it All Together
Here is an example of how this might play out in the real world…
- Someone visits your blog post (built with Divi Theme Builder) or landing page (Using a Divi Layout).
- After one or more visits, they sign up to your email list to receive “5 Secrets to Weight Loss.” (Using a Divi Email Opt-In or a Bloom Popup.
- The Email Automation Sequence (in MailerLite) has been set up to start when a subscriber joins the group “Secrets”.
- The Email Opt-in Module and the Bloom Popup have both been integrated to add new subscribers to the list “Secrets” in MailerLite.
- The subscriber receives a welcome email (the first email in the sequence) with the “5 Secrets” they were promised.
- The subscriber continues to receive more emails that target a product that they are interested in. One of the emails has a link to a product page featuring an eBook for $20 (a product template built with Divi’s WooCommerce Modules and the Divi Theme Builder)
- The subscriber clicks “Add to Cart” but never completes the purchase on the checkout page.
- CartFlows is set up with a simple sales funnel (or “Flow”) for that eBook product so that when the customer reaches the checkout page and doesn’t purchase, the abandoned cart recovery email automation begins sending emails to the customer urging them to finish the purchase.
- Finally, the customer purchases the eBook product by going back to the checkout page (which is a part of the CartFlows funnel). Maybe because you’ve made some changes to the checkout page using Divi Leads split testing.
- CartFlows sends the customer to a custom Thank You page immediately after purchasing the product. This thank you page was built using CartFlows and Divi to include an upsell to another product.
- The customer doesn’t buy the up-sell and leaves.
- But, because you integrated WooCommerce with MailerLIte (via a plugin or a zap), the subscriber was put in a new email automation list that continues to urge the customer to buy the up-sell or a new product.
- A New Funnel starts
Final Thoughts
Building a content marketing funnel with Divi isn’t as overwhelming (or costly) as you might think. With the right tools and know-how, you can actually build a complete funnel that captures leads and nurtures them until they become life-long customers (hopefully).
For this tutorial, we tried to keep the funnel as simple, effective, and free as possible. No doubt, there are countless other strategies and resources out there for creating a content marketing funnel. Feel free to share your own experiences and resources in the comments below.
I look forward to hearing from you!
Featured Image via venimo / shutterstock.com



Understanding the value of useful and truly consumable content, experts work around researching, developing and planning strategies that help in breaking down complex concepts to easy understandable readings. Only best will be recognized in content marketing for targeting audience with help of funnel. Nice Blog!
Thanks, Ossisto.
What a great blog! I’m in the middle of improving my tunnel, with the content I already have on my site. I do use some of these methodes, but having it al together like this is really helpfull. Thanx for another great post Jason.
Great to hear, Marleen. Glad it is helpful.