")
Learning how to install WordPress on a brand-new website may seem like a daunting task, but it doesn’t have to be. In fact, since WordPress continues to rise as one of the most popular content management systems on the planet, hosting providers and software companies continue to make WordPress a top priority. WordPress’s popularity is mainly because of its customizability; with themes like Divi, you can build advanced websites in no time.
It is not uncommon for hosting providers to install WordPress for you or at least simplify the installation process down to the click of a button. And for those of you looking to install WordPress manually, learning how can be empowering and rewarding.
Let’s start with a reminder of what you may need before installing WordPress.
- 1 Pre-Game Checklist: What You Need Before You Install WordPress
- 2 Taking Advantage of WordPress Hosting to Handle Installation for You
- 3 How to Install WordPress Using Automatic “One-Click” Installers
- 4 How to Install WordPress Manually on any Web Host
- 5 How to Setup a Local WordPress Installation on Your Computer
- 6 How to Choose a Language for a WordPress Installation
- 7 Installing WordPress on a Virtually Private Server (VPS)
- 8 Installing WordPress on Google Cloud
- 9 Next Steps: What to Do After You Install WordPress
- 10 More Related Articles from our Blog
- 11 The Future of Your Website Starts Now
Pre-Game Checklist: What You Need Before You Install WordPress
Without going into much detail, we thought it would be helpful to include what is needed before you begin the process of installing WordPress. If you want to install WordPress locally, this is not relevant, but if you want to put your WordPress site live on the web, you will need to have done these things first.
Get a Domain
If you haven’t done so already, you will need to purchase/register a domain for your website. There are many different domain registrars out there to choose from, including Namecheap. If you need help finding one, check out this breakdown.
Get a Hosting Provider
A hosting provider , like SiteGround or Hostinger, is necessary if you want to install WordPress on a website that is live on the web. They will provide the server space you need for your website files and connect your site to the web. There are a lot of Hosting Providers out there that specifically provide WordPress hosting (see below). Even so, I think it is safe to say that most hosting providers have environments that are suitable for WordPress. But just in case, here are the server requirements needed for the WordPress version at the time of this post:
- PHP 7.4 or greater
- MySQL 8.0 or greater (or MariaDB version 10.4 or greater)
- HTTPS support (all sites are moving to HTTPS these days)
- WordPress also recommends that your server be run on Apache or Nginx, but as long as the server supports PHP and MySQL, it is fair game.
Manage the Domain Name System
It is important to have a hosting provider with DNS management so that you can properly configure your Domain settings. One crucial step that may be needed before launching a website is to update the nameservers. This links your domain’s information to the service you used to register it. To put it another way, it “points” your new domain to the server where your website lives. This may not be necessary if you registered the domain with the same company that is hosting your site. For more information, you can learn about how the domain name system works.
These are just a few basic needs any typical website will want to address. Your own website needs may be more involved. But generally speaking, once you have your domain and hosting provider all set up. You are ready install your new WordPress website.
Taking Advantage of WordPress Hosting to Handle Installation for You
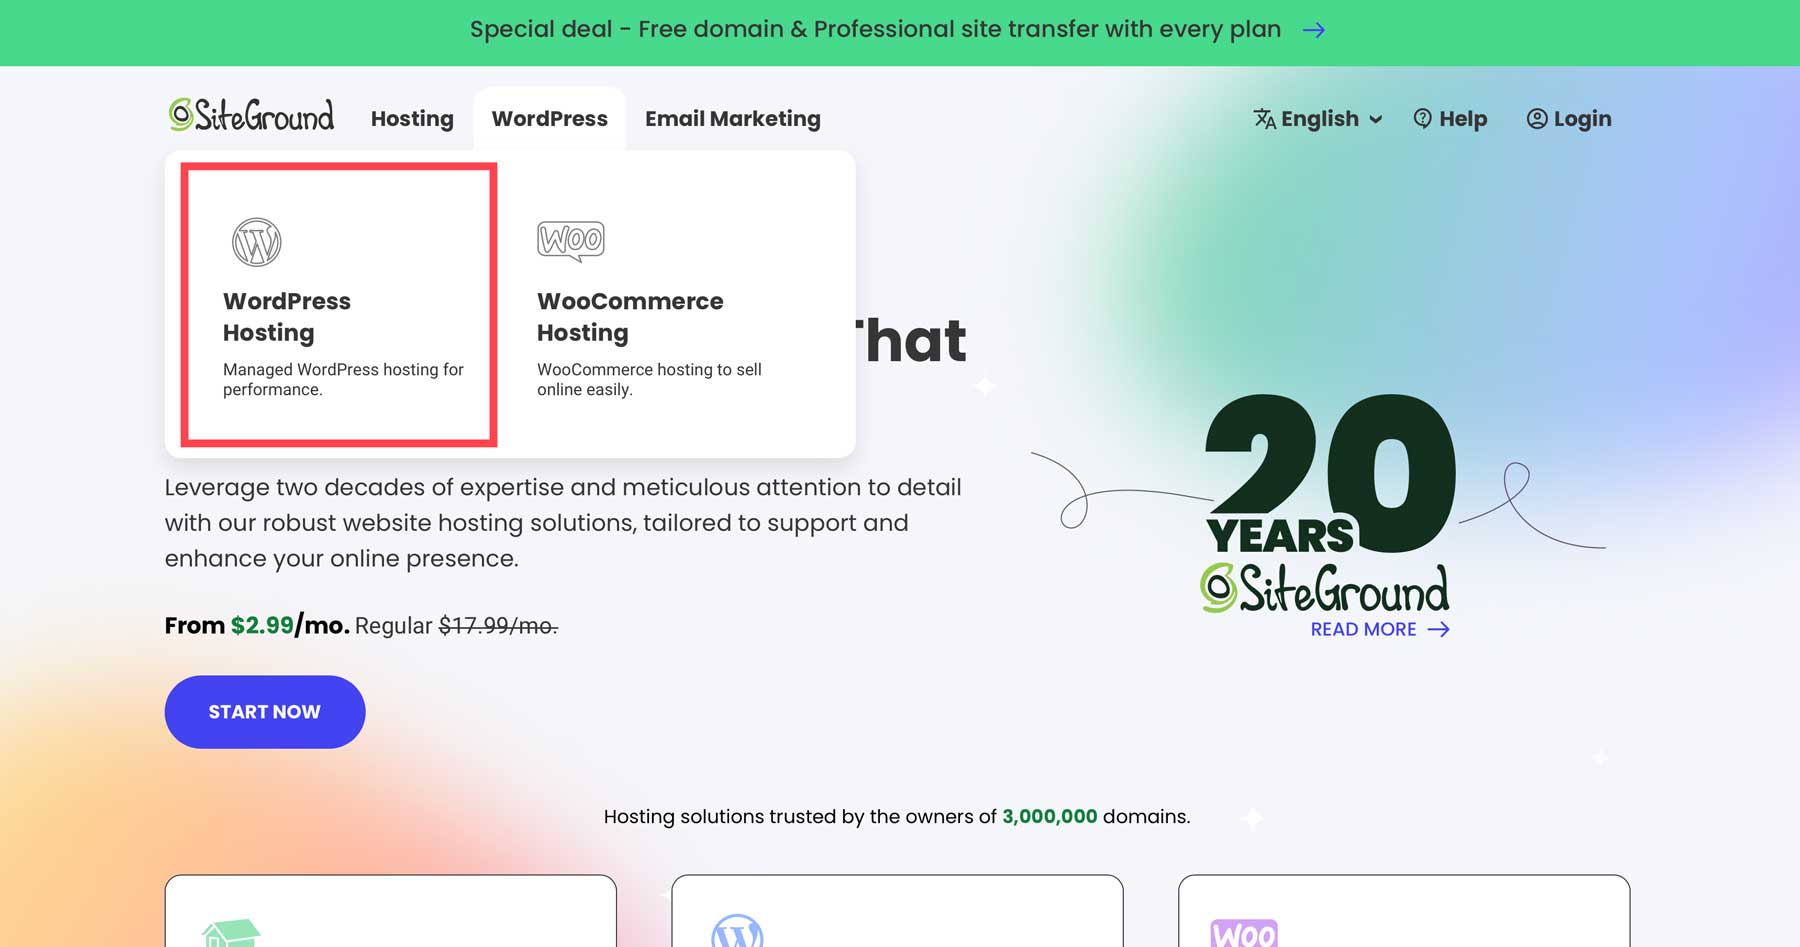
Because WordPress is such a popular CMS for websites, many hosting providers have excellent managed hosting built specifically for WordPress. In most cases, if opting for a WordPress Hosting plan, the process of installing WordPress is a simple click of a button. But be warned, this may come with unexpected limitations. For example, WordPress hosting will not let you install any other CMS other than WordPress so if you want to change later on, you will have to change your hosting plan. There also may be limitations on what you have access to in your hosting account, so it is a good idea to ask about this beforehand. In short, WordPress hosting makes things easier but may also give you less control.
Some hosting providers are completely dedicated to hosting only WordPress sites, so the process of installing WordPress is built into the onboarding procedure.
Some examples of Hosting Providers include but are not limited to:
- SiteGround
- GoDaddy
- Flywheel
- Dreamhost
- Hostgator
- Cloudways – (read more about Cloudways for WordPress)
- BlueHost
- WPEngine
Feel free to take some time to choose the best option for your own WordPress hosting provider.
How to Install WordPress Using Automatic “One-Click” Installers
Subscribe To Our YouTube Channel
The second easiest way to install WordPress (other than a WordPress Hosting provider) would be to use a one-click installer. One-click installers are scripts that hosting providers include to make popular CMS platforms like WordPress easy to install. And as the name suggests, it reduces the installation process to “one click” (okay, actually, it is a few clicks, but you can’t blame them for trying). Different hosting providers will provide different installer scripts that allow you to install WordPress in “one click”. Some popular installers include:
Softaculous
Installatron (see partners)
QuickInstall (by MOJO Marketplace)
MOJO Marketplace
To see what installers you have available, you will need to login to Cpanel and check out what is included. Normally, you can find them under a category with the title “Autoinstallers” or “Software”, “Applications” or “Website”.
Note: If you see a script called “WordPress” or “WordPress Installer”, there really is no need to look any further. This is a convenient way to launch the WordPress script offered by a particular software (like Softaculous, Quickinstaller, etc…).
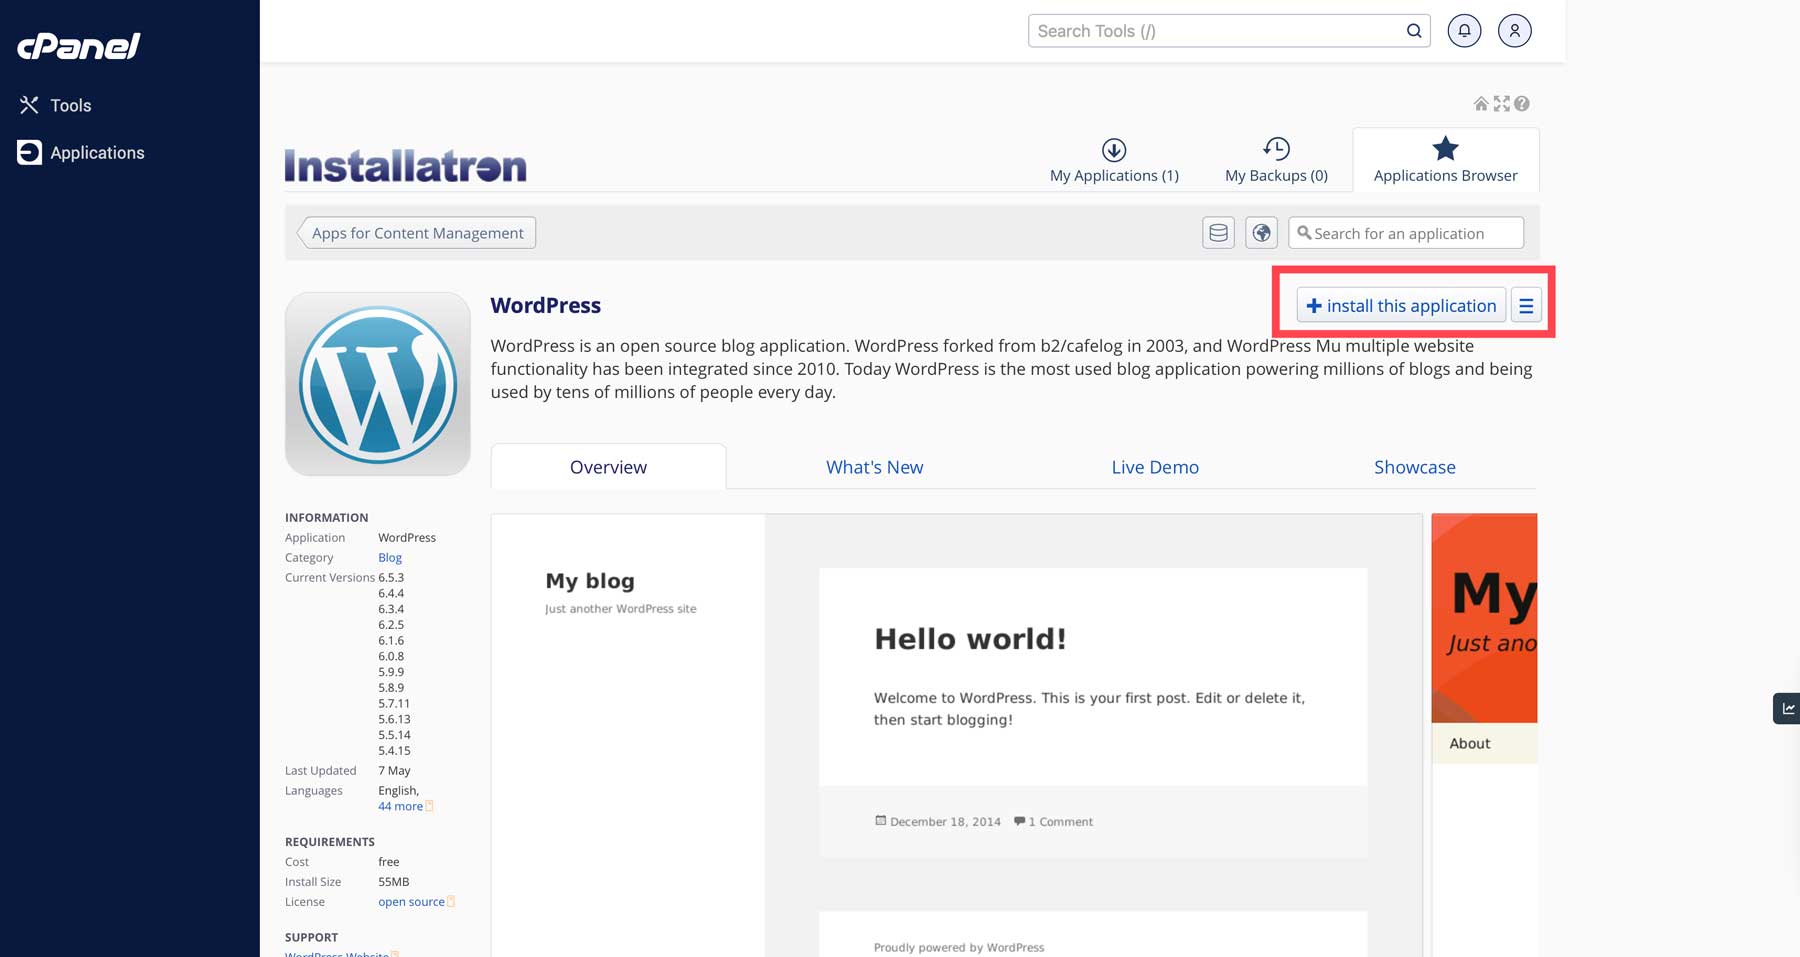
For this example, we’ll show you how to use GoDaddy‘s Installatron to install WordPress, but many of these installers will function the same way.
Under applications, choose WordPress.

When the screen refreshes, you’ll see the Installatron WordPress installer. Click on Install This Application to install WordPress.
If you choose a quick install, you will need to enter the following:
- The domain for the install
- The directory location for the install (if you are installing to the root, you should be able to just leave the option blank)
- The Admin Account information (username, password, email) for accessing the backend of the site.
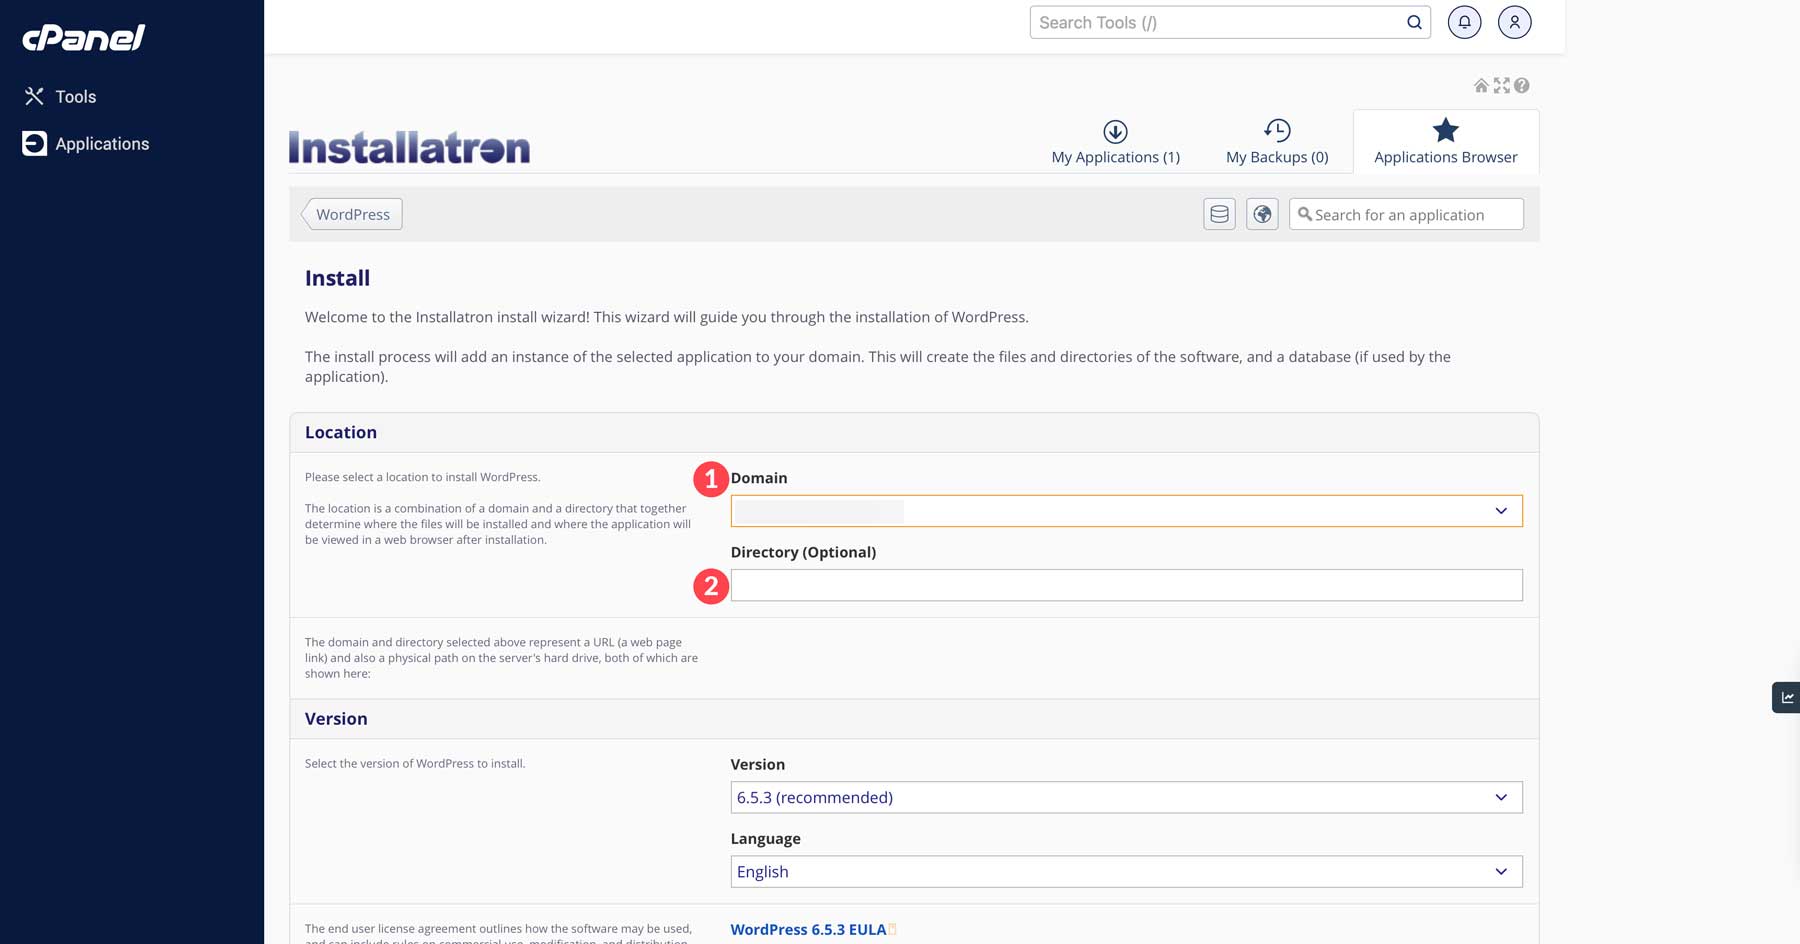
Then Click Install.
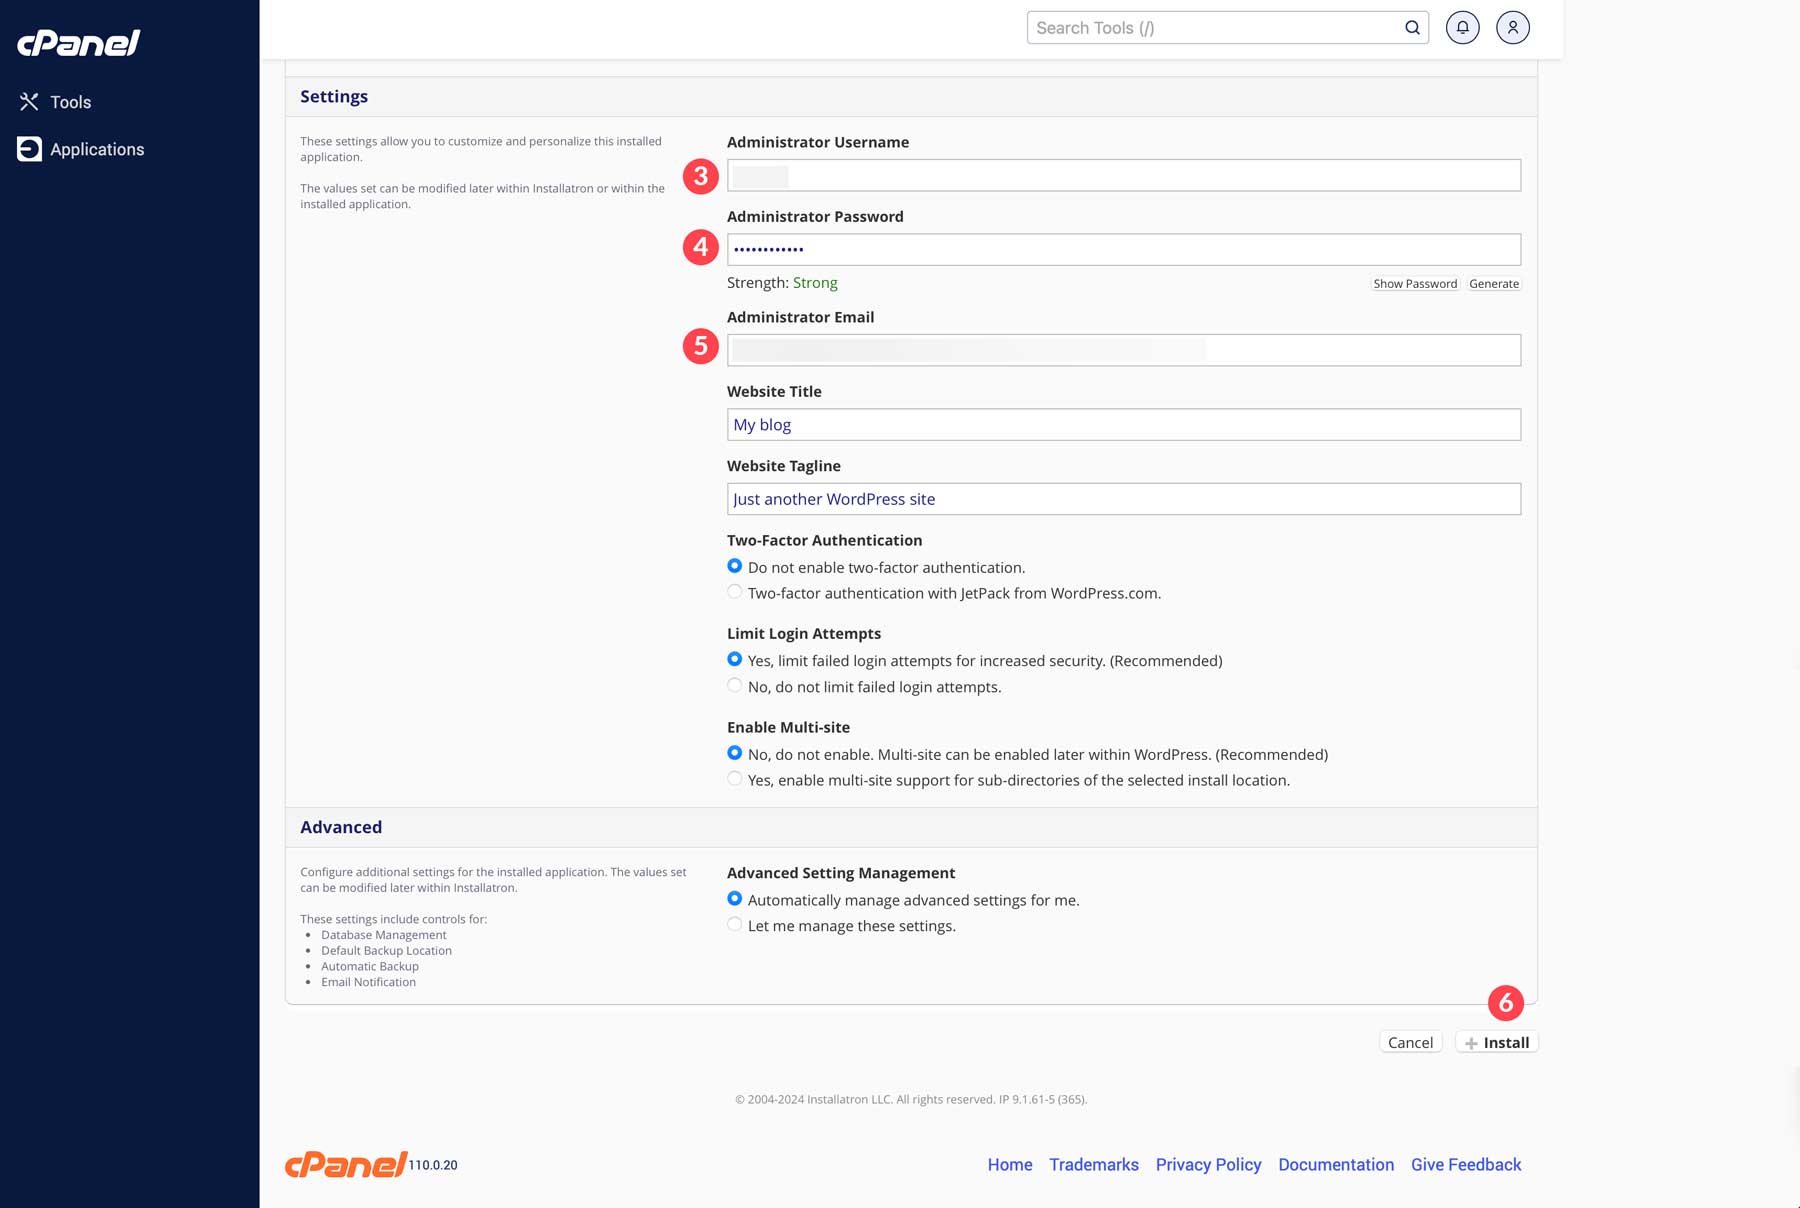
And that’s it! WordPress will be installed for you.
Once done, you can log in to your site with the admin account info you entered by going to www.yoursite.com/wp-login.php from your browser.
How to Install WordPress Manually on any Web Host
Subscribe To Our YouTube Channel
At this point, you should have a web host and your domain set up and ready to go.
Step 1: Download the WordPress .zip File
First, go to wordpress.org and download the latest version of WordPress by clicking the Download WordPress button.

Once clicked, the zip file will be downloaded to your computer (probably to your downloads folder). Go ahead and unzip (extract) the files so they are ready.
Step 2: Create a Database and Database User
Before adding WordPress to your web server, you must first create a database to store those WordPress files. To do this, log in to your hosting account and launch Cpanel.
This process will look different for each hosting provider. But if you get confused, you can always access Cpanel directly by entering your domain followed by “:2082” in the address bar of your browser (e.g., www.yourwebsite.com:2082).
From the Cpanel dashboard, open MySQL Databases (it should be under the Databases category).
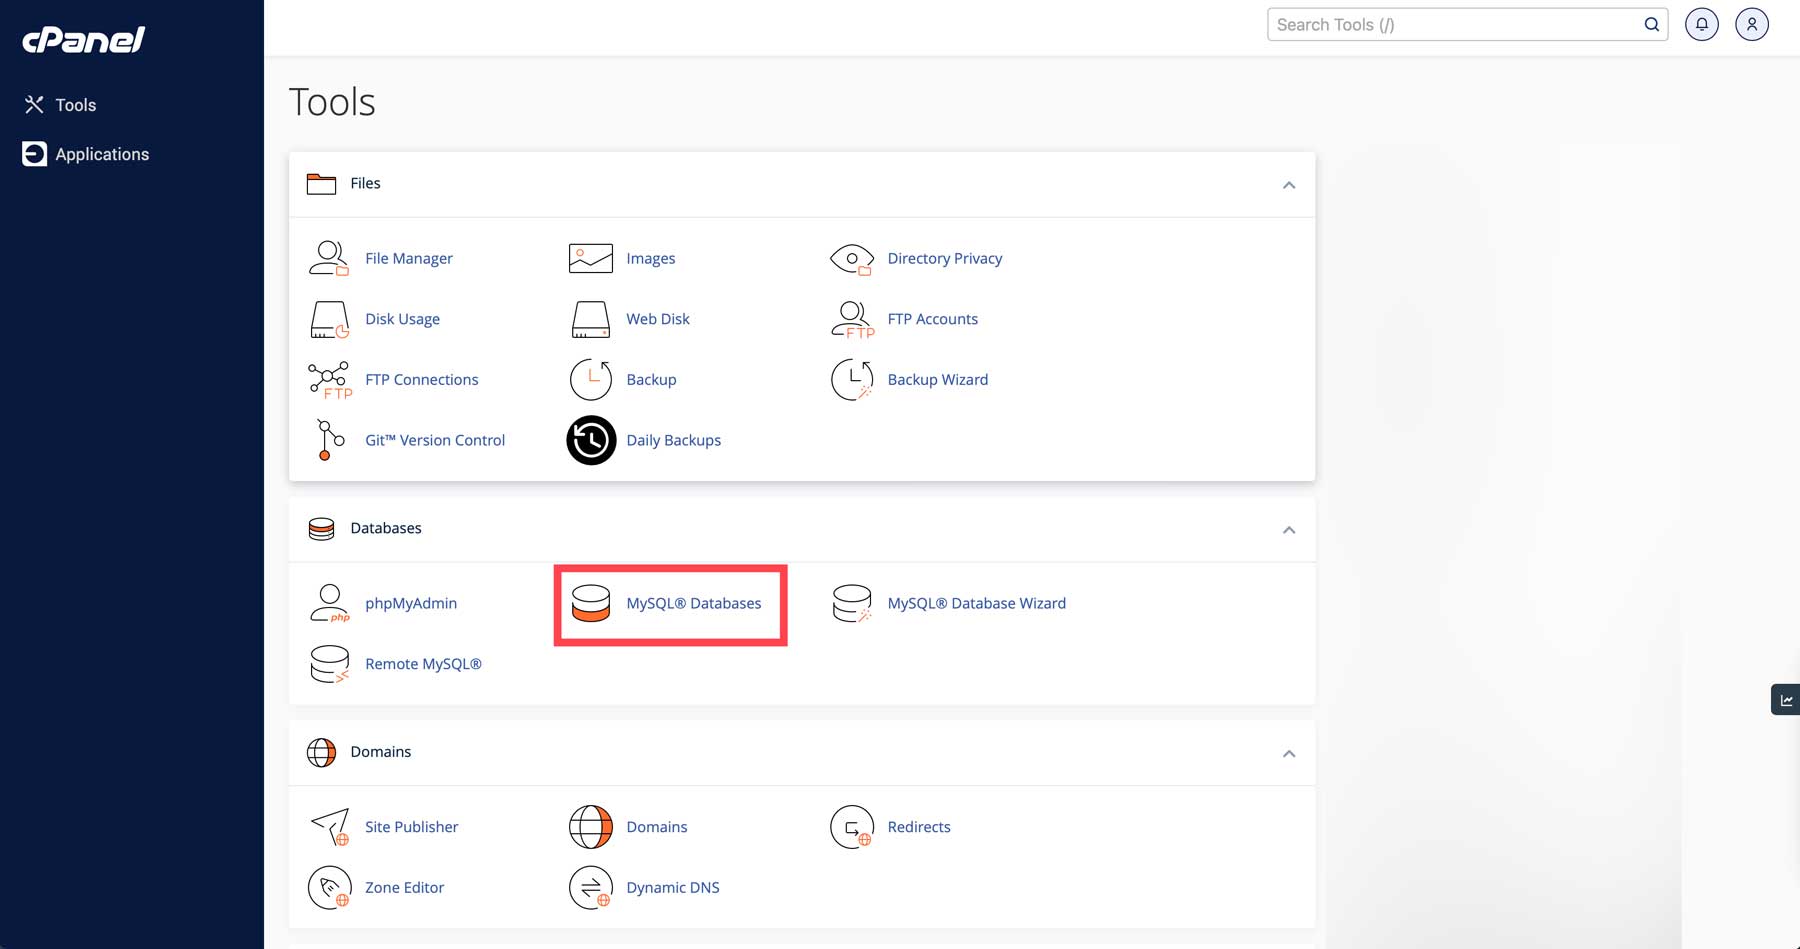
There you need to do 3 main things:
- Create a New Database
- Create a New User for your Database
- Add the User to the Database
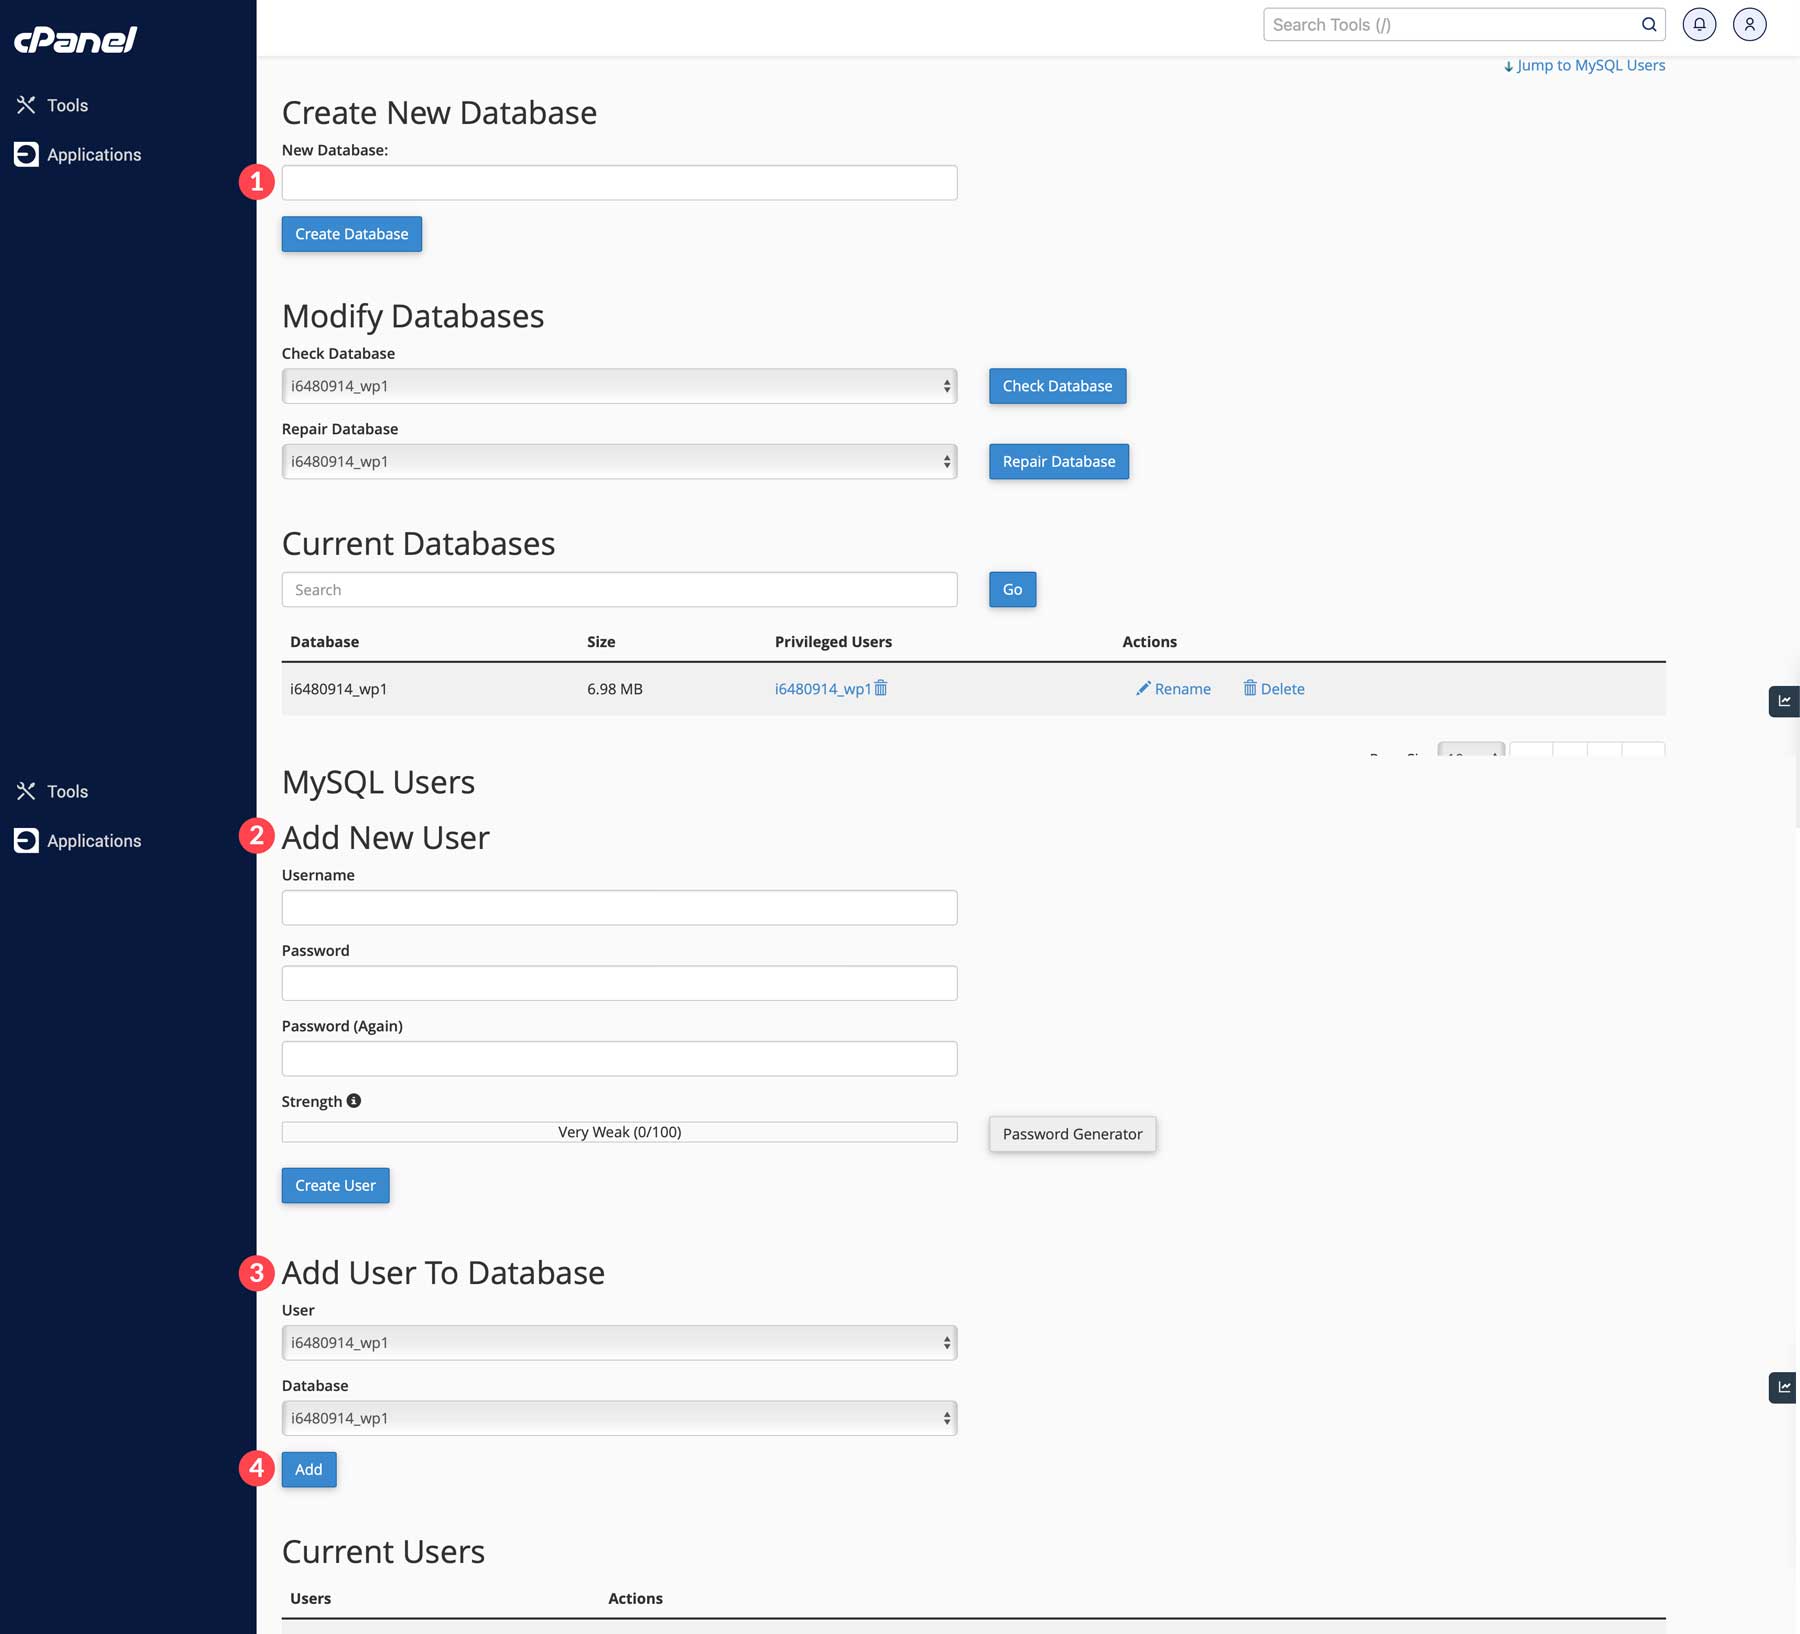
You will need to remember this information (database, username, password) when setting up your WordPress Installation you may need to save it somewhere temporarily.
Now you are ready to transfer your WordPress files over to your site.
Step 3: Upload WordPress Files to Your Site’s Root Folder
Accessing your site’s directory on your web server will require using an FTP client or accessing the directory using the file directory via CPanel.
Method 1: Uploading the Files with FTP (FileZilla)
To access your web server root directory using FTP, You will need an FTP client like (FileZilla, Cyberduck, or Transmit). Feel free to find the best FTP client for your needs. For this illustration, I’m using FileZilla.
Open FileZilla and enter the FTP credentials provided by your hosting provider. This includes the Hostname (the address to the server), Username, Password, and Port (leaving the port blank will work fine in most cases). In some cases, you will need to create a new FTP user on your hosting site so that you will have a username and password to log in to the server.
FileZilla (like most FTP clients) will have a section on the left that accesses your local site (your computer) and a section on the right to access the remote site (your web server). On the left, locate and open the WordPress Folder contents you downloaded earlier. On the right, open the public_html directory (this is the root directory of your website).
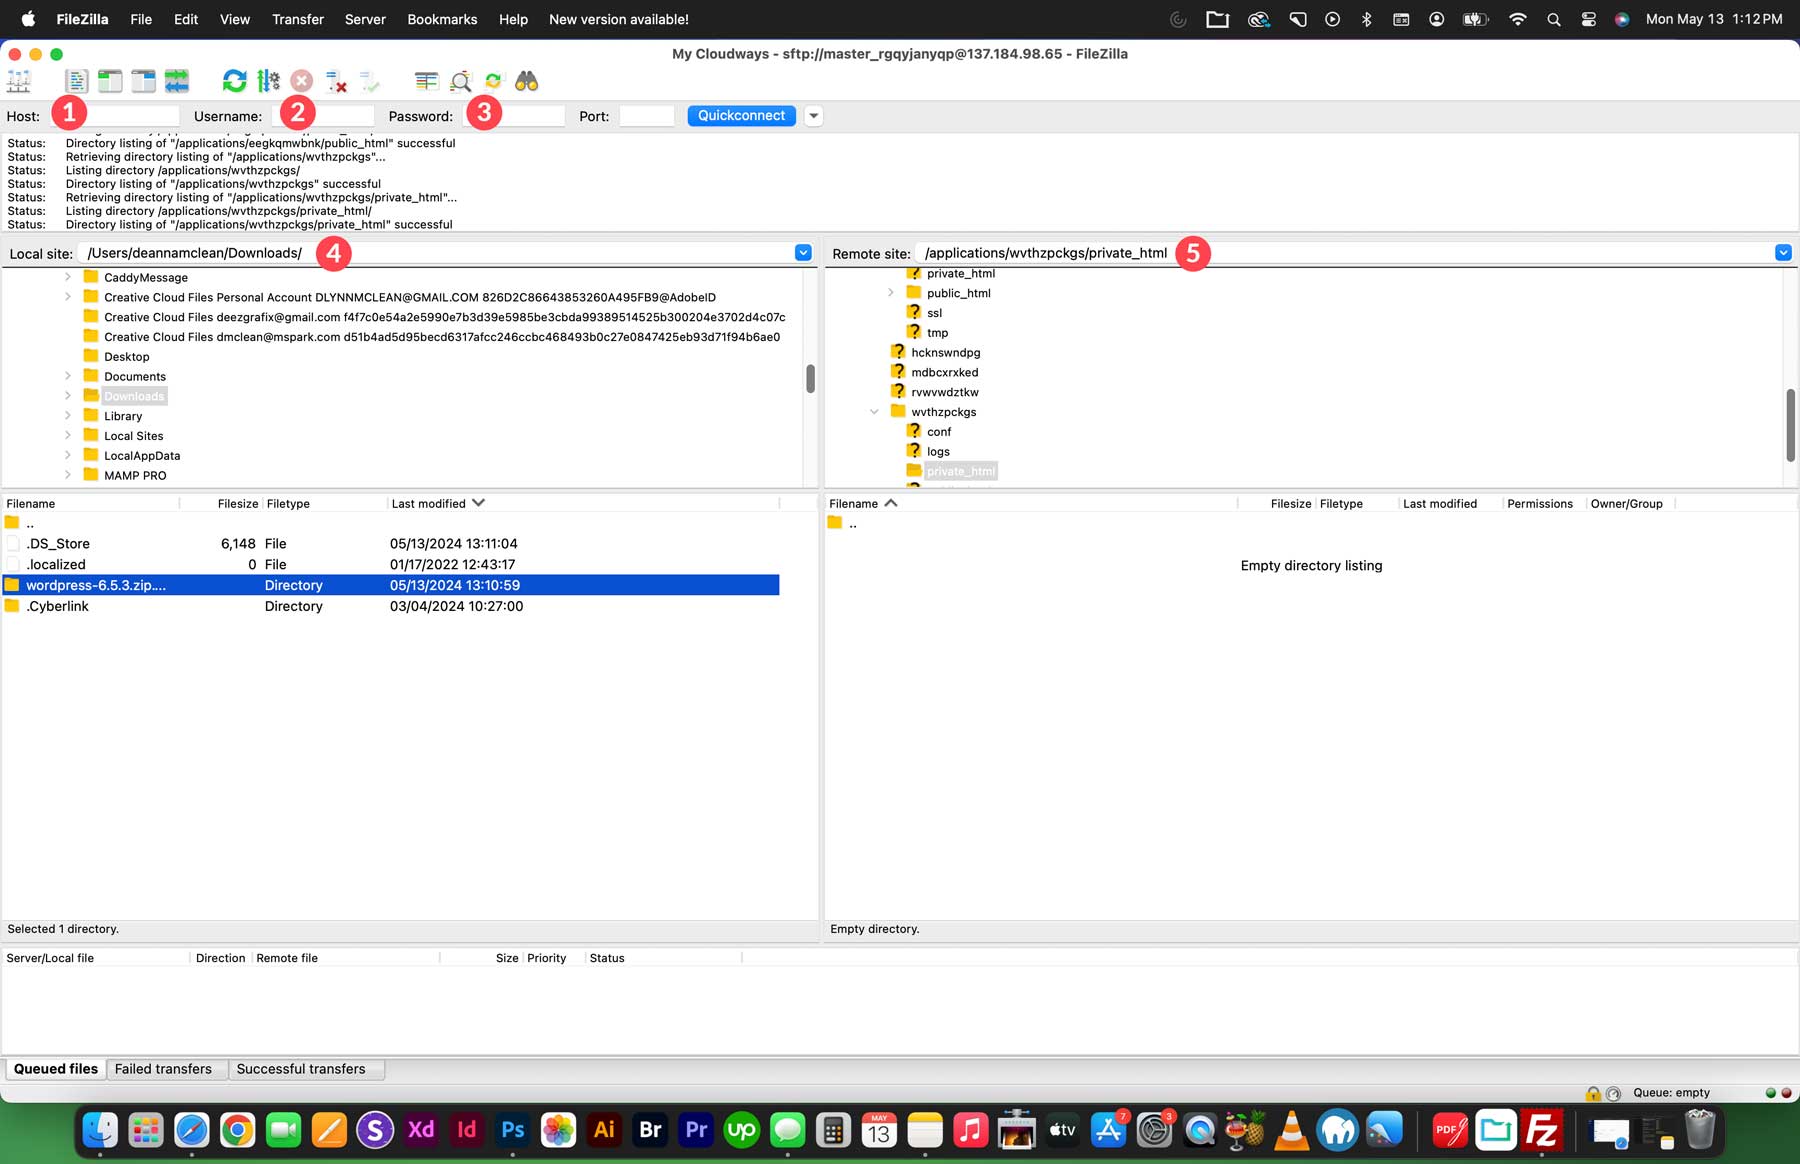
Select all the the wordpress files from the left and drag them over to the public_html directory on the right.
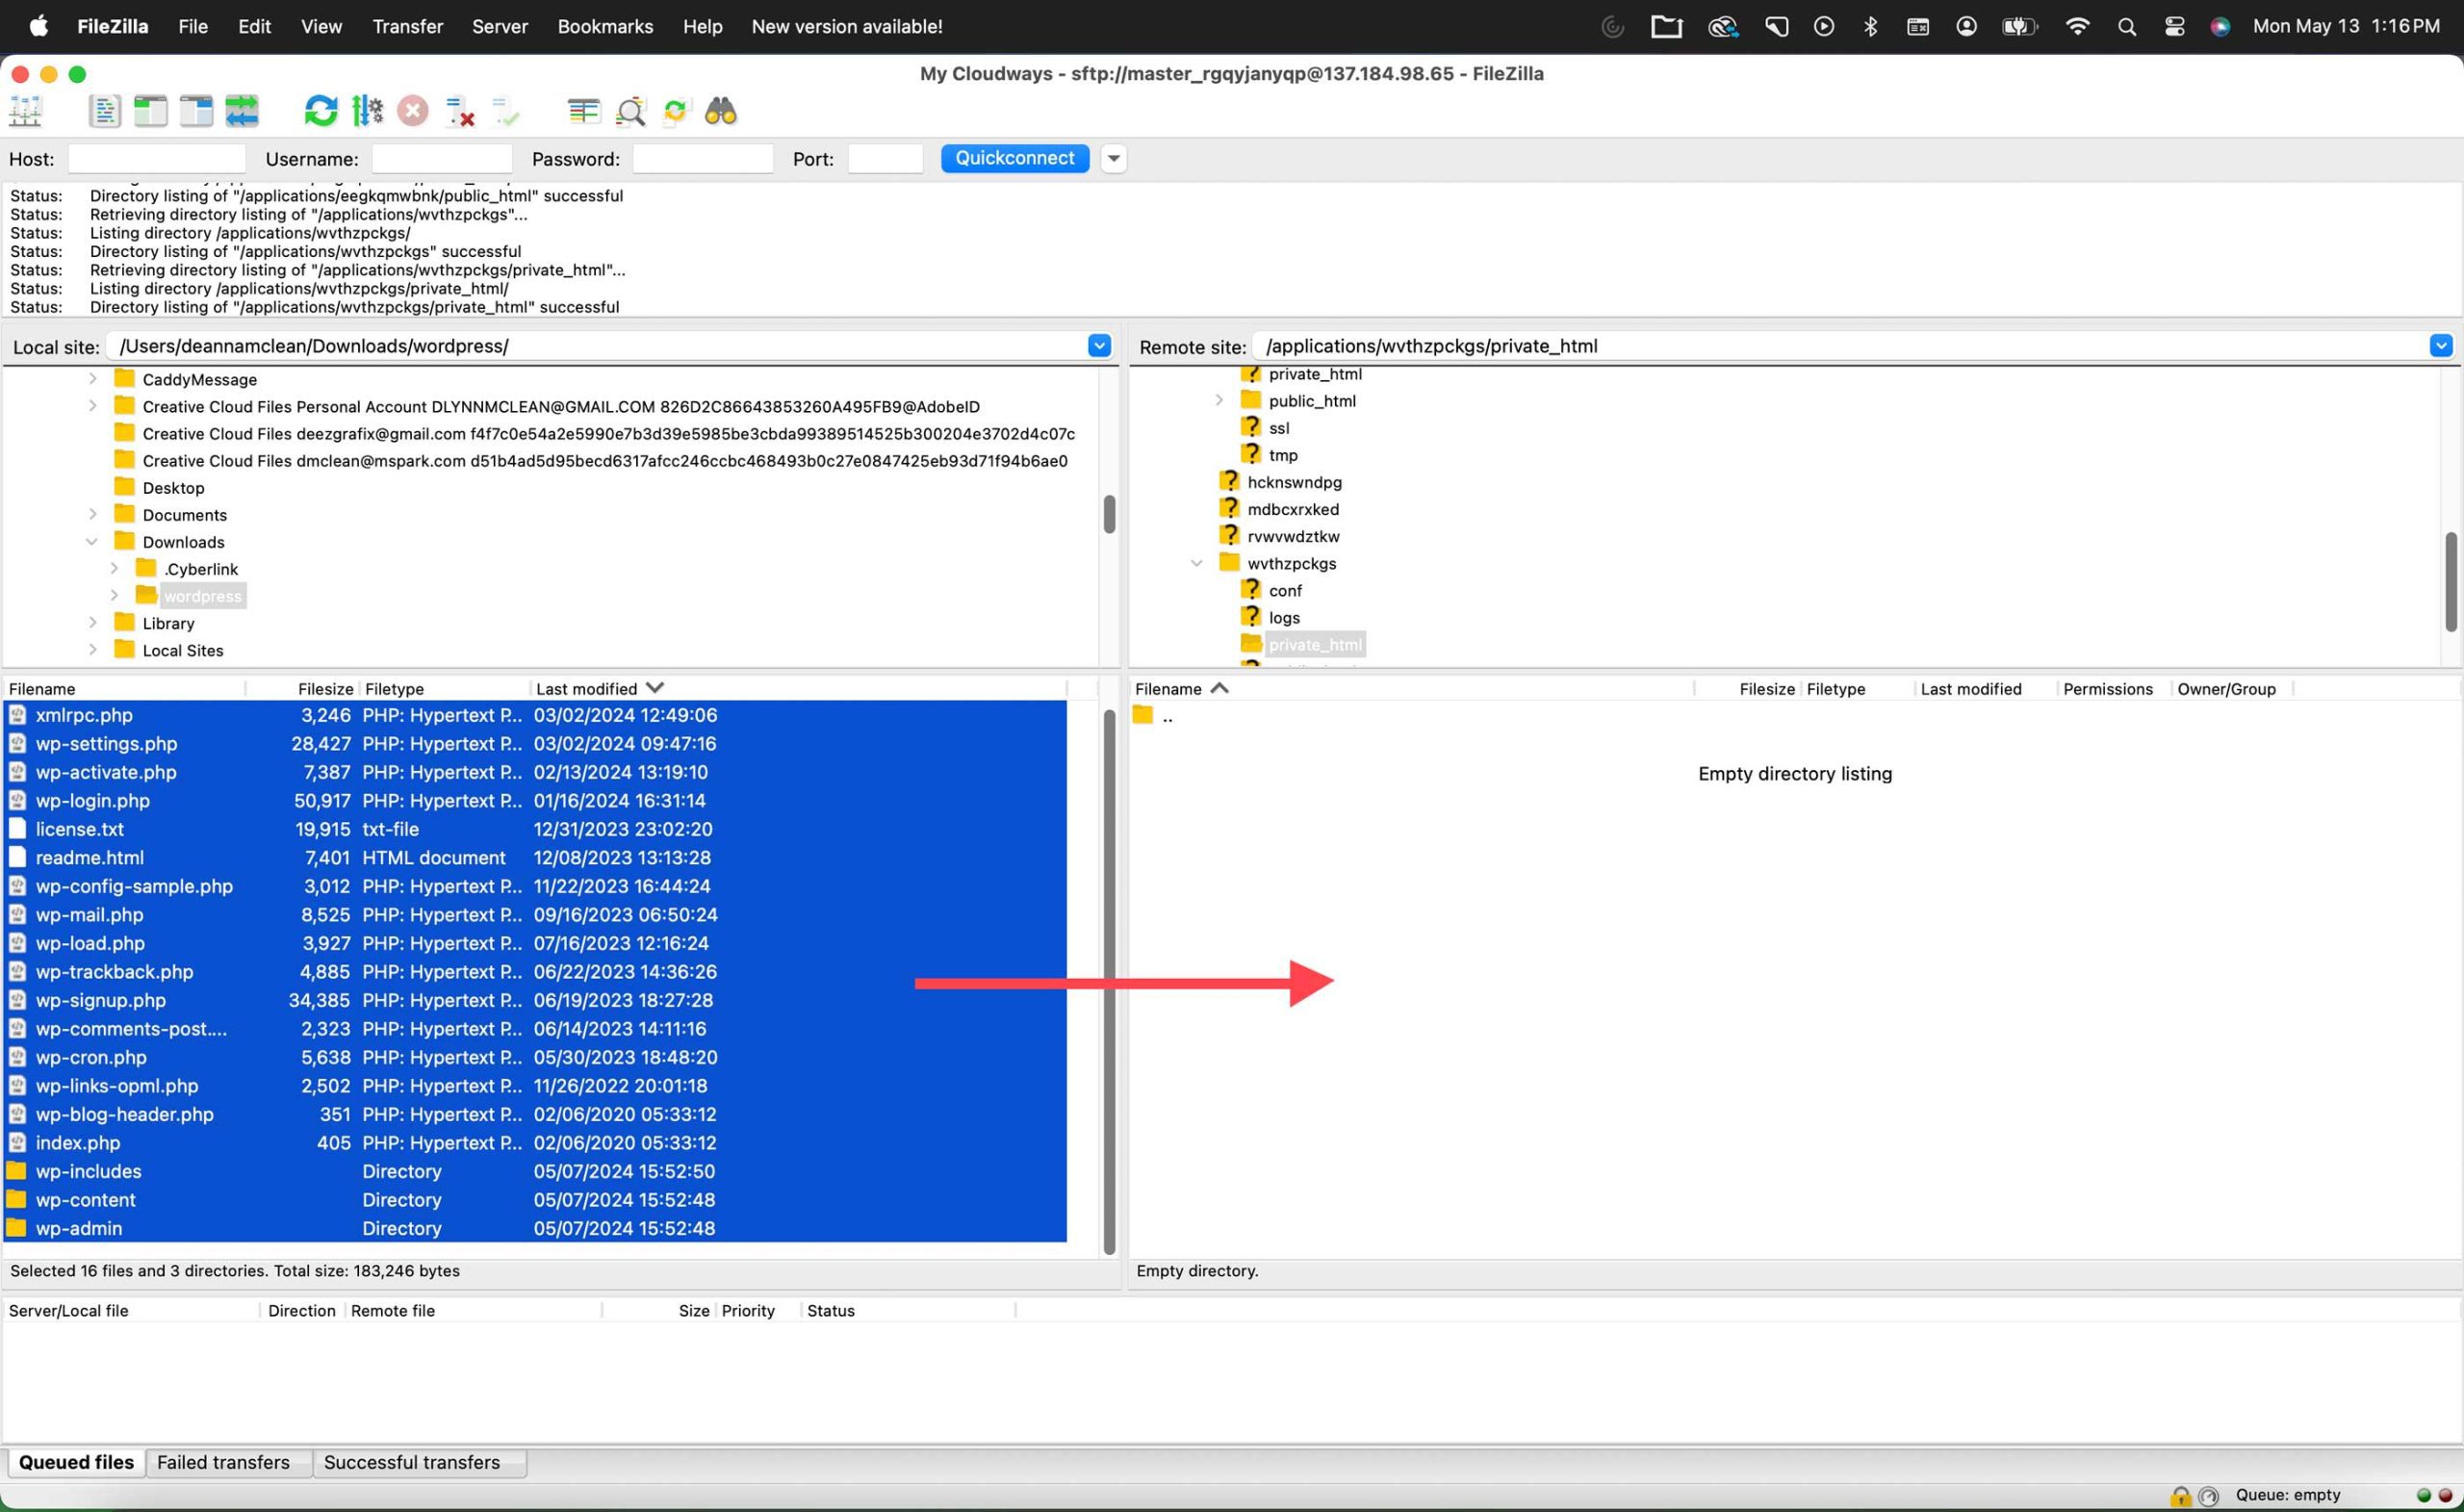
This may take a few minutes to complete. However, after the transfer is complete, you are ready to run the WordPress installation.
For more info, you can check out our ultimate guide to managing your WordPress website with FTP.
Method 2: Uploading the Files using File Manager from Cpanel
As an alternative to using an FTP client, it may be easier to transfer your files using File Manager. Login to Cpanel and launch the File Manager (it should be under the Files category in the Cpanel dashboard).
Once clicked, you may be prompted to choose the directory location. Most of the time, this will be the Web Root (public_html/www). If you have more than one website on the server, make sure you choose the one that needs the new WordPress install.
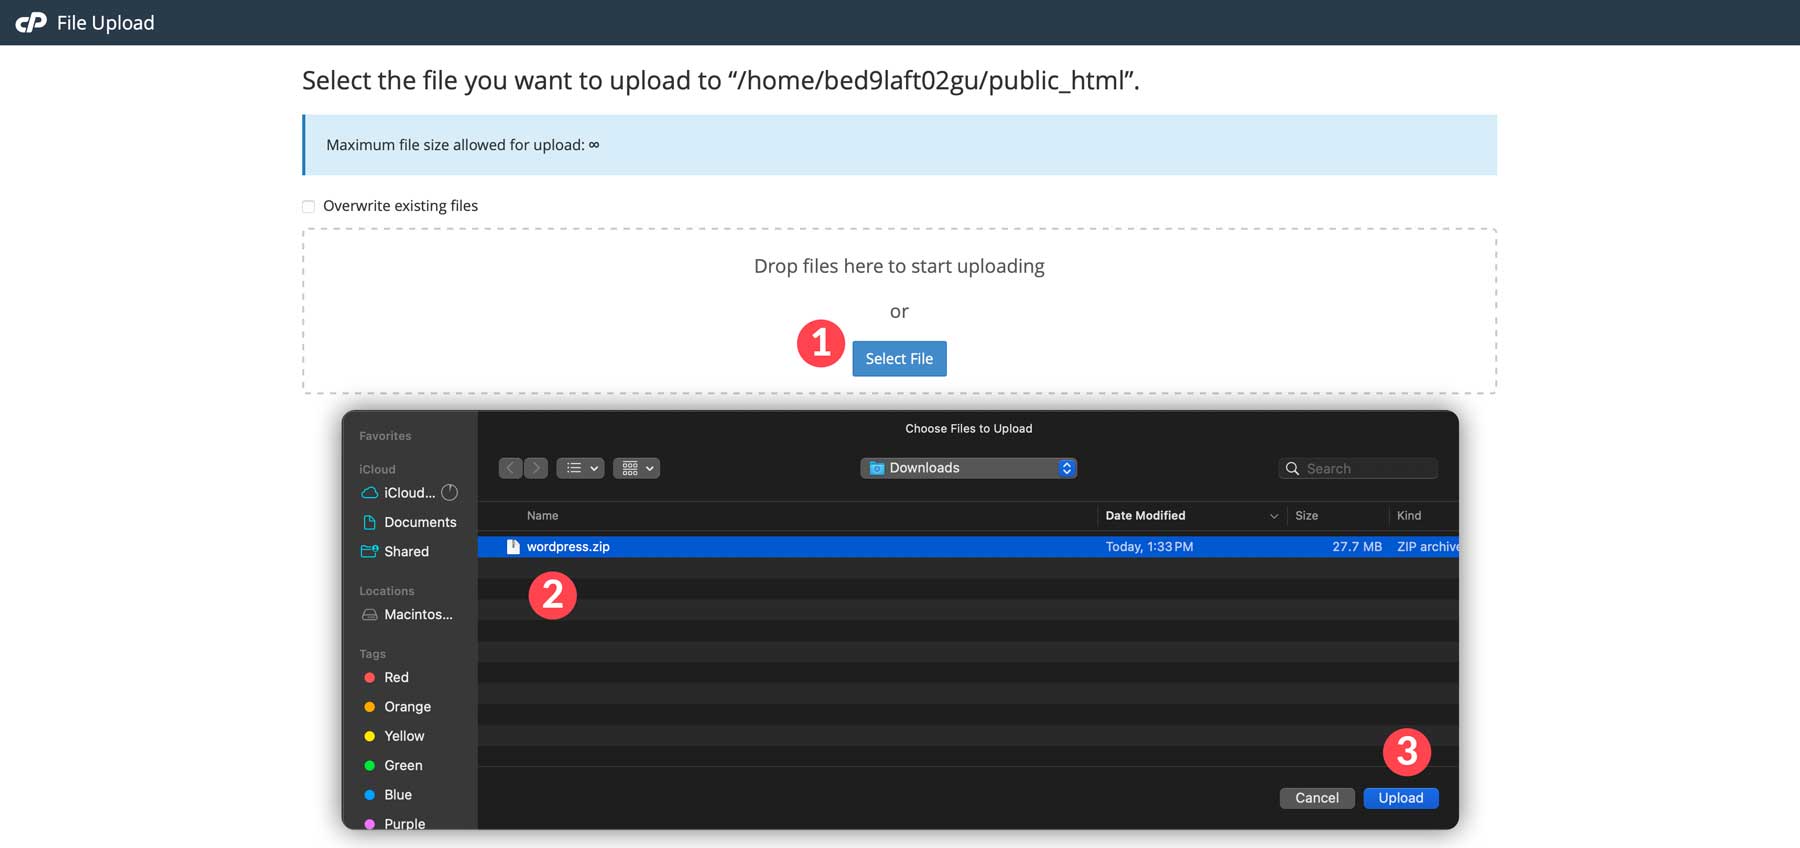
From the File Manager, make sure you are at the web root (public_html) directory and then click the upload button.
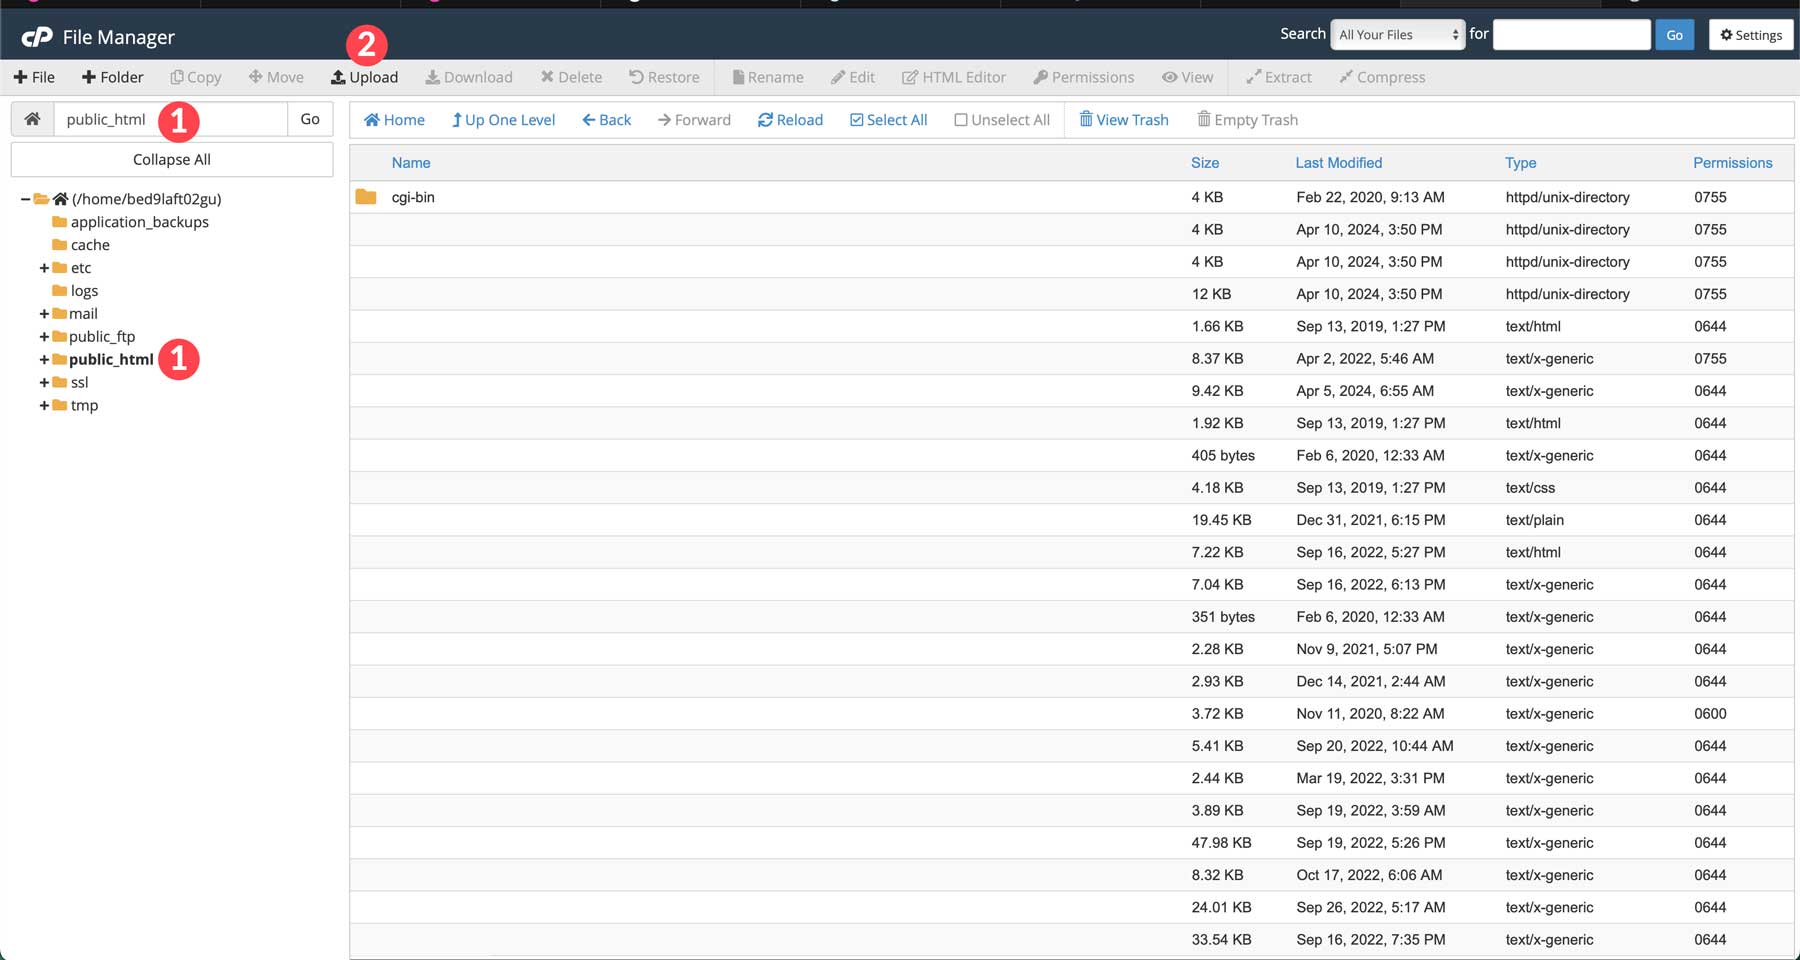
Then upload the WordPress Zip file.
This would be a good time to take a few sips of coffee while you wait for the file to be uploaded.
Once done, you will need to extract the folder/files from the zip file.
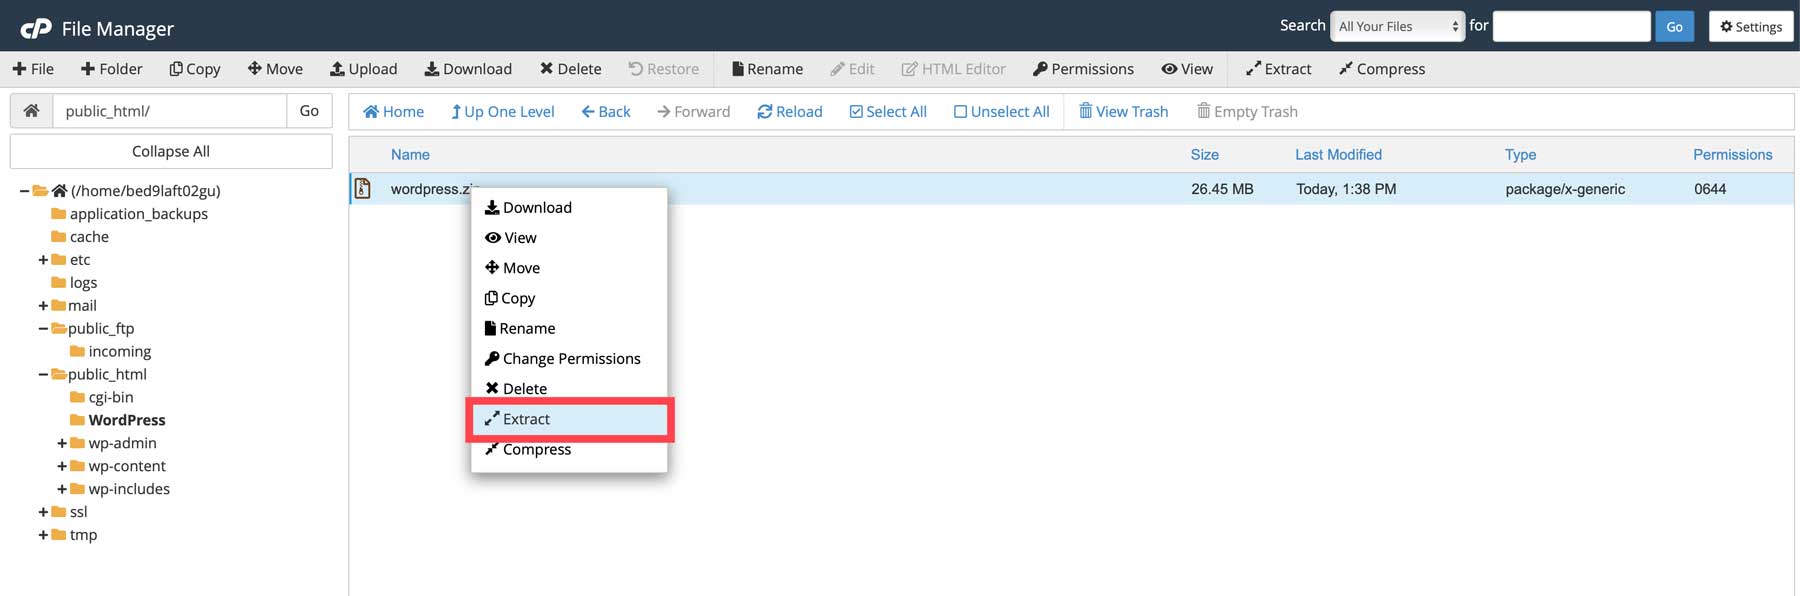
Once extracted, a new extracted folder appears in the root directory. We are not quite done yet. Technically, WordPress lives wherever the files live. Open the extracted folder to see the WordPress files.
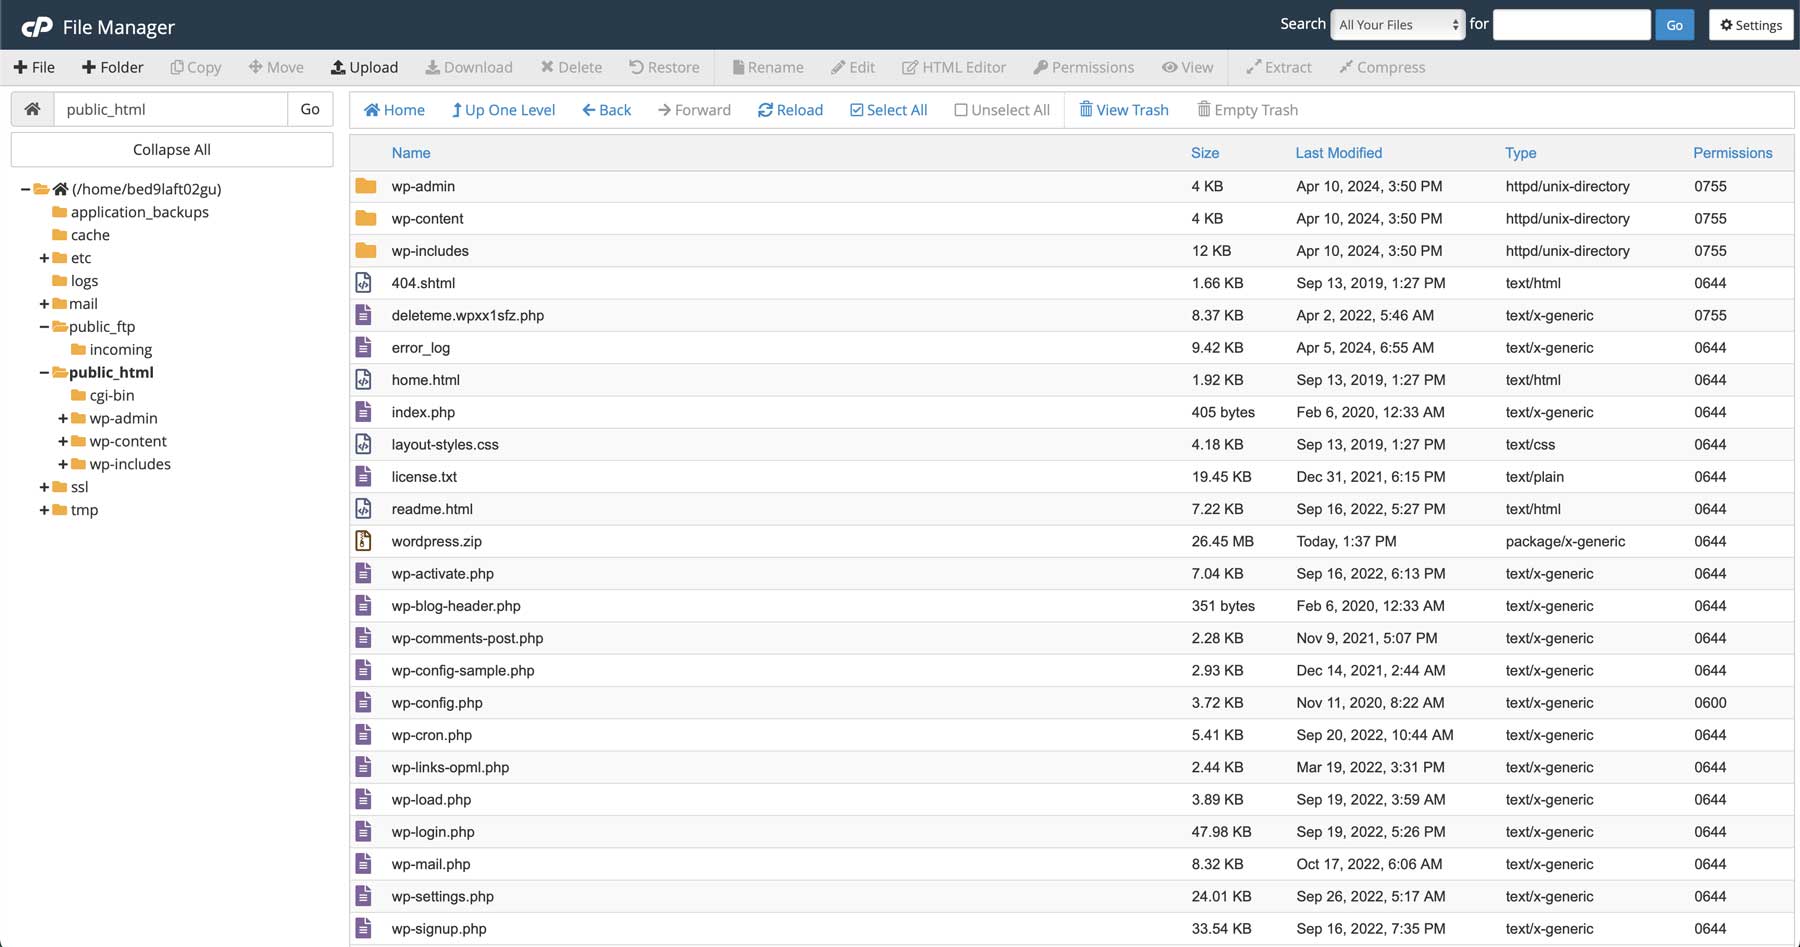
So, if you want WordPress to live in the root directory (which is what you want most of the time), you need to move the files from its folder(s) so that all the files exist at the web root (public_html). To move the files, click Select All to select all the WordPress Files and select to move them. Then select the directory you want to move the files to. In this case, it is the public_html directory.
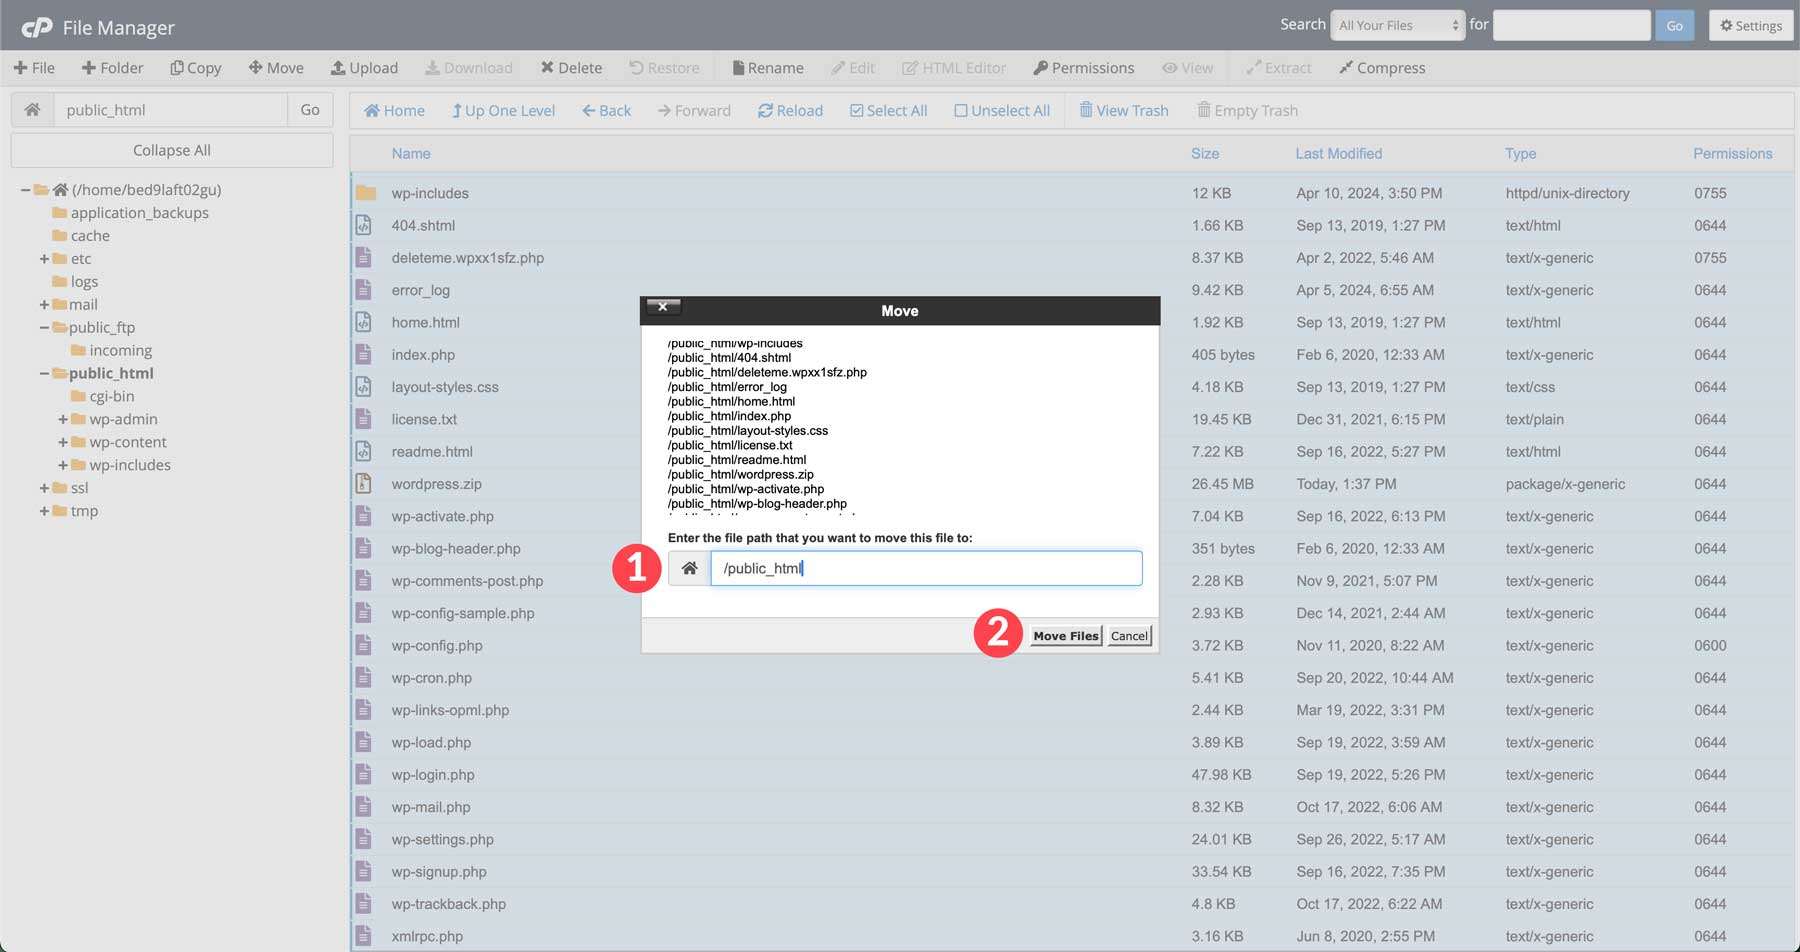
Now, all of the files are in the intended directory.
Right now your WordPress site is accessible from www.yoursite.com.
But if you wanted WordPress to exist in a subdomain, all you would need to do is create a new folder at the root (public_html) and move all the WordPress files into that sub folder. For example, if I created a new folder with the name “wpsite” and then moved the WordPress files into that folder, my WordPress site would now be accessible from www.yoursite.com/wpsite/ instead of www.yoursite.com.
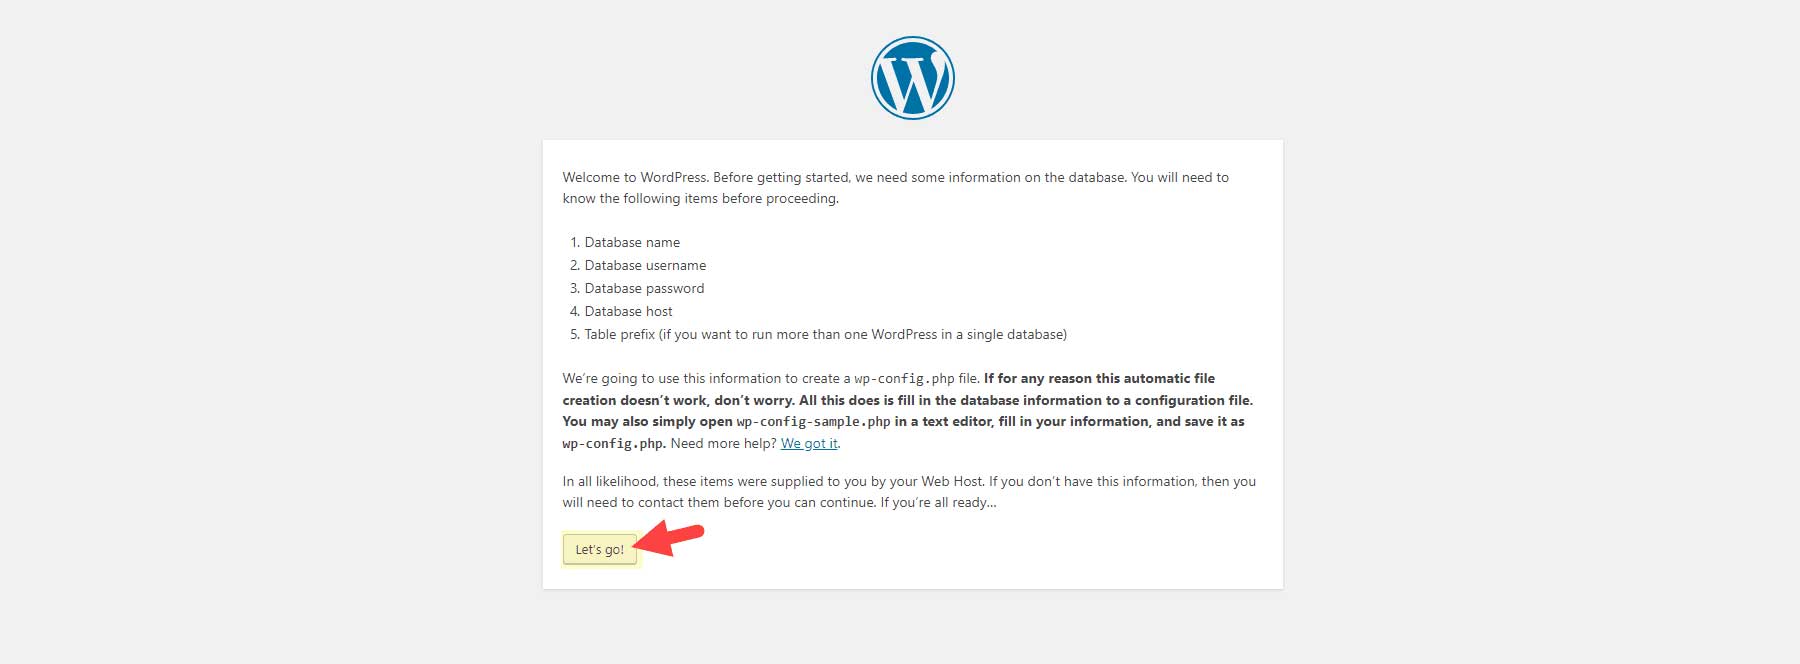
Run the WordPress Installer
Now that you have the WordPress files loaded on your host server in the correct directory, it’s time to run the famous five-minute WordPress installation process. You may be thinking, “Install WordPress? Haven’t I already done that?!”. Don’t worry; you have done most of the heavy lifting already. This important installation process adds WordPress to your database.
To jumpstart the WordPress installer, simply navigate to your site from your web browser. So, if you have WordPress at the root, go to www.yoursite.com.
The first step allows you to select a language. Once you select your language, click continue.

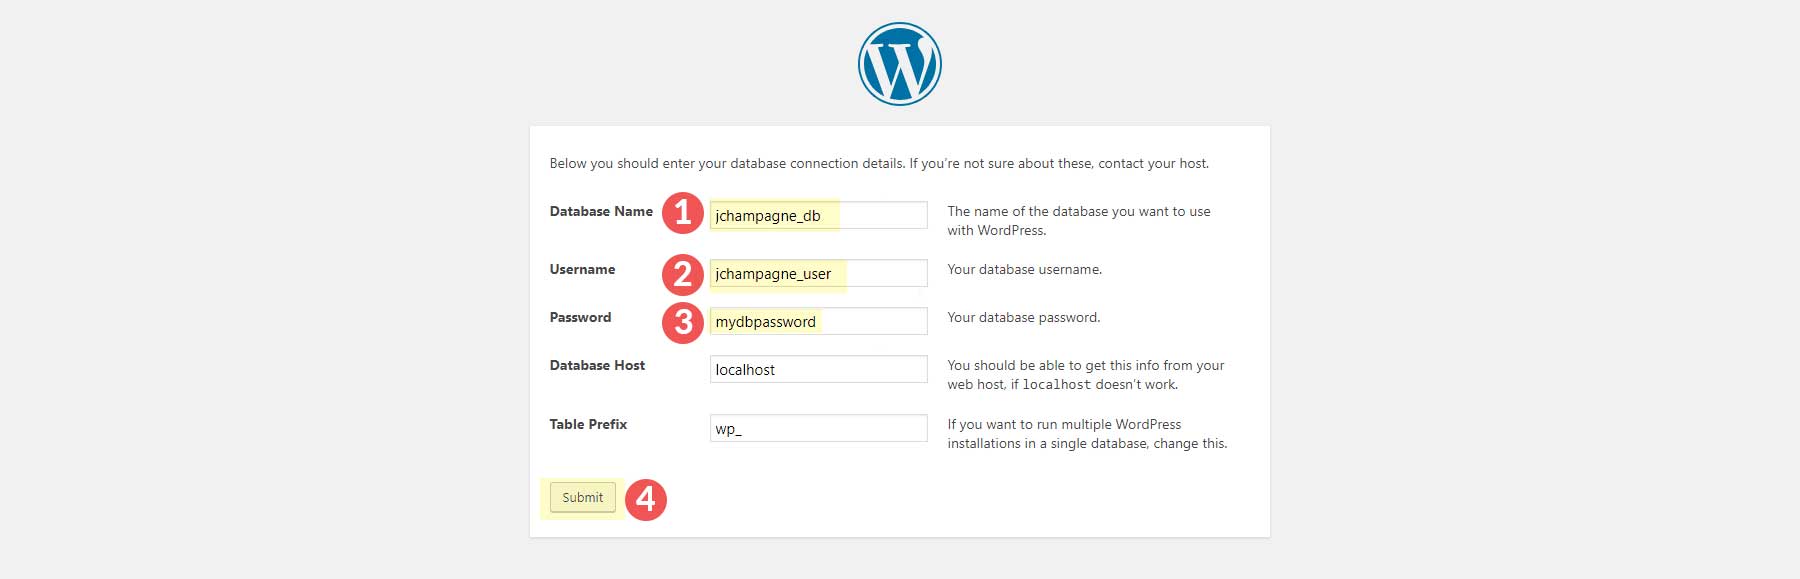
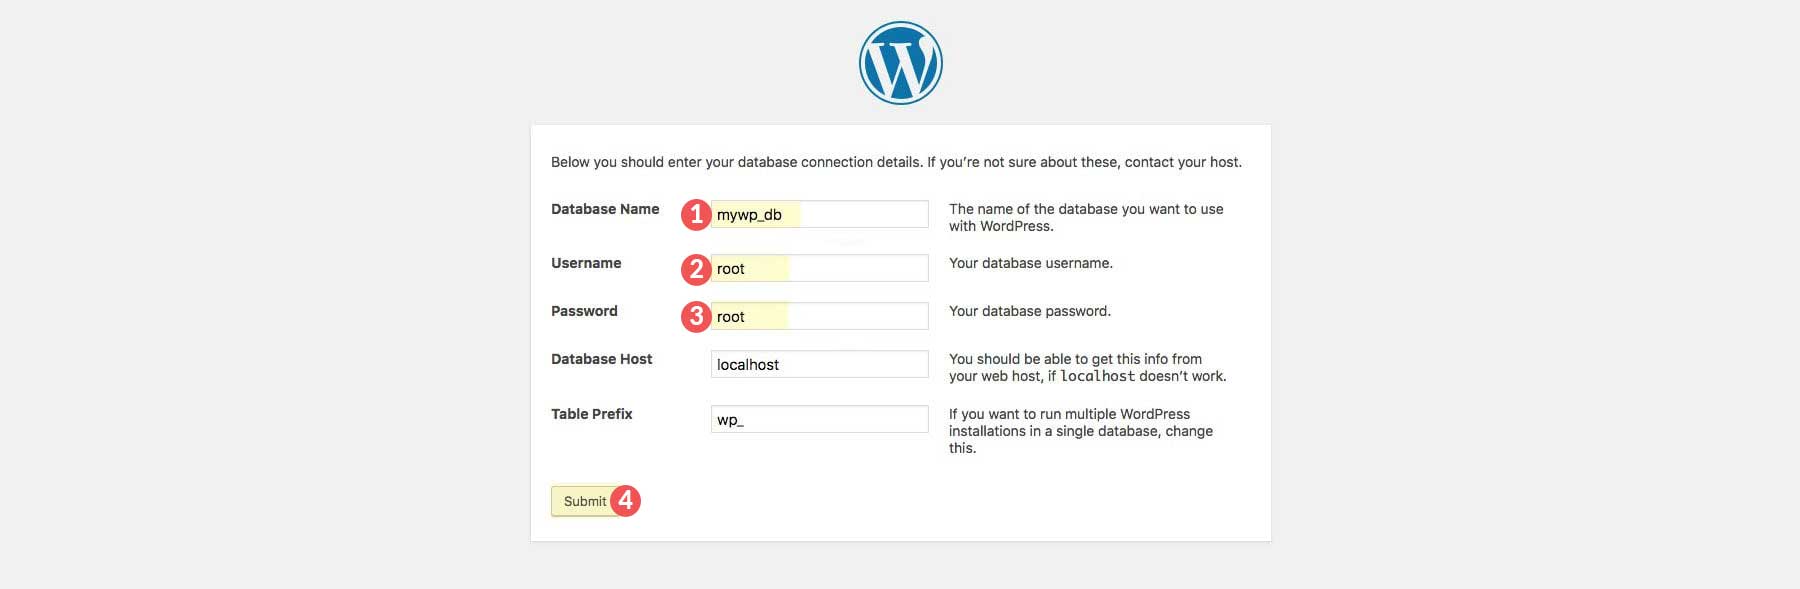
Next, you will be prompted to retrieve your database credentials, which were created in step 2 above.
When ready, click “Let’s Go”.
Enter the Database Name, Database User, and Database Password you created in step 2. You can leave the Database Host as “localhost” and the Table Prefix as “wp_” unless you have a unique setup in mind. Then click Submit.
Now run the installation.

For this last step, enter the information needed for your new WordPress website. This includes the Site Title, the admin username and password to access the backend of your site, and the admin email address. Don’t worry, you can always change this later within the WordPress dashboard after WordPress is installed. Once done, click Submit.
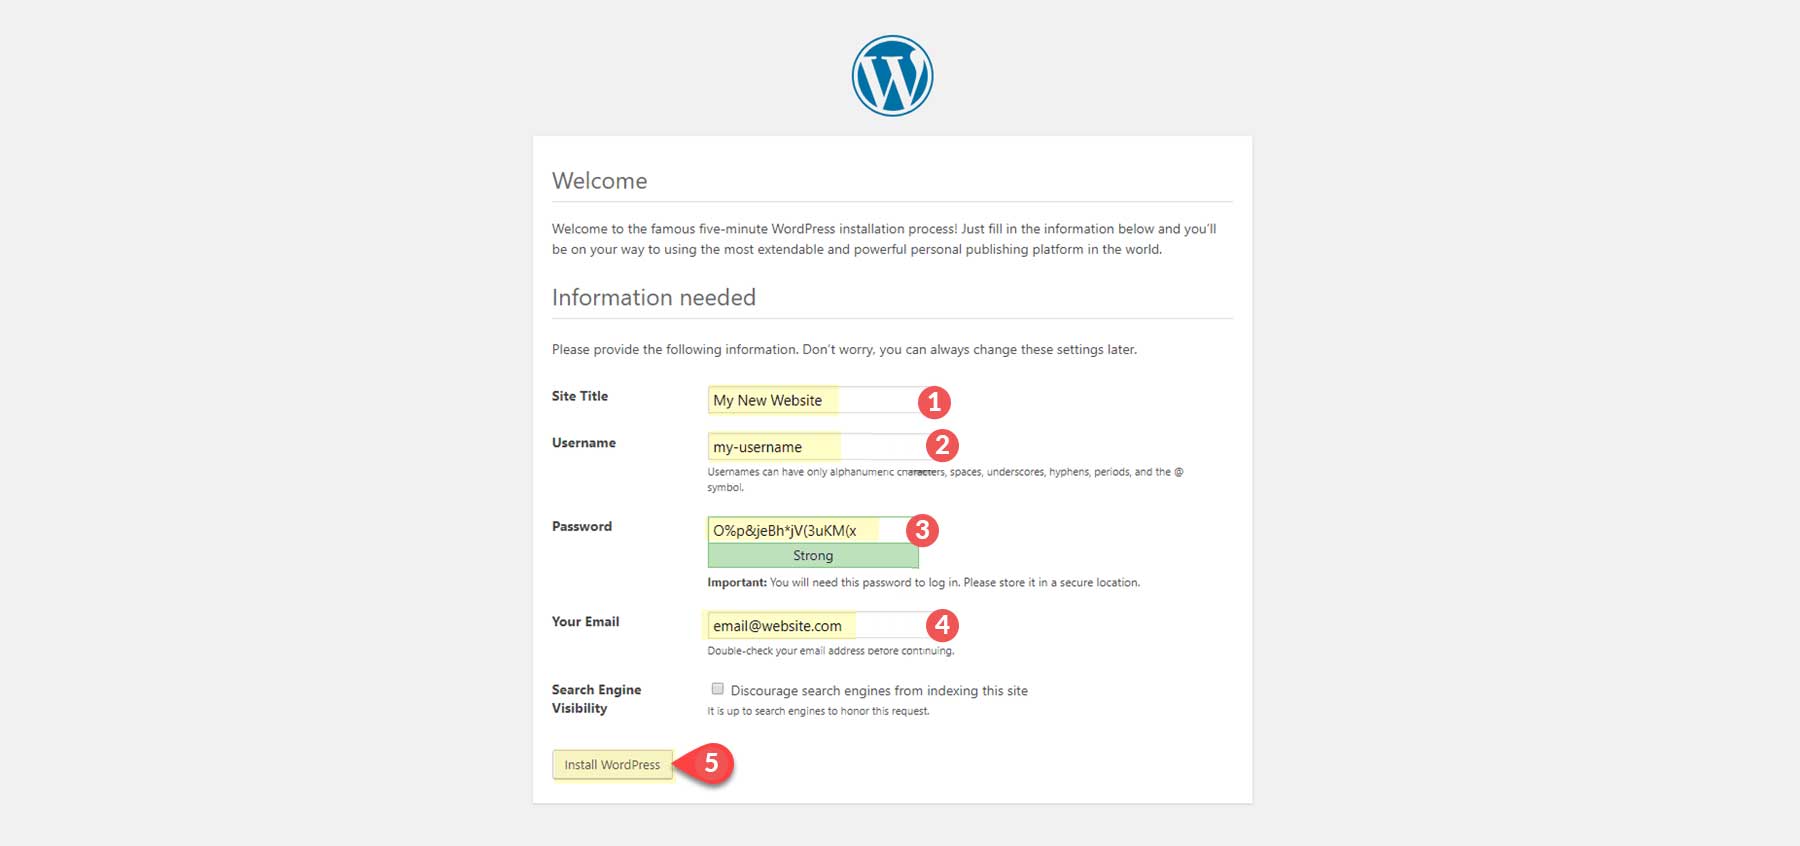
You will be greeted with a nice message telling you that the installation was a success! Click the Login button.

This will bring you to the login page to your WordPress website. You will want to bookmark this page for the future. It can also be accessed by going to the following URL:
www.yoursite.com/wp-login.php
If you don’t like that URL, you can also go to www.yoursite.com/admin, which will redirect you to login as well.
To log in, enter the admin username and password you created in the last step of the WordPress Installation process under “Site Information.”

This will bring you to your WordPress Dashboard, the backend of your site.
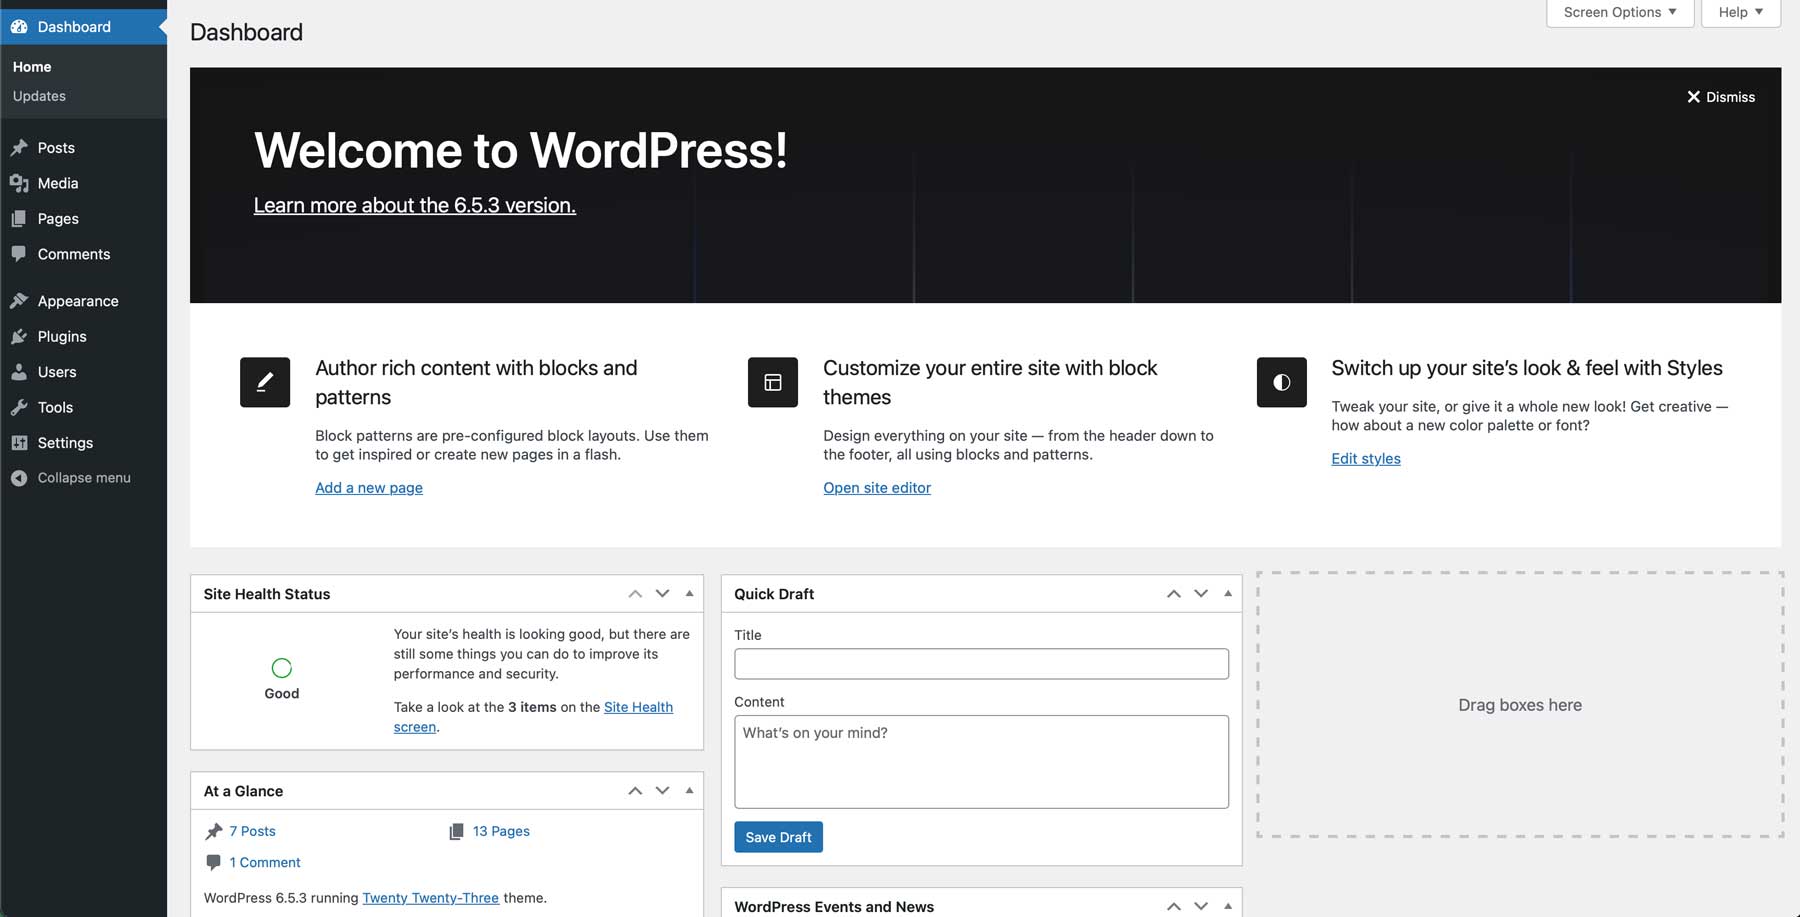
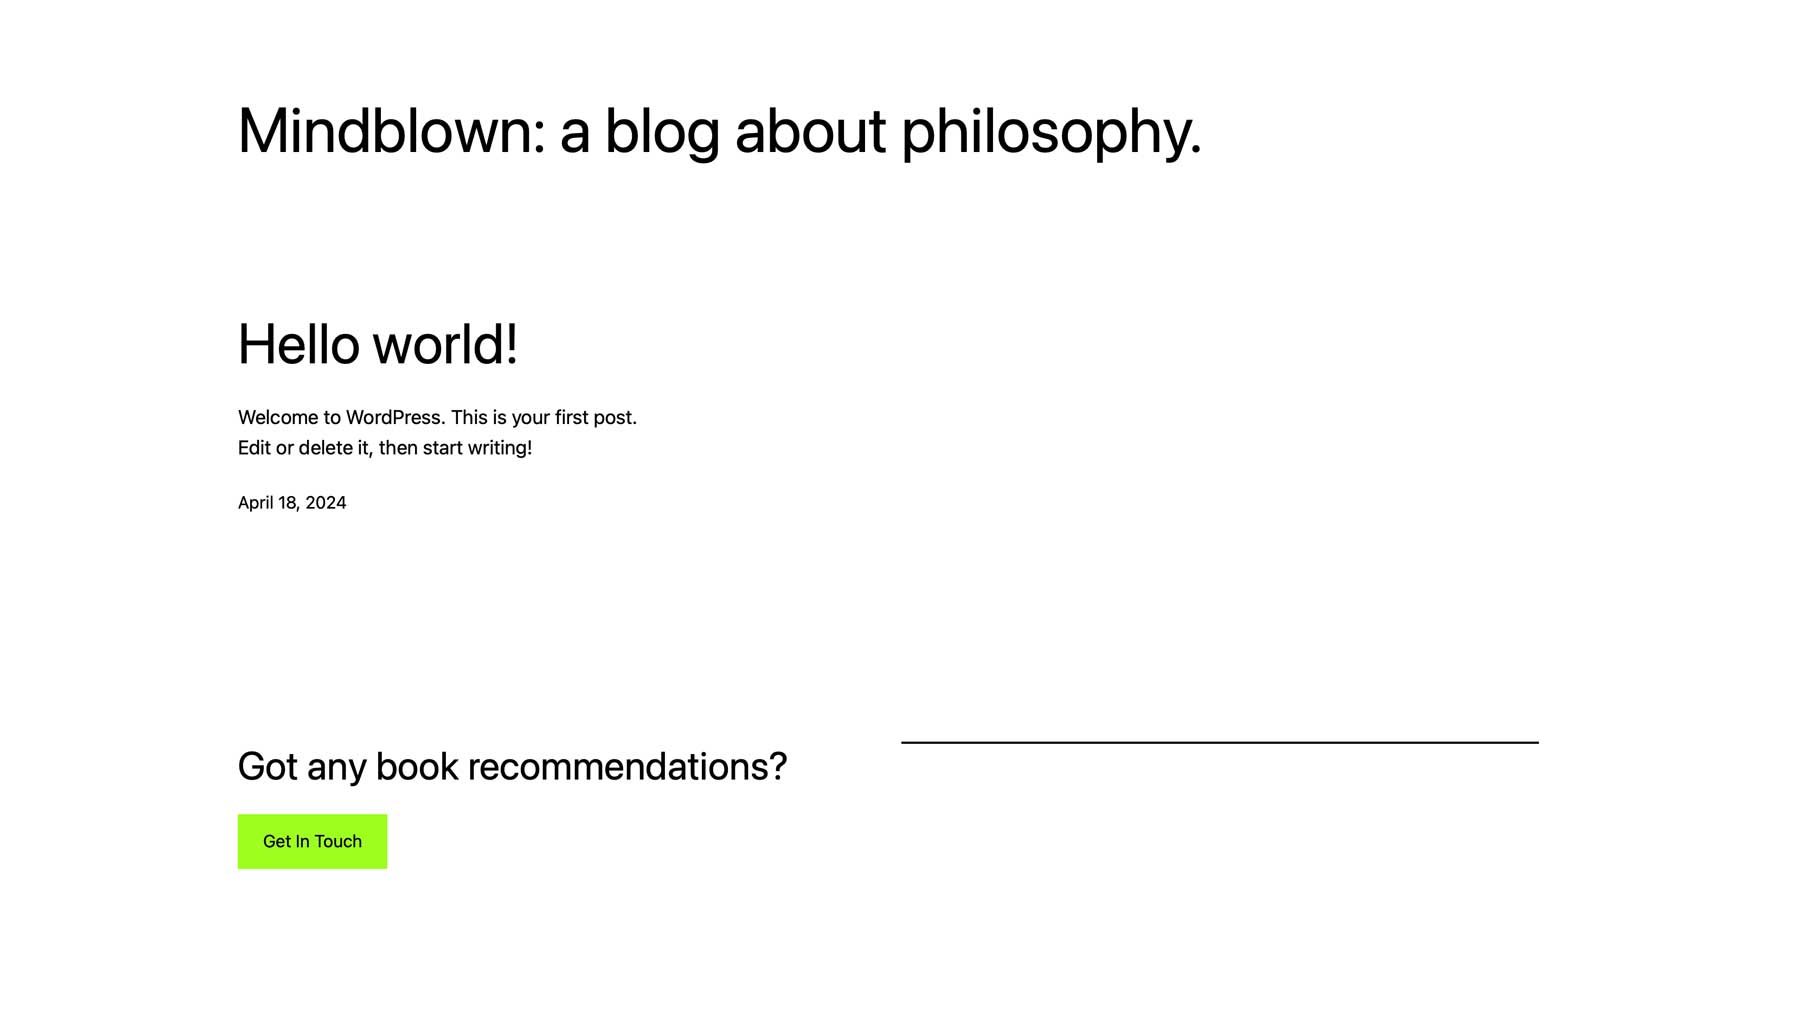
And if you haven’t checked already, visit your live site to see your brand-new website! The default WordPress theme will be active.
How to Setup a Local WordPress Installation on Your Computer
Installing WordPress on your personal computer can be a great way to speed up the development of your WordPress website since you will not be dependent on the internet speed of your ISP. It is always helpful to have a separate local installation of your live site for testing purposes too. That way, you can fix any bugs before pushing necessary updates to the live site.
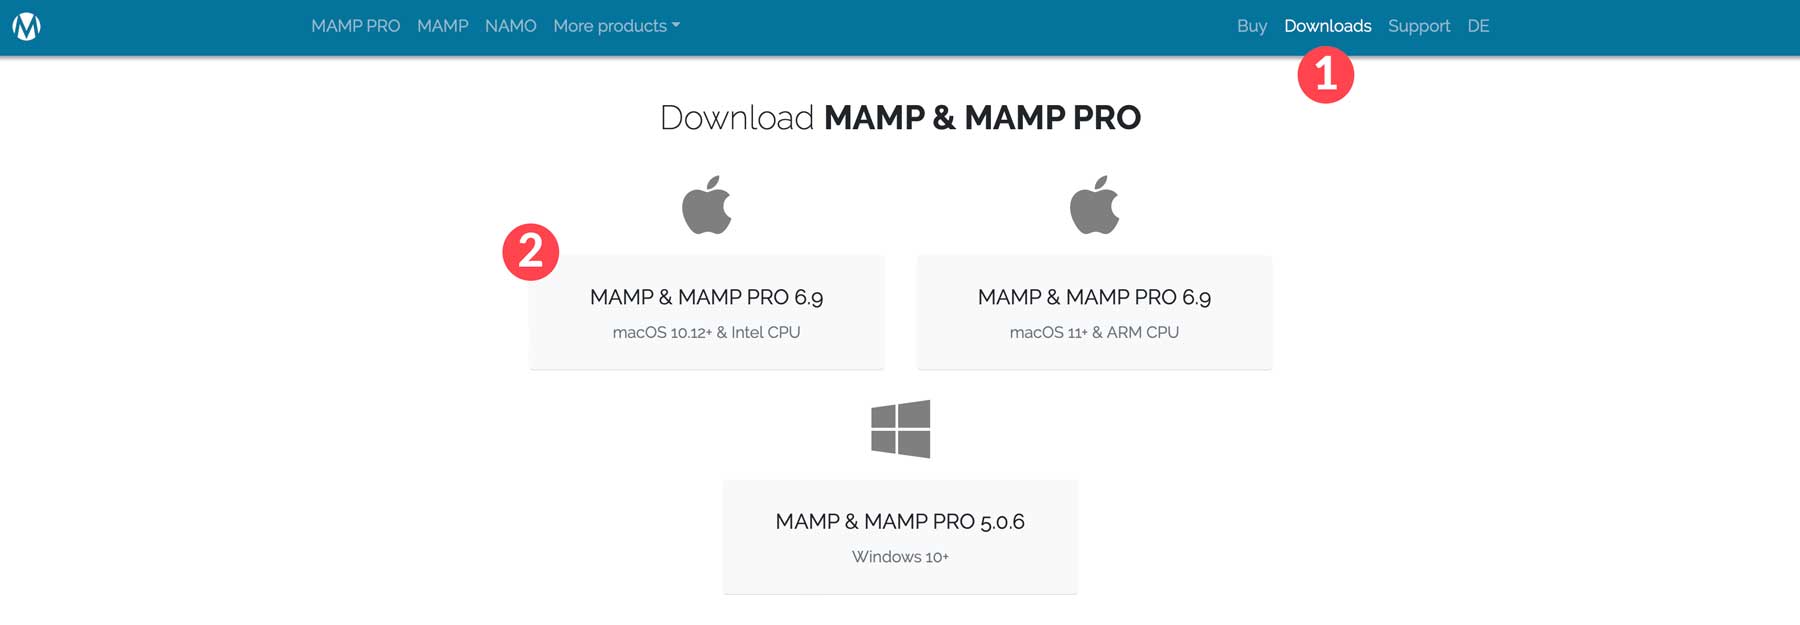
If you want to install WordPress on your personal computer, you will need to set up a local server. The most popular environment to do this is MAMP (for Mac and Windows).
How to Install WordPress on a Mac using MAMP
Subscribe To Our Youtube Channel
MAMP is a free local server that you can use to host your WordPress website locally. It can be installed on both Mac OS and Windows. For this section, we’ll focus on installing MAMP on Mac OS, but the steps are relatively the same for Windows users.
How to Set Up MAMP on a Mac OS
To install MAMP on your Mac, go to their website and download the latest version for Mac OS.
Open the downloaded file to launch the installation. Click continue and complete all the steps to install the software.
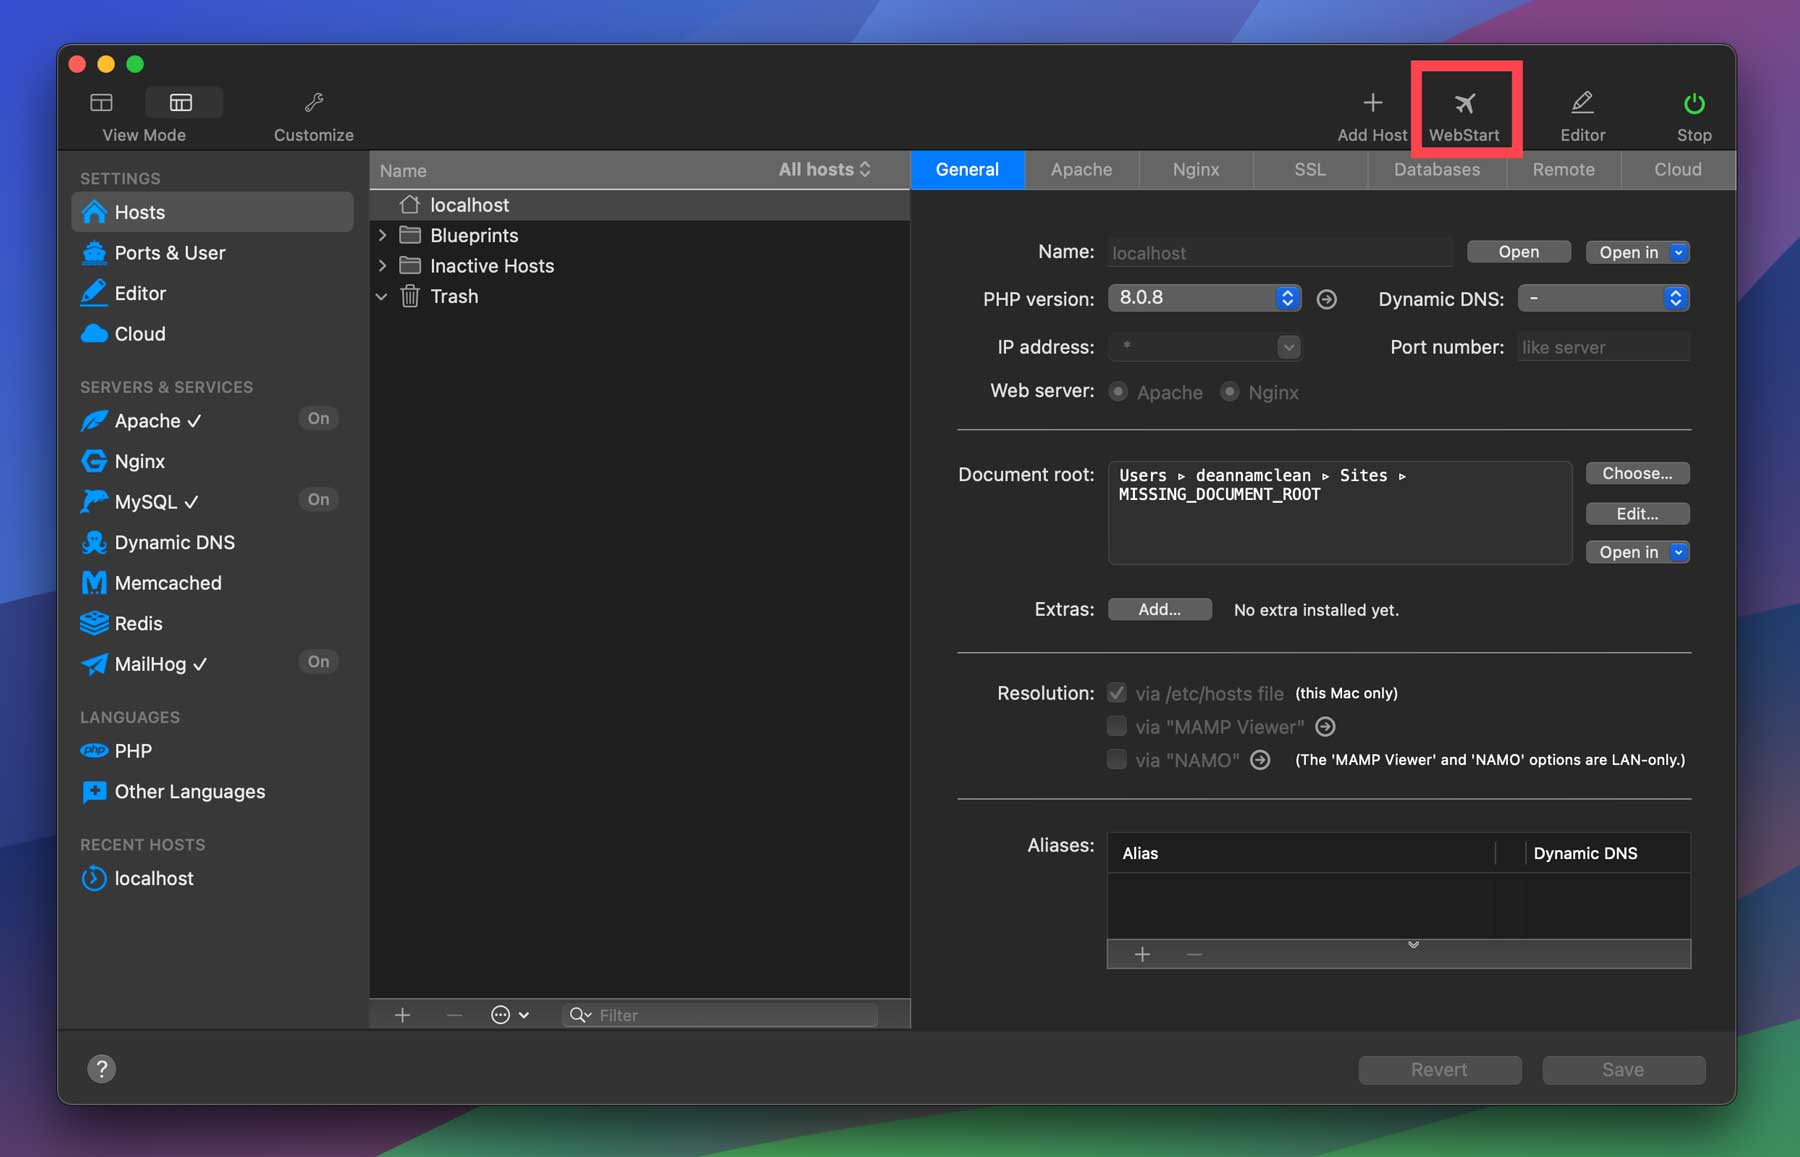
Next, launch the MAMP application. It should be located in your Applications folder or in Launchpad. There will also be a MAMP Pro version (which makes it easier to upgrade if needed) so make sure you launch the free version (with the gray icon).
Next, Click the “power” button on the right with the label “Start Servers.” After a moment, a green light should appear next to each of your servers (Apache and MySQL) listed in the upper right corner.
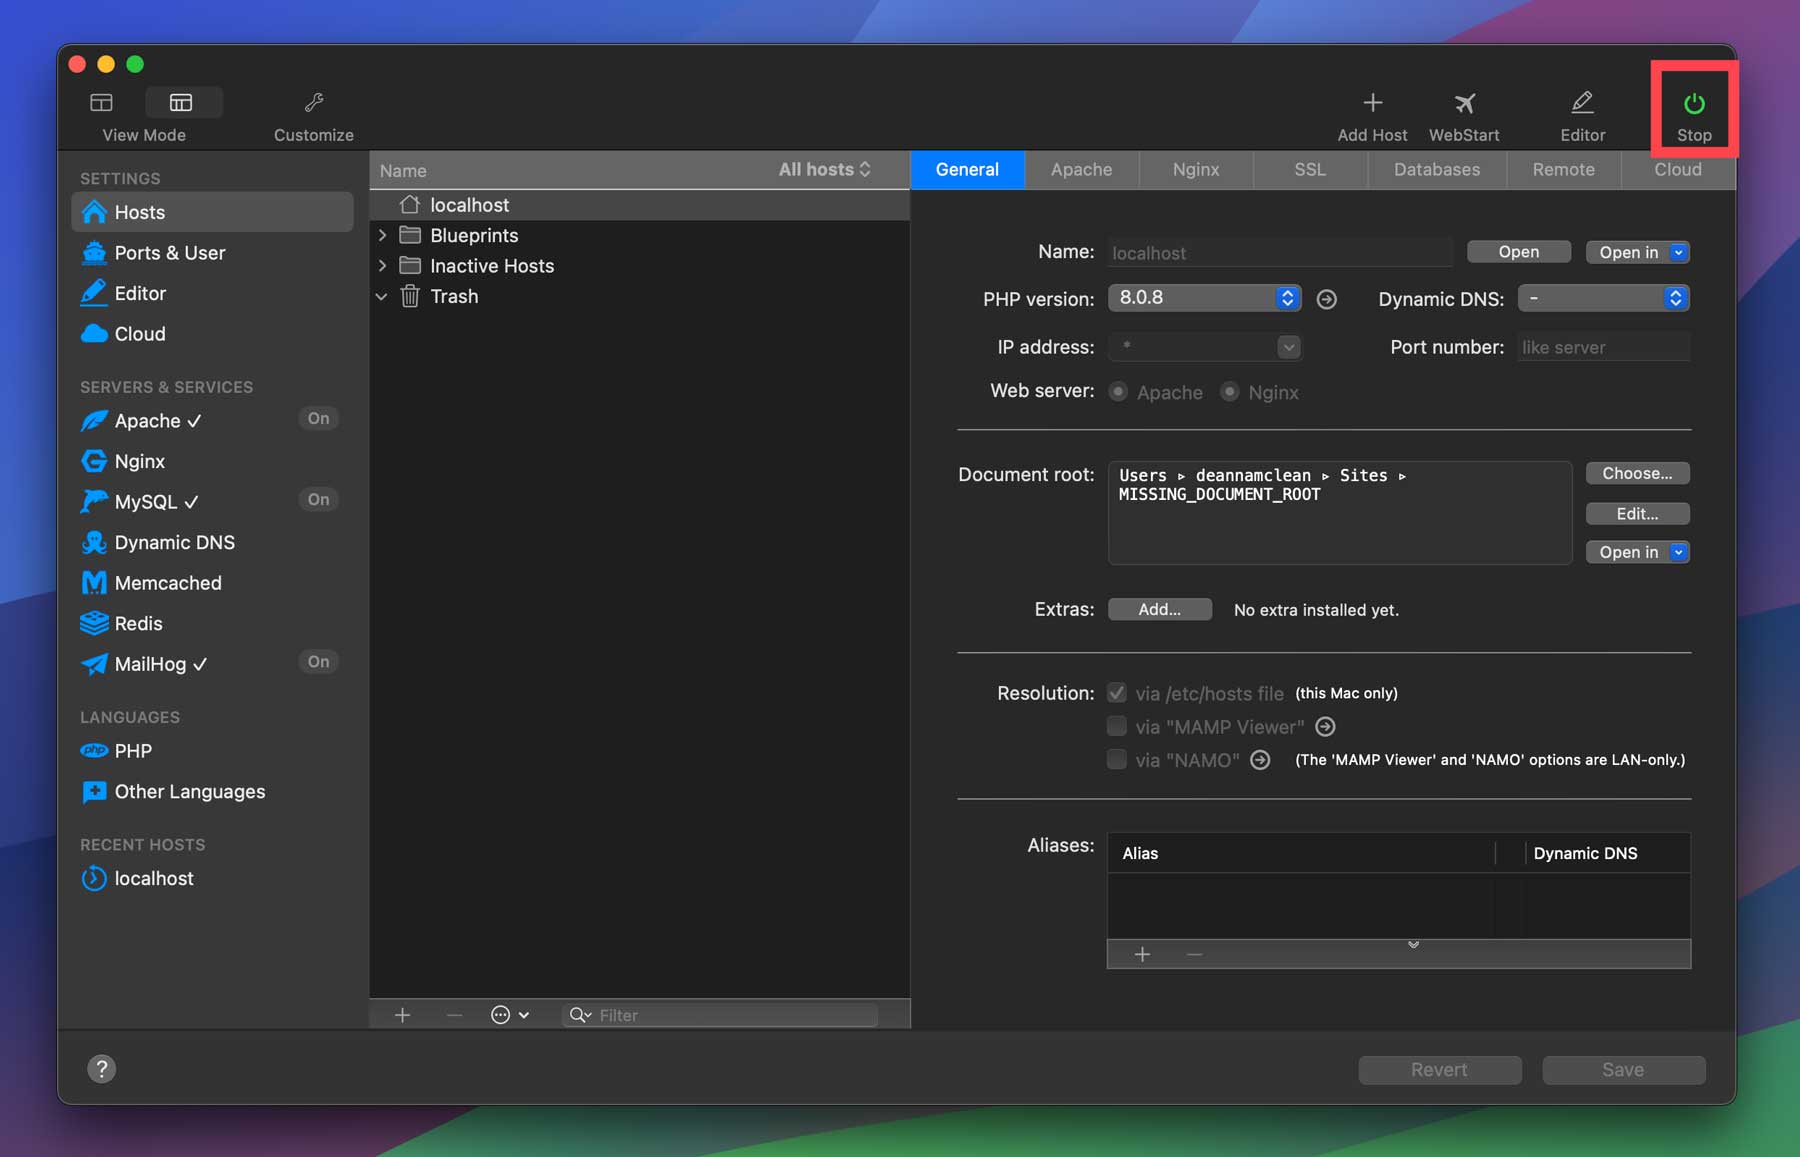
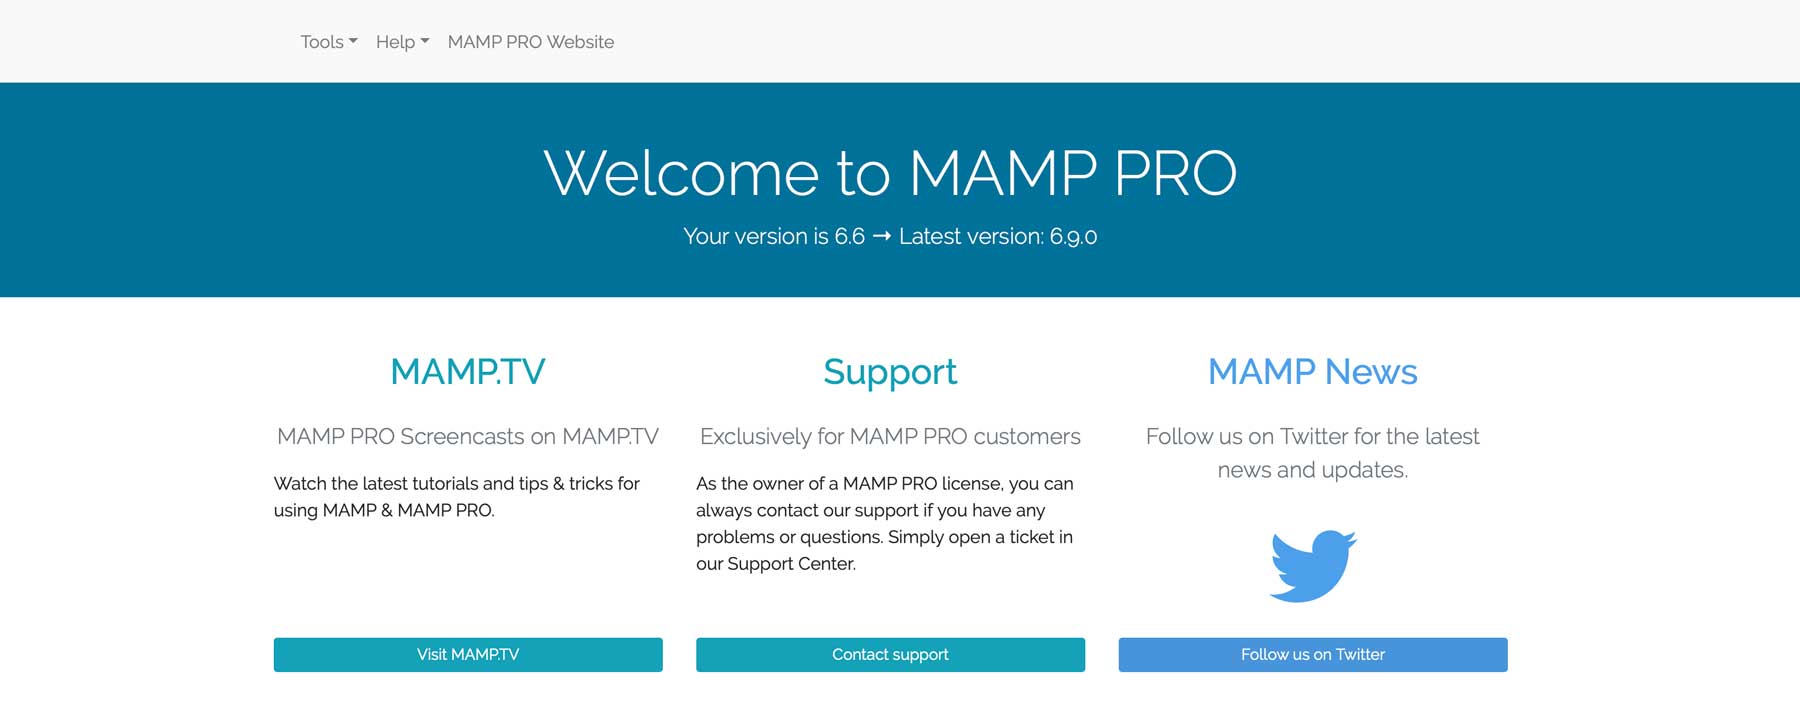
This should launch the WebStart page in your browser. But if not, you can click on it from the MAMP application window.
This page is actually hosted on your new MAMP local server at the following location:
http://localhost:8888/MAMP/
This page has helpful information about the server, but the main thing you need to do at this point is access phpMyAdmin to create a database before installing WordPress. Use this url to access phpMyAdmin: http://localhost:8888/phpMyAdmin/
Then select the Database tab at the top of the page and create a new database by entering a database name and clicking the create button.
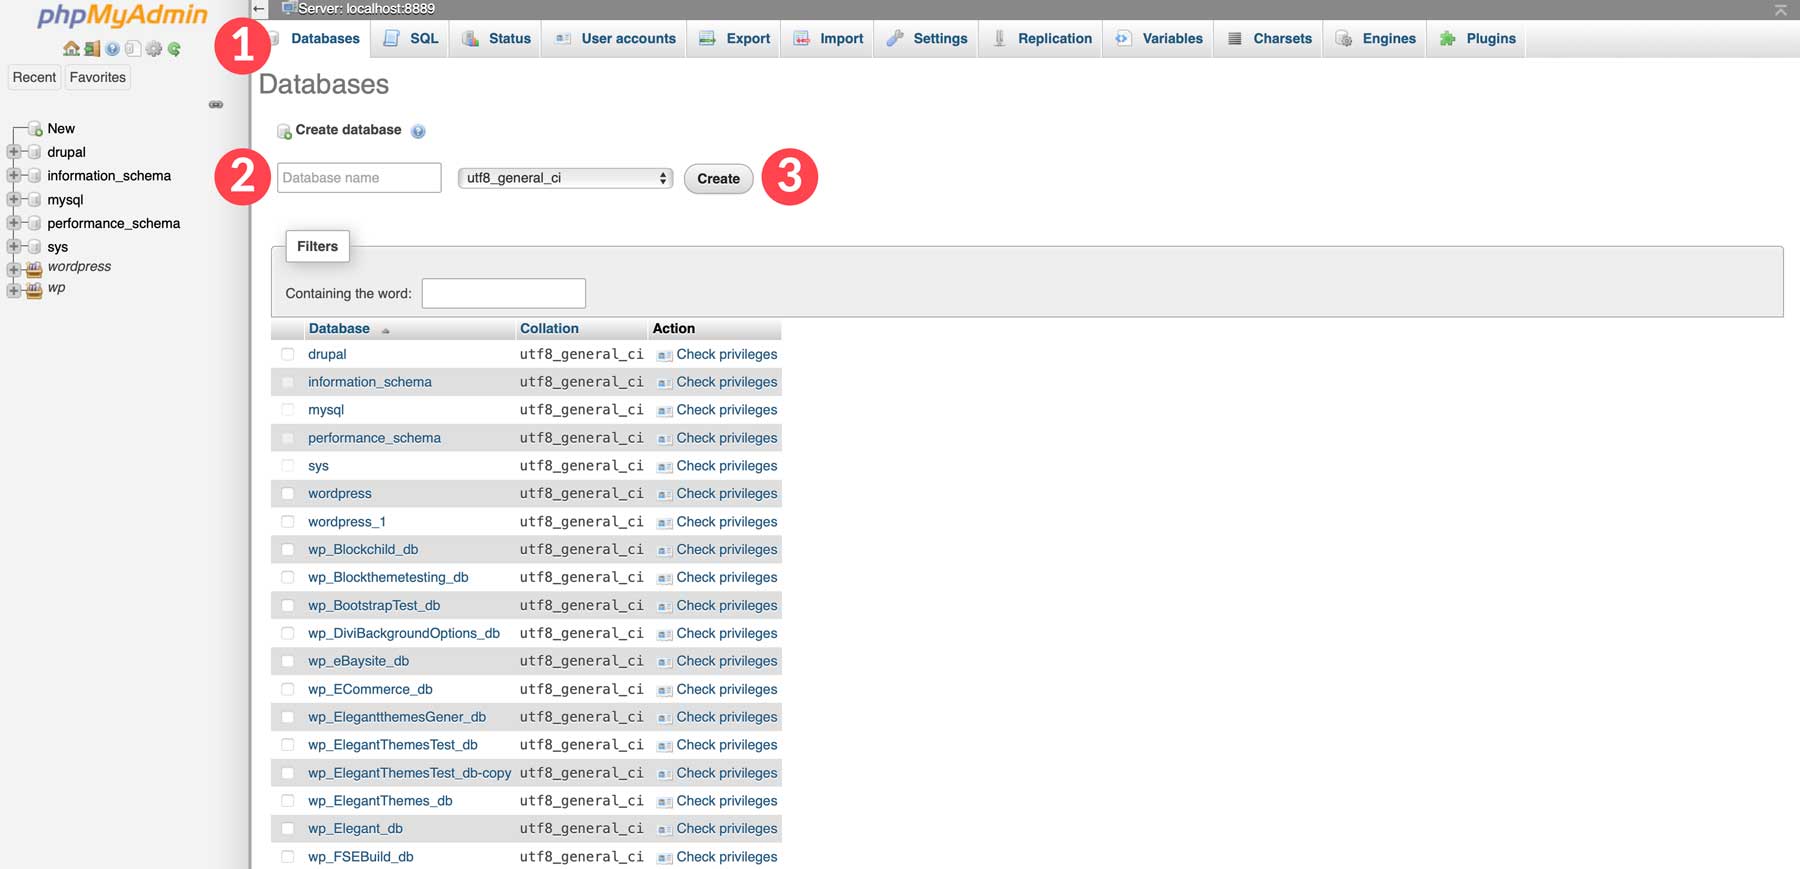
Remember the database name because you will need it for the WordPress installation.
Installing WordPress Locally on your MAMP server
Now that your MAMP server is up and running, you are ready to install WordPress. First, you will need to download the latest version of WordPress.
Next, you need to find the root folder for your local server. By default, it is named “htdocs” and can be found on your computer under Applications > MAMP > htdocs.
Now, find the WordPress download (probably in your downloads folder) and unzip it. Then, drag the unzipped WordPress folder into the htdocs folder.

Keeping WordPress contained in the WordPress folder like this will allow your WordPress site to exist in a subdirectory at the following location:
http://localhost:8888/wordpress/
NOTE: You can rename the WordPress folder to whatever you want. This is helpful if you plan on adding more WordPress websites to the server.
Now all you need to do is go to the above URL (localhost:888/wordpress/) in your browser. This will start the WordPress Installation process.
Go ahead and select a language. On the next screen, click “Let’s Go” to enter the database details.
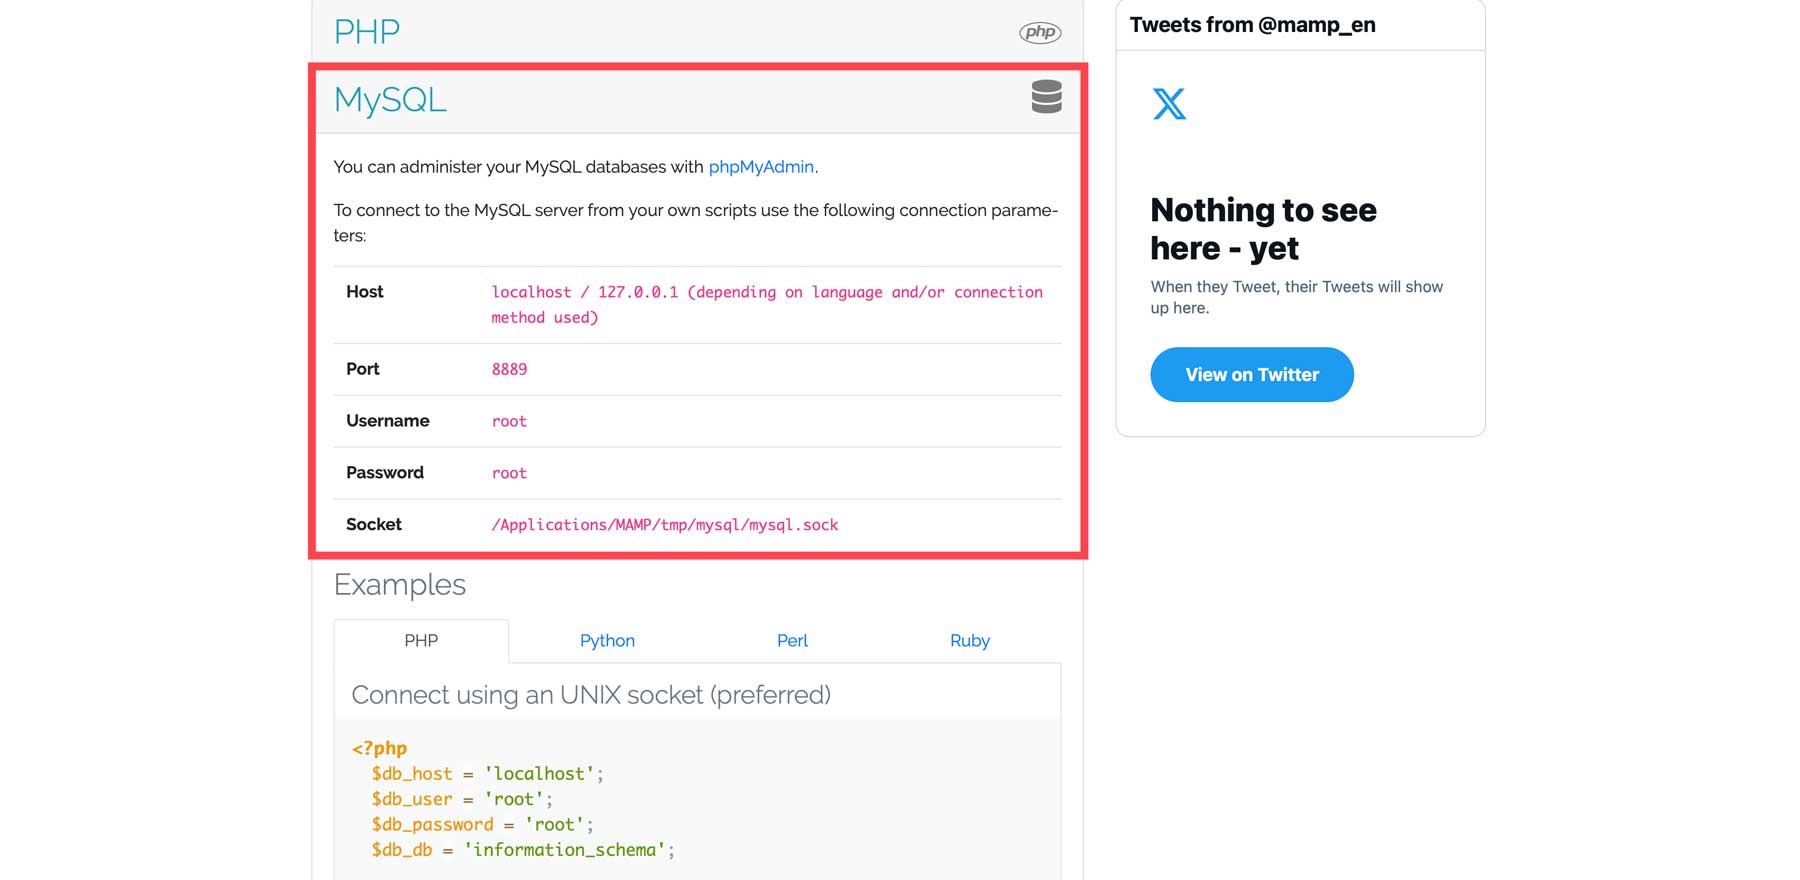
Enter the Database Name that you created in phpMyAdmin earlier. And enter “root” for the username and “root” again for the password.
MAMP also provides database information on the WebStart page (localhost:8888/MAMP/) under the MySQL heading.
Then continue to run the installation and enter your site information.
Your new local WordPress site will be accessible from the following location moving forward:
http://localhost:8888/wordpress/
And you can log in to the backend of the site here:
http://localhost:8888/wordpress/wp-login.php
For more details, check our full article on how to create a local WordPress installation on a Mac.
Migrating Your Local WordPress Install to a Live Site
Now that you have a local installation of WordPress, you will probably want to migrate that installation to a live site someday. For more information on how to do this, check out or post on migrating your local WordPress installation to a live web server.
How to Choose a Language for a WordPress Installation
Installing WordPress in a specific language is easy. In fact, a language option is the first thing that pops up when running the WordPress Installation process.
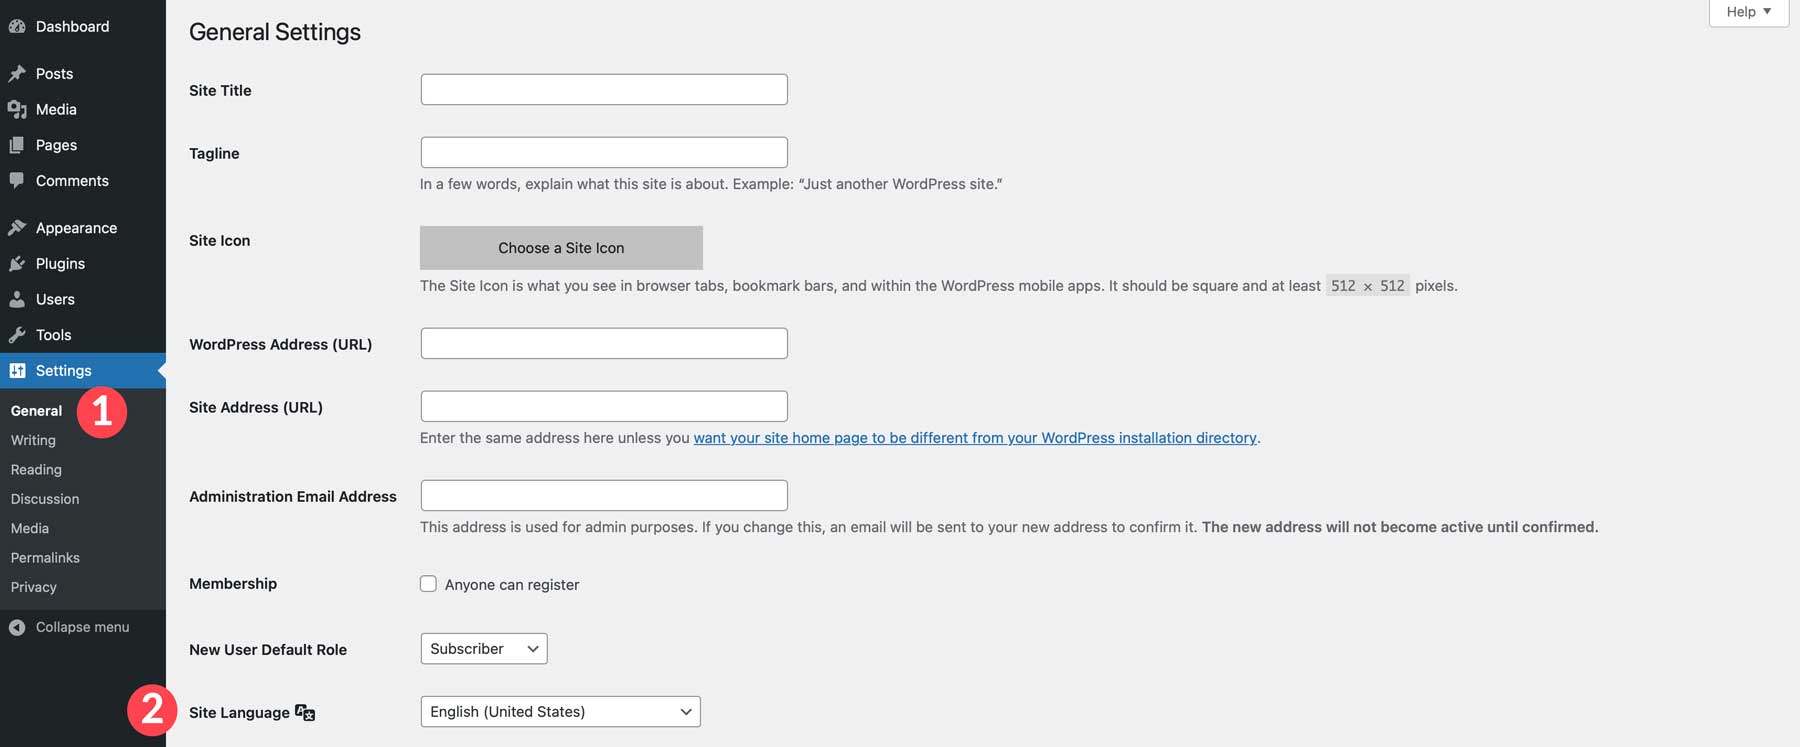
If you already have WordPress installed, you can also change the site language by going to your WordPress dashboard and navigating to Settings > General and updating the Site Language option.
Installing WordPress on a Virtually Private Server (VPS)
Subscribe To Our YouTube Channel
If you are looking beyond the typical shared hosting solution for your WordPress Website, you may benefit from a VPS hosting provider, such as Hostinger or DreamHost. The main benefit of a VPS is that it gives your website a private server that you have more control over. We have a wonderful guide on how to install WordPress on a VPS using Cpanel and manually via SSH.
Installing WordPress on Google Cloud
Subscribe To Our YouTube Channel
Cloud hosting providers, like ScalaHosting, can be a beneficial alternative to hosting your WordPress site on a single server. These benefits include cost, uptime, speed, and scalability. If you are interested in cloud hosting for your WordPress site, check out our post on how to install WordPress on Google Cloud.
Next Steps: What to Do After You Install WordPress
Now that your new WordPress website is up and running, take a few moments to rejoice in your success. You’ve earned it! After that, it’s time to think about the next steps. One of the great things about WordPress is that it is open source, and a ton of people support it, which means that it is improving every day. So there are always new things to learn. But where do you start? Here are a few suggestions.
Selecting a WordPress Theme
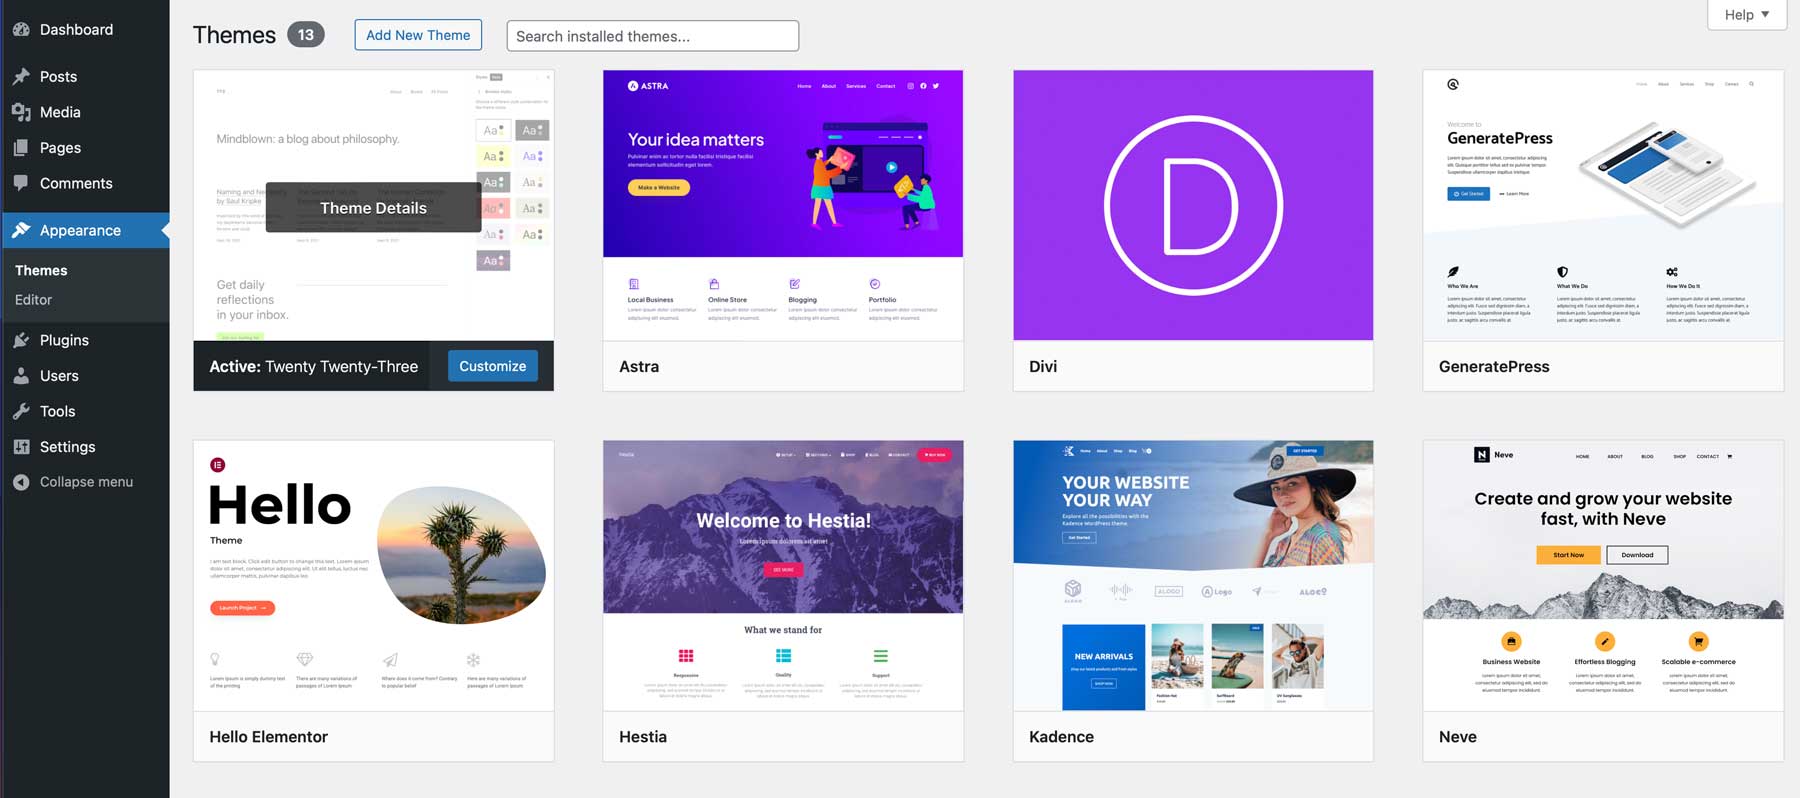
If you have a type of website in mind that you want to design, starting with a WordPress theme can take a lot of the headache out of the design process, especially if you don’t know any code. A theme, in simple terms, is a skin for your website that styles all of your pages for you. Many of the WordPress themes are FREE and available from the WordPress Dashboard on your WordPress site. There are also many premium themes for sale across the web.
The Divi Theme by Elegant Themes is perhaps the most popular WordPress theme because it allows you to customize your website easily using a visual page builder. Your membership includes over 300 complete layout packs FREE. You can also generate your own layouts using Divi’s powerful new artificial intelligence assistant, Divi AI.
Exploring WordPress Plugins
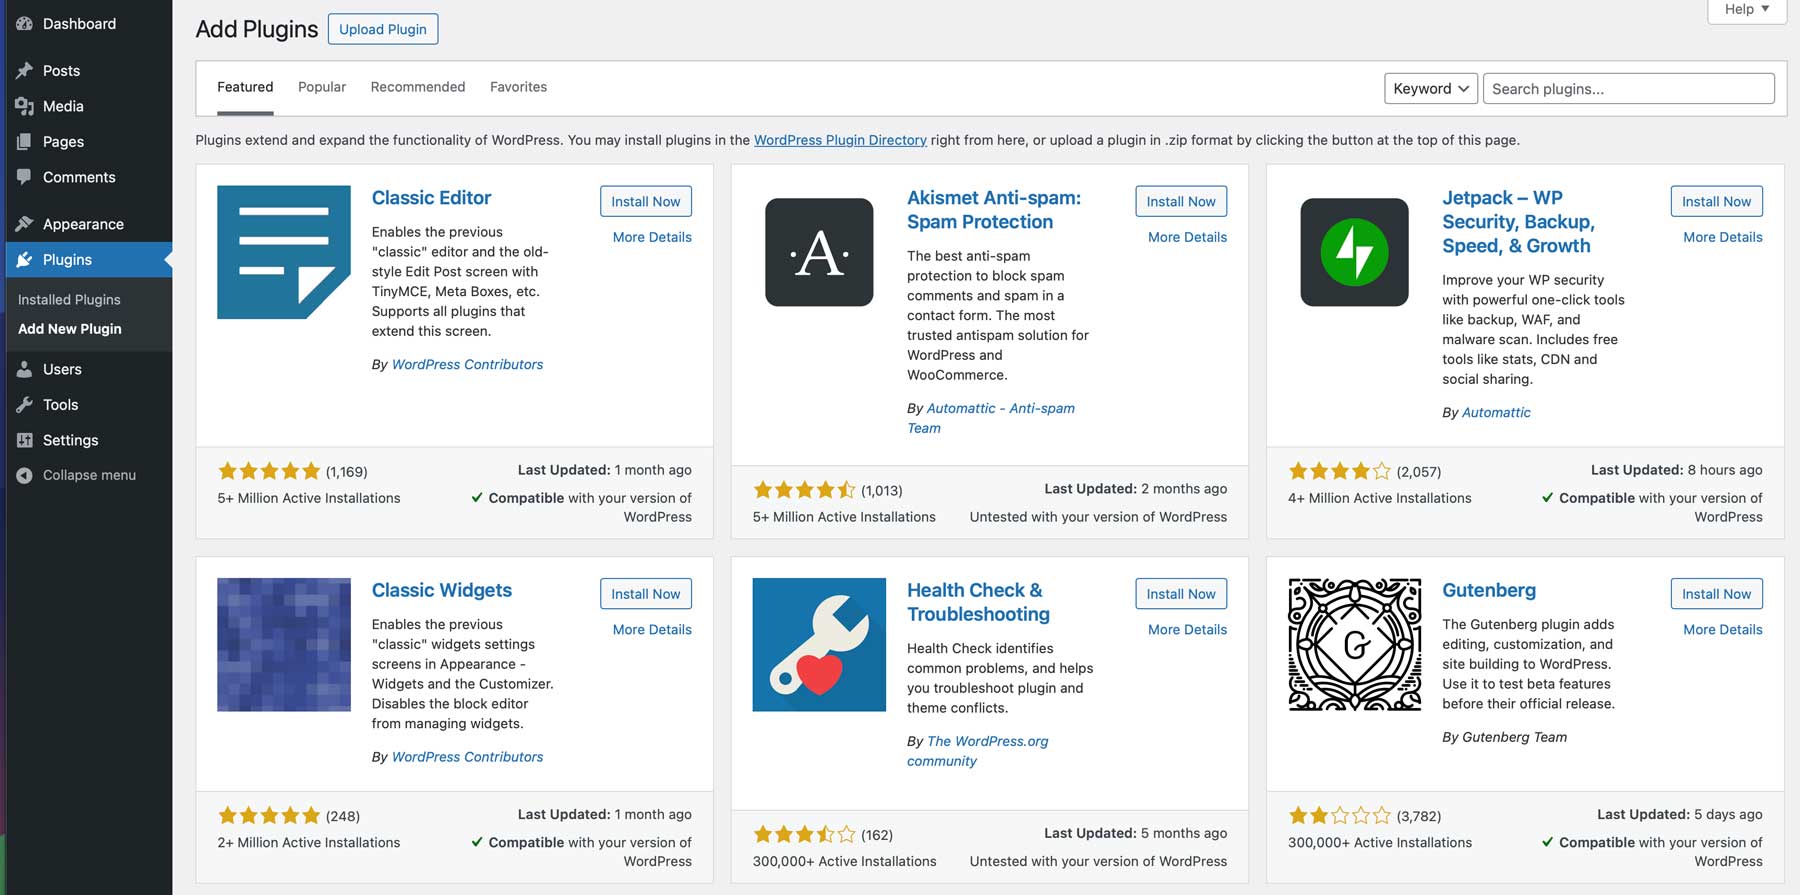
In addition to themes, WordPress comes with a huge selection of plugins that can add countless types of functionality to your site without having to hire a developer. You may be surprised at how much you can do with WordPress without knowing code. The first plugin you may want to install on your site could be an under-construction plugin like SeedProd. This will allow you to tinker around your website without having other people looking at it unfinished before its grand reveal.
Even though you can use a theme to manage the overall look of your site, you can get more granular with your design by using a page builder plugin, like Beaver Builder or Elementor, to customize what each individual page or post on your website will look like. So, it is definitely worth exploring what is out there before you start getting your hands dirty. One of the first plugins you should look into getting is a credible plugin for backing up your WordPress website in case something breaks. A migration plugin, such as Solid Backups, can save you peace of mind as well as all the energy spent in getting your site online.
Plugins For Specific Themes
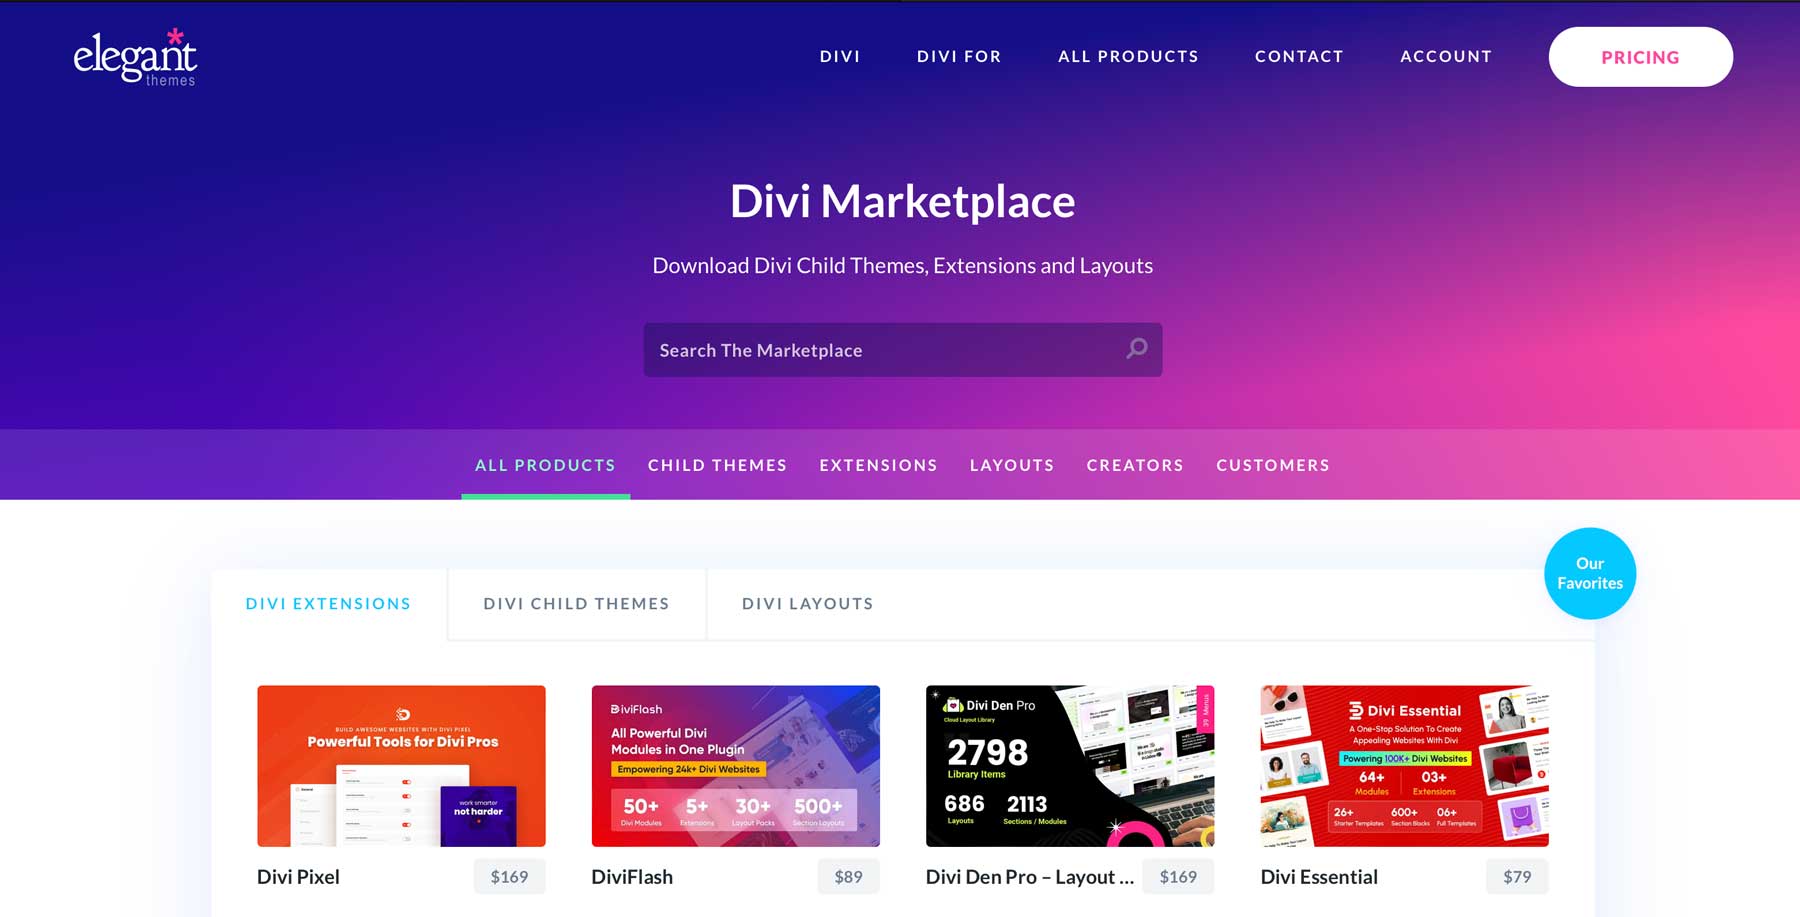
In addition to free and third-party plugins, most premium themes offer plugin integrations with major developers. For example, the Divi theme offers dozens, including WP Forms, Amelia Booking, FunnelKit, Paid Memberships Pro, and more. In addition to that, the Divi Marketplace serves as Divi’s version of the WordPress repository. It provides hundreds of extensions, child themes, and layouts specifically made for Divi. Products like Divi Pixel offer over 50 custom modules for Divi, including a blog slider, a popup maker, a timeline, and more. Some products, such as Divi Plus, offer a combination of pre-built websites, starter templates, and section blocks to provide Divi users with an excellent way to extend Divi’s already amazing functionality.
Learn More About WordPress
If you are like me and tend to jump into things without understanding them, you may run into a few walls as you try to understand your new WordPress website. If so, you don’t need to look very far for great resources on the web. To get you started, here are a few helpful resources from our blog.
For more info, check out the 10 Most Important Things You Should Do Immediately After Installing WordPress.
- How to install WordPress within a subdirectory
- How to Launch a WordPress Website in 8 Steps
- The Ultimate Guide to HTTPS and SSL for WordPress
- Converting HTML Sites to WordPress Sites
The Future of Your Website Starts Now
WordPress is an outstanding CMS for your website, and because of its popularity, the process of installing WordPress is quite easy in most cases. Whether you are new to WordPress or a seasoned WordPress developer, this ultimate guide covers the steps needed to properly install WordPress according to your needs.
Once you’re comfortable installing WordPress, the exciting part begins. Explore the WordPress themes and plugins we mention in the table below. It’ll provide you with all of the information you need to find the best tools for building your website. For a highly customizable and user-friendly theme, consider Divi. Its intuitive interface and extensive design options make it the best choice for starting your journey with WordPress.
For plugins, consider products from the Divi Marketplace. It has everything you’ll need to effectively launch your Divi website, whether it be plugins, layouts, or child themes.
| Products Mentioned | Starting Price | Description | Action | |
|---|---|---|---|---|
| 1 | WordPress | $2.99/month | Content Management System | Get |
| 2 | Namecheap | $5.98/year | Domain Registrar | Get |
| 3 | SiteGround | $2.99/month | Hosting Provider | Get |
| 4 | Hostinger | $2.99/month | Hosting Provider | Get |
| 5 | GoDaddy | $9.99/month | Hosting Provider | Get |
| 6 | Flywheel | $13.00/month (billed annually) | Hosting Provider | Get |
| 7 | Dreamhost | $16.95/month (billed annually) | Hosting Provider | Get |
| 8 | HostGator | $3.75/month (three-year term) | Hosting Provider | Get |
| 9 | Cloudways | $12.00/month | Hosting Provider | Get |
| 10 | Bluehost | $2.95/month (billed annually) | Hosting Provider | Get |
| 11 | WP Engine | $13.00/month | Hosting Provider | Get |
| 12 | Hostinger VPS | $4.99/month | VPS Hosting | Get |
| 13 | ScalaHosting | $14.95/month (3-year term) | Cloud Hosting | Get |
| 14 | Divi AI | $16.08/month (billed annually) | AI Website Builder | Get |
| 15 | Divi | $89.00/year | WordPress Theme | Get |
| 16 | Lifter LMS | Free, $39.50/year | Page Builder Plugin | Get |
| 17 | Beaver Builder | Free, $99.00/year | Page Builder Plugin | Get |
| 18 | Elementor | Free, $59.00/year | Page Builder Plugin | Get |
| 19 | Solid Backups | Free, $99.00/year | Migration Plugin | Get |
| 20 | Visual Builder | Included with Divi | Page Builder | Get |
| 20 | Divi Layout Packs | Included with Divi | Layout Packs | Get |
| 21 | WP Forms | Free, $49.50/year | Form Plugin | Get |
| 22 | Amelia Booking | $49.00/year | Booking Plugin | Get |
| 23 | FunnelKit | $99.50/year | Landing Page Plugin | Get |
| 24 | Paid Memberships Pro | Free, $247/year | Membership Plugin | Get |
| 25 | Divi Marketplace | N/A | Divi Plugin Repository | Get |
| 26 | Divi Pixel | $169.00/year | Divi Module Plugin | Get |
| 27 | Divi Plus | $79.00/year | Divi Module Plugin | Get |
We look forward to hearing any suggestions or questions you may have in the comments below.
Cheers!


I suggest you update the content of this article to the newer version of WordPress 6.3.2
Regards.
Great post thank you! Quick question (probably really amateur one) – when you install wordpress on google cloud, does that eliminate the need to get a hosting service (like Godaddy, Hostgator etc)… I’ve installed WP using the steps in the video and everything seems to good to be true 🙂 I use divi on my main website (hosted by hostgator) and think itll be really cool if we can create new sites by using the Google cloud installation 🙂
Hi. I am just dealing with the local WordPress installation in Wamp. All Wamp services are running okay. I unzipped WordPress inside www and created the database. But WordPress does not complete the install as it seems to be an error establishing the connection with the database. I tried different browsers and also I tried writing the wp-config.php manually, but nothing happens. Something I notice is that the browser alerts that the site is not secure. But, as I can see in your examples up here you are using http://localhost/ and not https://. Could it be the problem? I hope the solution is simpler than going thru the SSL process for my own computer as I am not sure I have the expertise to do it myself. Thanks!
Ana,
Sorry you are having trouble. Seems like you are doing everything right. Maybe double check you are using the right credentials. Go to phpmyadmin and click on the User Accounts tab. Then check to make sure you have a user with the login “root”, the password “no” (meaning no password needed), and Global Privileges are set to “All Privileges”. Then connect to the database during the WP install using the username “root” with no password and it should work. If not, maybe this will help…
https://www.elegantthemes.com/blog/tips-tricks/how-to-fix-error-establishing-a-database-connection-in-wordpress
Thanks! I was using root and no password. So, I’ll follow your link and see what happens. This is driving me crazy 🙂
Great Article, full of lots of good info! A “Other great plugins” article would be well appreciated, especially for membership & appointment plugins that work great with Divi.
Thanks for the suggestions/good ideas, Gary. I don’t know about a “other great plugins” article, but I did settle on Memberpress as a great plugin for building a membership site with Divi. https://www.elegantthemes.com/blog/divi-resources/how-to-build-a-membership-site-with-divi-part-1
I wonder if you also suggest deleting the folders like cgi-bin and/or .well-known from the public_html folder before uploading the WordPress files? (when installing WordPress on a web host)
Good question. It seems the cgi-bin folder is okay to delete since it doesn’t get used much these days. https://stackoverflow.com/questions/2321572/should-i-delete-the-cgi-bin-folder-in-a-subdomain-i-just-created
awesome post. thanks for wamp section 🙂
This is very nice tutorial Jason also in very detail. I had installed WordPress directly from cpanel then installed divi. I was unaware of many things that you mentioned in the blog but now I am updated. Thanks to your blog.
This is great! Thanks 🙂
It’s definitive in terms of the different use cases – and is very comprehensive in terms of those – but you’ve left out important “best practices” for hardening security, such as:
– changing file and folder permissions in FTP
– editing .htaccess
– deleting unused themes
Can I suggest a second post in the series for this stuff? And maybe another one for common configuration steps right after installing? (setting timezones, permalinks etc).
Obviously it’s too much to put all in one post, but all of this is important to know about, and not obvious from the mythical “5 minute install”.
Yes…exactly what I was thinking as well. It would be nice to have a list of “best practices” included and actually what I thought this article would include. By this I mean after you set up your WP site there are many more things that should be put in place before developing begins as Tim mentioned above – changing permissions, setting up security, child themes, etc…all the things that most do later on but should be done right out of the gate. To me, then this would be the definitive guide to a complete WP install and setup. make it the “end all” article for a perfect and smooth install and setup?
Otherwise very nice article for the basics 😉
Mike
Good idea, Tim. I think this does address an important need.
Greate post, thx 😉
Hello
As an alternative to WAMP/MAMP, I would highly recommend the Local by Flywheel package for comprehensive local WordPress development environment. (Even if not using Flywheel for hosting).
Great suggestion Rowland. I’ll have to look into that.
Thanks.
Thanks for this tutorial.
And LAMP for Linux 🙂
Sound like a great future update for the post! Thanks Bruno.
Thank you very much.
Still a pity you don’t mention LAMP.
if you could you possibly cover a word-press multi site installation that would be great…
Desktop Server from ServerPress is a very easy to use local install and worth the $$. I use it with BackupBuddy to migrate to the live server.
I have no affiliation. I’m just a happy customer.
https://serverpress.com/
That’s a great suggestion. We actually mentioned this in another post… https://www.elegantthemes.com/blog/divi-resources/how-to-add-custom-templates-and-design-to-divis-blog-post-formats-part-1-of-3
Thanks!
Excellent Post Jason, all in one! … your article I have shared with several followers of mine … thanks!
Awesome to hear! Thanks, Agustin.
I’d point out the importance of the fact that the author did not use the default “admin” as the username, but changed it to something obscure. A very critical step in securing your WP site that deserves at least a sentence in the article, IMO.
Very good suggestion. I should have thought of that. Thanks!
Impressed with that piece of post, of course it is complete, congratulations and thanks for the guide.