
It’s always scary to migrate your WordPress site. But it’s doubly worrisome when you throw changing your domain name into the mix. You put all that time and effort into building your site’s SEO ranking. Now, you’re naturally worried about throwing it all away when you switch to your new domain name.
But, you really don’t need to worry…that much. Google knows people need to switch domain names sometimes, so they’ve made it fairly simple to maintain your SEO ranking as long as you follow the right steps. And that’s what this guide will show you how to do:
Migrate your site to a new domain name without losing your SEO ranking.
- 1 Why Would Someone Change Domain Names, Anyway?
- 2 Three Important Notes Before Beginning
- 3 Step 1: Copy Your Existing Site and All Content to Your New Domain
- 4 Step 2: 301 Redirect Your Old Site to Your New Site
- 5 Step 3: Tell Google You Changed Your Domain Name
- 6 Step 4: Submit a New Sitemap
- 7 Step 5: Monitor the Google Search Console for Any Issues
- 8 Step 6: Update As Many Inbound Links as Possible
- 9 Step 7: Notify Users About Your Move
- 10 Step 8: Monitor, Wait, and Feel Accomplished
- 11 Wrapping Up
Why Would Someone Change Domain Names, Anyway?
Whenever possible, it’s definitely better to stick with your existing domain name. But there are some scenarios in which a switch is beneficial (or downright necessary):
- You get access to a domain name that is infinitely better than your current one. Sometimes this happens because the old owner lets their registration lapse. Or sometimes it happens because your site was so successful that you can afford to purchase a premium domain name.
- Your domain name gets penalized. Hopefully this never happens to you. But if it does, switching is one way to get out of the penalty.
- You rebrand intentionally. Sometimes companies or individuals need to rebrand for a variety of reasons. Switching domains is an essential part of this.
With that out of the way, let’s dig into the actual process of moving your content to a new domain while preserving your SEO rankings.
Three Important Notes Before Beginning
First, these tips are all about avoiding a major, permanent loss in SEO ranking. Your site will likely experience a temporary dip during the migration process. This is largely unavoidable. But if you follow the process correctly, you should minimize this loss and be back at your original search positions as soon as possible.
Second, I’ll assume that you have a backup of your site. Keep a clean backup somewhere in case something goes wrong with the migration. If you’re not sure how to do that, read this guide to backing up WordPress.
Third, you will still need to maintain ownership of your old domain name, even if you no longer use it for your site. This is essential to ensure that the redirects you add in this guide continue to function forever.
Step 1: Copy Your Existing Site and All Content to Your New Domain
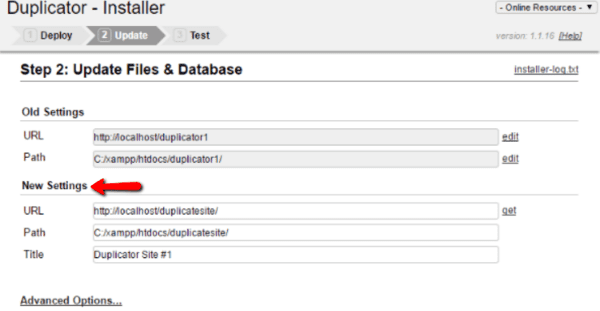
Before you start redirecting anything, you need to create an exact copy of your site at your new domain. You can use a popular and well-trusted migration plugin like Duplicator to easily duplicate your existing WordPress site.
While you can also do this migration manually, I definitely recommend using Duplicator. Here’s why.
Duplicator includes an option to update all of your existing URLs to your new domain. When you migrate manually, you can update the URL in the WordPress dashboard, but that won’t update all the internal links you’ve used in posts or pages. Duplicator will automatically update all of these internal links, which makes the process much simpler:
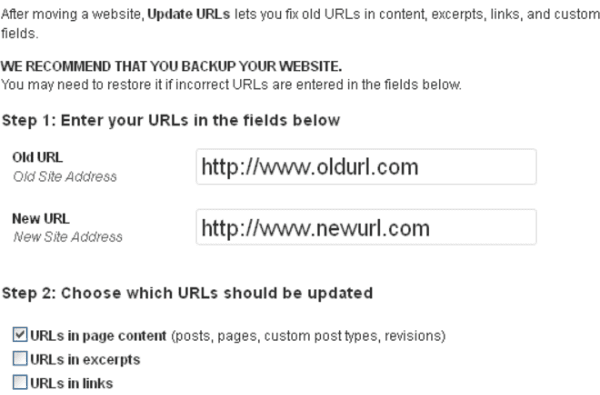
If you use a method other than Duplicator to move your site, you can automatically update all your internal links by using a redirection plugin like the Velvet Blues Update URLs plugin. It’s not difficult – it just adds an extra step to the process.
Once your site is set up on your new domain with all the proper internal links, you should browse through it and make sure everything is functioning properly. Make sure the links work and there aren’t any broken images.
In the next step, you will redirect all traffic from your old site to your new site. Your new site needs to be 100% ready to handle this live traffic.
Step 2: 301 Redirect Your Old Site to Your New Site
Now’s the somewhat tricky part. You need to 301 redirect your old site to your new site so that both humans and search engine robots can find the correct page.
Why 301 redirect? Because a 301 redirect tells browsers and search engines that the page has moved permanently. This is essential so that Google and other search engines know to pass the same “link juice” to your new pages as your old pages.
You’ll need to find your .htaccess file. To do that, you need to use an FTP program to access your WordPress site’s server. The .htaccess file will be in the root folder of your site – the same one which includes important documents like wp-config.php and your wp-admin folder.
Download this file and make a copy of it. Keep the original untouched. This is another backup in case anything goes wrong with your redirects.
Once you have a backup copy safely secured, open the .htaccess file with notepad or another text editor. If you’re using pretty permalinks, you should see code added by WordPress that looks something like this:
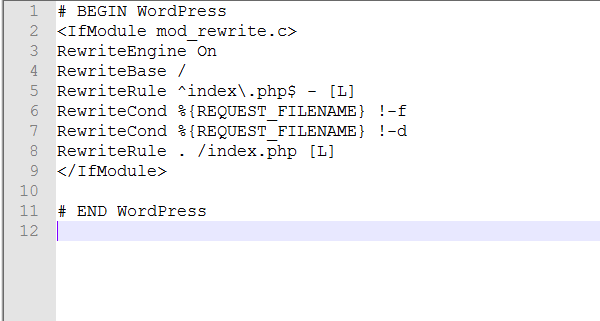
Don’t worry if you see more code than my screenshot – some plugins may have added additional rules. That’s not a problem.
Adding a 301 Redirect
Now, you need to add your 301 redirect code to the top of your .htaccess file.
The 301 redirect code you use will depend on whether or not you’re planning to keep the exact same URL structure on your new site.
Use this code if you’re planning to use the same URL structure. That is, “olddomain.com/posts/cool-post” will be “newdomain.com/posts/cool-post”:
RewriteEngine on
RewriteCond %{HTTP_HOST} ^oldurl.com [NC,OR]
RewriteCond %{HTTP_HOST} ^www.oldurl.com [NC]
RewriteRule ^(.*)$ http://newurl.com/$1 [L,R=301,NC]
Where “oldurl.com” is the URL of your original domain name and “newurl.com” is the URL of your new domain name.
If you’re planning to change the URL structure, you’ll need to manually redirect every single link on your site. That is time-consuming and…not fun. But, it is most definitely necessary. Here’s the code you’ll need to use for every single post and page:
Redirect 301 /original-post http://newdomain.com/cool-new-post
Where “/original-post” is only the part of the URL which comes after “olddomain.com” and “http://newdomain.com/cool-new-post” is the full URL of the post on your new site.
Once you save and upload the new version of your .htaccess file, all traffic to your old site should be redirected to the corresponding URLs on your new site. You should do some manual testing to ensure these redirects are functioning properly.
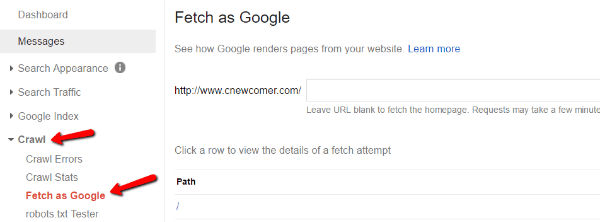
After your manual tests are successful, you should also use the Fetch as Google tool in the Google Search Console to make sure Google is being properly redirected to your new site:
Step 3: Tell Google You Changed Your Domain Name
Now that you’re sending all traffic to your new domain name, you should tell Google about the change. While Google will eventually figure out the change no matter what, filling out their official form makes the transition easier and helps ensure that you don’t lose your SEO rankings.
To do this, you need to go to the Search Console (previously known as Webmaster Tools).
If you haven’t verified your old domain in the Google Search Console, you’ll need to do that first (here’s how to verify a site in Google Search Console).
Once your old site is verified, you also need to verify your new site by following the same process. It’s essential that both sites are properly registered in the Google Search Console.
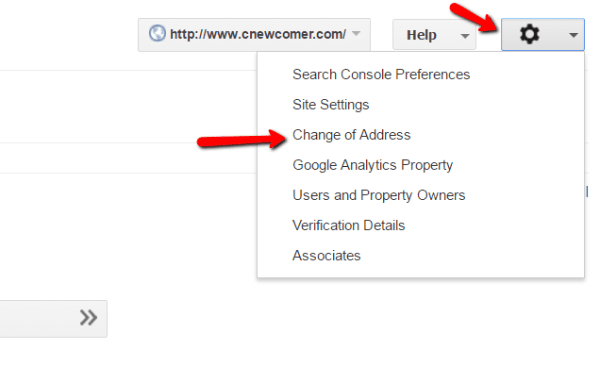
Once both sites are verified, you can fill out the Change of Address form by clicking on the gear icon in the top right of the dashboard for your old domain name:
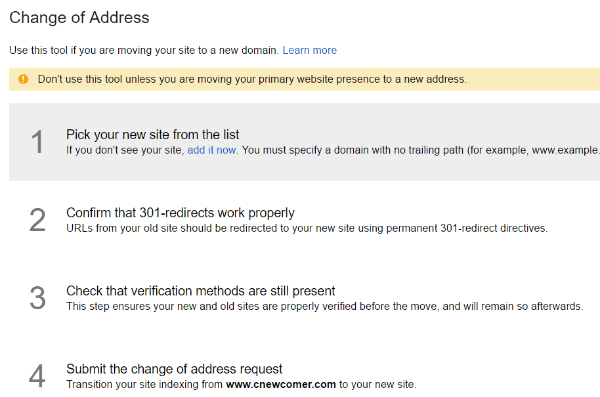
Follow the instructions on the form completely and then click the Submit button:
Step 4: Submit a New Sitemap
After telling Google about your change of address, it’s also a good idea to submit a sitemap for your new domain name.
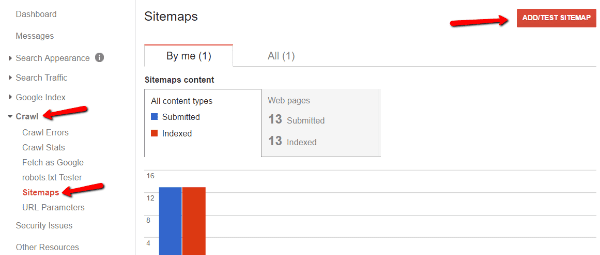
To do that, you first need to create an XML sitemap for your new site. This can be easily done with a sitemap plugin. Then, you need to submit that sitemap to the Google Search Console. Because you should have already verified your site if you’re following the guide properly, all you need to do is click Crawl → Sitemaps → Add/Test Sitemap:
Step 5: Monitor the Google Search Console for Any Issues
Because you just made some pretty major changes to your site, it’s a good idea to keep an eye on the Google Search Console for any indexing issues Google runs into.
Check reports like index count, crawl errors, and search queries to make sure your new site is getting indexed and crawled correctly. Google has a full list of everything to check in this help article.
You should also be on the lookout for any messages from Google inside the Search Console.
Step 6: Update As Many Inbound Links as Possible
Now is a good time to reach out to the sites linking to you and ask them to update their links to your new domain name. You probably won’t be able to get everyone to update their links. But it’s a big win even if you only get some of these inbound links updated.
Of course, the 301 redirect will still redirect people who use your old domain. But it’s always cleaner and better user experience for users to go straight to the linked domain.
You should also make sure to update all of your own properties – think of every social network or profile page you have. They all need to be updated to your new URL.
Step 7: Notify Users About Your Move
This might not have a direct effect on your SEO ranking, but it’s important for readers to know about your domain switch. This eliminates confusion and ensures they link to the proper URL in the future.
There are two ways that you can do this:
- Write a post on your new site explaining the change.
- Create a custom 404 error page for your new site to catch people who may have clicked on an improperly redirected link.
I recommend doing both.
Step 8: Monitor, Wait, and Feel Accomplished
You’ve now done everything possible to minimize the impact of a domain change on your SEO ranking. All you can do now is wait for Google to fully index your new site and move it up in the rankings.
You will likely experience a temporary drop. But, if you did everything properly, this drop should be just that:
Temporary.
Wrapping Up
Hopefully you found this tutorial helpful! It can be scary moving everything to a new domain and our goal is to help make that process as pain free and anxiety free as possible. We’d also like to encourage those who have made the switch successfully to chime in below.
Have you successfully moved your WordPress site to a new domain without losing your SEO ranking? It would be awesome if you shared your experience in the comments.
Article thumbnail image by Bloomicon / shutterstock.com


I would have to agree with Luke above, this is a great checklist especially when you want to make sure you keep all your link power. I have a few clients like this would wished they had this checklist sooner. Thanks for sharing!
I have switched my website to HTTPS and it it’s better than just http.
Thanks for the guide. It did save me some frustration.
This is a really nice checklist. Migrating a domain does kind of fill me with dread usually. There are so many unknowns before the switch. This is a nice, simple, guide to making it as hassle-free as possible. Gonna bookmark for my customers 🙂
Thanks for this guide lines i wish i had come across this earlier all the same now i know better
Very good post!
In my experience, when migrating to a new domain you have to wait a couple of months until you get again your rankings (did it by January’16 and till March my web was KO) Also try to not change the new domain URLs for some months or the 301 won’t give you all your rankings
thanks for the post
Hi,I am very thankful to you.I have visited many sites to read the step by step guide to move my site to new domain but was not satisfied.Your have written complete article which helped me a lot.Thank you so much.
Thanks and its new information for me
Once i Changed my Blogger to WordPress and my ranking went off. after a Month or two I decided to work on it and then it came back don’t know how but after reading this blog of yours I realized what i Did Wrong.
Thanks for Sharing
Hi Brenda,
Excellent post and thanks for sharing this beautiful process. I was planning to move one of my blog to a new domain but was a little bit confused about my SEO rankings.
The most important part of this process to copy the whole content to a new domain and the duplicator plugin will surely do the best job.
Now, I can quickly change blog domain without any issue.
I had to migrate a site to a different server and the MySQL version on the new server was older than the MySQL version on the old server.
This of course caused some problems and Duplicator was no use.
I ended up using the Migrate DB plugin as I read that their backups can actually be uploaded to a different host with different MySQL versions.
I can wholeheartedly recommend this alternative way of migrating the database. 🙂
Thanks for the article. I’m new at this and don’t know any coding.
I just installed Redirection plugin.
I want to redirect my current live wordpress site (hosted by Hostgator) to a new URL which I just bought from Godaddy. My questions are: 1) does my new target URL need to be hosted by HG first in order to redirect. 2) does the new target URL need to have content already?
Thank you in advance.
Excellent article Brenda, thank you very much
I was looking for this process a few days ago.
What you do not mention is how long the Google Change Management process can take?
Thank you. Very helpful
Thank you for the helpful guide!
Great article. Thanks!
One question, do you make the 301 redirect changes to the htaccess file at the old domain or the new one?
What about using a 301 redirect plugin ?
I used Redirection plugin. It is great bc it gives you stats on how many redirects your site has made.
https://wordpress.org/plugins/redirection/
I am not affiliated with the plugin.
Thank you for this article and writing clear steps one must make to go through migrating a site to a new domain. Nice to have Elegant Themes and your articles:) Take care! 🙂