
When you set up a new WordPress website, the platform gives you three image sizes to play with: thumbnail, medium, and large (plus the file’s original resolution). This gives you a solid number of options to work with. However, thumbnails in particular can be tricky to use, since you need to make sure they look good across all themes and devices.
Fortunately, changing your images’ thumbnail size in WordPress only takes a minute or two. While you’re at it, you can also add new default image sizes to your website, for even more choices. In this article, we’ll teach you how to do both, so let’s get to work!
Subscribe To Our Youtube Channel
How to Change Your Thumbnail Size in WordPress
Changing thumbnail sizes in WordPress is remarkably easy. Here are the steps you’ll need to follow, which we’ll dig more into shortly:
- Go to your WordPress dashboard.
- Navigate to the Settings > Media tab.
- Look for the Image sizes > Thumbnail size section.
- Change the default width and height of your thumbnails in pixels.
That’s pretty much it. Let’s take a closer look at the Image Sizes > Thumbnail section, however:
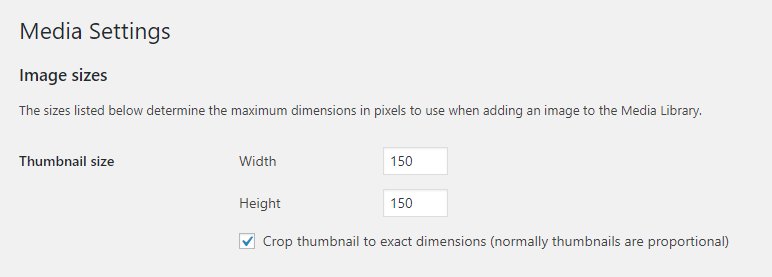
As you can see, the default thumbnail sizes make for a proportional, square image. At 150×150 pixels, here’s what you should be looking at:

This image employs what’s called a ‘hard crop’, since we enabled the setting Crop thumbnail to exact dimensions. What this means is that WordPress will take the thumbnail size you set, ‘fill’ the area with the image you use, and leave the rest of the image off. A ‘soft crop’, on the other hand, is a resize that shrinks your images while retaining their proportions.
For now, go ahead and choose your new default thumbnail size. Then, remember to save the changes to your settings.
Once you set a new default thumbnail size, WordPress will use it for all images you upload from that moment on. However, what if you already have a sizable media library that uses other thumbnail sizes?
Instead of re-uploading those images, you can simply ‘resize’ them. The best tool for that job is the AJAX Thumbnail Rebuild plugin:
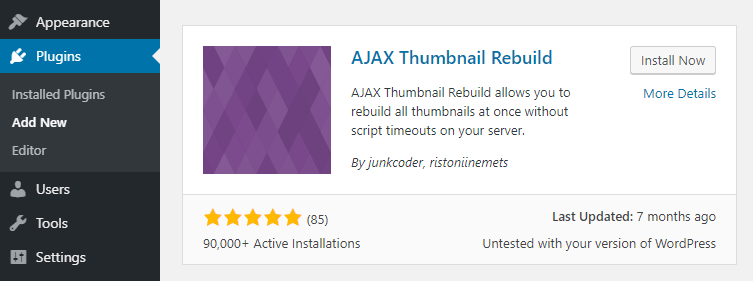
What this plugin does is take all your existing thumbnails and resize them, one by one. It also works on the other image sizes WordPress uses, such as Medium, Large, and so on. That means you can use it even if you change any of those default dimensions (which we’ll show you how to do later).
To get started, install and activate the plugin. Once you do, jump to the Settings > Rebuild Thumbnail tab and choose the images you want to resize, and then click on the Rebuild All Thumbnails button:
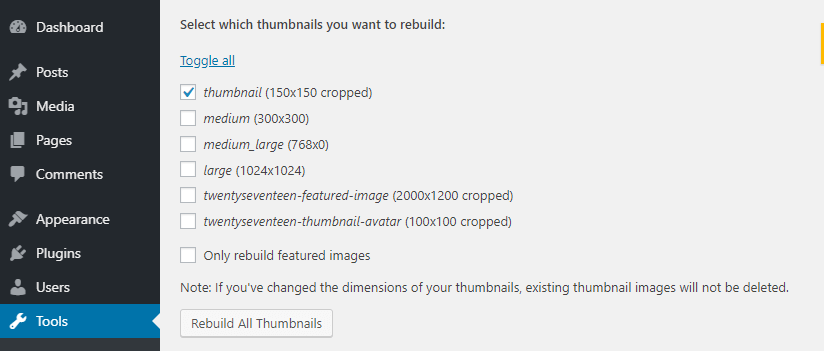
The process might take a while, depending on how many images your media library contains. So be patient, and don’t close the tab until you see the Done message appear.
Why You Might Need to Change Your WordPress Thumbnail Size
At this point we’ve already covered the how when it comes to changing your thumbnail size, but we haven’t discussed the why yet. WordPress’ default thumbnail size of 150×150 pixels can work well for some users, but no single image resolution is appropriate for all types of designs.
You might want larger thumbnails that show off more detail, for example. This is particularly relevant if you’re running an e-commerce store. Or you may want to use a more rectangular shape, especially when it comes to featured images for a blog or news site.
If you’re redesigning your website or trying out a new theme, it’s also a good idea to spend some time experimenting with image sizes, so you can see what works best with the new style. Plus, the process is so simple that it should barely take you a few minutes, and it doesn’t affect your existing media library unless you install the extra plugin we introduced above.
What If You Want to Add Custom Image Sizes to WordPress?
Whenever you upload an image to WordPress, the platform works some magic in the background to resize that image into multiple dimensions you can use. As we mentioned earlier, this includes thumbnails, medium, and large images. Having multiple sizes of the same image can make your life easier, by enabling you to pick the option that best fits your needs.
You can change these default image sizes by using the same process we described above. However, you can also add new default sizes to your site. This can be a very useful option to have. You can set up specific sizes for all different types of images across your site, and avoid having to resize each new image manually.
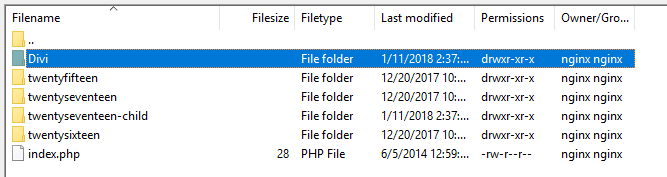
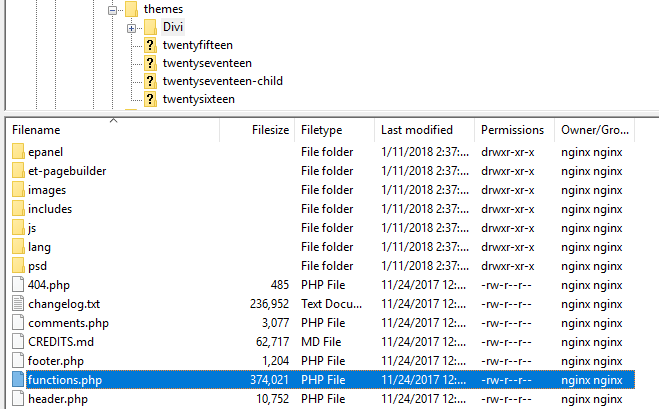
To add new default image sizes to WordPress, you’ll need to edit your theme’s functions.php file. That means you’ll want to connect to your site using a File Transfer Protocol (FTP) client such as FileZilla, and then navigate to your site’s root folder.
Once you’re there, open up the wp-content/themes directory and look for the folder that shares your theme’s name:
You should find the functions.php file inside this folder. Once you do, right-click on it and hit the View/Edit option. This will open the file using your local text editor, so you can make changes to it:
Be very careful when making any changes to your theme’s functions.php file, and don’t change any of its existing content. Instead, you’ll want to add a new snippet of code at the bottom:
// This enables the function that lets you set new image sizes
add_theme_support( 'post-thumbnails' );
// These are the new image sizes we cooked up
add_image_size( 'post-image', 660 );
// Now we register the size so it appears as an option within the editor
add_filter( 'image_size_names_choose', 'my_custom_image_sizes' );
function my_custom_image_sizes( $sizes ) {
    return array_merge( $sizes, array(
        'post-image' => __( 'Post Images' ),
    ) );
}
The comments within this code explain how it works quite well. First, it tells WordPress that you want to add new image sizes to your theme. Then it creates a new default option, and registers it so that it shows up within the editor the next time you open it.
Let’s take a closer look at the new default we registered:
add_image_size( 'post-image', 660 );
When you add new custom image sizes, you can set both a width and height. In our example, we just set the width, which is always the first value. This means that WordPress will resize images to the width we want, and a proportional height.
If you want to add a specific height as well, your line would look like this instead:
add_image_size( 'post-image', 660, 480 );
Feel free to add any custom sizes you want, using a new line for each. Then save the changes to your functions.php file, and the new options should show up in your WordPress editor.
Conclusion
One of the best parts about using WordPress is its customizability. There’s no aspect of the platform – big or small – that you can’t change. That also applies to WordPress’ thumbnail size, and the various other default image options.
If you want to change the default WordPress thumbnail size, you can do so in four quick steps:
- Go to your WordPress dashboard.
- Navigate to the Settings > Media tab.
- Look for the Image sizes > Thumbnail size section.
- Change the default width and height of your thumbnails in pixels.
Do you have any questions about WordPress image sizes? Let’s talk about them in the comments section below!
Article thumbnail image by ConceptVectorDesign / shutterstock.com


Thanks, John,
I’m getting an error on the 7th line as follows:
unexpected ‘-‘, expecting ‘(‘ in your code on line 7
function my-custom-image-sizes( $sizes ) {
Thanks for bringing this one to our attention, Patti! PHP doesn’t like hyphens for function names, preferring underscores. As such, lines 6 and 7 should read:
add_filter( ‘image_size_names_choose’, ‘my_custom_image_sizes’ );
function my_custom_image_sizes( $sizes ) {
You are welcome, John.
Thanks, Brian
Hey Patti,
Your getting that error because function names in PHP can’t have dashes. change the dashes to underscores and you should be good.
Thanks Brian 🙂
Hi,
after adding the code snippen to the functions.php of Divi my website gets offline with the error message HTTP ERROR 500….
Best regards I´m using Divi an
Hi Dony
Please contact the Elegant Themes contact page so the support team can take a look.
https://www.elegantthemes.com/contact/
Hi John,
Thank you so much for this post,you are the best
You’re welcome
Hi John,
I’m fairly new to WP, only using Divi thus far. A few questions: What thumbnail size as a standard would you recommend? I know you said it depends on pixel size and the resolution or is 150×150 ok?
Besides using Php file is it possible to only crop an image in the row CSS vs the entire site? Can I use the same code you provided for the Php file? It takes too much time to go into Photoshop and resize every image the same size vs cropping in Divi. I wish they had this option like in Wix.
I apologize if these are stupid questions, as I’m a newbie to this!
Thank You!
Melissa Irfanview is a good lightweight image editing tool. It only does the basics but cropping and resizing are included.
Hello Melissa,
There are no stupid questions ever when it comes to WordPress. 🙂 Welcome aboard!
As for your questions, 150x is a good start, although it really does differ depending on your theme and other factors. Look at what your theme defaults to, and do that basically.
As for your other question, to put it simple, you can’t use PHP where CSS would be used. However, you don’t use this for cropping an image – our example was for something slightly different.
WordPress includes a cropping tool, although your Photoshop method is good too. Check out the specific WordPress options and see if they make your process any quicker.
Hi John,
Thank you so much for sharing this detailed & informative article on How to Change Thumbnail Size in WordPress. This is the most common issue faced by every newbie WordPress user but experts like you helps a lot in solving these issues.
Keep up the good work & keep sharing…
Cheers,
Abhay
Thank you for your kind words, Abhay!
Hi John Hughes,
This post is great and I think will help people as they open their mind to what can WP really do? My team has built augmented reality experiences, games, and other applications all while using WordPress as our backend API/DB handler.
If the application needs a website, the solution is simple… WordPress! But if we are just needing to manage the data, then running headless is great.
Additionally, you can build it as a stateless cloud platform as well.
Thank you for regards.
Howdy John,
thanks for the insight, useful article. However, it only touches on a subject I’ve been wondering about for some time.
I use Imagify to reduce image sizes. But, using the option to resize larger images on upload, I see the notification that “The new width should not be less than your largest thumbnail width, which is actually 2880px.” This is a specific for Divi setting, since I can see a thumbnail named ‘et-pb-post-main-image-fullwidth-large’ which is exactly this 2880 wide. But an image with this width, is still pretty big; I’d rather have a max image width of 1920px.
So my question: is there a way to reduce that specific thumbnail size for Divi? For most of my clients, it’s way more than they need.
I’m anxious to hear if there is a solution for this.
Hello Eric,
Try giving us a quick message via our contact page (https://www.elegantthemes.com/contact/). We may be able to help you further.
Thanks!