
UpdraftPlus is one of the most popular plugins for WordPress. And for good reason: you can backup, restore, or even migrate your website with just a few clicks. You get access to features such as backup scheduling and external cloud storage, and if there’s something you need that’s not included in the base plugin, you can expand it using add-ons.
Of course a tool is only useful if you know how to use it. This article will guide you through creating backups, restoring, and migrating your WordPress website using UpdraftPlus.
Subscribe To Our Youtube Channel
The Dashboard
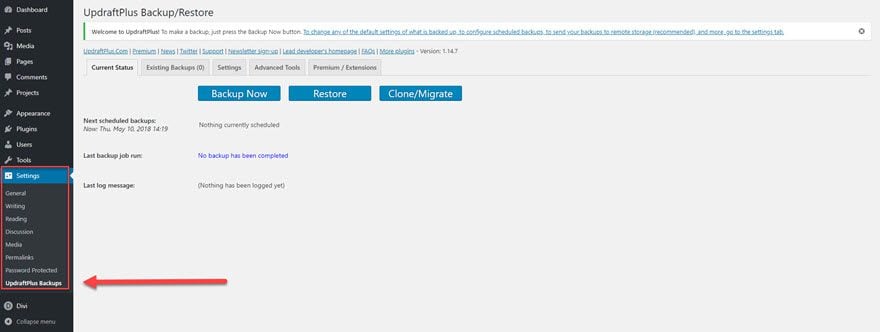
All of the adjustments for UpdraftPlus are done in its customized dashboard. To access the dashboard go to Settings -> UpDraftPlus Backups.
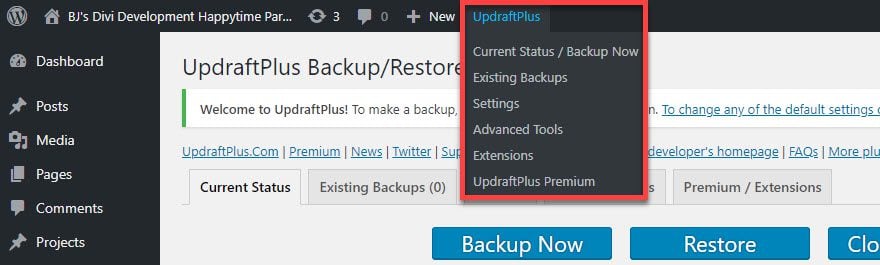
You can also access this menu from the drop-down from the admin menu bar at the top of your screen. When you’re making lots of changes to a site, being able to back up your work whenever you want is exceedingly helpful.
Setting UP and Backing Up
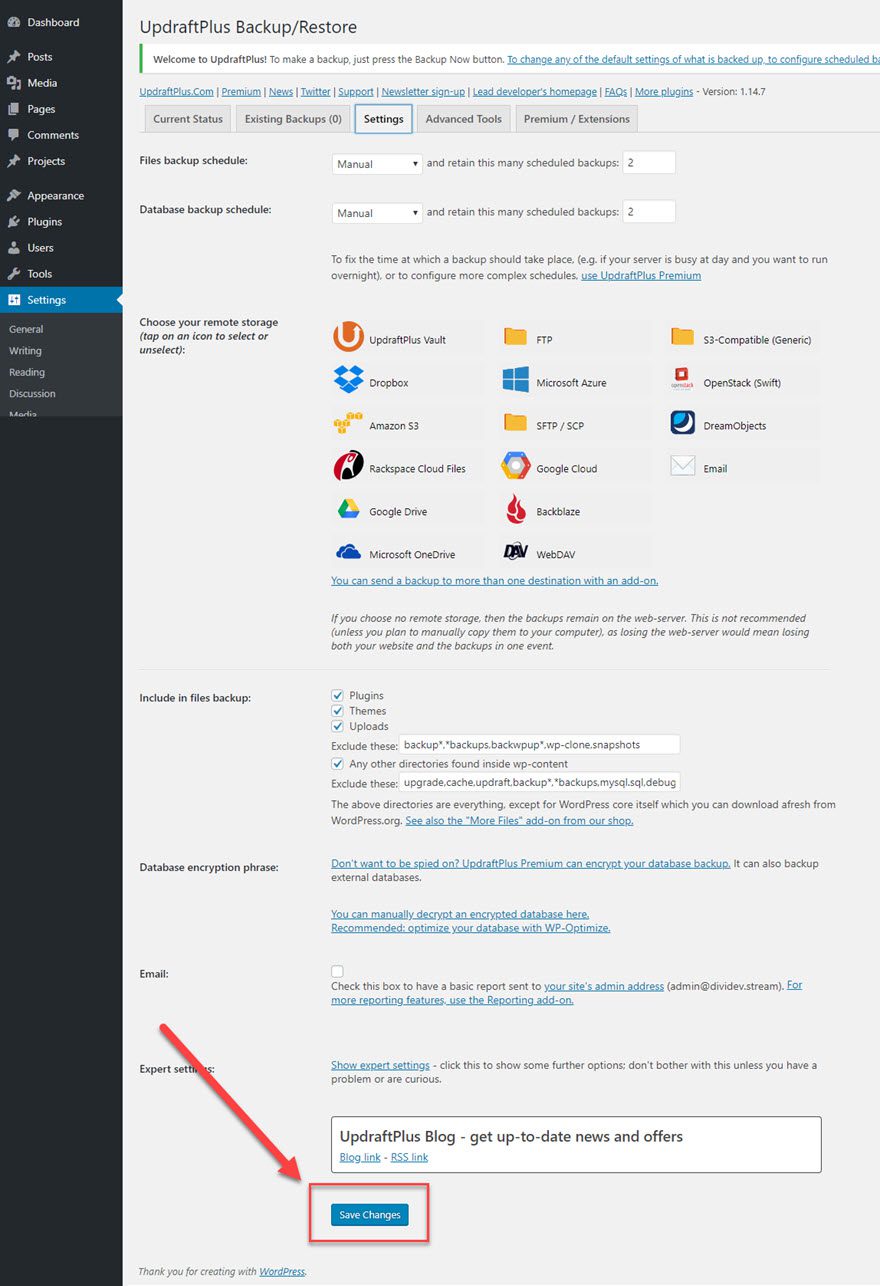
Before running UpdraftPlus for the first time, I suggest setting up the backup schedule, where the backups will be stored, and which files that will be included in the archive. In the UpdraftPlus dashboard, select the Settings tab to make your choices. Please make sure that when you’re finished, you hit the save button. Otherwise your changes won’t take effect. The settings tab is pretty long, so it’s very easy to navigate away and lose your progress.
Files Backup Schedule and Database Backup Schedule
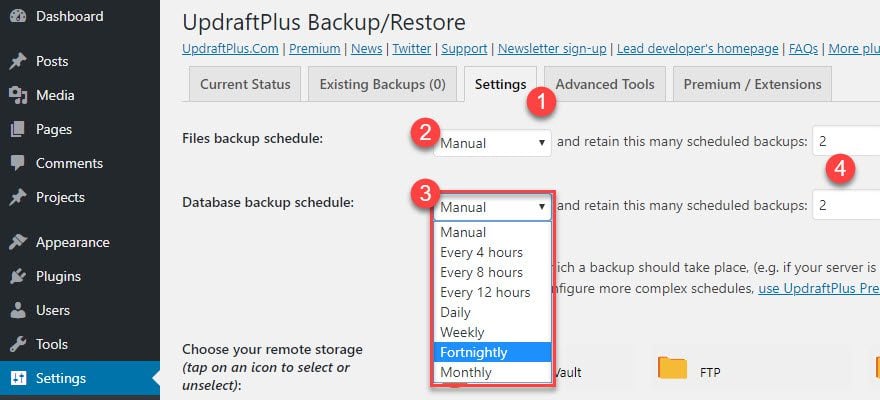
In the settings tab, use the dropdown menus to change whether you want to back up your files, your database, or both. You then choose how many archives you keep in storage, and whether or not you want to perform the backups manually or every 4 hours, 8 hours, 12 hours, daily, weekly, fortnightly, or monthly.
Remote Storage
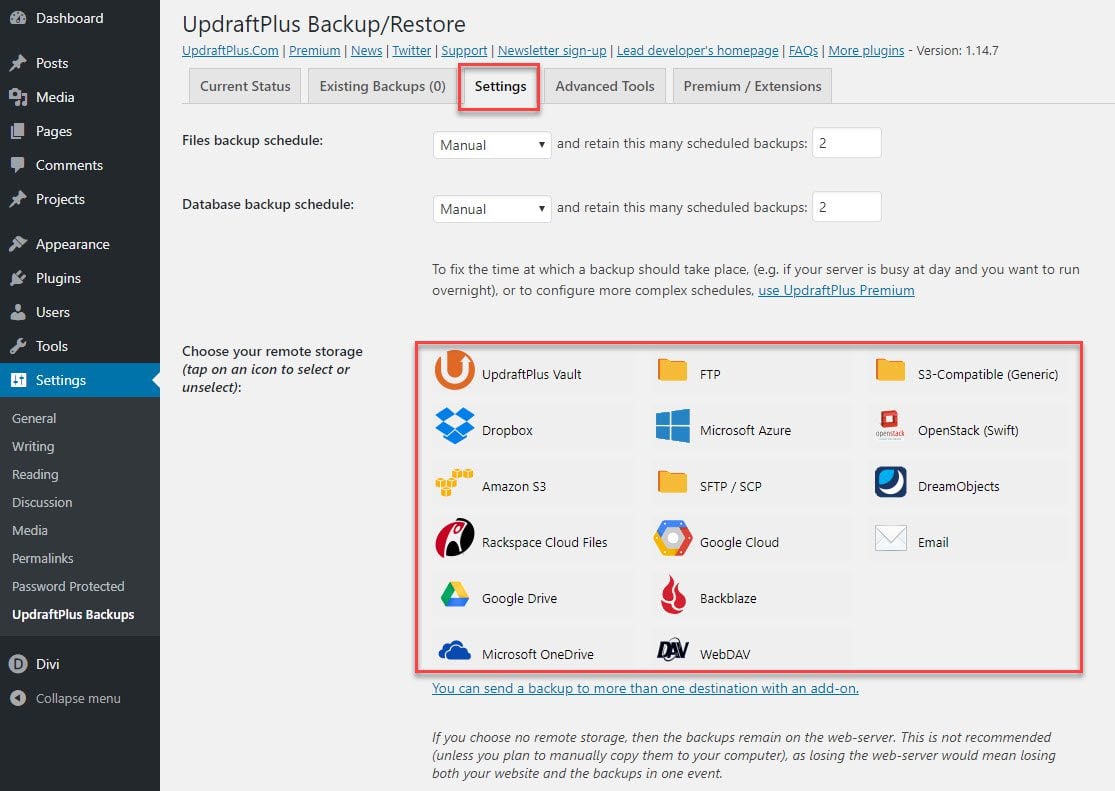
UpdraftPlus can save your backups to your own server, various cloud services, or even offline by simply downloading the files. If none of that works, just email them to yourself. Unless you just want to store them on your own server (but that defeats the majority of the reason you use a backup), you’ll need to set up the external storage locations before running the UpdraftPlus backup process.
Currently, they support 16 different options for storage:
- UpdraftPlus Vault
- Dropbox
- Amazon S3
- Rackspace Cloud Files
- Google Drive
- Microsoft OneDrive
- FTP
- Microsoft Azure
- SFTP/SCP
- Google Cloud
- Backblaze
- WebDAV
- S3-Compatible
- OpenStack
- DreamObjects
Many of these choices are external premium services. Once you select a service you’ll have to connect to it using the their methods. You may have to find an access key, API key, authorization, etc. Some options will require an UpdraftPlus add-on.
Some of these choices allow you to download or upload in chunks. This is helpful so you don’t have server time-out issues. I only recommend email storage for small files. Email servers often have attachment size limits so you might never receive your files. (Yes, it will appear to be sent.)
If you don’t select a remote storage location, then your files will be stored on your server. One problem with this is if something happens to your website, you might not be able to access the files because they’re on the same server. Another problem is that if your site is pretty large, having multiple backups of it can take a lot of space and slow your server down.
If you prefer not to use a remote storage service, I recommend downloading the files to store offline. Then make sure you then deleting the files on your server. Out of the box you’ll only get to choose one storage location. If you want to send your files to more than one location you’ll need a premium add-on.
For the examples in this tutorial I’ve selected Dropbox.
Include Files in Backup
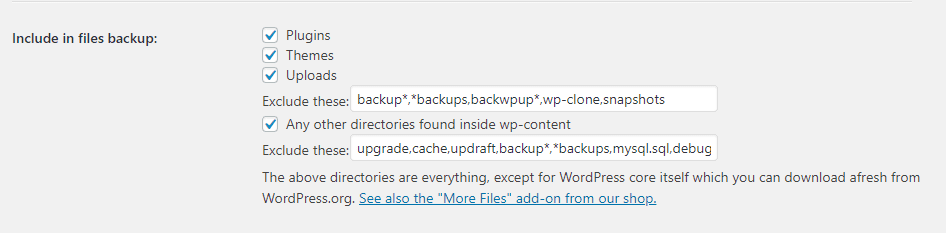
These settings let you choose the types of files to include in the backup. Choices include plugins, themes, uploads, and other directories within the wp-content folder. You can also tell which individual files to exclude.
Database Encryption Phrase
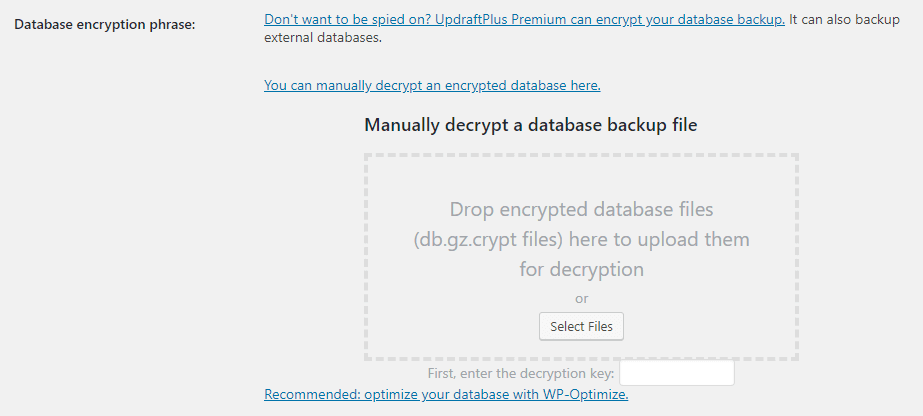
To improve security you can decrypt an encrypted database. Enter a decryption key and then drop the zipped database file into the decryption box.

The email selection box allows UpdraftPlus to send you a basic report in your email.
Expert Settings
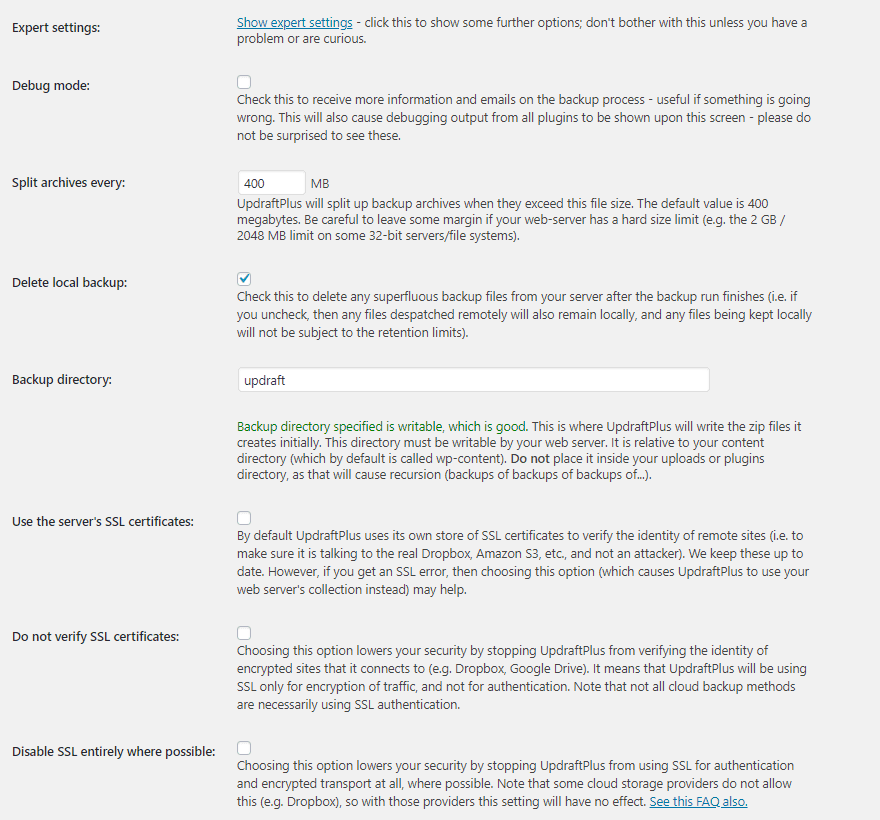
Selecting this will show the expert settings. Settings include:
- Debug mode
- Split archives
- Delete local backup
- Backup directory
- Use the server’s SSL certificates
- Do not verify SSL certificates
- Disable SSL entirely where possible
Creating Backups
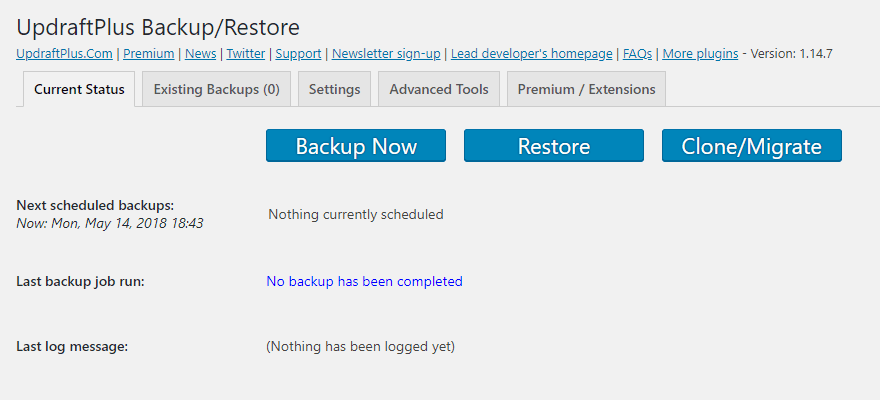
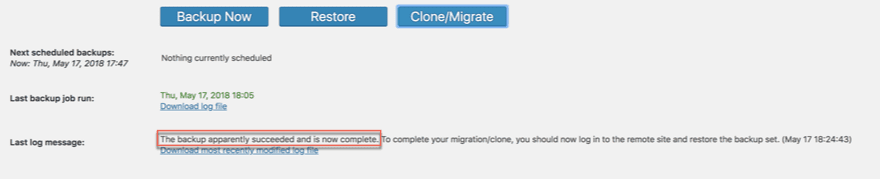
Create manual backups in the Current Status tab. Your options here are Backup Now, Restore, and Clone/Migrate. Clicking Backup Now will start the backup process. Clicking Restore or Clone/Migrate will take you to their respective tabs.
Backup to Server

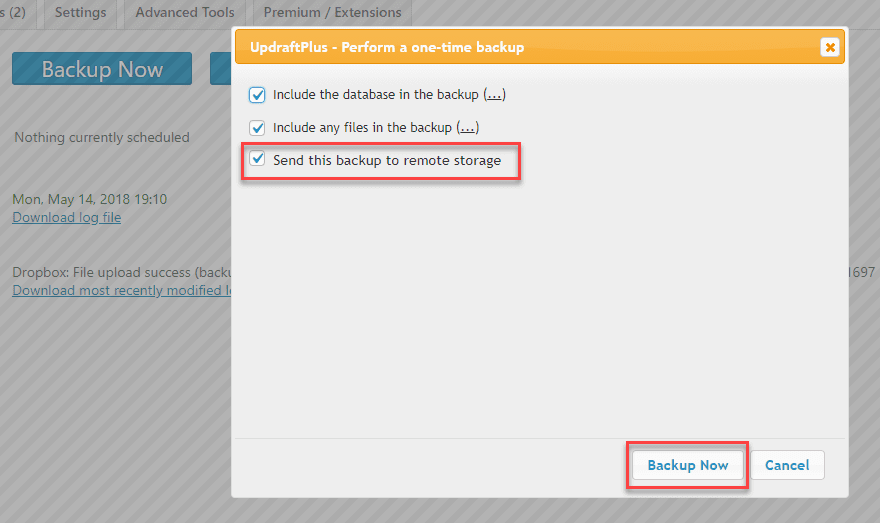
Clicking the Backup Now button opens a modal with several choices. Here you can choose to include the database and/or files in the backup and decide if the backup is sent to remote storage.
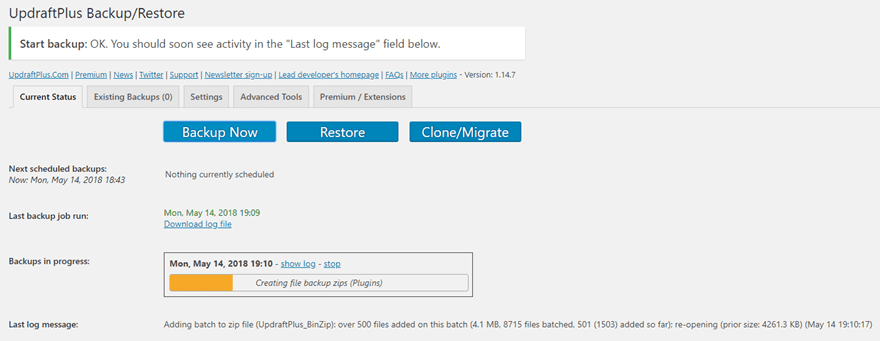
Click Backup Now to start the backup process. Unless you’ve set up a remote location the backup will be stored on your server. Depending on the size of your website, this can take a while to complete.
Whenever it’s finished, you can download the archive to store it offline.
Backup to Dropbox
If you’ve connected a remote storage such as Dropbox then remote storage will automatically be selected.
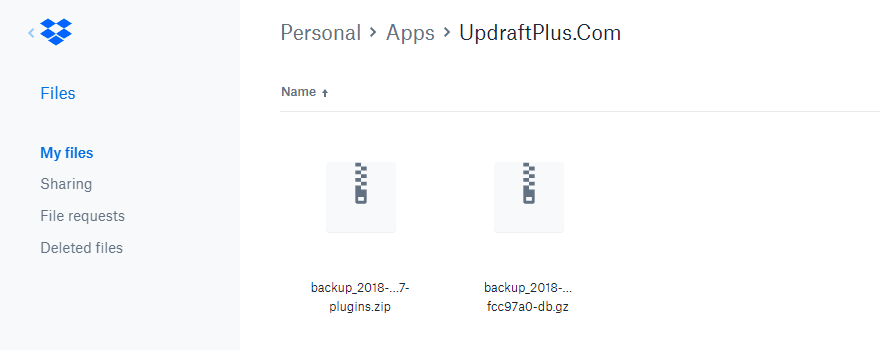
After connecting my Dropbox account the next backup I performed appeared in a folder within my Dropbox account that it automatically made for UpdraftPlus. (If you have a Personal and a Business Dropbox account linked, you will be asked to choose which will host your backups.)
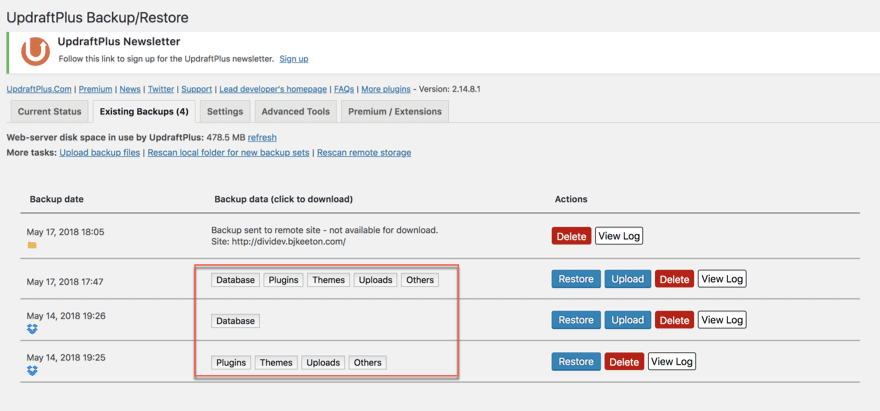
Downloading, Uploading, and Restoring Backups
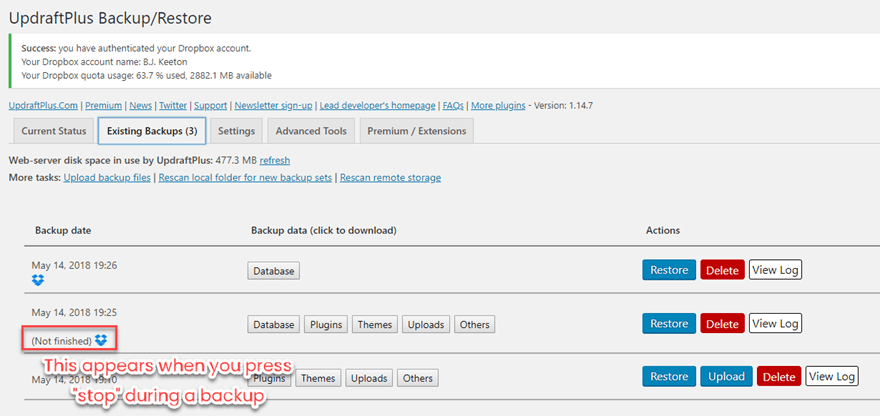
You can see your available backups in the Existing Backups tab. From this tab you can restore, delete, and upload any backup files that you need to restore from. If the backups you’re looking for are not here, there is a link where you can rescan your local folder or remote storage for backups.
Downloading Backup Data
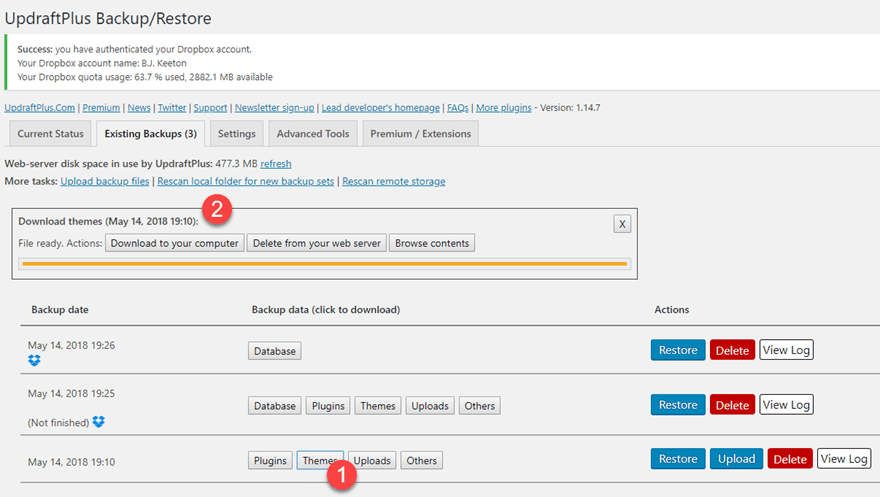
You can download the files from your list of existing backups. Every backup has a series of buttons, so pick the section of the archive you want to download, click the corresponding button, and hit download to your computer.
This is a great way to store your files on your own computer or USB drive. Additionally, large files will be broken into smaller files. At any point, you can choose which backups stay on your server. Just press the red Delete button to make it go away.
Restore
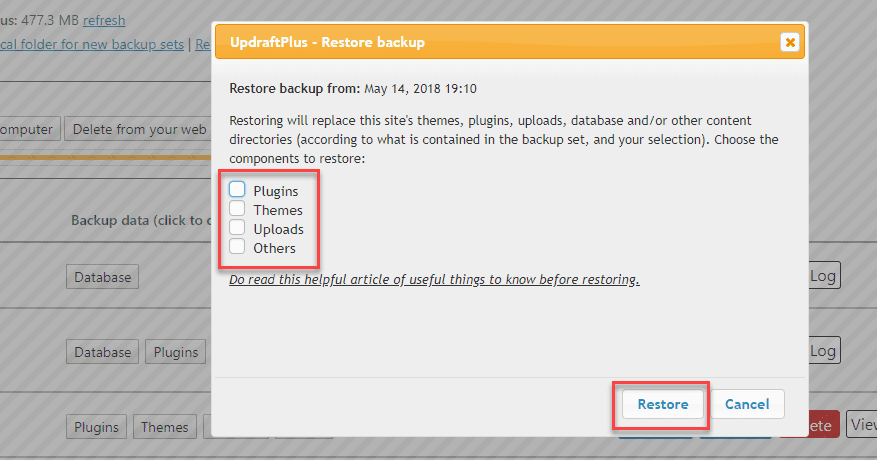
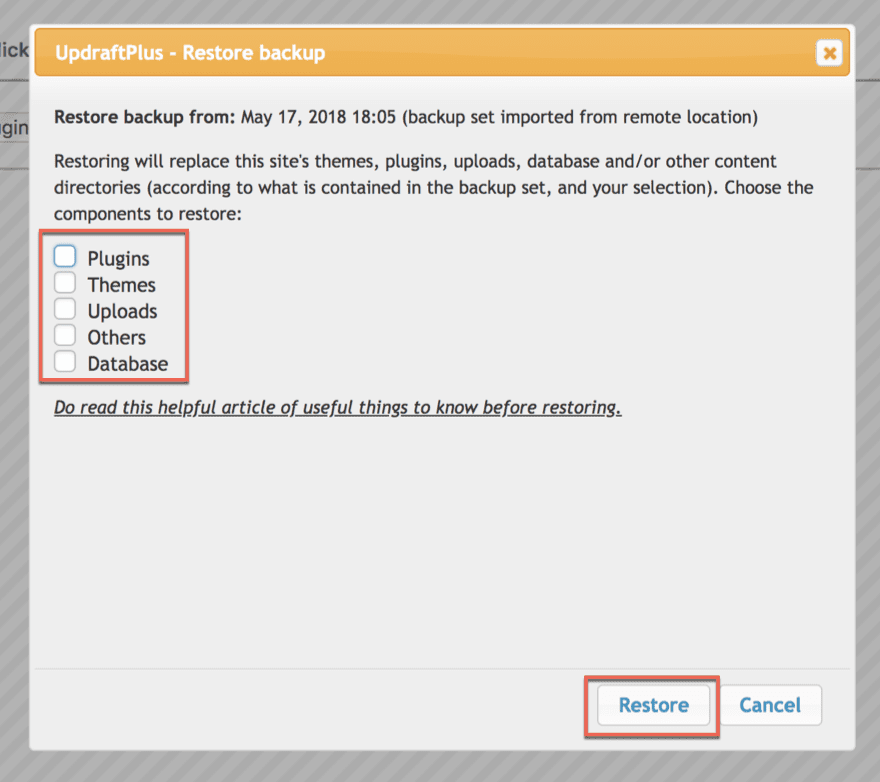
If you have an issue with your site and need to restore one of your backups, it’s as easy as clicking the Restore button on whichever backup you wish to restore. If you’re not sure which you want you can select View Log to get more information about the files.
Additionally, you can choose to restore only part of a backup, so if your plugins are giving you trouble, the themes won’t be overwritten.
Selecting the Restore button opens a modal popup where you can choose which files to restore. Using these options you can restore just your images or plugins without making changes to your database. The options and files work the same regardless of whether they are stored on your server or an external service.

Make your selections and click Restore. It will now process the information and give you one more chance to cancel before restoring. Be sure to take the time to make sure you are restoring what you mean to. These files will overwrite the files on your website. If you’re sure, click Restore again.
It’s important to wait for the restore to complete before closing your browser.

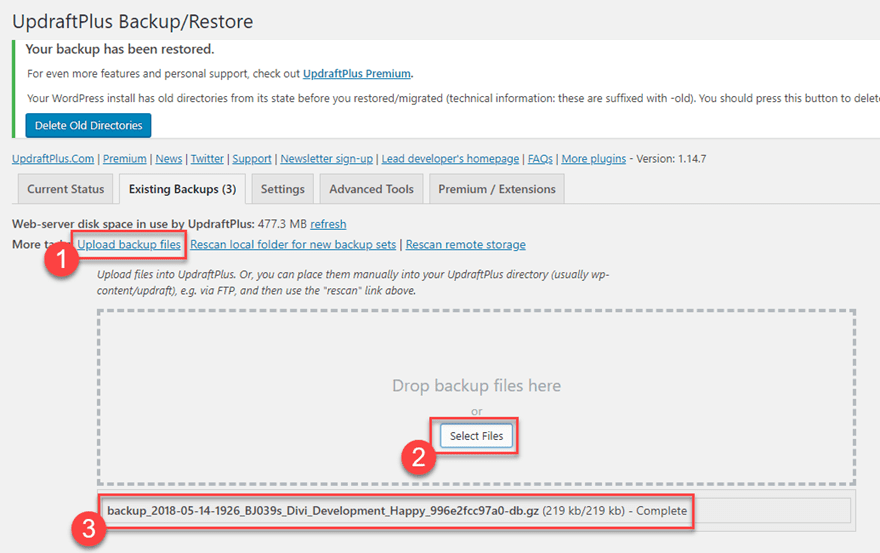
Once the backup is fully restored you’ll get a message that shows the restore was a success.
Upload
You can also upload files to restore from. Just find the file (or files, if you’ve broken it up into chunks) and hit the button. It’s that easy.
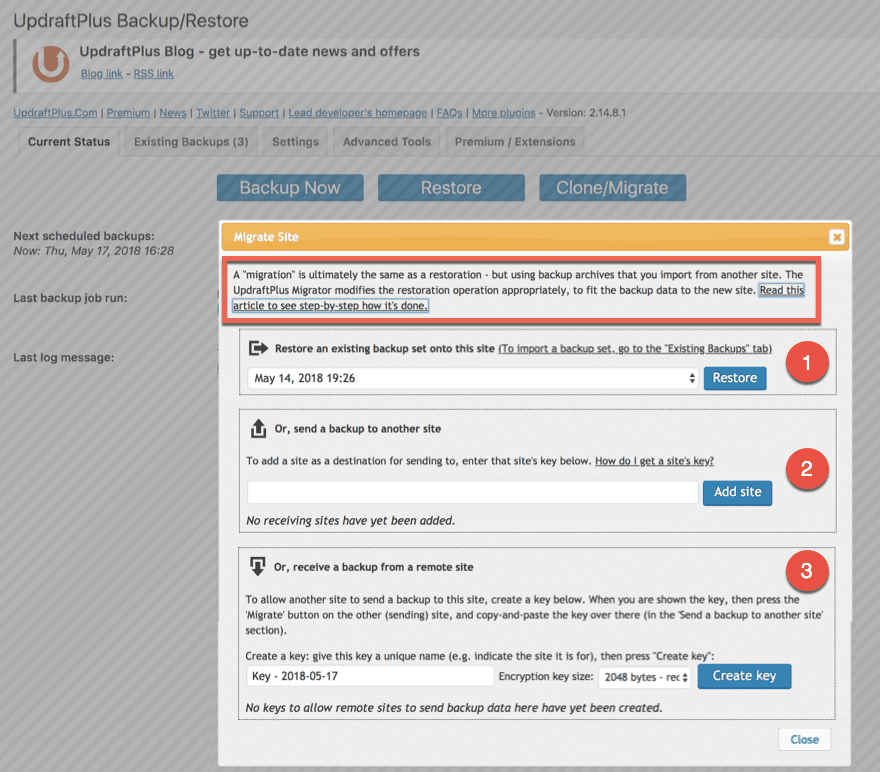
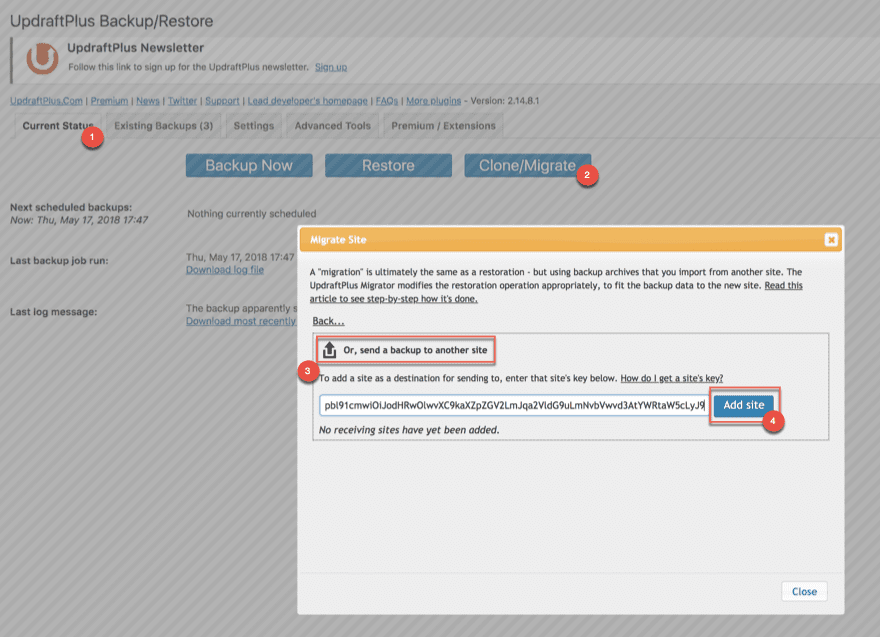
Migrating
In the UpdraftPlus settings, you will see a button that reads Clone/Migrate. In general, there are multiple methods to performing a clone or migration. If one method doesn’t work for you then try one of the others. All of the methods are just different ways of getting the files to the new site. You can import them, upload them through the built-in uploader, connect to an offline storage service, or upload via FTP.
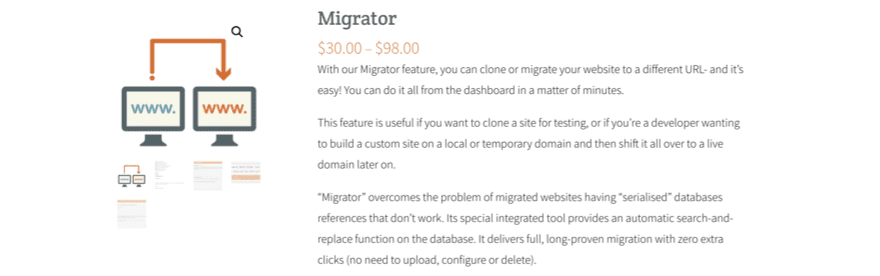
Probably the easiest way to Clone/Migrate a site to a new host or directory is by using the official Migrator plugin. Keep in mind, this is a premium add-on for UpdraftPlus and will cost at least $30 USD depending on the features and level of support you want. Additionally, the Migrator plugin actually replaces the free version that you downloaded from the WP repo, so make sure you deactivate and uninstall the old version before uploading this one. (Don’t worry — your settings and backups aren’t going anywhere).
When the new plugin is installed, you’ll need to enter the login credentials you made at the time of purchase to authenticate yourself, and voila! If there is an update available a message will appear across the top of the screen, as well.

The Migration Process
Once you’ve authenticated, go back to the Current Status tab and click Clone/Migrate.
Migrating and restoring are virtually the same thing with the exception of where the files are restored to. You can’t just take files from one installation of WordPress and upload them to another site. The databases and files are specific to each site site, and the Migrator plugin modifies those files to work on the new site address and file system.
Outside of that adjustment, performing the migration process through the Migrator plugin will create a clone of the original site. Any content on the destination site will be lost. Additionally, you must already have WordPress installed on the new site, and you also need the premium version of UpdraftPlus with Migrator installed and activated there, too. (In addition to the original, source site.)
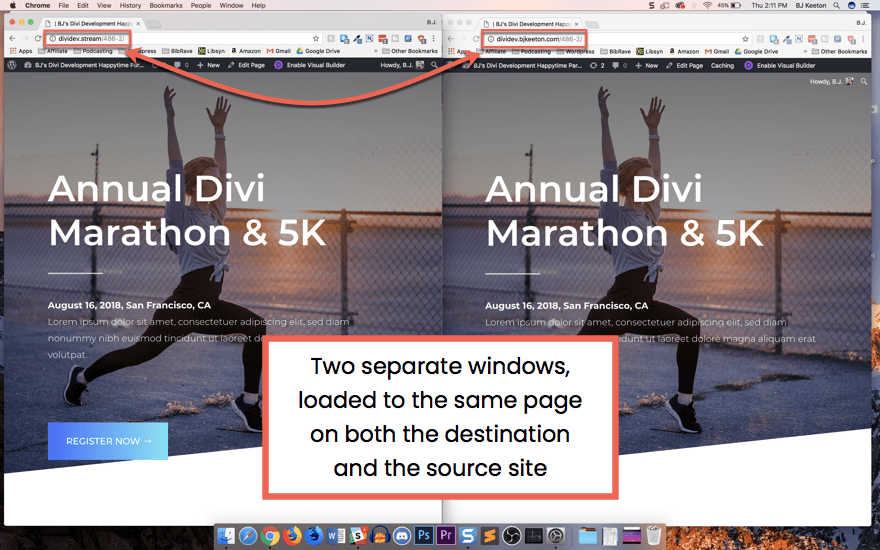
The Test Sites
For this example I’m doing an imported migration. Here’s a look at the sites that I’m using for this walkthrough.
The Receiving Site

The site that I’m migrating into is pretty bare version of WordPress using the Divi theme. It has a few posts and pages, and the only plugin that’s installed and activated is the UpdraftPlus with Migration add-on.
The Source Site
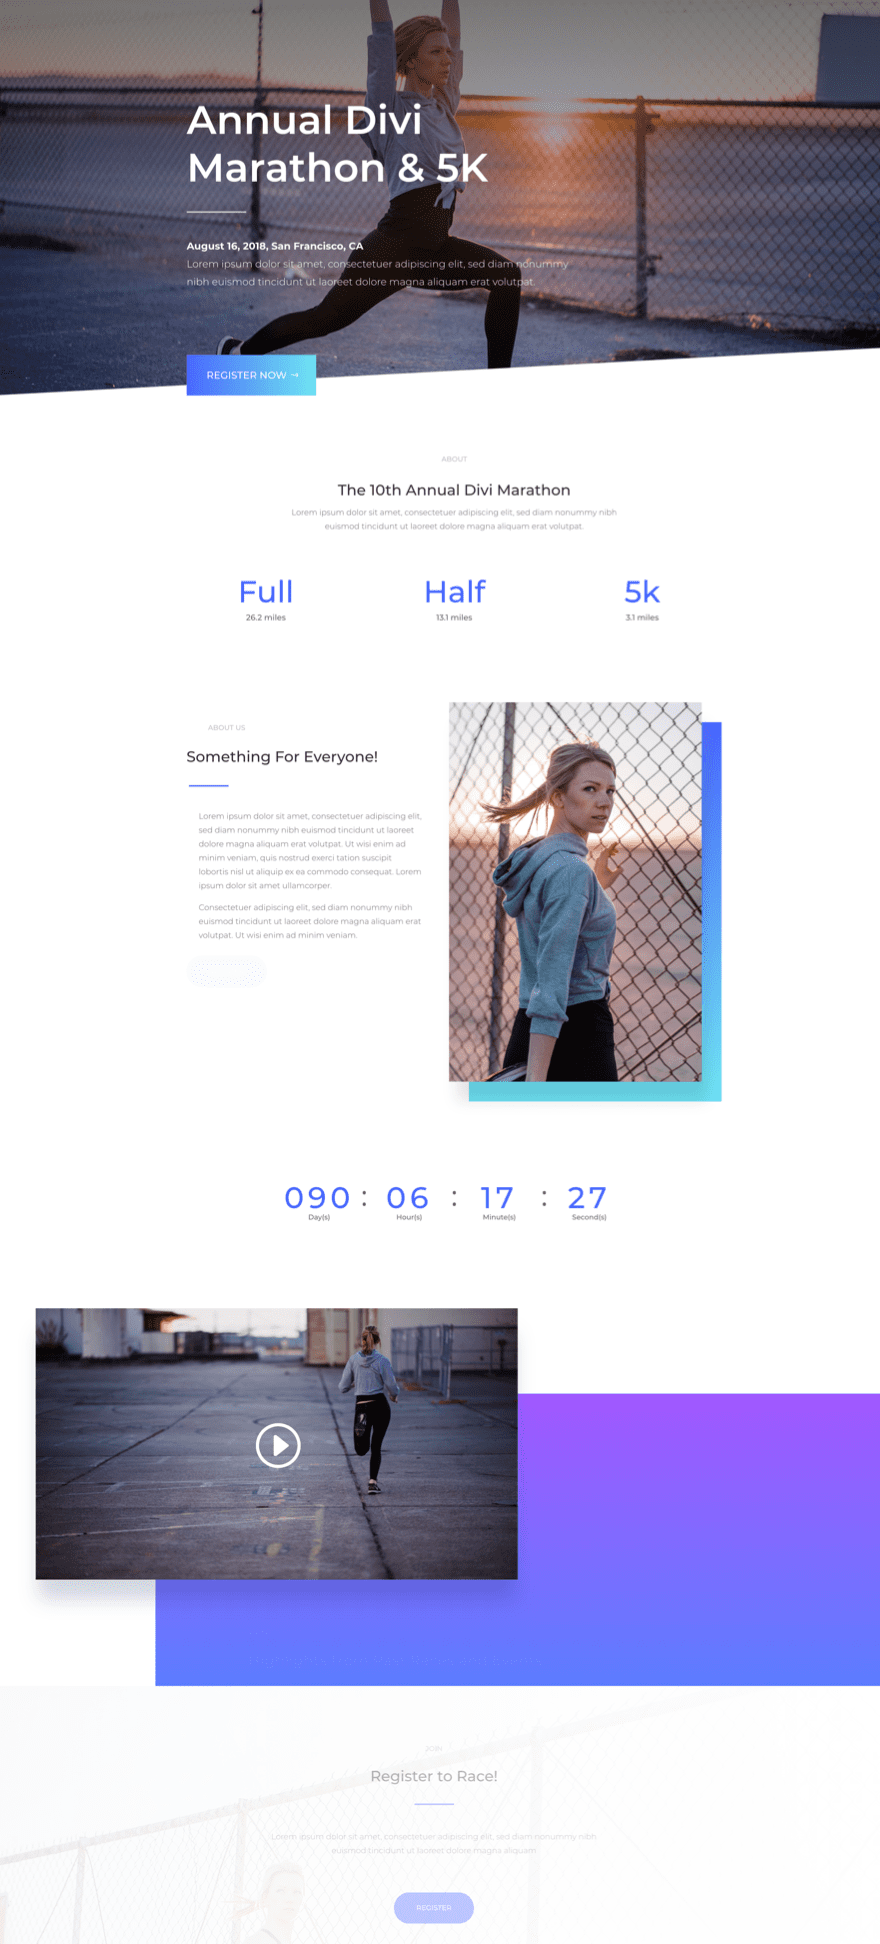
The site that I am using as a source is using the Divi Design Initiative Marathon layout landing page, and has quite a few test pages and posts created.
Importing from the Original Site
The goal here is to get all your files to the other installation of WordPress. And you only have a few steps to take here.
Step 1
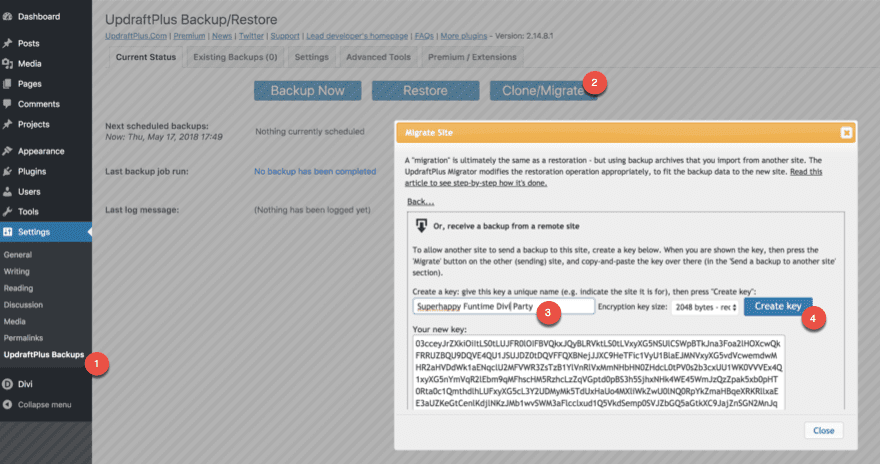
In your destination site (which has an activated version of the Migrator plugin installed, remember?), go to Current Status and click Migrate/Clone.
Next you need to create a migration key. Essentially, this is an encrypted identifier that links your two sites together and makes sure your information goes to the right place.
Enter a name for the key in the field labeled Enter your chosen name. Next choose the encryption size you want for the key from the drop-down box. The larger the number you choose, the size the better the encryption, but it will also take longer to migrate. This will entirely depend on the sensitivity of your data. Once you’re ready, click Create key, and a string of encryption will appear in the field labeled Your new key.
Highlight this key and copy it so that you can paste it in the source site.
Step 2
Now, go back to your source site, and navigate toCurrent Status and click Migrate/Clone. Click Send a backup to another site and paste the encrypted key into the field and click Add site.
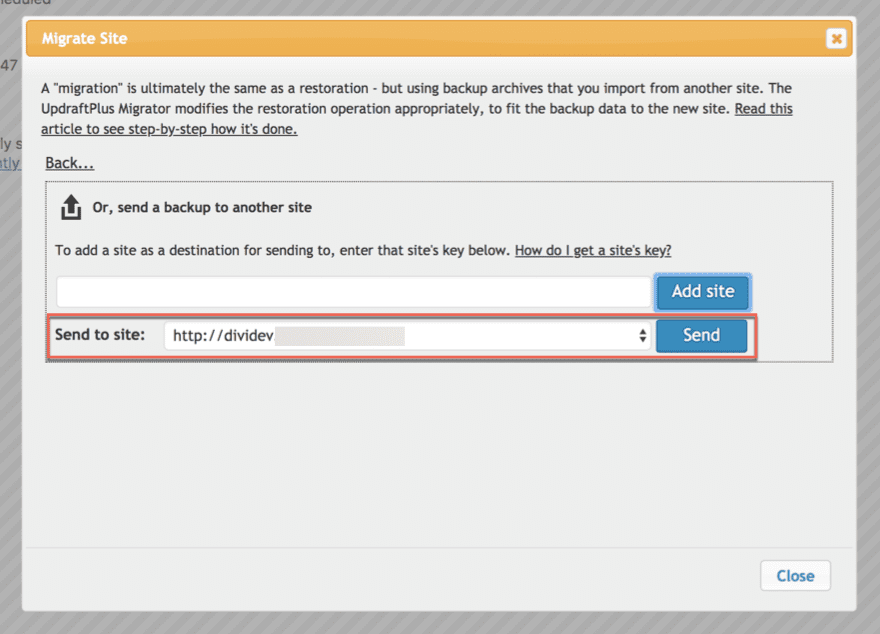
The URL for the destination site will appear in a drop-down box labeled Send to site. Make sure the URL is correct and click the blue Send button.
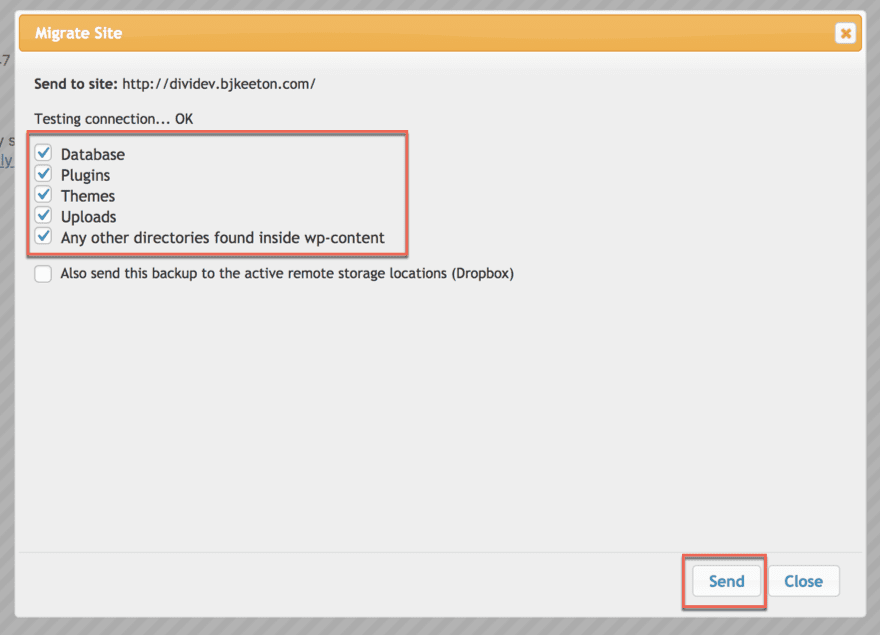
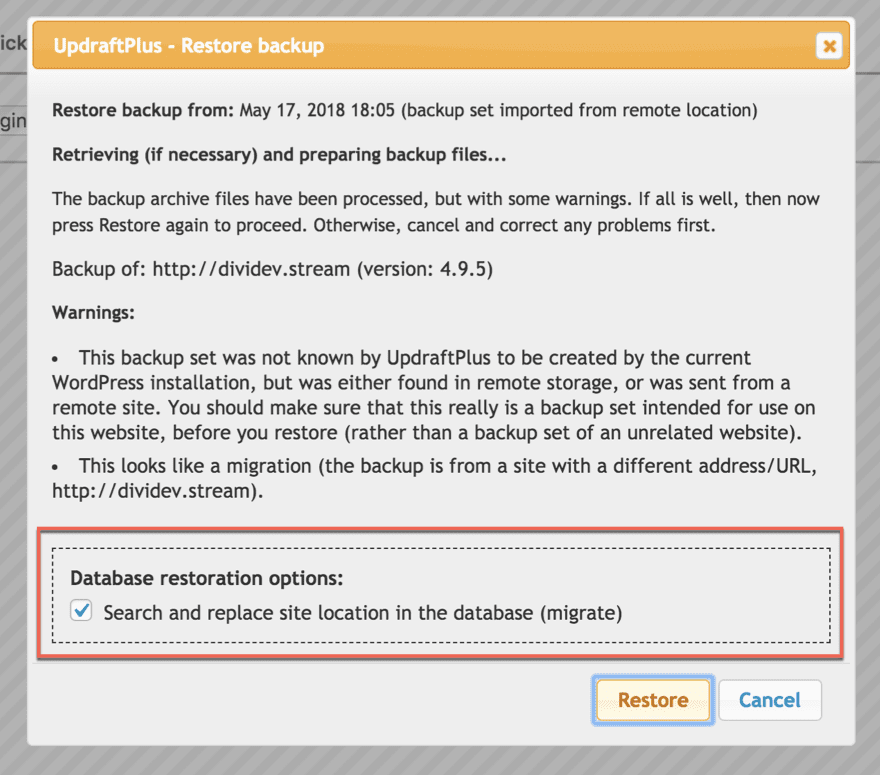
It will then test the connection between the sites. If the connection is good, you’ll get a modal where you can select what parts of the source site to migrate.
- Database
- Plugins
- Themes
- Uploads
- Any other directories within the wp-content folder
Once you’ve made your selections click Send. Keep in mind that this creates a new backup at the time of the migration. It does not send an old backup. Which is why you get the option to send the backup to remote storage at this point.
When you’re ready, UpdraftPlus will start the migration process whenever you hit Send. The whole process may take a while, especially if you’re moving a big site. WordPress has to export and upload the files, so maybe go make a sandwich or something.
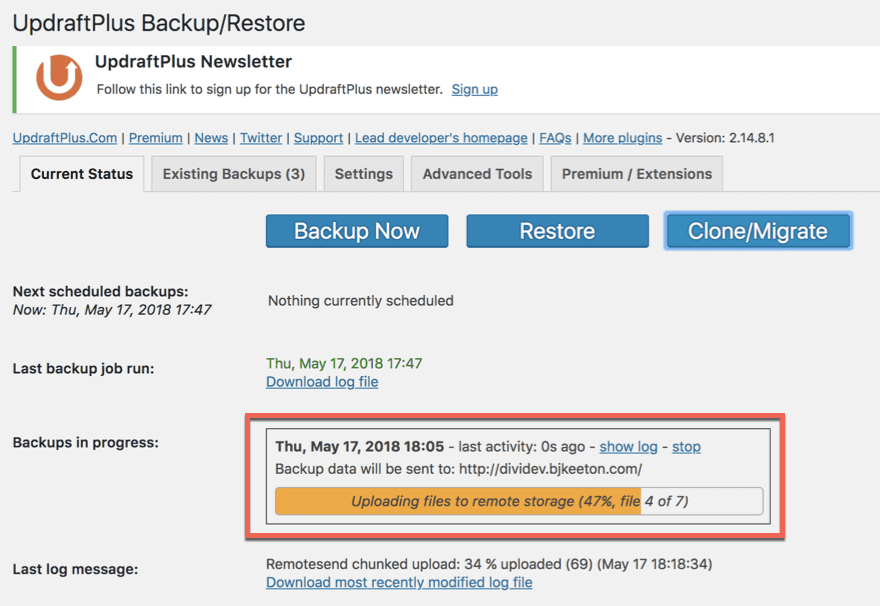
Once the transfer is complete and the destination site has verified that all of the files have been sent over, you’ll get a message that remote send has completed and to log into the remote site to restore the backup set.
Step 3
The receiving site will now show the files as an existing backup. From this point, you are basically doing just a simple restoration of that backup. Click Restore next to the backup to install the migrated files onto their new home at the destination site.

Before actually performing the restoration, you’ll be prompted to choose which of the migrated files you want to install. Once you’ve made sure that things are in order, click Restore. When this is done, all of the files on this site will be replaced by the backup. Anything that was at the destination site will be erased at this point.
If you choose to migrate the database, you’ll also need to select the box that says Search and replace site location in the database. This will move all of the references to the site location to this site. This step is crucial. If you do not perform this step, the URLs within the database will point back to the source site. This is the same code as the searchandreplaceb2.php script.
The plugin will give you one final warning that that all of your files are about to be replaced (because this really is a big deal). If you’re ready, then click Restore. UpdraftPlus will now start the restoration. Leave the browser open to this page.
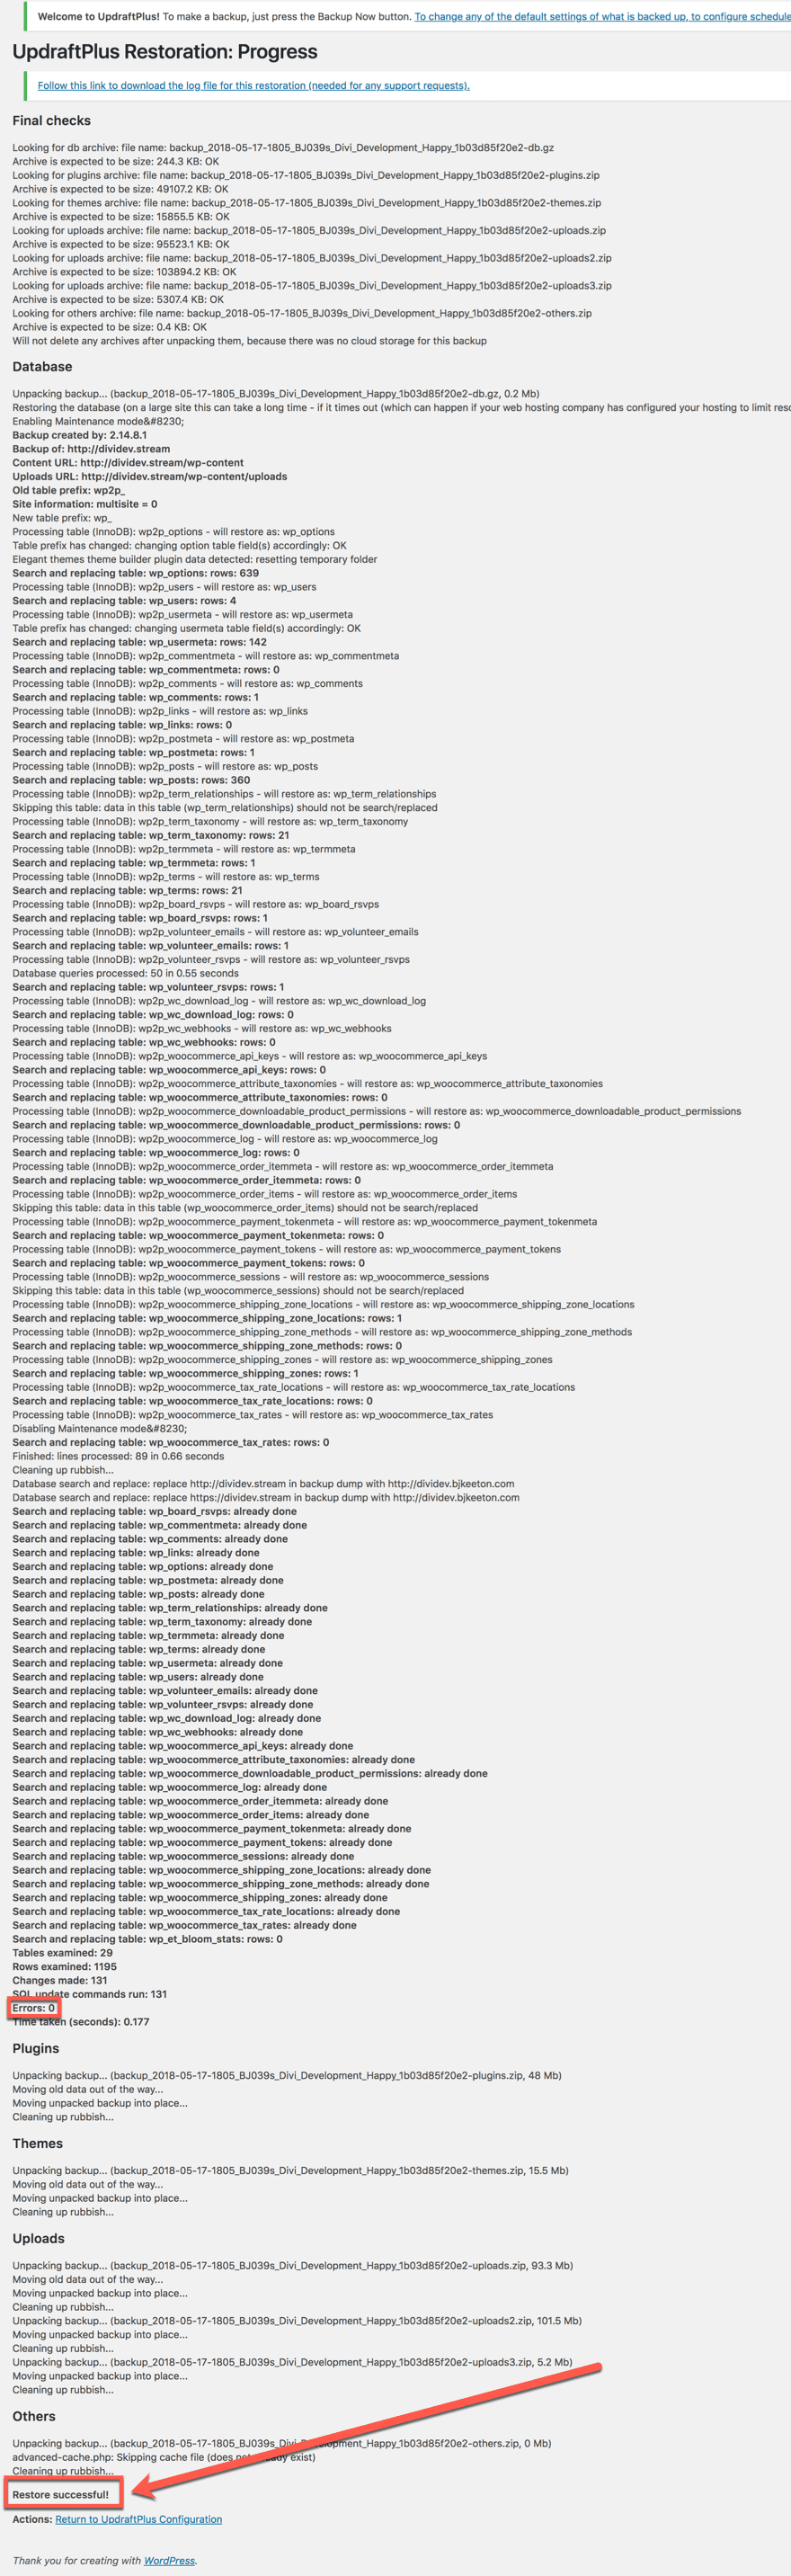
UpdraftPlus will display the progress as it performs the migration. It’s important to wait for the restoration to complete. The time it takes will vary depending on the size of the files but it can take a while. The site will be placed in maintenance mode until the migration is complete. It will tell you when it’s finished. If you have any issues you might have to restore each set (plugins, themes, files, etc.) individually.
Once the migration is complete you will have to login again. Most likely, the site will log you out automatically and give you a pop-up login modal. Note: the login credentials will be from the site you migrated from, both usernames and passwords.
The Result
All of the content imported (pages, menus, even the home page was set as the front page).
Other Methods
If the files fail to migrate to the new site (caused by server time-out issues, etc.) you will need to use one of the other methods to get the files to your website. All of these processes work practically the same. Your options include:
Download and Upload the Files Manually
One option is to download and upload the files by hand. Just repeat Steps 3 and 4 above once they’re uploaded.
Download
In the dashboard of the site you want to migrate from, create backups, click on each backup set (Database, Plugins, Themes, Uploads, and Others), and then click Download to your computer for each file.
Upload
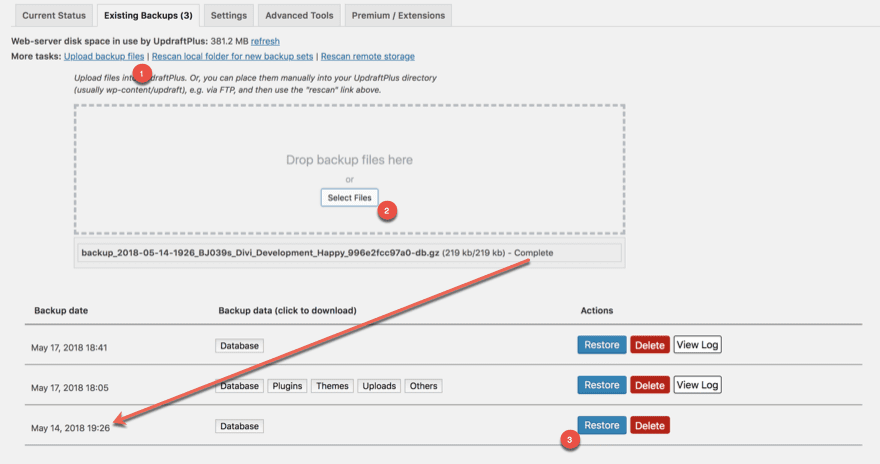
In the destination site, go to Existing Backups and select Upload backup files. Drag and drop the files just like any media, or find it through your computer’s file system. Once the upload is complete you can restore from the uploaded files just like performing the migration — hit Restore and go through Steps 3 and 4 above. Be sure to select search and replace site location just like before, too.
Connect to External Storage

Connect your site to the external storage and your files will appear as an existing backup. If they don’t appear then select Rescan remote storage. You can migrate the site by selecting Restore as normal. The only difference is where the files are physically located. You can also download the files from these links that are found.
Upload Files Via FTP

Your hosting provider should have given you an FTP login during set up (or maybe your sysadmin gave them to you). All you have to do is use an FTP client such as FileZilla to send the files to \wp-content\Updraft. Once you’ve uploaded your files you might need to rescan the local server. Your files will now appear and you can restore (or migrate) as normal. The regular edition of Updraft only supports non-encrypted FTP. For the increased security of SFTP, you’ll need an add-on.
Help
The UpdraftPlus dashboard includes links for support and FAQ. The support page (which runs on Divi, btw) includes FAQ, forums (the WordPress support forum for the free version and a paid support forum for the premium version), and a YouTube channel with video tutorials.
Add-ons
Add-ons include the external storage services and several other upgrades. Any of them can be purchased separately, or as a full-stack bundle for a reduced price.
From the product page, the whole suite of add-ons includes
multiple storage destinations, automatic backup, migrator, importer, enhanced reporting, no adverts, fix backup time, more files, more database options, multisite/network, WebDAV, Microsoft OneDrive, SFTP/FTPS/SCP enhanced support for Dropbox (sub-folders), Rackspace Cloud Files, Amazon S3 (Standard and Standard – Infrequent Access Storage classes) and Google Drive (sub-folders).
Final Thoughts
UpdraftPlus is a great tool to backup, restore, or migrate your website. Performing these tasks can be crucial for keeping your website running. As you saw, with just 4 simple steps, you can maintain and restore or even clone/migrate your entire website. It doesn’t get a whole lot simpler than that.
Do you have any UpdraftPlus tips to share?
Featured Image via Julia Tim / Shutterstock.com


Hello! I just started using this plugin and I have a question. If I delete several records from the database, can I then keep those deleted records in the backup?
Thank you very much in advance,
All the best.
Can you migrate a site that has a wordpress site currently on it? Will it just delete whats already on the site your migrating to?
I have a question. I have my backups sent to my remote Dropbox Storage. Is there a way to have Updraft send to remote storage and then automatically delete from the website plugin? The updraft files take up so much space, so I only want them in Dropbox but I watch over multiple websites so it would be too time consuming for me to go and clean every site out every week.
Hi you set the number of backup versions to store and the plug in deletes the oldest version at the end of the upload of the latest back up
It can also delete local copy on server after uploading it’s all in the settings
Once I tried to use a plugin to migrate my multisite WordPress installation from live site to local server and failed. In the end I resorted to manually download and upload WordPress content files and do the search and replace database method. Worked on first trial.
This was an ultimate guide, thanks for this post Randy Brown. This saves huge time in migration….
Fantastic post full of great information. However for a free backup restore workflow that just works, it has to be Akeeba Backup.
I do fairly straightforward wordpress sites (meaning fairly small). I use UpdraftPlus to back up my sites to Dropbox and I’ve also used it, without the add-on to create a sandbox site from an online site.
I really like this product. The code is clean and aligns to wp’s guidelines (no cURL). The user interface is straightforward. You can set it to do a scheduled backup and forget it.
More to the point, it’s saved my bacon three times in the last 3 months. restores are just as easy as backups.
I use Updraft for backing up and restoration. I have also used it to migrate a large site. I pair it with Dropbox and have had excellent results. I highly recommend both!
Great article. This will help us a lot when migrating our local Divi site to our cloud servers. Thanks for the guide. Bookmarked 🙂
Really nice post Randy.
It is possible to use the same method to transfer a single WP installation for a WP Multisite network?
Are you think in create any post about this kind of WP transfer?
Hi Ricardo. You can migrate a single installation from a multisite to another multisite. The process is the same.
If you want to transfer between standalone and multisite you’ll need an addon.
Good to know! I am doing it manually!
Really nice guide. Thank you
It seems like Duplicator (by Life in the Grid) would be better than this
Great rundown! I love Updraftplus. Like Neal Ghoshal I use it on all my websites with automated backups to Amazon. I’ve tried dropbox, but find the backups take longer to run.
This article is great because most people need help on how to navigate WordPress because it can become very difficult. I have been a WordPress user for over a year now and I still find areas I am not sure on. I also think this is a great blog because it provides pictures on how to navigate the page which are extremely helpful.
Hi!! Nice article. Always is good two know other admin tools. I’m using managewp and the clone option works fine. Want to knows any other experience with managewp or article in the future.
Thanks for this great detailed article. I use Updraft on all my websites for clients with automated backups to Amazon – it works brilliantly. Great for migrations too.
UpdraftPlus works well for me on every site and the migrate tool is great. Use it a lot.
I’m assuming it works well with Divi?
Hi Bud. Yes!!! It works great with Divi 🙂
Great article Randy, very detailed information really appreciate it.
Thanks Rob!
Great guide to updraft very informative, how does you feel updraft compares to the backup and cloning in managewp?
Unfortunately, when it comes to both backup and migration, size matters – a lot.
Updraft can handle large backups if you send the file to an FTP or such, but migration (with their $35 upgrade) doesn’t work with large sites. There are better solutions, albeit not cheaper ones.
Hi Bob. Thanks for the info. I’ve had better luck using uploads or FTP to migrate large sites than with using the transfer method.