
Welcome to the last part of the Divi 5 Mastery Course. Over the last 15 parts, you went from a blank WordPress install to a complete coworking website with a global design system, Theme Builder templates, responsive layouts, dynamic content, and interactive elements.
You created Design Variables, built Presets, created Theme Builder templates, mastered Flexbox and CSS Grid, worked with the Loop Builder, and learned a faster power user workflow.
Now it is time to step back, review everything with a critical eye, polish the details, and prepare the site for launch. In this post, we will walk through a complete pre-launch audit, check visual and functional details, review performance settings, tighten accessibility and SEO basics, test across devices and browsers, and finish with the final launch steps.
By the end, your Divi 5 website will be ready for real visitors. Let’s dive in!
- 1 Divi 5 Mastery Course Overview
- 2 The Pre-Launch Checklist
- 3 Visual And Functional Audit
- 4 Performance Optimization Checklist
- 5 Accessibility And SEO Polish
- 6 Final Design Refinements And Consistency Checks
- 7 Testing Across Devices And Browsers
- 8 Pre-Launch Preparations
- 9 Going Live: Launch Steps
- 10 Divi 5 Mastery Course Wrap-Up
Divi 5 Mastery Course Overview
| Part | Title | Visit |
|---|---|---|
| 1 | What To Prepare Before Building Your Divi 5 Website | Learn more |
| 2 | Exploring Every Aspect Of The Divi 5 Interface | Learn more |
| 3 | Creating A Divi 5 Global Design System With Design Variables | Learn more |
| 4 | Mastering Divi 5 Presets For Faster, More Consistent Web Design | Learn more |
| 5 | Building A Divi 5 Homepage From Scratch | Learn more |
| 6 | Building A Custom Header And Navigation In Divi 5 | Learn more |
| 7 | Building A Custom Footer In Divi 5 | Learn more |
| 8 | Using Divi 5’s Theme Builder To Create Global Website Templates | Learn more |
| 9 | Building The Core Inner Pages Of Your Divi 5 Website | Learn more |
| 10 | Mastering Flexbox In Divi 5 | Learn more |
| 11 | Mastering CSS Grid In Divi 5 | Learn more |
| 12 | Making Your Divi 5 Website Fully Responsive | Learn more |
| 13 | Creating Interactive Off-Canvas Elements (Popups & More) | Learn more |
| 14 | Mastering The Divi 5 Loop Builder | Learn more |
| 15 | Divi 5 Power User Workflow | Learn more |
| 16 | Auditing, Polishing, And Launching Your Divi 5 Website | Learn more |
The Pre-Launch Checklist
You have spent weeks in builder mode, tweaking modules, adjusting spacing, and refining every part of your Divi 5 website. Now it is time for one of the most important shifts in the process: moving from creator to critic.
This transition is harder than most people realize. After working on a design for a while, you can stop seeing it clearly. Small inconsistencies, awkward spacing, broken links, and usability issues can become easy to miss. That is why a strong pre-launch audit starts with the right mindset.
Step Away Before You Audit
If possible, step away from the project for a short period before the final review. Close the browser, take a break, and let your mind reset. Coming back with fresh eyes helps you experience the website more like a first-time visitor.
When you return, view your site in a new way:
- Use an Incognito window in Chrome or a Private window in Safari.
- Stay logged out of WordPress when testing the front end.
- Browse the site on a physical phone or tablet, not only inside the builder preview.
Then, review the site from a user-first perspective. Ask yourself:
- Does this feel intuitive?
- Is the navigation clear?
- Does the content flow naturally?
- Are the calls to action easy to find?
- Would I trust this website with my time or money?
This mindset helps you move beyond “Does it look finished?” and toward the more important question: “Does it work well for visitors?”
Use Your Power User Workflow
This is where everything you learned in Part 15: Divi 5 Power User Workflow becomes valuable. Use the Layers panel, Command Center, Page Manager, Inspector, Design Variables, and Presets to move through the site efficiently.
Instead of clicking around aimlessly, review the site with a system. Move page by page, check repeated components, inspect anything that looks inconsistent, and fix problems at the Design Variable or Preset level whenever possible.
Visual And Functional Audit
Now that you are approaching the website with fresh eyes, it is time to run a visual and functional audit. This is where you catch the small details that can affect the professional feel of the site. Treat this as your final quality control pass before opening the site to real visitors.
Step-By-Step Audit Checklist
Go through the following items carefully. It helps to create a simple checklist so you can track what you have reviewed and what still needs attention.
1. Review Every Page For Consistency
Start by visiting every major page on the site: the homepage, core inner pages, Blog page, archive templates, single post template, search results page, and 404 page.
As you review each page, pay close attention to typography. Check that heading sizes, font weights, line heights, and spacing feel consistent with the design system. Small typography inconsistencies can make a site feel unfinished.
Next, verify that colors are controlled through your Design Variables from Part 3. This is one of the biggest advantages of the workflow you built. If you ever need to rebrand or adjust your palette, you can update the variable once and let the connected presets and modules follow.
Then, examine your button styles. Confirm that buttons use the correct Option Group Presets and Element Presets from Part 4. Check text size, padding, hover states, border radius, and spacing so buttons look and behave consistently across the site.
Finally, review spacing between sections and modules. Make sure vertical gaps feel balanced on desktop, tablet, and phone. This is the time for small spacing adjustments that improve the final polish without changing the overall design.
2. Check Header And Footer Behavior
Next, focus on the header and footer. Test whether the header stays sticky as intended on every page and whether it behaves correctly on desktop, tablet, and phone.
Pay attention to how the header interacts with different content lengths and screen sizes. Verify that the custom navigation from Part 6 does not overlap content, break across lines awkwardly, or hide important links on smaller screens.
Then, confirm that the footer from Part 7 displays correctly on every page. Check spacing, column stacking, social icons, copyright text, and link alignment.
3. Test All Interactive Elements
Interactive elements can make a website feel polished, but only if they behave predictably. Open and close any off-canvas menus, pop-ups, notices, or slide-ins you built in Part 13.
Test hover states on buttons, images, and links. Confirm that interactions trigger at the right time and do not interrupt the user experience. Next, scroll through your Loop Builder layouts from Part 14. Verify that featured images, post titles, terms, excerpts, metadata, links, and pagination display correctly.
Finally, click through every link and submit every form. Make sure contact forms, email opt-ins, buttons, navigation links, social links, and dynamic Read More links all work as intended.
4. Check Content Accuracy
After the visual review, shift your focus to content accuracy. Proofread the entire website for spelling, grammar, punctuation, and formatting issues. Look for leftover placeholder text, repeated phrases, incorrect dates, outdated offers, and unfinished captions.
Replace any placeholder images with the final assets. Then check all internal and external links to ensure none are broken.
Also, verify that company information is consistent across the site. Contact details, business hours, address, email, phone number, and social links should match wherever they appear. If you stored these values as Text or Link Variables, update them there instead of editing each instance manually.
5. Review Mobile And Tablet Layouts
One of the most important parts of the audit is reviewing the site on smaller screens. Use Divi 5’s Customizable Responsive Breakpoints and the Responsive Editor to test the layout across active breakpoints.
Look for overlapping elements, hidden content that should be visible, text that is too small to read, awkward column stacking, and buttons that are too close together.
If typography needs adjustment, edit the Design Variables or Presets created earlier in the course whenever the change should apply globally. Use module-level changes only when the issue is specific to one section.
This review often reveals issues that are easy to miss when working primarily on a desktop canvas.
6. Use Divi’s Layers Panel And Inspector
Finally, use Divi 5’s built-in workflow tools to speed up the audit. Open the Layers panel to scan the structure of complex sections and understand the hierarchy of modules at a glance.
Then, use the Inspector to review styles, content, Design Variables, Presets, and other attributes across pages and elements.
These tools help you spot inconsistencies without manually opening every module and every option group.
Performance Optimization Checklist
With the site looking sharp and functioning correctly, shift your attention to performance. A faster website improves the user experience and can support better engagement, conversions, and search visibility.
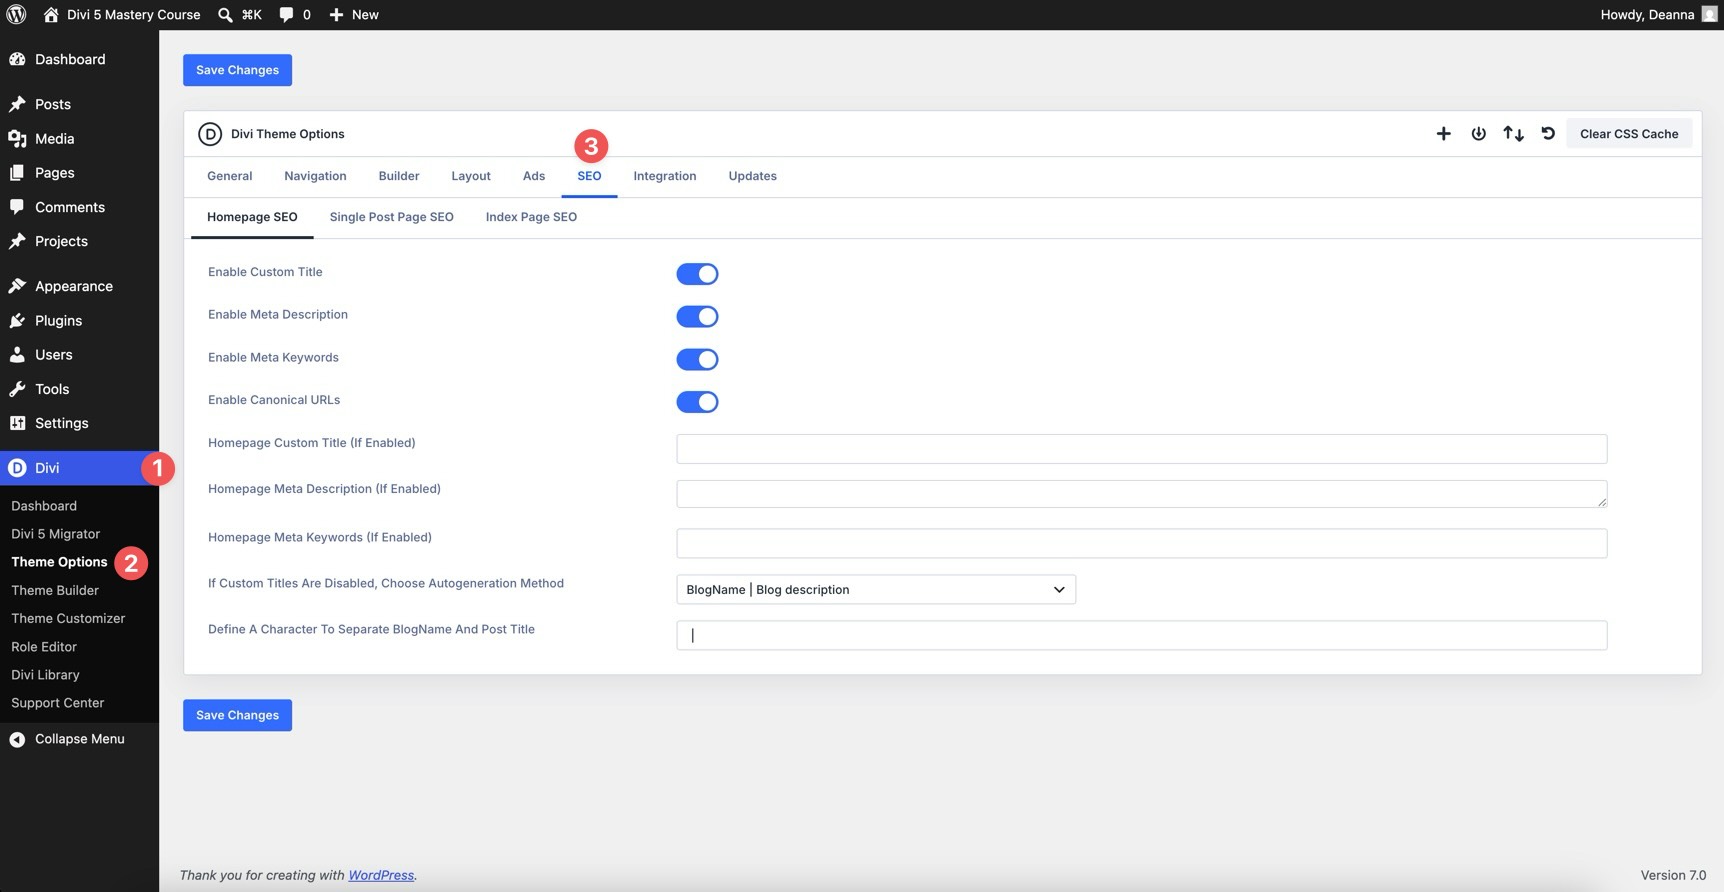
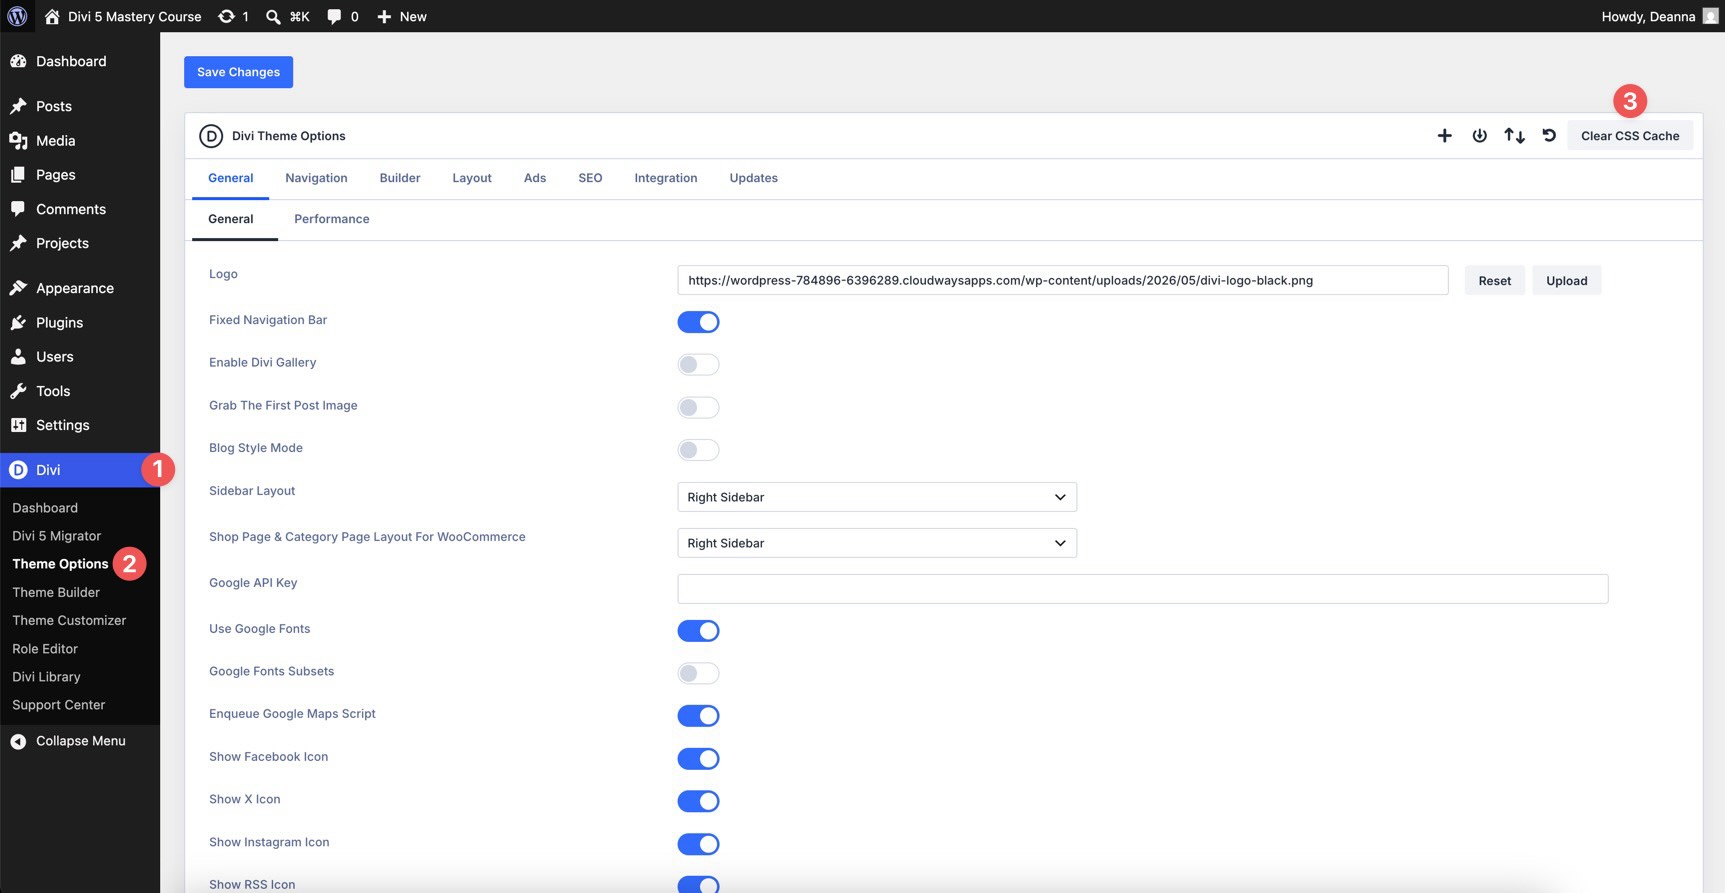
Start in Divi > Theme Options > General > Performance. Review the available performance options and enable the settings that fit your site.

Important settings to review include Dynamic Module Framework, Dynamic Icons, and Critical CSS. Critical CSS helps by prioritizing the CSS needed above the fold and deferring the rest.
Set the Critical Threshold Height to a level that works for your layout. Medium is a practical starting point for many sites, but test after changing it.
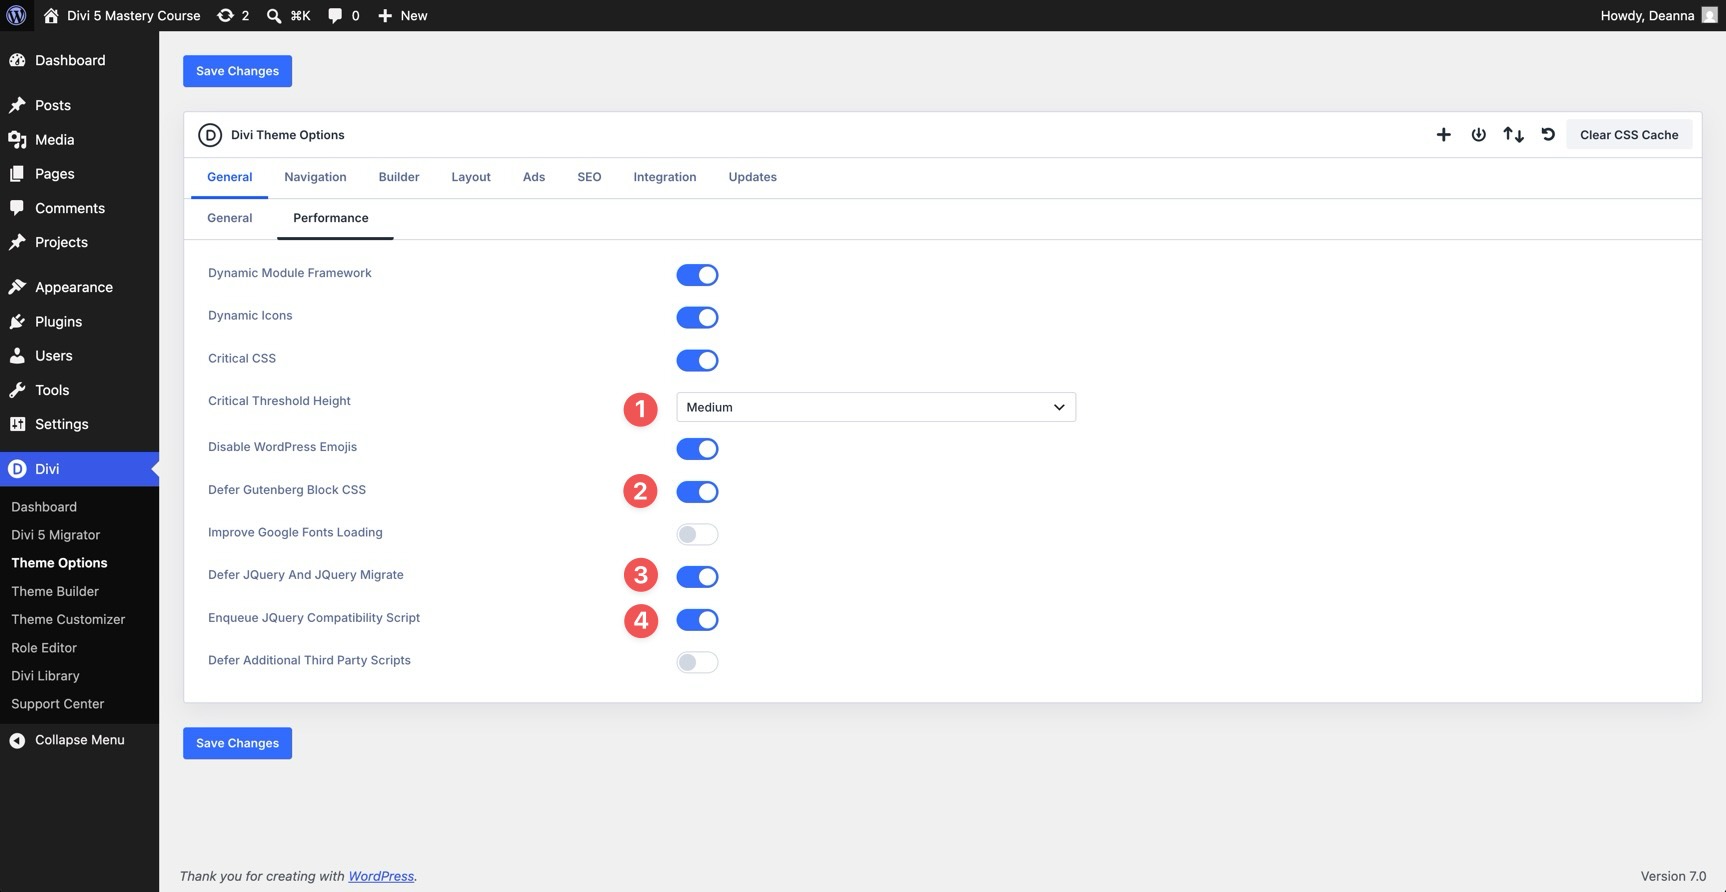
You can also consider enabling options such as Defer jQuery and jQuery Migrate and Defer Gutenberg Block CSS. After enabling JavaScript or CSS deferral settings, test forms, menus, sliders, pop-ups, and third-party integrations to make sure nothing breaks.
Review the remaining performance options, activate the settings that fit your build, and save your changes.
Optimize Your Images
Next, optimize your images. Image files are often one of the easiest places to reduce page weight.
Resize images close to the largest size they need to display on the site. For example, if a hero image never displays wider than 1920px, avoid uploading a 4000px original. Use tools such as Photoshop, Affinity Photo, Squoosh, or TinyPNG to resize, compress, and export optimized files.
When possible, use modern image formats such as WebP, especially for large photographic images. Divi 5’s Aspect Ratio and Image Framing settings also help keep images consistent. You can define image proportions and control how an image fits inside its container.
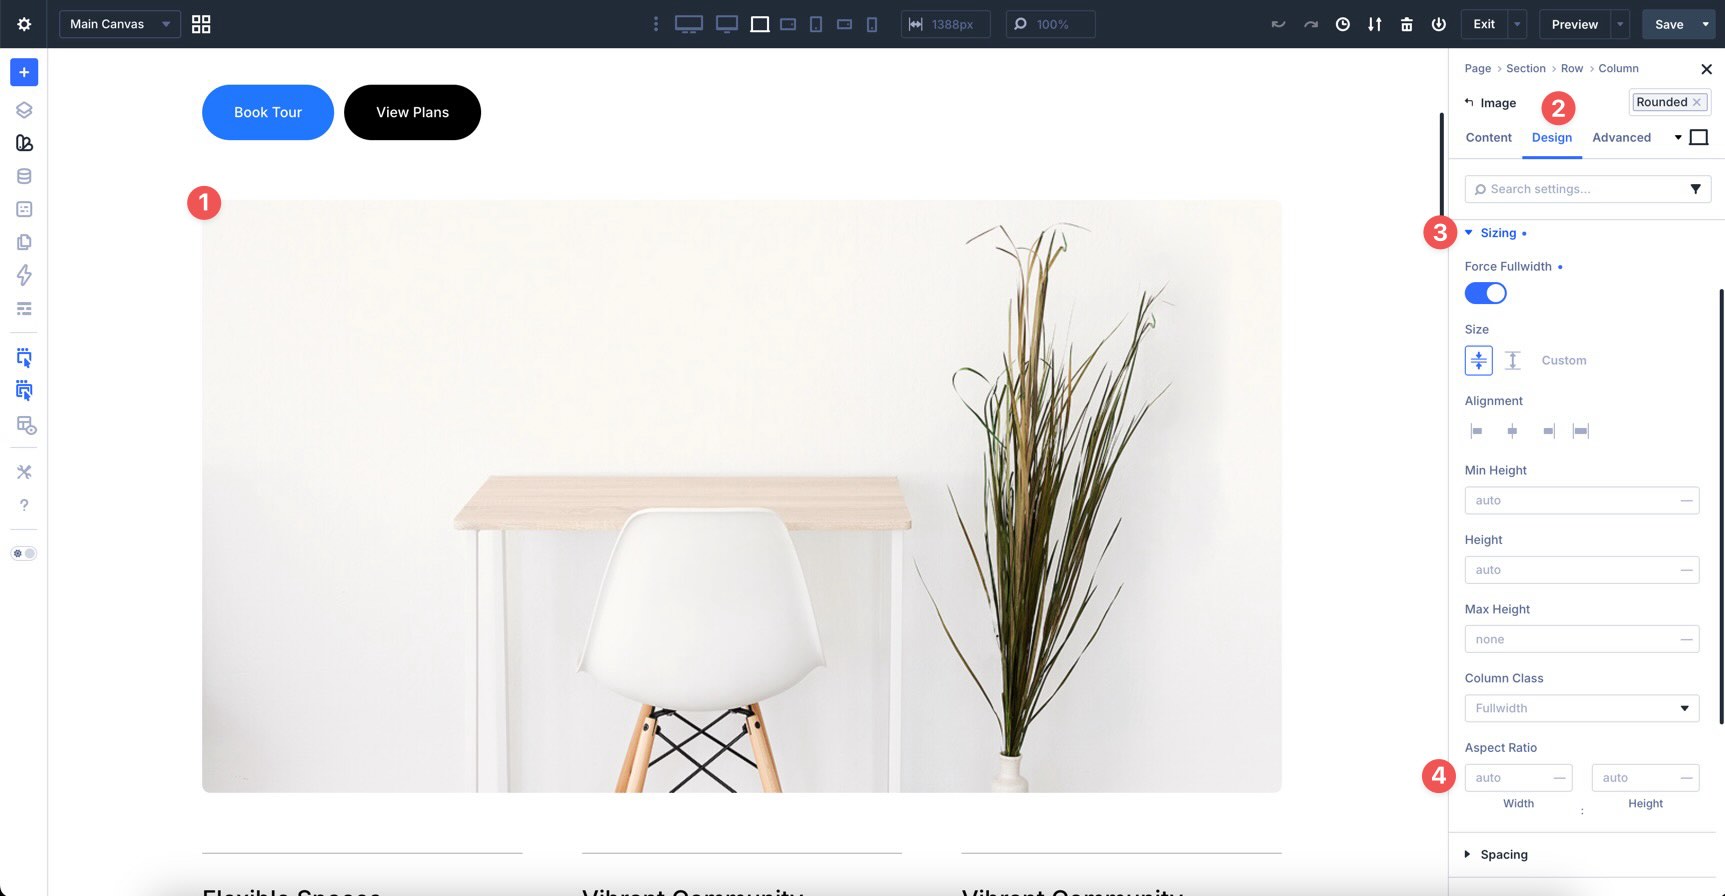
This is especially useful in Loop Builder templates and grid layouts, where inconsistent image proportions can make cards look uneven. Finally, check image-heavy pages after optimization. Confirm that images still look sharp, load correctly, and do not cause layout shifts.
Accessibility And SEO Polish
A professional website should be usable by as many people as possible and easy for search engines to understand. These final checks improve both usability and discoverability.
Start with accessibility. Run the site through tools such as WAVE, axe DevTools, or Lighthouse. Look for issues such as insufficient color contrast, missing image alt text, keyboard navigation problems, unlabeled form fields, or interactive elements without clear accessible names.
Use Semantic Elements
Divi 5 helps here with Semantic Elements. Review key layout areas and assign appropriate HTML elements when they improve the structure of the page.
For example, use nav for primary navigation, section for thematic content groupings, article for standalone post or card content, and aside for secondary content. Choose tags based on the content’s purpose, not how it looks.
Also, review heading structure. Use one clear main H1 for the primary page title, then organize major sections with H2s and supporting sections with H3s. Logical heading hierarchy helps visitors, screen readers, and search engines understand the page.
Focus On SEO Basics
Write unique meta titles and descriptions for important pages. You can use an SEO plugin, such as Yoast SEO, Rank Math, or All in One SEO, or use Divi’s built-in SEO settings where appropriate.
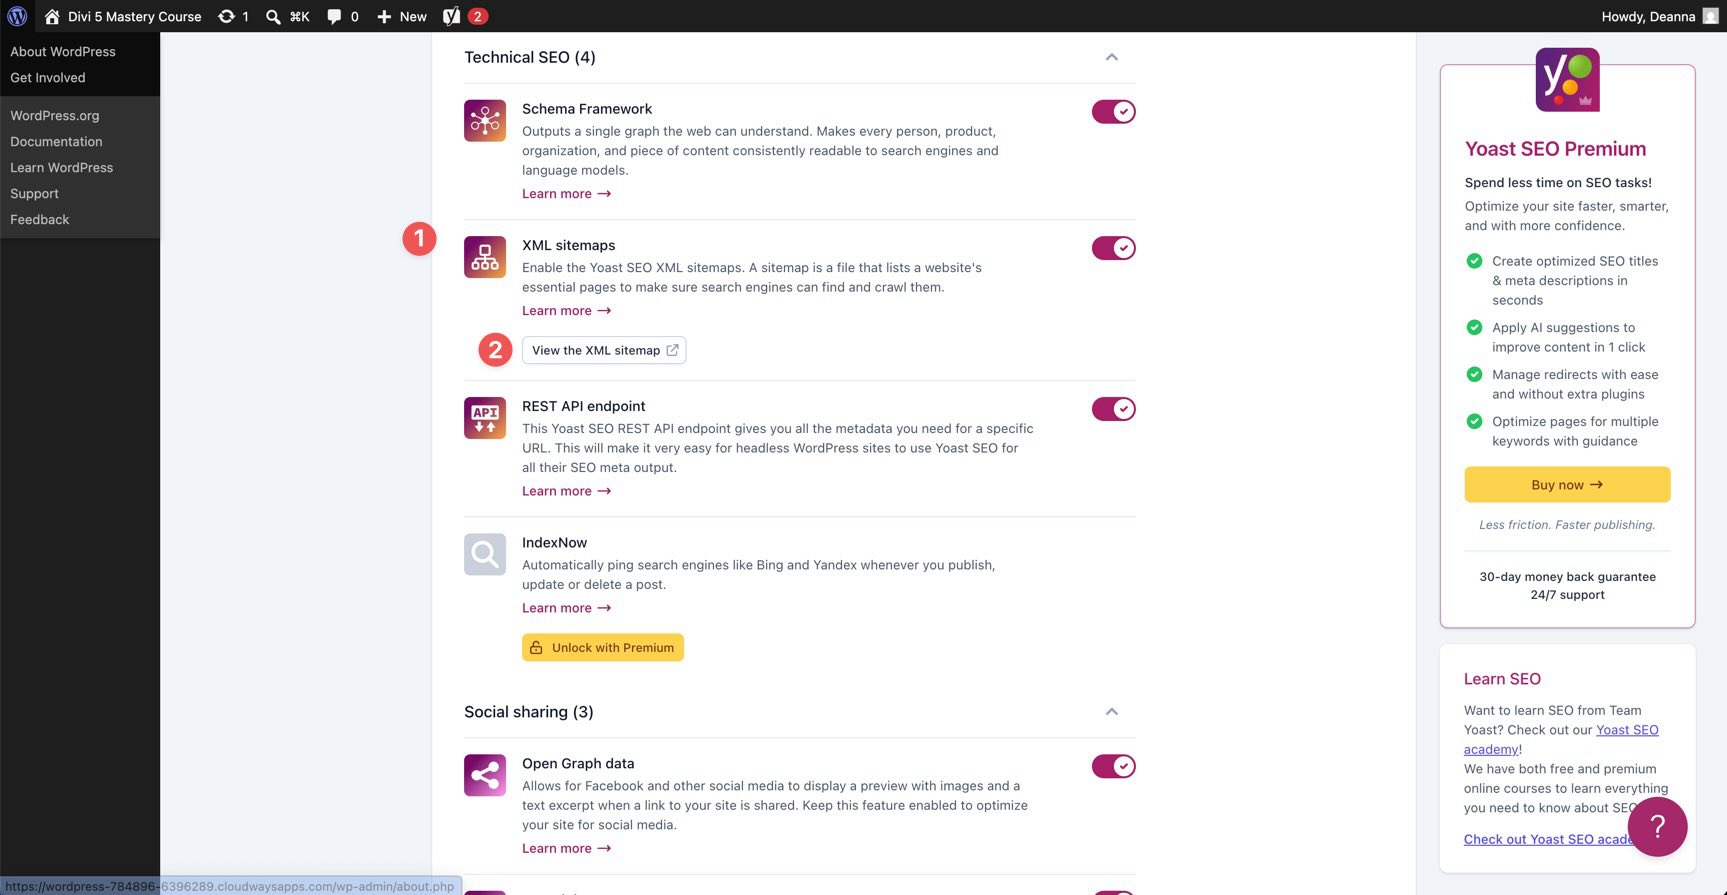
Next, make sure your XML sitemap is enabled. If you use Yoast SEO, go to Yoast SEO > Settings > Site Features and confirm that XML sitemaps is turned on. Yoast provides a sitemap index, which is commonly available at /sitemap_index.xml.
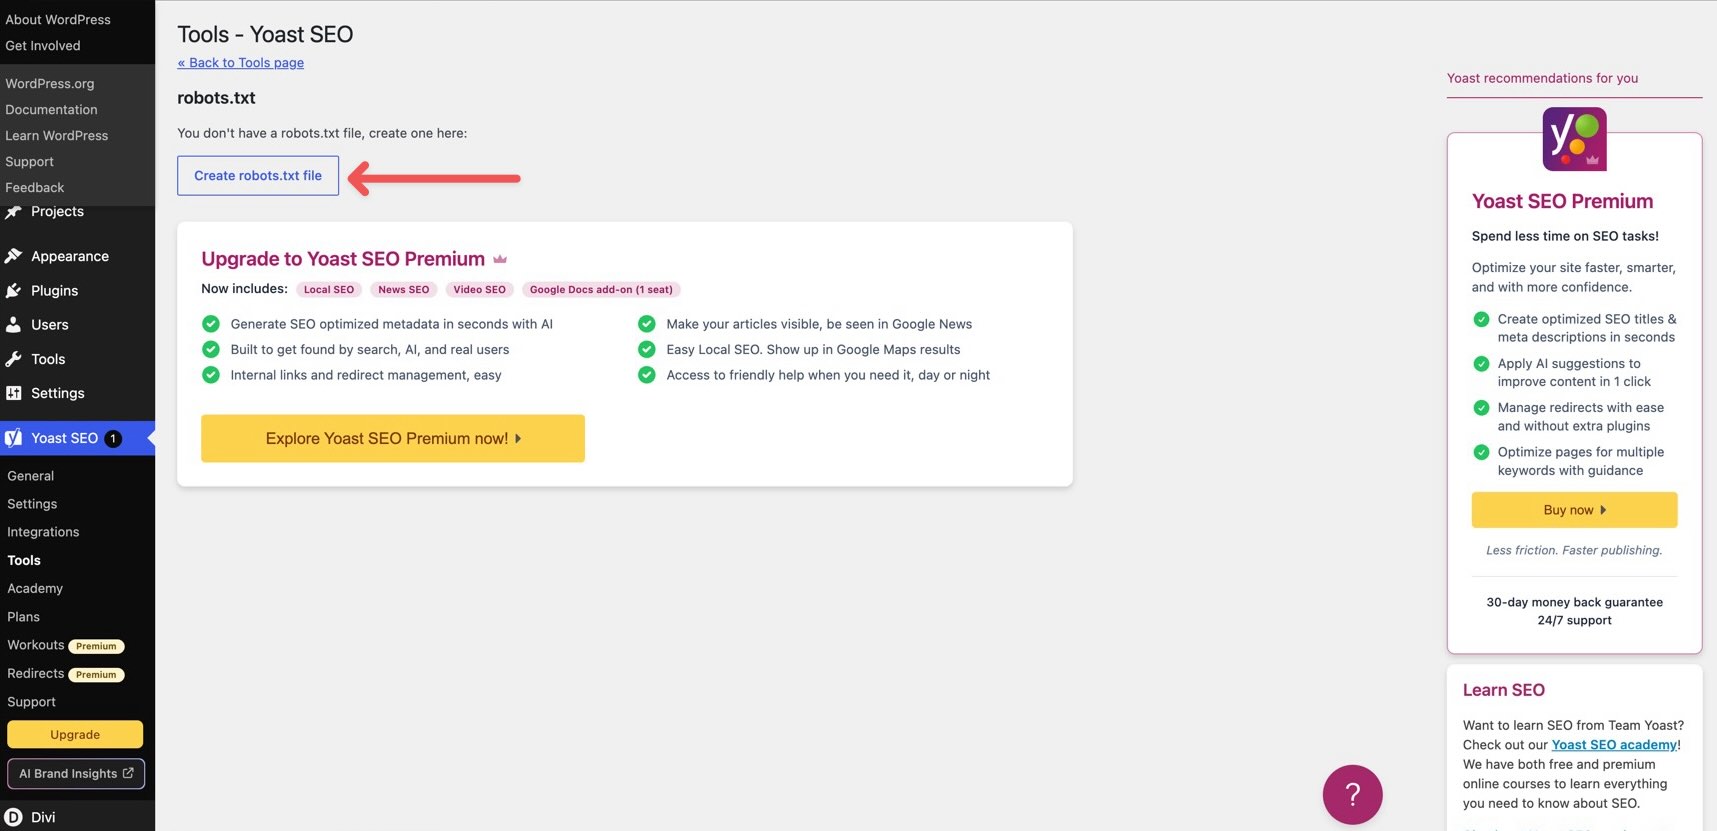
Also, check your robots.txt file. Make sure it is not accidentally blocking important pages or your sitemap.
Final Design Refinements And Consistency Checks
With the visual, functional, performance, accessibility, and SEO checks complete, it is time for the final polish.
Go through the site one last time and make only necessary adjustments. Cross-check everything against your global design system. If you find inconsistencies, update Design Variables or Presets instead of making one-off changes whenever the fix should apply globally.
You can add subtle polish, such as small scroll animations or tasteful hover effects, but avoid overdoing it. The goal is clarity and confidence, not distraction.
Finally, read through the site copy again. Make sure the tone, terminology, button labels, and calls to action feel consistent from page to page. To move between pages without leaving the Visual Builder, use the Page Manager. Divi 5’s Speculative Prerendering can help make navigation inside the builder feel faster by preparing likely destinations in the background.
Testing Across Devices And Browsers
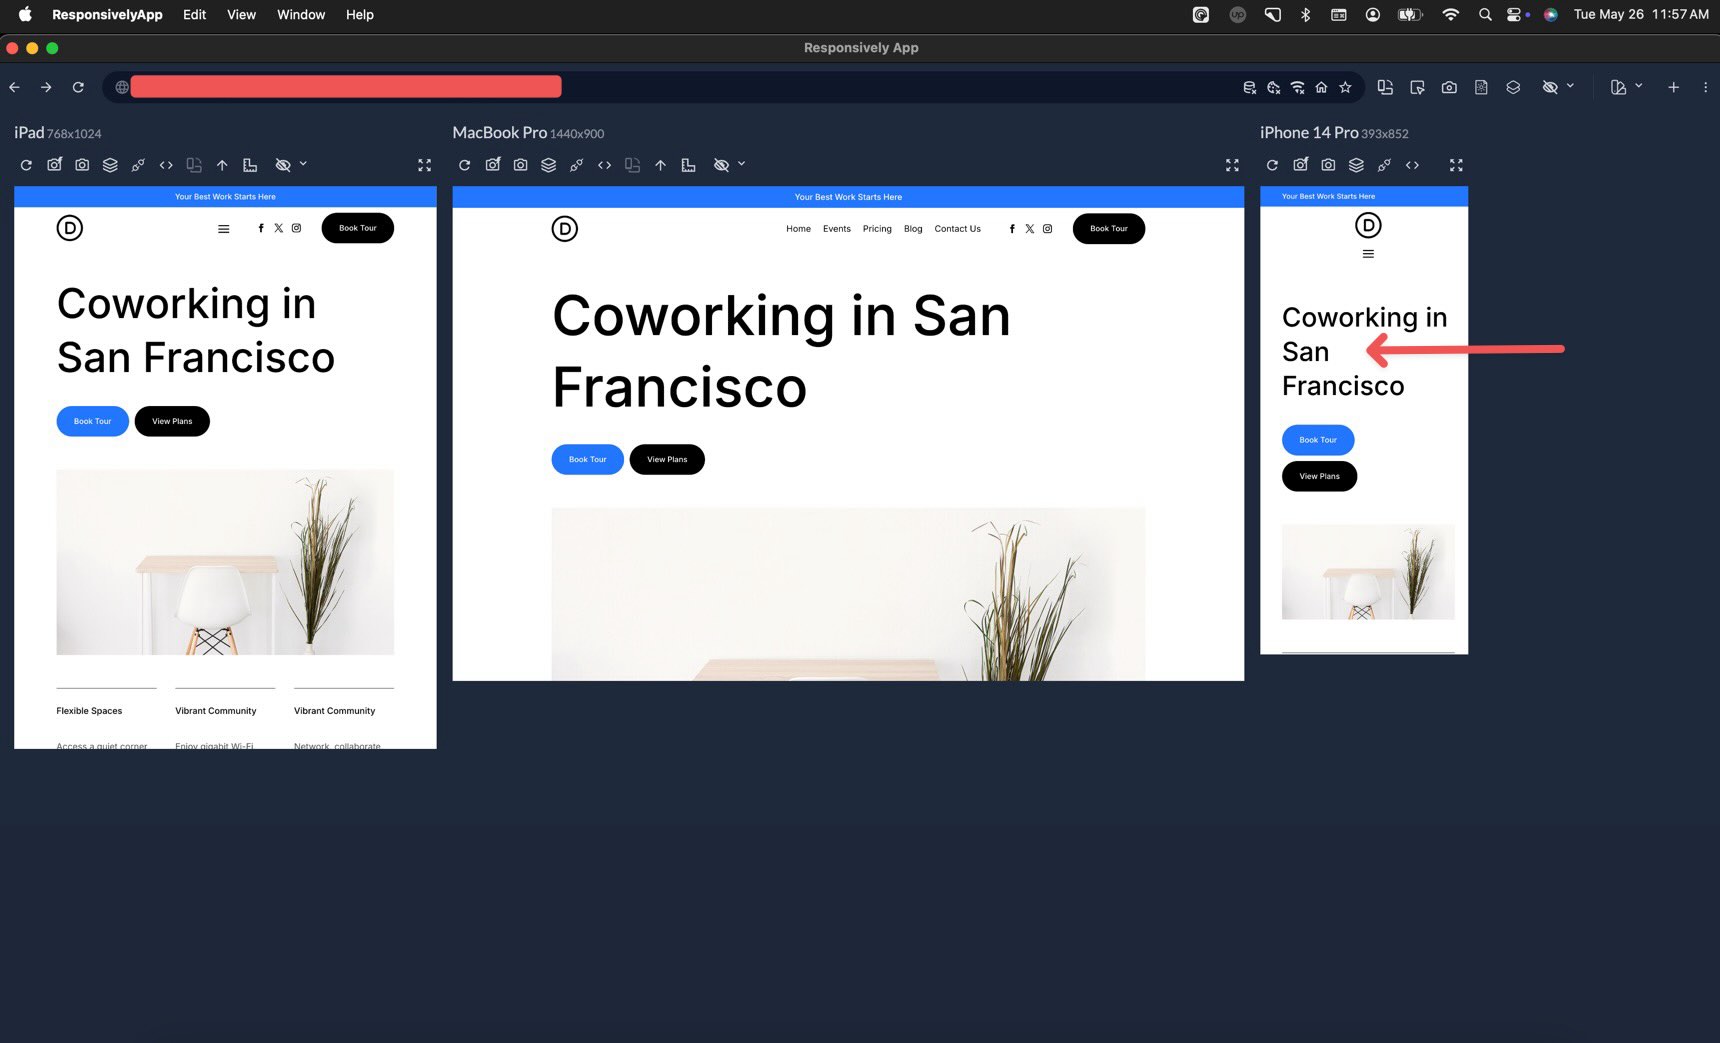
No website is finished until it has been tested in real-world conditions. Use Divi 5’s responsive tools, but do not stop there. Open the site on actual phones, tablets, laptops, and desktop displays. Test in multiple browsers, including Chrome, Safari, Firefox, and Edge.
You can also use tools such as BrowserStack, Sizzy, or ResponsivelyApp to preview the site across many screen sizes. Pay close attention to scroll behavior, touch interactions, typography size, sticky elements, forms, and off-canvas UI.
For better feedback, ask a few friends or colleagues to navigate the site and share what feels unclear. Fresh eyes often catch usability issues you have stopped noticing.
Pre-Launch Preparations
Before making the site public, take care of a few behind-the-scenes tasks. Secure the site with strong passwords and make sure SSL is installed correctly. Many hosts provide free SSL certificates, often through Let’s Encrypt, but confirm that the certificate is active and that the site loads over HTTPS.
Create a full backup before launch. If you built on a staging environment, migrate the site carefully to the live domain and confirm that links, media paths, forms, and Theme Builder assignments still work.
Set up required integrations, including contact forms, analytics, email marketing tools, CRM connections, and any third-party services your site depends on. Finally, implement any needed 301 redirects, review DNS settings, and confirm that your domain configuration is correct.
Going Live: Launch Steps
You have done the hard work. Now it is time to open your Divi 5 website to the world. Follow these final steps for a cleaner launch.
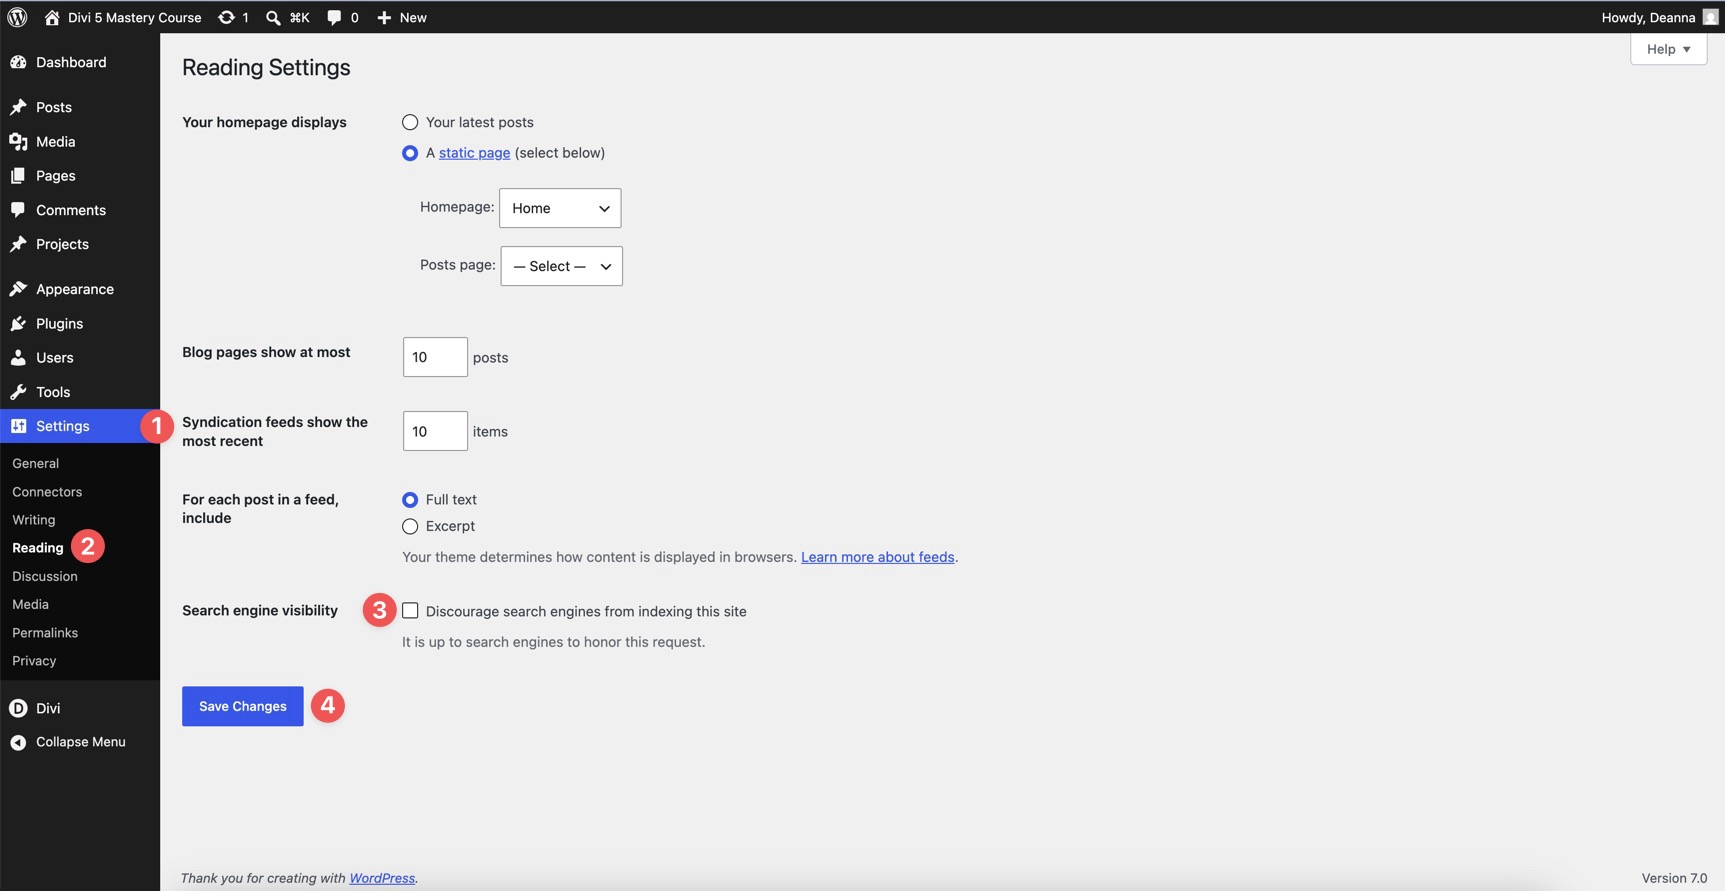
1. Make Your Site Public
Go to Settings > Reading in WordPress and make sure Discourage search engines from indexing this site is unchecked. This is one of the most commonly missed steps when launching a new WordPress site from staging or development.
2. Publish All Content And Templates
Double-check that all pages, posts, and Theme Builder templates are published and assigned correctly. Make sure your custom header, footer, single post template, archive templates, search results template, and 404 template are active where they should be.
3. Flush Permalinks
Go to Settings > Permalinks and click Save Changes. This refreshes WordPress’s permalink rules and can help resolve unexpected 404 errors after launch or migration.

4. Clear All Caches
Clear the Divi static CSS cache, any optimization plugin cache, your server-side cache, your CDN cache, and your browser cache. Then reload the front end and confirm the latest styles and scripts are loading.
5. Test One More Time
View the live site in a private or incognito window while logged out. Test navigation, forms, responsive layouts, pop-ups, dynamic content, search results, and checkout or booking flows if your site uses them.
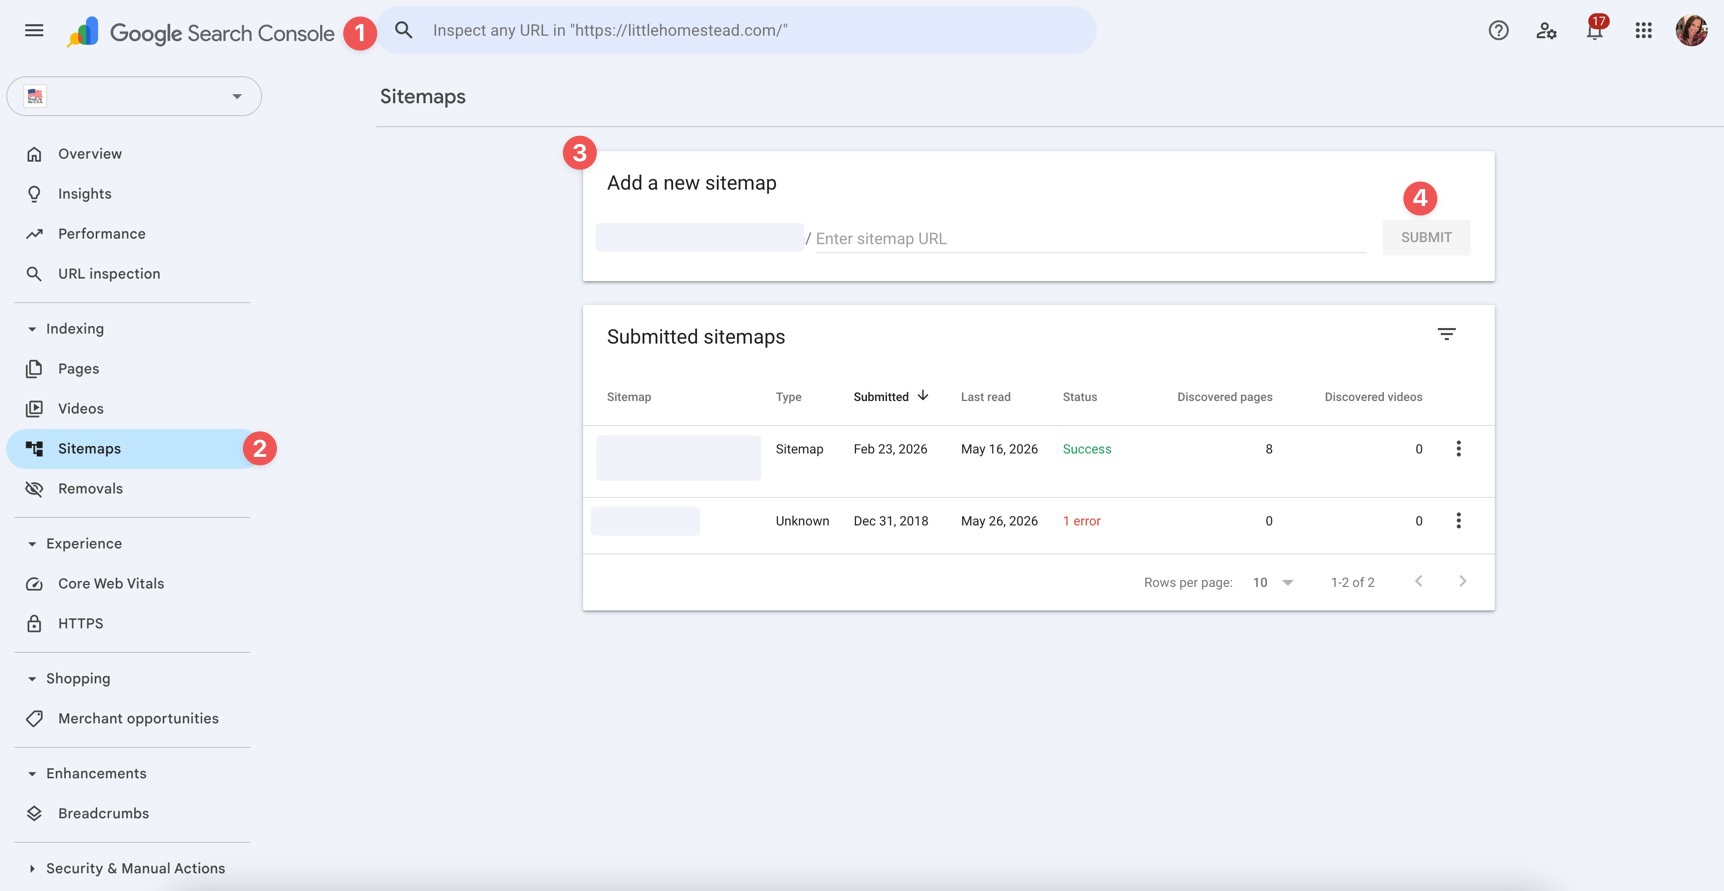
6. Submit Your Sitemap
Submit your XML sitemap in Google Search Console. Open the Sitemaps report, paste your sitemap URL, and submit it. This helps Google discover your site structure and lets you monitor sitemap processing issues.
7. Announce The Launch
Share the new site on social media, your email list, and any relevant communities that would benefit from the content. Consider publishing a short launch post that explains what the site offers and directs visitors to the homepage.
8. Monitor Closely
Keep an eye on the site during the first 24–48 hours after launch. Watch analytics, form submissions, server logs, uptime monitoring, and Search Console for unexpected errors.
Divi 5 Mastery Course Wrap-Up
You have reached the end of the Divi 5 Mastery Course. From preparing a blank WordPress install to building a full coworking website, you have worked through the core pieces of a modern Divi 5 build.
You built a design system with Design Variables and Presets. You created layouts with Flexbox and CSS Grid. You used the Theme Builder, responsive tools, Canvases, Interactions, and the Loop Builder to build a site that is structured, reusable, and easier to maintain.
More importantly, you learned the reasoning behind the workflow. You did not just copy steps. You learned how the system fits together, which means you can apply the same process to future client sites, business sites, portfolios, blogs, and custom WordPress projects.
Your Divi 5 website now has a launch process: audit the design, test the functionality, optimize performance, review accessibility and SEO, check real devices, prepare the domain, and monitor the site after launch. Thank you for following through this entire series. Feel free to drop a link to your finished website in the comments below or reach out on our social media channels to share your thoughts.


I think a general outline like this in a start-to-finish workflow is a valuable asset, especially for those just getting started with Divi.
I’m sorry to see that for the final auditing process, you did not suggest any external auditing services (many FREE) that are much better than an author review – how is an author going to do a performance evaluation or check for unsafe color choices (not all people see color the same?)
I also consider Grammarly an essential writing tool. Even if you are using AI (Divi or ChatGPT) to generate content, Grammarly can still improve it in most cases.
– Great job on a much-needed course
P.S. With all the new features, power, and control that Divi 5 has added to website creation, I find that “Divi 5 has done for websites, akin to what Photoshop does for imaging.”
“Divi 5 Mastery Course”
Hi,
Do you have this as video?
Not at present, but this may change in the future. Thank you for your interest, Guenter! 👍
Hey I am also waiting for Video Tutorial