
Welcome to the Divi 5 Mastery Course — a hands-on series that takes you from a blank WordPress install to a fully designed, launched website. Over 15 parts, you’ll build a complete site for a coworking business from scratch using Divi 5, learning every major feature along the way.
No imported templates. No pre-built layouts. You’ll do the designing yourself. By the end, you’ll understand not just how to use Divi, but how a real build comes together from start to finish. Each part builds on the last, so following along in order gives you the full picture. That said, if you already know your way around and want to jump to a specific topic, each part includes enough context for you to self-guide.
Ready? Let’s get started.
Divi 5 Mastery Course Overview
| Part | Title | Visit |
|---|---|---|
| 1 | What To Prepare Before Building Your Divi 5 Website | Learn more |
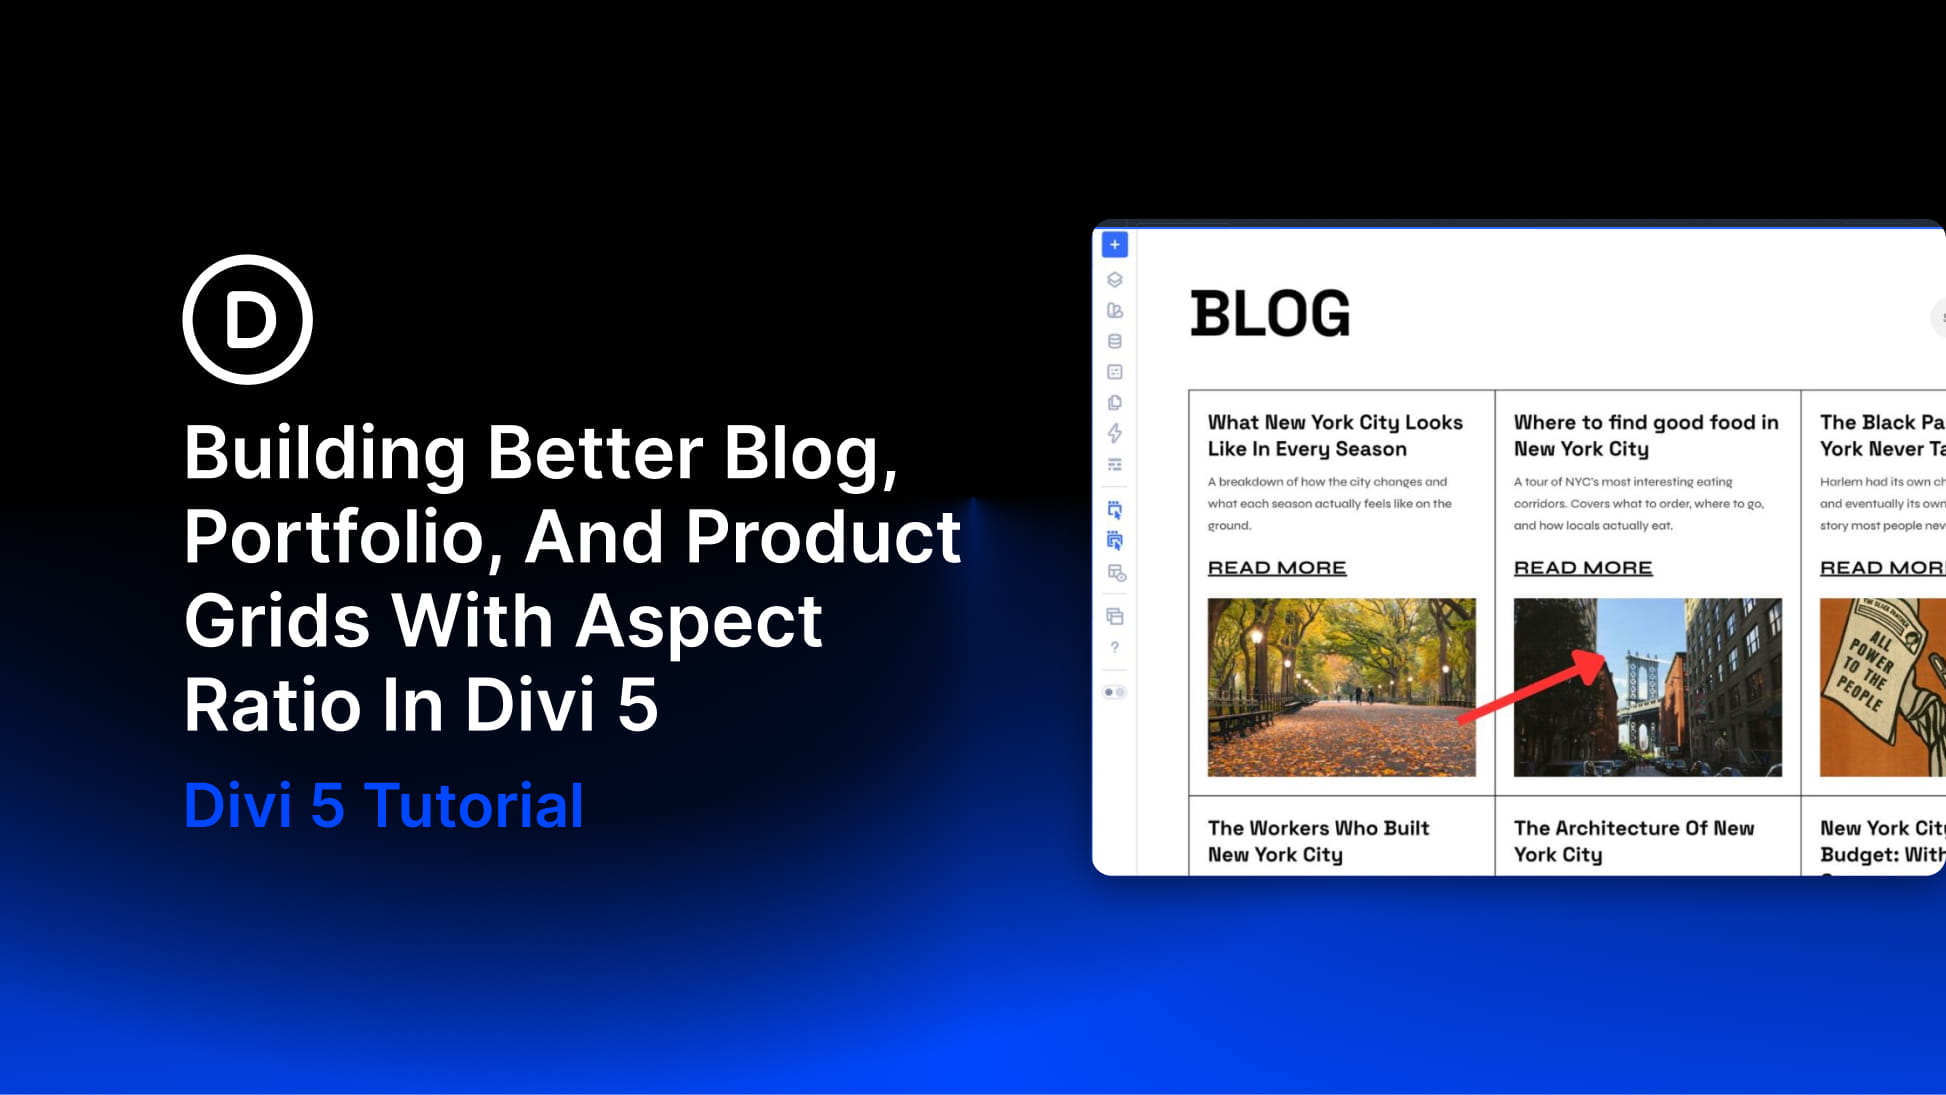
| 2 | Exploring Every Aspect Of The Divi 5 Interface | Learn more |
| 3 | Creating A Divi 5 Global Design System With Design Variables | Learn more |
| 4 | Mastering Divi 5 Presets For Faster, More Consistent Web Design | Learn more |
| 5 | Building A Divi 5 Homepage From Scratch | Learn more |
| 6 | Building A Custom Header And Navigation In Divi 5 | Learn more |
| 7 | Building A Custom Footer In Divi 5 | Learn more |
| 8 | Using Divi 5’s Theme Builder To Create Global Website Templates | Learn more |
| 9 | Building The Core Inner Pages Of Your Divi 5 Website | Learn more |
| 10 | Mastering Flexbox In Divi 5 | Learn more |
| 11 | Mastering CSS Grid In Divi 5 | Learn more |
| 12 | Making Your Divi 5 Website Fully Responsive | Learn more |
| 13 | Creating Interactive Off-Canvas Elements (Popups & More) | Learn more |
| 14 | Mastering The Divi 5 Loop Builder | Learn more |
| 15 | Divi 5 Power User Workflow | Learn more |
| 16 | Auditing, Polishing, And Launching Your Divi 5 Website | Learn more |
Before You Open The Builder
Every new website starts before opening the builder. The sitemap, the color palette, and the copy on the homepage — all of it shapes how quickly and confidently you’ll move once you’re inside the editor. This first part covers everything that happens before you touch the builder: understanding how Divi and WordPress fit together, installing them, finding your way around the dashboard, and, importantly, gathering the raw materials your site actually needs.
If you already have Divi 5 installed and know your way around WordPress, skip ahead to the preparation checklist near the end of this post. But if you’re starting fresh, read on.
What Is WordPress, and Where Does Divi Fit?
WordPress is a content management system (CMS). It handles your pages, posts, media, and site settings. On its own, WordPress gives you a functional website, but designing that website requires either code or a tool that translates visual decisions into code for you.
That’s where themes and page builders come in.
A WordPress theme controls your site’s default appearance: fonts, colors, header and footer layout, and page structure. WordPress requires an active theme to work, as it’s a fundamental part of how it’s built. Classic themes give you some design control through a settings panel, but you’re largely working within the theme author’s predefined structure. Newer block themes offer more flexibility through WordPress’s built-in Site Editor, but either way, the theme sets the baseline that everything else builds on.
A page builder goes further. It gives you a visual, drag-and-drop interface for placing content blocks — such as text, images, buttons, and columns — and styling them directly on the page. Instead of writing CSS or editing PHP templates, you make design decisions visually and see results as you work.
Divi happens to be both. It’s a WordPress theme and a visual page builder in one package. When you install Divi, you get a theme that handles your site’s global structure and a builder that lets you design every page visually. You also get access to the Theme Builder, which controls templates for your headers, footers, blog post layouts, archive pages, 404 pages, and more. All this gives you full design control over every part of your site without code (unless you’re comfortable using it — Divi doesn’t hold you back either way).
Everything — layout, styling, global templates, and responsive design — lives in one system when you use Divi.
Getting WordPress and Divi Installed
Before you can build anything, you need two things: a WordPress installation running on a web host and the Divi theme installed on that WordPress site.
Web Hosting and WordPress
WordPress requires web hosting — a server where your site’s files and database live. Most hosting providers offer one-click WordPress installation, which handles the technical setup (database creation, file permissions, and initial configuration) automatically. If you don’t have hosting yet, Elegant Themes offers Divi Hosting, which comes with WordPress and Divi pre-installed and activated. That’s the fastest path from zero to building.
If you already have hosting and need to install WordPress manually, Elegant Themes has a thorough guide: How to Install WordPress.
Installing and Activating Divi 5
Once WordPress is running, you install Divi the same way you’d install any WordPress theme:
- Log in to your Elegant Themes Members Area and download the Divi 5 zip file.
- In your WordPress dashboard, go to Appearance > Themes > Add New > Upload Theme.
- Upload the zip file, click Install Now, and then click Activate.
- Follow the onboarding prompt to connect your Elegant Themes license. This allows your site to receive theme updates as they are released.
That’s the short version. For the full walkthrough with screenshots, see How To Install The Divi Theme.
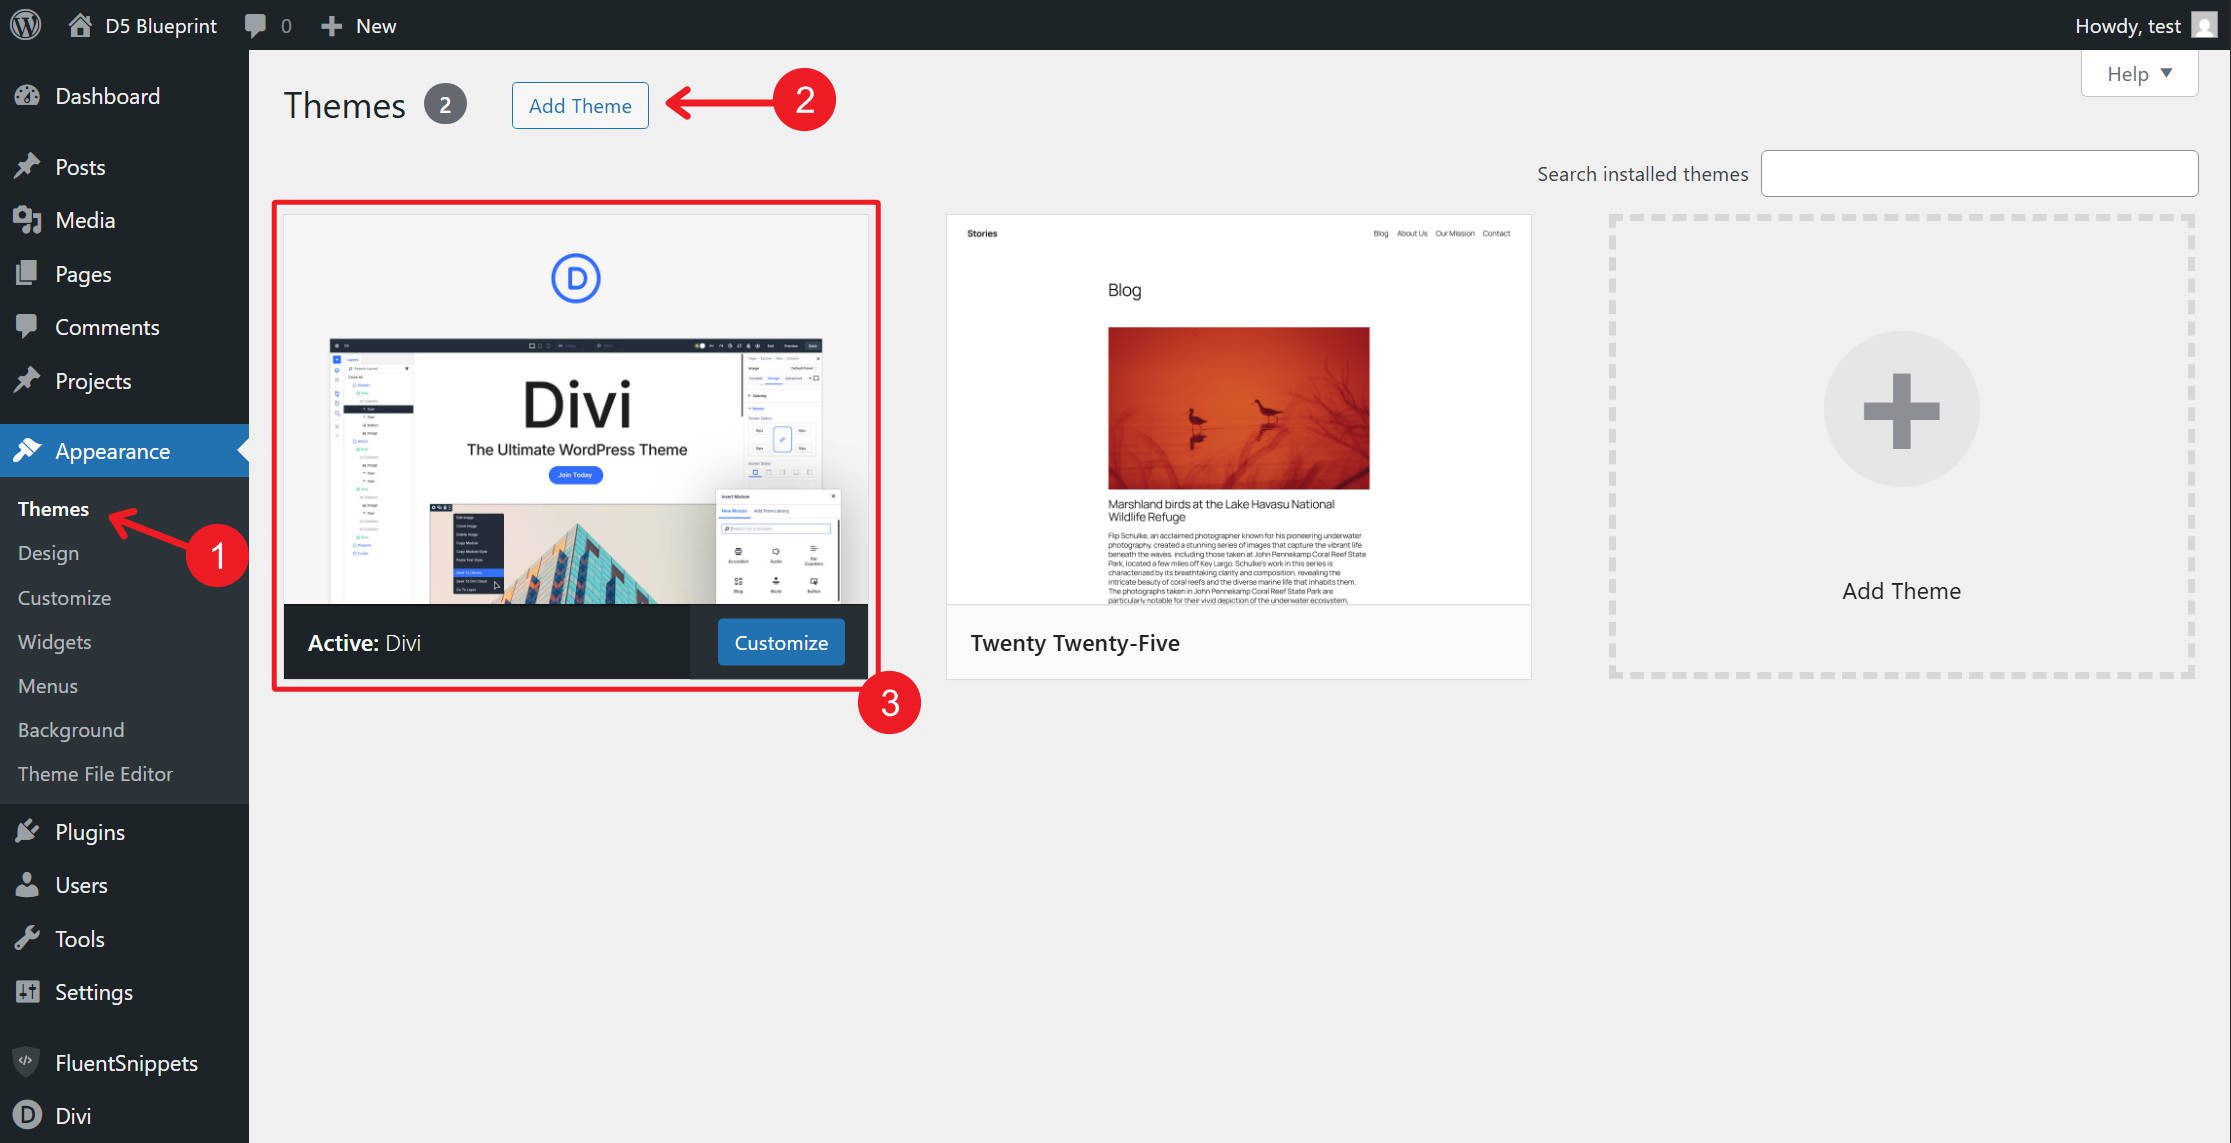
With Divi active, a new Divi menu item appears in your WordPress sidebar. That’s your command center for everything Divi manages outside the visual builder.
Finding Your Way Around WordPress with Divi 5
Divi adds several features to the standard WordPress dashboard. You don’t need to memorize every option right now — later parts of this course will use specific settings in context. For now, here’s a map of what’s where and what matters most at this stage.
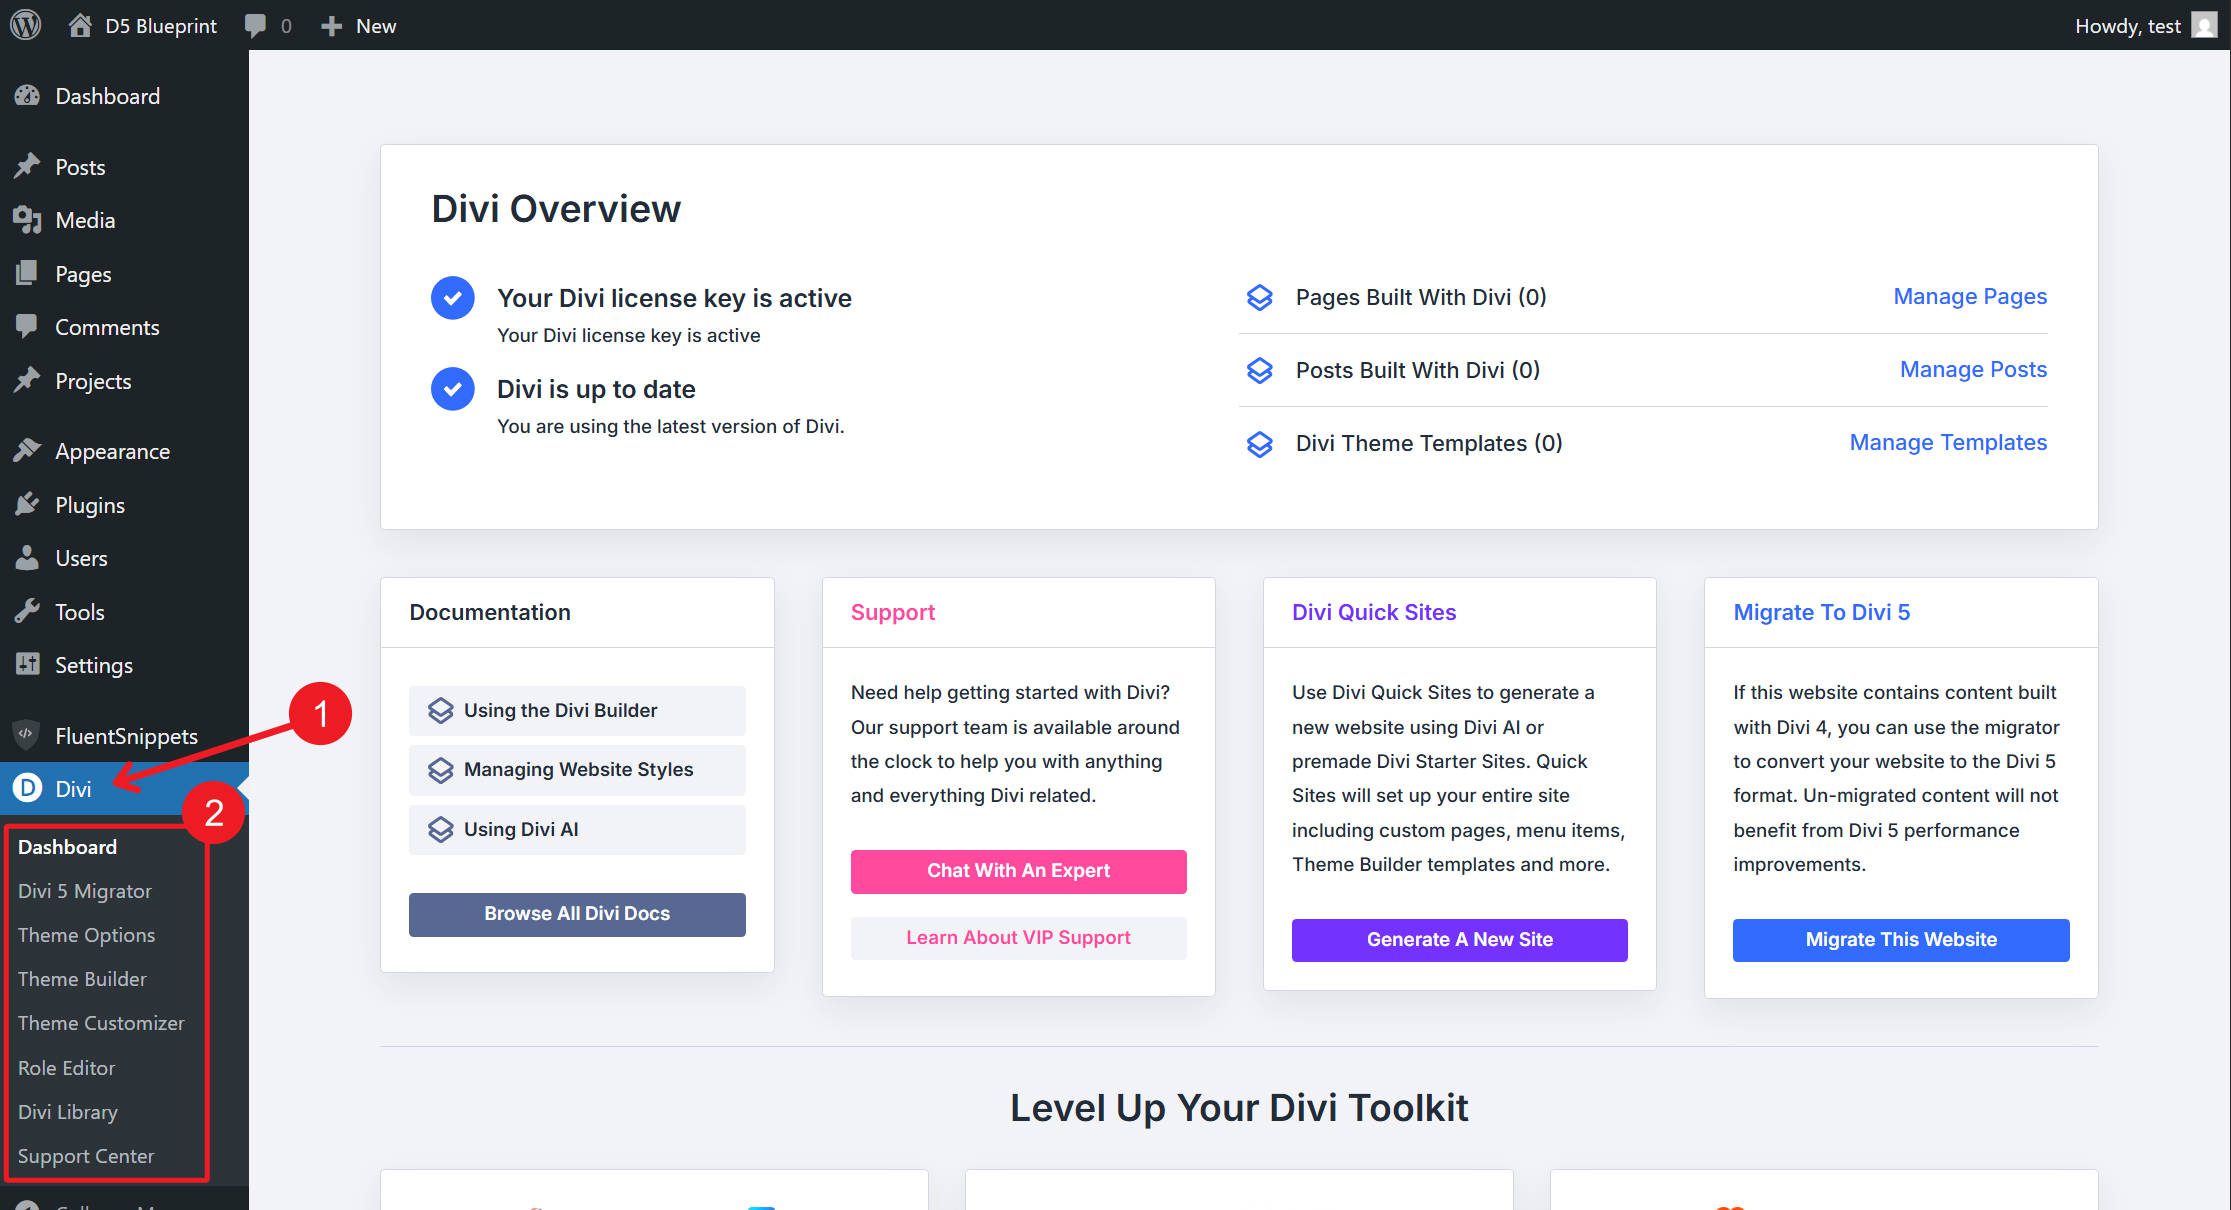
Click Divi in the WordPress sidebar, and you’ll see several sub-items:
Divi Dashboard is the main hub. It shows your license status, current Divi version, and links to create pages, manage templates, or generate a site with Divi Quick Sites. For this course, we’re building from scratch, so we won’t be using Quick Sites, but it’s worth knowing it exists for future projects where speed matters more than custom control.
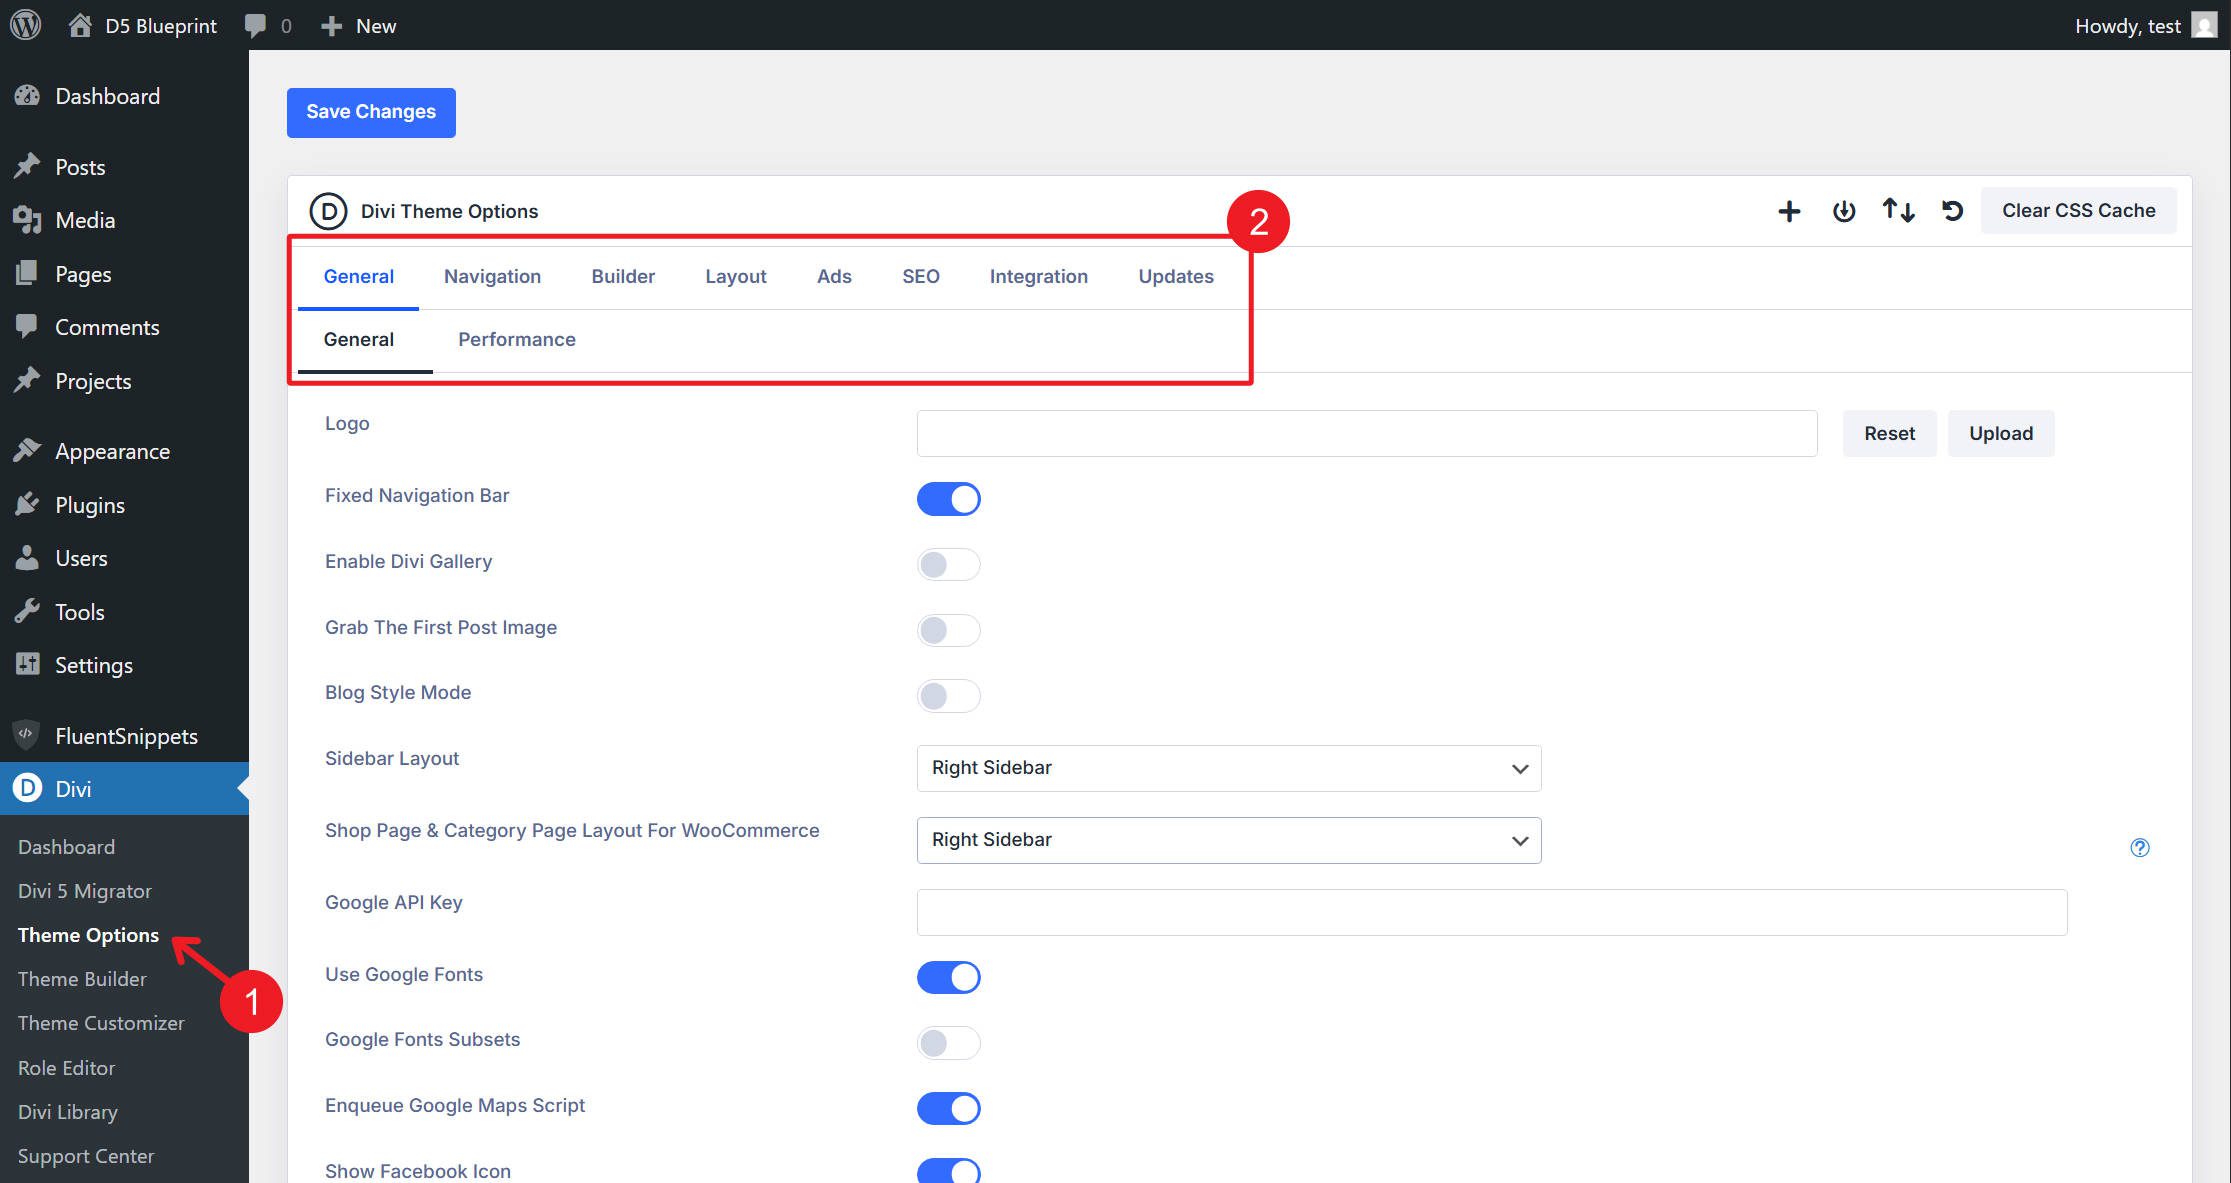
Theme Options is a settings panel that controls site-wide defaults — your logo, social media URLs, performance settings, SEO basics, and integration code (like analytics scripts). The tabs you’ll interact with most early on are:
- General: Upload your site logo and set social media profile URLs. These feed into the default header and footer.
- General > Performance: Enable Dynamic CSS, Dynamic Module Framework, and Critical CSS to optimize front-end loading. These are good to enable from the start.
- Integration: This is where you paste tracking scripts (Google Analytics, Meta Pixel, etc.) that need to load site-wide. The Add code to the <head> field is the most commonly used.
- Updates: This is where your Elegant Themes username and API key are stored so WordPress can automatically pull Divi updates.
The remaining tabs — Navigation, Builder, Layout, Ads, and SEO — exist but are either handled better by dedicated plugins (SEO, for example) or addressed later when we build specific templates. Don’t feel like you need to configure every tab before moving forward.
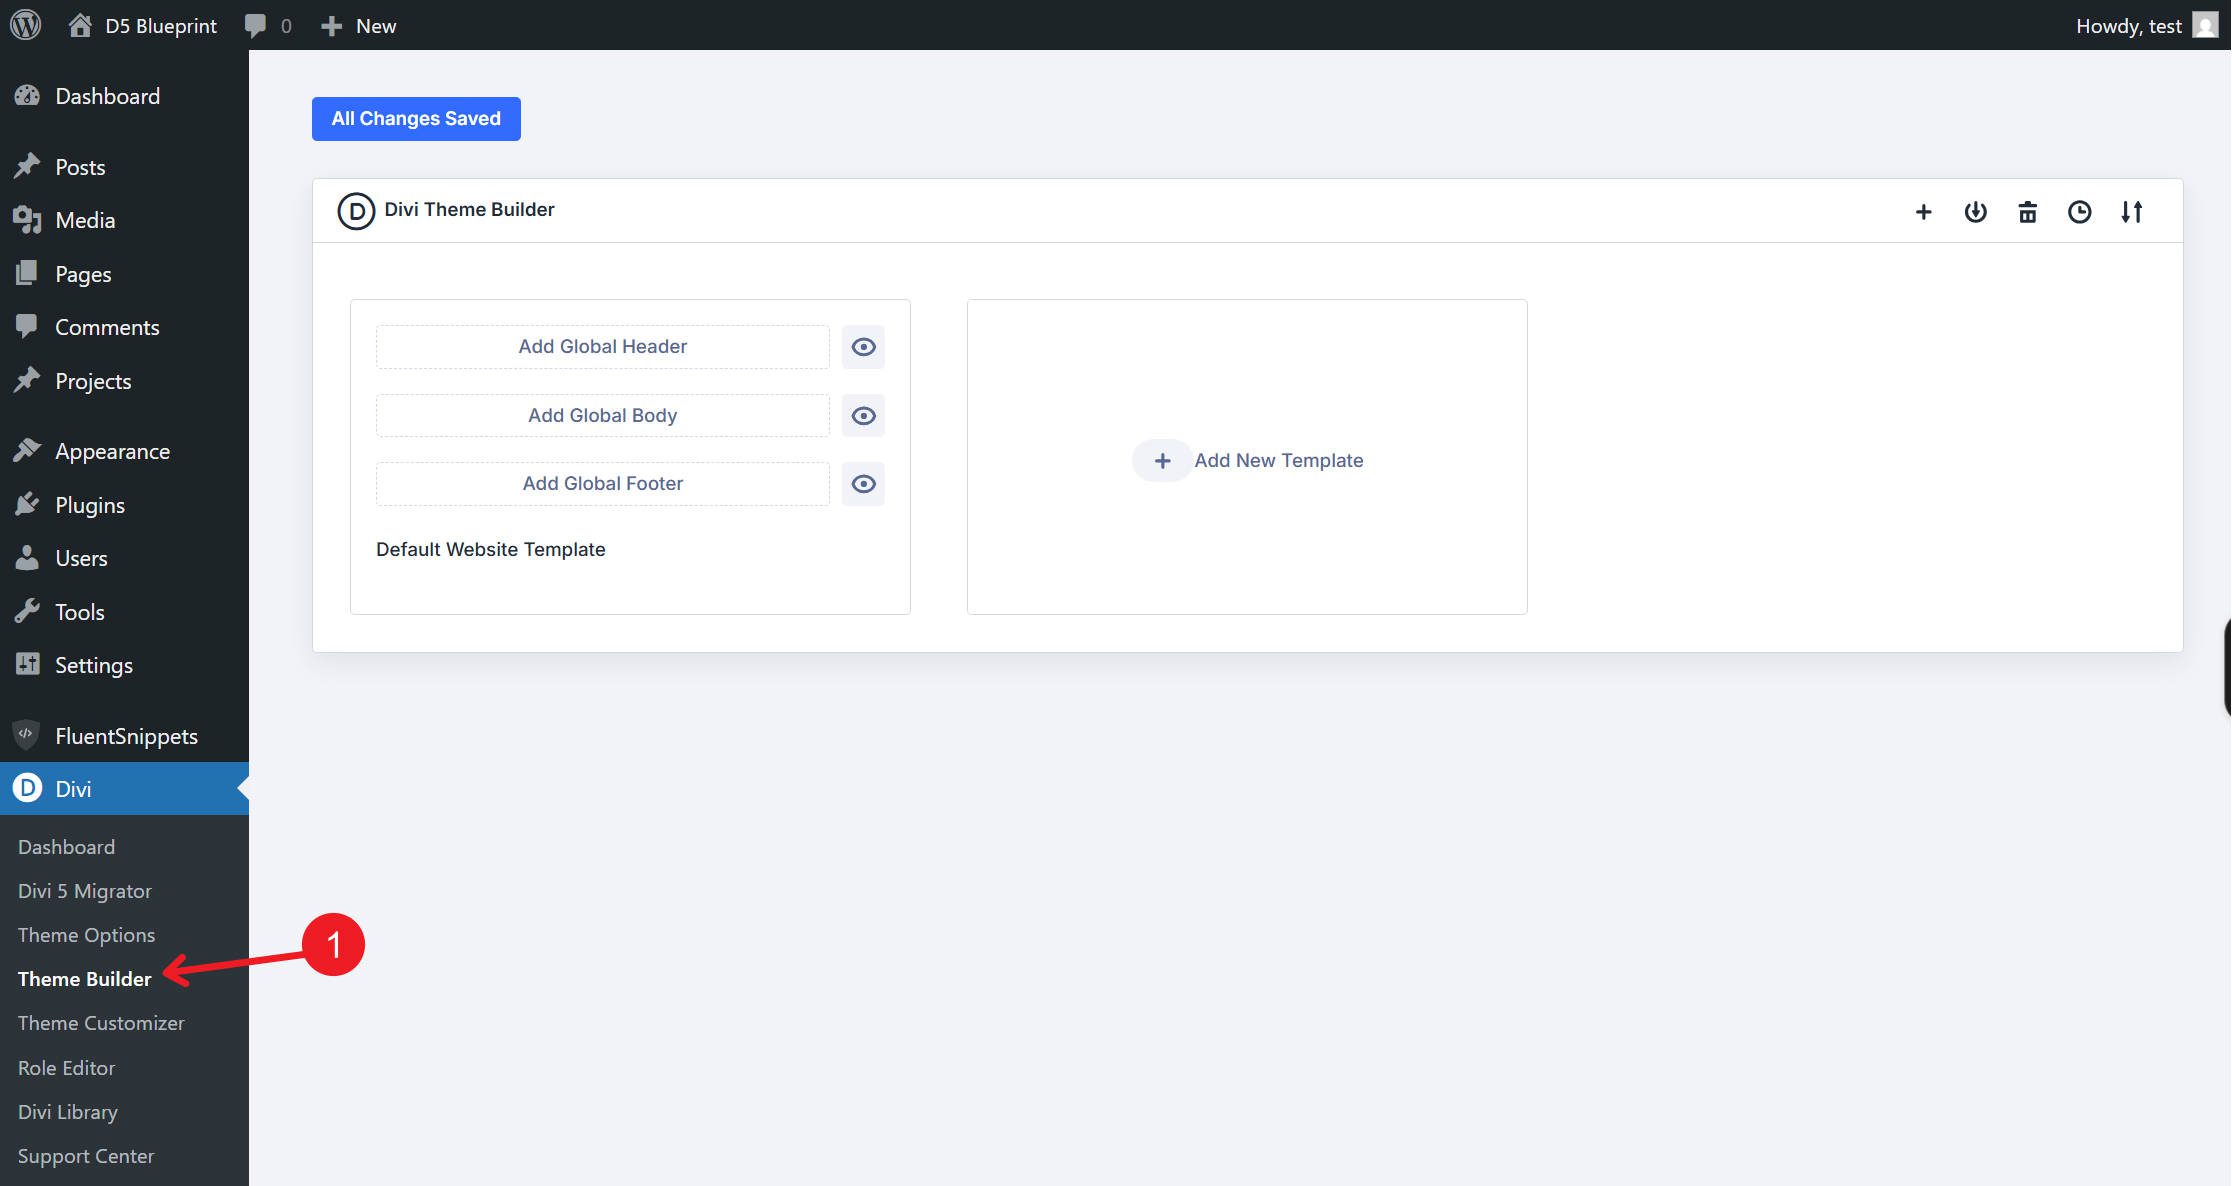
Theme Builder is where you create and assign global templates — your site’s header, footer, blog post layout, 404 page, archive pages, and any other template-driven area. We won’t build these until Parts 6, 7, and 8 of this course, but know that it’s here in the dashboard and central to how Divi controls your entire site structure. For now, the default Divi theme templates will handle your header and footer until we replace them with custom ones.
Editing Pages with Divi
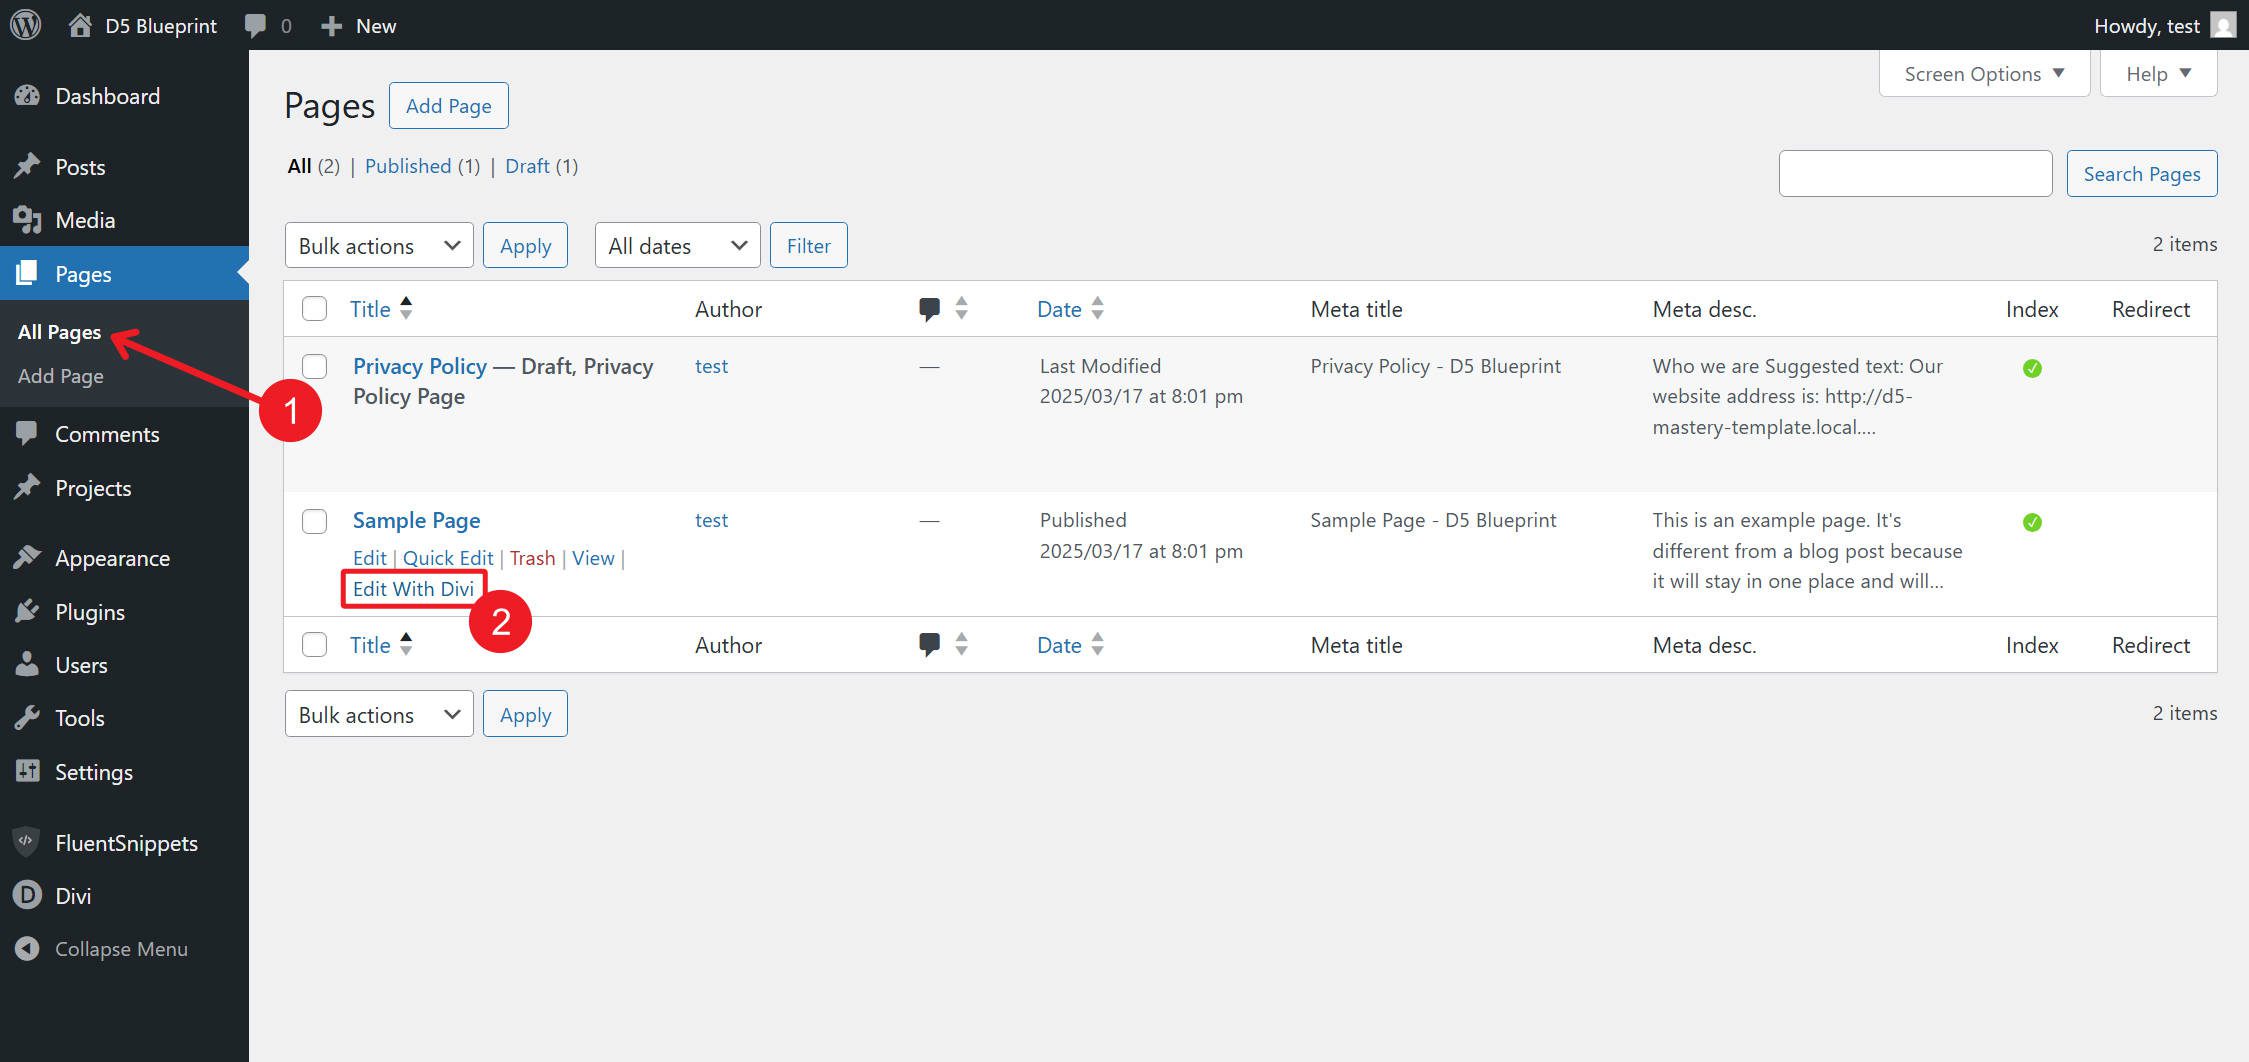
To build a page, go to Pages > Add New in WordPress (or Pages > All Pages to edit an existing one). After you give the page a title and save it, you’ll see the Edit With Divi option. This launches the Visual Builder — the front-end editing interface where all design work happens.
You can also launch the Visual Builder from the front end of your site. While logged in, navigate to any page and click the Edit With Divi button in the WordPress admin bar at the top of the screen.
The Visual Builder is where you’ll spend most of your time in this course. Part 2 covers the entire interface in detail — every major panel, toolbar, and interaction mode. For this part, just know that the builder opens on the front end of your page and gives you direct visual control over layout and design.
What To Gather Before You Start Building
Before building, it’s best to have a general direction. If you’re learning a new website builder while also figuring out what you want to build, the process will be very slow and potentially frustrating. Instead of doing both at once, we recommend getting clarity on what you want to build before you start learning how to build it. This may involve several things:
Brand Direction
You don’t need a 40-page brand guide. But you do need something that keeps you on track and focused as you learn a new skill. At a minimum, you should consider these items:
Colors: At minimum, choose a primary brand color, a secondary (or accent) color, and a neutral palette (a near-black for text, a near-white for backgrounds, and one or two grays for borders and secondary text). If you have specific hex codes, that’s even better. If you’re starting from scratch, tools like Coolors or Adobe Color can help you build a palette quickly.
Fonts: Pick a heading font and a body font. Two fonts total are enough for most sites. Google Fonts is the easiest source since Divi loads them natively. A reliable starting point is to pair a clean sans-serif heading font with a readable sans-serif or serif body font.
These decisions get formalized into Design Variables in Part 3. But you need to make these decisions before you can systematize them.
A Logo
Your logo can appear in the header, the browser tab (as a favicon), in the footer, and potentially in other places. If you have one, make sure it works on both light and dark backgrounds. SVG or high-resolution PNG files with a transparent background are the best formats for web use. You might also want to use different logo variations that look better in different contexts.
If you don’t have a logo yet, create a simple text-based placeholder in Canva, Photoshop, or GIMP. A styled site name in your chosen heading font works fine until a real logo is ready. Or, if you want to move quickly, you can use Divi’s default logo while getting started and replace it before launch.
Images and Media
Stock images are fine to start. High-quality stock photo sites like Unsplash and Pexels offer free options that work well for placeholder content. For a coworking space site — which is what we’re building in this course — look for images of:
- Open workspace and desk areas
- People collaborating or working independently
- Meeting rooms and private offices
- Building exteriors or lobbies
- Amenities (coffee bars, lounges, event spaces)
Gather more images than you think you’ll need. Having options prevents the build from pausing while you search for “one more hero image.” If possible, optimize images before uploading them. Tools like TinyPNG or Smush reduce file size without visible quality loss. Large, uncompressed images are one of the most common causes of slow WordPress sites, so it’s best to address this before uploading them.
A Sitemap
A sitemap is a list of every page your site needs and how those pages relate to each other. For the coworking site we’re building in this course, the sitemap looks like this:
- Homepage: The main landing page with an overview of the space, key benefits, and calls to action.
- About: The story behind the space — who runs it, why it exists, and what makes it different.
- Spaces (or Membership Plans): What’s available — hot desks, dedicated desks, private offices, and meeting rooms — including pricing and features.
- Blog: A dynamic archive page that pulls from blog posts. Useful for SEO and community updates.
- Contact: Location, hours, a contact form, and an embedded map.
Your site might include additional pages like Events, FAQ, Careers, or Terms, but start with the core pages and expand later. A focused sitemap keeps the build on track and helps you understand what content you need to create.
Written Content
Before Part 5 (where we build the homepage), you should have at least rough drafts of your content:
- Homepage headline and subheading: What does this coworking space offer, and why should someone care? One sentence each.
- Value propositions: Three to four short statements explaining what makes the space worth joining.
- About section copy: Two to three paragraphs about the space’s mission, history, or team.
- Service or plan descriptions: For each membership tier — a name, a short description, and a price (even if approximate).
- Calls to action: “Book a Tour,” “Get Started,” “See Plans,” “Contact Us” — decide on consistent wording early.
- Contact information: Address, phone number, email, and hours of operation.
The content doesn’t need to be final, but it needs to exist in a usable form. If necessary, use placeholder text while refining it later.
Design Inspiration
Browse five to ten websites in your industry (or related industries) and save examples of layouts or sections you like. Pay attention to:
- Homepage structure
- Navigation layout
- Spacing and whitespace
- Typography choices
- Color usage
You’re not copying — you’re building a reference point. Having visual direction makes design decisions easier.
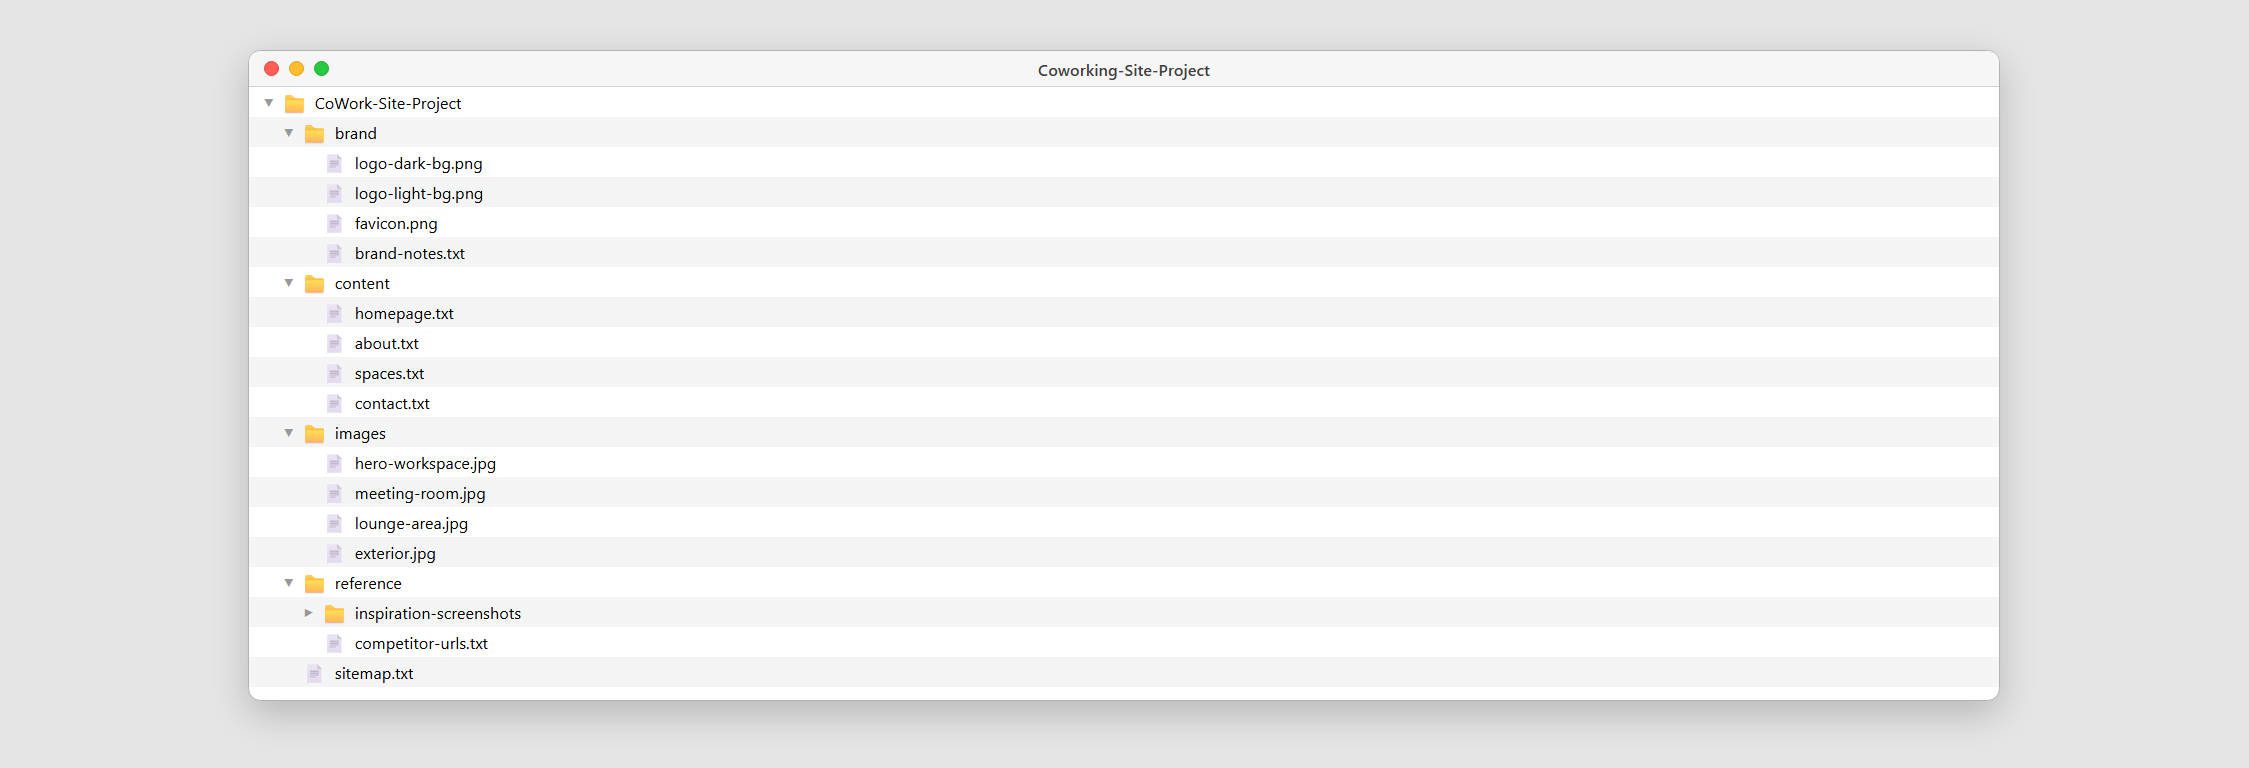
Organizing Your Preparation Materials
Keep everything in one place. A simple folder structure works well:
- /brand: Logos, colors, fonts
- /images: Photos and media
- /content: Page copy
- /reference: Inspiration and examples
This prevents constant context switching while building.
What’s Coming Next
With WordPress running, Divi 5 installed, and your preparation materials gathered, you’re ready for the build.
Part 2 takes you inside the Divi 5 Visual Builder and walks through every panel, toolbar, and interaction mode so you know exactly where everything lives before you start designing.
The full course builds a complete coworking website from scratch — no imported templates, no pre-built layouts, and no shortcuts. You’ll see exactly how a professional build comes together from an empty canvas through to launch.


In the first section of the Divi Mastery course there is no link to the second part! Why?
Part II and others are published on the blog. 😊
Stay tuned for the rest of the series as well, and thank you for your patience! 👍
Thanks for this course. It really helps put all of the great new features in a logical structure to follow and pick up a more new skills with every post. I am looking forward to all of the future posts.
These tutorials are really great! Thank you!