
If you want to monetize your WordPress site with ads, the Advanced Ads plugin is a great place to start. With its ability to generate quality ads, use different ad layouts, and add custom ad blocks to streamline your workflow, Advanced Ads can provide effective and creative opportunities to boost your ad marketing strategy. This comprehensive review of Advanced Ads will explore its key features, benefits, pricing, pros and cons, and more to help you decide if it is the right AI WordPress plugin.
What is Advanced Ads?
Advanced Ads is a WordPress plugin that helps you manage and optimize ads on your website. It is a powerful ad management tool that works with all ad types and networks, including Google AdSense, Google Ad Manager, Amazon, and media.net ads. The plugin offers many features to test and optimize ads, including ad rotation, scheduling, and targeting by content and user groups. It also allows you to inject ads into posts and pages without coding automatically.
The plugin is available in both free and premium versions. The premium version boasts additional features such as targeting, split testing, click fraud protection, lazy loading, sticky ads, seamless integration with Google Ad Manager, and more. If you are looking for a simple ad manager plugin, Advanced Ads is the right choice.
Getting Started with Advanced Ads: User Experience & Interface
Installation
To install the Advanced Ads Plugin, you can follow these steps:
- Sign in to Your WordPress Dashboard: Log in to the admin area of your WordPress website using your credentials.
- Go to Plugins: Locate and click on “Plugins” in the left-hand sidebar menu.
- Select “Add New”: Once in the Plugins section, click on the “Add New” button at the top of the screen.
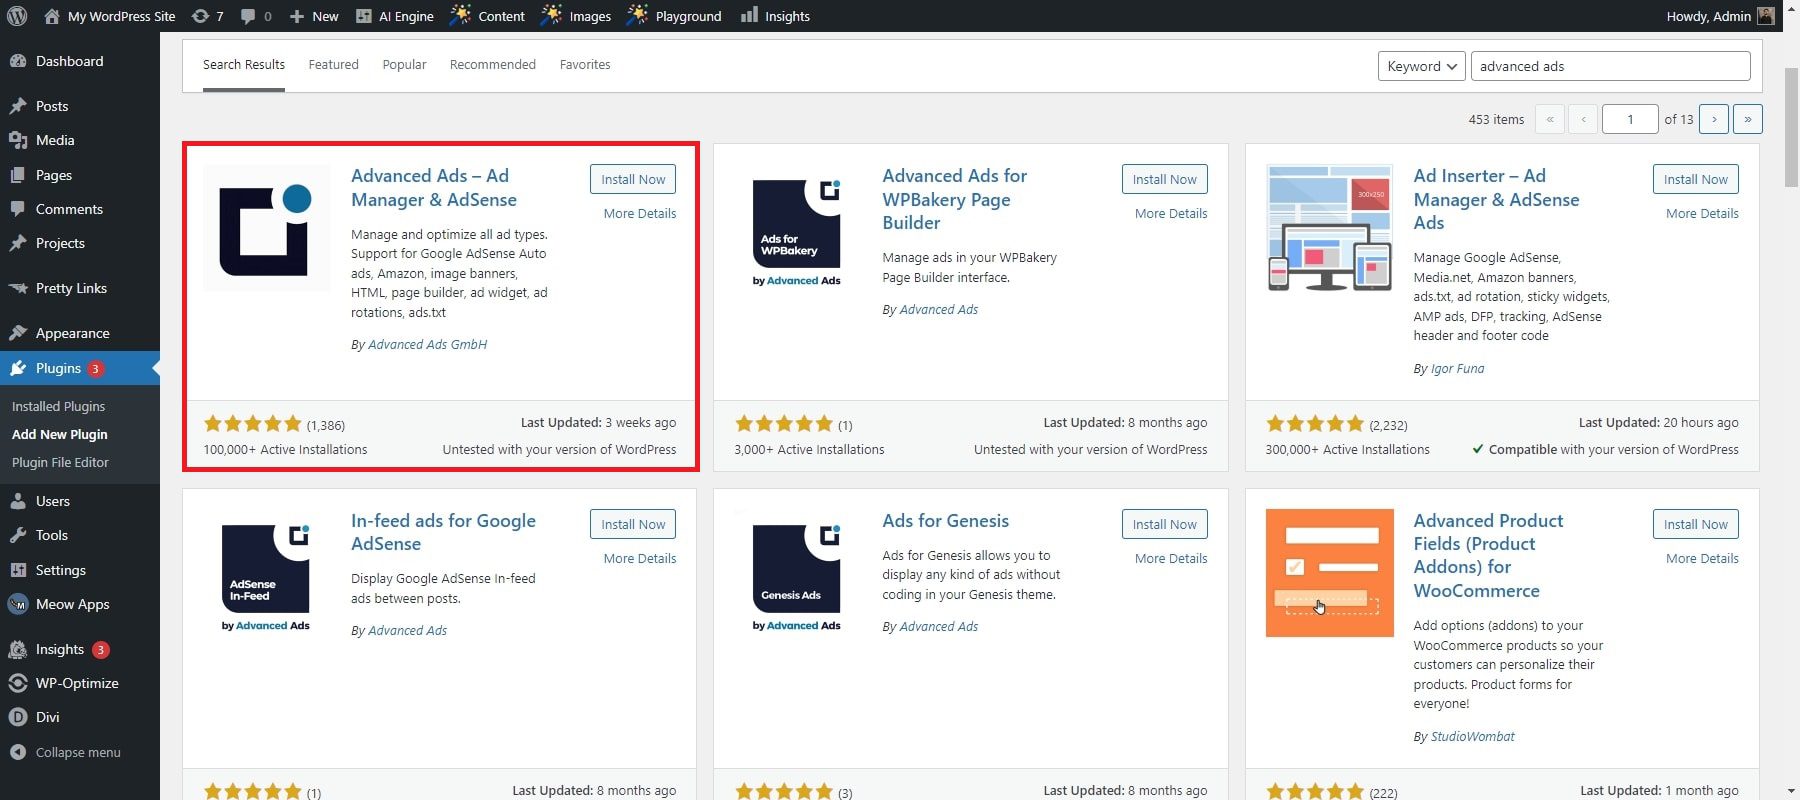
- Search for “Advanced Ads”: Type “Advanced Ads” into the search bar at the top right corner of the screen and press Enter.
- Install the Plugin: The search results should display the Advanced Ads plugin. Click the “Install Now” button next to the Advanced Ads plugin.
- Activate the Plugin: After the installation, click the “Activate” button to activate the Advanced Ads plugin.
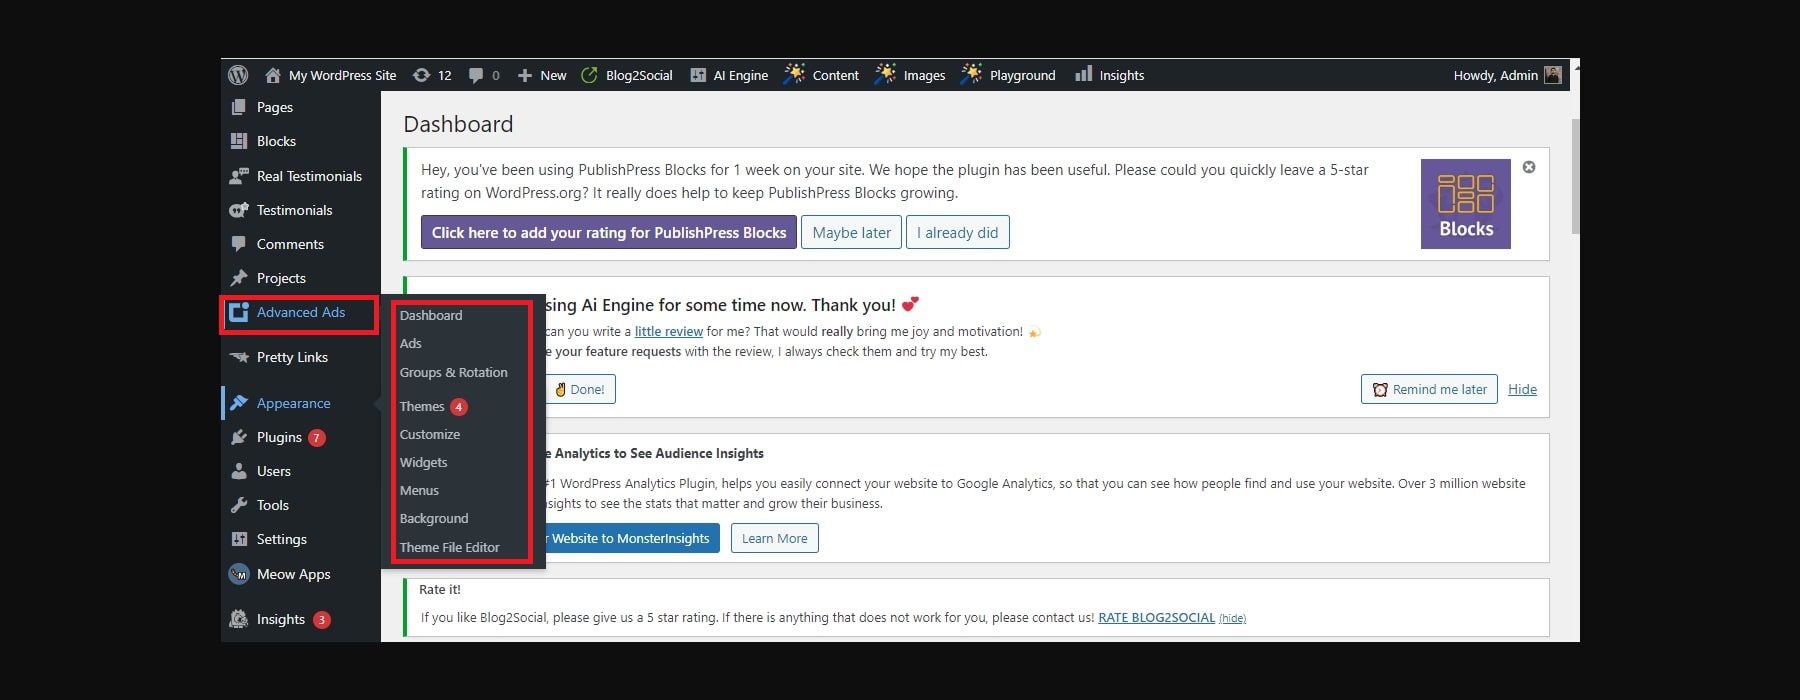
Once the Advanced Ads plugin is installed, you can easily access its settings via your WordPress dashboard. Navigate to the left sidebar, where you’ll find the “Advanced Ads” tab. Clicking on this tab gives you various options to configure your ads. Within the Advanced Ads settings, you can fine-tune multiple parameters such as ad settings, placements, and management.
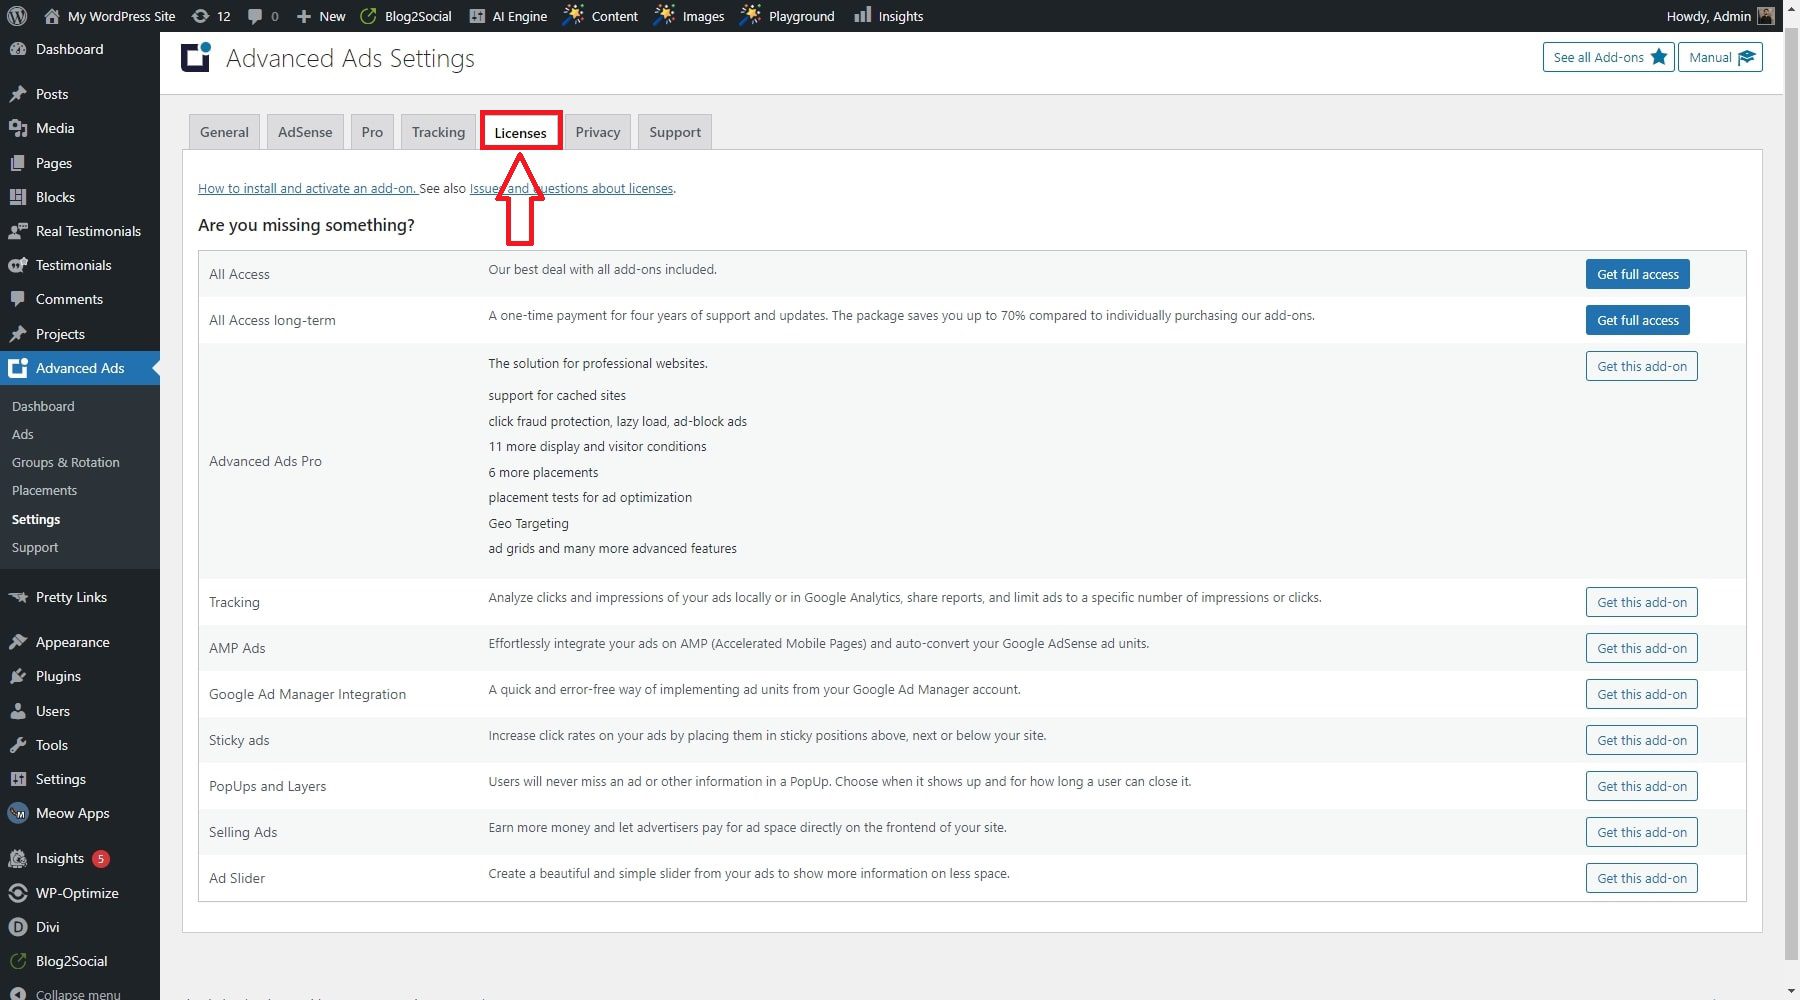
If you have a license key for the Advanced Ads Pro version or any add-ons, you can enter it in the settings to unlock additional features.
Key Features of Advanced Ads
The Advanced Ads plugin offers a range of features to help monetize your site with ads and enhance your website marketing strategy. These include advanced ad creation, dynamic ad placement, ad management tools, and more. This brief overview will highlight the key features and benefits of this plugin.
1. Ad Creation Overview
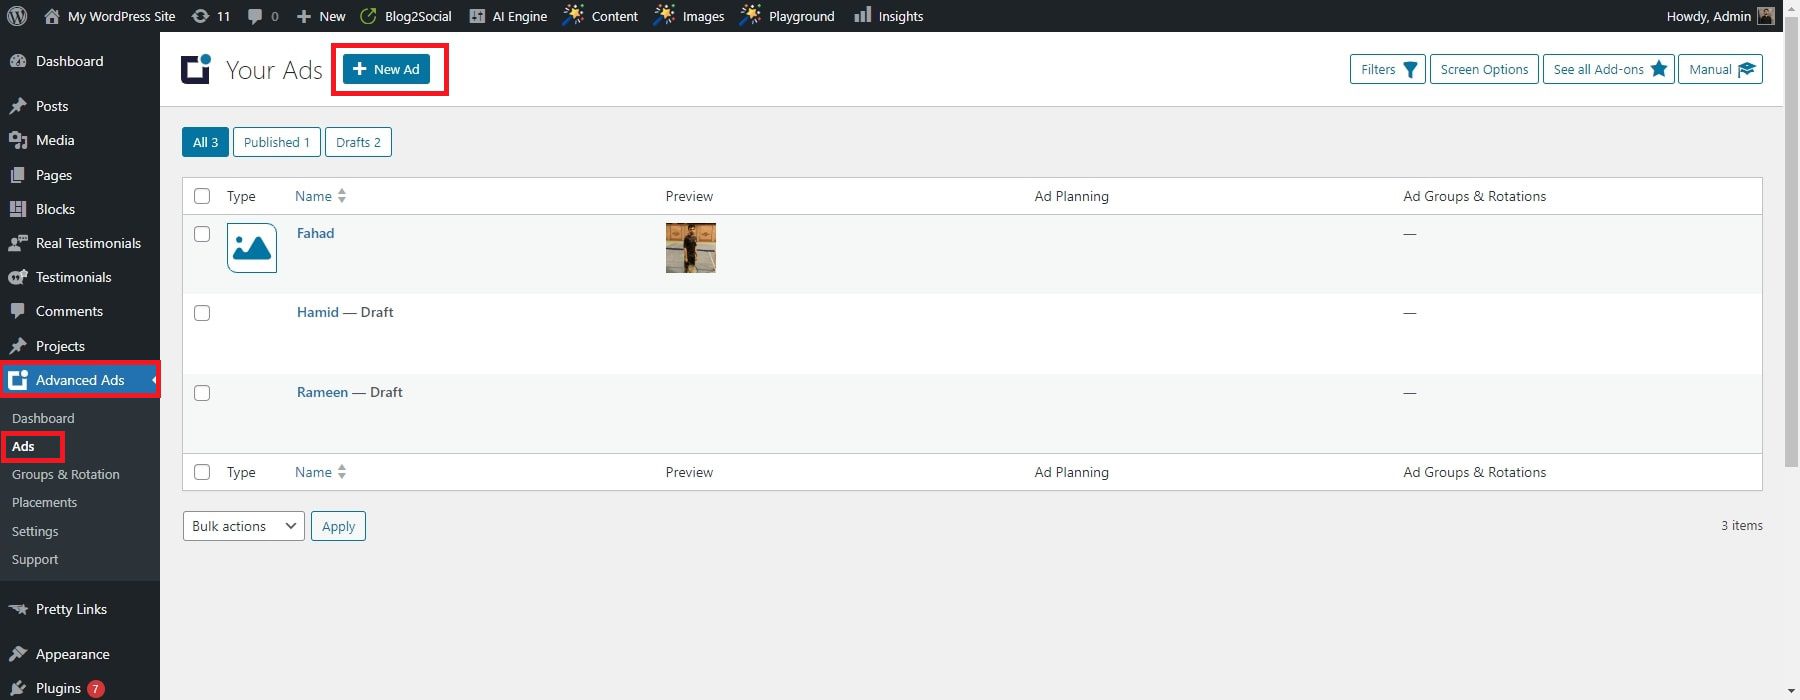
Once the plugin is activated, you can start creating ad units. Ad units are containers for your ads and define where and how your ads will be displayed on your website. To create a new ad unit, go to Advanced Ads > Ads in your WordPress dashboard and click the “New Ad” button.
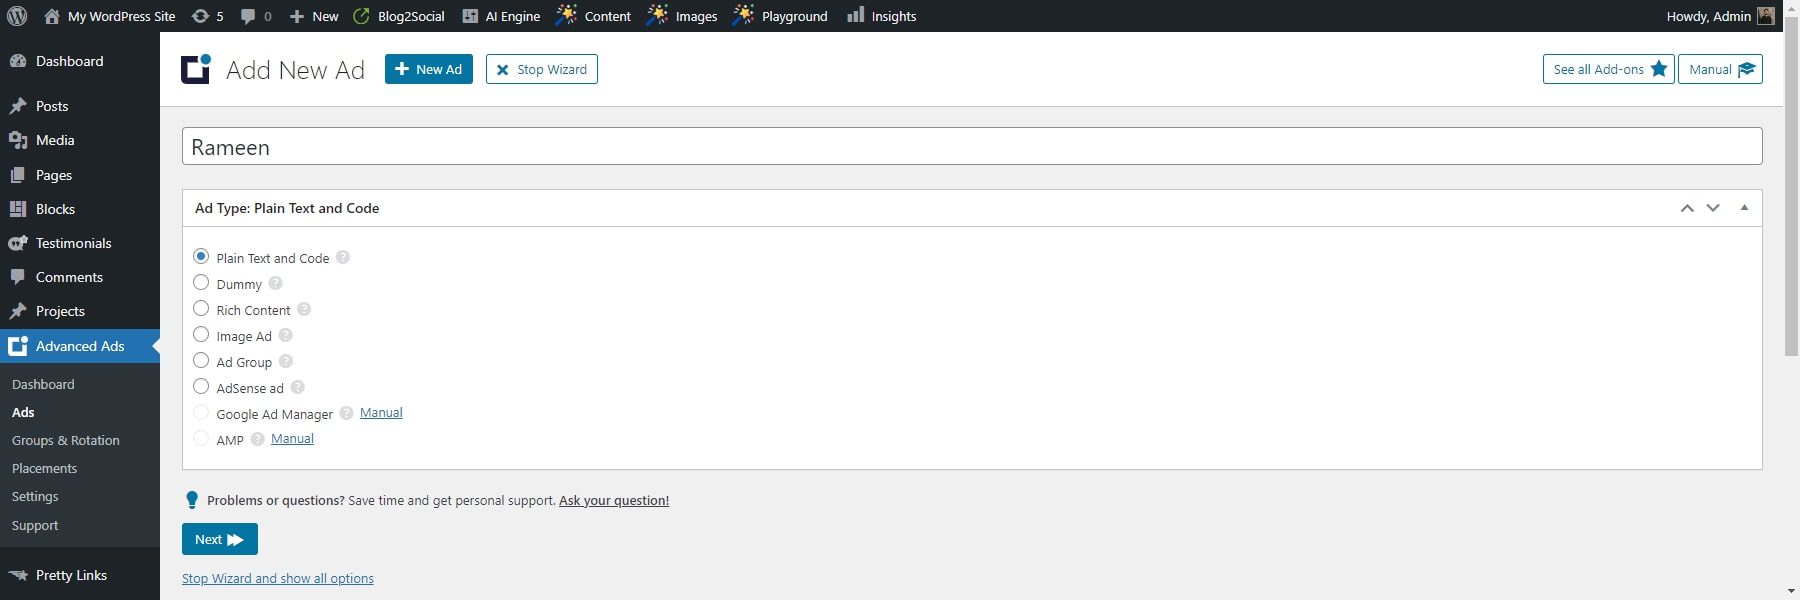
In the ad creation interface, you’ll have various settings to configure for your ad. This includes choosing the ad type (e.g., display ad, sticky ad, in-feed ad, etc.), usage, ad parameters, targeting, and statistics. Below, we will provide an overview of these settings and how they influence the creation of your first ad.
Ad Type
This section supports various ad types, including display ads, native ads, and pop-ups. You can also create custom ad types using the plugin’s API.
Usage
The Ads feature allows you to create and display ads on your website. You can choose where to display the ads, such as specific pages, posts, or categories. You can also control the frequency of the ads, such as how often they appear and for how long.
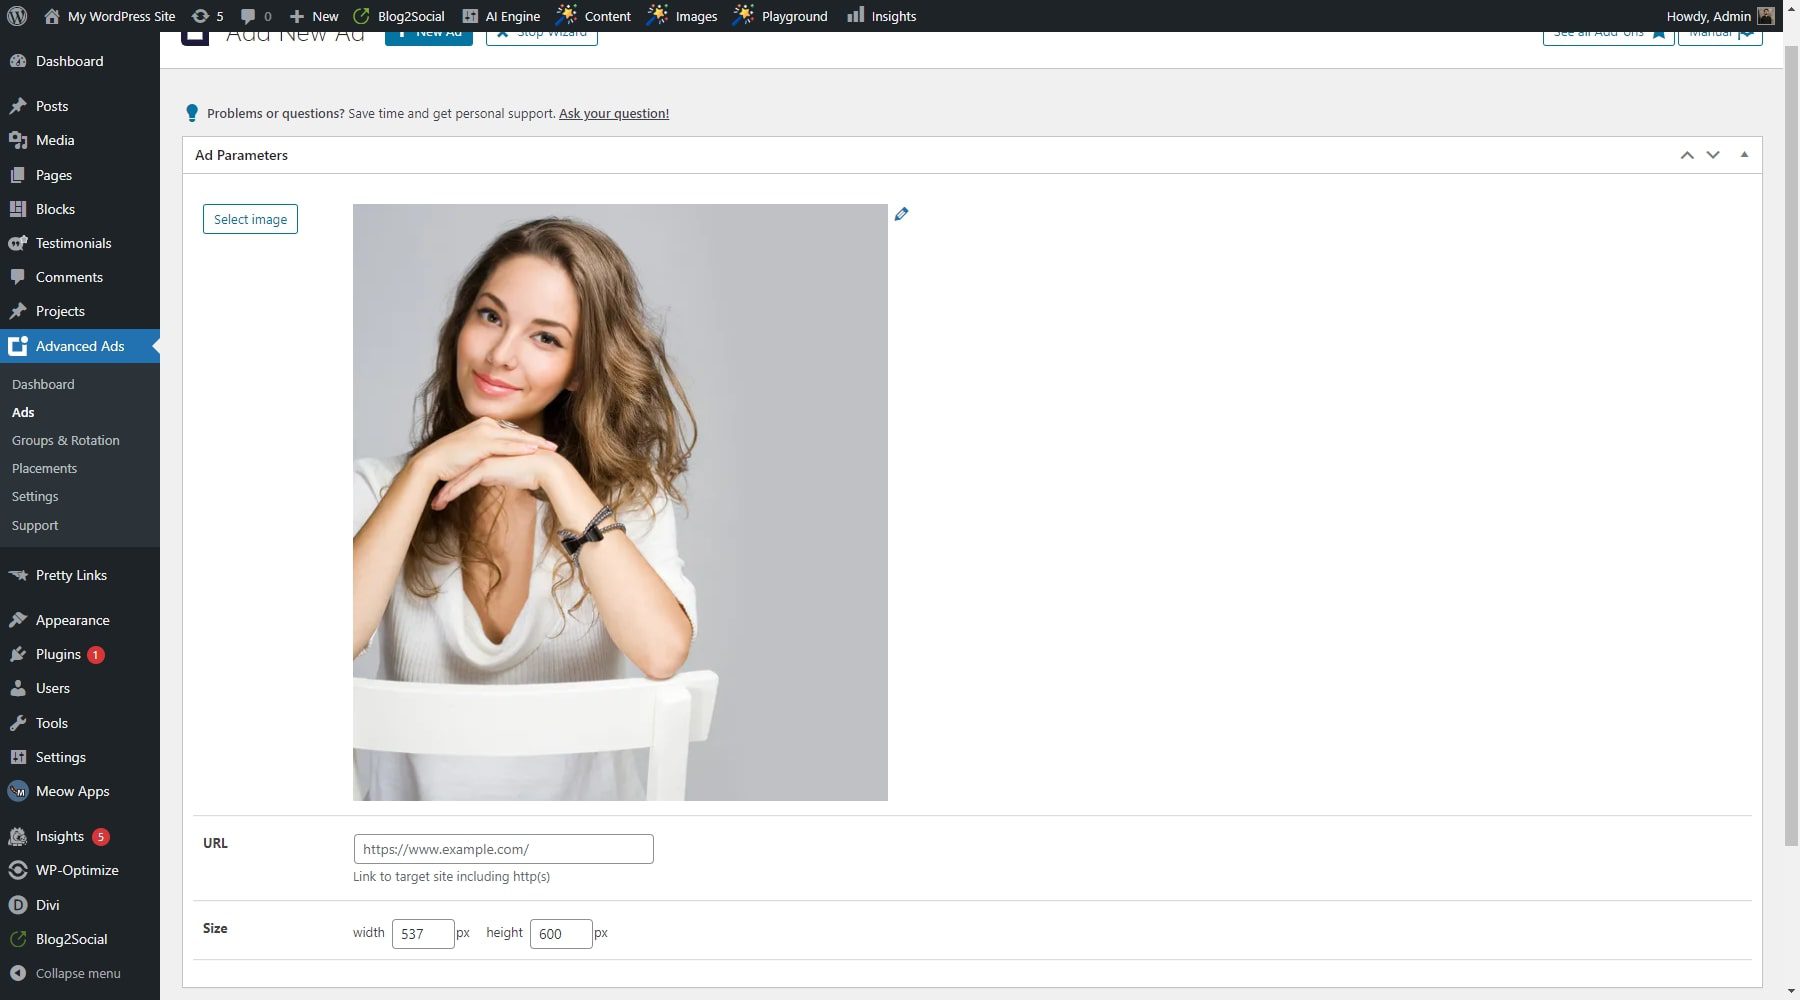
Ad Parameters
Provides a range of ad parameters you can use to customize your ads. These parameters include ad size, position, rotation, and alignment. You can also add custom CSS to your ads to further customize their appearance.
Targeting
You can also target your ads to specific audiences based on various parameters, such as user location, device type, browser type, and more. The plugin also supports retargeting, which allows you to show ads to users who have previously interacted with your website.

Statistics
The plugin provides detailed statistics on your ads’ performance. You can view data such as impressions, clicks, click-through rates, etc. The plugin also supports integration with Google Analytics, which allows you to track your ads’ performance alongside other website metrics.
![]()
2. Gutenberg Blocks Integration
With the “Advanced Ads Plugin,” you can use Gutenberg blocks to create more engaging and visually appealing ads. For example, the Stackable Gutenberg block plugin comes with a range of pre-built blocks that you can use to create ads, including an icon block, a post block, and a notification block.
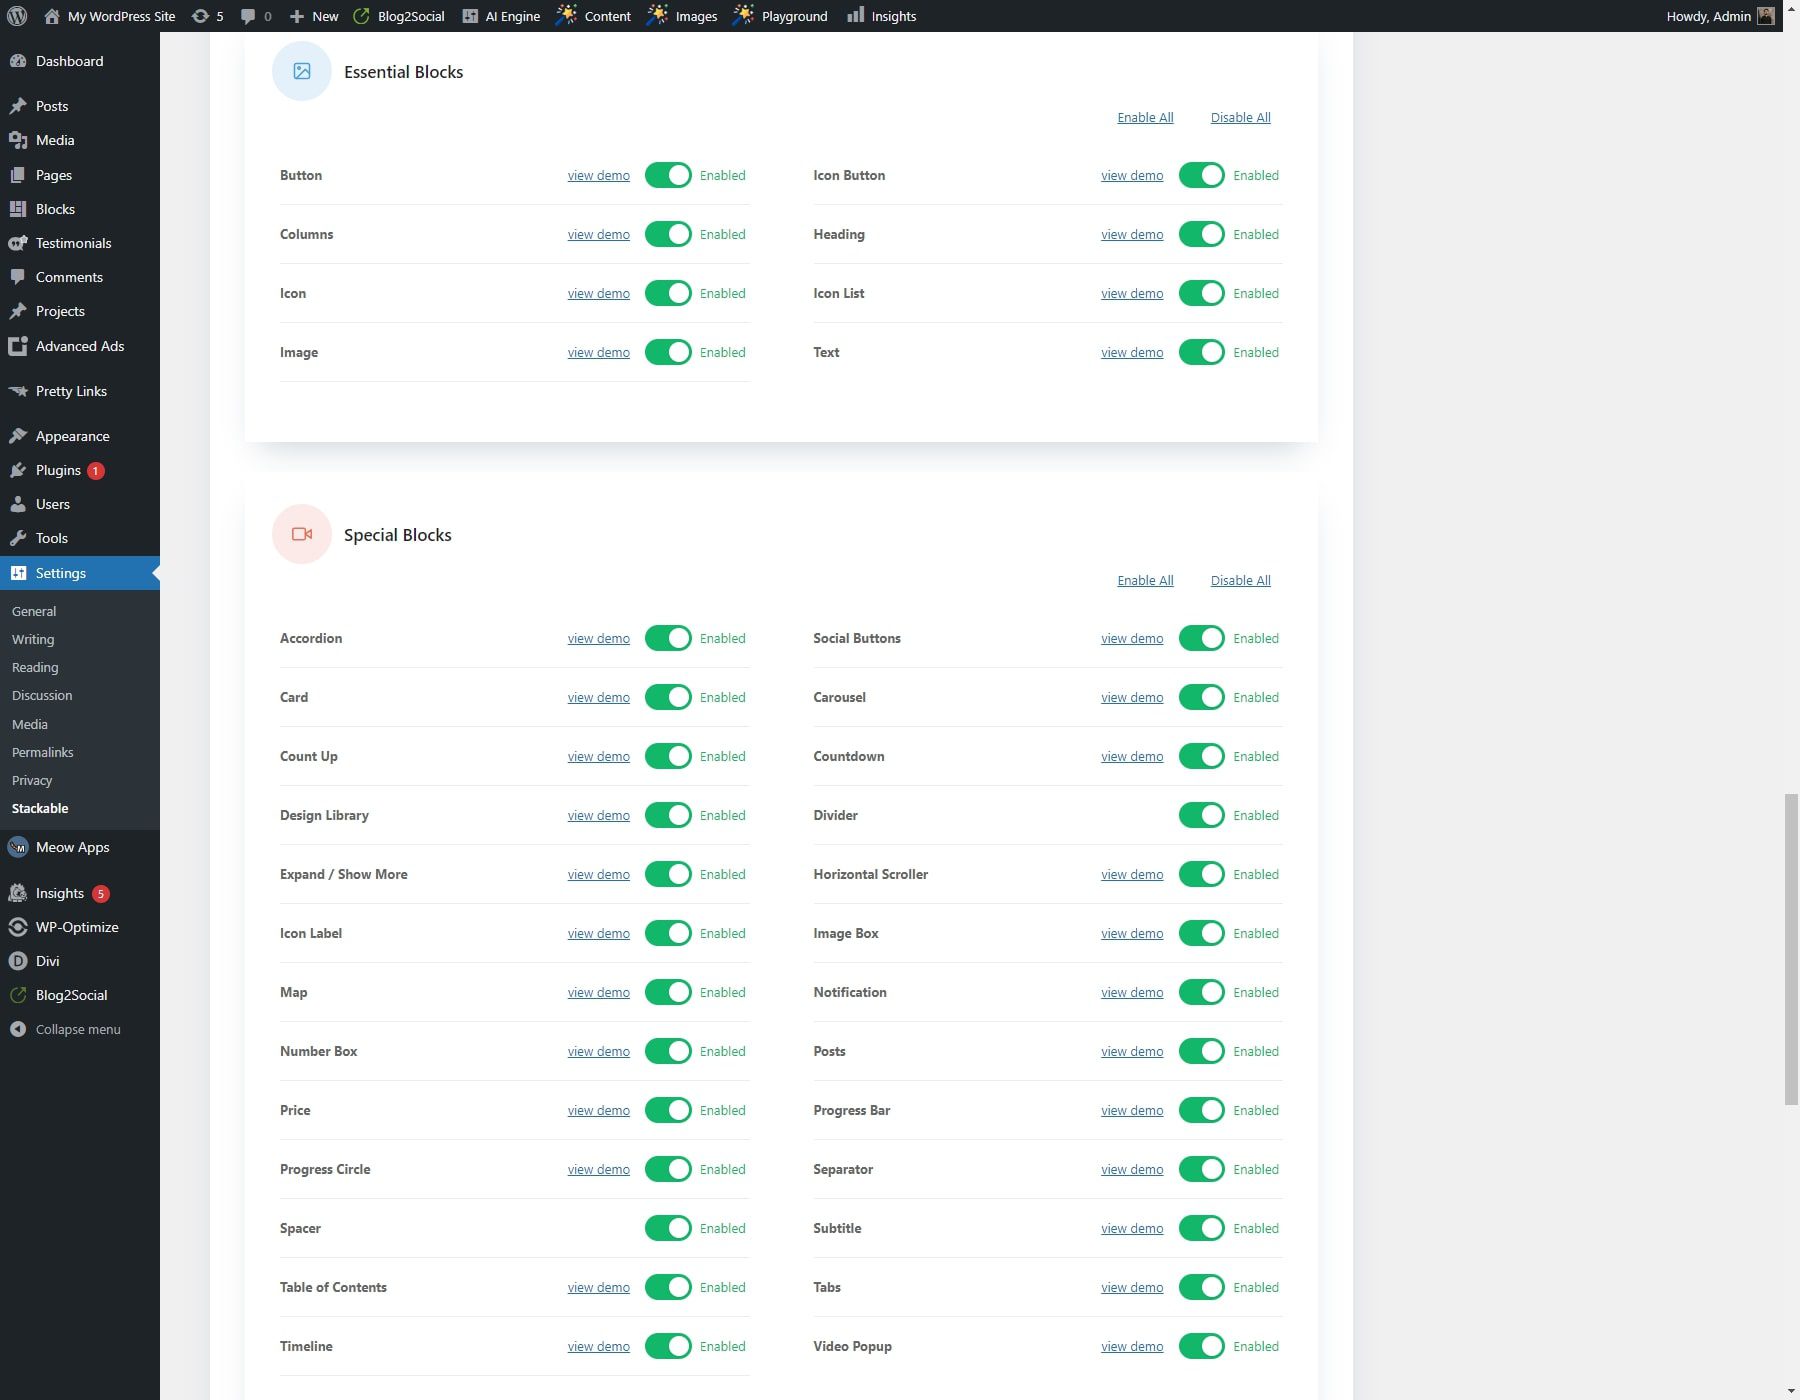
In addition to the pre-built blocks, you can also create your own custom blocks using the plugin’s built-in block editor. This allows you to create ads tailored to your specific needs and requirements. Overall, this feature of the Advanced Ads Plugin is a powerful tool to help you create more engaging and visually appealing ads for your website.
3. Disable Ads
The Advanced Ads Plugin allows disabling ads on the website’s front end. You can enable the Disable Ads option in the plugin’s settings to disable ads. This will remove all ads from your site, including the AdSense Auto ads code. If you have manually placed ads using shortcodes, you must also remove them.
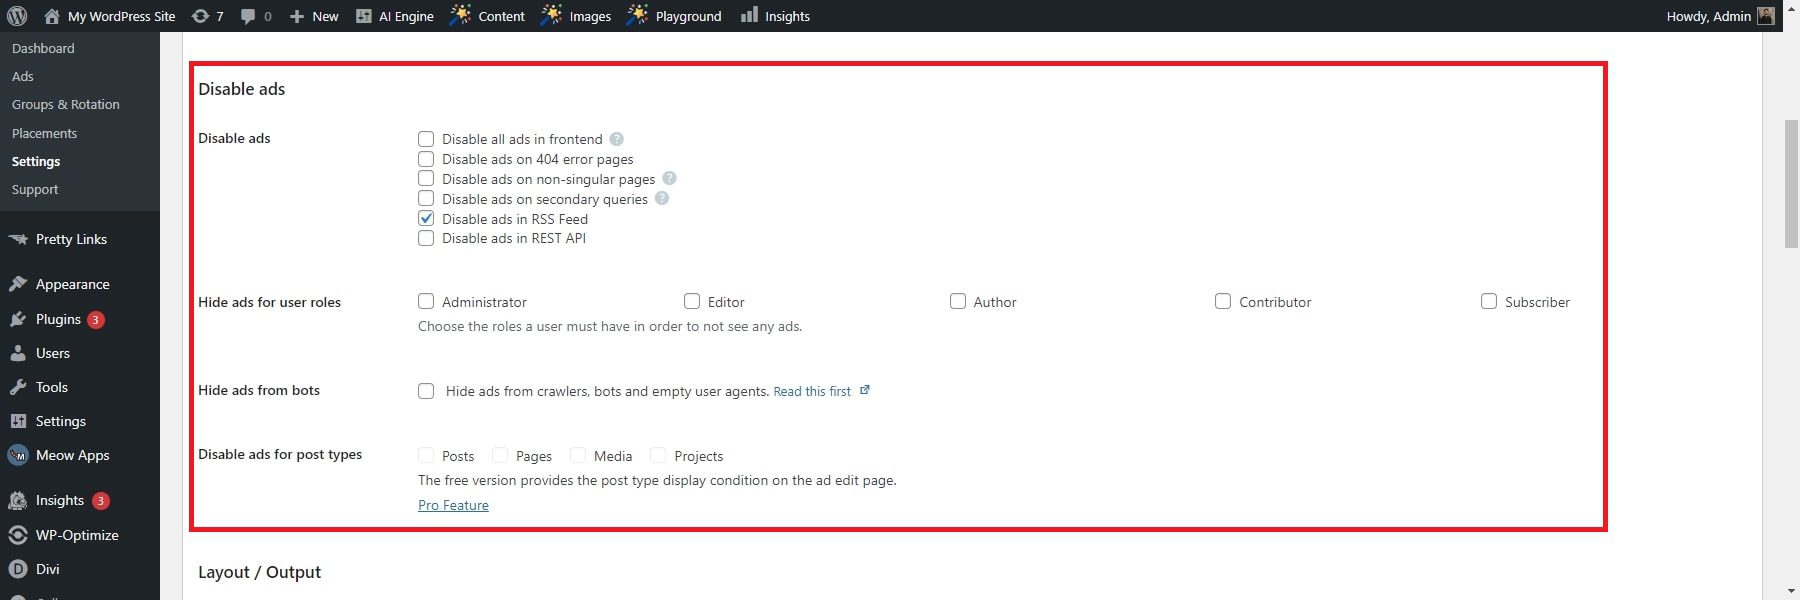
The plugin also allows disabling ads for specific pages or visitors. You can set general rules to disable ads for many pages or visitors in the main plugin settings under Advanced Ads > Settings > General > Disable ads.
4. Ad Groups & Rotation
The Groups & Rotation feature enables the display of multiple ads in a single position on your website. It’s particularly valuable for split-testing ad units, helping you gauge the effectiveness of different ad creatives and refine your campaigns for better results. Additionally, you can utilize this feature to showcase several banners within a single ad spot, either based on a specific frequency or a predetermined order.
The plugin offers four methods for rotating ads:
- Rotation on every page impression: Ad groups enable the display of a different ad each time the page is loaded.
- Rotating banner advertisements with a slider: Ads are showcased as animated slides on the current page.
- Ad refresh in the same spot: Automatically loads the next ad after a specified duration without needing a page to reload.
- Rotate advertising in a specific order: Ads are presented chronologically, such as displaying ad #1, then refreshing to show ad #2 and ad #3.
Ad groups consolidate various ads, offering the flexibility to use them just like individual ads—within widgets, via a shortcode, or through a placement. The benefit lies in the ability to seamlessly incorporate new ads into the group without altering the position where they are displayed.
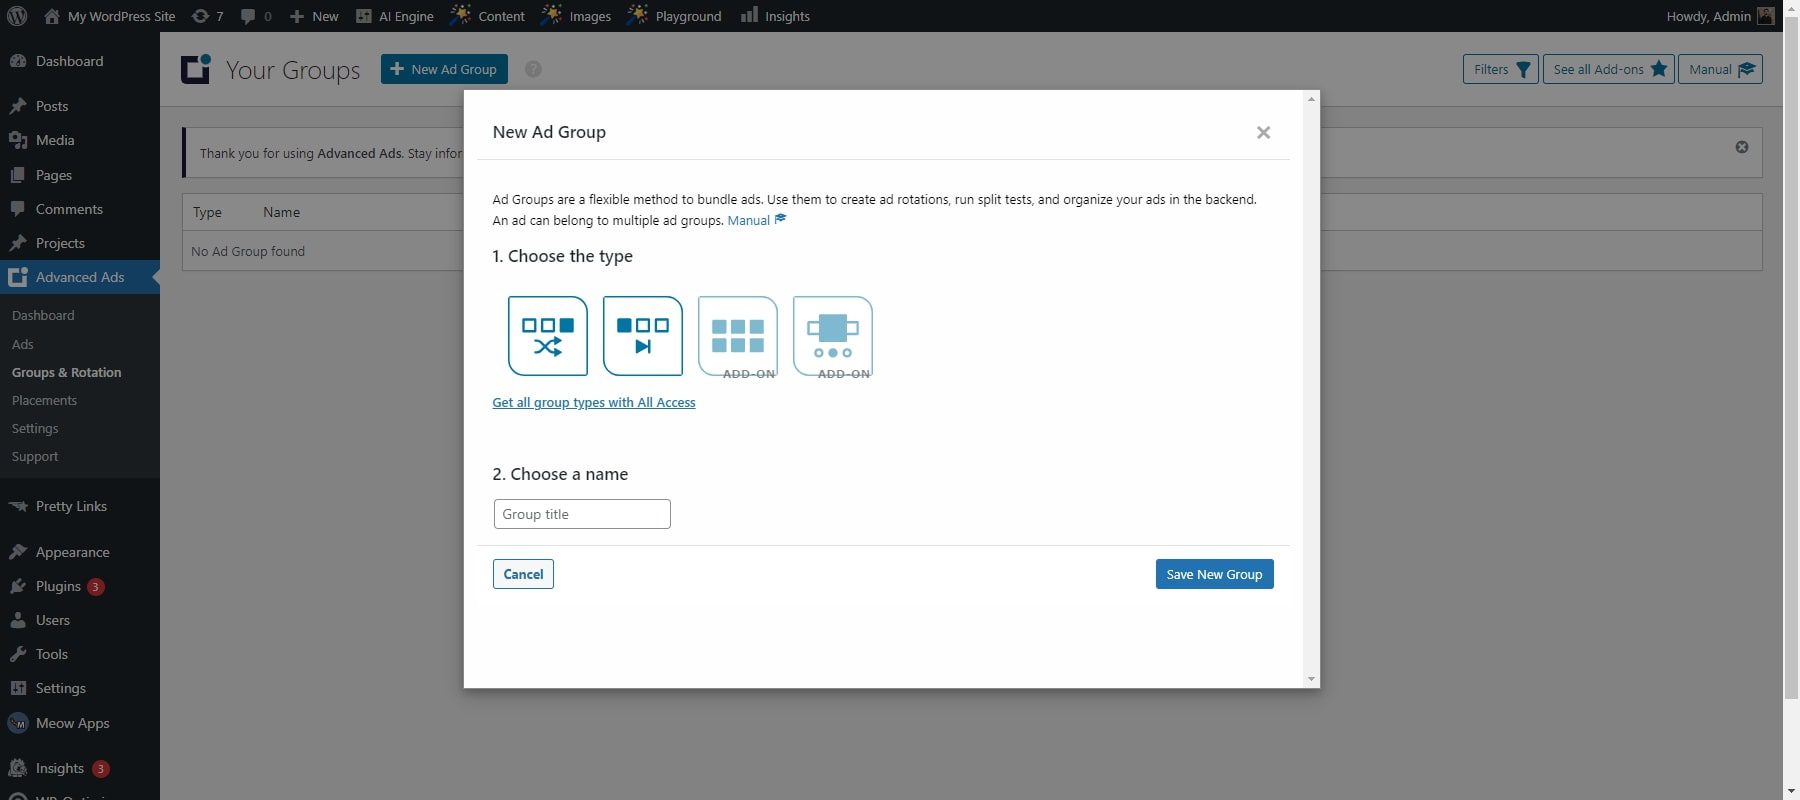
Let’s go through the steps to create an ad rotation via Ad Group:
Create the group on any ad edit page in the Ad Groups box on the right sidebar. To configure group options, go to Advanced Ads > Groups & Rotation. Identify the Random ads group type.
Specify the number of visible ads, indicating how many should appear simultaneously. This can be helpful for constructing advertising blocks.
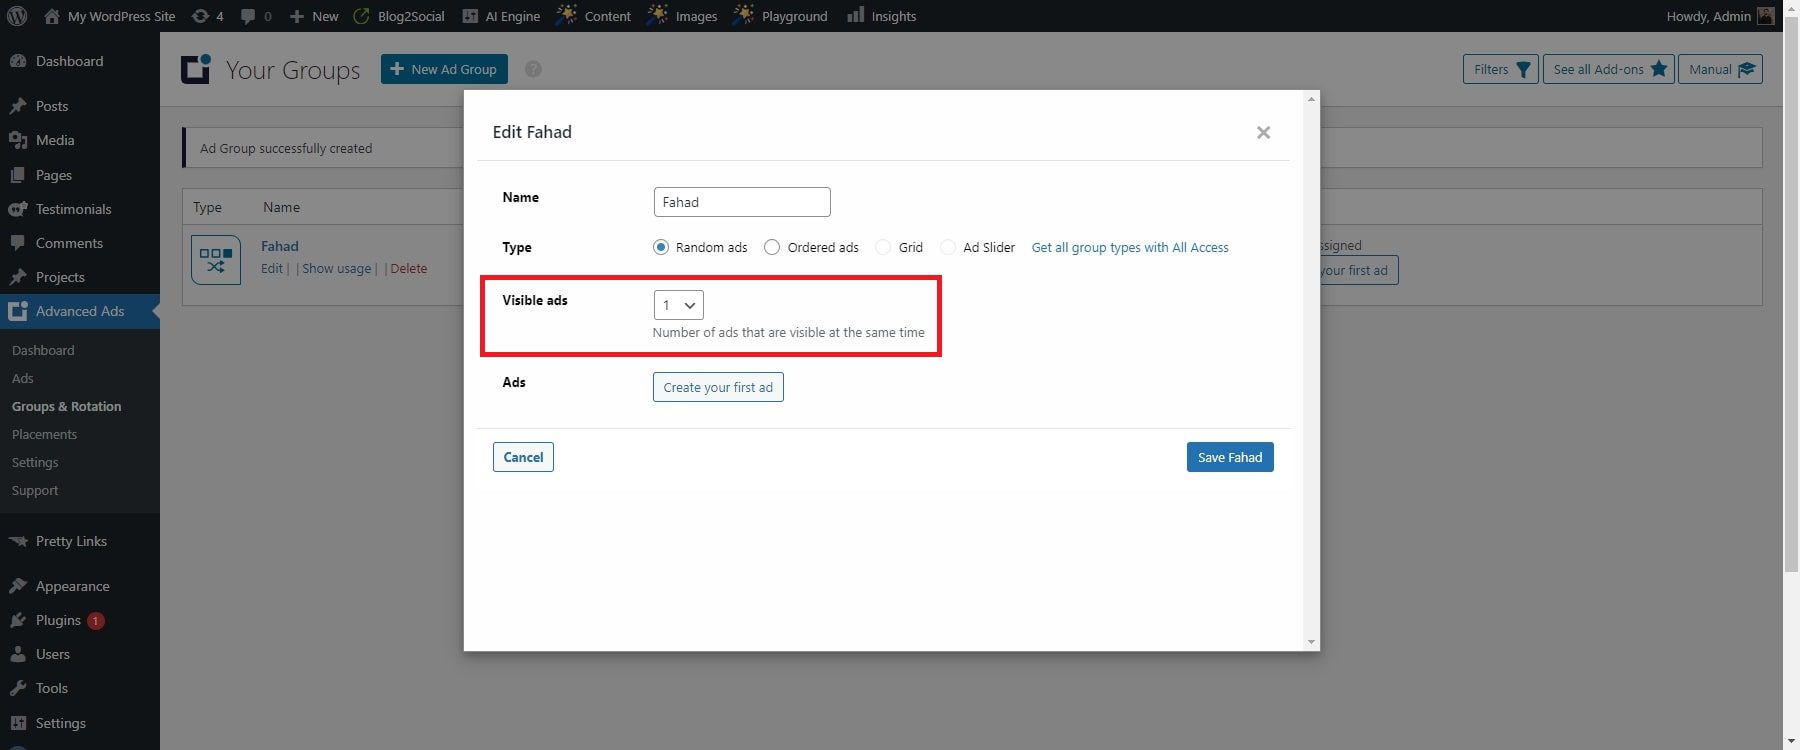
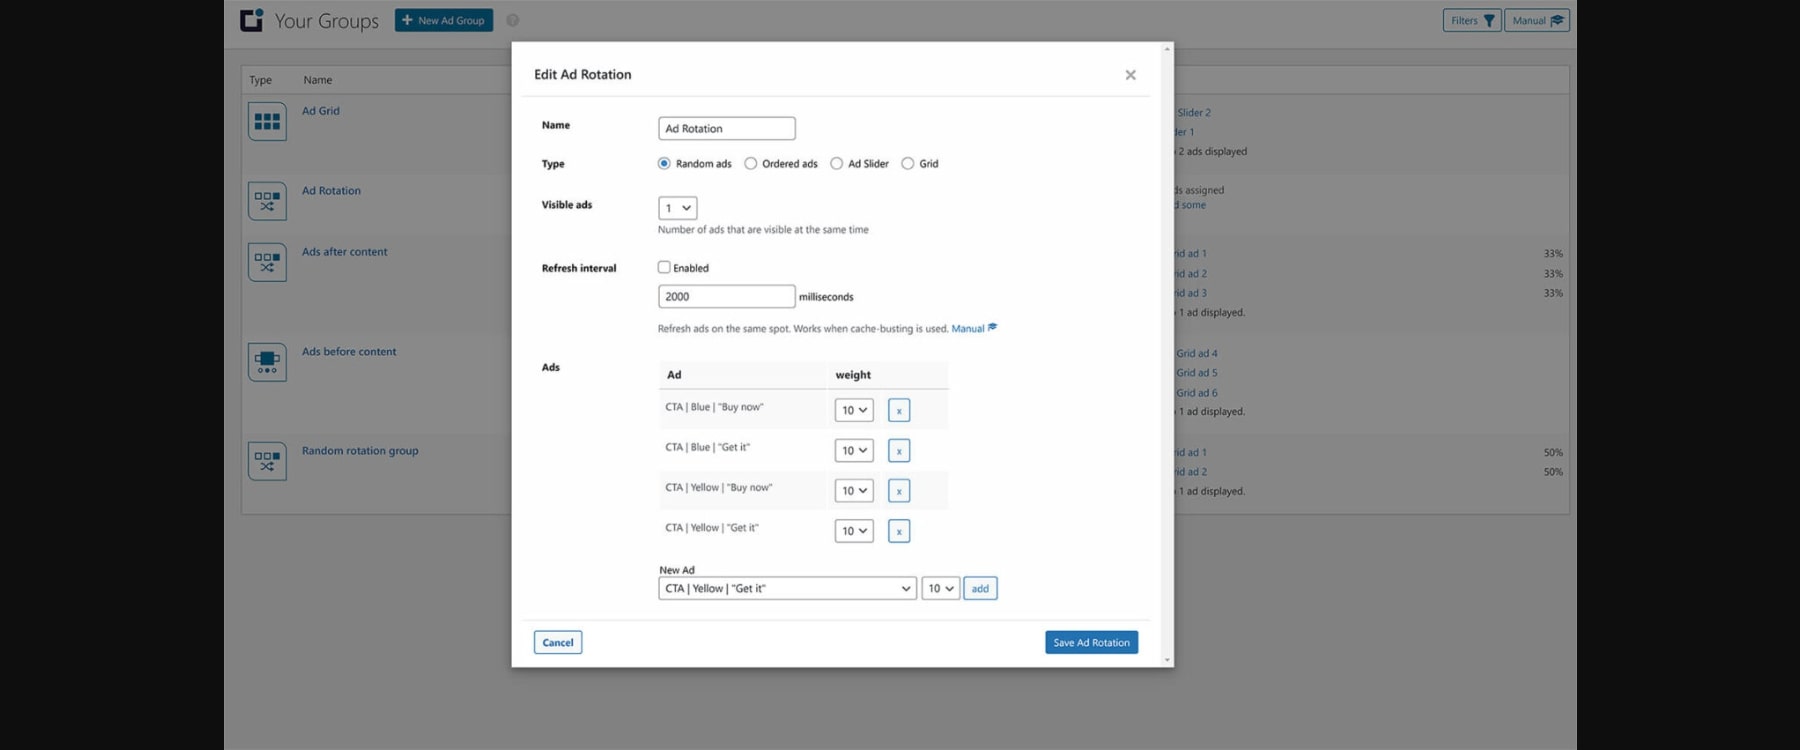
Set the weight for each ad to determine its probability of appearing. Choose from various modes available for ad rotations.
5. Ad Layout/Output Customization
The Advanced Ads Plugin provides a range of options to customize the layout and output of ads on your website. Here are some of the features that you can use to optimize the ad layout:
- Position: The Position option allows you to align the ad to the layout’s left, center, or right.
- Margin: It enables you to create space between the ad unit and surrounding elements.
- Container ID: State the identification code for the ad container.
- Container Classes: State one or multiple classes for the container.
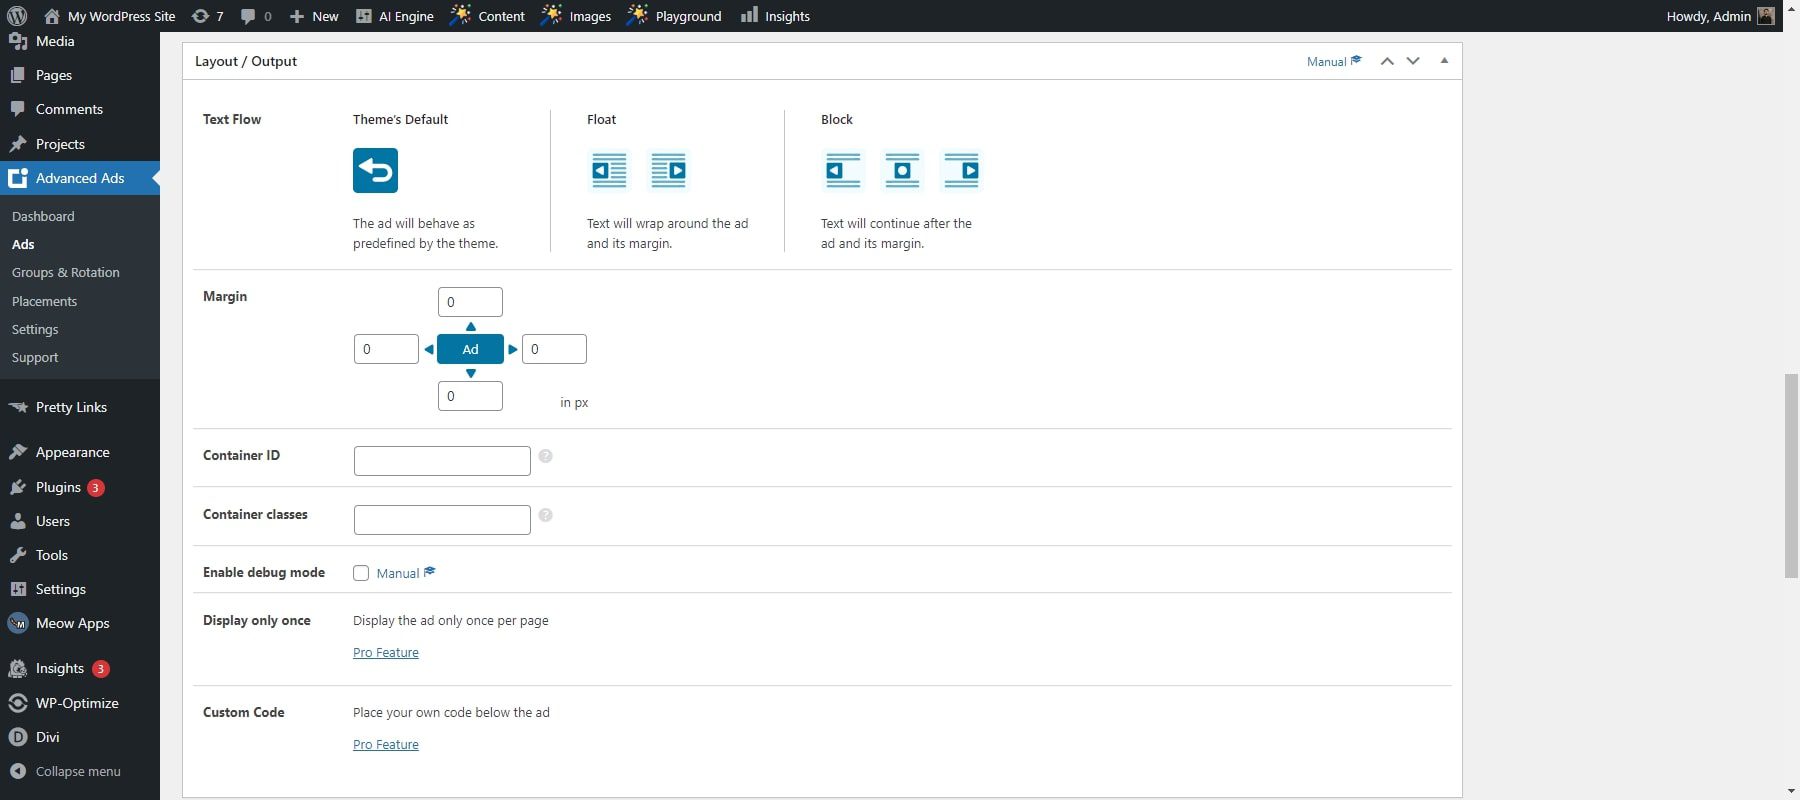
Advanced Ads Pro provides extra features allowing you to insert custom code and control the display of advertisements to ensure they only have a single occurrence per page. You can also define the position and margin values and assign existing style settings by specifying a container ID or class. To access these features, navigate to Advanced Ads > Ads and either create a new ad or modify an existing ad unit. Then, scroll down to the Layout / Output options section to access and configure the available settings.
6. Content Injection
The Content Injection feature of the Advanced Ads Plugin empowers you to seamlessly insert ads within the content of your posts and pages, using elements such as paragraphs, headlines, images, or any other designated element on your website. When utilized effectively, this placement can significantly enhance ad revenue. You need to create at least one Post Content placement to inject an ad into your content.
Alternatively, you can utilize the “custom” option to tailor your injection rules. This option includes a tool that simplifies selecting the ad position on the front end by allowing you to click on it with your mouse.
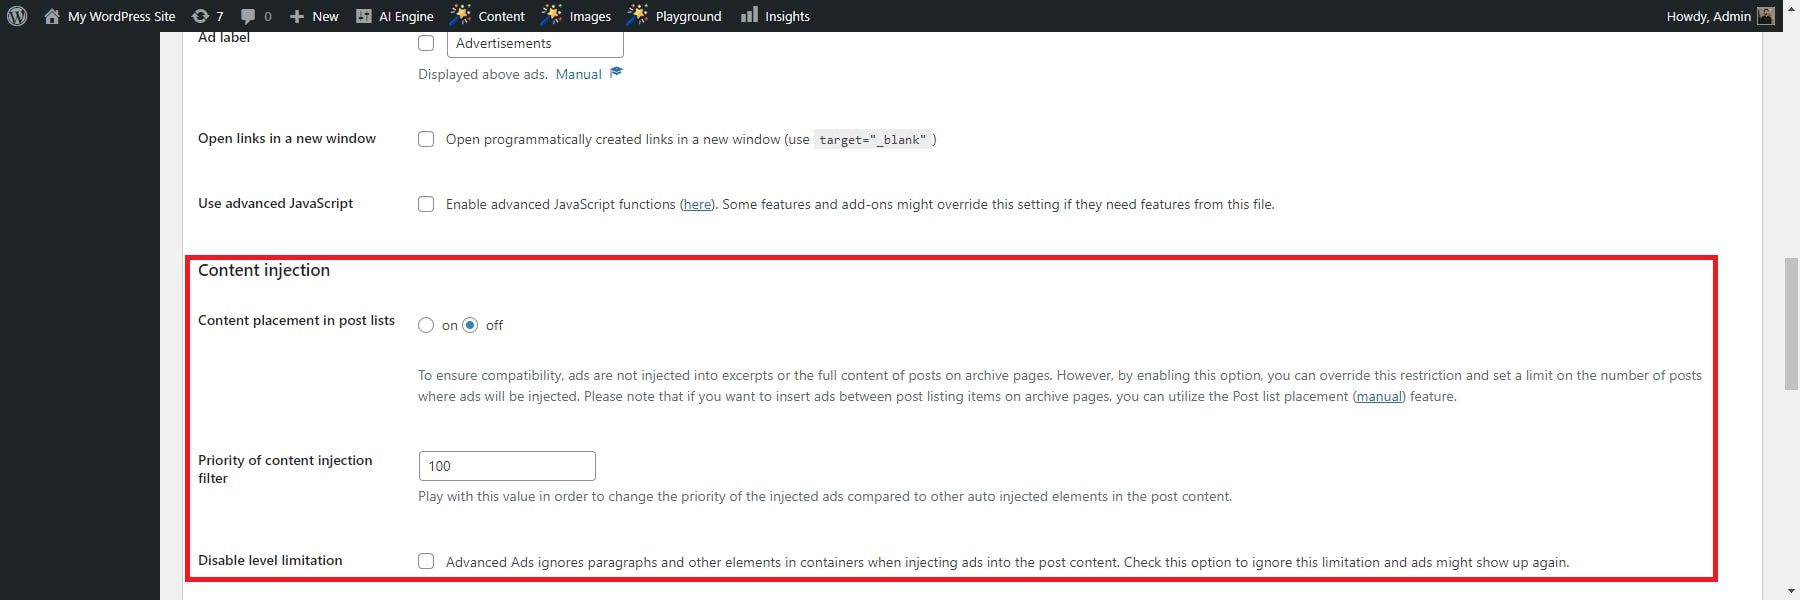
The Advanced Ads Plugin provides an Unlimited ad injection setting that allows you to enable ads on archive pages and outside of “single pages.” Set this option to -1 or above zeo to enable AJAX-loaded advertisements and infinite scroll.
7. Ad Blocker
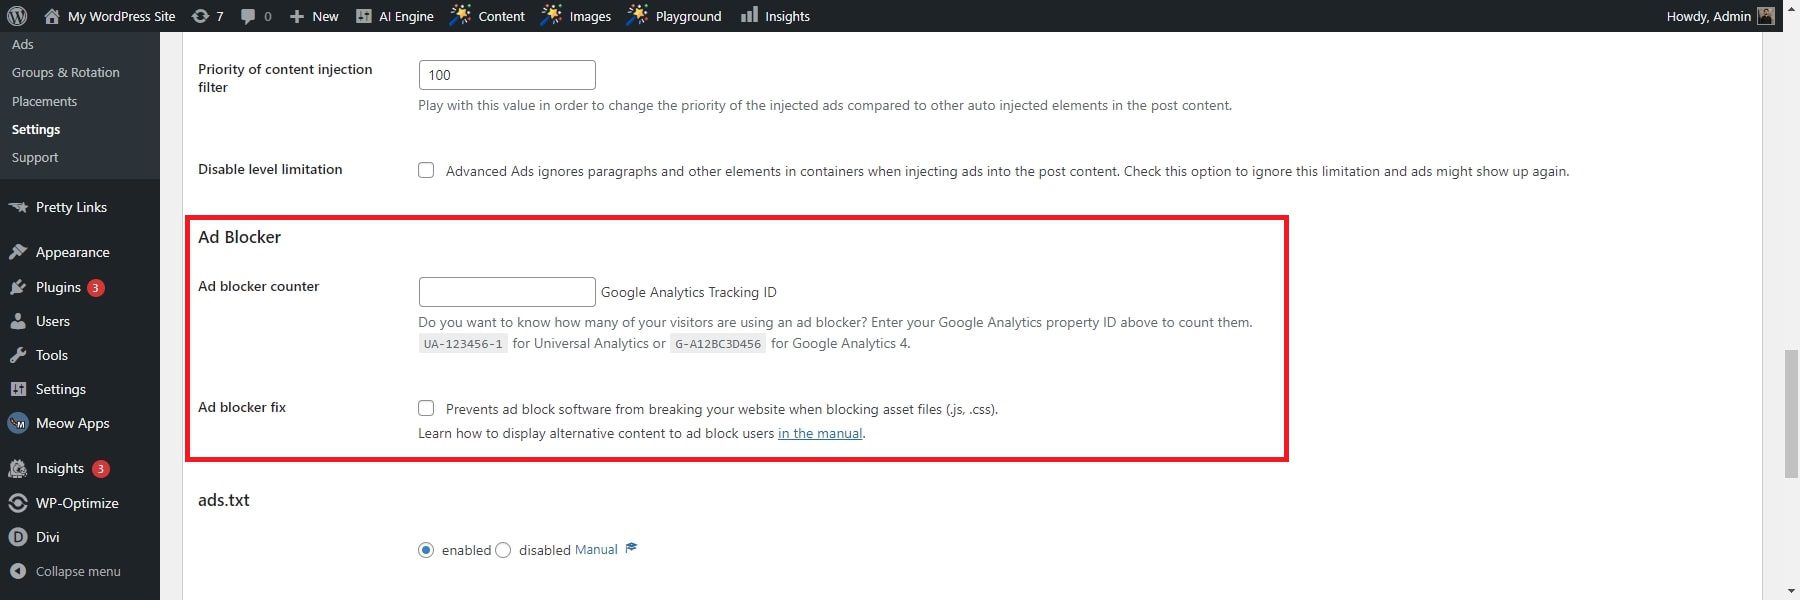
The Ad Blocker is designed to help publishers deal with the increasing use of ad blockers, which can lead to decreasing revenues and script issues without any inserted ads. The feature provides some integrated options to handle this issue, such as adding strings to your ads that ad-blockers could theoretically consider to suppress ads. Additionally, some fundamental aspects should be considered when setting up your ads, such as choosing your file names wisely and checking if your WordPress theme or page builder has features or placements that are evident for ad blockers.
8. Ads.txt Support for Google Adsense
The “ads.txt” feature allows publishers to manage and validate their ads.txt files from within WordPress. This feature is handy for publishers who use Google AdSense, as the ad network requires publishers to integrate their respective credentials to an ads.txt document to verify that the ad network can sell advertisements on their site.
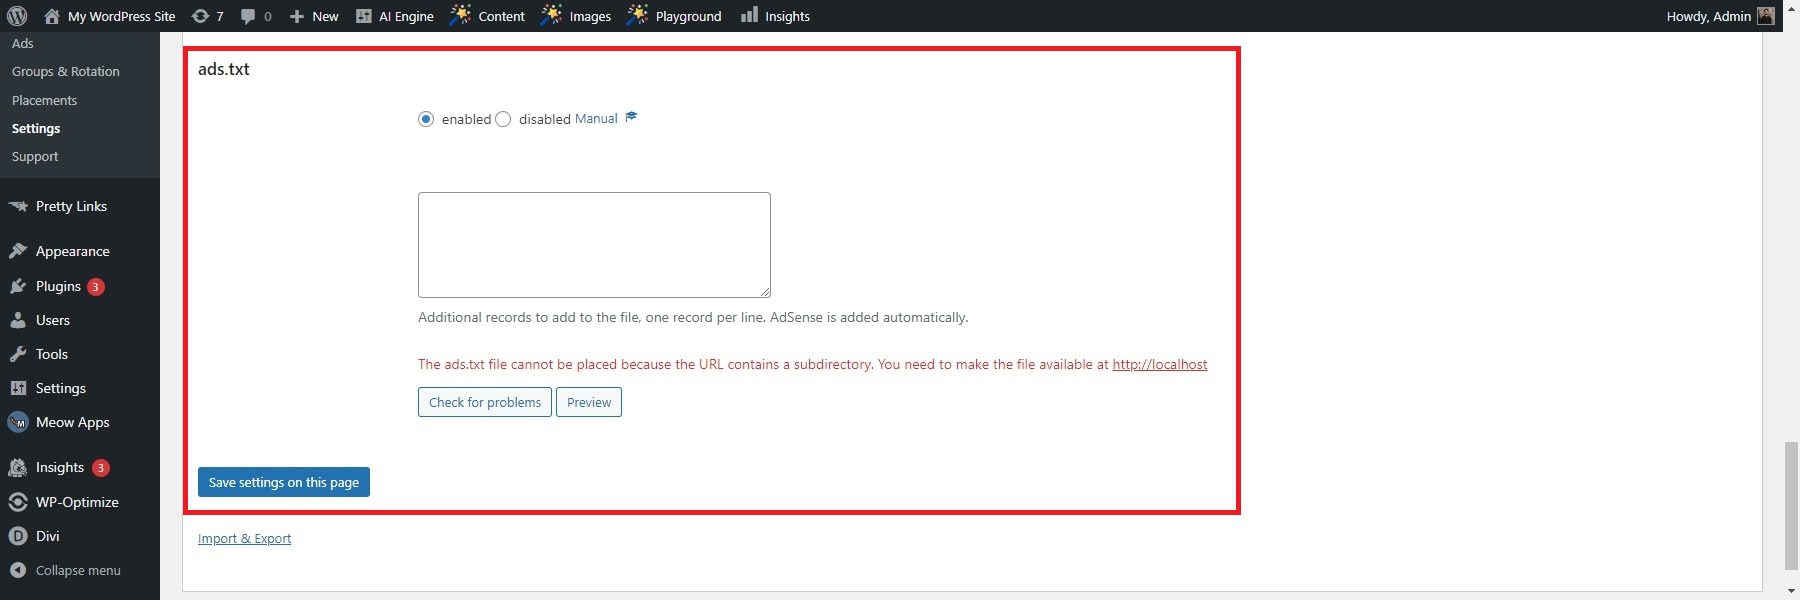
Advanced Ads Plugin allows publishers to manage the content of their files and even generates one automatically after the activation of AdSense. The plugin will enable you to create an ads.txt file via default. Developers can include their content in the ads.txt file generated by Advanced Ads using the advanced-ads-ads-txt-content filter.
It’s crucial to recognize that if the ads.txt file doesn’t display “# Advanced Ads ads.txt” at the top, it indicates that Advanced Ads didn’t generate the file. Instead, it either already exists physically in the website’s root directory, or another plugin might be overriding the plugin’s settings. In such instances, it’s necessary to identify and remove the source to utilize the Advanced Ads ads.txt feature effectively.
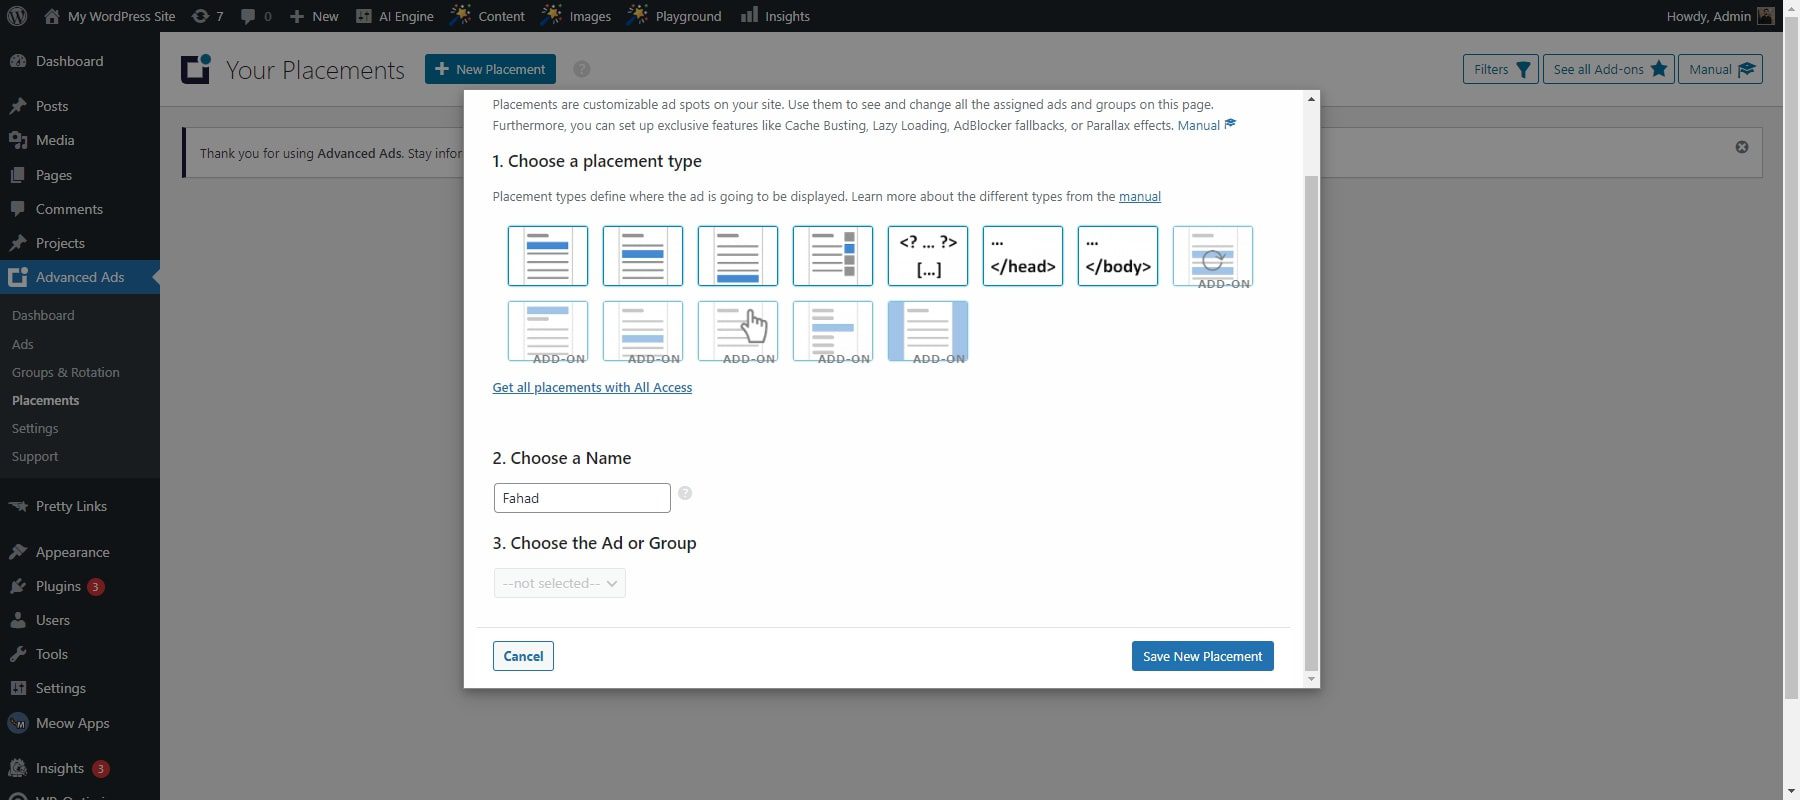
9. Dynamic Ad Placement Options
The Advanced Ads Plugin has seven placements that can deliver ads in different parts of your website. These placements include:
- Above Headline: Insert the ad before the main headline (H1) on singular pages.
- Before Content: Inject the ad before the post or page’s content.
- Content: Places the ad within the content of posts and other public pages.
- Content Middle: Injects the ad in the middle of the content, based on paragraphs.
- After Content: Insert the ad after the post or page’s content.
- Sidebar Widget: Places the ad into widgets to display in the sidebar or the footer.
- Manual Placement: This placement isn’t automatically visible in your content. You must include it via a WordPress block, a widget, a shortcode, or a PHP function. It’s useful for precisely inserting ads within your template files and enables easy adjustment of the placement content afterward.
You can also add display and visitor conditions to ads and directly to your placements using Advanced Ads Pro. This feature helps you to show ads in the positions that generate the most attention. For example, you can place ads in the middle or at random places in the content, between posts on archive pages, in ad grids, as parallax ads, or as background ads.
Advanced Ads Review: Pricing
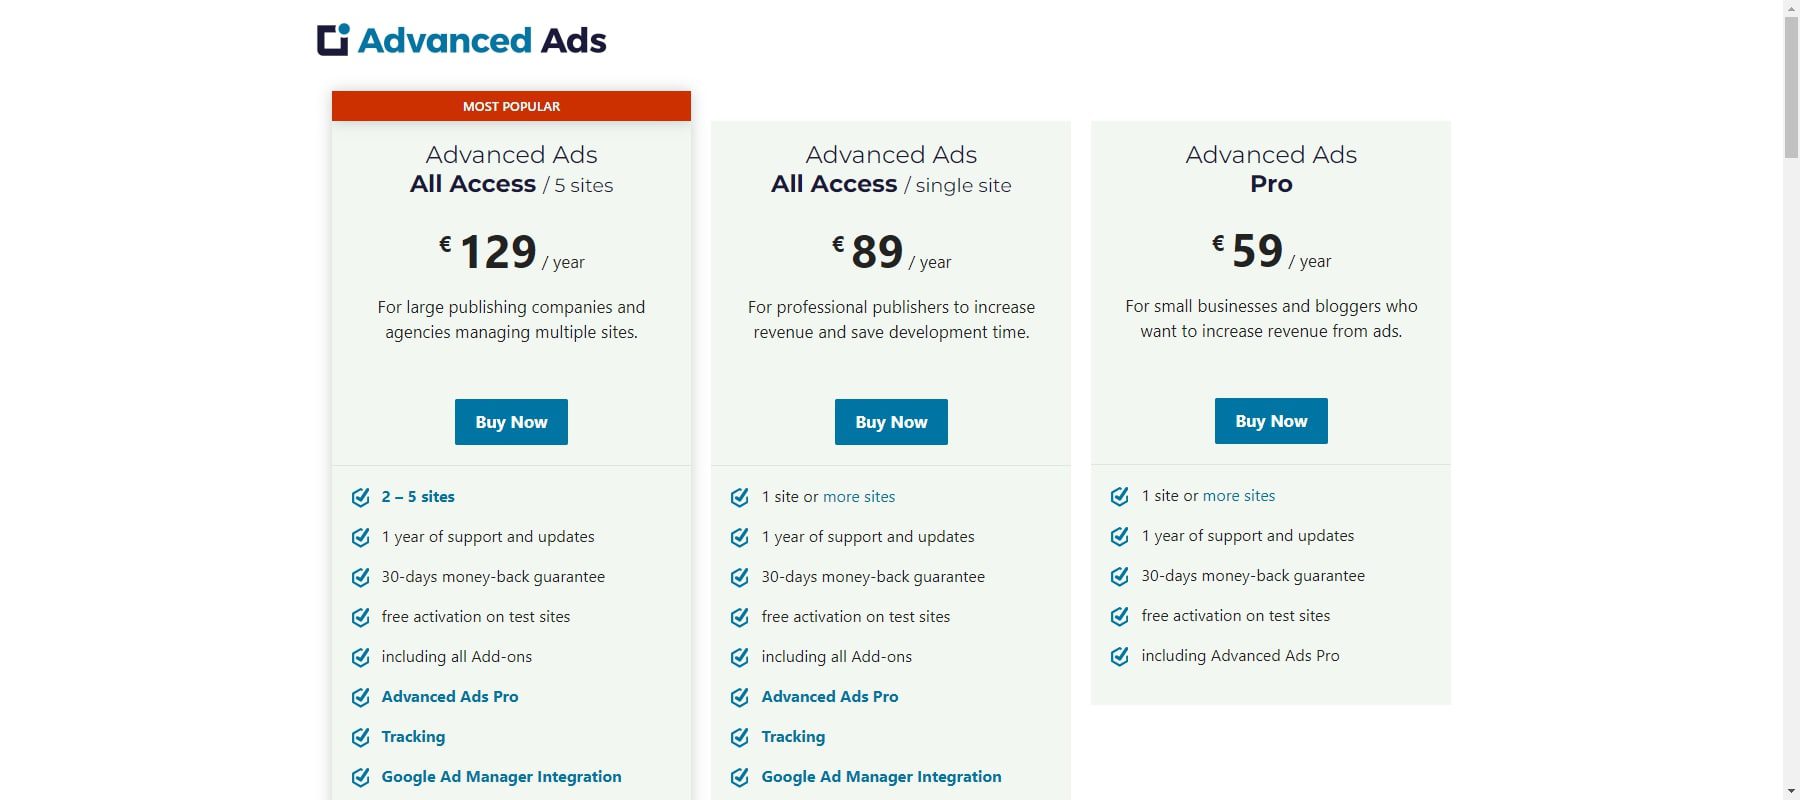
The Advanced Ads Plugin has a free version, and premium versions are available in three different pricing packages: Pro, All Access (single site), and All Access (up to 5 sites).
The pricing for each package is as follows:
- Pro: €59 (~$64.6) per year
- All Access (single site): €89 (~$97.4) per year
- All Access (5 sites): €129 (~$141.2) per year
The Advanced Ads All Access packages offer all the features of the Pro package, plus additional features such as Tracking, AMP, and Google Ad Manager support, and many more features to help you increase your revenue.
Pros and Cons of Advanced Ads WordPress Plugin
The Advanced Ads Plugin offers a range of features to manage and optimize ads on your website. Here are some of the pros and cons of using this plugin:
Pros of Advanced Ads
- Creates and manages unlimited ads—from static images to JavaScript, HTML, and PHP scripts.
- Targets specific users and pages effortlessly using advanced ad placement features.
- Ensures fair exposure by rotating ads within groups for even display distribution.
- Complies with privacy standards like TCF 2.0 and functions seamlessly on cached sites.
- Seamlessly integrates with Google AdSense Auto ads, Amazon, image banners, HTML, page builders, ad widgets, ad rotations, and ads.txt for comprehensive ad management.
Cons of Advanced Ads
- The free plugin has limited features, prompting a paid upgrade for full access.
- Plugin compatibility issues may arise with AdBlock Plus and other plugins.
- Limited display conditions in the free version might not meet all user requirements.
- Plugin complexity could pose a learning curve, especially for newcomers.
Should You Use Advanced Ads? The Verdict
The Advanced Ads Plugin is a powerful tool for managing advertisements on websites. It offers a range of features that make ad management easier, such as creating and displaying various ad types like banners, videos, or pop-ups. The plugin also allows for precise targeting, showing ads based on specific criteria like user location or device. With its user-friendly interface and detailed analytics, Advanced Ads Plugin helps website owners maximize their ad revenue while maintaining full control and customization over their advertising strategies.
Overall, it’s a versatile and efficient solution for effective ad management on websites. We recommend using it as a solid solution for most WordPress users first starting out.
Looking for more? Check out our list of the best WordPress advertising plugins and other top marketing plugins. You can also explore more of the best overall WordPress plugins you can use to enhance your site.


Leave A Reply