

Email popups are one of the most direct ways to grow your subscriber list. Used well, they catch attention at the right moment, make the offer clear, and get out of the way. Building one that actually looks good and behaves the way you want is the harder part. The popup needs its own design space, the form needs to connect to your email list, the timing needs to feel intentional, and visitors need a clear way to dismiss it.
Divi 5 gives you the tools to build that workflow visually. With Canvases, the updated form modules, Interactions, Design Variables, and form field focus styling, you can create email popups without relying on a separate popup plugin or writing custom JavaScript.
In this tutorial, we’ll look at why email popups work, which Divi 5 features make them possible, and how to build two popup styles from scratch: a centered modal popup and a minimalist corner popup.
- 1 Why Are Email Popups Effective?
- 2 The Divi 5 Tools Behind Building A Popup
- 3 What We’re Building
- 4 Download For Free
-
5
Design 1: Stacked Email Popup
- 5.1 1. Add A New Canvas
- 5.2 2. Style The Overlay Section
- 5.3 3. Build The Popup Card
- 5.4 4. Style The Popup With Design Variables
- 5.5 5. Style The Email Field Focus State
- 5.6 6. Add A Close Button
- 5.7 7. Hide The Popup By Default
- 5.8 8. Wire The Close Interaction
- 5.9 9. Wire The Page Load Interaction
- 6 Design 2: Minimalist Email Popup
- 7 Email Popup Best Practices In Divi 5
- 8 Build A Better Email Popup In Divi 5
Why Are Email Popups Effective?
Popups have a bad reputation, and some of that reputation is earned. A popup that covers the entire screen before someone has read a single line, hides the close button, or interrupts the page without a clear offer creates friction. It makes visitors trust the site less, not more.
That is a design and timing problem, not a format problem. A good email popup appears when the visitor has enough context to care. It presents one clear offer, keeps the form simple, and makes dismissing it obvious.
The reason email capture still matters is simple: an email list is a channel you own more directly than social reach or paid traffic. Social platforms can change distribution overnight, and ads stop the moment the budget stops. A subscriber list gives you a direct line to people who already raised their hand.
That does not mean every popup will perform well. The offer, timing, audience, and site context all matter. But a well-built popup can create a clean path from visitor interest to subscriber growth.
The popup is just the start of that relationship. Build it with care, and the rest of the email funnel has a better foundation.
The Divi 5 Tools Behind Building A Popup
Building an email popup used to mean installing a third-party popup tool or forcing popup content into the main page layout. Divi 5 gives you a cleaner way to handle the structure, form, styling, and behavior directly in the Visual Builder.
The three main pieces are Canvases, form modules, and Interactions.
Canvases
A popup should not have to live inside the normal page structure. If it does, it becomes something you have to work around while editing the page, and the page becomes something you have to work around while editing the popup.
Canvases solve that by giving you separate design spaces inside the Visual Builder. The Main Canvas holds the page content, while additional Canvases can hold popups, off-canvas menus, slide-ins, notices, overlays, and other hidden interface elements.
That separation matters for maintenance. Your email popup gets its own workspace, its own section, and its own modules. You can design and update it without cluttering the page you are building. Use a Global Canvas when the popup should be available across the site. Use a Local Canvas when the popup only belongs to one page or template.
For this tutorial, a Canvas lets us build each popup as its own interface layer, then reveal it with Interactions when the timing is right.
Email Optin And Form Styling
A popup lives or dies on two things: the offer and the form. For most email popups, the Email Optin module is the right starting point because it is built for subscriber capture. It can connect directly to email marketing providers, so new signups can land in the list you choose.
The design side is just as important. Divi 5’s updated form field options make form styling more consistent across form-based modules. Instead of one limited field group, form modules now use more complete design groups for inputs, checkboxes, and radio buttons where they apply.
That gives popup forms the same level of visual care as the rest of the design. You can style input backgrounds, labels, placeholder text, borders, spacing, focus states, buttons, and more.
Focus states are especially useful in a popup. When someone clicks or tabs into the email field, the field can respond visually, confirming that the form is active and ready.
If your site already uses Contact Form 7 for a specific workflow, Divi 5’s Contact Form 7 module can bring those existing forms into the builder and style them visually. But for a standard newsletter or lead magnet popup, the Email Optin module is usually the cleanest choice.
Interactions
Canvases handle where the popup lives. Form modules handle the signup. Interactions handle the behavior. Every Interaction has three parts:
- Trigger Event: What starts the Interaction, such as Load, Click, or Viewport Enter.
- Effect Action: What happens after the trigger, such as Show Element or Hide Element.
- Target Module: The element that receives the effect.
For an email popup, Interactions decide when the popup appears and how it disappears. You can show a popup after a delay, reveal it when someone scrolls to a specific section, or hide it when they click the close icon. You can also stack Interactions when needed. For example, a close icon can hide the popup and, in a more advanced setup, write a cookie so the popup does not show again after the visitor dismisses it.
For this tutorial, we’ll use Interactions to reveal each popup at the right moment and close it on click.
What We’re Building
We’ll recreate two layouts inspired by our free Divi 5 email popup pack.
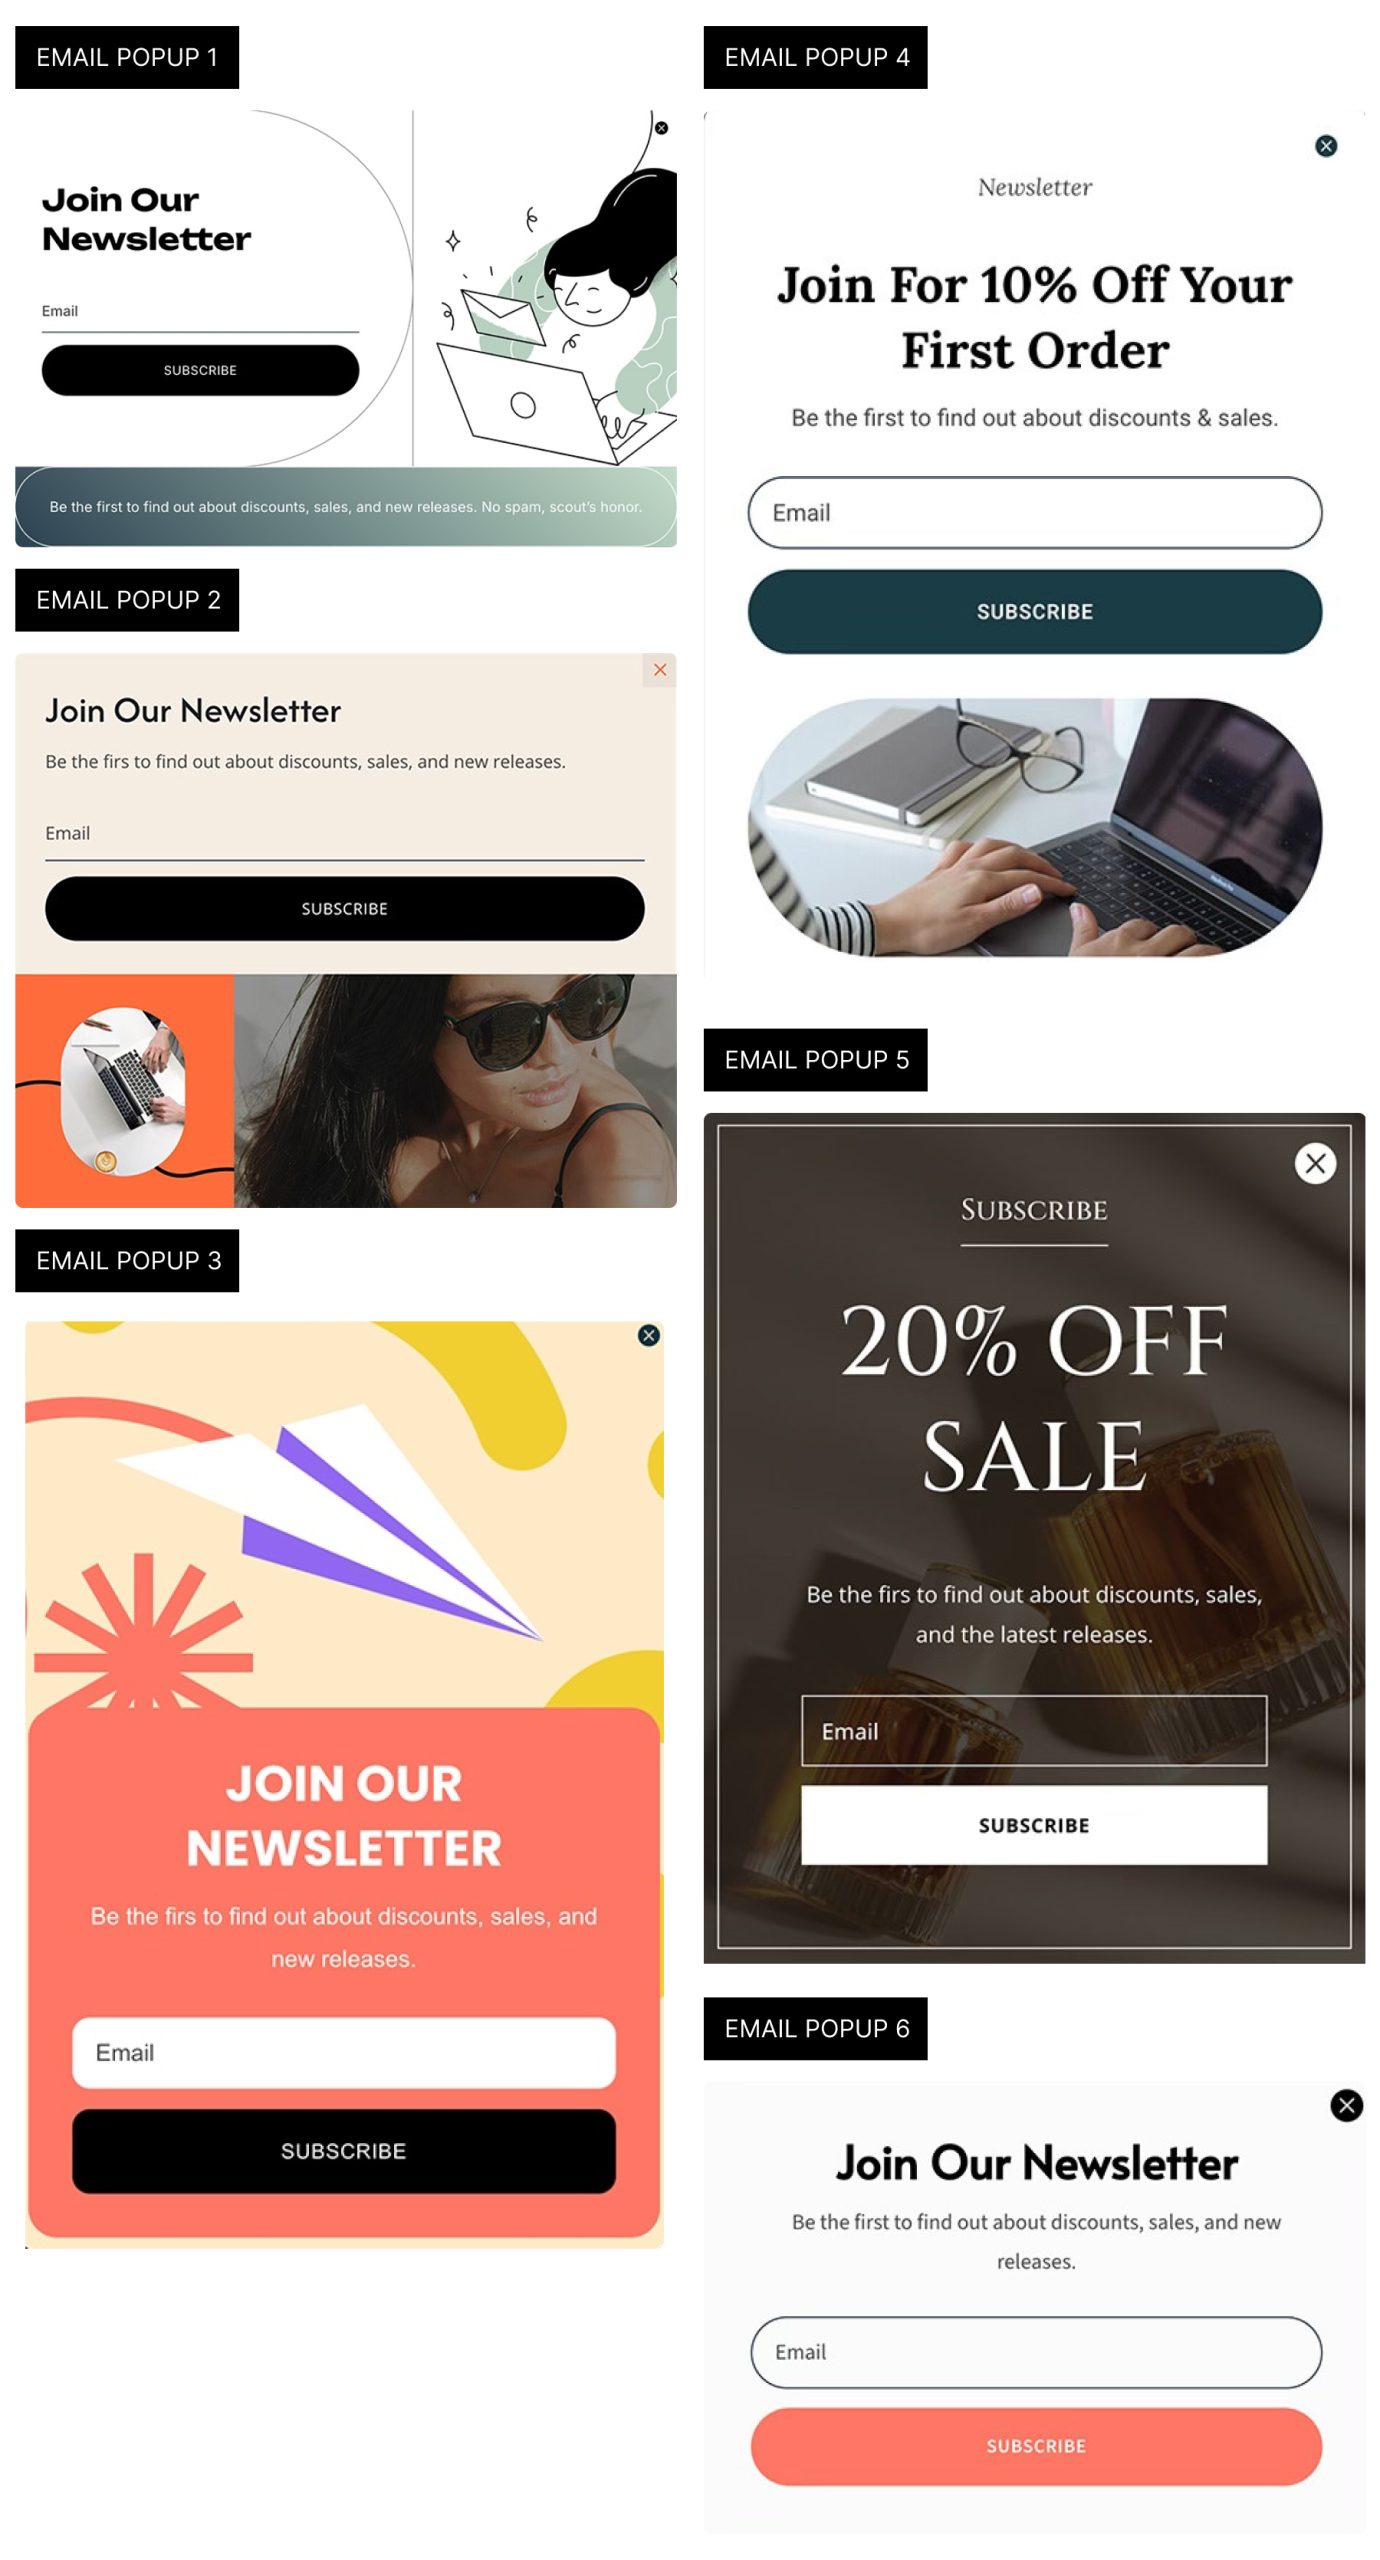
The first design is a centered modal popup. It uses a dark full-screen overlay, a compact signup card, an offer headline, an Email Optin form, a product image, and a close icon. It appears after a short page-load delay. The second design is a minimalist corner popup. It sits in the bottom-right of the screen without an overlay, uses a lighter footprint, and appears when the visitor reaches a specific section of the page.
Both use the same general pattern: build the popup in a Canvas, hide it by default, show it with an Interaction, and close it with another Interaction.

Design 1: Stacked Email Popup
The first layout leads with a bold discount offer, stacks the signup form underneath, and closes with a product image below the form. This design works as a centered modal with a dark overlay behind it. The overlay dims the page, the popup card becomes the clear focus, and the close icon sits in the top-right corner so visitors always have an obvious way out.
1. Add A New Canvas
Open the Visual Builder and find the Canvas dropdown at the top of the interface. It should currently show Main Canvas.
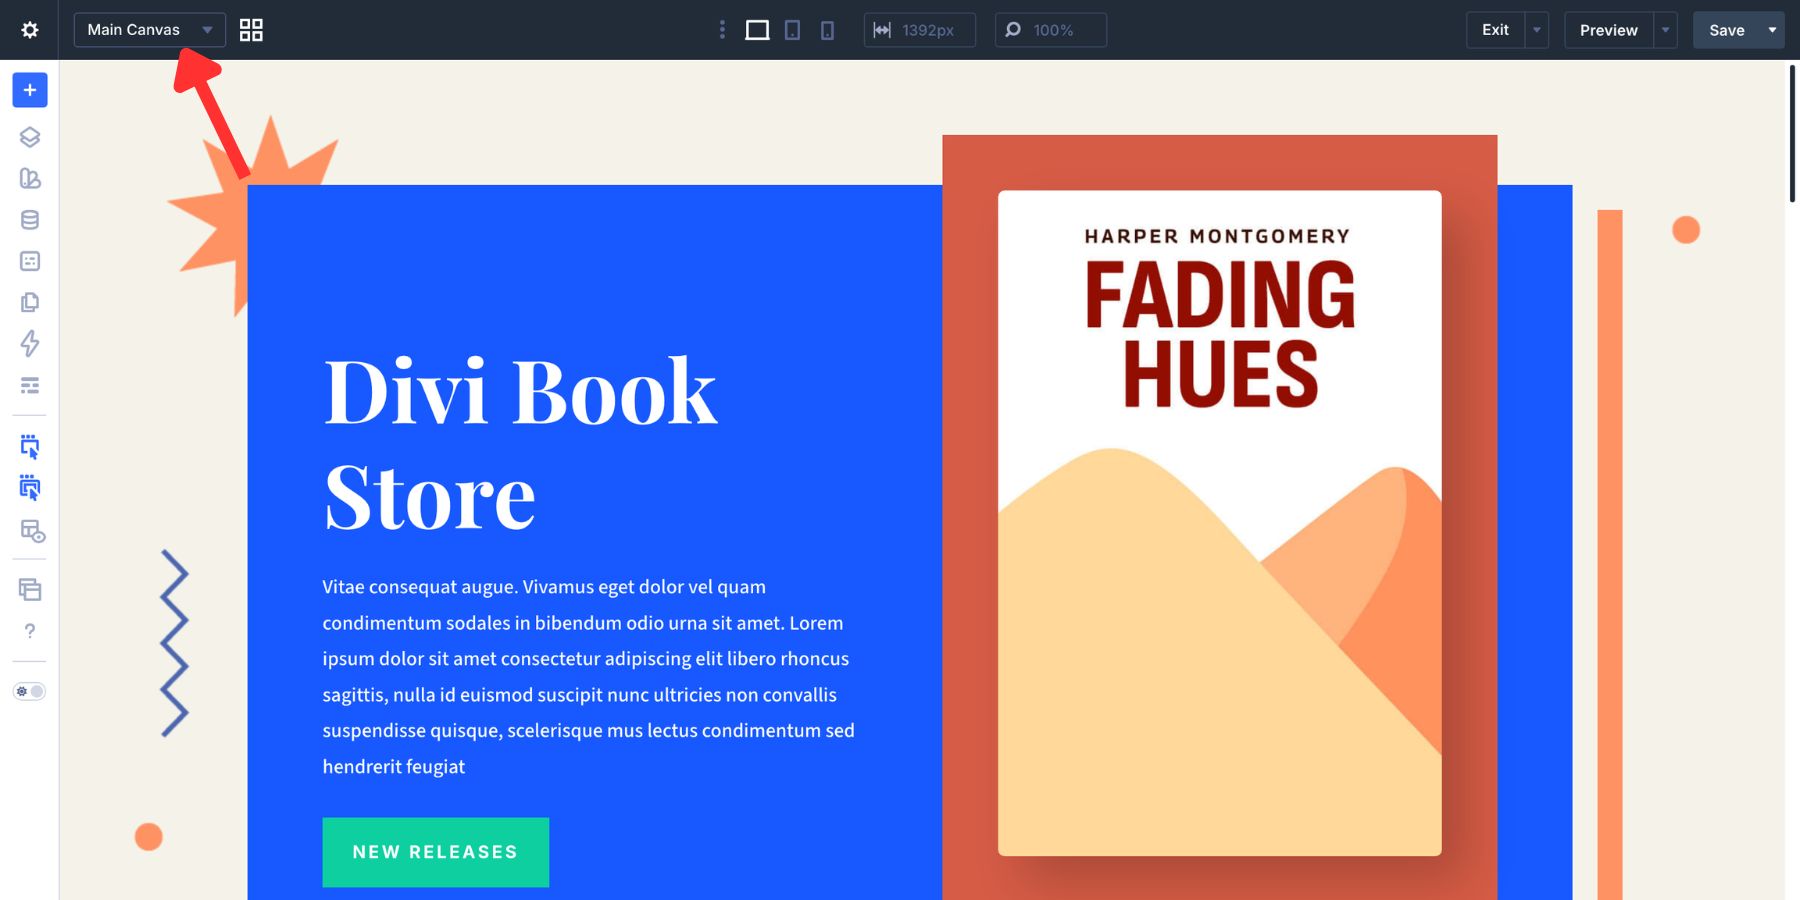
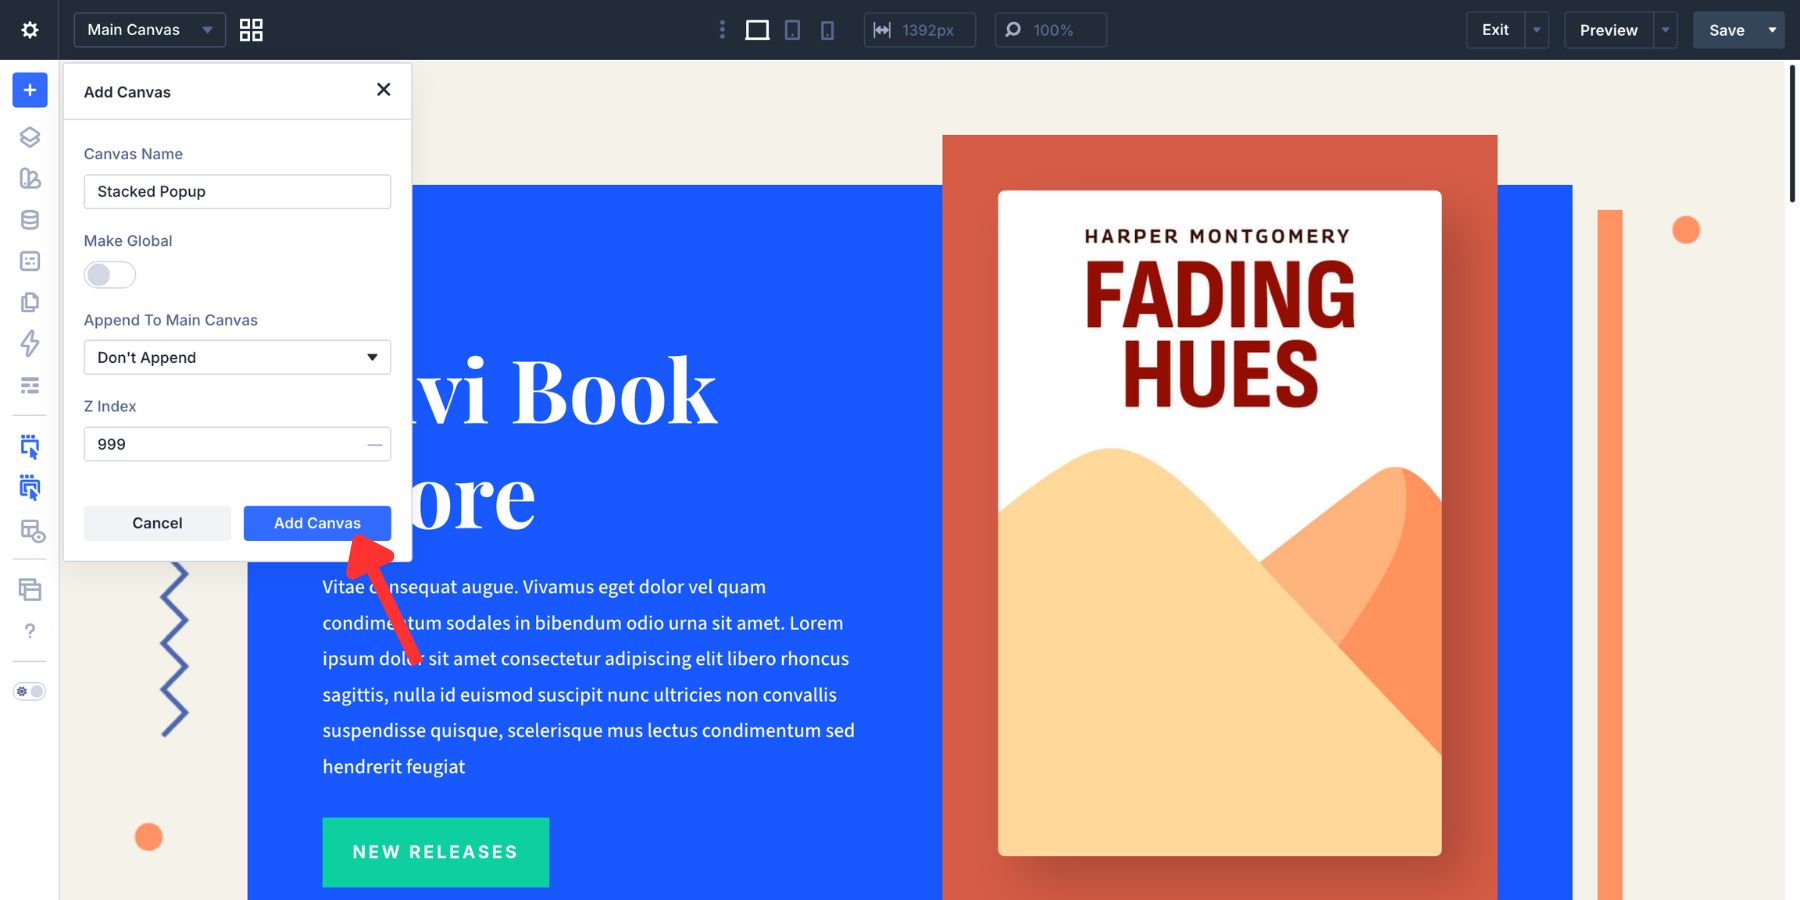
Select Add New Canvas. In the dialog that appears, give the Canvas a clear name, such as Stacked Popup. A descriptive name matters because you will need to target this popup later when setting up Interactions.
Set the Z Index to 999, then click Add Canvas. Divi opens the new Canvas as a separate workspace with a blank section ready to style.
2. Style The Overlay Section
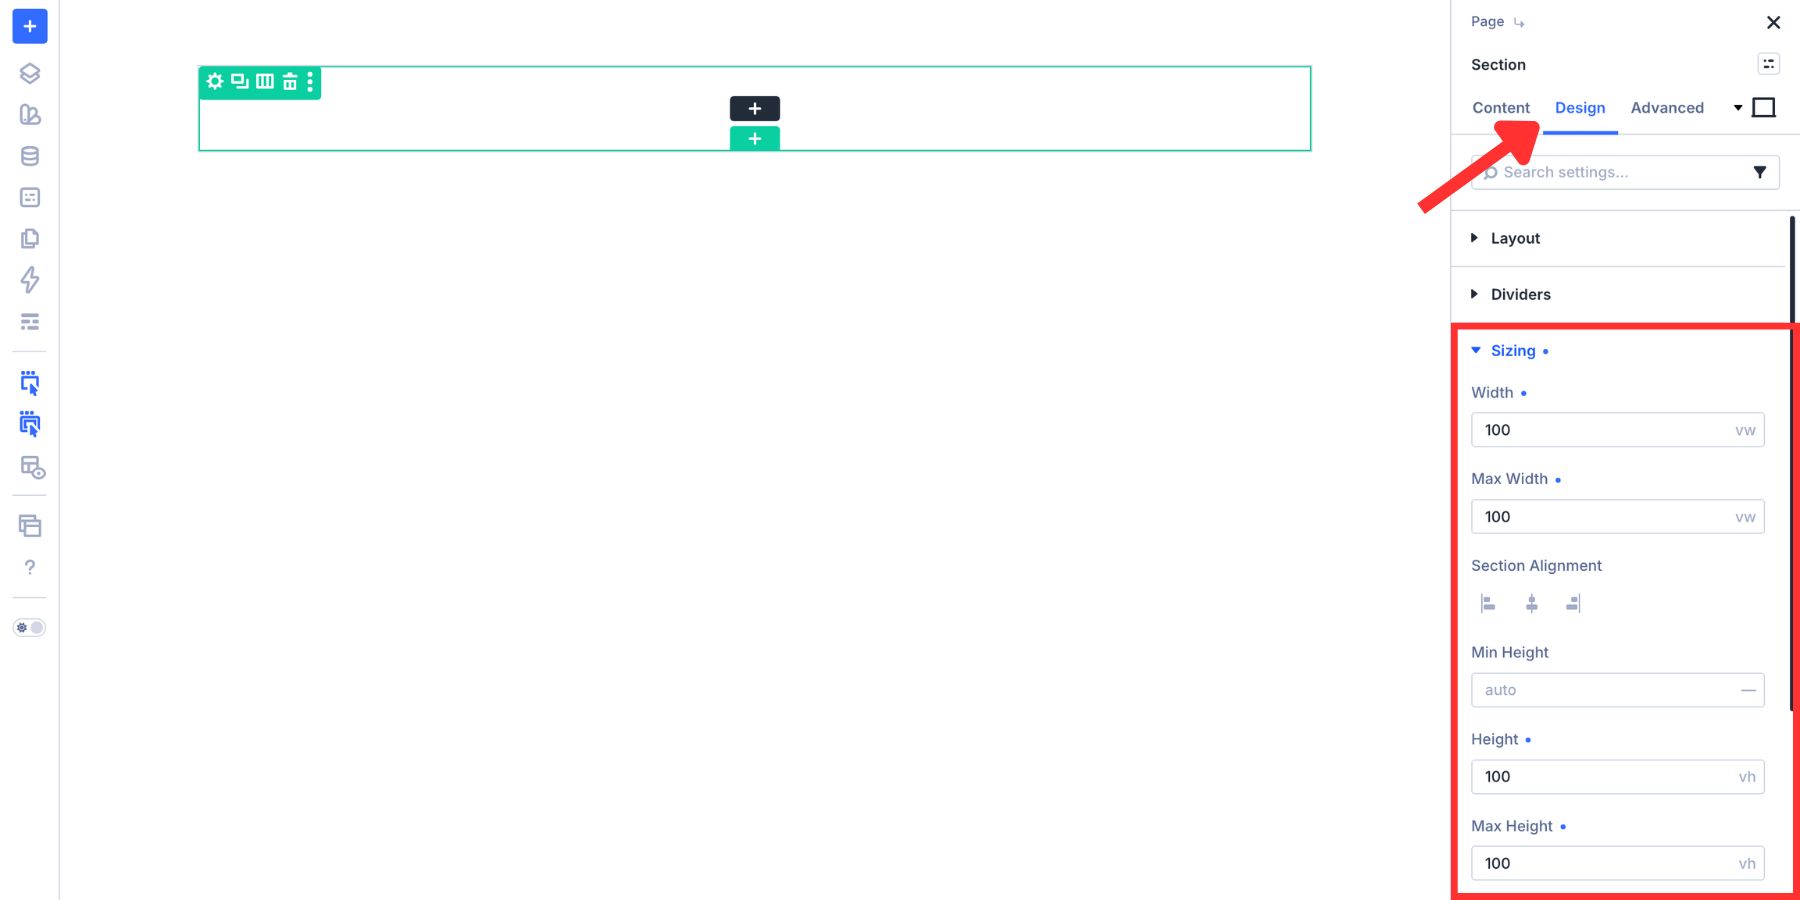
The section inside this Canvas becomes the full-screen overlay. Open the section settings and go to the Design tab. Set the minimum height to 100vh and the width to 100vw. This lets the section cover the full viewport.
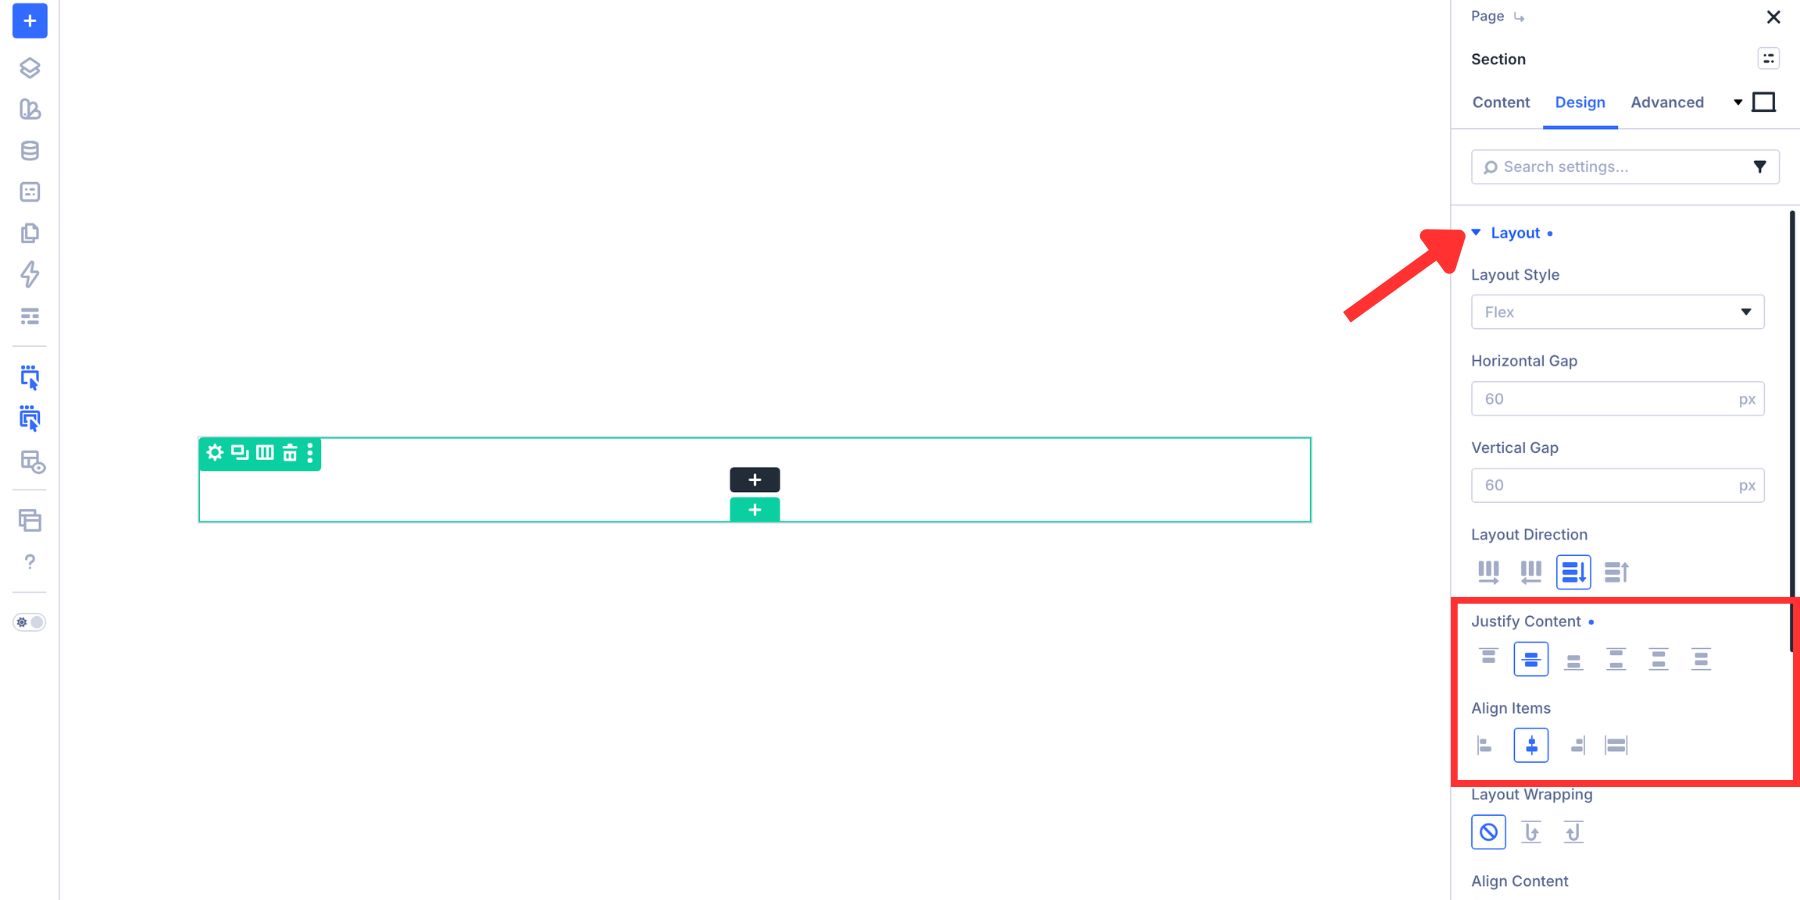
Next, use the section’s layout settings to center the popup card. Set Justify and Align Content to Center.
Now add the overlay background. Go to Content > Background and set a dark background color, such as #000000, with around 30% opacity.
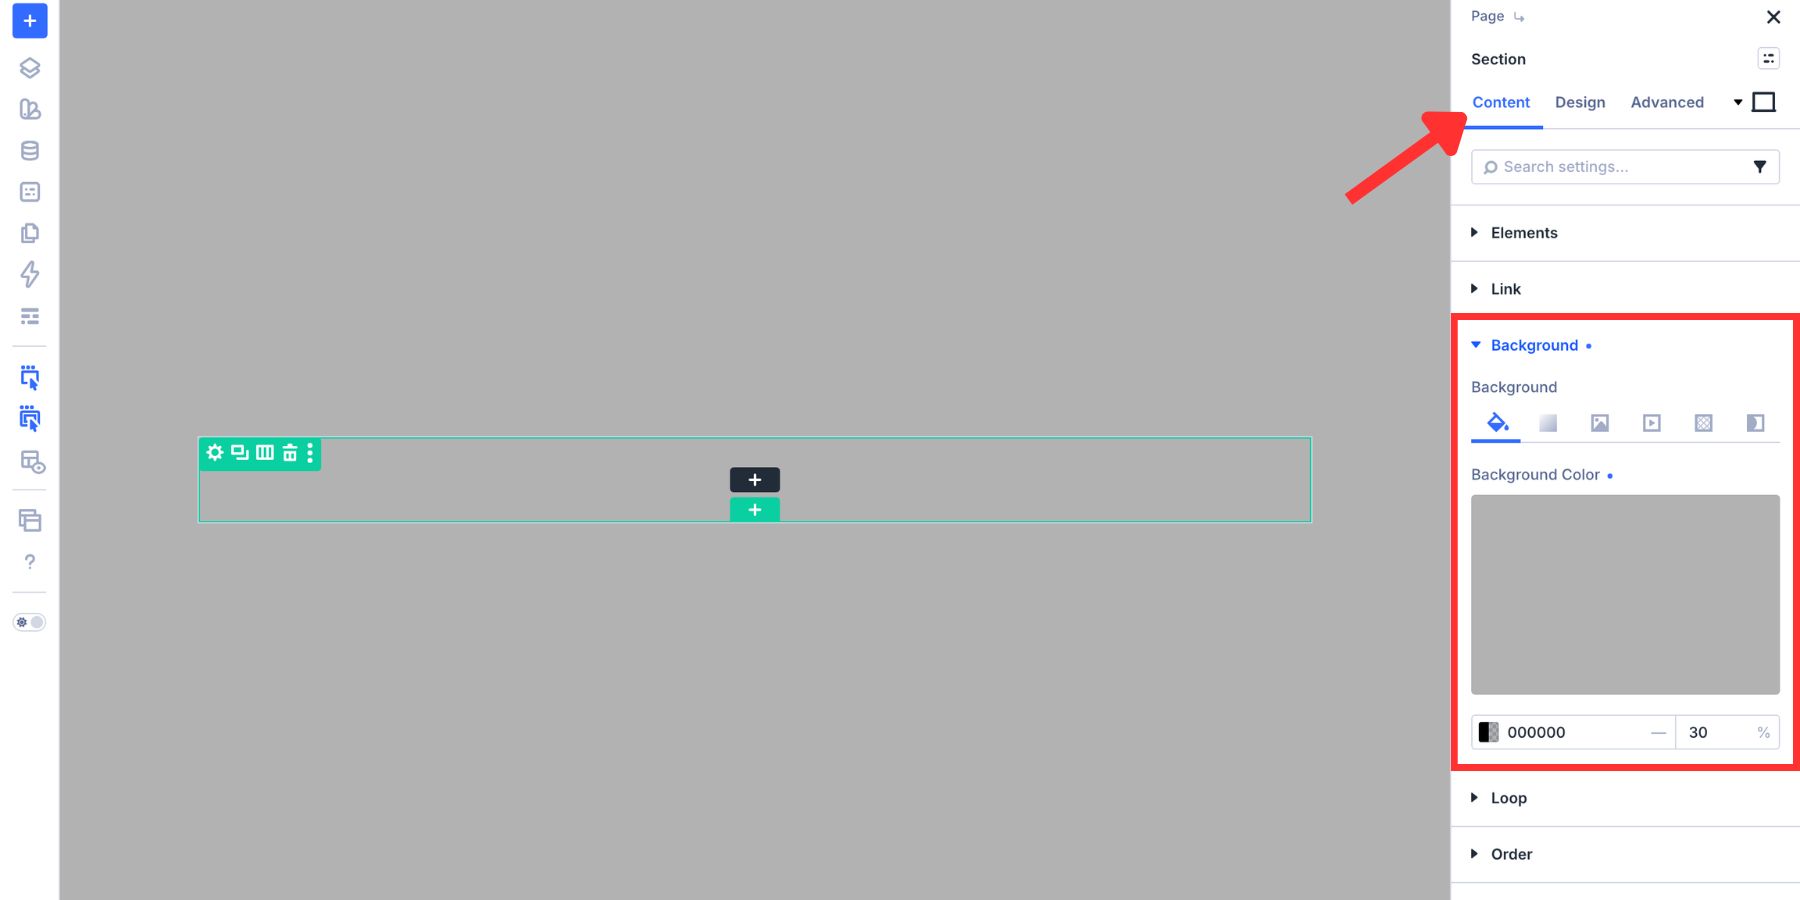
The overlay should be dark enough to push attention toward the popup, but not so dark that visitors feel trapped. The page behind it can still be visible, but the card should clearly own the moment. Open the section’s Meta option group and add a clear element label, such as Popup Section. This label will make it easier to find the section when choosing the Interaction target.
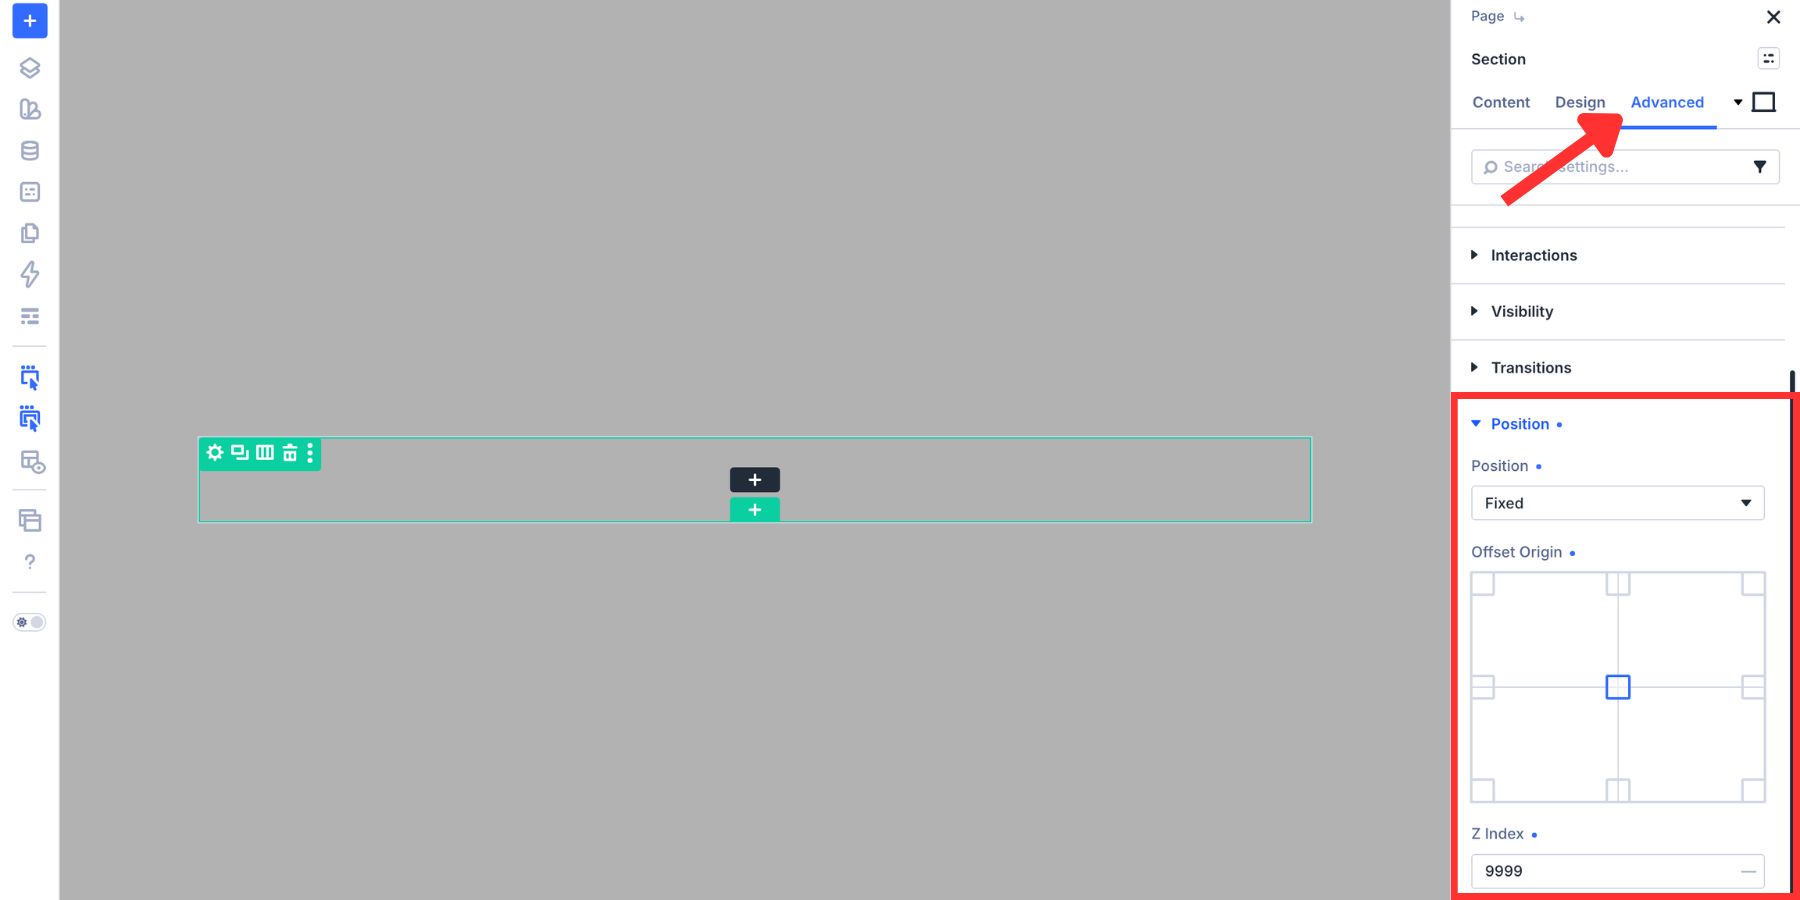
Finally, go to Advanced > Position. Set Position to Fixed, set Offset Origin to Center, and use a high Z Index, such as 9999, so the popup appears above the rest of the page.
3. Build The Popup Card
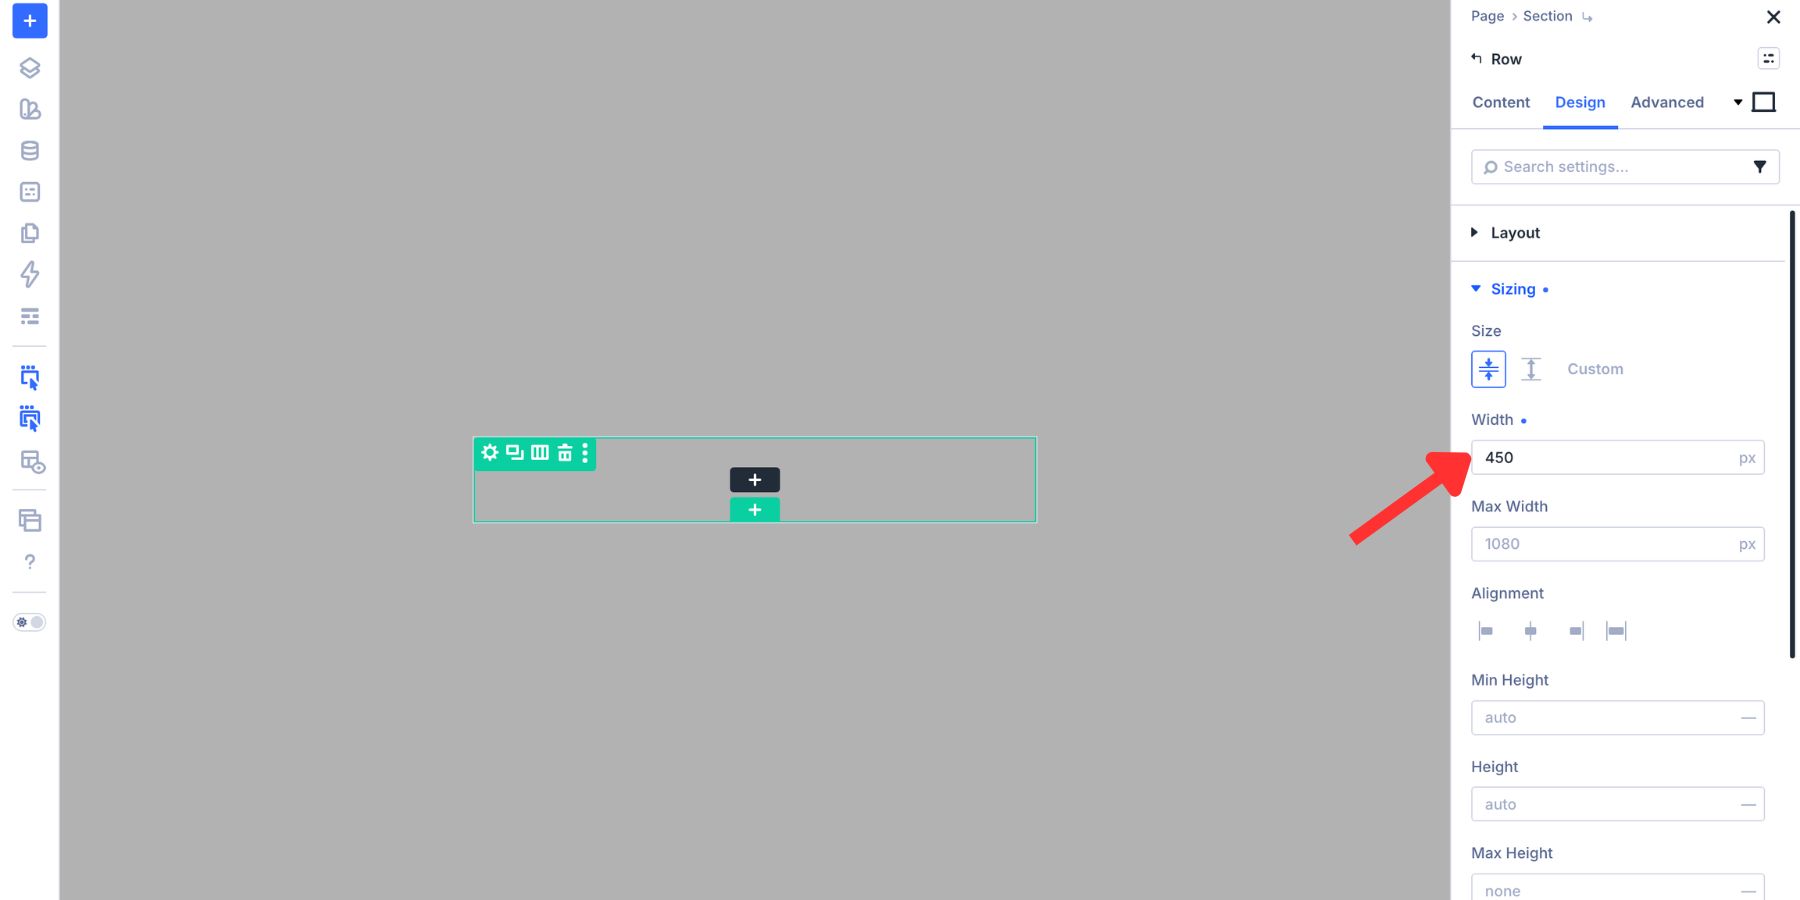
The popup card sits inside the overlay section as a row. Add a single-column row and style it as the visible card. A light background gives the card its own visual plane against the dark overlay. Set the row width to 450px so it reads as a compact popup rather than a full layout.
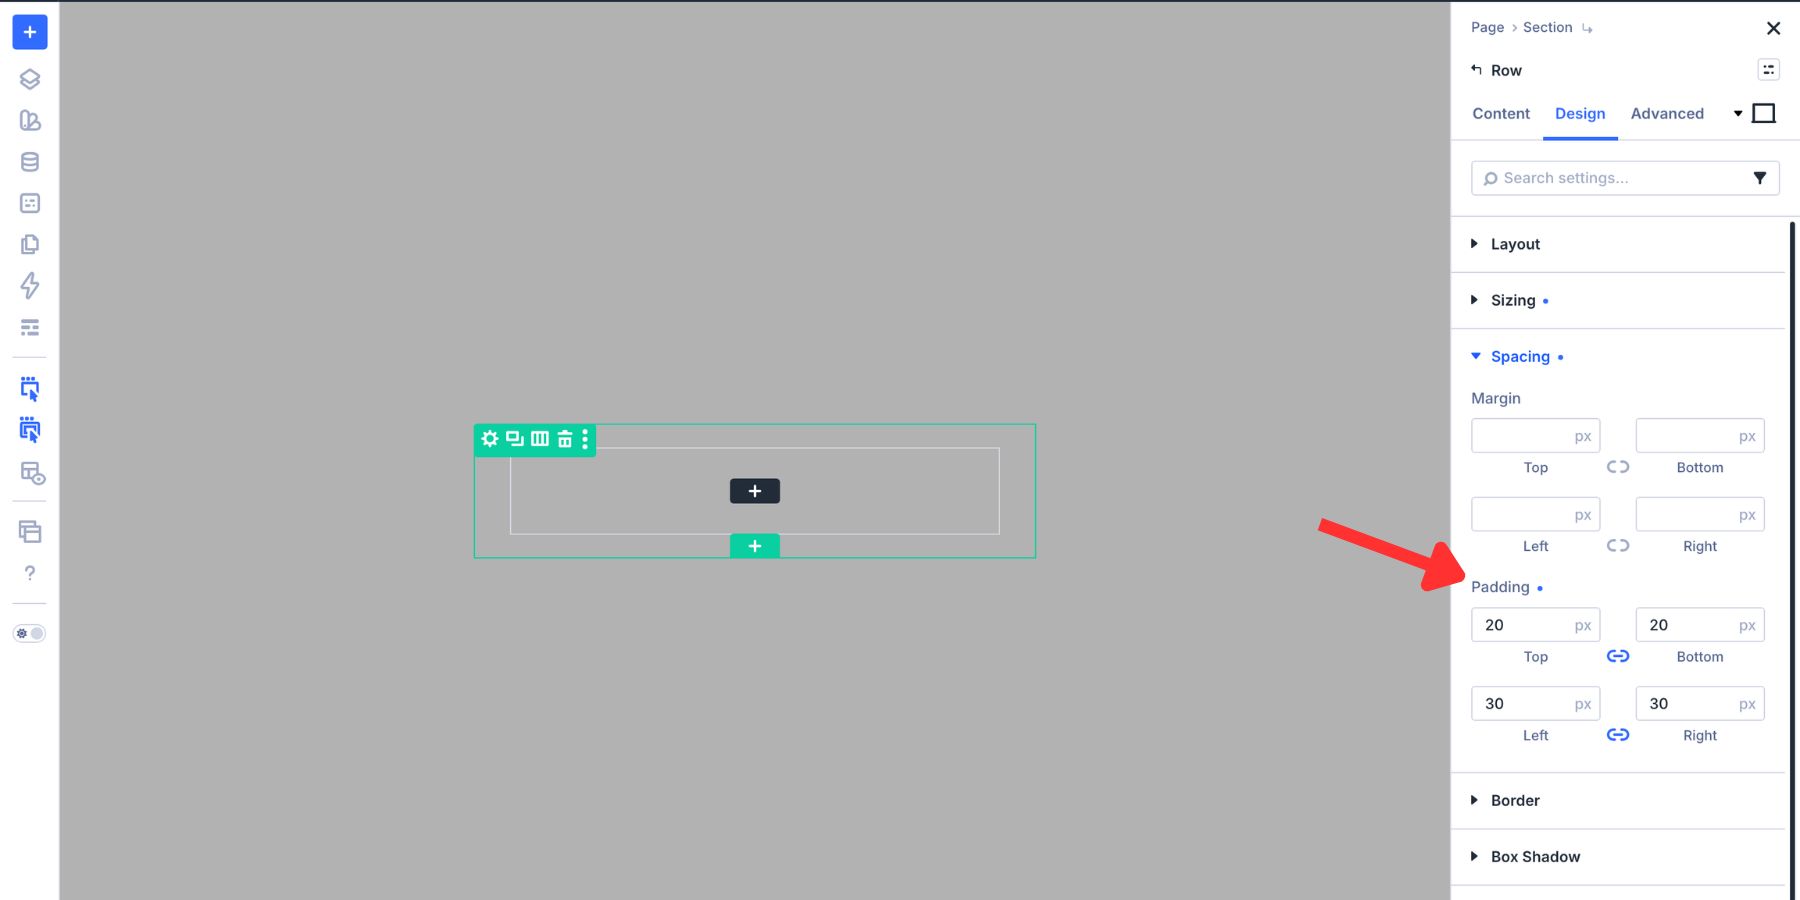
Add padding of 20px on the top and bottom and 30px on the left and right.
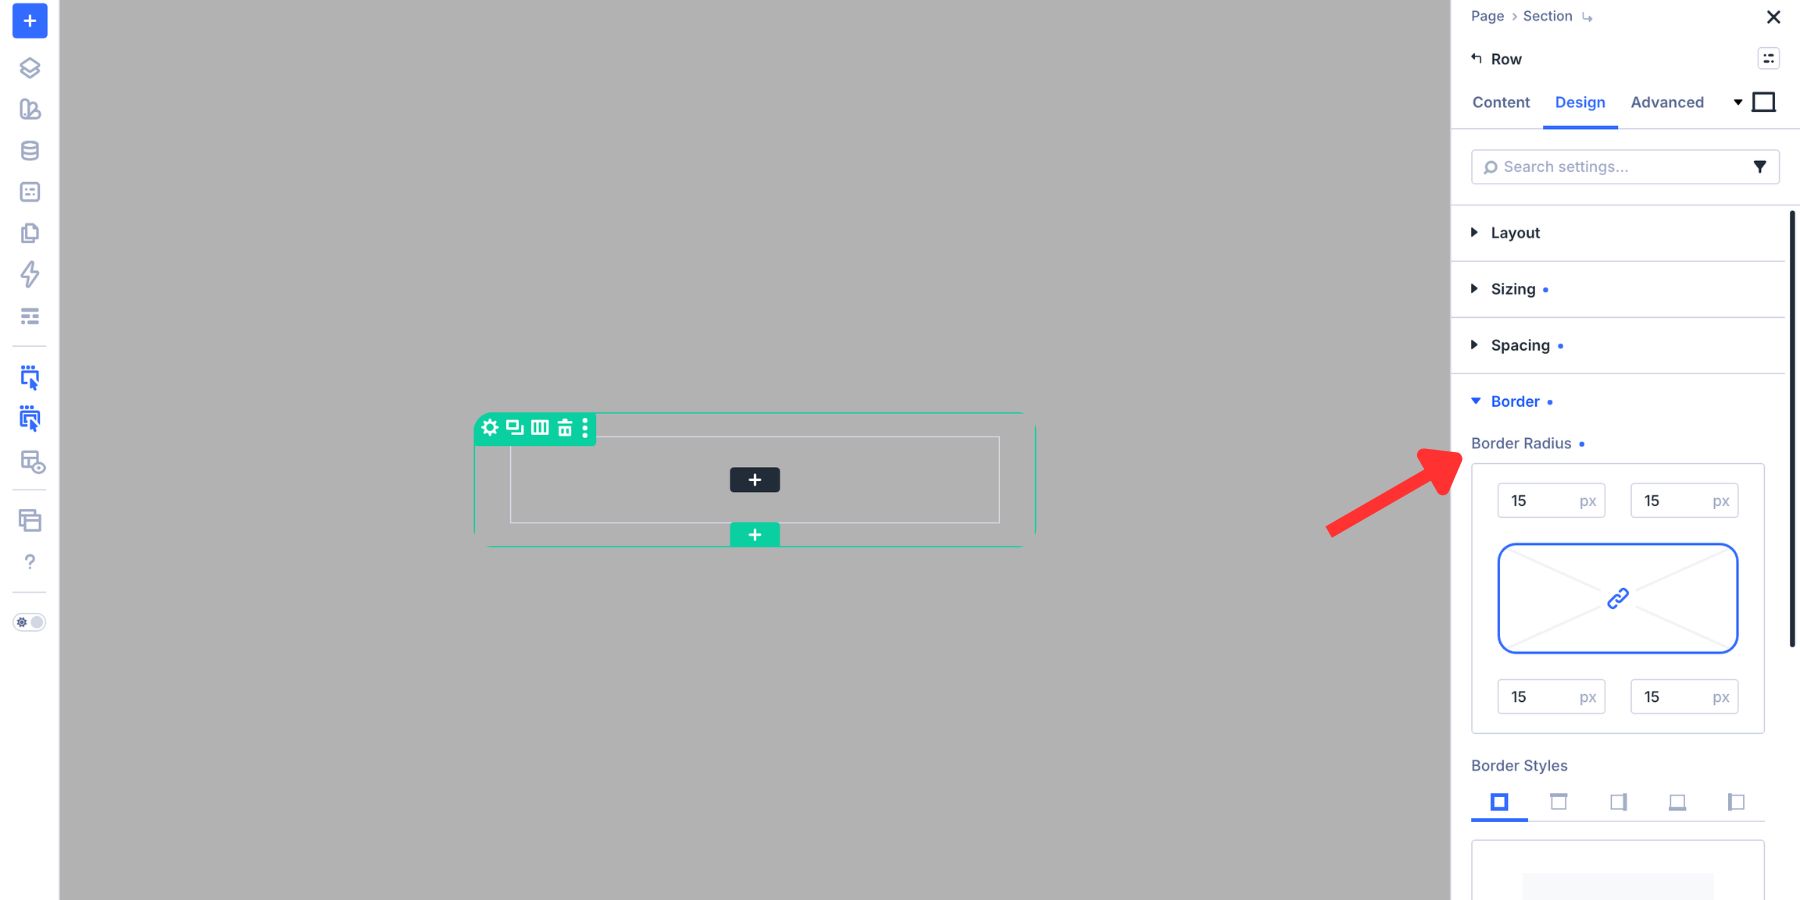
Set the row border radius to 15px so the card feels softer and more modern.
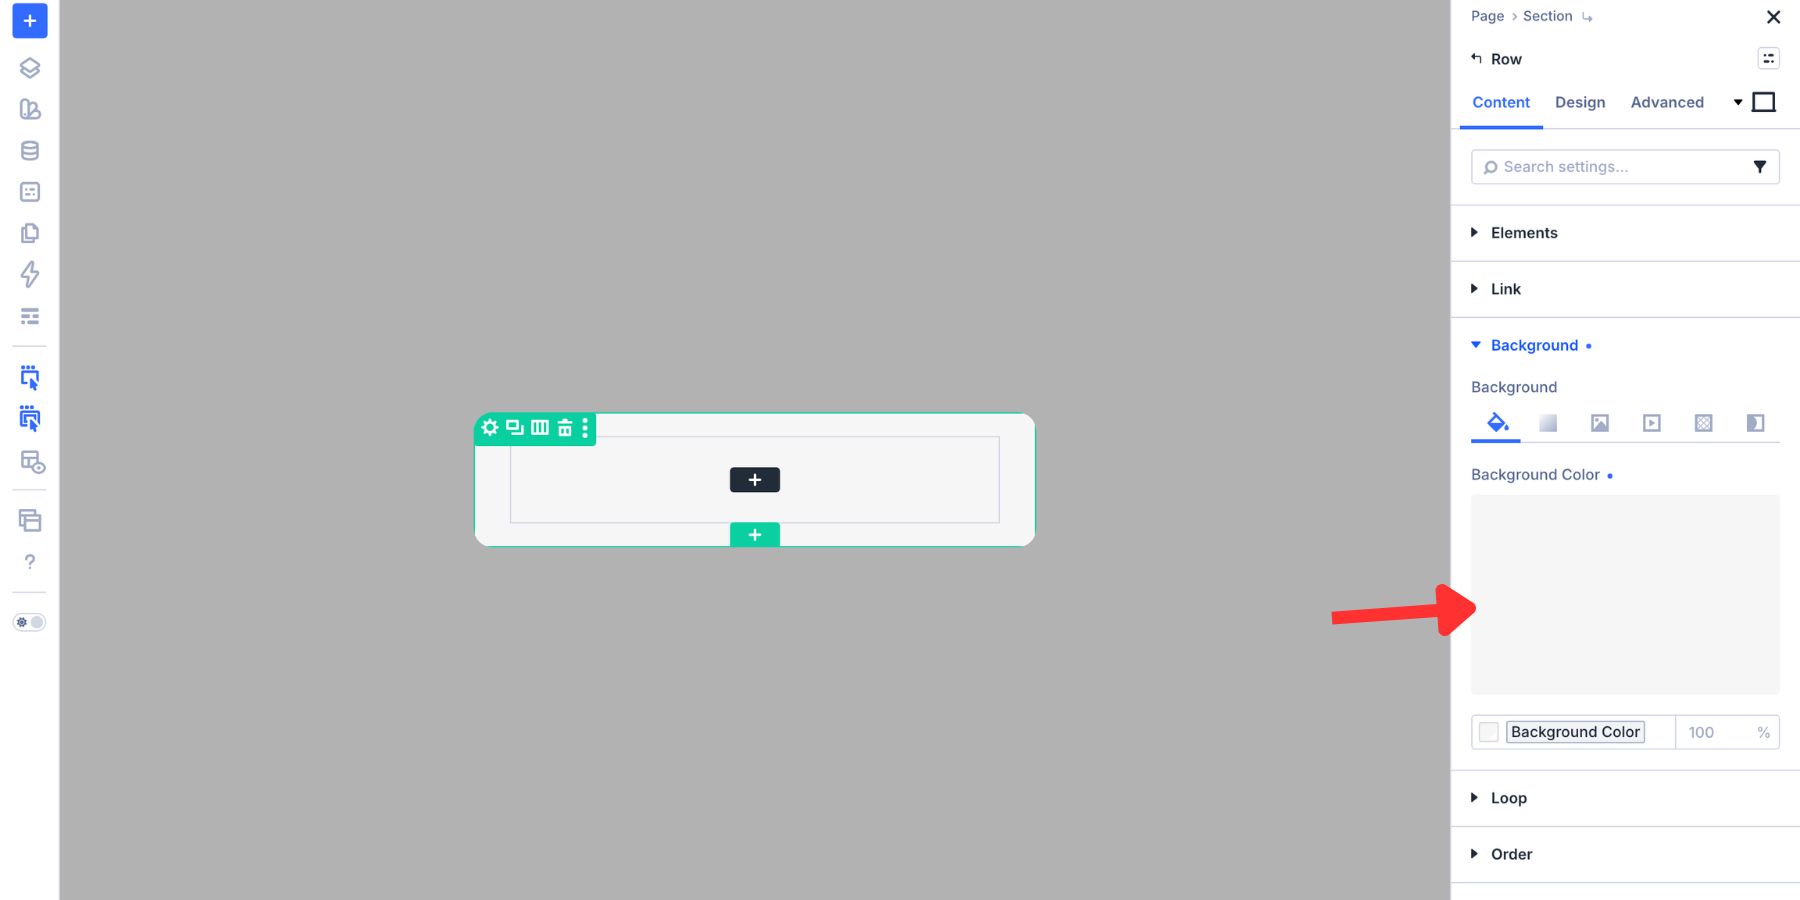
Then add a background color to the row.
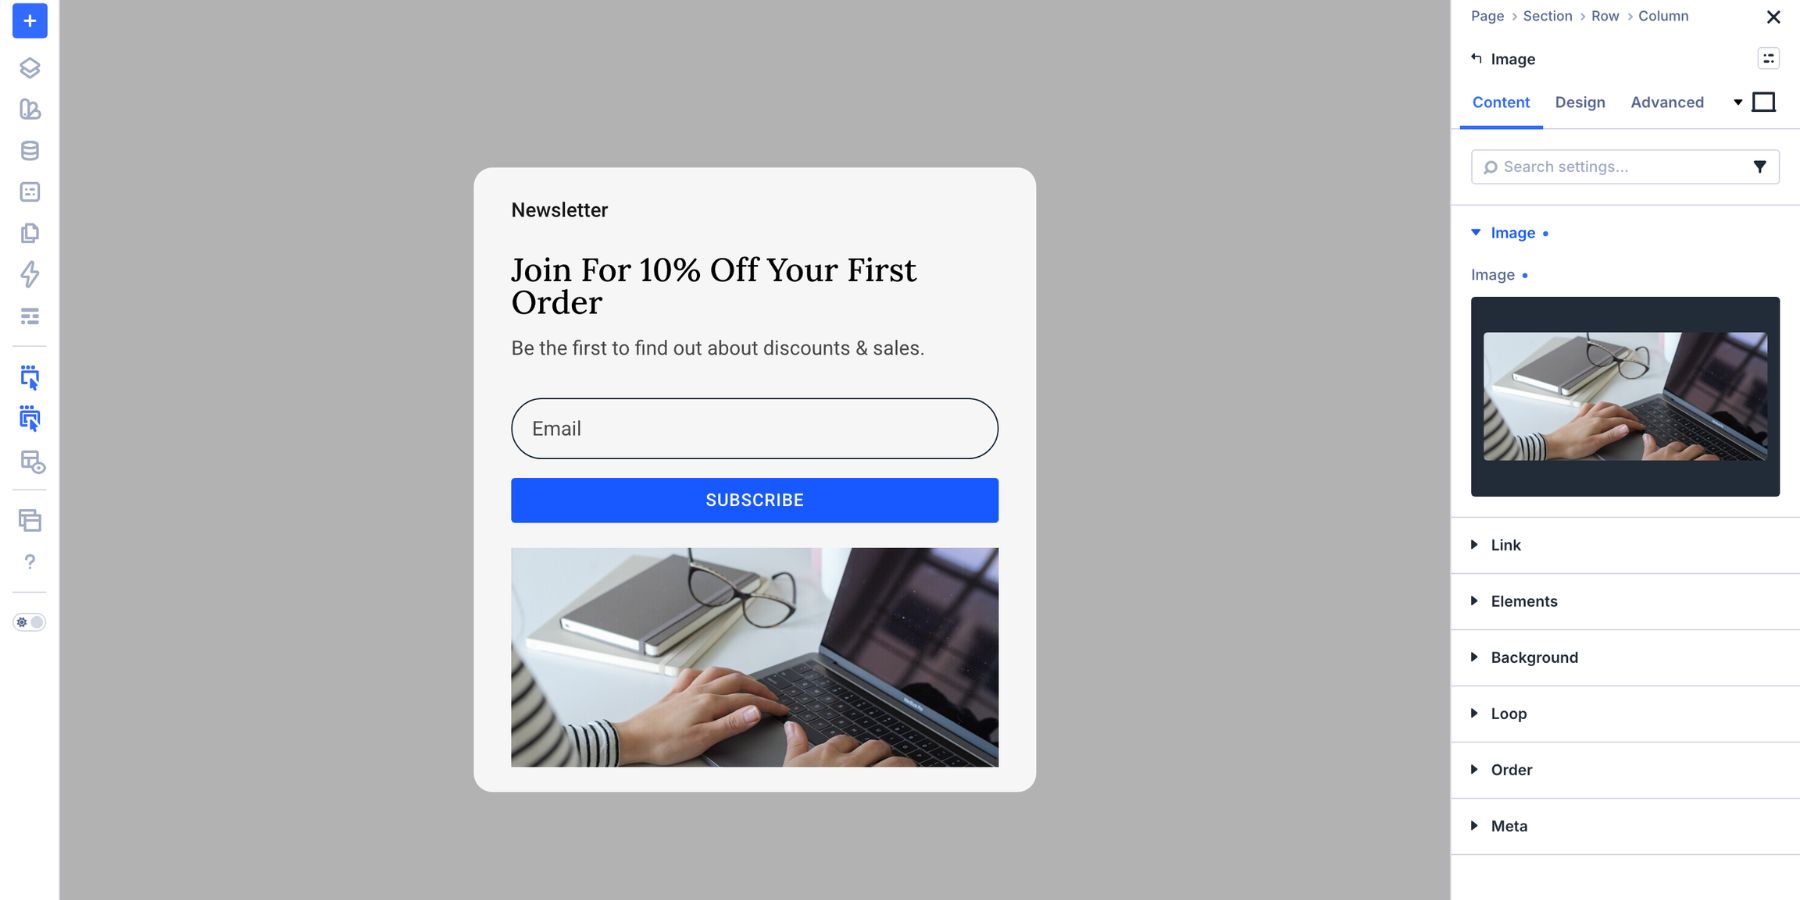
Inside the row, add three main modules:
- A Heading module for the offer.
- An Email Optin module for the signup form.
- An Image module for the product visual.
That order matters. The visitor sees the offer first, then the action, then the product visual that supports the offer.
4. Style The Popup With Design Variables
A popup should feel like part of the site, not something pasted on top of it. Design Variables help with that. Use the Variable Manager to pull from the same colors, spacing values, border radius values, and typography choices used across the rest of the site. That keeps the popup connected to your design system.
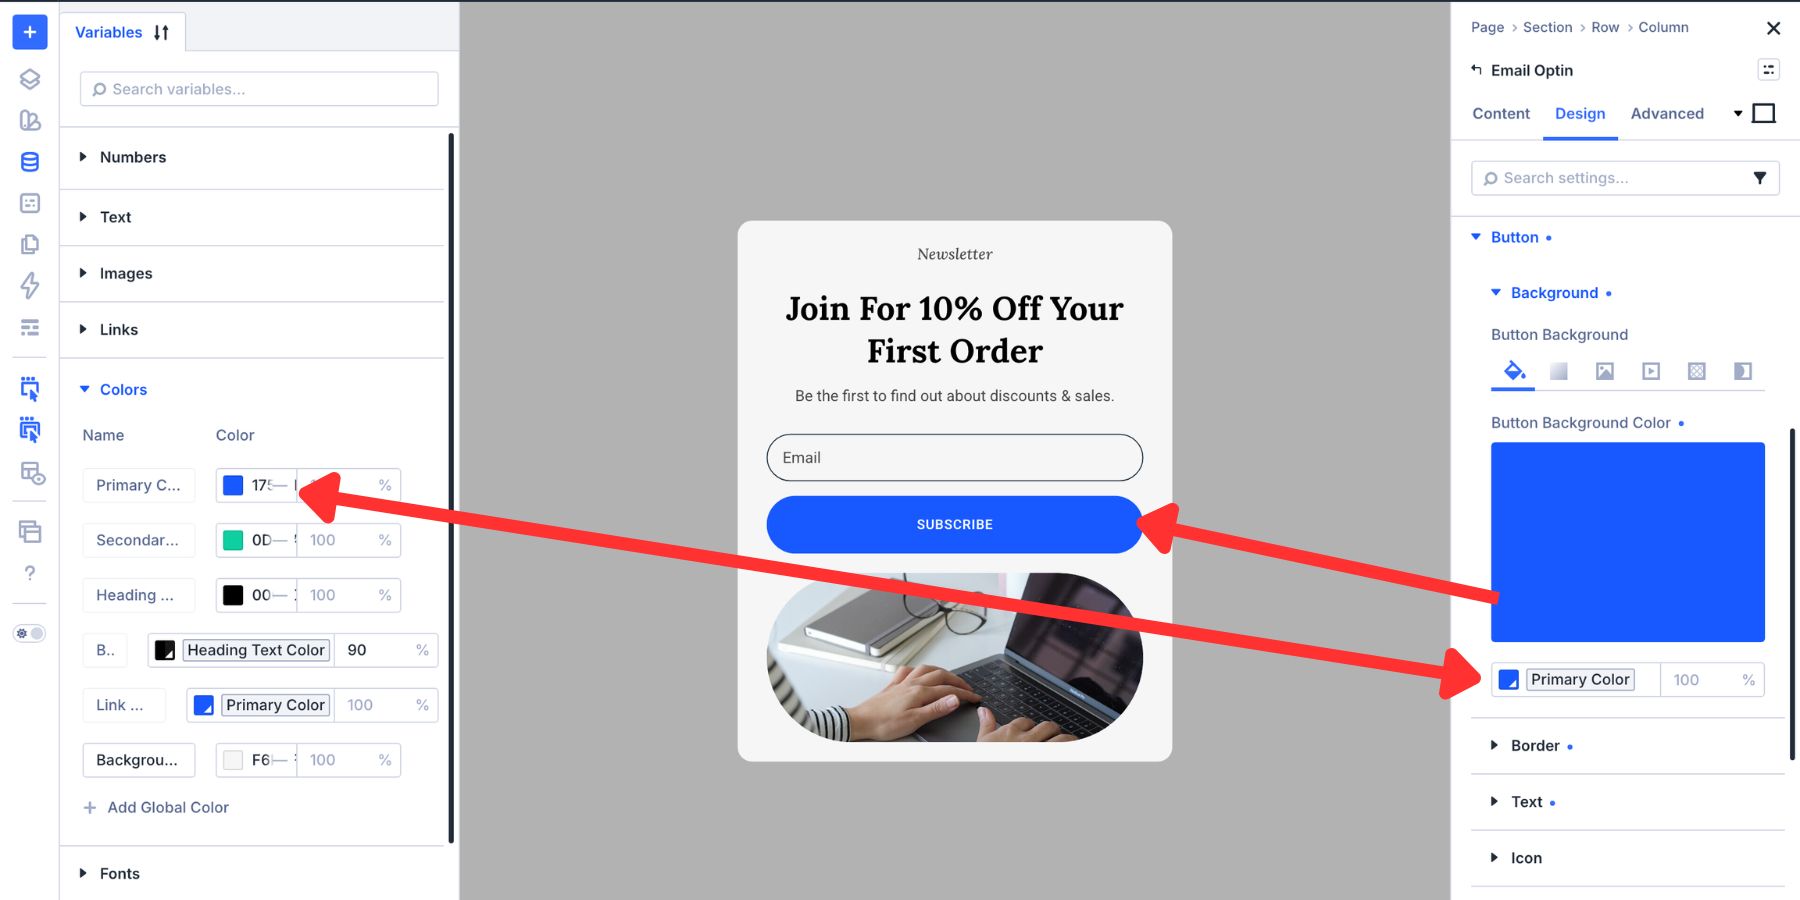
For example, use color variables for the button and accent colors, number variables for spacing and radius, and font variables for the headline and form text.
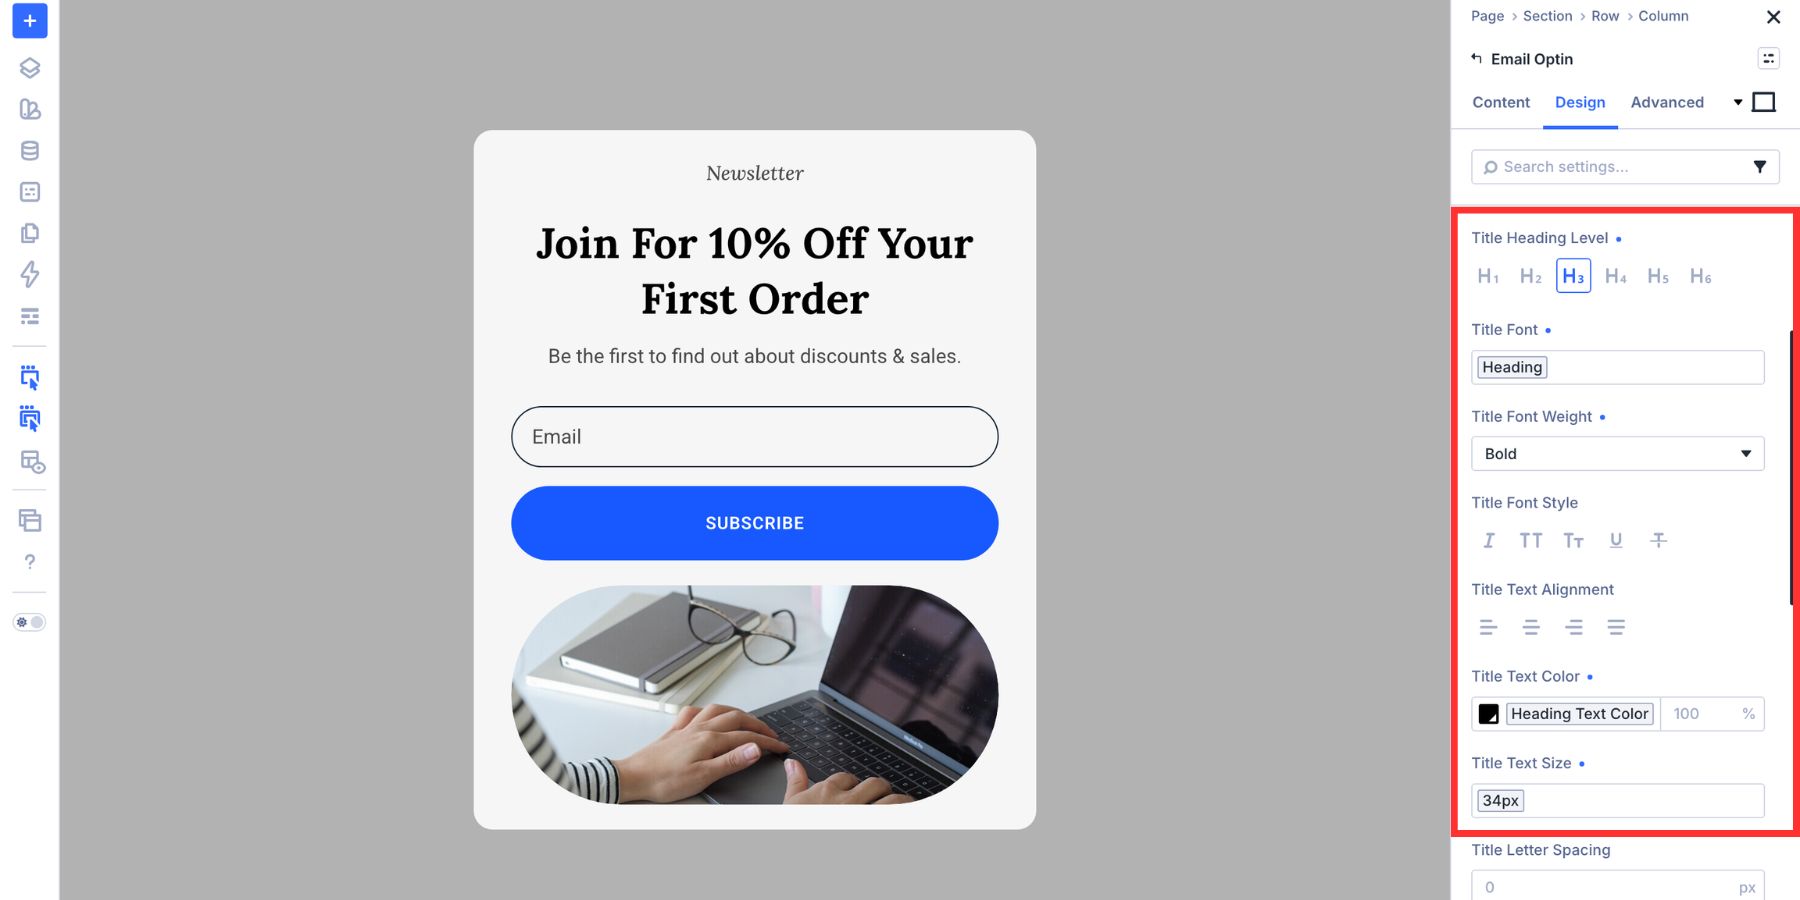
This makes future updates easier. If the brand color, radius, spacing, or typography changes later, the popup can follow the same system as the rest of the site.
5. Style The Email Field Focus State
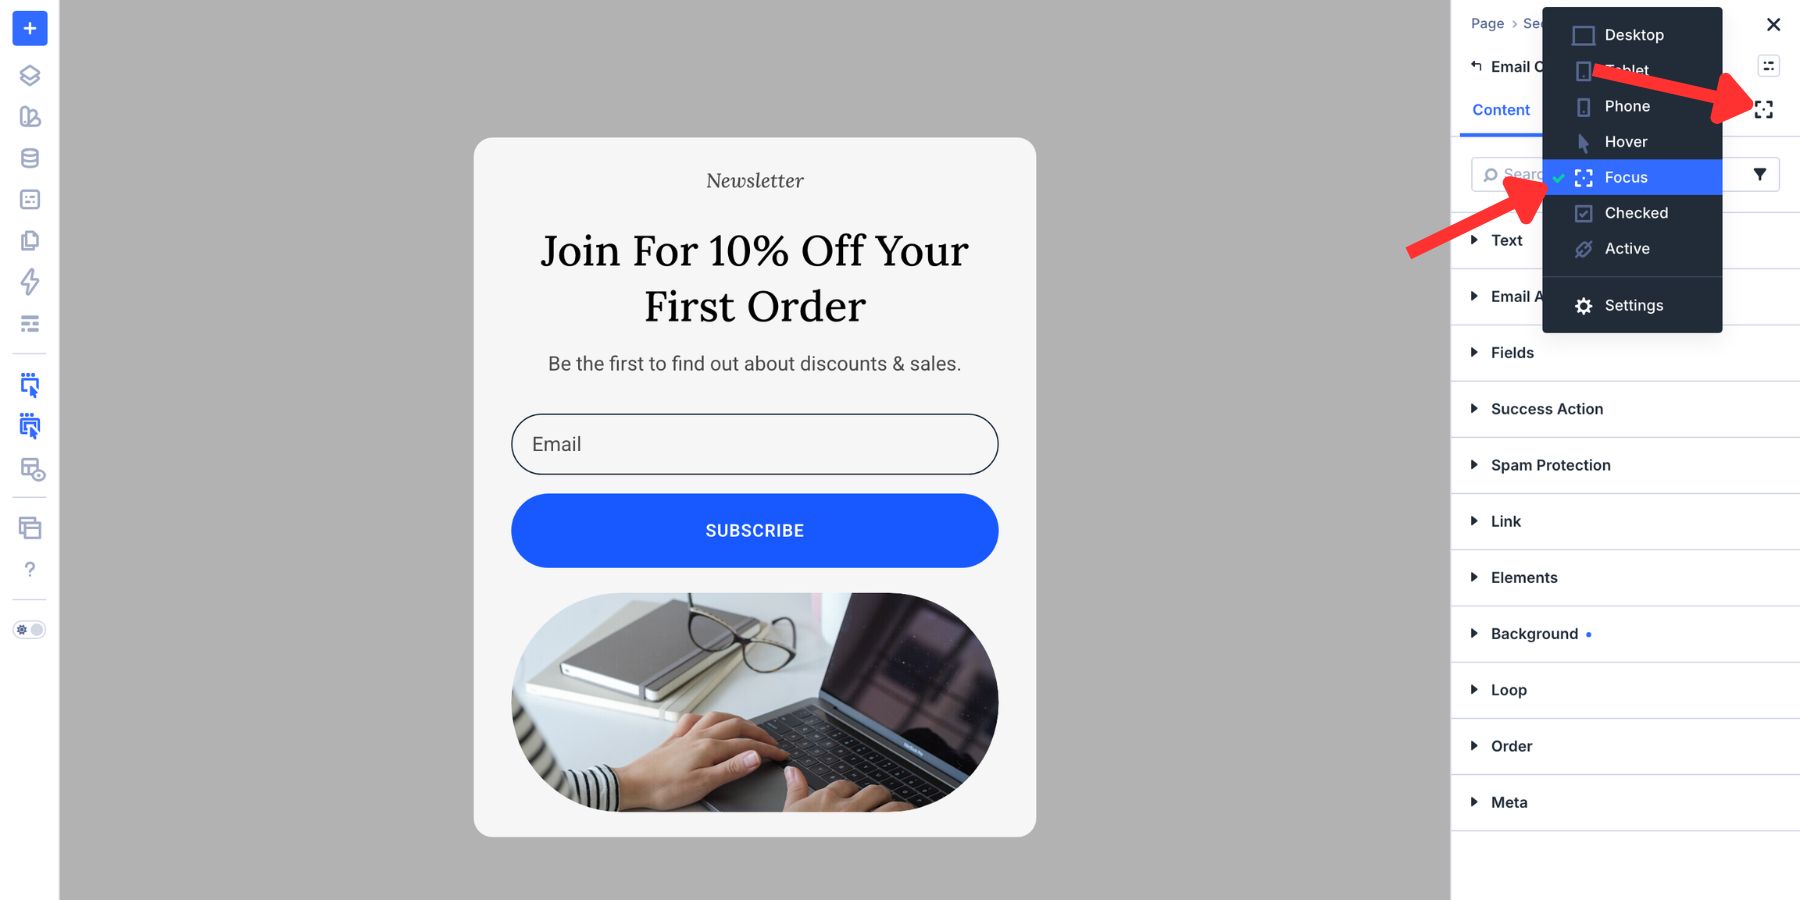
The form is the reason the popup exists, so its interaction state matters. The focus state controls how the email field looks when someone clicks, taps, or tabs into it. Without styling, the browser’s default focus treatment may not match the popup design. With Divi 5’s focus editing, you can style that active state visually.
Open the Email Optin module settings and find the field styling group. Use the state selector at the top of the group header to switch from Default to Focus.
If you do not already have brand tints and shades available, the Variable Generator can help. Open the Variable Manager, hover over the Colors group, click the palette icon, and generate tints, shades, and transparency variants from your brand colors.
In the Focus state, add a subtle brand tint to the active field background.
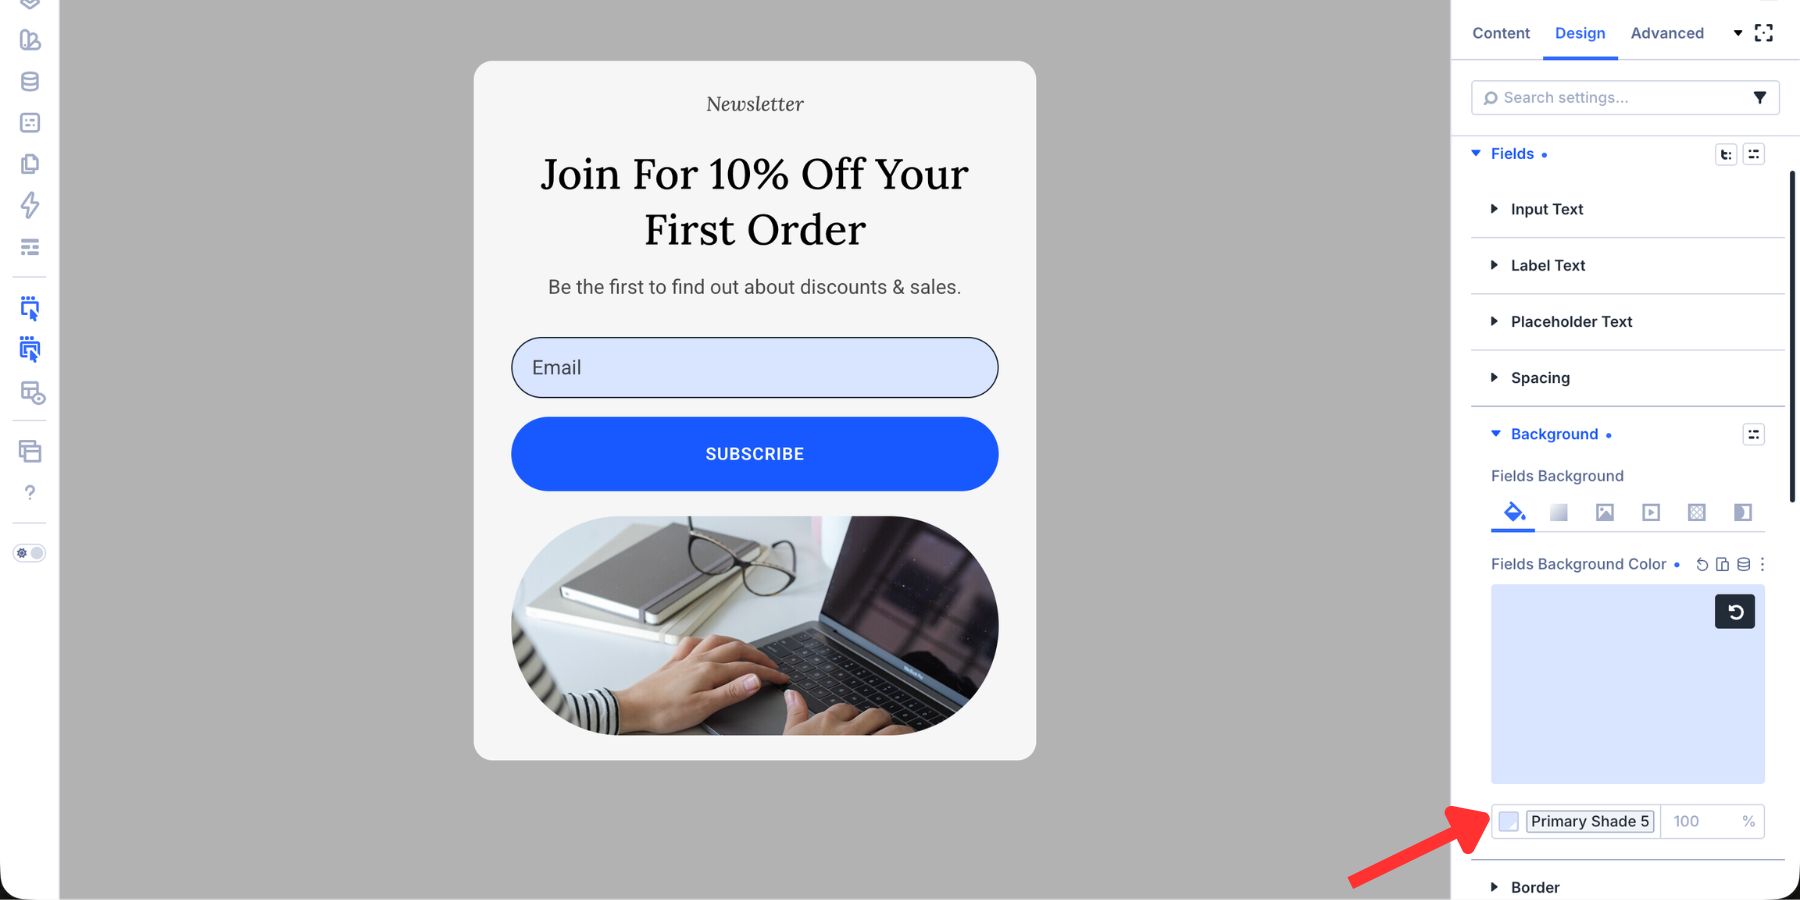
Then style the border for extra confirmation.
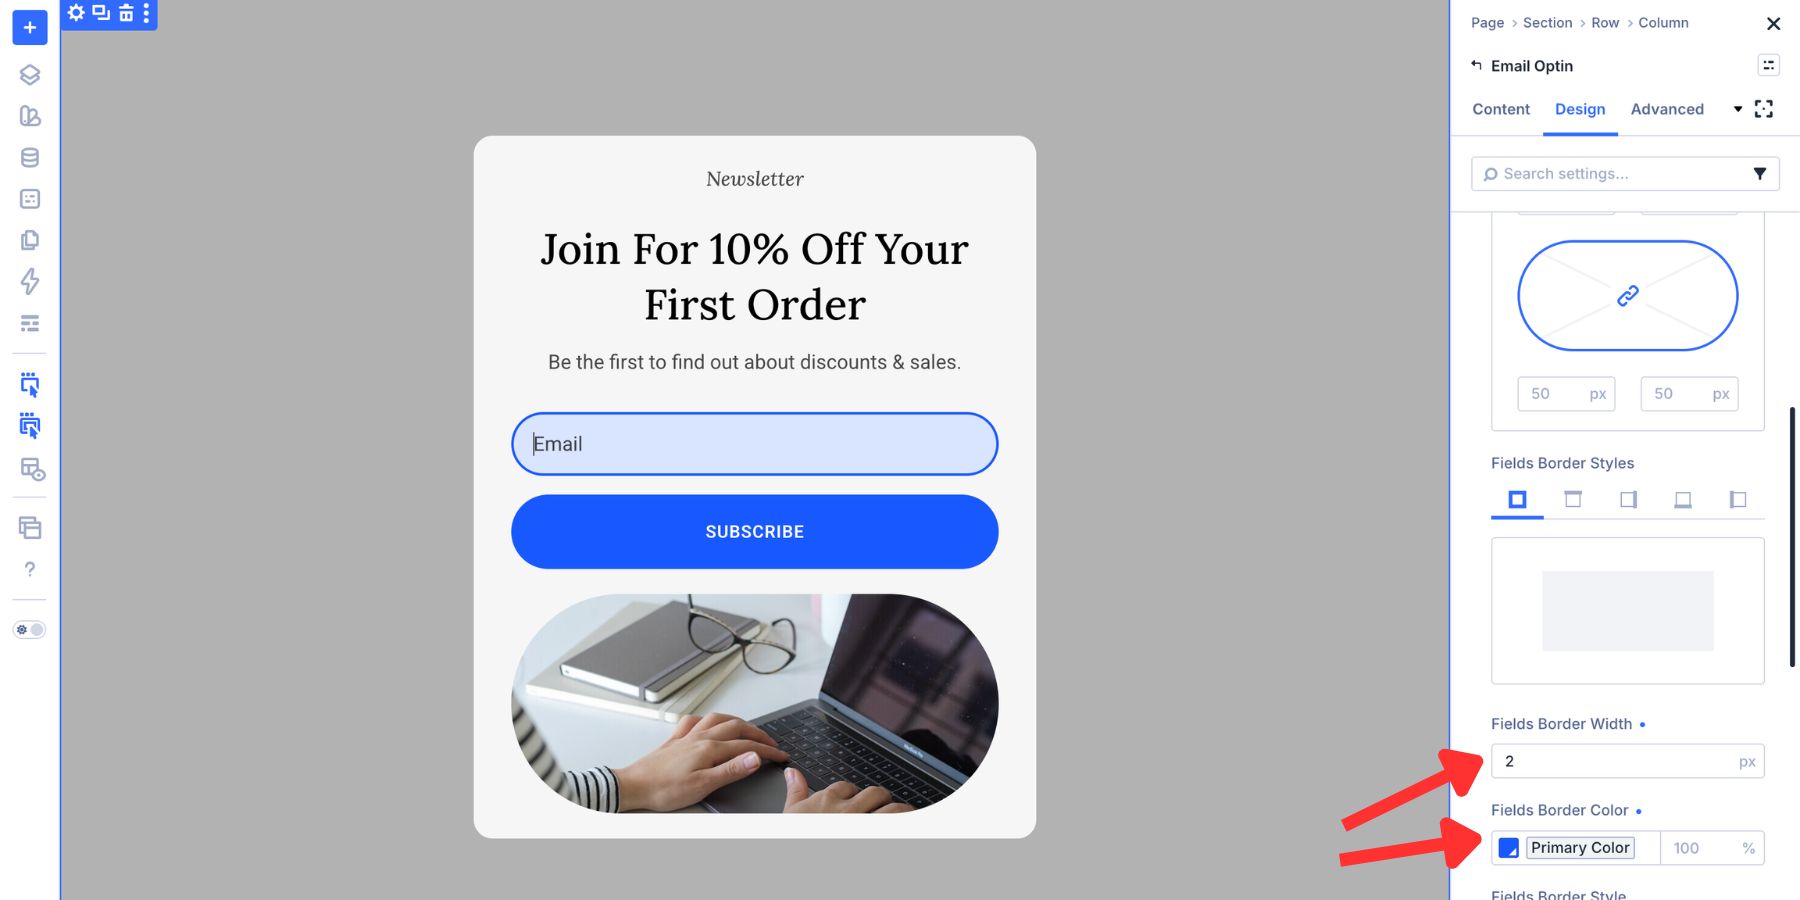
The goal is not to make the field loud. The goal is to make it obvious where the visitor is typing.
A popup always needs a clear exit. Add an Icon module above the popup content. Open the icon picker and search for close or times, then select an X icon.
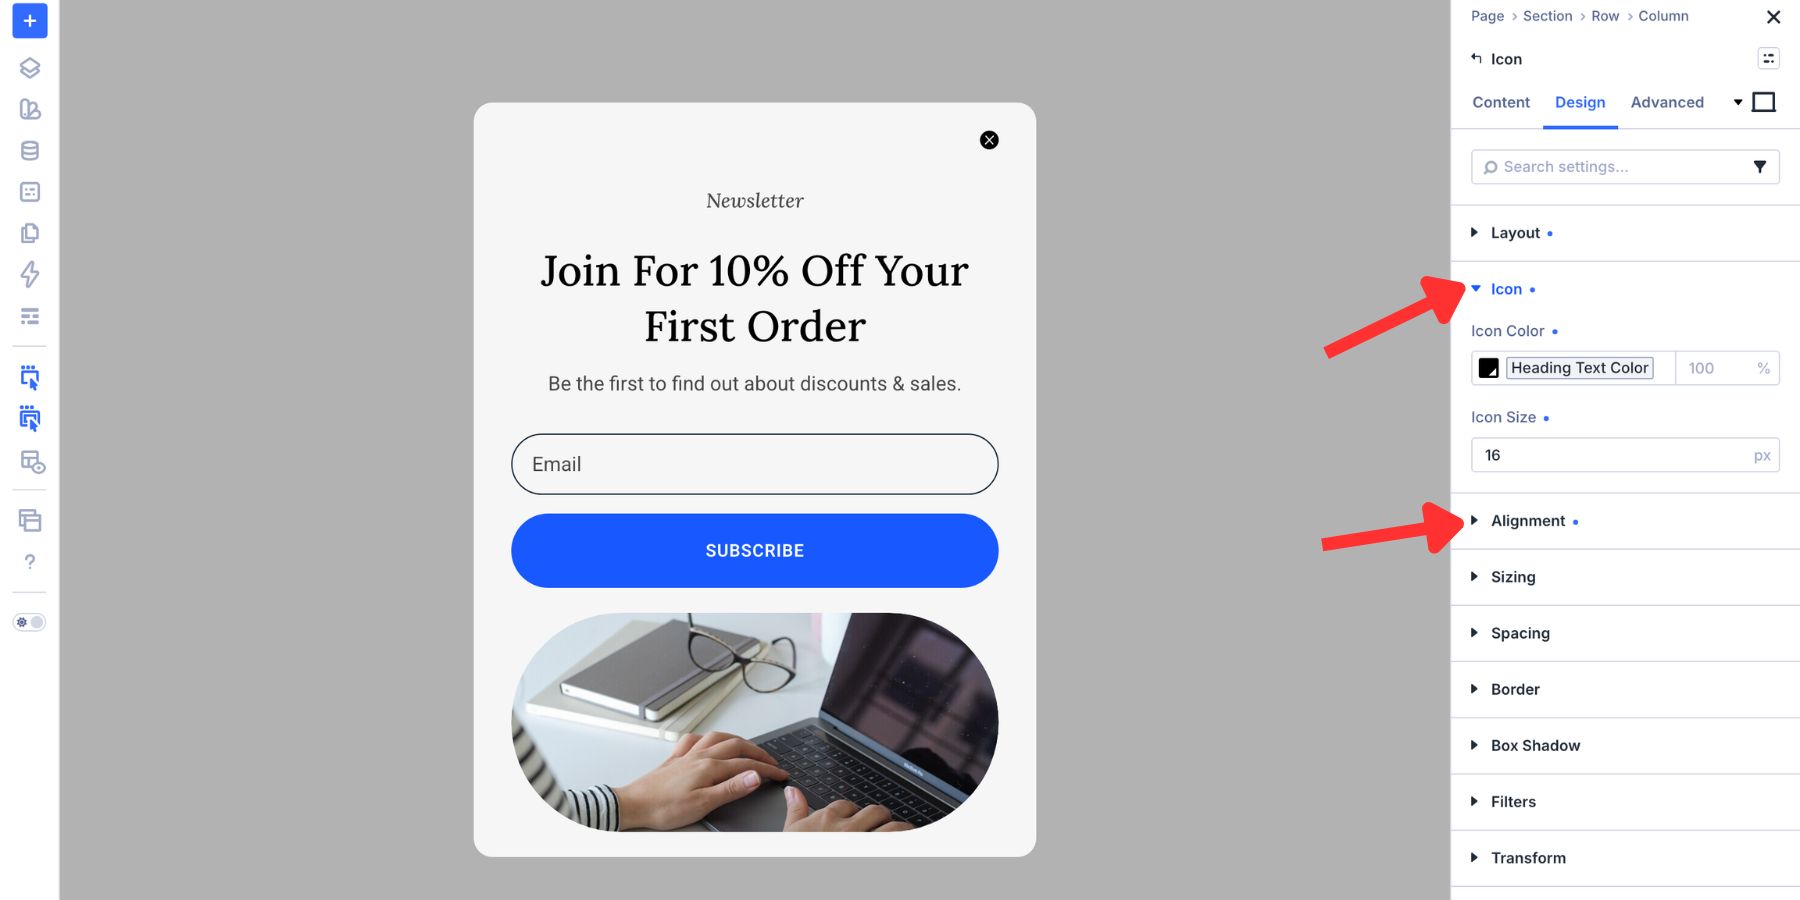
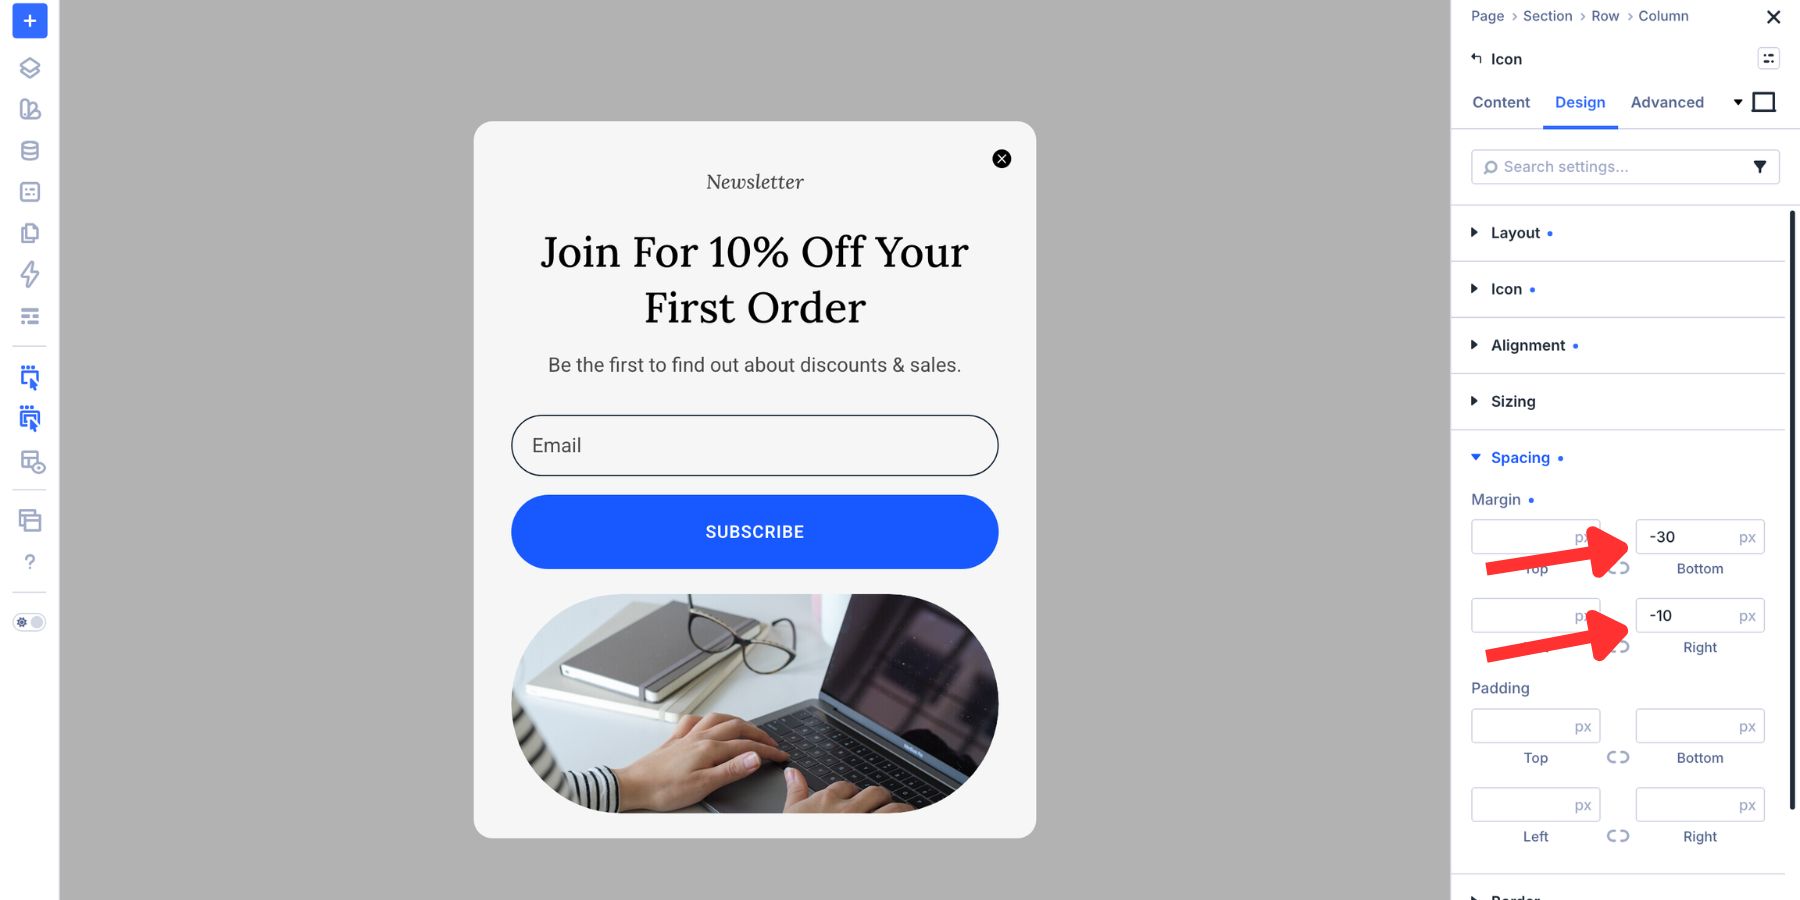
In the Design tab, adjust the icon size, alignment, and color so it fits the card. Then use spacing or positioning to place it comfortably in the top-right corner. In this design, negative margins of around -30px on the bottom and -10px on the right help tuck the icon into place without crowding the content below it.
7. Hide The Popup By Default
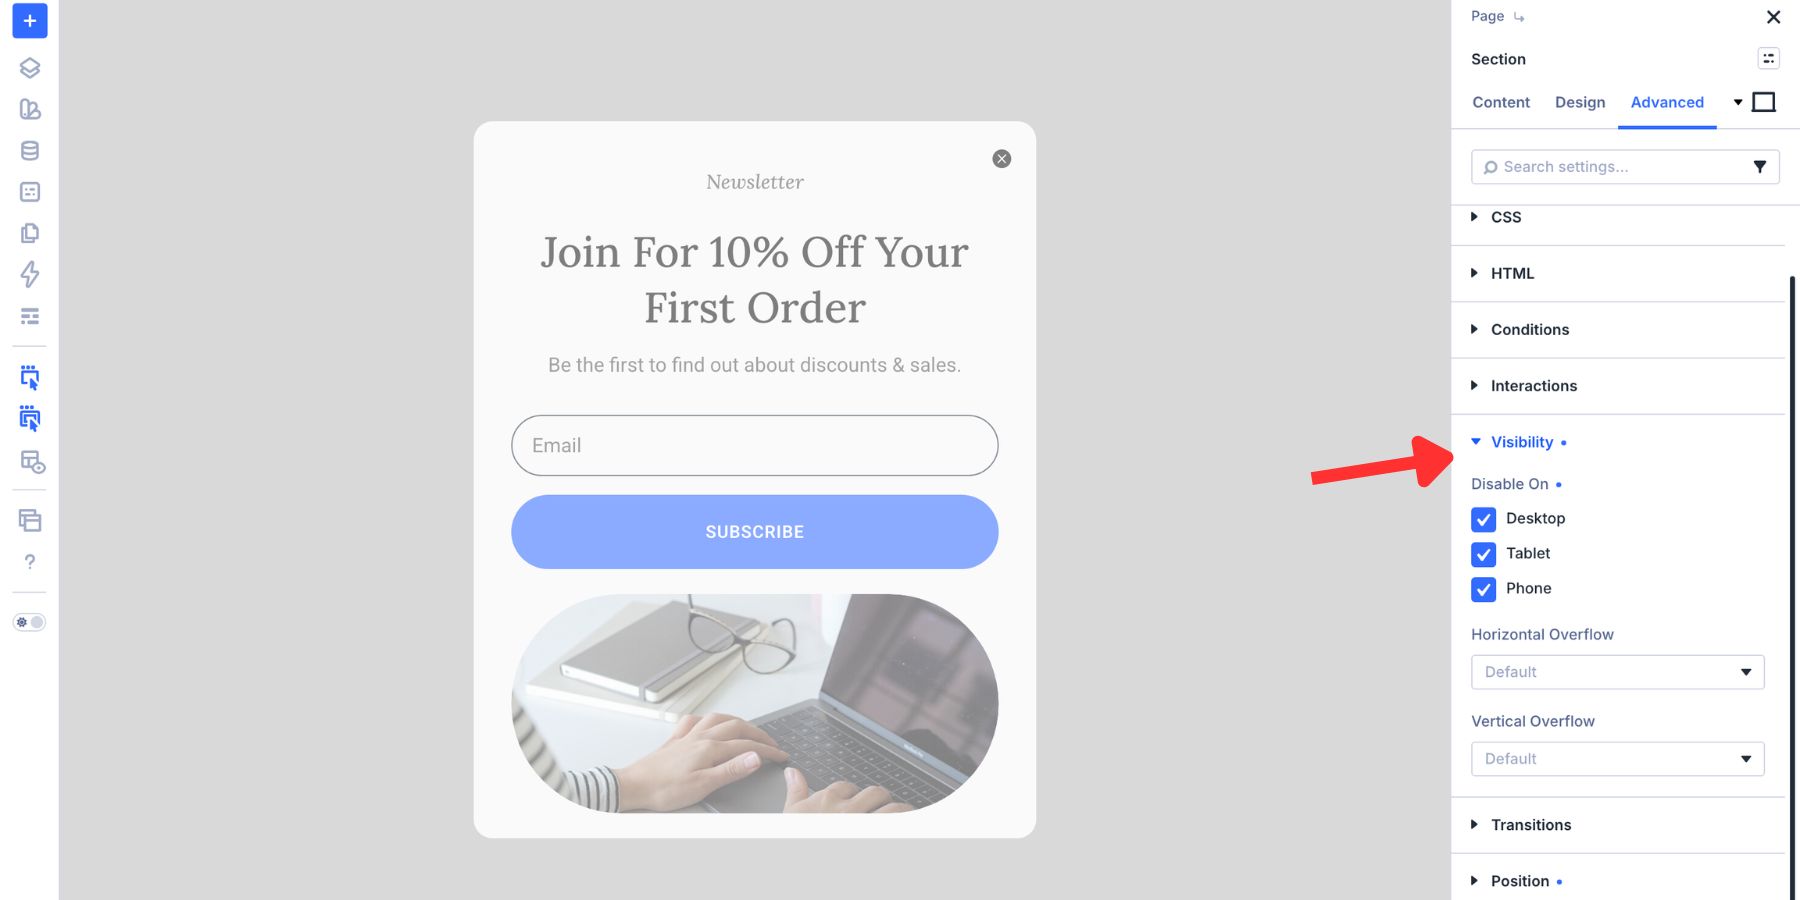
Before wiring the Interactions, hide the popup section so it does not appear immediately on the page. Open the popup section settings, go to Advanced > Visibility, and hide the section across all devices. The section will stay hidden until an Interaction reveals it.
8. Wire The Close Interaction
The close icon needs an Interaction that hides the popup section when clicked. Open the Icon module settings, go to Advanced > Interactions, and add a new Interaction. Set it up like this:
- Trigger Event: Click
- Effect Action: Hide Element
- Target Module: Popup Section
- Time Delay: 0
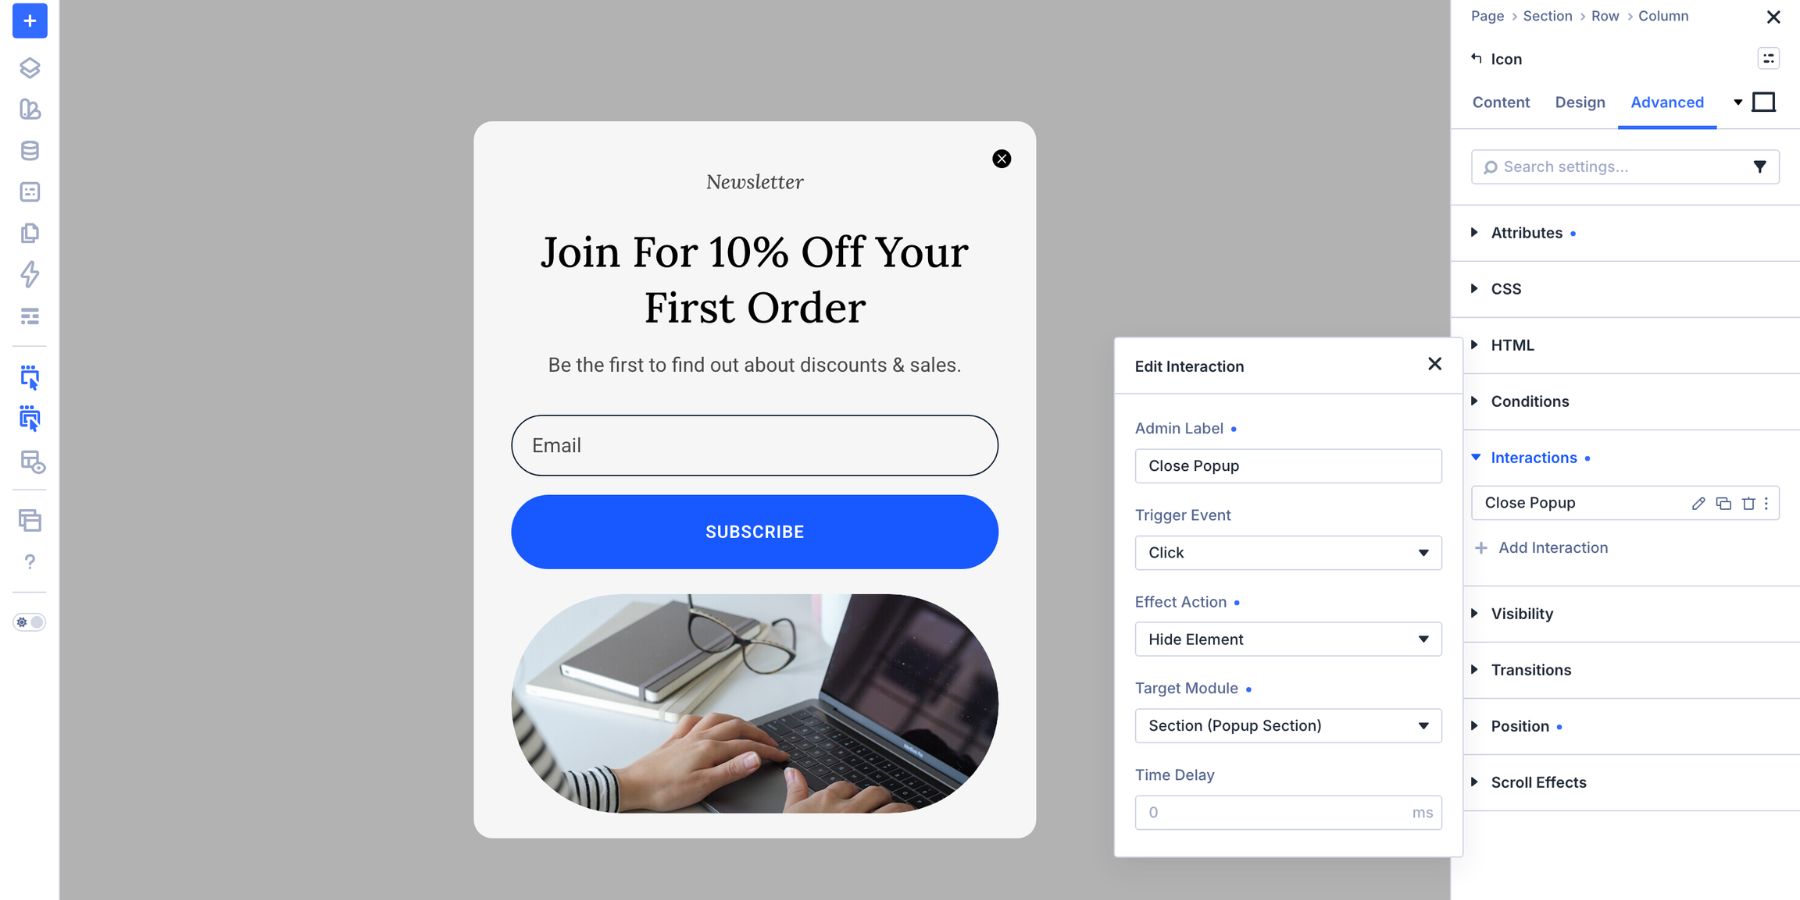
A close button should respond immediately, so a delay is not needed here.
9. Wire The Page Load Interaction
The show Interaction belongs on the Main Canvas, because that is where the page load event fires. Switch back to the Main Canvas using the Canvas dropdown. Choose an element on the page to hold the Interaction. A hero section works well because it loads with the page.
Open that element’s Advanced tab, go to Interactions, and add a new Interaction. Set it up like this:
- Trigger Event: Load
- Effect Action: Show Element
- Target Module: Popup Section from the Stacked Popup Canvas
- Time Delay: 5 to 8 seconds
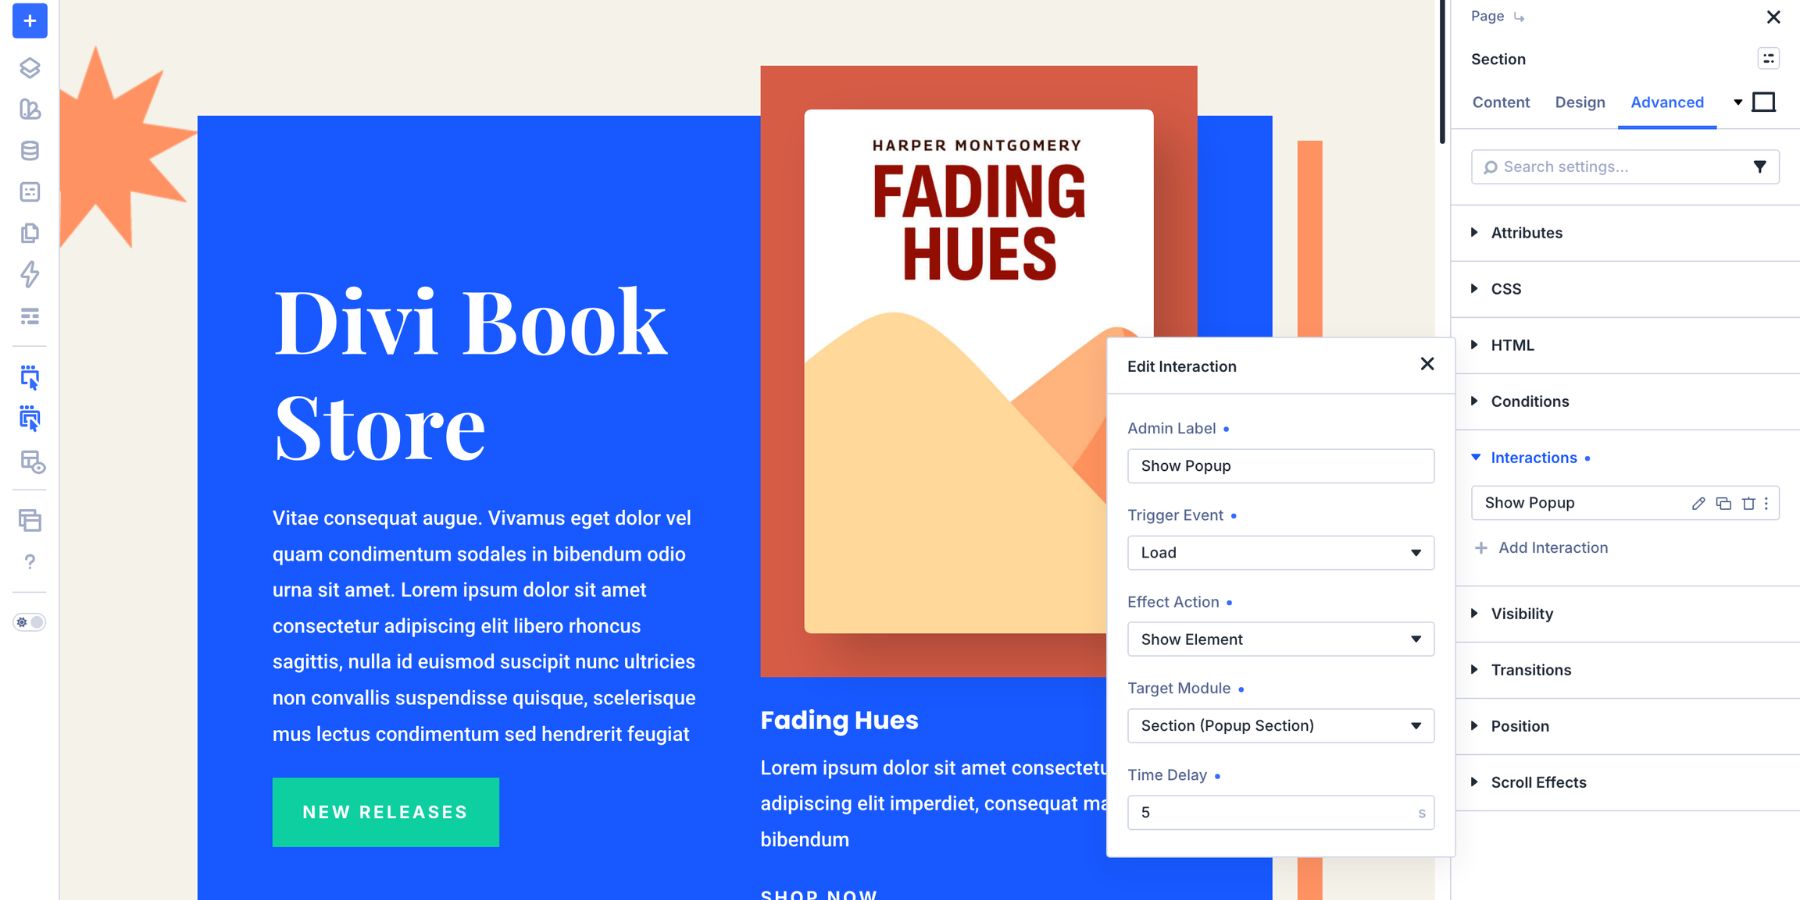
The delay matters. A popup that appears the instant the page loads can feel abrupt. Waiting a few seconds gives visitors time to orient themselves before the offer appears.
The first email popup is now ready.
Design 2: Minimalist Email Popup
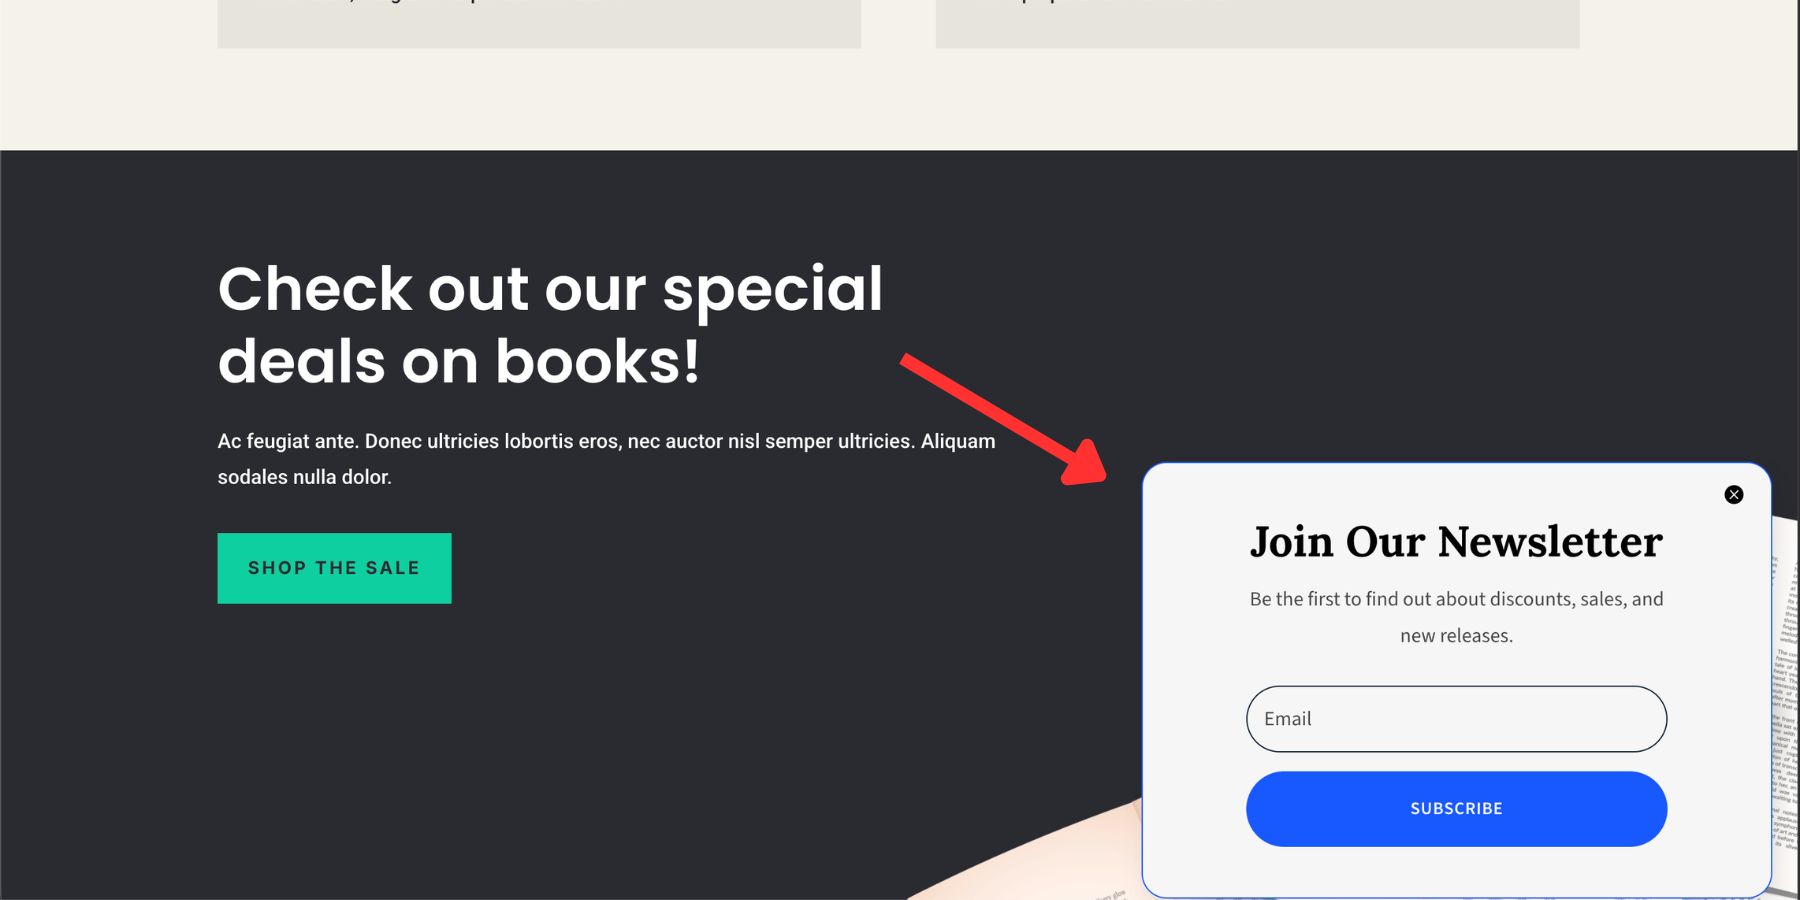
The second design strips the popup back to a headline, one line of supporting copy, an email field, a subscribe button, and a close icon. Instead of taking over the screen, it appears as a fixed card in the bottom-right corner. The page stays visible behind it, so the popup feels more like a timely prompt than a modal interruption.
This design will appear when the visitor reaches a specific section of the page.
1. Add A New Canvas
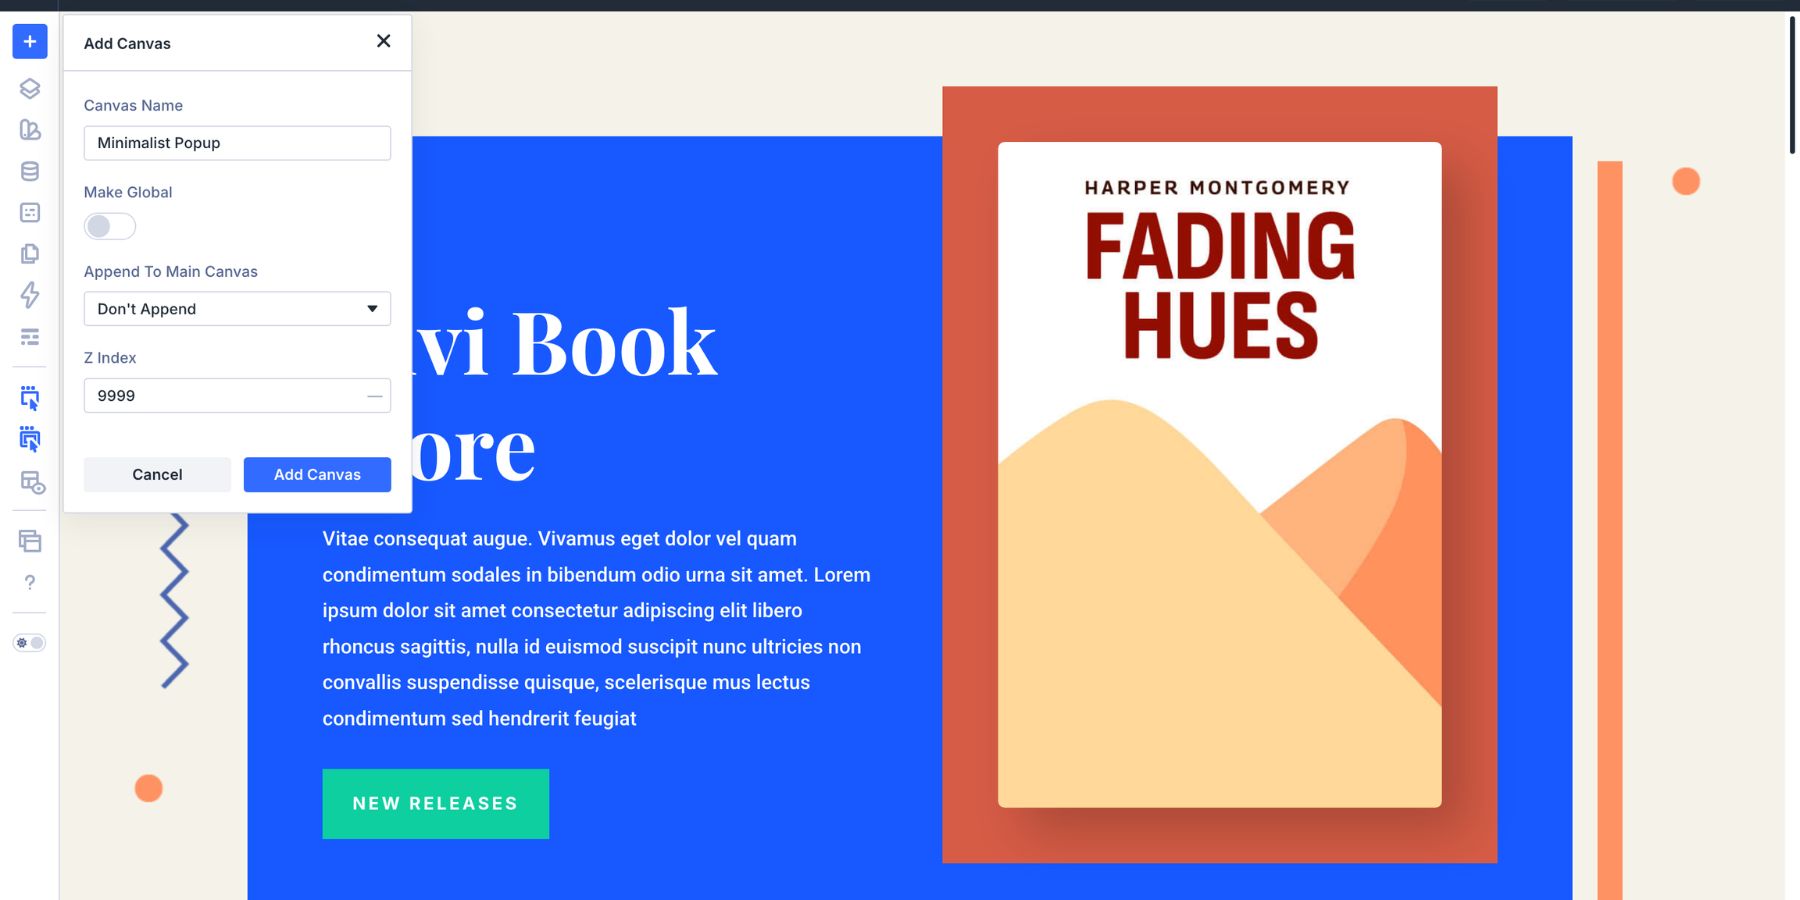
The setup starts the same way as the first design. Open the Canvas dropdown at the top of the Visual Builder, select Add New Canvas, and name it something clear, such as Minimalist Popup.
2. Build The Popup Structure
Design 1 needed a full-screen overlay because the popup appeared as a centered modal. This second design does not need that treatment. Because it sits in the corner while the page remains visible, the section itself becomes the popup card. There is no separate overlay section or inner card row to build.
Set the section width to 500px, add 40px of padding, and set the border radius to 20px. This creates a compact card that feels polished without taking over the page.
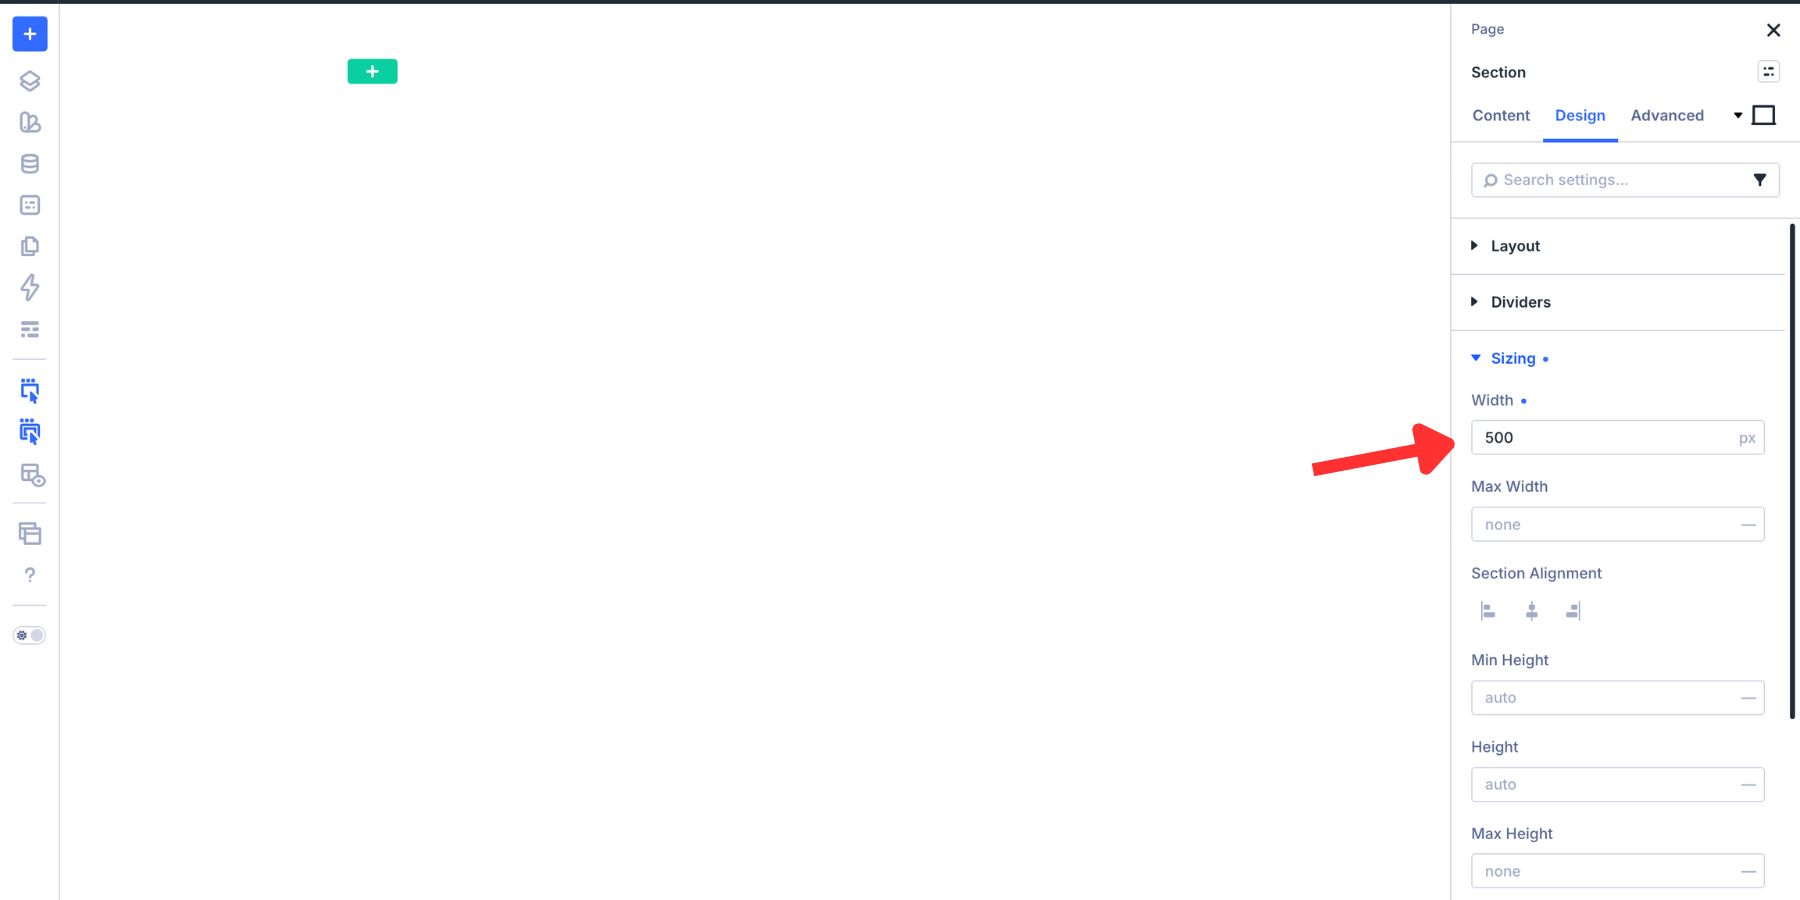
Because there is no dark overlay behind this popup, the card needs enough separation from the page. Add a subtle border and box shadow so it does not blend into the content behind it.
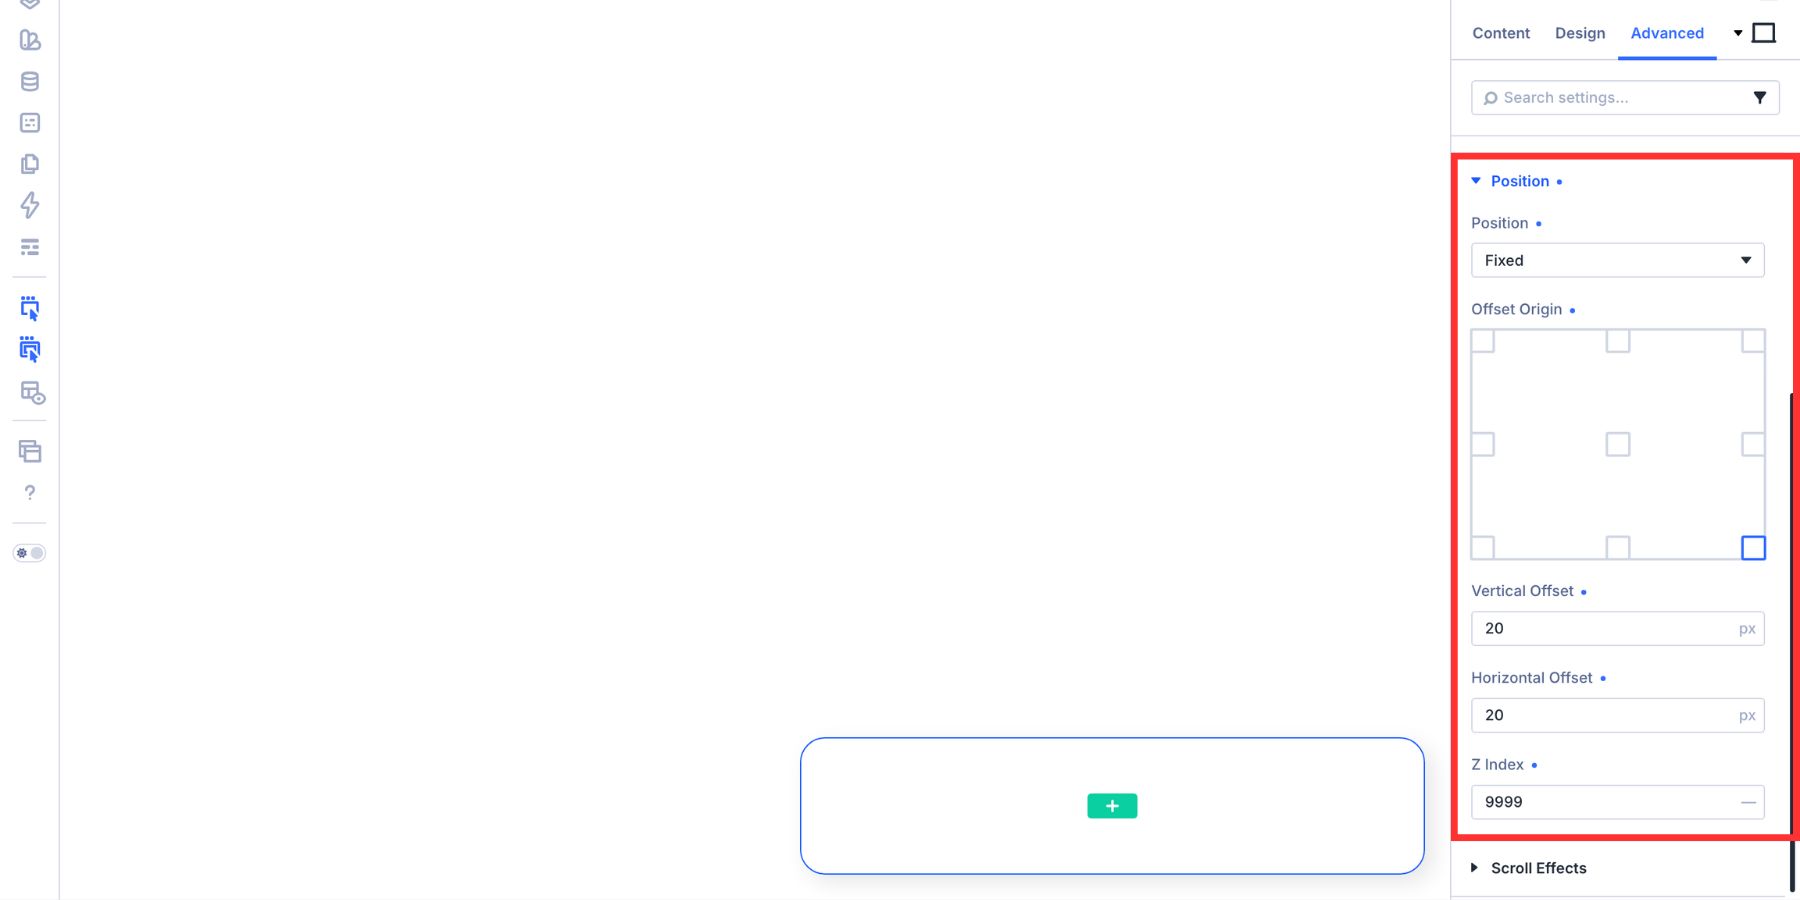
Then go to Advanced > Position. Set Position to Fixed, set Offset Origin to Bottom Right, and add bottom and right offsets of around 20px. Set the Z Index to 9999 so the card appears above the page content.
3. Add And Style The Email Optin Module
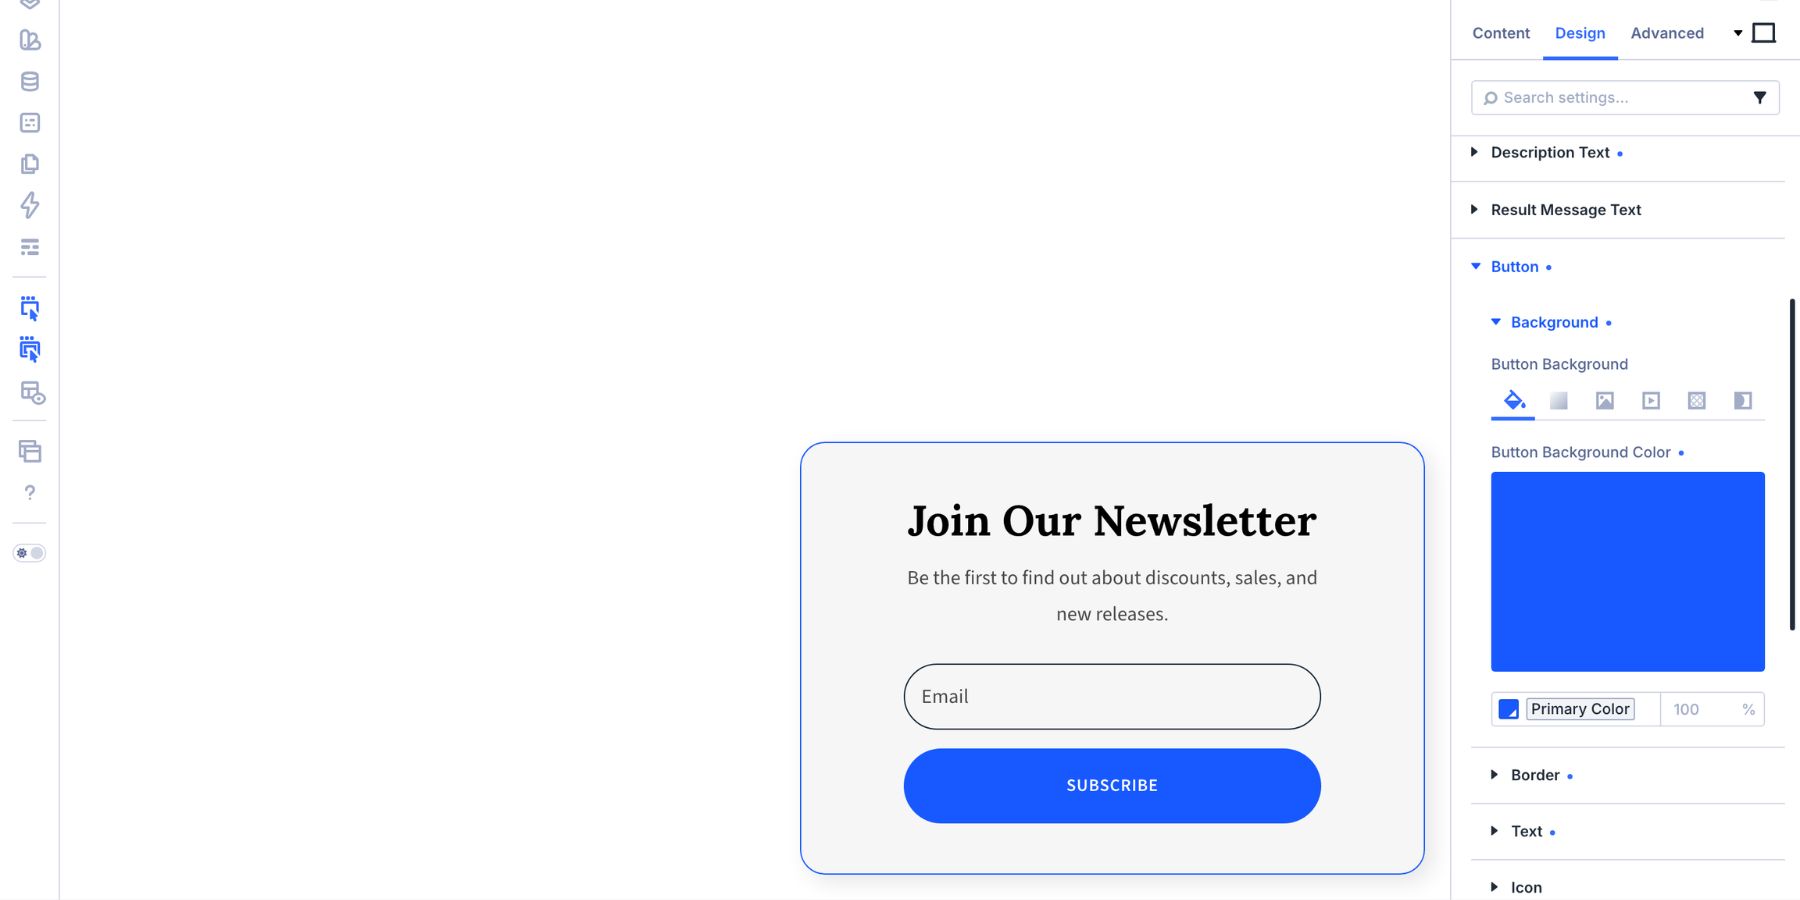
The Email Optin module handles the core content: the email field, placeholder text, and subscribe button. Add the module inside the section, remove any content you do not need, connect your email provider in the Content tab, and style the module in the Design tab.
Just like in Design 1, use Design Variables where possible. Pull in your shared colors, spacing values, radius values, and typography choices so the popup feels connected to the rest of the site.
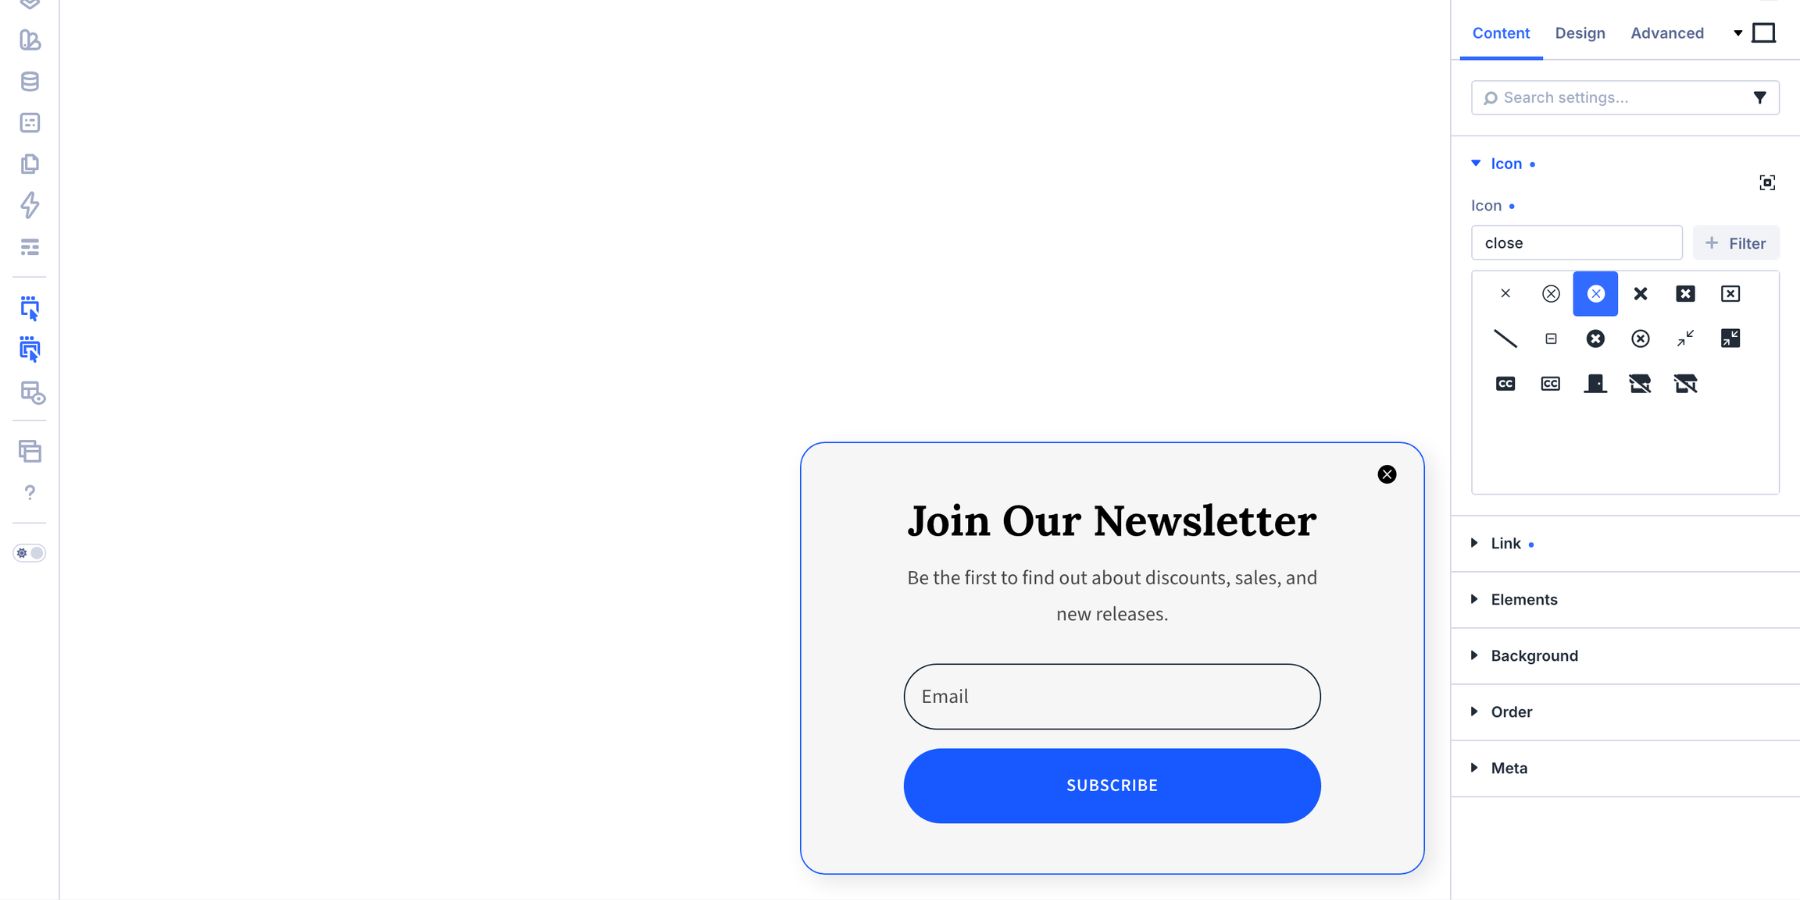
Add an Icon module above the Email Optin module, choose an X icon from the icon picker, and style it as the close button. Use spacing or positioning to place it neatly in the corner of the card.
Once the content is in place, add a clear label to the popup section and hide it across all devices in Advanced > Visibility, just like we did in the first design.
4. Wire The Close Interaction
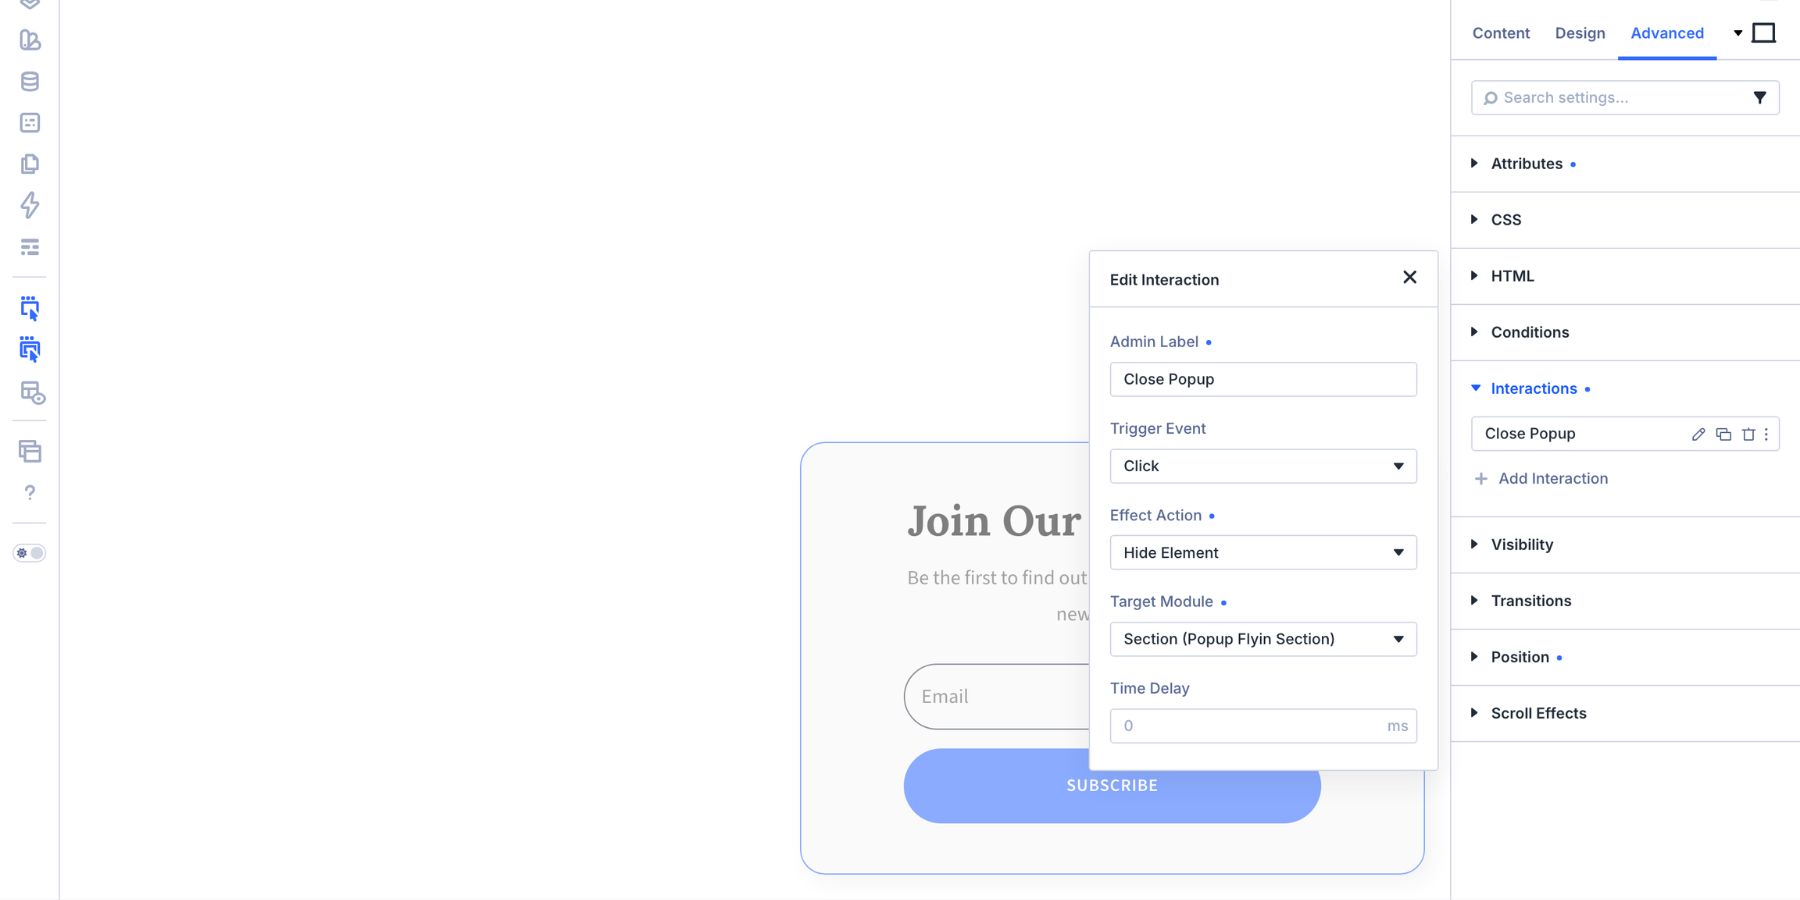
The close button uses the same setup as Design 1. Open the close Icon module, go to Advanced > Interactions, and add a new Interaction:
- Trigger Event: Click
- Effect Action: Hide Element
- Target Module: Minimalist Popup section
- Time Delay: 0
5. Wire The Scroll-Based Show Interaction
The show Interaction is different for this popup because the timing is different. A Load trigger appears based on time. A Viewport Enter trigger appears based on behavior. Instead of showing the popup immediately after someone lands on the page, it waits until they reach a chosen section.
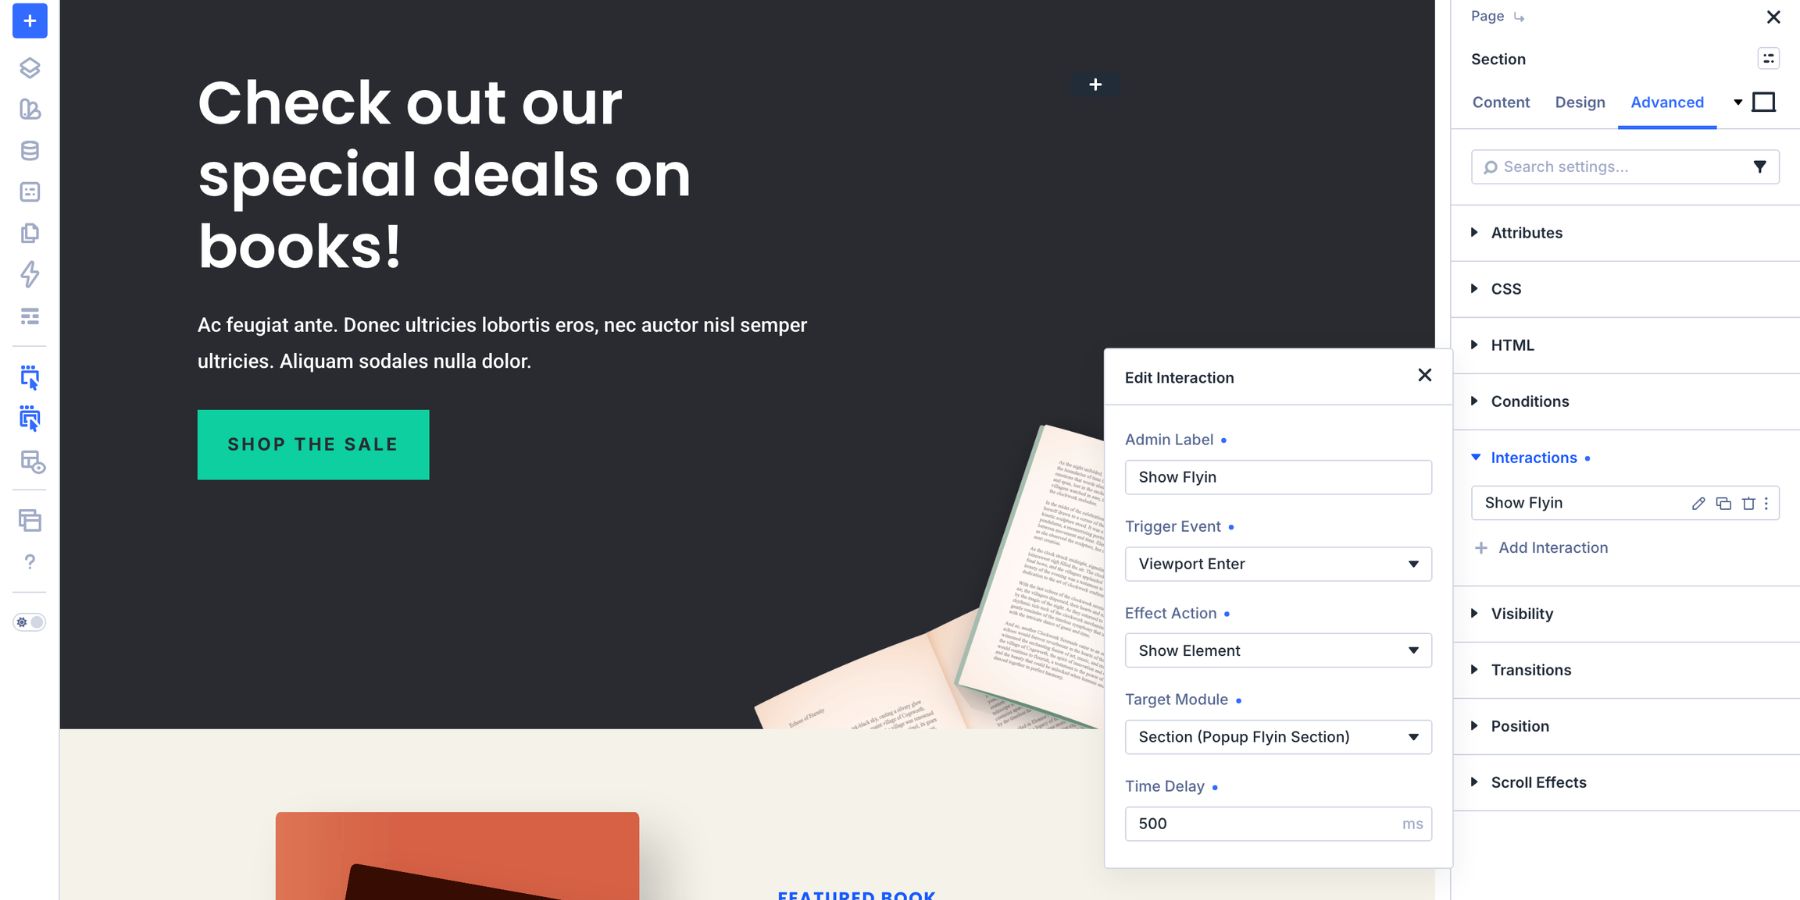
Switch back to the Main Canvas and select a section far enough down the page to suggest real engagement. A pricing block, feature breakdown, blog section, product section, or testimonials row can work well. Open that section’s Advanced tab, go to Interactions, and add a new Interaction:
- Trigger Event: Viewport Enter
- Effect Action: Show Element
- Target Module: Minimalist Popup section from the Minimalist Popup Canvas
- Time Delay: 0, or around 500ms if the entrance feels too abrupt
This approach usually feels less intrusive because it waits for a signal of interest. The visitor has already moved through the page, so the signup prompt appears with more context. The second popup is now ready.
Email Popup Best Practices In Divi 5
The technical build matters, but the strategy matters just as much. A popup should support the visitor’s experience, not fight it. Use these guidelines when building email popups in Divi 5:
- Lead with one clear offer. A discount, guide, checklist, early access invite, or newsletter promise is easier to understand than a vague “subscribe” request.
- Keep the form short. For most email popups, the email field is enough. Add names or extra fields only when the offer truly needs them.
- Delay disruptive popups. A centered modal should usually wait a few seconds or appear after a scroll signal.
- Use smaller prompts for earlier moments. A bottom-corner popup can appear with less friction than a full modal.
- Make the close button obvious. Visitors should never have to hunt for a way out.
- Style focus states. The email field should clearly respond when someone clicks, taps, or tabs into it.
- Use Design Variables and presets. Keep popup colors, spacing, typography, buttons, and fields connected to the rest of the site.
- Test on mobile. A centered popup may need different sizing, spacing, or timing on smaller screens.
- Avoid showing the same popup too often. Use Display Conditions and cookies when repeat views would feel annoying.
The best popup feels deliberate. It appears at the right moment, asks for one clear action, and respects the visitor’s control.
Build A Better Email Popup In Divi 5
A strong email popup is not just a card with a form. It is a small conversion flow: the offer, the layout, the form styling, the trigger, and the close behavior all work together.
Divi 5 makes that flow easier to build visually. Canvases give the popup its own workspace. The Email Optin module connects the form to your list. Form field controls let the input match the rest of the site. Interactions decide when the popup appears and disappears. Design Variables and presets keep the styling maintainable.
In this tutorial, we built two versions. The centered popup creates a focused moment with an overlay. The minimalist corner popup waits for engagement and stays lighter on the page. Both use the same Divi 5 logic: build the popup separately, hide it by default, reveal it intentionally, and give visitors a clear way to close it.
Start with the popup style that matches your offer, then refine the timing until it feels helpful instead of interruptive.





Leave A Reply