
Divi and Cloudways make a great team. With the customization features of both Divi and Cloudways, you’ll have a hosting plan perfectly optimized for Divi at your disposal. Our partnership with Cloudways allows us to offer developers a way to streamline their Divi websites with one-click installs, and get great features including cloud storage, bot protection, SSL certificates, a CDN and more. In this post, we’ll show you how to optimize your Divi hosting server on Cloudways to get the most out of your hosting plan.
What is Cloudways?
Cloudways is one of the best managed hosting providers that provides a cloud-based approach to WordPress hosting that can be tailored to your specific needs. They offer the ability to choose between cloud storage providers, the amount of storage for your sites, along with optimized Divi installs in one click. Unlike other hosting companies, Cloudways is feature-rich and offers many options that would cost additional fees to acquire with other providers. Plans begin at $10 per month, and go up from there based on the options you choose. This modular approach allows for you to change your plan options at any time, so that your costs increase only when your business grows.
Starting Your Free Trial With Cloudways
One of the benefits of Cloudways is their generous three day trial offer. You’ll get full access to everything they have to offer – including launching the server of your choice, as well as installing Divi in one click. At the end of your trial, they make it easy to transition your account to a full access account. At that point, you can swap cloud providers, increase storage capacity, or add additional services. As previously mentioned, as you add sites and clients, you can adjust your plan’s configurations to meet your needs.
How To Choose the Right Cloudways Plan
The plan you choose depends on what your needs are. Because Cloudways allows you to alter your plan at any time, there are endless options. For example, if you are just getting into the world of WordPress, it might be beneficial to you to start out with a lower-tiered plan that utilizes Digital Ocean. For $10 per month, you can get your site on a cloud provider, with tons of benefits including a Free SSL, free backups, bot protection, among other features.
If you are a seasoned web developer with more than a few client websites, going with Vultr‘s high frequency offering could be your best bet. With 4GB of RAM, 128GB of storage, and 3TB of bandwidth for $50 per month, your client’s needs will be met with ease. Cloudways allows you to have as many applications and servers on your plan as you’d like. They make it easy for you to grow your business.
If you own or manage a medium to large web agency, Cloudways has you covered, too. With high-end providers such as Amazon Web Services (AWS) and Google Cloud, your larger sites will be right at home — optimized for speed and stability for a fraction of the cost of some other Google Cloud and AWS hosting companies.
Setting Up WordPress and Divi
If you sign up through Elegant Themes to host your Divi websites, set up is a snap. Divi comes pre-installed with a Divi hosting server optimized for you, right from the start. Adding in additional Divi websites is a breeze, too. As previously mentioned, your hosting plan with Cloudways includes as many WordPress websites as you’d like — for the same low price.
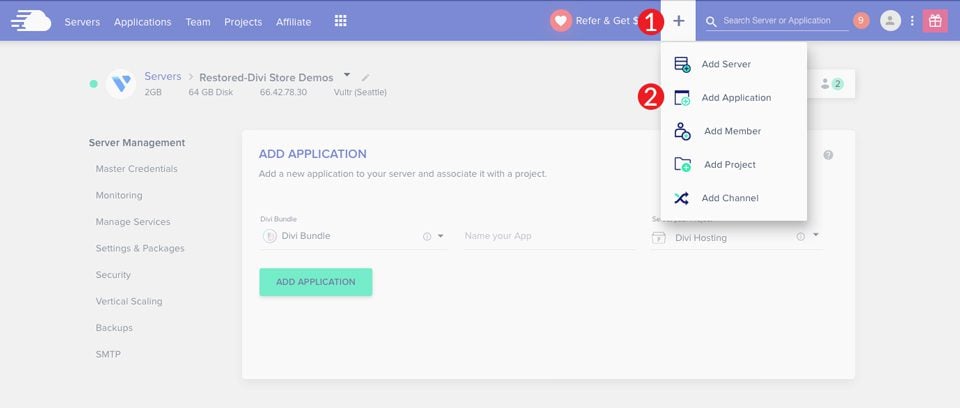
Simply log in, then click the + button in the main menu. Select Add Application.
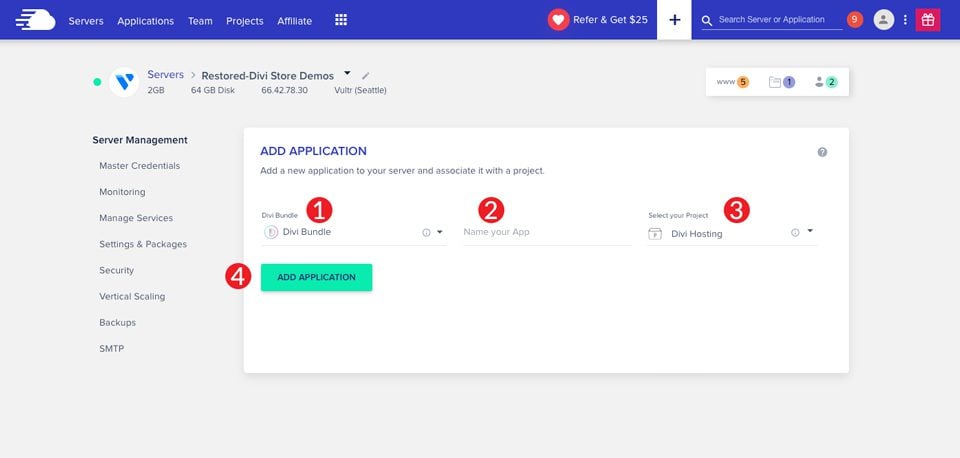
Next, choose Divi Bundle from the dropdown menu, name your app, choose your server, and click the Add Application button. Cloudways will have a new WordPress site pre-installed with Divi, ready to go in under a minute.
Adding Divi Website Without a Divi Hosting Bundle
If you already have Cloudways and want to install your new Divi website, the process is similar. Repeat the steps above to add a new WordPress site. However, this time you’ll choose your server, then click the Add Application button. Once the screen refreshes, you’ll have several options. Install WordPress version 6.0, Multi-site version 6.0, or a clean install. Additionally, you can Choose WordPress with Woocommerce pre-installed.
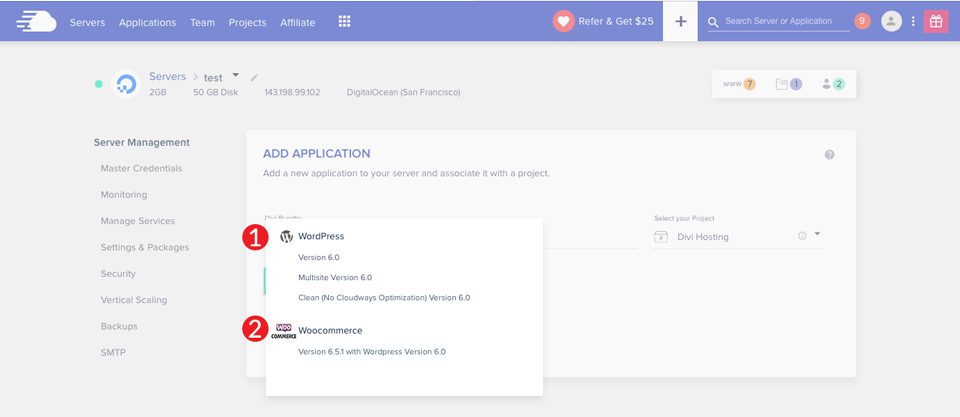
Finally, you’ll name your install, then click the Add Application button.
Setting Up Your Divi Hosting Server
Your Divi hosting server on Cloudways comes optimized for Divi. However, there are a few additional steps you might want to take to get the most out of your server. We’ll show you how to set up a real cron job and make some adjustments to your settings to give you the best setup possible. Additionally, we’ll walk you through the steps to set up your email, bring in your domain, and configure a content delivery network (CDN). Let’s get started.
Setting up a Real Cron Job
WordPress crons are tasks that are scheduled by WordPress on either an hourly, twice daily, daily or weekly basis. For example, when you schedule a blog post to be posted on a certain date and time, you’re utilizing a WordPress cron. Crons can also allow you to schedule scripts to run at a certain time. Not all crons need to be recurring, and can be set up to run only once.
By default, WordPress comes with 11 crons that must run in order for WordPress to work correctly. The cron system is utilized to control things like scheduling blog posts, checking for updates, deleting comments from the trash, and other system tasks.
How to Manage WordPress Crons
There are basically two ways that you can manage crons — using a plugin, or by using Cloudways. Both will accomplish your goal, it just depends on how familiar you are with coding. For WordPress users without PHP knowledge, using a plugin will be less daunting. There are several to choose from, but the most popular is WP Crontrol. We won’t get into setting things up with a plugin in this tutorial. If you’re interested in using a plugin to schedule crons, check out our post that fully explains how to set them up. We’re going to show you how to set up crons editing system files, then integrating them into Cloudways.
Modifying WordPress Crons
As previously mentioned, WordPress comes standard with a list of crons that enable your site to run correctly. With some cron processes, there is room for improvement. It’s important to note that when modifying crons, the utmost care should be taken. Fiddling with system processes without knowledge of what you’re doing can and will break your site. That being said, you can make changes here that will optimize your WordPress site for speed, making it load faster and more secure for your visitors.
WordPress must work across all types of browsers, operating systems, and configurations. Because of this, it’s not always possible to trust that there’s a cronjob service that will be able to handle all of the necessary tasks. Some WordPress developers developed a workaround for this utilizing the wp-cron.php file method. However, this method can leave your site vulnerable to Denial of Service (DOS) attacks. A better way to do this is to create a real cron job that will limit constant file execution, leaving your site running faster and more protected.
Setting Up Crons on a Divi Hosting Server by Cloudways
To schedule a real cron job in Cloudways, you’ll need to edit your wp-config.php file to disable any default crons that are running in your site. To accomplish this, you’ll open an FTP application on your computer, then connect to your Cloudways server.
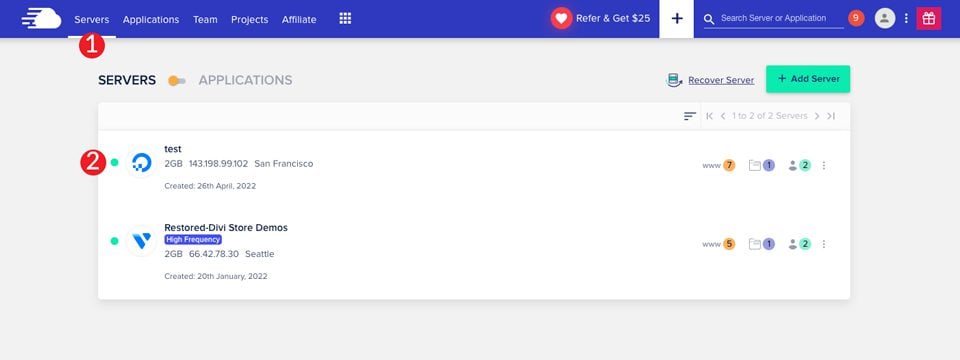
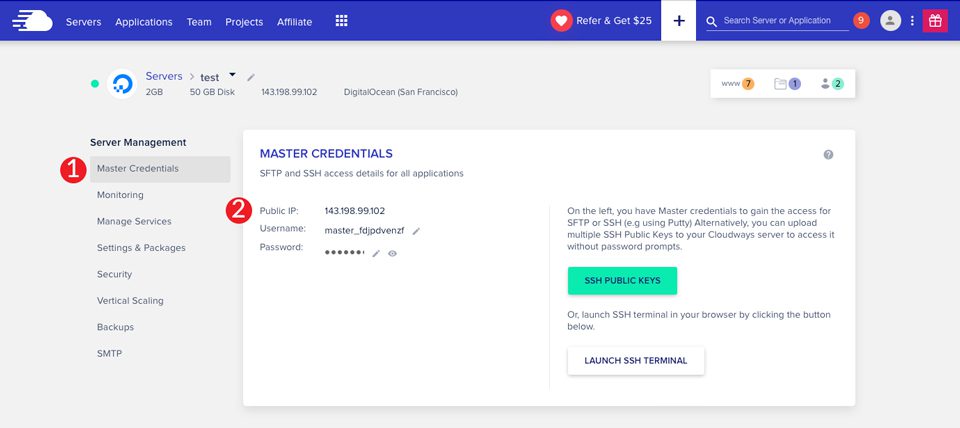
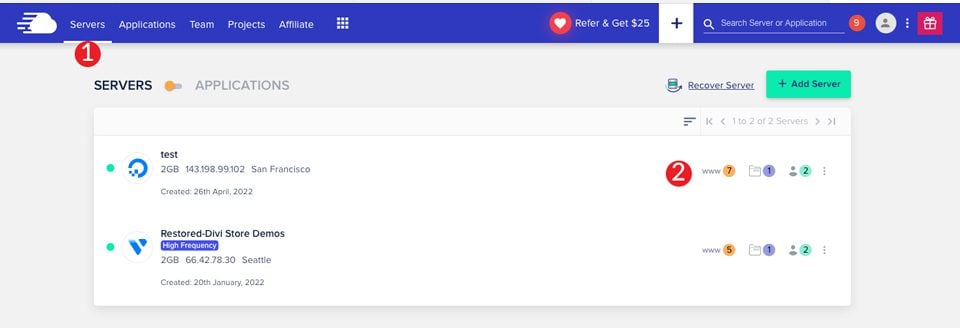
The first step is to navigate to your server by clicking on servers in the main navigation menu. Next, click on the server that you want to get the login credentials for.
Next, click on Master Credentials. Here, you’ll find the information you’ll need to connect to your server through an FTP application such as FileZilla.
Once you’ve connected to your server via FTP, open the wp-config.php file in your text editor. You’ll need to add the following line of code directly before the line /* That’s all, stop editing! Happy blogging */:
define('DISABLE_WP_CRON', true);
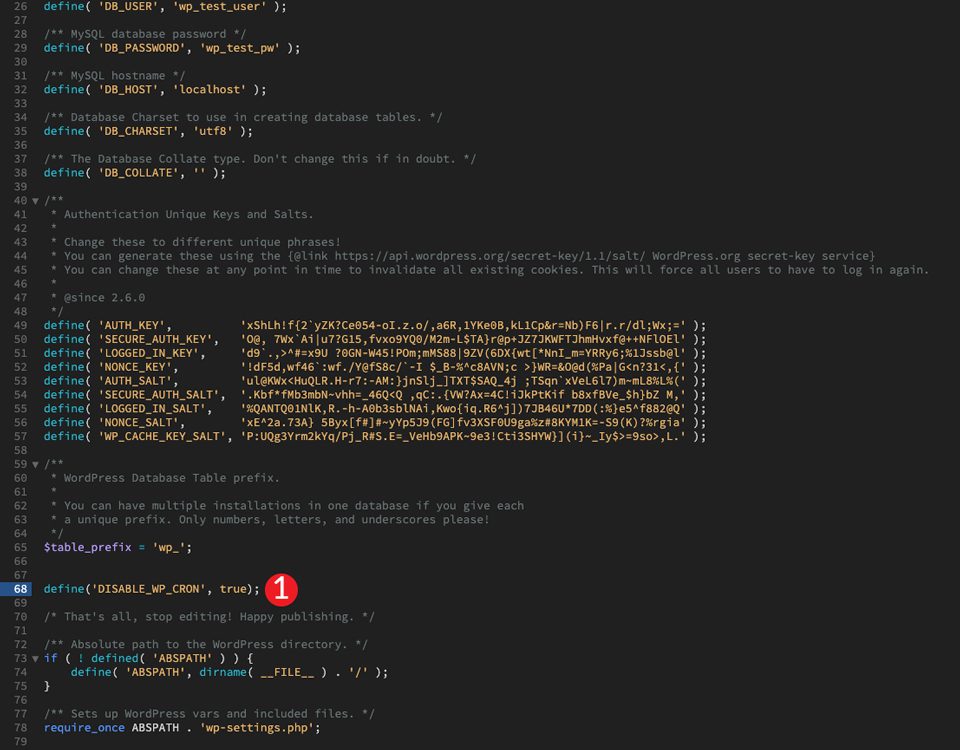
This tells WordPress to disable any running cron events on your WordPress site so that you can create a real cron job.
Adding a Real Cron Job in Cloudways
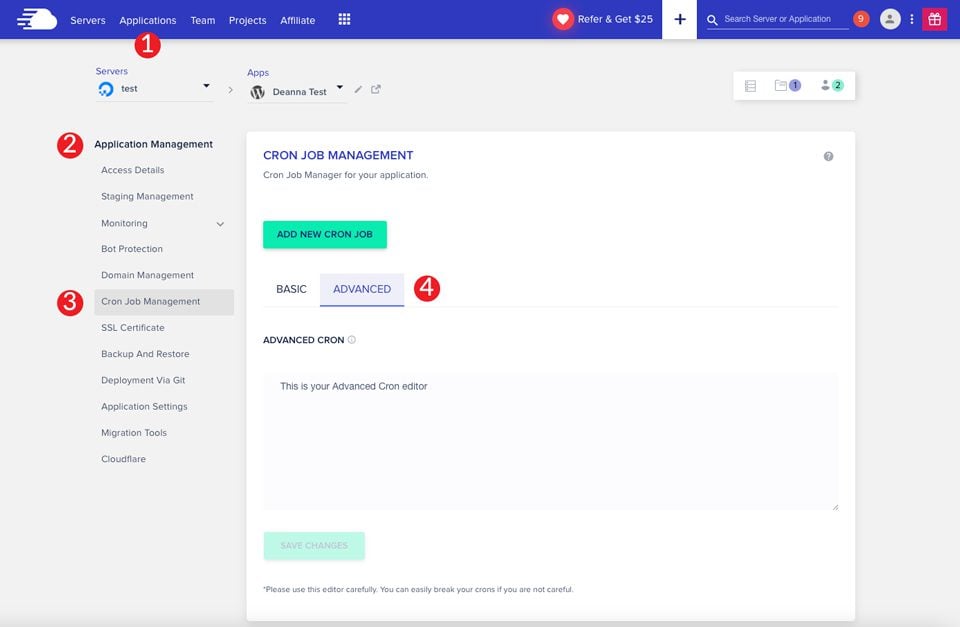
Head back over to your Cloudways account and navigate to Applications in the main menu. Next, navigate to Application Management panel > Cron Job Management > Advanced.
Add the following command to the advanced cron editor and click the Save Changes button.
*/30 * * * * wget -q -O - 'https://wordpress-765222-2610922.cloudwaysapps.com/wp-cron.php?doing_wp_cron' >/dev/null 2>&1
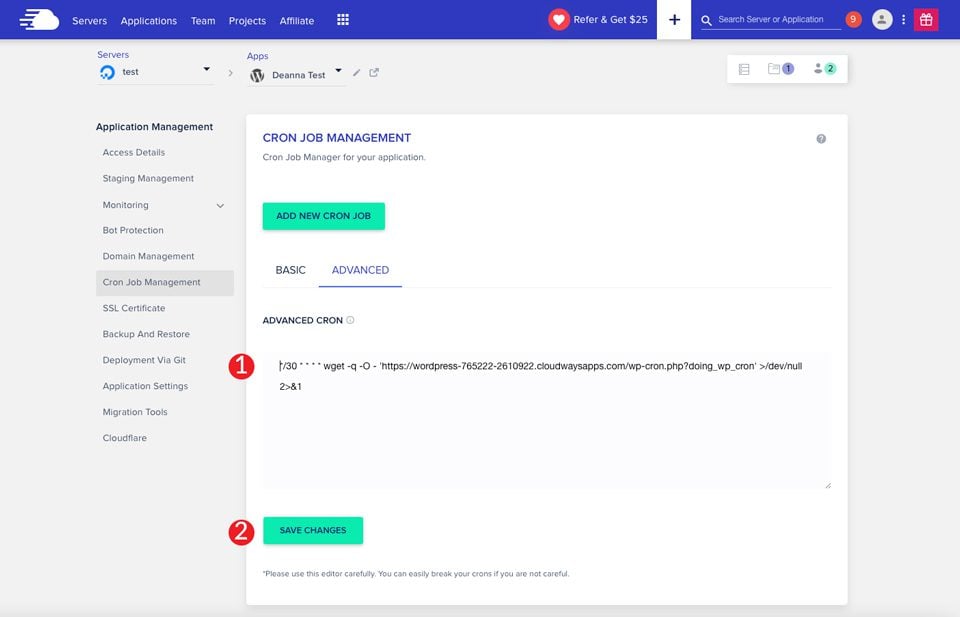
Be sure to replace https://wordpress-765222-2610922.cloudwaysapps.com with your application’s URL. In the command, we’ve defined an interval of 30 minutes for the cron job. You can increase or decrease the time intervals based on your preferences. Keep in mind that decreasing the time between scans could slow your site down. It’s best to keep it around 30-60 minutes for speed optimization. Creating a real cron job is a good step to get the most optimized Divi hosting server on Cloudways.
Getting Your Email Up and Running
Cloudways handles email setup a bit differently from providers such as SiteGround or Wp Engine. With Cloudways, there are additional steps you’ll need to take to get your email working. First of all, there are several different types of emails that you can set up within Cloudways. There are mailboxes, which are provided by email service providers such as Gmail or Microsoft. If you go that route, you’ll need to set up an SMTP service if you plan to send more than a few emails from your WordPress site every month.
Another thing to consider is whether you’ll be sending transactional or marketing emails. For example, transactional emails are triggered when your site visitors complete a purchase through your online store. If you use WooCommerce on your website, you’ll have transactional emails.
Marketing emails are sent through various signup or opt-in forms that are used for newsletters, promotional emails, or welcome and onboarding sequences. These services are separate from your hosting environment and usually require you to set up a paid subscription service to assist you in sending emails from your WordPress site.
Lastly, there are self-hosted emails. In some situations, you may want to set up your own email domain through Cloudways in which to send and receive emails.
For this tutorial, we’re going to show you how to set up your gmail account to work within Cloudways with the Elastic email add-on.
Adding Elastic Email to Cloudways
Elastic email is a fast and reliable solution for sending emails through Cloudways. It handles transactional emails as well as marketing emails. Elastic utilizes an external SMTP through several providers to get your email flowing from your website. Setup is a simple process that only takes a few minutes to achieve.
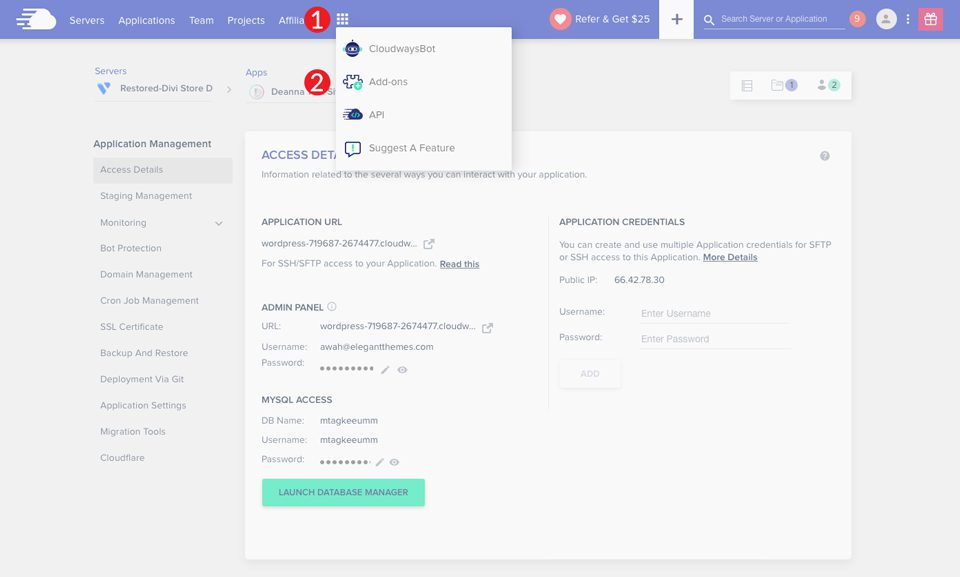
The first step is to activate the Elastic email add-on in Cloudways. To do this, click the grid icon in the main menu, followed by add-ons.
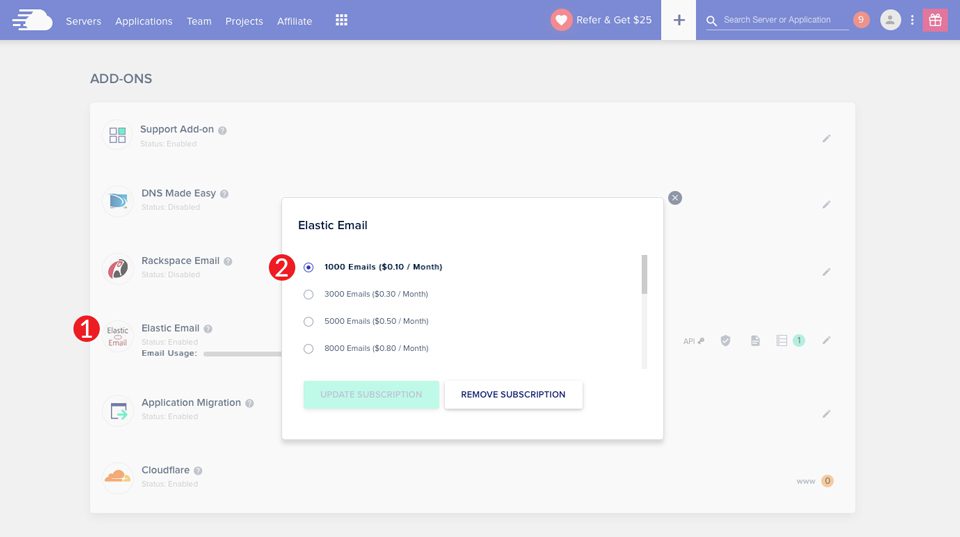
Choose Elastic Email from the add-on selections, and choose the amount of emails you’d like to have per month. For the purpose of this tutorial, we’ll choose 1000 per month.
Setting Up SMTP
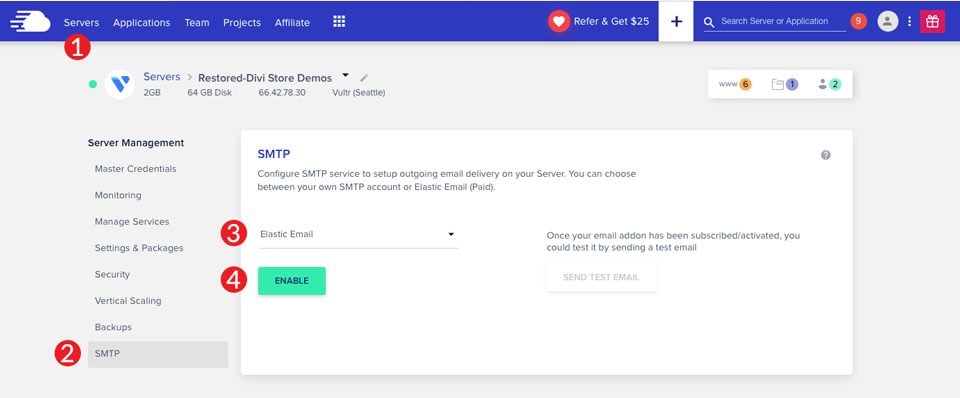
To set up SMTP, you’ll need to bind your Elastic Email add-on to your server. To do this, click servers in the main menu. Next, choose a server. Under Server Management, select SMTP. Choose Elastic Email from the dropdown menu. Finally, click Enable.
Verifying Your Domain
In order for your SMTP and email to work on your Divi hosting server on Cloudways, you’ll need to verify your domain. This is an essential step to ensure that your emails are sent properly. Without this step, emails will most likely be sent to spam inboxes, or not delivered at all. To verify your domain, you’ll need to point a few DNS records to Cloudways. For this tutorial, we’ll use a domain hosted on GoDaddy to make our DNS changes.
Setting the DNS Records
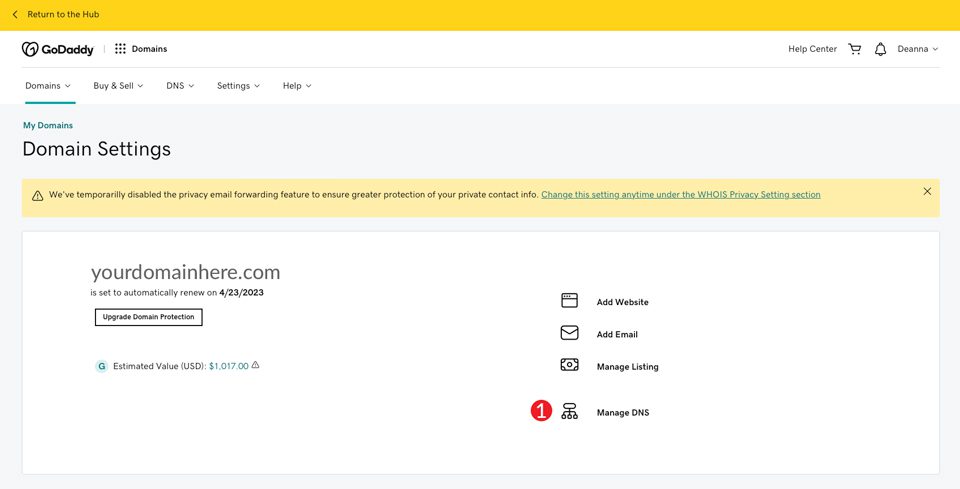
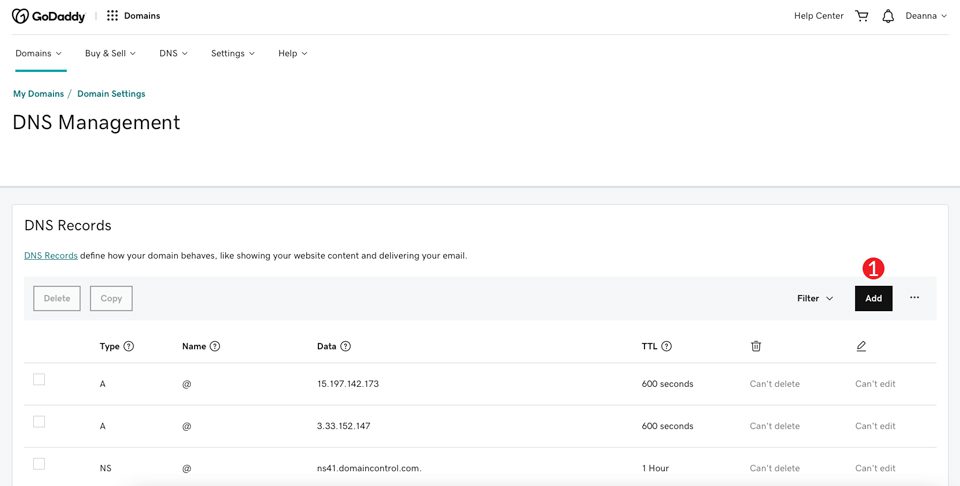
First, you’ll need to add a Sender Policy Framework (SPF) TXT record. This will help servers confirm that the emails you are sending are from a verified domain on your server. To add the TXT record, you’ll need to sign in to your domain provider. In GoDaddy, click on the domain you wish to alter the records for. Next, click manage DNS.
When your screen refreshes, click the ADD button to add a TXT record.
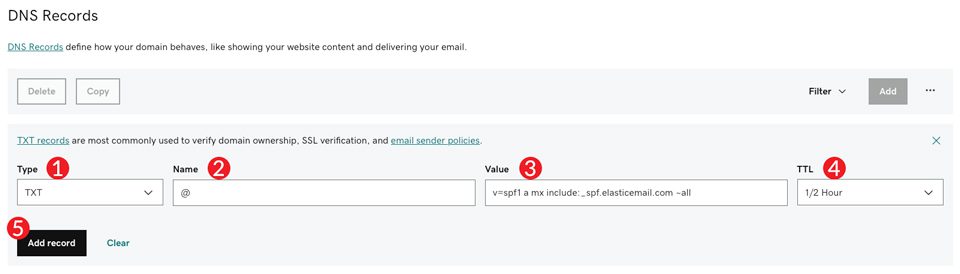
For the name/host/alias field, type @. In the value field, type v=spf1 a mx include:_spf.elasticemail.com ~all. For the time to live (TTL), select automatic or the lowest allowed. Finally, click Add record.
Note: Some registrars might not accept @ as a host, so you may need to leave the name field blank.
The next record we’ll add is a DomainKeys Identified Mail (DKIM) TXT record. This is another email authentication record that will add a digital signature to each message sent. To add the DKIM record, repeat the steps above to create a new TXT record. This time, for the name, type api._domainkey. For the value, input
k=rsa;t=s;p=MIGfMA0GCSqGSIb3DQEBAQUAA4GNADCBiQKBgQCbmGbQMzYeMvxwtNQoXN0waGYaciuKx8mtMh5czguT4EZlJXuCt6V+l56mmt3t68FEX5JJ0q4ijG71BGoFRkl87uJi7LrQt1ZZmZCvrEII0YO4mp8sDLXC8g1aUAoi8TJgxq2MJqCaMyj5kAm3Fdy2tzftPCV/lbdiJqmBnWKjtwIDAQAB
Lastly, adjust the TTL to the lowest allowed value.
Next, we’ll add a CNAME record. Make the name tracking, assign api.elasticemail.com as the value, and make the TTL the lowest allowed.
Using a DMARC Policy
The last step is to assign the Domain-based Message Authentication Reporting and Conformance (DMARC) record to your Divi hosting server on Cloudways. SPF and DKIM are prerequisites of DMARC and are needed to set up a DMARC policy. This is basically a failsafe that allows a sender to verify that both SPF and DKIM are present. To set up the most common DMARC record, add a new TXT record to your host. Use the name _dmarc, set v=DMARC1; p=none; as the value, and choose the lowest value for your TTL.
Configuring Divi Hosting Server Optimization for Cloudways
The last few steps are for speed optimization on your Divi hosting server. We’ll enable caching to make your site lightning fast. There are two options for caching – application and server side caching. Additionally, we’ll enable bot protection that will keep your site safe from bad actors who want to expose your site, and use it for nefarious purposes. Finally, we will increase the PHP memory.
How to Enable Redis
One of the most important speed optimization settings on any WordPress server is caching. Caching is the process of copying your site’s files and storing them in a close-by location in order to deliver them faster to your users. By default, Cloudways uses Memcached for its caching software, which is a great service. However, if you want to step it up a bit, using WordPress Redis is more robust with more advanced features.
Before enabling Redis, we recommend that you backup your site’s files since we will be making changes to crucial components of your core WordPress installation. To enable Redis, you’ll first need to make an addition to your site’s wp-config.php file. Using FTP and your text editor, open the wp-config.php file and add the following line of code beneath the opening php tag.
define('WP_CACHE', true);
Next, locate the Salt Keys Section of the file, and add the following code:
define('WP_CACHE_KEY_SALT', 'yoursite.com');
Be sure to replace yoursite.com with your website’s URL. If you are installing Redis on more than one application, you’ll need to repeat this step for each site’s wp-config file. This ensures that Redis is prepared to properly handle your site. Once you’ve made this change, activate Redis.
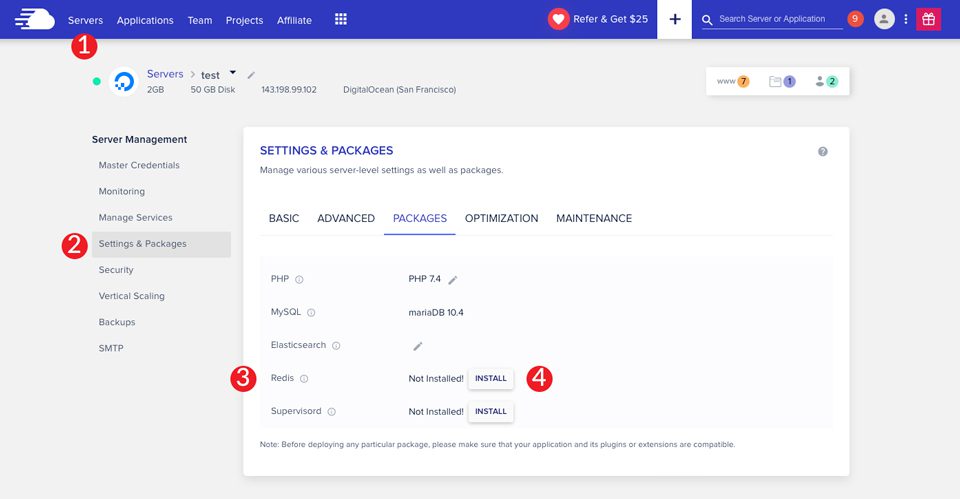
Navigate to Servers > Settings & Packages > Packages > Redis, then click Install.
Once Redis is installed on your server, the last step is to install the Redis Object Cache plugin, followed by the Breeze plugin. Installing both will accomplish two things. First, Breeze will cache your site’s contents, while Redis Object Cache handles queries, and other data structures for WordPress Admin processes. Having both plugins installed on your site, along with enabling Redis on your Divi hosting server will dramatically speed up your site.
Using Varnish in Cloudways
Varnish is a server-side caching solution that comes standard and enabled with every Divi hosting plan with Cloudways. Enabling server caching is an excellent way to speed up your WordPress sites. Periodically clearing your cache will dump data and files that you may have deleted out of your database, allowing for faster loading times.
If you wish to exclude certain pages on your site from server side caching, you can do so at the application level. Click on your server, then your application by clicking the www on the right side of the screen.
Under Application Management, navigate to Application Settings > Varnish Settings. Click the Add New Exclusion button.
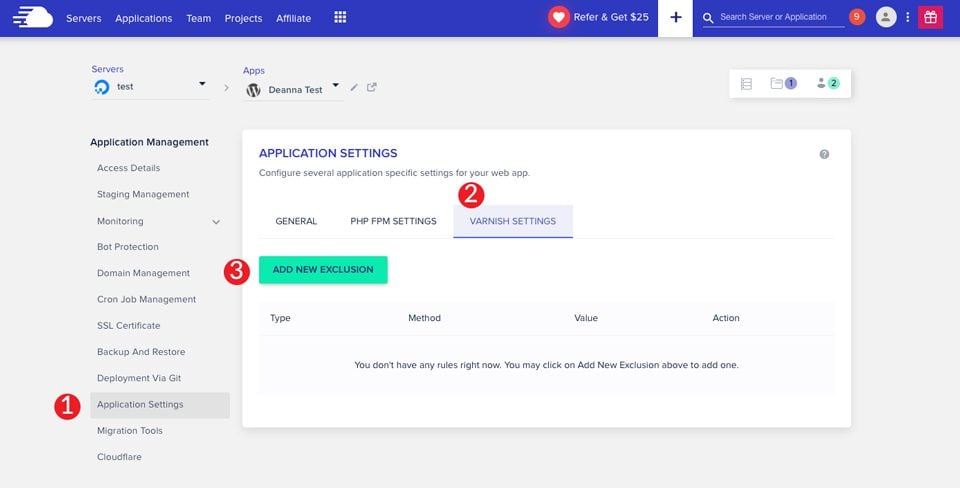
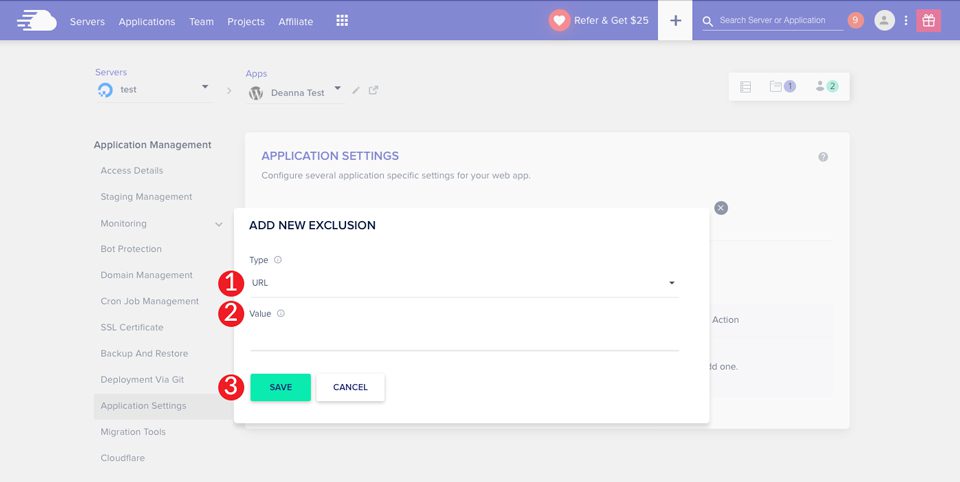
Choose URL as the type if you wish to exclude a URL. Keep in mind that if you call a parent page such as /shop/, all nested child pages will be excluded as well. In addition to URL’s, you can exclude cookies from server-side caching. Once you’ve made your page or cookie selection, type in the value, then click save.
Enable Bot Protection
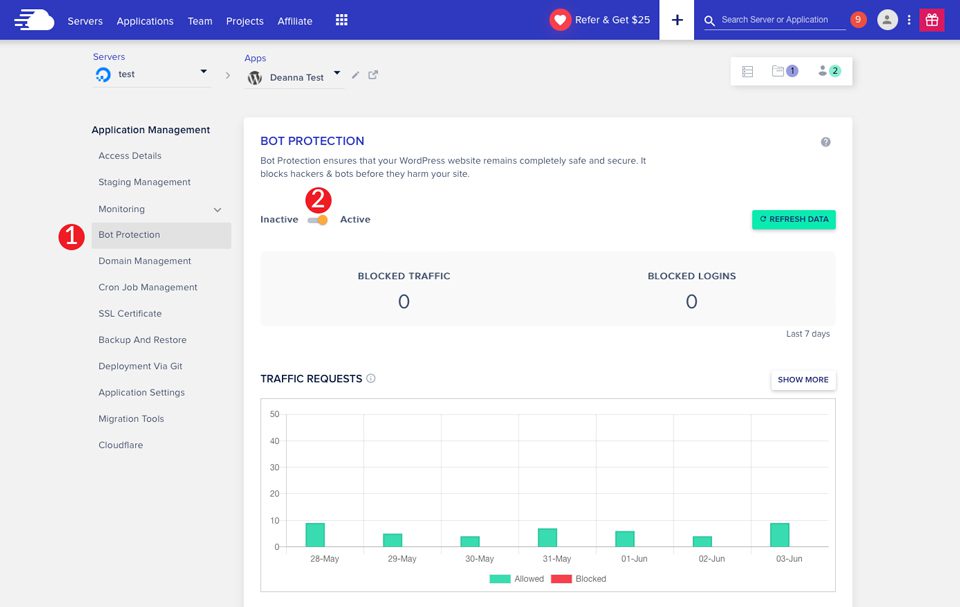
One very crucial feature that Cloudways offers is bot protection. It keeps your Divi hosting server from having issues with attacks that can leave your server’s speed decimated. In addition to that, not having bot protection exposes your site to security vulnerabilities that could render it inoperable.
Bot protection must be enabled at the application level. Navigate to Application Management > Bot Protection in your application. Make sure the toggle is set to on.
Increasing the Memory
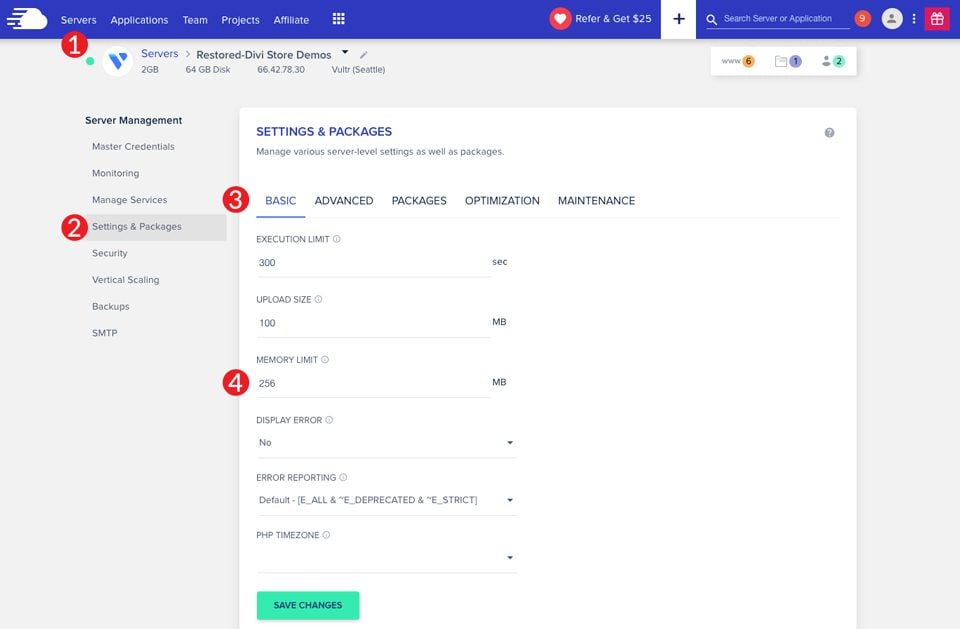
The last optimization step is to increase your site’s memory. By default, Cloudways recommends at least 128-256mb. That should be more than sufficient for small to medium websites. That being said, if you have a large site with hundreds of products, you may want to increase that.
For example, if you have a high traffic site that receives thousands of hits per day, you might want to increase your PHP limit to 1024MB. A high PHP memory limit will assist in helping your website run faster, especially if you are using a lot of scripts, or storing a lot of files. To increase your PHP limit, click servers in the main menu. From there, click on the server of your choice. Under Server Management > Settings & Packages > Basic, choose memory limit. Make the changes you desire, then click Save Changes.
Setting Up a CDN for Divi Hosting on Cloudways
In order to set up your CDN directly through Cloudways, you’ll need to sign up for Cloudways Enterprise. It includes a CDN through Cloudflare, amongst other great features. Priority DDoS protection, intelligent firewall, image optimization, wildcard SSL support, and Broti compression are a few of the things you’ll receive with your upgrade. The cost per domain is $4.99. This is a good choice for those who seek more protection and even faster speeds for their website.
Once activated, Cloudflare is super simple to set up. Head to applications in the main menu. Next, choose the application you wish to attach to Cloudflare. Under Application Management, choose Cloudflare. Type in your domain and click enable.

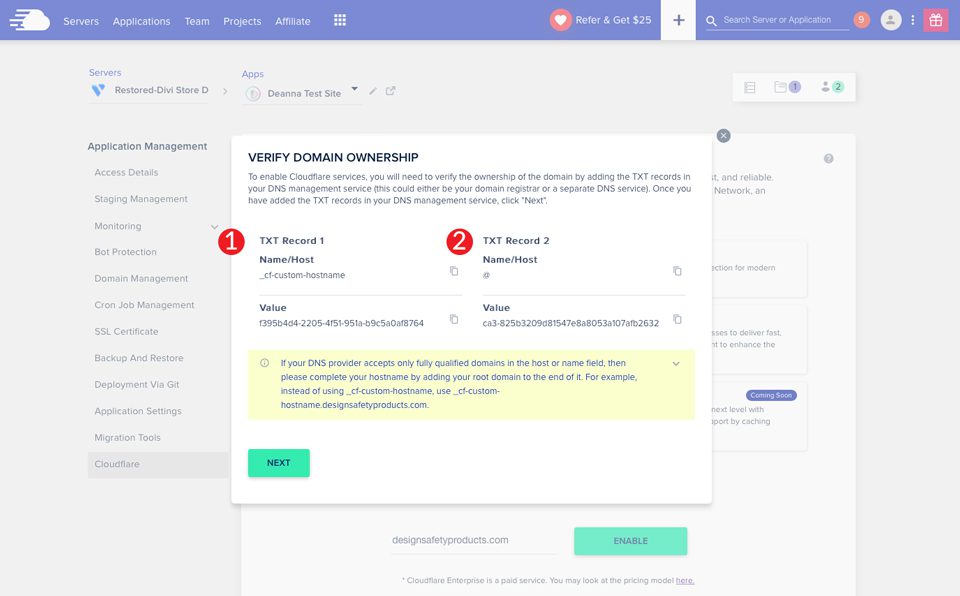
Cloudways will start the process of attaching your domain to Cloudflare. The process shouldn’t take more than a few minutes to accomplish. Next, you’ll need to create two TXT records that will let Cloudways and Cloudflare verify domain ownership. Head over to your domain’s registrar to create the two new TXT records. Once in place, come back to Cloudways and click next.
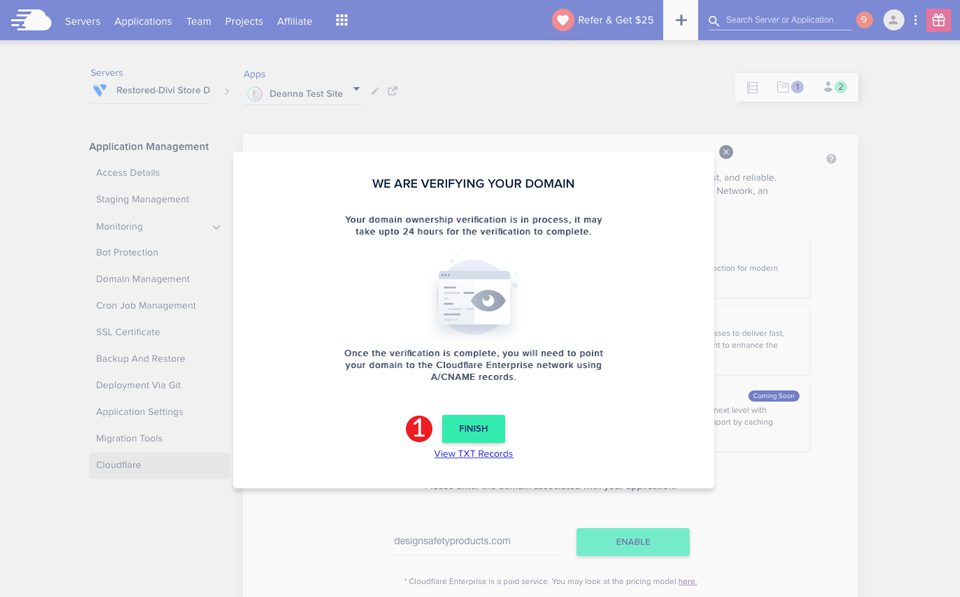
Cloudways will take the steps necessary to verify your domain. They state that it can take up to 24 hours to verify. Once the verification process is completed, your domain will need to be pointed to the Cloudflare Enterprise network using A and/or CNAME records. Having Cloudflare enabled on your Divi Hosting Server on Cloudways will give you an extra speed boost for your website.
Optimizing Your Divi Hosting Server On Cloudways is Fast and Easy
Setting up your Divi hosting server on Cloudways is a simple process that will give you the fastest, most optimized Divi WordPress site available. We choose our hosting providers carefully, selecting only the best options for our customers. With one-click installs, plenty of speed optimizations, and excellent built-in features, your Divi site will be smoking fast and ready to go in minutes. Aside from server-side improvements brought by Cloudways, these speed optimization plugins could make your WordPress install as efficient as possible.
Do you use Divi Hosting by Cloudways? If so, share your thoughts with us below.


Thank you so much. I solved my issue about this topic!
Good one, Really enjoyed reading it..
I have a question – How many websites can be in one server??..
I am really glad to see that Elegant Themes is now partnered with Cloudways. We have been hosting through them for several years and we are currently on a top-tier Vultr High Frequency server. There is no official restriction on how many live and staging websites you can have on any plan. The number of sites you can host on a server of any size deployed through Cloudways depends on the size of your websites and their traffic. You can check your server’s “monitoring” tab to see how much of each resource you are using and you can scale up your server to the next tier at the click of a button if there is a need.
Thankyou so much for sharing this blog with us.