")
If you’re a content creator, finding good video editing software is crucial. Those just starting will likely favor a more user-friendly option, such as Wondershare Filmora. In this post, we’ll dive deeply into this beginner-friendly video editing powerhouse and discuss its features, pros, and cons!
Let’s get started.
Wondershare Filmora is a video editing software for Mac and PC launched back in 2015. Unlike cloud-based options, you must download it to your computer and use its resources to edit videos. For some, this could be an issue due to system requirements. To run Filmora successfully, you’ll need a Mac or PC with at least 8 GB RAM, 10 GB storage space, and an Intel i3 (PC) or i5 (Mac) processor. Filmora has several video editing tools, including AI copywriting and image generation, millions of stock image and video assets, keyframing, motion tracking, auto reframing, and more.
In addition to a desktop app, Filmora is available on Android and iOS though the Filmora app. You can retouch selfies, add augmented reality (AR) effects, and add music and stickers. There’s also Filmora Workspace, which allows you to manage, share, and store your projects in the cloud. You can also continue where you left off on your latest project using a combination of Workspace and the Filmora app. Finally, there’s Filmstock for Filmora, which provides over 400 effects packs for your videos. The app is standard with your Filmora subscription, but to take advantage of Filmstock, there is an additional monthly fee.
Filmora offers features for creating and editing videos in a flash. Some standard features include 3D titles, motion blur, and speed ramping, which allows you to slow down or speed up your videos in a few clicks. An instant mode feature enables users to create videos with titles, effects, and highlights in just a few minutes. Additional tools include auto beat sync, which automatically adds effects to the beat of your video’s audio tracks, and masking, which enables you to mask elements you wish to hide from your video.
In Filmora’s latest version, 12, there are quite a few new features to mention, including multiple platform support, where you can create or edit a video in the desktop version and then complete it on the go with the Android or iOS app for iPhone or iPad. To give you a better idea of what Filmora can do, let’s go over some of its best features so you can decide if Filmora is right for you.
Video Editing
Filmora is packed with tools to make video editing a breeze. From AI copywriting to the innovative cutout feature, plenty of tools help you create stunning videos. Let’s walk through some of the more notable ones offered by Wondershare.
AI Copywriting
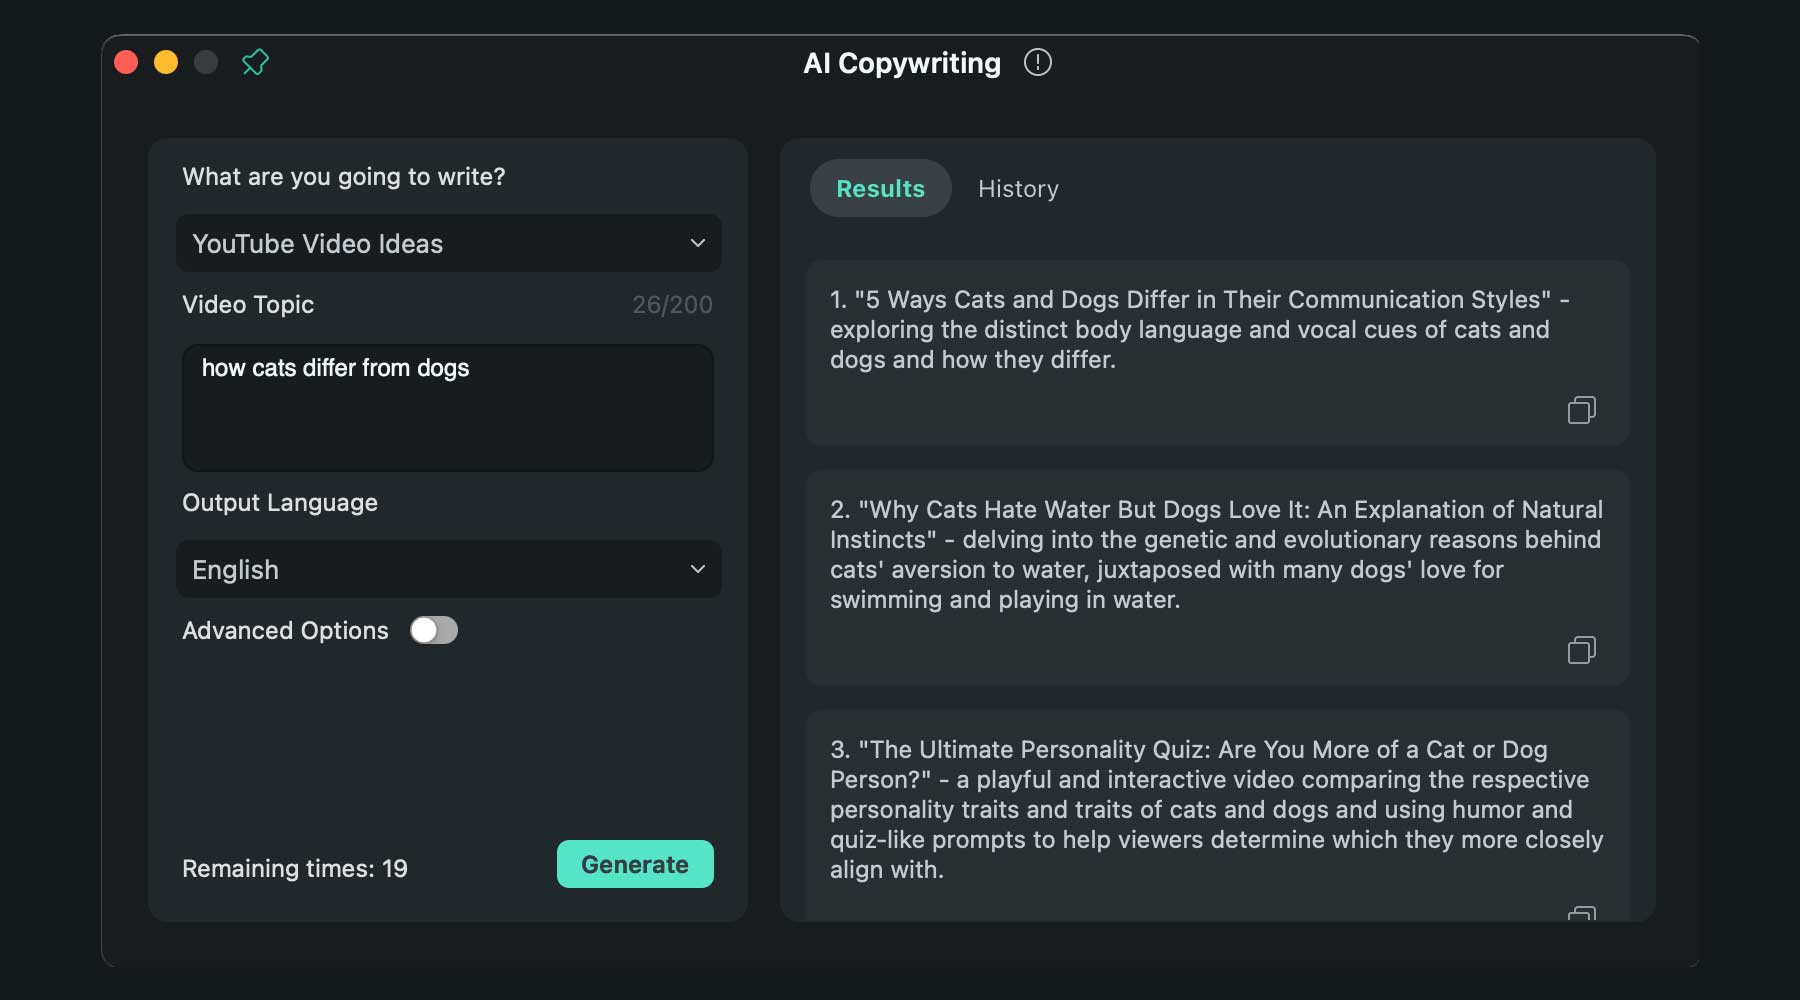
One of the newest features is ChatGPT built into the software. You can generate scripts, YouTube titles and descriptions, and video copy with a text prompt and button click. ChatGPT can be used before launching a project or during editing to add or replace text in your video.
AI Image Generation
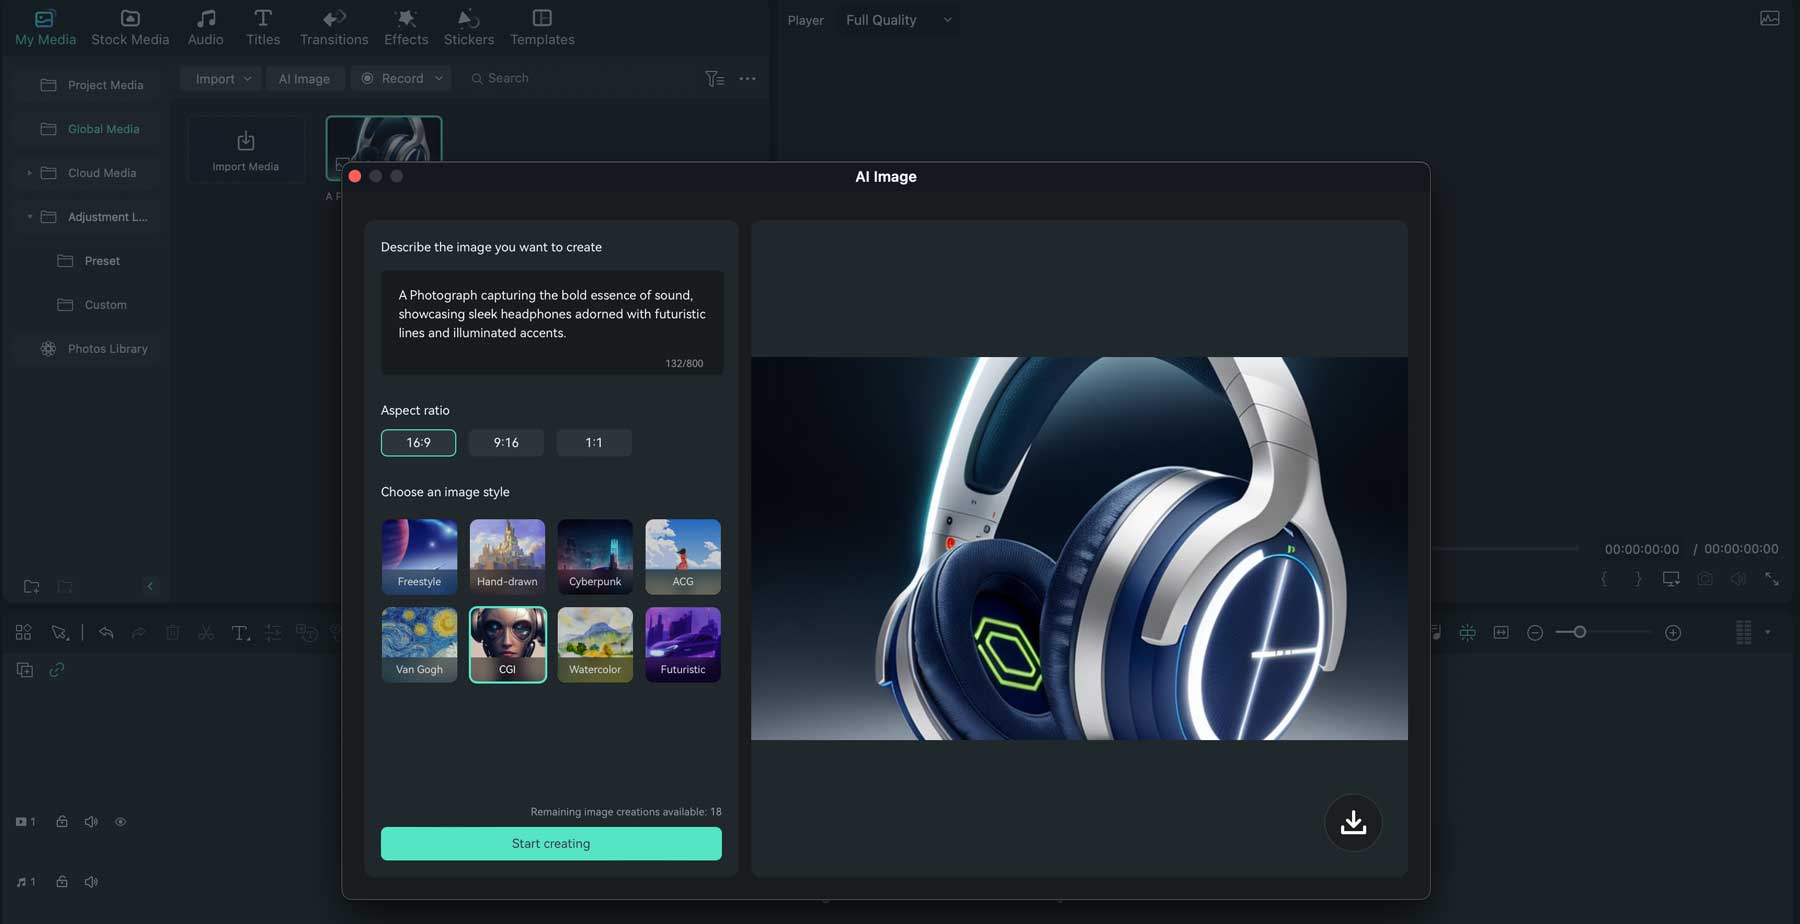
Another new addition to Filmora is the text-to-image tool. Using text input, you can generate images through the desktop app for use in your video projects. There are a few styles to choose from, including hand-drawn, CGI, cyberpunk, Van Gogh, and Watercolor, to name a few. There are also three aspect ratios, including 16:9, 9:16, and 1:1, so you can create images for widescreen or YouTube shorts.
AI Smart Cutout
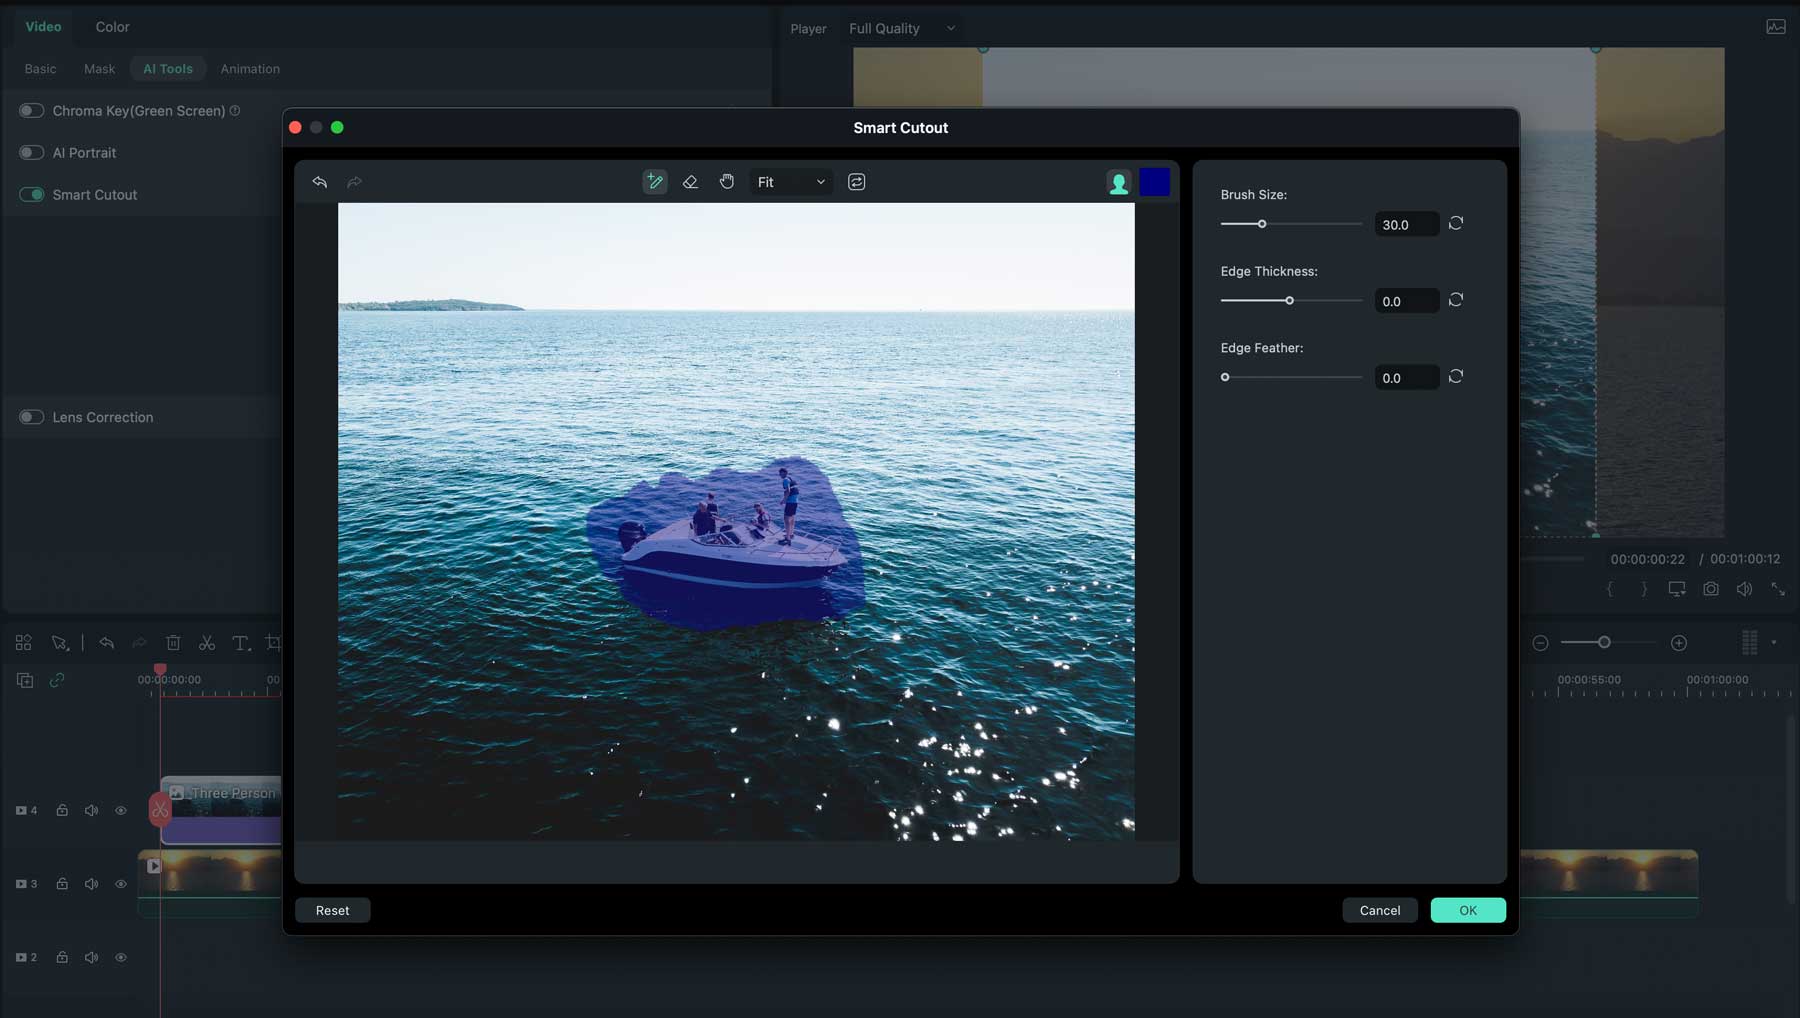
Another cool AI feature of Filmora is the AI Smart Cutout tool, which allows you to easily select a subject in your video, remove objects, or replace the background in your clips.
Auto Reframe
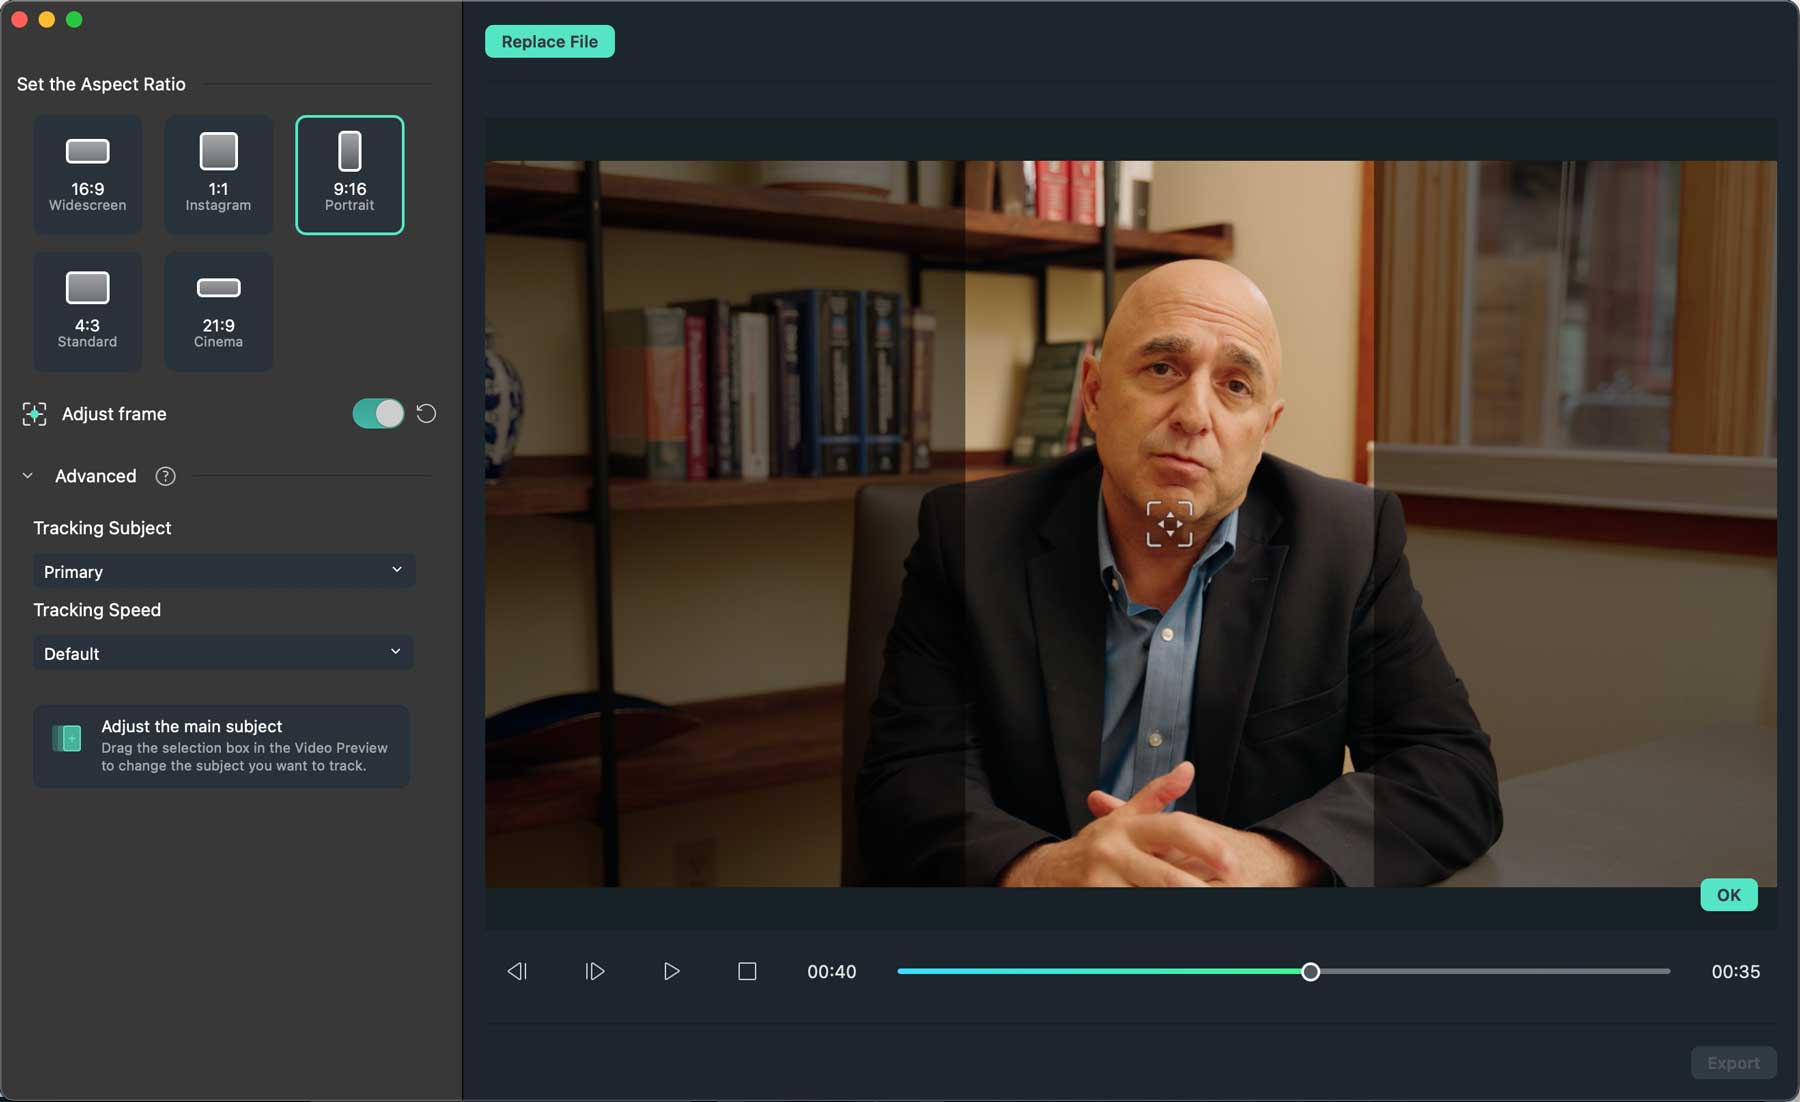
You’ll love the Auto Reframe tool if you’re tasked with creating videos for multiple platforms. With the click of a button, this AI-powered tool will automatically change the orientation of your video from landscape to portrait or vice versa, so there’s no need to create two versions. The best part? It will automatically track the subject of your video so the experience is seamless across platforms.
Avatar Presentation
![]()
Another exciting feature of Wondershare Filmora is the AI Avatar Presentation tool, which allows you to create an animated, virtual avatar that can talk, mimic facial expressions, and move in real time. You can upload your virtual relationship model (VRM) or use one of 15 pre-made avatars.
Additional Video Editing Features
Aside from the tools listed above, a few other video editing features are available with Wondershare Filmora. These include an asset backup & sync tool, which allows you to access your videos on the desktop or mobile app and then share them with team members or friends. An adjustment layer tool lets you create cool effects and copy and paste them throughout the video’s timeline. Additionally, the split screen feature allows you to create multiple screens, allowing you to create unique videos to get your message across.
Video Effects
With Wondershare Filmora, you’ll have access to plenty of cool effects for your videos. You can apply engaging transitions, filters, 3D titles, and motion elements to make your videos more engaging. You can also create a green screen effect to replace the background, use the pen tool to draw and mask elements in your video, and then animate them. With the AI Portrait plug-in, you can automatically add sticker effects, remove backgrounds, and add AR elements, making cool animated shorts for your social media channels.
Audio Editing
Wondershare Filmora has several audio tools, including the AI Audio Denoise tool, which removes undesirable background noise from your videos. There’s also the AI Audio Stretch tool, which uses generative AI to either shorten or lengthen audio in your video files to match the length of the video. You can also create voiceovers with the text-to-speech tool, synchronize audio and video to make the sound clearer, fade audio with the ducking tool, and use the silent detection tool to cut out quiet parts of your video easily. Finally, millions of audio clips are available, so if you need the means to add audio, Filmora can help.
Making Color Adjustments
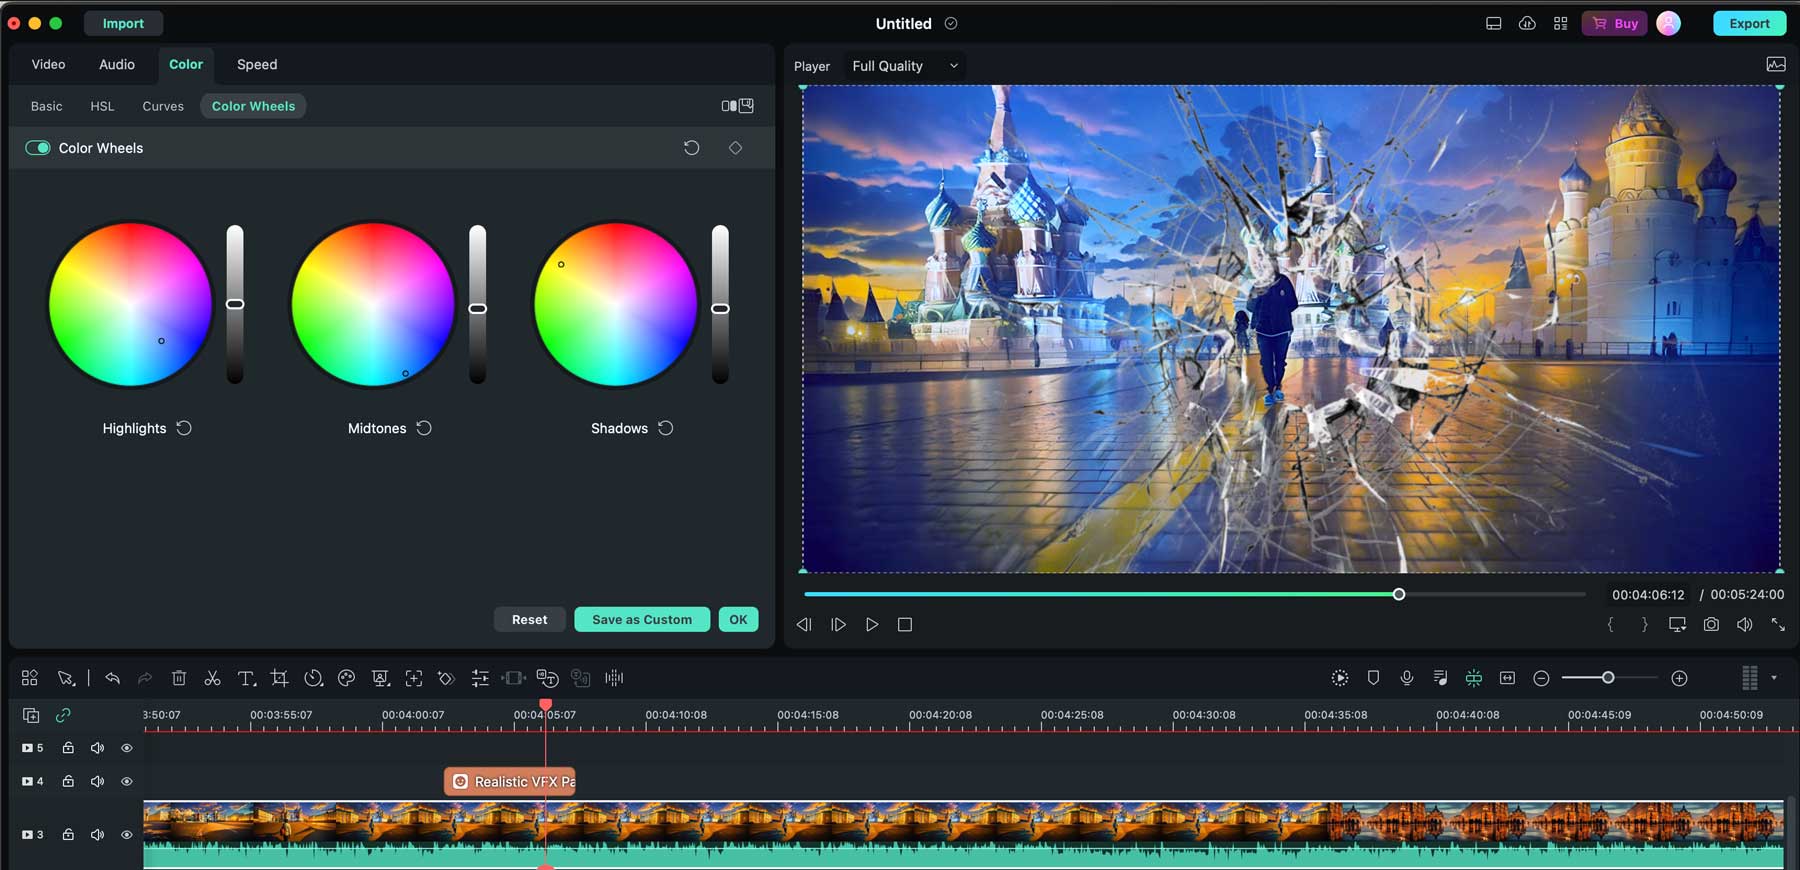
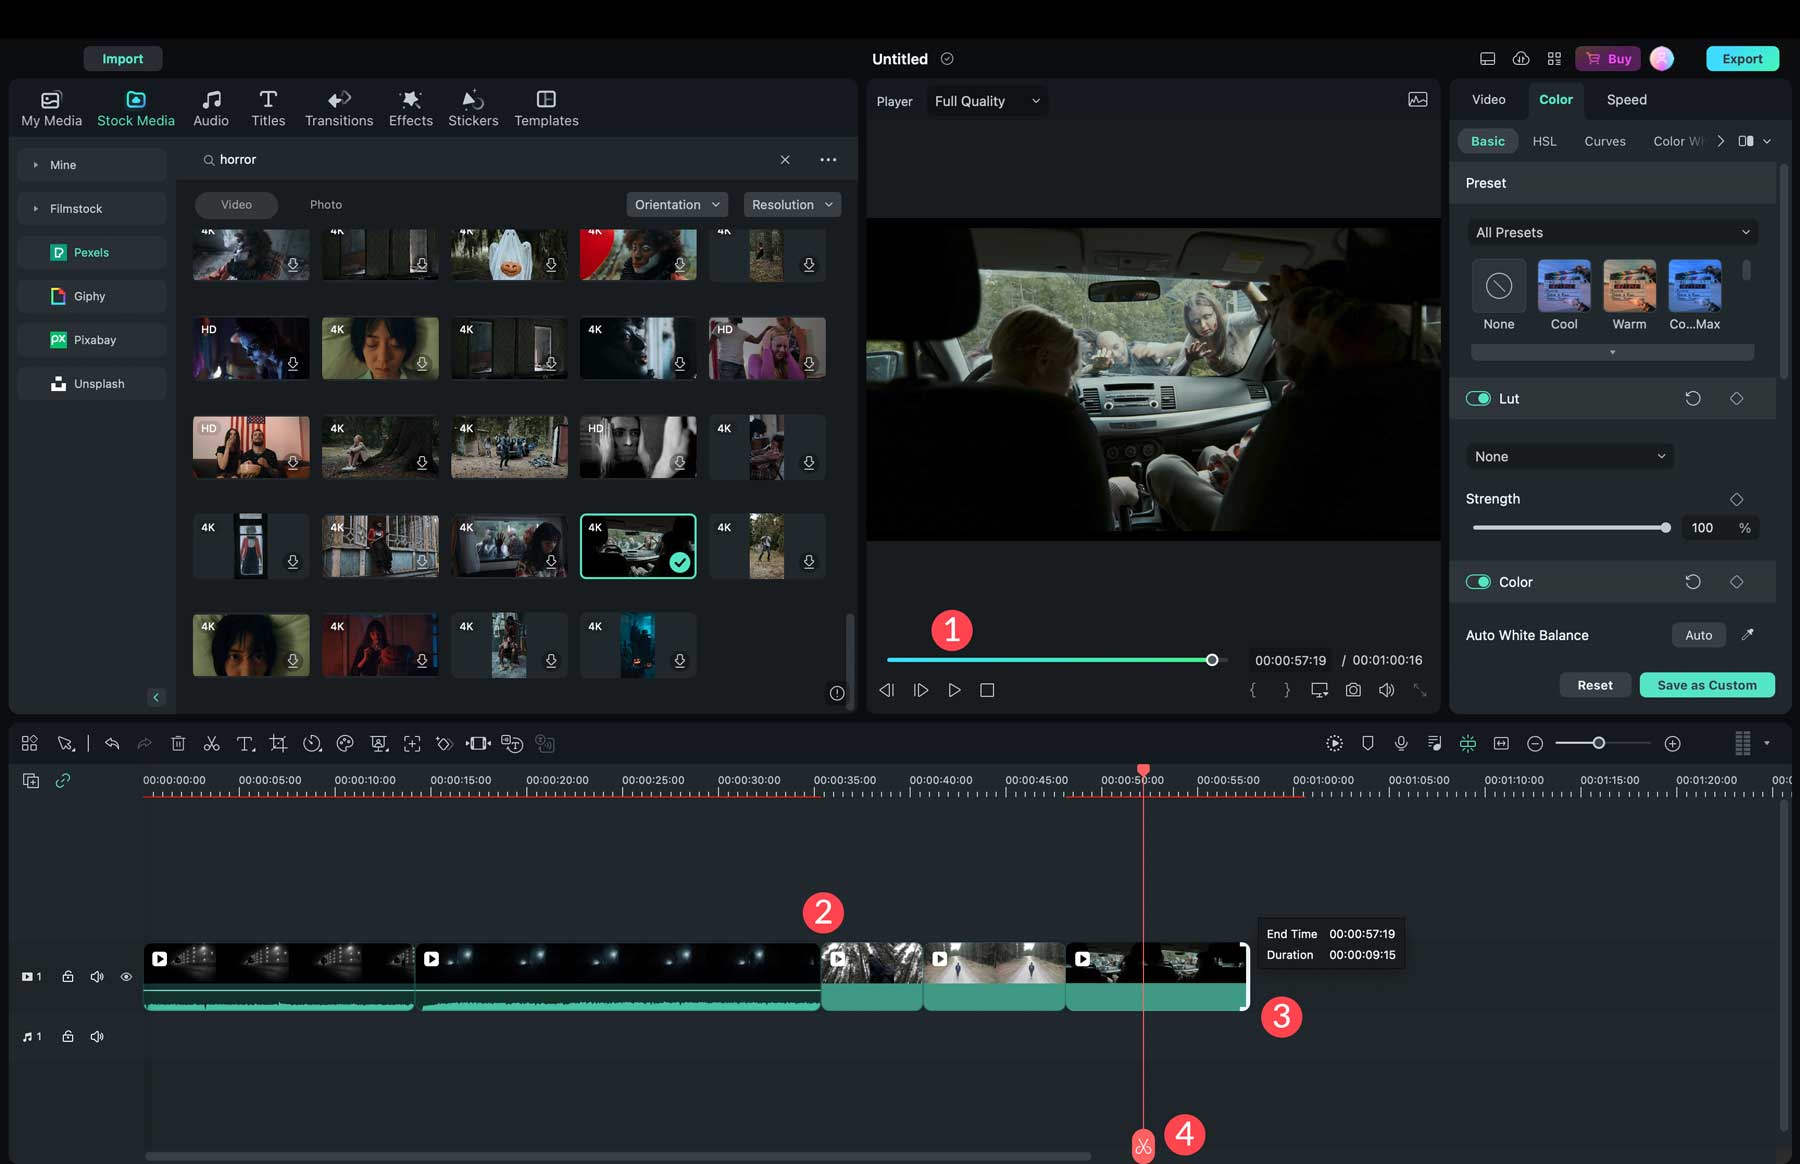
Filmora offers the option to apply color corrections to videos using 3D LUT. It boasts a library of more than 100 lookup tables (LUTs) that can transform the style and appearance of your video. You can seamlessly import one if you’ve previously crafted a specific 3D LUT in another program, like Photoshop. Additionally, the color match tool enables the selection of a precise color from a particular frame, which can then be copied and applied to other clips. Lastly, over 40 color presets are available to enhance the warmth, vibrancy, or coolness of your video’s look.
Now that we’ve given you a better idea of what Filmora can do, let’s look at the steps you’ll need to take to create your first video. The great news is that Wondershare makes it easy to get started and offers a free version for you to try. You’ll have access to almost every tool they offer, minus a few, such as the AI avatar presentation feature. With the free trial, you can create and export up to 10 projects (with a watermark), so you’ll get a feel for how things work.
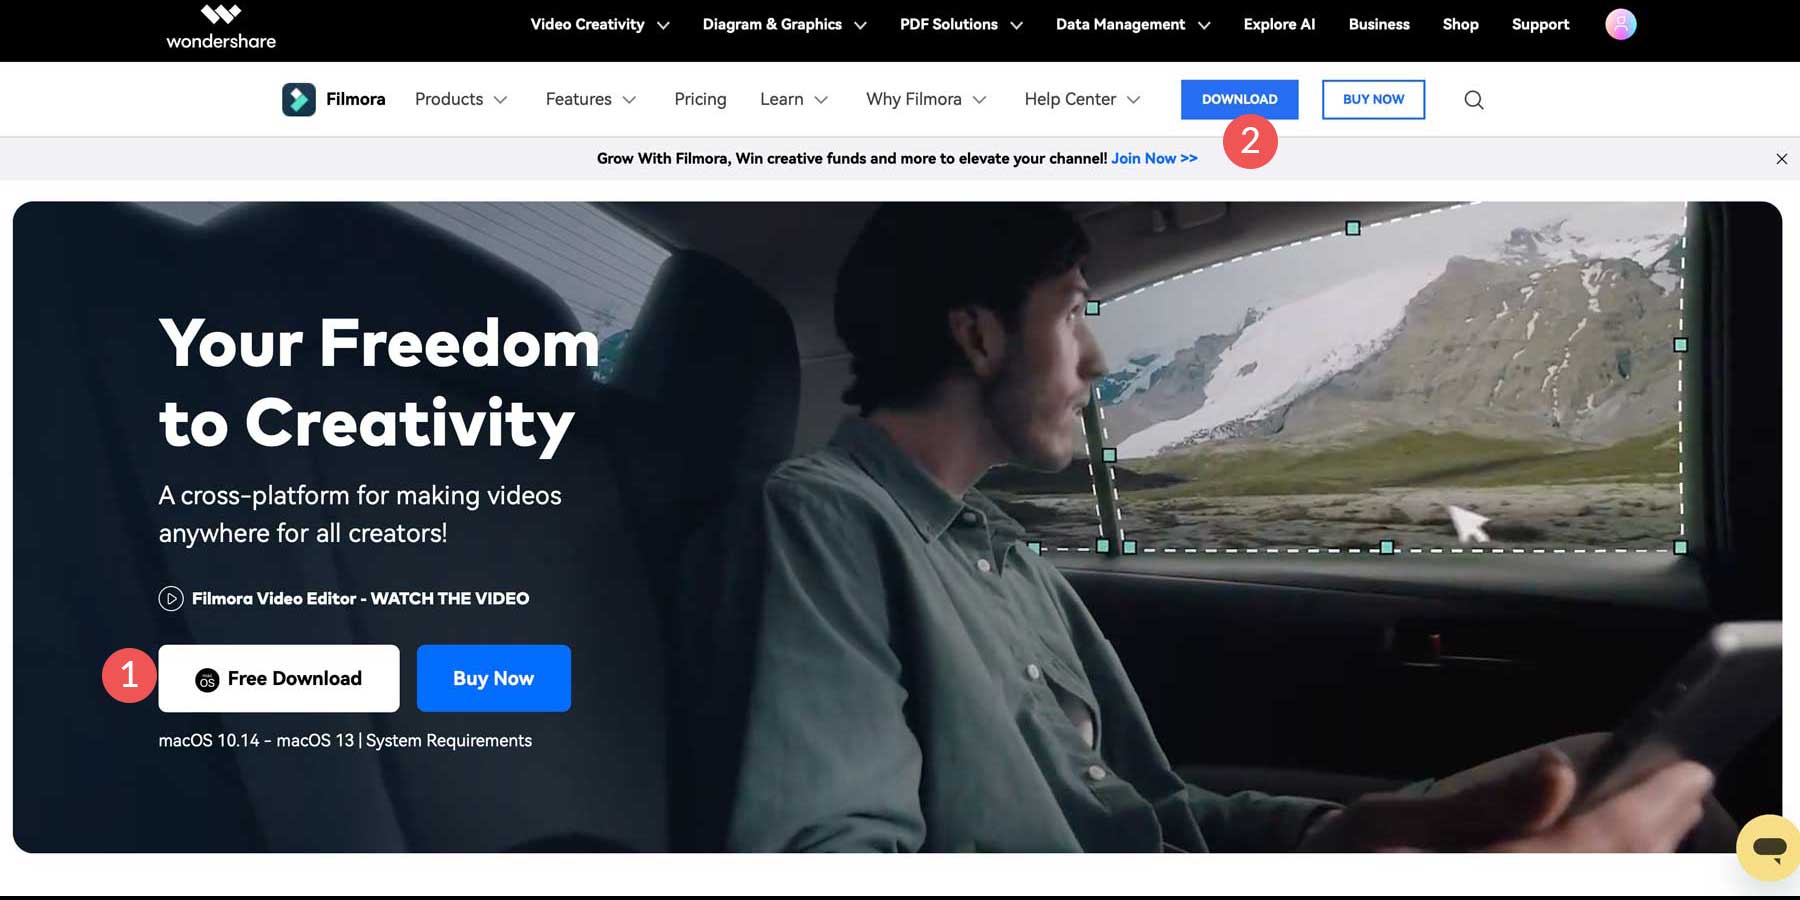
The first step is downloading the software to your computer. Ensure that your system meets the requirements, then start by clicking the Free Download button on Wondershare Filmora’s home page.
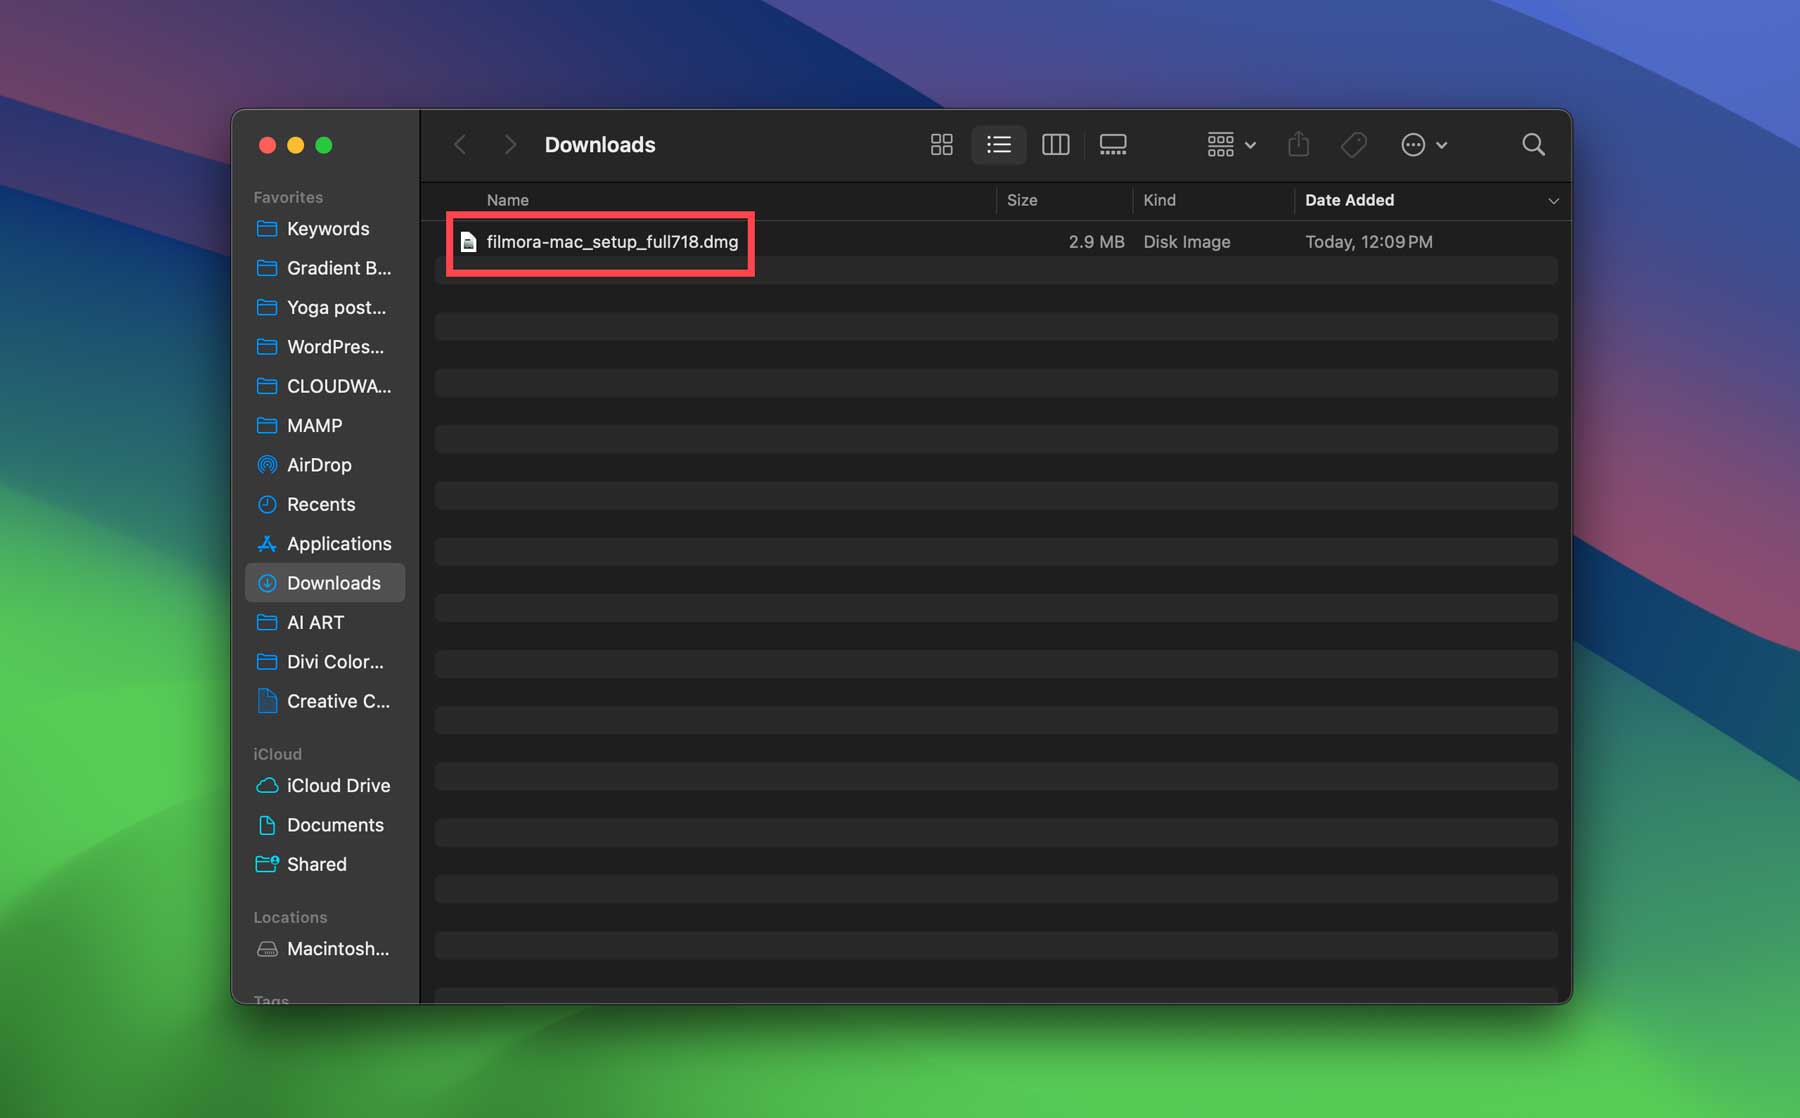
Once the software is downloaded, locate the downloaded file and double-click to open it.
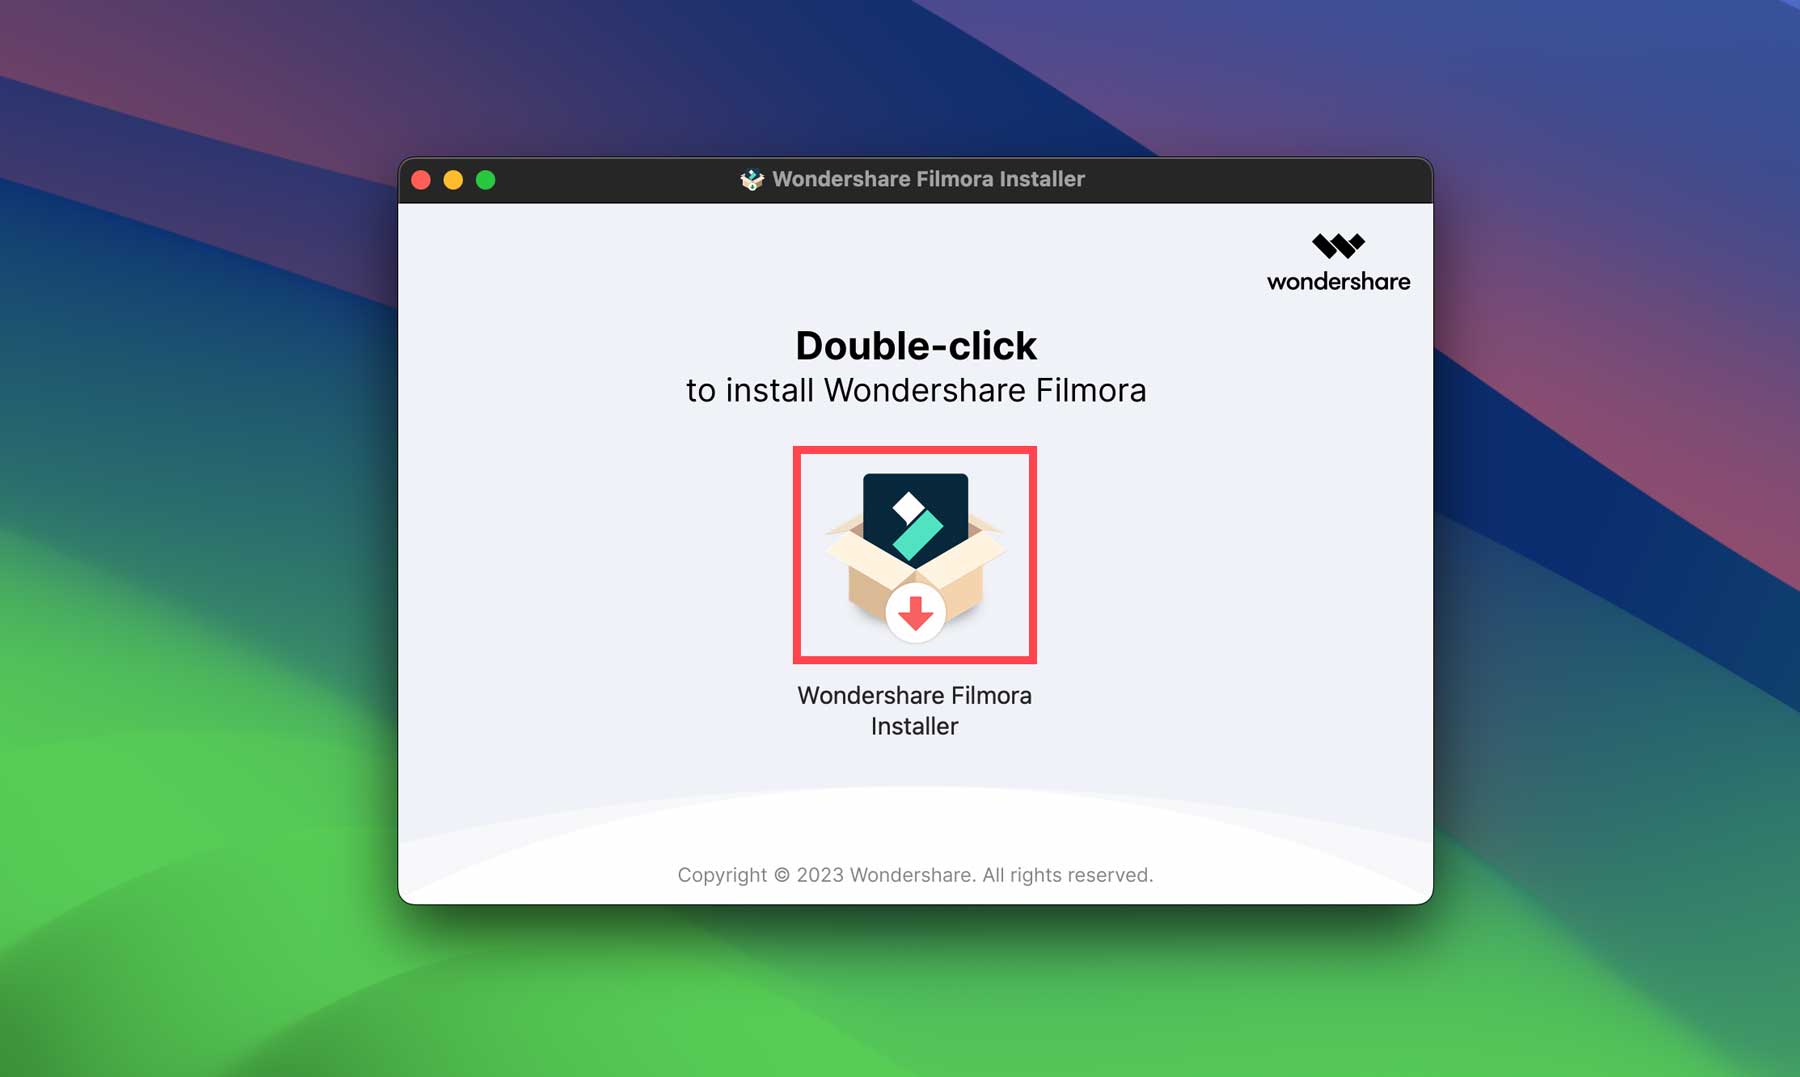
Next, double-click the installer package to install it on your computer. Your install screen may look different depending on your system, but the process is the same.
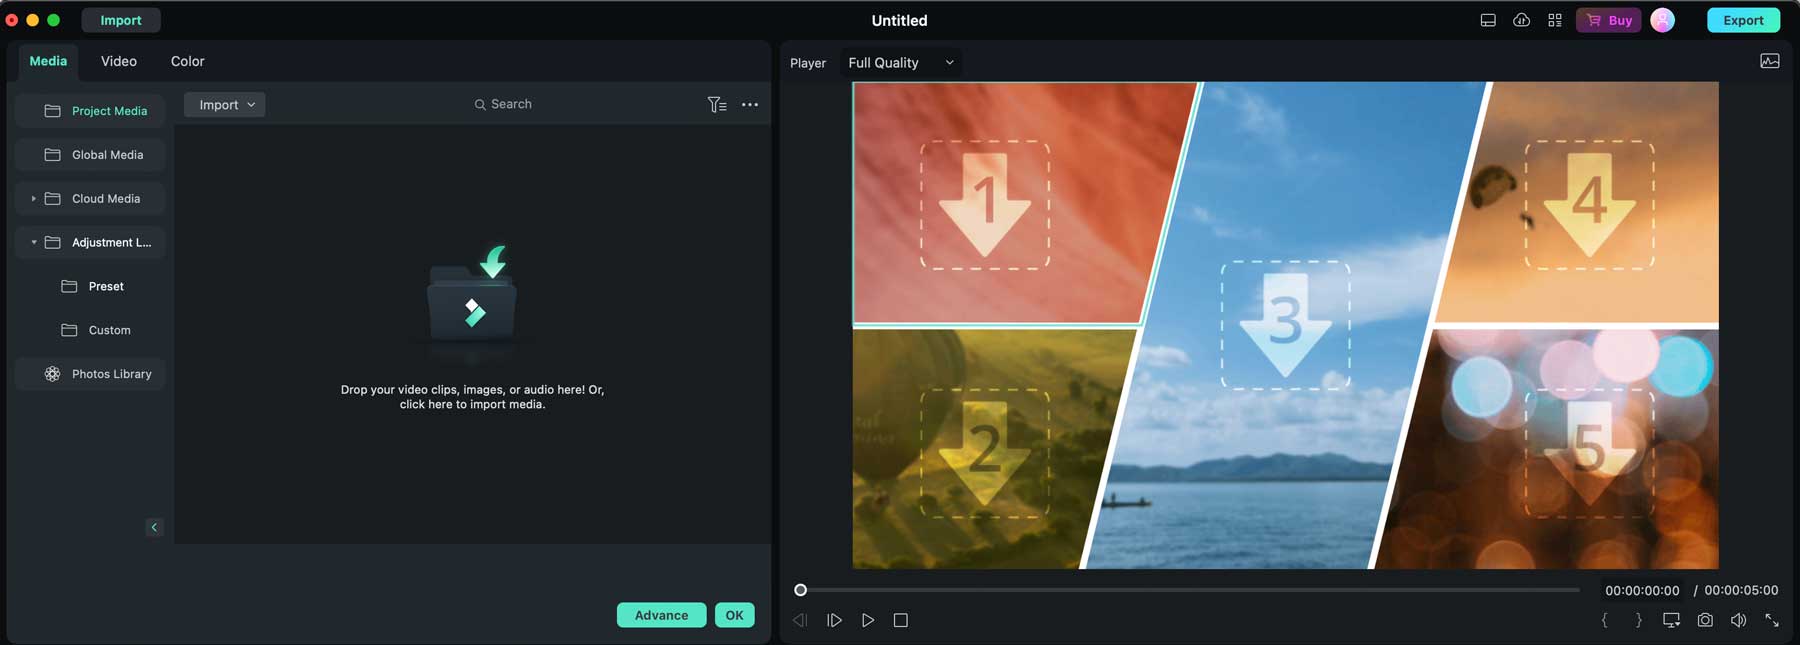
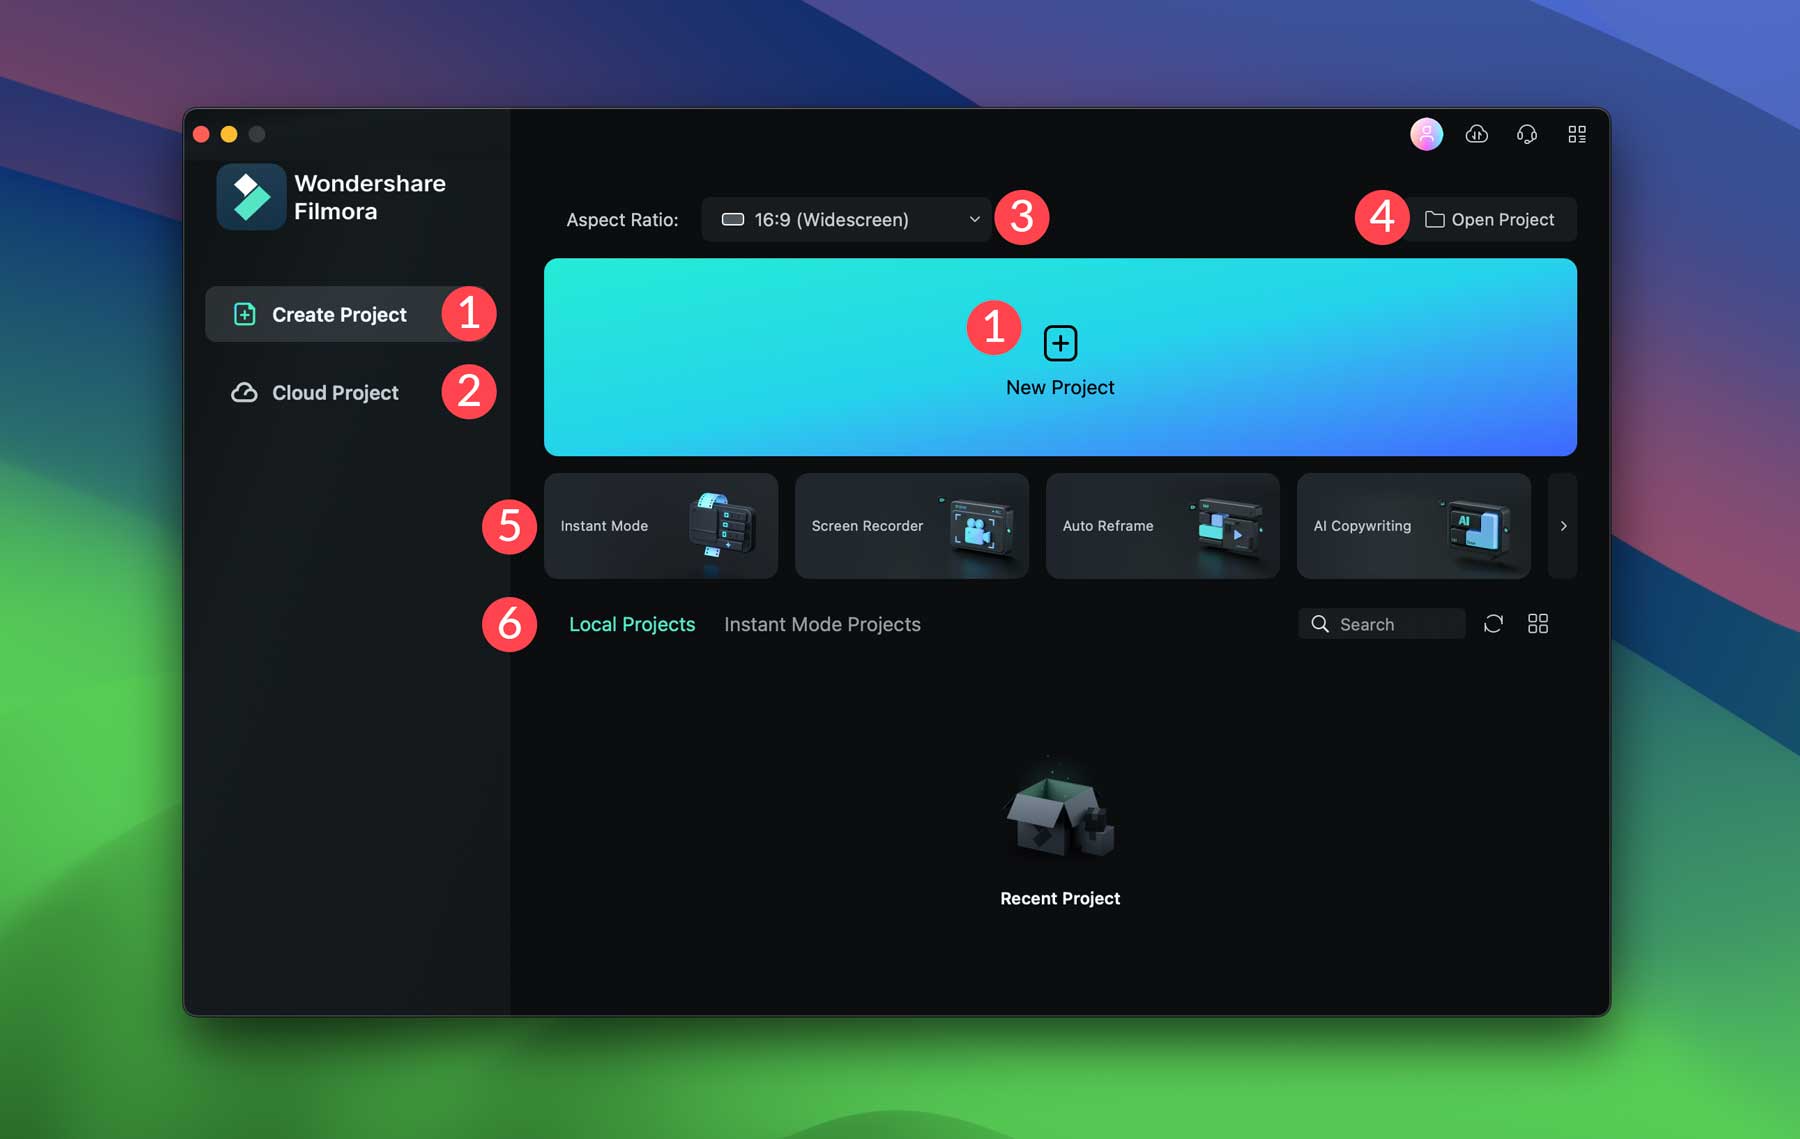
After the software is installed, Filmora will open on your computer. You’ll be met with a quick-start dashboard where you can create a new project (1), open a cloud project (2), set the aspect ratio for a new project (3), open a project stored on your computer (4), or launch one of the various tools, such as instant mode, screen recorder, the AI copywriting too, and others. After completing projects, they will be listed in the project gallery near the bottom of the screen (6).
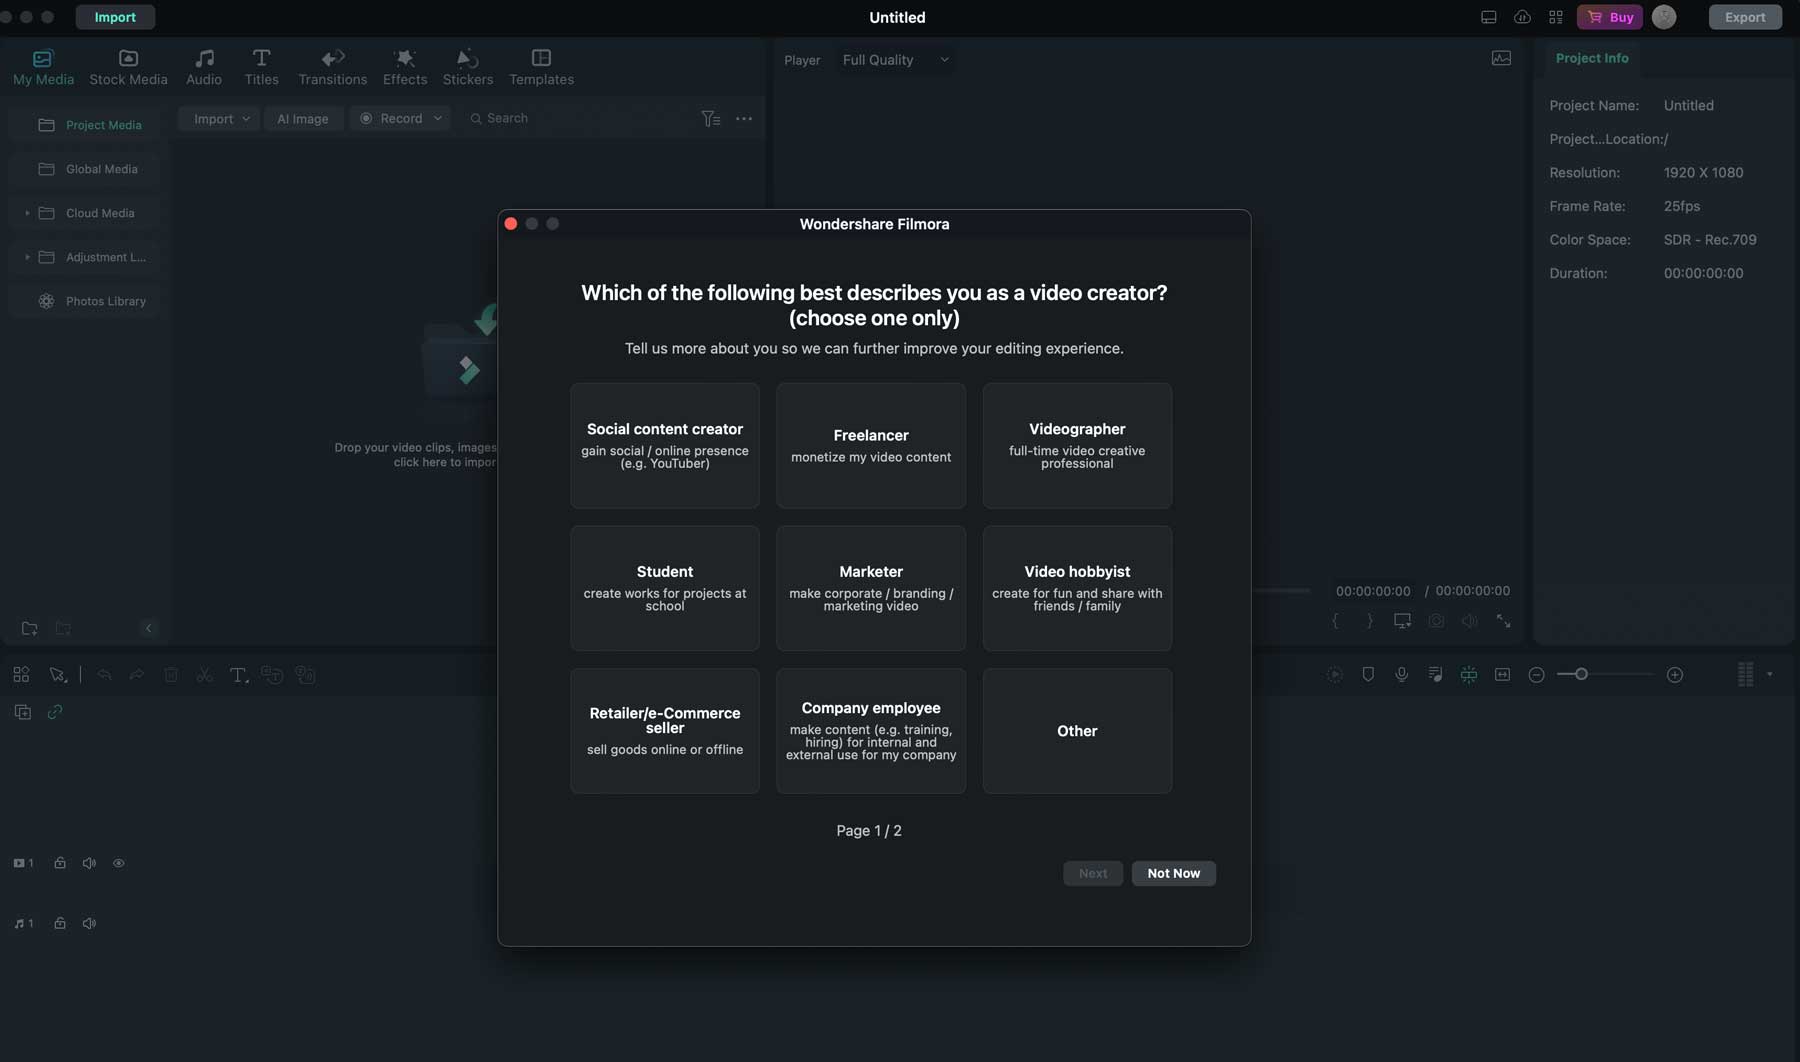
Start by clicking the new project button. Once your new project is created, a quick start wizard will help you set up your workspace based on how you plan to use the software.
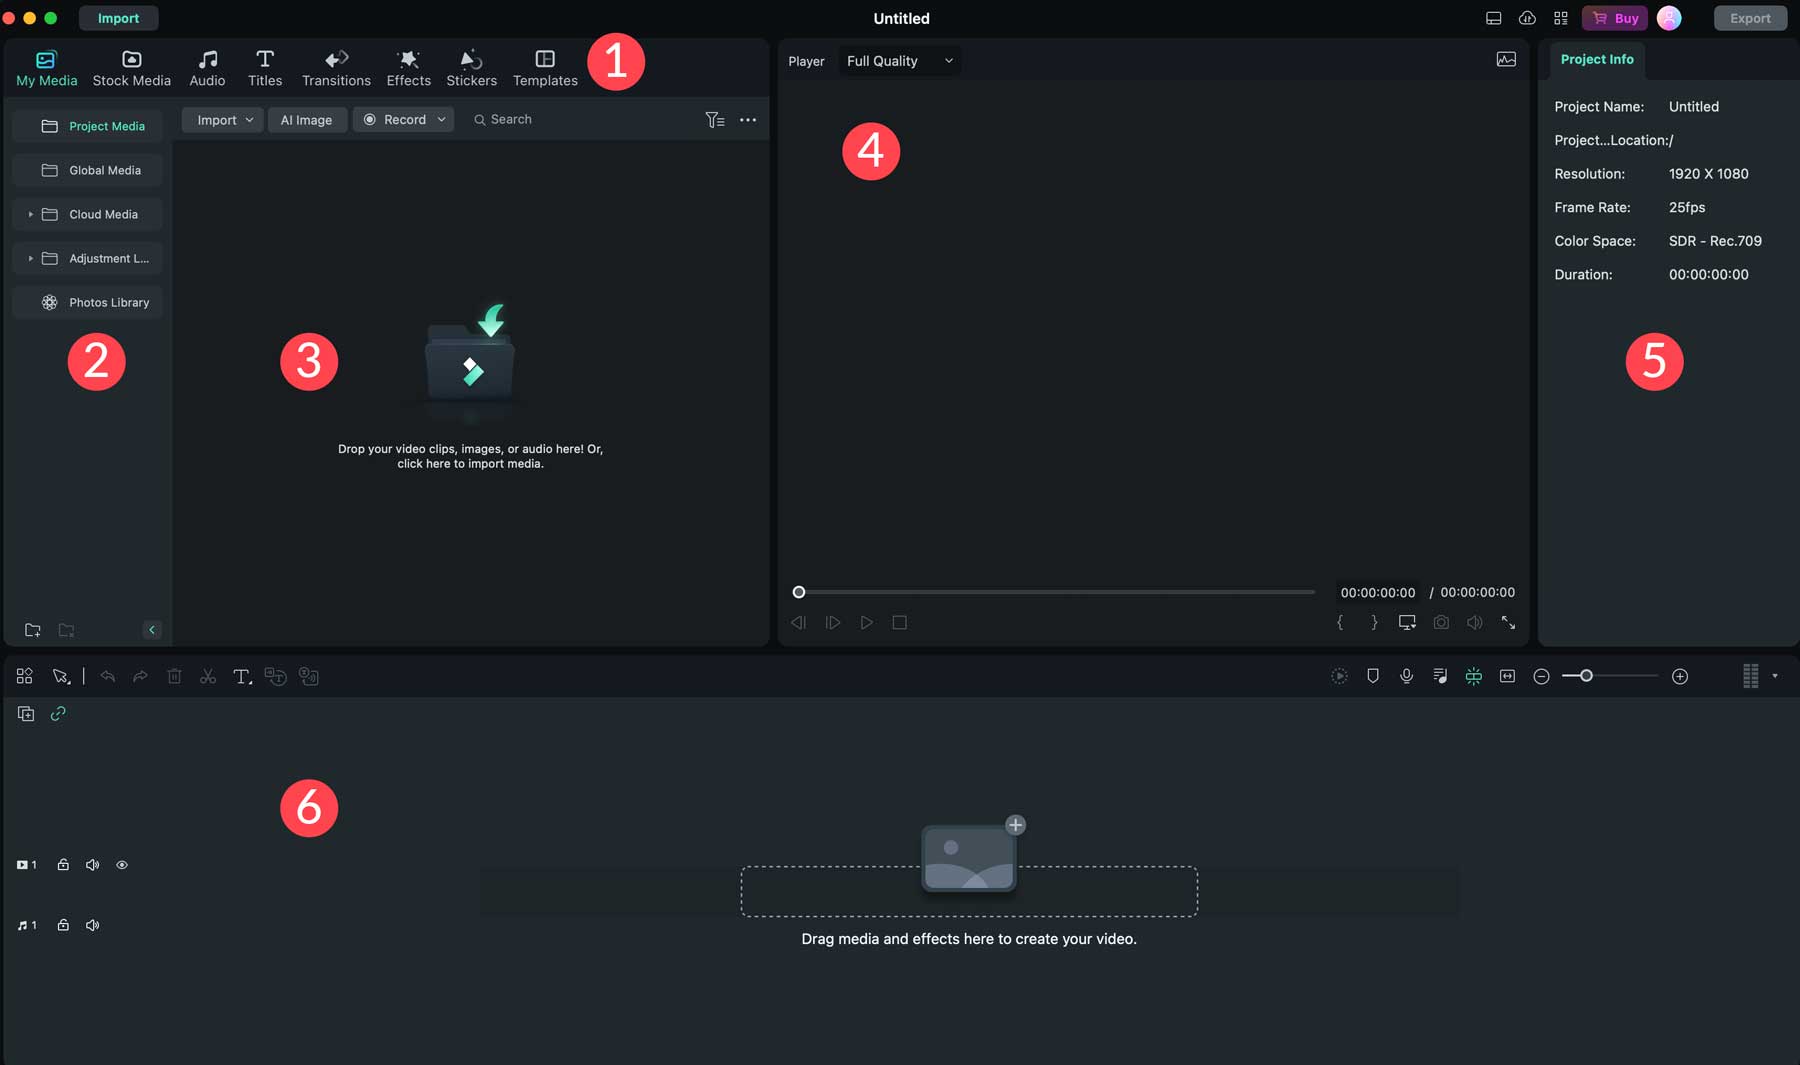
Before we create our first video, it’s essential to know the interface you’ll be working in. There are quite a few features to learn, including the tools tab, which allows you to import media, select stock video or audio assets for your project, create title screens, transitions, effects, and stickers, or choose a template.
Here’s a brief rundown of the interface so you’ll know where everything is located:
-
- Tools tab: Allows you to select different media, stickers, effects, and text to add to your videos.
- Tool options: Once a tool is selected, a list of available options will pop up, allowing you to choose one.
- Import media: You can double-click the folder icon to upload assets to your video or select an option from the menu.
- Video preview: Once assets are present, you’ll be able to view your video in the preview window.
- Video settings: Reveals frame rate, aspect ratio, and other details about your project.
- Timeline: After placing assets into your project, a timeline will appear showing you when and where each asset will begin playing.
Adding Stock Media
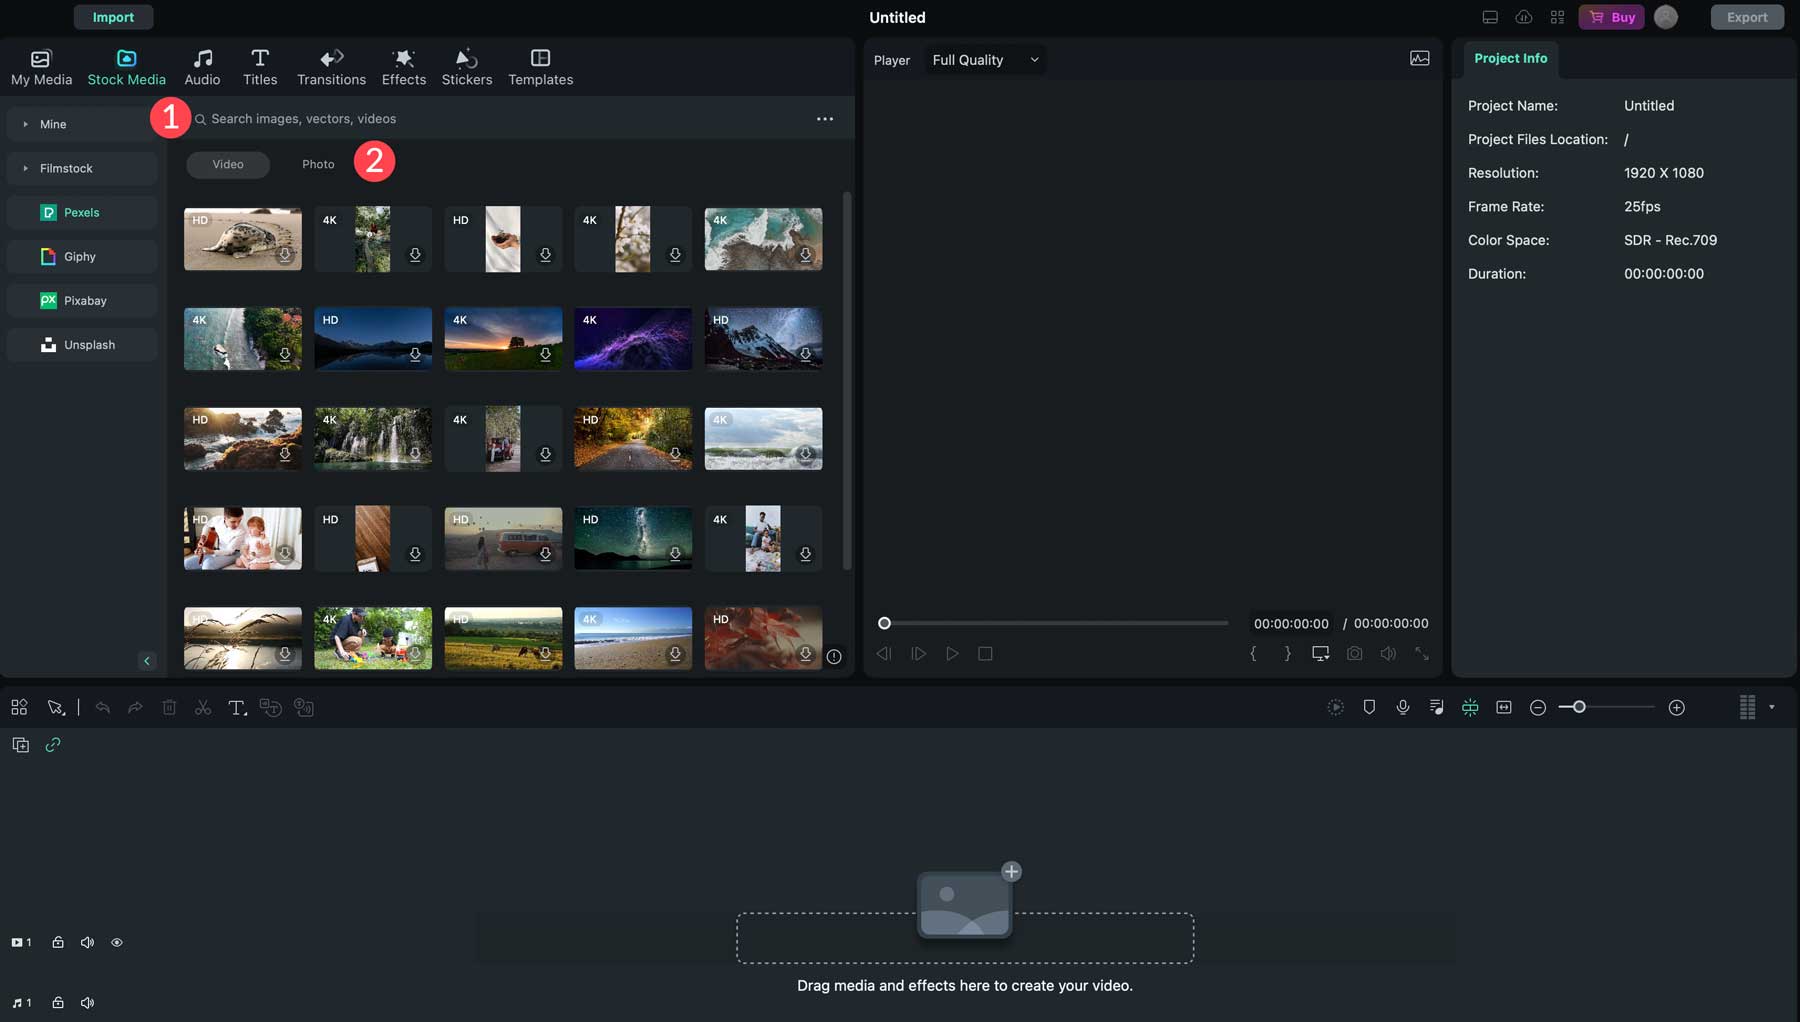
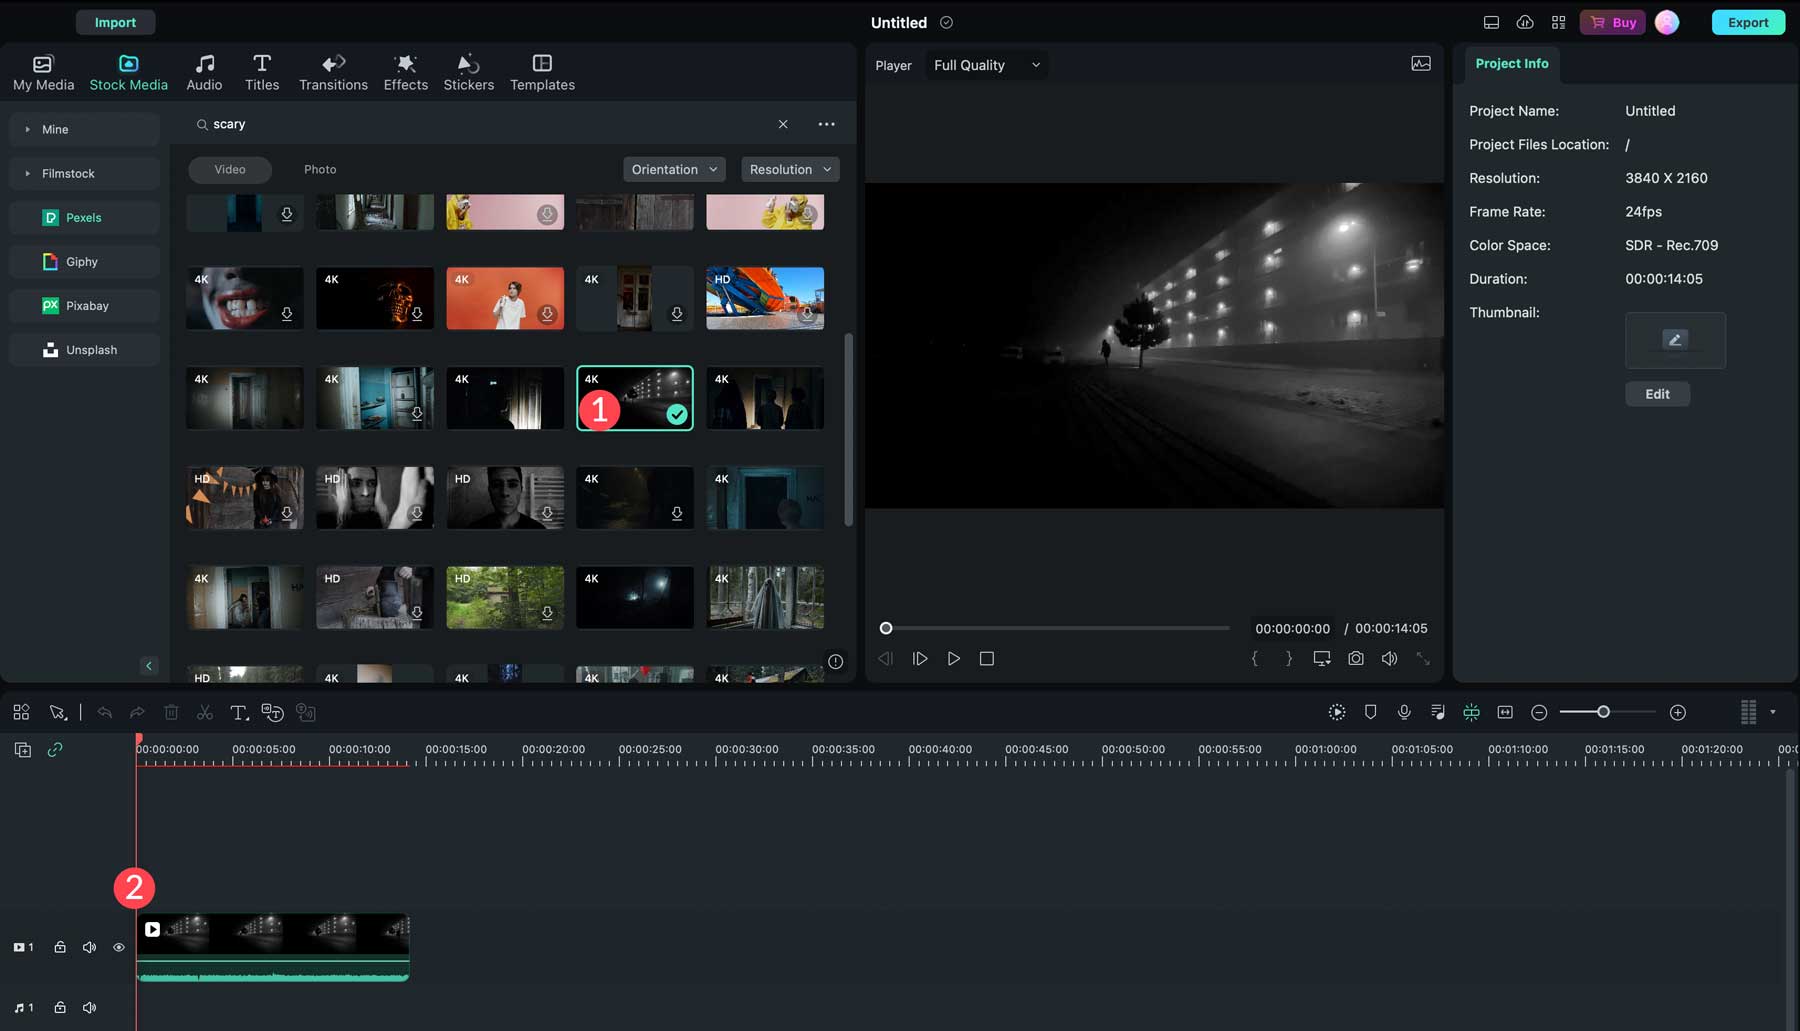
Now that you understand where everything is located, let’s add an asset to our project. Start by clicking the Stock Media tab in the toolbar. You can search video and photo assets by typing into the search field (1) or browsing video or audio (2). You can preview each one by double-clicking on it to play in the preview window.
Once you find the media you’d like to use, double-click it to download it (1) and then drag it into the timeline (2). Depending on the media chosen, Filmora may ask whether you want to match the project’s aspect ratio or modify it for your chosen asset. Choose the match to media option for the best results.
As you add video assets, Wondershare Filmora will automatically snap them onto the timeline immediately following the previous clip. This avoids any unnecessary pauses or blank screens in your video. You can also preview your video using the preview window (1), adjust the placement of clips by rearranging them on the timeline (2), or adjust the length of each clip by clicking and dragging them on the timeline (3). If you decide not to use a clip, simply click it in the timeline and hit the delete button to remove it (4).
Once your media assets are in place, you can add transitions, effects, audio, and stickers to enhance your video.
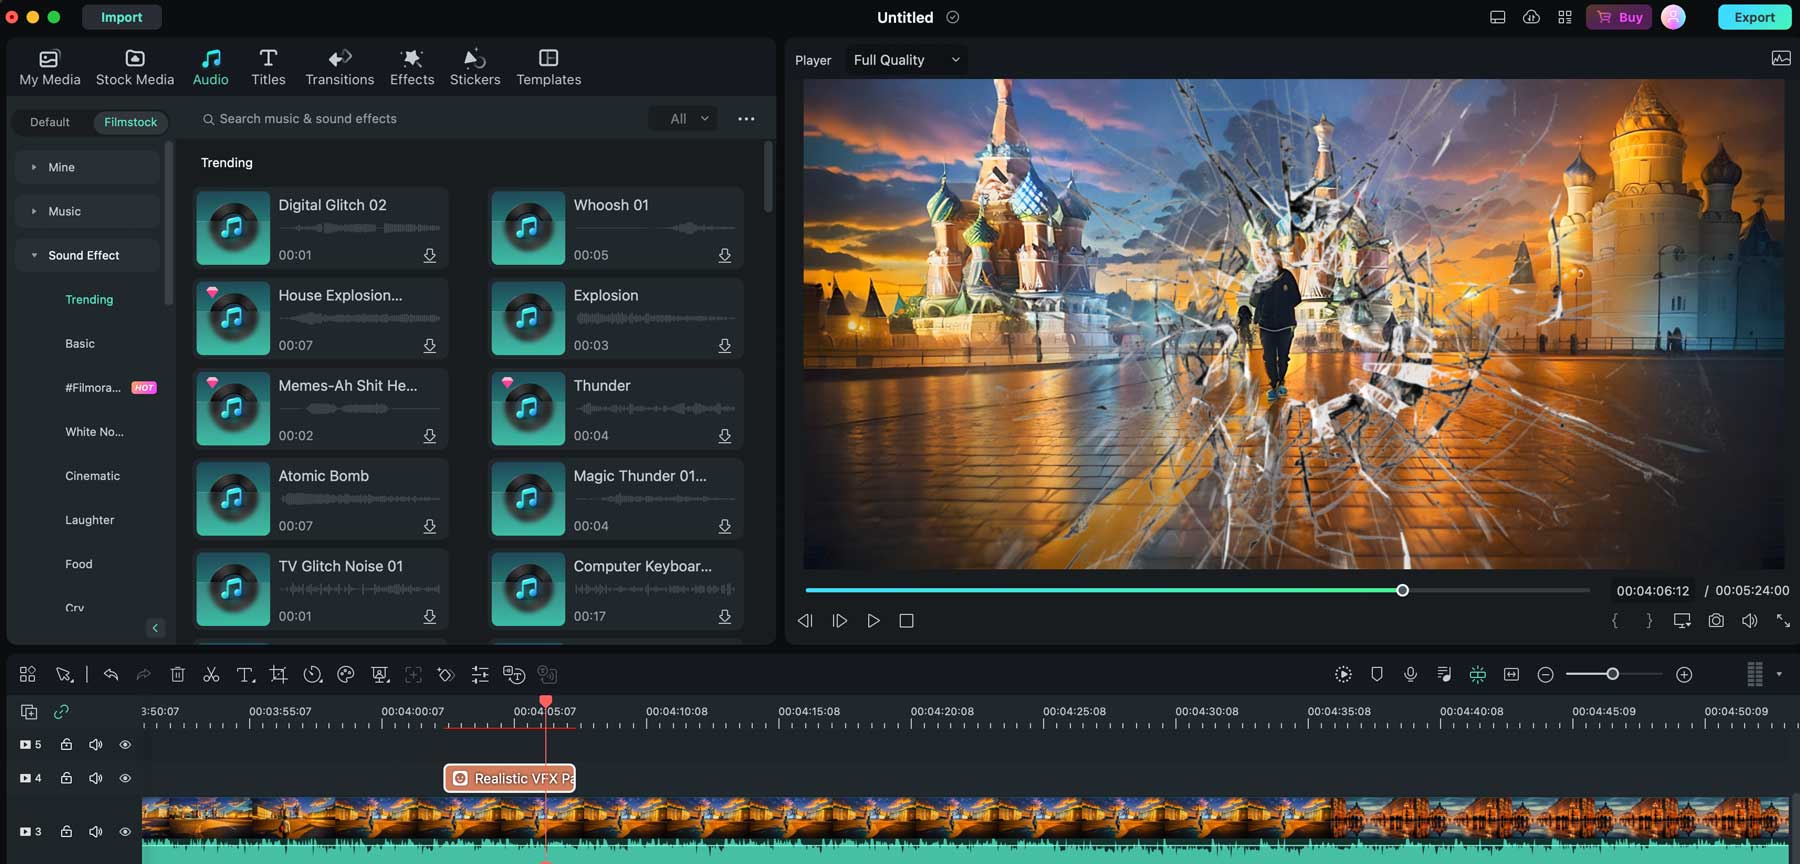
Adding Audio
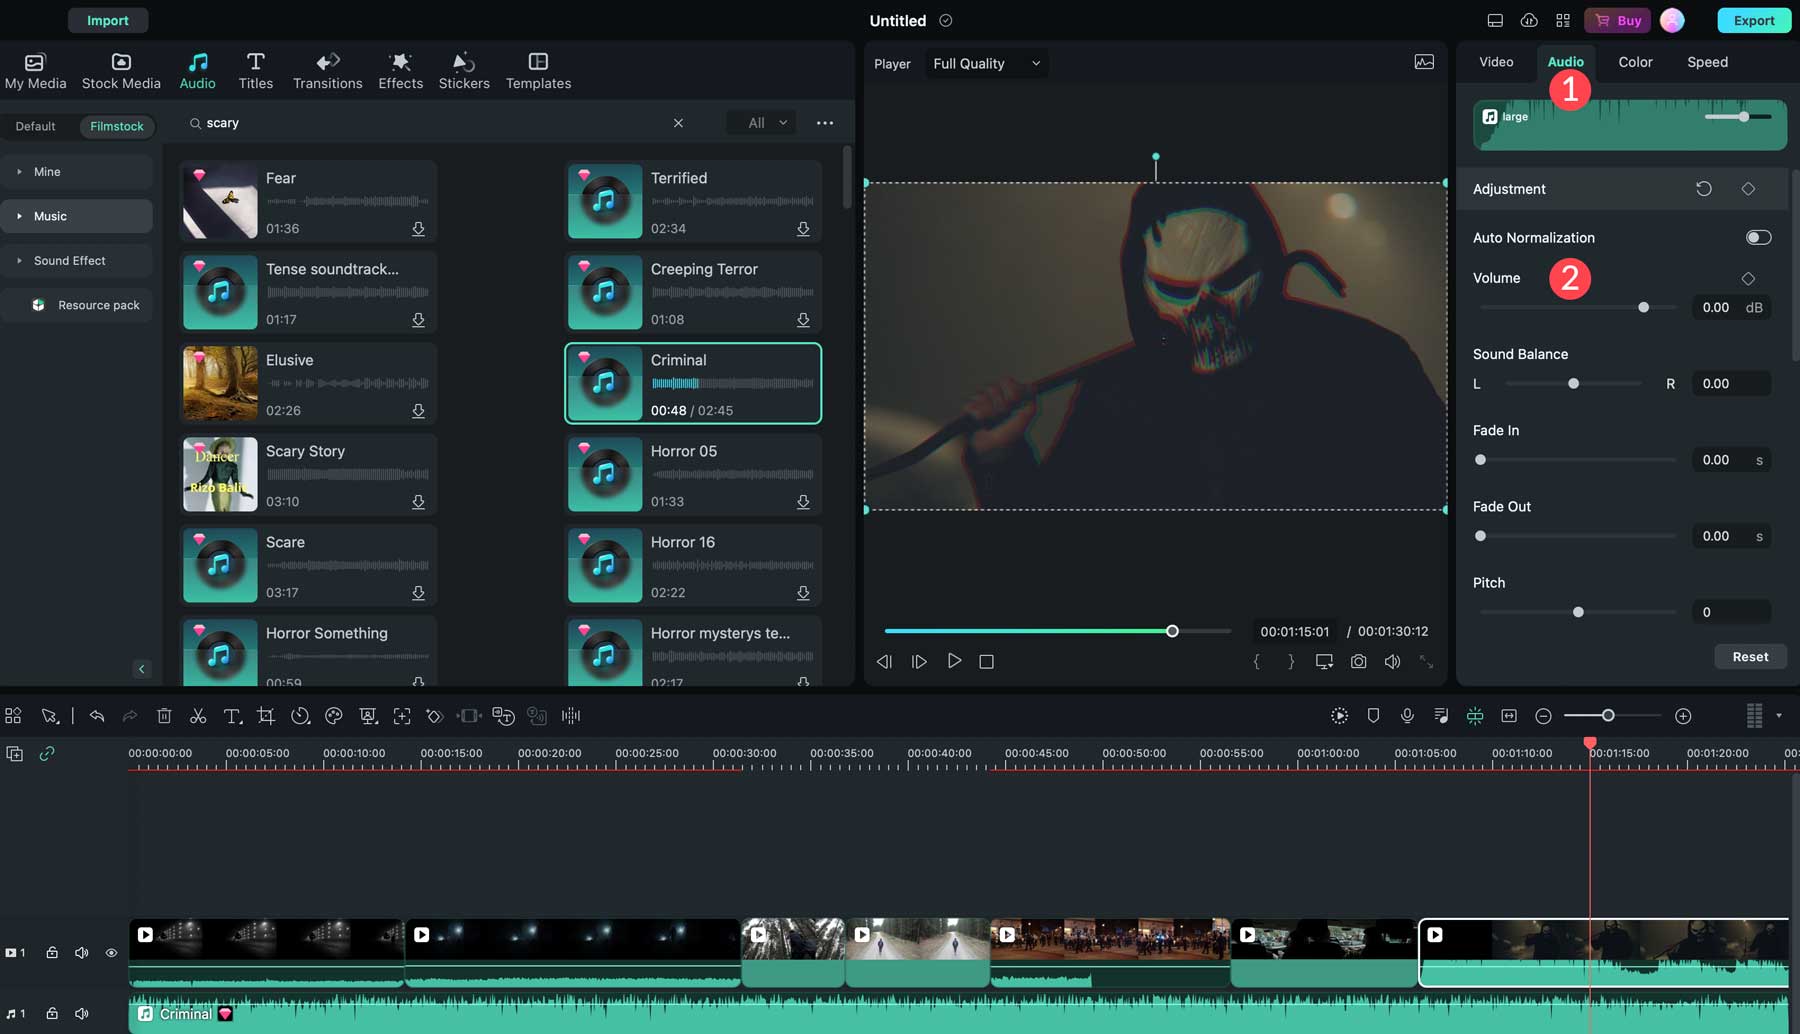
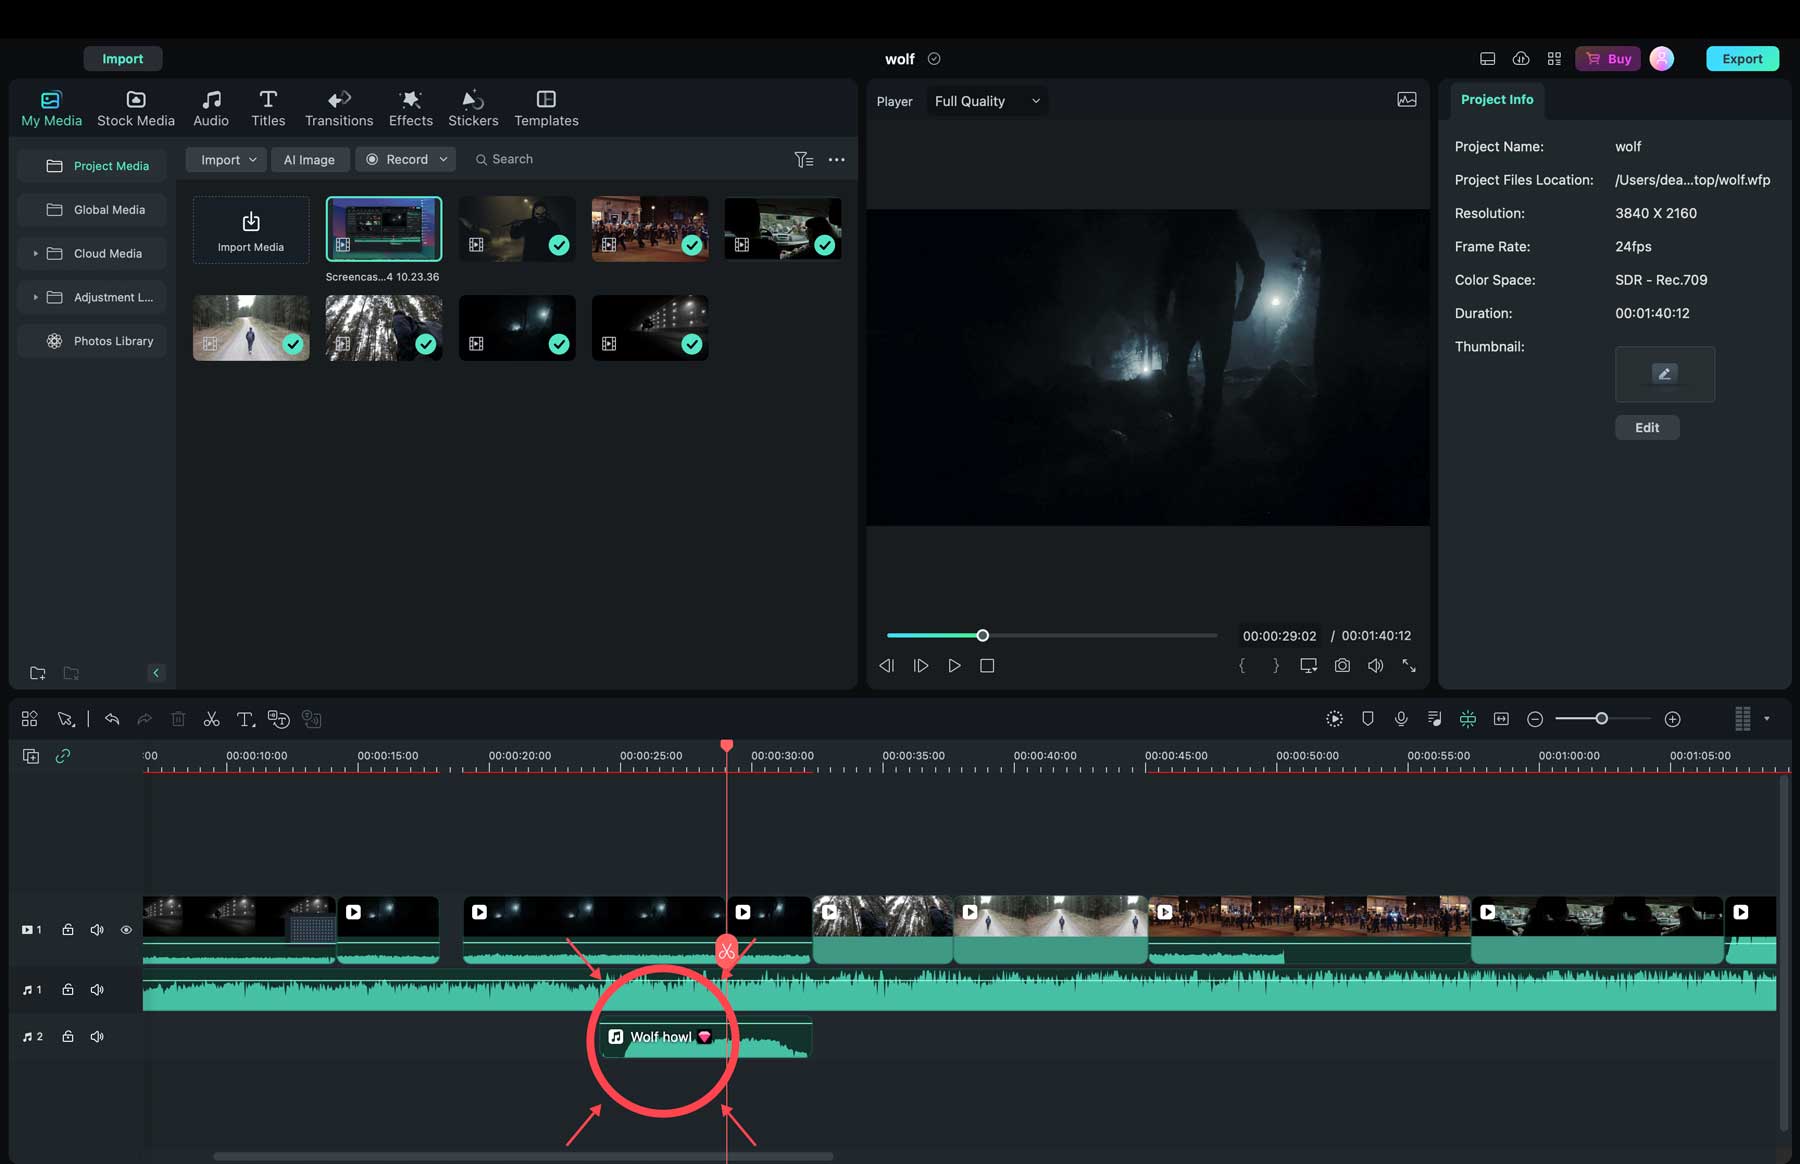
Wondershare Filmora provides millions of audio clips you can use in your projects. Navigate to the toolbar’s audio tab (1) to add audio. For adding video or photos, search for and select the audio you wish to use (2), double-click it to download it to your computer, and drag it into the timeline (3). By default, Wondershare Filmora will add the audio clip to the music section of the timeline (4). From there, you can stretch the audio to fill the length of your video (5). You can also add multiple audio clips to any video.
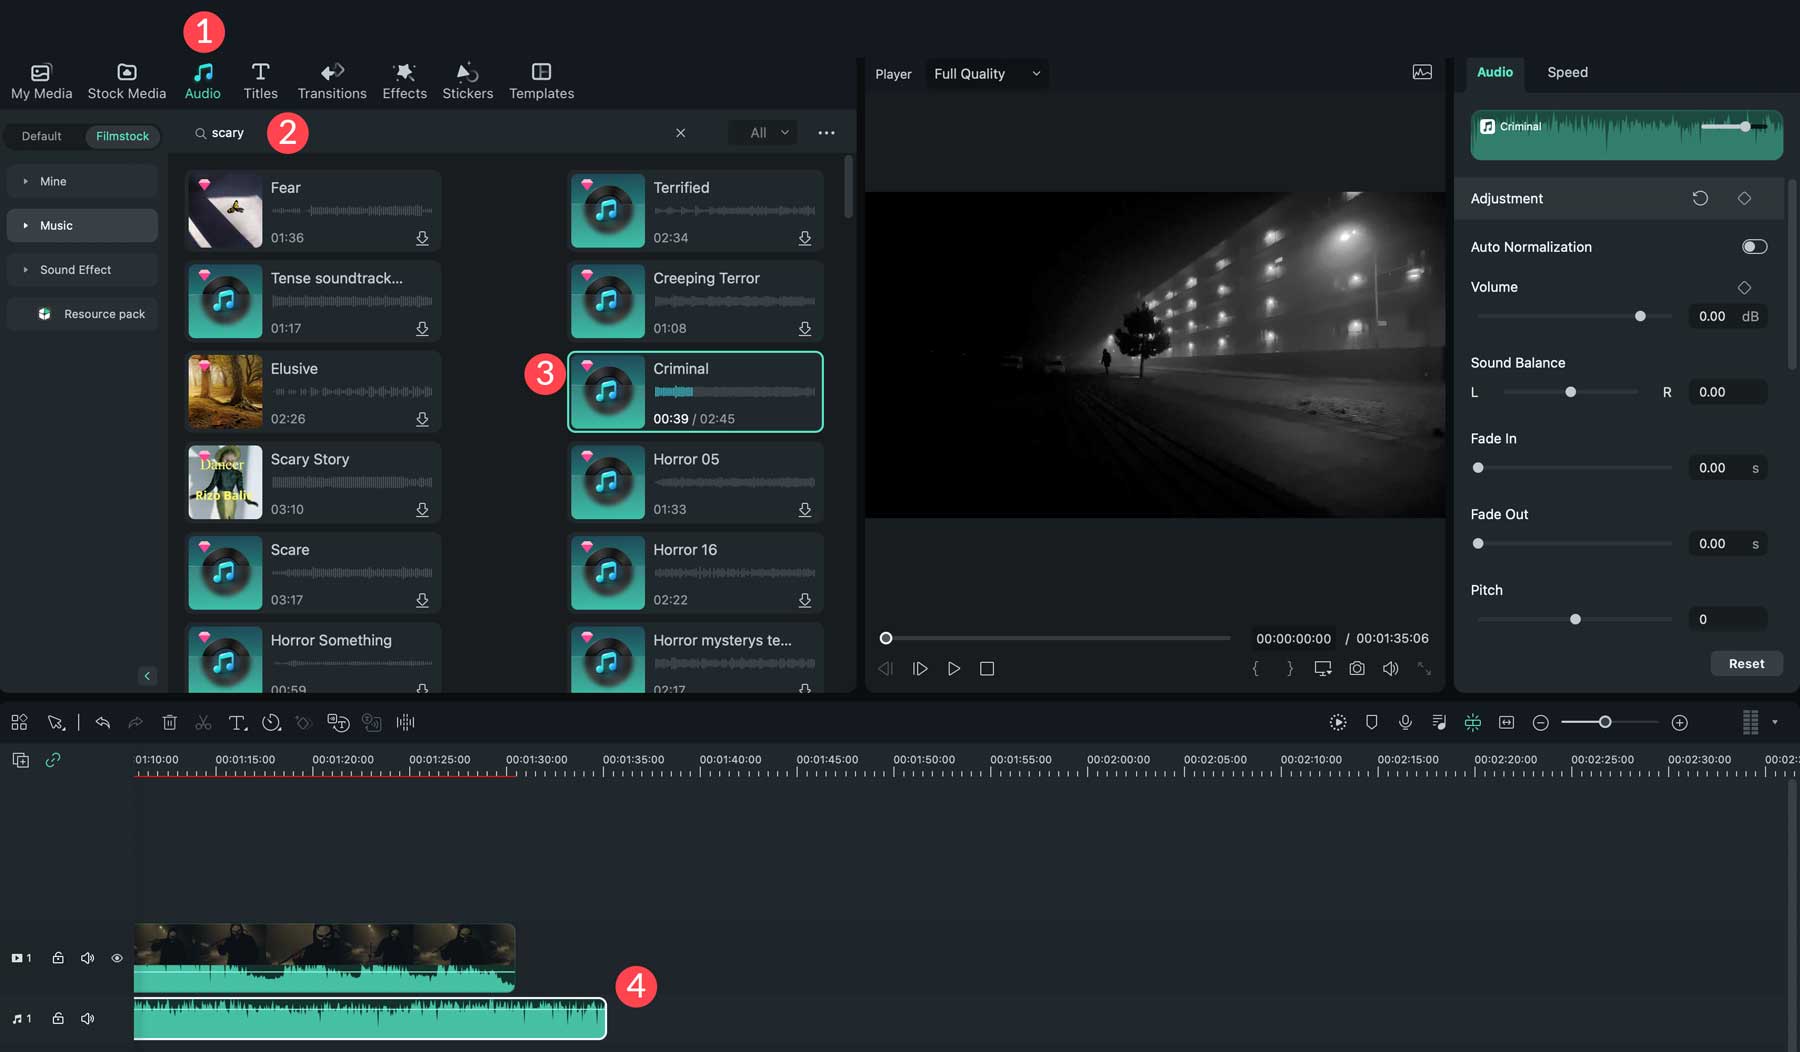
Tip: If you select a video that already has music present, you can access the clip’s settings by clicking the video’s audio settings (1) and adjusting the audio to 0 decibels (2).
In addition to music, Filmora provides thousands of sound effects clips. These can be used in combination with music to add emphasis to a particular scene. For example, if you want to add a scary wolf howl during a dark forest scene, there are plenty to choose from.
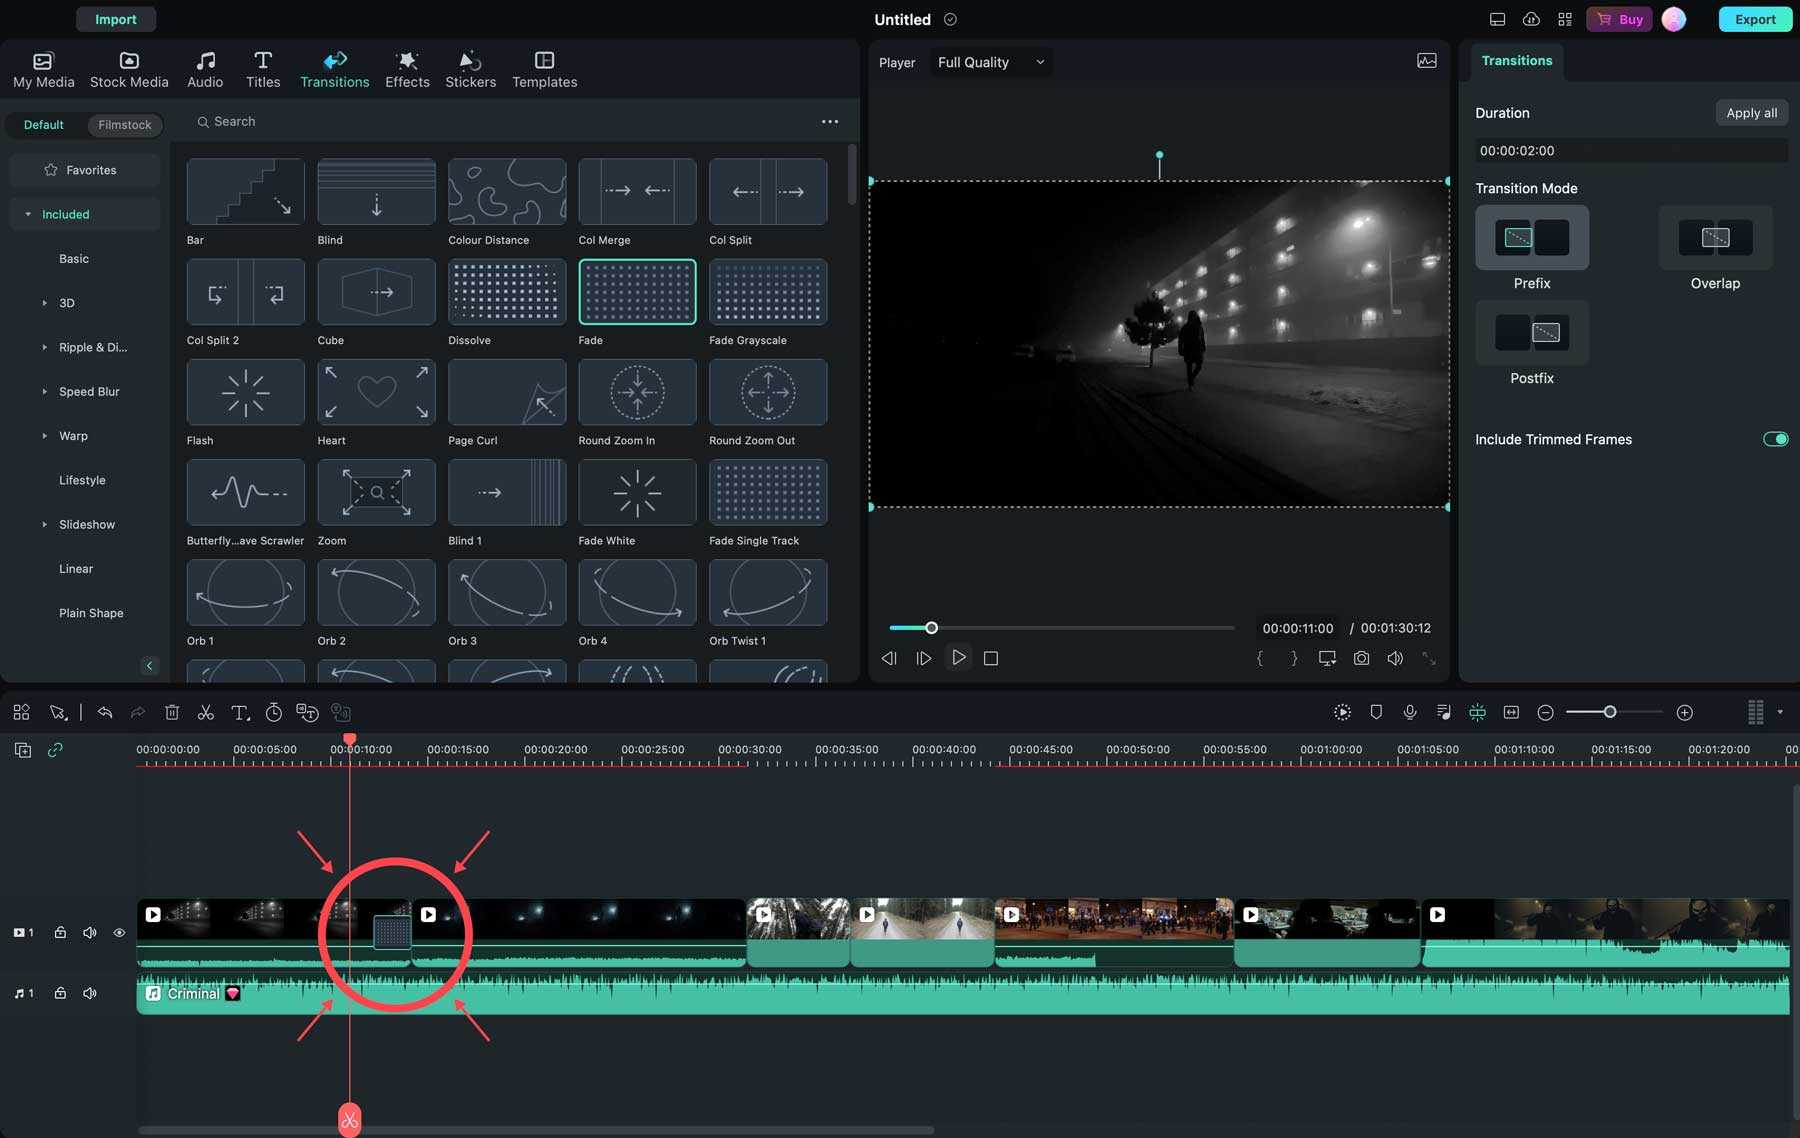
Adding Transitions and Effects
Wondershare Filmora has tons of special effects, text, transitions, and stickers to add to your videos. Adding them works like video and audio by searching, clicking, and dragging them into the timeline. One crucial step is to add transitions if you’re using more than one clip in your video. The software offers plenty, including fades, fly eye, evaporate, and more. Filmora will automatically place them within the end of a clip when dragged into the timeline.
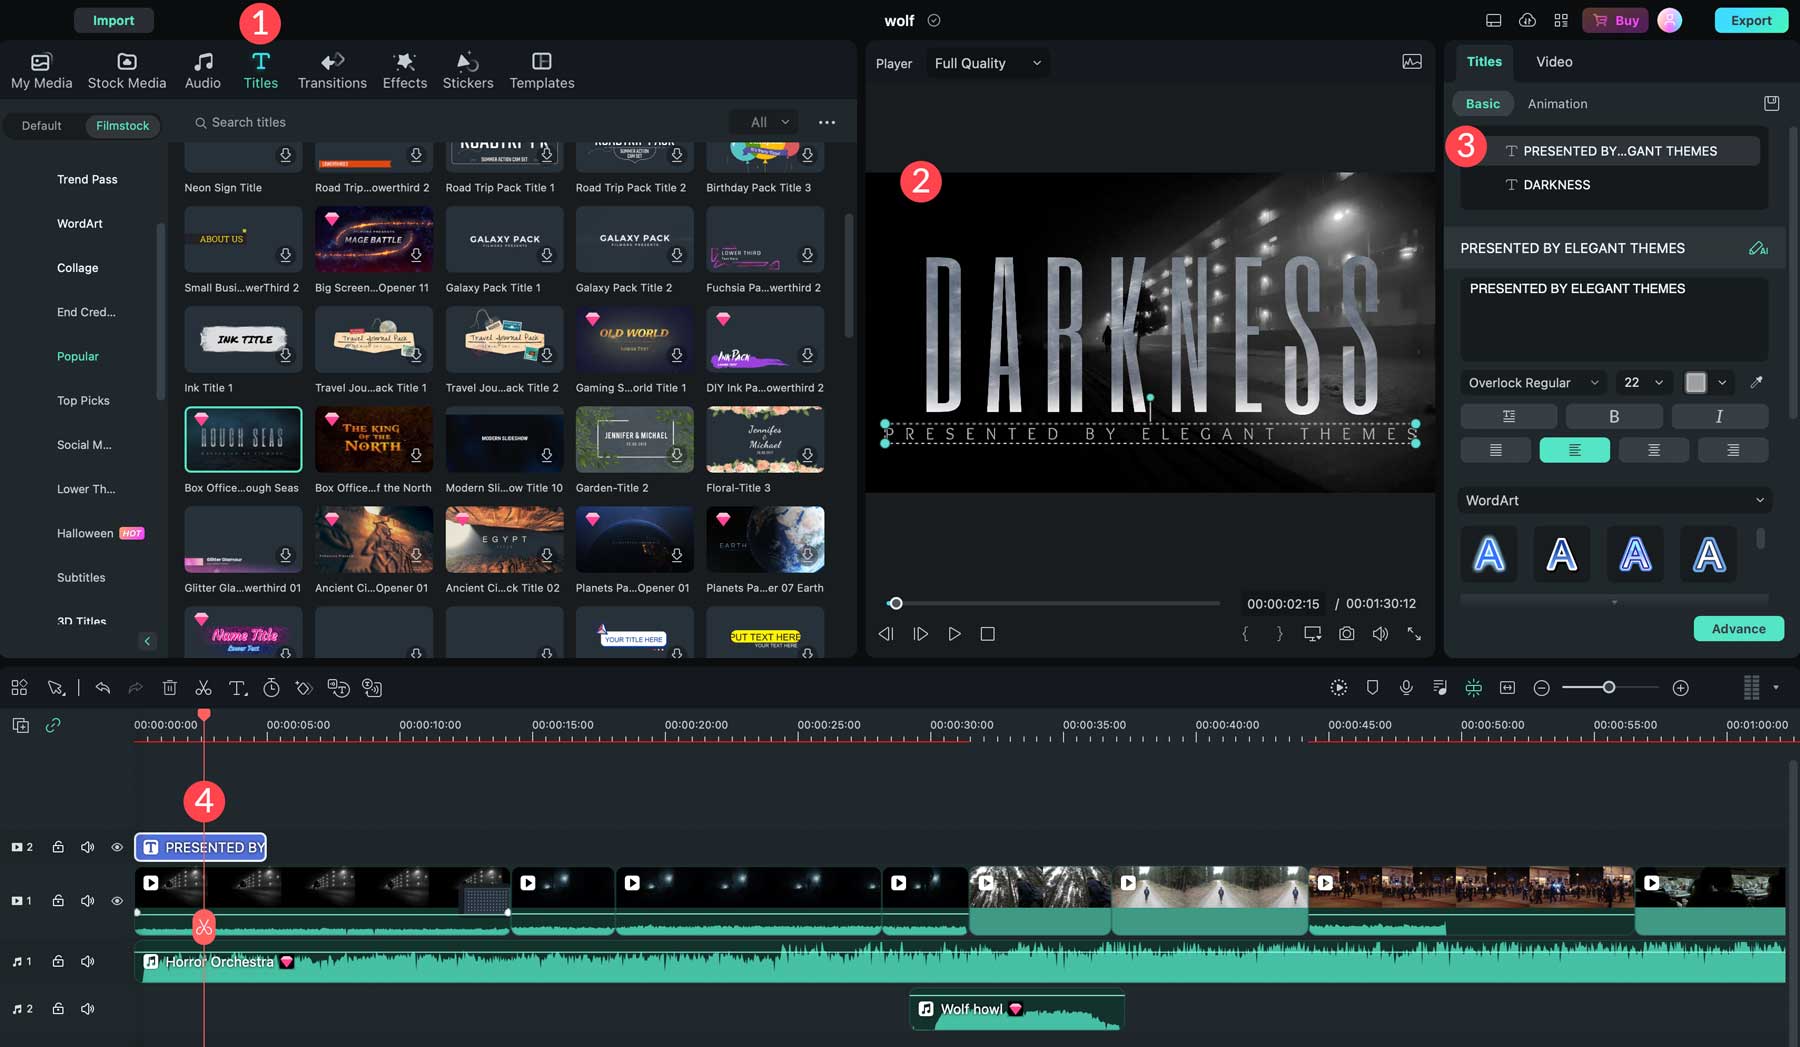
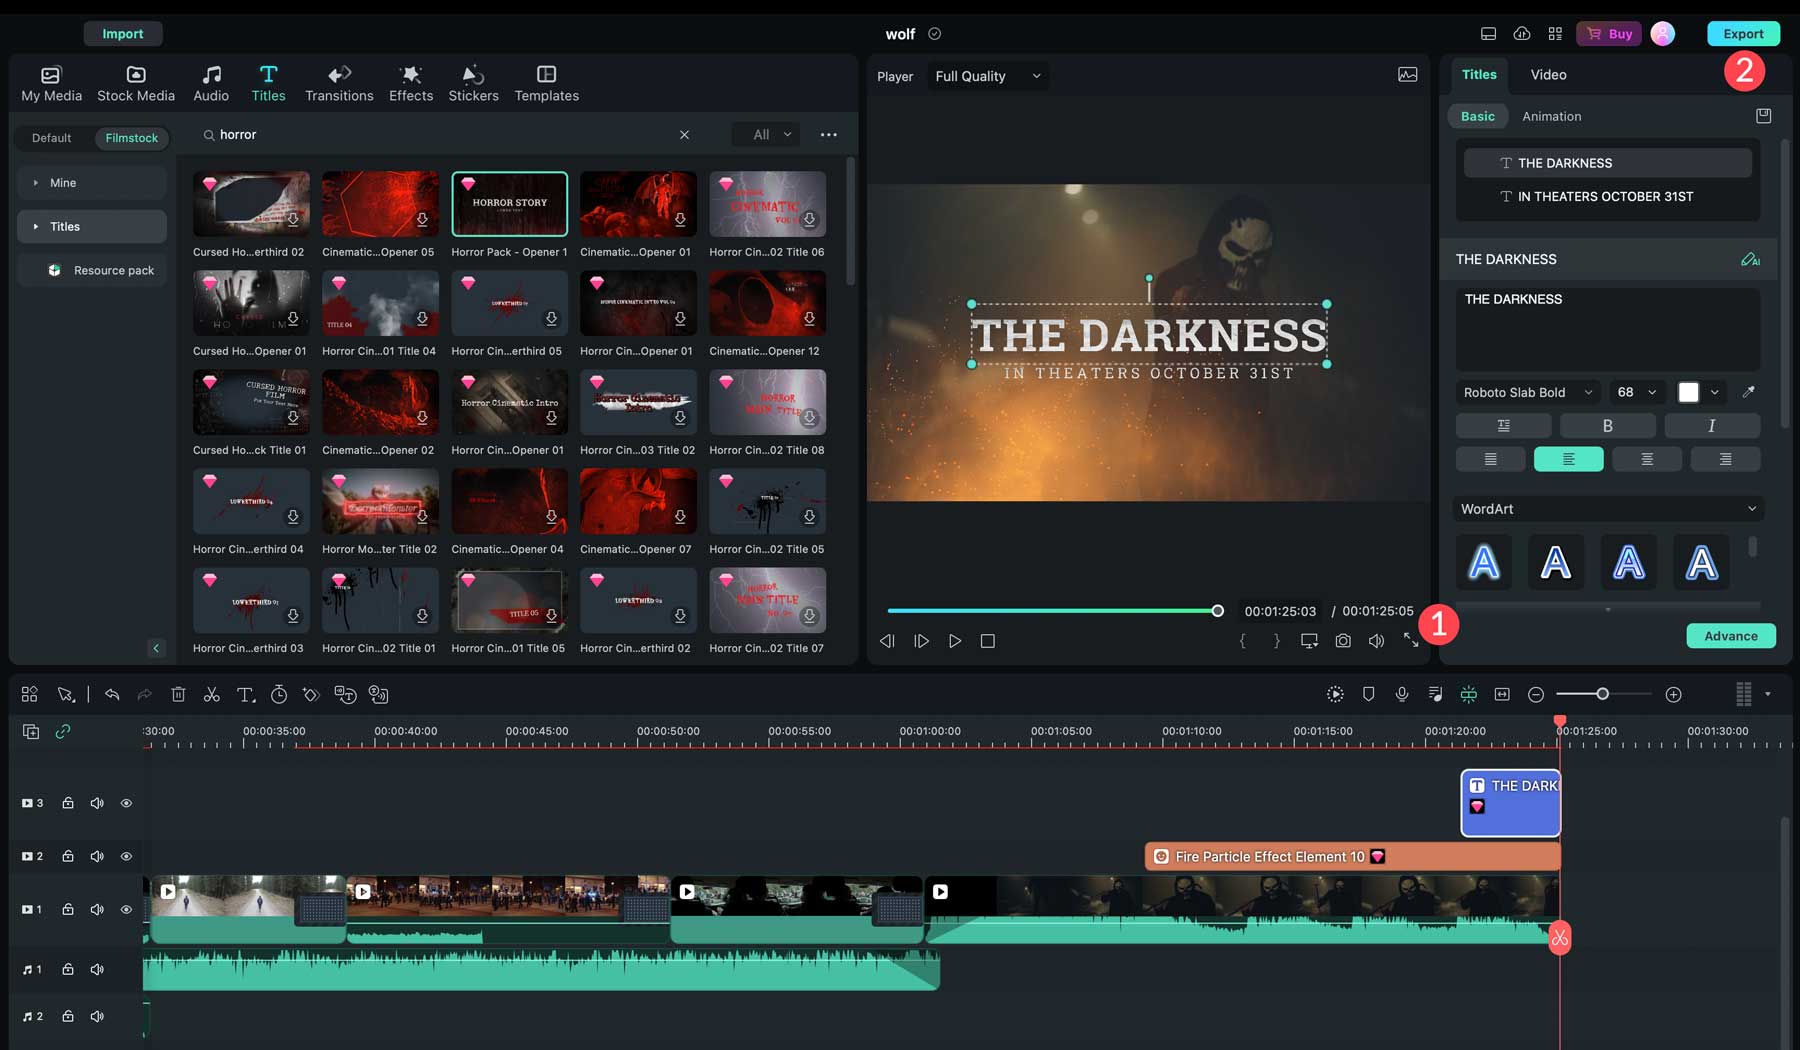
You can also add scene titles to your videos. There are plenty to choose from, including 3D, news, and the most popular ones used by other Filmora creators. You can locate them under the titles tab (1), preview them (2), adjust the title’s settings (3), and move them in the timeline (4) to your desired location.
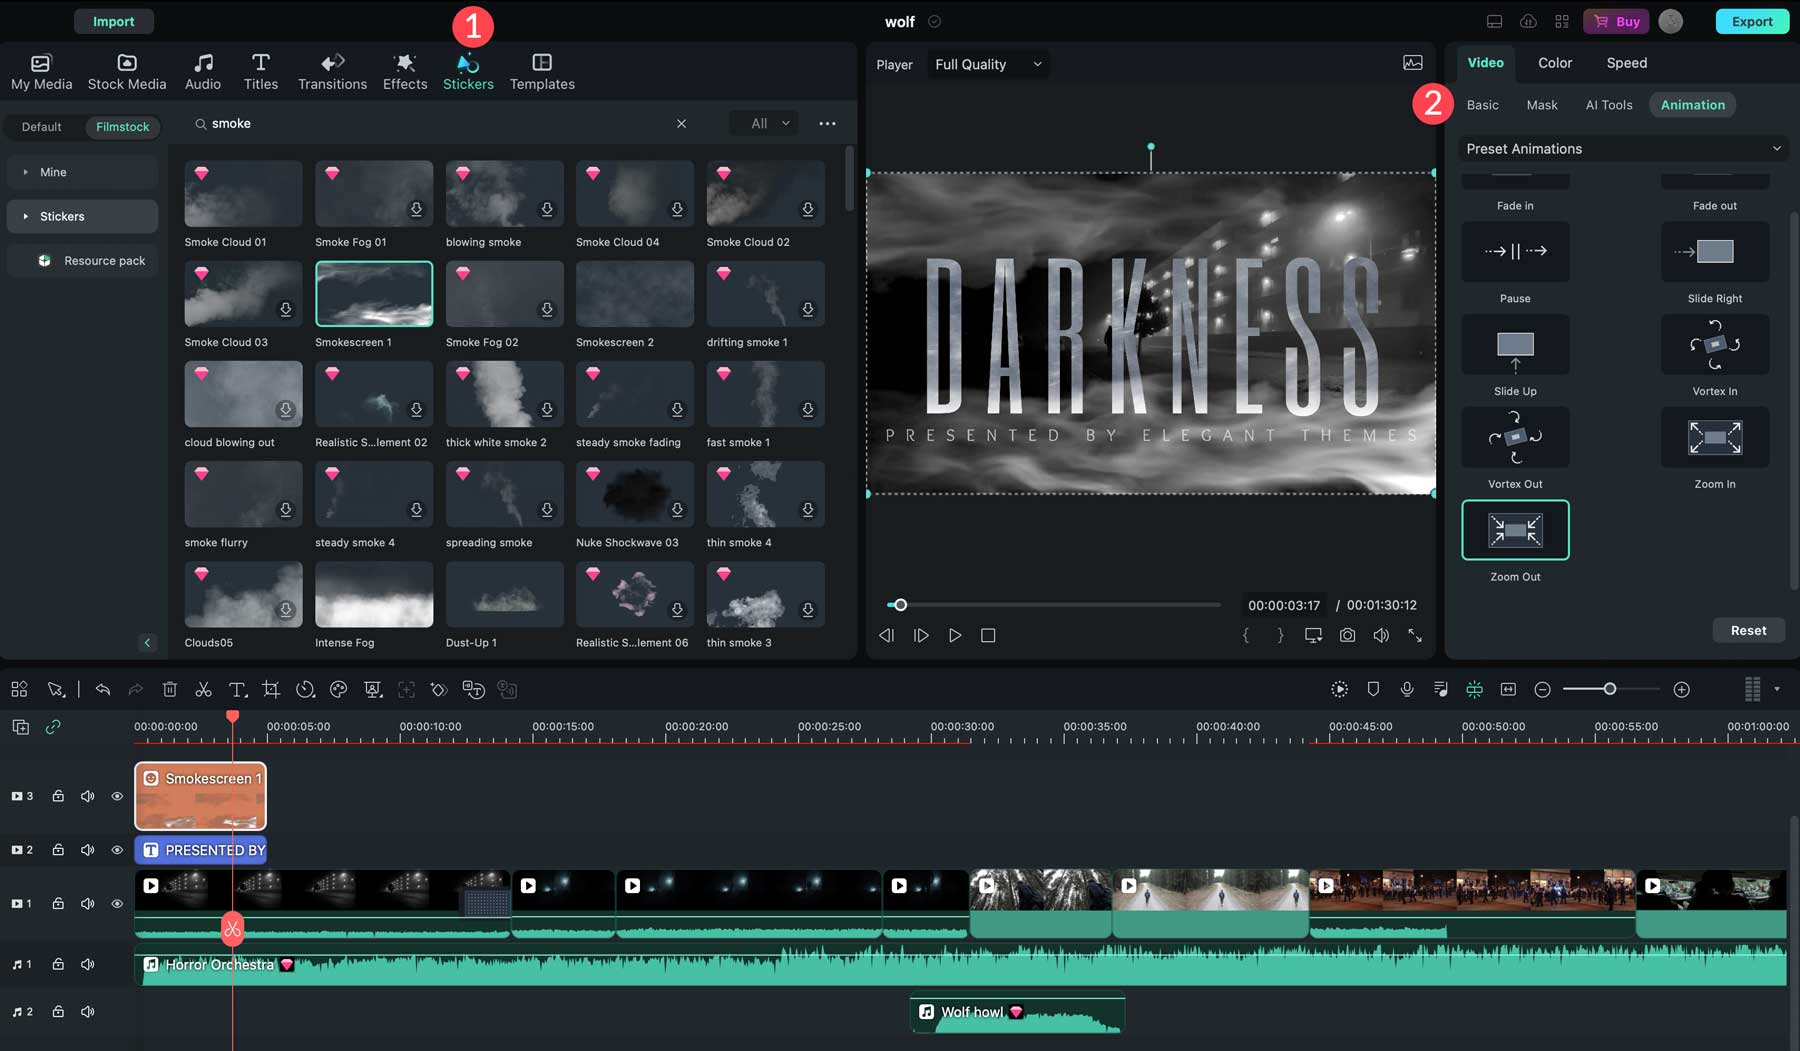
Want to add some cool animated effects? No problem. Wondershare Filmora offers a plethora of animated stickers (1) for your videos. For example, you can overlay a rolling smoke effect over your video’s title to add more emphasis. Once added, you can transform it, add a mask, apply animations, or adjust the colors and speed (2).
Exporting Your Video
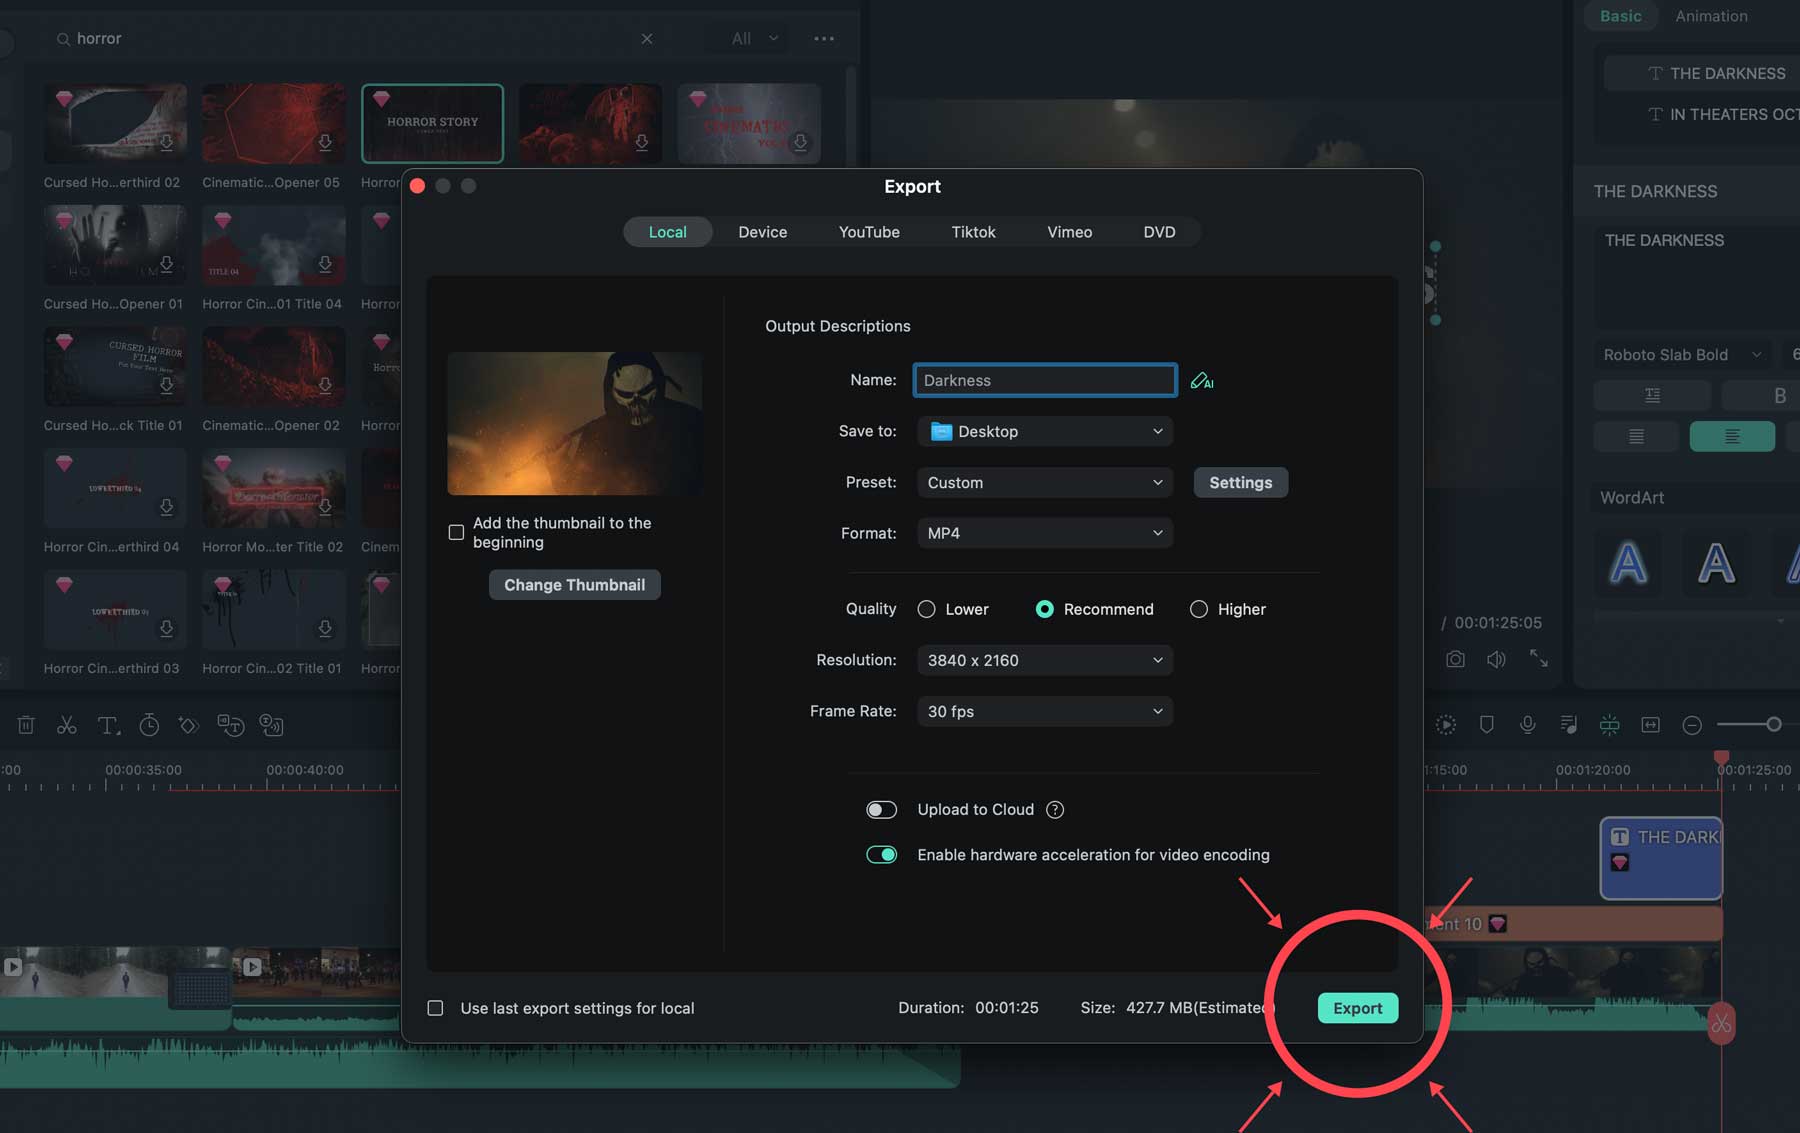
Before exporting your video, previewing it in full screen is a good idea to ensure everything looks the way you want. Start by clicking the expand icon in the playback settings of the preview window (1). After previewing your video, click the export button (2) at the top right of the Filmora interface.
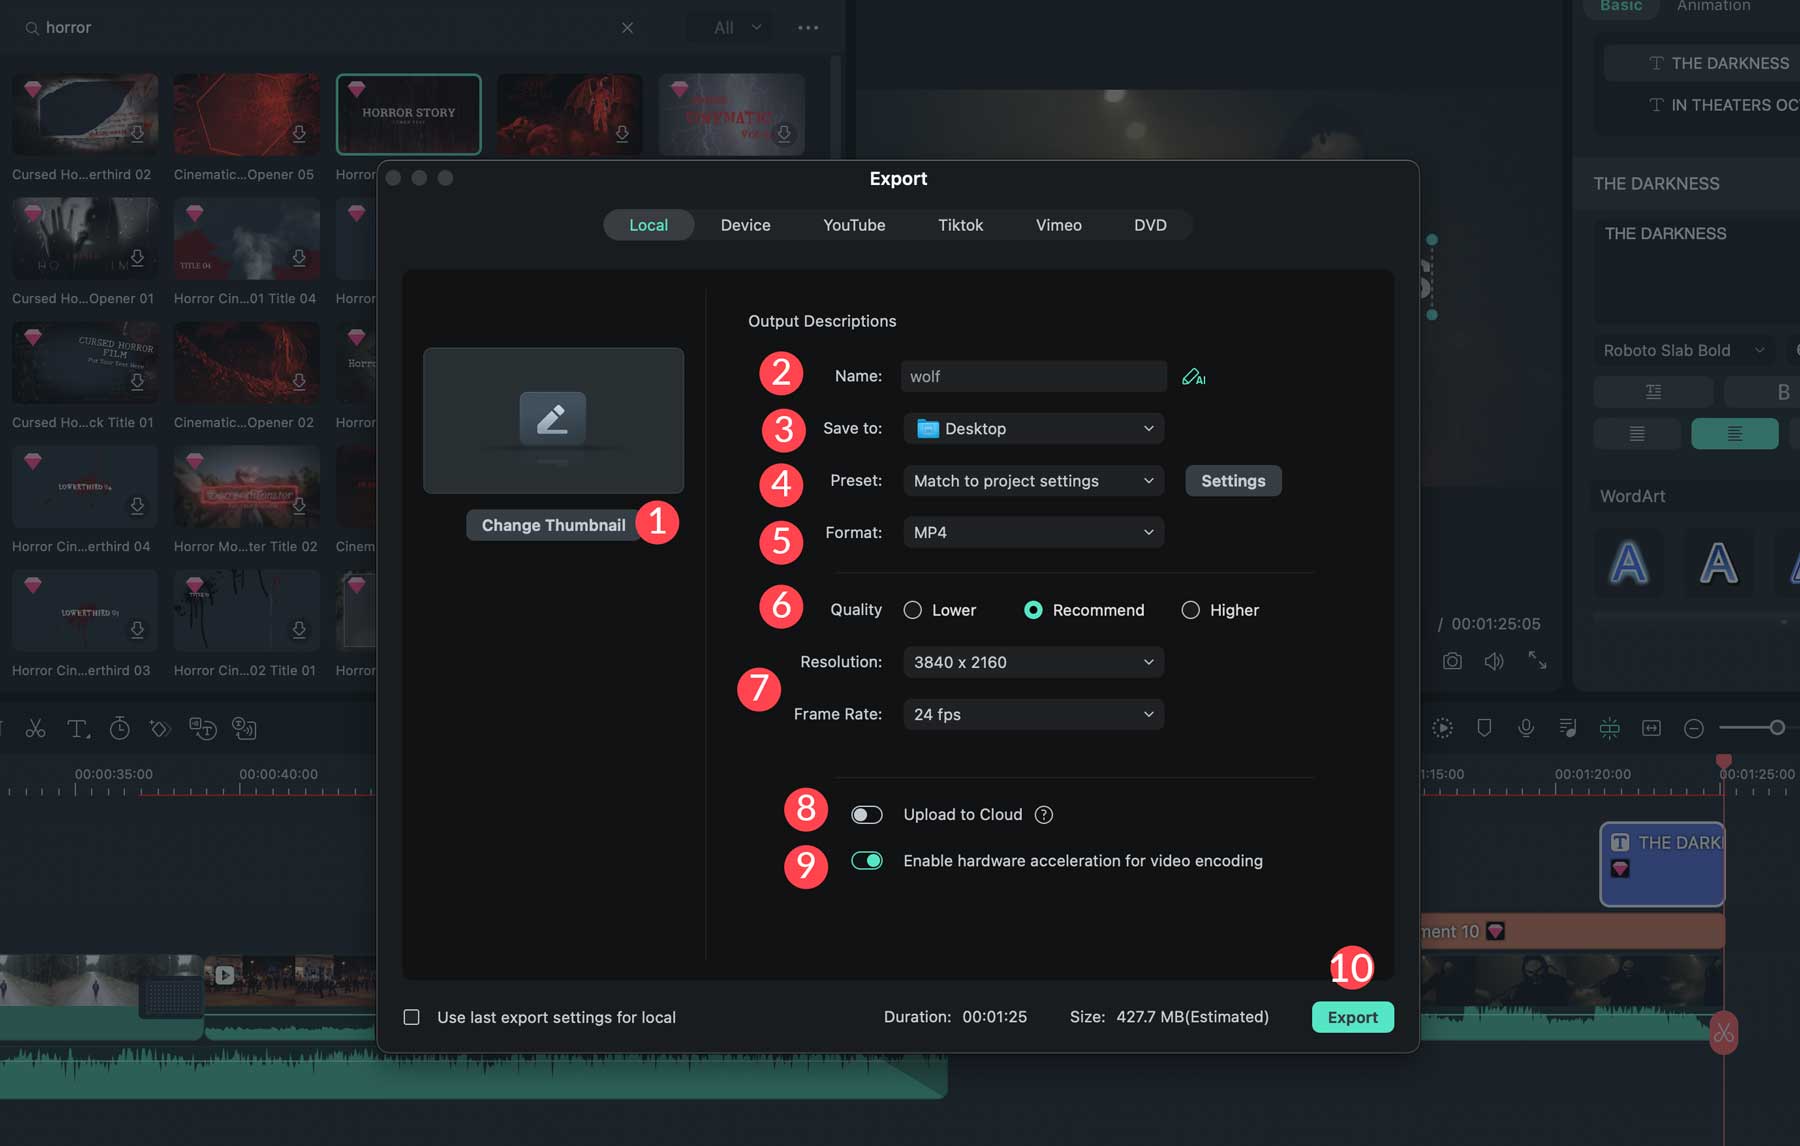
This will bring up the export settings. The first step is to choose the export format. You can choose between local, device, YouTube, TikTok, Vimeo, or DVD. Depending on the format you choose, the options will be different, so let’s go over them so you’ll know what your options are.
The local option lets you export your video directly to your computer’s hard drive. Start by adding a thumbnail (1). You can upload one or allow Filmora to generate one from the video. Next, you’ll give your video a name (2), choose the destination (3), export preset (4), format (5), quality (6), resolution and frame rate (7), decide whether to upload it to the cloud (8), and enable hardware acceleration (9). Once settings are complete, click the export button (10) to download your video.
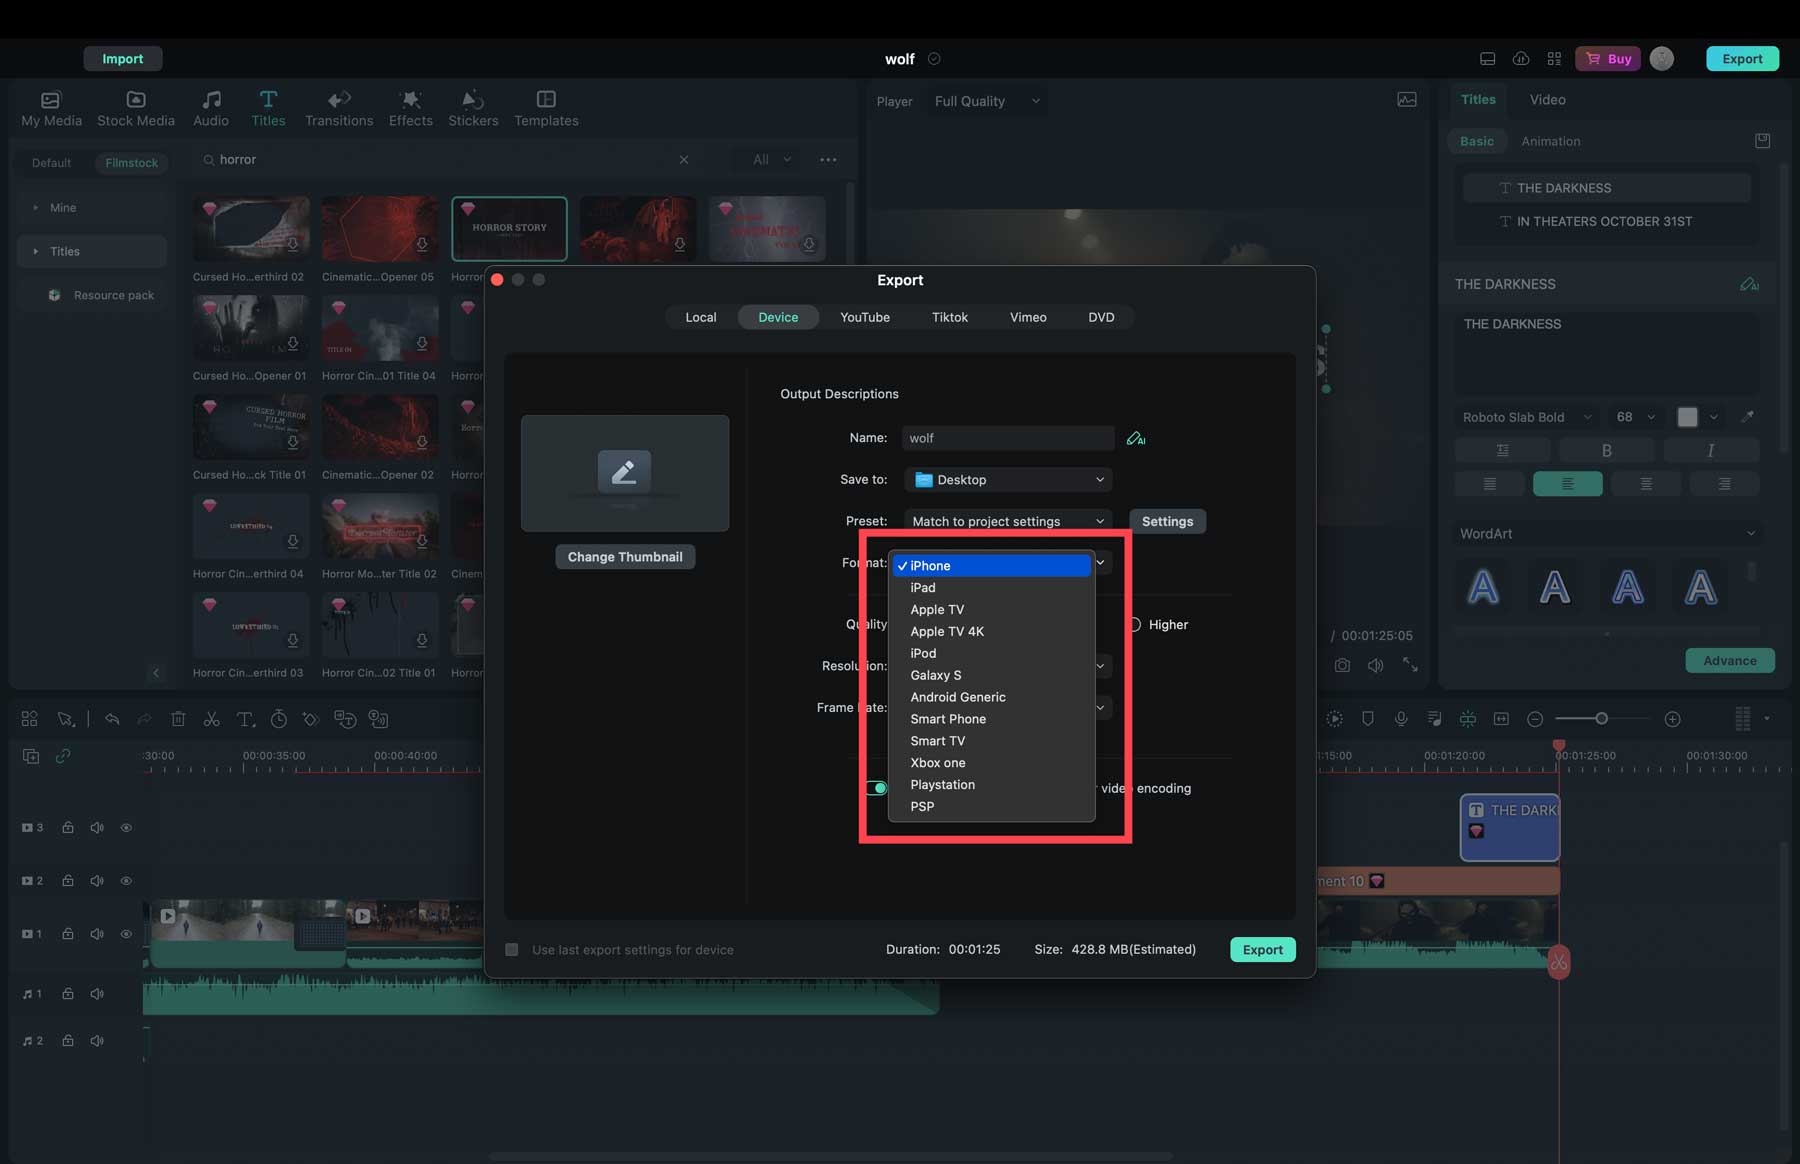
If you choose the device export option, you can select the format you wish. There are options for iPhone and other Apple devices, Android, and gaming consoles such as Xbox and PlayStation.
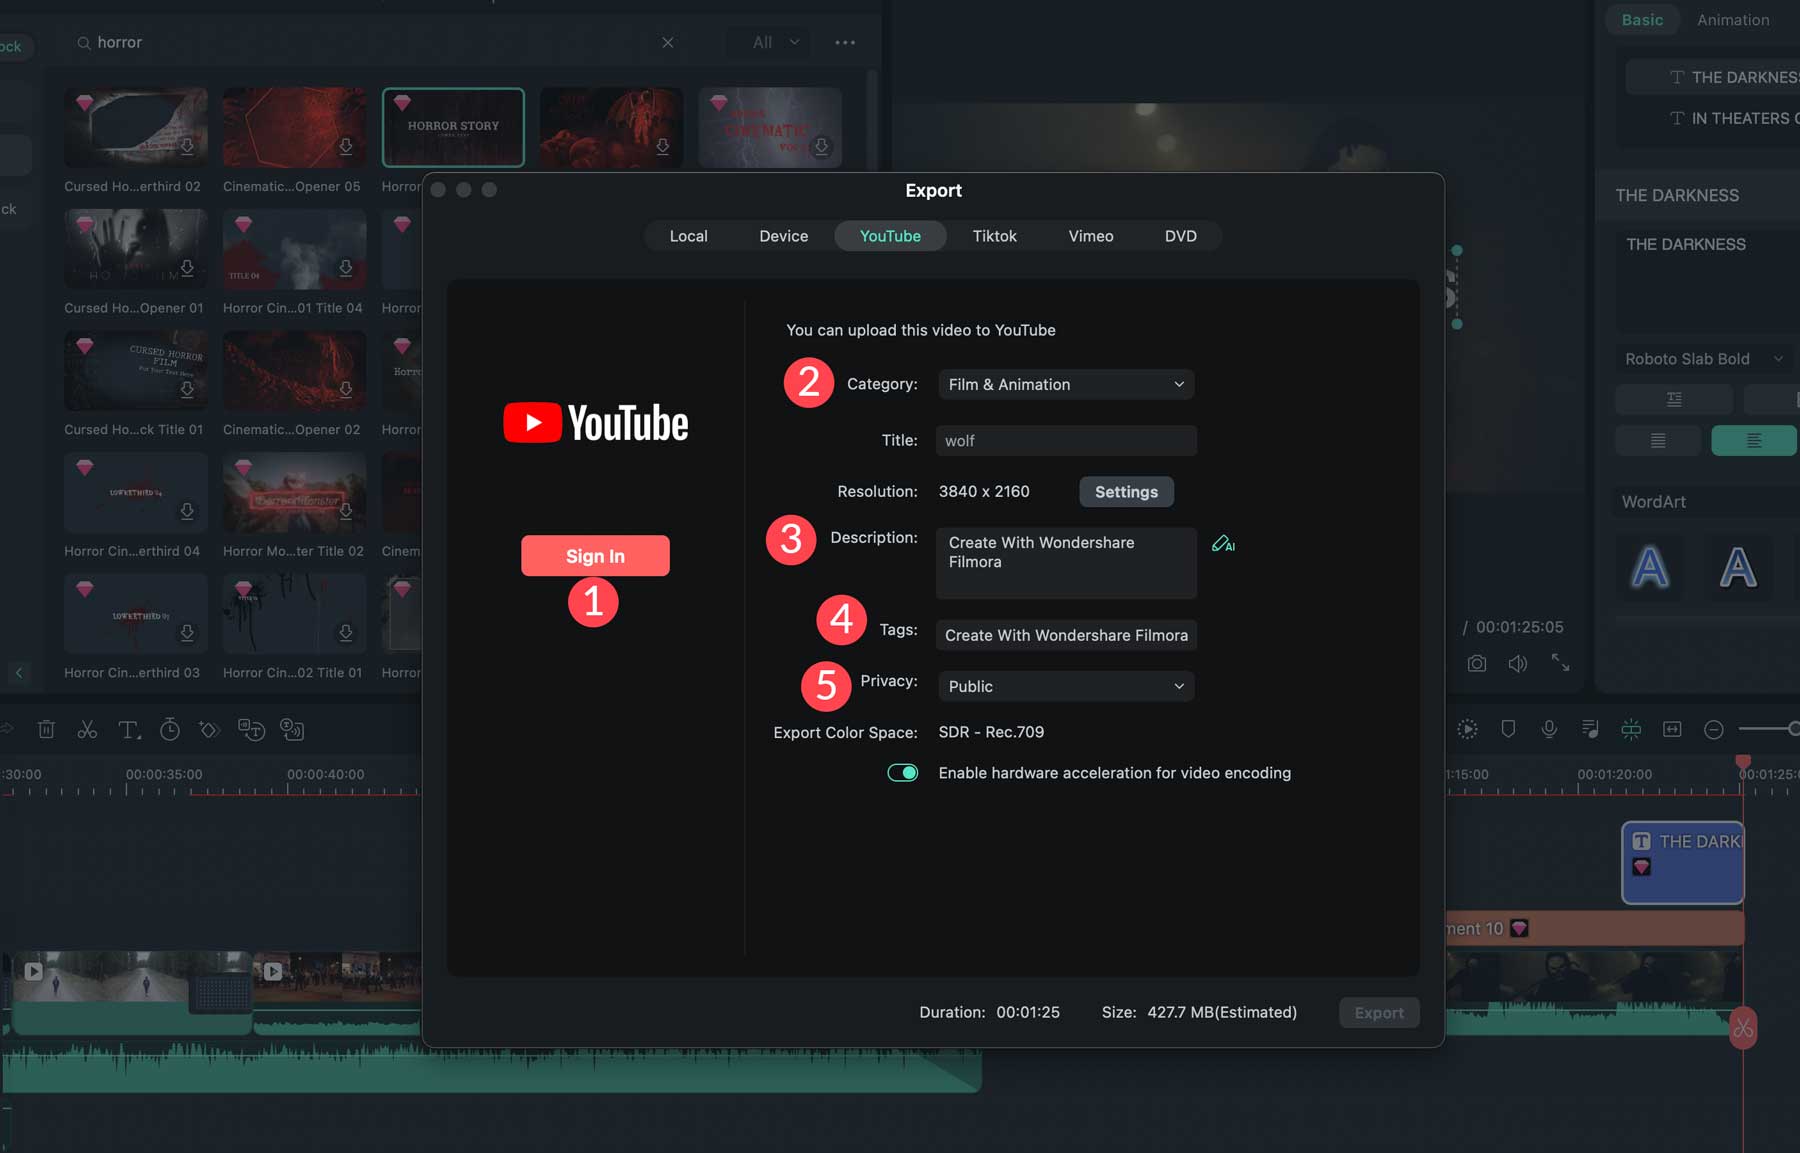
Finally, a few social media channels integrate directly with Wondershare Filmora, so you can log in to YouTube, TikTok, or Vimeo (1) and automatically upload your video to a specific category (2). You can also add a description (3), tags (4), and adjust privacy settings (5).
Once you’ve chosen your desired export settings, click the export button to continue.
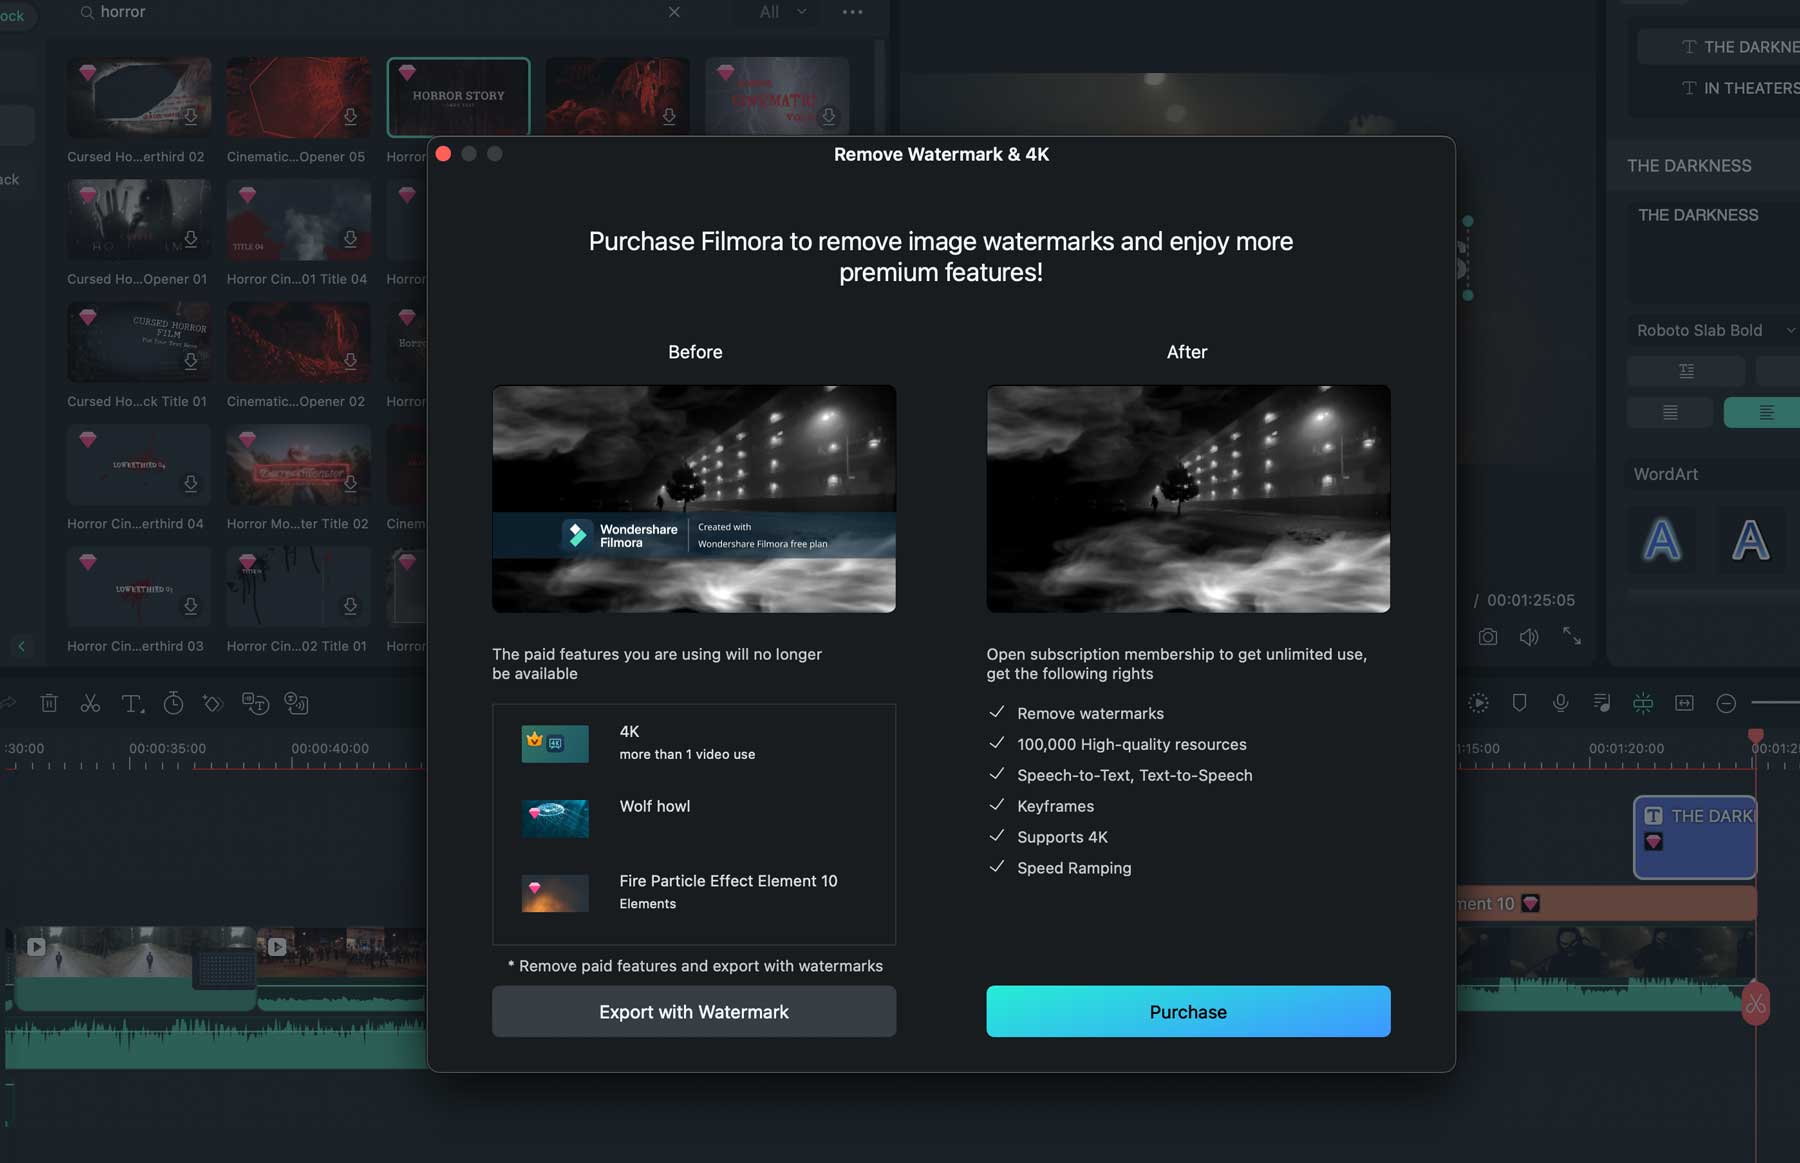
If you’re following along with the free version, you’ll notice you can only export your video with a watermark. Also, any elements requiring a premium license will be absent from the video. Alternatively, if you purchase the software, you’ll have access to all the effects, stickers, audio, and titles, along with speech-to-text, text-to-speech, keyframes, speed ramping, and 4K export resolution.
After extensively researching the Wondershare Filmora software, we’ve compiled a list of pros and cons based on our experiences. There are many positives, with a few notable reasons to consider an alternative.
- Simple interface geared towards beginners
- Easily create videos in different formats or use the auto-reframing tool
- Millions of stock photos, audio, and videos
- The AI Audio Stretch tool allows you to “stretch” audio in your videos
- Masking with the pen tool is a real plus. You can select any element in your video, mask it, and either remove it or add animation effects
- Generate copy with ChatGPT or images with a text prompt
- Some tools require an extra Filmstock subscription
- Some users have experienced copyright issues while trying to upload videos to YouTube
- It is not as robust as other video editing software, such as Adobe Premiere Pro
- On the pricey side, if you add the monthly subscription plan as well as the yearly plan
- New effects are released every month, but only for monthly Filmstock subscribers
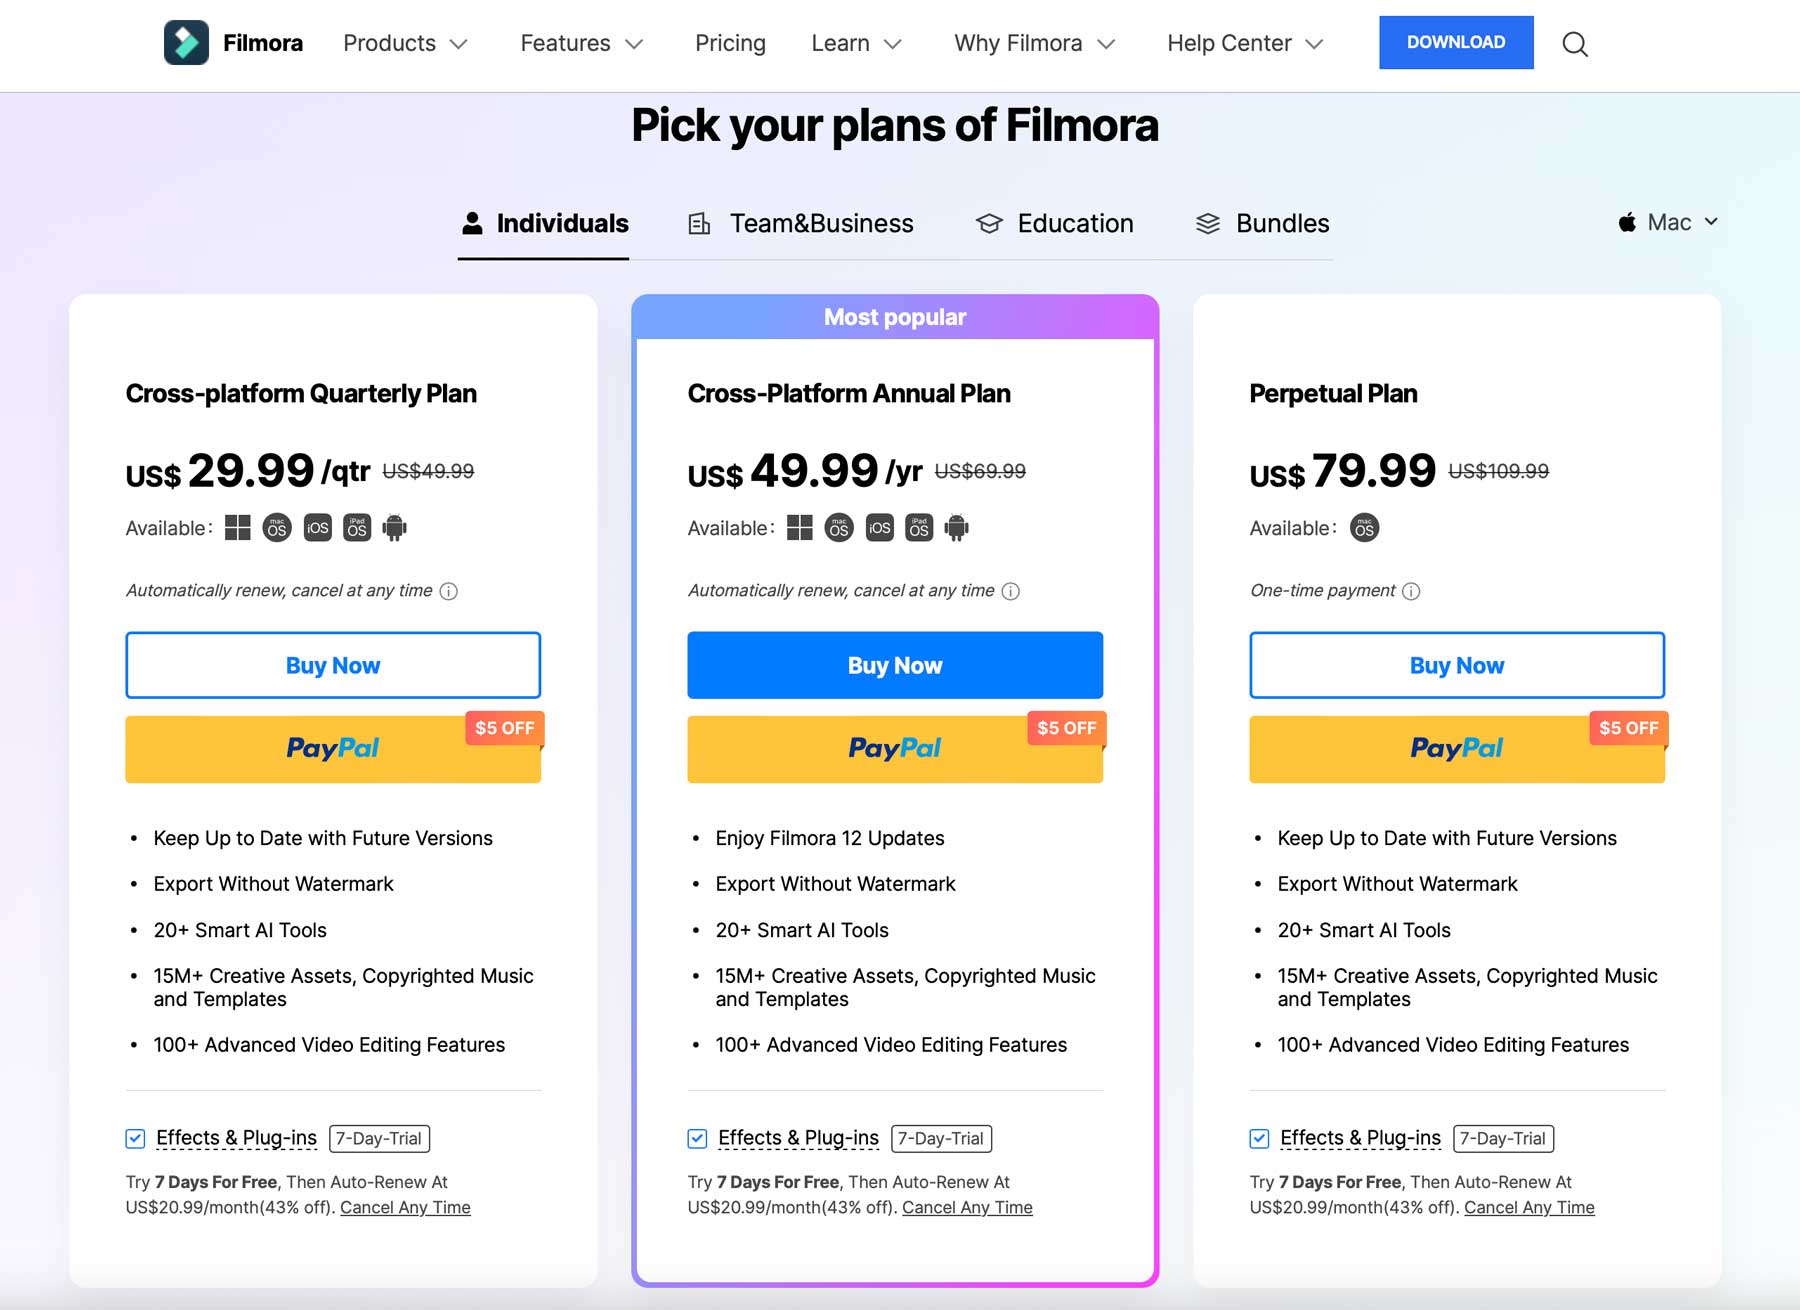
Wondershare offers several individual, team, education, and bundled plans with varying price points. The most popular option is the Cross-Platform annual plan for $49.99. This includes all updates, exporting without a watermark, access to over 20 AI tools, over 100 video editing features, and 15 million creative assets, music, and templates.
However, to take advantage of Filmora’s extensive sound and video effects library, you’ll be required to pay an additional $20.99 per month for a Filmstock subscription. That means you’ll have to pay roughly $300 annually to use the software to its full potential.
For creatives looking for video editing software that provides an intuitive way to create, edit, and publish videos, Wondershare Filmora is worth a try. It offers millions of video, audio, and creative assets, an easy way to upload your creations to social media, and a minimal learning curve. However, the cost of all assets may be steep for more budget-conscious individuals. That said, the free version and a 30-day money-back guarantee give users plenty of time to determine whether it’s the right solution.
Are you considering incorporating Wondershare Filmora into your creative process but want to avoid the added cost of the asset subscription? Check out some free video asset sites along with other options for creating videos:


Leave A Reply