
Picking a perfectly on-brand WordPress theme is just the start of creating a customized website. WordPress has a built-in theme customizer, allowing you to make design and style tweaks to your site and preview them (before publishing them live) in real time. Even the greatest website theme can use refinements to get it just right for your purposes. Let’s go over the WordPress customizer in detail, from how to access it to everything it can do for you.
Subscribe To Our Youtube Channel
- 1 Where is the WordPress Theme Customizer Located?
-
2
What are the Customizer Features and Functions?
- 2.1 Customizing the Title, Logo, and Favicon
- 2.2 Adding (or Hiding) a Header Image
- 2.3 Changing the Website Color Scheme
- 2.4 Changing the Default Website Fonts
- 2.5 Selecting Homepage Settings
- 2.6 Setting Your Content Options
- 2.7 Creating Navigation Menus
- 2.8 Customizing Website Widgets
- 2.9 Adding Custom CSS
- 2.10 Even More Customization Options
- 3 Preview Your Changes on Different Screen Resolutions
- 4 Publishing Your Website Updates
- 5 Test New Themes Using the Customizer
- 6 Wrapping Up
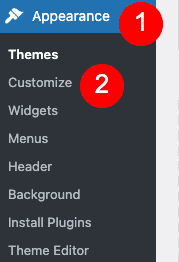
Where is the WordPress Theme Customizer Located?
Every WordPress website comes standard with the theme customizer. To access it, log in to your WordPress admin dashboard, then navigate to Appearance > Customize, which you can find on the left-hand sidebar. Doing this opens the customizer for your current theme. (When you want to exit the customizer, click the X in the top-left corner.)
No matter what theme you’re using, there are always the same base default panels in the customizer. And this is also where other advanced and custom themes will add their own options, making it easier for you to make changes all from one place.
What are the Customizer Features and Functions?
Once you have the customizer open, you’ll see customization options on the left of the screen and the preview of your website on the right. Remember, that preview isn’t what it looks like live; instead, it’s what your site will look like once the changes have been published.
To make changes using the customizer, click the individual panel you want to work on. Or, click the Blue Pencil icon to open that item’s settings if the icon is present (only some elements will have it).

Now, we’ll go over the different features and settings of the WordPress theme customizer that you can choose.
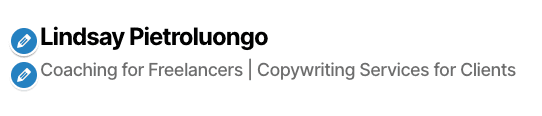
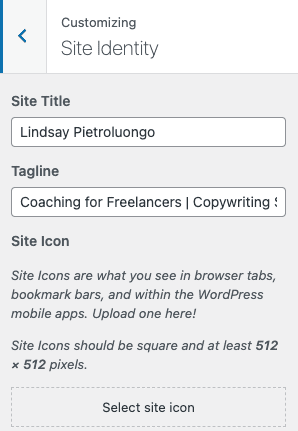
Customizing the Title, Logo, and Favicon
You can update the title, tagline, logo, and favicon in the Site Identity panel. The directions are pretty clear-cut in this panel. For example, choose the Select Logo or Select Site Icon options to upload a logo or favicon.
Here are a few things to know:
- The site title will appear at the top of your website in the main header section.
- If you don’t update or remove the tagline, your website will use the WordPress default: “Just Another WordPress Site.”
- Only some themes support logos. You may add your logo in this panel but not see it on your website, which likely means your theme doesn’t support them.
- The favicon, which is called a “site icon” on WordPress, appears in bookmark bars, browser tabs, and mobile apps.
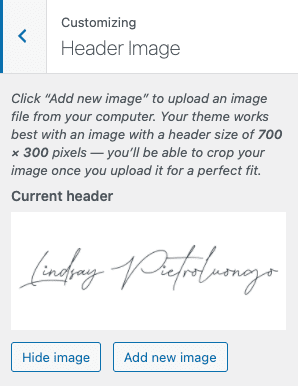
Adding (or Hiding) a Header Image
If your theme supports header images, you may see a Header Image panel in the customizer. Usually, this panel will give you information about the best size for your header. Once you upload your header image to WordPress, you can crop it to the correct size for the best display possible. You can also choose Hide Image if you prefer not to have one at all.
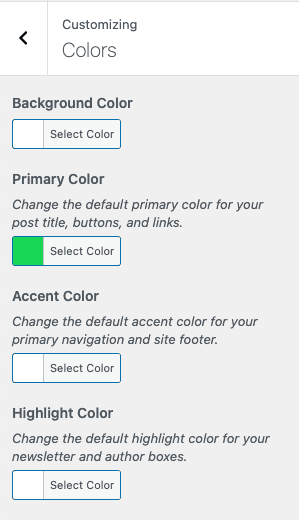
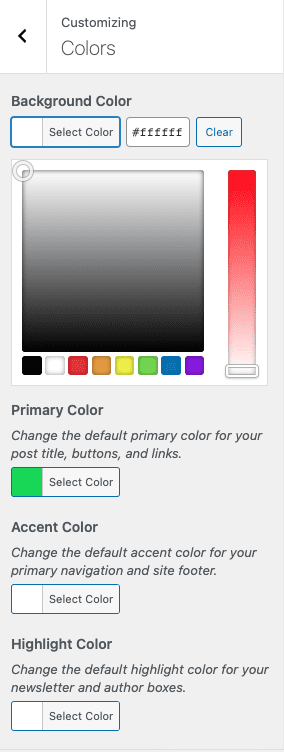
Changing the Website Color Scheme
The Colors panel lets you change your website’s color scheme. The WordPress theme you’re using will affect the available controls, which means that not every theme has endless color options. For example, you may be able to change the color of the header text but not much else. Or, you may be able to select colors for each site element, like the background, body text, headers and links.
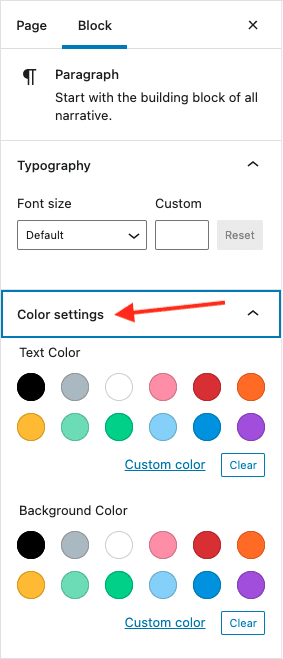
Pro Tip: If you don’t get the color control you want from the Colors customizer panel, you can make custom updates in the Block Editor. Each block can have its own color settings, giving you control over your theme that you may not get in the WordPress theme customizer. When in the block you want to edit, click Color Settings on the right.
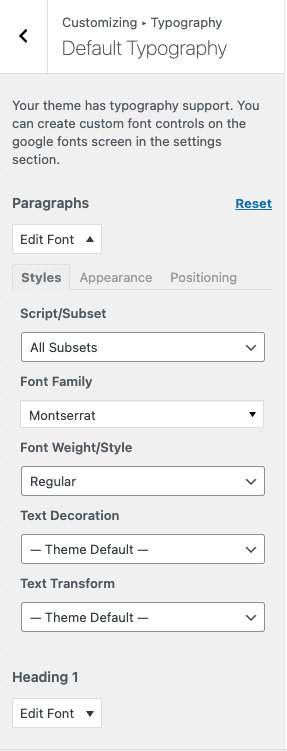
Changing the Default Website Fonts
If you see a Typography panel available in the customizer, your theme allows you to change the default font options. If there aren’t enough options for you to choose from, that usually means that your theme doesn’t allow changes to the default fonts. However, you’re not out of luck. You can use a dedicated plugin or add custom CSS to change your site’s typography styles.
Selecting Homepage Settings
Your WordPress website will display blog posts on the homepage by default, but this is easy to change if you prefer a static homepage instead. On a static homepage, you can add any content you want to remain there for the foreseeable future, like welcome copy, links to specific products or pages, highlighted testimonials, etc.
If you want to display a static page instead of your recent blog posts on the homepage, select A Static Page in the Homepage Settings panel. A drop-down menu will appear, and you can select the page that you want to use as your homepage. You’ll also be able to select your blog page from the drop-down under Posts Page.
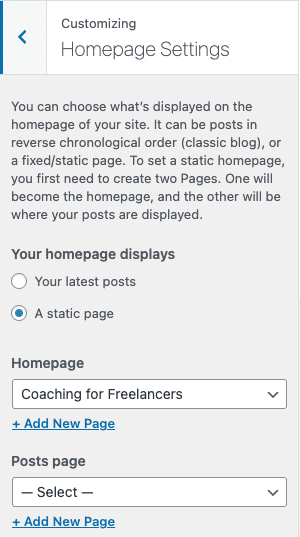
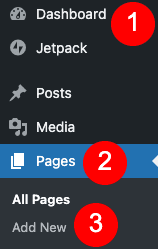
If you don’t have pages that you want to use for your homepage or blog, you can choose + Add New Page under the drop-down menus to create them. You can create a blank page and name it whatever you want, then go back in later to customize the pages. If you don’t have any published pages yet, you’ll have to create one first by going to Dashboard > Pages > Add New. Only then will you see the Homepage Settings panel in the customizer.
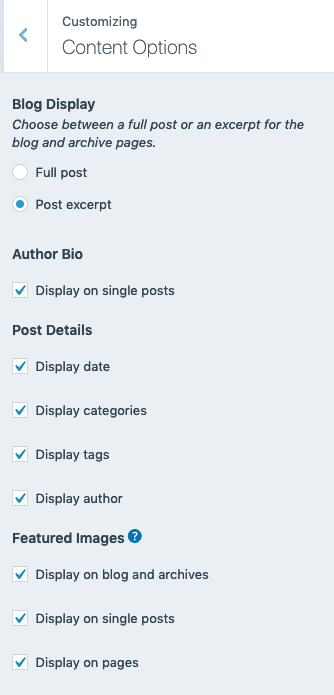
Setting Your Content Options
If your theme has a Content Options panel, you’ll have extra control over how your content appears on different website pages. While each theme will have its own Content Options (if it has them at all), here are some common options that you may see:
- Author Bio: Opt in or out of displaying your bio on blog posts.
- Blog Display: Opt to display a blog post excerpt or the full post.
- Featured Images: Decide where featured images will show, like on blog posts or pages.
- Post Details: Decide which details to display on each post, such as author, categories, date and/or tags.
Source: WordPress.com
If you don’t see a Content Options panel, you can access some of those controls elsewhere in WordPress. For example, you can choose between displaying Full Text or a Summary of your blog posts by going to the Dashboard > Settings > Reading.
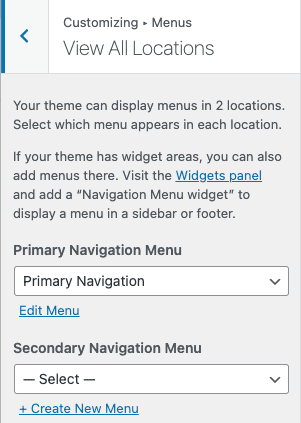
In the Menus panel, you can create different navigation menus and choose where they’ll be located on your site. This is also where you can find existing navigation menus that you can leave as-is, update or remove.
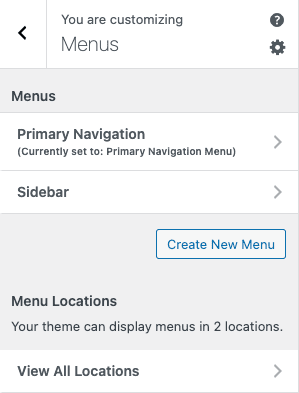
To determine where different navigation menus can go, choose the View All Locations option, which will show you theme-supported menu locations. You may also be able to add a Navigation Menu widget to display it in one of your site’s widget areas. It’s a good idea to play around with all this before creating a menu to plan where yours will go.
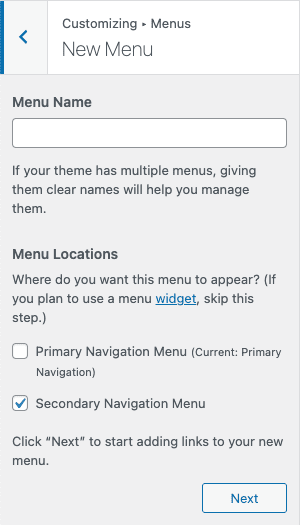
To create a new navigation menu, select Create New Menu. Then, name the menu. The name won’t actually show up on your website; it’s just there so you can better manage your navigation menus as you customize your site. Next, you’ll choose the location menu. When you’re finished, click Next.
Now it’s time to add links to the menu. Choose Add Items, which will open a new panel. This is where you can add categories, links, pages, posts and tags to your menu. When you’re finished adding everything you want to the menu, select Reorder to arrange them however you like.
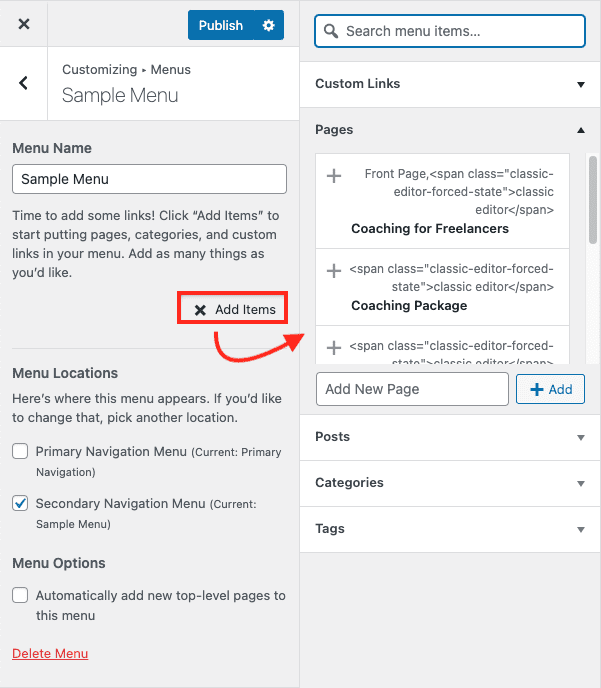
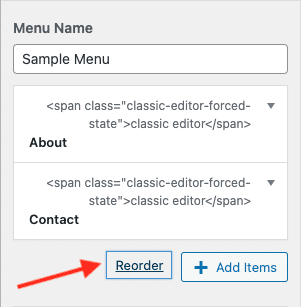
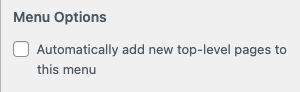
Pro Tip: If you know that you want all of your top-level pages in a specific navigation menu, like one that will stay in your sidebar, you can check Automatically Add New Top-Level Pages and get out of adding them manually every time you create a new high-tier page.
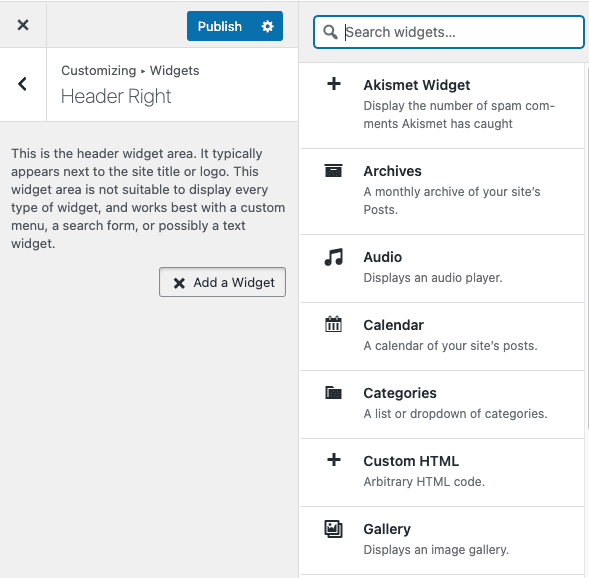
Customizing Website Widgets
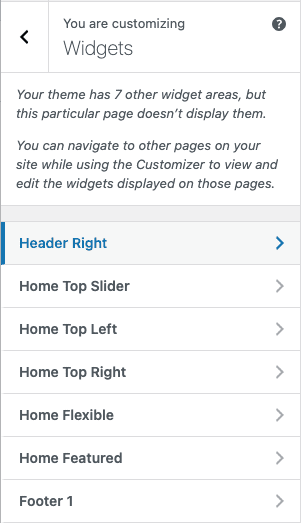
In the Widgets panel, you can add, manage and remove your site’s widgets. There are all sorts of widgets that you can opt to use on your site, like Calendar, Gallery and Search.
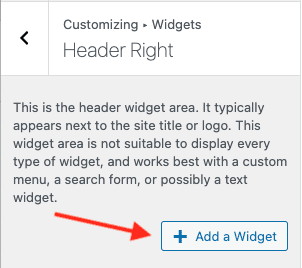
First, you’ll see the available widget locations. Different themes will have different location and widget options. Some themes have only the basics, like footer and sidebar widget areas, while other themes have more widget placement options. By clicking a location, you’ll see the widgets you have there (if there are any), and you can make the changes you want.
To add a new widget, select a location and then choose Add a Widget. A panel will open to show you the widgets that are available for your site in that location. Click one to add it, then adjust the settings and make updates within the widget. You can also drag the widget to change its position in the location.
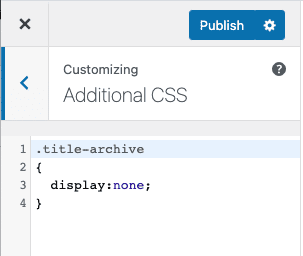
Adding Custom CSS
If you want to add custom CSS to your website to make further tweaks to it, you can use the Additional CSS panel. This lets you make custom changes to your site without directly editing the style.css file ¬– which means it’s a safer way to try out and finalize changes, making it an ideal option for moderately-tech-savvy users. Also, by using the Custom CSS panel, you’ll see changes in real time before publishing (just like with the rest of the customizer).
Even More Customization Options
As we mentioned earlier, advanced and custom WordPress themes may come with additional customizer options, which you can also access in the same area as the features above. Additional customizations may include adding a background image, adding randomly changing header images, choosing a different layout, etc. And if you have a feature that you want to add that isn’t an option, you may be able to get that functionality with WordPress plugins.
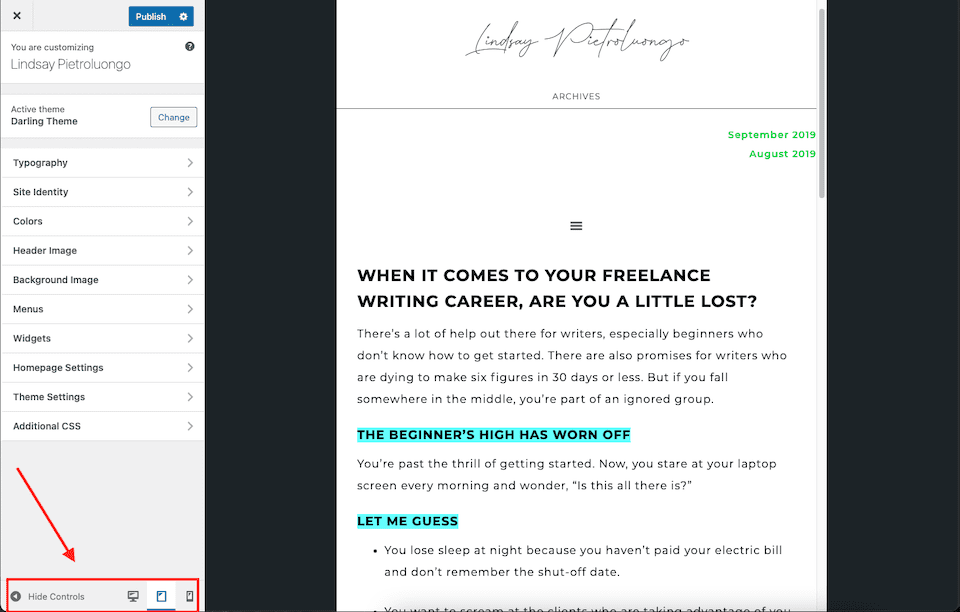
Preview Your Changes on Different Screen Resolutions
Now that you’ve made all the changes you want to your website, it’s time to see what it’ll look like live on different screen resolutions – again, before publishing it live. At the bottom of the customizer, you’ll see a Hide Controls link and, to the right of that, three Screen icons. These icons let you see what your site will look like on a desktop computer, tablet, or mobile device. When viewing in desktop mode, clicking that Hide Controls link will give you a full, proper preview of your site without the customizer panel showing.
Publishing Your Website Updates
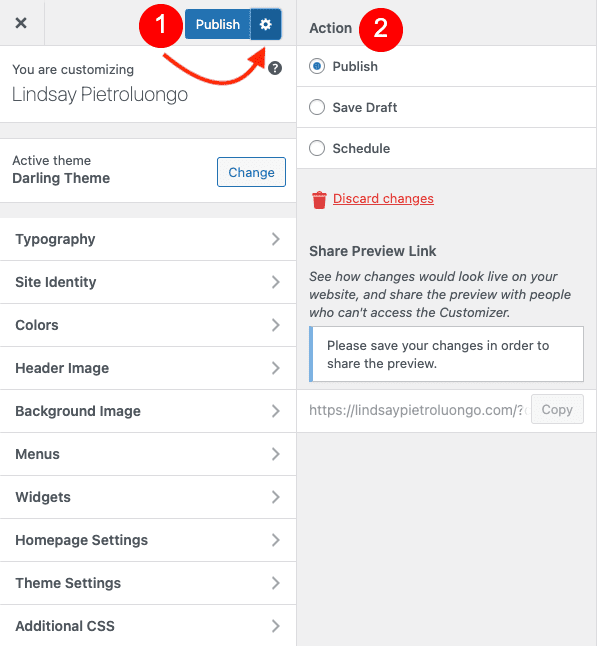
Love what you see? When you’re done making changes to your website, it’s time to publish them – or plan to publish them. To apply the changes right away, click the Publish button. Remember, this will actually publish your changes live, not just save them as a draft.
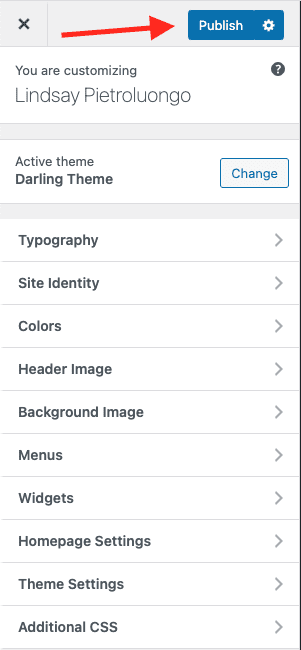
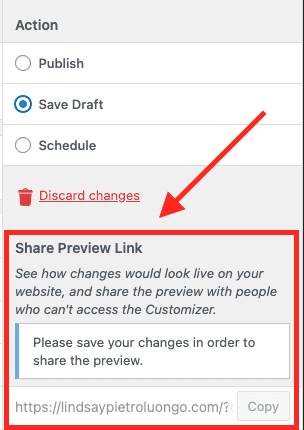
If you’re not ready to publish your changes yet, you can save them as a draft to publish later. (Make sure to do at least this, though. Otherwise, you could lose all those changes you worked so hard on.) To save your changes without publishing, click the Gear icon to the right of the Publish button. From the action panel that opens, you can select Publish, Save Draft or Schedule. If you don’t know when you’re going to be ready to publish the changes, click Save Draft.
Pro Tip: Saving a draft of your changes to continue working on in the future? You can share a preview link of the revised, unpublished website, which is a great way to get feedback on your work.
If you know you want the changes to go live on a specific date (and time), click Schedule. You can share a preview link from the Schedule panel, too.
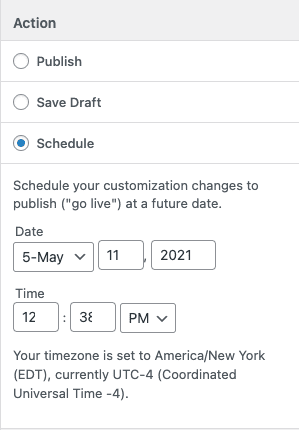
Pro Tip: Schedule the changes to go live when traffic is low, like the middle of the night. That way, if something goes wrong, you won’t impact everyone who’s visiting your site, and you’ll have time to fix it before traffic spikes again.
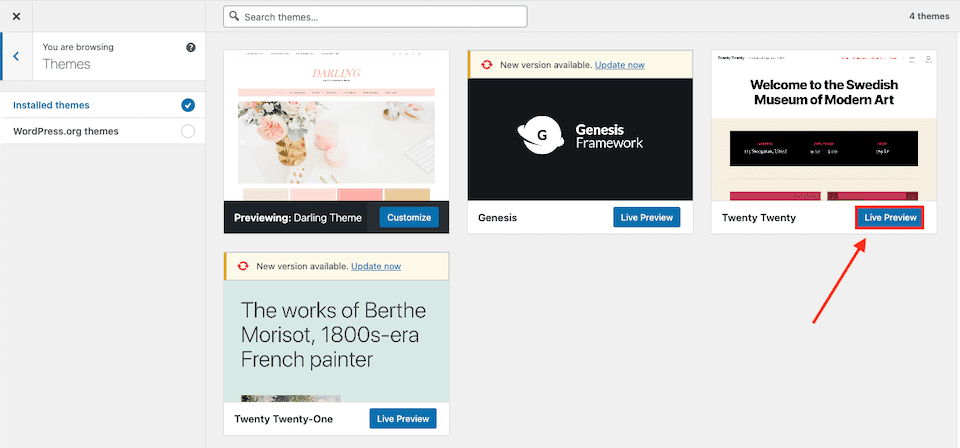
Test New Themes Using the Customizer
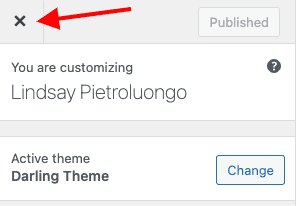
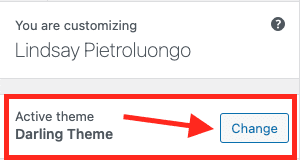
Here’s something a lot of website owners don’t know: You can also use the customizer to make changes to an installed yet inactive theme. That means you can customize a theme that you want to play around with or that you may use at a later time (or for another website).
Go to the customizer and look for Active Theme. Click the Change button. You’ll see all of your installed themes on the right. To see what a theme will look like if activated for your site, click Live Preview. This will open the customizer, and you can make changes as you would with an activated theme.
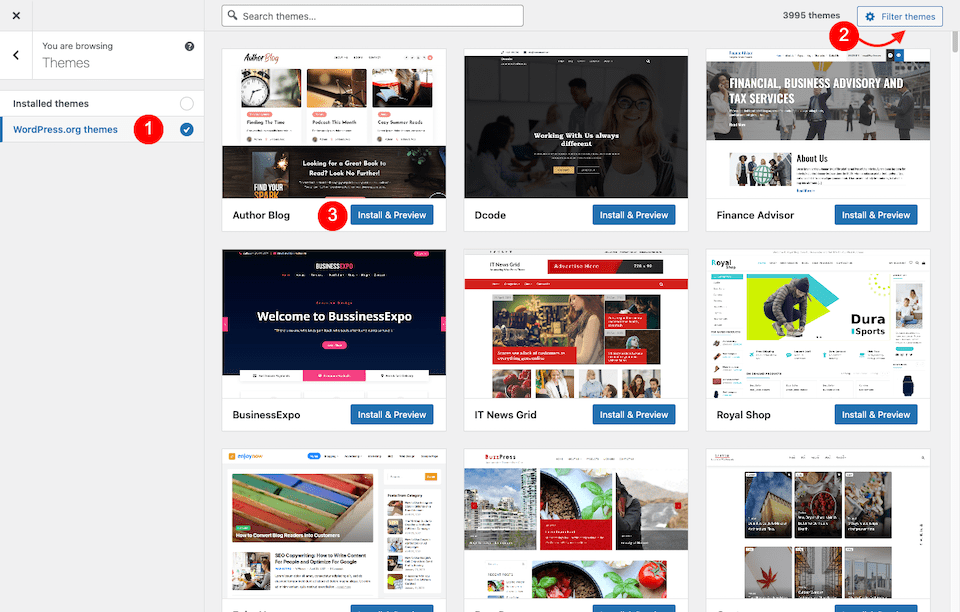
Want to see other themes that you haven’t installed but that are available from WordPress? Check the box to the right of WordPress.org Themes. To filter by specifics, choose Filter Themes on the top-right. When you find a theme you want to try out, select Install and Preview.
Wrapping Up
The WordPress Customizer is so easy to use that you can easily get through all your site updates in an afternoon or weekend. And if your specific theme has additional options, you’ll find it easy to figure out how to work with them since you already know how to handle the customizer’s base functionality. Plus, with smart features like sharing preview links, saving changes in a draft, and scheduling updates, you can get the feedback you need and space out your updates however you like, too.
Ready to custom design your website? You may also want to check out our post about using the Divi Theme Customizer and other ways to customize WordPress.
Featured Image via Creative Shell / shutterstock.com


I thought I knew everything about the customiser but I didn’t know about the gearwheel alongside the publish button nor did I know about trying out other themes. Thank you.
Very nice write up. I finally switched over to wordress about five years ago and I am still amazed by the developer support.
Great Work. perfectly explained about theme customizer. Keep it up, Please keep update nice articles in future. Well done