
Building an online store used to mean balancing design and functionality. You wanted a store that looked polished, felt on-brand, and worked smoothly at checkout, but achieving all three often took extra effort.
Divi and WooCommerce have long been a strong combination for building online stores, and Divi 5 takes that further. With a rebuilt foundation, modern layout systems, a stronger design workflow, and native WooCommerce modules, you have much more control over how your store looks and works across product, cart, checkout, and archive templates.
That means the design decisions you make early, like your colors, typography, and product card styling, can carry through your store more easily and more consistently. Instead of rebuilding the same patterns over and over, you create the foundation once and reuse it as your store grows.
In this post, we’ll walk you through the whole process, from setting up your store’s visual foundation to building your shop, product, cart, and checkout pages, all the way to going live.
Why Divi 5 And WooCommerce
WooCommerce is the engine. It reliably handles your products, payments, shipping, and inventory. What it doesn’t do on its own is give you much visual control over how your store looks and feels. The default templates are functional, but they can feel rigid, and customizing them the traditional way often means working with template overrides or custom CSS. For many store owners, that gap between how their store works and how they want it to look is where the frustration starts.
Divi 5 closes much of that gap, and it does so at a level earlier versions of Divi couldn’t match. The rebuilt architecture is cleaner and more modern, but the bigger shift is in how the system works as a whole.
Divi 5 is designed to help you manage your store holistically, not just element by element. That philosophy shows up in four distinct ways.
1. Native WooCommerce Modules
Divi 5 includes native WooCommerce modules for product pages, product listings, cart pages, checkout pages, notices, breadcrumbs, and more. Each one pulls live data directly from WooCommerce, so the content stays in sync with your store. You focus on the layout and styling, while WooCommerce handles the underlying store data.
2. Loop Builder For Custom Product Grids
The Loop Builder takes that a step further. You design a single product card exactly the way you want it, connect it to your store’s live data via Dynamic Content, and the Loop Builder automatically repeats that design for every product in your catalog. Publish a new product, and it can inherit that card design immediately, no manual updates, no reformatting. Pair the Loop Builder with the Group Carousel module, and your product sliders can update the same way.
3. System-Level Store Building With Theme Builder
Most page builders treat every page as its own project. The Theme Builder in Divi 5 lets you treat your store as one connected system. You can build one template for your shop page, one for your product pages, one for your cart, and one for checkout, and each template can apply globally as soon as you save it. Update a font, adjust a layout, or swap a color, and that change rolls out across every relevant template.
Managing a growing store starts to feel less like repetitive maintenance and more like working from a repeatable system.
4. A Built-In Design System
Underpinning all of this is how Divi 5 handles design consistency. Design Variables, Presets, and Advanced Units work together to keep your store’s visual identity consistent as you build.
- You define your brand colors, fonts, spacing values, links, and other reusable values once in the Variable Manager and can reuse them across your site.
- Presets let you save an element’s styling and reuse it across your store, keeping your product cards, buttons, and price tags visually consistent.
- Advanced Units give you precise control over spacing and sizing at every screen size, so the store feels intentional whether someone’s shopping on a laptop or a phone.
On top of that, Divi 5 keeps WooCommerce customization visual and drag-and-drop. You can build a lot without writing code, although custom CSS or deeper WooCommerce customization may still be helpful on some stores. To give you a faster start, we’ve put together a free set of ready-made ecommerce layouts you can import directly and customize to match your brand. You’ll find the download link at the beginning of this guide, and you’ll want to use the latest version of Divi 5 to follow along.
What You Need Before Getting Started
This guide assumes you already have WordPress installed. From there, you need two things in place before we start building: WooCommerce and Divi 5.
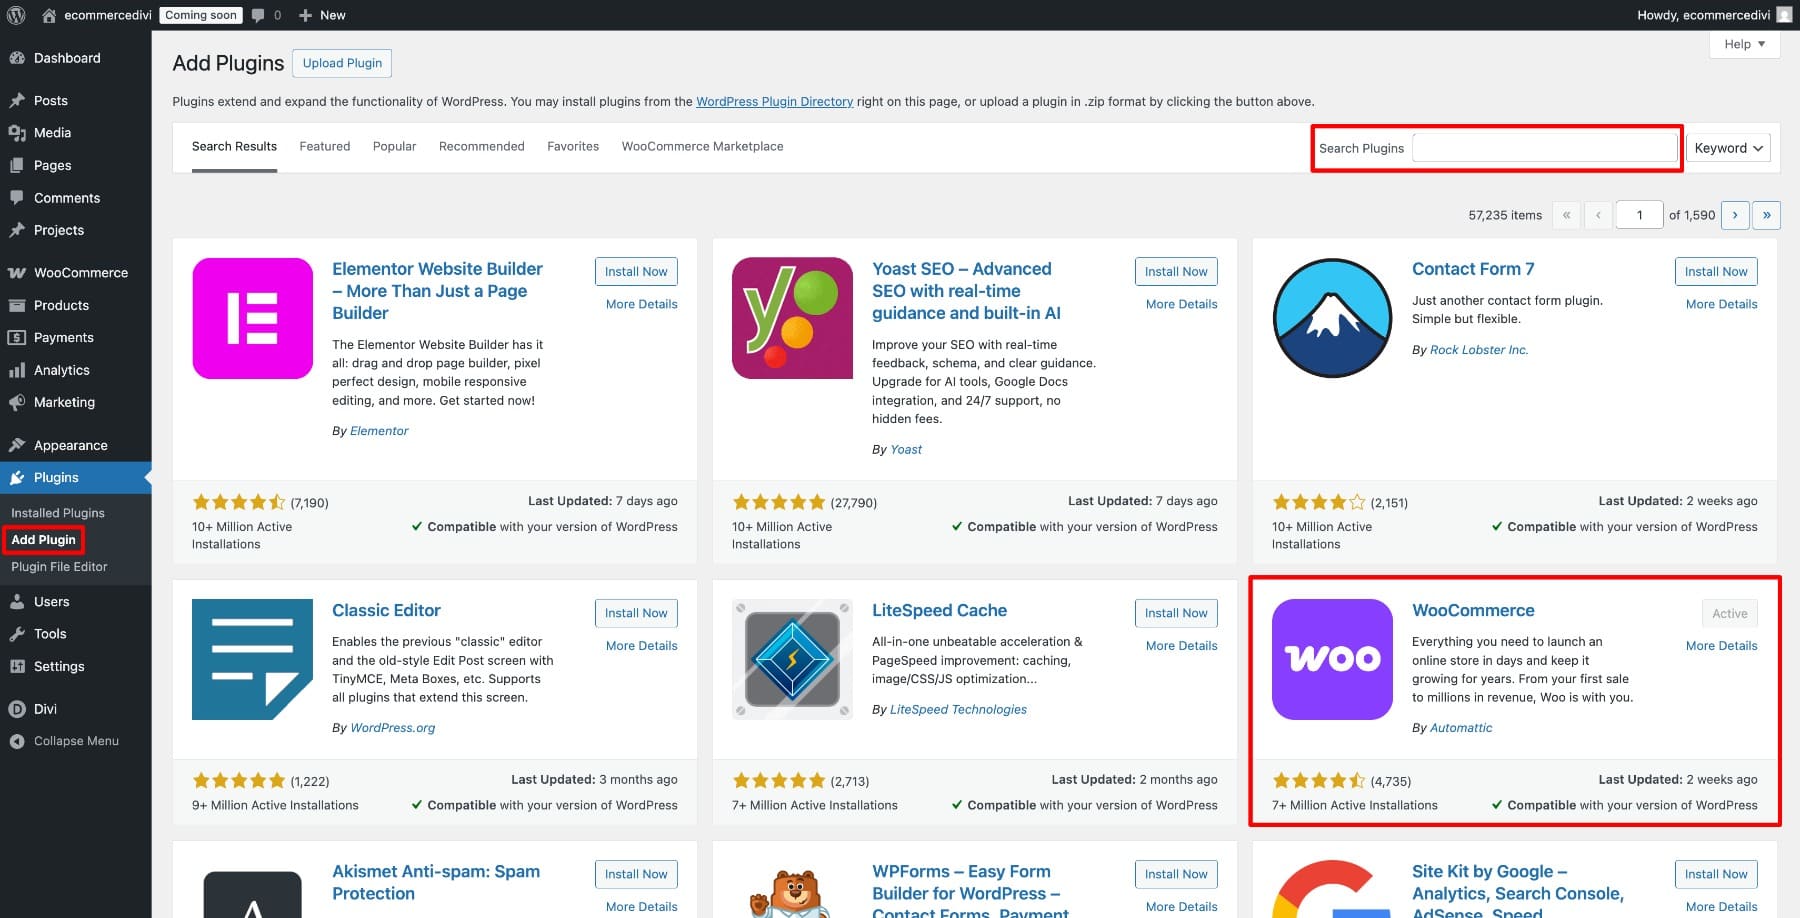
If you haven’t installed WooCommerce yet, head to your WordPress dashboard, go to Plugins, search for WooCommerce, and activate it. The onboarding flow will walk you through the basics and can help you set up the core store pages and settings you need, including Shop, Cart, Checkout, and My Account. These are the pages Divi 5 can take over visually once we get going.
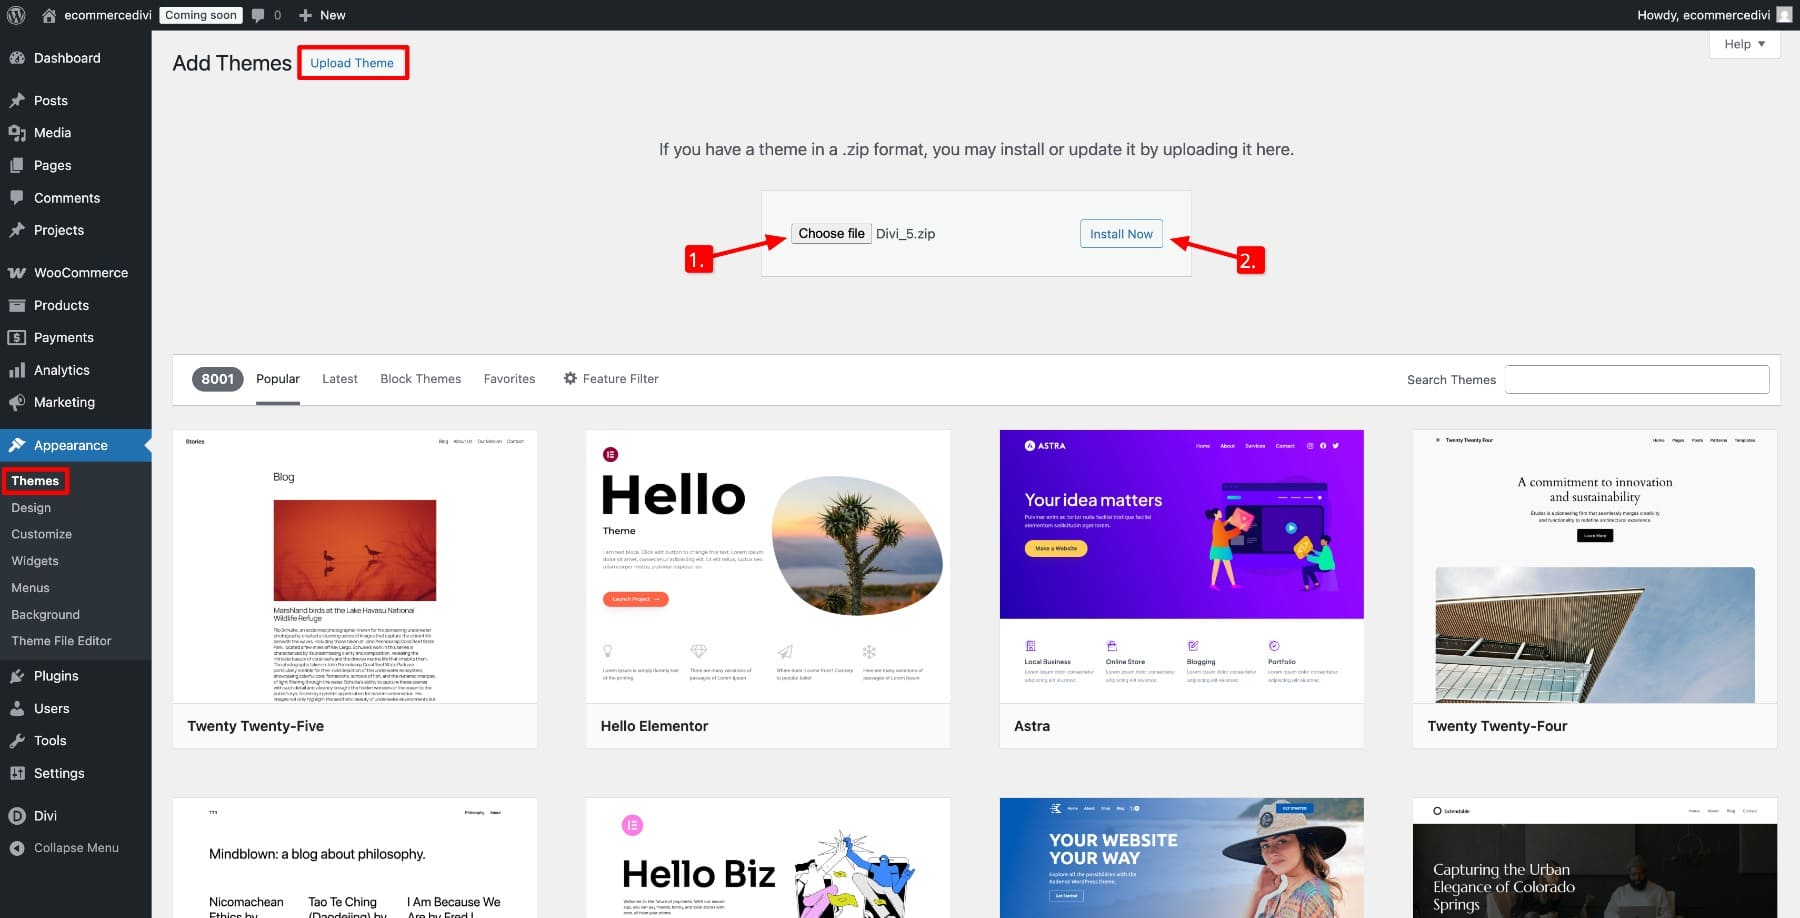
Next, install Divi 5. Log in to your Elegant Themes member area and download the latest Divi zip package. Then upload it under Appearance > Themes in your WordPress dashboard.
Once it’s active, authenticate your Elegant Themes account to receive updates and access Divi services. That’s your setup done. Every step from here happens inside Divi 5.
Before we jump into building, it’s worth taking a moment to understand how Divi 5 structures a WooCommerce store, as it shapes every decision we make from here on out.
Understanding Ecommerce Architecture In Divi 5
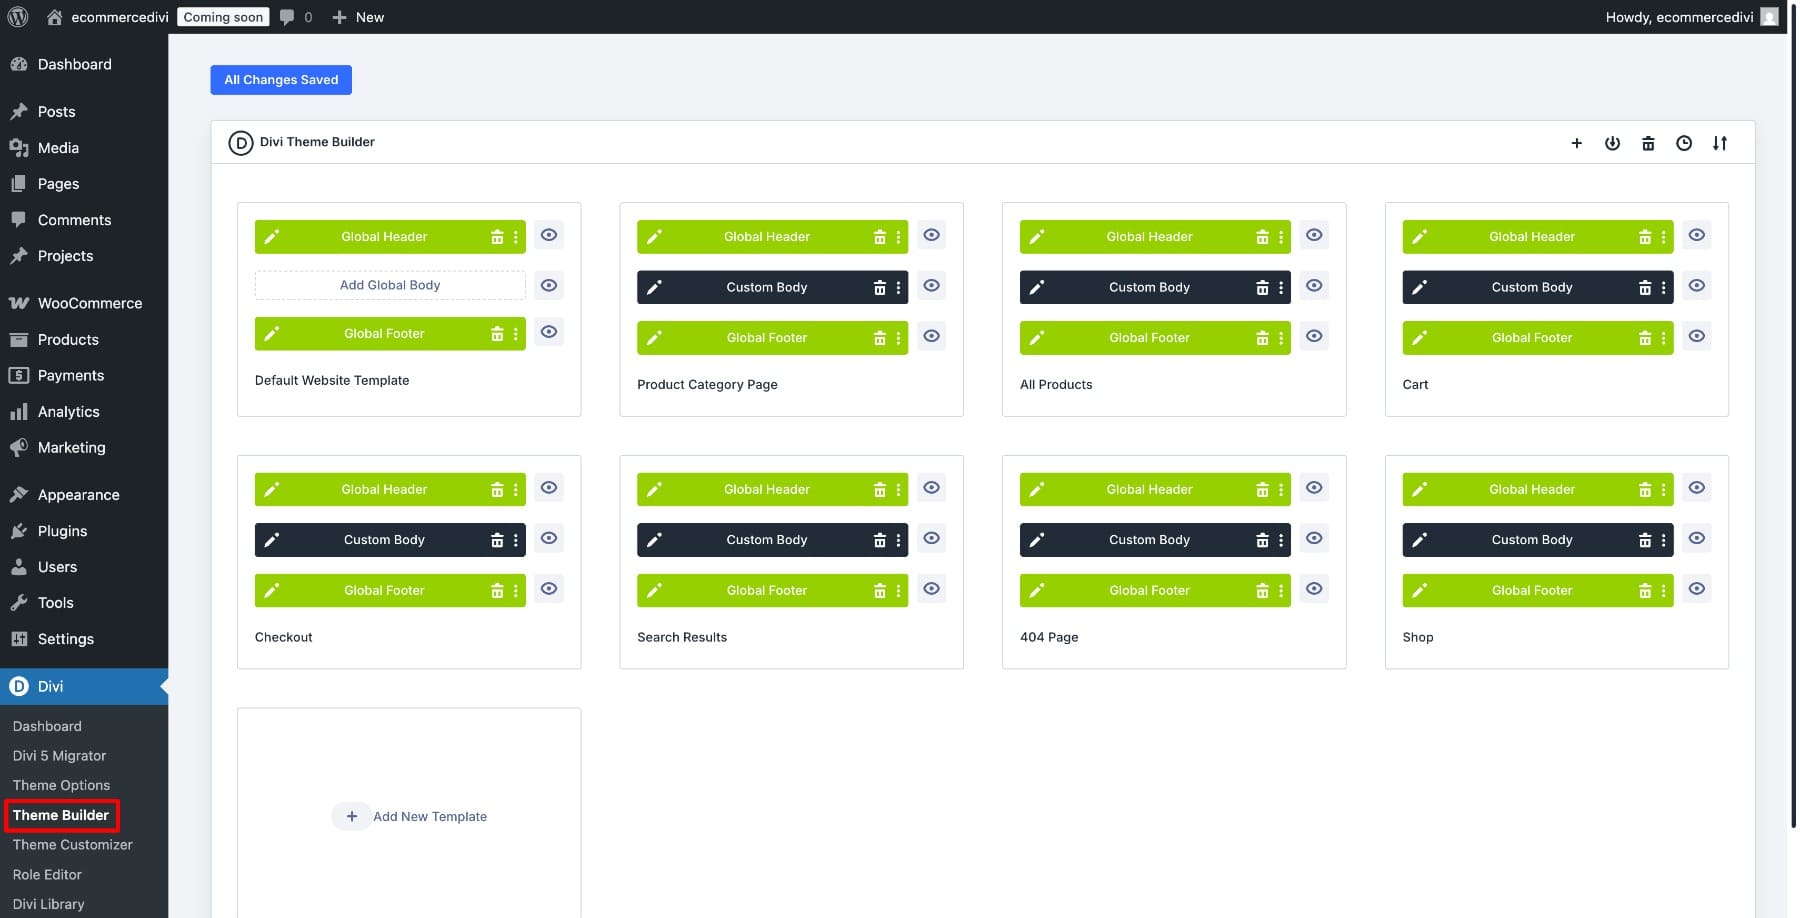
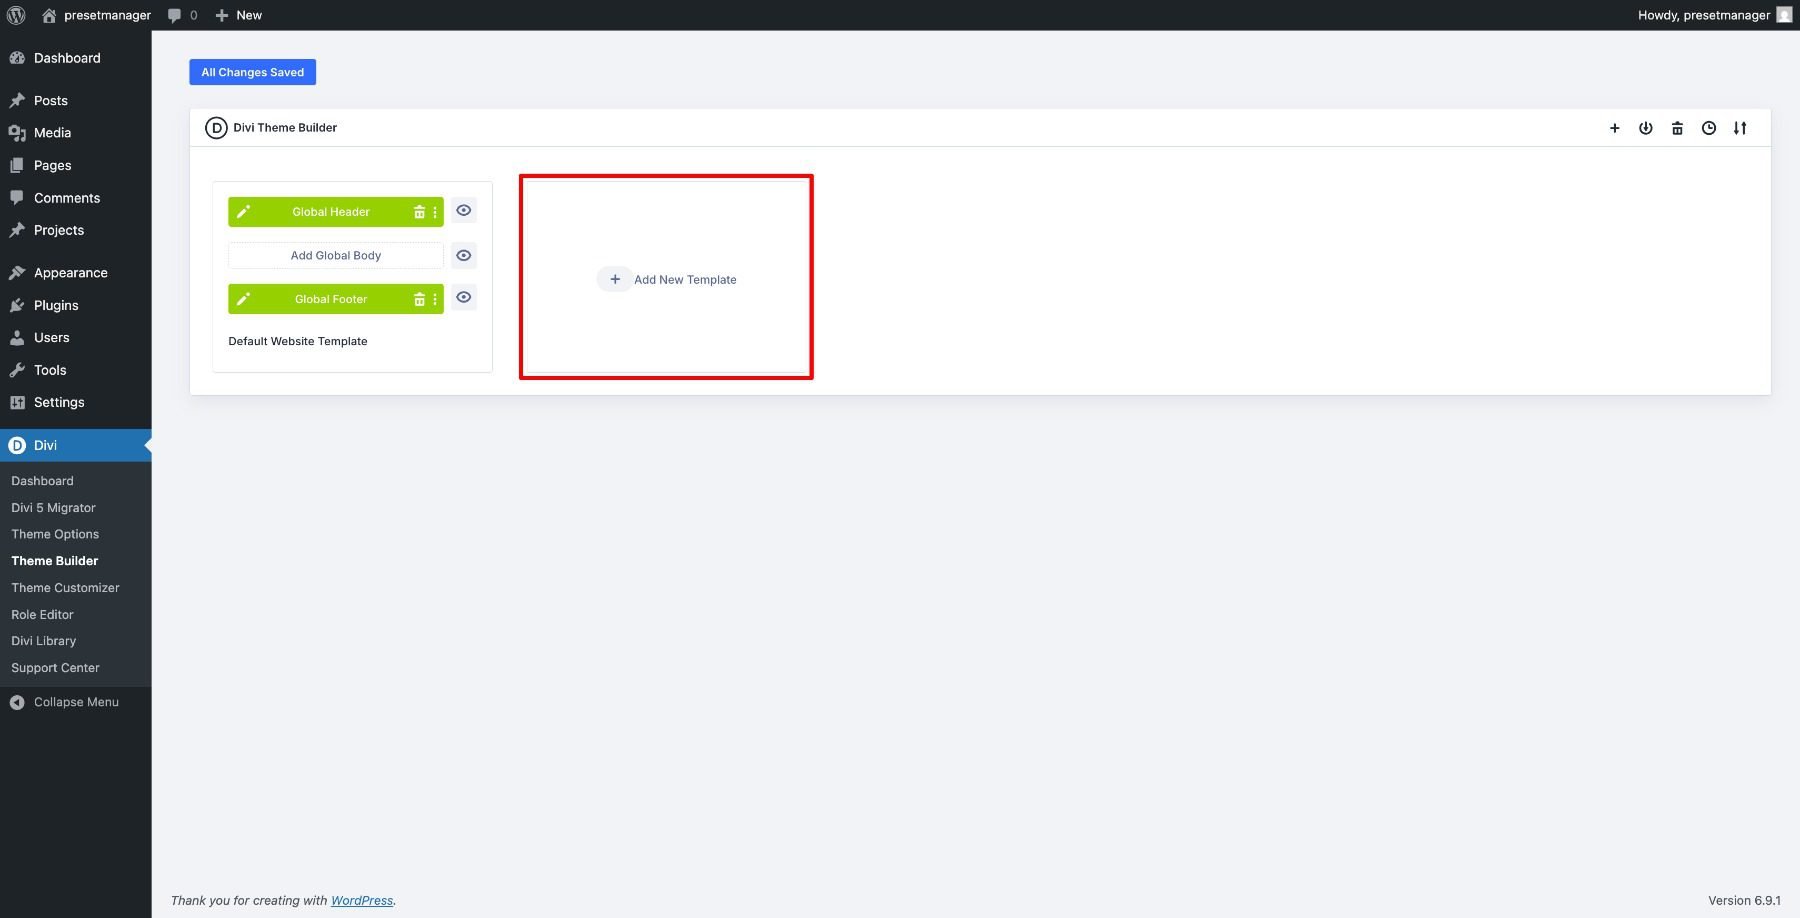
Before we start building, you need to know where everything lives. Go to Divi in your WordPress dashboard sidebar and click Theme Builder. This is where you’ll create and manage the store templates used throughout this guide. Each template gets assigned to a specific WooCommerce page or content type, and Divi takes over the design from there.
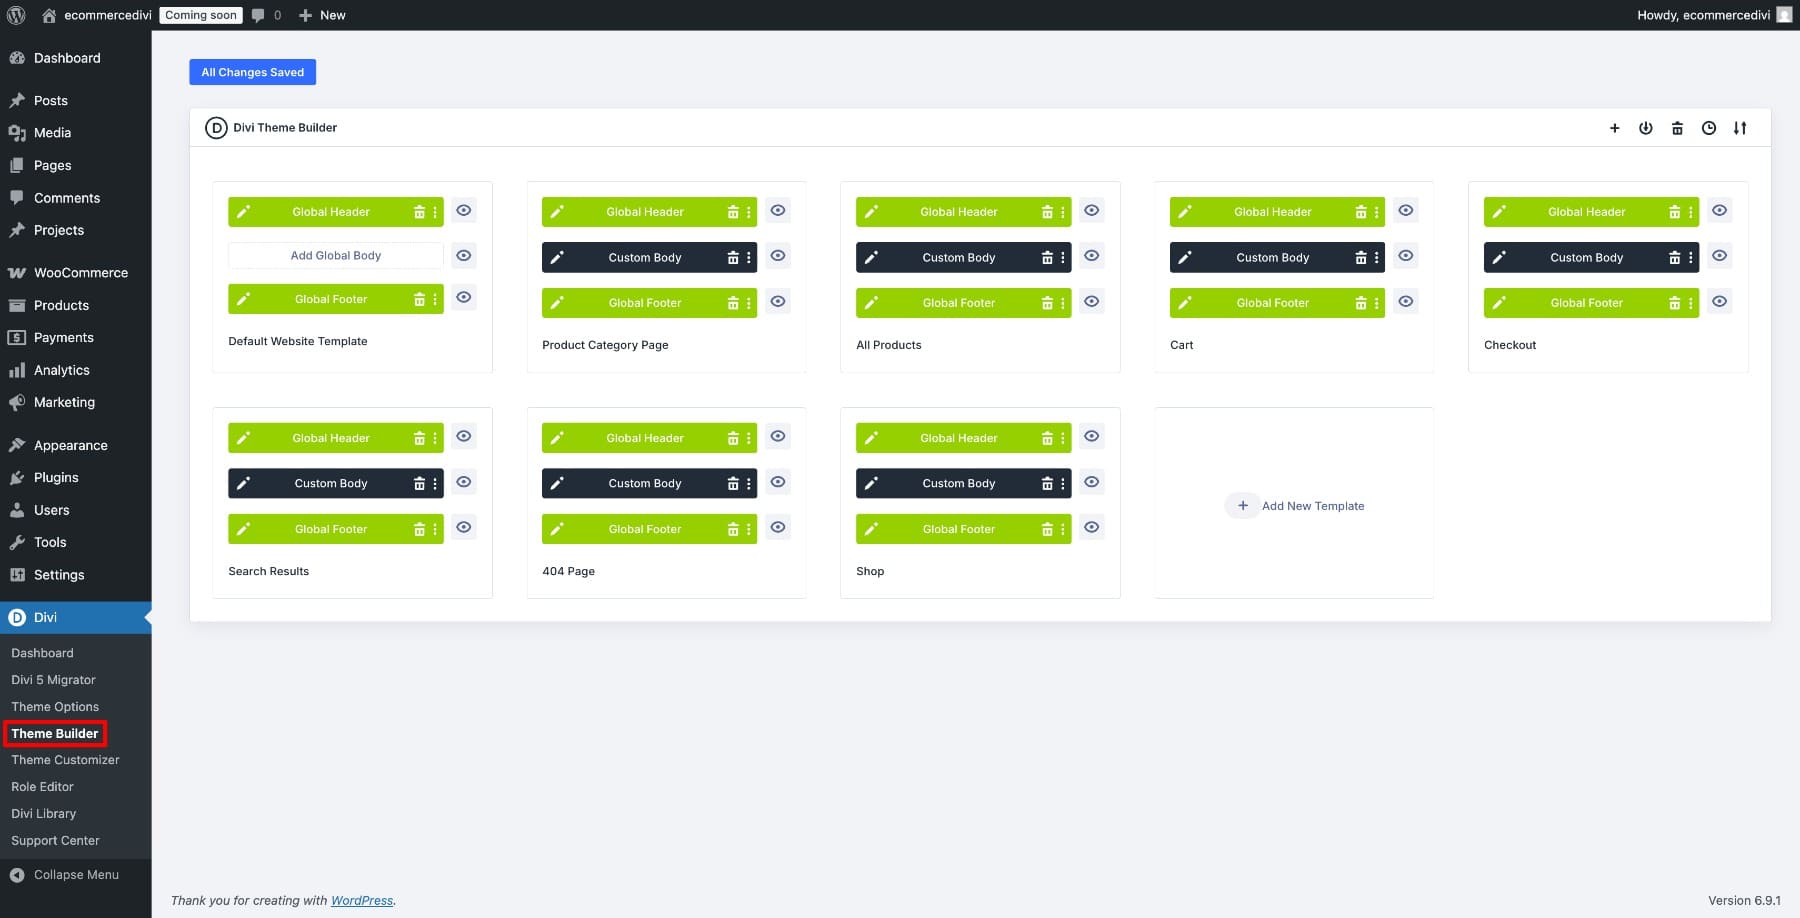
Here’s how the four template types break down. The Shop template controls your main product listing page. The All Products template applies to individual product pages across your catalog and controls what customers see when they click through to them. The Cart template is assigned to your Cart page, and the Checkout template is assigned to your Checkout page. Each one is built independently in the Visual Builder, saved once, and then applied where it’s assigned.
Download & Access The Layouts & Templates Used In This Guide
The download comes as a .ZIP file containing multiple JSON files. These files are designed to work with Divi 5’s native import systems, so setup is quick once you’re on a fresh Divi 5 installation. The layout files are uploaded to the Divi Library, while the templates are uploaded directly to the Theme Builder.

How To Use Divi 5 With WooCommerce
Step 1. Set Up Your Design Variables
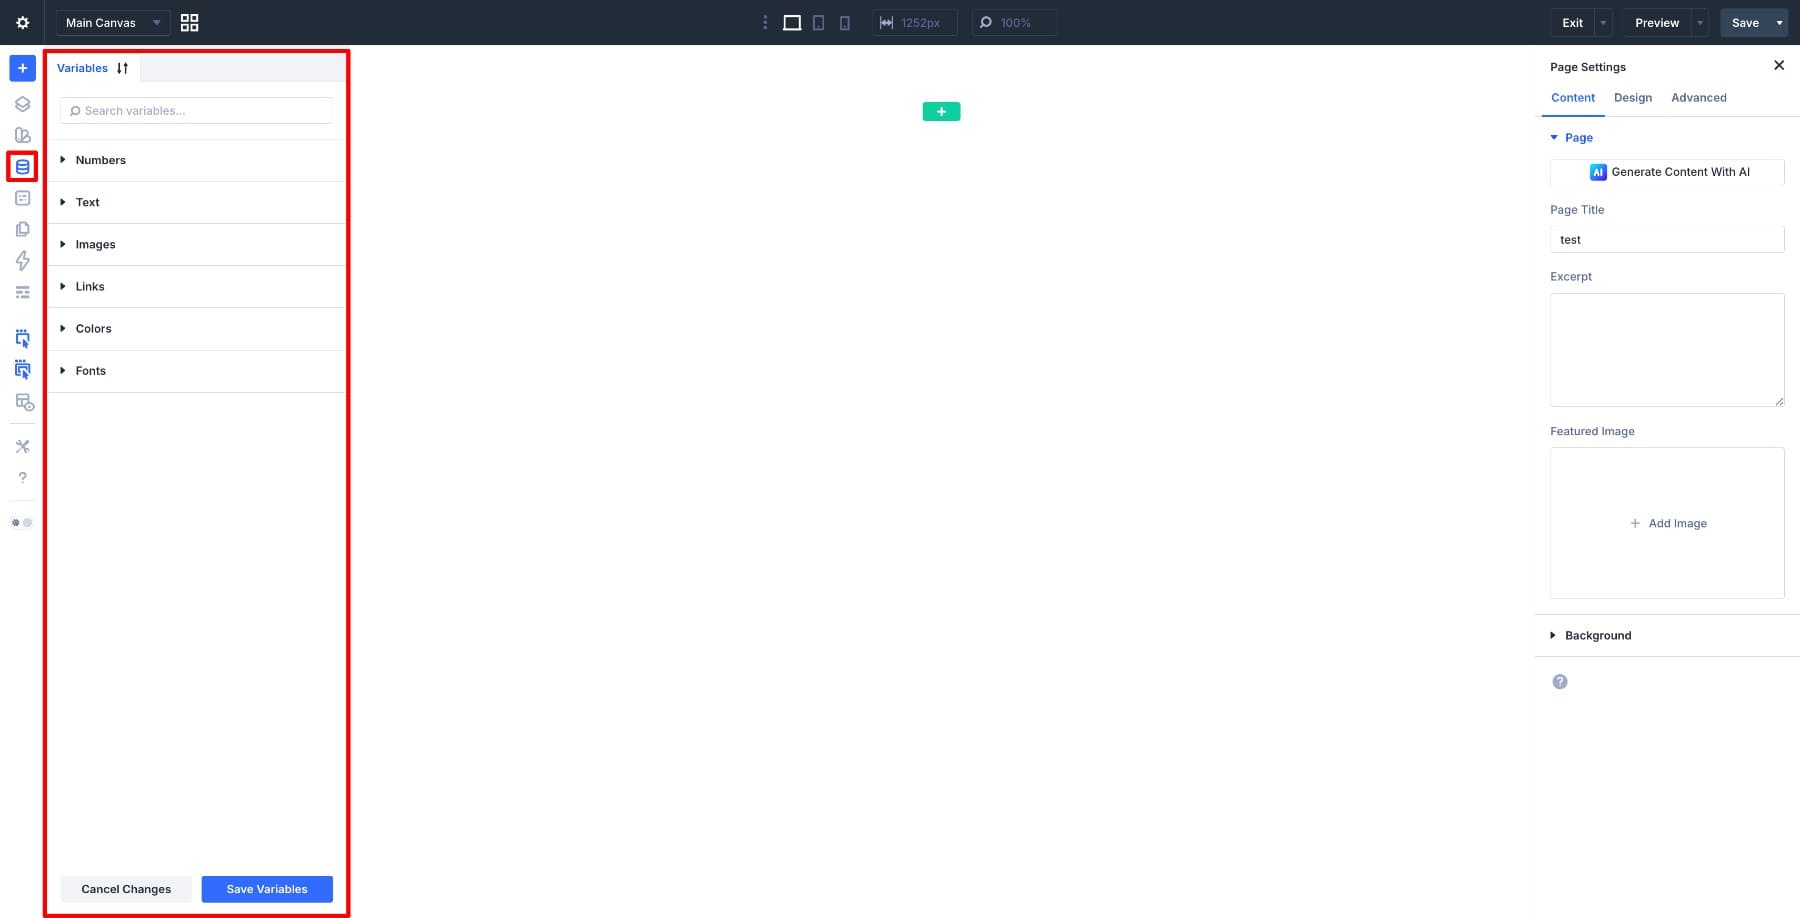
Before you touch a single page, it’s helpful to define your store’s visual identity in one place. Think of it as laying the foundation that every template you build will draw from. Design Variables let you do exactly that. You define your colors, fonts, spacing, and more once inside the Variable Manager, and Divi 5 can reuse those values across your entire store. When you need to update your primary color later, you change it once, and every linked use updates.
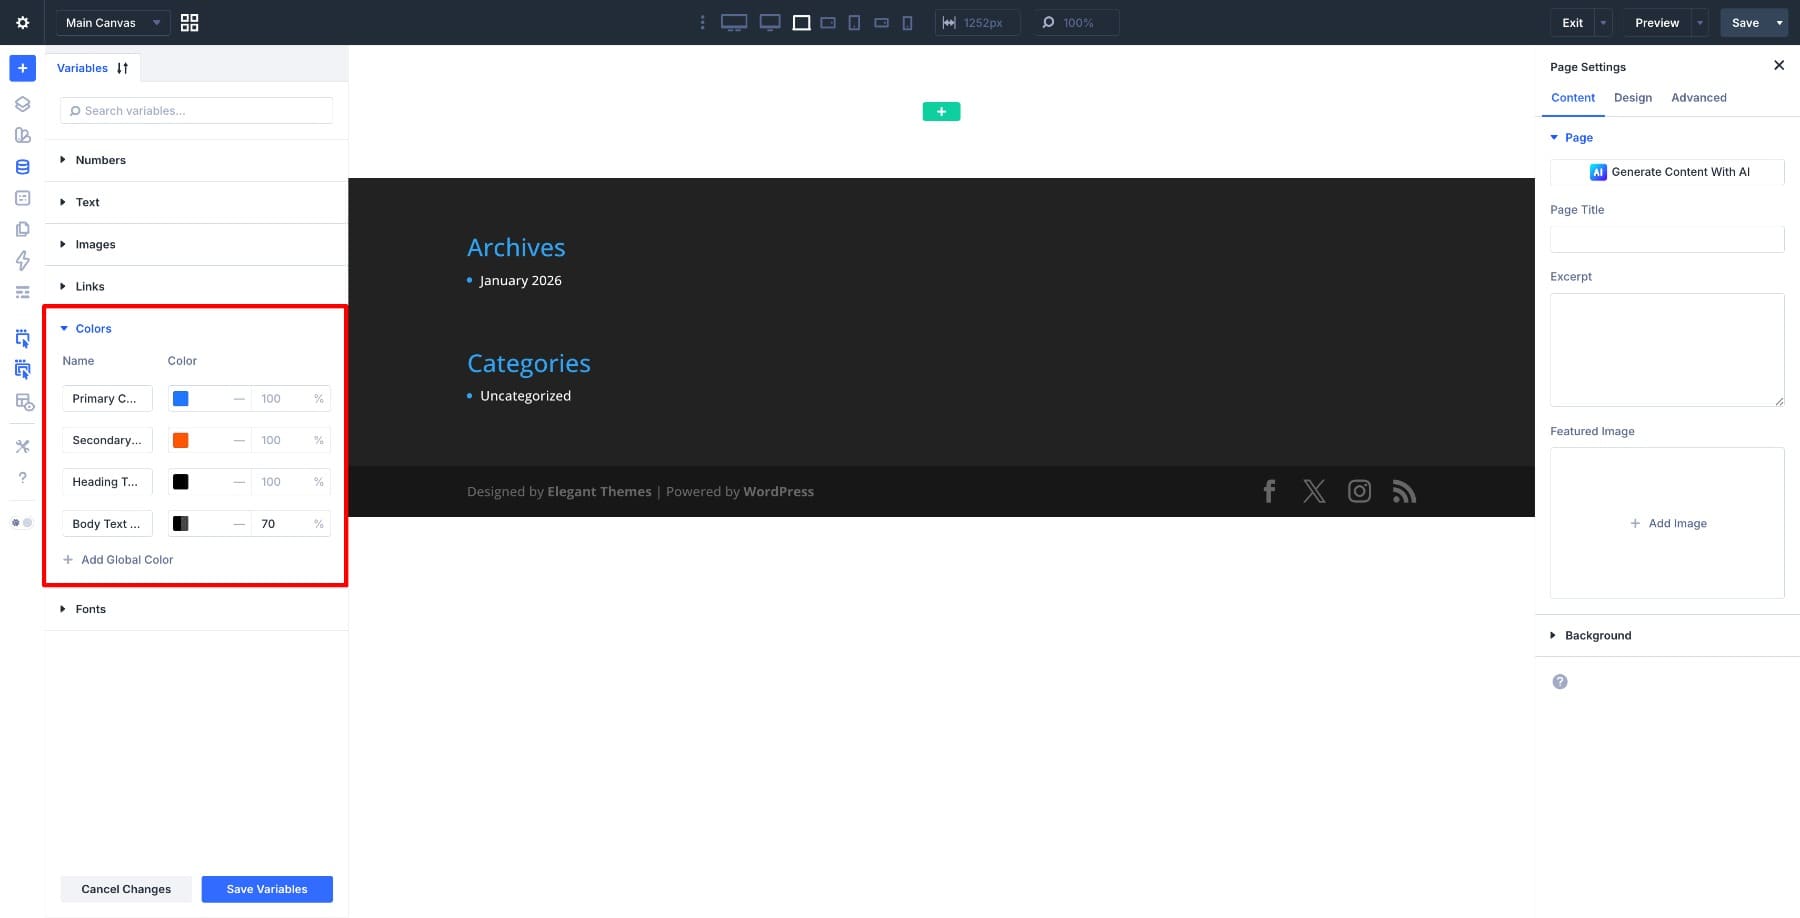
To get started, open any page in your WordPress dashboard and launch the Visual Builder. Look for the Variable Manager icon in the left sidebar and click it. This opens a panel with tabs for Colors, Fonts, Numbers, Text, Images, and Links.
For your store, you’ll primarily work with Colors and Fonts. Start with the Colors tab. Create or edit the variables you want to use for your brand, such as primary, secondary, heading, and body text colors.
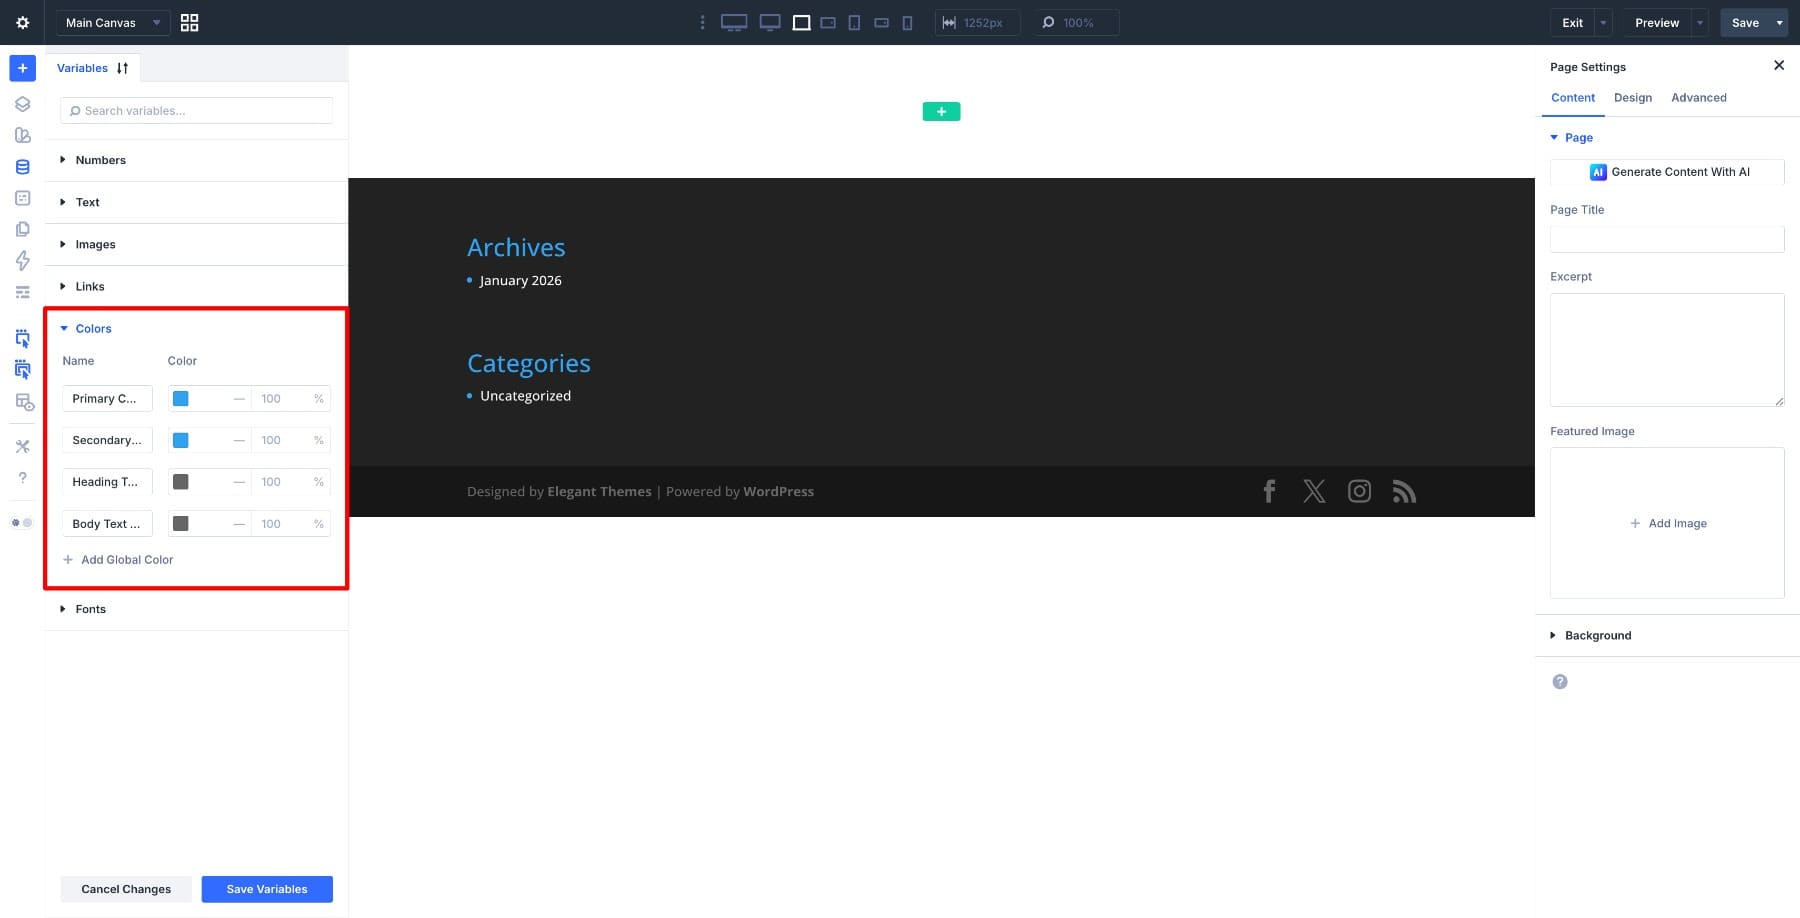
Click into the Primary Color field, enter your brand’s main color as a hex code, and click Save Variables.
Do the same for Secondary. These two colors often drive most of your store’s visual identity, covering everything from buttons and links to accents and highlights. If your store uses additional tones, such as a background color or a specific shade for sale badges, add them as new variables and give them clear, descriptive names like Background Light or Sale Badge Red so they’re easy to identify later.
Switch to the Fonts tab next. This is where you define the font variables you’ll use for headings and body text across product titles, prices, descriptions, and navigation.
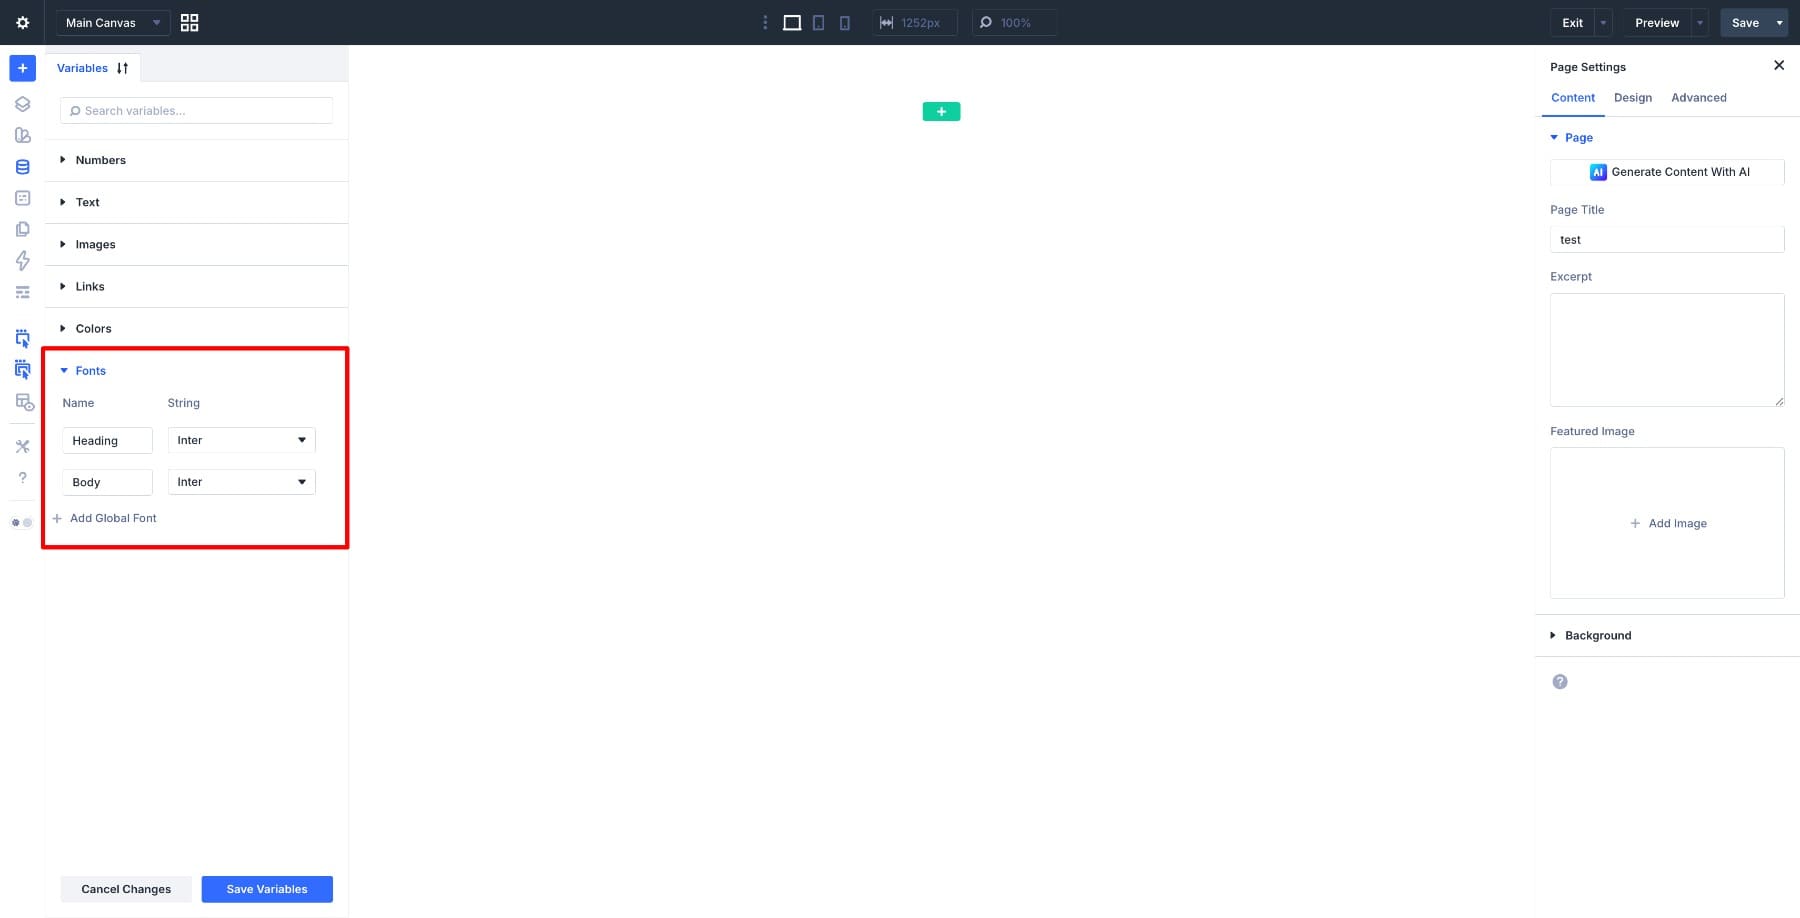
While you’re here, it’s worth spending a few minutes on the other tabs too. In the Numbers tab, save your base spacing values, such as a standard padding size for sections and a border radius for buttons and product cards. In the Text tab, store recurring content like your tagline or return policy blurb that appears across multiple pages. In the Links tab, save your social media URLs and any links you plan to reuse in the header, footer, and product pages. Small decisions made now translate into a lot of time saved as you work through each template.
Once your variables are saved, every template you build from this point can draw from this foundation. And when you import the free layouts included at the beginning of this guide, the Inspector tool can help you find hardcoded styles and replace them with your own Design Variables.
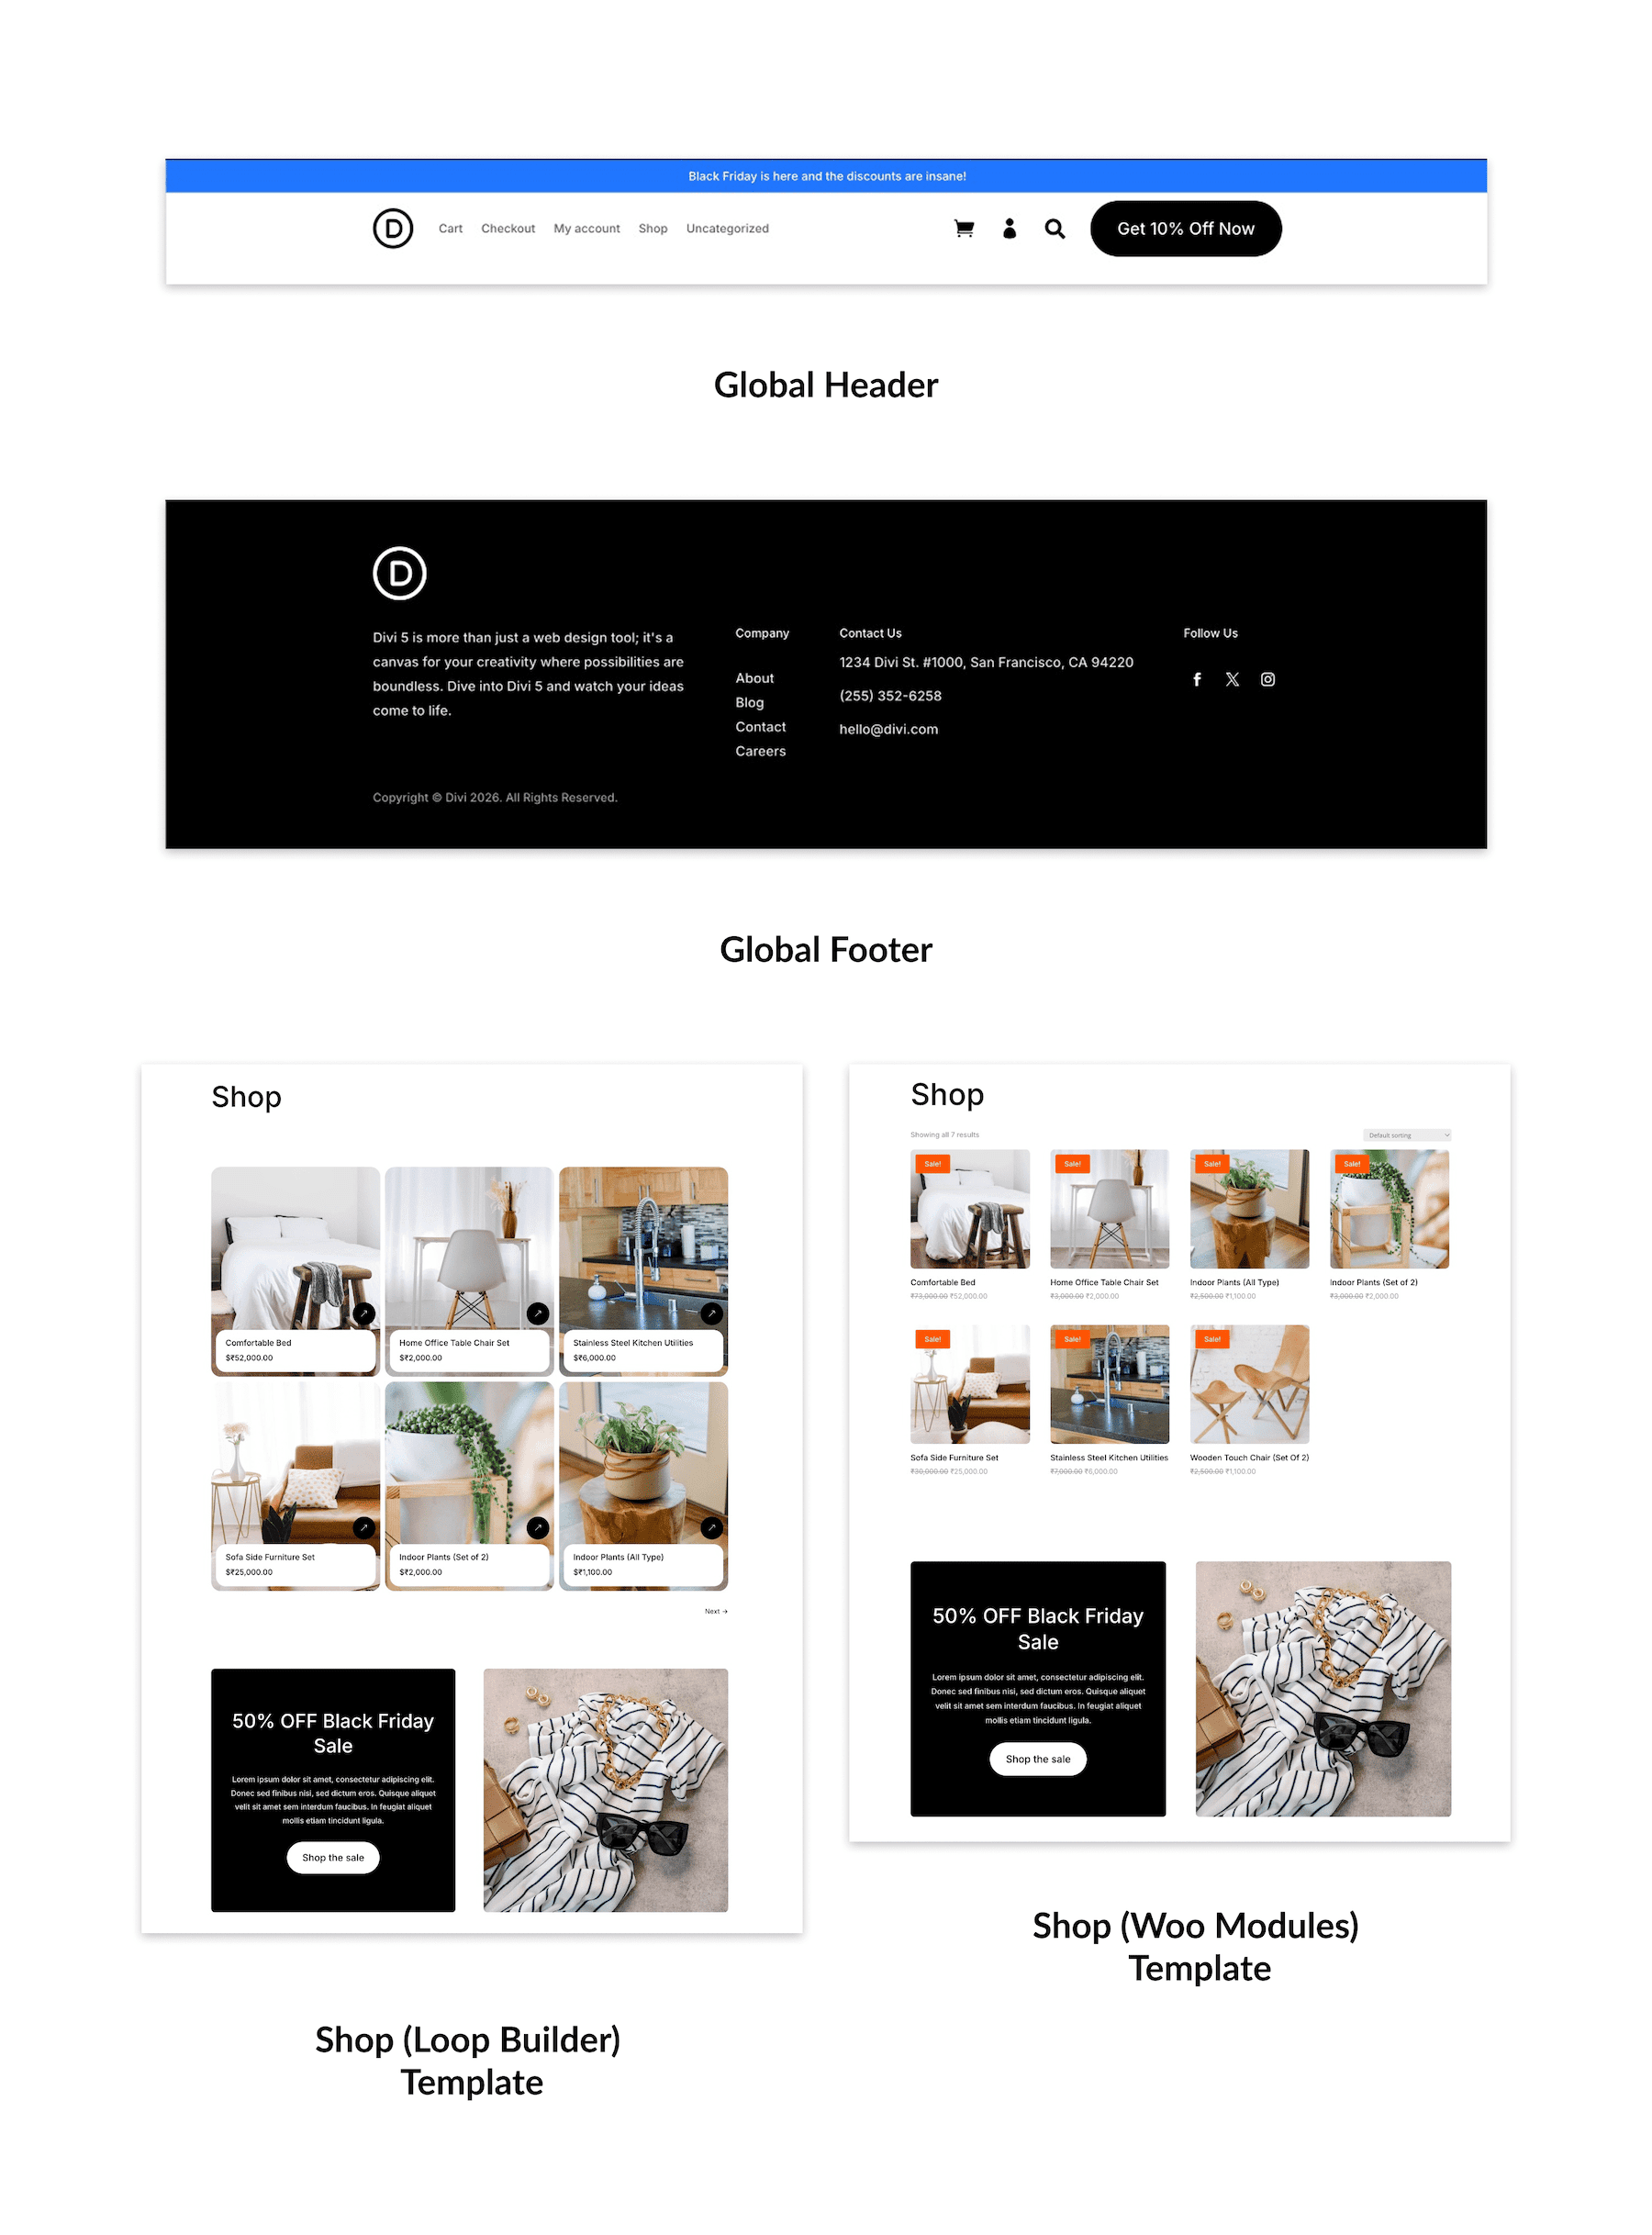
Your header and footer are the one thing every page of your store shares, so building them first means that every template you create afterward can inherit them automatically. You set them up once and move on.
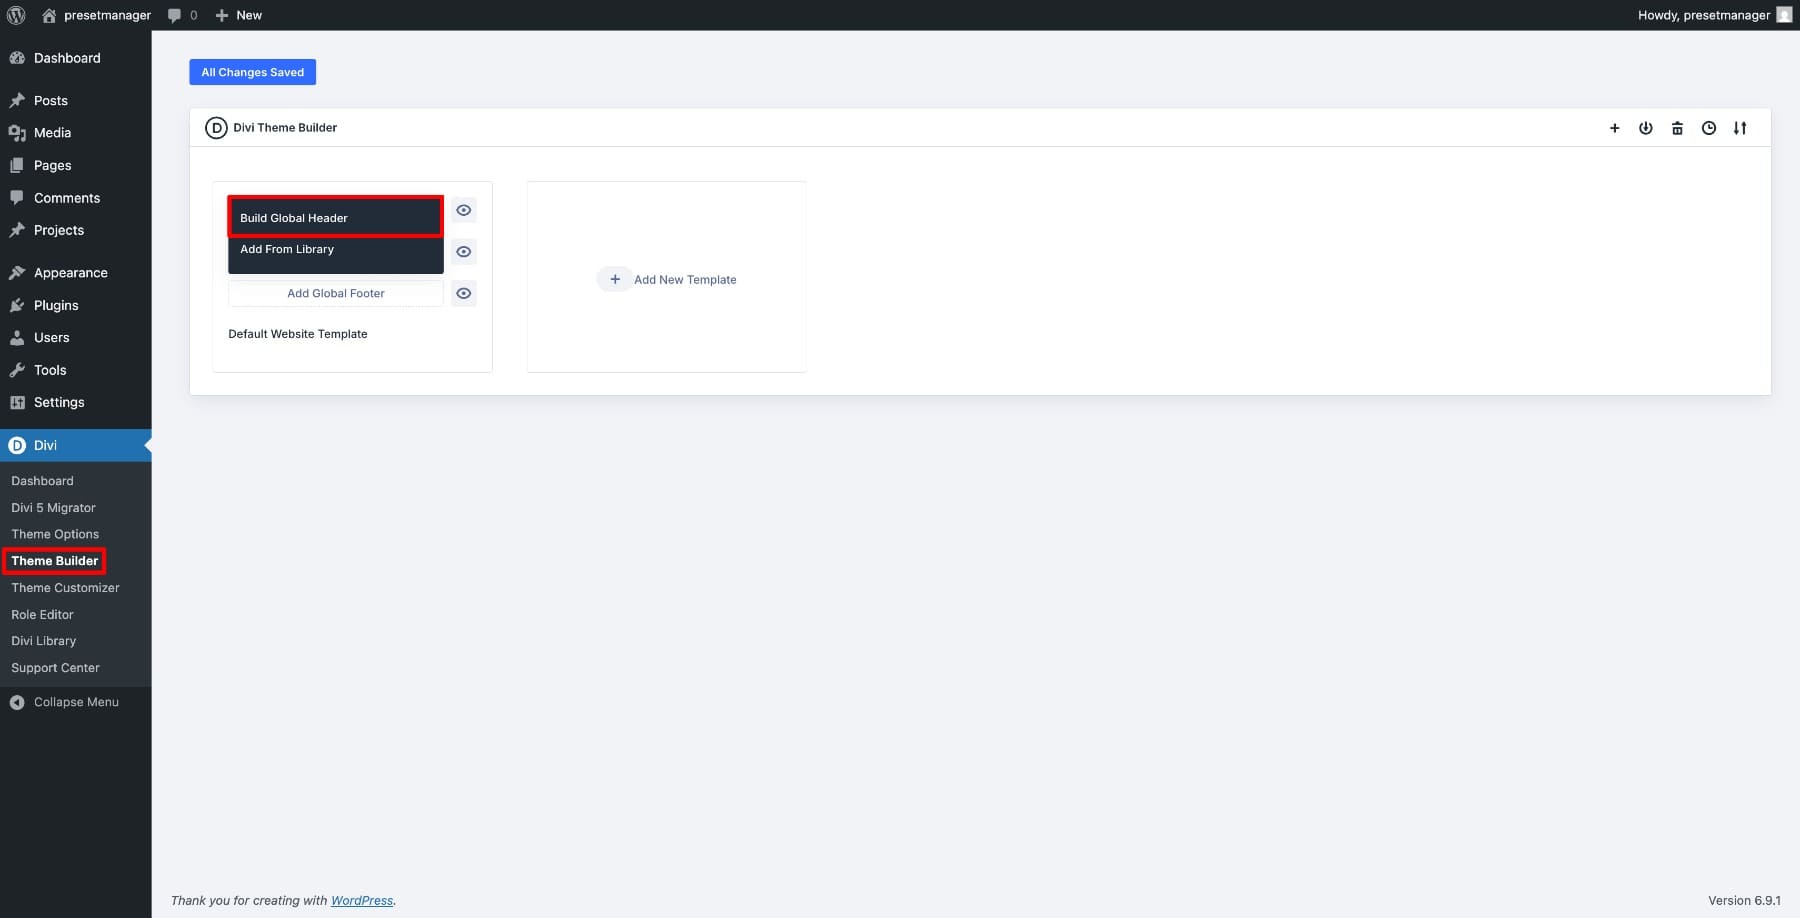
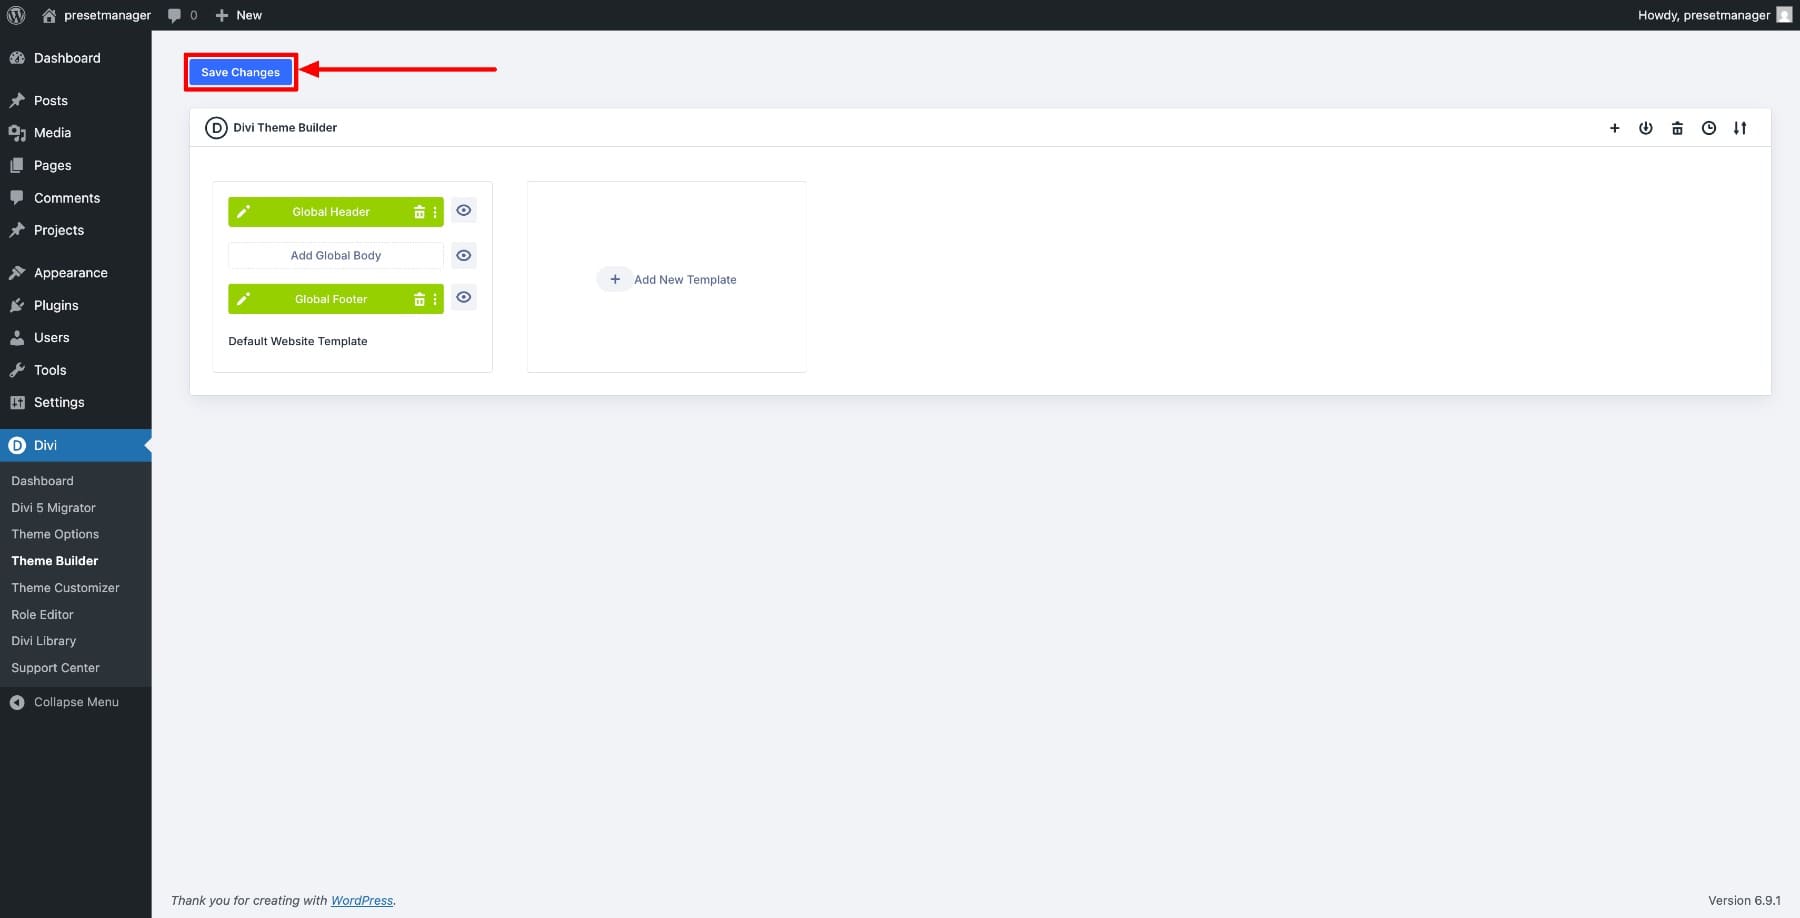
Go to Divi in your WordPress dashboard sidebar and click Theme Builder. In the Default Website Template box, click Add Global Header and then choose Build Global Header.
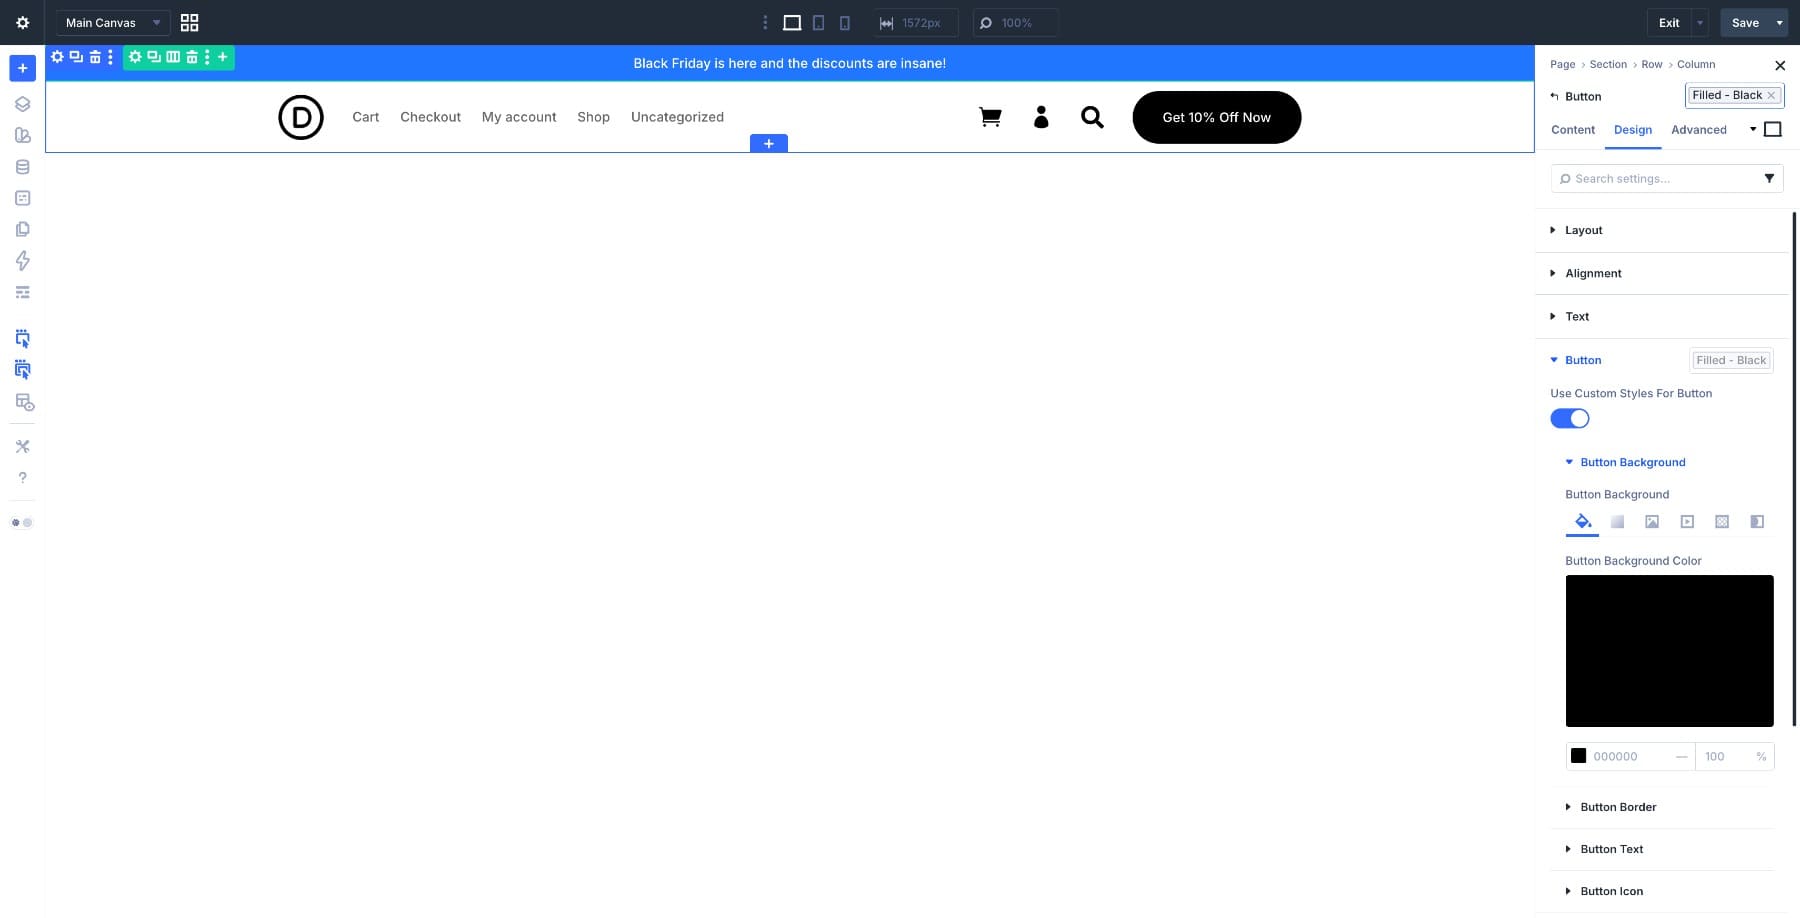
This opens the Visual Builder, where you’ll design the header. Start by adding a row with three columns, your logo on the left, navigation in the center, and a button or utility area on the right. This practical ecommerce layout gives customers quick access to the most important parts of your store.
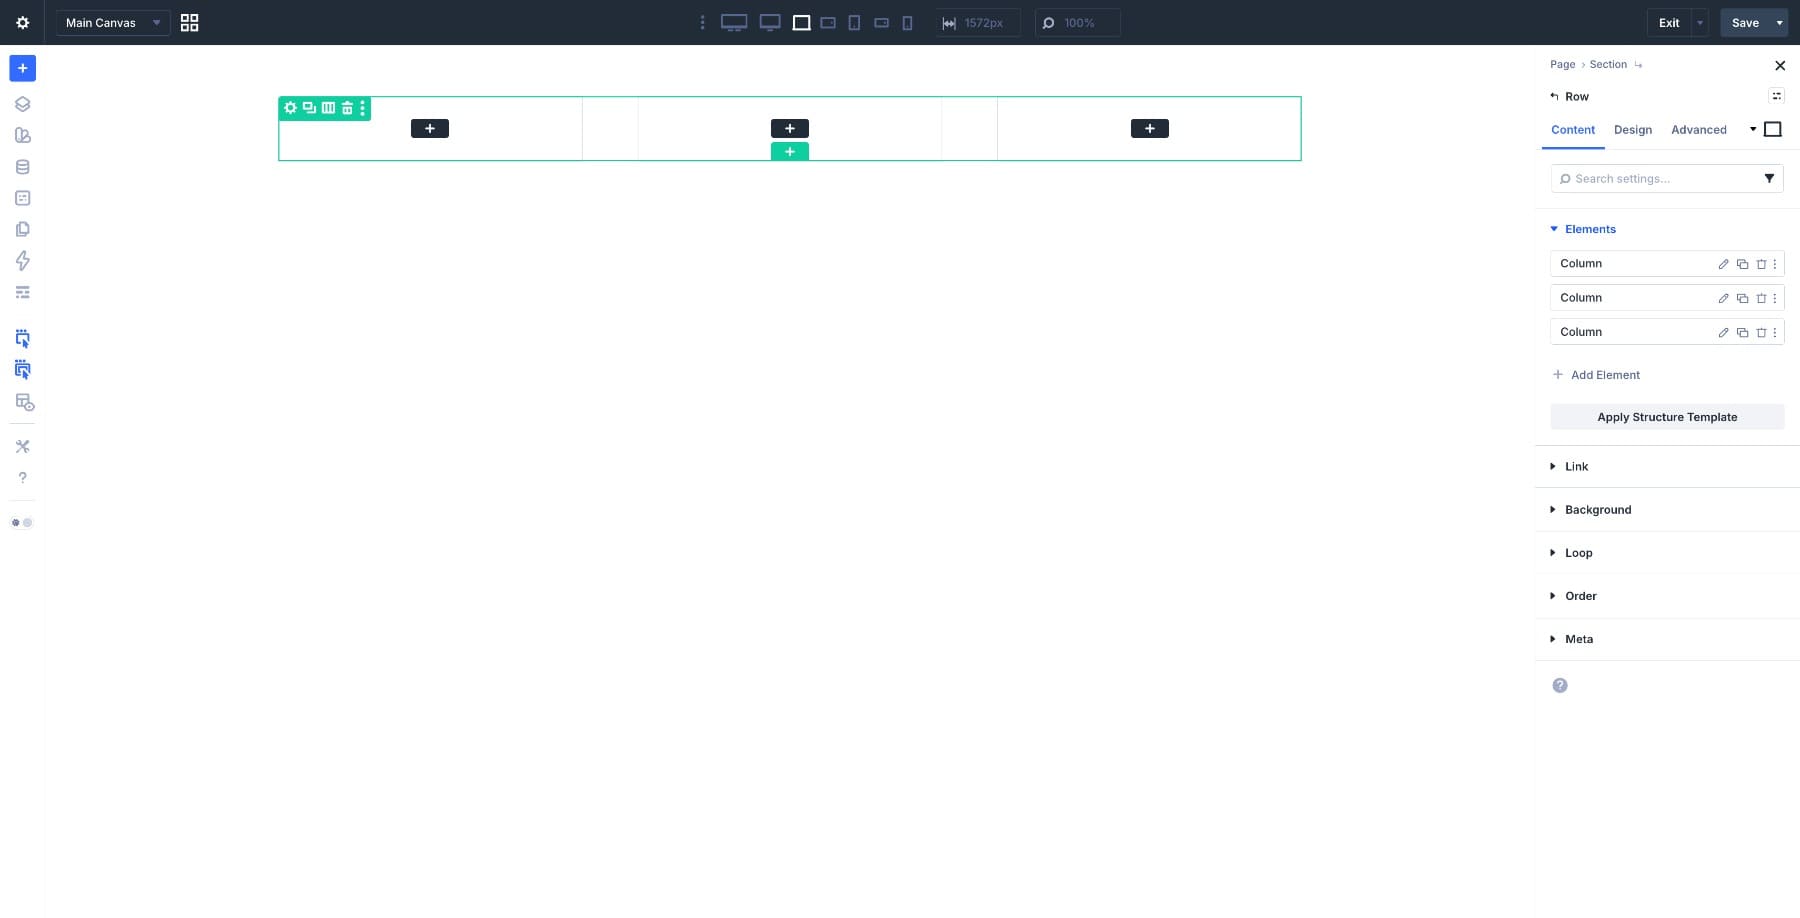
In the first column, add an Image module and upload your store logo. In the center column, add a Menu module and select the navigation menu you’ve set up in WordPress. In the third column, add a Button module or utility elements like account and cart links. Pull in your brand colors directly from your Design Variables to keep everything consistent with what you set up in Step 1.

For cart, account, and search shortcuts, you can add Icon modules and link them to the relevant destinations, or use whichever Divi modules best fit the interaction you want.
![]()
Once your layout is in place, style the section background, set your font colors using your Design Variables, and check the header across screen sizes. Divi 5’s Responsive Controls let you adjust the layout at tablet and mobile breakpoints so everything stays in place on smaller screens.
When you’re happy with it, click Save in the Visual Builder toolbar, then click Exit to return to the Theme Builder dashboard.
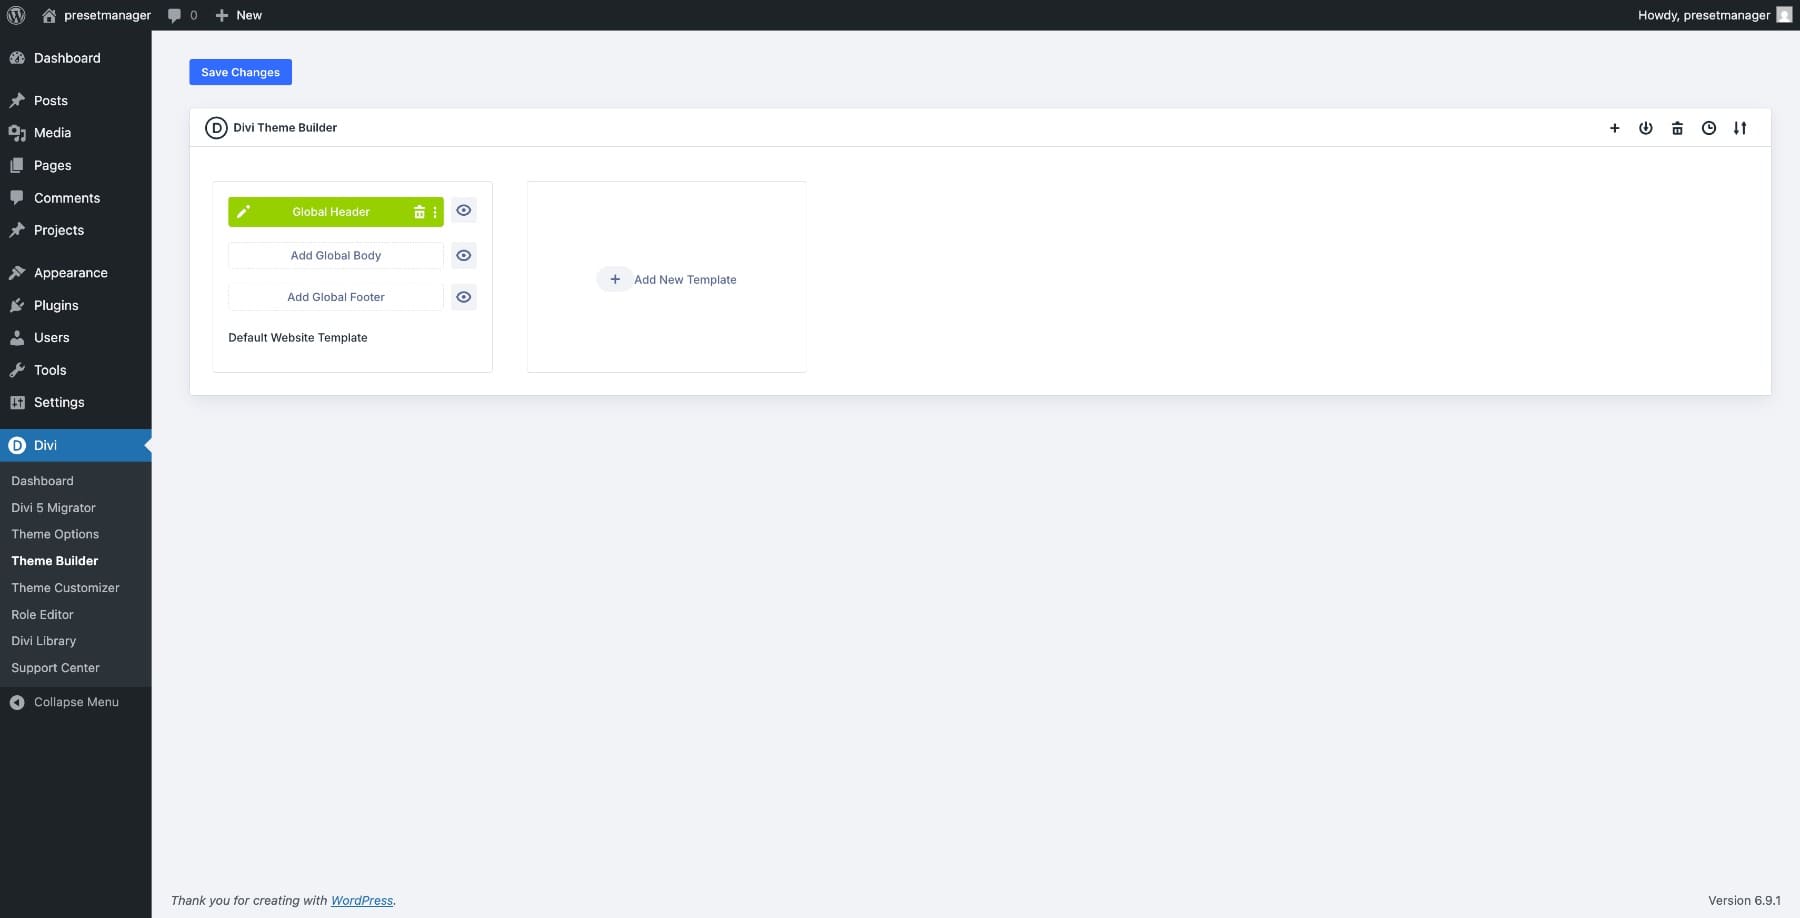
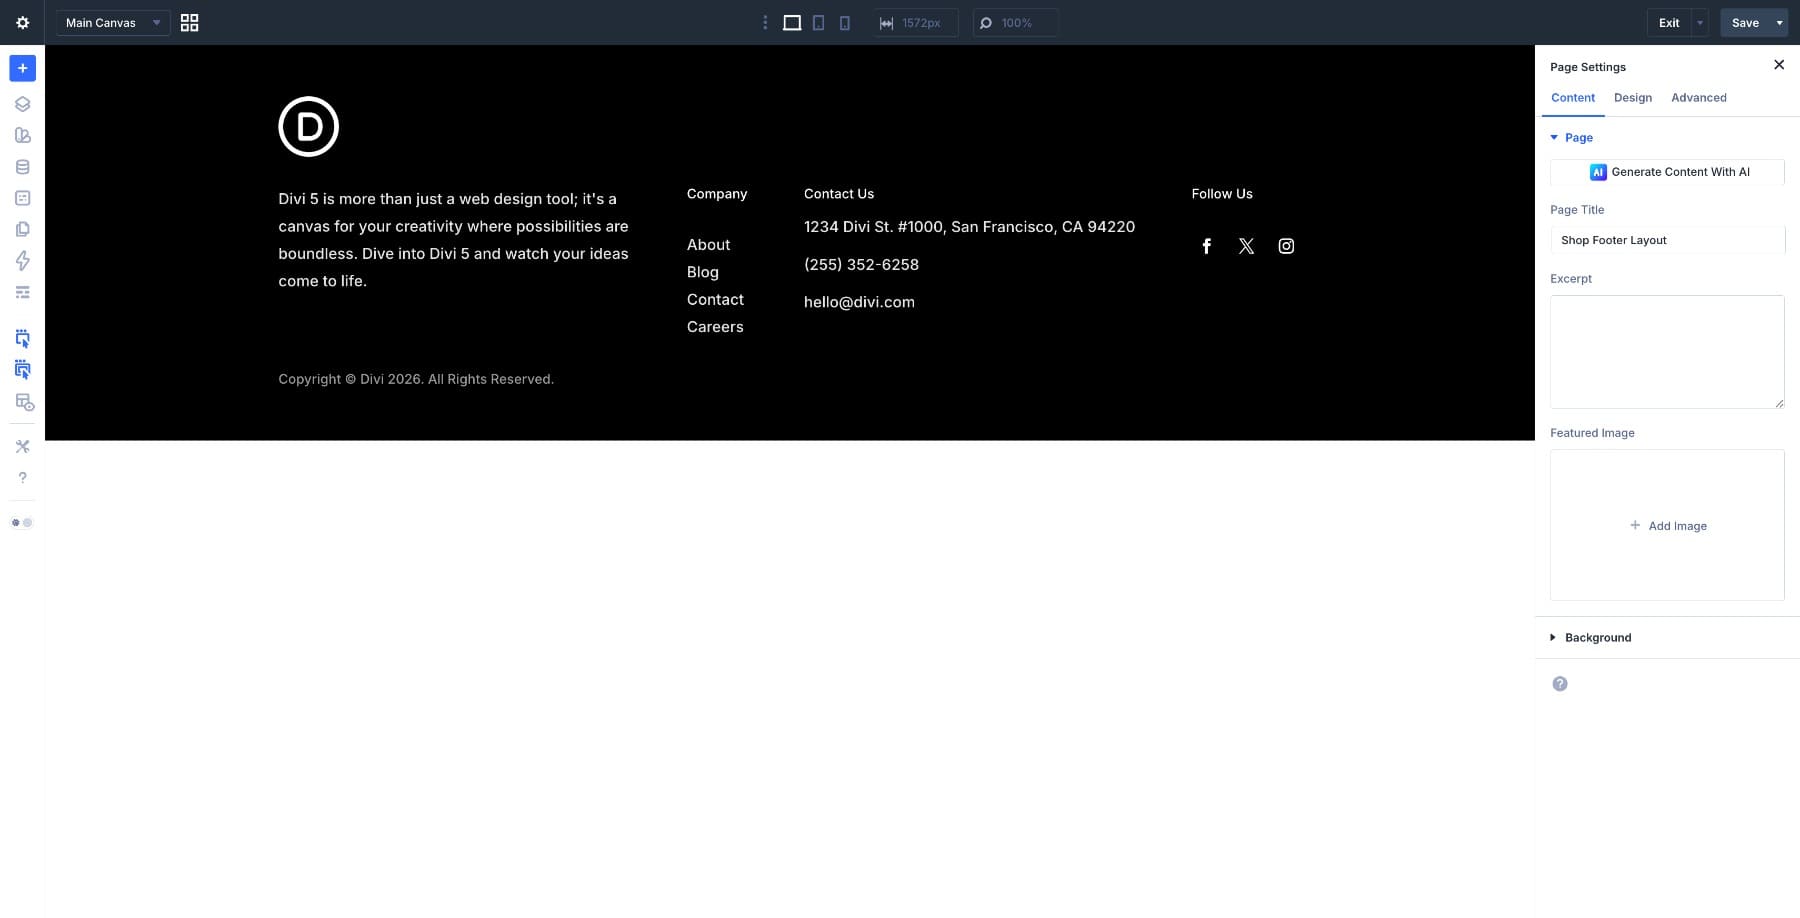
Click Add Global Footer in the same Default Website Template box and choose Build Global Footer. Your footer doesn’t need to be complex. A clean layout with your logo, a short set of secondary links like your refund policy and contact page, social icons, and a copyright line covers what most stores need. Build it the same way you built the header, then save when done.
Back on the Theme Builder dashboard, click Save Changes in the top right to make both templates live.
Every page of your store can now use this header and footer, including the WooCommerce templates we’re about to build.
You can find the Header-Footer-Template.json file in the freebie folder at the beginning of this guide, ready to import directly into your Theme Builder.
Step 3. Build Your Shop Page With Loop Builder
The shop page is where customers browse, discover, and decide. Getting it right matters more than almost any other page in your store, and the Loop Builder is what makes it possible to design it the way you want without rebuilding it every time your catalog grows.
1. Create The Shop Page Template
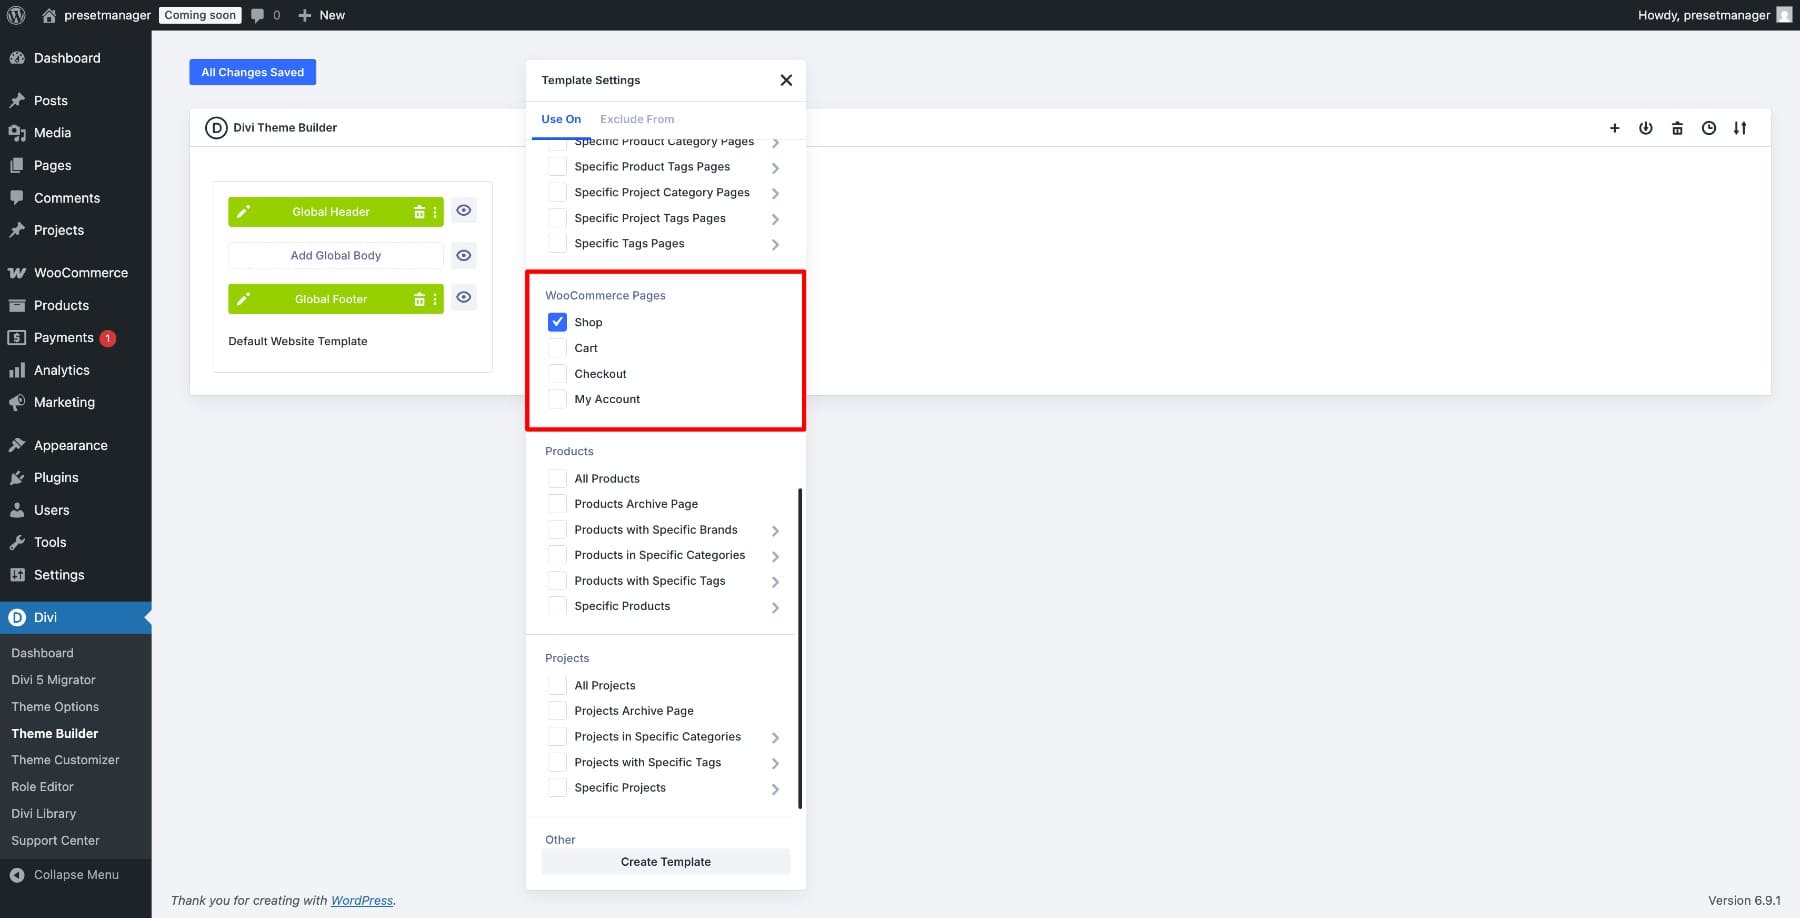
Go to Divi in your WordPress dashboard sidebar and click Theme Builder. Click Add New Template and choose Build New Template.
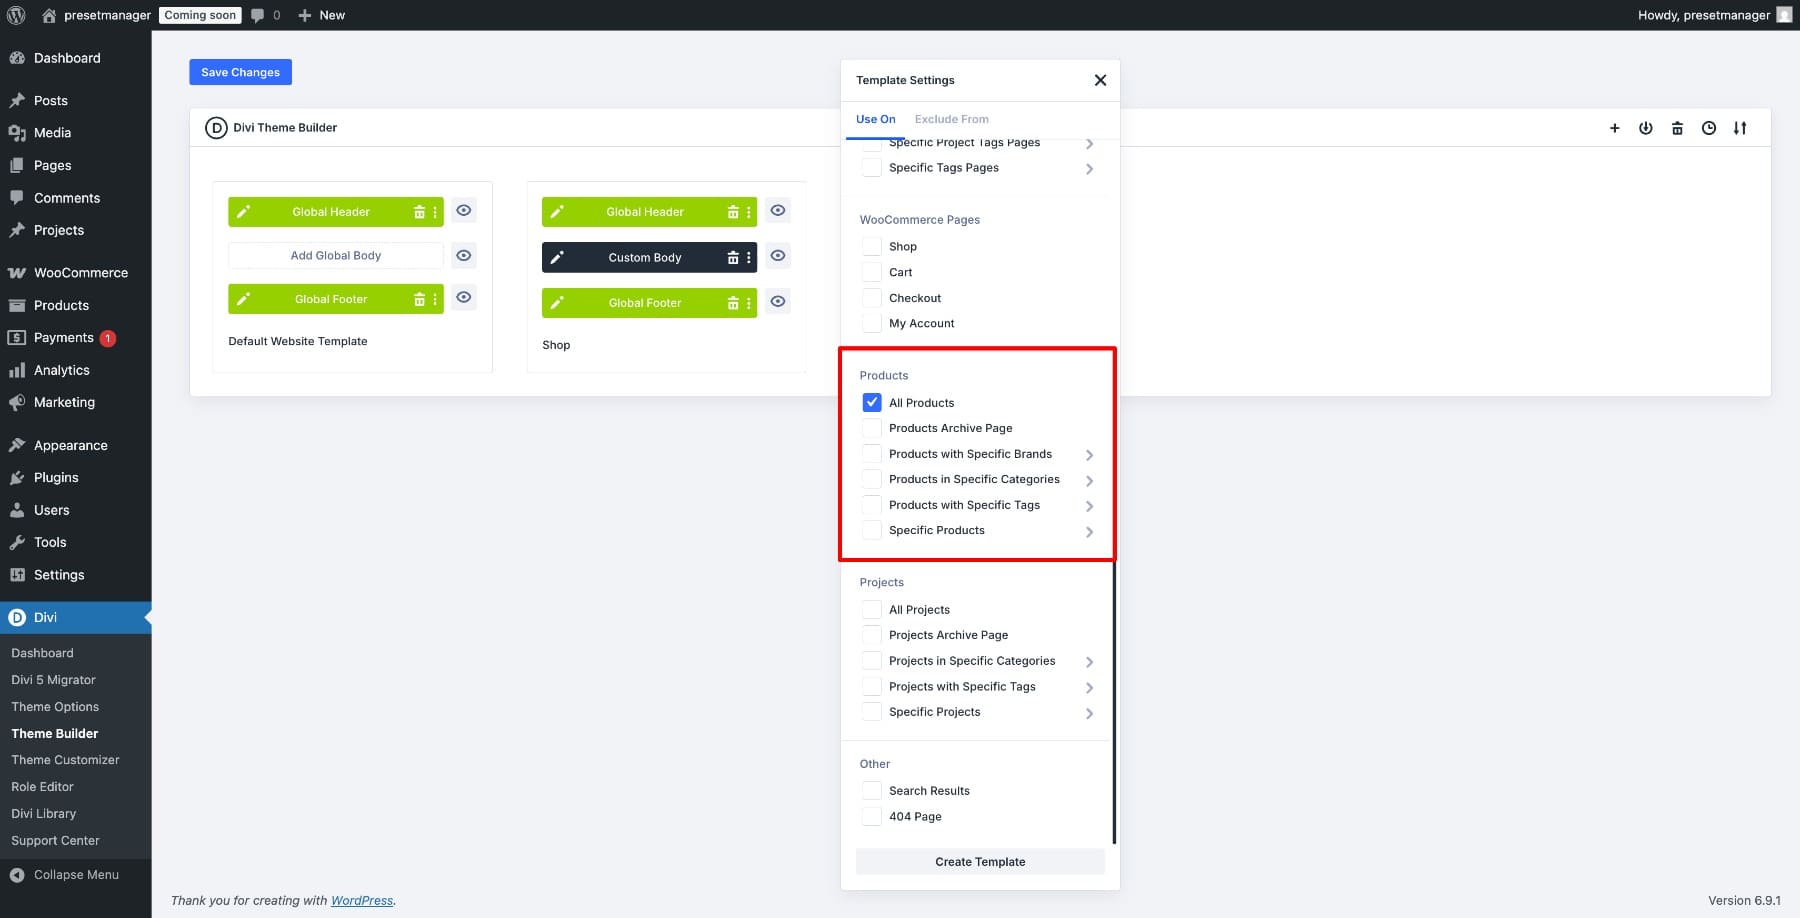
In the Template Settings modal, scroll down to WooCommerce Pages and check the Shop option. Click Create Template.
Once the template appears in the dashboard, click Add Custom Body and select Build Custom Body.
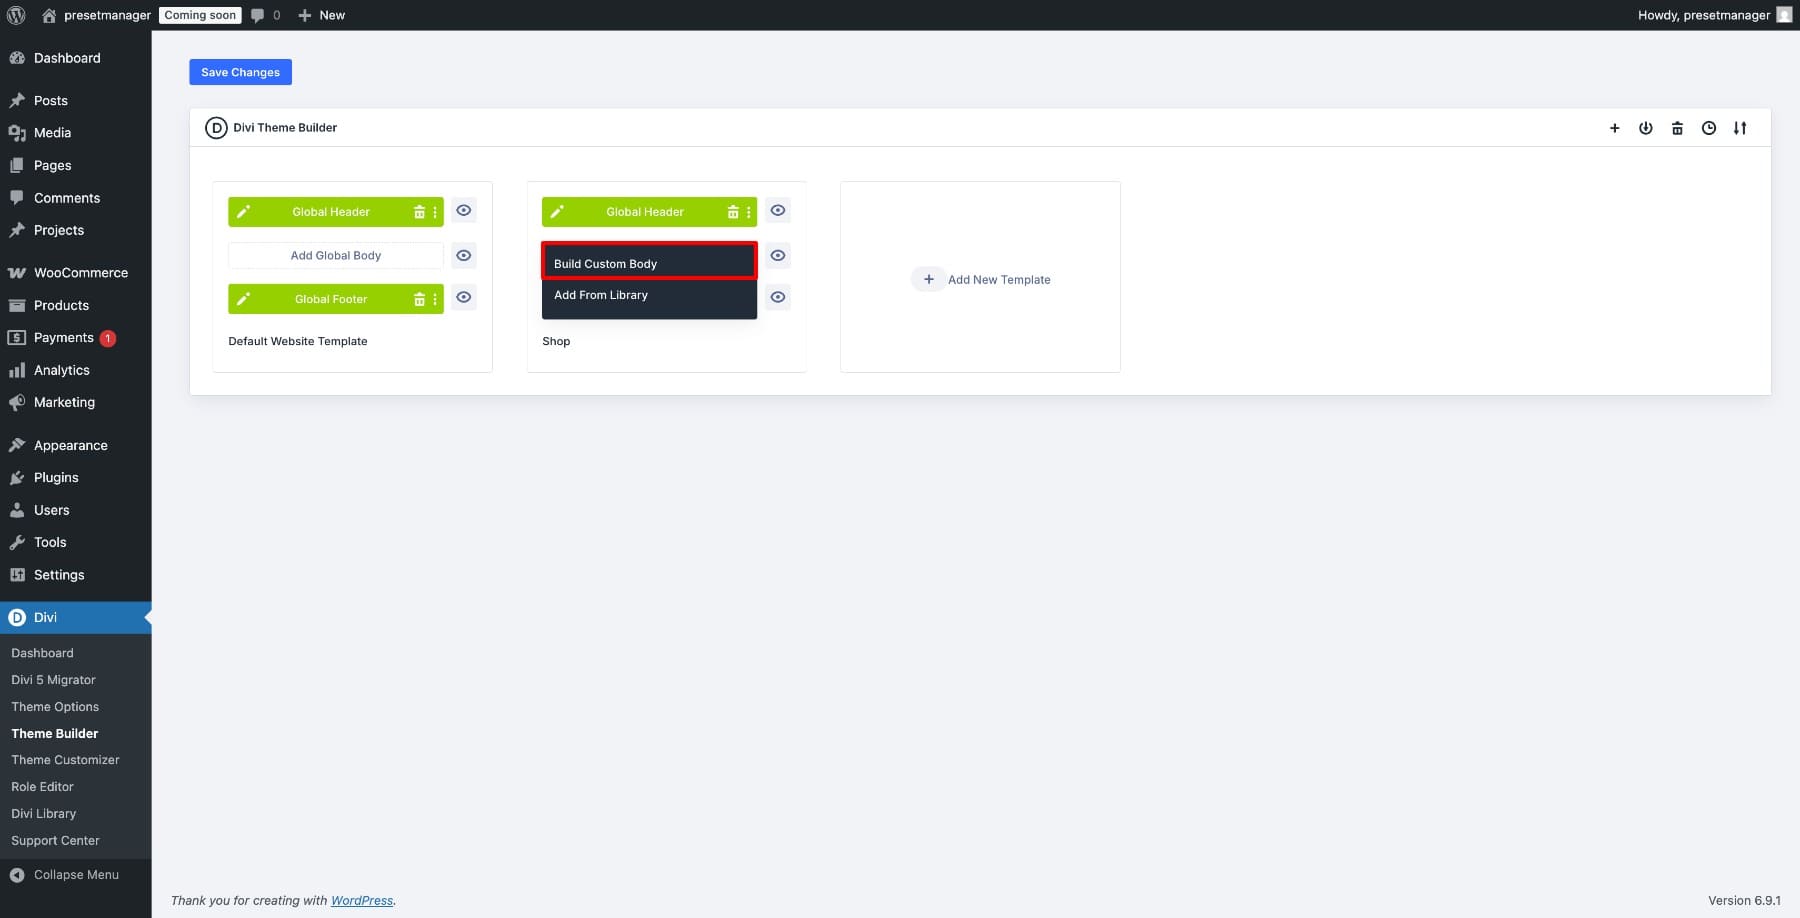
This opens the Visual Builder, where you’ll design the entire layout of the shop page.
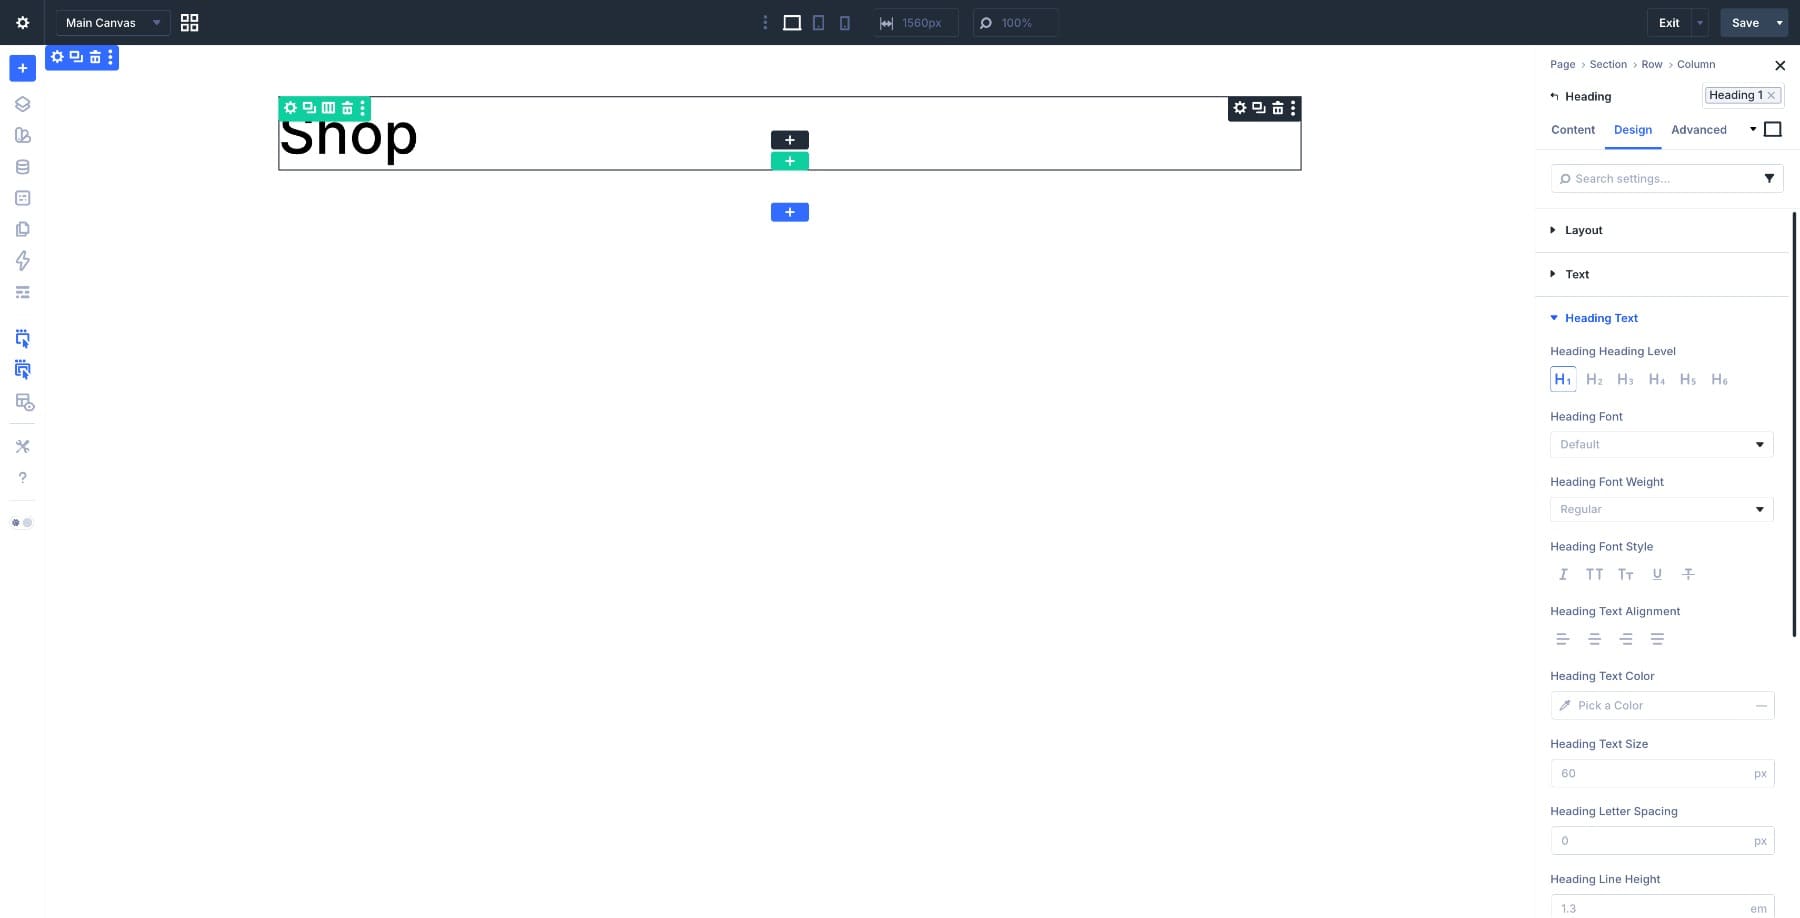
2. Build The Page Layout
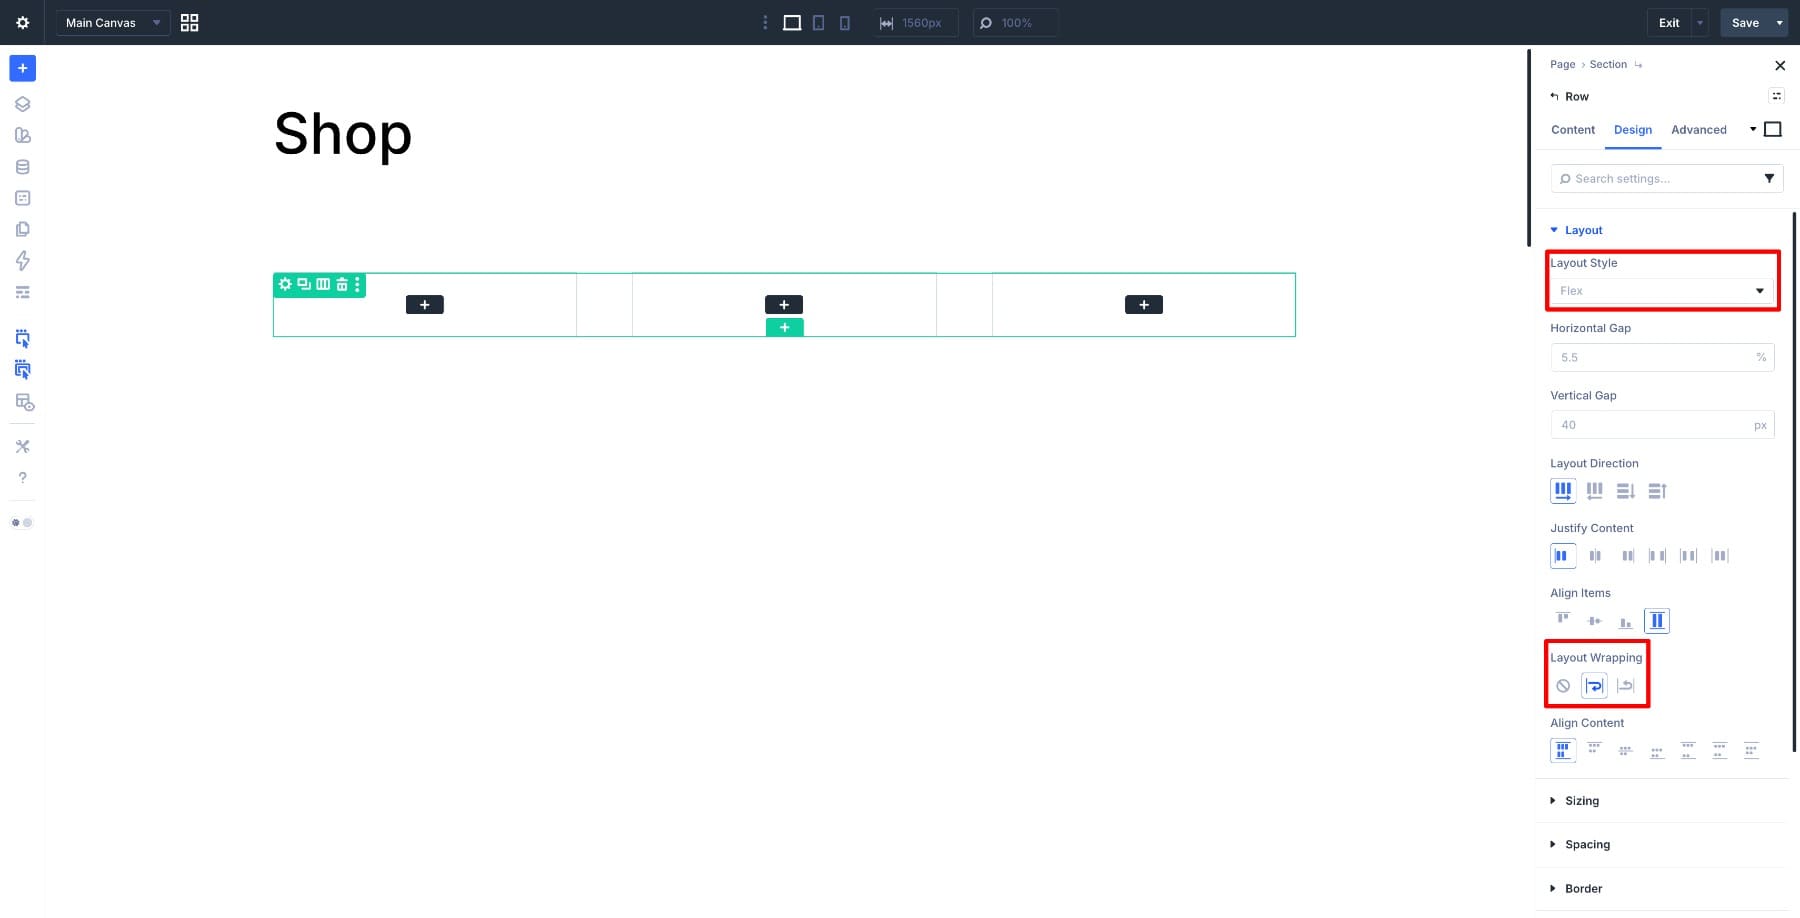
Start by adding a single-column row at the top for your shop title. Add a Heading module and type in your shop name or a short label like “Shop” or “Our Products.” This gives the page a clear starting point for visitors.
Below that, add a new section for your product grid. This is where the Loop Builder will live. Add a row to this section, confirm the row is using Flex, and enable wrapping if needed. This helps your product cards wrap neatly across rows at different screen sizes, preventing overflows and layout breaks.
3. Design Your Product Card
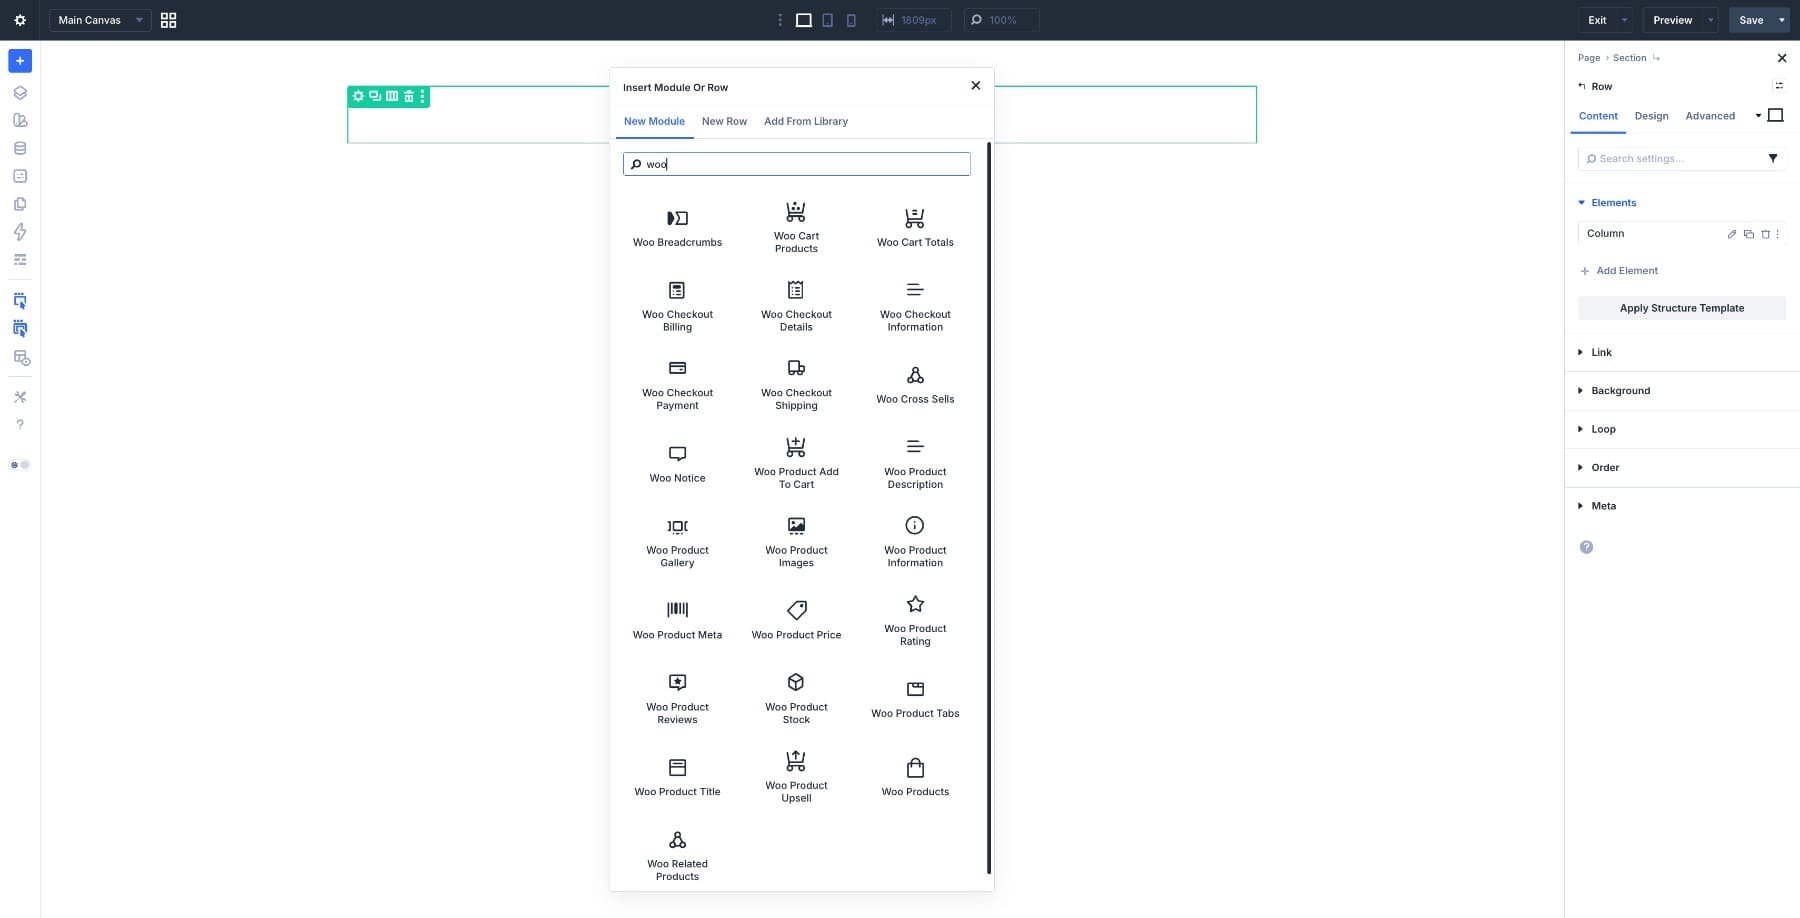
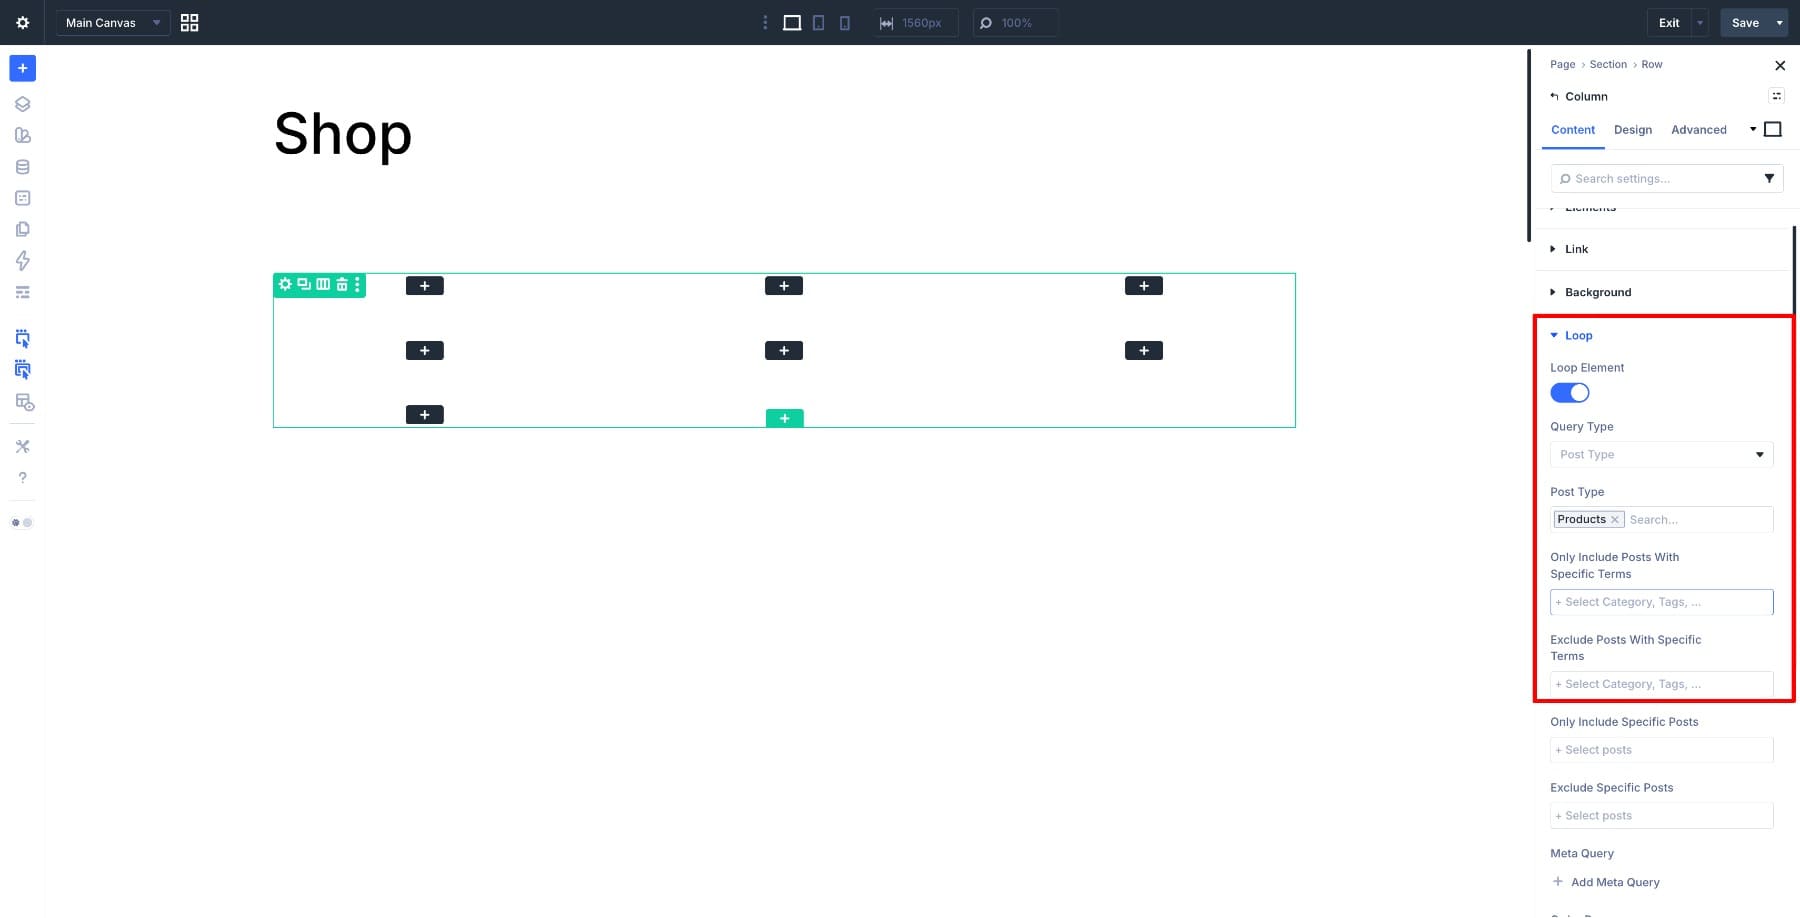
Inside the row, select the column and open the Content tab. Scroll down to find the Loop option and toggle Loop Element on.
Once enabled, the Loop query settings appear. Set the Post Type to Product, configure the number of products per page, and set Order By to Date or your preferred sorting.
This tells Divi 5 which products to pull from your WooCommerce store and in what order they appear.
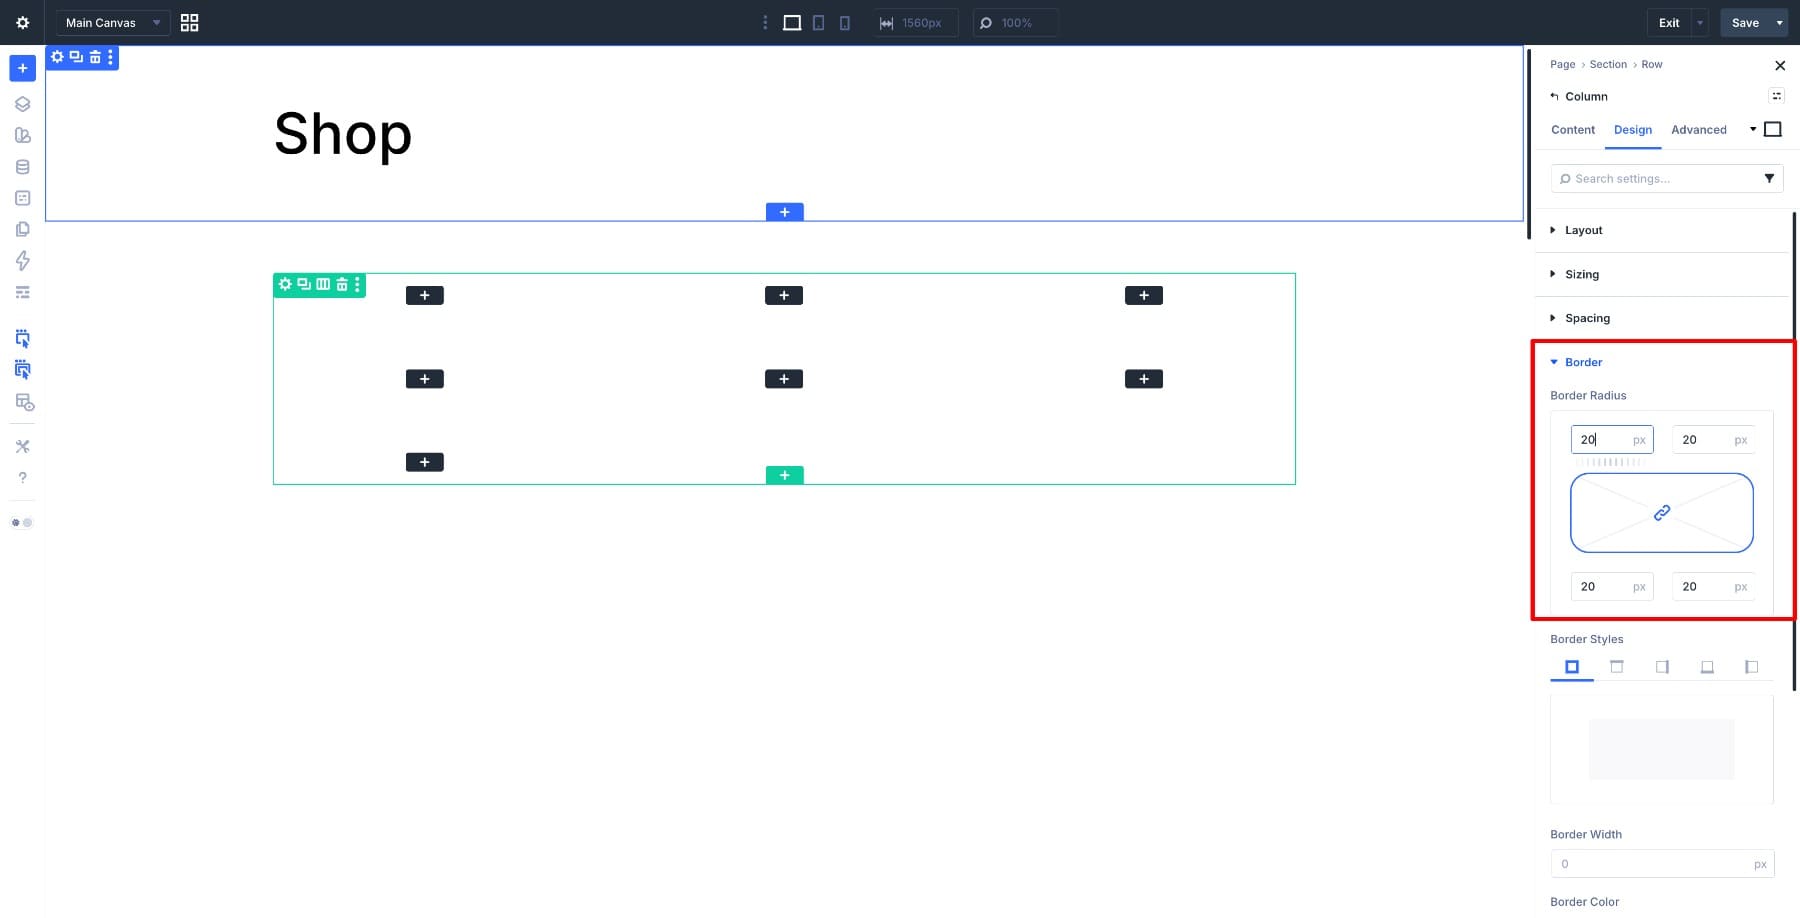
Now it’s time to design the card itself. Start by adding 10px padding and a 20px border radius to the column. These small decisions give each card breathing room and a cleaner visual shape, separating products from one another.
For the product image, go to the column’s Background Image setting and use the Dynamic Content option to select the product’s featured image in the loop context. This connects the card’s background directly to each product’s featured image in WooCommerce, so every card displays the right image automatically.
Add an Icon module and a Module Group inside the column. The Icon can create visual space above the product details so the background image stays visible, and the Module Group keeps all the card elements contained and easier to manage as a single unit.
![]()
Customize the Icon module and adjust its spacing so the background image has enough breathing room.
Inside the Module Group, add a Heading module for the product title. Hover over the Heading field in the Content tab, click the Dynamic Content icon, and select Loop Product Title. Each product’s name populates automatically from your store. Below that, add a Text module for the price and connect it to Loop Product Price using the same Dynamic Content option. This pulls the price directly from WooCommerce, including sale prices when applicable.
Your base shop page is ready. If you want to take it further, you can add a sale badge using Conditions in the Advanced tab to show it only on discounted products, apply a hover effect on the Module Group for a more polished feel, and save the entire card as a Preset so you can reuse it elsewhere on your site. That last step is worth doing before you move on, because the same card design can carry through to category pages later without rebuilding it from scratch.
Click Save in the Visual Builder toolbar, then click Exit to return to the Theme Builder dashboard. Click Save Changes to publish the template. Visit your shop page on the front end to see the Loop Builder working with your real products, populating the grid automatically.
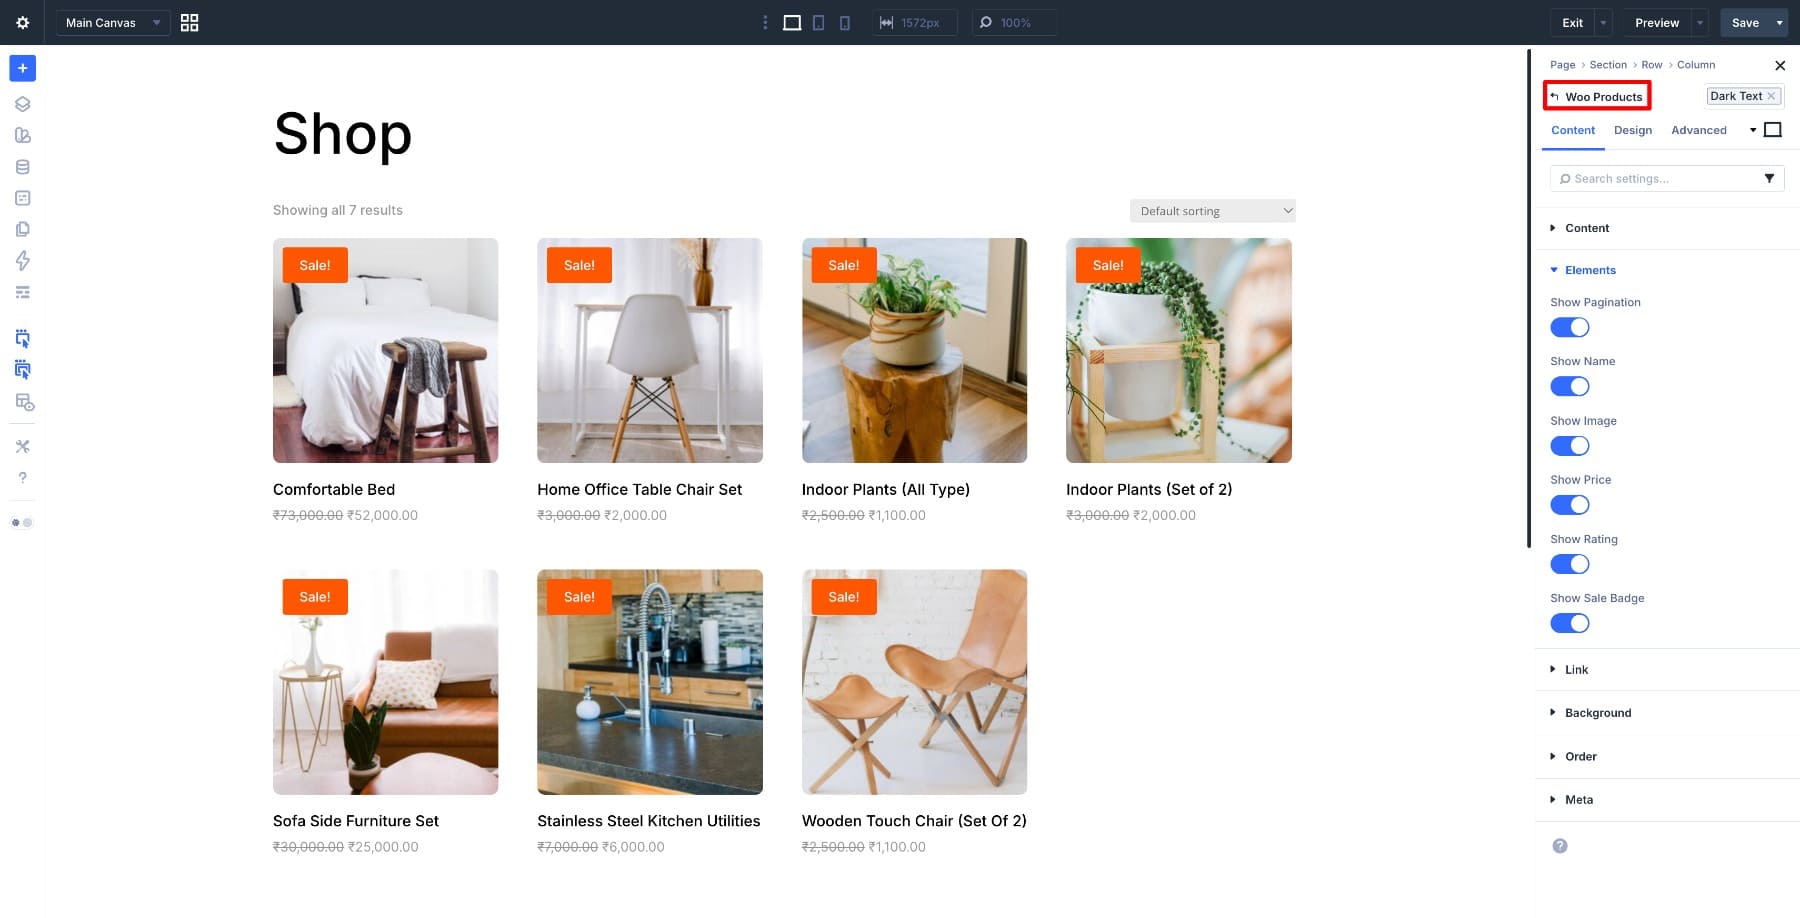
If you’d prefer a faster setup with less customization, you can also build your shop page using the Woo Products module, which offers a simpler drag-and-drop approach for product listings.
Both shop layout designs are included in the freebie. Import Shop-Section-Loop-Builder.json or Shop-Section-Woo-Products.json from the freebie folder into your Divi Library to use either design directly.
Step 4. Set Up Your Product Page
Every product in your store needs its own page, but that doesn’t mean you have to design each one individually. You build one template, assign it to all products, and WooCommerce automatically pulls the right content for each product.
Back in the Theme Builder, click Add New Template and choose Build New Template. In the Template Settings modal, scroll down and check All Products. Click Create Template, then click Add Custom Body and select Build Custom Body.
Adding The Modules
Start with a single-column row at the top and add the Woo Notice module. This handles system messages like “Item added to cart” or stock warnings, and it should sit above everything else on the page.
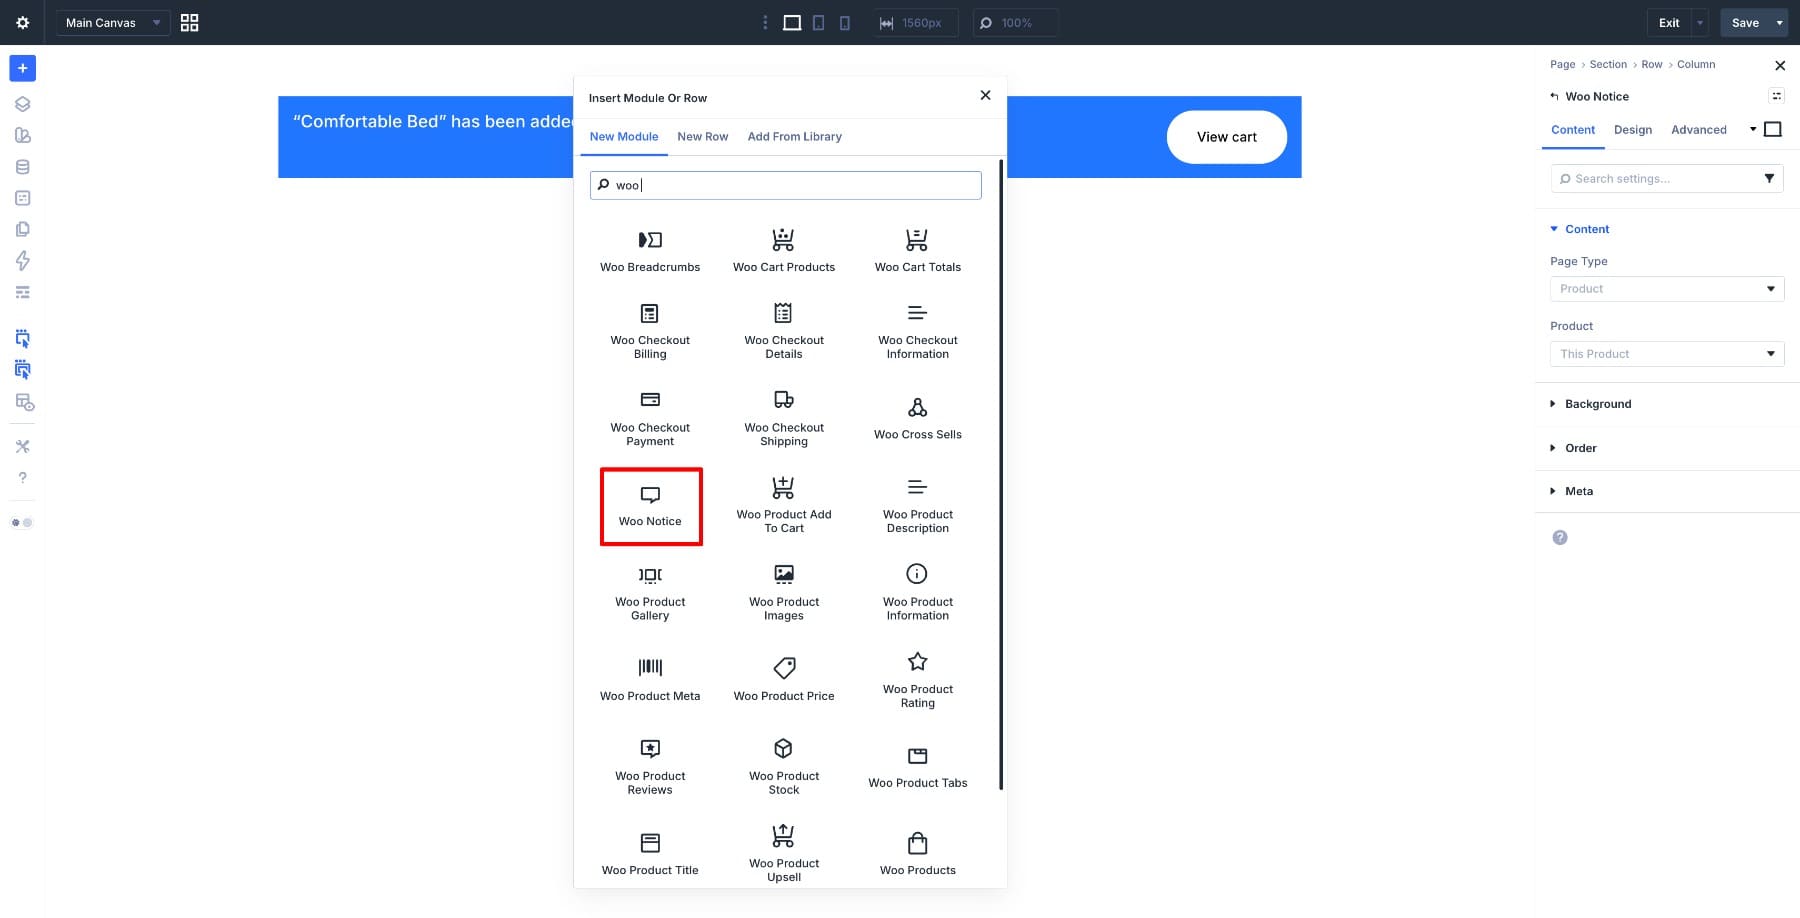
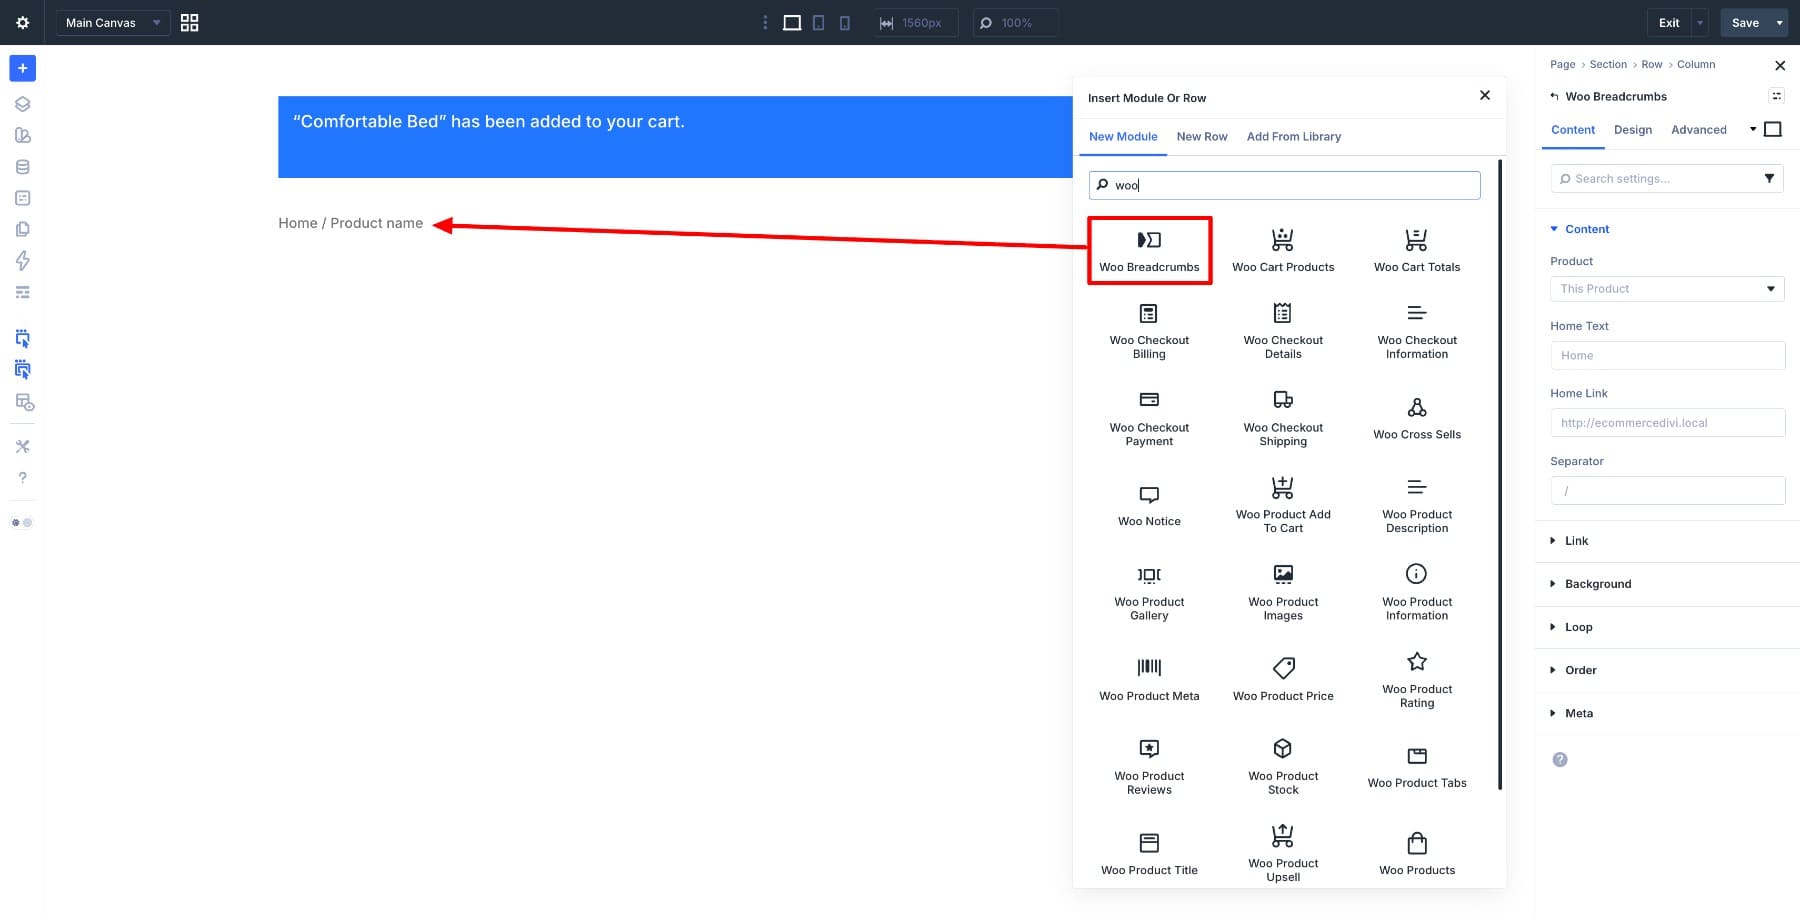
Below that, add the Woo Breadcrumbs module. This gives customers a clear navigation trail showing where they are in your store, like Home / Category / Product Name, so they can move back through your store without relying on the browser button.
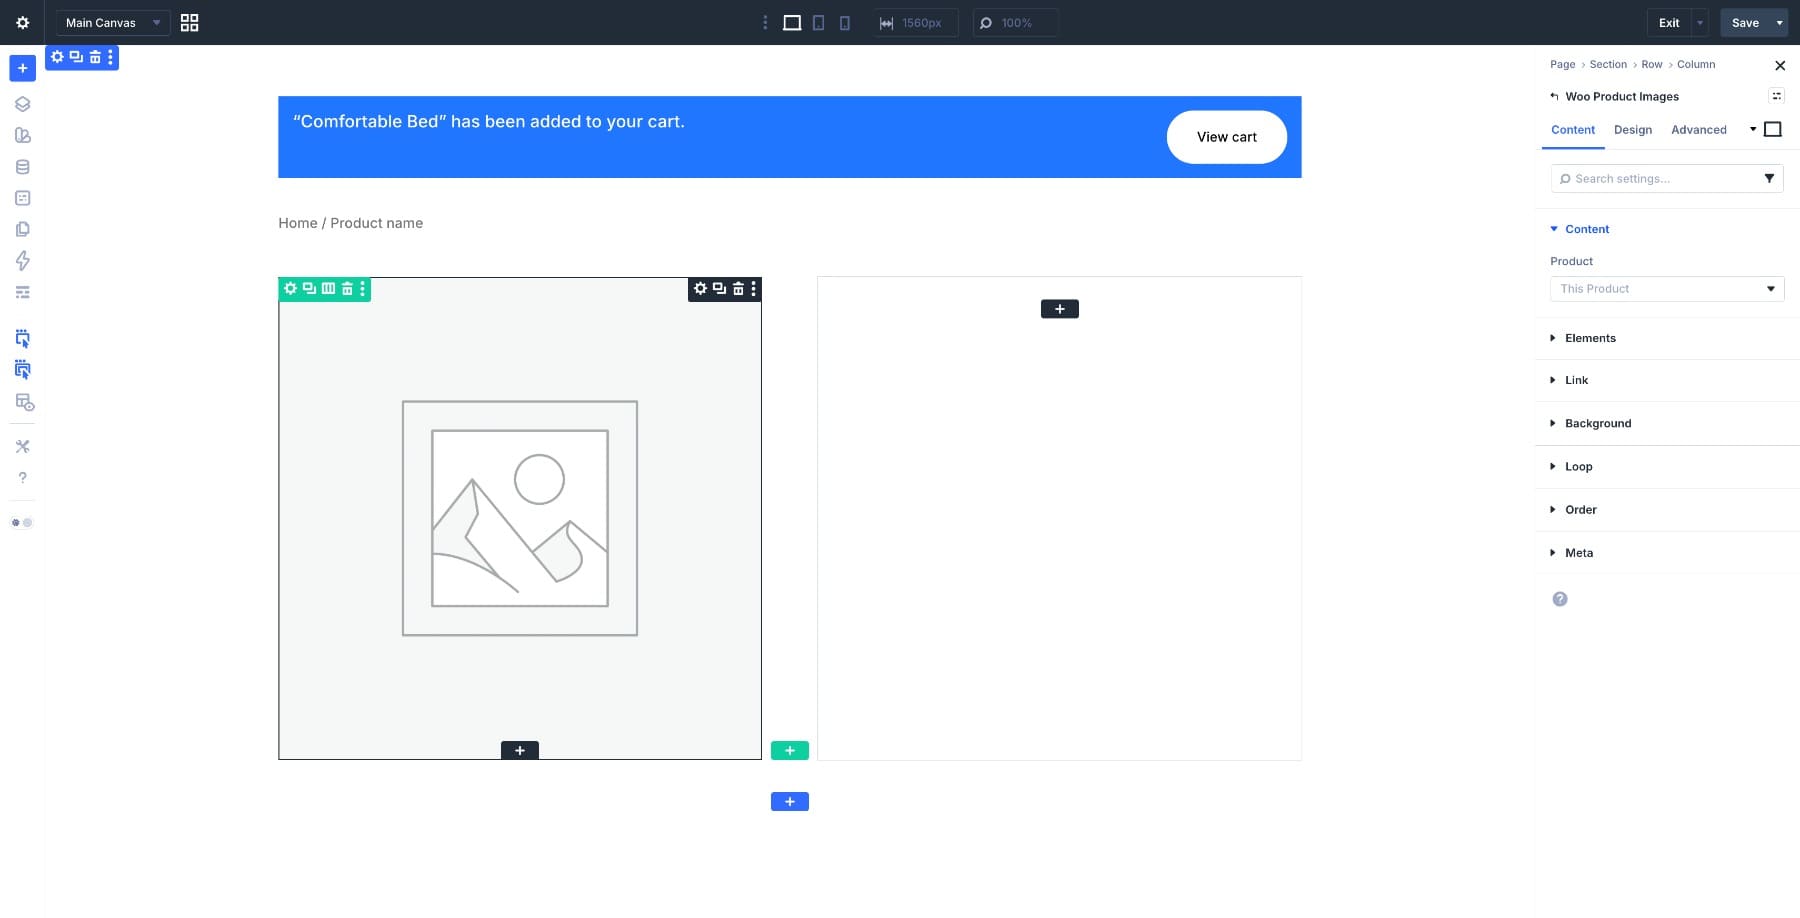
Next, add a two-column row. This is the core of your product page layout. The left column holds the product visuals, and the right column holds everything a customer needs to make a purchase decision.
In the left column, add the Woo Product Images module. It pulls the product’s featured image and gallery images directly from WooCommerce.
In the right column, build the purchase flow from top to bottom. Add the Woo Product Title module and set the heading level to H1. Below that, add the Woo Product Rating module to display star ratings and review counts. Then add the Woo Product Description module. In the Content tab, you can choose between the full description or the short description depending on how much detail you want above the fold.
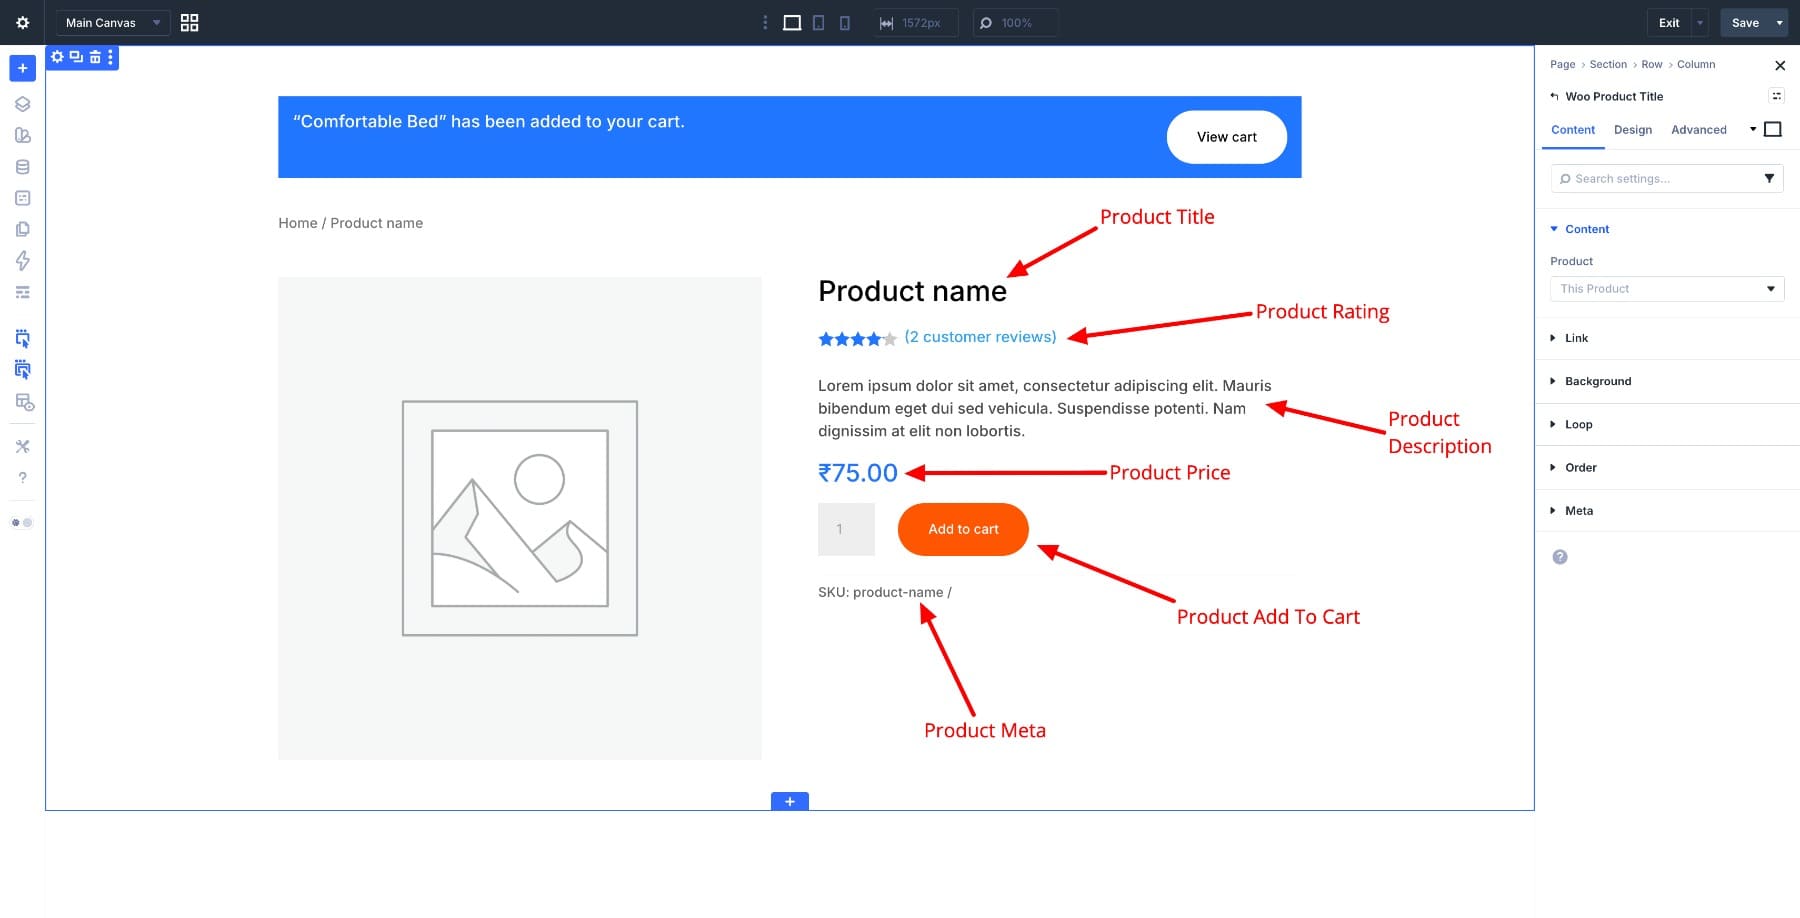
Add the Woo Product Price module next, which automatically displays both regular and sale prices. Below that, add the Woo Product Add To Cart module. This handles the quantity selector, the Add to Cart button, and variation dropdowns for variable products, all pulled from WooCommerce. Complete the right column using the Woo Product Meta module, which displays supporting details such as SKU, categories, and tags beneath the cart button.
Below the two-column row, add a single-column row and place the Woo Product Tabs module and, if you want a separate details block, the Woo Product Information module. These keep the lower section of the page organized and give customers access to specs and details without cluttering the main purchase area. Add one more single-column row at the bottom and place the Woo Related Products module.
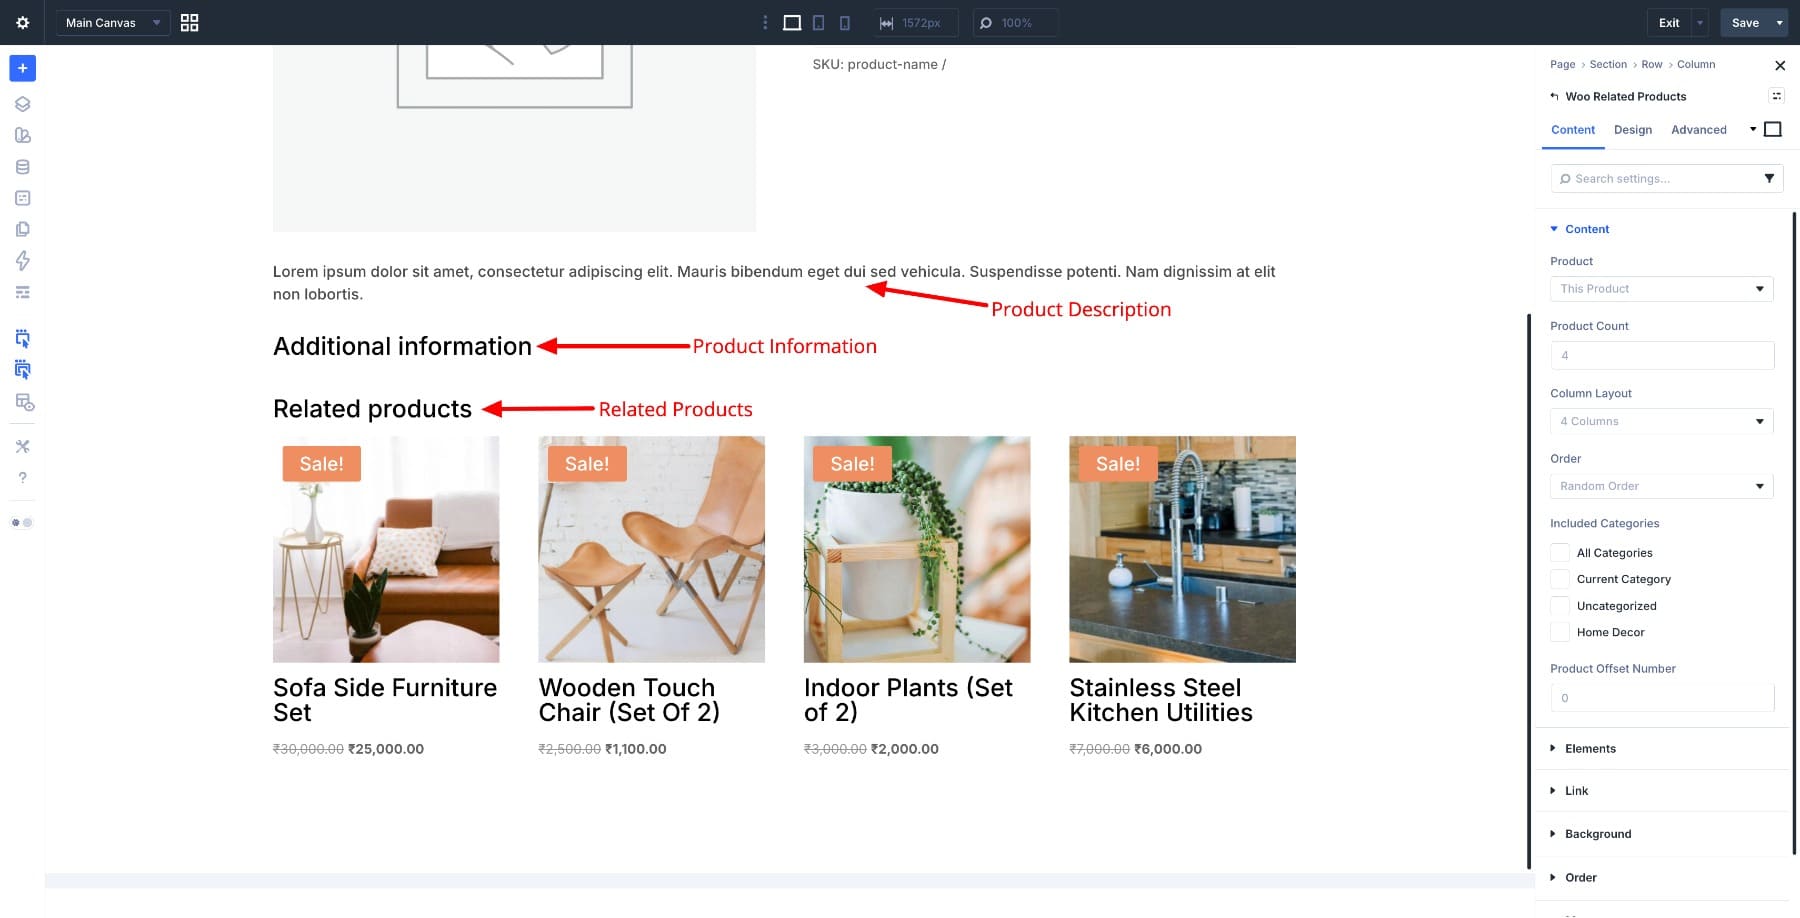
The Woo Related Products module typically pulls products with related terms, such as shared categories or tags, and displays them as a grid at the bottom of the page, giving customers somewhere to go if the current product isn’t quite right. Finish by adding the Woo Product Reviews module, and your product page template is complete. Check your layout across screen sizes using Divi 5’s responsive controls before saving.
Click Save in the Visual Builder, then Exit back to the Theme Builder dashboard and click Save Changes to make the template live. Here’s a complete guide to creating a product page with the new Woo modules in Divi 5.
You can find the Product-Page-Template.json file in the freebie folder at the beginning of this guide, ready to import into your Theme Builder.
Step 5. Set Up Your Cart And Checkout Pages
The cart and checkout pages are where everything you’ve built either pays off or falls apart. A well-designed product page can bring a customer right to the edge of a purchase, and a cluttered cart or a confusing checkout form can still lose the sale at the last moment. These two pages deserve the same care you put into the rest of your store.
Building The Cart Page
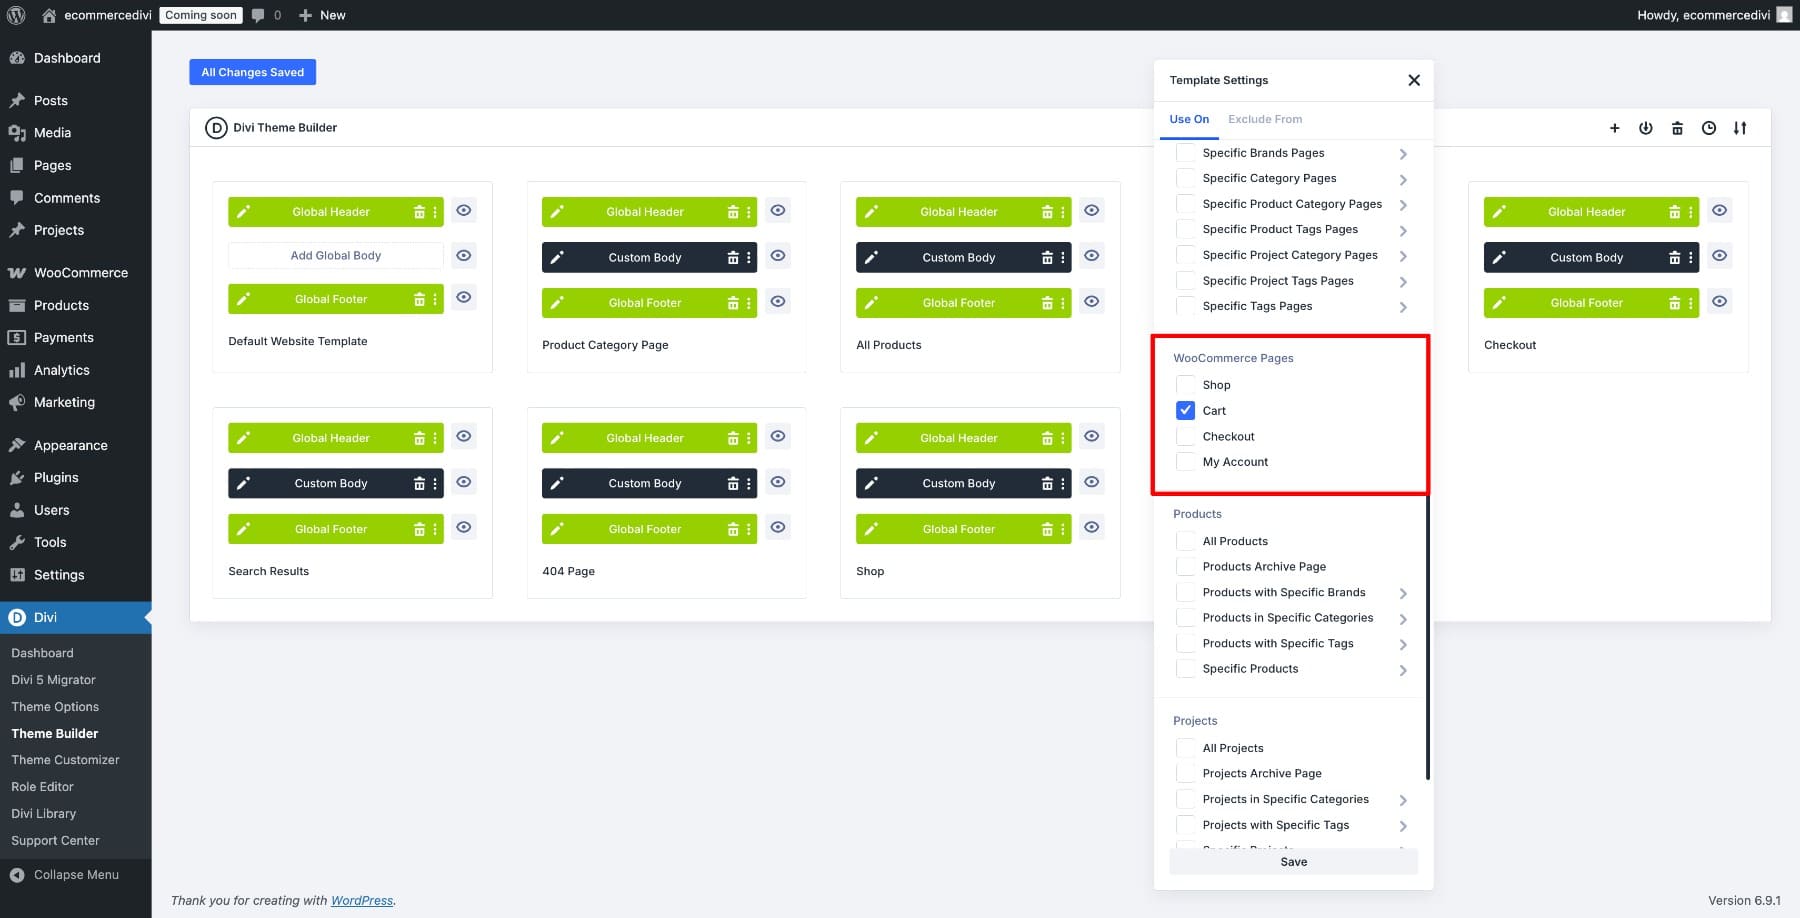
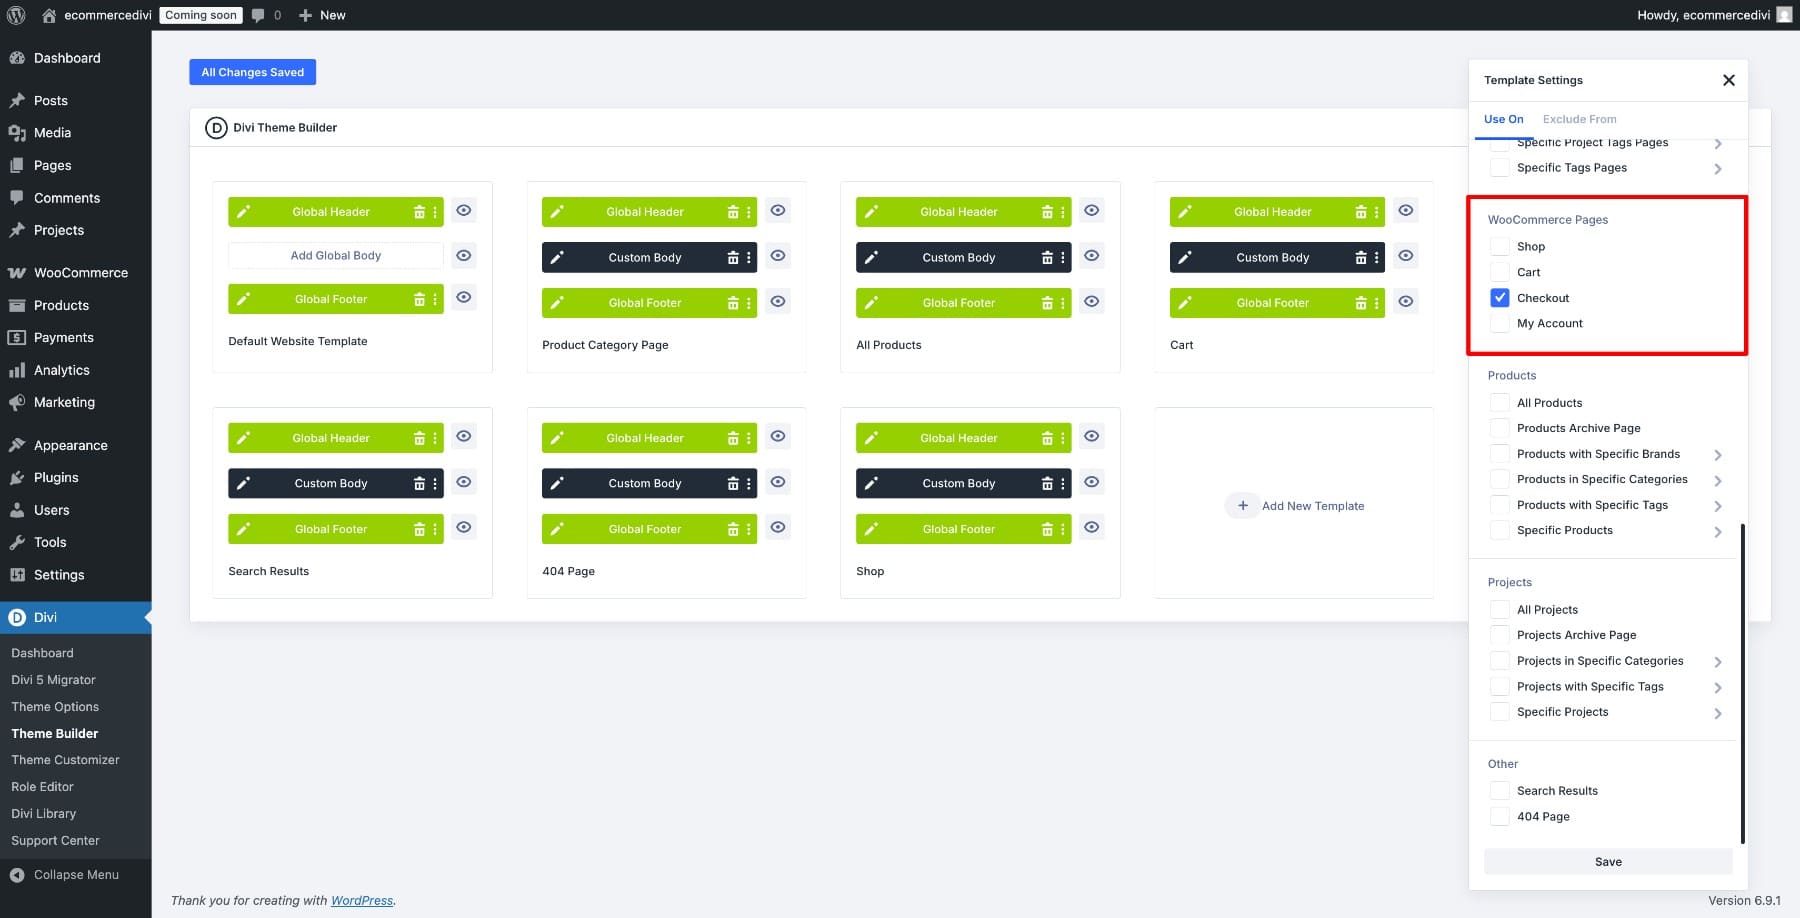
Back in the Theme Builder dashboard, click Add New Template and choose Build New Template. In the Template Settings modal, scroll down to WooCommerce Pages and check the Cart option. Click Create Template, then click Add Custom Body to open the Visual Builder.
Start with a single-column row at the top. Add a Heading module and set the text to Cart.
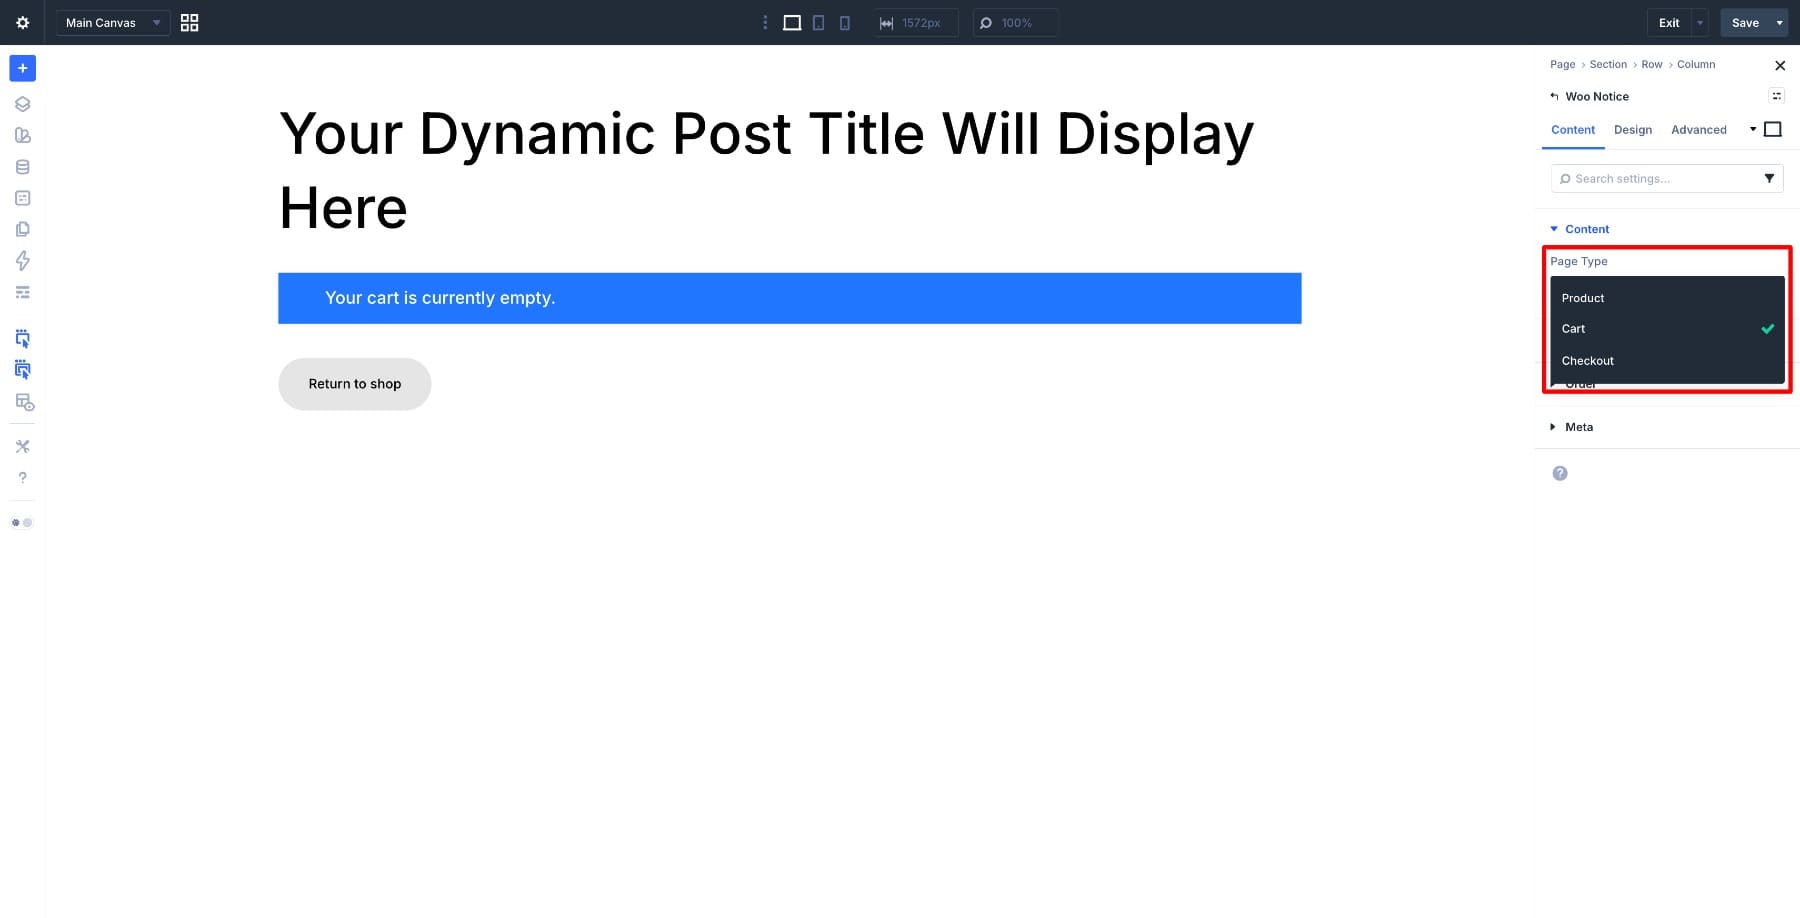
Add the Woo Notice module below that and set the Page Type to Cart in the Content tab. This ensures the module displays cart-specific messages, such as coupon confirmations and stock alerts, rather than generic ones.
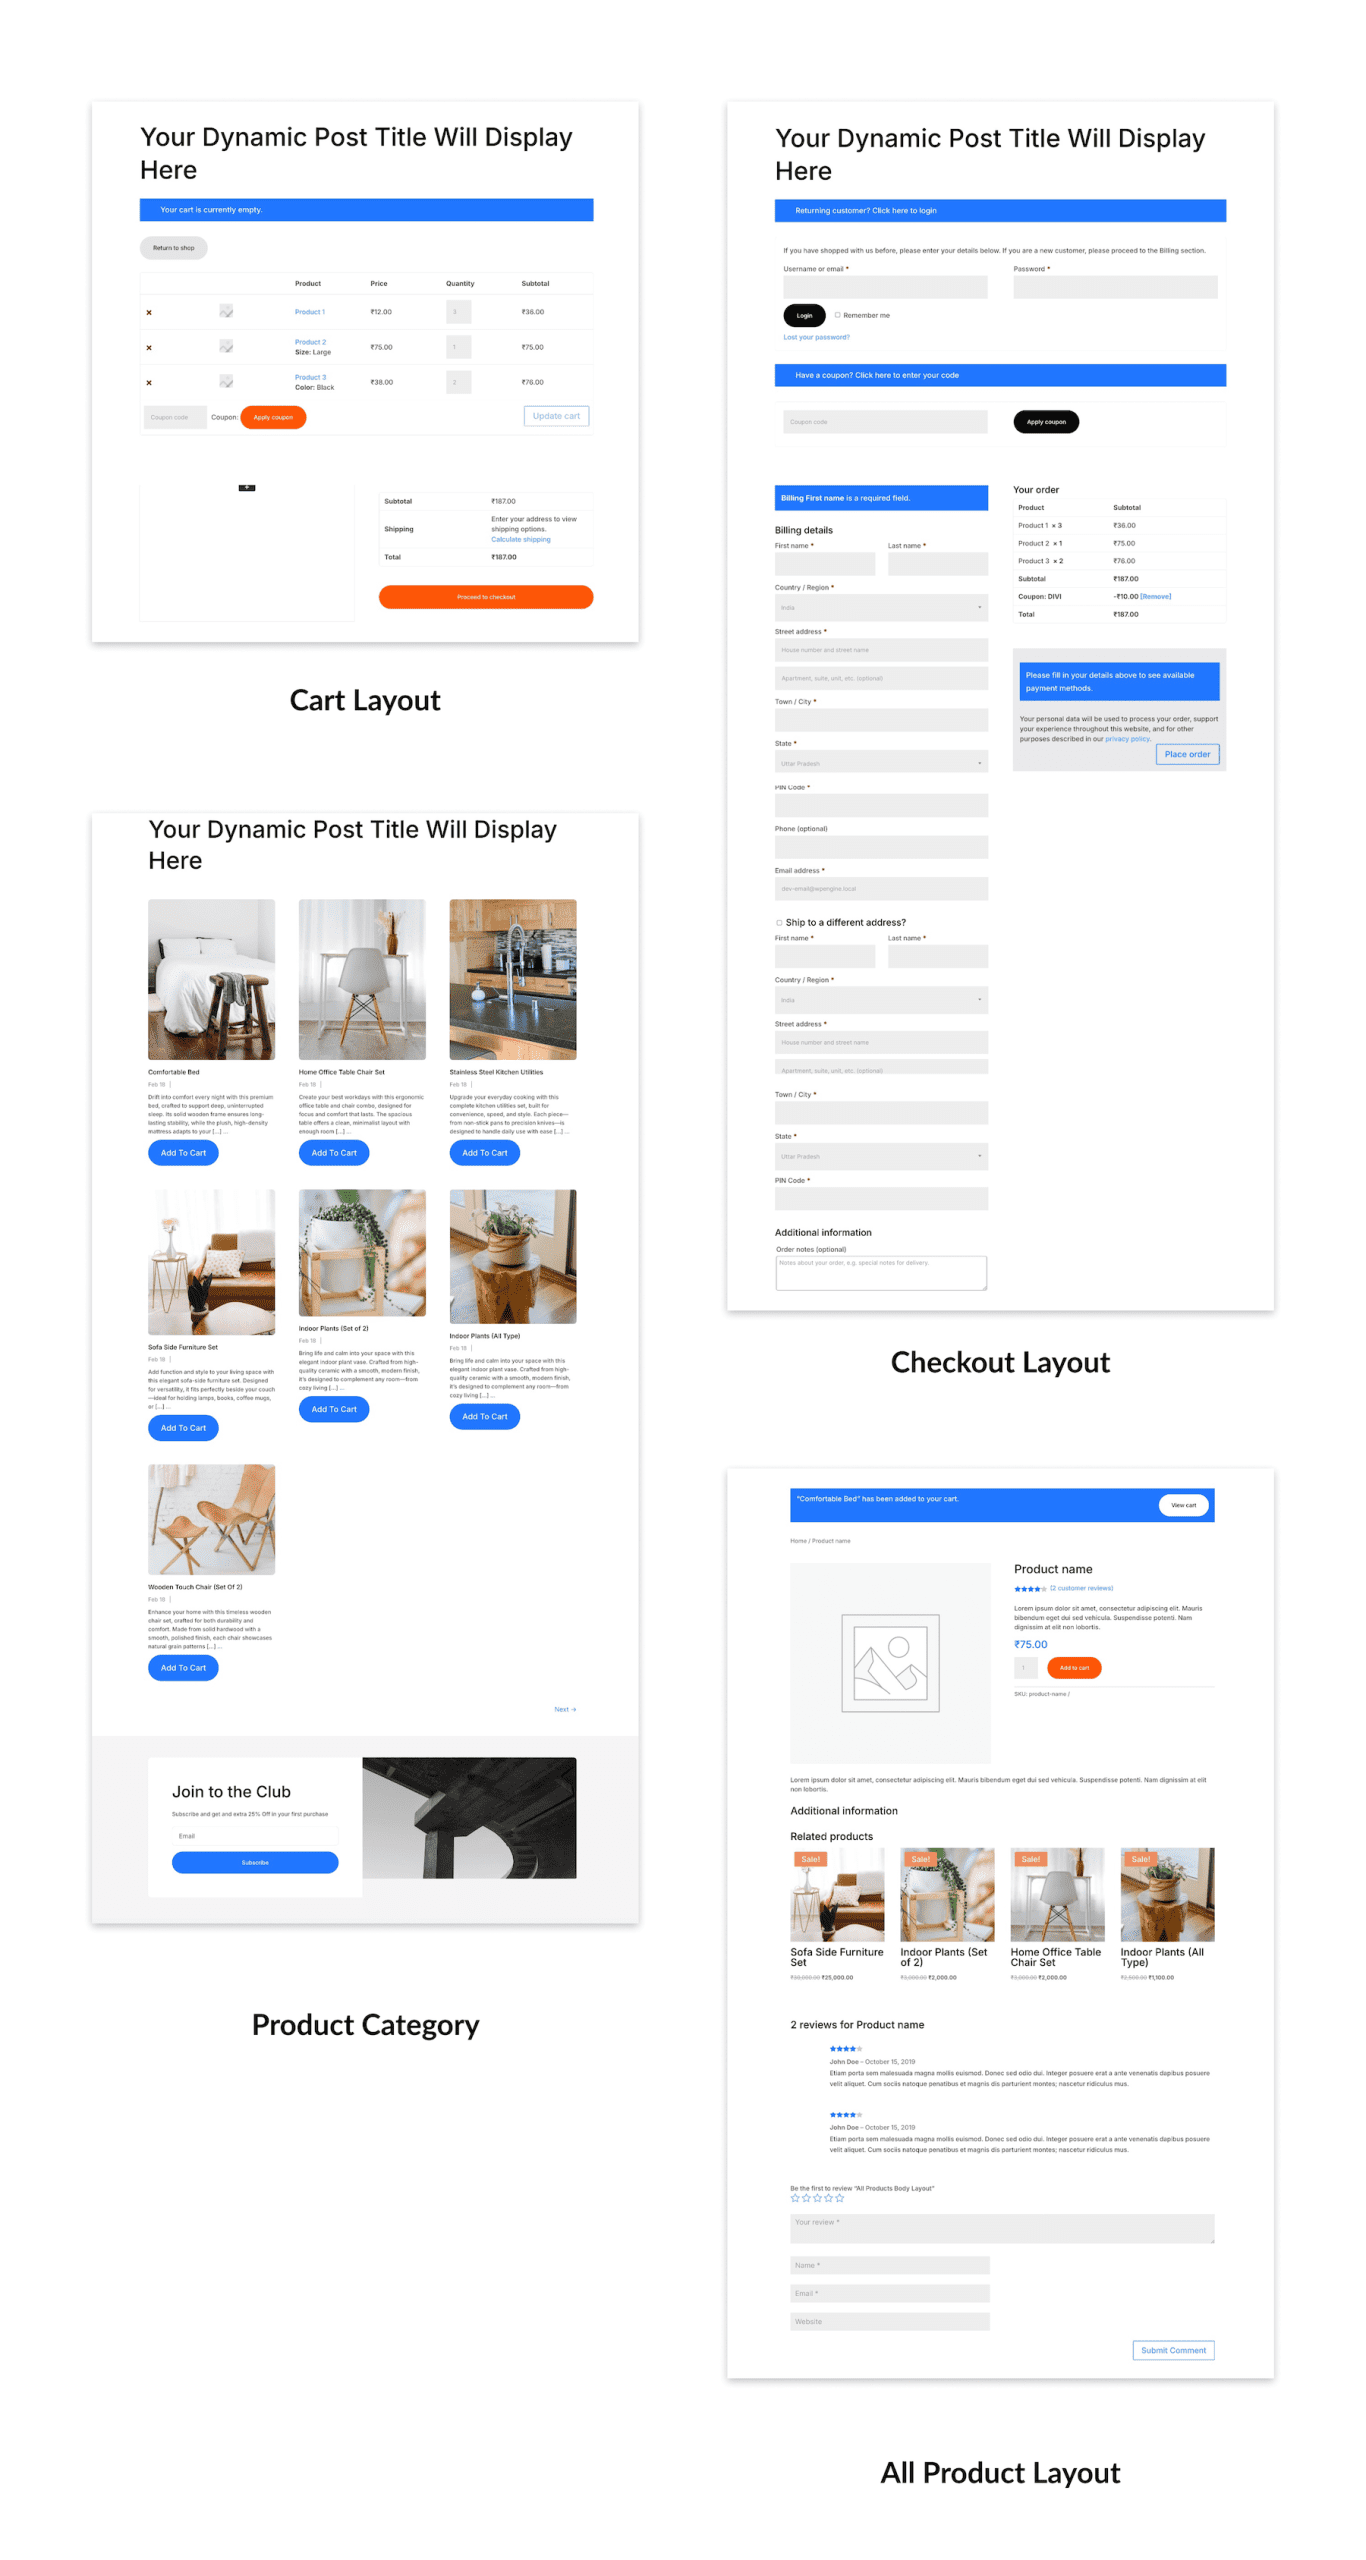
Below that, add the Woo Cart Products module. This displays everything in the customer’s cart, including product images, names, quantities, and prices. In the Content tab you can control exactly which elements appear, including the Product Image, Coupon Code field, Update Cart button, and Remove Item icon.
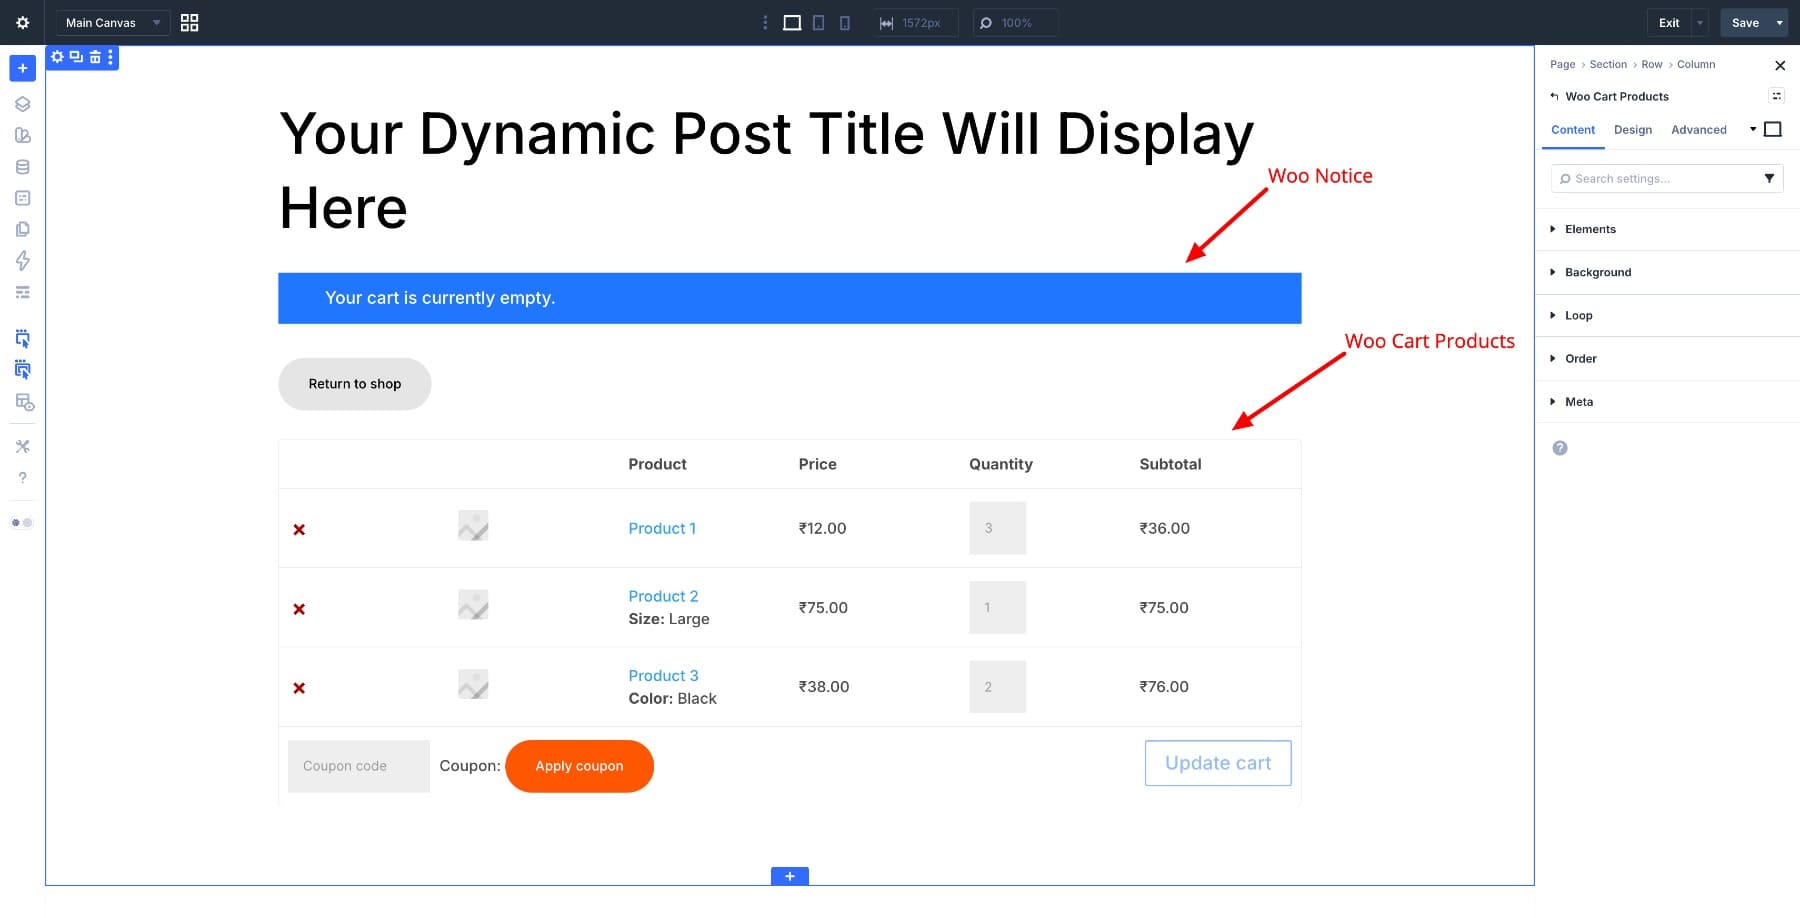
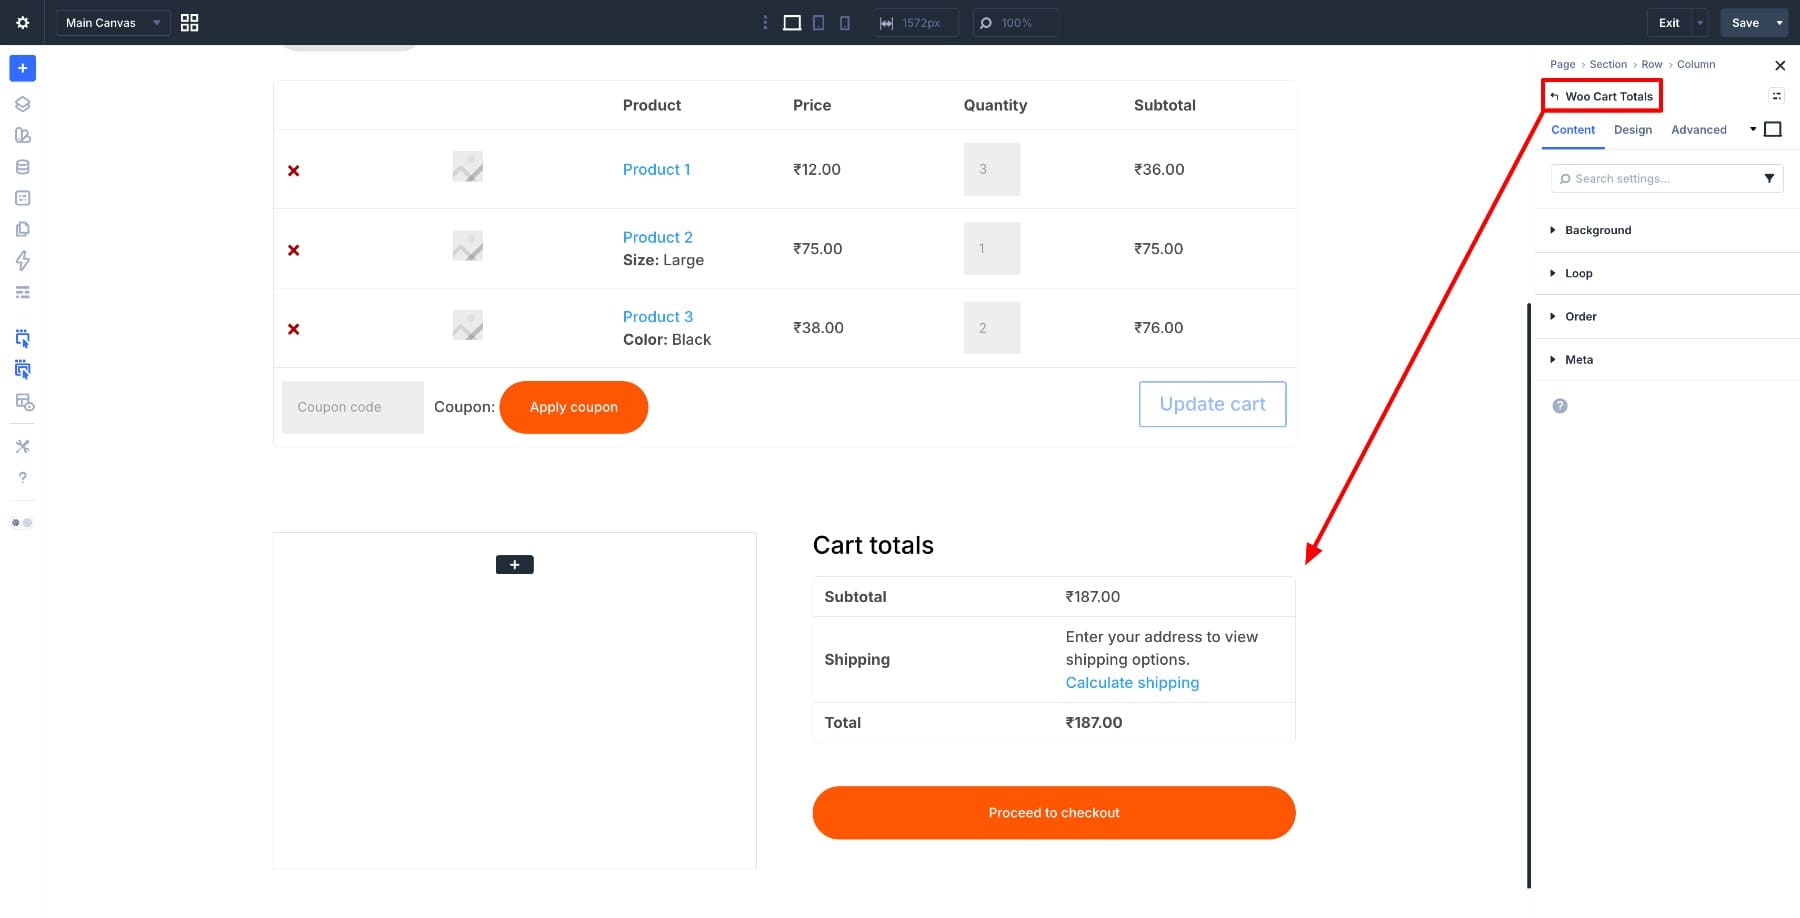
Add a new two-column row below. The left column is a good place for the Woo Cross Sells module, which surfaces related products and gives customers a reason to keep browsing before they check out. In the right column, add the Woo Cart Totals module, which displays the order summary, including subtotal, shipping, taxes when enabled, and the final total, along with the Proceed to Checkout button.
Building The Checkout Page
Back in the Theme Builder dashboard, click Add New Template again, then choose Build New Template. In the Template Settings modal, scroll to WooCommerce Pages and check the Checkout box. Click Create Template, add a custom body, and open the Visual Builder.
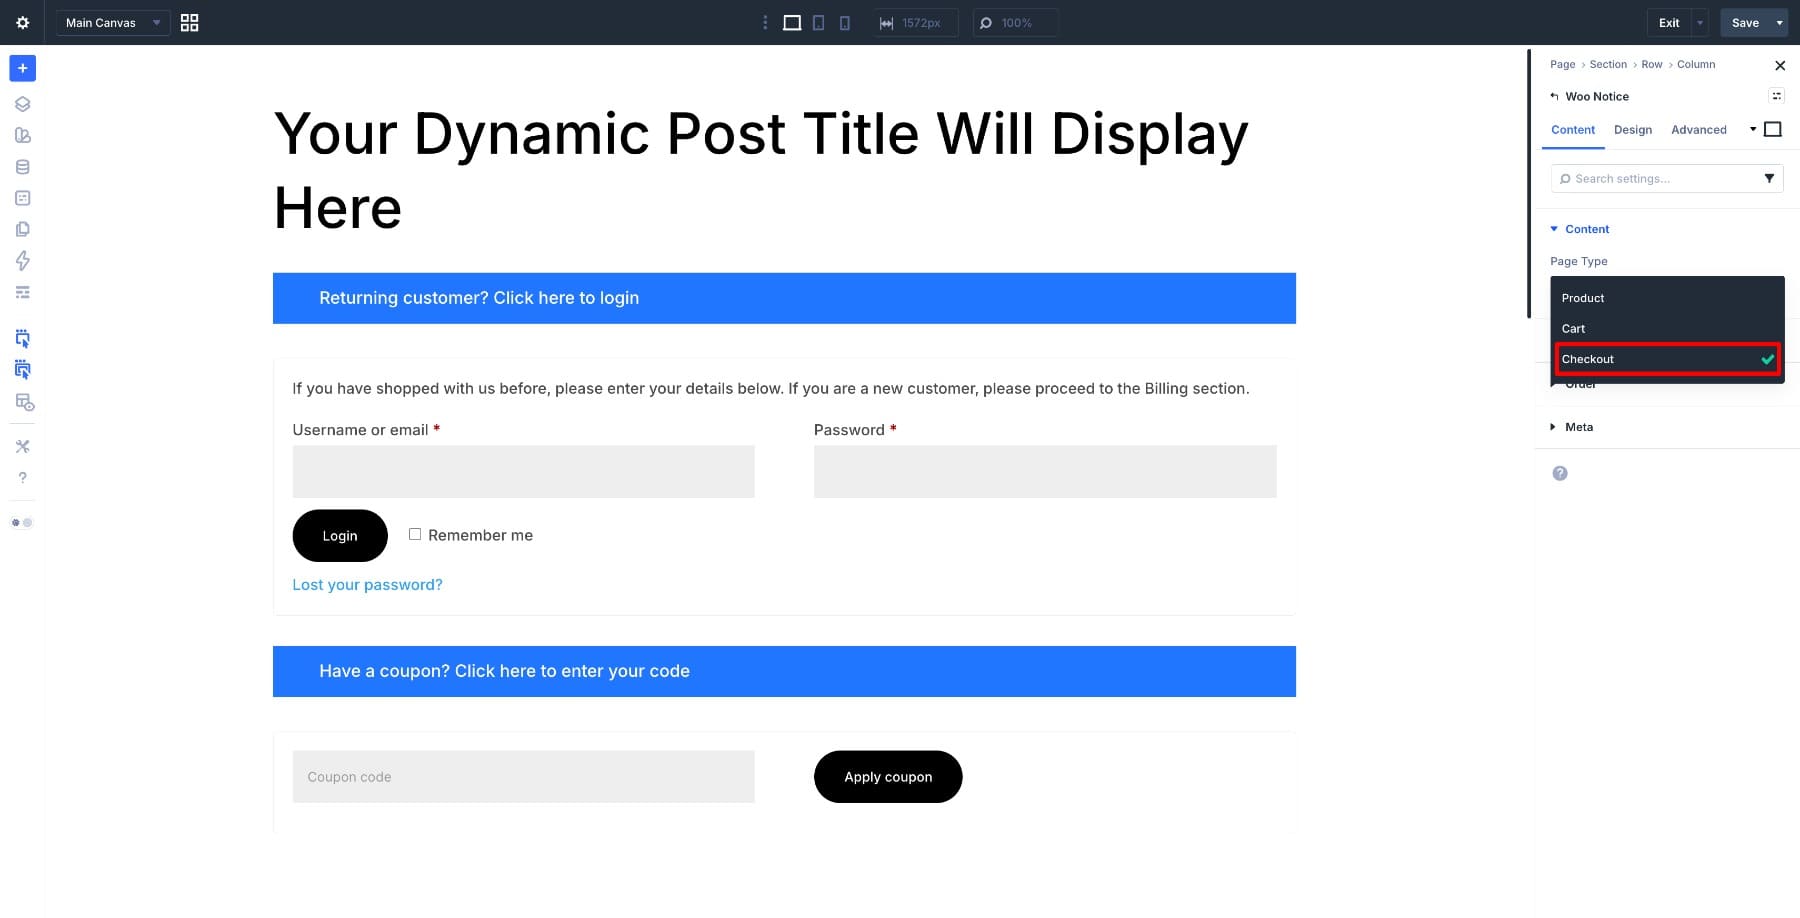
The checkout page works well with a two-column layout. Start with a single-column row at the top and add the Woo Notice module. This time, set the Page Type to Checkout so it displays checkout-specific messages like field validation errors and coupon confirmations.
Add a two-column row below. In the left column, add the Woo Checkout Billing module for billing details, the Woo Checkout Shipping module below it for the shipping address, and the Woo Checkout Information module at the bottom for additional order notes. In the right column, add the Woo Checkout Details module to show the order summary with product names, quantities, and totals, then the Woo Checkout Payment module below it for the payment form and Place Order button.
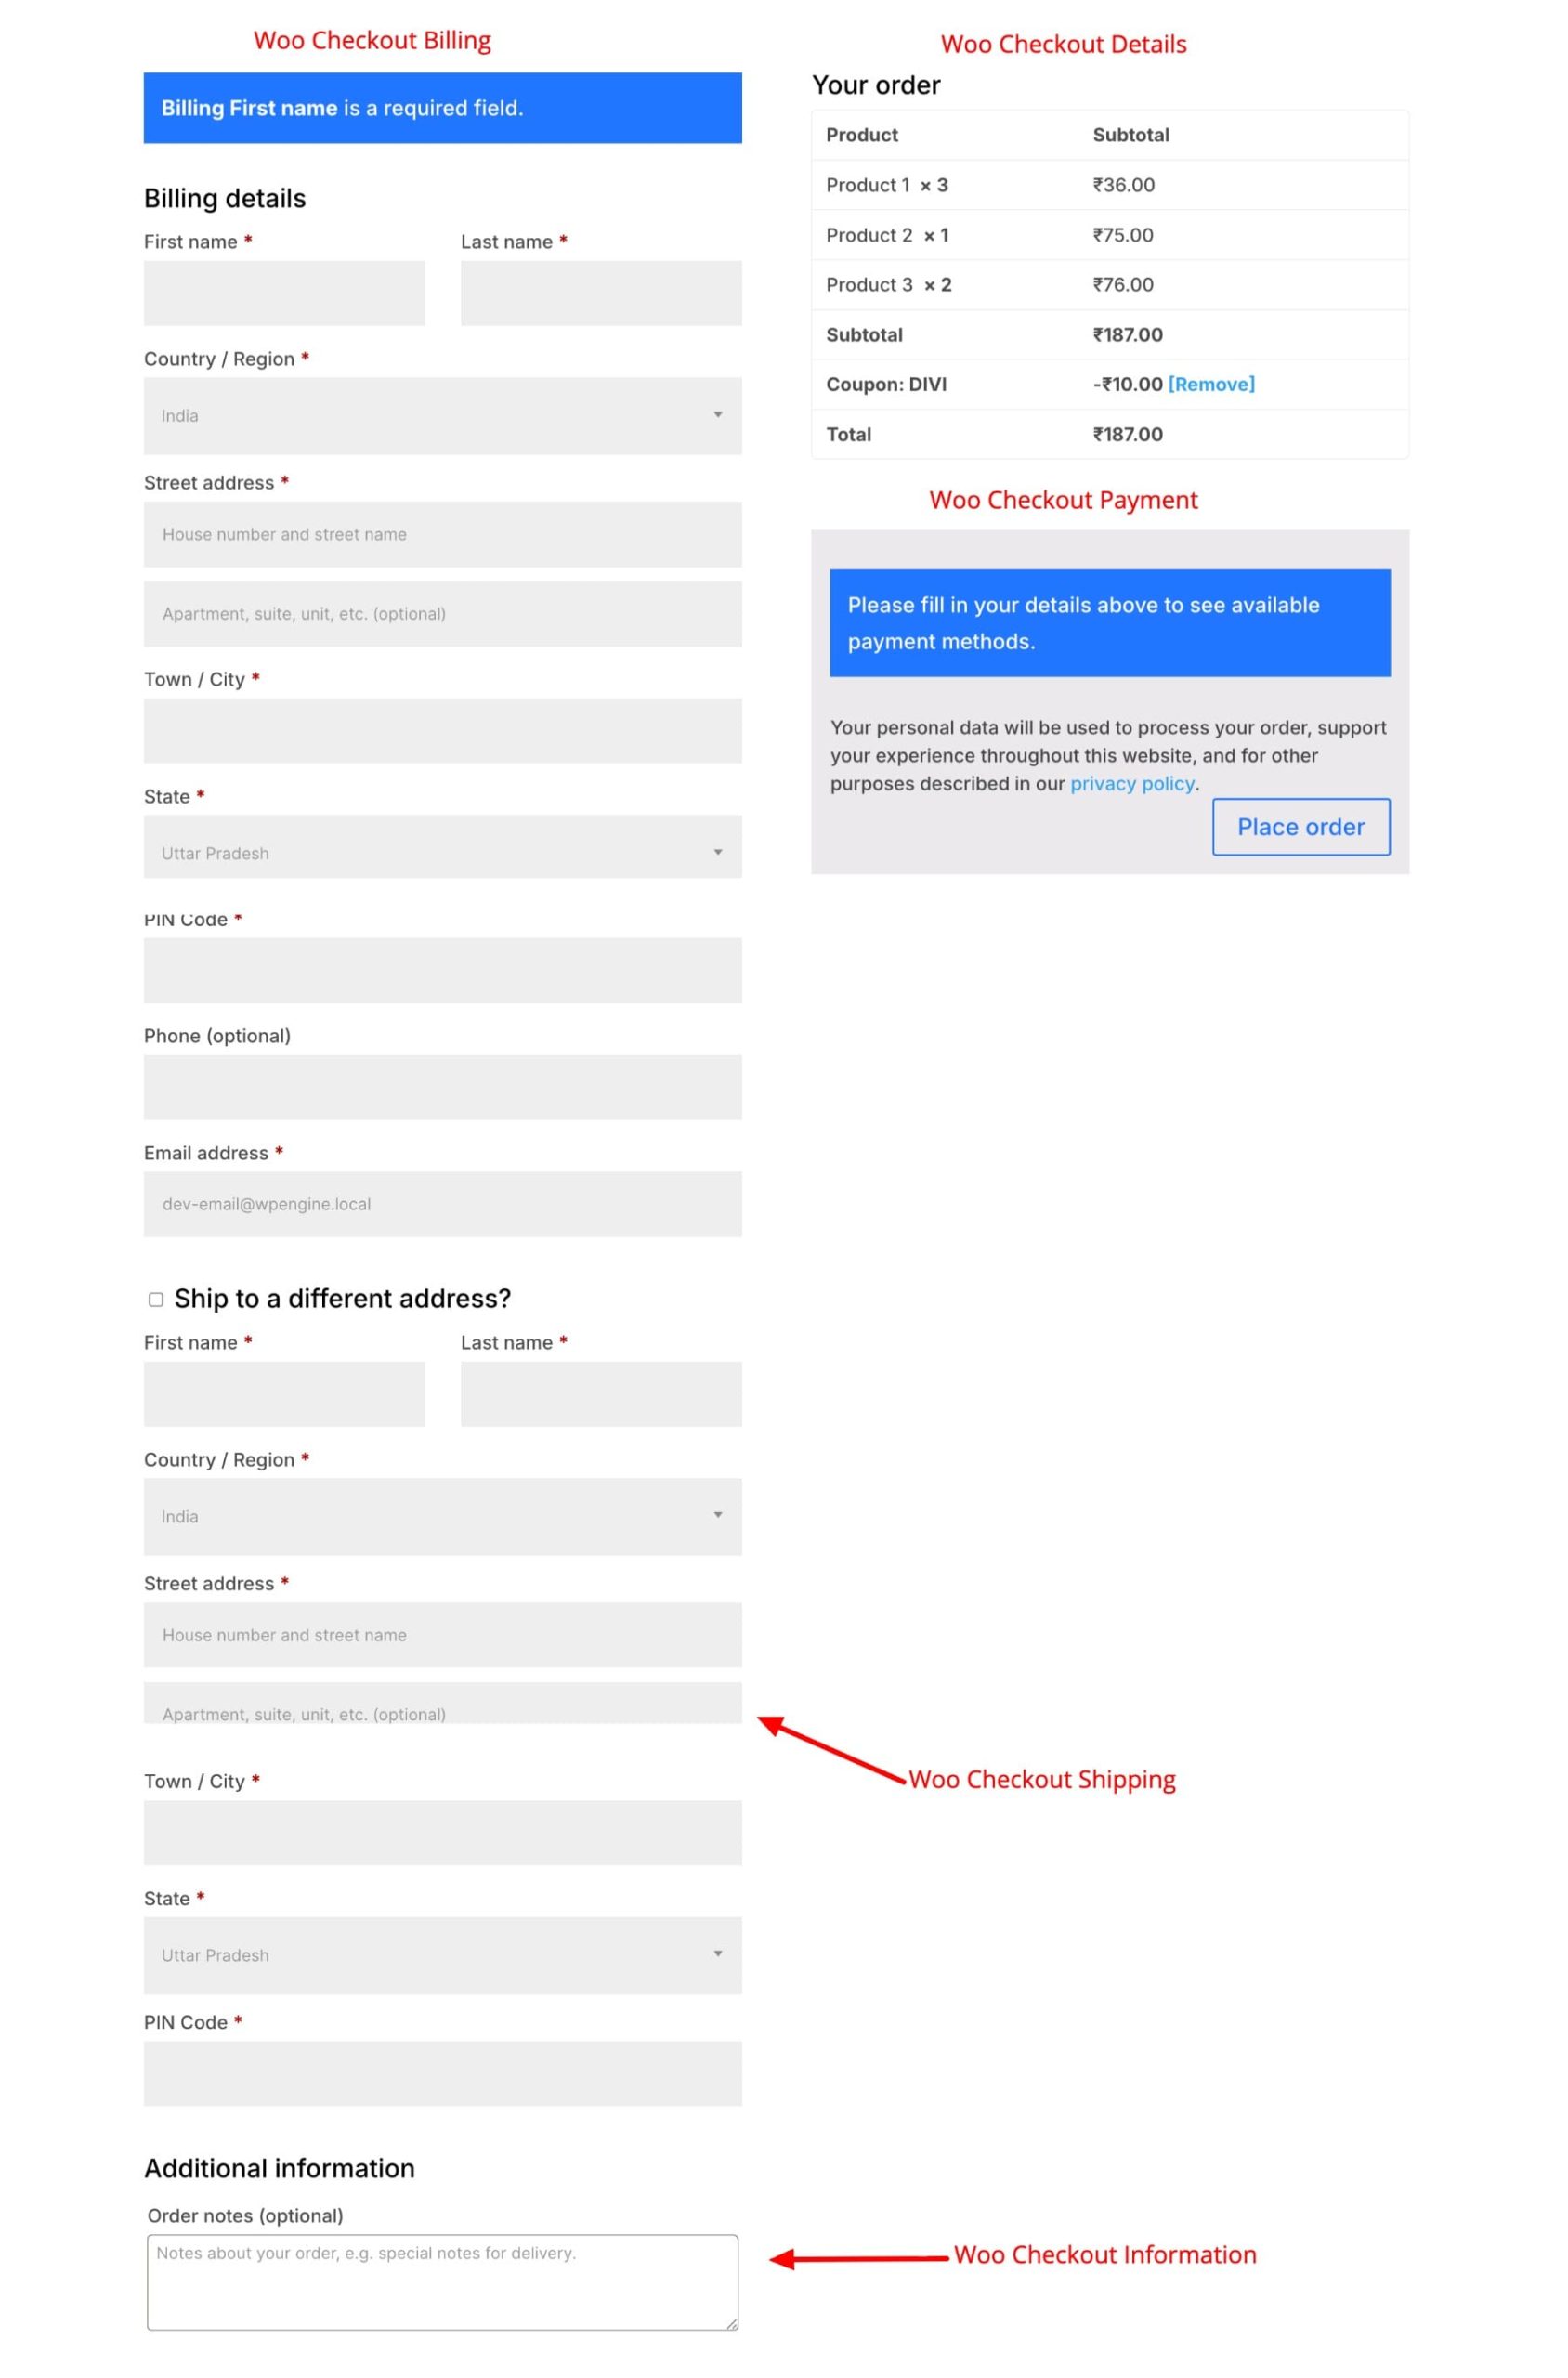
Before you save, a few things are worth getting right on this page. Keep it distraction-free so there’s nothing pulling customers away before they complete their order. Make the Place Order button prominent and easy to find. Add trust signals, such as a security badge or accepted payment icons, near the payment section, as small details like these can improve buyer confidence. And check the page on mobile carefully, because a large portion of online purchases happen on phones, and a checkout that breaks on smaller screens will cost you sales.
Once you’re happy with both pages, save each template in the Visual Builder and click Save Changes in the Theme Builder dashboard.
The Cart-Page-Template.json and Checkout-Page-Template.json files are both included in the freebie folder at the beginning of this guide.
Step 6. Category And Product Discovery Pages
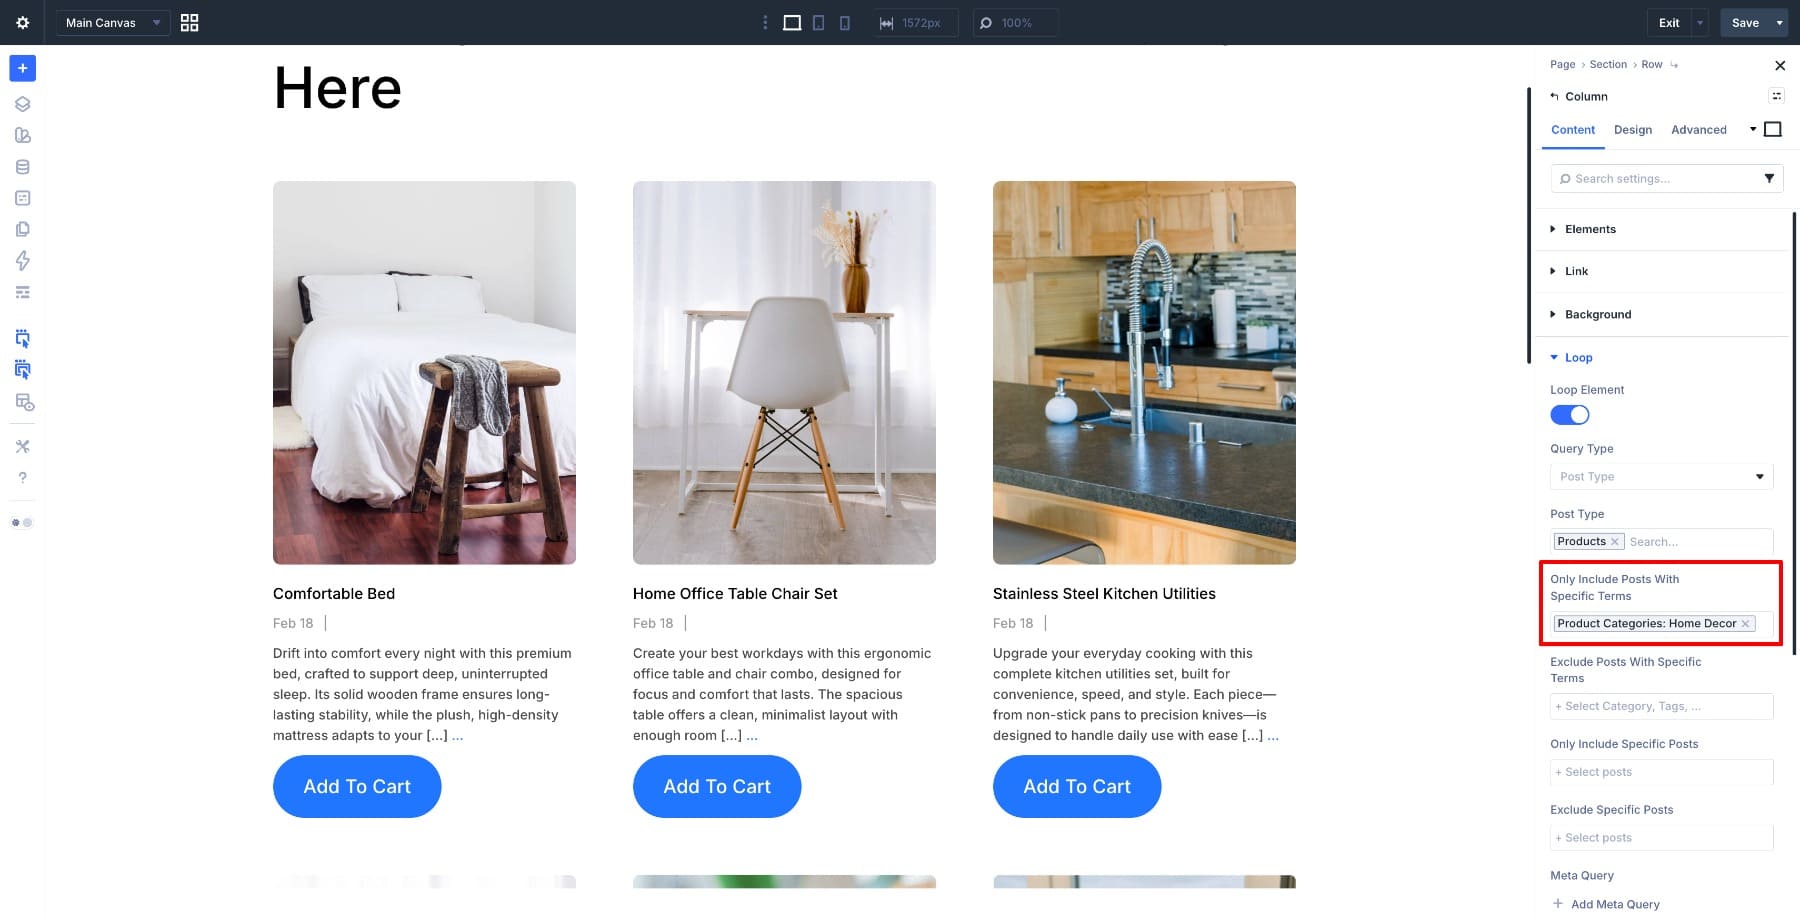
If your store has multiple product categories, a dedicated page for each one gives customers a more focused browsing experience and makes your catalog easier to navigate. Building one follows the same process as your shop page, with one difference in the Loop query settings.
When you enable the Loop Element on your column and set the Post Type to Product, you’ll see an Only Include Posts With Specific Terms field. Select your product category there and the Loop Builder will pull only the products that belong to it.
The Product-Category-Section.json file is included in the freebie at the beginning of this guide, ready to import into your Divi Library and customize.
Your Ecommerce Template Preview
Every template in this guide has a ready-made version in the freebie below. If you want everything at once, import All-WooCommerce-Theme-Builder-Templates.json into your Theme Builder and All-Shop-and-Category-Sections.json into your Divi Library. Or grab individual files for just the pages you need. Either way, open the Inspector tool and swap in your Design Variables to bring any layout in line with your brand in just a few clicks. This is what the complete set looks like.
Configure Your Store Settings
With your templates built, the last thing standing between you and launch is your WooCommerce configuration. Head to WooCommerce > Settings in your WordPress dashboard and work through the essentials before your first order comes in. Under the Payments tab, enable the gateways you want to accept, like Stripe, PayPal, or direct bank transfer. Under Shipping, create zones for the regions you deliver to and assign your rates. If you need taxes, first enable tax calculations under WooCommerce > Settings > General, then configure the Tax tab and decide whether your prices are entered inclusive or exclusive of tax.
One more setting worth turning on before you go live is inventory tracking. Go to WooCommerce > Settings > Products, enable stock management, and set stock quantities for each product individually. WooCommerce can mark items as out of stock automatically when managed stock reaches zero, helping you avoid overselling.
Start Building In Divi 5 Today!
What you’ve built here is more than an online store. It’s a more consistent way to build and manage one. The decisions you make early, like your Design Variables, global templates, and product card styling, can carry through the rest of your site as it grows. That’s where Divi 5 makes a practical difference: it helps you create a store that’s easier to update, maintain, and keep consistent over time.
Instead of making the same changes page by page, you can reuse the work you’ve already done across the rest of your store. The result is a smoother building process and a storefront that’s easier to manage as you continue to grow.


Hello,
I was surprised to find out that neither of the icons used in the menu (cart, user, search) were linked to anything. So they do not work at all and it’s quite difficult to implement them out of the box. Also it would have been cleaner to use a icon list instead 3 single icons, but that’s not the reason for this comment.
I need some way to achieve the Woo Cart to be linked with the new Divi cart icon shown in the screenshots, so I can display the Woo Cart amount besides the new Divi cart icon.
So although I apprechiate the guide, I find it a bit counterproductive that you give us such a nice menu with a download link but then you don’t even implement it in any way. Same goes for the new search icon. What was the plan? Linking the user to the Woo “My Account” page is the only icon that’s straight forward.
Maybe you can find a solution how we can change the default Woo Cart Icon and maybe also access the value for the “et_show_cart_total” or in other words the Woo Cart Product count (amount). Imo as dev it should be an easy fix, because we can change the icon color, font style of the Woo Cart Product amount (Items: 0) and the default Menu Search Icon already.
Currently I only use the default Woo Cart and default Search icon and to make it look like in this guide I needed to create an extra secondary Empty Menu where not a single page is visible, to work around the problem that it can only be shown inside the primary menu.
Besides that it would also be great if we could not just change the Woo Cart Amount (Items: 0) text and font style, but also completely hide it. Also it would be nice to show it as a small counter bubble on the Woo Cart Icon instead of the old “Items: 0 besides cart” look. Most of the described things would not be needed if we just could handle the Woo Cart and Search Icon by our selfs in a clean way.
Everything menu realted currently seems too hacky. I love looping but a half-dynamic menu is not really relyable for customers nor makes it fun to develop.
I need to add that I’m a bit confused on which guide is the most “state of the art” way to create navigation. There are several ET guides out there that all show different ways to achieve static menus, dynamic navigation and mega menus with looping and some without. To me it appears that resources like that are a bit hard to find becasue they are hidden behind big general guides with general article/topic titles. I stumbled upon this menu only by coinsidence. The article name “WooCommerce And Divi 5: The Complete Ecommerce Guide” does not suggest this and makes it hard to find.
Thanks for the guide anyways!
I’m still very grateful! Thank you for everything Divi (ET) Team!
Thanks so much for the thoughtful feedback and for the kind words! We really appreciate the detailed breakdown. 👍
You’re right that Woo cart, account, and search elements need to be easier to implement as fully functional, dynamic menu components in Divi 5. Better cart linking, cart count styling, counter bubbles, search handling, and clearer “best practice” navigation guidance are all great points.
We’ll pass this along to the team. In the meantime, please reach out to support via support chat with your setup so we can take a closer look and see what the best current approach is for your menu. 😊
Hello,
A guide that I have been waiting for a long time. Well done ! A note. In section 1.4 at the beginning of the guide, it says: On top of that, Divi 5 keeps WooCommerce customization visual and drag-and-drop. You can build a lot without writing code, although custom CSS or deeper WooCommerce customization may still be helpful on some stores. To give you a faster start, we’ve put together a free set of ready-made ecommerce layouts you can import directly and customize to match your brand. You’ll find the download link at the beginning of this guide, and you’ll want to use the latest version of Divi 5 to follow along. Surprisingly, I can’t find the download link… Is it possible to confirm that this download link is missing or am I the one having a visual problem? Alternatively, if you can provide it that would be much appreciated.
Search the page for “Download For Free”
THANKS ! I had seen this module, but I thought it was just to subscribe to the newsletters, which I already am! I find that this was not clearly specified in the description, but hey, I downloaded it with my email and everything worked fine. Thanks again for the response!