
Have you ever noticed that most of your favorite websites have a URL that starts with HTTPS? You’re more likely to notice when the S, which indicates a URL is secure, is not present. That’s because Google now flags websites without an SSL certificate–an important component of a secure website. Because website security is so important, it’s crucial that you understand HTTPS and SSL for WordPress.
If you run a WordPress website, you’re going to want it to have SSL and HTTPS for greater security and visitor trust. As an added bonus, your website will have a higher SEO search ranking. So if you’re ready to add an extra layer of security and protection for both your site and the users who visit it, read on.
- 1 What is HTTPS and SSL?
- 2 Do You Need HTTPS and SSL?
- 3 How to Install SSL for WordPress
-
4
SSL and HTTPS Frequently Asked Questions
- 4.1 How do I know if my site has an SSL Certificate?
- 4.2 Will SSL and HTTPS make my site slower?
- 4.3 I have installed the SSL Certificate, but my site is still showing that it’s insecure. What do I do now?
- 4.4 How do I fix mixed content errors?
- 4.5 How do I force HTTPS?
- 4.6 How much do SSL Certificates Cost?
- 4.7 Is there a difference in free vs paid SSL Certificates?
- 4.8 Do I have to renew my SSL Certificate?
- 5 Conclusion
What is HTTPS and SSL?
HTTPS and SSL for WordPress go hand in hand. On its own, HTTP (the original URL prefix) stands for hypertext transfer protocol. Installing an SSL (secure sockets layer) certificate on your website secures it. When you have the proper SSL or TLS certificate installed on your website, URL prefix switches from HTTP to HTTPS: hypertext transfer protocol secure.
Let’s take a deeper dive into what HTTPS and SSL are and how they work. According to the Mozilla Developer Network (MDN):
HTTPS (HyperText Transfer Protocol Secure) is an encrypted version of the HTTP protocol. It uses SSL or TLS to encrypt all communication between a client and a server. This secure connection allows clients to safely exchange sensitive data with a server, such as when performing banking activities or online shopping.
Essentially, HTTPS means that your site is end-to-end encrypted. That means that only the two clients on each end of the transaction are able to read the data. If a malicious user or entity were to intercept the communication, they would get nothing but a mess of random, garbled characters.
Now, let’s jump to the MDN’s definition of SSL:
Secure Sockets Layer, or SSL, was the old standard security technology for creating an encrypted network link between a server and client, ensuring all data passed is private and secure. The current version of SSL is version 3.0, released by Netscape in 1996, and has been superseded by the Transport Layer Security (TLS) protocol.
When it comes to TLS vs. SSL, TLS is essentially the follow-up to SSL. Like SSL, TLS establishes an encrypted connection between a server and a client. The two protocols result in better security for your WordPress website.
Do You Need HTTPS and SSL?
The short answer is yes: you do need HTTPS and SSL. Aside from building trust with your visitors, site security is one competent of solid SEO. In 2018, Google began flagging websites without an SSL or TLS certificate. This discourages users from navigating to sites that don’t have an SSL certificate.
Years ago, SSL certificates were expensive–thousands of dollars, in fact. Large websites that drove revenue, such as Facebook and Amazon, displayed the lock icon in a user’s browser window. That’s because they had the budget to buy the certificate. On the other hand, the average user’s WordPress website simply had an HTTP prefix. These days, SSL certificates are both necessary and affordable.
While WordPress now automatically installs SSL certificates on every new website, you might have an older domain or long-established site that needs securing. It’s possible to get a free SSL certificate for your WordPress website if you don’t already have one. Most good hosting providers also offer a free or discounted SSL certificate as part of their hosting packages. With HTTPS and SSL for WordPress now so accessible, there’s no reason to leave your website vulnerable.
How to Install SSL for WordPress
Wondering how to install SSL for WordPress? We’ll walk you through the steps and show you how it’s done.
Using a Plugin
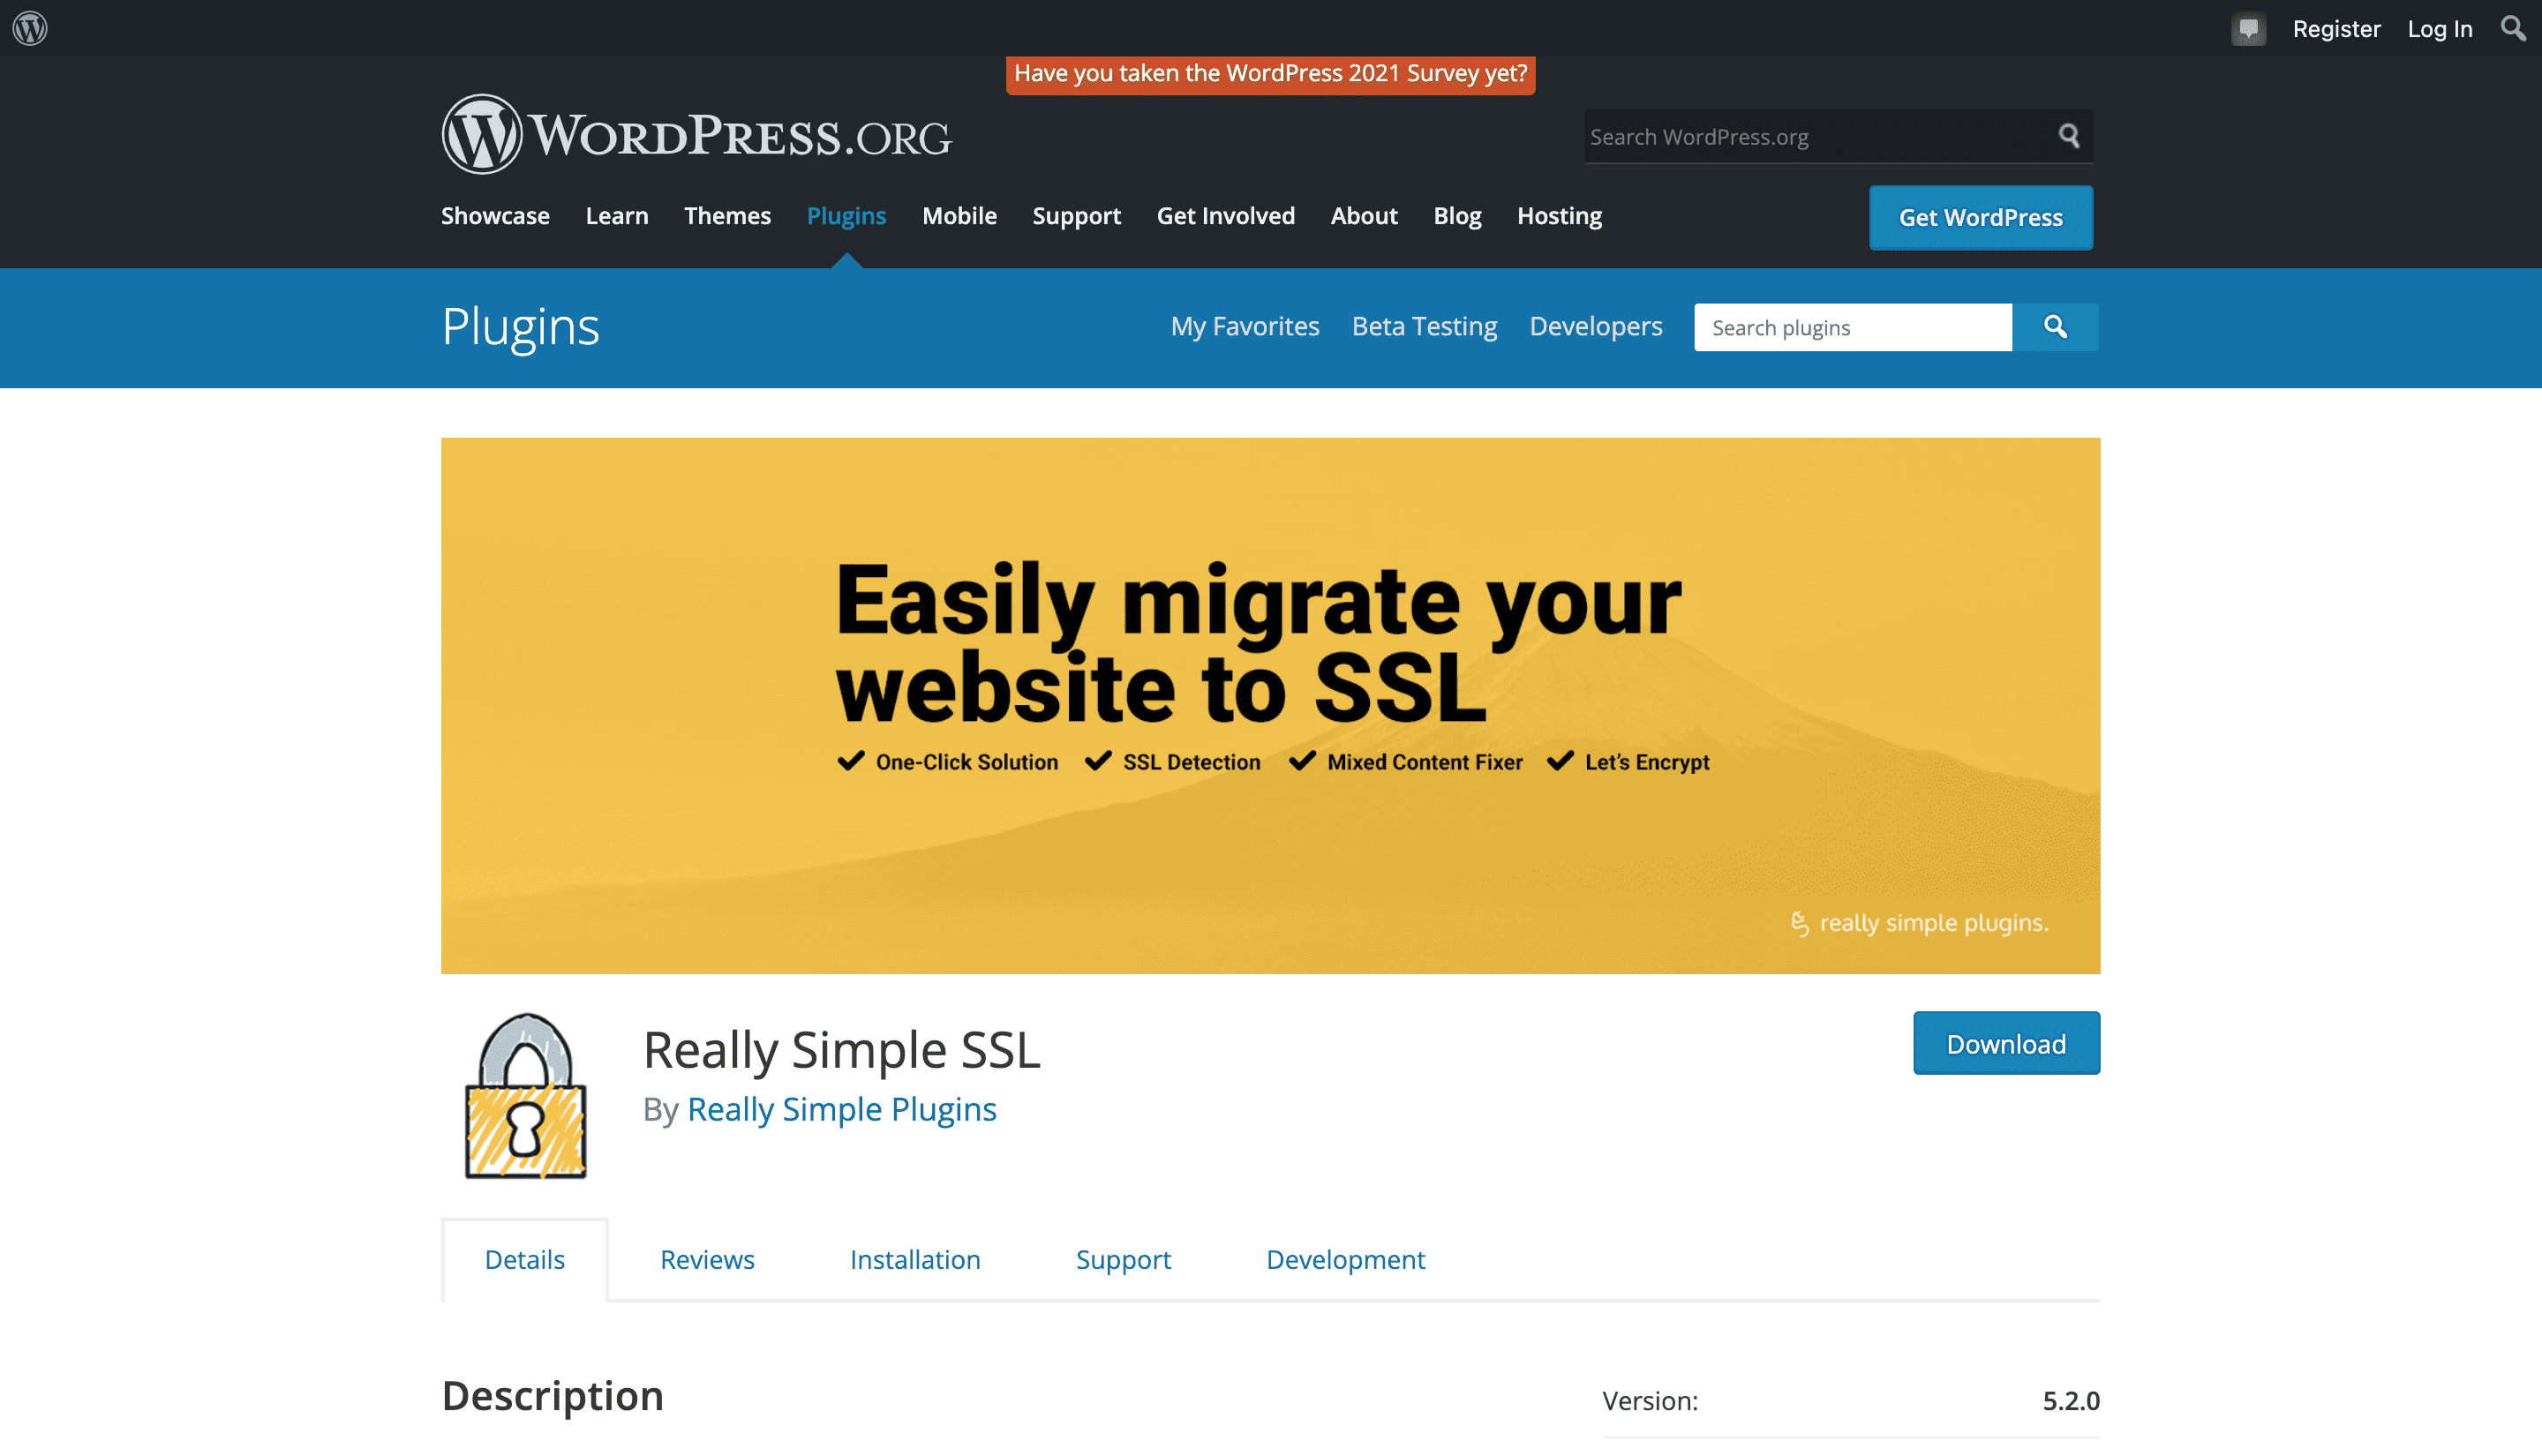
Let’s start out by installing SSL for WordPress by using a plugin. For this tutorial, we’re using Really Simple SSL. This plugin automatically moves your WordPress website over to SSL. So if your URL still displays HTTP rather than HTTPS, this plugin will take care of the issue and help you secure your site.
Let’s get to it.
1. Navigate to the Really Simple SSL plugin page and click Download. Save the plugin .zip file to your computer.
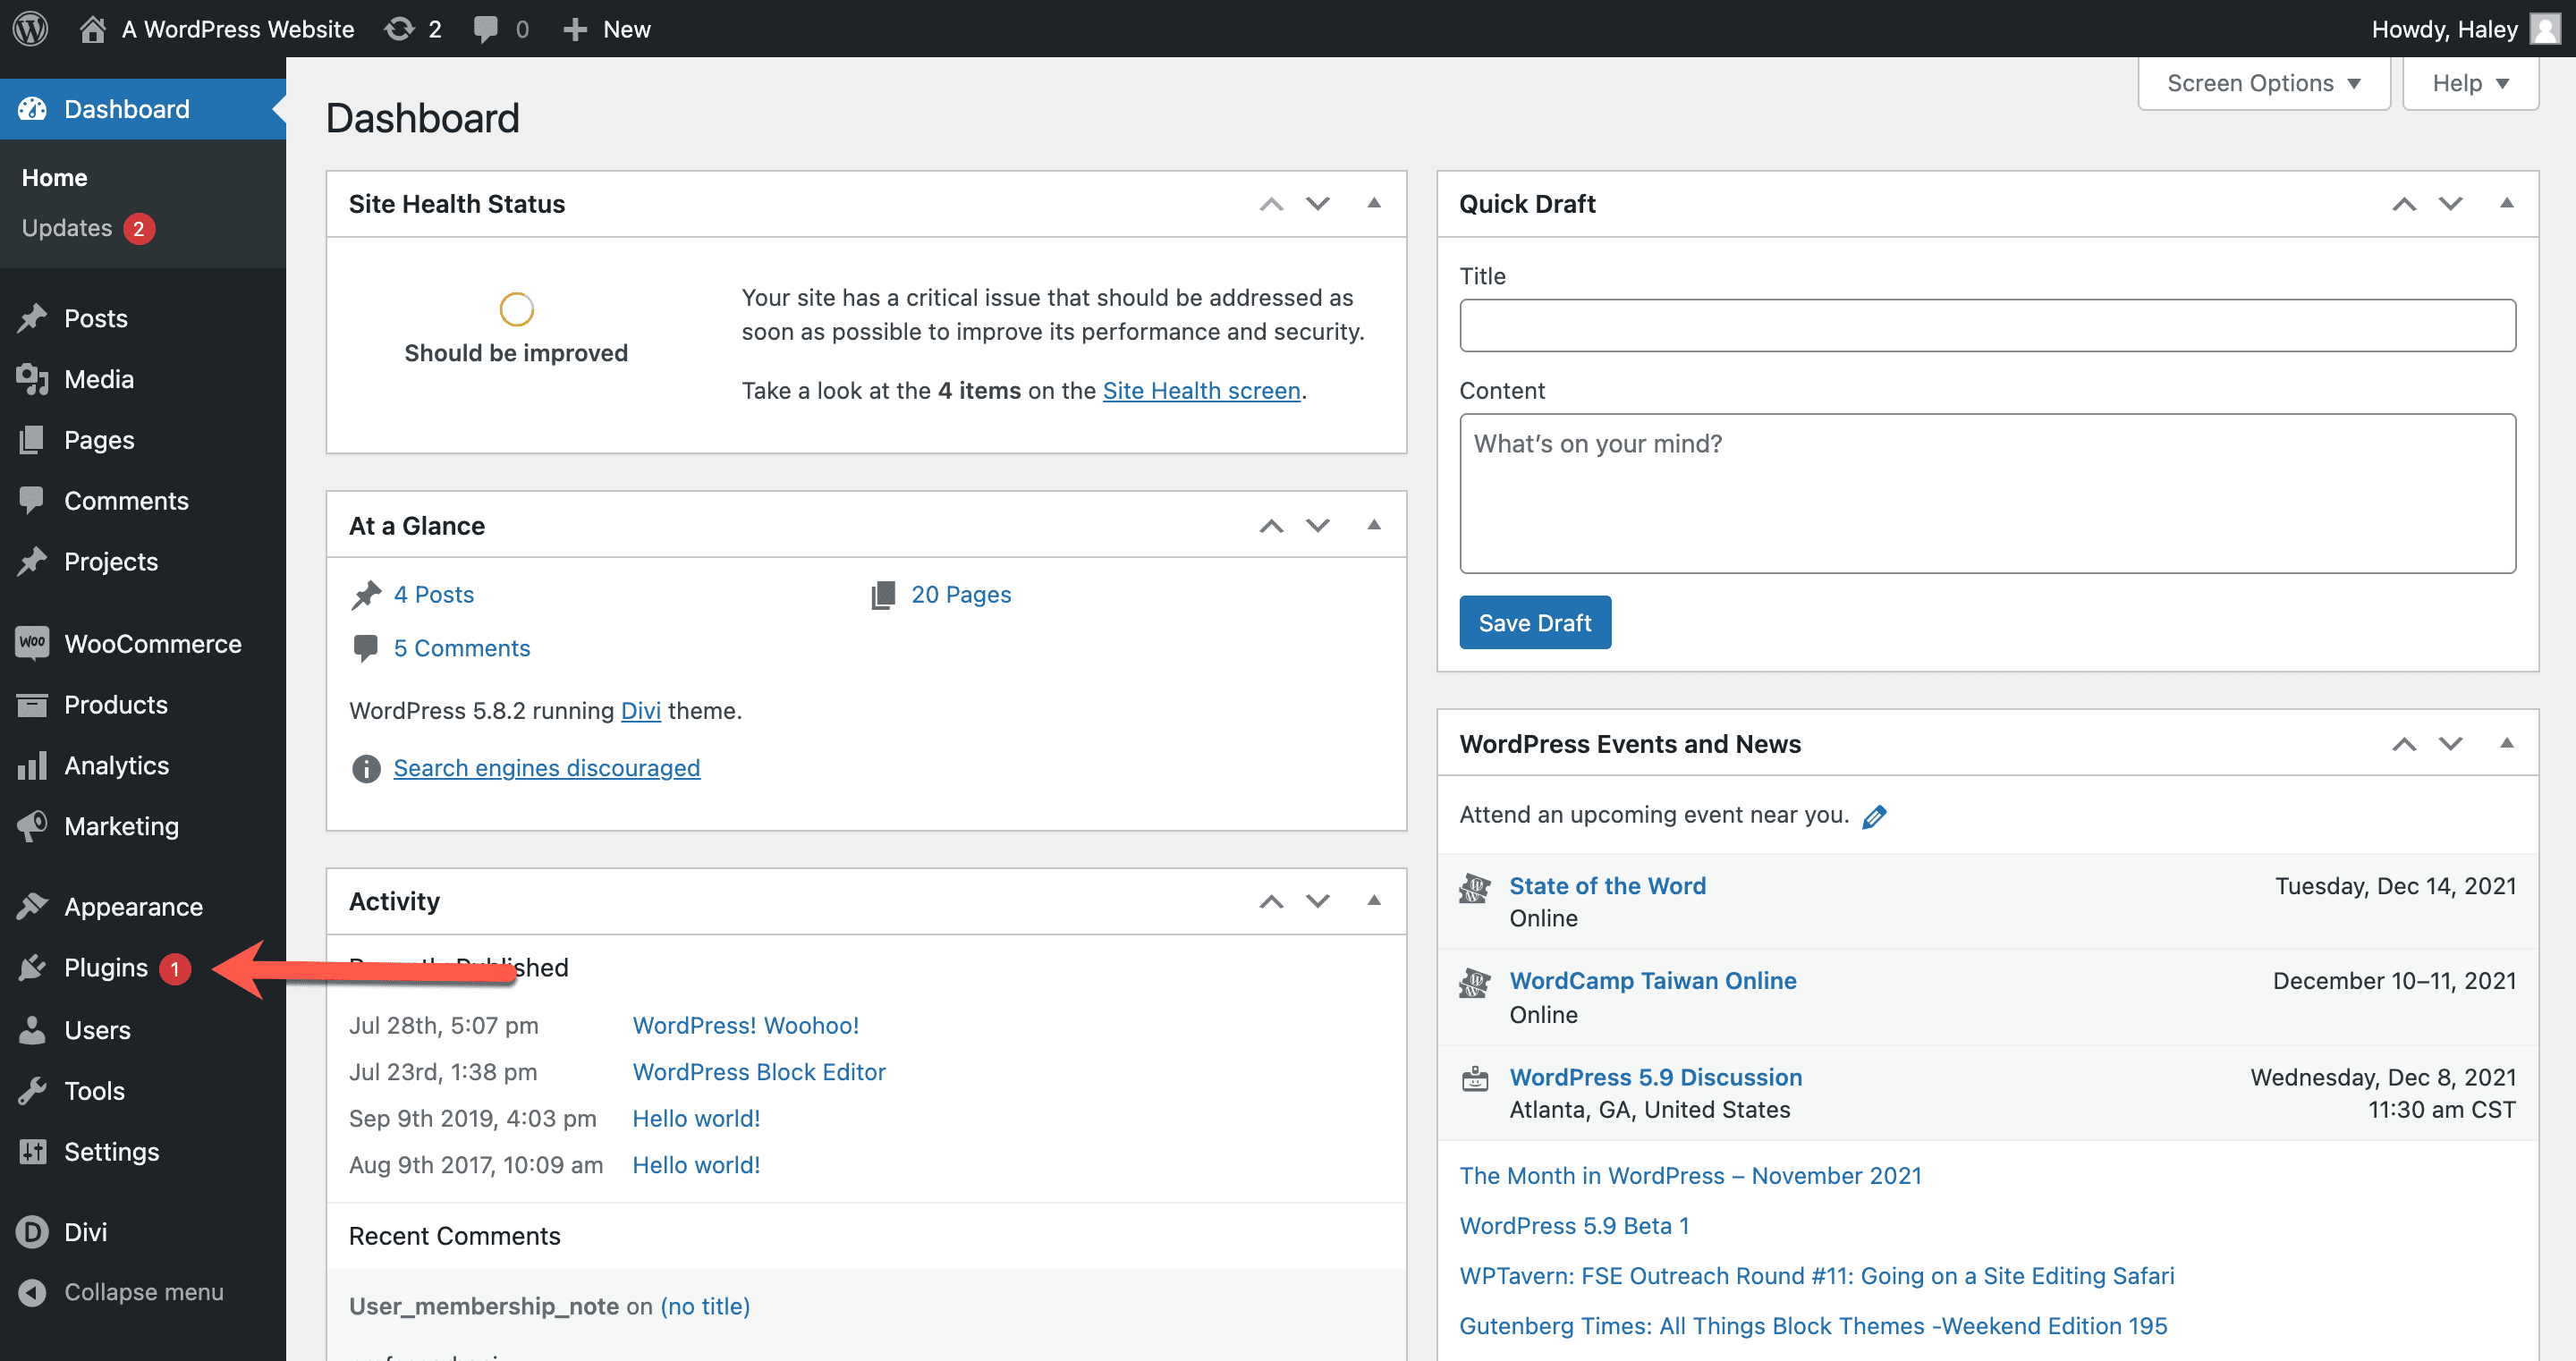
2. Open a new browser tab, login to your WordPress dashboard, and click Plugins.
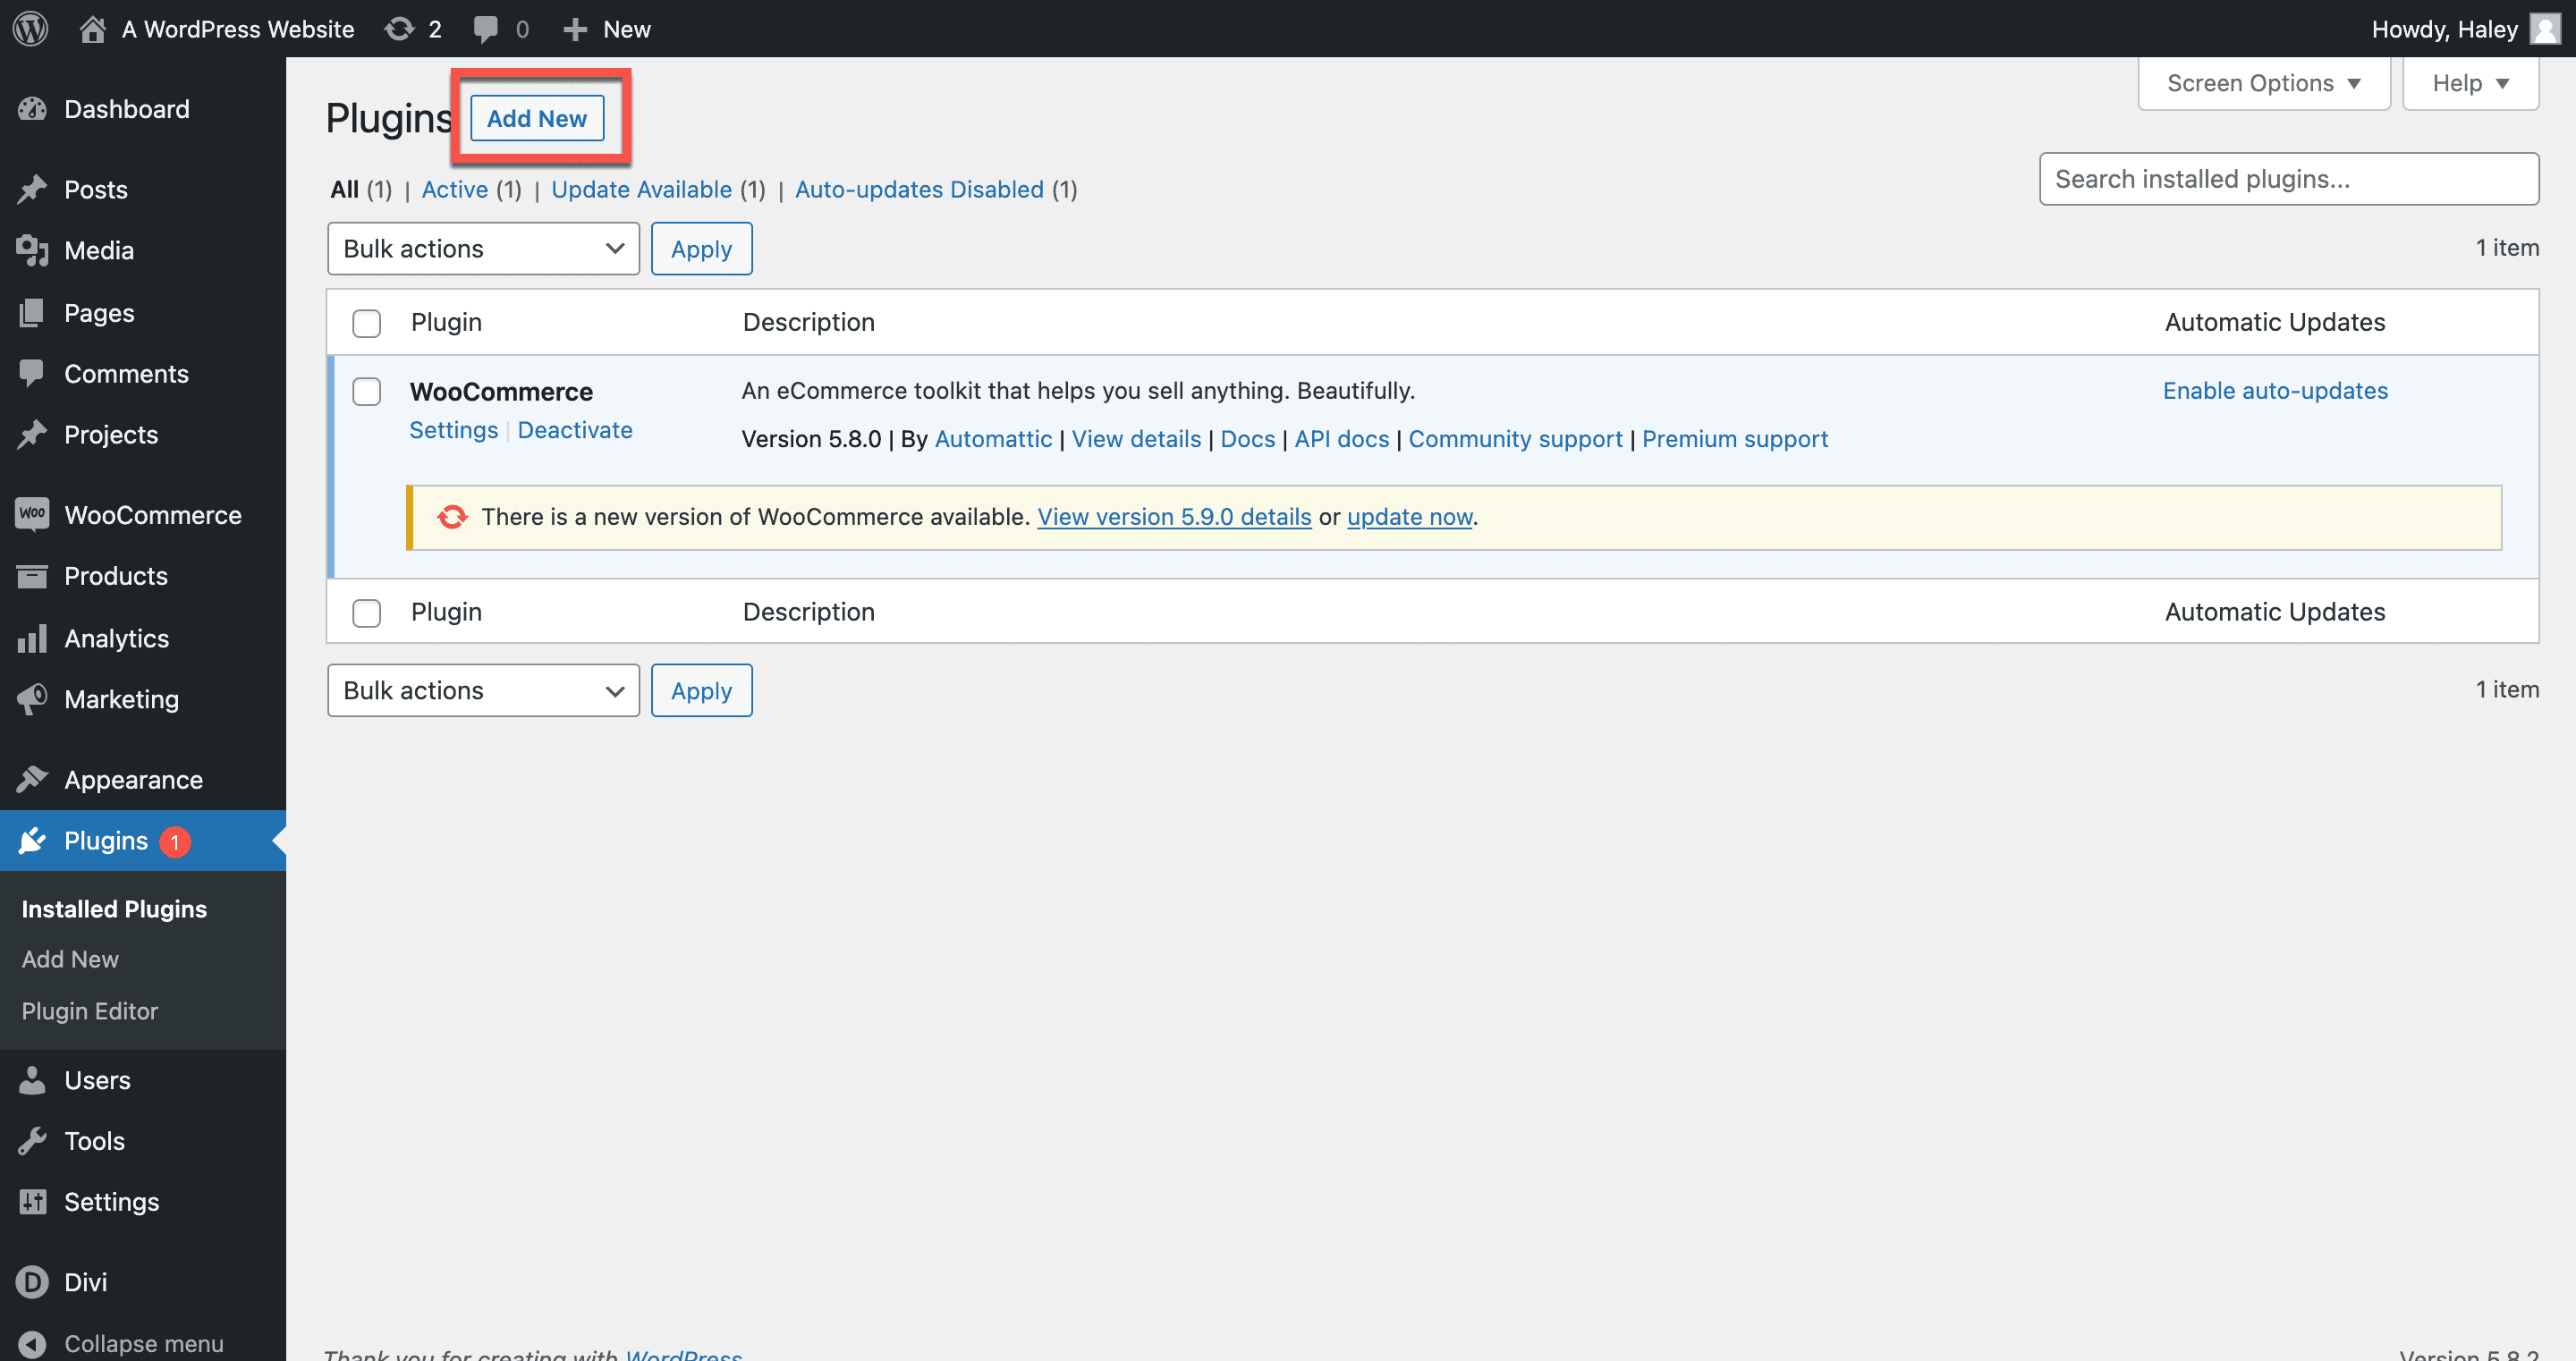
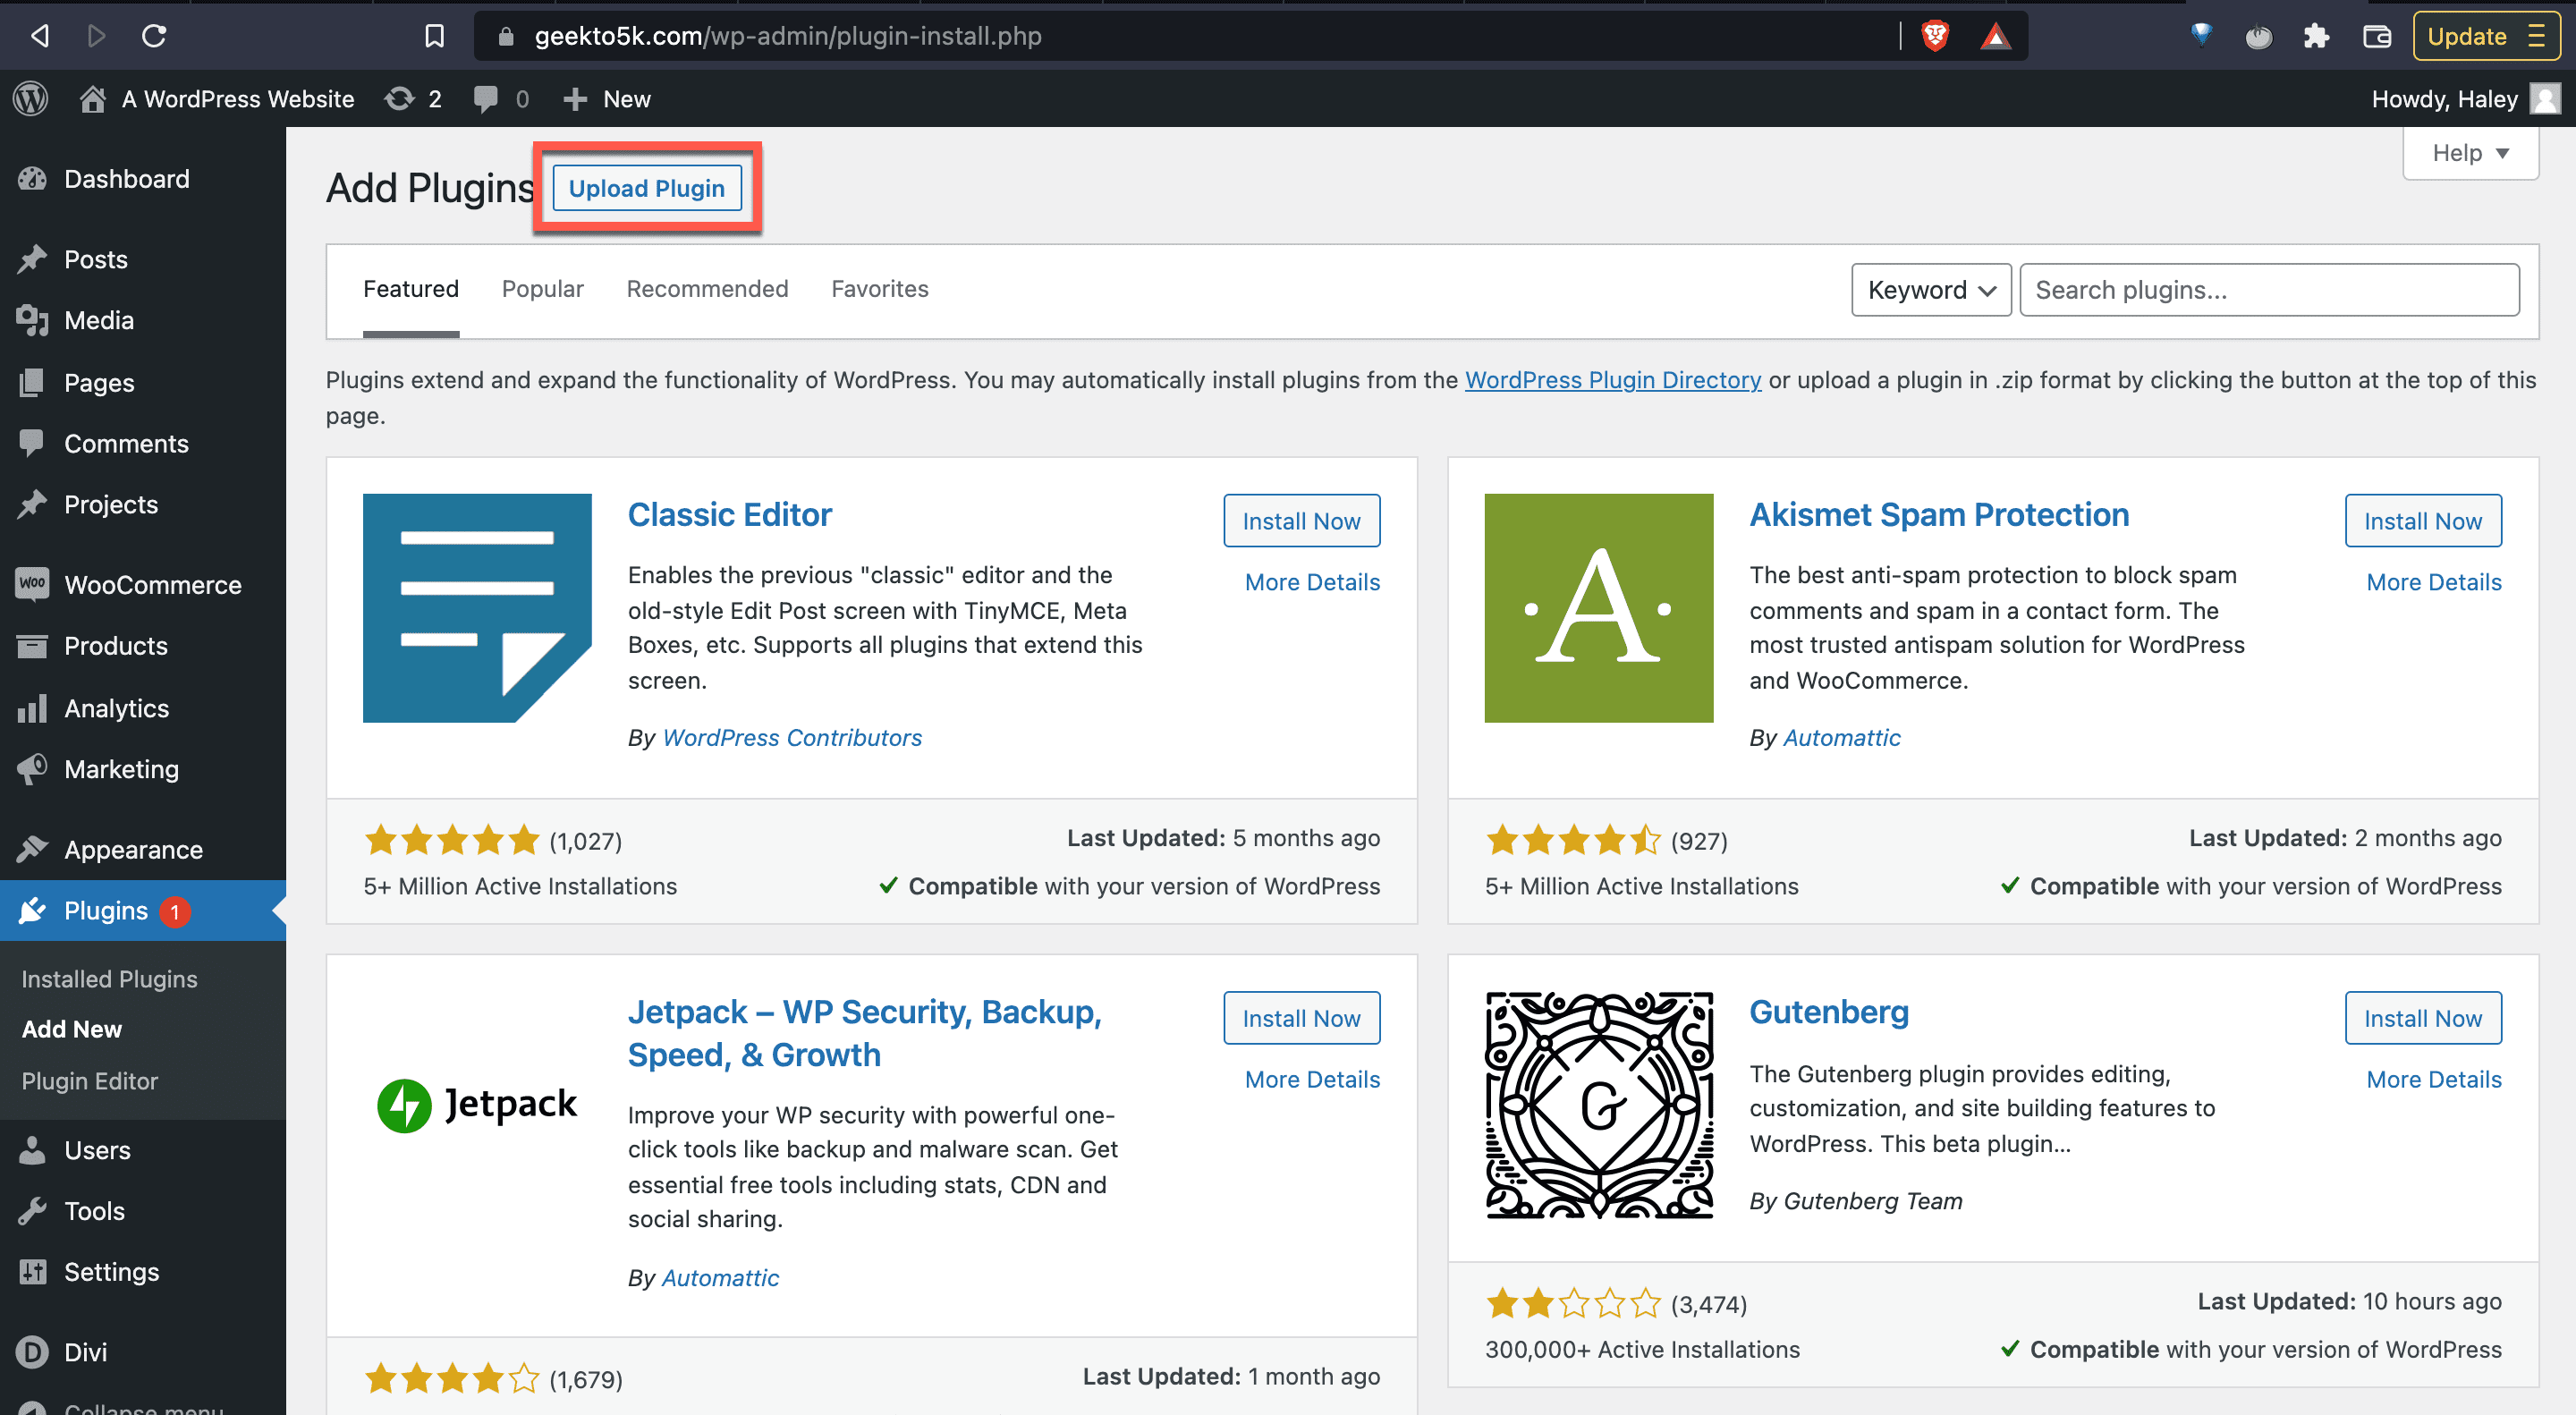
3. From your Plugins screen, click Add New.
4. From the Add Plugins page, click Upload Plugin.
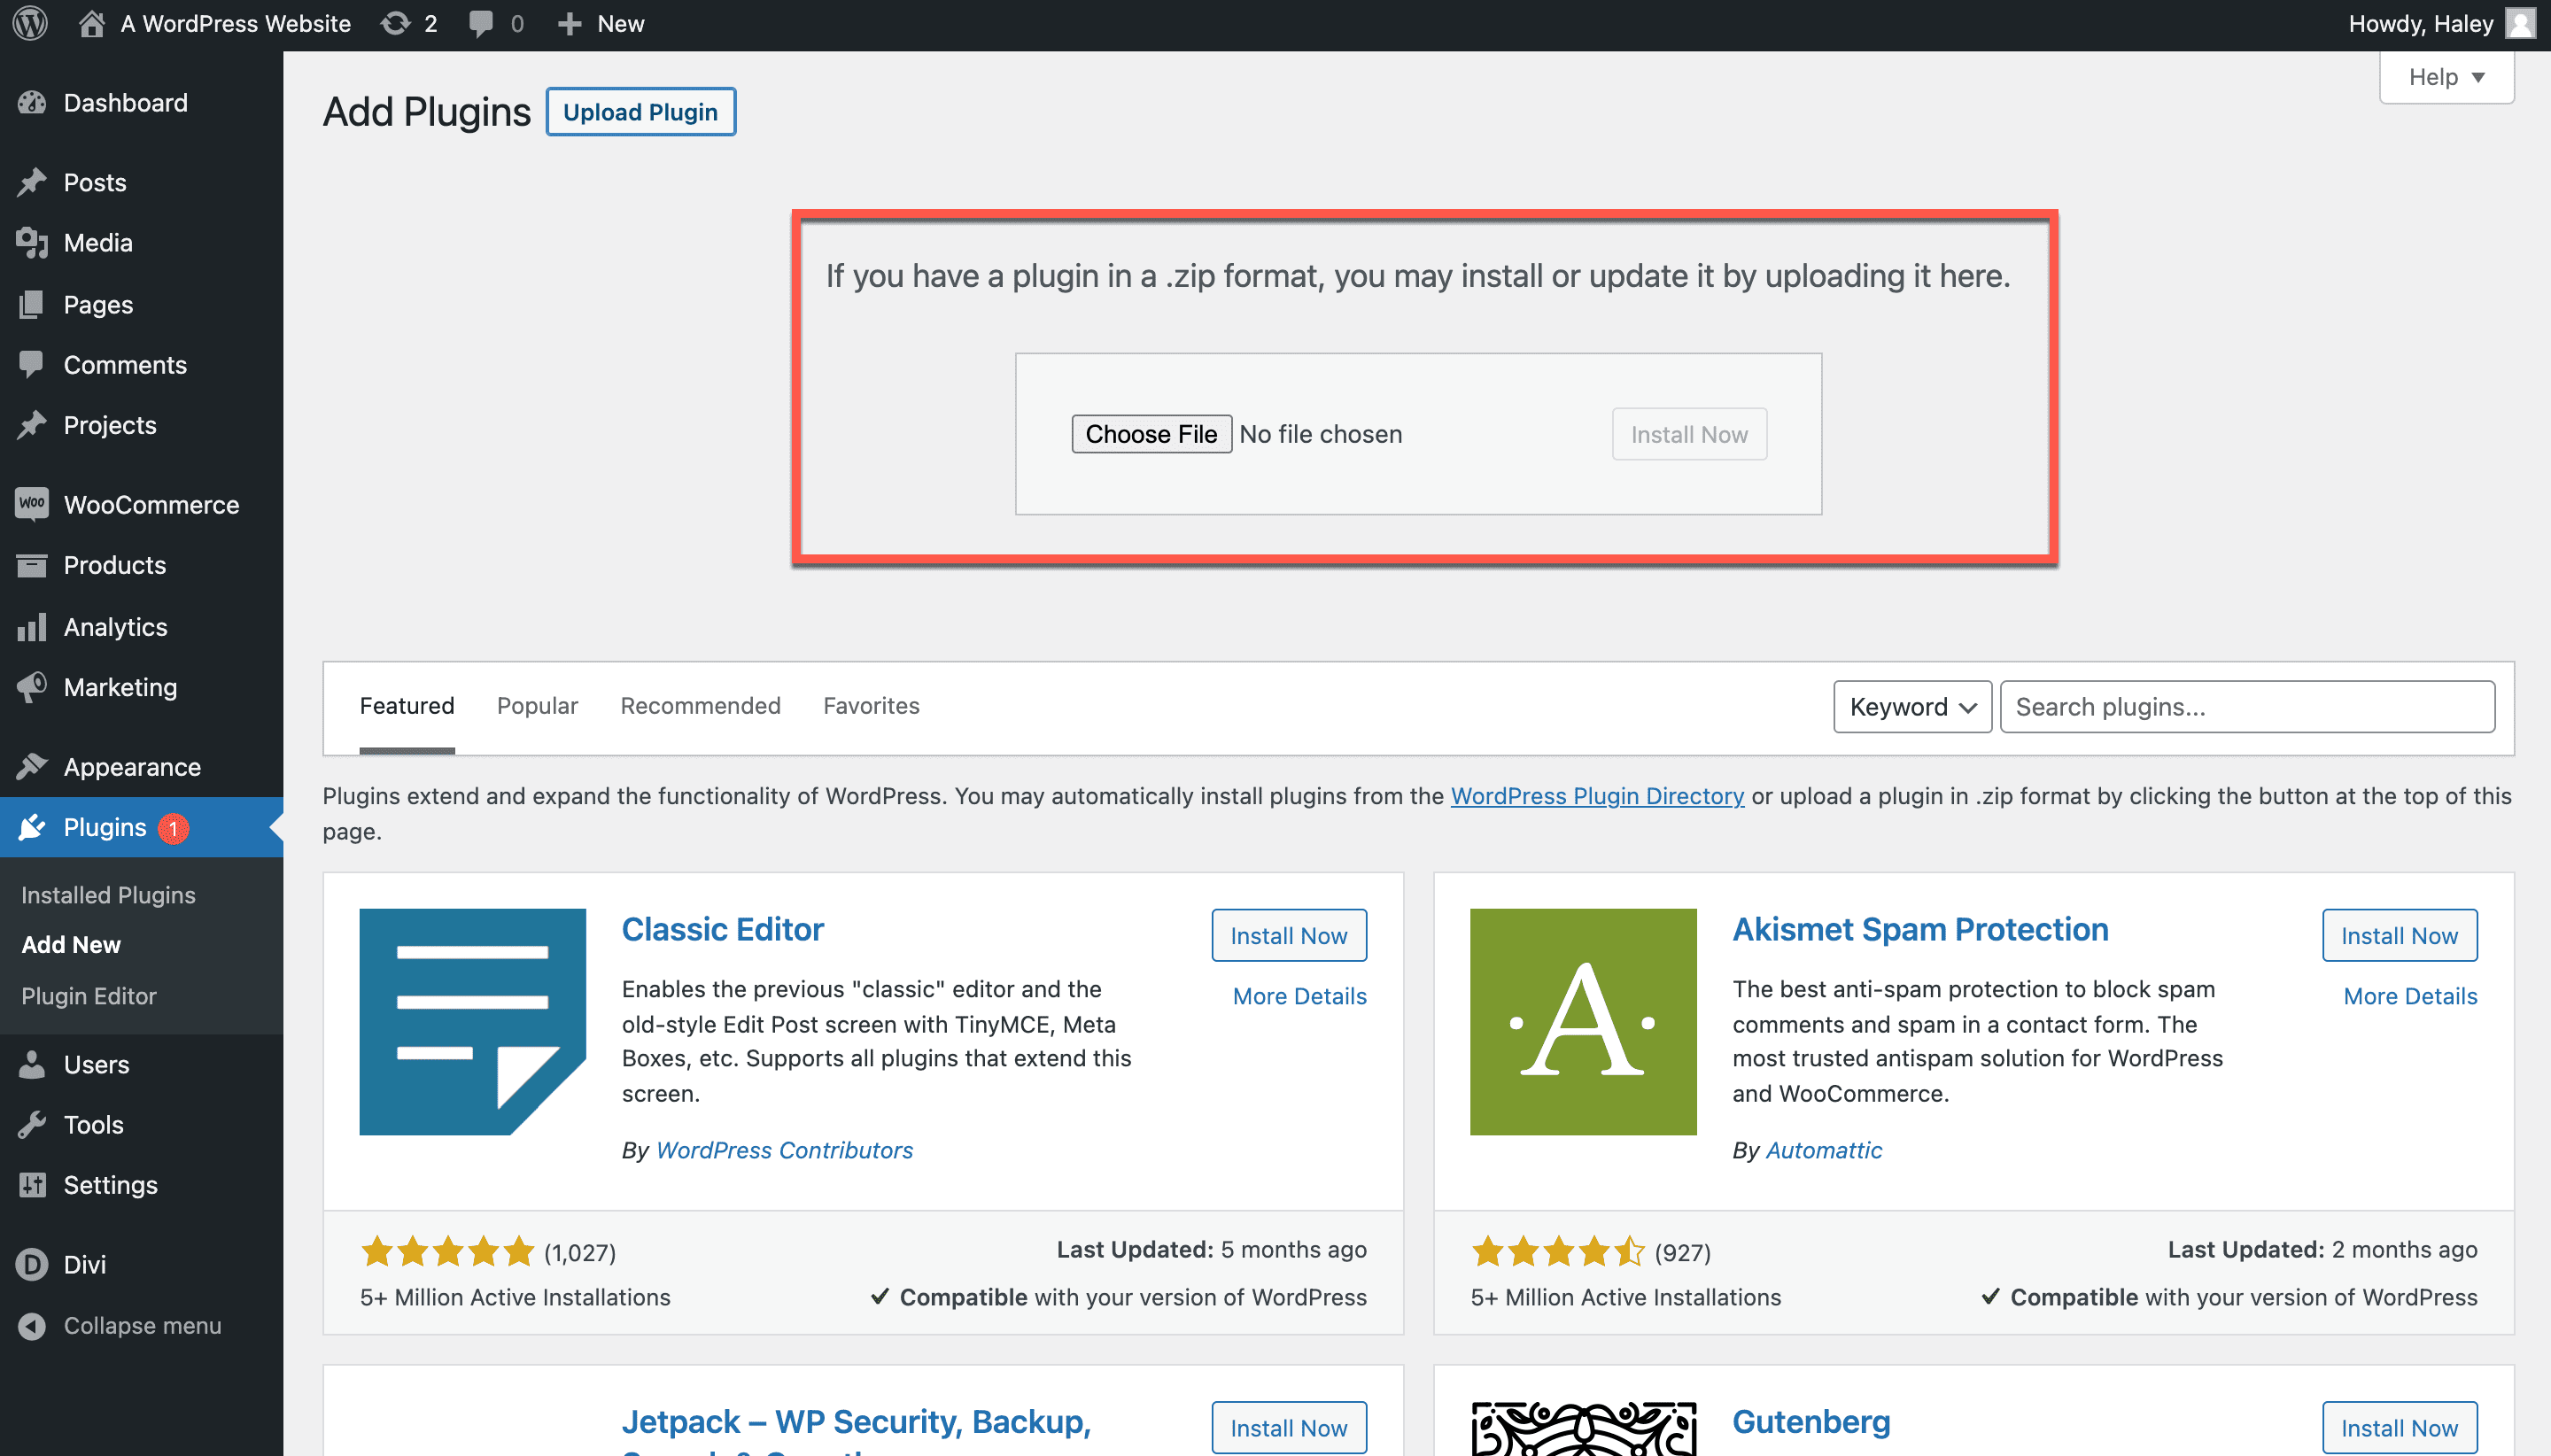
5. Next, upload the .zip file associated with your plugin. Choose your file, then click Install Now.
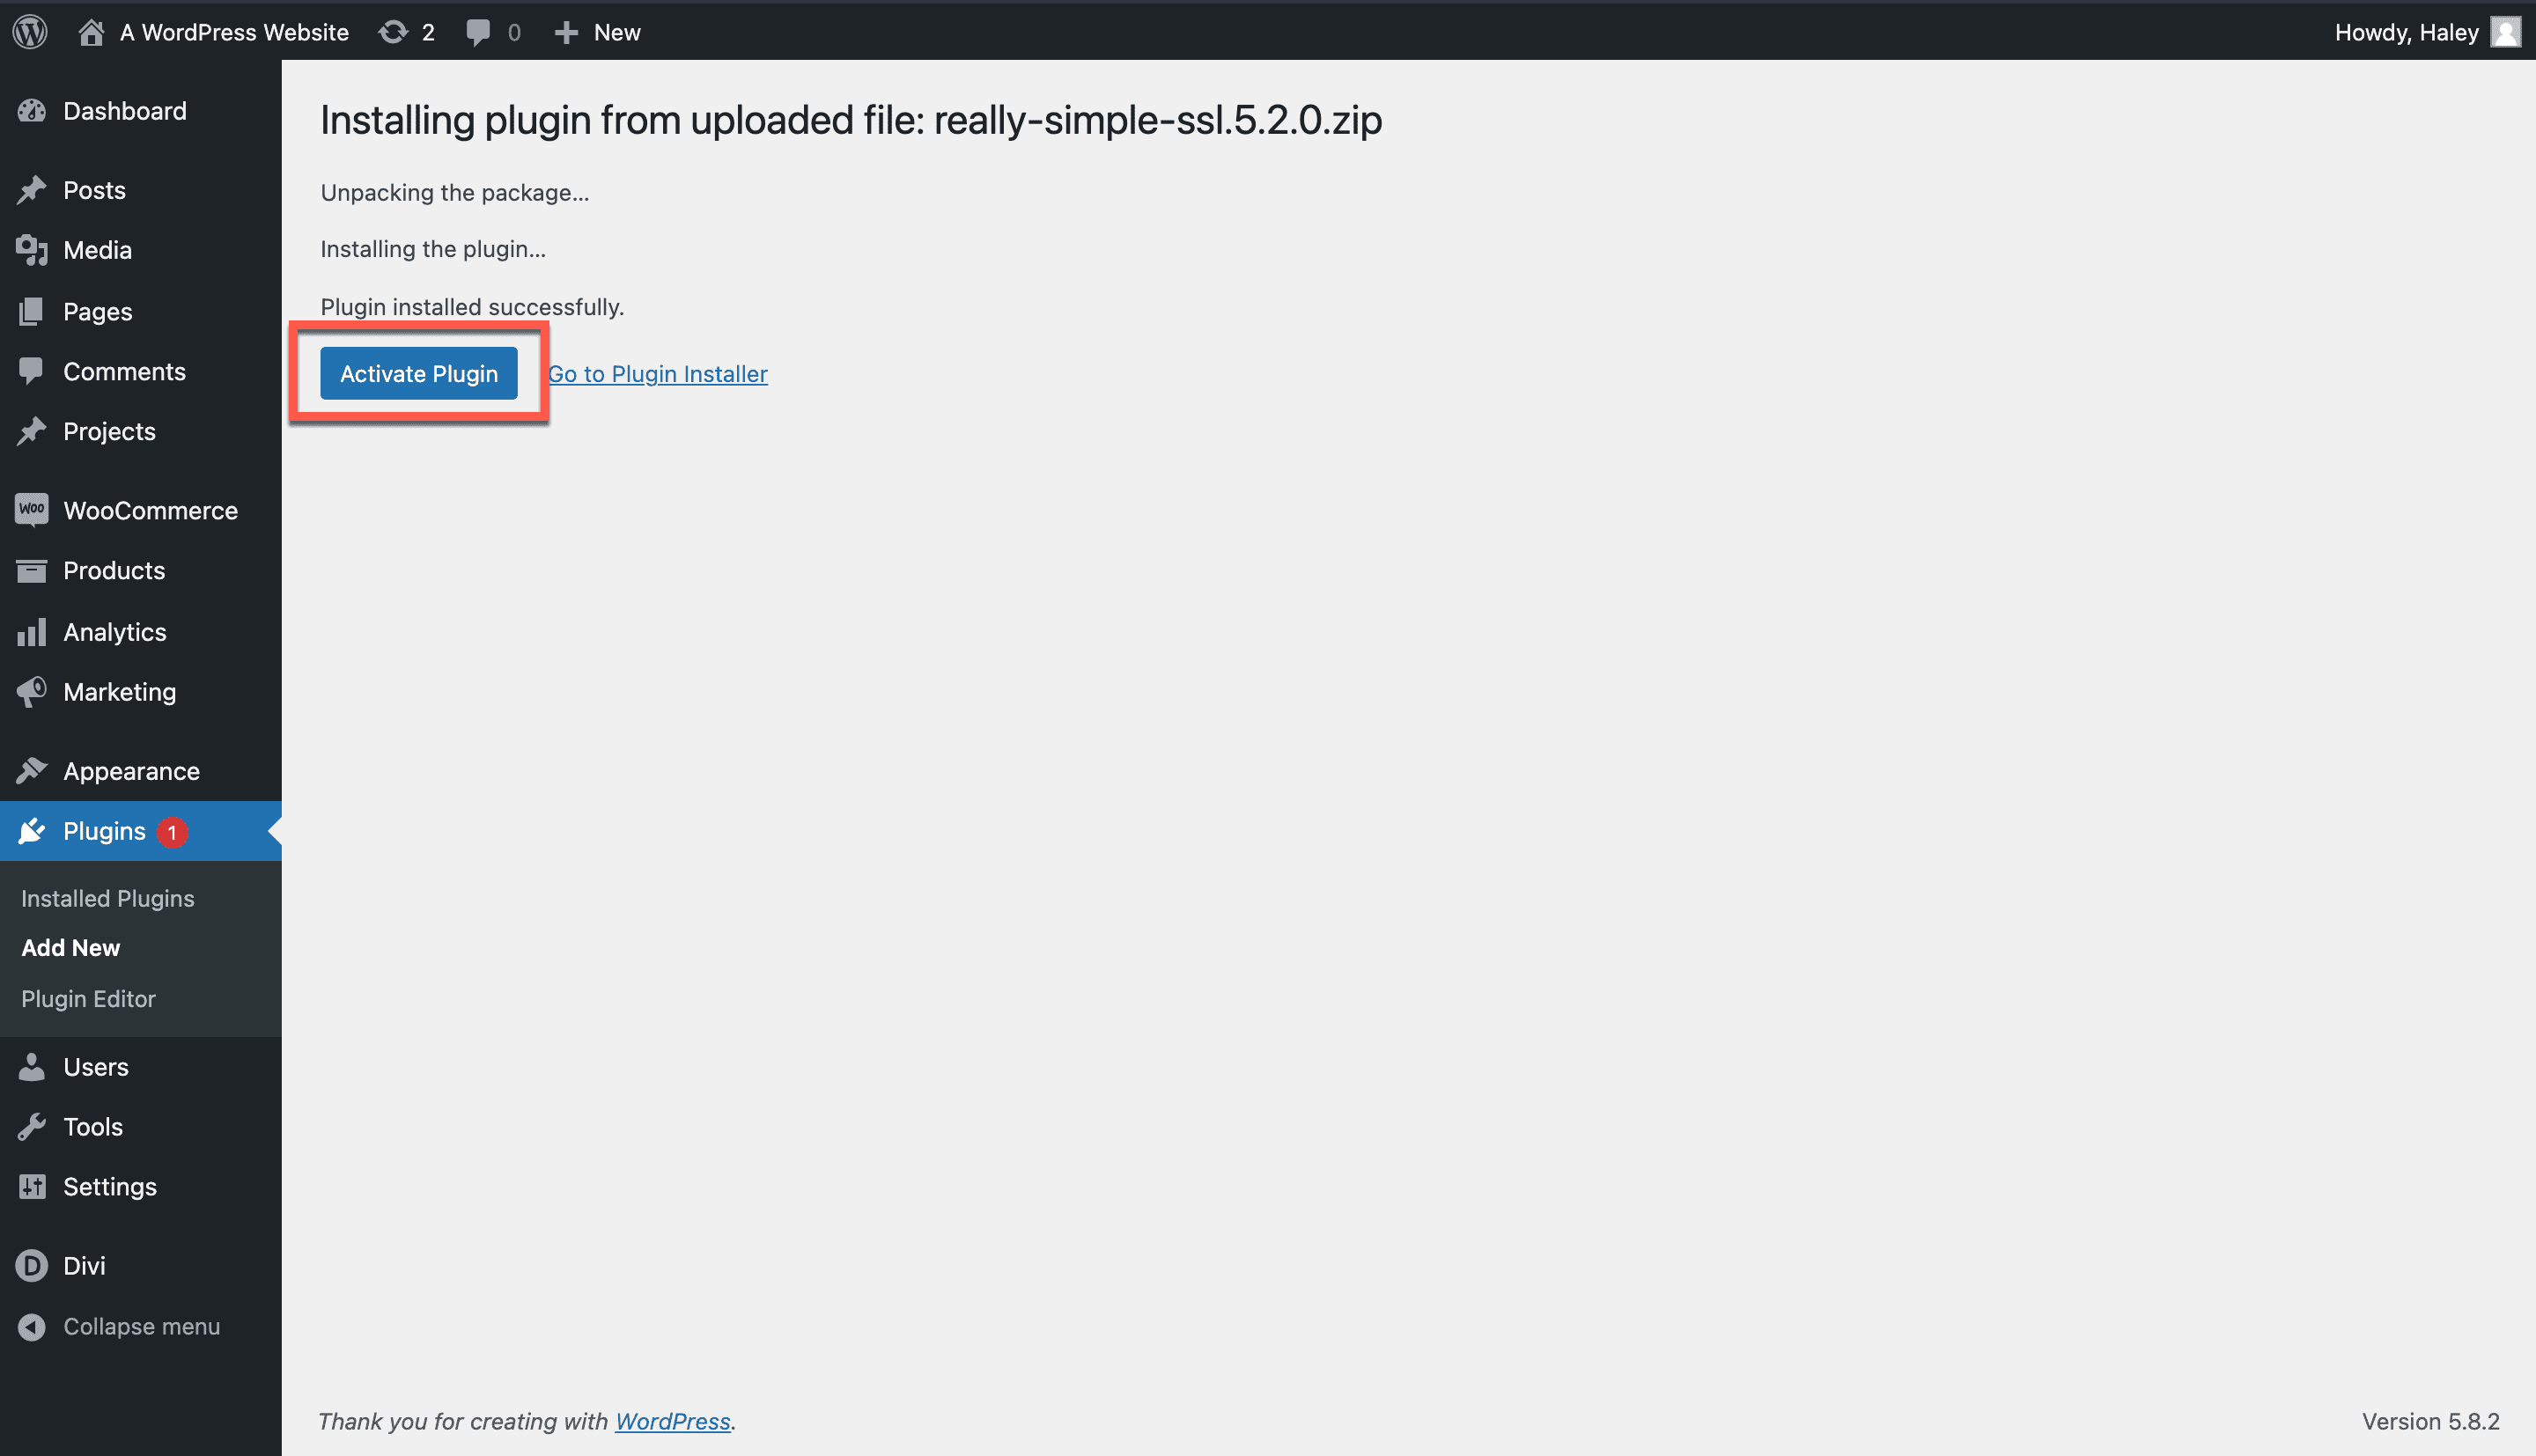
6. WordPress will display a page that shows your upload progress. Once the plugin is uploaded, just click Activate Plugin.
Possible Plugin Adjustments
7. As you can see, there is already an SSL certificate detected on the website I’m working on. But if we didn’t already have SSL, the next steps we’d need to cover would be:
- Changing any http:// references in .css and .js files to https://
- Removing any scripts, stylesheets, or images that originated at a domain without SSL
- Login again (because once you activate the plugin, WordPress will log you out)
When you’re ready, click Activate SSL to finalize the installation. This plugin will change your default URL over to HTTPS.
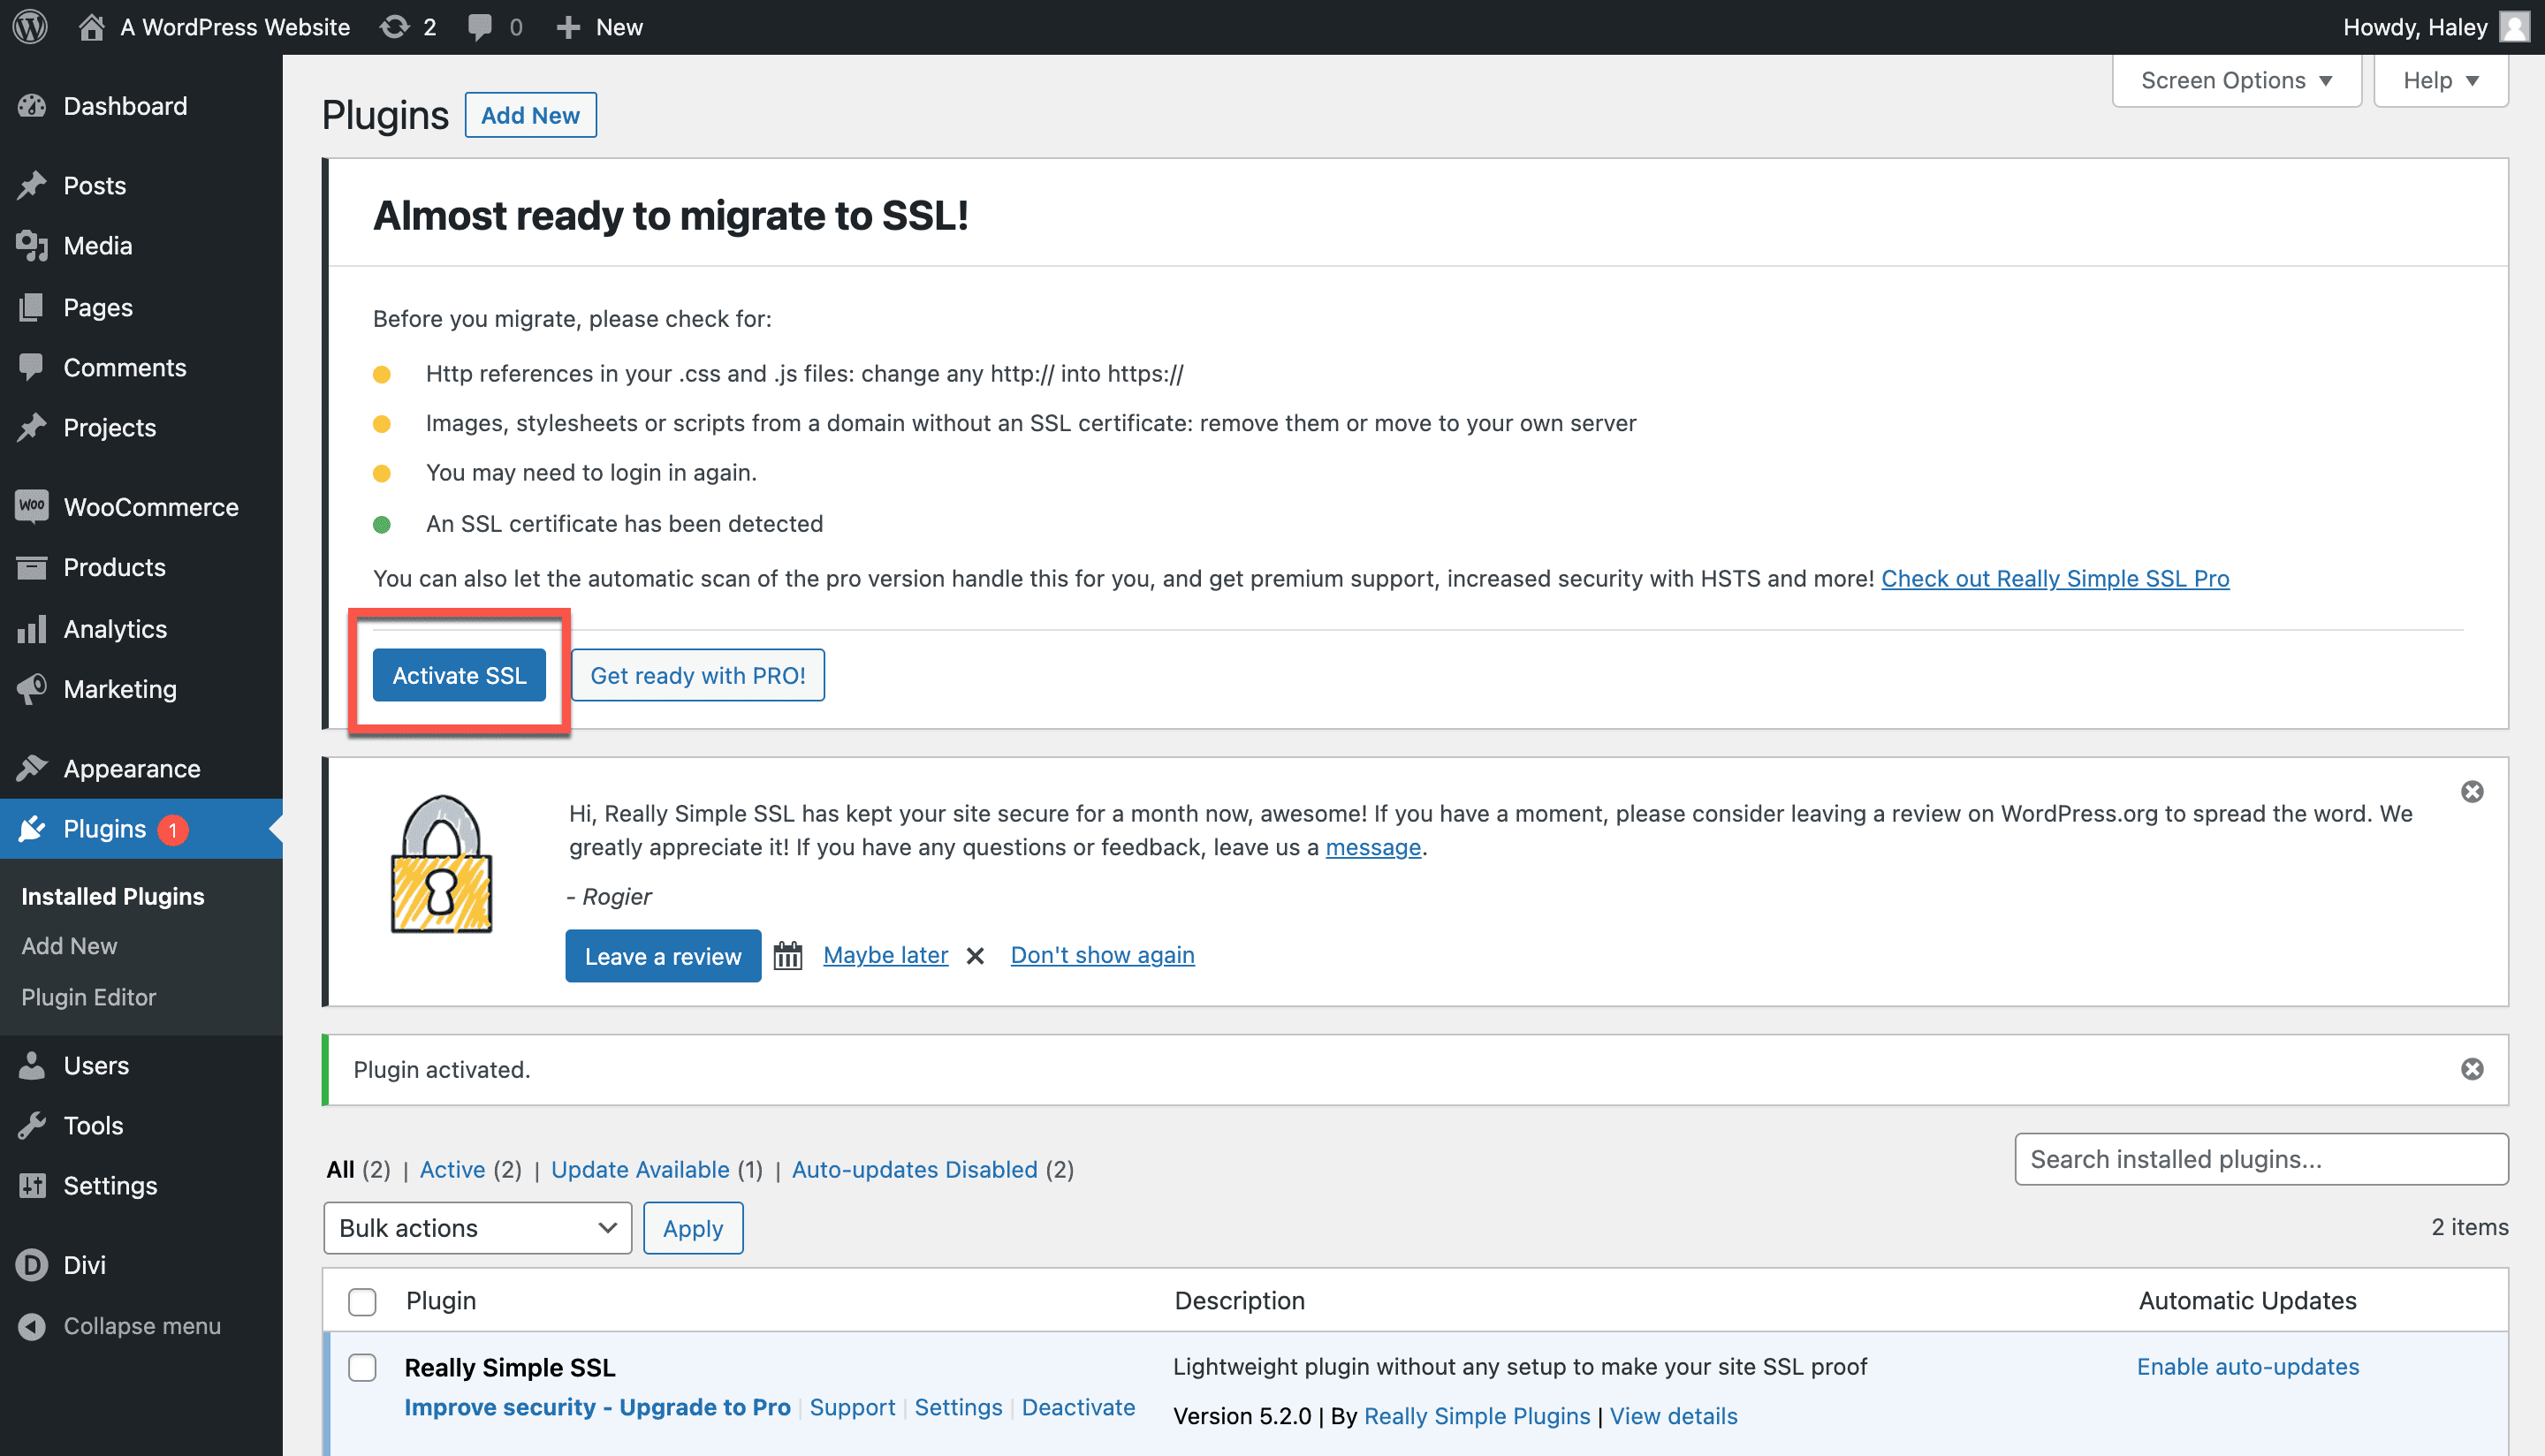
8. Now, SSL is activated. The plugin window shows me what steps need to be taken to further secure the website. Really Simple SSL provides articles and resources to help me tweak my security settings to an optimal level. I can go through those one by one to optimize my security.
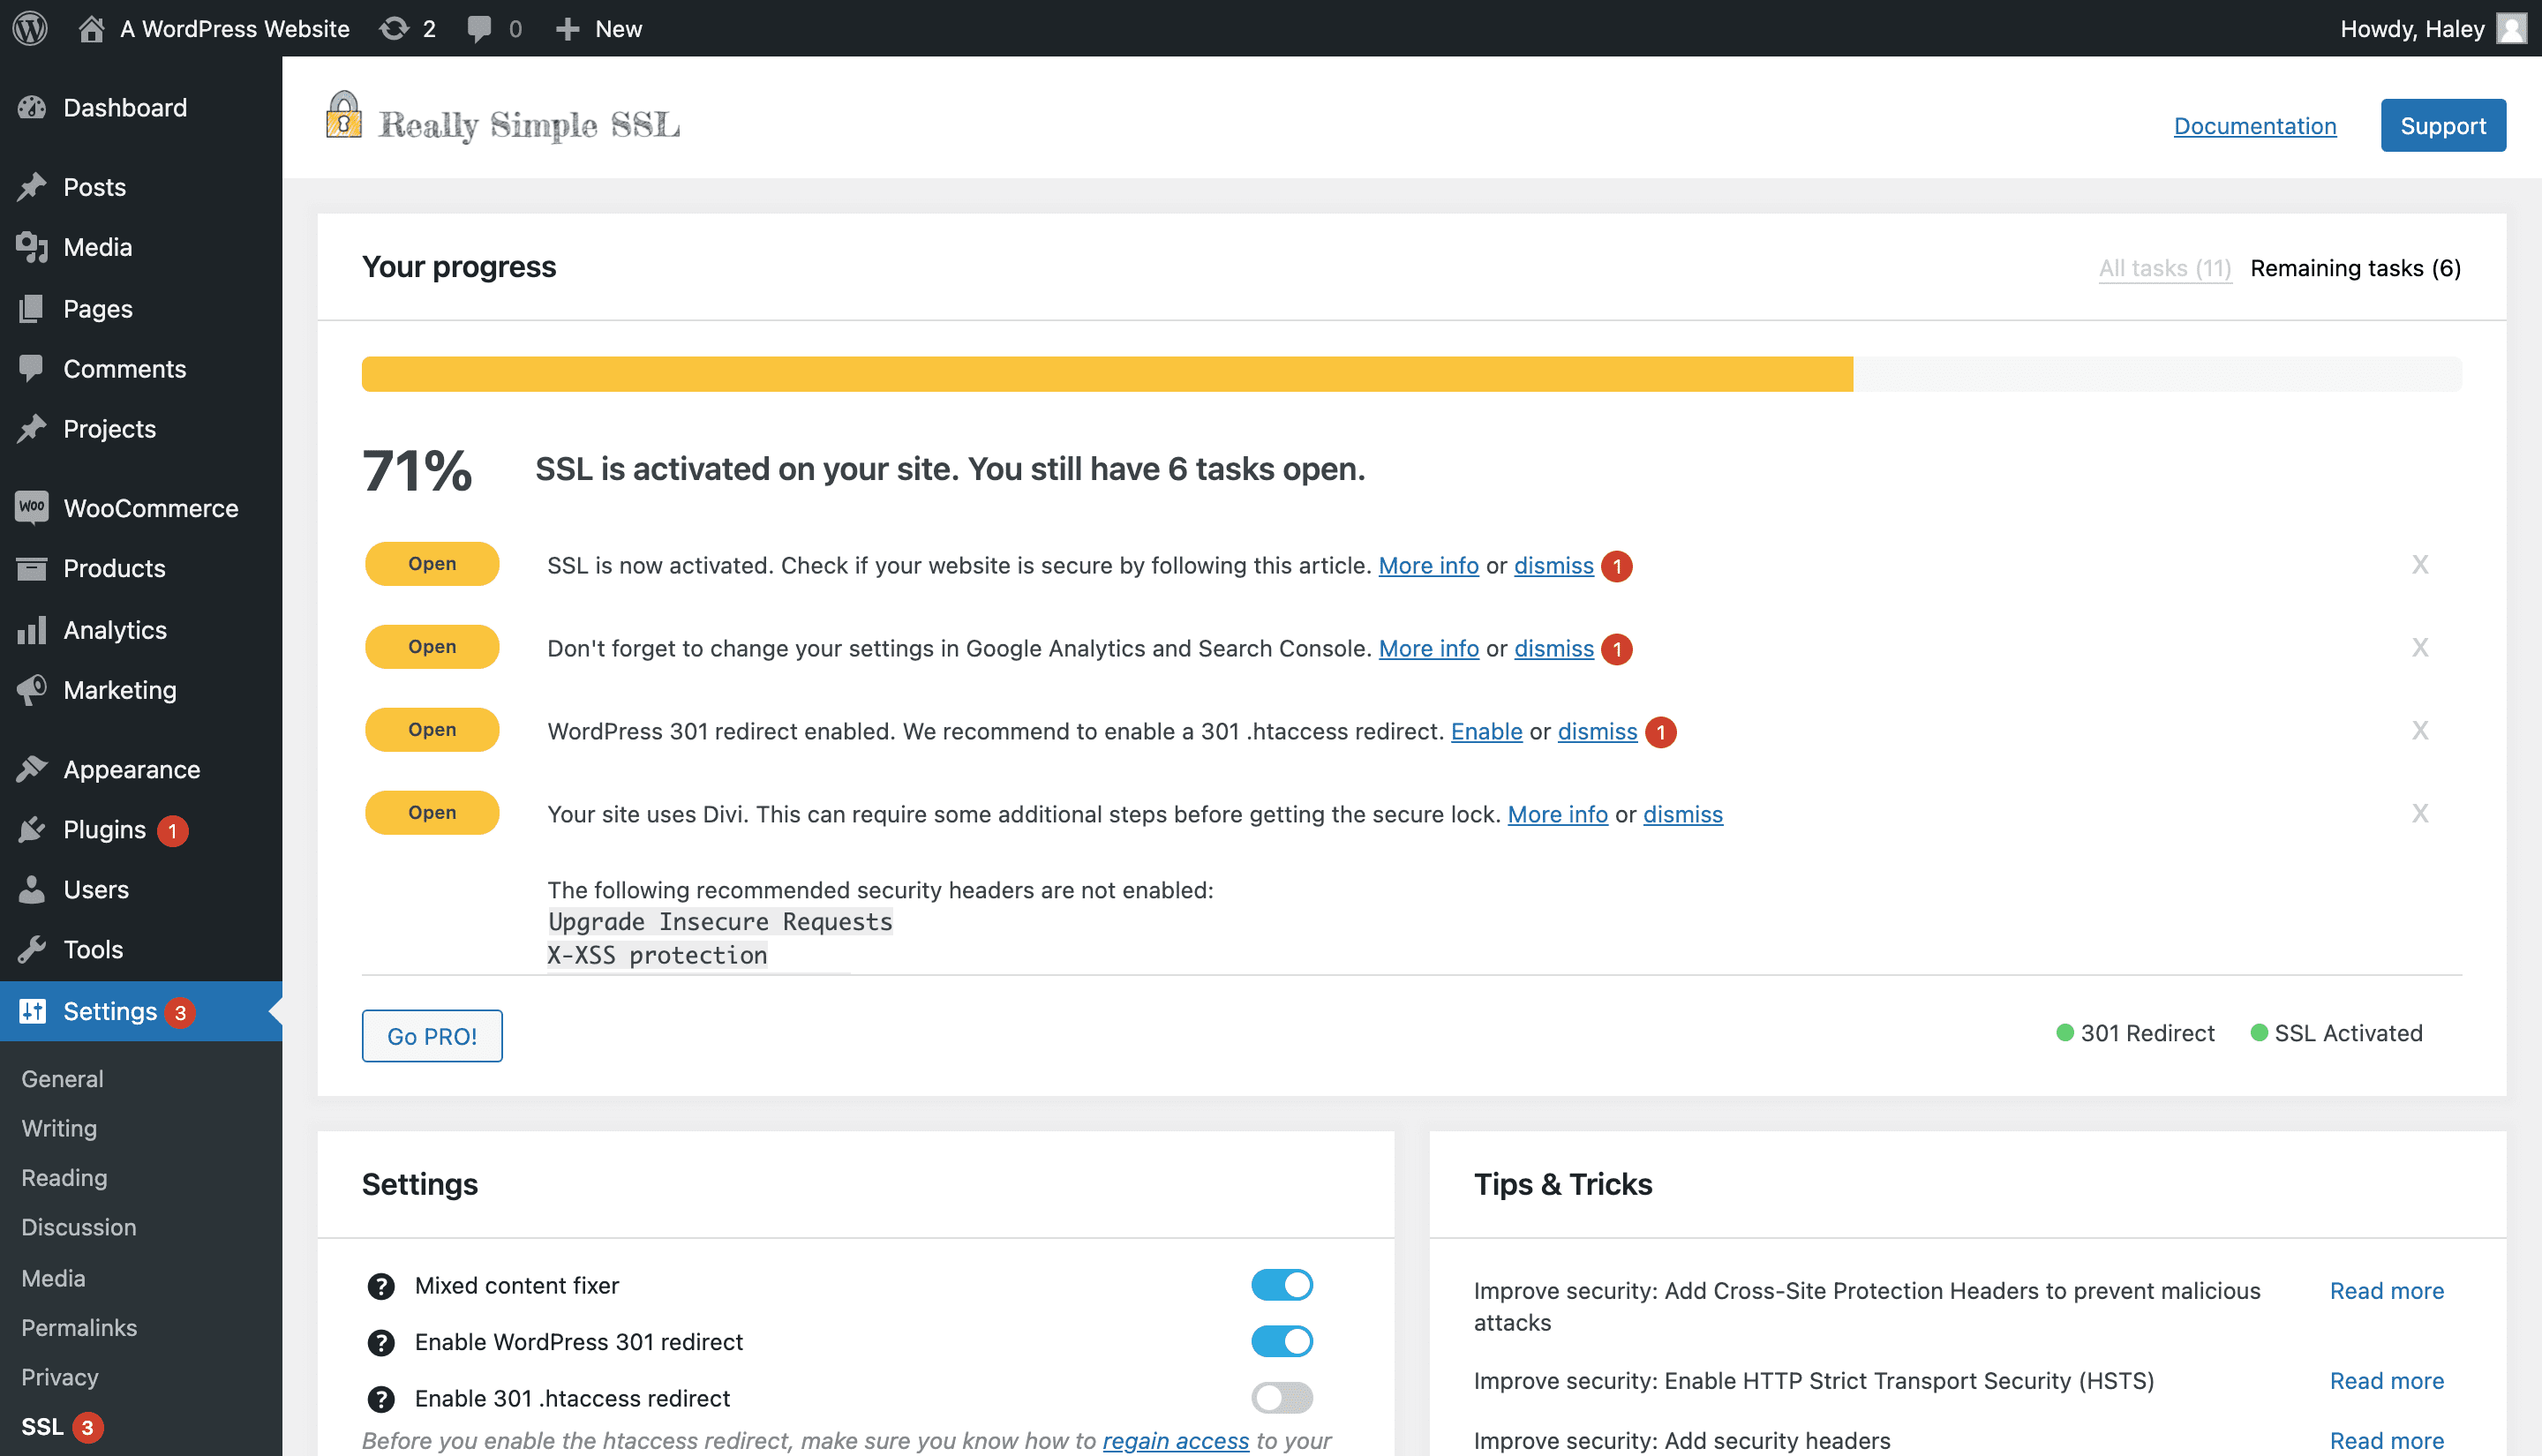
Are you running Divi on your WordPress site? Some users with Divi experience issues with mixed content when they install Really Simple SSL. If that’s the case, the Divi cache must be cleared to fix the problem. Read more about how to resolve the issue here.
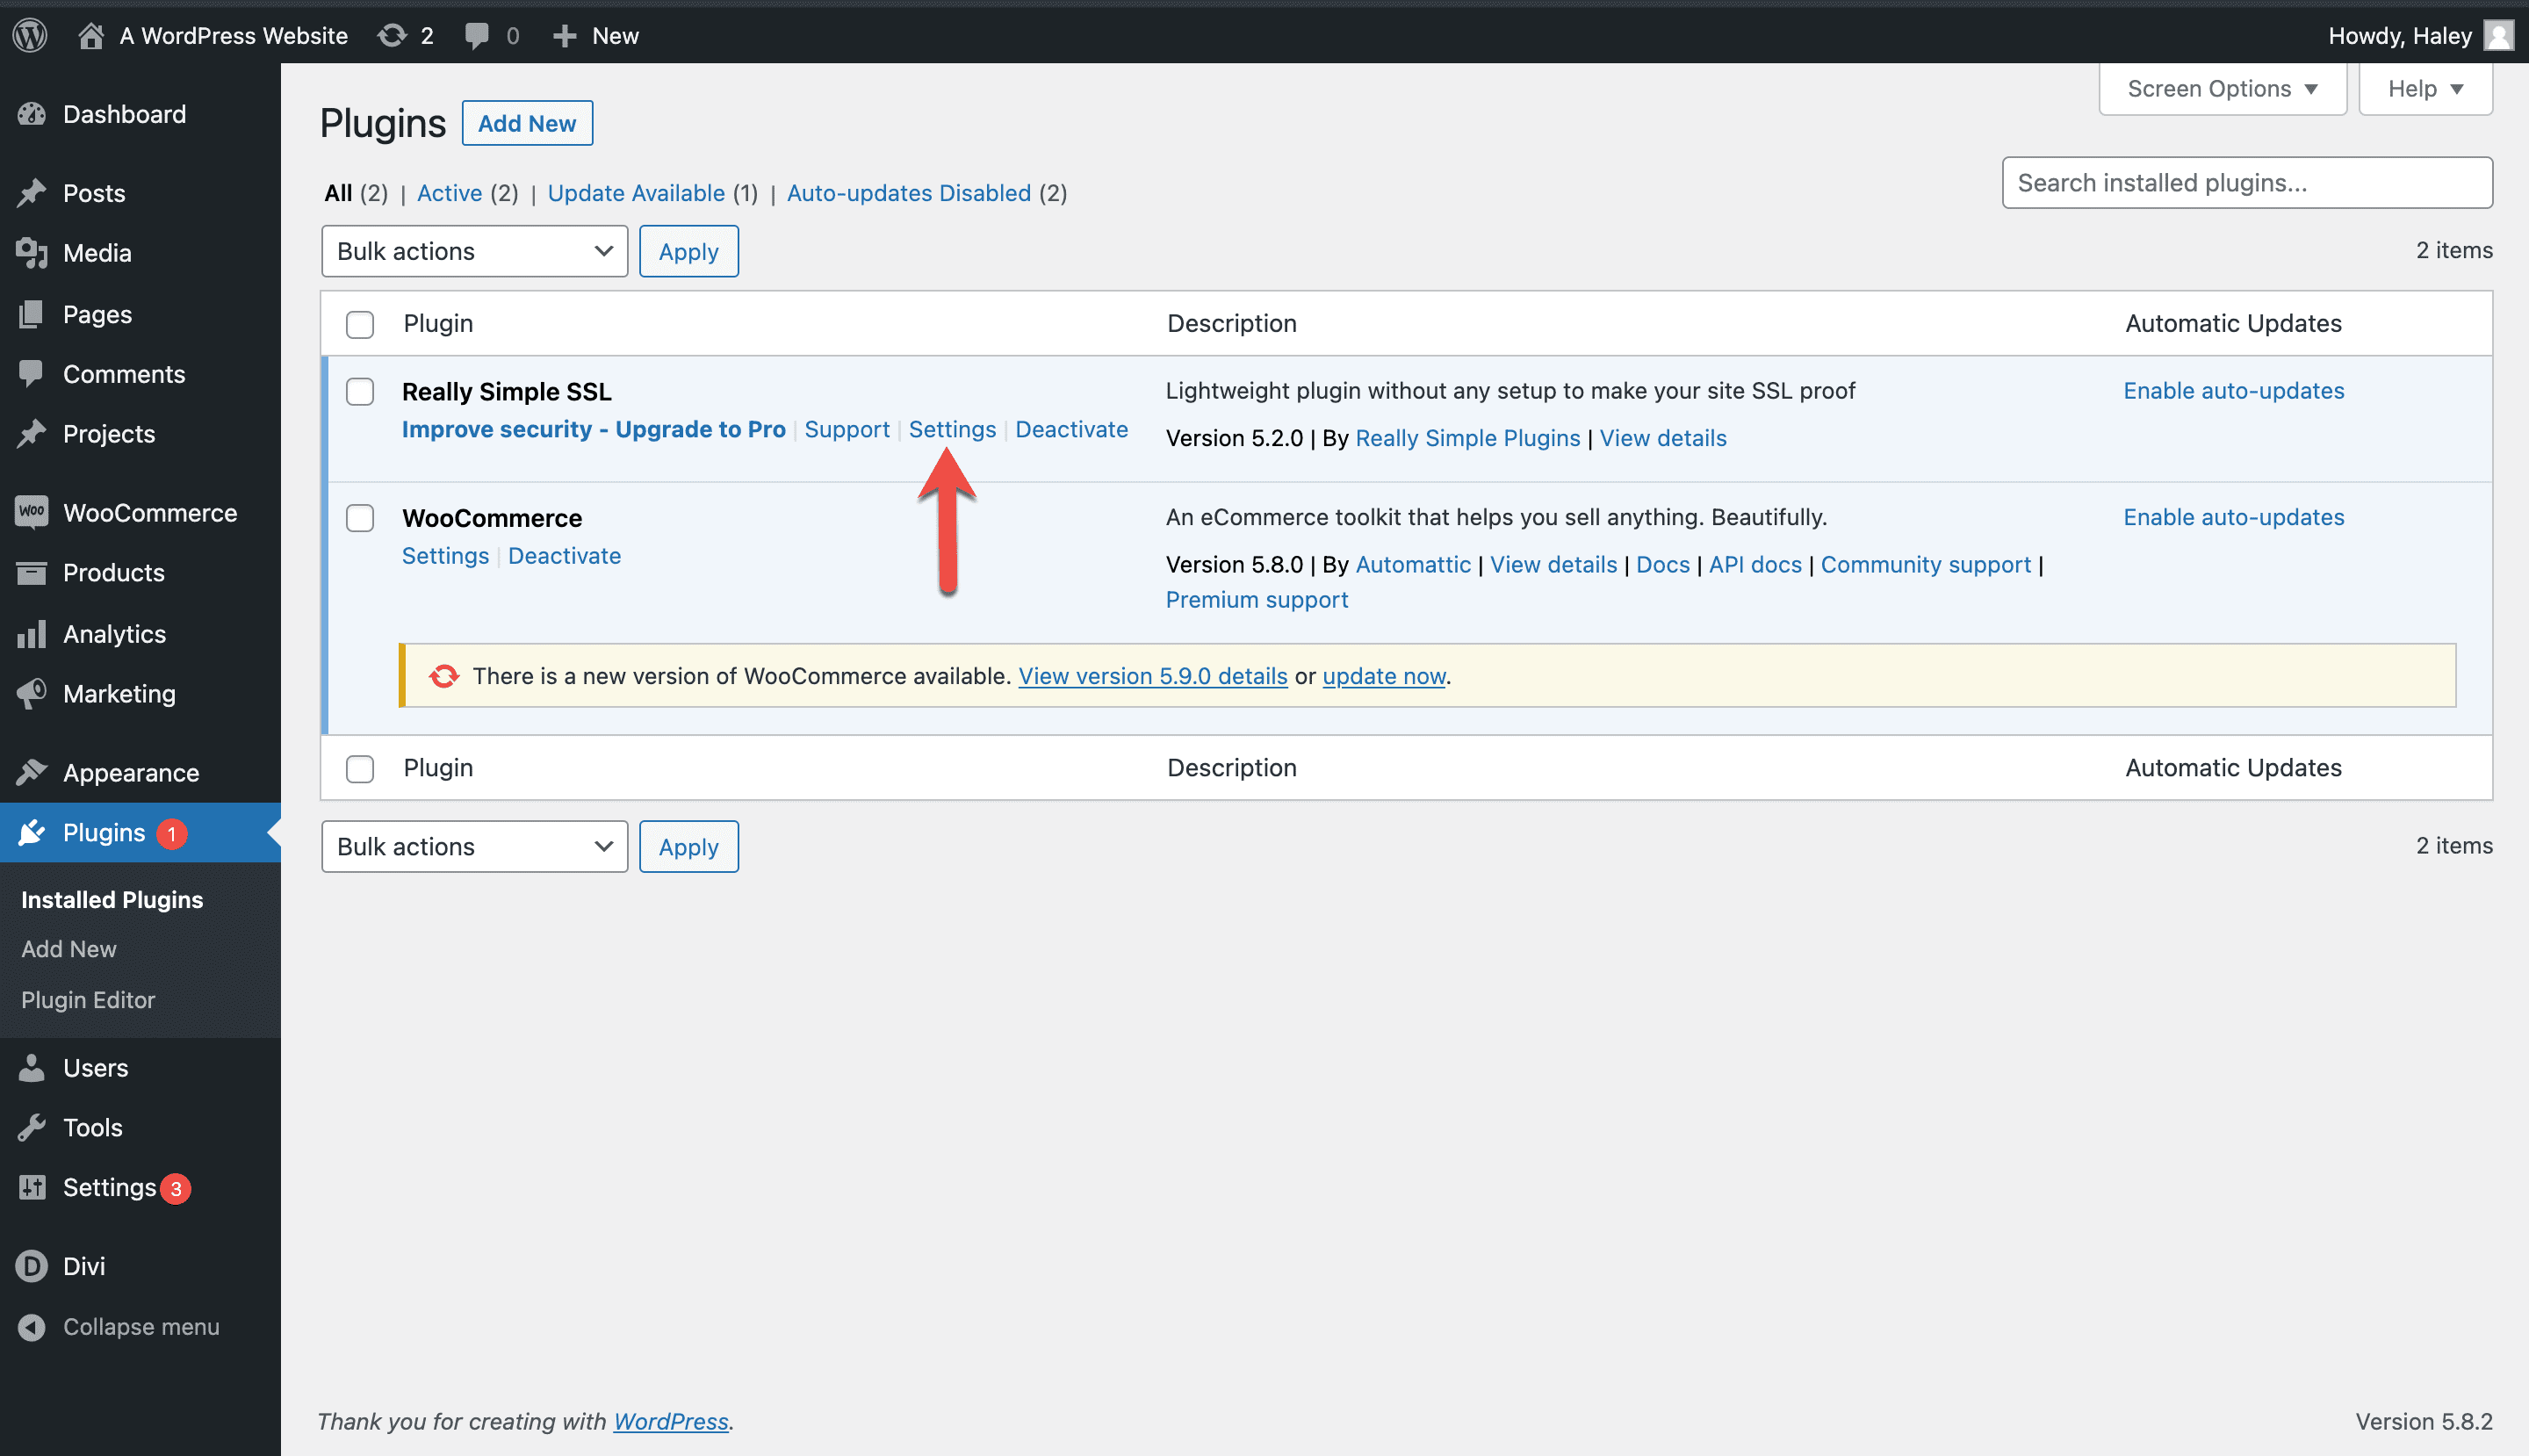
Review SSL Plugin Settings
Now, it’s time to navigate over to your main Plugins page and check the settings on your SSL plugin. Just click Settings to get started. You’ll see the same checklist of resources as before. Simply scroll down the page to see where you can toggle the settings.
The plugin’s default settings should be adequate, but you can always make adjustments. Primarily, you want to make sure that mixed content fixer is checked. Most likely, that one will already be selected. If it isn’t, check it and save the page.

Be sure to read any attached documentation before you change your settings.
That’s it! You have installed SSL for WordPress via plugin.
Manual Installation
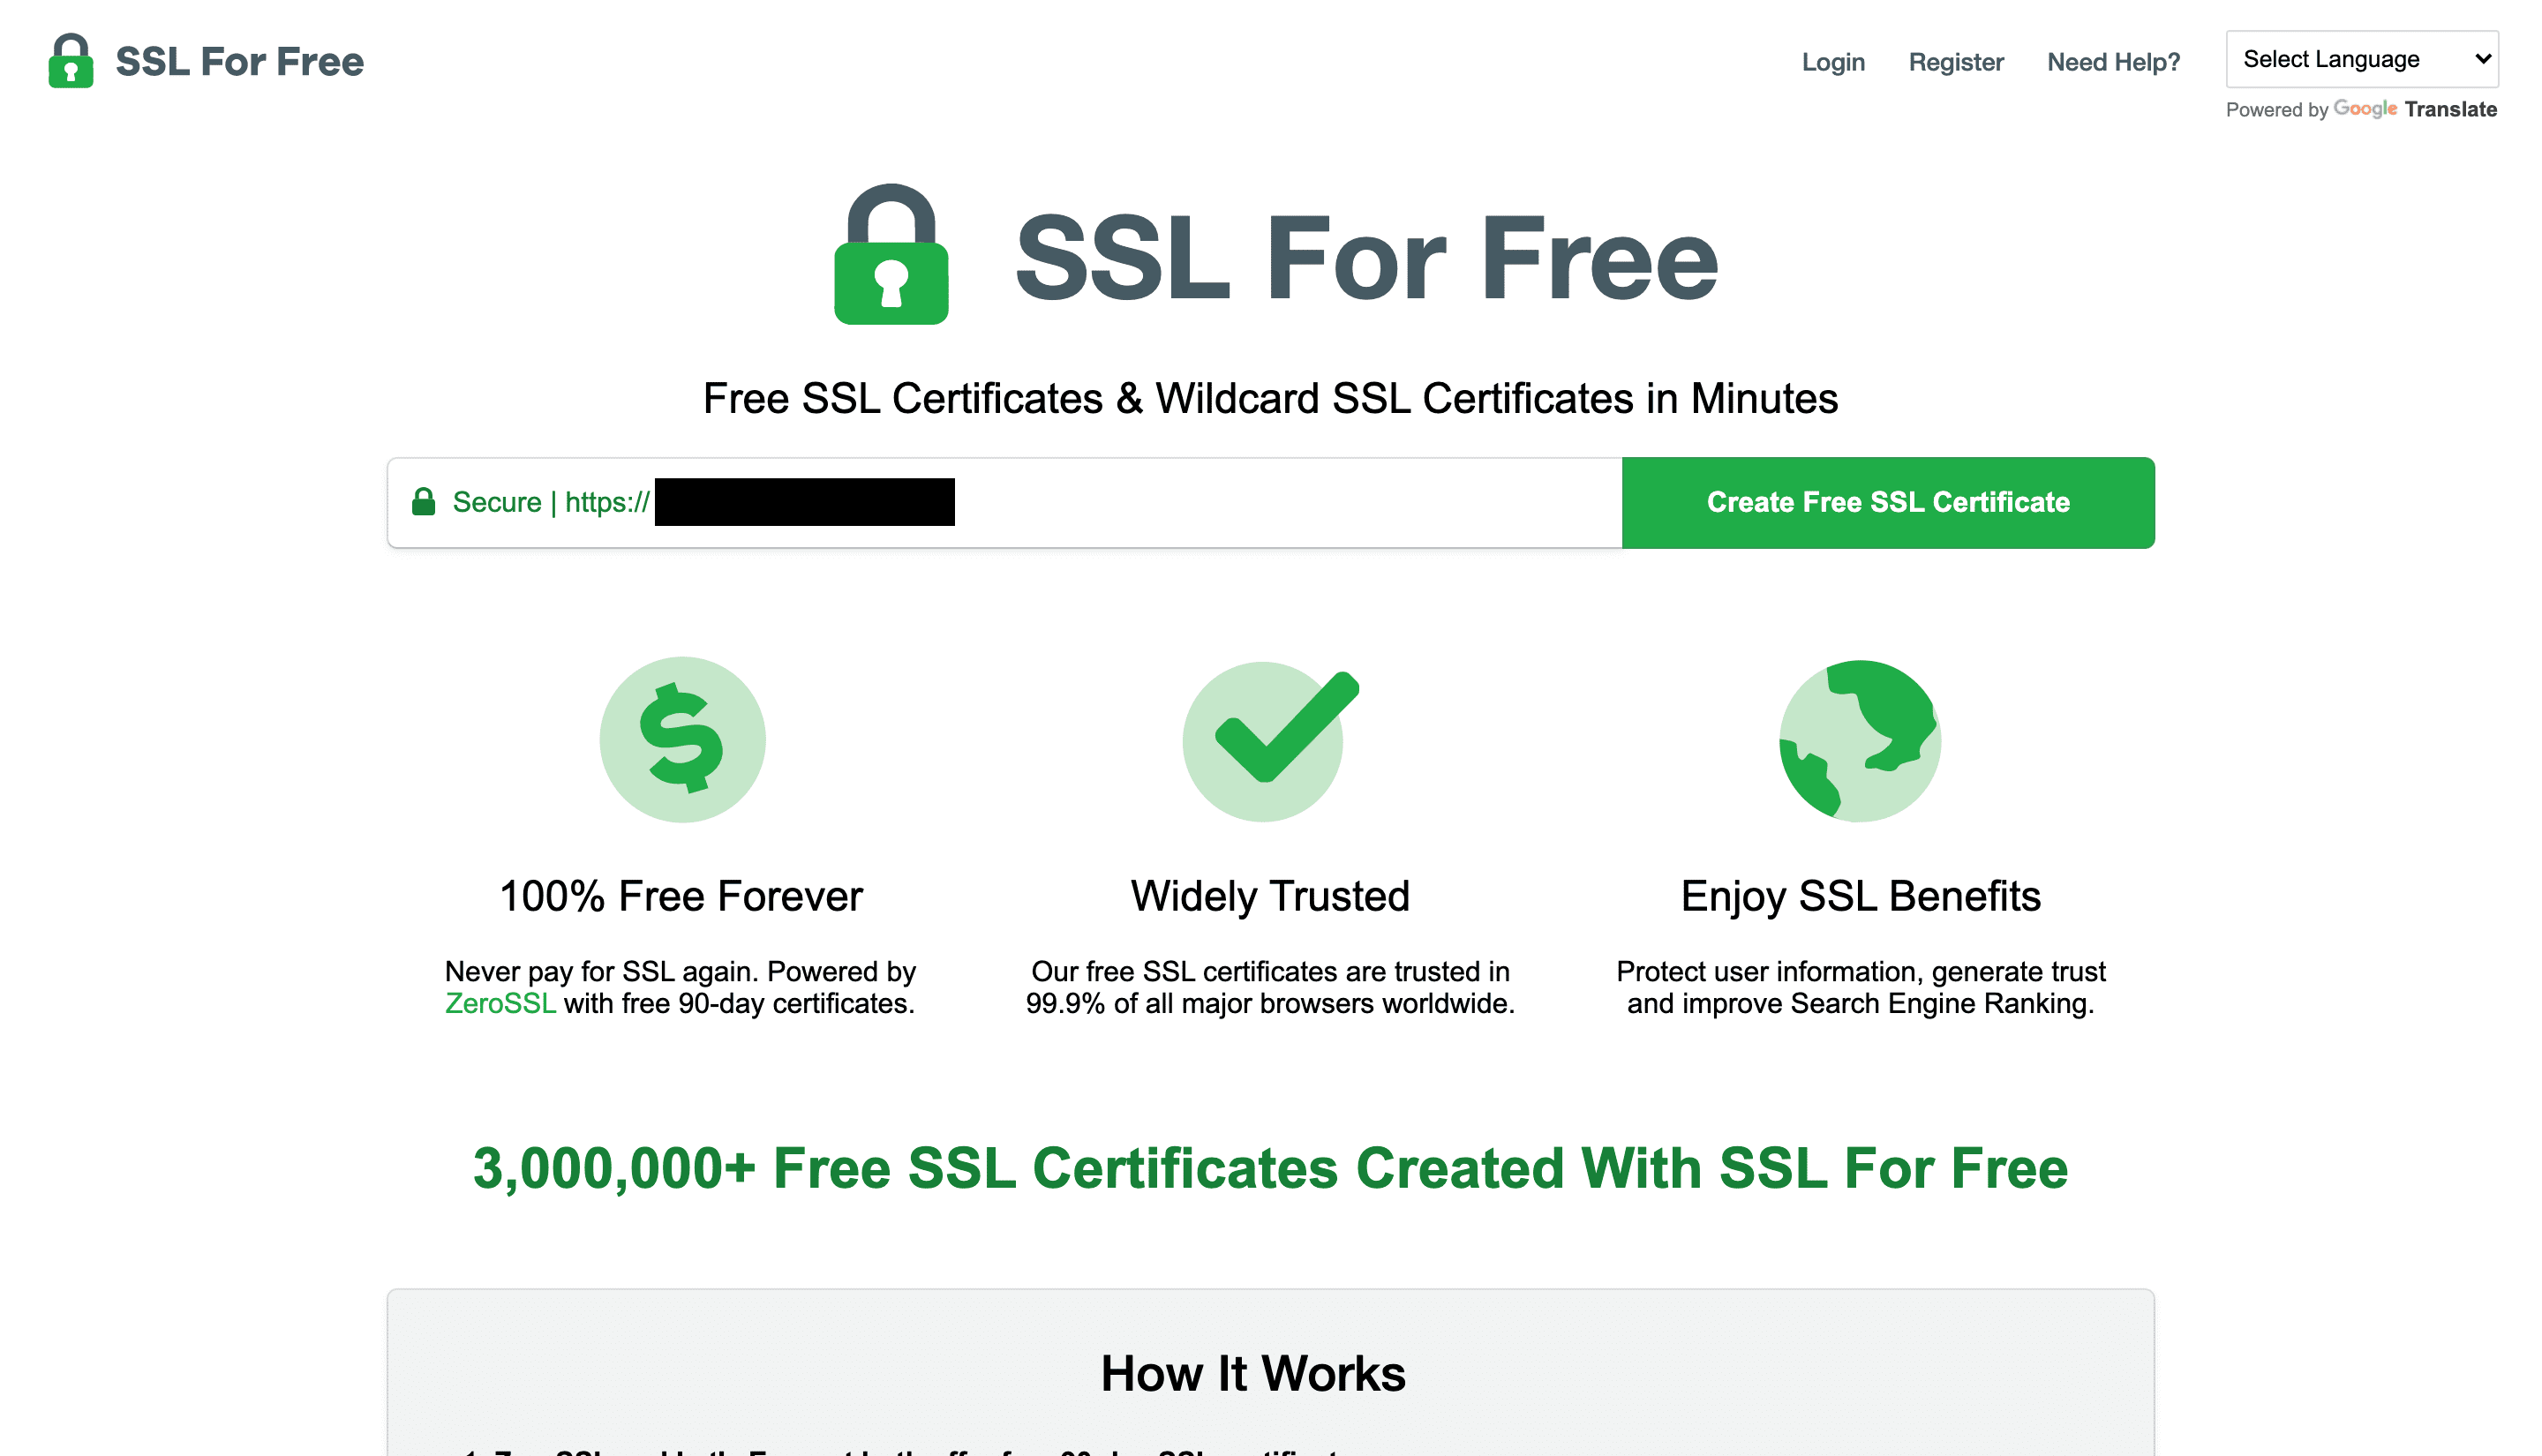
Now, let’s look at how to install SSL for WordPress manually. We’ll start by opening a new browser tab and navigating to SSL For Free (ZeroSSL).
1. From the home page, enter your site’s URL into the text bar and click Create Free SSL Certificate.
2. You’ll be prompted to create an account. Once you’ve done that, the site will redirect you to the ZeroSSL homepage. From there, click New Certificate.
3. On the next page, you can enter your domain in the text box, then click Next Step.
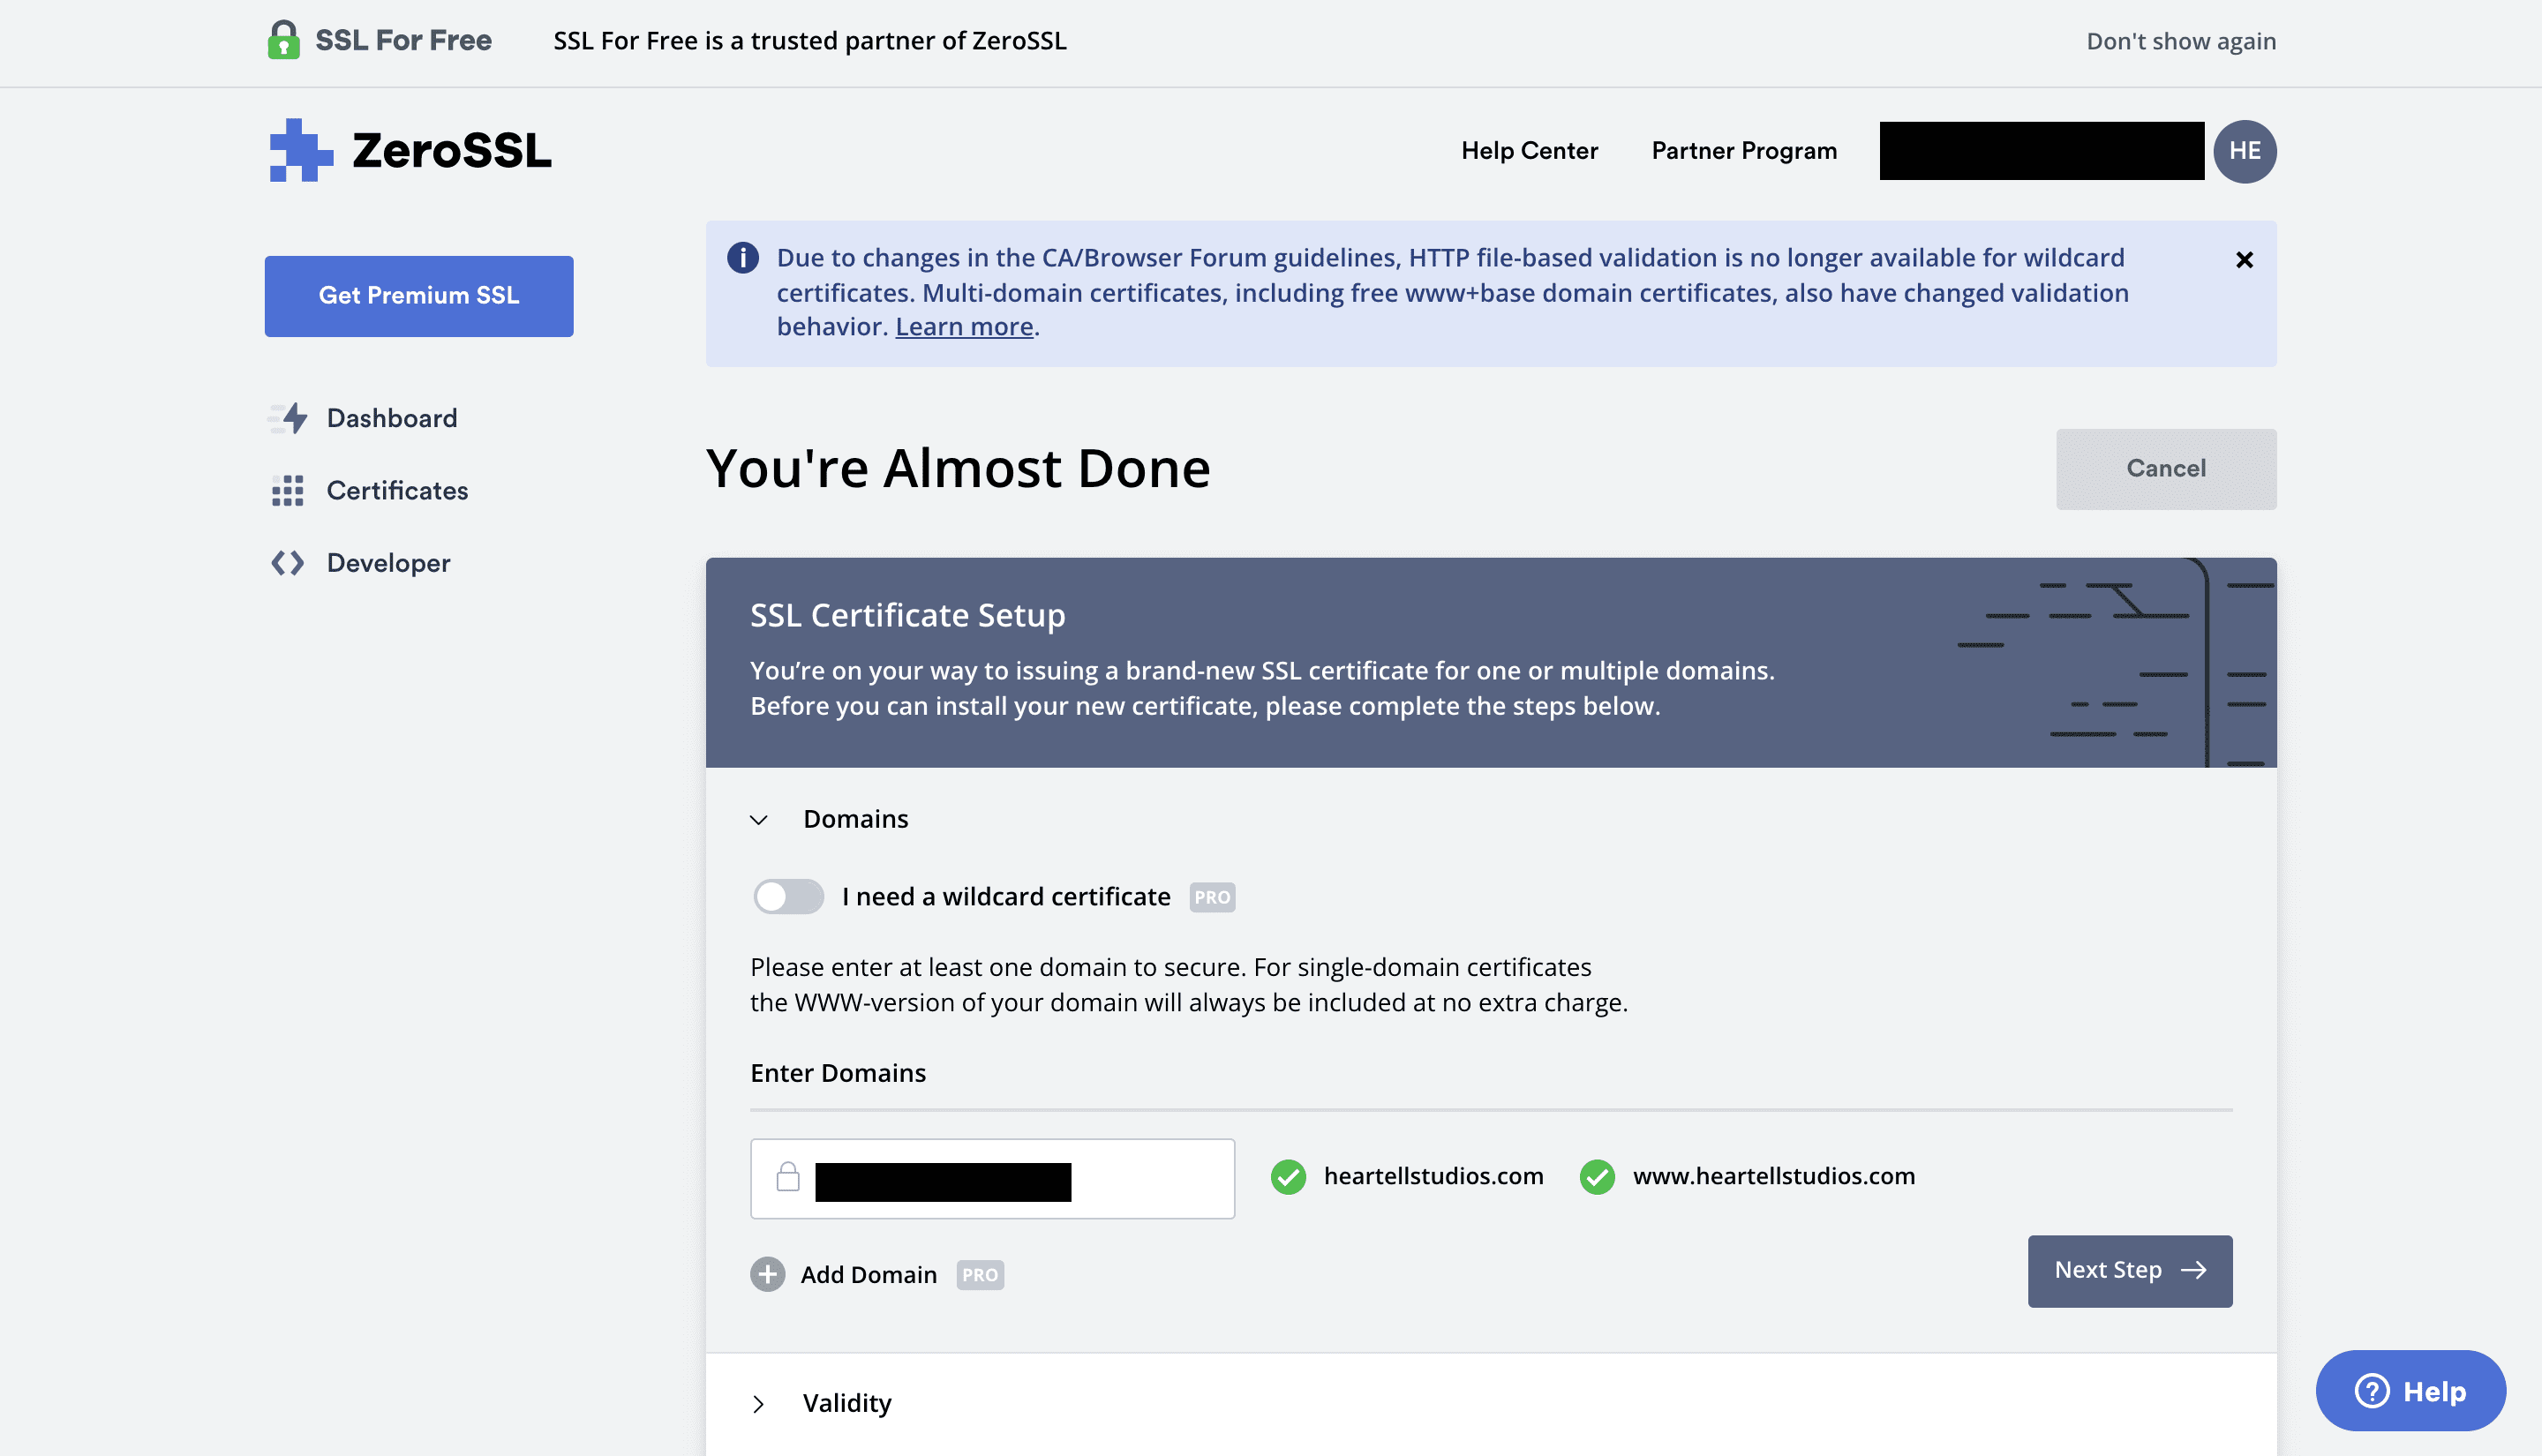
4. You can choose whether to create a 90-day certificate for free, or a 1-year certificate (paid). If you choose one that lasts for 90 days, you’ll need to go back in and re-generate another every 90 days. Once you’ve selected which option you want to go with, click Next Step.
5. Next, you can have the program auto-generate a certificate signing request (CSR) if you want. You can also manually fill in your information. The purpose of this is to verify your identity and the fact that you do, in fact, own the domain you’re generating the SSL for. You’ll then be prompted to select the plan you want.
Domain Verification and SSL for WordPress Manual Installation
6. You’ll now be asked to verify your Domain. You can do this one of three ways:
- Through email verification
- By adding a new CNAME record on your host server
- Via HTTP file upload
Depending on the option you choose, follow the instructions provided on the site.
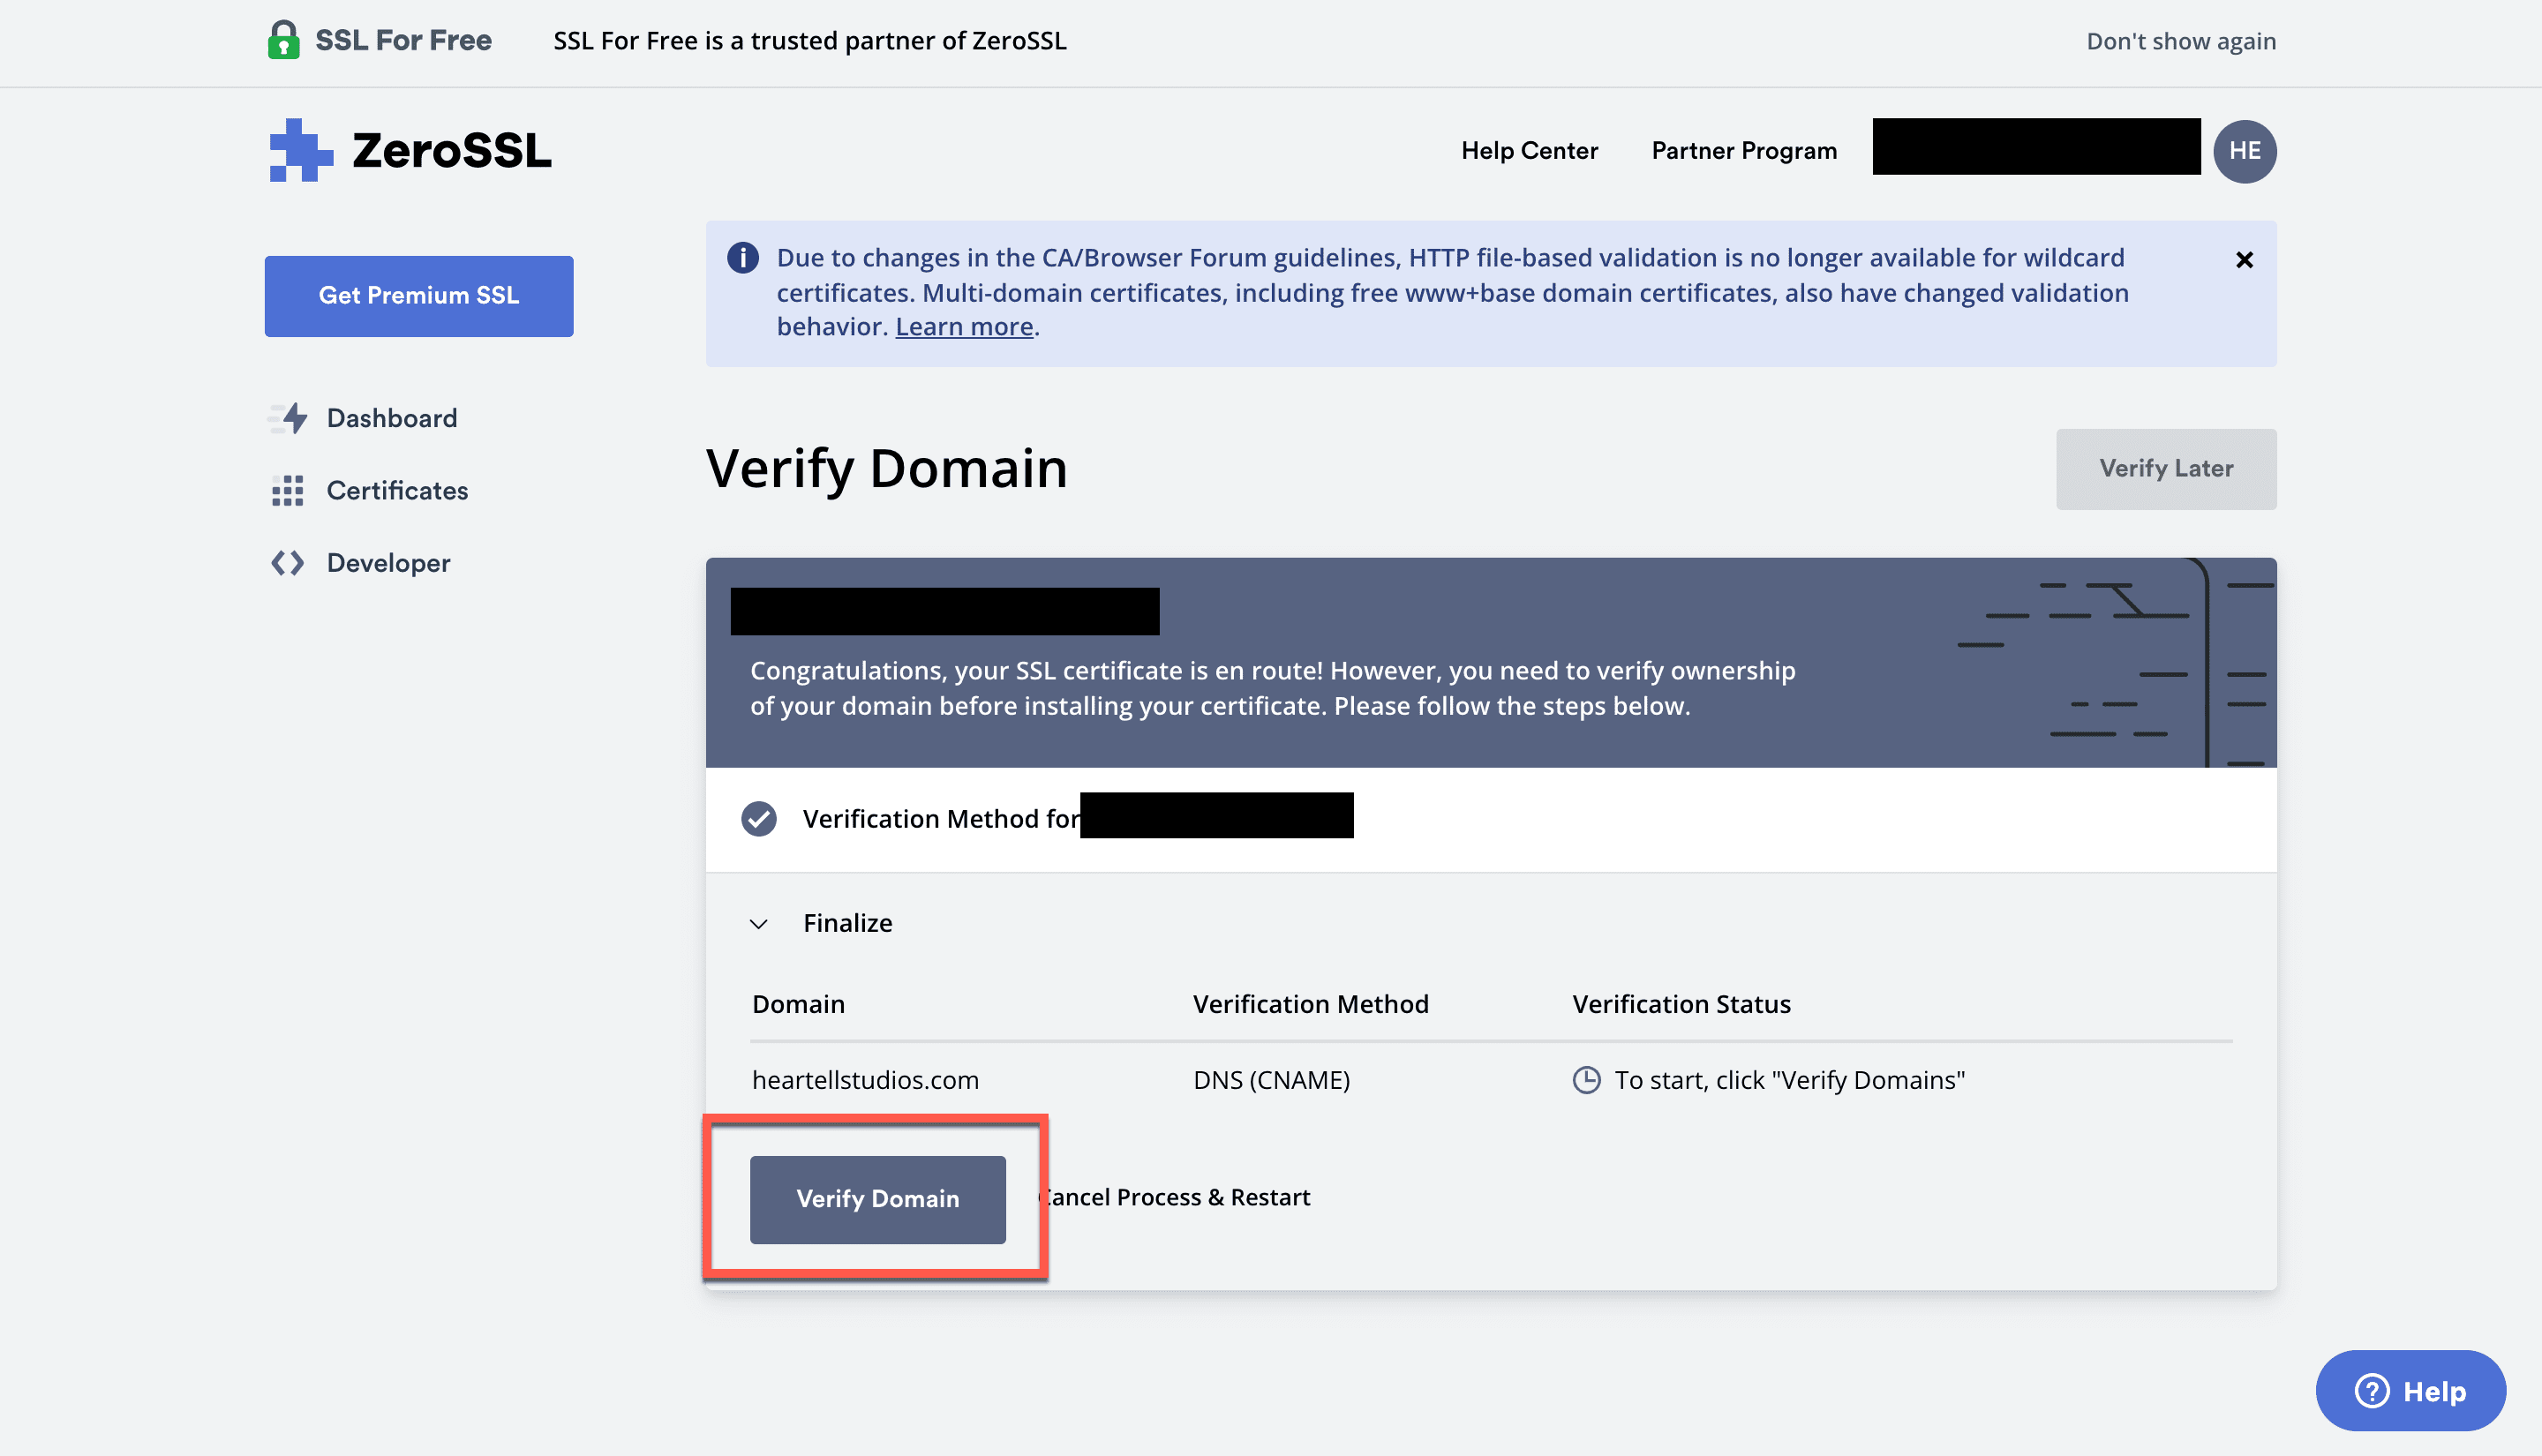
7. Once your domain is verified, the site will generate your SSL certificate. You can download your certificate, then click Next Step.
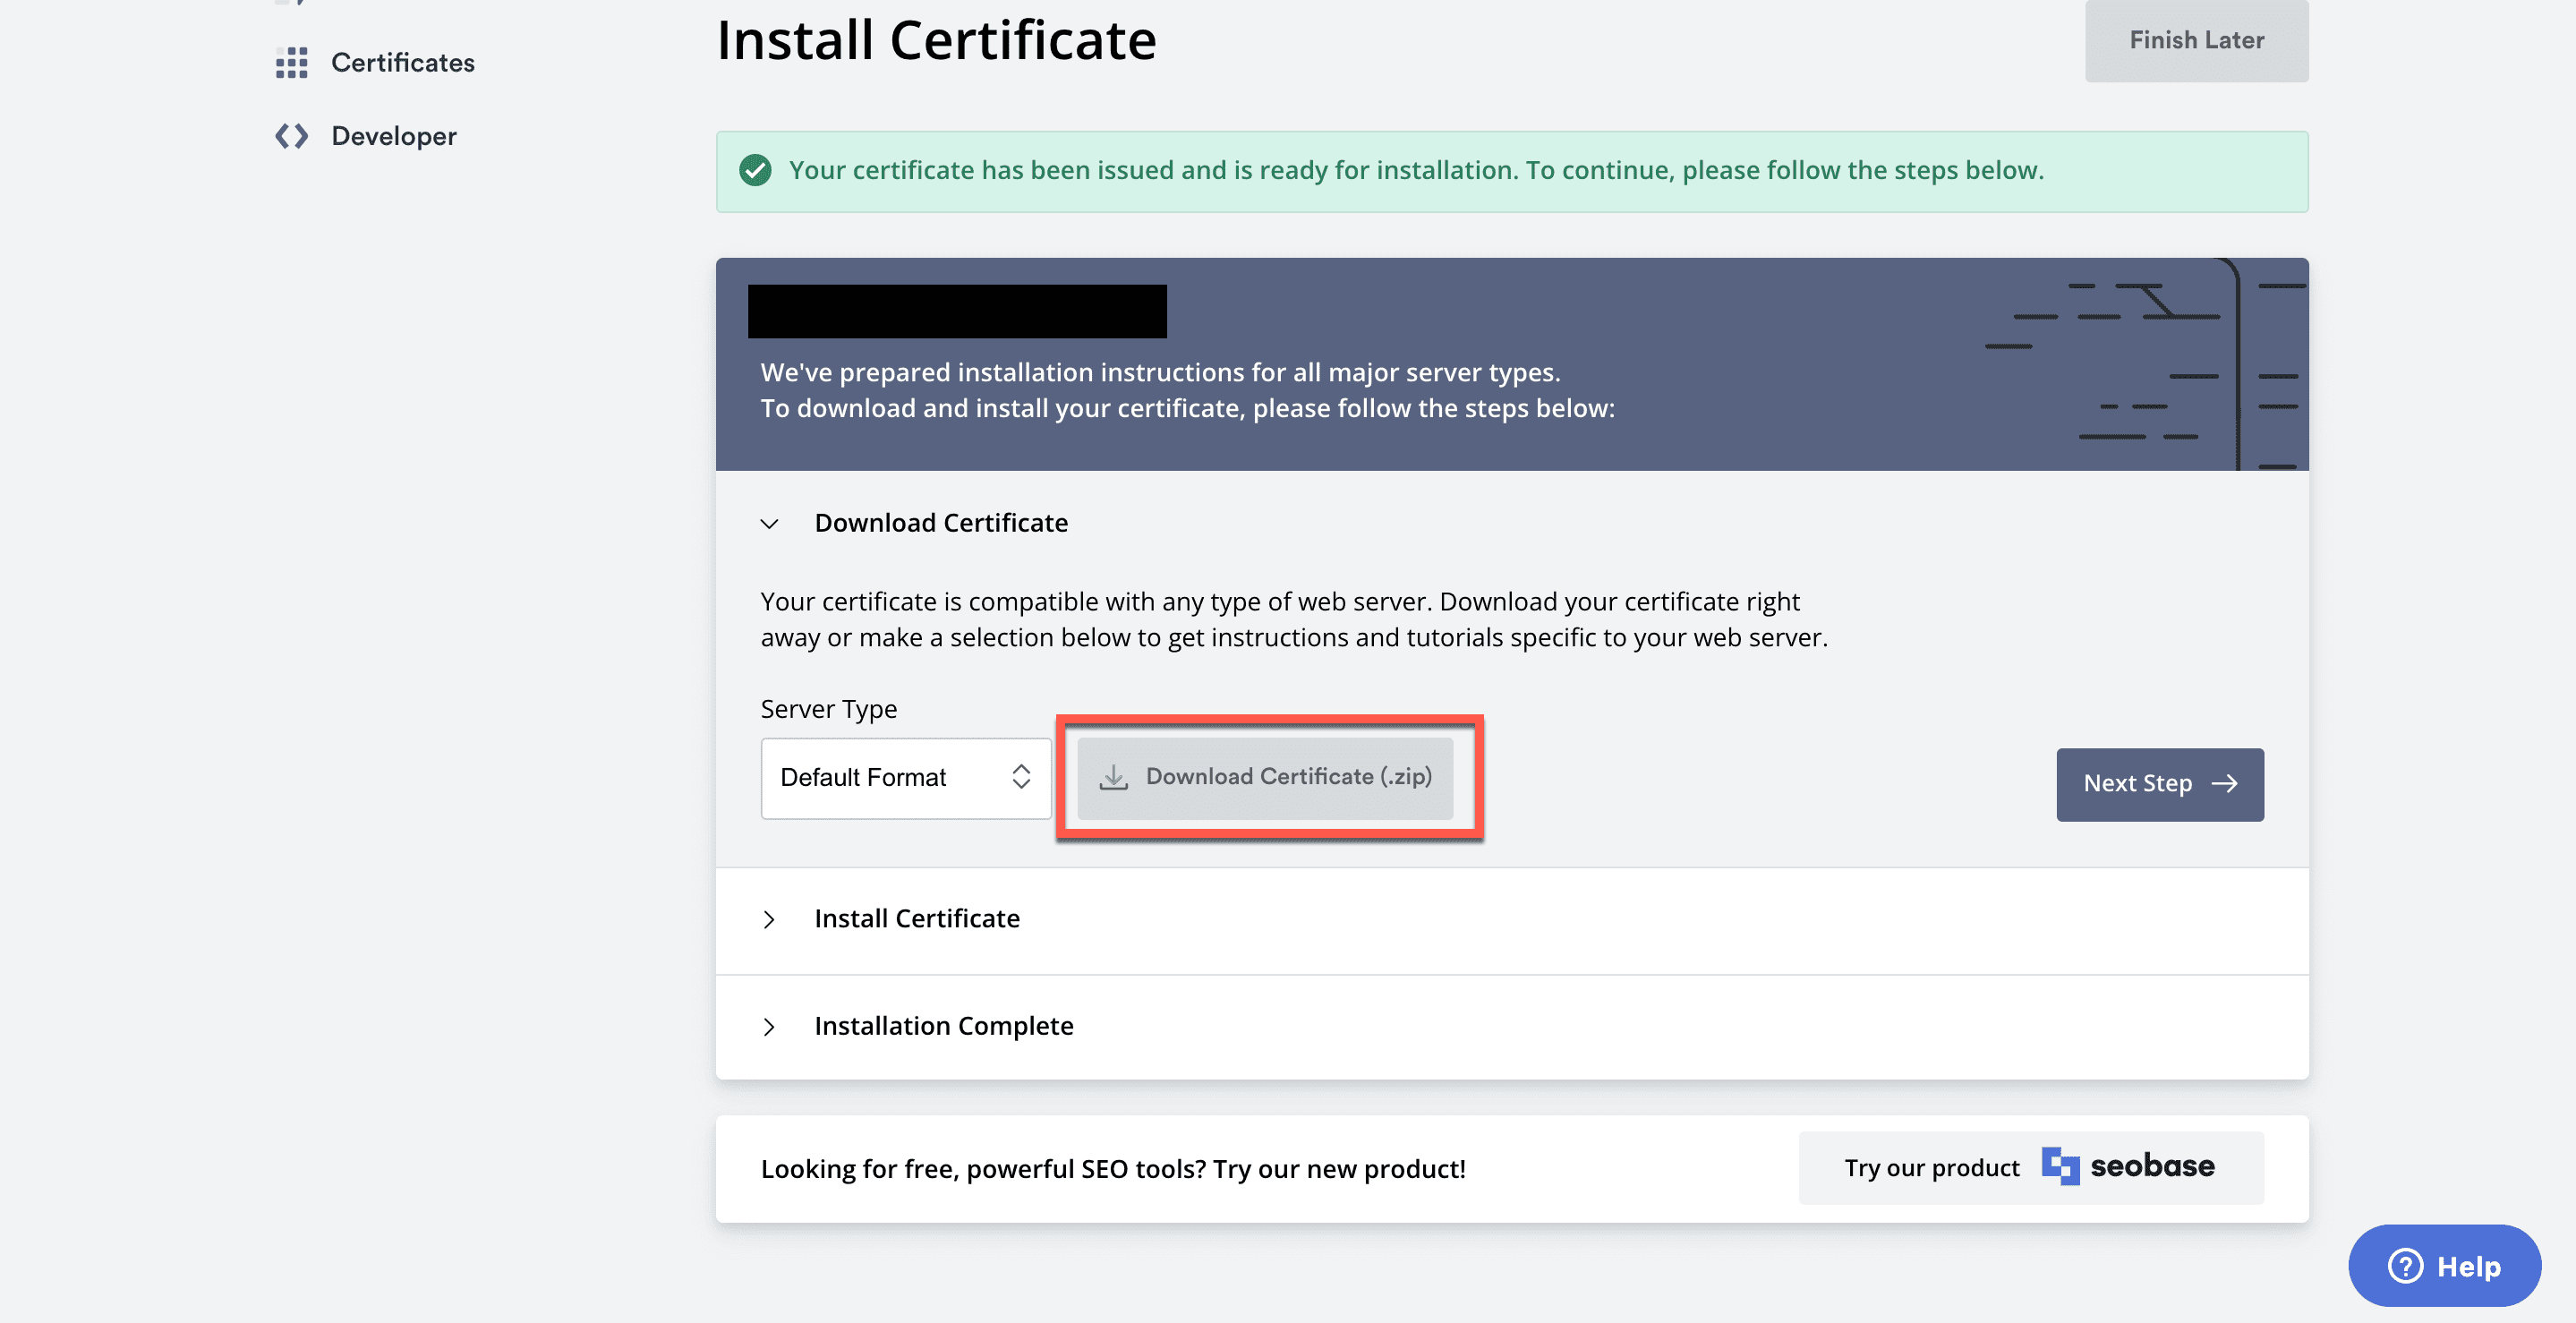
8. Now, you’ll need to upload the SSL certificate to your cPanel. This process might look a bit different depending on which host you use. For step-by-step instructions, look for your host in this list from ZeroSSL, which will walk you through finalizing your SSL for WordPress installation.
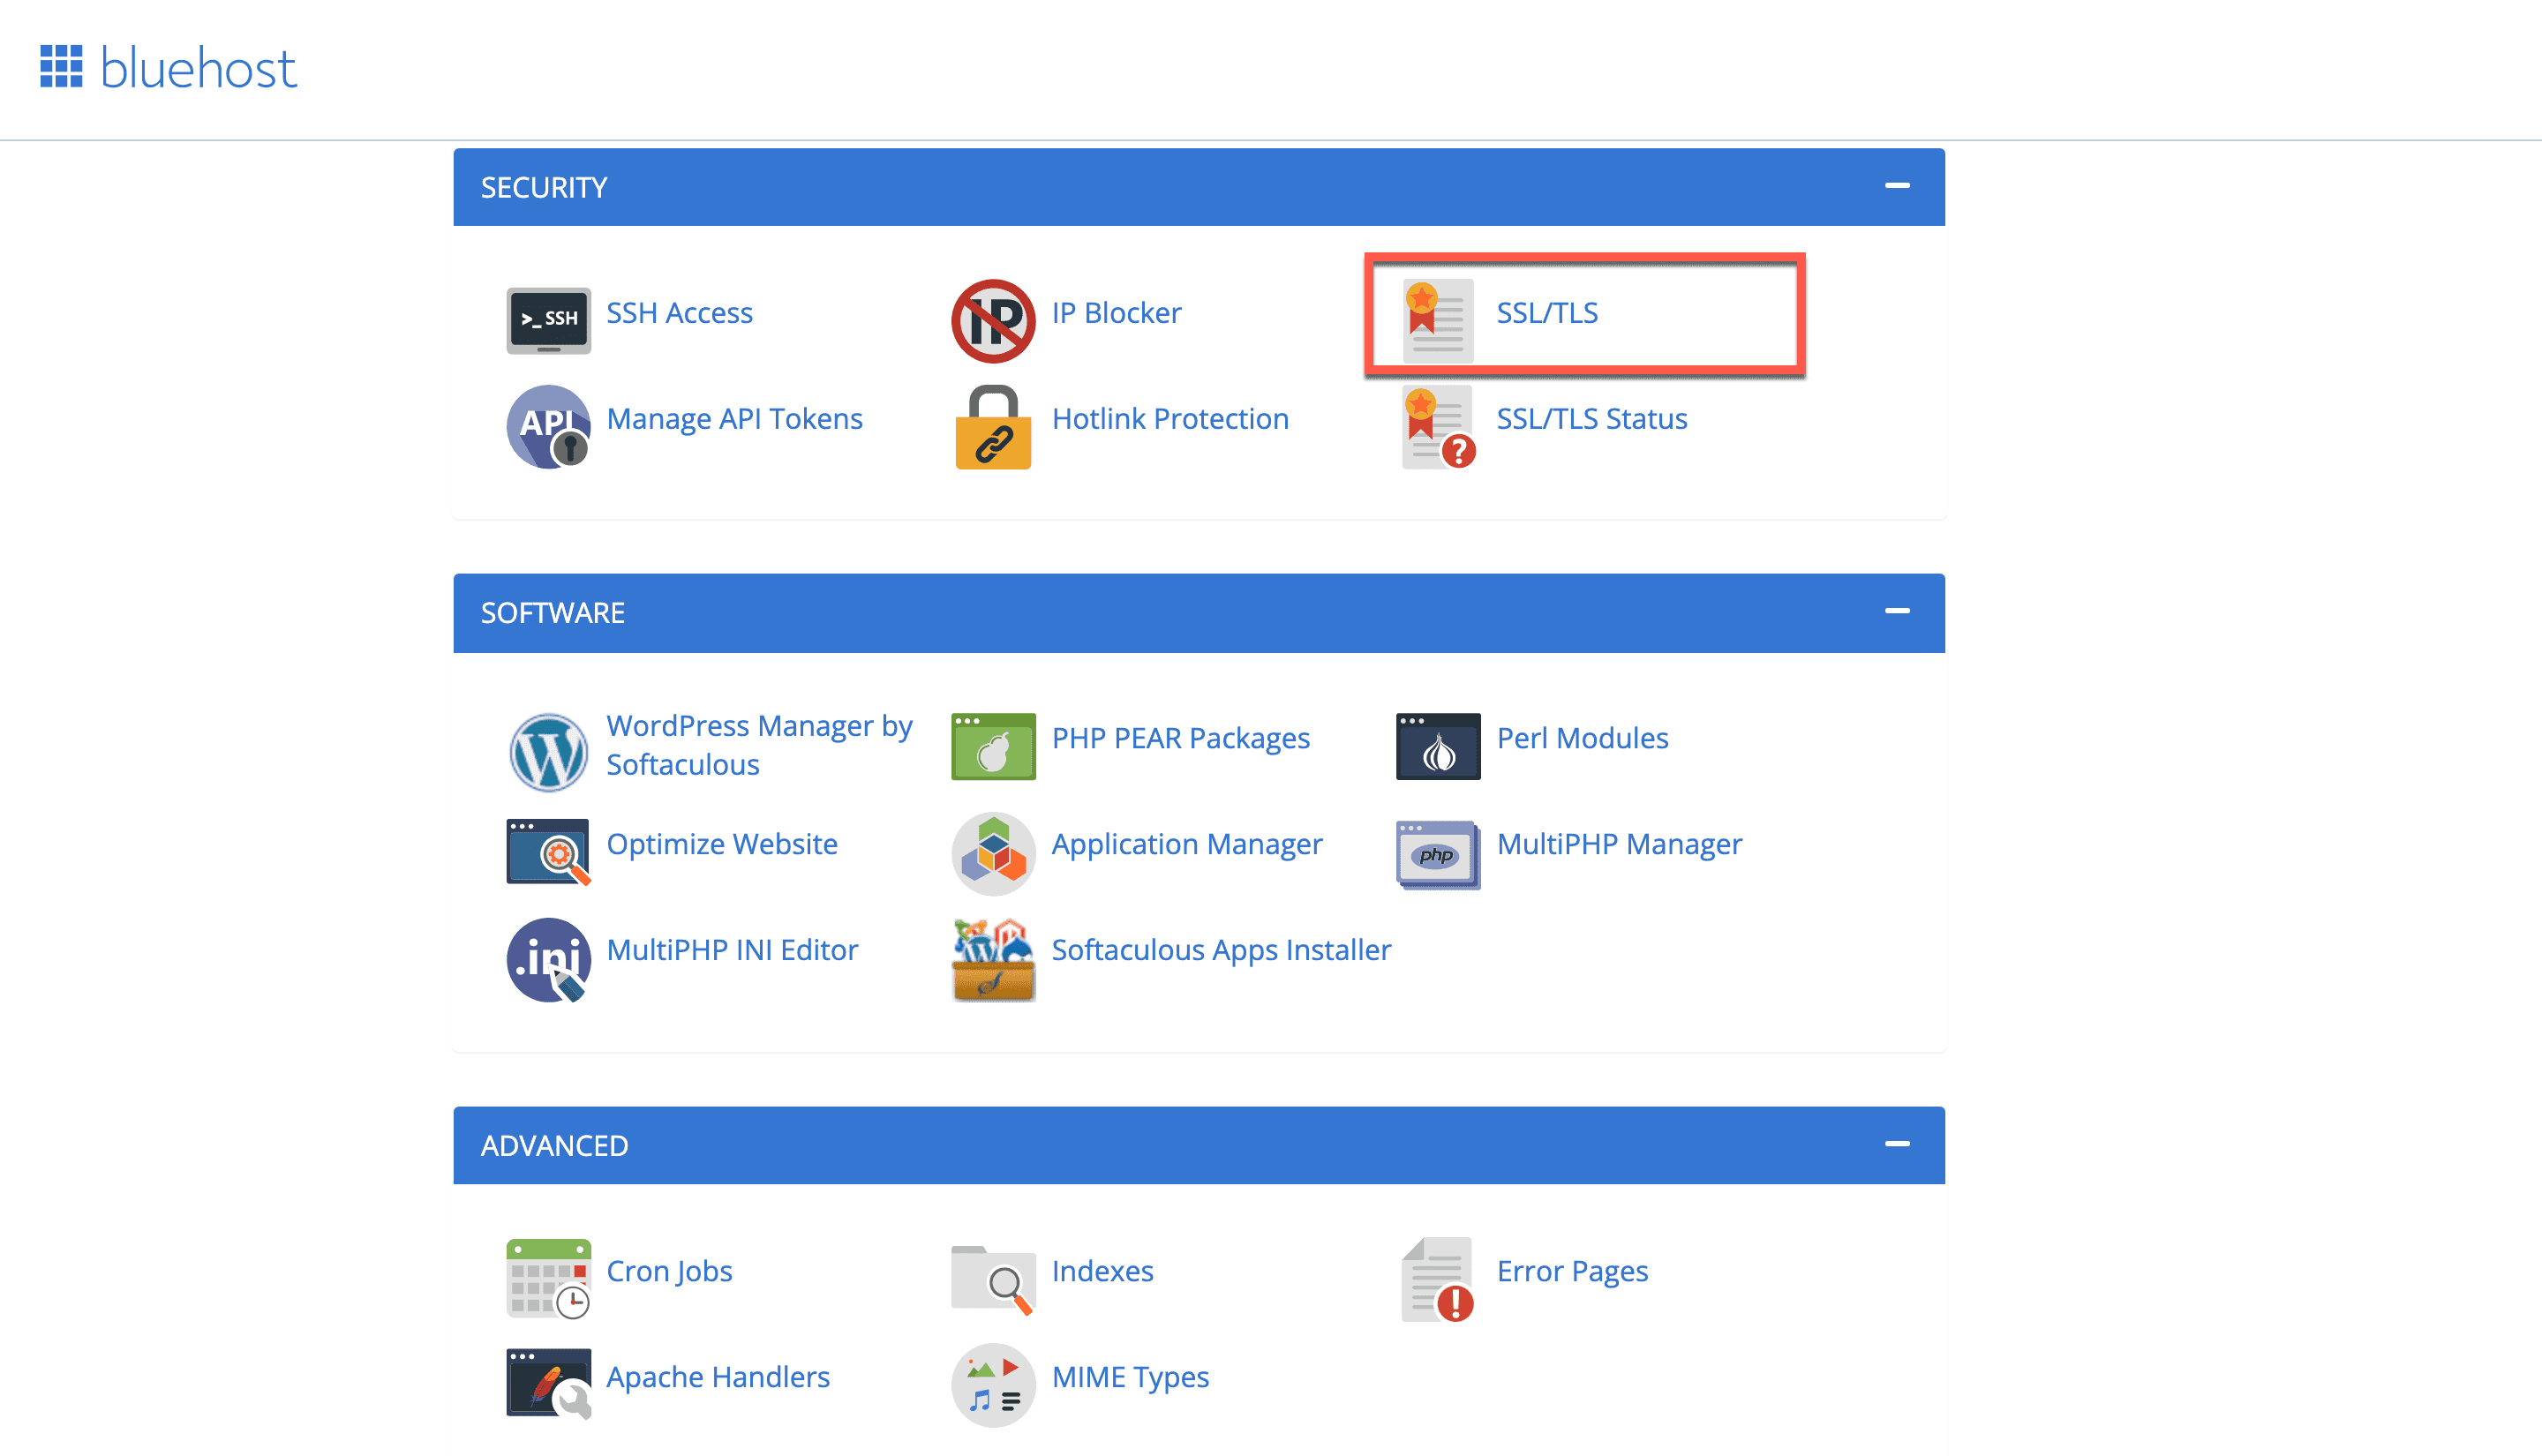
For the purposes of this article, I’ll show you what that looks like via my Bluehost cPanel.
9. First, navigate to your cPanel and scroll down to the SECURITY section. Click SSL/TLS.
10. Click “Generate, view, upload, or delete SSL certificates.”
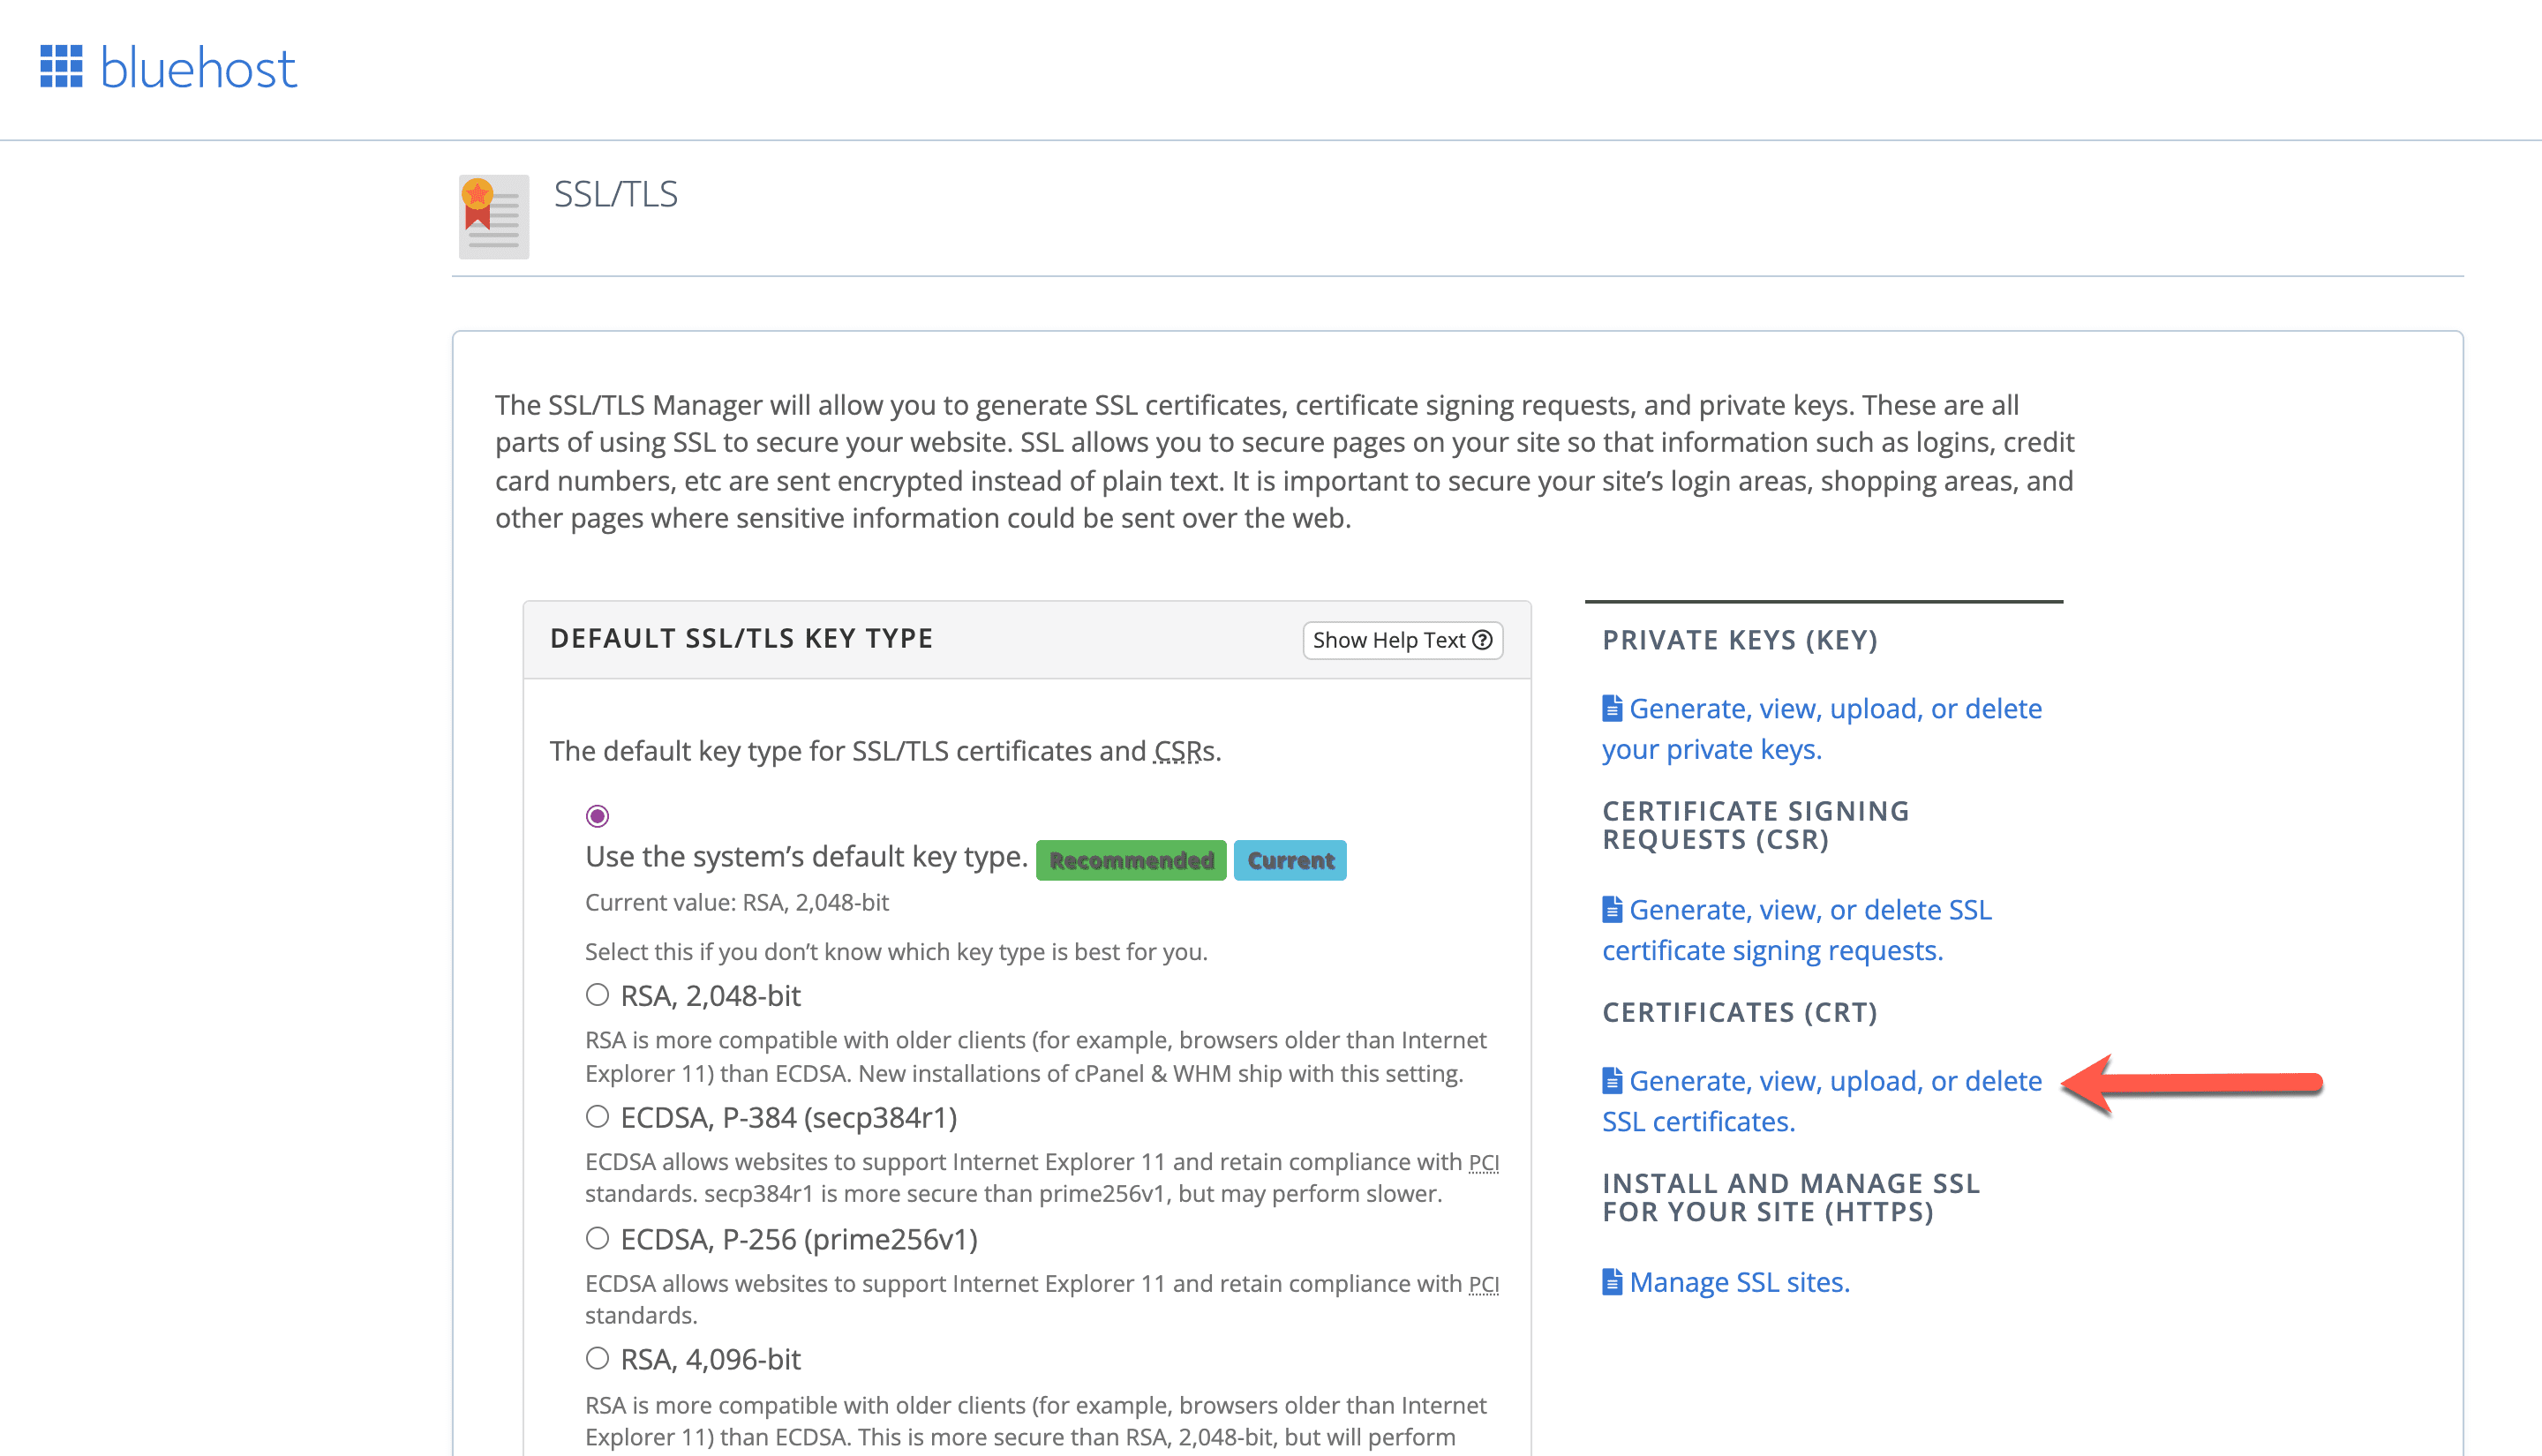
11. You’ll now see a list of certificates currently on your server. Scroll down to the section labeled “Upload a New Certificate.”
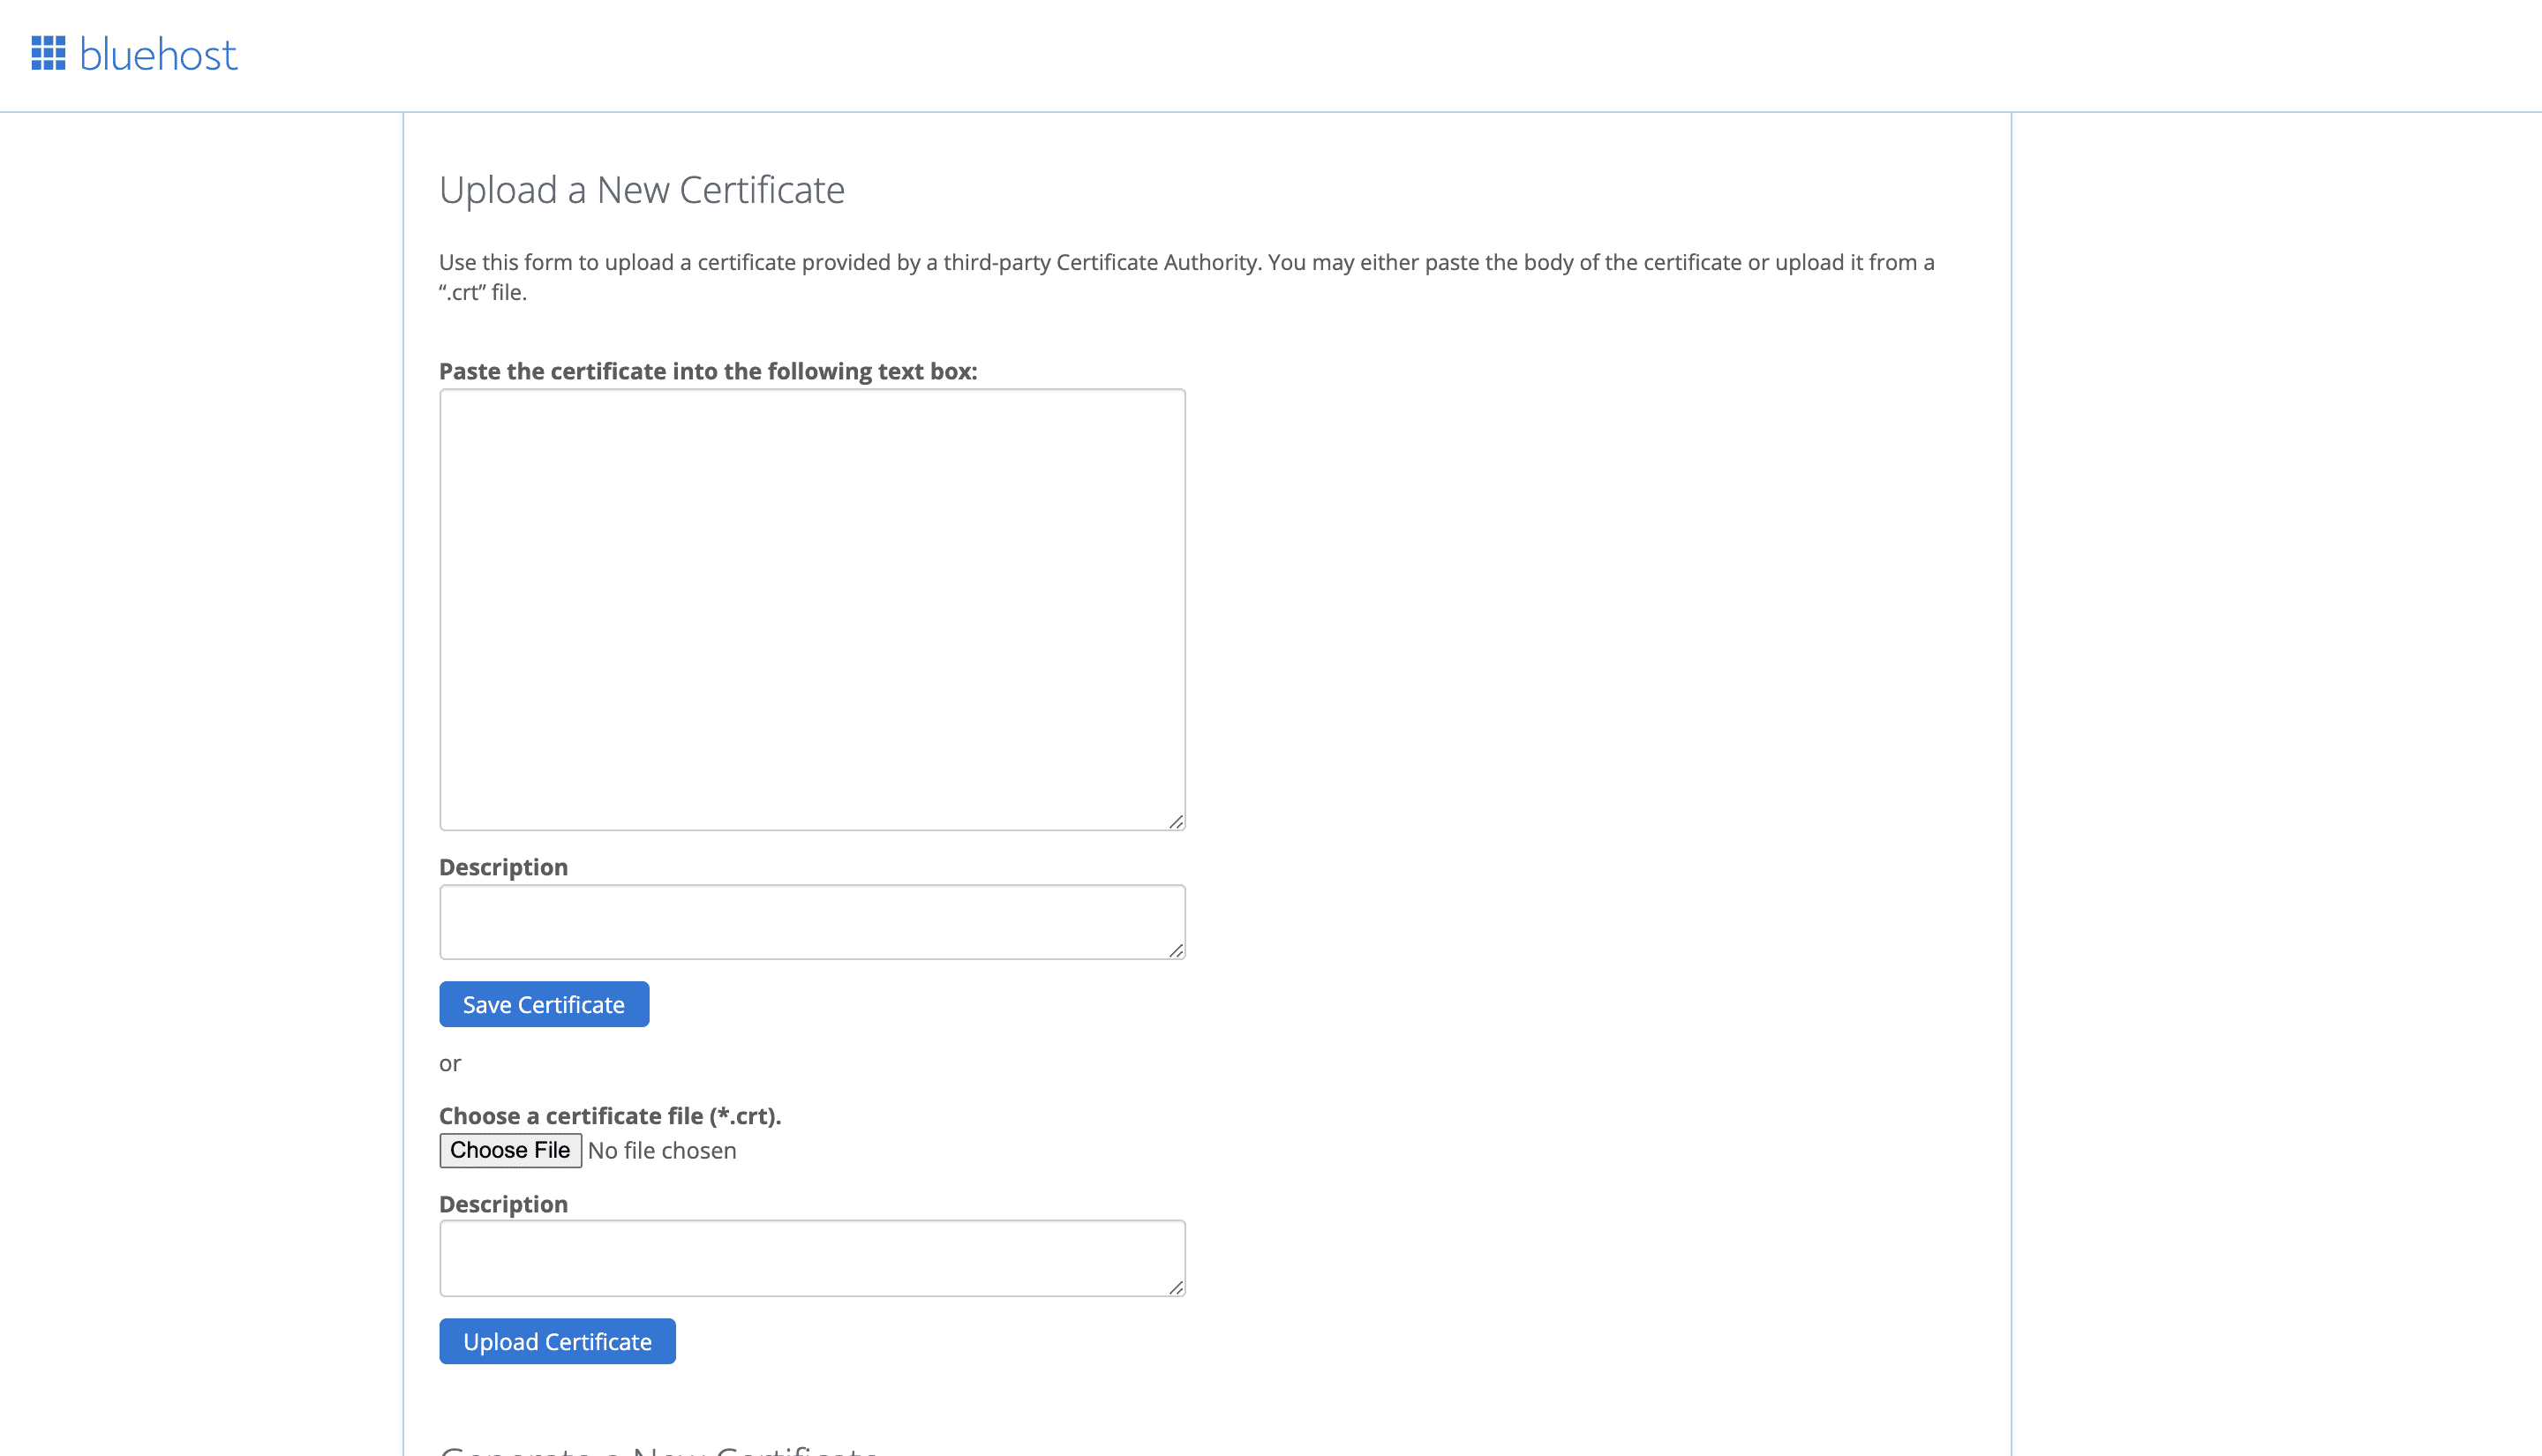
12. Now, you have a couple of options. You can either:
- Unzip your SSL certificate that you downloaded from ZeroSSL, then upload the .crt file.
- Or, you can open the .crt file in a basic text editor. Copy the full text of the certificate, then come back to your cPanel and paste it into the text box labeled “Upload a New Certificate.” This includes the header and footer text that denotes the beginning and end of the certificate.
13. Click Upload Certificate. After that, you’ll want to double-check that the installation was successful. You can check your certificate on your ZeroSSL dashboard. Alternatively, try navigating to your URL with the prefix https:// to see whether it works for you.
That’s it!
SSL and HTTPS Frequently Asked Questions
Now, let’s take a look at some frequently asked questions regarding HTTPS and SSL for WordPress.
How do I know if my site has an SSL Certificate?
Open a new browser window and navigate to your website. Look to the left of your URL prefix. Your browser window should display a lock icon next to the URL. Alternatively, click into the text box, and you should be able to see HTTPS displayed.
Will SSL and HTTPS make my site slower?
SSL and HTTPS can make your site slightly slower. However, if your website visitors are encountering Google’s error screen that prevents them from accessing your HTTP website in the first place, that’s more of a problem. You’re either going to sacrifice a small amount of speed for a secure website that users trust, or you’re going to deal with a high bounce rate from an unsecured site.
I have installed the SSL Certificate, but my site is still showing that it’s insecure. What do I do now?
Double check that your installation was successful. You can do this in WordPress by navigating to your plugin’s settings page, or by checking your manual installation via your ZeroSSL dashboard. There may be some settings that you need to toggle, or you might have to perform troubleshooting.
If you’re seeing continued SSL errors on your site, you may need to:
-
- Force HTTP to HTTPS redirects
- Fix mixed content errors (broken images)
- Inspect existing plugins and themes for errors
- Fix a redirect loop
- Further troubleshoot your SSL certificate, which may be showing an invalid certificate warning (in which case, you can renew it)
To inspect SSL errors, you can right-click your website and select Inspect in the drop-down menu. Errors are highlighted in red. You can report errors to the author of a plugin or theme, your web hosting provider, or your tech support team, depending on where and how your site is hosted and set up.
If you’re not a developer, it’s best not to attempt tweaking your plugins or themes. It’s too easy to break something that you’re either unaware of, or that affects your site on a broad scale.
Depending on the tool you’ve selected, you should be able to get some amount of assistance. You can ask questions in open forums, follow troubleshooting guides, or contact your host for help. If you run Divi, we have a live-chat team that can help you out, too. Most likely, you’ll be able to get assistance from someone else who has expertise in the problem you’re experiencing.
How do I fix mixed content errors?
Mixed content errors occur when you’ve installed SSL for WordPress, yet your website still sees some of the content as insecure. You might notice missing images, for example. To fix this, you can set your WordPress site up to display mixed content.
You can fix mixed content errors by installing and activating the SSL Insecure Content Fixer plugin. If you continue to get mixed content errors, it’s possible that something is wrong in your database. You’ll need to take a few extra steps to fix that issue, including installing and running the Better Search and Replace plugin. We’ve written a post to walk you through fixing mixed content errors here.
How do I force HTTPS?
To force HTTPS, you may need to set up automatic redirects from HTTP to HTTPS. Forcing automatic redirects will keep users from being able to open the HTTP version of your website, which technically still exists.
Here’s a tutorial from Name.com that walks you through the process via cPanel. Alternatively, you can fix this issue directly in the .htacess file via your FTP client. This tutorial from Dreamhost will take you through the steps to force your site to load securely.
How much do SSL Certificates Cost?
SSL certificates vary widely in price, anywhere from free to roughly $1000 annually. On average, they tend to be much less expensive. The price depends on the service you choose and the level of support you require.
Is there a difference in free vs paid SSL Certificates?
Not in terms of functionality. Both free and paid SSL certificates offer the same amount of security to end users. However, a paid SSL certificate is likely going to have additional technical support and more thorough validation. If you’re comfortable with DIY-troubleshooting your SSL, then using a free certificate may work just fine for you. But if you think you might need ongoing technical support, and you don’t want to have to reinstall a new free certificate every time your current one expires, a paid SSL certificate might be a better option.
Do I have to renew my SSL Certificate?
SSL certificate renewal depends on your host. If you’re using a host that includes an SSL certificate as part of your hosting plan, it can be set up to renew automatically (and these days, many are set up that way so users never have to touch them). If you use the 90-day or 1-year SSL certificate option from ZeroSSL, you’ll need to manually renew your SSL certificate at intervals.
Conclusion
Now that you know how to install and troubleshoot your SSL certificate, it’s time to secure your WordPress site. HTTPS and SSL for WordPress are critically important to your website’s success and level of trust with users (and with Google). They help keep your data secure and protect your website against things like Man in the Middle (MitM) attacks. If you want to make your site viable not only now, but in the future, make sure to lock it down with HTTPS and SSL.
Have you run into issues with SSL for WordPress? How did you approach solving them? Leave us a comment below and let us know.
Article featured image by Eny Setiyowati / shutterstock.com


Thanks for the in-depth tutorial. Since I didn’t had access to cpanel, I used WP ENCRYPTION wordpress plugin to automate the entire process of SSL generation and installation, it worked absolutely great.