

A post you just published is missing from the homepage. Your CSS change never shows up. Another tab says you are still signed in after you signed out. The cause of these and many other issues is usually a cache, which saves finished copies of pages and files so the server does less work and helps your page speed. When a copy outlives the change behind it, visitors keep getting the old version.
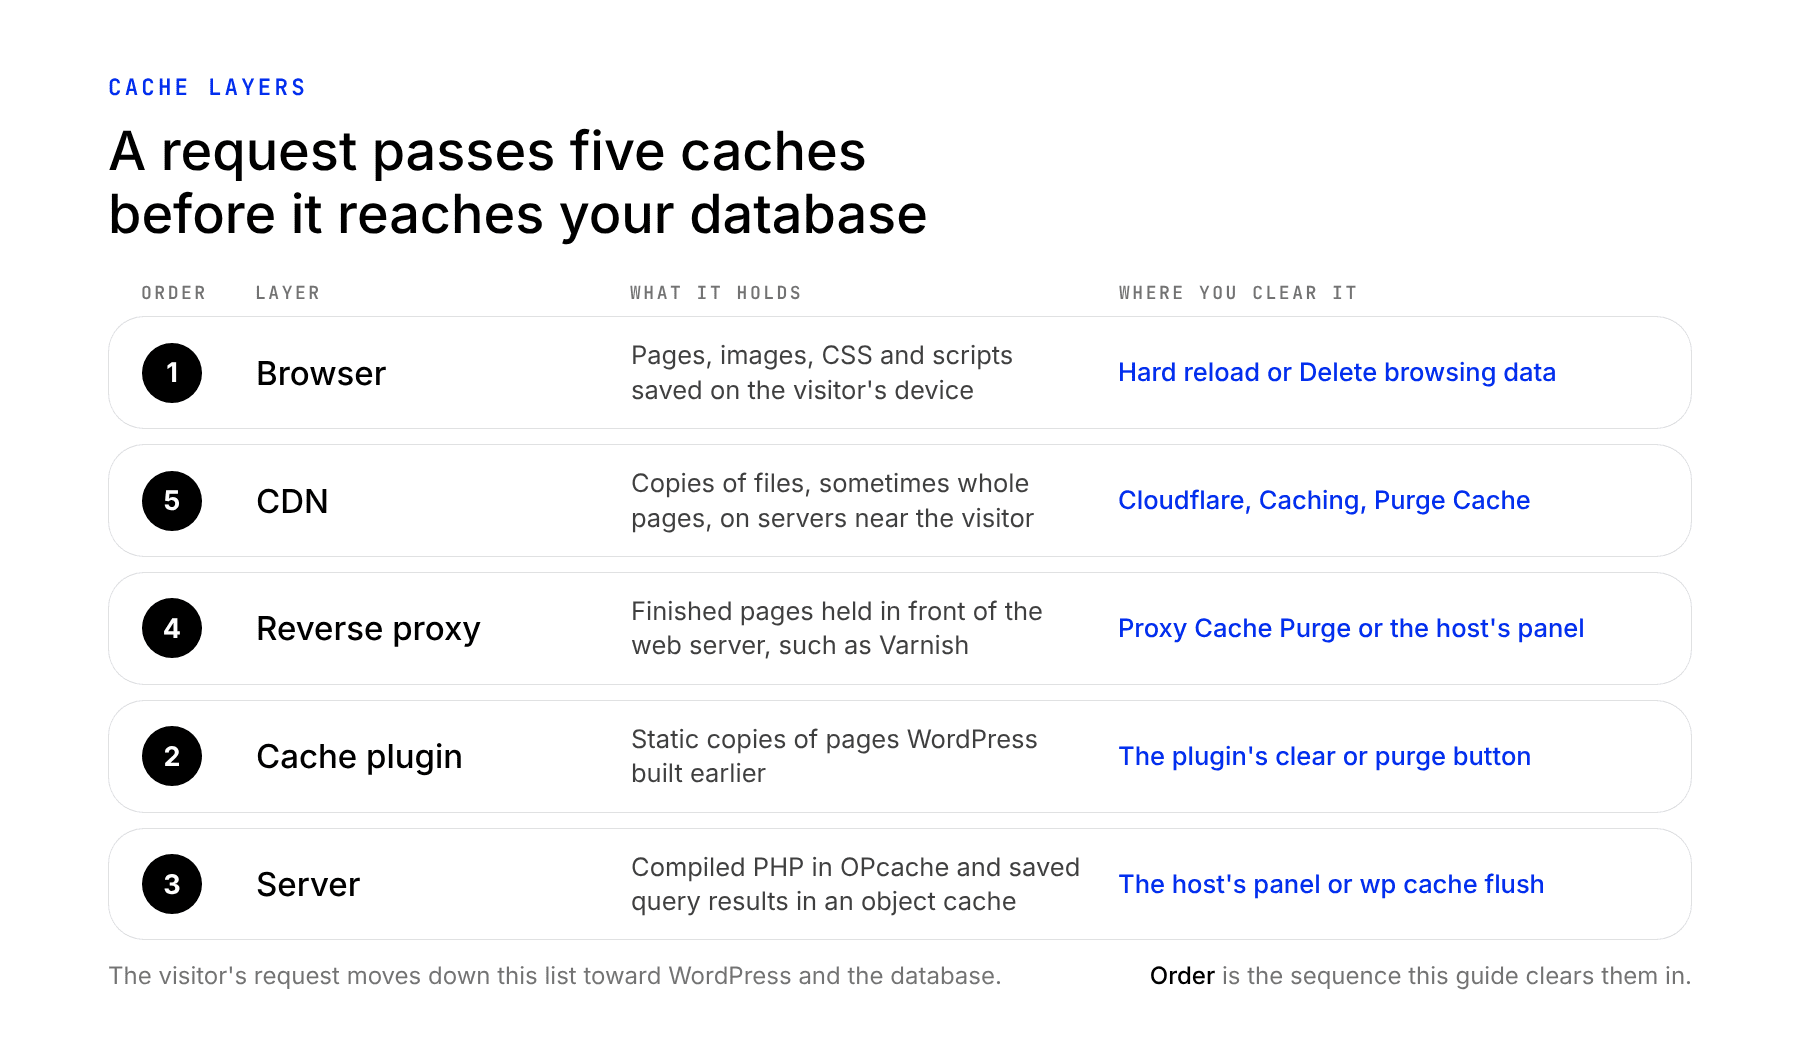
A WordPress site can hold that stale copy in five places: the browser, a cache plugin, the host’s server cache, a reverse proxy, and a CDN. This guide goes through them in the order that is quickest to try, with the exact button names for each.
What Is A Cache?
A cache is a saved copy of a page, a file, or a query result, kept on disk or in memory so it can be served without rebuilding it. Copies can sit in your browser, on the server that hosts your website, or on a CDN server far, far away from everything else. Visitors get those copies instead of waiting on a database query for every page load.
The Five Layers Of WordPress Cache
A request for one of your pages can pass through all five of these before WordPress builds the response:
- Browser: a place on your computer or device where the browser keeps pages, images, CSS, and scripts that rarely change, so it does not download them again on every visit.
- Cache plugin: a WordPress plugin that saves finished copies of your pages as static files and serves them in place of rebuilding each page from PHP and the database.
- Server: the host’s own page cache, plus OPcache, which keeps compiled PHP, and an object cache, which keeps saved database results.
- Reverse proxy: a server in front of your web server, such as Varnish, that holds finished pages in memory.
- CDN: a network of servers near your visitors that stores copies of your files, and sometimes of whole pages.
A problem starts when one layer does not notice an update, or does not count it as important enough to refresh. Visitors then miss new images, edits, and even new posts. You may not need to clear every layer, but knowing all five means you can clear the right one when it counts.
Find The Stale Layer First
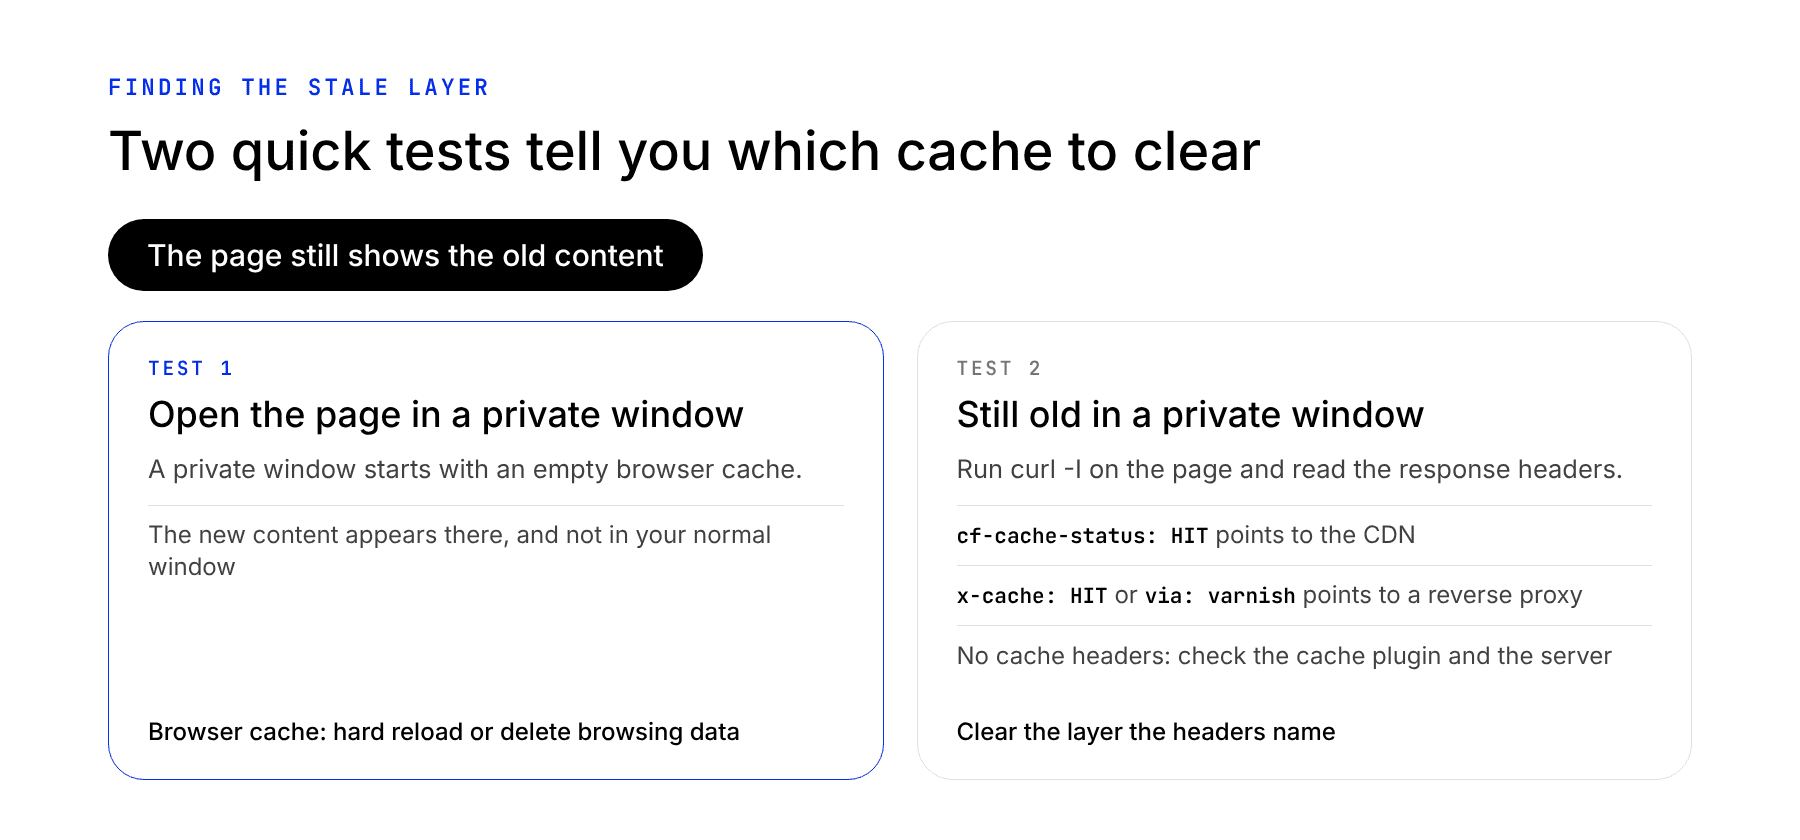
Two quick tests narrow the list before you clear anything. Open the page in a private window, which starts with an empty browser cache. If the new content appears there but not in your normal window, you have found the culprit: the browser cache.
If the page is still old in the private window, check it from a second device on a different network. Then run curl -I with the page address in a terminal. The response headers name the layer that answered. A cf-cache-status: HIT header with a large age value means Cloudflare is serving a stored copy, while an x-cache: HIT header, or a via header naming Varnish, points to a reverse proxy. With no cache headers, look at the cache plugin and the server.
Clearing Browser Cache
The browser cache is the easiest to clear and the most common reason you do not see a change. It only affects your own browser, though. If other people see the old page too, clearing yours will not help.
To refresh a single page without its cached files, press Ctrl + Shift + R on Windows and Linux or Cmd + Shift + R on a Mac in Chrome, Edge or Firefox. On Windows, Ctrl + F5 does the same (or if you have DevTools open on a page, right-click the refresh button to get more refresh options). In Safari, turn on the Develop menu and choose Empty Caches. A hard reload refreshes only this one page, so the rest of your cache stays untouched and every other page on the site still loads from it.
To clear everything, open the browser’s data screen. In Chrome and Edge, press Ctrl + Shift + Delete (Cmd + Shift + Delete on a Mac) and choose cached images and files. In Firefox, go to Settings > Privacy & Security, find Cookies and Site Data, click Clear Data, and tick Cached Web Content. Safari users can choose History > Clear History instead.
Clearing Cache Plugin Data
If the old page shows on more than one browser or computer, clear your cache plugin next. WordPress cache plugins save a finished copy of each page so the server does not rebuild it for every visitor. Some popular WordPress security plugins that add a firewall layer also include caching.
Each plugin names the button a little differently. The four below cover most sites. Most also put a clear or purge link in the admin toolbar at the top of the dashboard.
WP Rocket
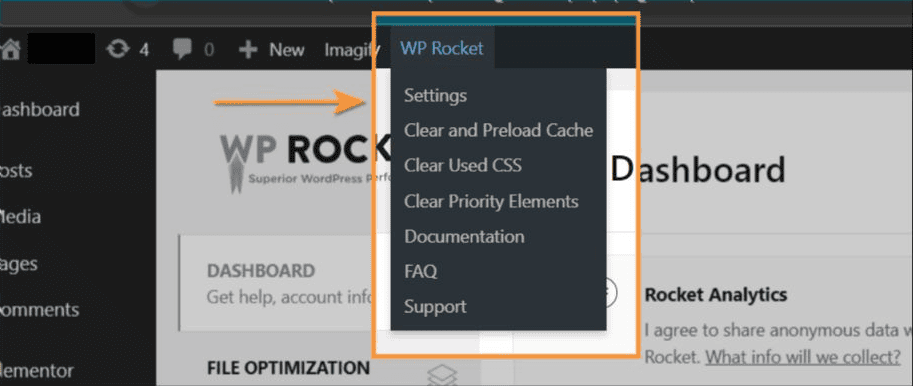
WP Rocket is a paid caching plugin. In the WordPress admin toolbar, open WP Rocket and choose Clear and Preload Cache. If preloading is disabled, the action is labeled Clear Cache. WP Rocket 3.24 moved Quick Actions from the Dashboard sidebar into this top menu. To clear one page, hover over it in the Pages or Posts list and click Clear this cache.
W3 Total Cache
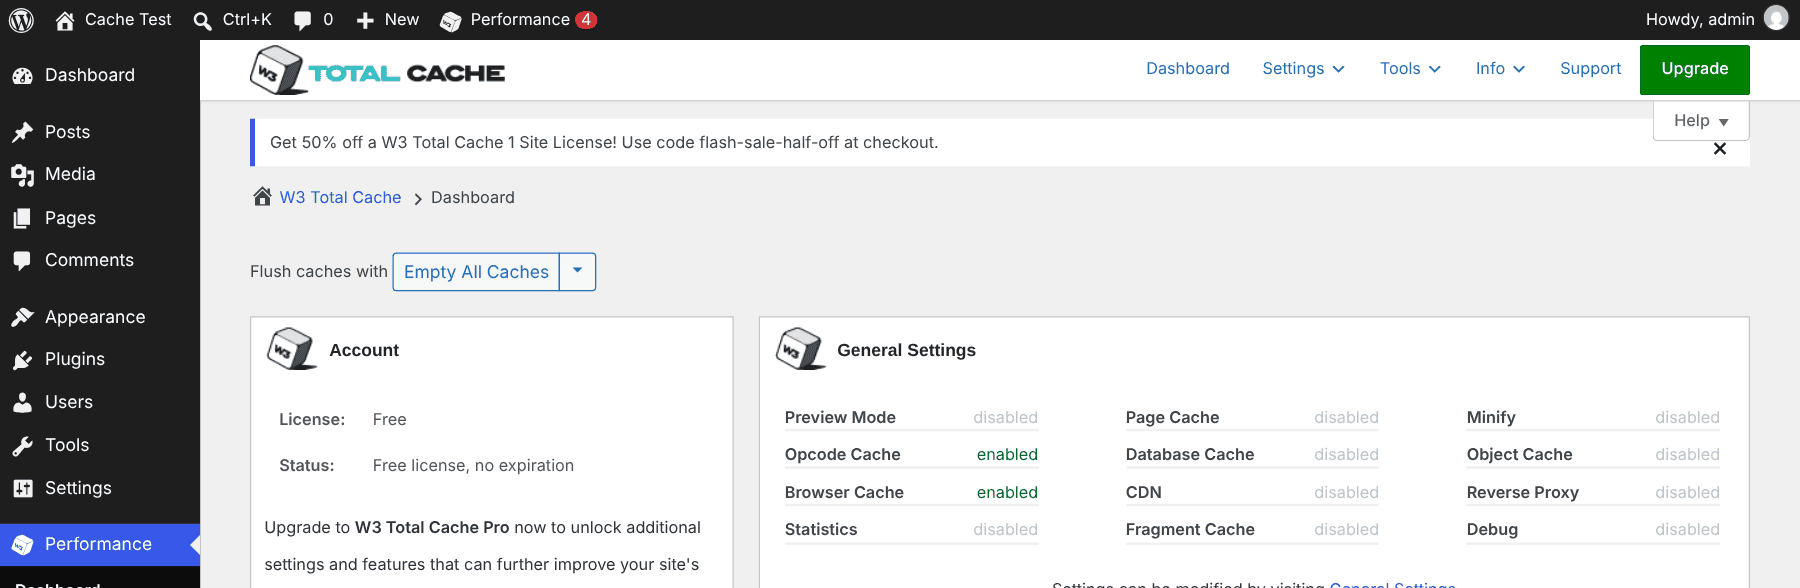
W3 Total Cache controls each kind of caching separately: page cache, minify, opcode, database, object, browser, CDN and reverse proxy. To clear all of them at once, go to Performance > Dashboard and click Empty All Caches. The toolbar has the same action under Performance > Purge All Caches.
WP Super Cache
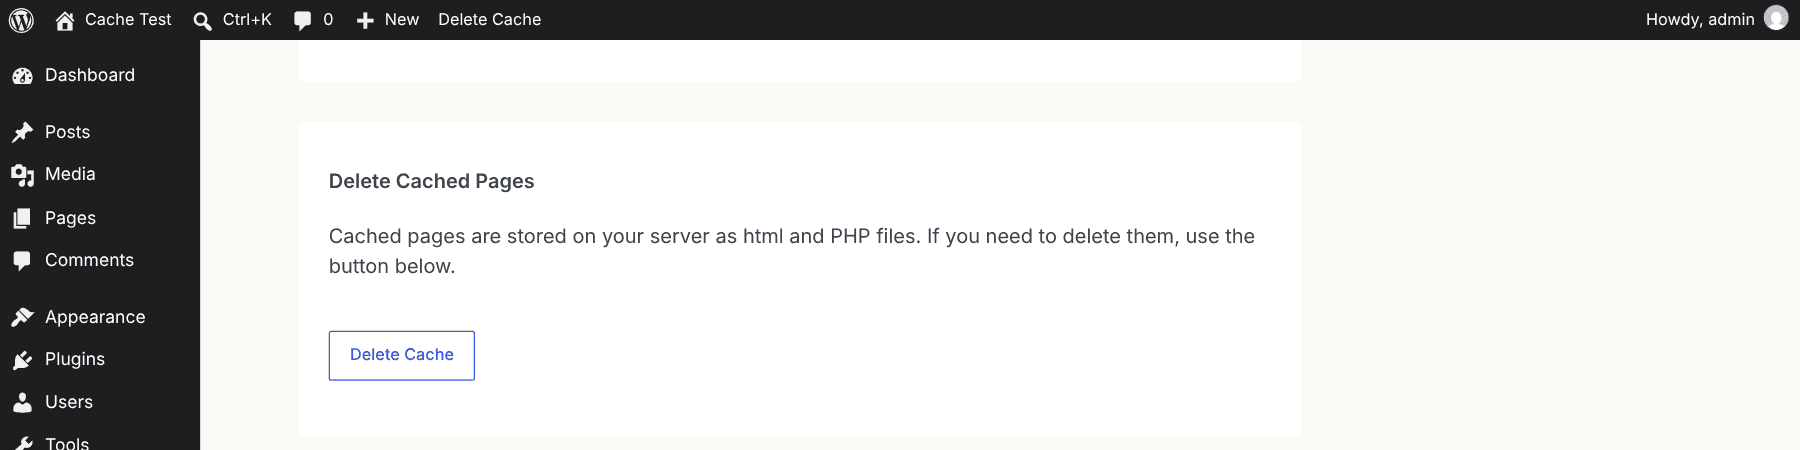
WP Super Cache can delete its cache by hand or on its own. For a manual purge, go to Settings > WP Super Cache, stay on the Easy tab, and click the Delete Cache button under Delete Cached Pages.
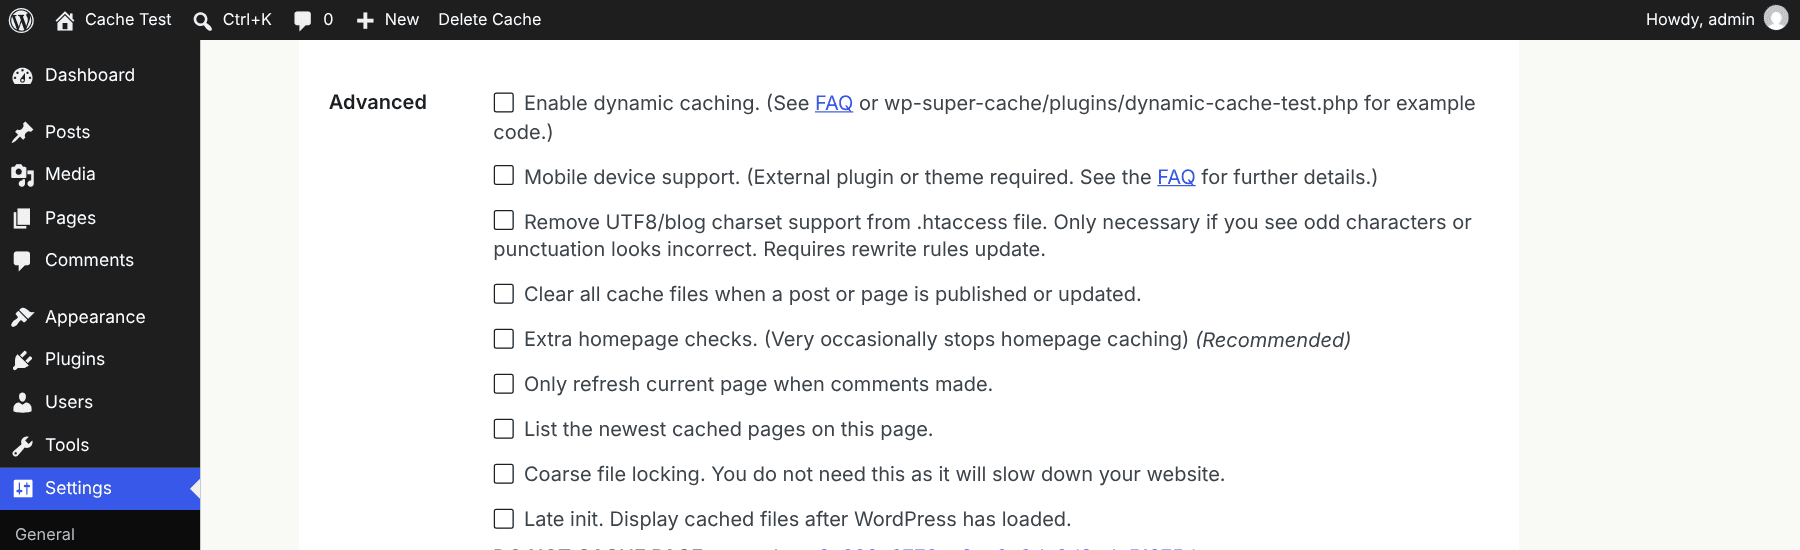
Two checkboxes on the Advanced tab help here. The option Clear all cache files when a post or page is published or updated is off by default. Turning it on clears the cache when you publish, so a new post shows up without a manual purge. The second is Extra homepage checks. Neither replaces a manual purge after you change settings or themes. The same tab holds the Cache Timeout field for how long a copy lives.
WP Fastest Cache
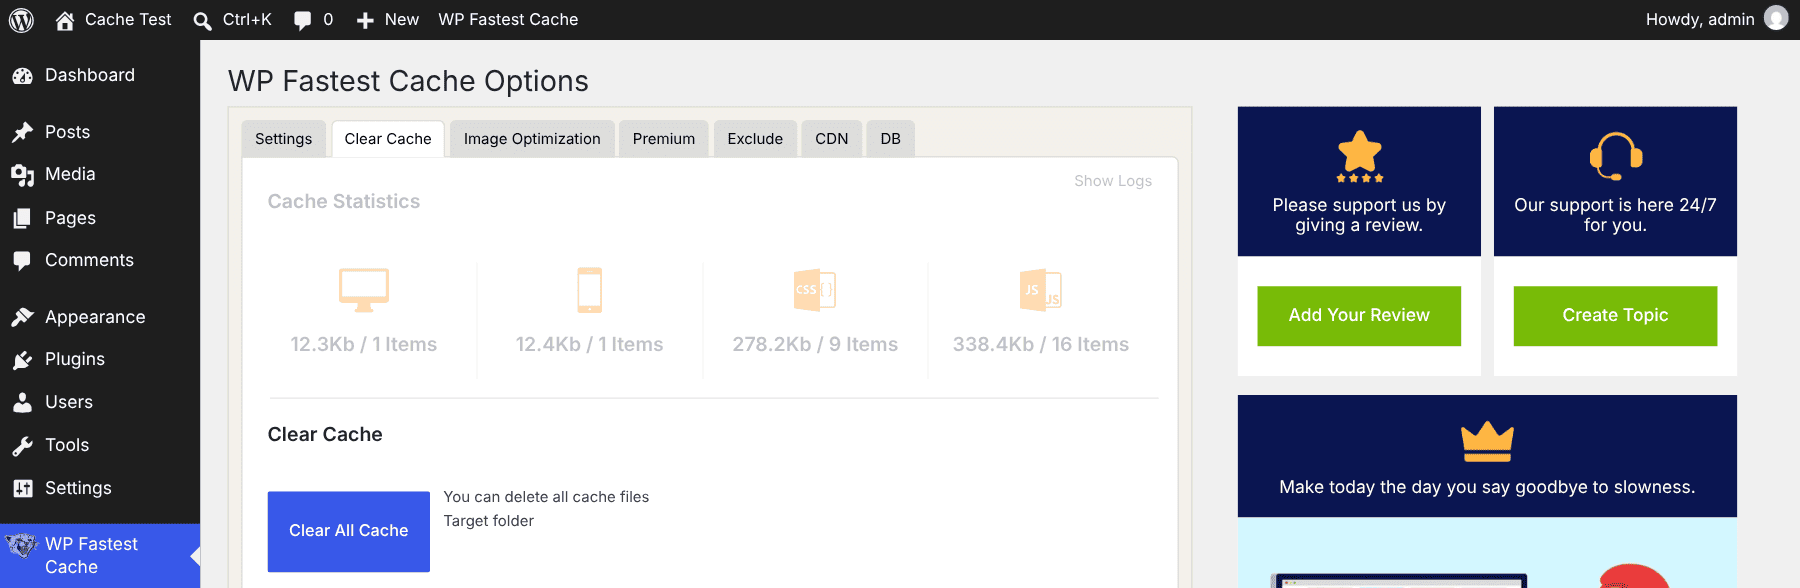
In WP Fastest Cache, the whole job happens on one tab. Open WP Fastest Cache in the dashboard menu, switch to the Clear Cache tab and click Clear All Cache. The button below it, Clear Cache and Minified, also deletes the combined CSS and JS files. Use it after you edit a stylesheet or script, and the plugin regenerates both files on the next visit.
Timeout rules live on the same tab. Click Add New Rule under Timeout Rules to set how long a page stays cached before the plugin rebuilds it.
Divi 5 And Your Cache Plugin
A cache plugin serves saved HTML that links to CSS files Divi generated. If Divi deletes those files while the plugin still serves the saved page, the page loses its styles. Divi 5 avoids that by keeping the old CSS files until your plugin clears its cache, so the stale page keeps working styles until the next fresh copy replaces it.
Divi 5 also clears the cache for you when a change touches pages your plugin cannot track, such as editing a Theme Builder template that targets many pages. Its integrations include WP Rocket, W3 Total Cache, WP Super Cache, WP Fastest Cache, LiteSpeed Cache, and Super Page Cache for Cloudflare, alongside other plugins and hosts. Divi cannot automatically purge a cache it has no integration for, so clear that cache by hand after editing a preset or a design variable.
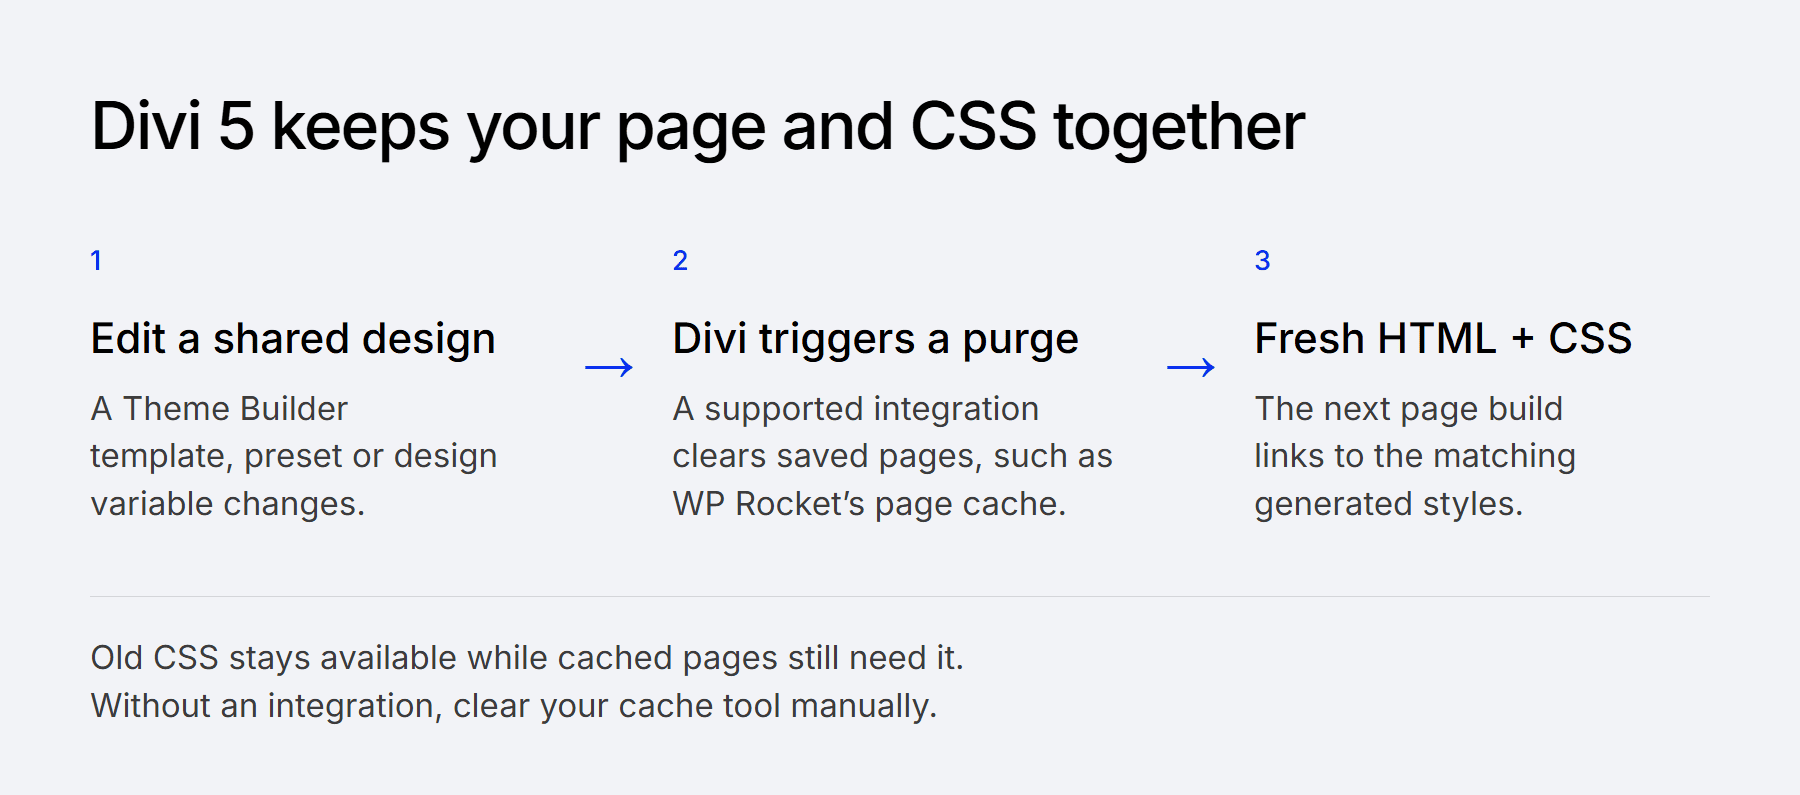
To delete the stale CSS files yourself, go to Divi > Theme Options and click Clear CSS Cache. Then clear your cache plugin and any server cache, in that order. Elegant Themes explains the change in New Cache Improvements for Divi 5, and its help article on fixing display issues after updating Divi 5 walks through the full clearing order.
Clearing Server Cache
Your host may cache pages on the server even when you have no caching plugin installed, which is common on managed WordPress hosting such as WP Engine, Kinsta and SiteGround, and each of these hosts adds its own purge button to the WordPress dashboard or toolbar for the layers it runs.
- SiteGround: open your site’s Site Tools > Speed > Caching (SuperCacher), select Dynamic Cache, and click the broom icon labeled Flush Cache under Actions for the domain.
- Kinsta: click Clear Cache in the WordPress admin toolbar, or go to MyKinsta and choose Sites > your site > Caching > Clear all caches.
- WP Engine: open the WP Engine menu in wp-admin, choose Caching and click Clear All Caches. The User Portal has the same option on its Cache page.
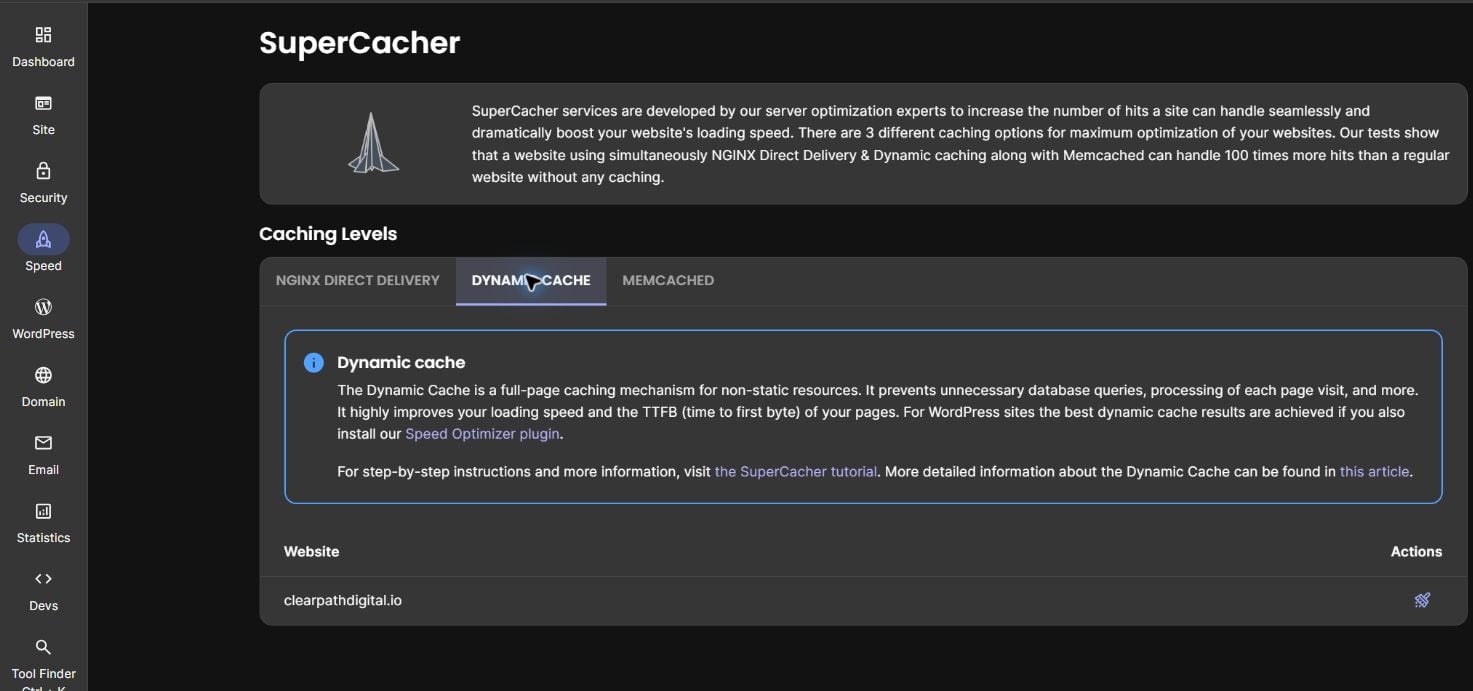
Other hosts put the same control in a cPanel or hosting dashboard, because this purge does not run through WordPress itself and you have to look in your hosting account. If you cannot find it, ask support to clear it. They often ask you to clear your browser and plugin cache first, which also helps narrow down the cause.
Two server caches never show up in a plugin. OPcache keeps compiled PHP, and hosts reset it from their panel or by restarting PHP. An object cache such as Redis or Memcached keeps saved database results, and a persistent one needs a cache server from your host. With WP-CLI, run wp cache flush over SSH to empty the object cache. On a multisite network with a persistent object cache, that usually flushes every site, so use it with care on a live site.
Reverse Proxy
A reverse proxy is a server that fetches pages on behalf of visitors and returns them as if they came from the proxy server. It shields the web server behind it.
With an HTTP reverse proxy such as Varnish, the stored copy expires after a set time, and the new content appears. Your host or provider sets that lifetime. To purge by hand, install the Proxy Cache Purge plugin, which was formerly named Varnish HTTP Purge. It sends a purge request whenever you edit content and adds an Empty Cache button to the admin toolbar that clears everything.
Clearing CDN Cache
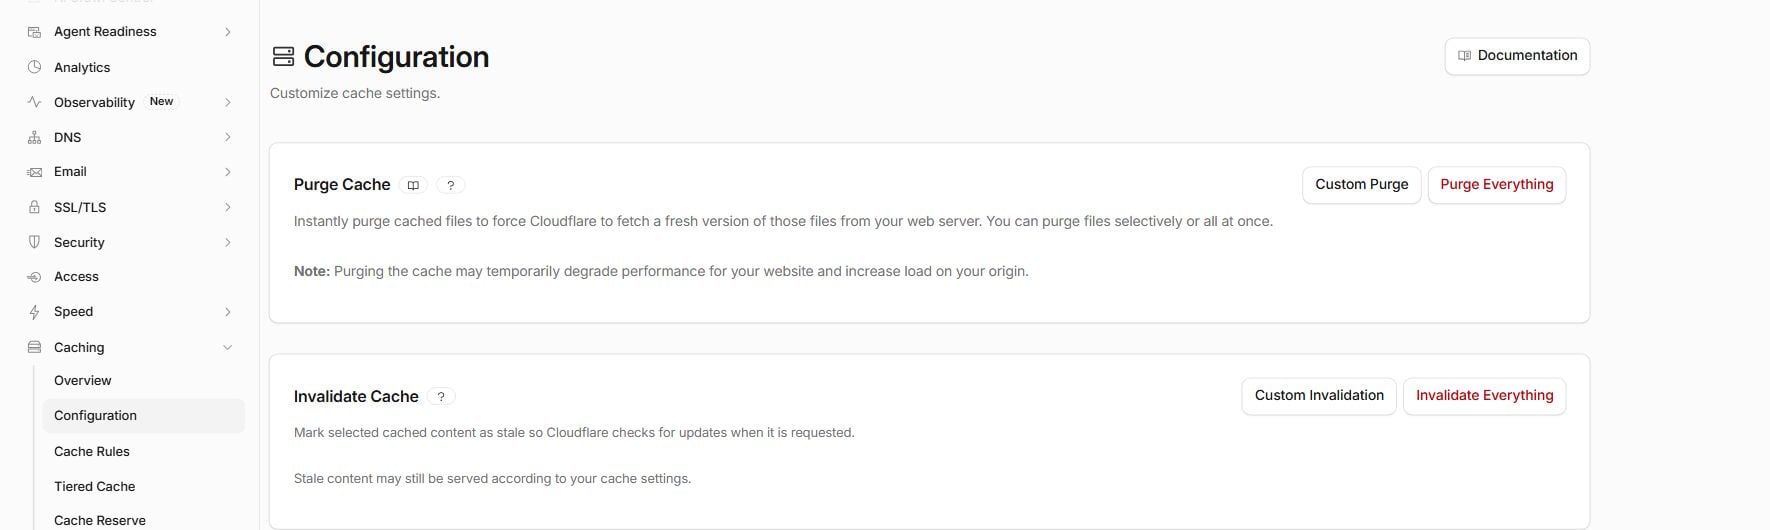
A CDN follows the same idea, with one caution: purge the single page or file you changed instead of the whole cache. Cloudflare, one popular CDN, recommends this. Purging everything sends every request back to your server until the cache refills, which can slow a busy site down.
In Cloudflare, select your domain, open Caching > Configuration and find the Purge Cache section. Choose Custom Purge to clear one URL, or Purge Everything to clear the lot. The next request to a purged resource comes from your server, and Cloudflare stores it again.
Clear WordPress Cache FAQs
A few questions come up again and again once you start clearing caches. Here are short answers.
Does Clearing the Cache Delete My Content?
How Often Should I Clear My WordPress Cache?
Why Do I Still See the Old Page After Clearing the Cache?
Is It Safe to Purge Everything on Cloudflare?
What Does the wp cache flush Command Do?
Show The Latest Version Of Your Site
Clearing the right cache fixes many everyday problems, from updates that will not appear to login issues. Work through the layers in order: browser, plugin, server, reverse proxy, then CDN. If a host controls a layer and you cannot find the button, its support team can clear it for you. To keep stale pages from coming back, compare the best WordPress caching plugins and pick one that purges on publish.




Your information is exactly what I was looking for, so thank you very much for providing it. Would you mind telling me what program you use to create your amazing, fast website? For my business, I also want to create a simple website, but I need help deciding on a name and hosting provider. Asphostportal is reputed to have a stellar reputation. Exist any other options? If so, what would you suggest?
Very very eye-catching feature there has been placed. in this innovative world, this one is very essential I mean. I am awaiting for the next one
Hey B.J.
Indeed an in-depth guide on clearing website cache. Among the top cache plugins, I personally prefer WP Rocket. It really helps in loading faster. Moreover, it is more user friendly than other plugins. It also has an option to integrate Cloudflare right from the plugin settings page.
Thanks for sharing!
You should put links to social sites like Pinterest where this content can be shared on my board.