Where there’s internet, there is Facebook. Because of that ubiquity, Facebook marketing is pretty much required if your brand is going to succeed online. The problem with that is simple: Facebook marketing is a huge topic with a lot of moving parts. You will need to consider a lot of variables to really hone in on a strategy, and that’s what we want to help you with. No matter what your business or brand, we can help you get your Facebook marketing strategy off the ground. And if you’re already knee-deep in Facebook, we have some ideas for you that can take your marketing from great to astonishing. Let’s get started.
Getting Started with Facebook Marketing
First, I want to acknowledge that not everyone is on Facebook for personal interaction. The beauty of approaching Facebook marketing from a business standpoint is that you can keep the two sides of your life pretty much completely separated. While you can’t use Facebook anonymously, you can have an account where the only personal information available is the name you choose and everything else is tied to the business accounts. In some ways, keeping these sides completely separate will limit your ability to market to certain demographics (such as Facebook groups and potentially Events); however, it is up to you on what are the most important aspects of the platform.
As we move through the various topics, we will touch on which elements may use your personal profile rather than your business one. If it’s not listed, you should be safe to assume that your brand identity will be the public-facing persona. For the most part, we are going to assume you will have a profile with reasonable privacy settings for your personal account.
Step 1: Create Your Facebook Account
If you already have an account, feel free to scroll down a bit. This step is showing how simple it is to get started on Facebook itself.
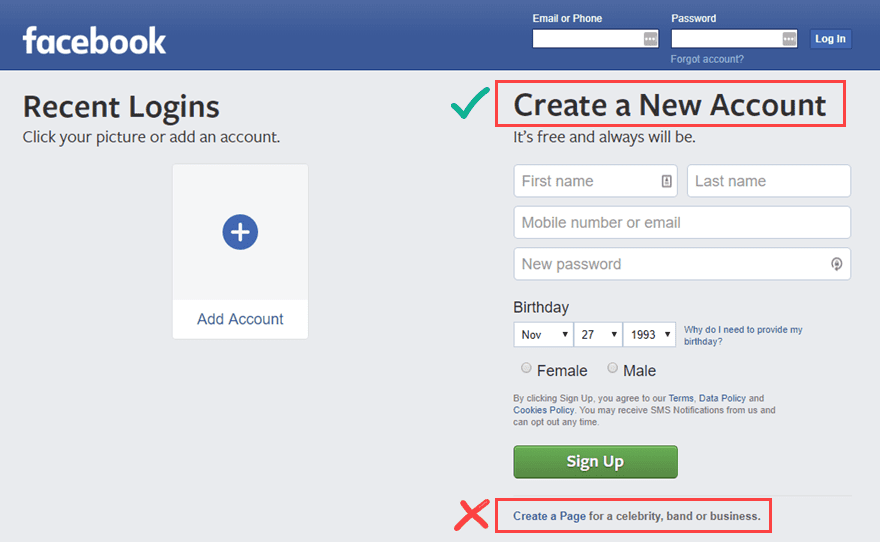
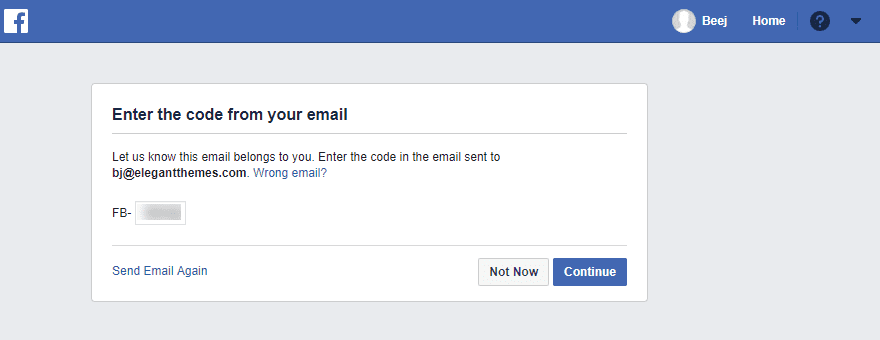
You might be tempted to click on the Create a Page link at the bottom of the screen. And while it will let you create a page for your brand immediately, the process hits a hurdle when it asks you to log in. So we are going to move forward with creating an account first and then creating the brand profiles we will work with. So press the Sign Up button, you will get an email to verify that you’re really you. Go ahead and enter the code to prove you’re a person.
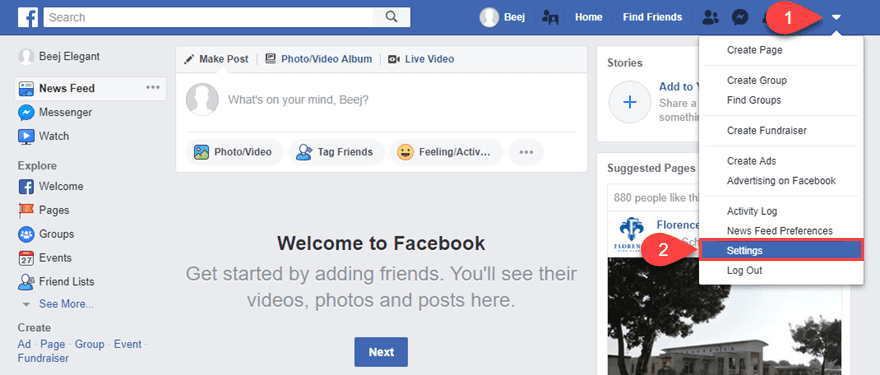
When you press Continue, you will be taken to your blank timeline. The only real must-do thing at this point is fixing your privacy settings. Regardless of whether you use Facebook personally or not, checking your privacy settings is a good idea. So click on the arrow in the upper-right corner and select Settings to get started.
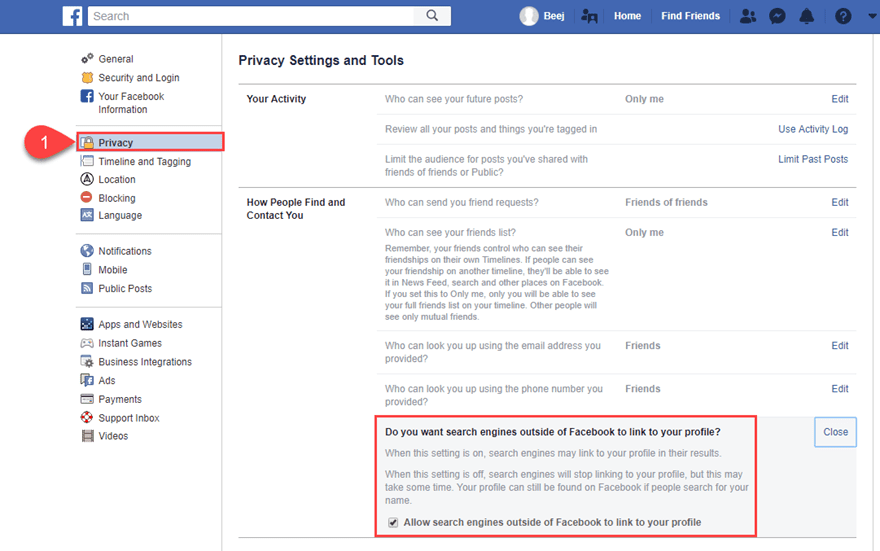
In general, we will run under the assumption that you let your Friends see pertinent information, but more sensitive information is set to Only Me. That’s just the bare minimum for security. So make sure that you go through all of the tabs in the left sidebar and tweak them to your own preferences. We would, however, like to highlight the section titled Do you want search engines outside of Facebook to link to your profile? This is an option many people are unaware of, so if you want to remove your personal profile from public Google searches, uncheck this box. This will have no effect on your brand identity, such as Pages, Groups, or Events.
After you’ve chosen your settings, it’s time to create the Page you want to be your home base on Facebook.
Step 2: Create a Facebook Page
The Facebook Page is where the majority of your marketing will take place. You will run ads through your page, host events, stream live video, and interact with your audience. Pages are the hub of most public-facing organizations. They can — for the most part — do anything a personal account can do. But without the need to share who is the one behind the branding.
Using a Page to market lets you assign a team of people to manage your business, and we will discuss each of the roles and permissions a bit lower. But first, let’s dig in on actually creating the page. To start, find the Pages link in the sidebar to the left of your timeline.
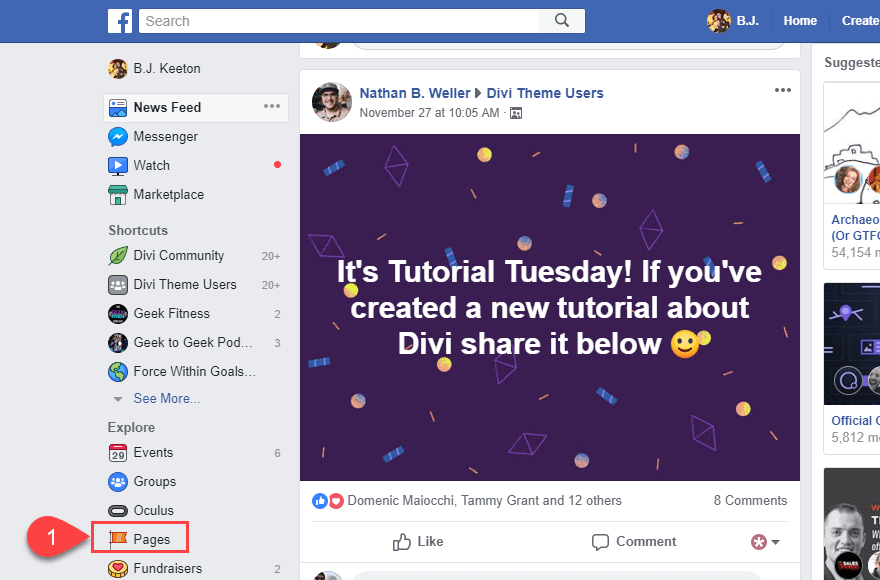
You will then be taken to a list of all the Pages on your account. This list will be empty if you haven’t done this before. In the upper-right of the toolbar, in the Your Pages tab, you need to press the green Create Page button.

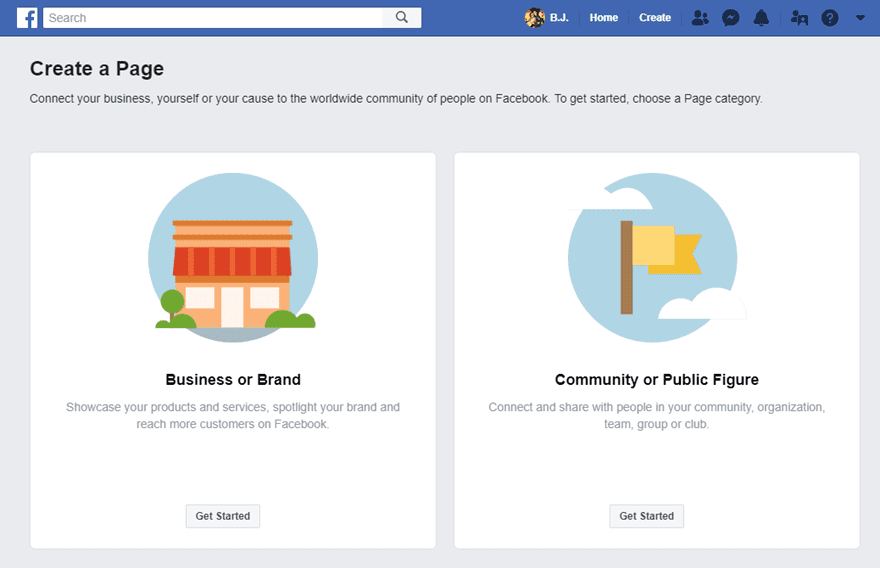
You now choose whether your Page will represent a Business or Brand (services and products, generally) or a Community or Public Figure (described as connecting and sharing with people, an organization, team, or group). For our purposes here, we will go with Business or Brand.
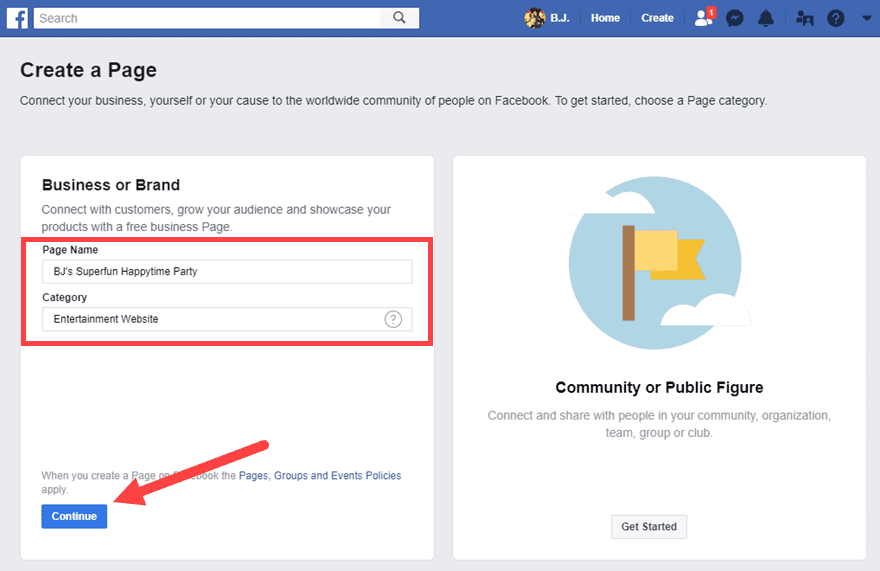
You should have a name chosen by this point (most likely the name of your company or blog or brand itself — such as Elegant Themes). We don’t suggest making a new Page for a single product (such as our Divi theme) because that can be showcased under the umbrella of a larger page that has more reach and utility beyond that single product.
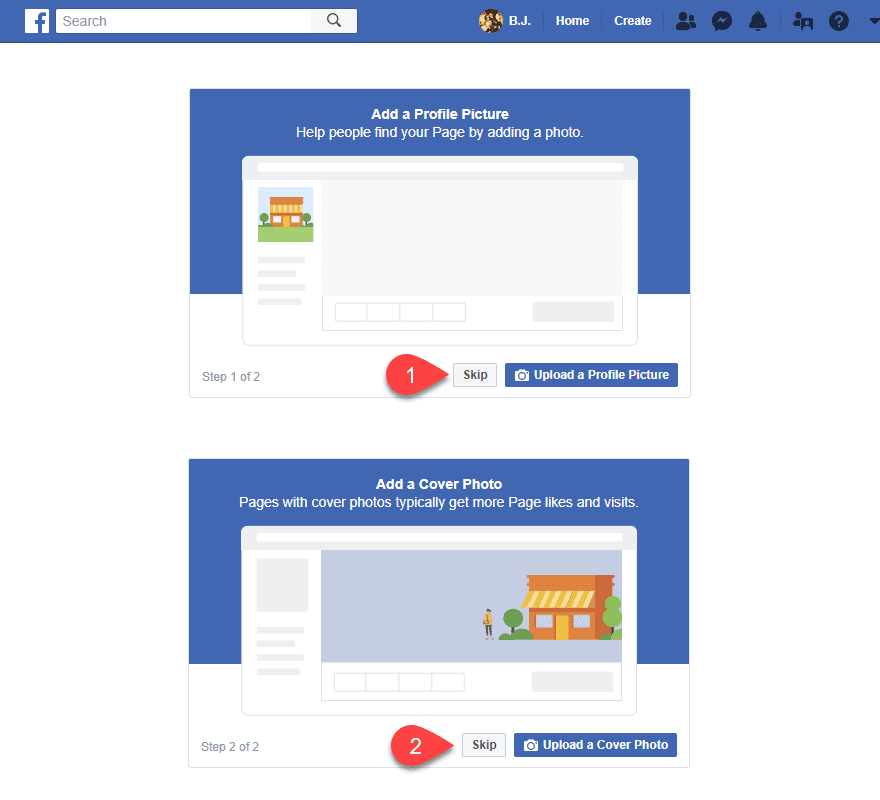
After this step, you will choose a Profile Image and a Cover Photo. You do have the option to skip them for the moment to gather your resources later. At some point, these are a necessity.
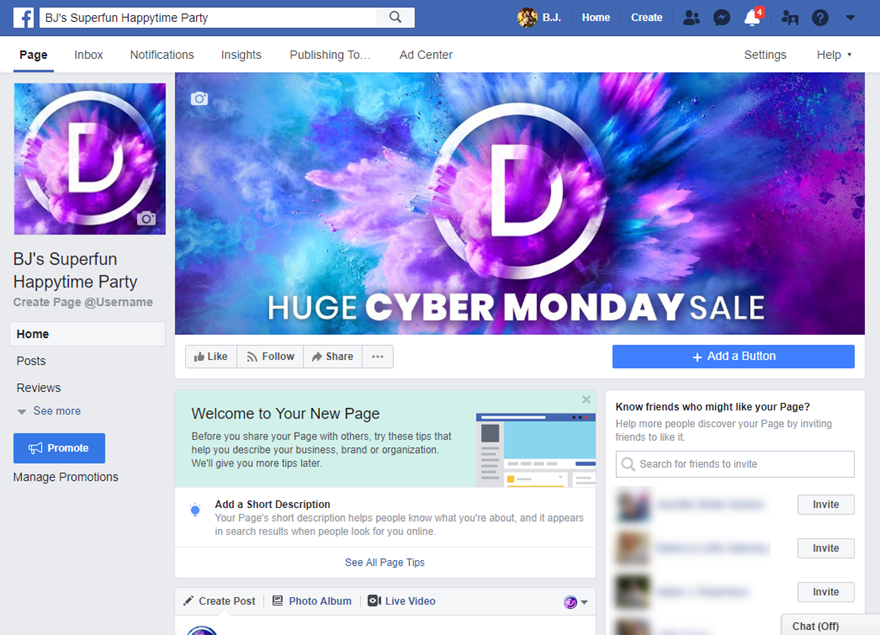
With that finalized, you see your new page on the next screen. It will be devoid of content and information at this point, but that’s what you can handle next.
Step 3: Customize Your Page
More than anything else in terms of customization, the @username you choose is the most important. Just click on the Create Page @Username link to the left of the screen to begin.
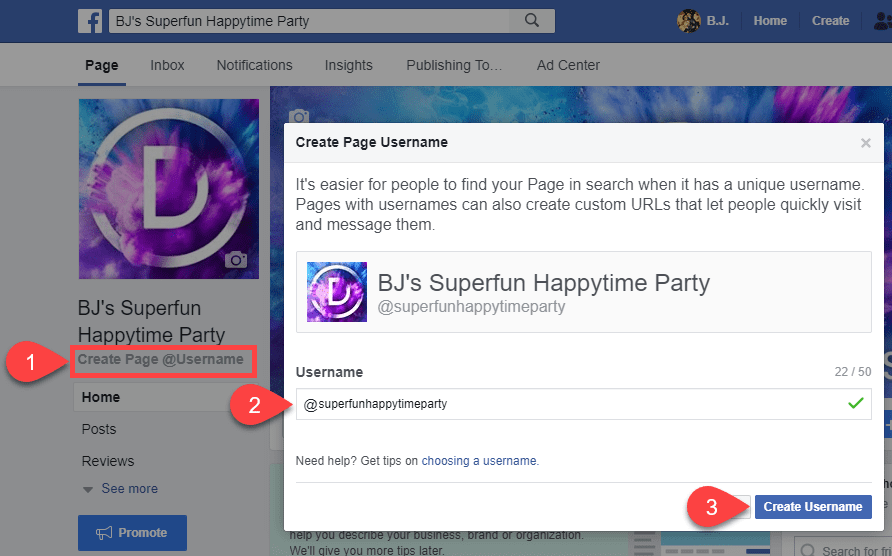
This will be the way that users and people tag your page in posts — “Look at this amazing deal I got from @username”. It is also the URL slug for your page: fb.me/username or facebook.com/username. Additionally, you get a Facebook Messenger URL where your users can directly IM you, and those messages go directly to your Messages app (assuming you use it).
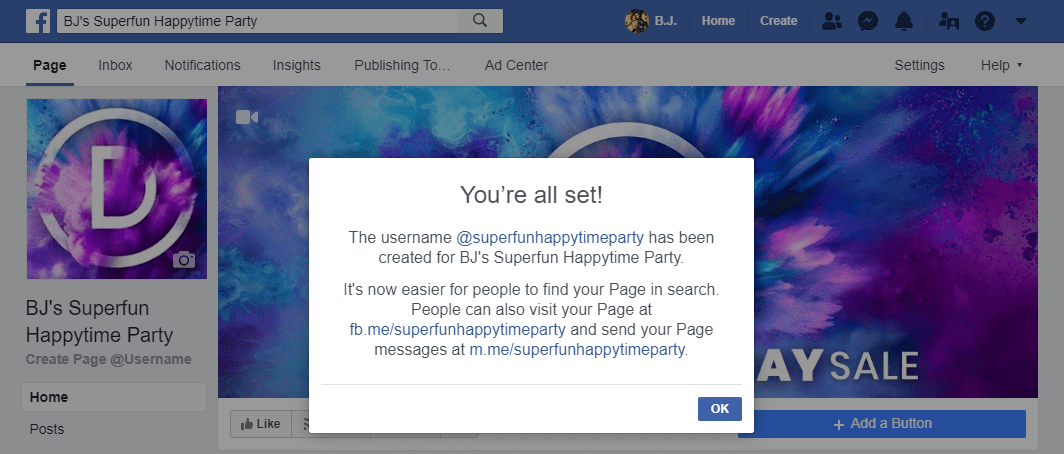
With that set, it’s time to fill in your brand details. These are the nitty gritty nuggets of information that your users and community need to know about you. A description of who you are, how to find you elsewhere online, where to find you in person if you have a storefront or physical location, menus, email lists, and so on.
Page Description
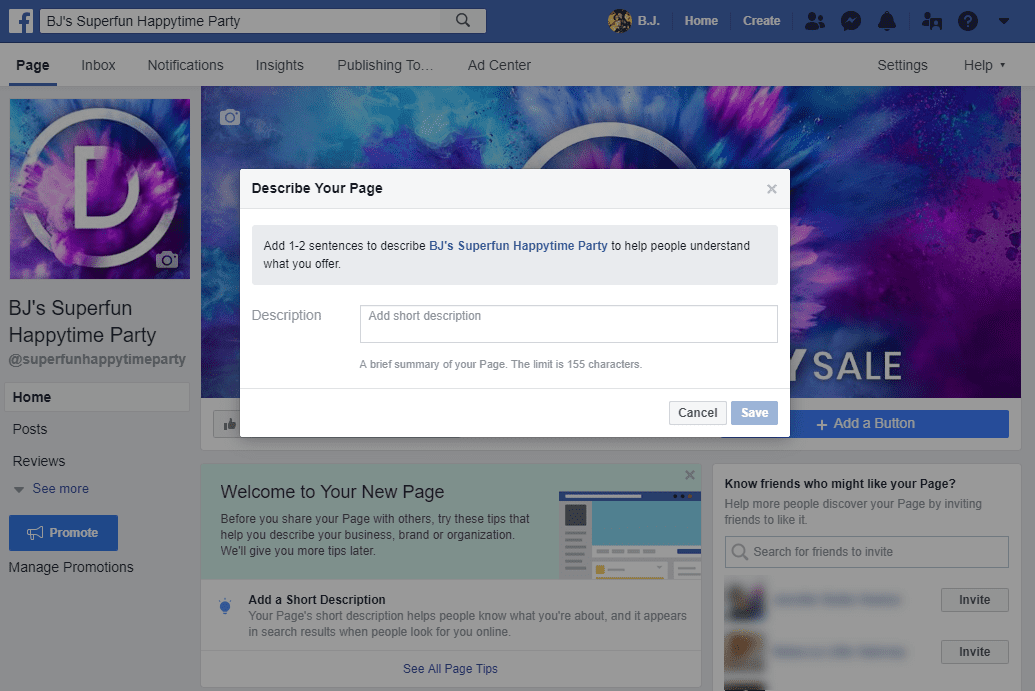
Two of the most prominent are Adding a Page Description. To add a description, just click on where the Add a Short Description link is under Welcome to Your New Page.
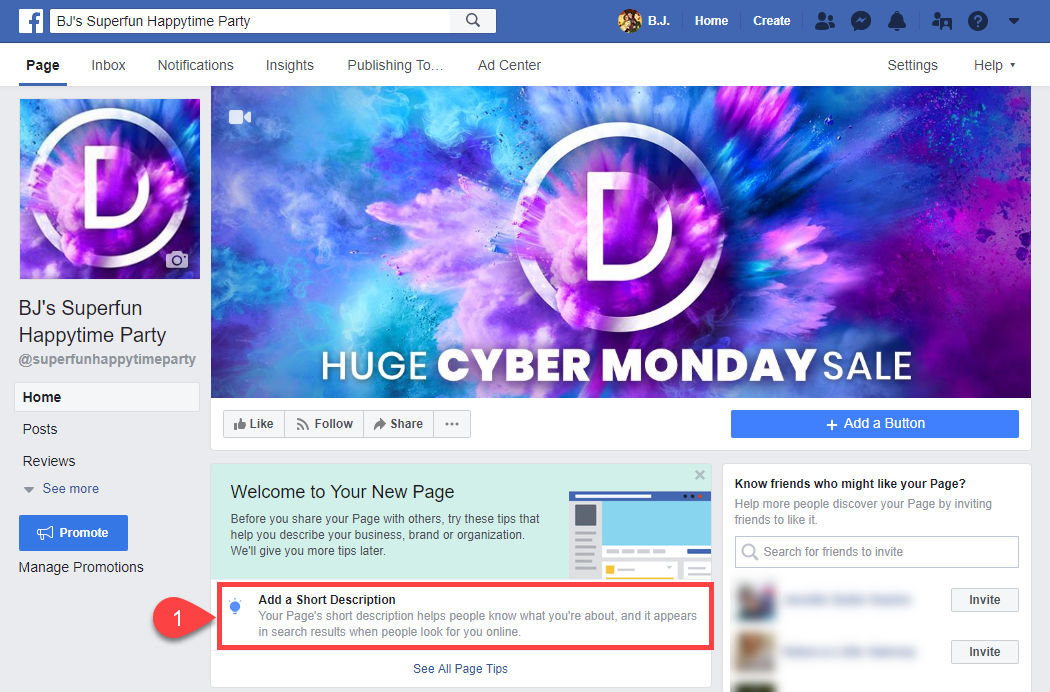
A modal will appear where you can add a 155 character description. This is your elevator pitch. The most succinct way you can describe your brand or business. For example, Elegant Themes’ page has the description, Elegant Themes builds amazingly beautiful Premium WordPress Themes coupled with advanced functionality and awesome support. Simple and gets right to the point.
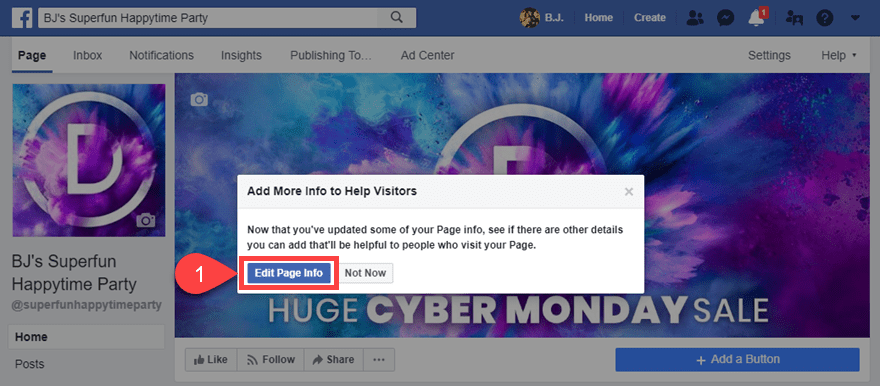
When that’s finished, another modal appears, asking you if you’d like to edit the rest of your page information or wait until later. No time like the present, so let’s edit that info.
General Page Info
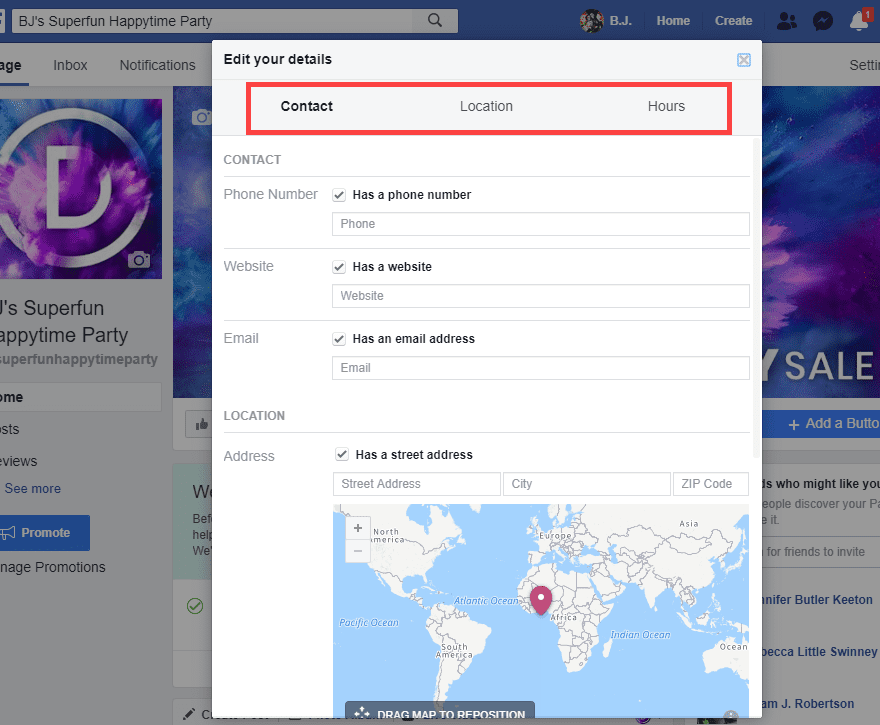
Yet another modal appears, this time with three tabs. Contact, Location, and Hours. All of these may not pertain to your business or brand. If you’re an online shop, you may not have hours. So you can select Always Open. And if you don’t have a street address or phone, you can uncheck them, and they won’t appear at all on your page. Anything you do enter, however, will show up on the main page for all visitors to see under your About section.
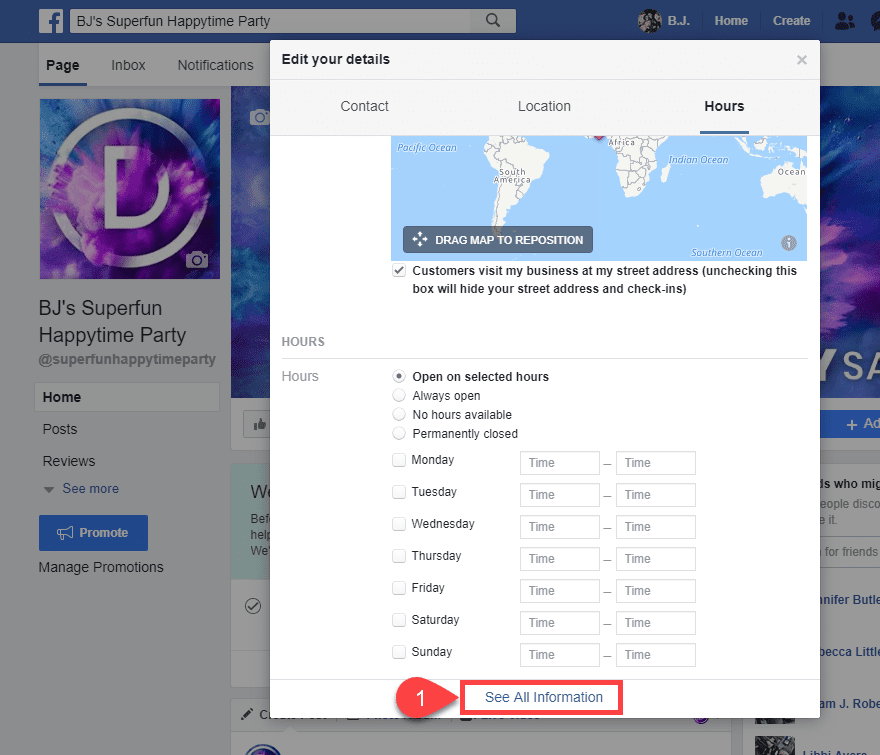
When you get through all the tabs, you’ll see a link that says See All Information. Since there’s a lot more than just websites and phones to your business, we should probably click through.
Page Name and Team Member Updates
When you do see all the information available, you may feel overwhelmed. That’s okay. You don’t have to fill it all in now, or really…ever. Some of it may not pertain to you or your Facebook marketing strategy. Much of it, however, will. Again, this is the info that shows up in your About section.
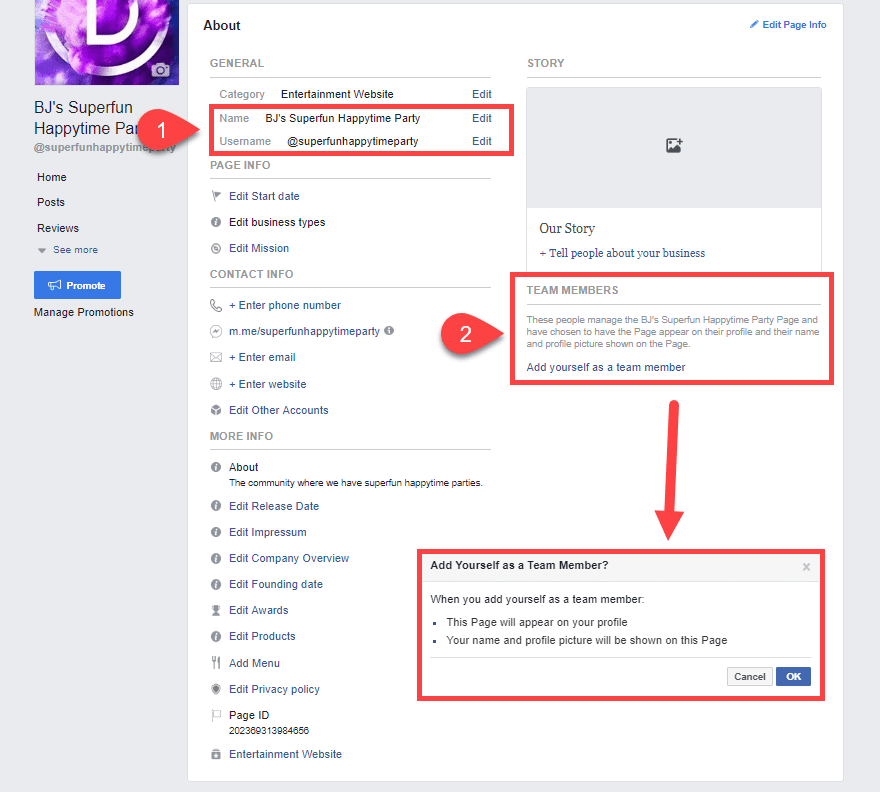
The two most important sections here, at least starting out, are General and Team Member sections. Under General, you can change your page’s name and @username. I bring this up now because you might have chosen the wrong username for your page, or you might have used a page name that might not fully encompass your Facebook marketing goals.
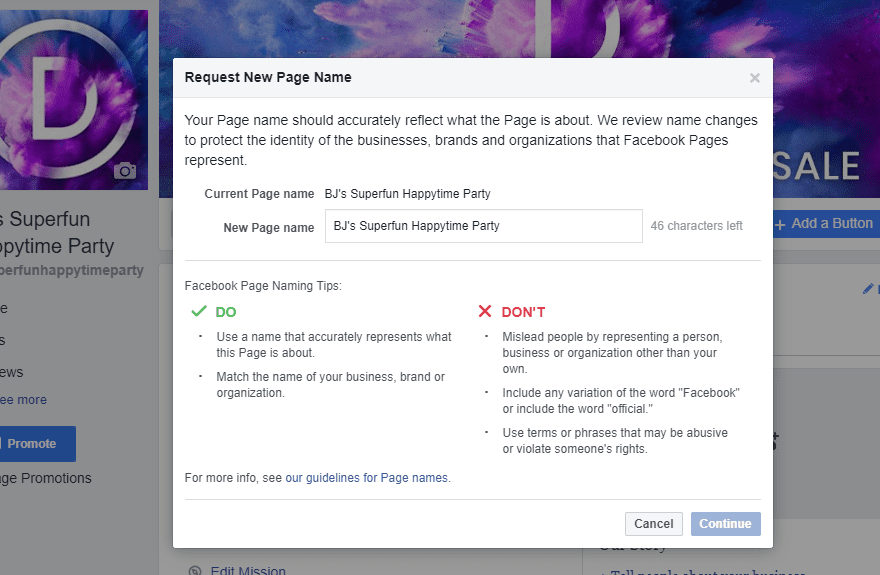
For instance, you might have named your Page Elmo’s Superblog – Fun, Frolick, and Learning with Elmo, but realize that the better page name would be simply Elmo’s Superblog. This is how you’d go about changing that. Also, you can change the @username here, too, and it is entirely independent of the Page name. So you can still have the username @superblog even if you change the name. The reverse is also true. You can change your username but keep the page name. So you could go to @elmosuperblog without worrying about changing your entire page name. In general, however, it is a good tactic to keep them pretty similar. That way, people won’t get confused. And it makes tagging and finding your page easier.
Regarding the Team Members tab, notice that it says if you add yourself to the page as a Team Member, the Page will appear on your profile as well as your own name nad profile picture being featured on the Page. You can still run the page as an Admin or other user role if you are not listed as a Team Member. So if privacy is an issue, or you just want to separate work and personal halves of Facebook, consider whether you should add yourself here or not. Either way is fine.

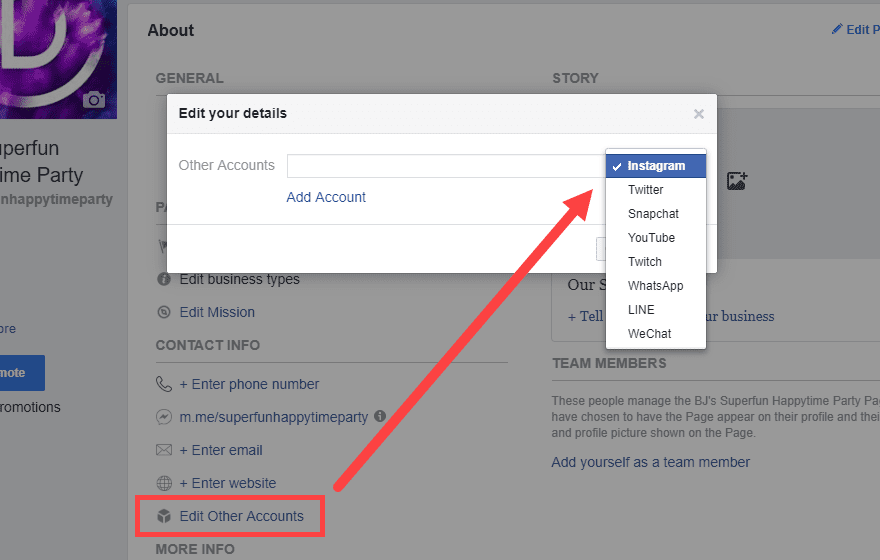
As an online business, you likely have more than a Facebook account. You have an Instagram, surely, and a Twitter. Maybe you use Snapchat and WhatsApp for customer service and promotion? If so, you want to link to them on your Facebook Page. Just click on the Add Other Accounts link and a modal will pop up so you can include the other platforms you want to showcase.
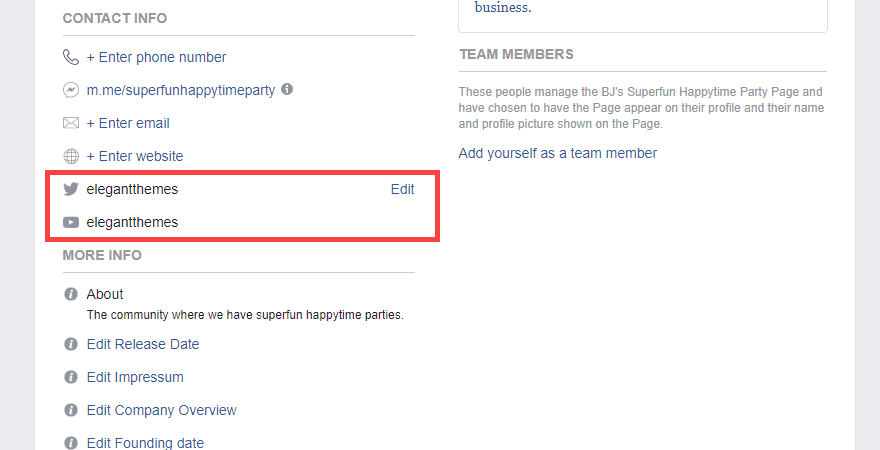
Any and all accounts you add will be shown under the Contact Info for your Page. When adding the other accounts, make sure only enter the username, not the full URL.
After that, you can simply edit the rest of the details you want to be public on your page. But before moving on to another aspect of your Facebook marketing, let’s take a look at the Story of your Page.
Your Story
To the right of the About section is a large box called Story.
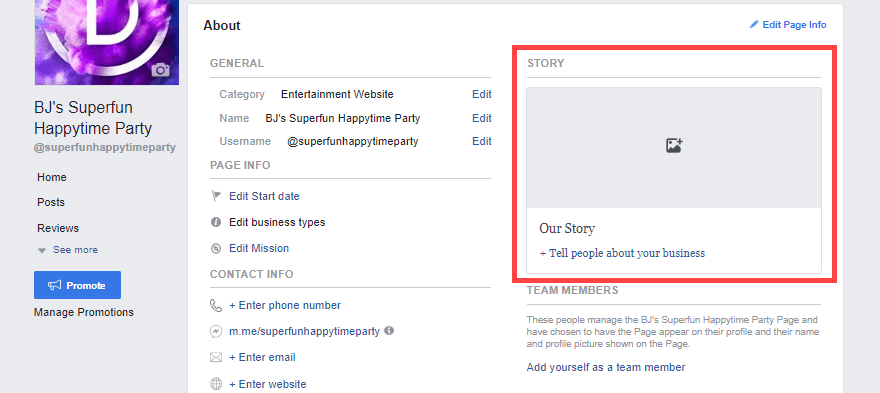
When you click the Tell People About Your Business link, a new editor appears. It looks surprisingly like a blog editor. Because that’s pretty much exactly what it is. You can add a large cover photo and a title. Then you construct a long-form post of what you believe your users, customers, or audience should know about your business or brand. If you have ever posted to Medium, the whole process feels similar to that. When I say long-form, I mean a few paragraphs, maybe. Not a treatise.
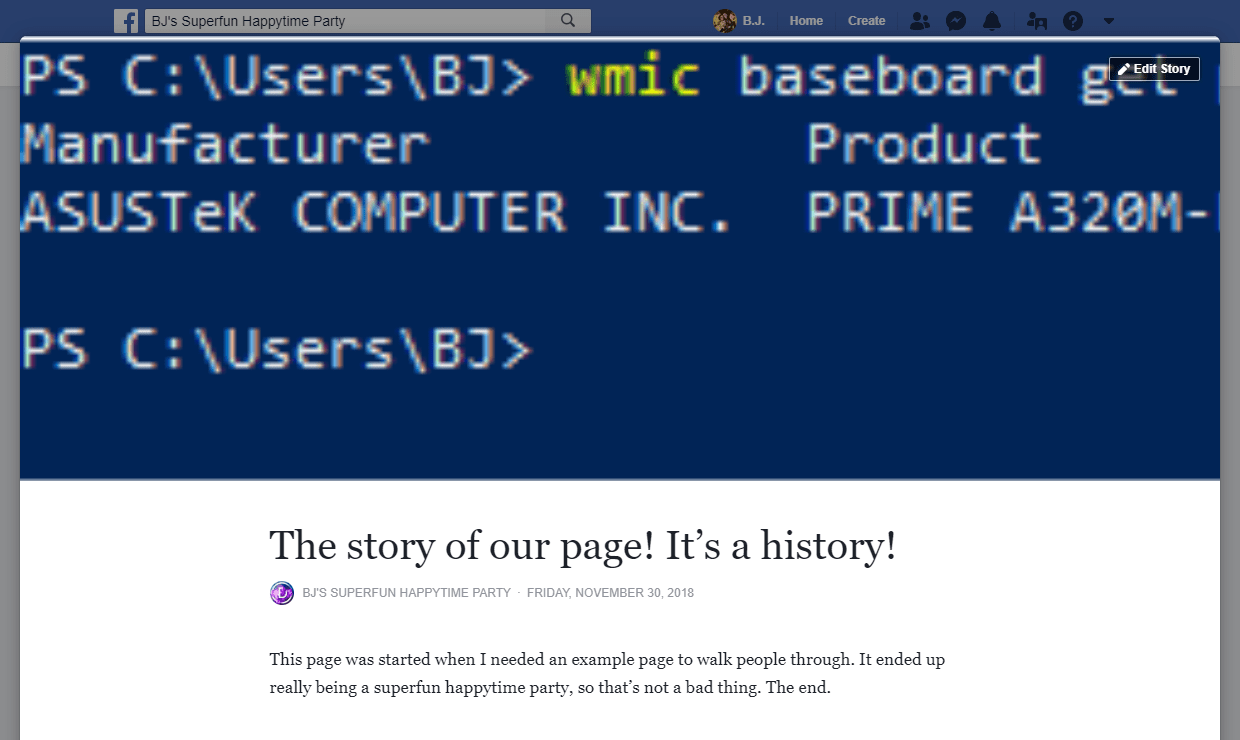
I cannot emphasize enough how important having a well-crafted Story can be. Please, take the time to write a narrative that gives your brand a personal connection to your audience. Narrative marketing is one of the hottest trends right now because it makes customers feel a deeper connection to the brand and engage more with it. These days, people don’t want to associate and interact with lifeless companies who are nothing but numbers, liquidation sales, and clearance percentages. They want to buy from the people behind the logo. That’s why they’re on Facebook to begin with. To be social. To interact. And it should be why you’re doing Facebook marketing, too.
After all, when someone new looks at your page, this Story is one of the first things they see. Like everything else on the internet, you have a very short window of time to get and keep their attention, so make it count. Having a good image, a good title, and a well-written narrative around your brand can go a long way to creating a lasting relationship with your visitors. A good story can take that beyond commerce or viral sharing.
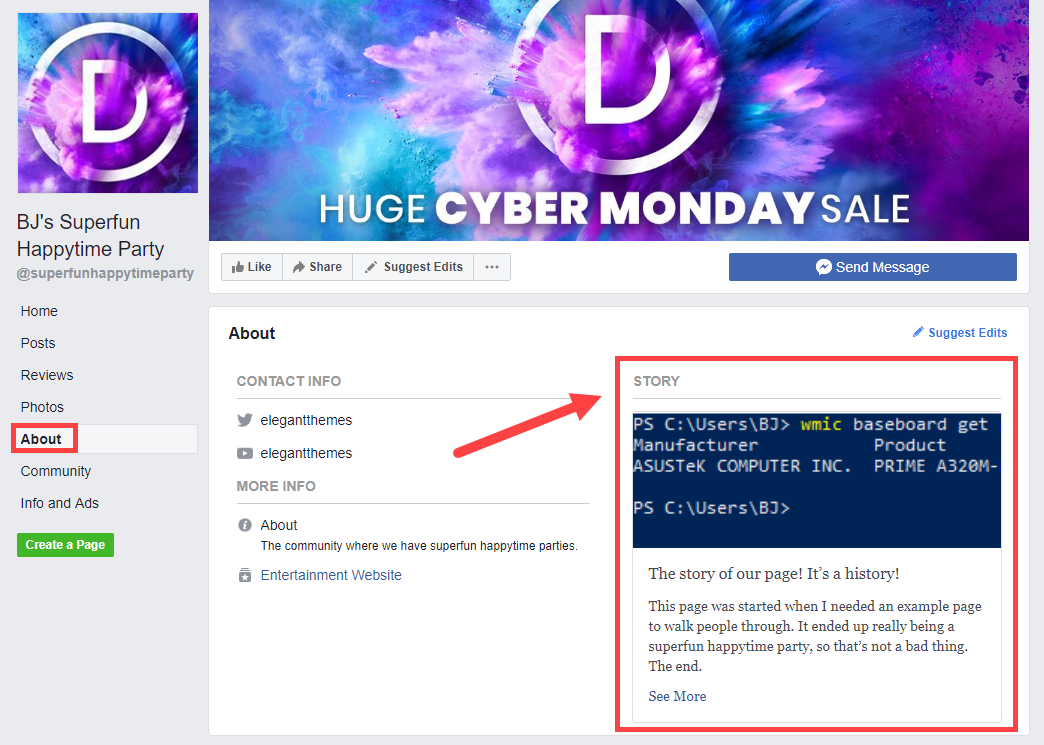
With all of those filled out, you can begin to fill out the rest of your information and tweak your page as you go. Those are by far the most important and required pieces you need to fill out.
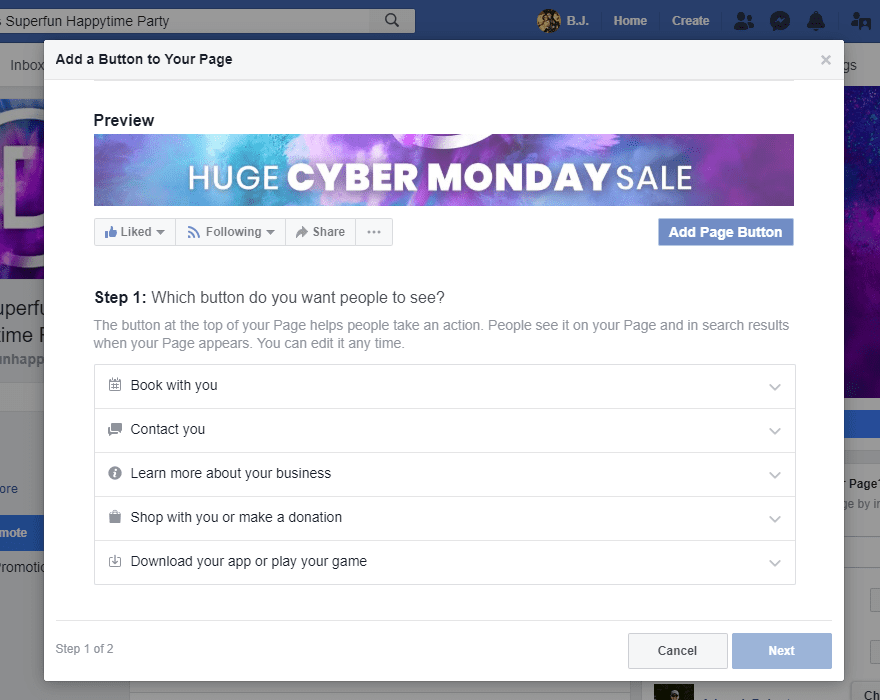
The final customization you need to make is the Add a Button button. If you don’t do anything else before publicizing your Page, make it this. Facebook lets you place one CTA button that appears at the top of your Page whenever people visit.
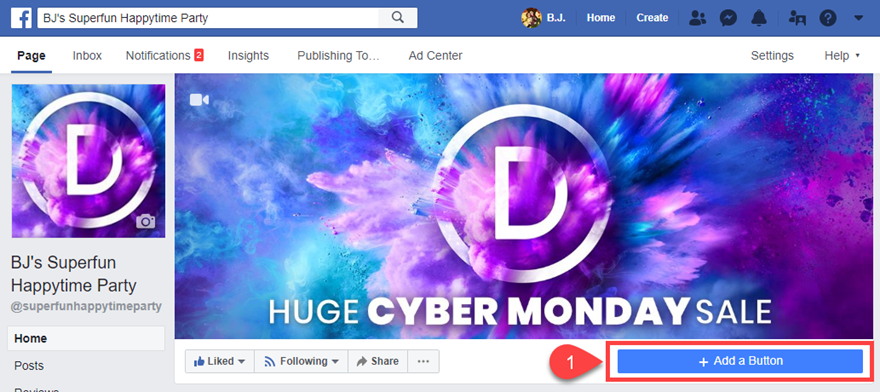
You have the option to choose from multiple pre-set kinds of CTA actions for your button:
- Book with you
- Contact you
- Learn more about your business
- Shop with you or make a donation
- Download your app or play your game
Now, every Facebook marketing strategy is going to be a little different. Some people use Facebook to book appointments (masseuses and other service-related brands, for example. Others are software companies that want to direct you to the App Store as quickly as possible. While other brands use Facebook as a support channel for their users. Regardless of what you use it for, this button is going to probably be the hotspot on your Page (or at the very least, one of them), so choose wisely what works best for your brand.
Useful Facebook Marketing Strategies
Now that your Page is set up, you can use it to market your brand. The Page itself is kind of like a headquarters and lets you perform various tasks. Not all of these ideas will work for every single kind of brand, but the majority will. Let’s take a look.
Messenger
These days, nearly everyone has Facebook Messenger installed on their phones. In many cases, they use it in lieu of traditional SMS/MMS messaging. Facebook recognized the power in that, and they now allow Pages and people to message back and forth within the same interface. Unless they opt-in somehow, you can’t be the one to message first, but under the Add a Button section, you can make it so that you’re just a click away for users to be able to basically text you.
And they will. Instead of sending an email that may or may not be delivered to or read by the right person, sending a Facebook message gives the user access to your brand in real-time as well as in their space. Many Pages run support this way, and it increases engagement heavily. It’s also very easy to set up so that you can start having conversations with your users.
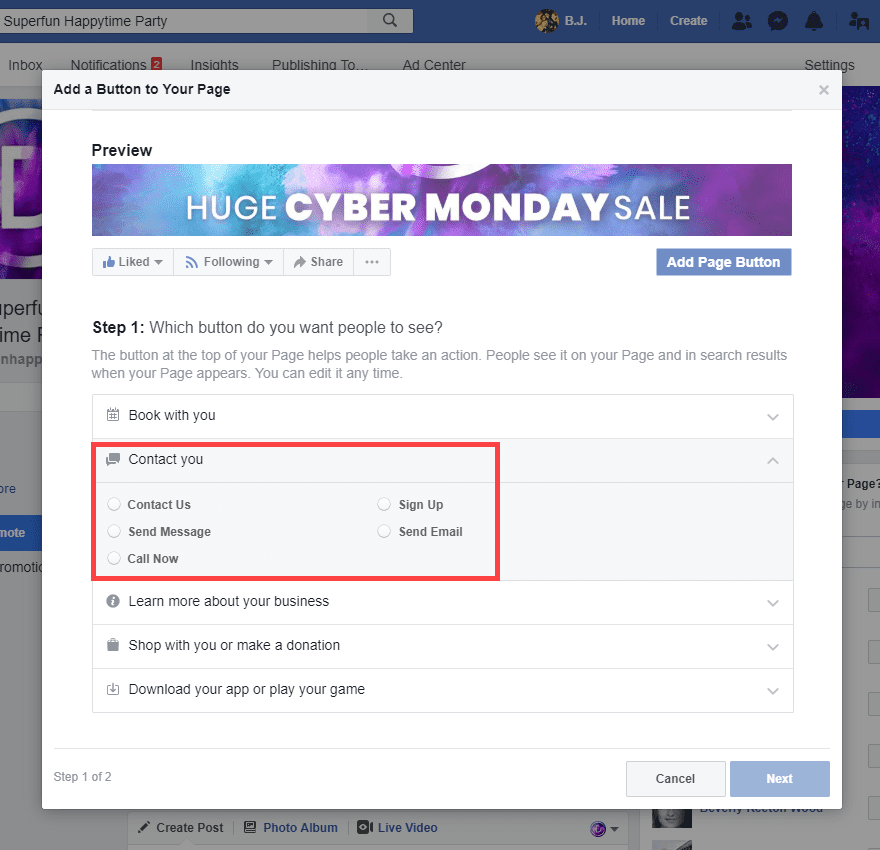
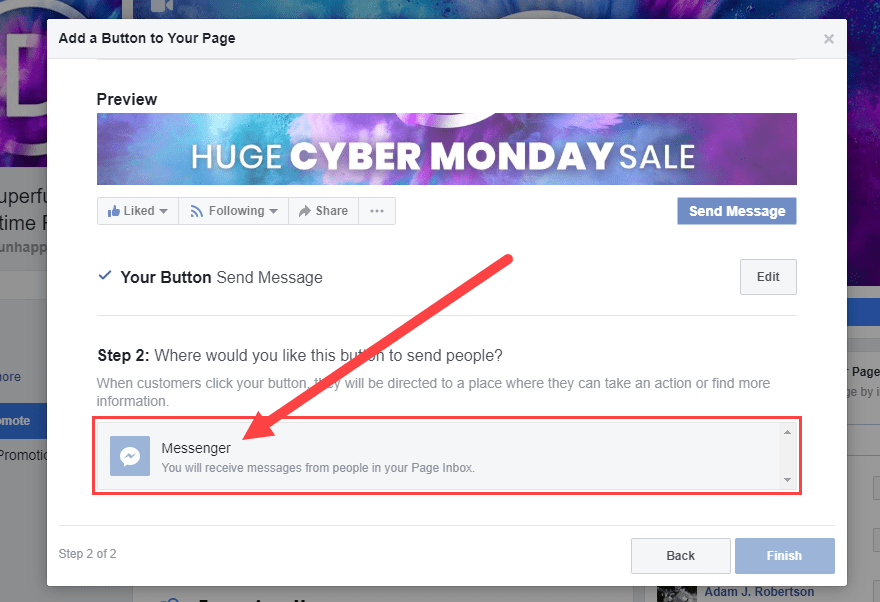
Select the Send Message radio button and click Next. You will now have the option to choose where the user can send a message. If you chose Send Message, your only option will be Facebook Messenger. However, if you have Call Now or Send Email, for example, you will get a field to enter your chosen address or method.
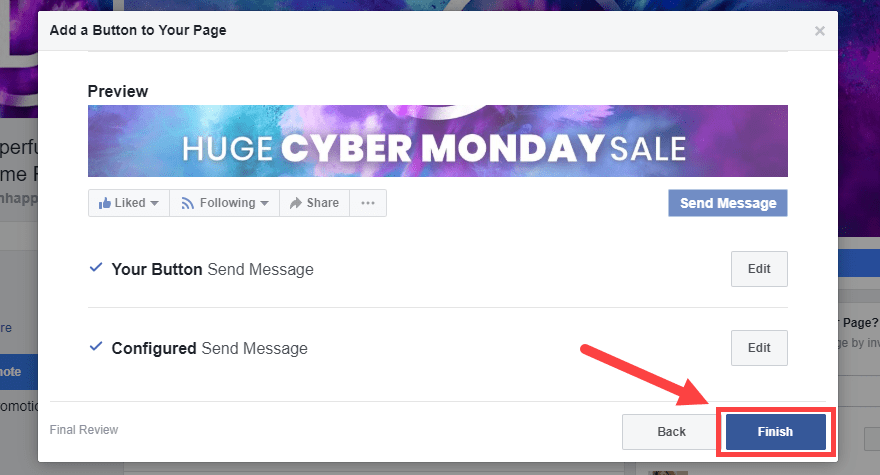
Now, you have the option to review these couple of choices. Just click the Finish button when you’re ready.
Now, you have a nice, shiny Send Message button in your Page’s toolbar. Your audience will absolutely choose to interact with you. If you make it a priority to respond quickly and respectfully, your engagement rate will advance steadily.

Setting Up Facebook Messenger Autoresponders
The final aspect of the Send Message button for your Facebook marketing is making sure that you respond. Because here’s the thing: you’re not always going to be able to get to each and every message as it comes in. Sure, the Message will show up on your phone as a text message, but you may not be able to respond. Or someone on your team may already be handling a different support issue. In those situations, one of the best things you can have is an autoresponder just to let your users know that you check your messages, that you aren’t ignoring their attempt to contact you.
When you first set up your page, you will get a banner alert telling you to set up the responder. This is the best way to do it. You can always get it ready from your settings, too.
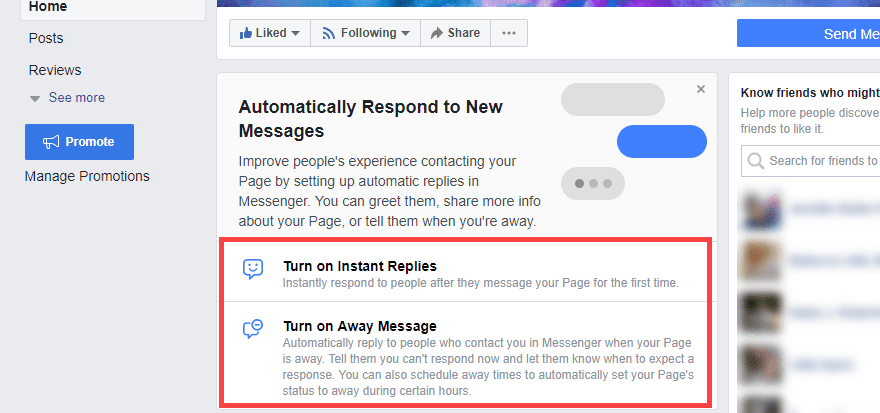
When you click either of these options, you will be taken to your Messages settings. In here, you get a ton of options that you can run through to customize exactly how you want to interact with your audience.
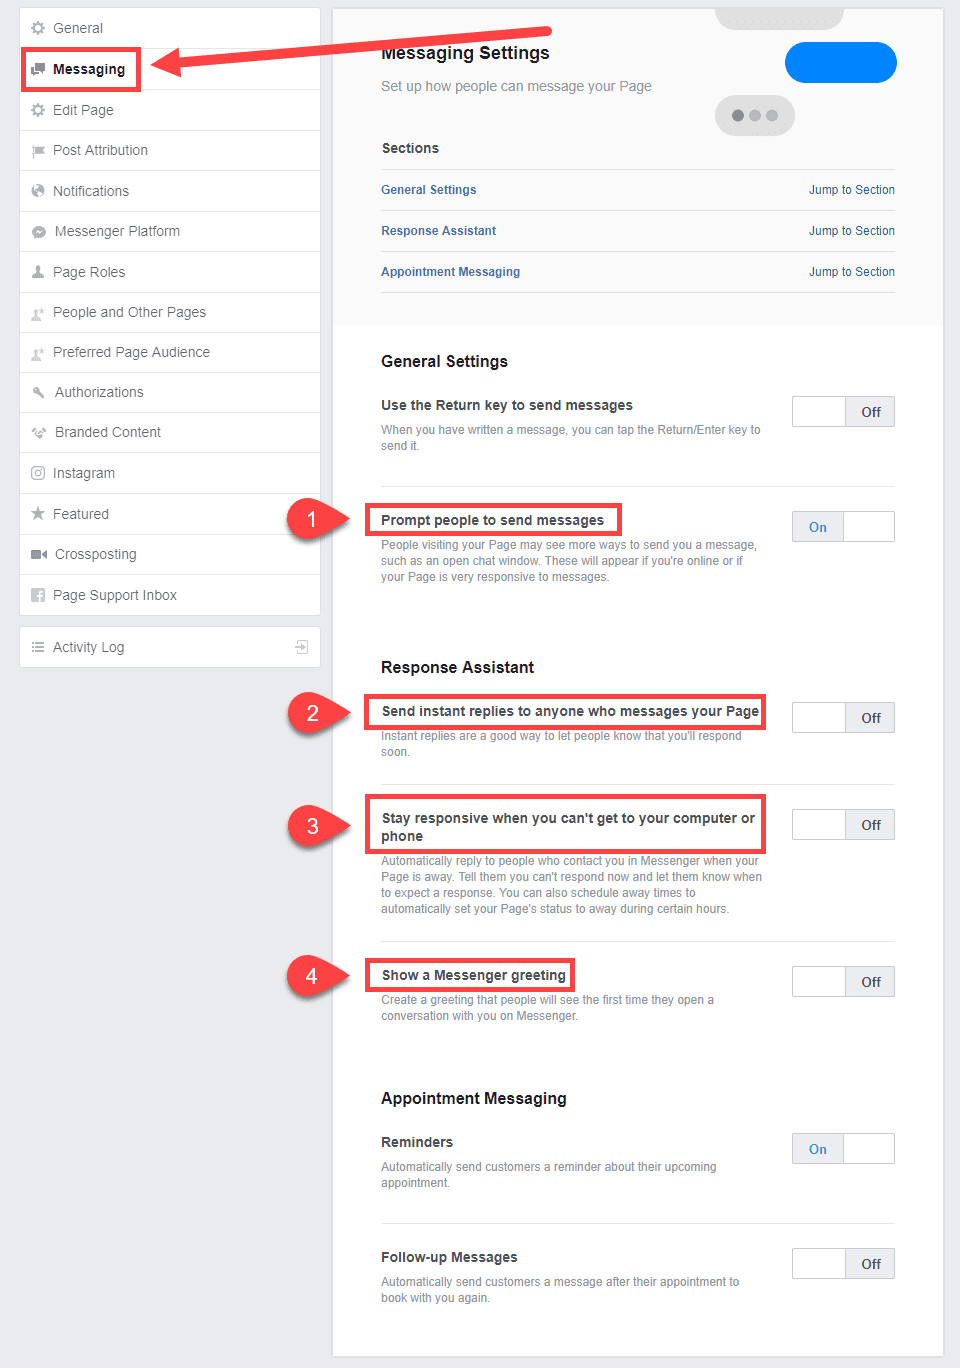
We think there are four important aspects to enable here.
- Prompt new people to send messages
- Send instant replies to anyone who messages your Page
- Stay responsive when you can’t get to your computer or phone
- Show a Messenger Greeting
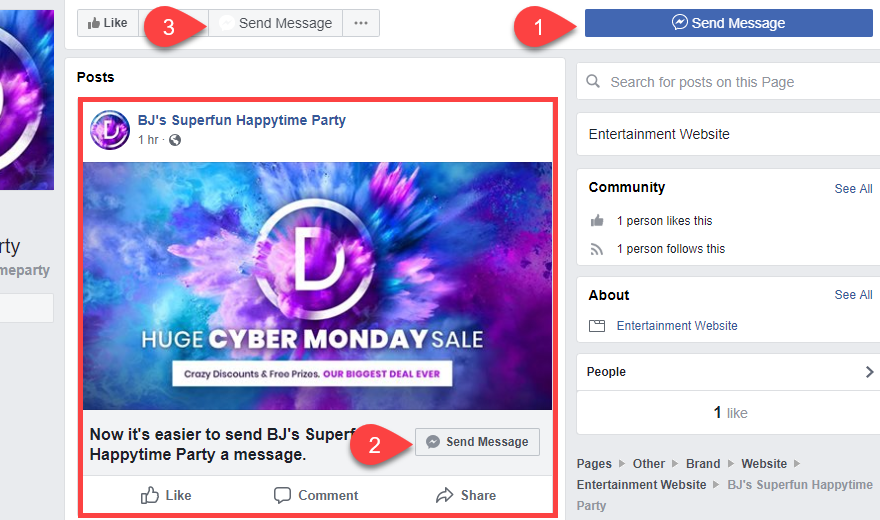
It is important to note the differences in these three options because they seem very similar. First, when prompting people to send new messages, your new visitors will see a post like this on your Page’s timeline. The message button is prominent in the post as well as in the toolbar and menu. And in the primary tabs (3 in the below image) if you choose to highlight it as well.
And within the autoresponders, you can up three unique messages, too. When the toggle is switched to On, a highlighted blue message will appear. This is what you will say to your visitors, so you want to personalize them. Hit the Change button to do so.
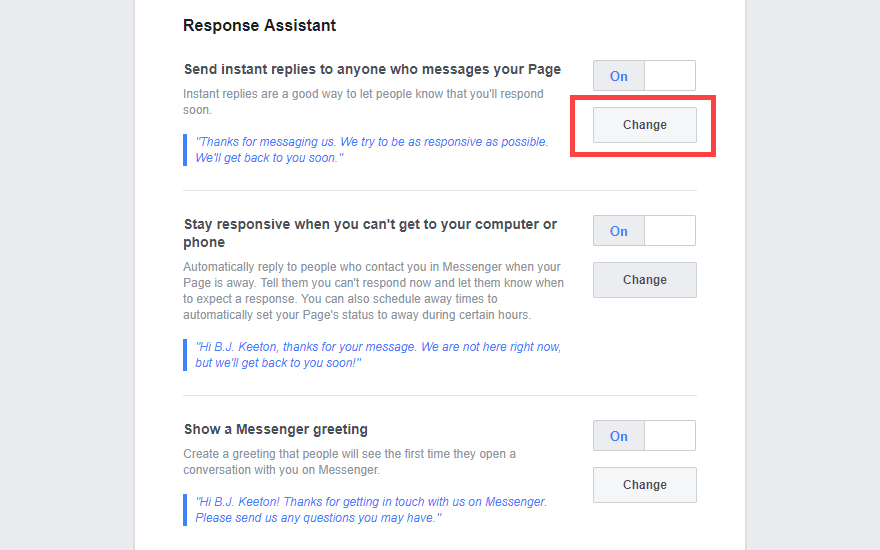
The differences from each of these are important. The Send instant replies to anyone who messages your Page option is the traditional autoresponder. Anyone who sends your Page a message will get this reply. It can be used to let folks know that you will reply quickly, maybe to link to a knowledge base or support forum, even to let them know you have a sale running. The message can be changed at any time, so it may be in your best interest to periodically use the Messenger autoresponder in your marketing strategies, same as you would an email series.
Then, the Stay responsive when you can’t get to your computer or phone option is a different autoresponder that only kicks in when you’re off the clock. You can set away hours — such as when your business is closed. That way, those who contact you can be directed to your website, maybe your after-hours support team, or even just telling them that you’ll get back to them when you open up bright and early the next day. If you use this and the above option together, this one takes precedence because of its specialized nature.
And the third, Show a Messenger greeting, is a one-time-only contact. On Twitter auto-DMs are frowned upon because they are impersonal. On Facebook Messenger, having a greeting can actually personalize the encounter. People can even opt-in for bots to periodically message them. The greeting, however, will only be down to visitors on the very first time they send your Page a message. Never again. Many pages will use a question for their opening, trying to elicit a response from the user to initiate a dialogue. One very good marketing strategy is to provide a unique discount code for the first time someone contacts you via Messenger. That way, you build goodwill with them even if they are contacting you for a more negative reason.
Posting to Your Facebook Page
Like we mentioned above, the Facebook Page itself is kind of your headquarters for everything that you do on the platform. All of your Facebook marketing in some way leads back to the Page. So you probably want to work to make the Page as central to your strategy as possible. Primarily, that means posting to the Page itself to appear in your followers’ feeds to generate shares, likes, comments, and other forms of engagement.
With that in mind, you should know there are a truly absurd number of options for you to post with. We are going to be primarily concerned with text posts, image/video posts, live video streams, and stories.
With each kind of these posts, you also get to choose your posting audience (public, restricted, or specifically targeted) and posting time (scheduled for a future date, backdated to show earlier in your page’s timeline, or simply saved as a draft for later review).
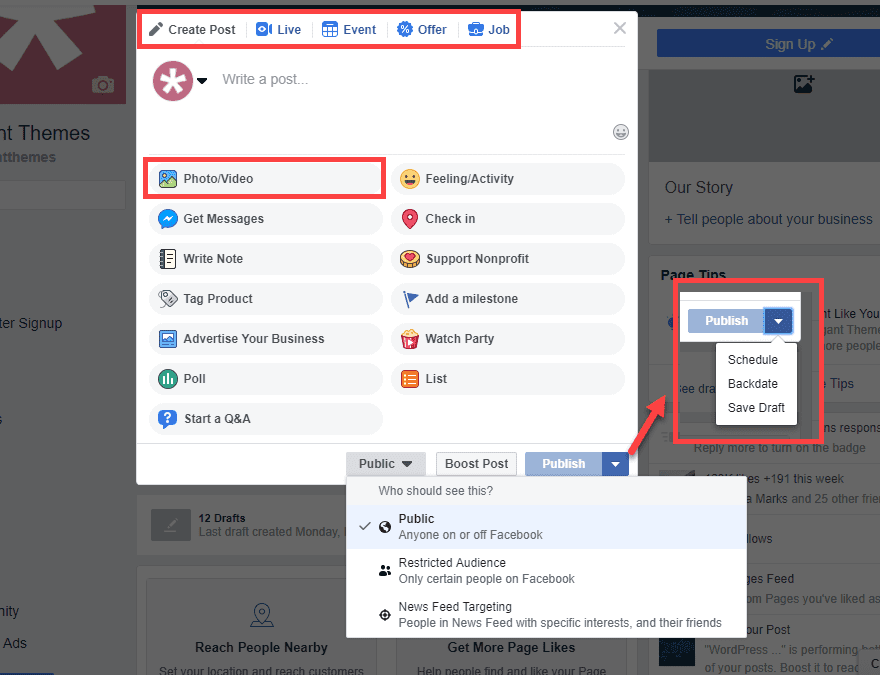
Many of these are self-explanatory (scheduling, backdating, for instance), we want to dig into the ones that can really take your Facebook marketing into a new league.
There’s no set rule on how many posts you should or shouldn’t publish, but keep in mind that if you post too many in sequence, they get truncated in people’s news feeds. Instead of showing your full post, it may say something like Elegant Themes has posted 3 updates today with a thumbnail of the Page. That severely limits click-through and engagement. You want to make your posting regular, but not overwhelming. It’s definitely a delicate balance. But you will get it as you practice and learn your audience.
Text Posts
Text posts are the bread-and-butter of the Facebook world. They’re what started it all. Because of that history, you need to incorporate text posts into your Facebook marketing rotation. It doesn’t have to be anything fancy, but when you click inside the box that says Write a post…, the default is plain ol’ text.
You might ask your followers a question for feedback. Perhaps you need to announce that your store isn’t opening on time that day or that a menu item is no longer available. You might even just tell people good morning and spark up a casual conversation in the comments.
Text posts do well at many lengths, but if you want to do something truly long-form, you’re better off writing it on your own blog or website and linking to it. That way you get the SEO benefits in your own domain. Individual text posts don’t do well in external search engines, just with the internal FB search.
Image/Video Posts
The real money (both literal and figurative), however, is in video. And to a lesser extent, image content. It’s why Instagram (a Facebook-owned company, by the way) is so successful. People love interactive media, and they can far more easily consume your content if it’s visual. So you need to be posting images and videos as your primary content.
Not only do images and video posts get higher engagement just because people are people and act like people, but also because Facebook prioritizes them in the algorithms that dictate what content shows up in users’ news feeds. These are the posts that get shared. Even Events and links focus on featured images and videos.
So knowing all this, what can you do in terms of publishing that can help your images and video succeed? Honestly, it’s pretty simple:
- High-resolution images and HD video – no one likes to see grainy and blurry content, and no one likes to share it
- Bright colors and crazy designs – you want to catch people’s attention, and this will do it
- Only necessary text – people scroll quickly, so your message needs to be concise enough for them to read it in seconds
- Short(ish) video duration – 30-second clips are amazing because people can watch them and share them without getting bored or distracted
- Long(ish) video duration – if you go into the 5-10 minute (or longer) realm, do so knowing that not every video you post should be this long. Only your very best content will get engagement at this lenth, and even then views will taper in the later portion
These aren’t hard-and-fast rules. There will always be exceptions to them. However, these do tend to be the hallmarks of the most successful individual video posts on Facebook. If your main focus is video (such as with Wistia or a media company), you have to determine what works best. Your audience may enjoy longer videos with more substance. But as a general rule for most people who aren’t video specialists, these tend to apply.
Additionally, if you have a consistent library of videos over 3 minutes long, you can have the option for mid-roll advertisements to monetize your page. These will play at set points during the video, and your visitors can wait to finish the rest of your video afterward. Note that doing this can lower engagement after the ad breaks because many people simply stop watching. So like we said above, only the best content you have should be long-form.
Live Video Streams
Probably the best way to market your business using Facebook (or YouTube, Twitter, Instagram, or any other platform that supports it) is live video. Livestreaming is incredibly popular, and if your goal is to engage your audience, livestreaming is the best way to do it. Why? Because you can actually talk with them in real time. You get to know them. They get to know you.
Livestreaming with Facebook is incredibly easy. All you need to do is click on the Live button when you start a post to be taken into the pre-show settings.
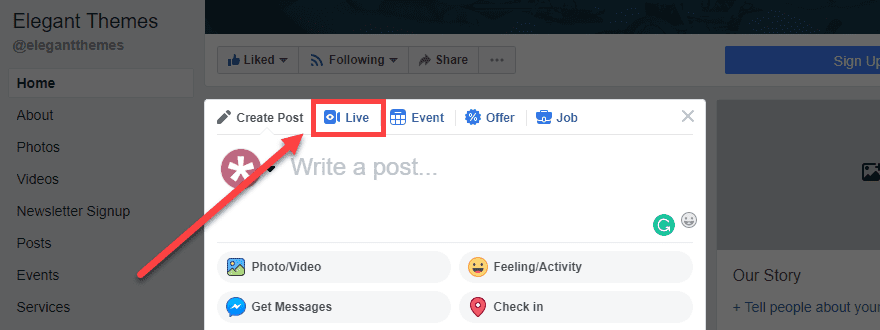
Once there, you will see two tabs. The Connect tab is for if you use an external service or software to stream. You may use Restream or OBS or even Wirecast. If you are using just Facebook, you will just fill out the info for the stream and go live with the camera attached to your computer.
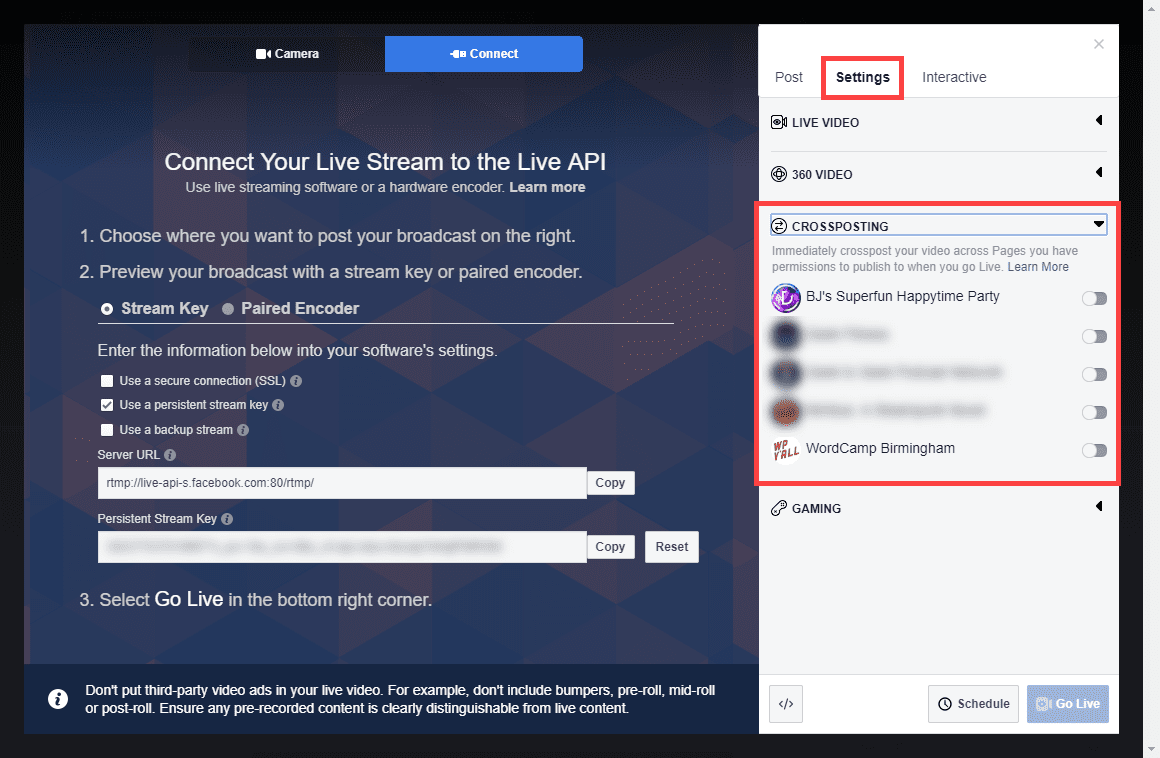
One of the best features for Facebook marketing regarding live video is that you can crosspost to other, related Pages that you run. If you click on the Settings tab in the Connect window, you will see a list of Pages that can host your stream simultaneously. This is a great idea for those of you who may have different departments, each running a different Facebook page, for instance.
You can also go Live on the mobile app, too, and it’s as simple as pressing Go Live when in the app. As long as your audience has notifications set up to be alerted when you go live, or (even better) you schedule your streams so they know when to tune in, you will be able to truly find champions for your brand who come back regularly to see your new content and say hello to you.
Stories
Snapchat took the internet by storm, and pretty soon nearly every single platform had stolen (appropriated, maybe?) the concept of temporary, time-limited pictures and images. On Facebook and Instagram, these are called Stories. And on Facebook, not only can you add to the Story that belongs to your personal profile, but you can also add to the Story of a Page that you manage.
Best of all, these Page-created Stories show up in your followers’ Story feed, right alongside their friends’. In fact, the Stories (as of this writing), don’t seem to be subject to as harsh an algorithm as news feed posts (images, video, text, etc.) like we discussed above. For the most part, they appear in chronological order, based on posting time.
The only real caveat to using Stories as a marketing tool is that they are mobile only. That’s right. You can only post to your Page’s Story through the official Facebook smartphone app. Lucky for all of us, it’s incredibly easy to do. But you do have to post to your Page’s Story differently than you do your personal one. First, click on the hamburger menu in the lower-right of the corner (if you’re on iOS. Android and other platforms may be in a different spot, but the functionality is the same).
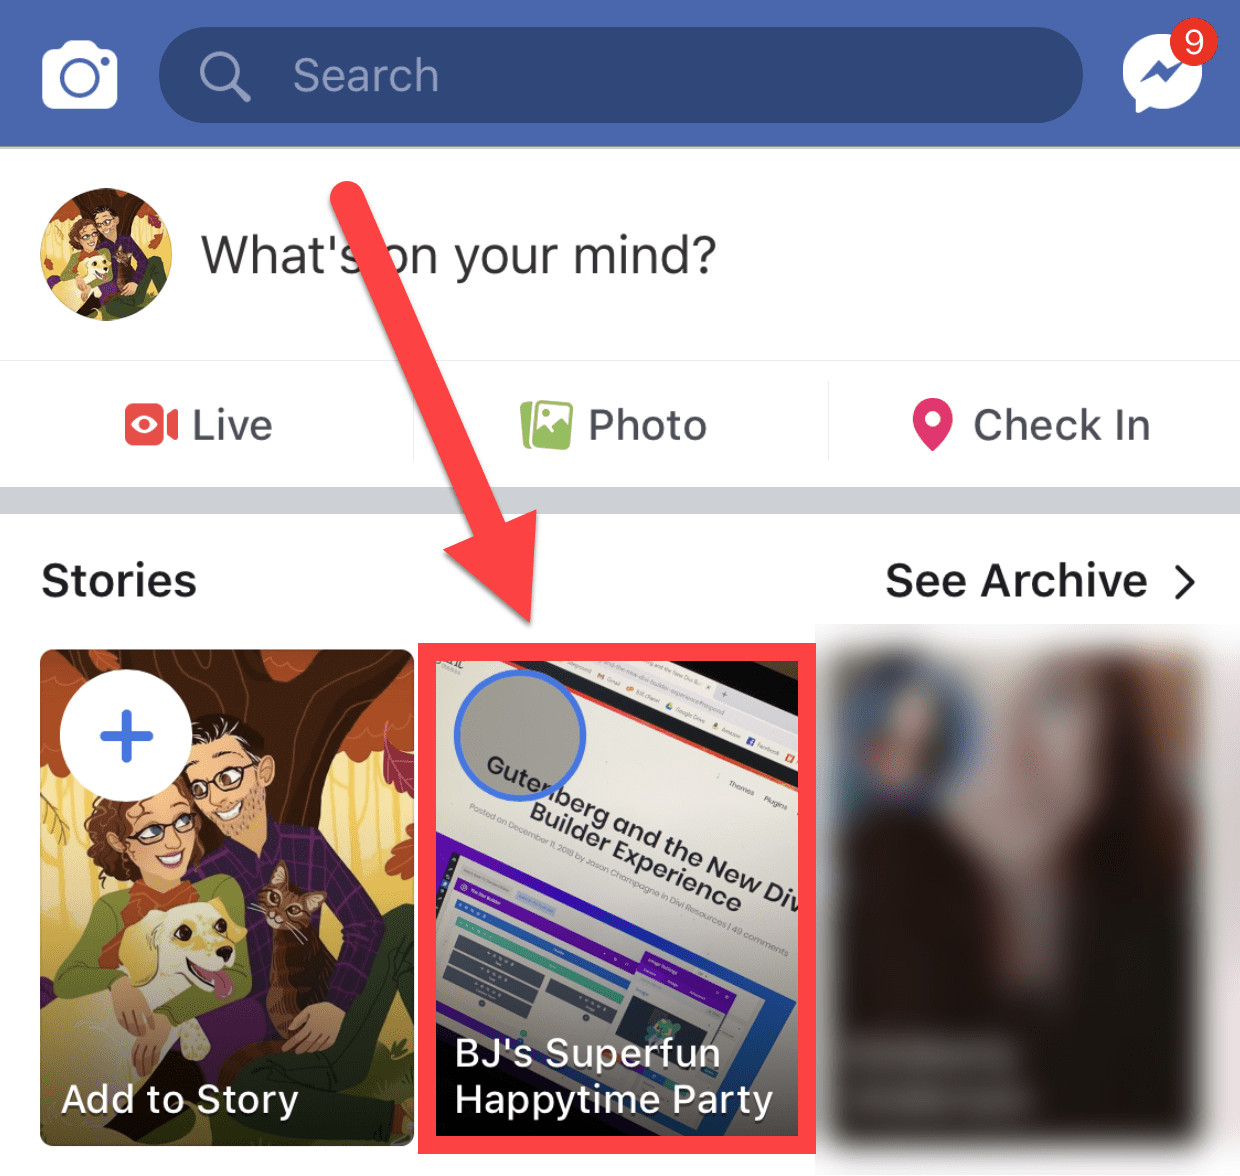
Next, choose the Page to which you want to post the Story.
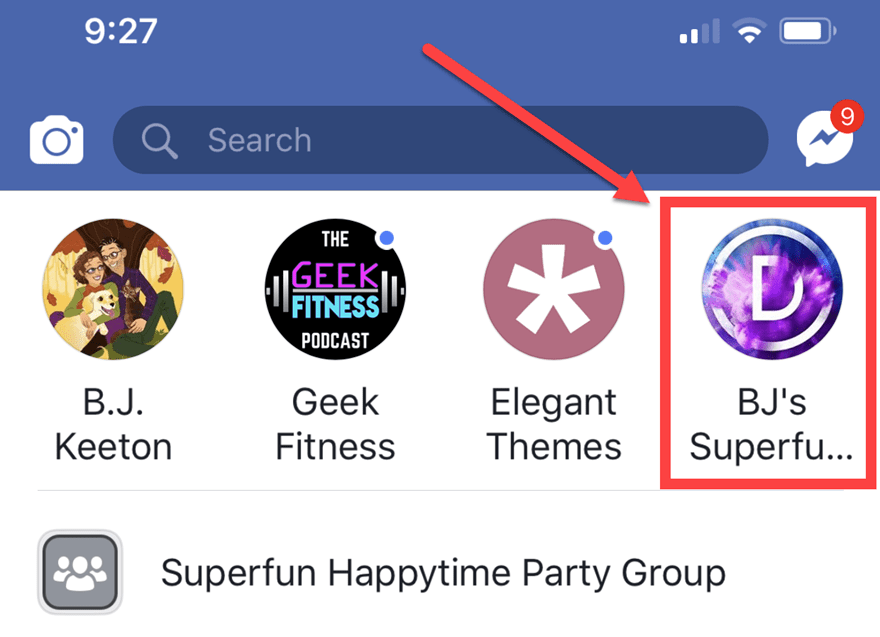
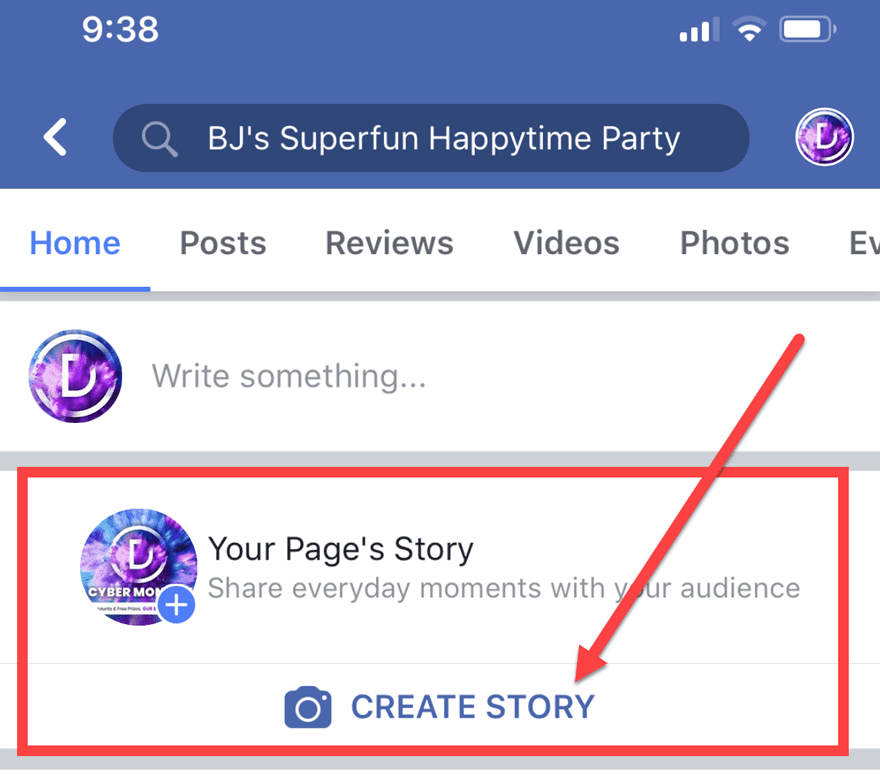
Once you’ve made it to your page, scroll until you see the area in which you can post an update. It should say Write something… or a similar message. Beneath it, you will see a box called Your Page’s Story with a button that says Create Story. Press it.
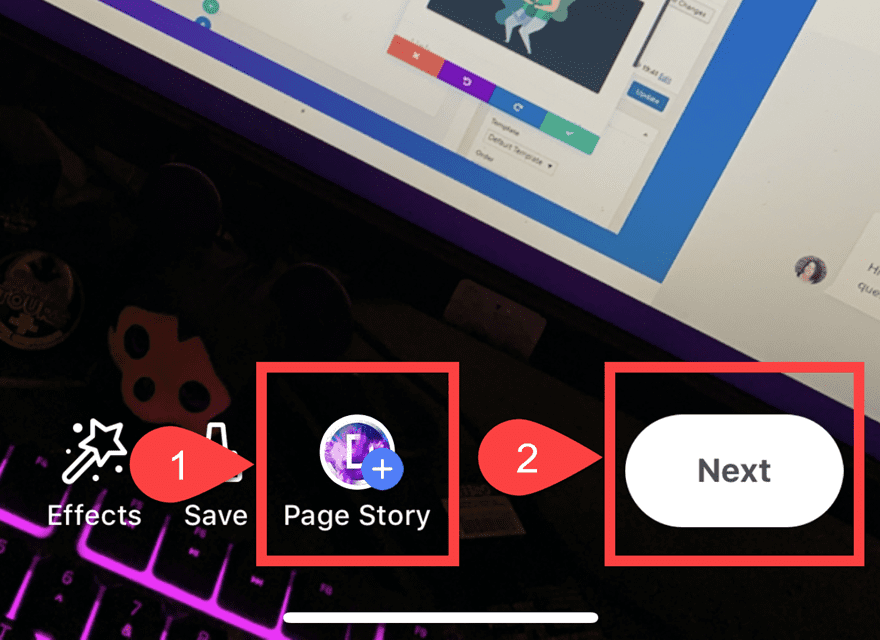
You will be taken to a camera window now (provided you allow access, otherwise you can’t post a Story). You can either take a photo or video here, or you can import one from your phone’s storage. Once you’ve chosen and annotated the Story you want to post, you have two options to post it: either immediately via the Page Story shortcut (1) or by confirming details of the Story by hitting Next (2) at the bottom of the screen.
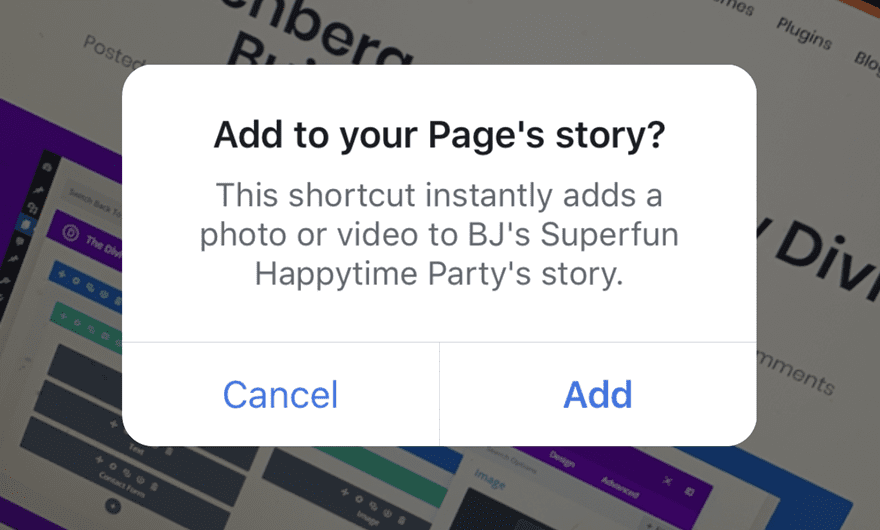
If you choose the shortcut, you get a confirmation before it goes directly to the Story.
And if you choose to press the Next button, you get a few more options to verify before moving forward with the Story. You can make sure that you’re on the right Page, first of all. The last thing you’d want to do is put up a personal story to your Page or something similar. You also get the option of sharing the Story to your Page’s news feed so that it shows up as a traditional Image post. You will have to experiment with which ones you should cross-post. Each audience is different. Stories are for more candid, slice-of-life topics. Maybe behind-the-scenes videos or fun staff profiles. News Feed posts, on the other hand, are the evergreen or more traditional posts.
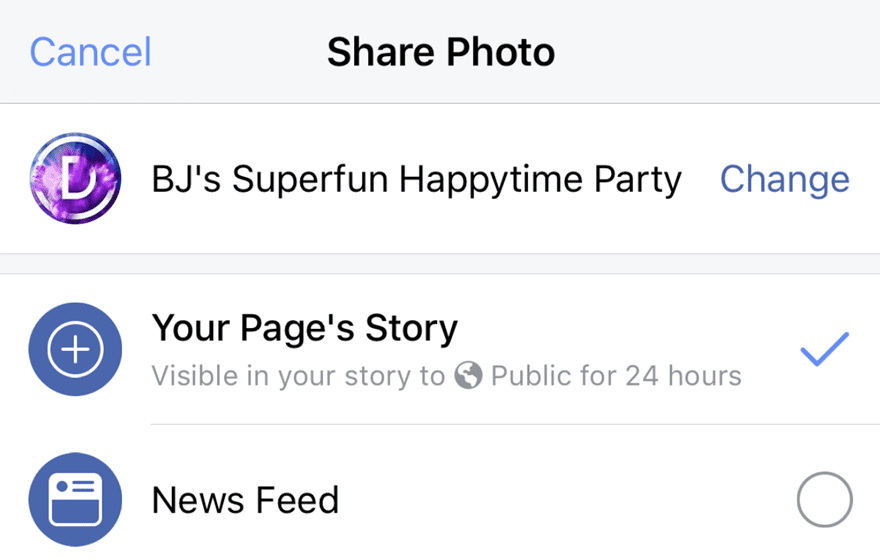
Once you’ve made sure the Story is ready for your adoring audience, share it, and everyone who follows your Page should see it at the very top of their Facebook app. It will appear chronologically (as of this writing), so determining when your audience is most active can be crucial.
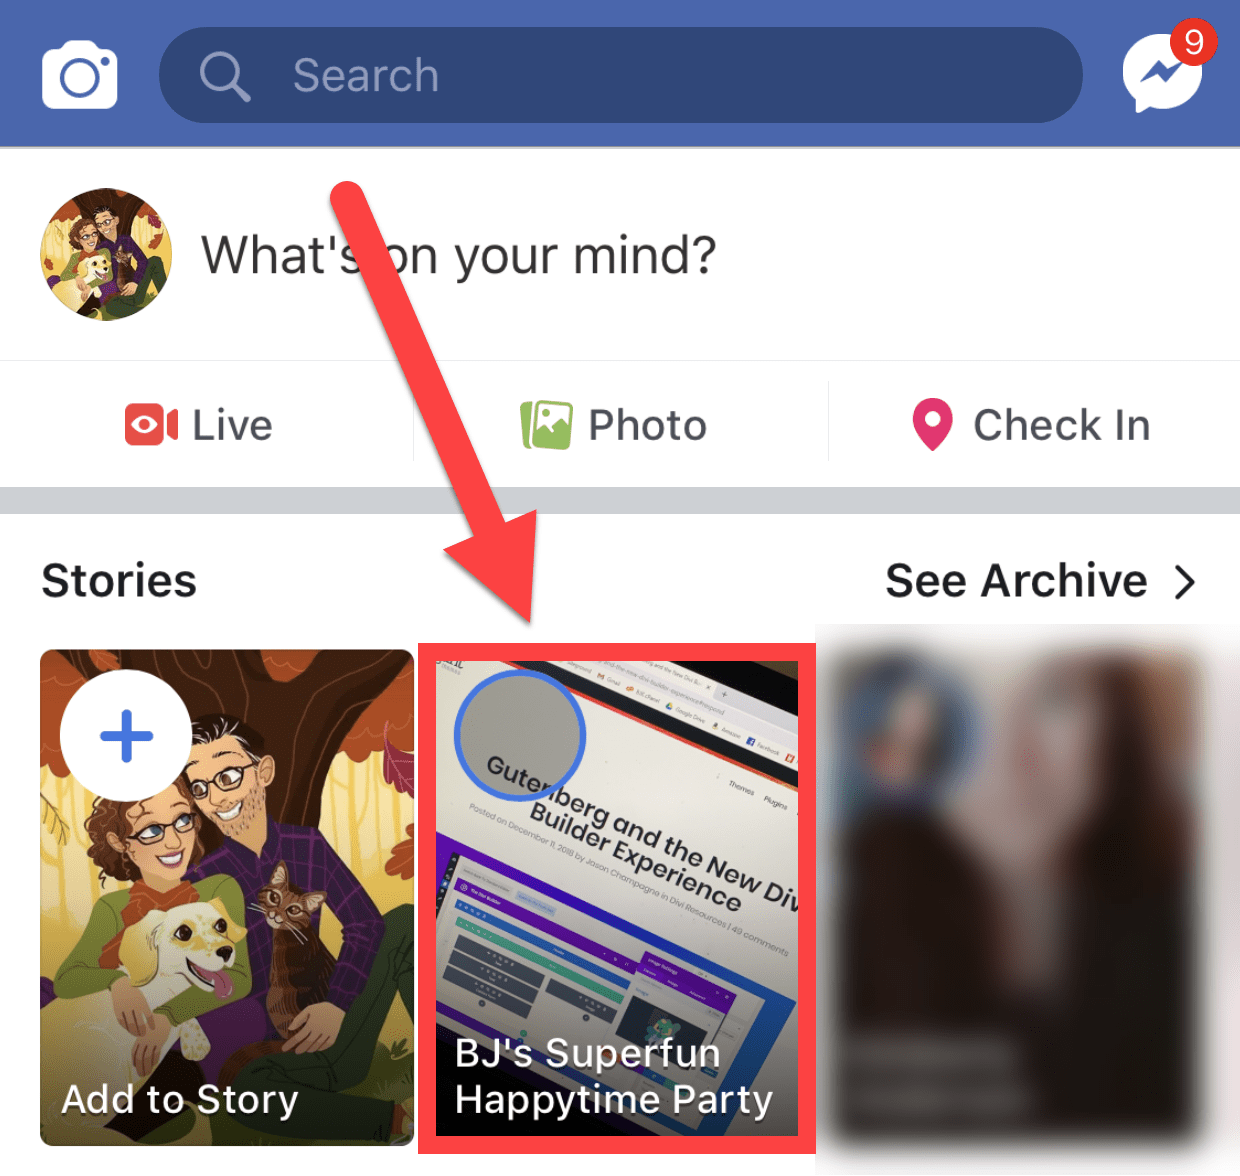
Also, Stories only last for 24 hours from the time of posting, so if you want to stay in people’s Story feeds, you need to post regularly to your story throughout the day.
Link Sharing
Very quickly, sharing links to your blog or website is another great way to generate engagement. But not just any articles. Only share either your newest posts (which you should do each time you publish, and then regularly afterward to make sure it get seen) or your best posts. In fact, the best way that you can leverage sharing your own content to Facebook is by integrating your site with Facebook Instant Articles. These work like the Google AMP pages where your site is pre-cached and loads instantly for users on the platform.
You will see these in your timeline often. They’re the posts with the lightning bolt next to them. By stripping out unnecessary code, Facebook Instant Articles mean that your users won’t have to wait on your page to load and get to the content they want to consume more quickly. In general, if a page takes more than 2 seconds to load, the average user will navigate away. Facebook Instant Articles fixes that.
Even if you don’t want to keep yourself that invested in the Facebook ecosystem, sharing your best and newest content will keep you in people’s minds, give them something to share, and get your brand’s message and story across, while funneling users from FB to your own website.
Of everything that you do on Facebook, link sharing is the most hit-and-miss. You pretty much need to do it but don’t rely on this being the number one source of traffic to your site or your primary lead generator. It takes a bit of work to make many of your links get through the news feed algorithm without paying for them to do so, and the time and effort that you spend on that work may be better spent elsewhere. So share away, but make this a lesser part of your overall Facebook marketing strategy when compared to live video, for instance.
If, for whatever reason, Facebook isn’t allowing you to share your posts, follow this guide on how to unblock a blocked URL on Facebook.
Pinned Posts
Any of the above types of posts (excluding Stories that are not posted to the news feed) are capable of being pinned to the top of your Page. What that means is that anyone who visits your page will see this post first, regardless of what else has been published since. Most Pages use this for announcements or product launches. Many restaurants keep menus pinned or dinner specials. Elegant Themes often uses our Pinned Post to showcase new features for Divi that have been released.
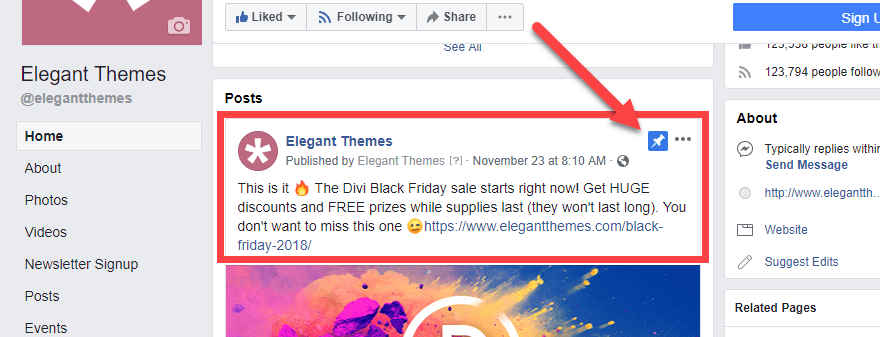
To pin a post, just click the ellipsis (the three dots) and select Pin to Top of Page.

To unpin it, do the same thing, but select to unpin it. You also have the option of replacing the pinned post when you try to pin a new one because you can have only 1 Pinned Post at a time.
There is no right or wrong way to use the Pinned Post, but the most important thing to remember is that you should always keep it updated. Visitors will see it as incredibly unprofessional to have outdated information pinned. For example, don’t still have your Christmas sale pinned in February. Or your summer menu in December. That shows them a lack of attention, which can have an impact on your engagement and business itself.
Facebook Marketing with Groups
Groups are kind of like Facebook’s take on message boards or forums. They aren’t quite chat rooms, but they give users a place to post messages, pictures, videos, and then comment back and forth to have a discussion. Both personal accounts and Pages can set up and administrate a Group, which works out really well, depending on whether you want a front-facing individual or overall brand persona.
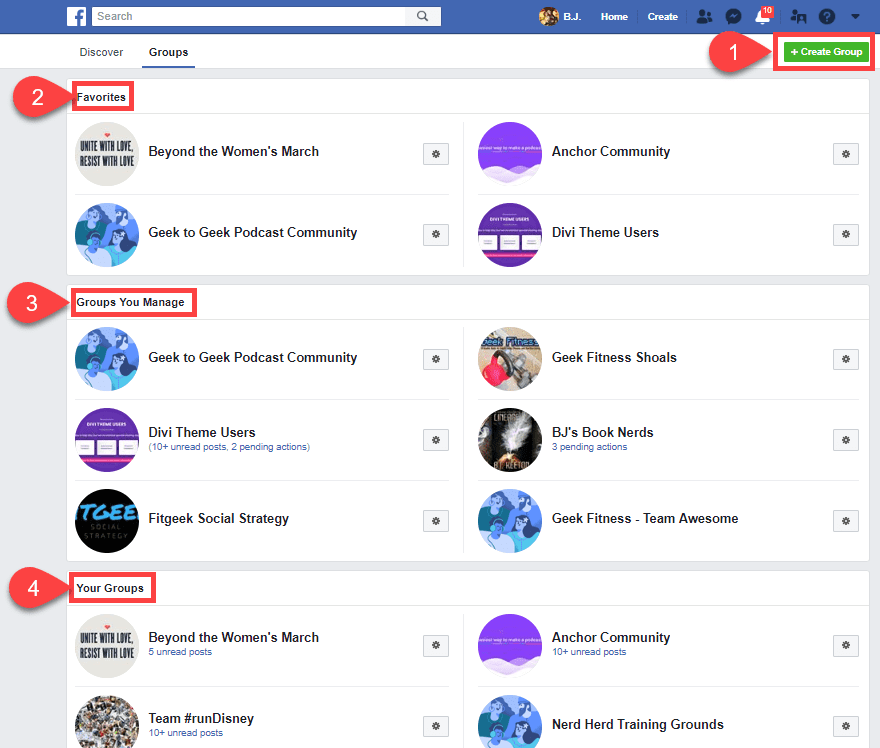
First, creating a Group is easy. Go to facebook.com/groups and click on the green Create Group button in the upper-right corner of the page. Additionally, you have three sections on this page:
- Favorites
- Groups You Manage
- Your Groups
So basically, this is the hub of all your Group activity, whether you’re a member or an admin. Anything you set as a Favorite will show up as a shortcut on your primary timeline, which simplifies your life as you manage everything on Facebook itself.
You need to make two decisions when you create a group: the name (which can be changed later, but it may not be a great idea, so choose wisely), and the privacy. We suggest creating the group as Secret first so that you can get it ready for your community before it appears in search results.
The difference in Secret and Closed is that in a Secret group, only people you invite and add to the group can find it or even see it. It’s as though it doesn’t exist to non-members. Secret Facebook groups do not show up in search results.
Closed groups, on the other hand, appear in searches, and people can be invited and added just as in a Secret one, but anyone can also request to join. That request must be approved (or denied) by a group manager. If you expect a lot of requests, you can set other moderators to weed through them.
And Public groups are, well, public. Anyone can join, they show up in searches, and often require the most moderation. Depending on your topic and community goals, it may work out well for you to be Public. But we feel that Closed gives you the best community and ability to market toward specifically those who are most engaged with your brand.
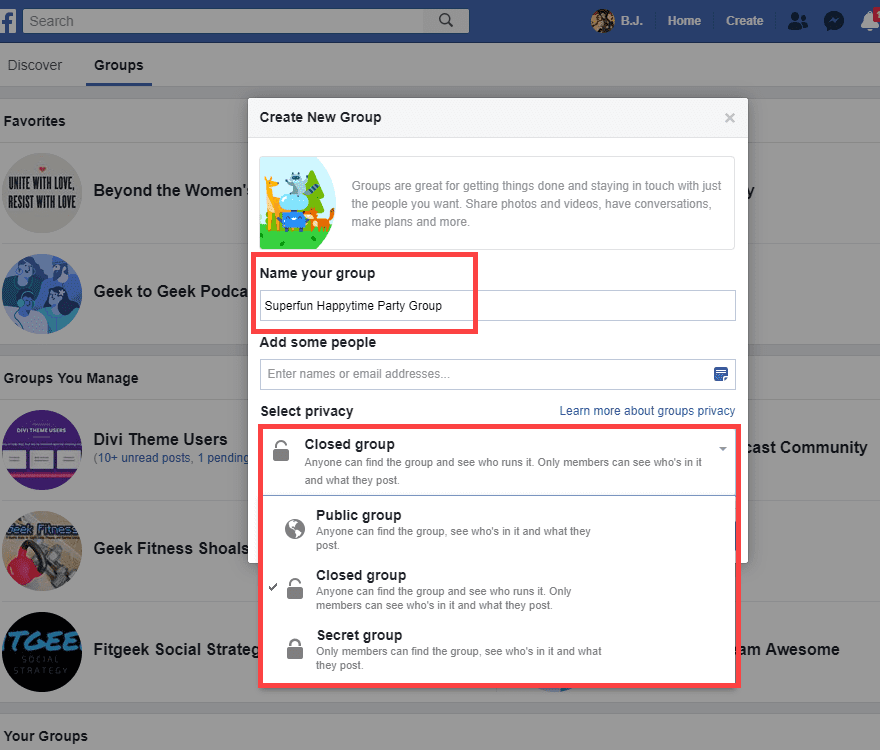
Keep in mind that you must add at least one friend to a group to create it. Facebook does not want you to create solo groups (and that would be lonely, anyway). Many folks either add a spouse or significant other, or even a co-worker or colleague from the organization who may also be a manager.
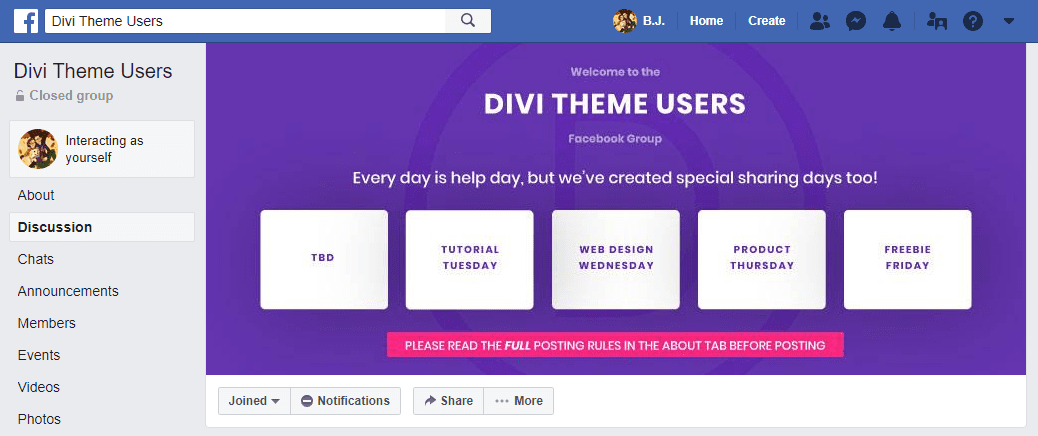
Now, your Group is live. Outside of inviting people, you have two major tasks to complete that aren’t very hard. The first is to add a cover photo for the group. Many people choose to use their Group’s cover photo as a banner for the rules and etiquette expected of members. Or if you have a schedule for particular topics on certain days, you can use the Cover Photo to highlight those as in the image below.
One other feature Groups have is that you can go Live only to specific groups. If you want to only appear to a subset of your audience (maybe for a Patreon reward), this is how. Many people set up Groups just for this feature.
Choosing Your Persona in a Facebook Group
In a Facebook Group (or on a Facebook Page), you have an option to interact with the group as yourself (your personal profile) or as the brand hosting the Group or Page. If you click on the box to the upper-right that says Interacting as…, you will get a modal where you can choose who you appear as in comments and posts.
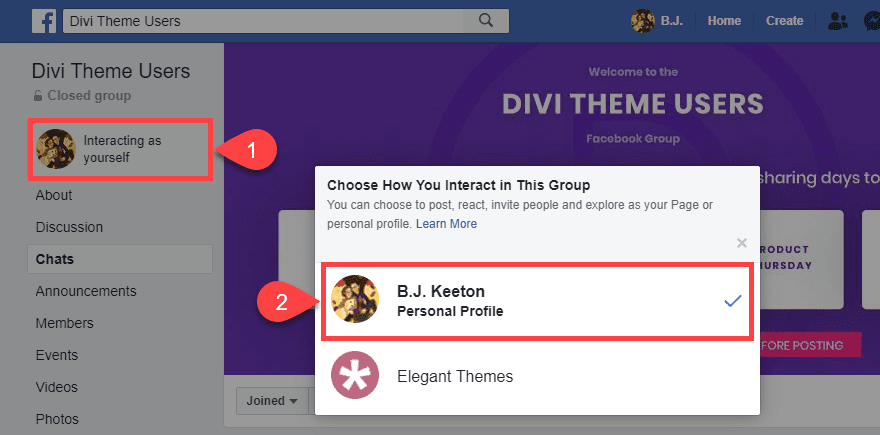
For Facebook marketing purposes, the choice is really up to you and your particular strategies. If you choose to interact personally, you can build a strong rapport between your users and yourself (and your staff, if they interact the same way). You will appear as people who are actively engaged in the community. That is the right fit for many brands and businesses, as that personal touch can be a huge boon to the way their products are received.
However, if you choose to interact as your brand, you don’t necessarily lose that personability. When a brand name interacts with people, it can make customers feel more special and can highlight that you’re a part of the community you’ve built. Not everyone knows your real name, but if they are a member of the Group or if they follow your Page, they know the branding. It can feel special for many users to get called out and talked to by major products they love.
Just choose which direction works best for your brand and try to be consistent. You can even mix it up. The daily conversation can come from your staff, but important messages or Group administrivia may need to be posted by the brand identity. The most important thing to remember when choosing your persona for Facebook Group interaction is to be purposeful and mindful of who is delivering your message and how they are delivering it.
The Groups’ Chat Tab
Because the Group’s primary function is a mini-Facebook timeline, the developers have also implemented a real-time Chat tab that lets users create conversations amongst themselves. These work similarly to Facebook Messenger, except that the conversations are essentially open-to-the-public chatrooms.
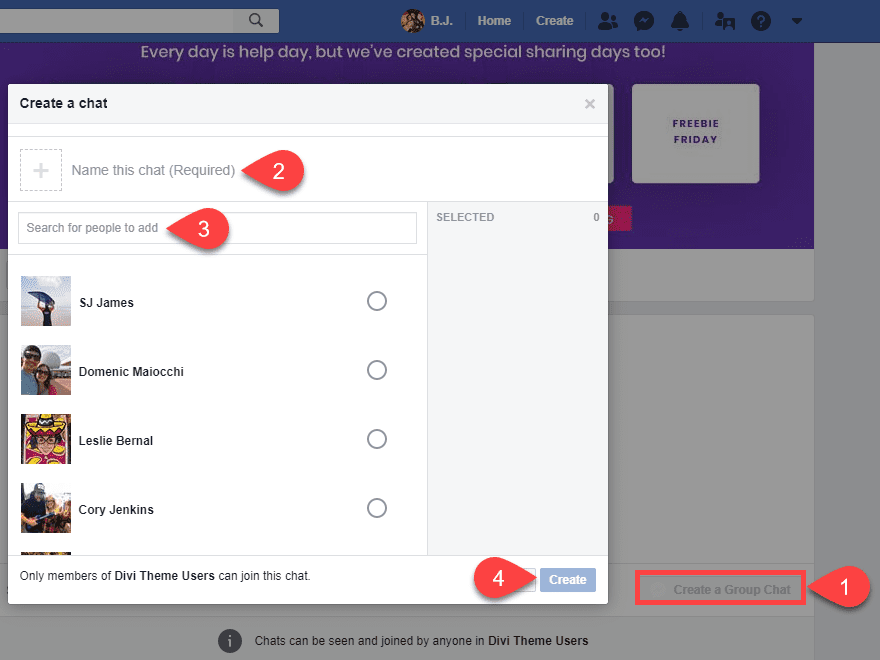
The default choice is to create chats with friends you know in the group; however, any of the chats can be seen and joined by anyone in the group. If you want a private group message, you will need to use the traditional Messenger app.
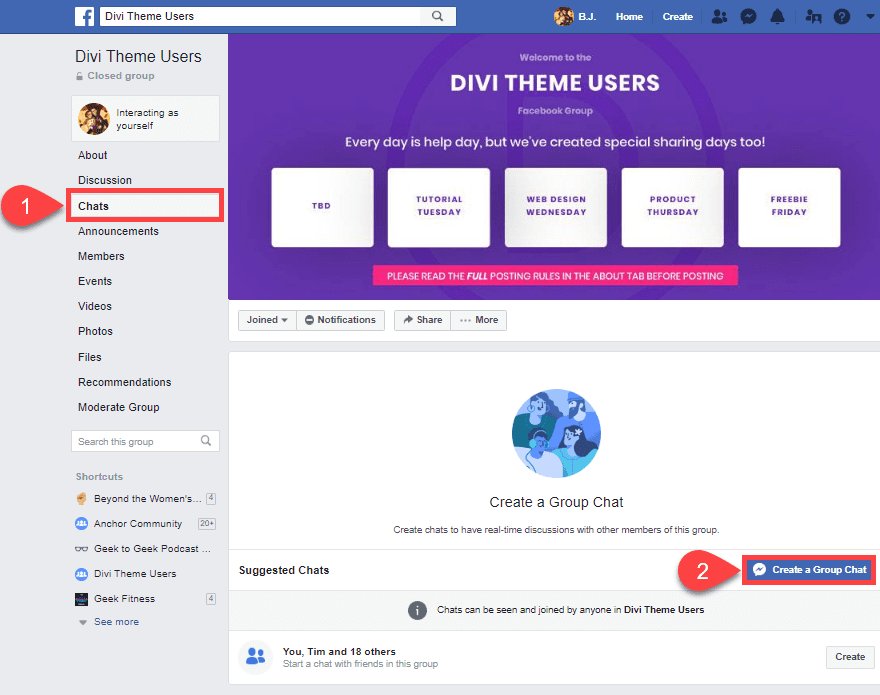
When you press the blue Create a Group Chat button, a modal appears for you to choose the initial members of the conversation. You will name it as well. If you want a real-time discussion on the year’s best WordPress themes or an on-going help and support room, just name it appropriately, add your staff (or members), and finish it up. Using Group Chats will keep your members’ timelines and news feeds clear of clutter, and their notifications won’t constantly alert them to new comments. They will see the new conversations in Messenger instead.
Facebook Marketing with Events
While not possible for everyone, using Events is a great way to get the word out about, well, major events that your brand is holding. These don’t necessarily have to be in-person events. Many Pages run virtual parties where a Live video Q&A goes on, or you might create a Facebook Event for a huge sale that’s coming up that you want people to know about. Especially if it’s a limited time deal.
Both personal profiles and Pages can host Events, and you can tie the Events to Groups as well. That way, you can get your entire Facebook marketing circle involved with one another and really reap the benefit of having built a community. The true draw of using Events on Facebook to market, though, is how Pages’ Events show up in followers’ notifications.
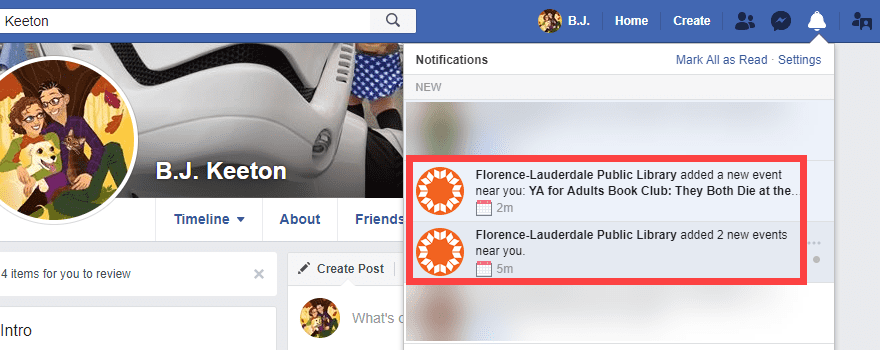
Not only do they show up when added, but if someone marks they are Interested or Going, they also get an alert to tell them the Event is upcoming so they don’t forget. In almost every way, Events are set-it-and-forget-it marketing. Even better, though, Events let hosts and guests post to the Event page as though it were a Group. Albeit a temporary one.
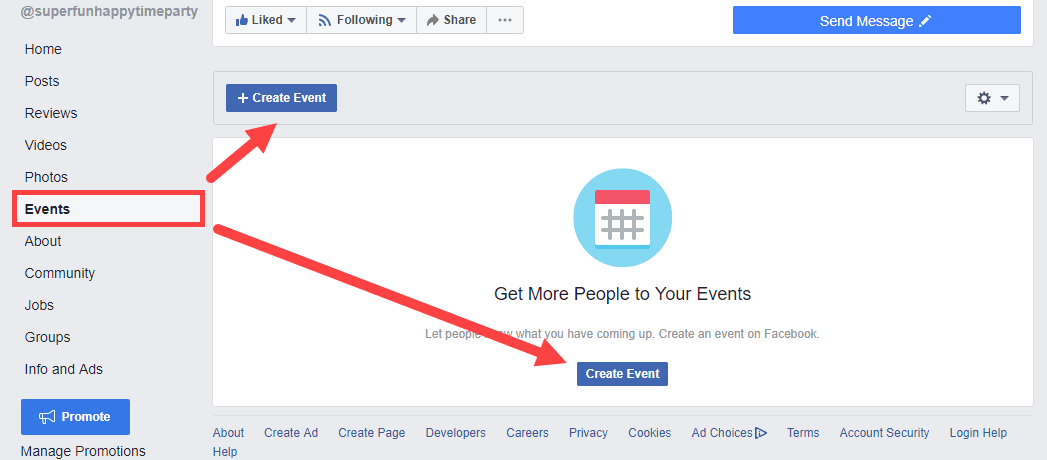
To create an Event as your Page, just hit the Events tab to the left-side of your Page. Then click on the blue Create Event button.
The modal you get now is full of details that your audience needs to know about the Event itself.
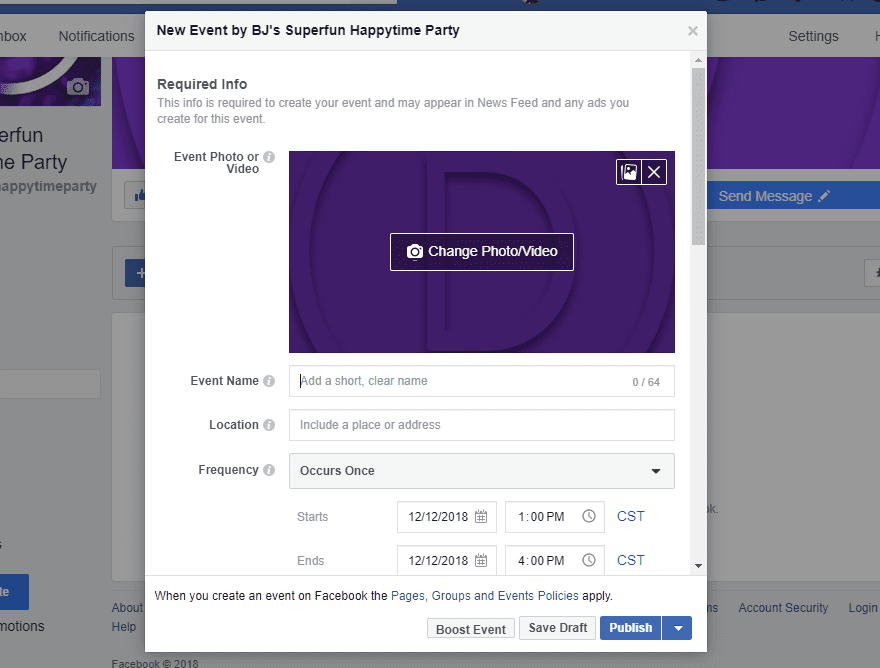
Also, you have the chance to add an Event photo. If you do not, Facebook defaults to your Page cover photo. It is a really good idea to use a new promo picture for each Event. Not only will that make your Event stand out and show that you’re serious about it, but it also won’t blend in for people who already follow your Page. They will not just assume it’s something they have already seen.
The rest of the information will depend on your event.
- Event Name
- Location
- Frequency
- Start and End Date and Time
- Description
- Category
- Schedule (of activities, etc.)
- Keywords (for search)
- Kid Friendly verification</li<
- Allow Messaging to Page through Messenger
- Ticket Info and Ticketing URL
- Co-hosts (can be other Pages or personal profiles)
- Posting permissions within the Event
- Public/Private Guest List
It should be pretty obvious that filling out each of these bits of info is incredibly important. Pay particular attention to the title (be as specific as possible) and the description. You want people to know exactly what kind of Event you’re hosting and what they can expect. The more details the better.
But here’s the thing: you may have incredibly high engagement within the Event itself. Lots of people will mark Going. Even more will say they’re Interested. And very few of those people will actually show up to the Event itself. If it’s in-person, at least. Virtual events tend to be more accurate.
But even if they don’t show up, simply interacting with your Event makes it pop up in their friends’ news feed. Which gets you exposure to a potentially new audience. If they see and like the Event, there’s a good chance they will navigate to your Page and Like it. And while they’re there, maybe they go into your Group. And eventually, they could become a customer.
Obviously, these leads diminish as the steps go through like everything else. Regardless, Facebook Events are a great way to link up the disparate parts of your Facebook marketing strategy.
Posting willy-nilly is not a good marketing strategy. The old saying is that content is king, but really…it’s consistency who sits on the throne. You need to post regularly and make updates so that your audience knows to expect them. You also need to make sure that you miss as few days as possible in posting. The internet moves fast. And people will forget you. It’s not a nice thought, but it’s certainly the truth.
The best way to keep yourself regular is to use an editorial calendar. Or in this case, a social posting calendar. You don’t have to choose anything expensive or fancy, but just something that can keep your updates sorted so that you and your team know when and what to post.
You can choose one of roughly a zillion social scheduling and calendar services out there. Depending on your budget and needs, any of these options will do just fine. I personally know people who have successfully run major companies’ and projects’ social and content calendars using each of these platforms.
Additionally, you might also get use out of a CRM suite. Apps like HubSpot and Zoho integrate socially so you can run your entire Facebook marketing campaign from within that platform and track analytics and process leads.
But even if you just write out a schedule of what kind of post you need to make and when on a piece of paper and stick it on your desk with tape, as long as you follow what it says, you’ll do great.
Use a Facebook Login on Your Own Website
If you’re really dedicated to Facebook marketing, the devs at FB have made it incredibly easy to integrate everything of yours and theirs together. Between the Facebook Pixel to the OpenGraph login, you can really take advantage of all the tools at your disposal.
Letting your users log in via Facebook is actually very simple. The first thing you will choose is what kind of permissions you need access to. You can request dozens upon dozens of data points. But don’t. Really. Users tend to opt-out if you can’t guarantee how you’re using their data (not to mention the GDPR requiring disclosure of it, too).
No matter what you choose to access, whether it’s just the email address, or the user’s friends and Page Likes (or something else entirely), you just need to start with clicking the My Apps > Create New App button in the upper-right of the Facebook Developers’ home screen.
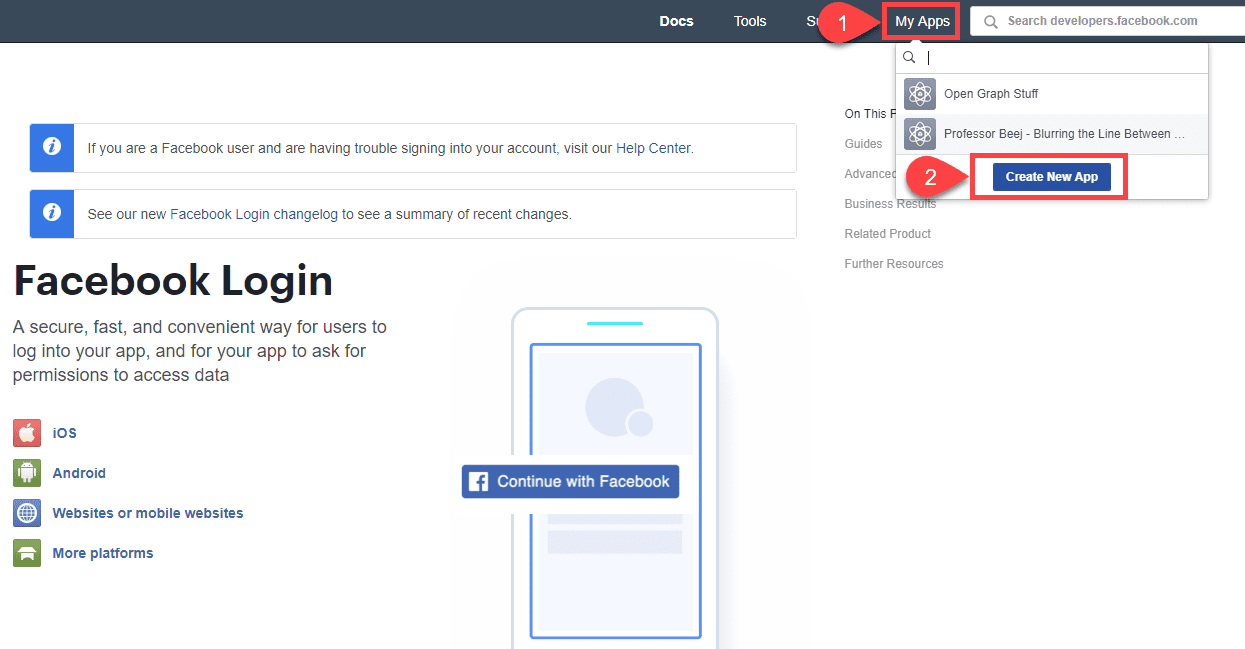
From there, you will name your login app (but make sure you don’t include any trademarked terms so that you don’t get in trouble with the folks upstairs) and put in your email address. You’re ready to now press Create App ID.
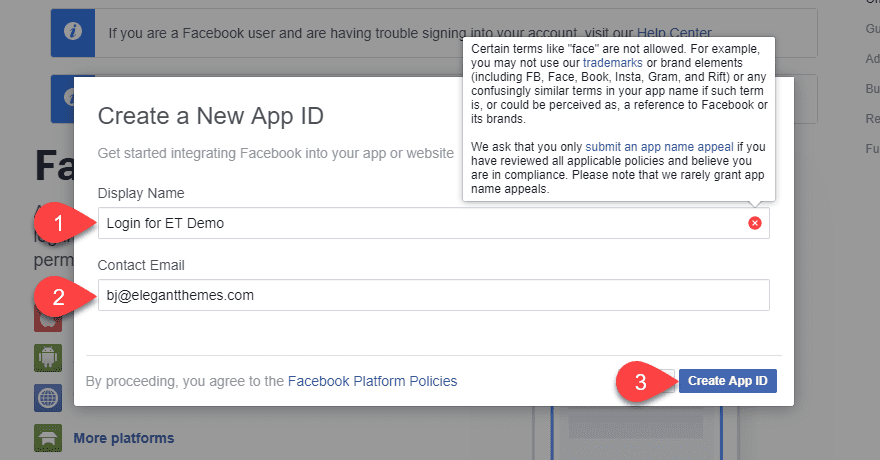
Next, select that you want to create a Facebook login and press Confirm.
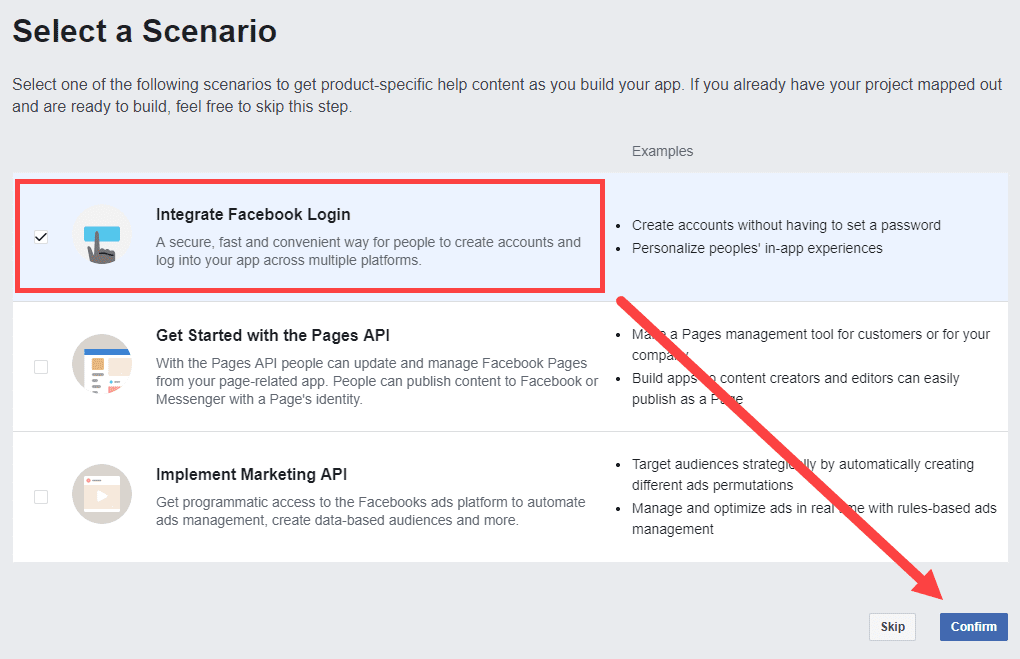
On the next page, you will enter your details, your contact info (for the GDPR), and the website URL where the login and app will live. To do so, scroll to the bottom of the page, click where it says + Add Platform, and pick website.
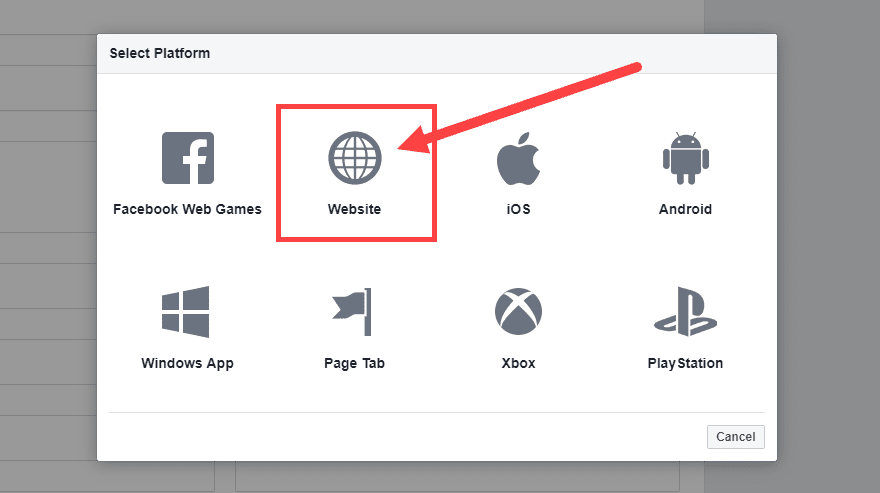
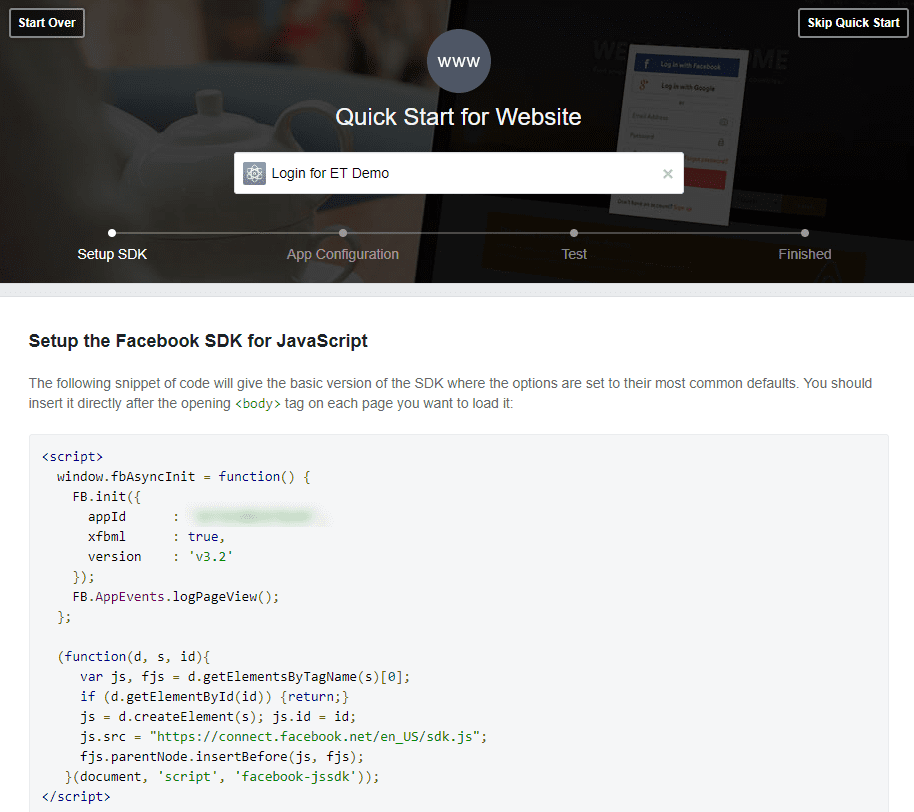
Or you can press Quick Start after you enter the URL, and you can get started…quickly.

You get the JavaScript code to add to your site immediately.
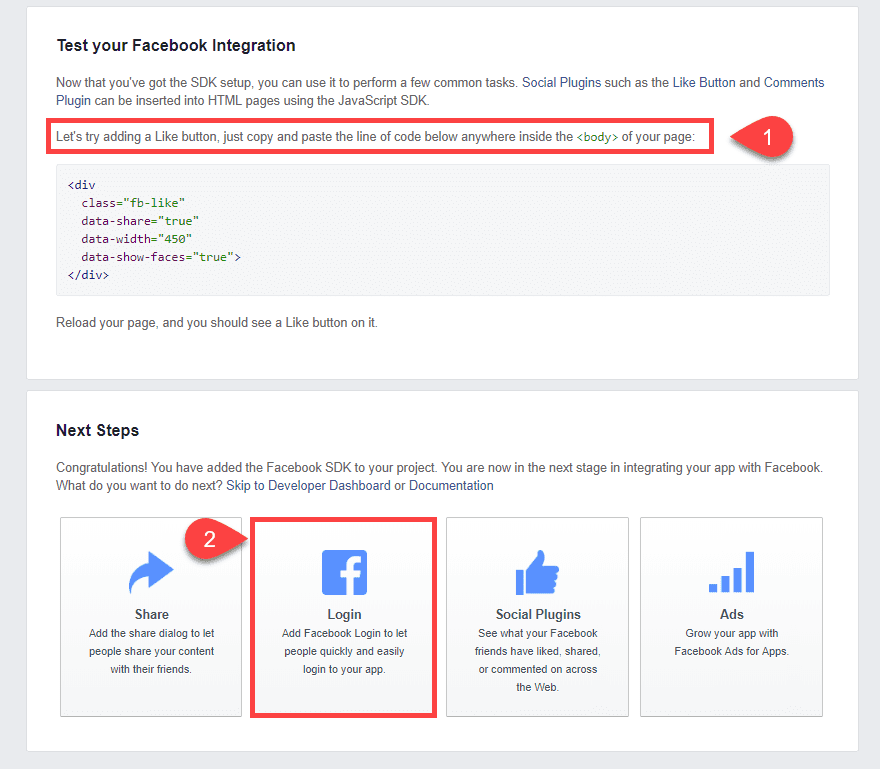
After which, you can test the integration with a simple Like button. And then move on to actually install the Login button the same way.
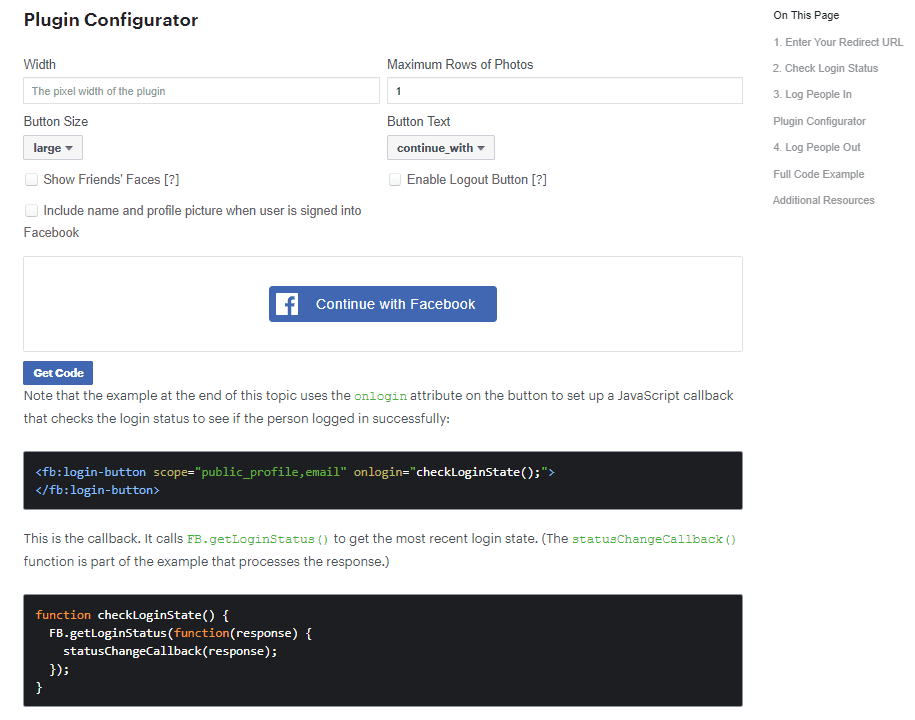
From that point on, it’s just going through what Facebook calls the Plugin Configurator and putting the code where you want it on your website.
Once that’s done, your users will be able to easily interact with your site and app as seamlessly as possible, letting you better keep tabs on how your Facebook marketing strategies are paying off.
Facebook Ads
So the real elephant in the room is the Facebook Ad network. They’re everywhere. In your news feed, in the news itself, and conversation on every single platform out there. People are talking about Facebook ads. And for good reason, too. They have an insane ROI, but they also take a lot of work to get right and have that return.
There are multiple kinds of Facebook ads, so let’s look at what they are and if they’re right for you.
You can find the Facebook Ad Center in the toolbar of your Page. It will be a tab near the end. When you click on it, you’ll be taken to an analytics page and a lot of options to run ads. Other tabs have links back here, too. Insights is the primary one you will use that way.
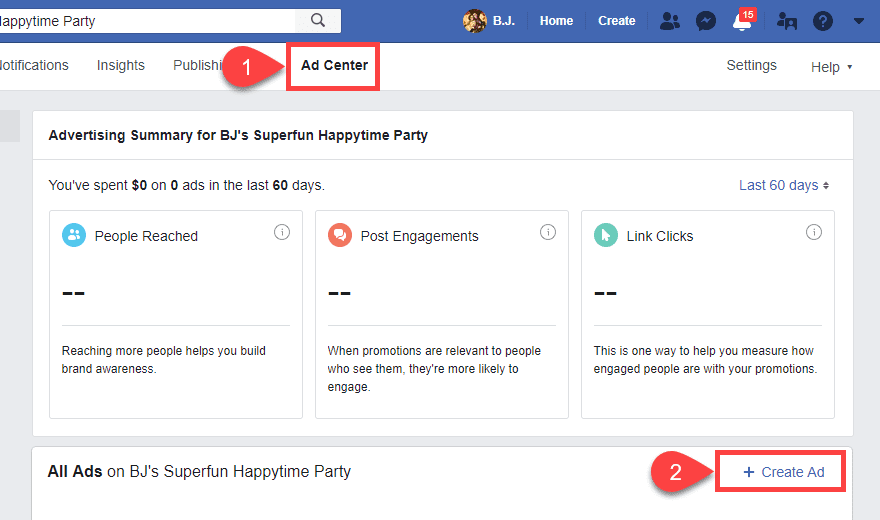
When you click on + Create Add, you see the different types of ads you can add.
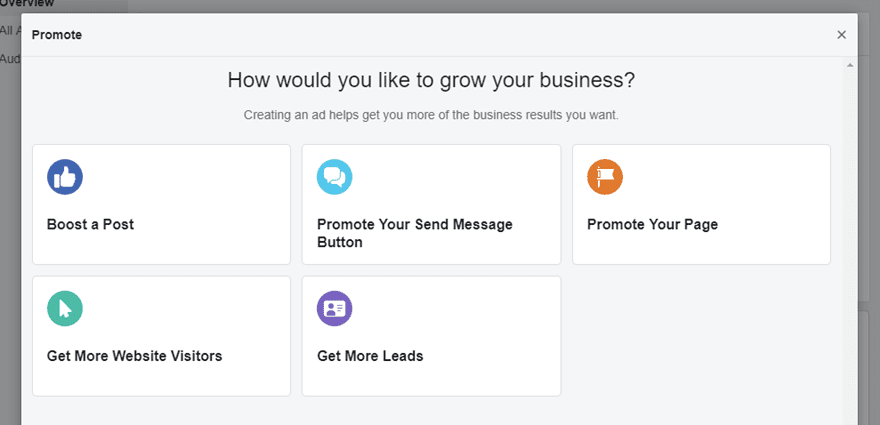
If you’re willing to pay for Facebook ads, you can put all sorts of things into a very specific audience’s news feed.
- Boost any post you create with your Page to get more engagement
- Promote that your visitors can send you one-on-one private messages through Messenger
- Just promote the Page itself and let people Like it from their news feeds
- Get website visitors by showcasing your external site, and each click leads them to your home page
- Include an email collection form so that you can contact interested user directly
Each of these ad types works and has a high chance of working because of how you can drill down into your audience. No matter which type you choose, the most important aspects of your ad campaign are
- Audience and demographic targeting
- Duration of the campaign
- Budget
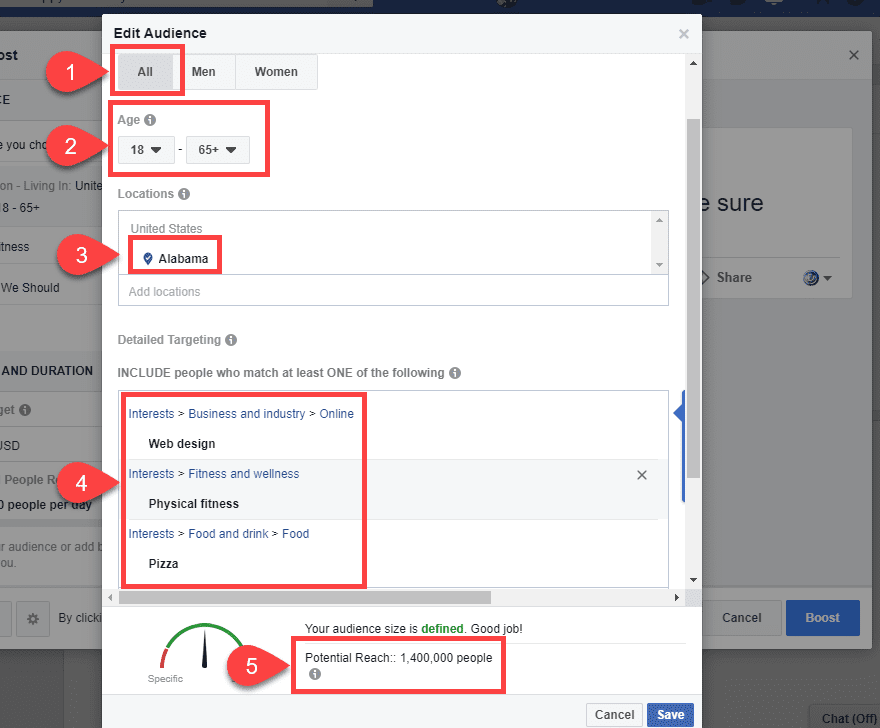
Choosing your audience is the most important aspect of Facebook marketing with ads. You can basically drill down and target a very specific portion of the Facebook user base. The main ways you do this are by choosing
- whether the ads are shown to just men, just women, or to everyone
- the age range from which you want to display ads to, where between 13 years old to 65+
- the location of whom you want to target, from a country to a state/province, to a county, or even city
- their public interests and Page likes
When you finish choosing these (and you should absolutely spend a lot of time making sure that you create and save the best audience you can so that you can refine it over time), Facebook will present you with an overall estimate of the maximum number of people within your reach. For the example below, we have targeted a potential 1.4 million people.
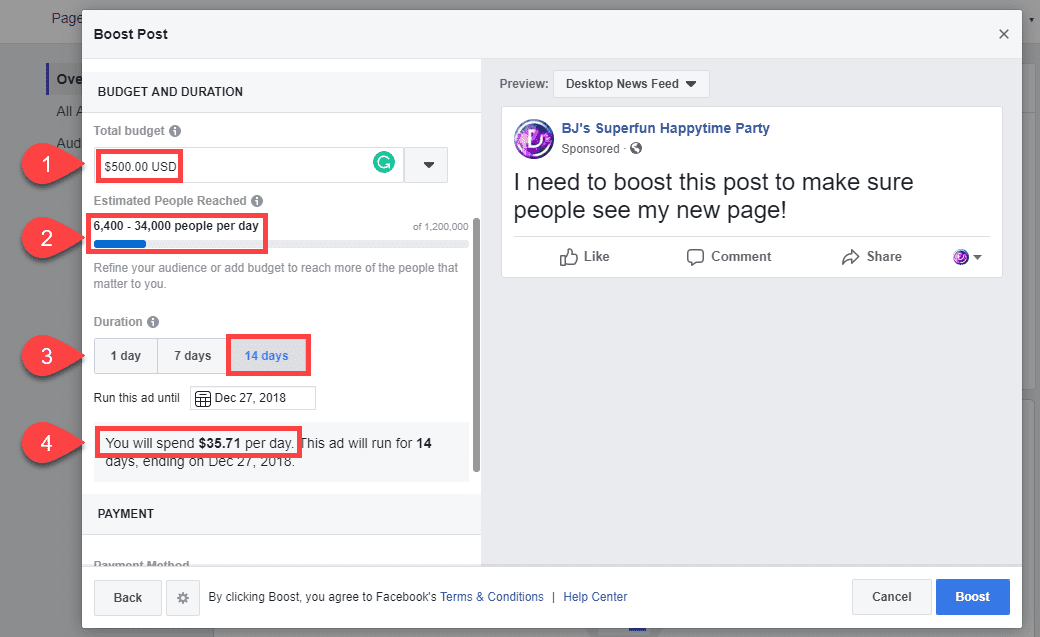
The budget is probably the most limiting factor because you only have so much cash that can go toward advertising. There is a ceiling on how much return you can get for your investment. It will take lots of experimenting to figure out what that is. Your budget ties directly to the duration of your campaign, too. You have the option to run an ad for 1, 7, or 14 days. Facebook will distribute your total budget over the course of that time. They will also tell you how many people you can expect to reach. That number (obviously an estimate) is based on the audience you chose. They also amortize your daily spend based on these factors.
And when you finish everything and set the ad to go live, your Ad Center tab will report the results back to you.
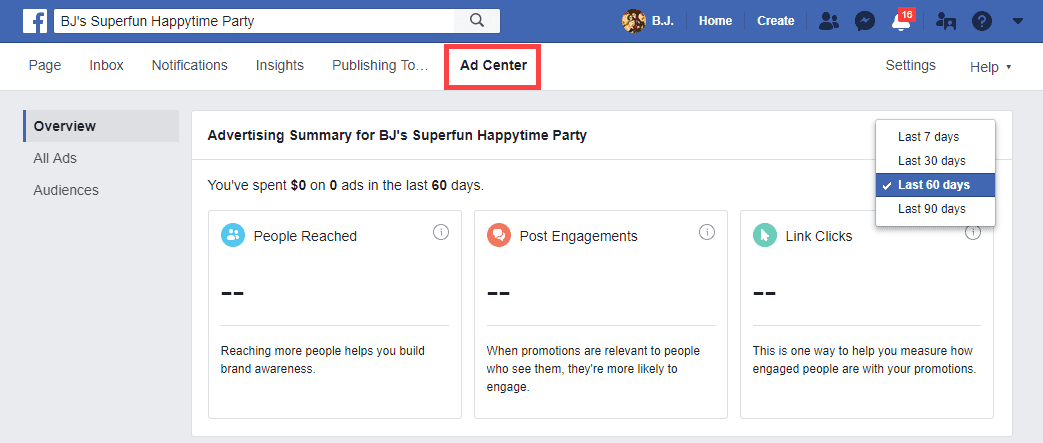
Additionally, you should be able to track the performance of your campaigns in a general sense by checking out the Insights tab. Here you willsee trends and data for your Page and overall engagements. You can also compare yourself to competitor Pages to see where you both stand.
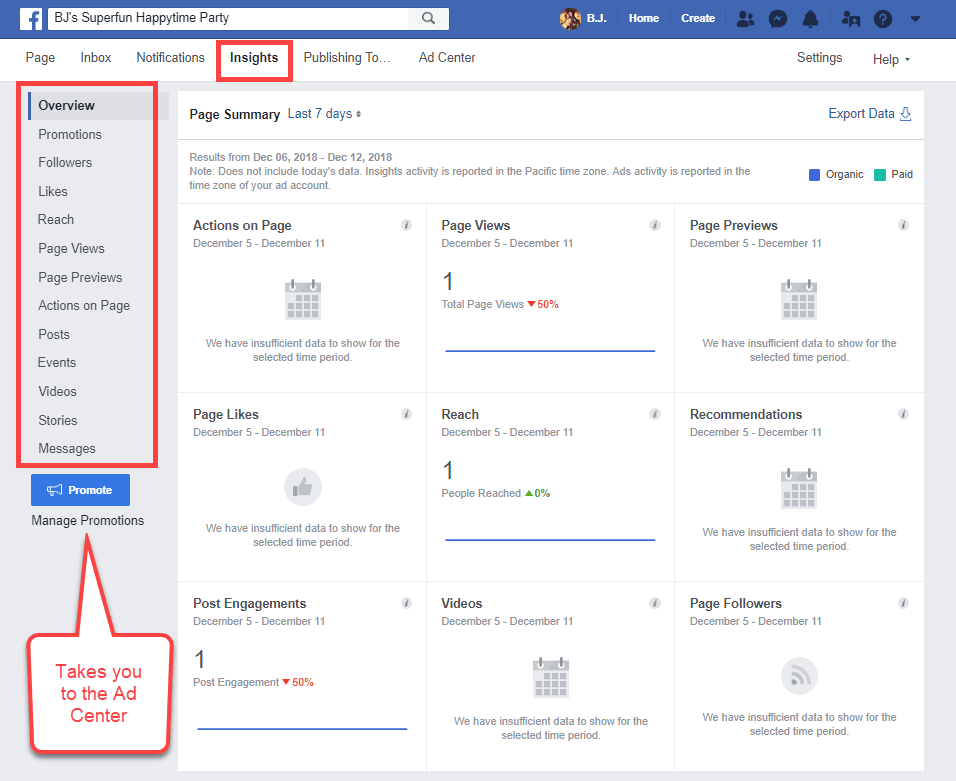
As you track the numbers and look at your Page analytics and refine your audience, you will see an increase in ROI across the board with Facebook ads.
Final Thoughts on Facebook Marketing
I hesitated to say that these are the final thoughts on the topic because it is such a large subject. But the information in this article should give you a pretty solid overview of the potential that Facebook holds. Potential for lead generation, community building, advertising, and so much more. The Facebook developer team has spent a lot of time and effort to make their methods of data acquisition a marketer’s paradise. If you aren’t taking advantage of that work, you’re missing out on a lot of benefit for your brand.
When you take Pages, ads, Stories, and livestreams into consideratio, along with the Groups, Events (which you can also boost and promote with the ads interface, by the way), and the rest of the platform, you should be able to truly excel in the Facebook marketing world. It may take some time to get used to it and integrate it all into your strategies, but when you do, you won’t be sorry. And neither will your audience.
What has your experience been with Facebook marketing? Share your stories, tips, and tricks in the comments!
Article featured image by Anikei / shutterstock.com



Thank you for sharing your post. Your post contains vital information.
I feel that is one of the so much vital information for me.And i’m satisfied reading your article .
Facebook paid for marketing used to work. Nowadays it is a complete waste of money.
Good article, thanks for sharing this. I have been using Facebook ads for my software business too.
Hello B.J,
Facebook for Business is not like how it was years ago. The numerous Facebook algorithms have resulted in decreasing organic traffic. Nowadays, the posts on Facebook pages doesn’t even reach 10% of your audience. With that being considered, we can forget about new audience.
The only solution is to invest more and more on Facebook Ads. How many companies have actually seen much profit with these Facebook Ads?
If you have high margins/sell a high ticket product/service Why wouldnt you?
Very detailed, this will really help my clients. – Thank you so much!
How about an explanation of how to use Divi since the update?
All i can use it the Divi Visual builder, the normal page builder is simply not opening.
I am very frustrated that you have made such a massive change without prior warning.
And now that the support forum no longer exists getting answers is taking much longer than usual too.
Enabling the Classic Editor is very easy. All you need to do is head out to Divi > Theme Options > Builder > Advanced and enabled the Enable Classic Editor option.
Hey… instal Classic Editor Plugin and the Divi Visual Builder works fine.
+1 I am the opposite, I can only use back end old builder now and I have the January holidays to look forward to sorting this out. 🙁
When you’re in the backend of the site on the page you want to edit, look just under the builder to the right side and you should see a button that says Use Classic Builder or something to the effect of that. Make sure all of your changes have been saved first and then click on that link. It will return you to the old backend builder. They stated all of this in their release update the other day. You might want to go back and reread it in a little deeper detail to make sure that you aren’t missing anything else.