
Live video has never been more accessible. Audiences are growing used to watching candid streams of their favorite brands and content creators. That makes the pressure mount to provide real-time interaction, entertainment, and information. Despite it seeming as though there is a large barrier to entry, jumping into livestreaming is relatively easy–and cheap! There is a lot of great live streaming plugins out there, including many premium livestreaming suites and apps. What’s great about OBS Studio is that it’s totally free and open-source! It is powerful enough to get you in front of an audience without a ton of hoops you have to jump through.
Subscribe To Our Youtube Channel
What is OBS Studio?
From the website:
Open Broadcaster Software is an open source project freely available under the GPL and developed by a dedicated team of passionate individuals. Your contributions help support our developers and fund equipment purchases for easier testing and development. They also go towards software licenses and other project expenses such as website and server hosting.
OBS Studio has come a long way over the years. It used to be somewhat buggy and unstable. But that is not the case anymore. OBS Studio has become one of the most solid platforms with which to go live. Even versus its premium competitors. Because it’s GPL licensed, you won’t have to buy a subscription to get updates or additional features, either. OBS Studio is actually one of the most stable open-source projects we’ve ever used on a regular basis. Like Atom and VS Code, we have no qualms about recommending OBS as a daily driver.
What about SLOBS?
You might also see the name Streamlabs thrown about in the livestreaming space. Or SLOBS, which stands for Streamlabs OBS. Since OBS Studio is a GPL-licensed, open-source project, Streamlabs forked the software and enhanced it to fit their own specific needs. The app is still free, but has premium add-ons and themes you can purchase to use. In most ways, it’s just as simple to get online with as the base OBS Studio, but it’s geared toward gamers in many ways, rather than being a generalized streaming software.
We’ve had good luck with SLOBS in the past, however. In our experience, the software runs well and smoothly, but we prefer the original OBS Studio to Streamlabs OBS because it tends to run faster and lighter on our systems. If you want more pre-made template and design options to choose from out of the box, however, you will very much like SLOBS.
How to Get Started with OBS Studio
Whether you are on Mac, Windows, or Linux, there’s an installer for you. The different versions are all roughly identical, so it shouldn’t matter which operating system you’re on. So just click the appropriate download link on the homepage and run the installer.
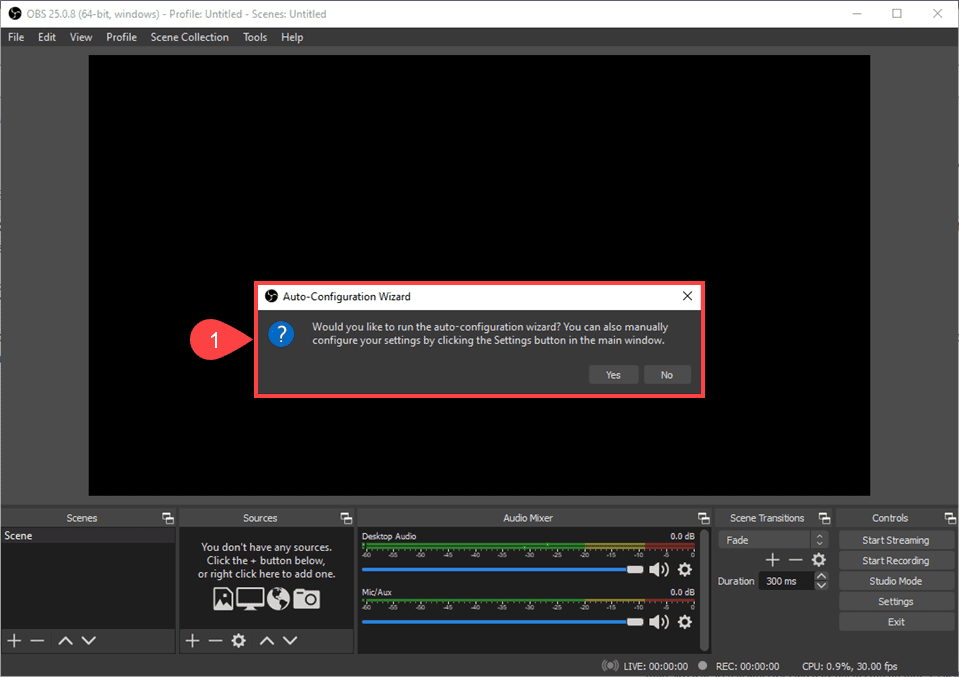
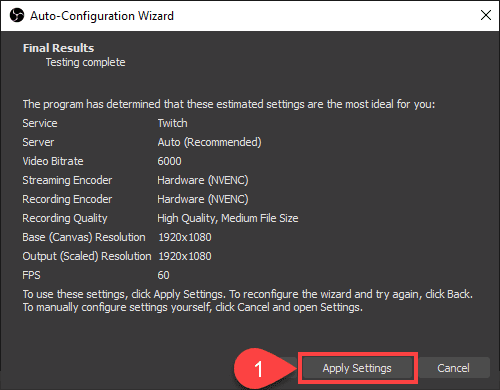
When the installation is finished, and you run OBS Studio for the first time, a popup will appear and ask if you want to run an auto-configuration wizard. We suggest doing so because in our experience, it has given a pretty good assessment of what our hardware is capable of. You can always tweak the suggestions in the OBS settings later.
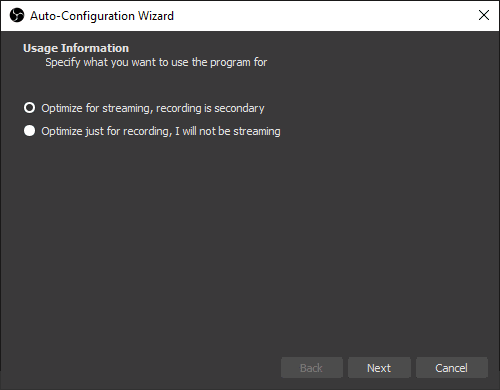
The first choice you need to make is whether to optimize settings for Streaming or for Recording. For our purposes here, let’s choose for streaming. It will help adjust base canvas size and resolution and fps, all along with your bandwidth capabilities.
Next, you will choose your primary streaming service. We do really like the Restream.io service, as it lets you broadcast to multiple platforms at once (via logging into their platform and authorizing your destinations to be sent through a single RMTP key provided by Restream).
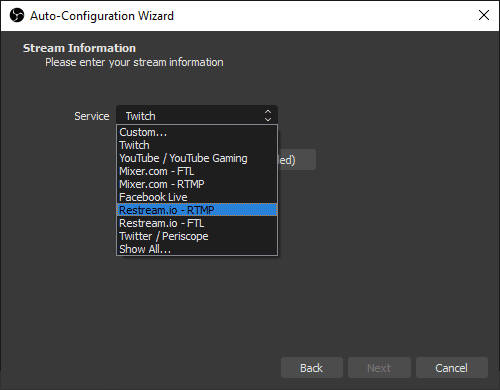
However, for this particular tutorial, we are going to just go with Twitch because using a singular platform has fewer steps to get started. Using Facebook or YouTube or anywhere else like this will function similarly.
At this point, you’re ready to go live. You should now see the main OBS Studio window and any applicable chat windows or other widgets that come along with your streaming service.
Let’s get things put together so that we can go live.
OBS Studio Setup
There are two things you will really need to understand in order to properly go live with OBS Studio: Scenes and Sources. At any given time, what is being broadcast is a single scene, and that scene is made up of various sources (such as audio tracks, desktop shares, cameras, game windows, etc.).
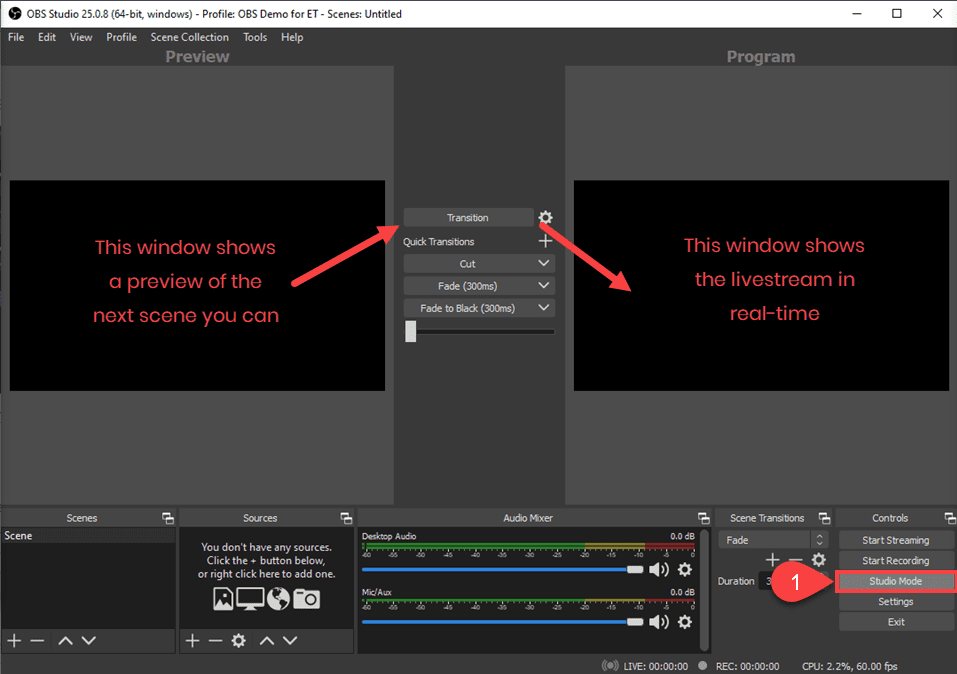
First, find the Studio Mode button to the lower-right and click it. That will split the window into two parts. The Program window on the right shows the livestream in real-time. The left Preview window shows what you have on deck to come next. You can press the Transition button to move from the Preview window to the live Program one. If you are not in Studio Mode, you will only see the livestream, not a preview.
With that done, let’s move into Scenes and Sources.
Setting Up a Scene in OBS Studio
A Scene consists of every element that you want to livestream at a single time. So let’s say that you want a microphone to stream your voice, as well as a webcam to show you and a game/app window for your viewers to see all at once.
First, press the + under Scenes in the lower-left corner. Name the scene something descriptive of how you will use it during your broadcast. While you’re live, remembering the difference in Scene, Scene 2, Scene 3, and so on is a lot harder than Main Stream Scene, Preroll, Endcard, etc.
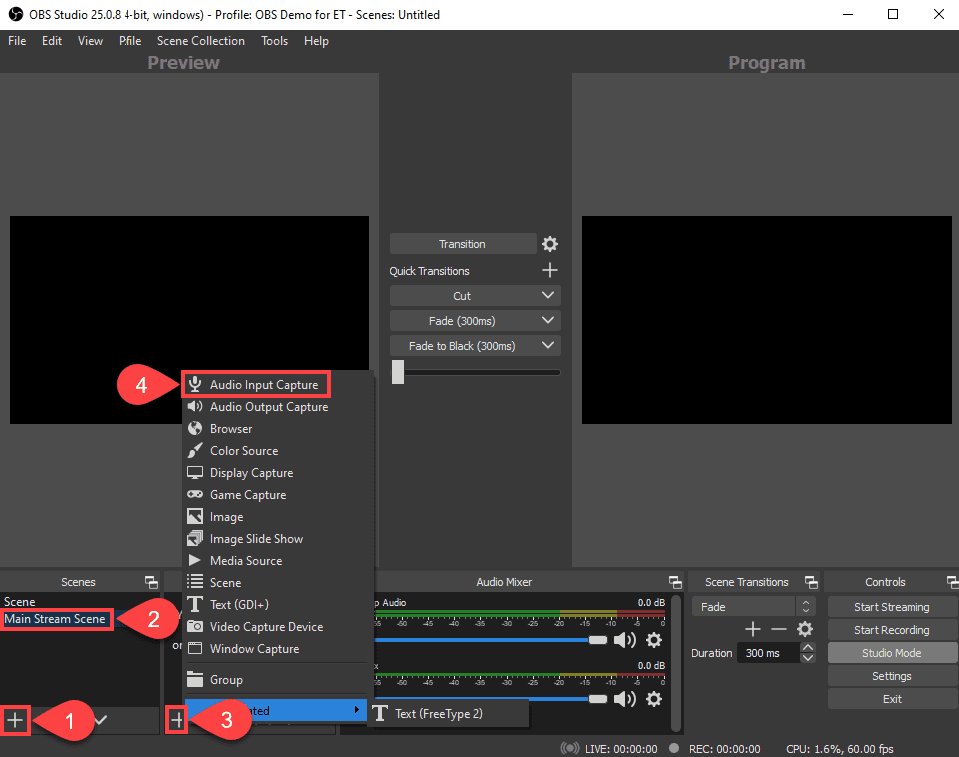
Highlight the scene you want to add Sources to. Note: single-click, don’t double click. There is an option under Settings to double-click a scene to transition it live. Even if you don’t think that you have this enabled, it’s not worth taking the chance. Next, click the + under Sources (3) and choose what kind of source you want to include.
Adding Sources to OBS Studio
Clicking Audio Input Capture (which is a microphone for your voice, whereas Audio Output Capture is the sound coming from a game or app or something on the computer). If you only have one mic or onboard audio, just click the Mic/Aux option. If you have an external mic or hub (such as the Scarlett 2i2), it will show up as a different option to select.

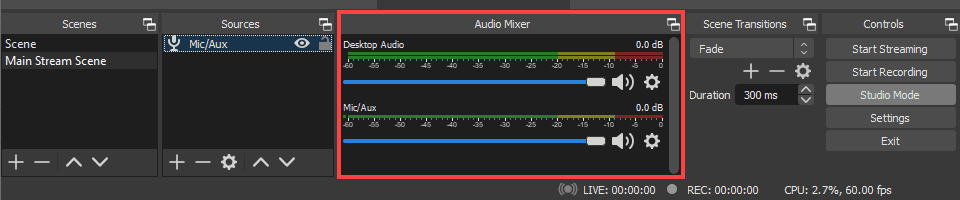
You will not see it under Sources. Also, the audio sources you have available show up to the right under Audio Mixer, where you can adjust levels and mute them when you need to. These can be adjusted on the fly, too.
Repeat these steps for the webcam and other displays or audio that you want to stream in this scene. Webcams come under Video Capture Device, while games and apps and such can be done a number of ways. If there is a dedicates game or program you want, you can use the Game Capture and then select how OBS Studio determines what it streams.
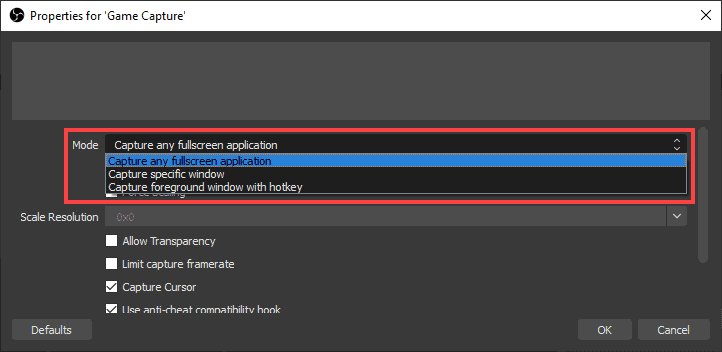
You can choose a specific window (if the app is already launched). Or any window you have currently in the foreground and are working in, or even any application set to fullscreen. Generally, we suggest Capture Specific Window.
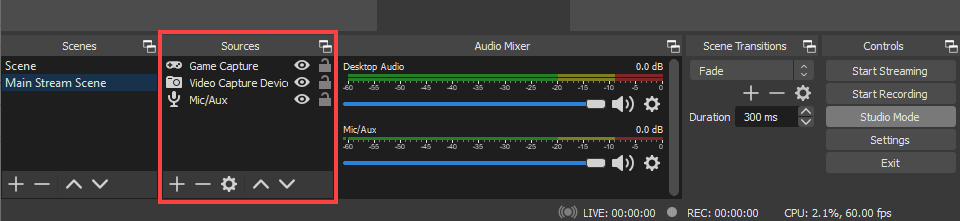
Now, all your sources are listed and just need to be organized on the screen. But what happens if you make a mistake and need something else? Well, you can’t just hit delete. You need to press the – button under Sources.
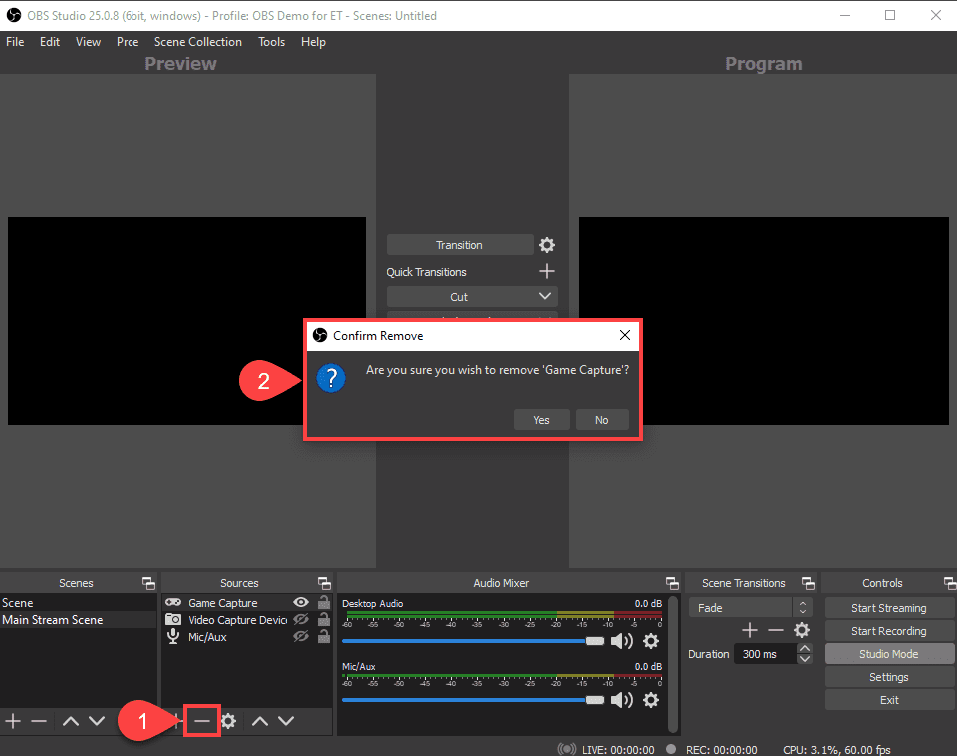
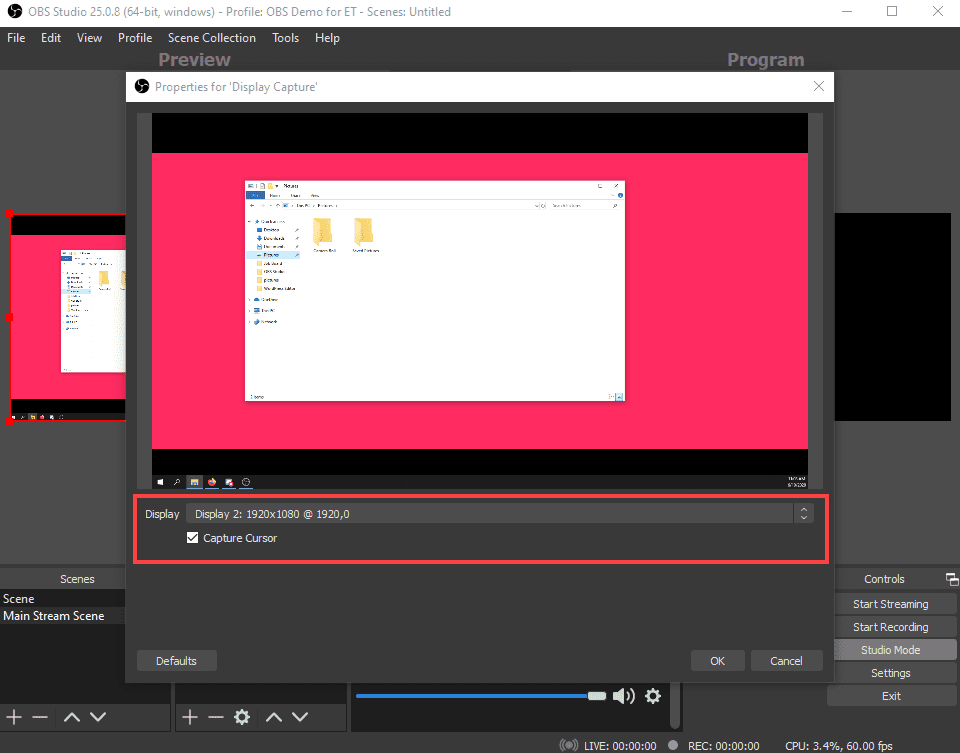
You can then replace it with something else, like Display Capture, where you choose a whole monitor to mirror and stream live.
When you have all the elements you want to stream, you need to adjust their sizes and positions.
Adjusting Sources Onscreen
Just click on the element you want to adjust and it will be surrounded by a red box that you can drag to resize or position. This is how you will make the webcam of yourself smaller than the app or display that you’re streaming. That way, the focus of your stream is the content, not yourself.
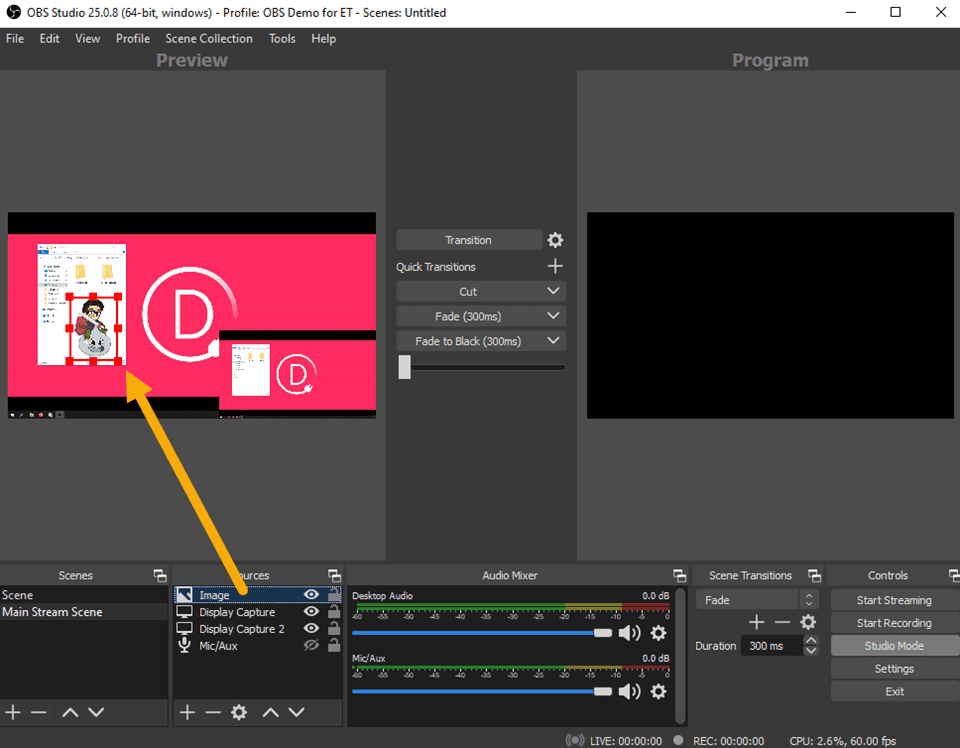
Also note that the Sources will display from the top down. That means that whatever is listed at the top of the Sources panel will be in front. So if you want a logo image to superimpose over your video, make sure the Image element is above the Display Capture. Same goes for any window you want displayed in a corner. Generally, the primary game or app being streamed will be at the bottom with other elements configured above.
If you need multiple scenes (such as one for your face being larger and then transition to one of the content in the forefront), follow these same steps as many times as necessary.
Once that’s done to your liking, all you have to do is press Start Streaming, and you will be live with OBS Studio immediately (if you linked an account like Twitch or Facebook earlier, like we did, that is).
Keep in mind that when you press the button to start streaming, it will change to Stop Streaming. If you press that, the stream will end (obviously). However, even if you immediately start again, a new stream will start, not continue the previous one. So your viewers will be notified twice, the archives will be split, and folks will generally be confused. It’s good practice to make sure that once you’ve begun to broadcast, that you’re in it for the longhaul.
RMTP Keys and OBS Studio
If you don’t directly log into a service, more than likely you’re going to need a stream key. Whether that’s from Facebook or Restream or another service, it’s basically a token that tells OBS Studio where to direct your stream.
First, go into File – Settings and select the Stream tab from the menu on the left.

Select the service you are getting the key from. A Stream Key field appears, as well as a Get Stream Key button. Pressing that will take you to the live studio for your platform. In this case, it loads up the Facebook Live Producer, where you can copy the key directly from the window.

If you don’t want to go with the Default Server in OBS Studio, you can paste the RMTPS:// url into the field above the stream key in the streaming software. We choose to do it this way because it’s a bit more consistent, and we can make sure we’re always connected securely. Additionally, the field in Facebook labeled Stream Key has a Reset button that will give you a new key to pasted into OBS if there are connectivity issues.
And if you look to the left under Setup Options, you will see Use a Persistent Stream Key is checked. We like this to be checked so that Facebook remembers that our account is using this specific stream key to go live. Until it is reset, you shouldn’t have to perform this step but once through OBS Studio. We generally choose to reset the persistent key every so often (perhaps monthly) to make sure that we’re able to connect without issue.
Once the new RMTP stream key is saved and the changes applied, you’re ready to press that Start Streaming button.
Wrapping Up
OBS Studio is an incredibly powerful livestreaming suite, and it stands up feature-for-feature to the most premium of its competitors. Being open-source means there are various options out there using its code base as a foundation (such as SLOBS), but that also means that there is a strong community that is full of people dedicated to making sure the software stays stable, useful, and feature-rich. If you’re looking for the cheapest and easiest way to get into livestreaming, OBS Studio is probably your best bet.
What have your experiences been with OBS Studio? Let us know in the comments!


Can this be used for pay-per-view livestream on an independent website (built with DIVI)?
Yeah, it can. You would need to use an external bit of software to handle the actual details of the PPV because OBS is just the encoder that sends the stream. But you can absolutely use it to send the stream to Crowdcast or another platform that handles registration and embed that within your Divi site.
Been working on a “livestream PPV” site for a client and the one thing I’ve been unsure about is an affordable livestream integration (that works). This would seem like a GODSEND – providing it works as it should.
Are there any LIVE examples of websites using OBS Studio to livestream that can be shared (for research/observation purposes)?
Next up I recommend an article on restream.io ; I use it for streaming to Youtube. Also it allows to stream to multiple outlets at the same time such as:
– Facebook
– LinkedIn
– Youtube
and even more!
Just curious about how secure is this?
As software, it is getting updates regularly and consistently being developed. Regarding the streams up and down, they’re generally secured the same way that website transactions are (SSL, I believe). Facebook, for instance, gives you a secure RMPTS authentication as opposed to unsecured RMPT, just like HTTPS is to HTTP.
It depends on what you mean by secure. The application itself is safe, it’d be the equivalent of using say- the GeForce Experience application to stream to Twitch or YouTube (native to Nvidia graphics cards.). That said like any other software can it – ever- be susceptible to some kind of vulnerability? Sure. However, it’s such a popular tool that it’s constantly being maintained & updated to perform as optimal as possible. So, I wouldn’t be worried at all really.