

Mega menus enhance site navigation on content-heavy websites, allowing users to access more options quickly without cluttering the header or requiring extra clicks. In previous versions of Divi, mega menus were created using the Menu module with the custom CSS class mega-menu to expand submenus and arrange items in columns. With Divi 5, Canvases offer a powerful new approach, enabling more flexible and complex mega menus featuring multi-column layouts, embedded images or icons, full modules, and more.
In this post, we’ll explain what Divi 5 Canvases are and how you can use them to build an eye-catching mega menu in a few easy steps. Let’s dive in.
What Are Divi Canvases?
Divi Canvases are detached workspaces in Divi 5, separate from your main page layout. They provide a clean, isolated environment for building off-canvas elements, such as mega menus, popups, sidebars, and more, without cluttering the primary content area.
Subscribe To Our Youtube Channel
There are two types of Canvases:
- Local Canvases: These are tied to a specific page or Theme Builder template, ideal for unique, one-off elements.
- Global Canvases: Available site-wide, making them perfect for reusable components like mega menus that appear consistently across your website.
Key Features Of Divi Canvases
Canvases offer several powerful features for building mega menus and work well with Divi Interactions. You can build interactions that control how and when the mega menu appears. Use hover or click triggers to reveal menus when a menu item or hamburger icon is clicked. For more complex designs, Nested Rows and Nested Modules let you build sophisticated layouts directly on the canvas, including multi-column grids, images, buttons, text, and even dynamic content. These features allow you to expand your designs beyond simple link lists.
Compared to previous versions of Divi, where mega menus relied on the Menu module with CSS classes, Canvases offer superior flexibility, better organization, precise positioning, and true reusability, eliminating the need for third-party plugins or custom code hacks. This results in cleaner builds, easier maintenance, and more creative mega menus.
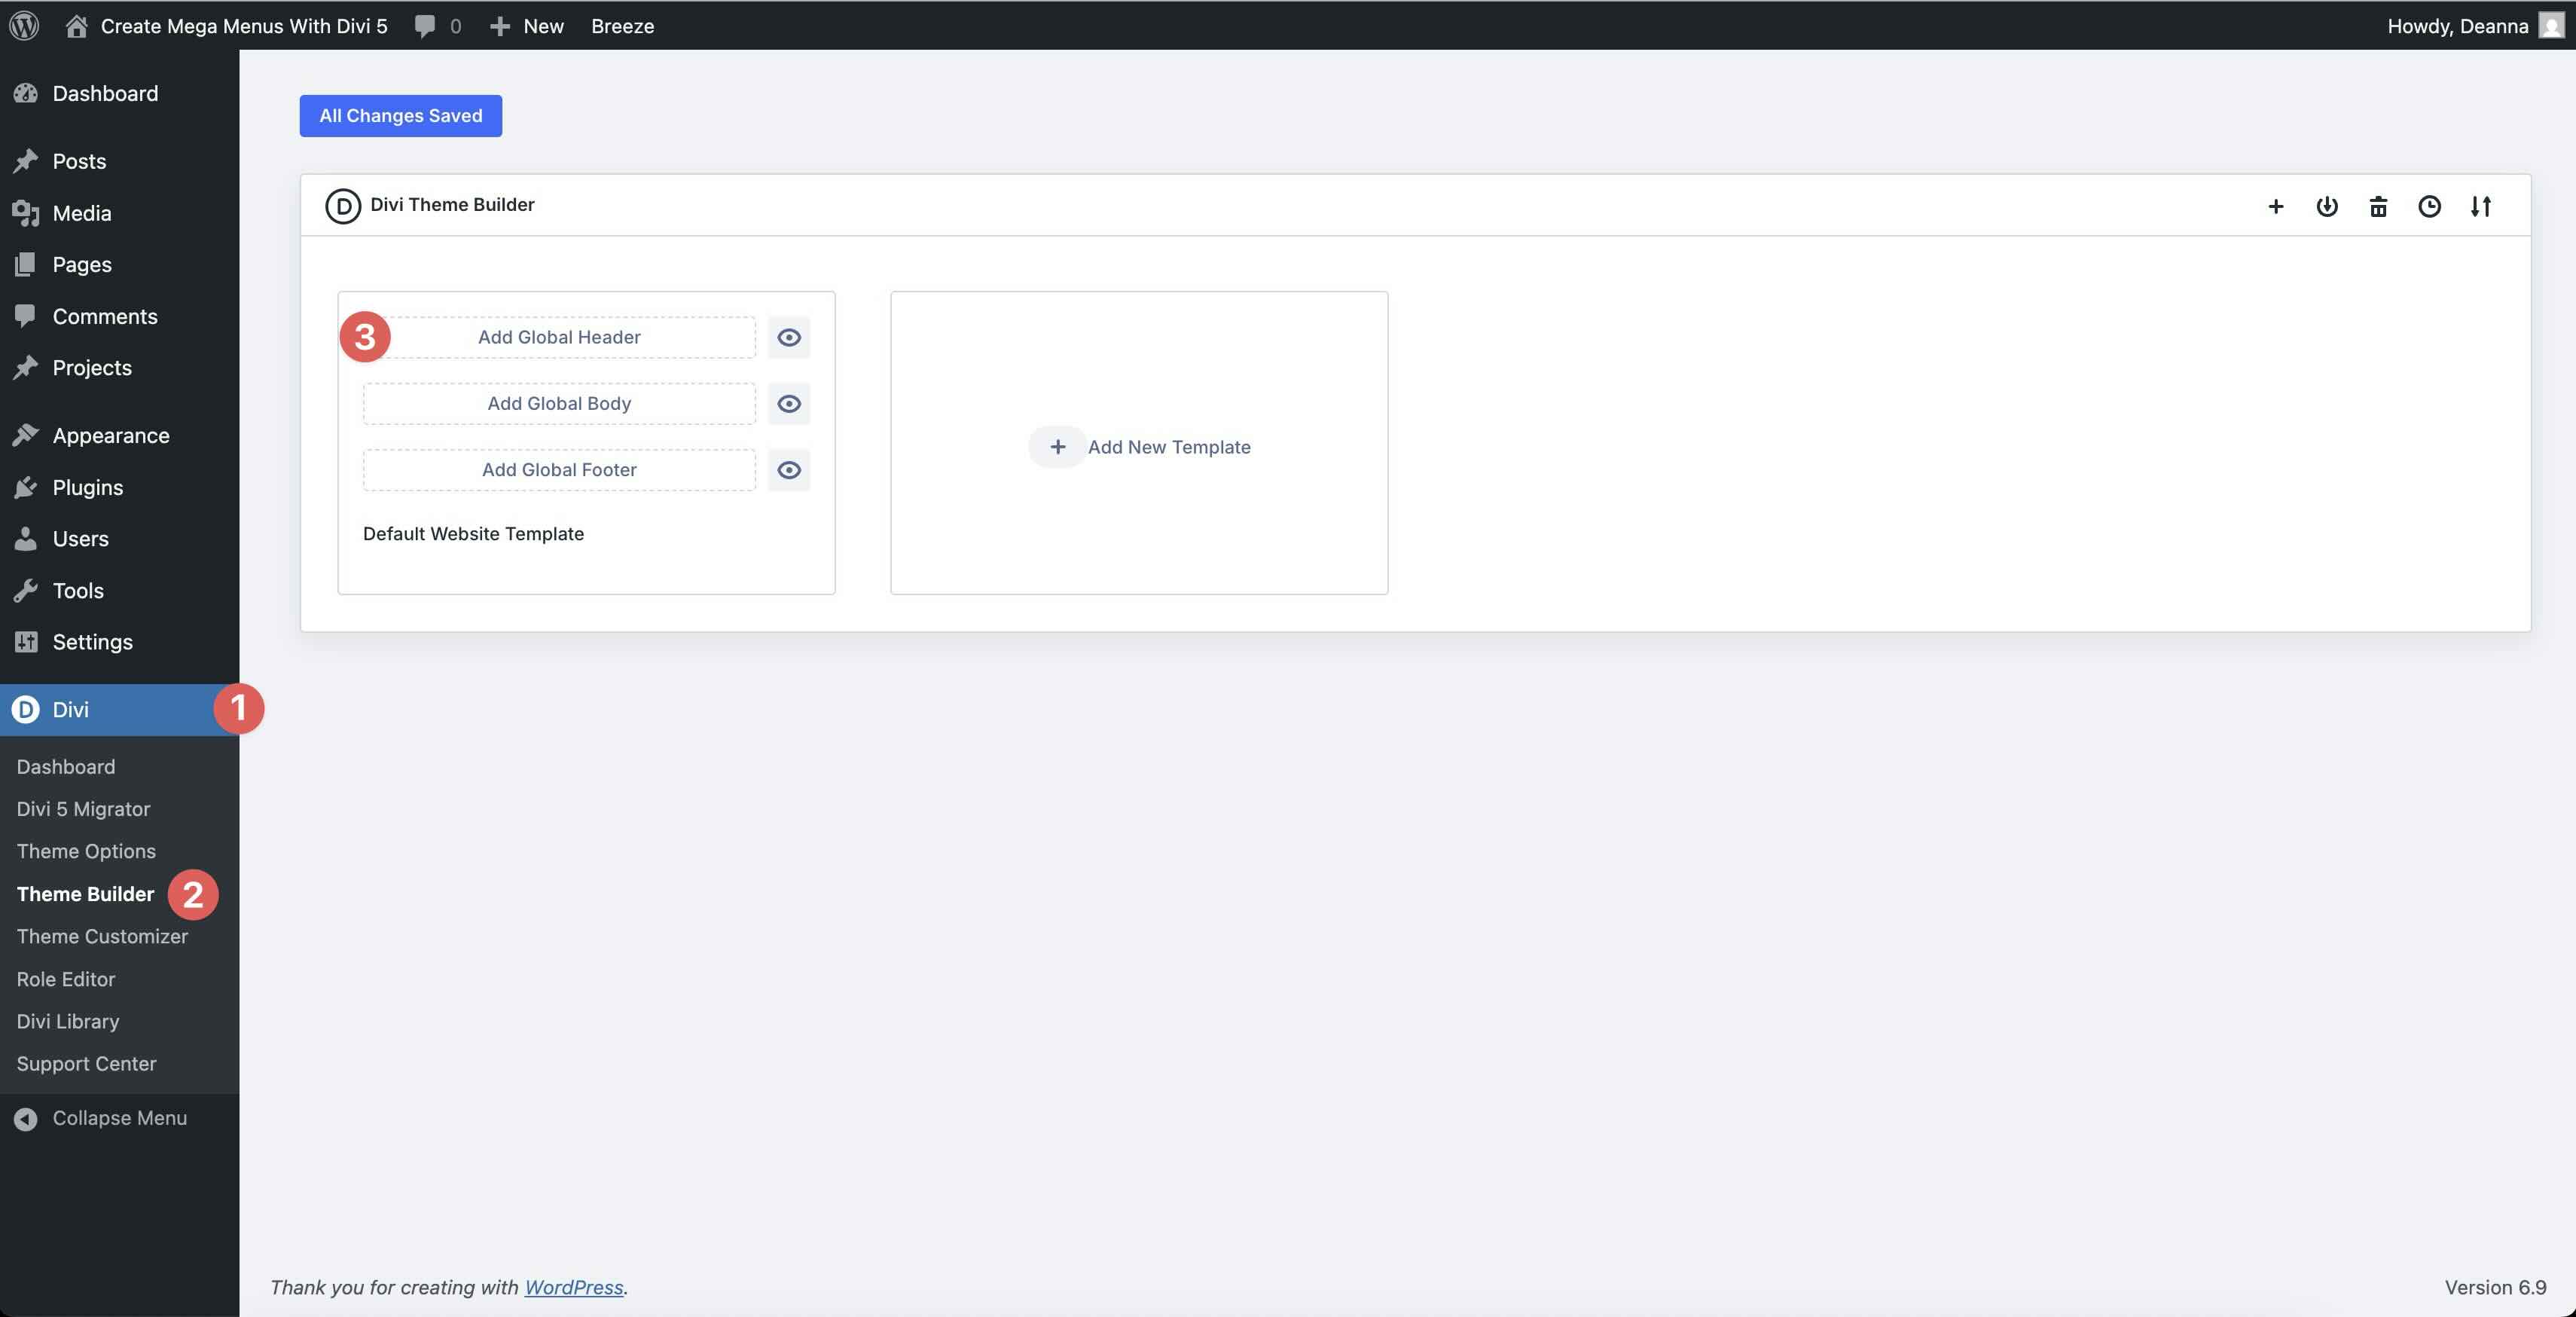
Step 1: Set Up The Header
The first step in creating our mega menu is to create a global header in the Theme Builder. Navigate to Divi > Theme Builder and click Add Global Header in the Default Website Template.
When the Builder opens, add a new single-column row to the template.
Add an Image module and Icon module to the Row. Add your logo to the Image module and assign the hamburger icon in the Icon module. Adjust the Image size to meet your preferences and set the Icon Size to 32px.
![]()
Next, navigate to the Row’s column settings. Click the Design tab and expand the Layout menu. Set the Layout Direction to Row, the Justify Content field to Space Between, and Align Items to Center.

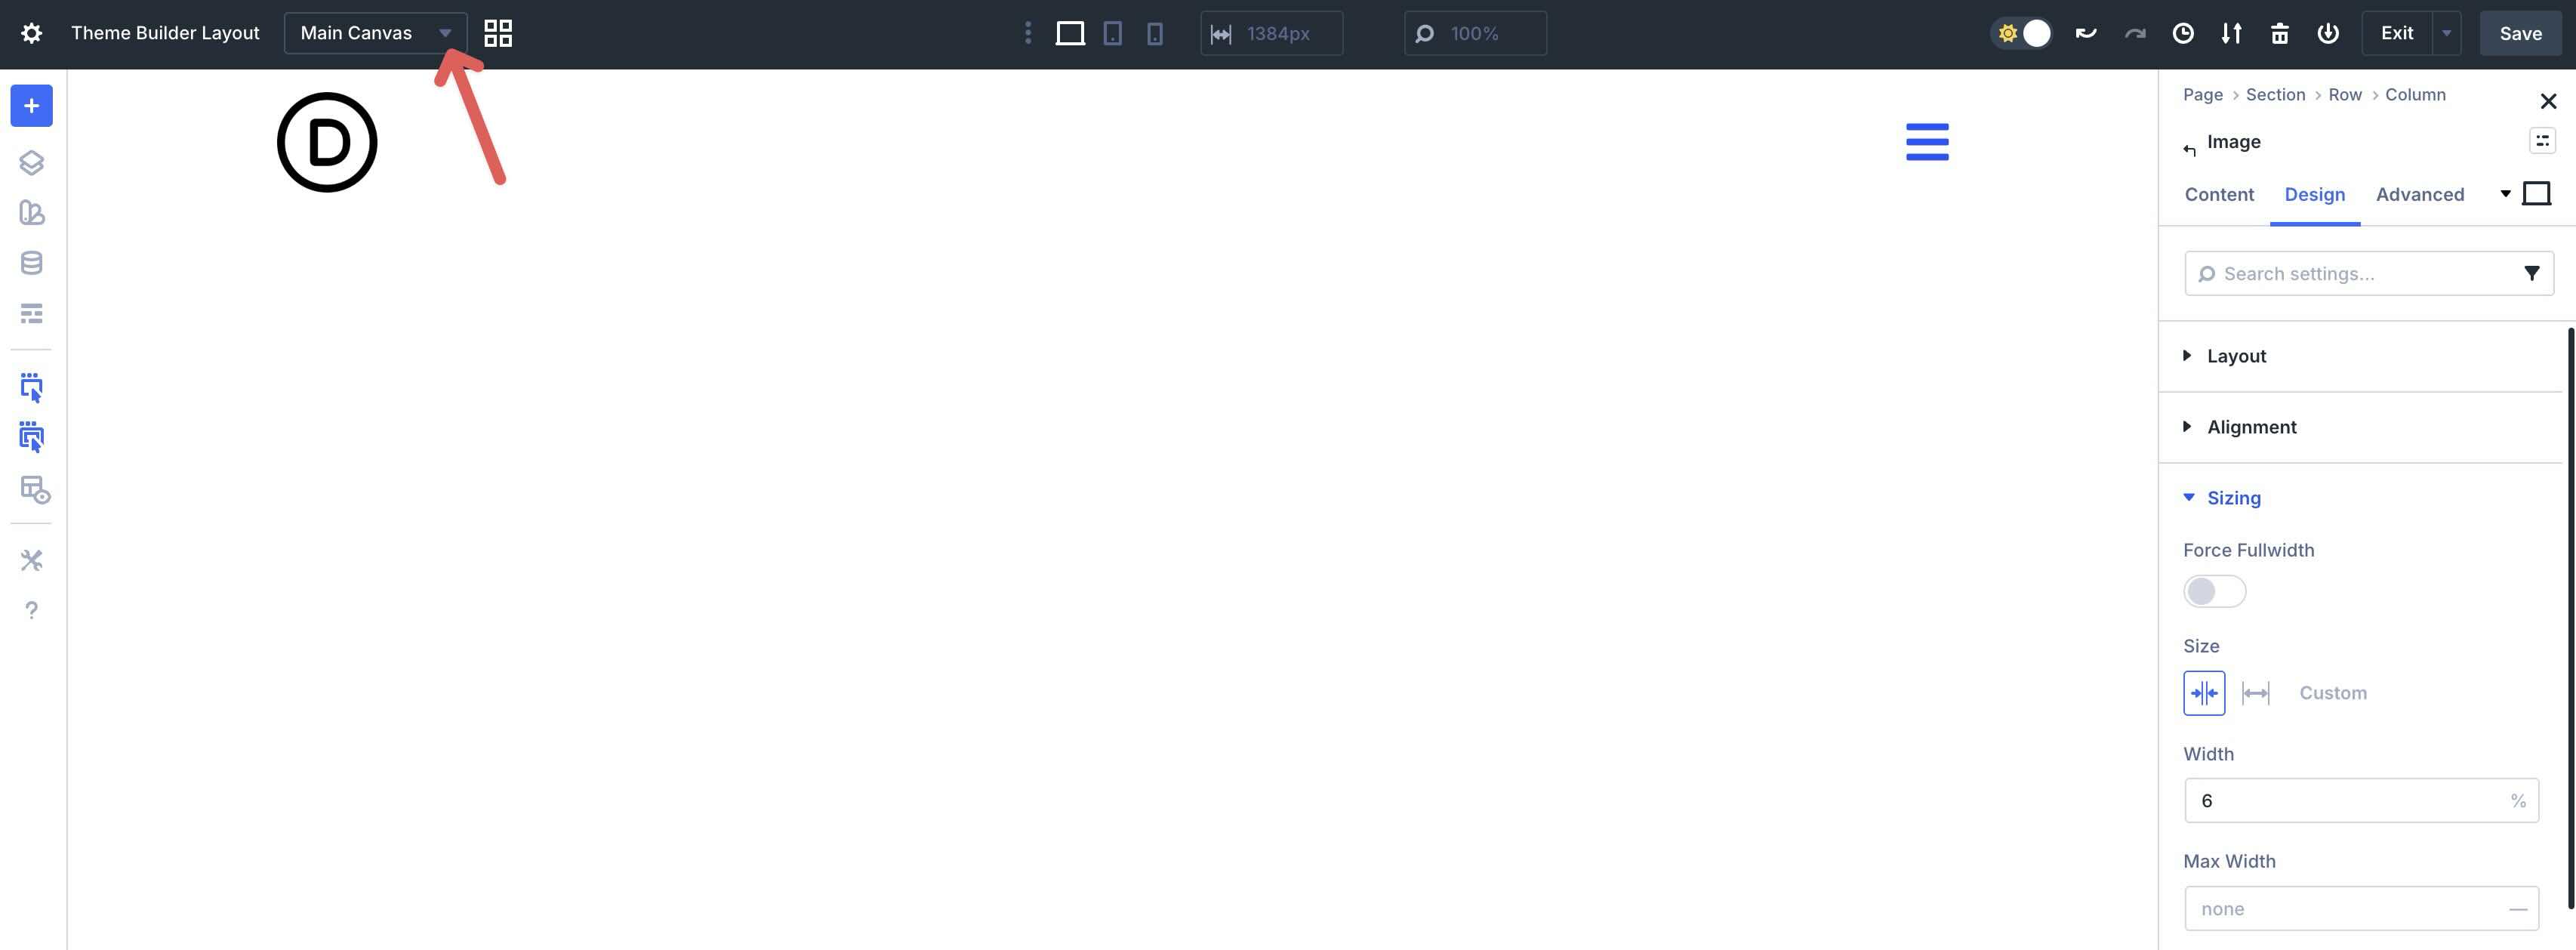
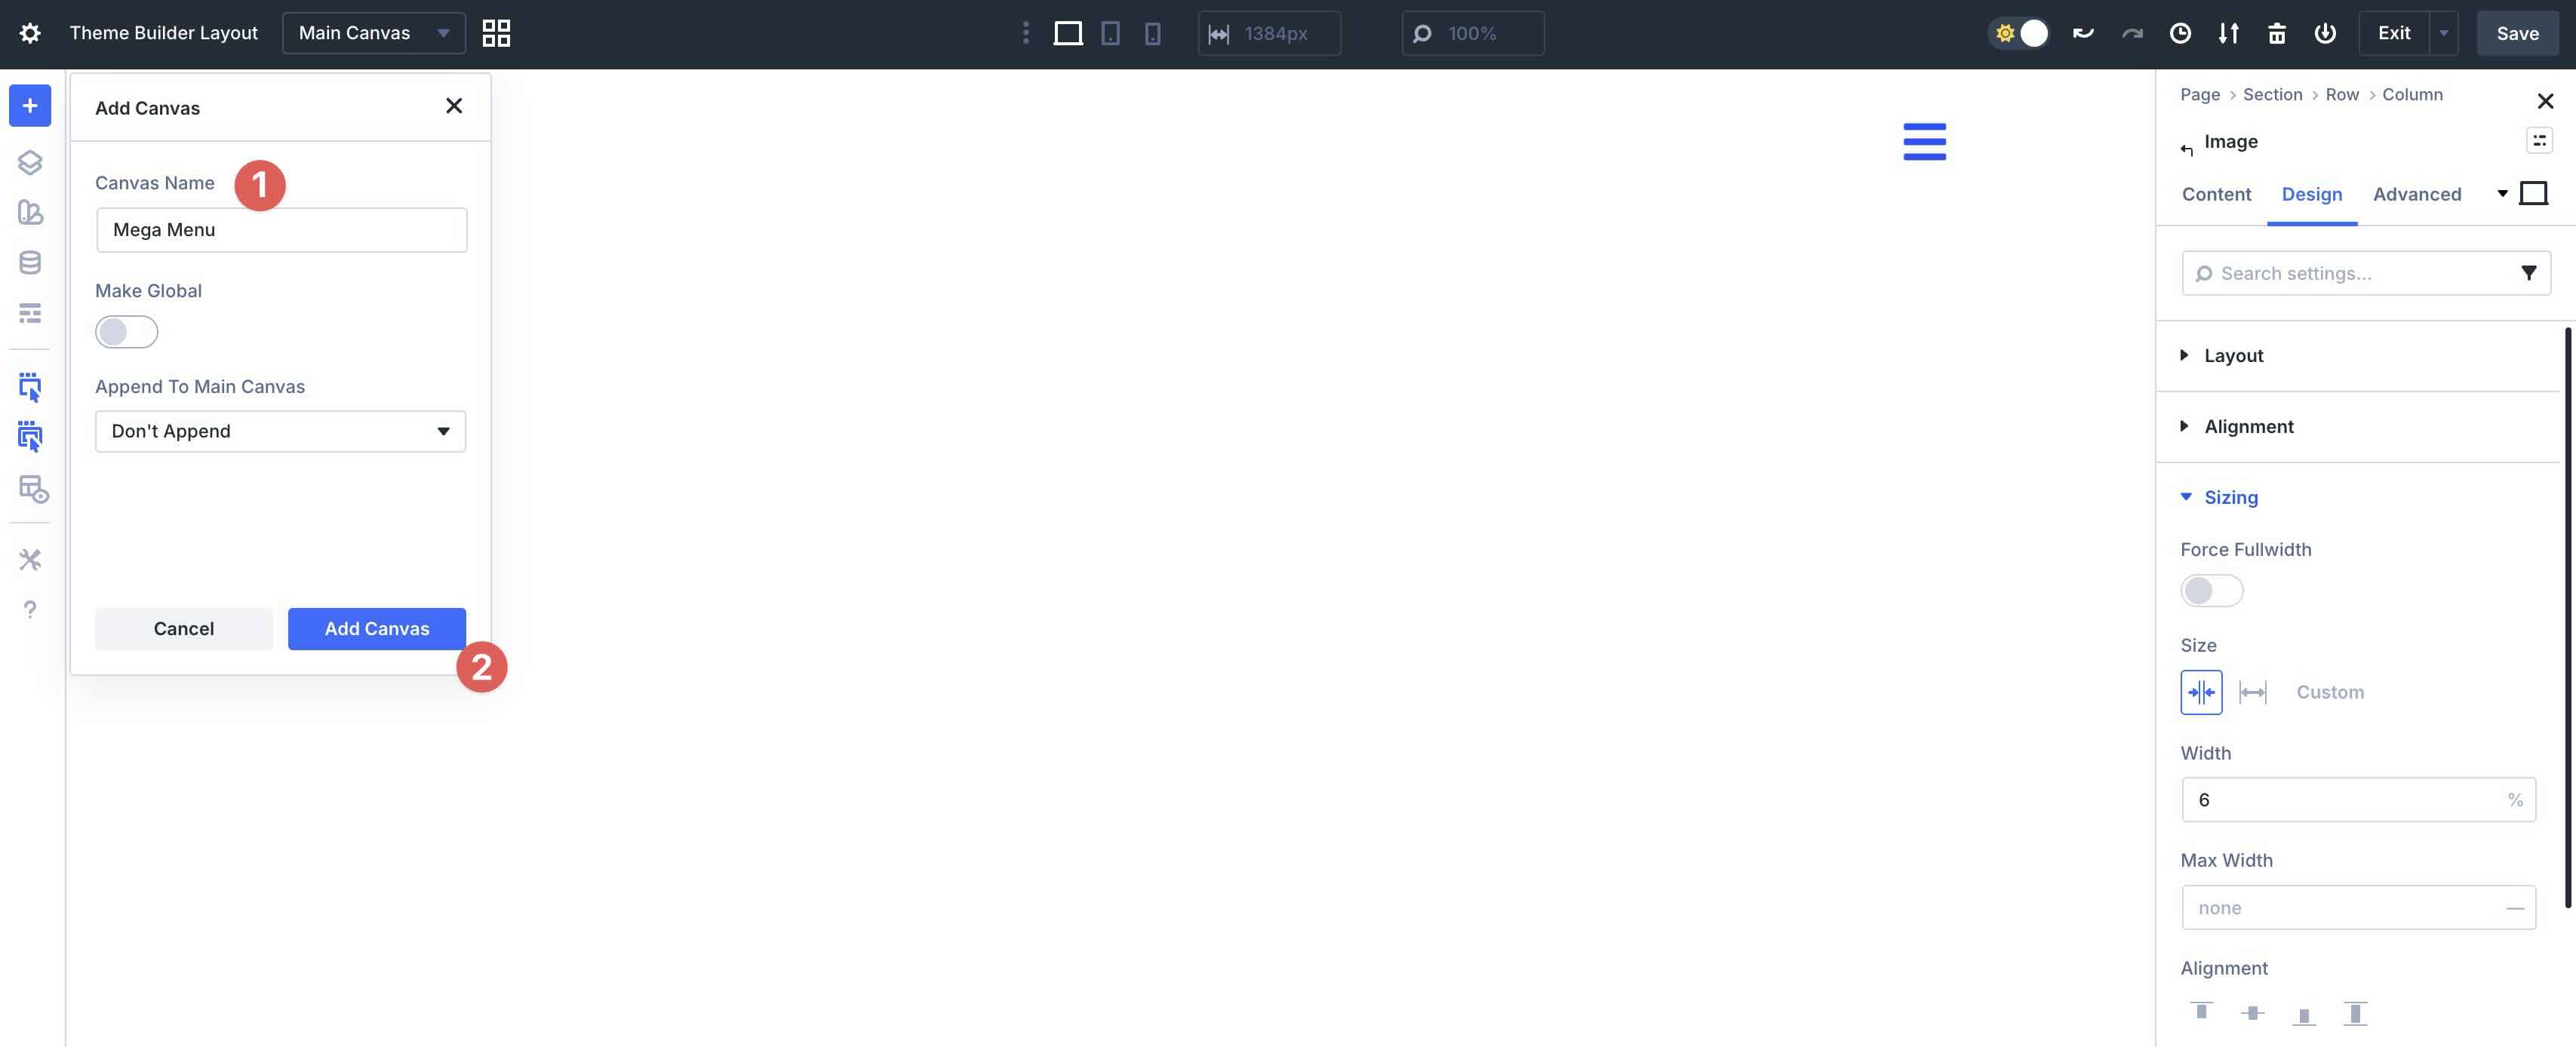
The next step is to create a new Global Canvas that will house our mega menu. In the Theme Builder, click the Canvas dropdown menu, located next to the Theme Builder Layout title.
Click the Add Canvas button to create a new Canvas.
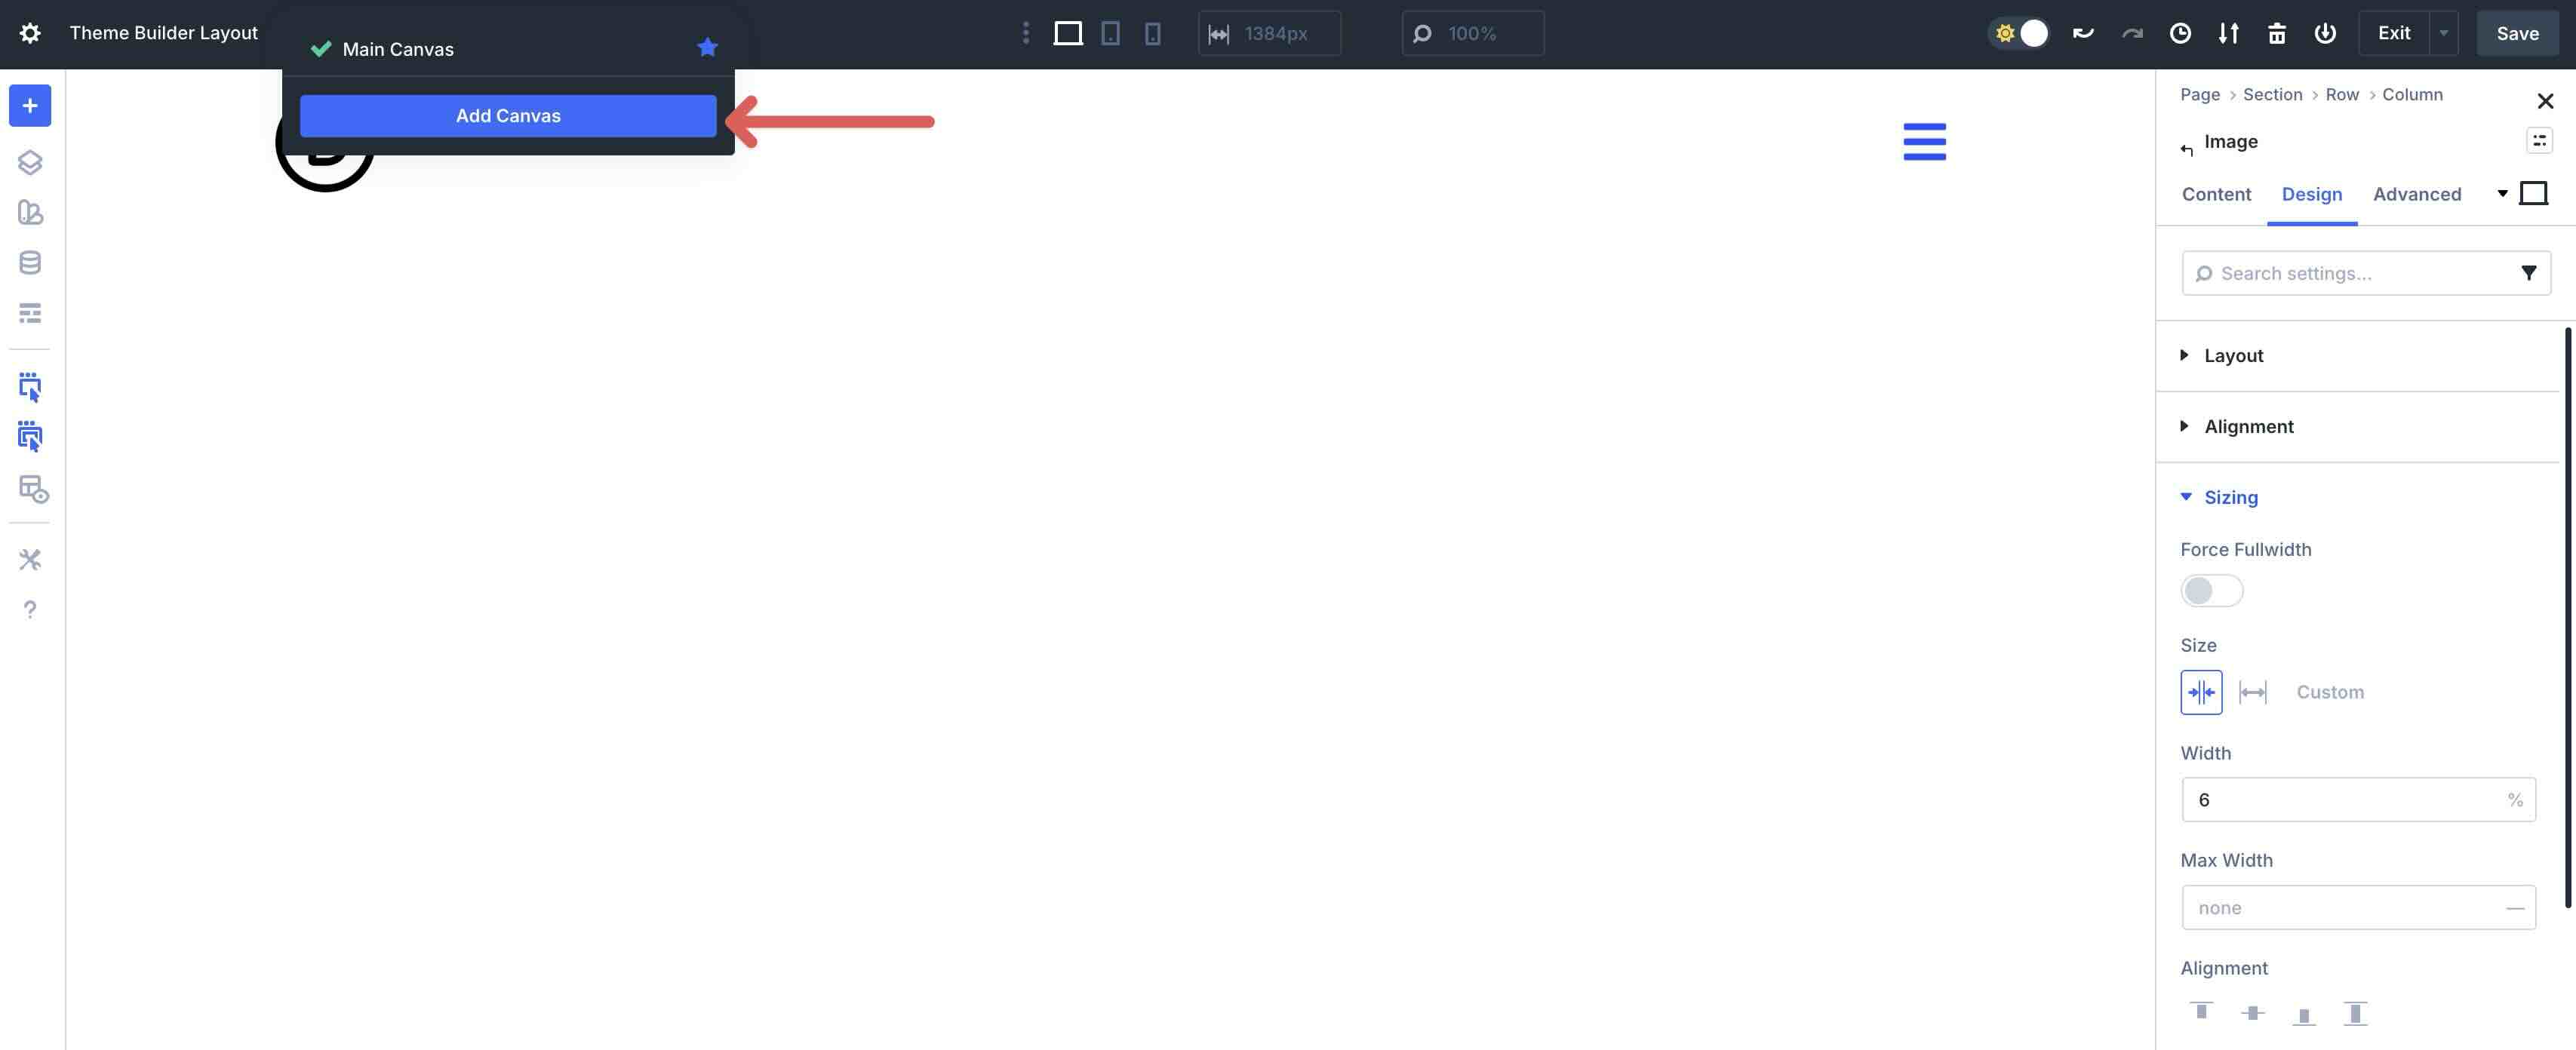
Give the Canvas a name and click Add Canvas.
In this step, we won’t go through all of the design settings. Instead, we will guide you in creating the mega menu structure, with the understanding that you will make design tweaks to suit your specific needs.
Style The Mega Menu Section
Inside the new Canvas, let’s make some settings changes to the Section already in place in the template. With the Section selected, click the Design tab. Expand the Sizing tab and set the Width to 90%. Set the Section Alignment to Center.
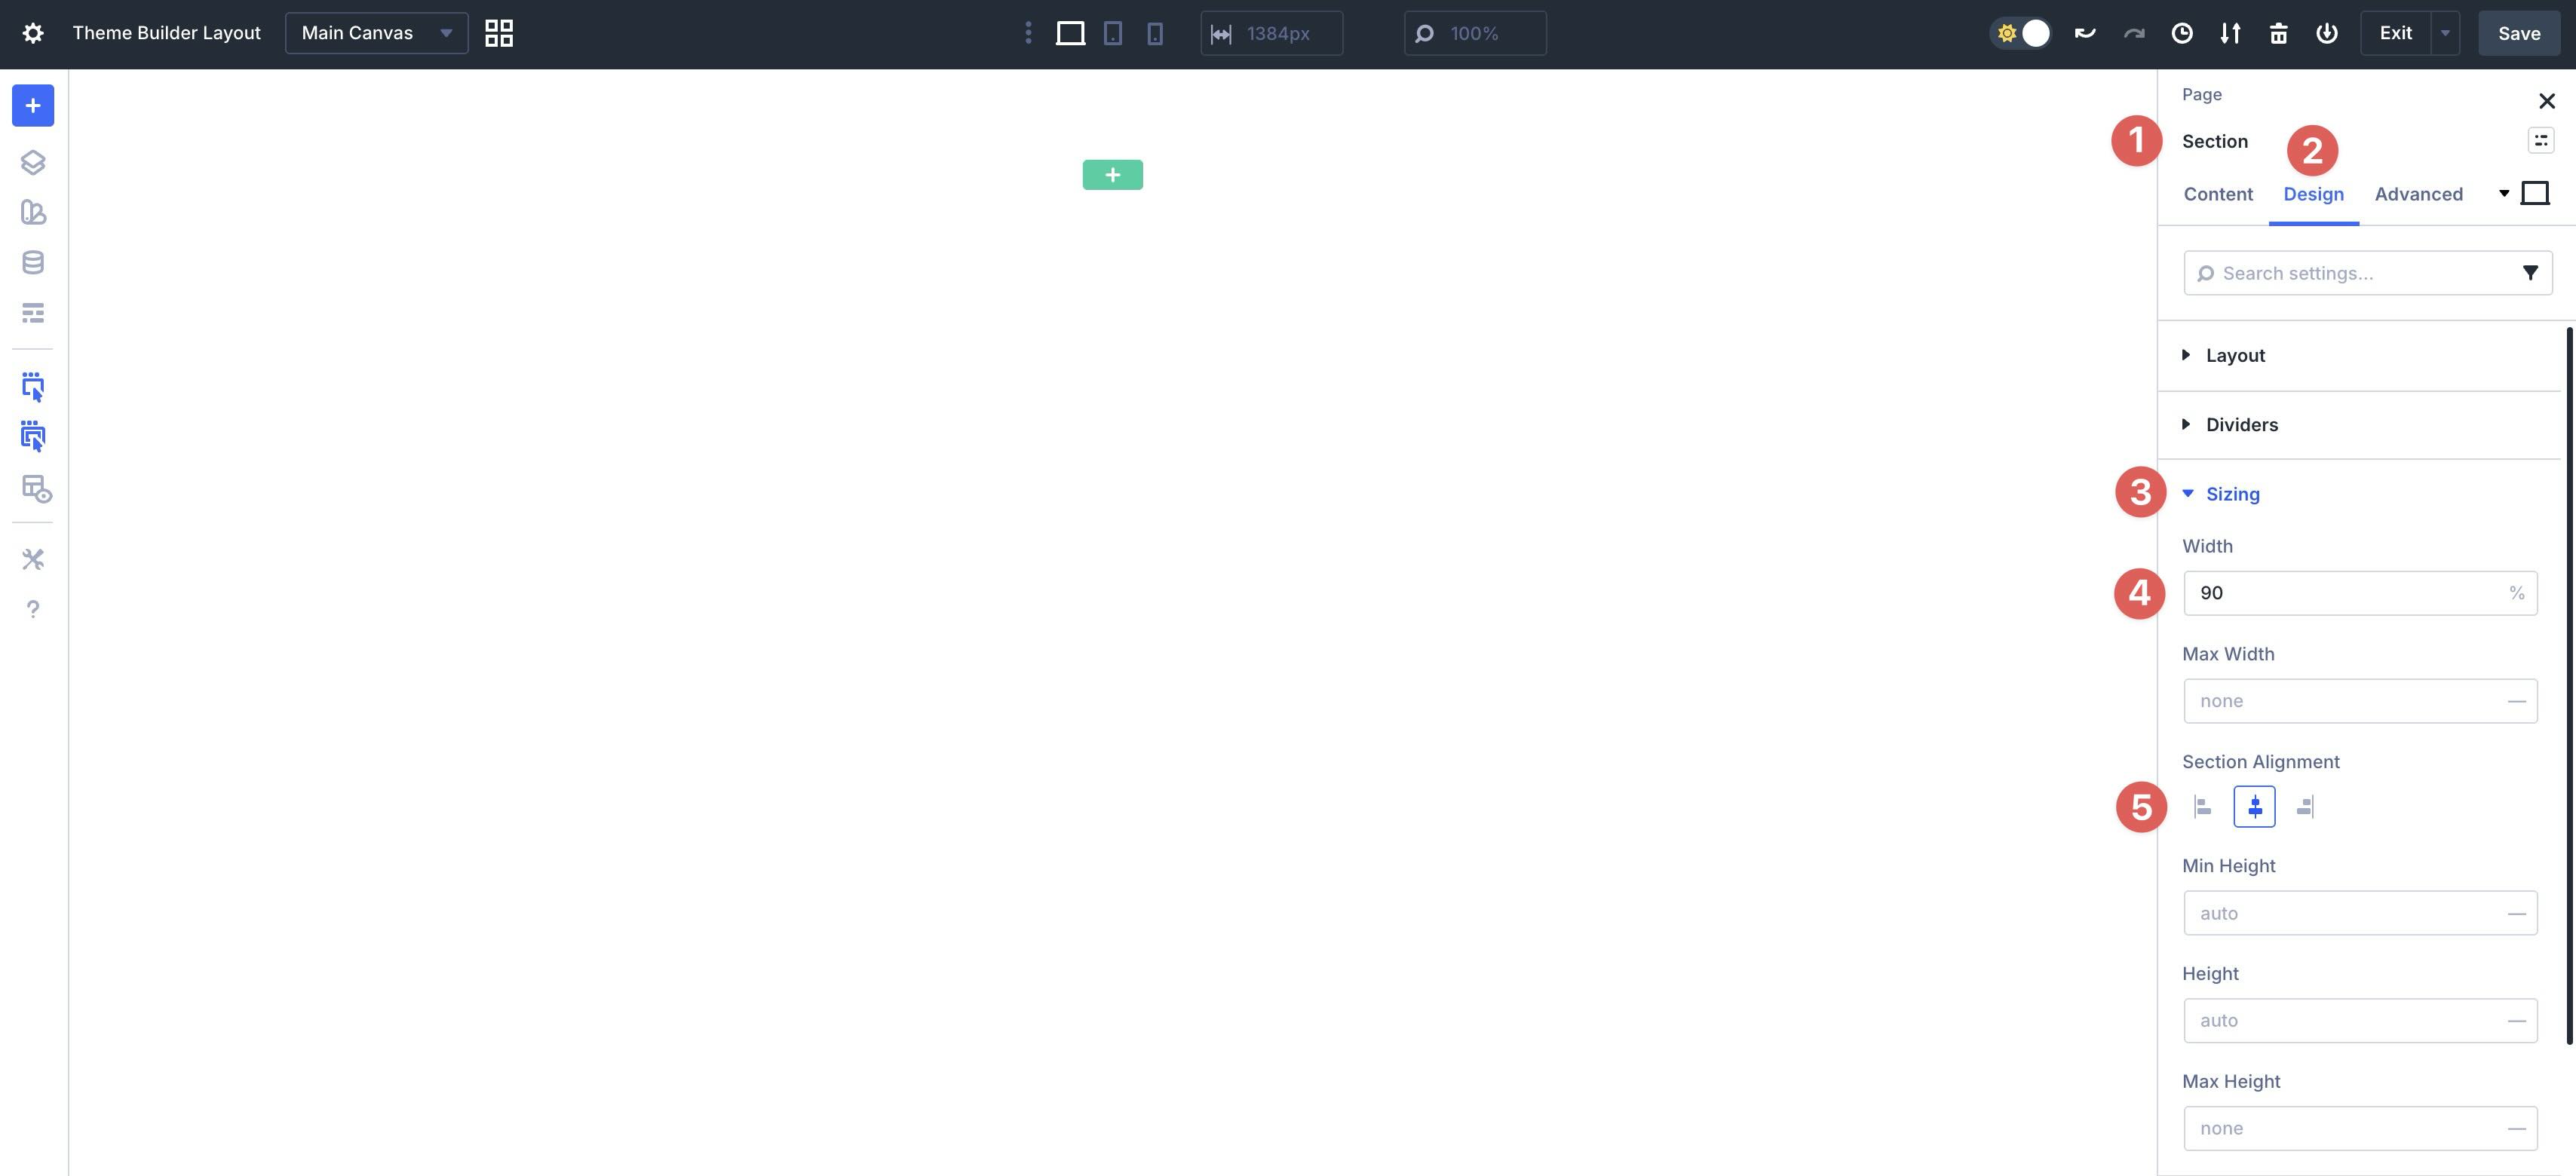
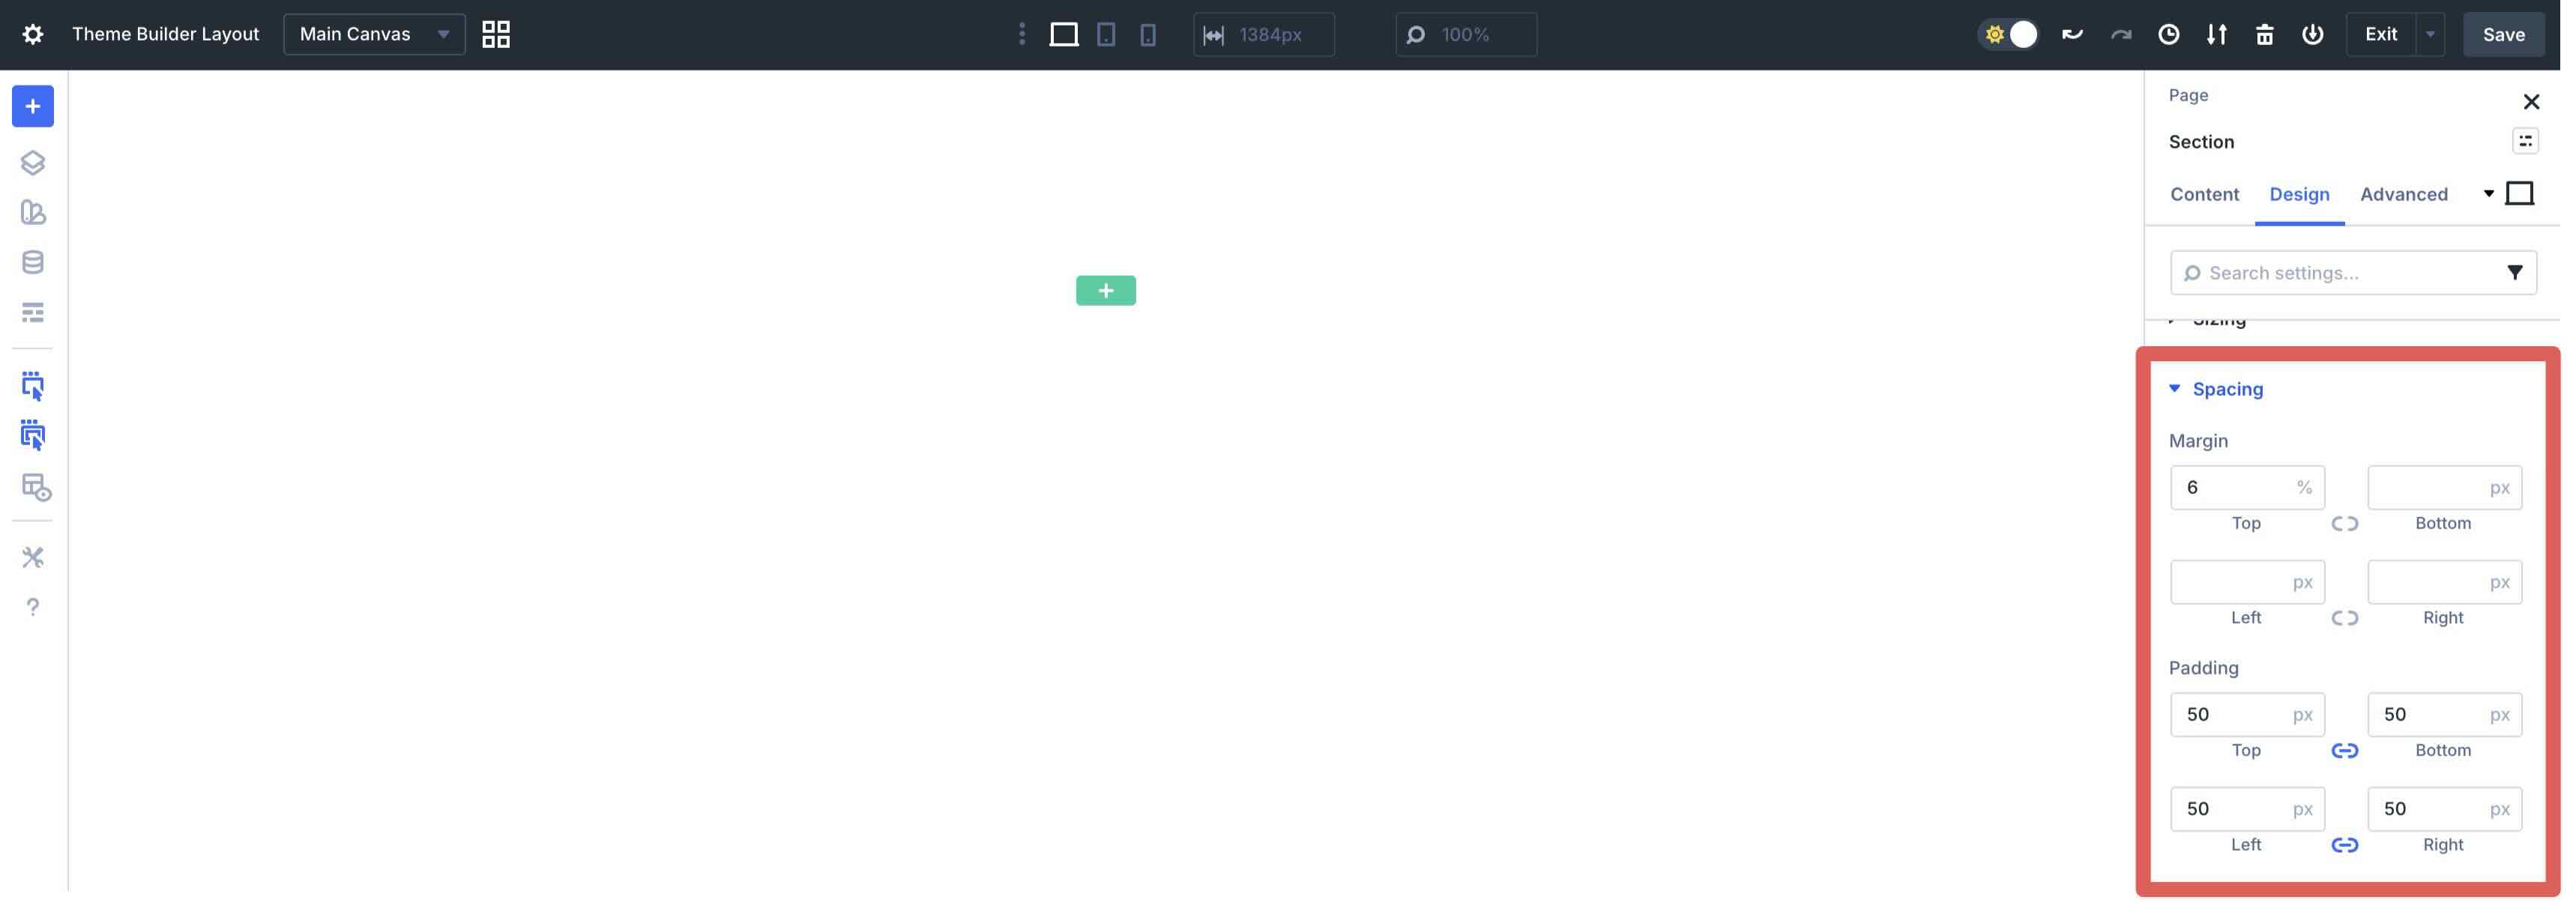
Next, expand the Spacing menu. Add 6% Top Margin to the section and add 50px Padding to all four sides.
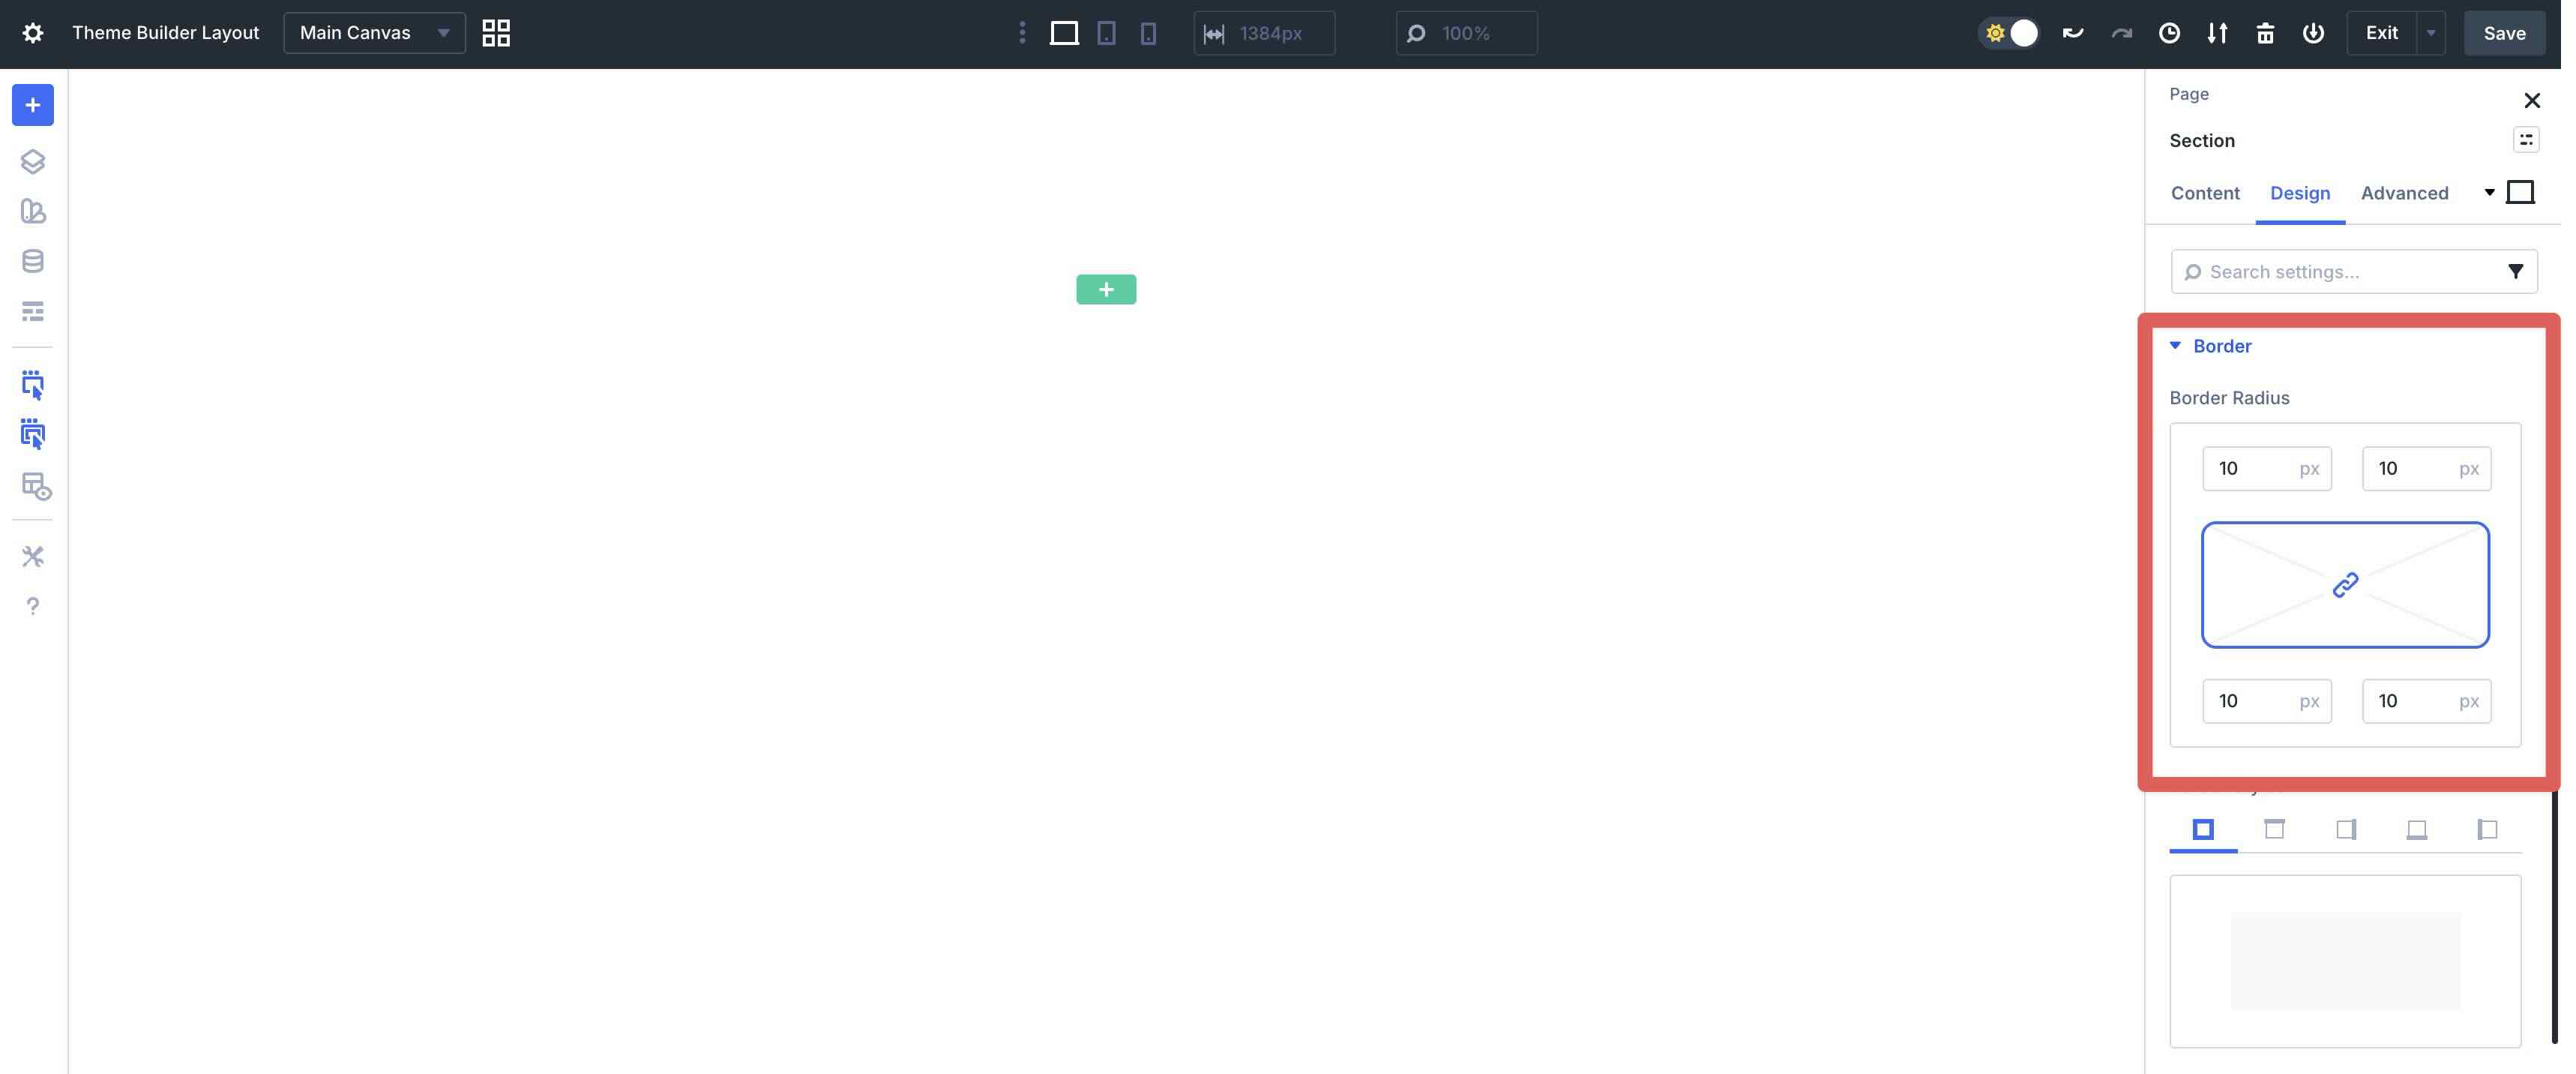
Open the Border menu. Add 10px Border Radius to the Section.
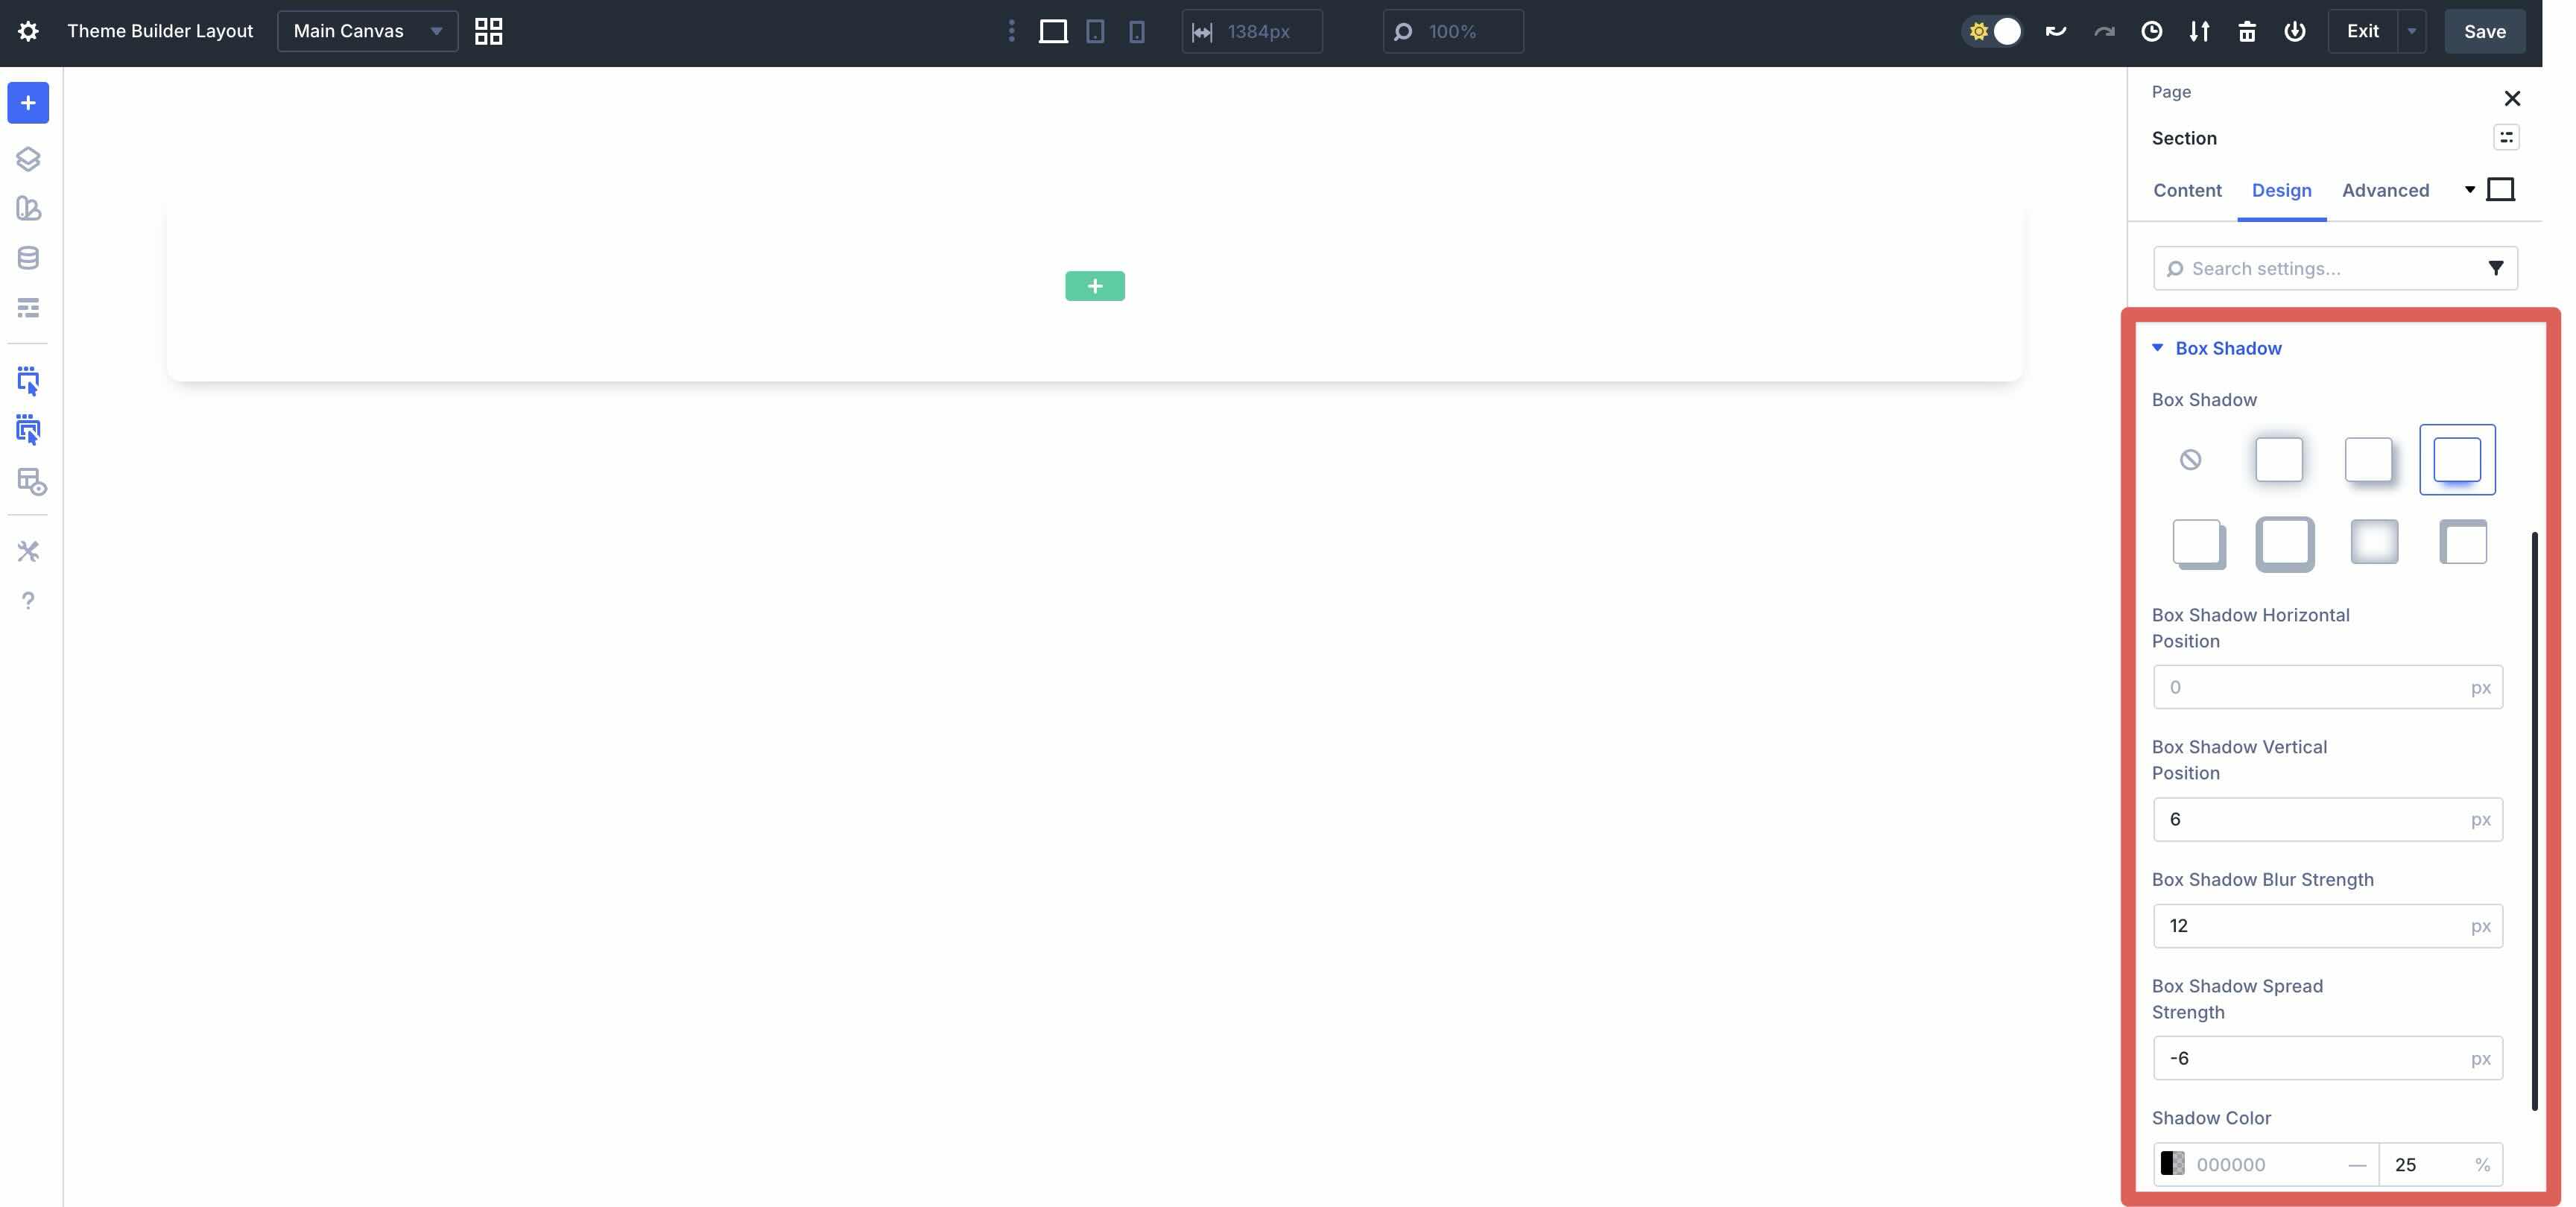
Finally, expand the Box Shadow dropdown menu. Select Preset 3 in the Box Shadow field, 6px as the Box Shadow Vertical Position, 12px as the Box Shadow Blur Strength, and adjust the Shadow Color Opacity to 25%.
Style The Row Settings
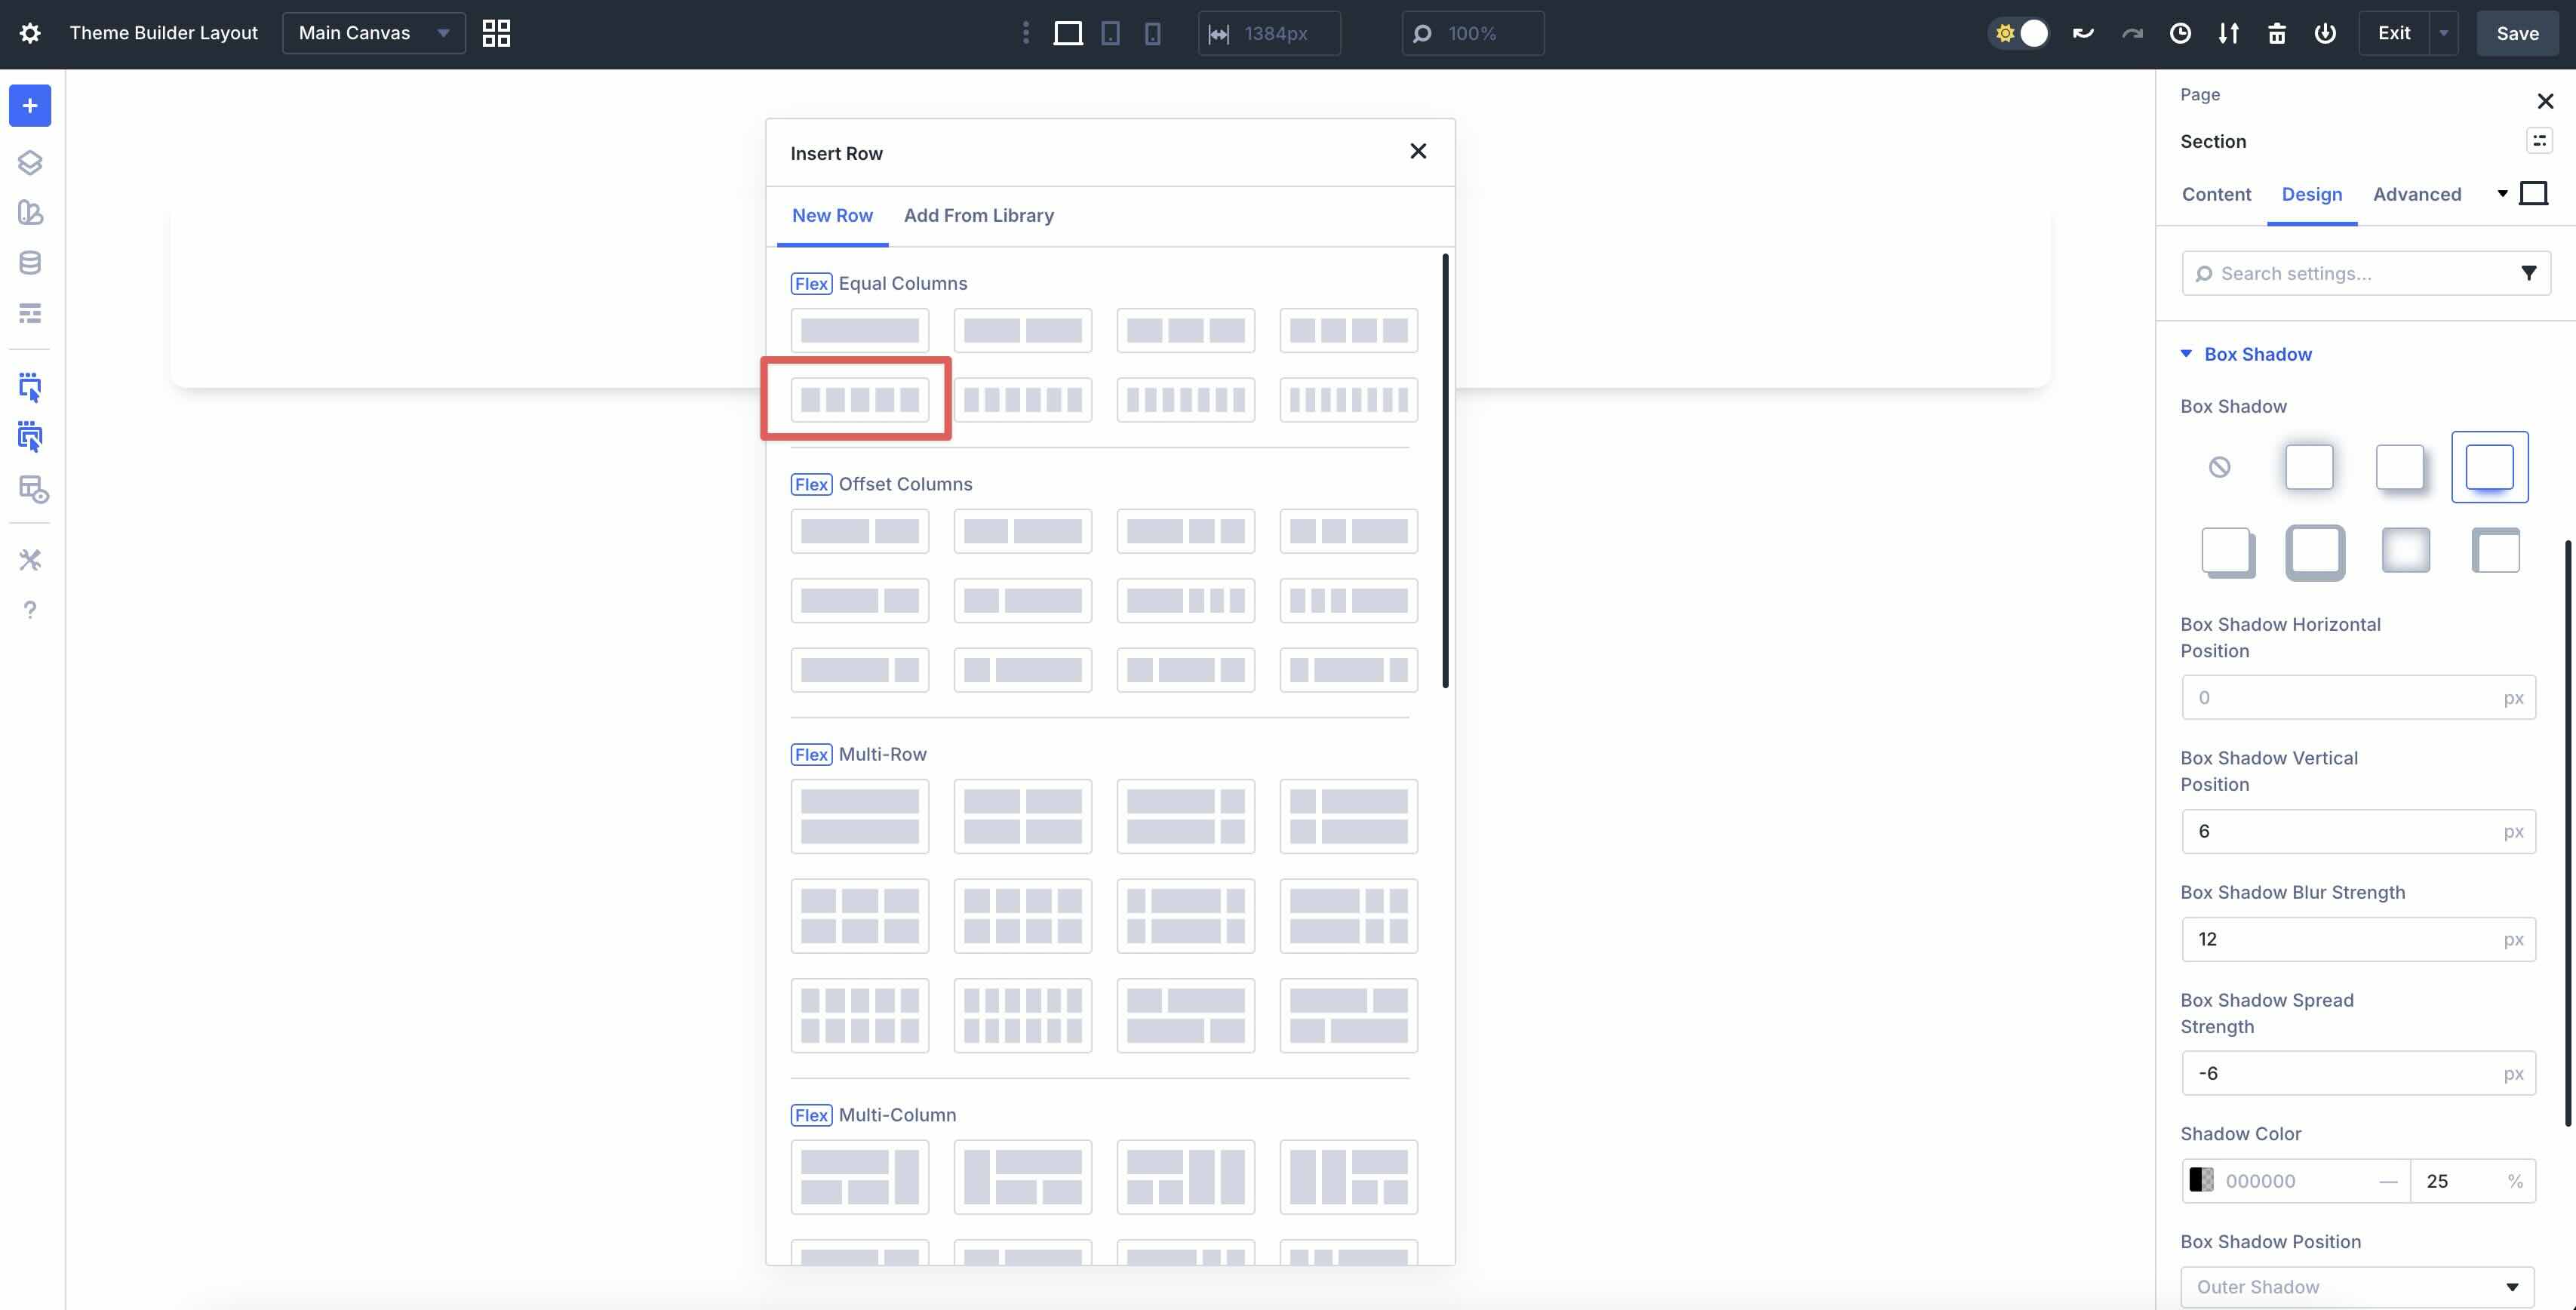
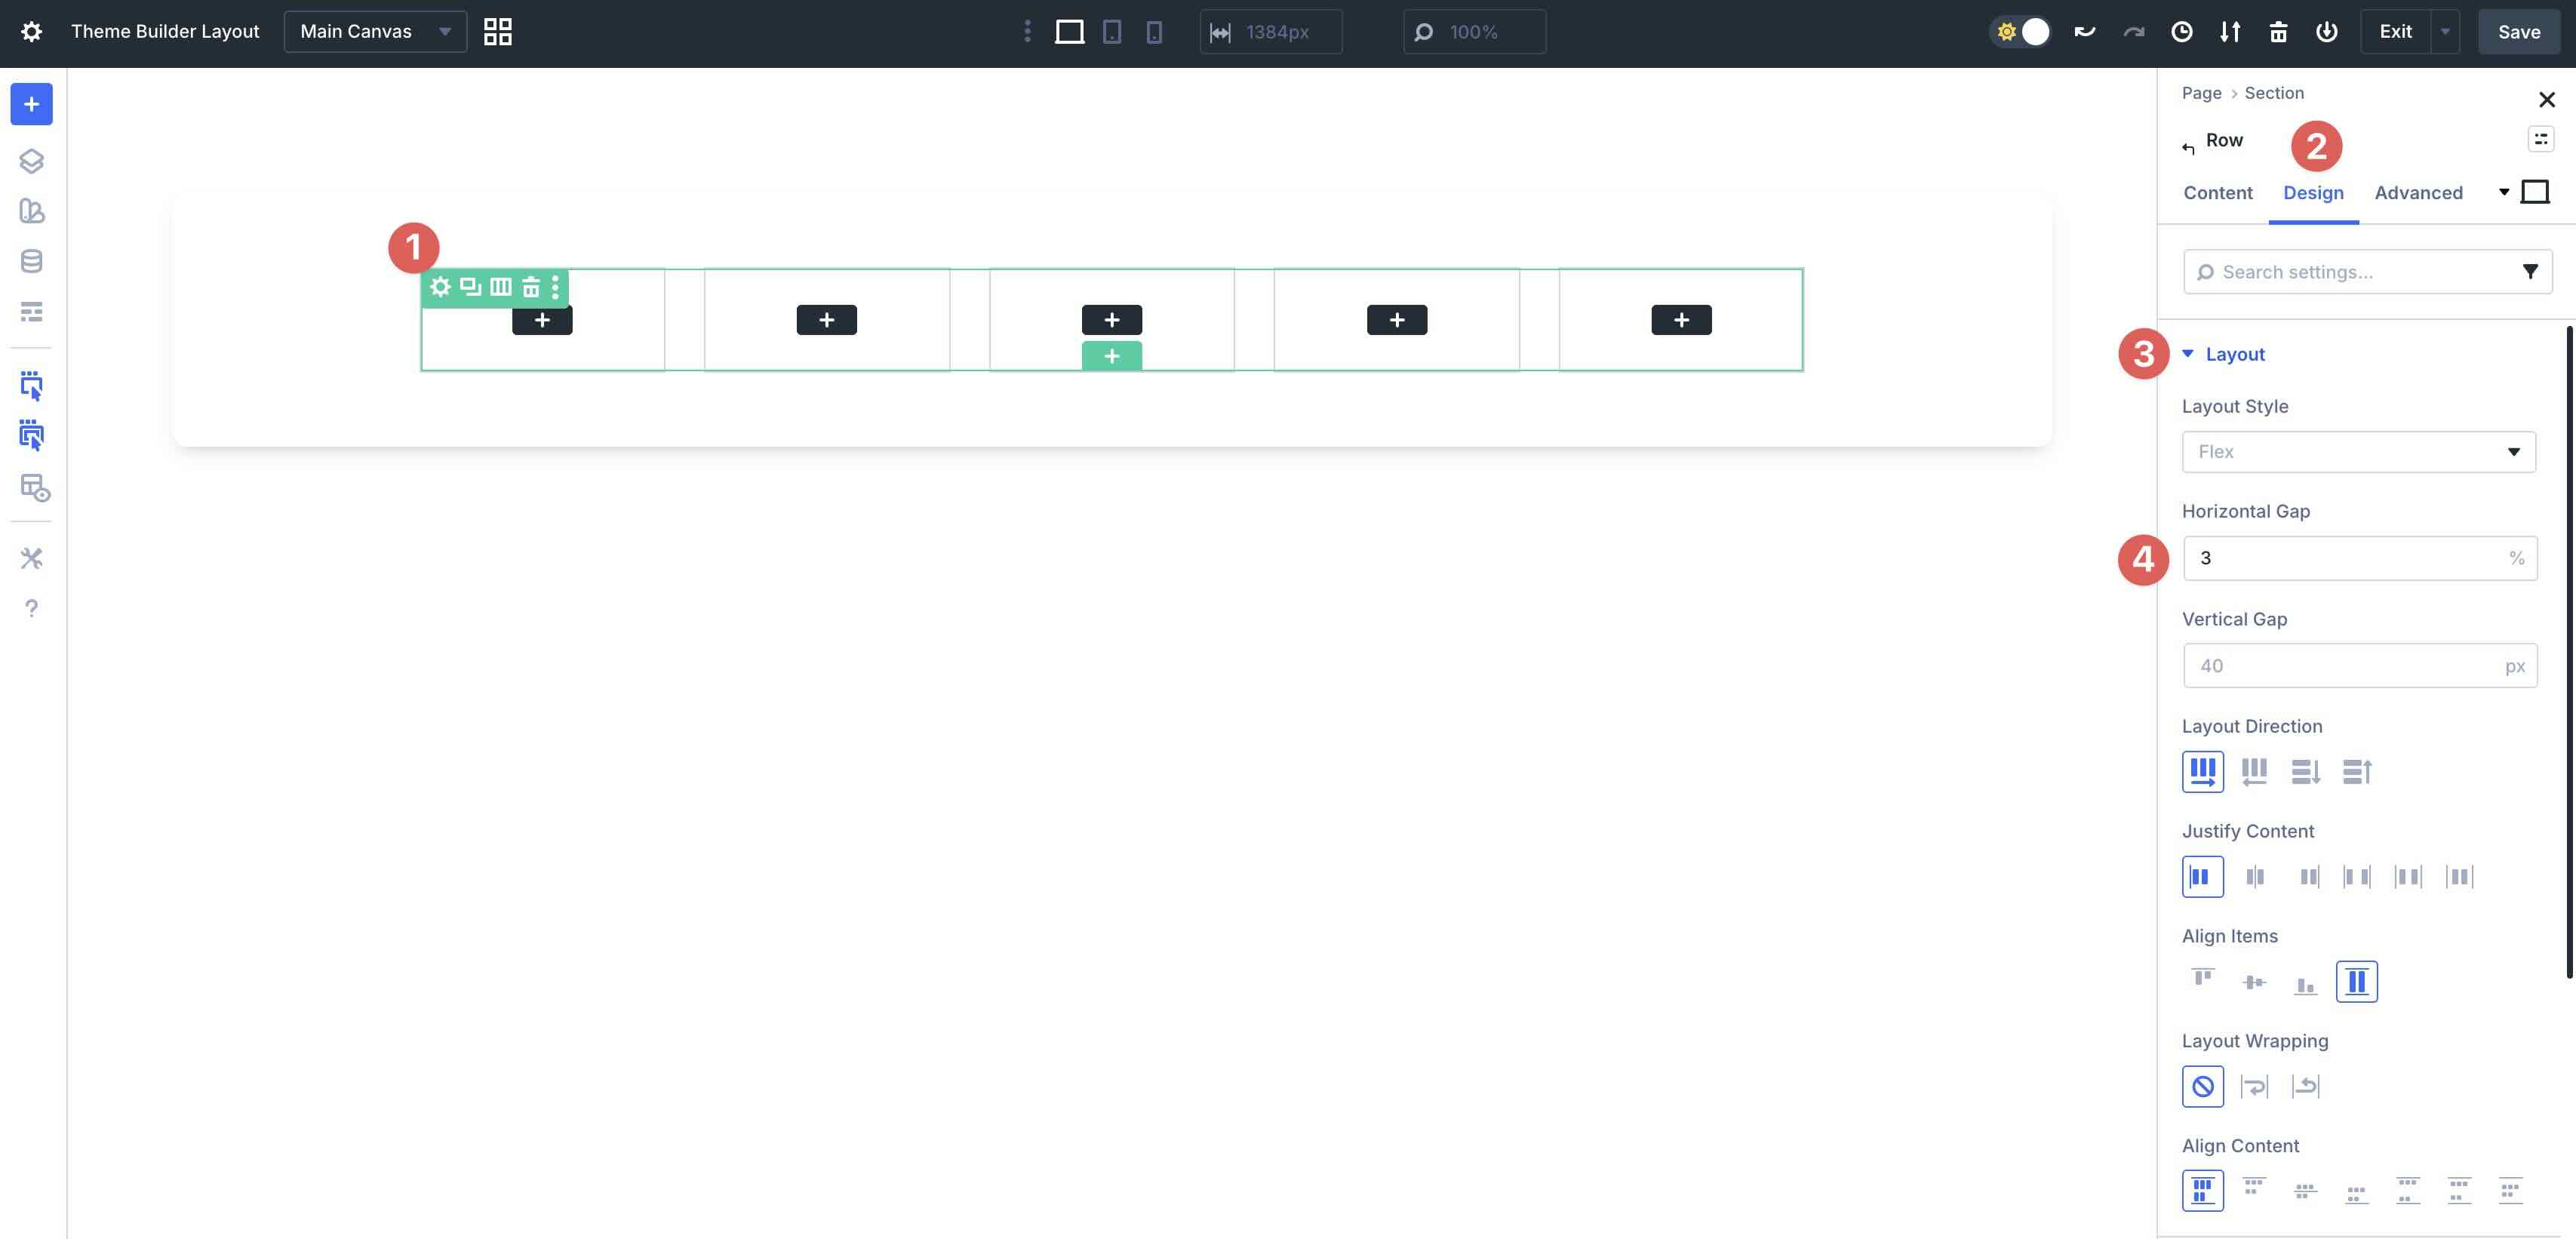
With the Section styles in place, let’s add a 5-column Row to the Section.
In the Design tab, expand the Layout menu. Set the Horizontal Gap to 3%.
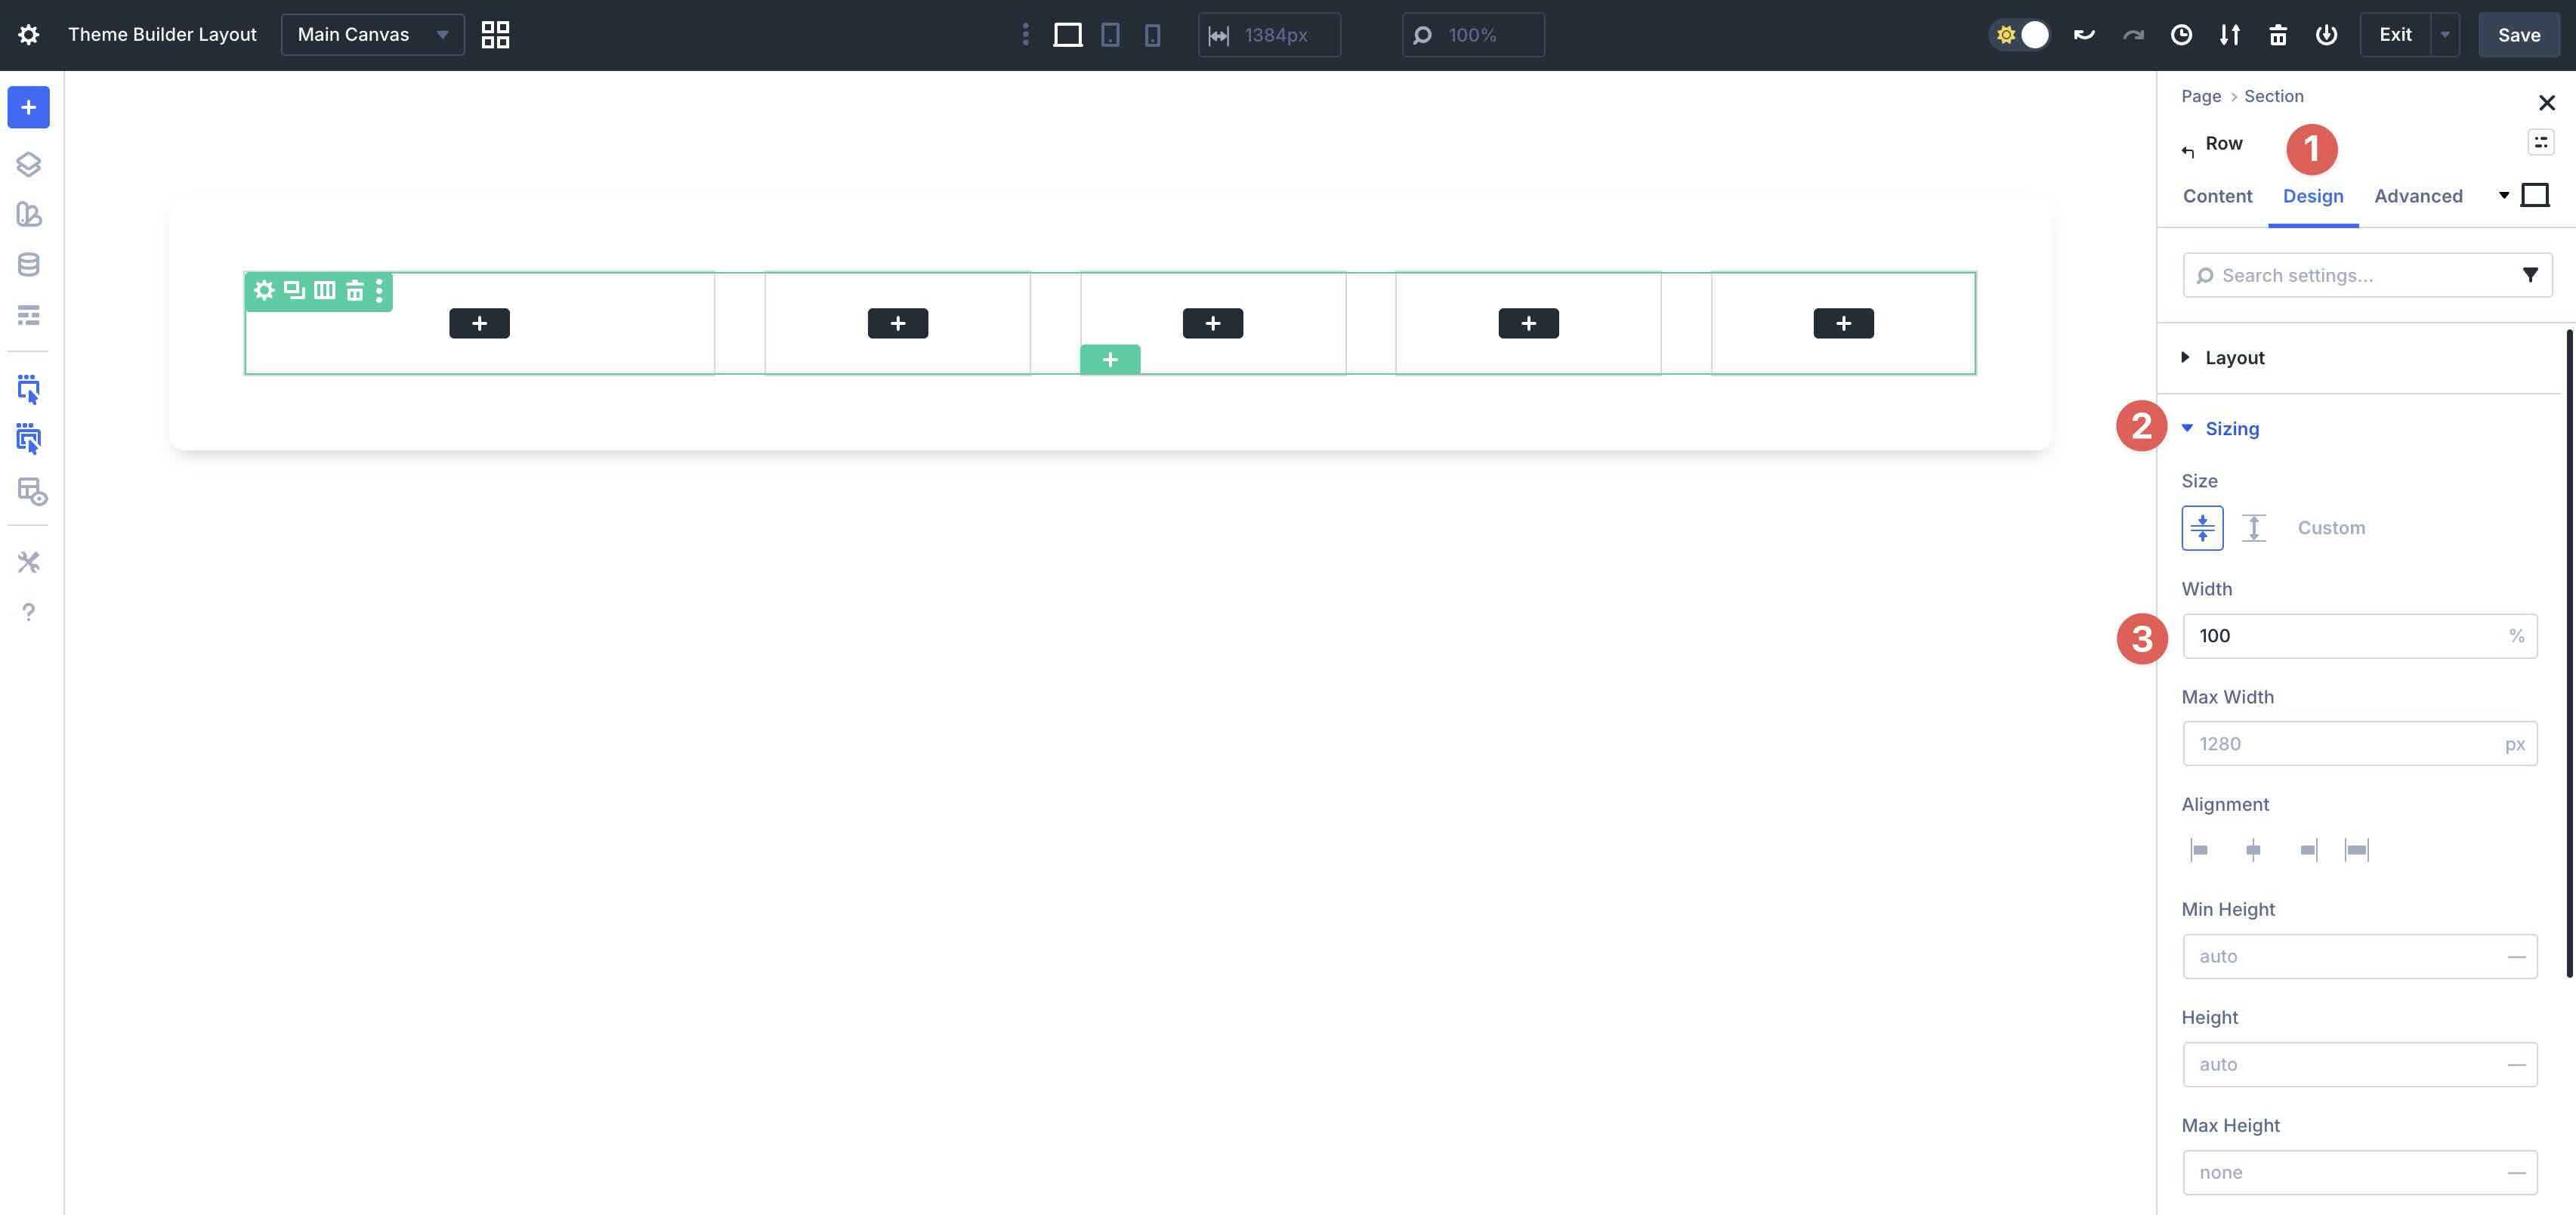
Expand the Sizing tab. Set the Row’s Width to 100%.
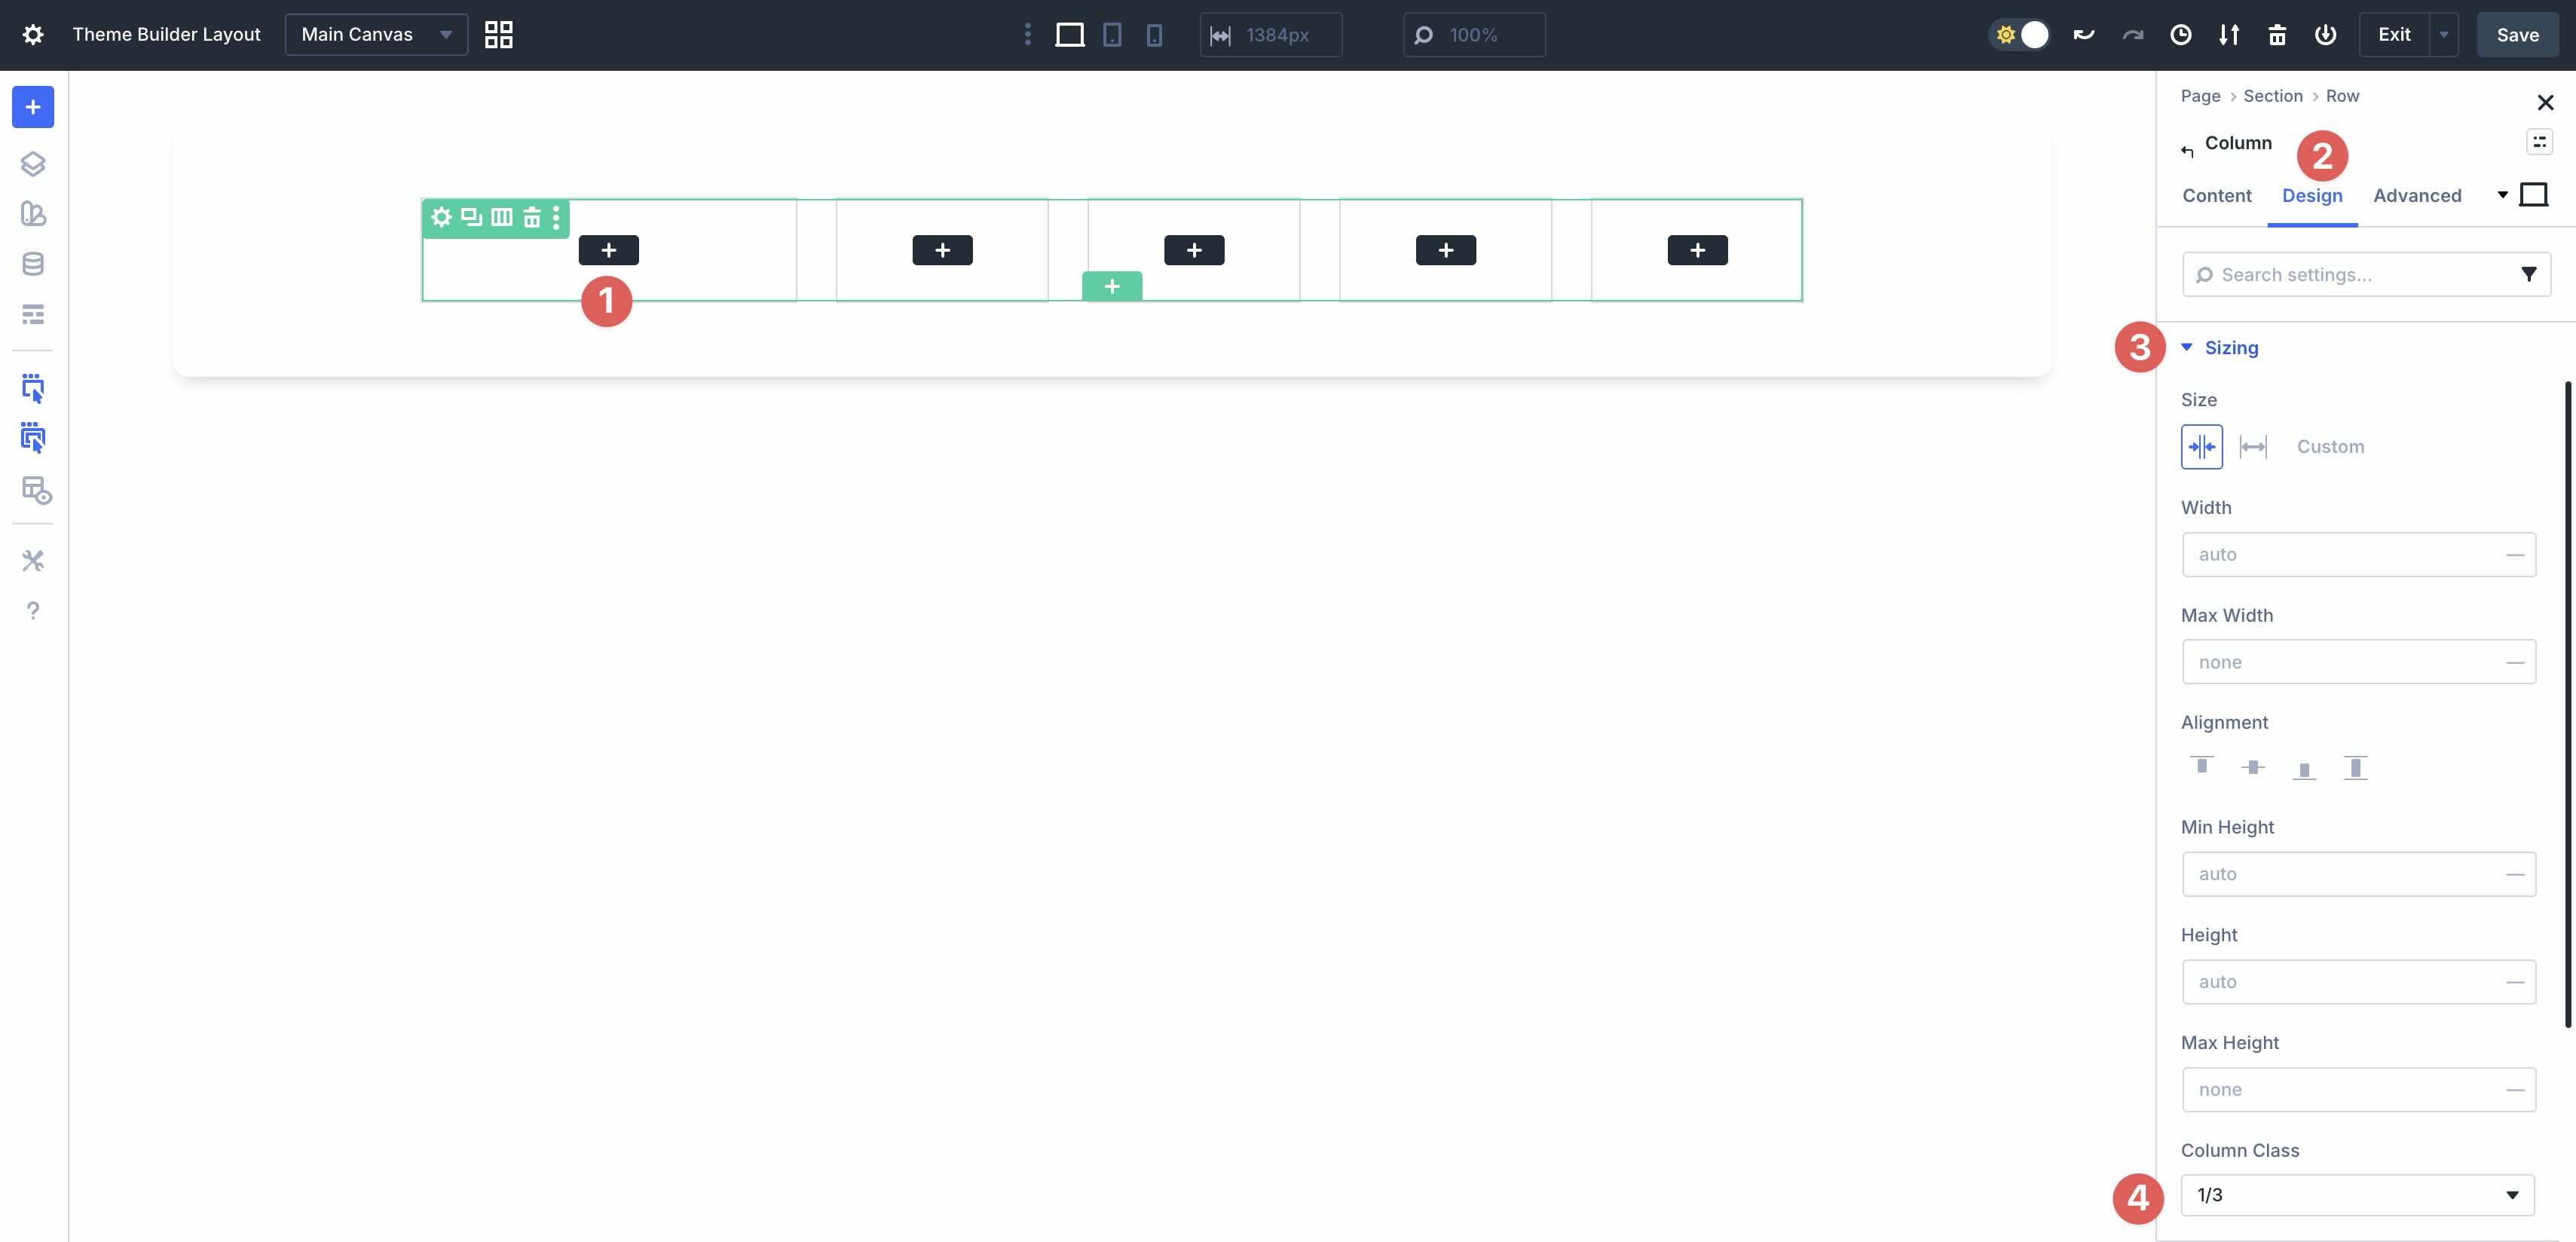
Now we’ll need to adjust the Column sizing for the Row. Select the Content tab and expand the Elements dropdown menu. Click the Edit Item icon for the first Column.
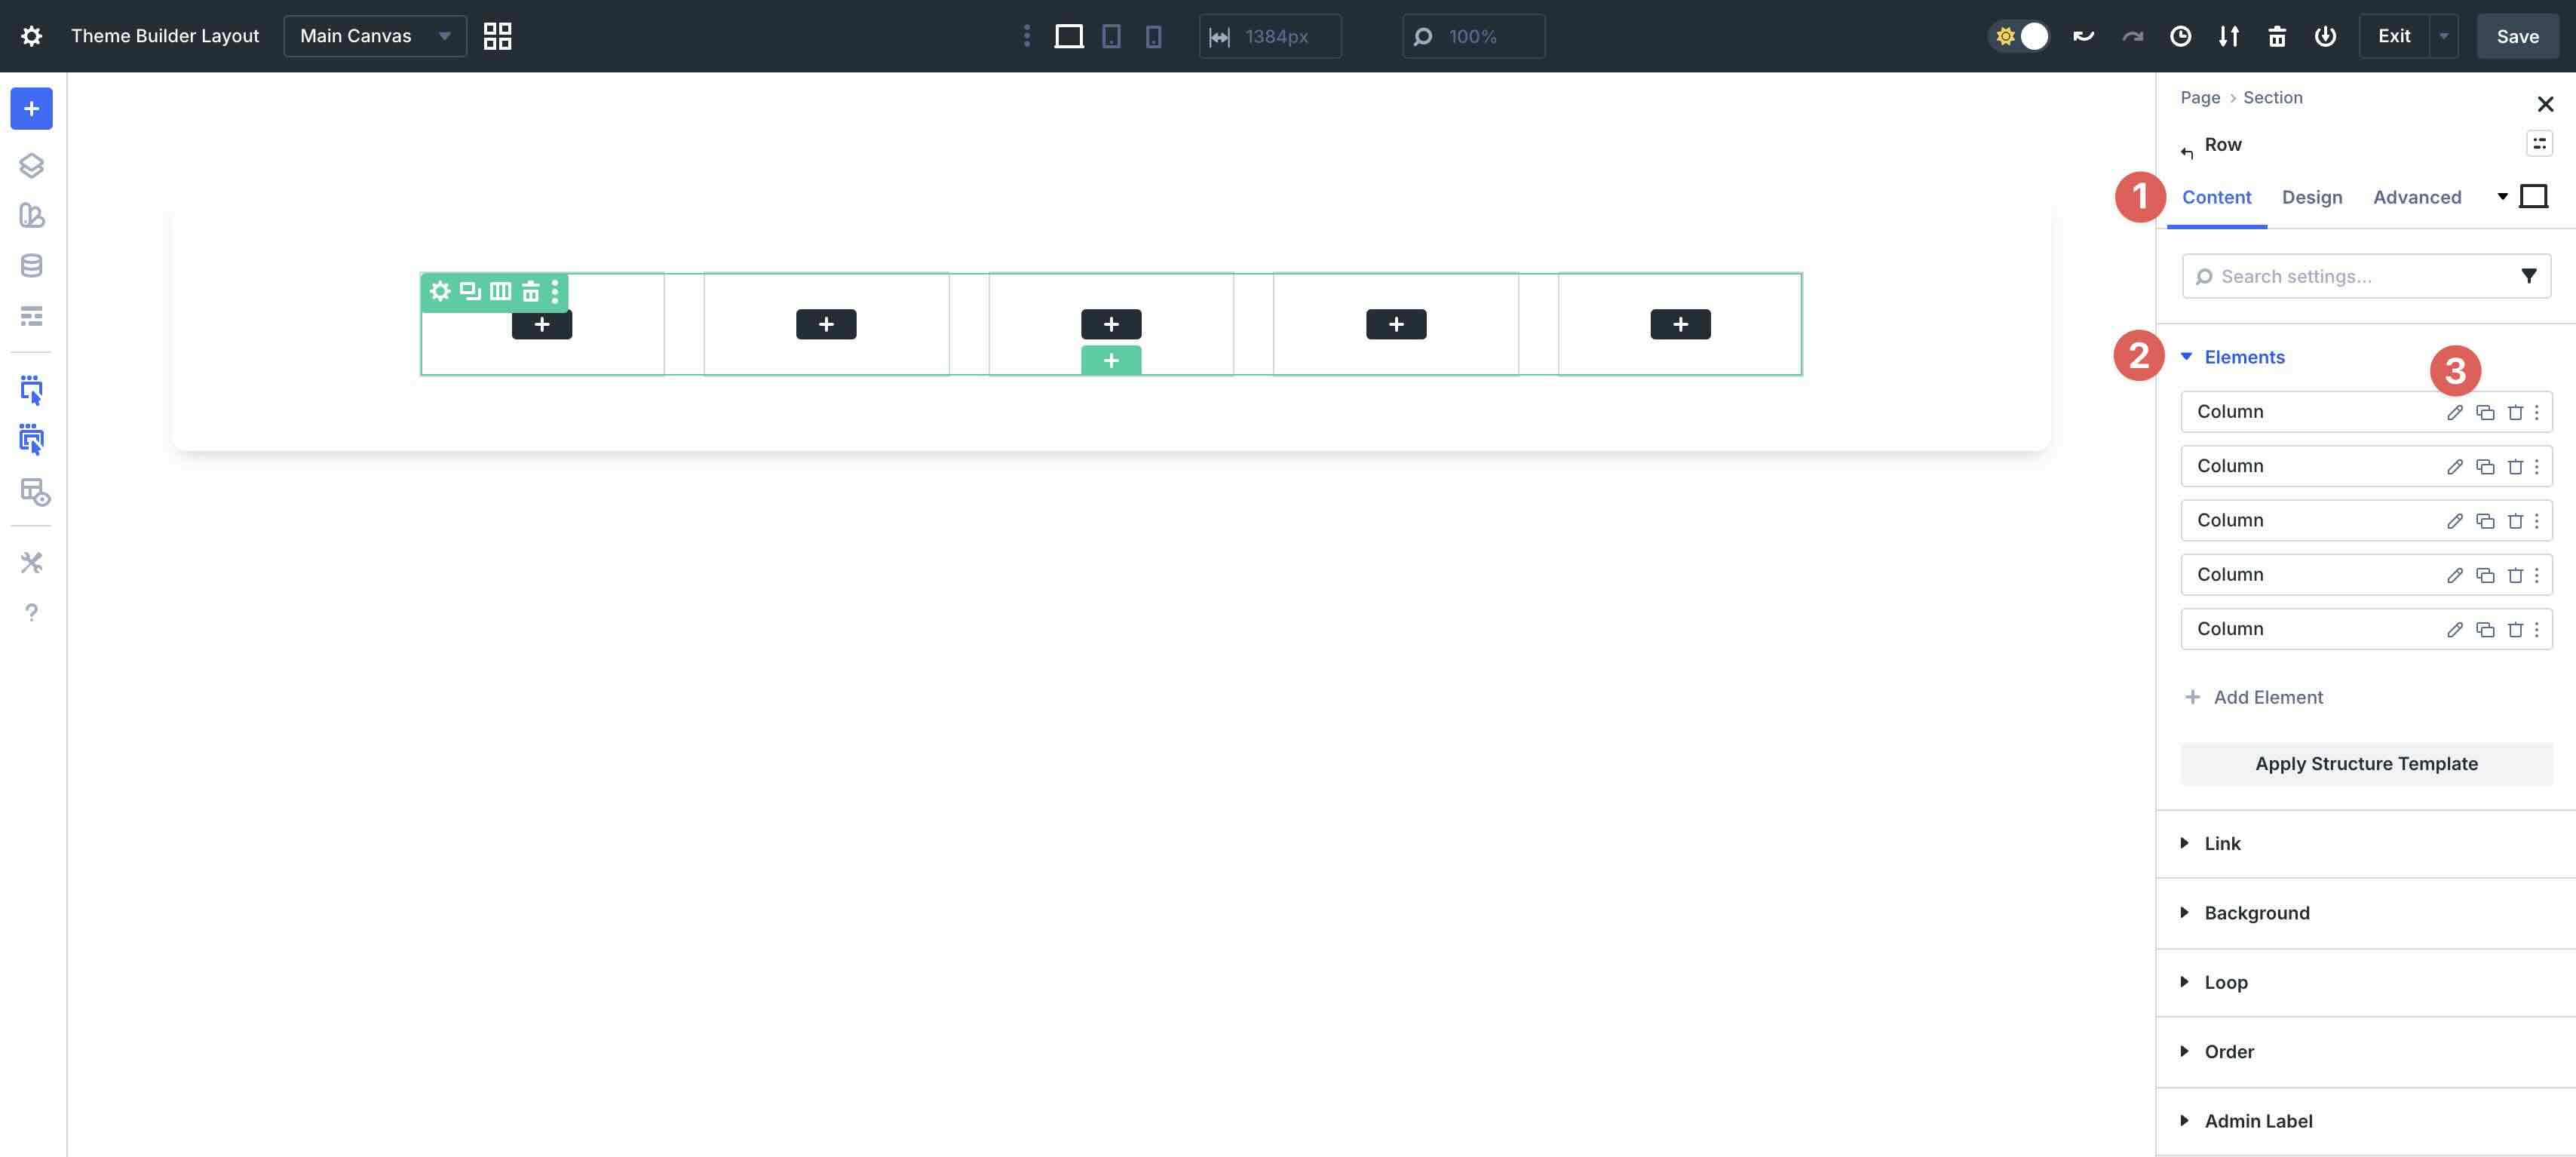
Choose the Design tab, expand the Sizing menu, and set the Column Class to 1/3.
Go back to the Row level, click the Content tab, and select the second Column to edit. This time, set the Column Class to 1/5. Repeat these steps for the remaining Columns.
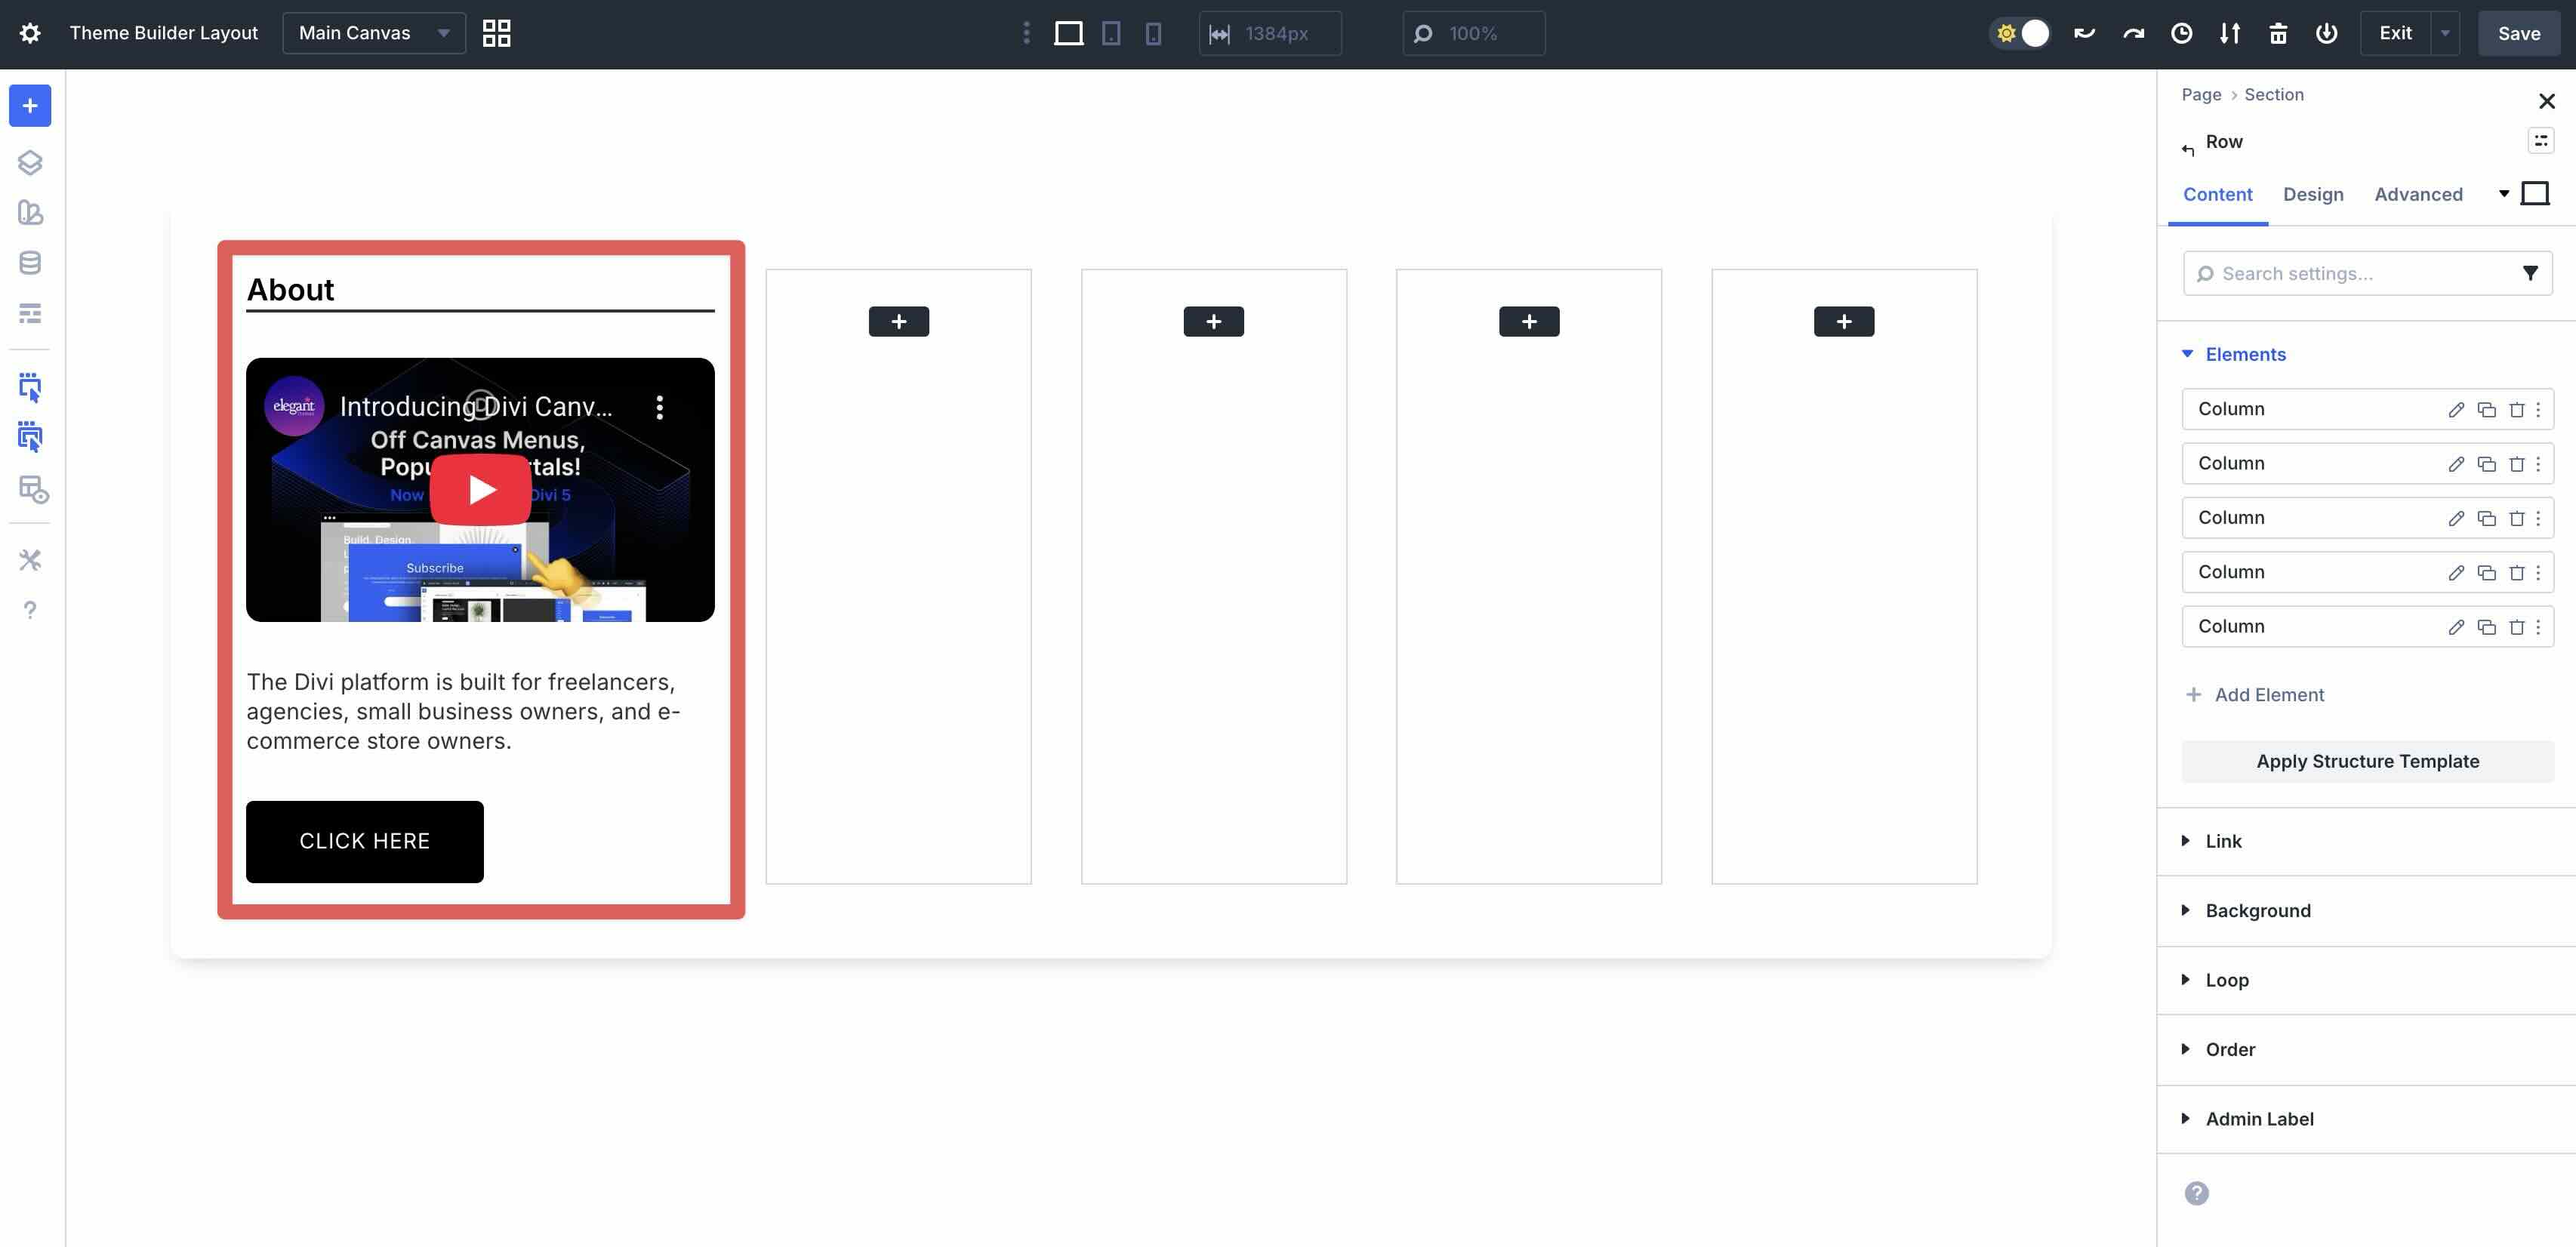
Add Content To The Mega Menu
Now, let’s add some content to our mega menu. In the first Column, add a Heading Module, Video Module, Text Module, and Button Module. Style the modules to suit your preferences.
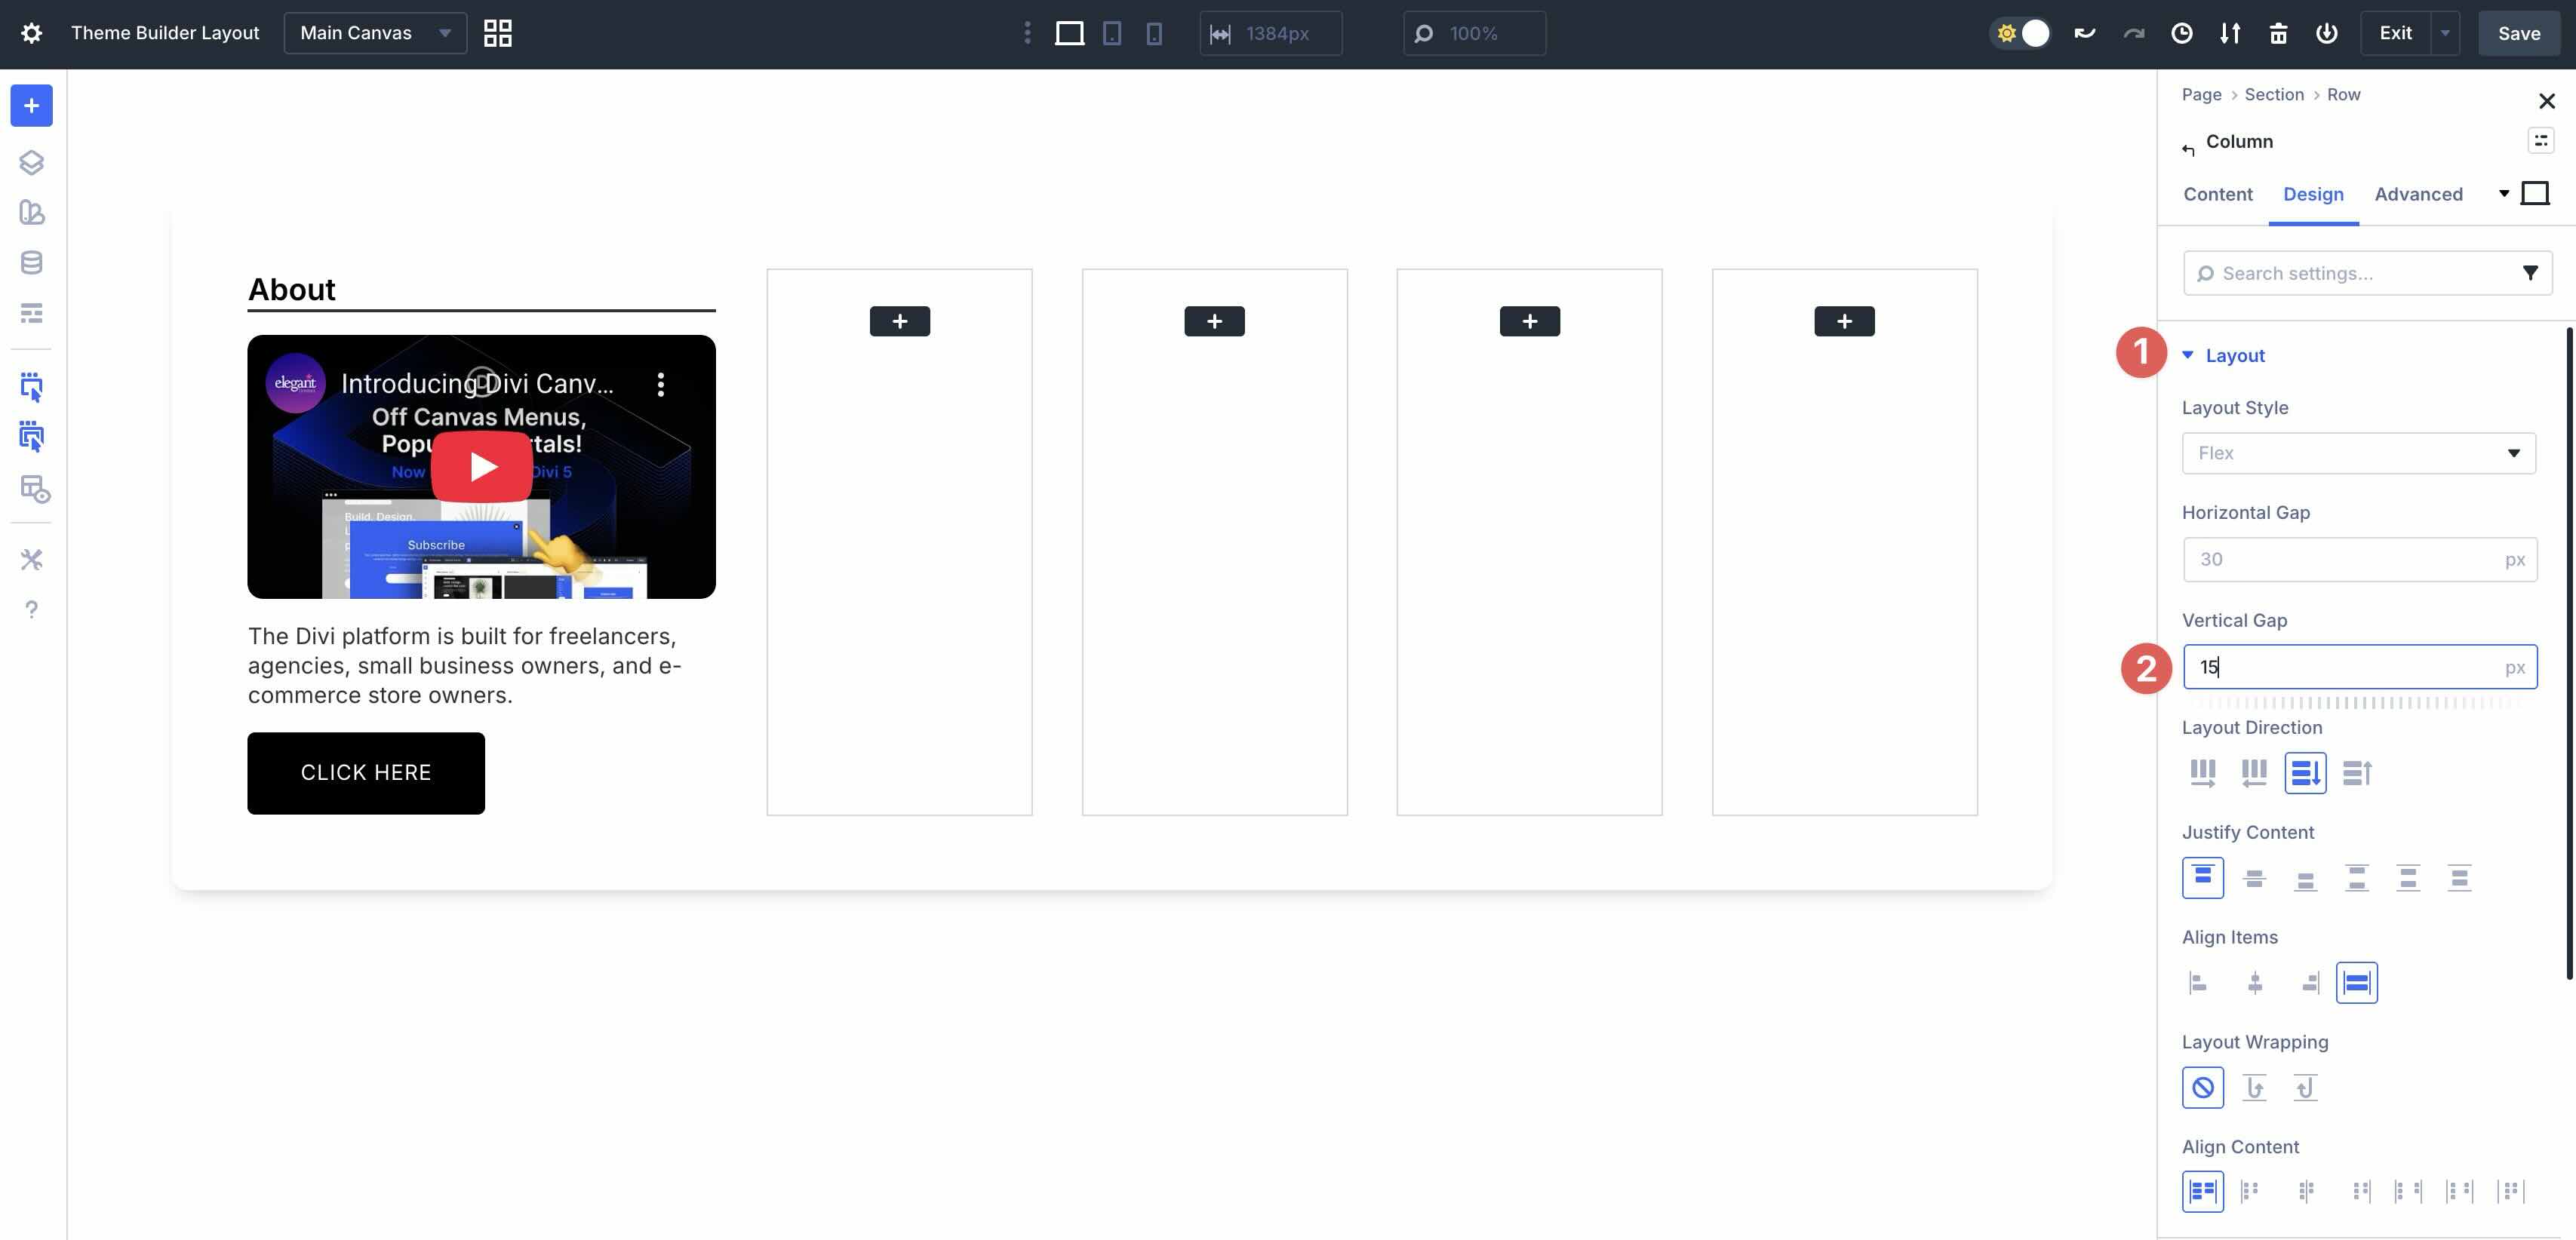
Select the first Column in the Row and adjust the Vertical Gap to 15px. This will tighten the spacing vertically.
Adjust the Vertical Gap for the remaining Columns by copying the Column’s styles in the Content tab. Right-click on the second Column and select Copy Item Styles.
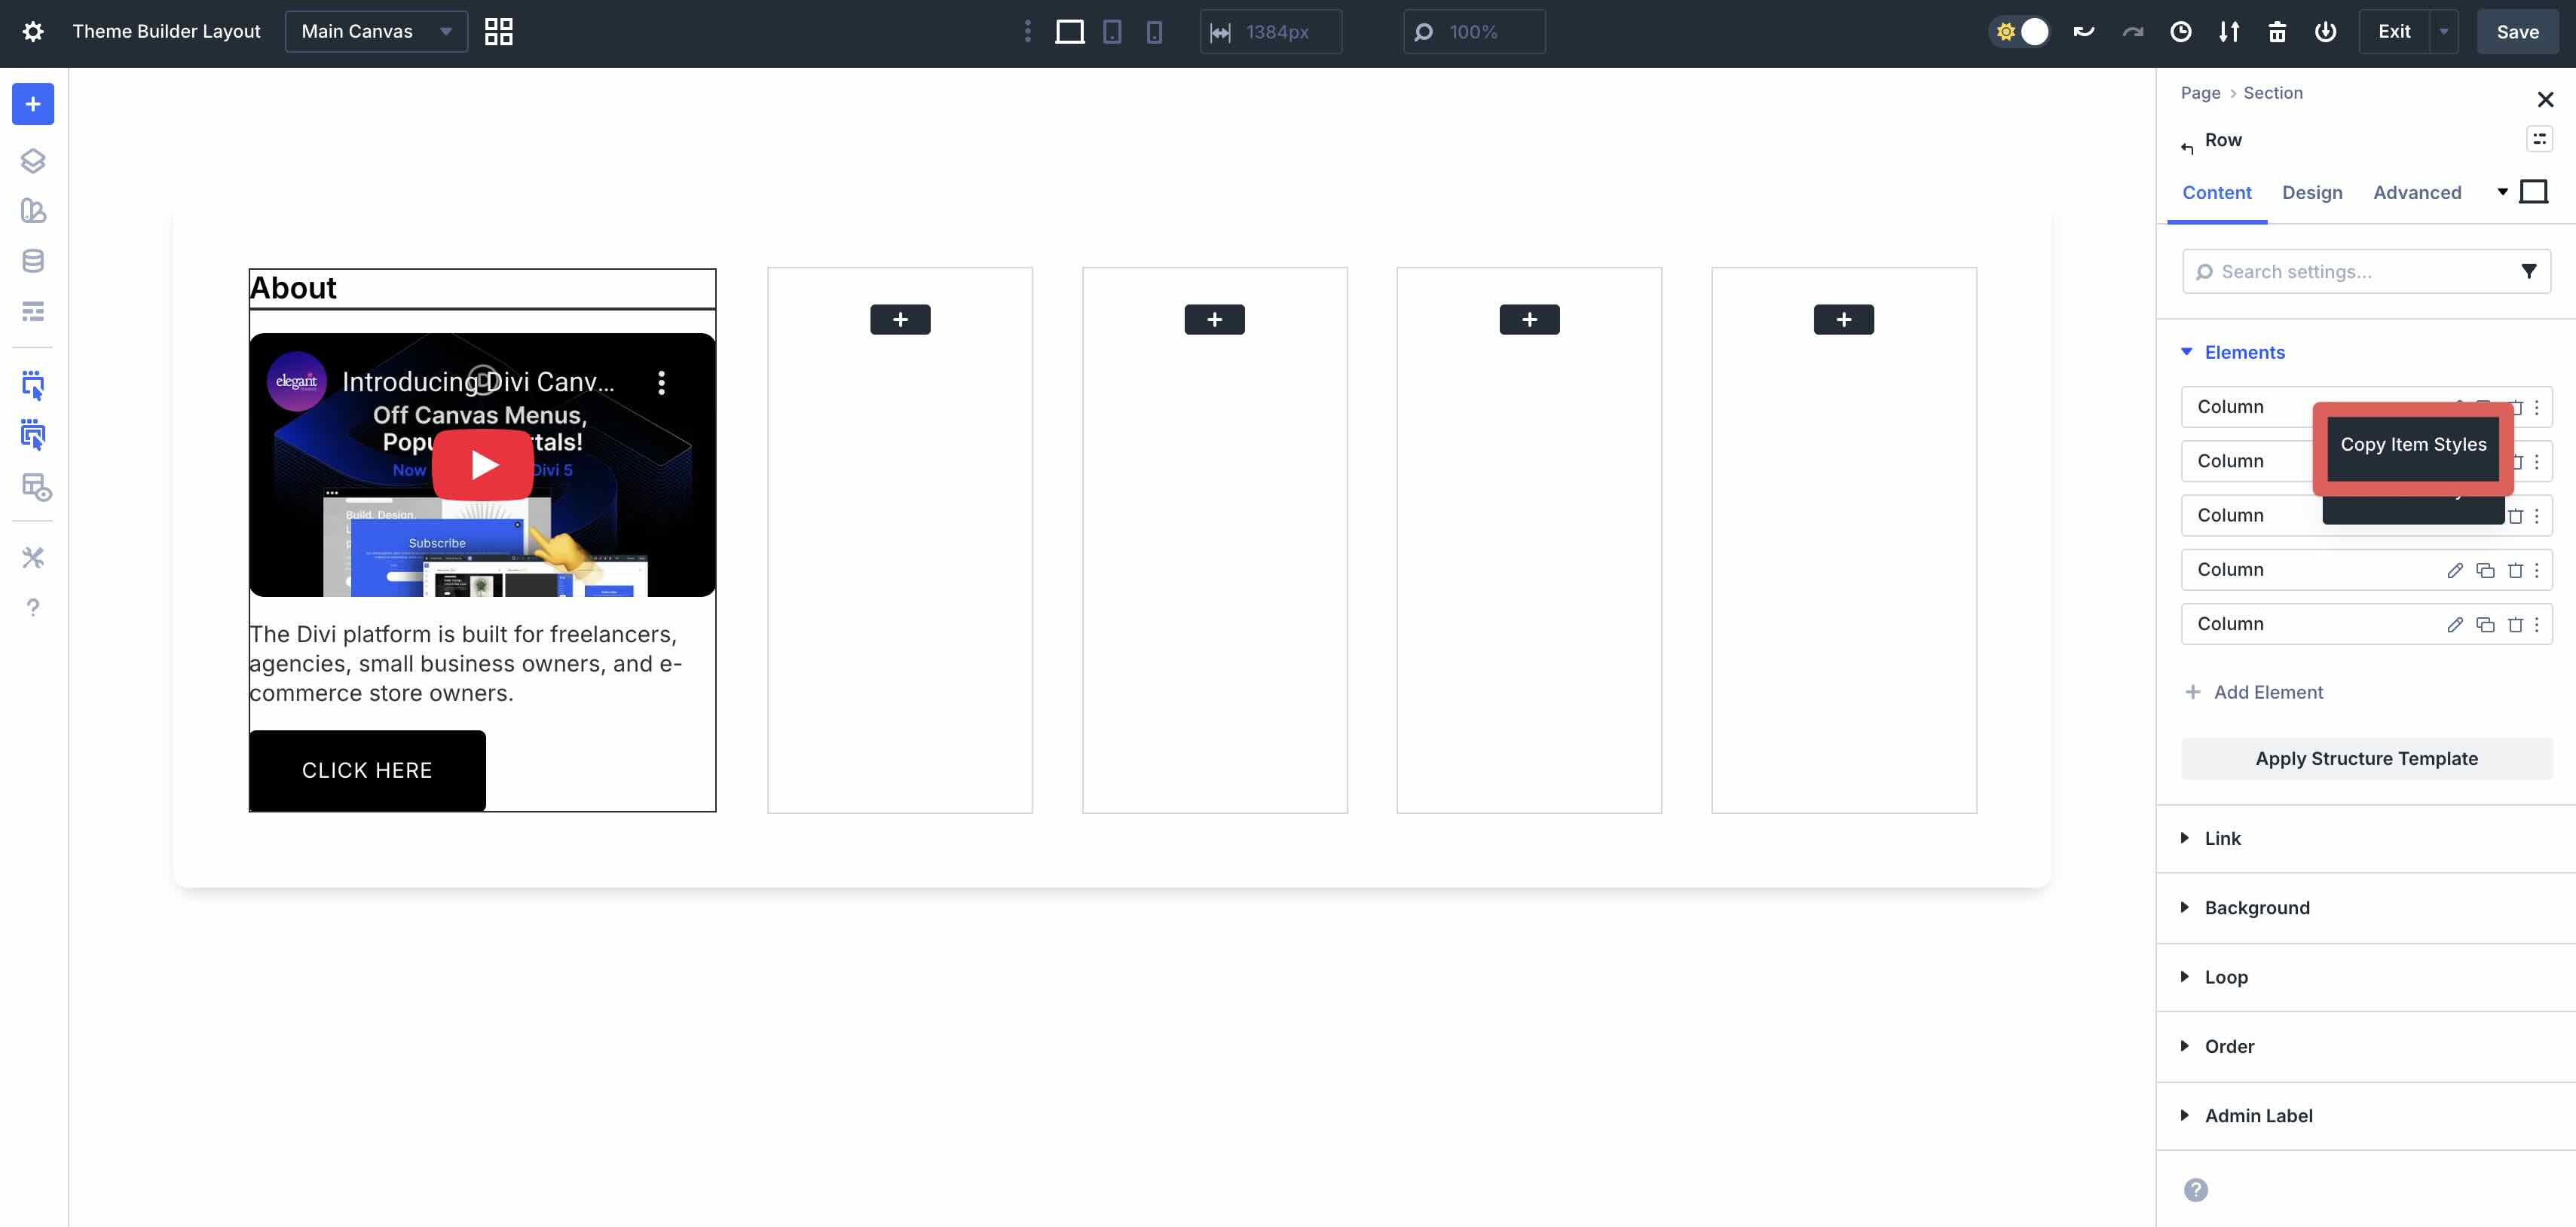
From there, right-click on the remaining Columns and select Paste Item Styles.
Continue adding content to the remaining Columns. Ensure that you’re using a Heading Module for each Column and link it to the main pages of your website. To set a page link, you can use Divi 5’s dynamic content icon to select the page rather than manually linking.
![]()
Once clicked, select the Page Link option.

Use the Page dropdown menu to select a page on your site to link to the Heading.
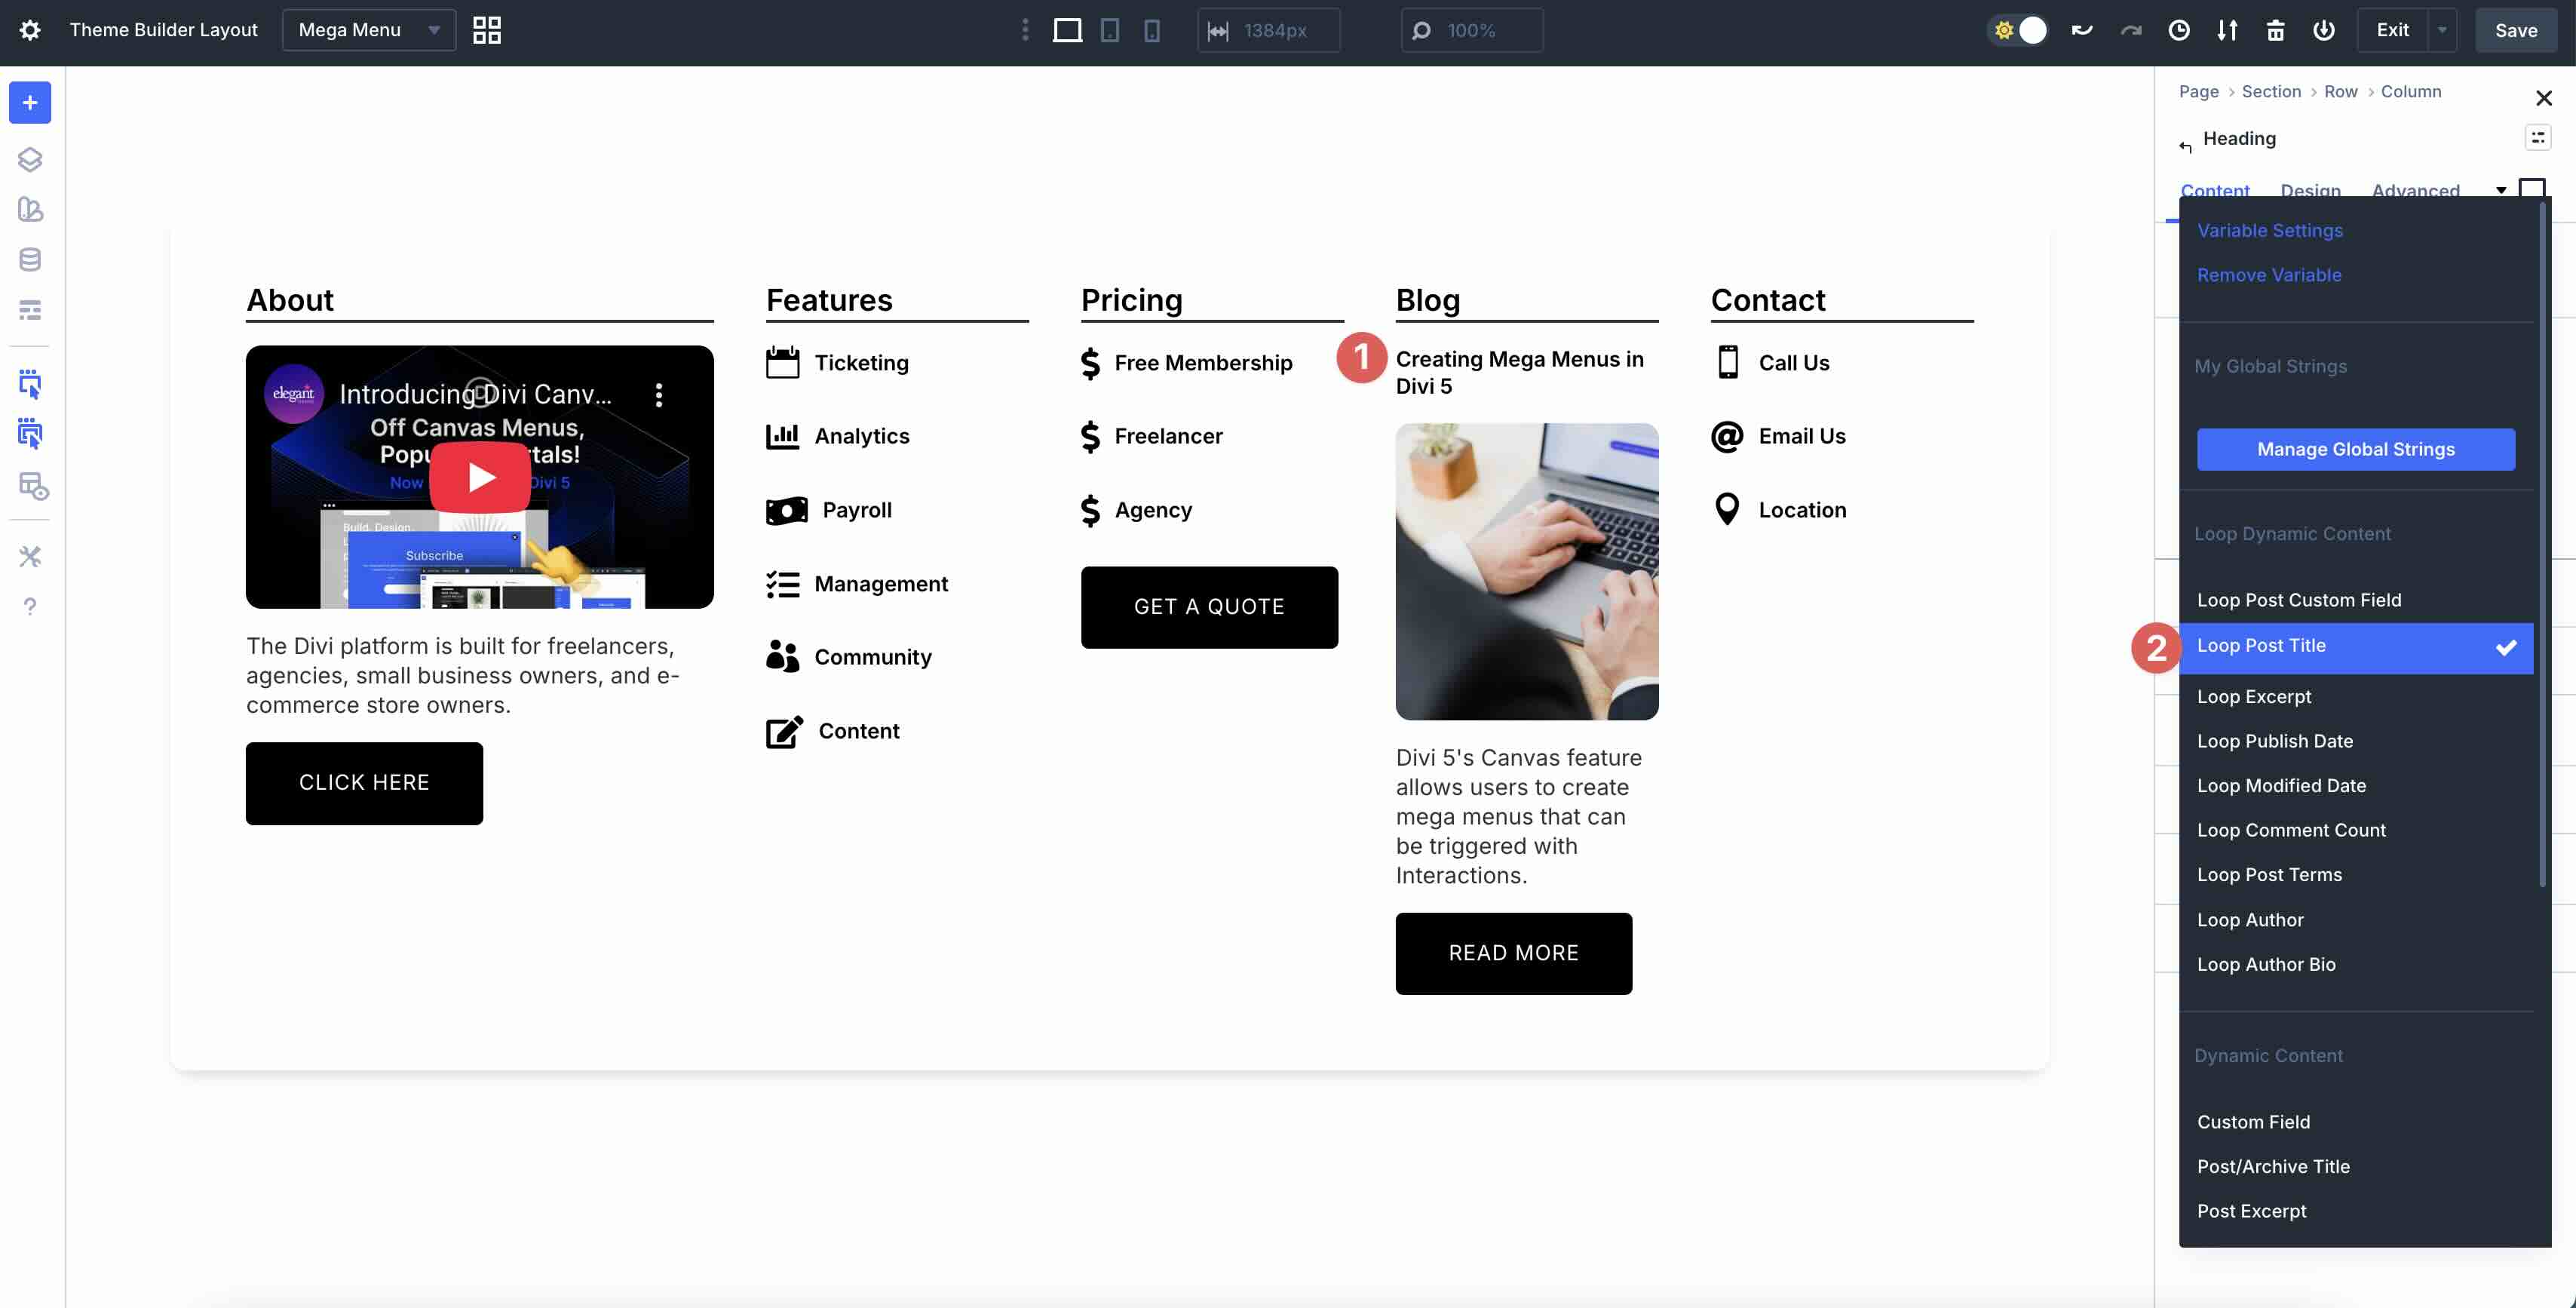
You can also use Divi 5’s Loop Builder to add blog posts to your mega menu. In this example, I have the blog set in the fifth Column. To keep posts current, you can enable the Loop Builder at the column level. Keep all options at their defaults, except for Posts Per Page, which you should set to 1.
From there, simply link the Modules in the Column to their respective dynamic content fields. The Heading Module would link to Loop Post Title, the Image Module to Loop Featured Image, Text Module to Loop Post Excerpt, etc.
Step 4: Add Interactions
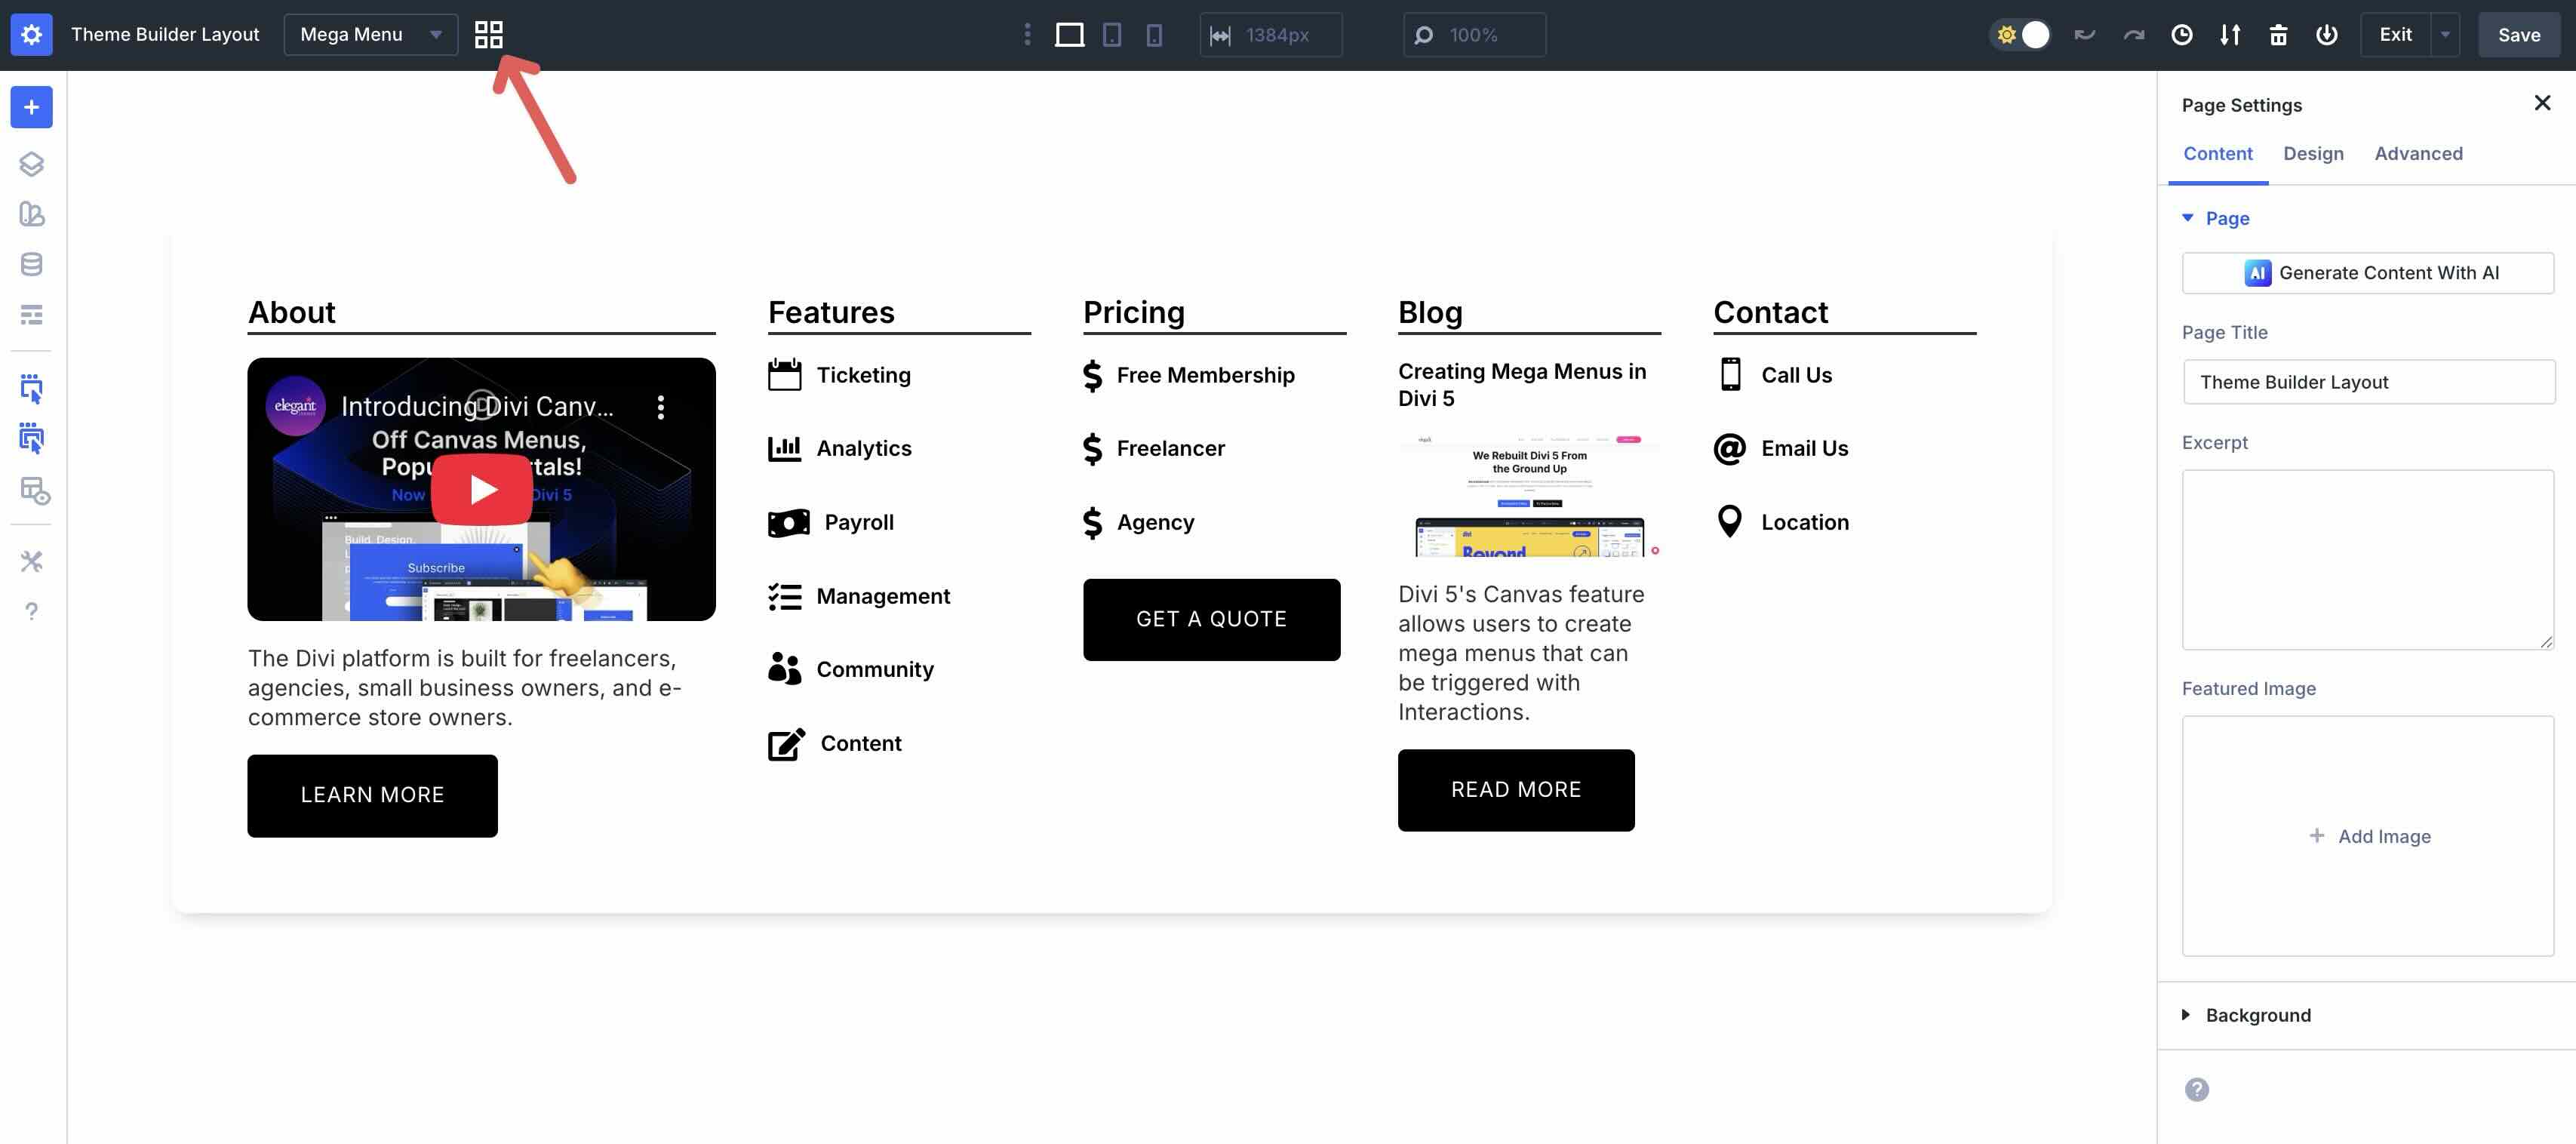
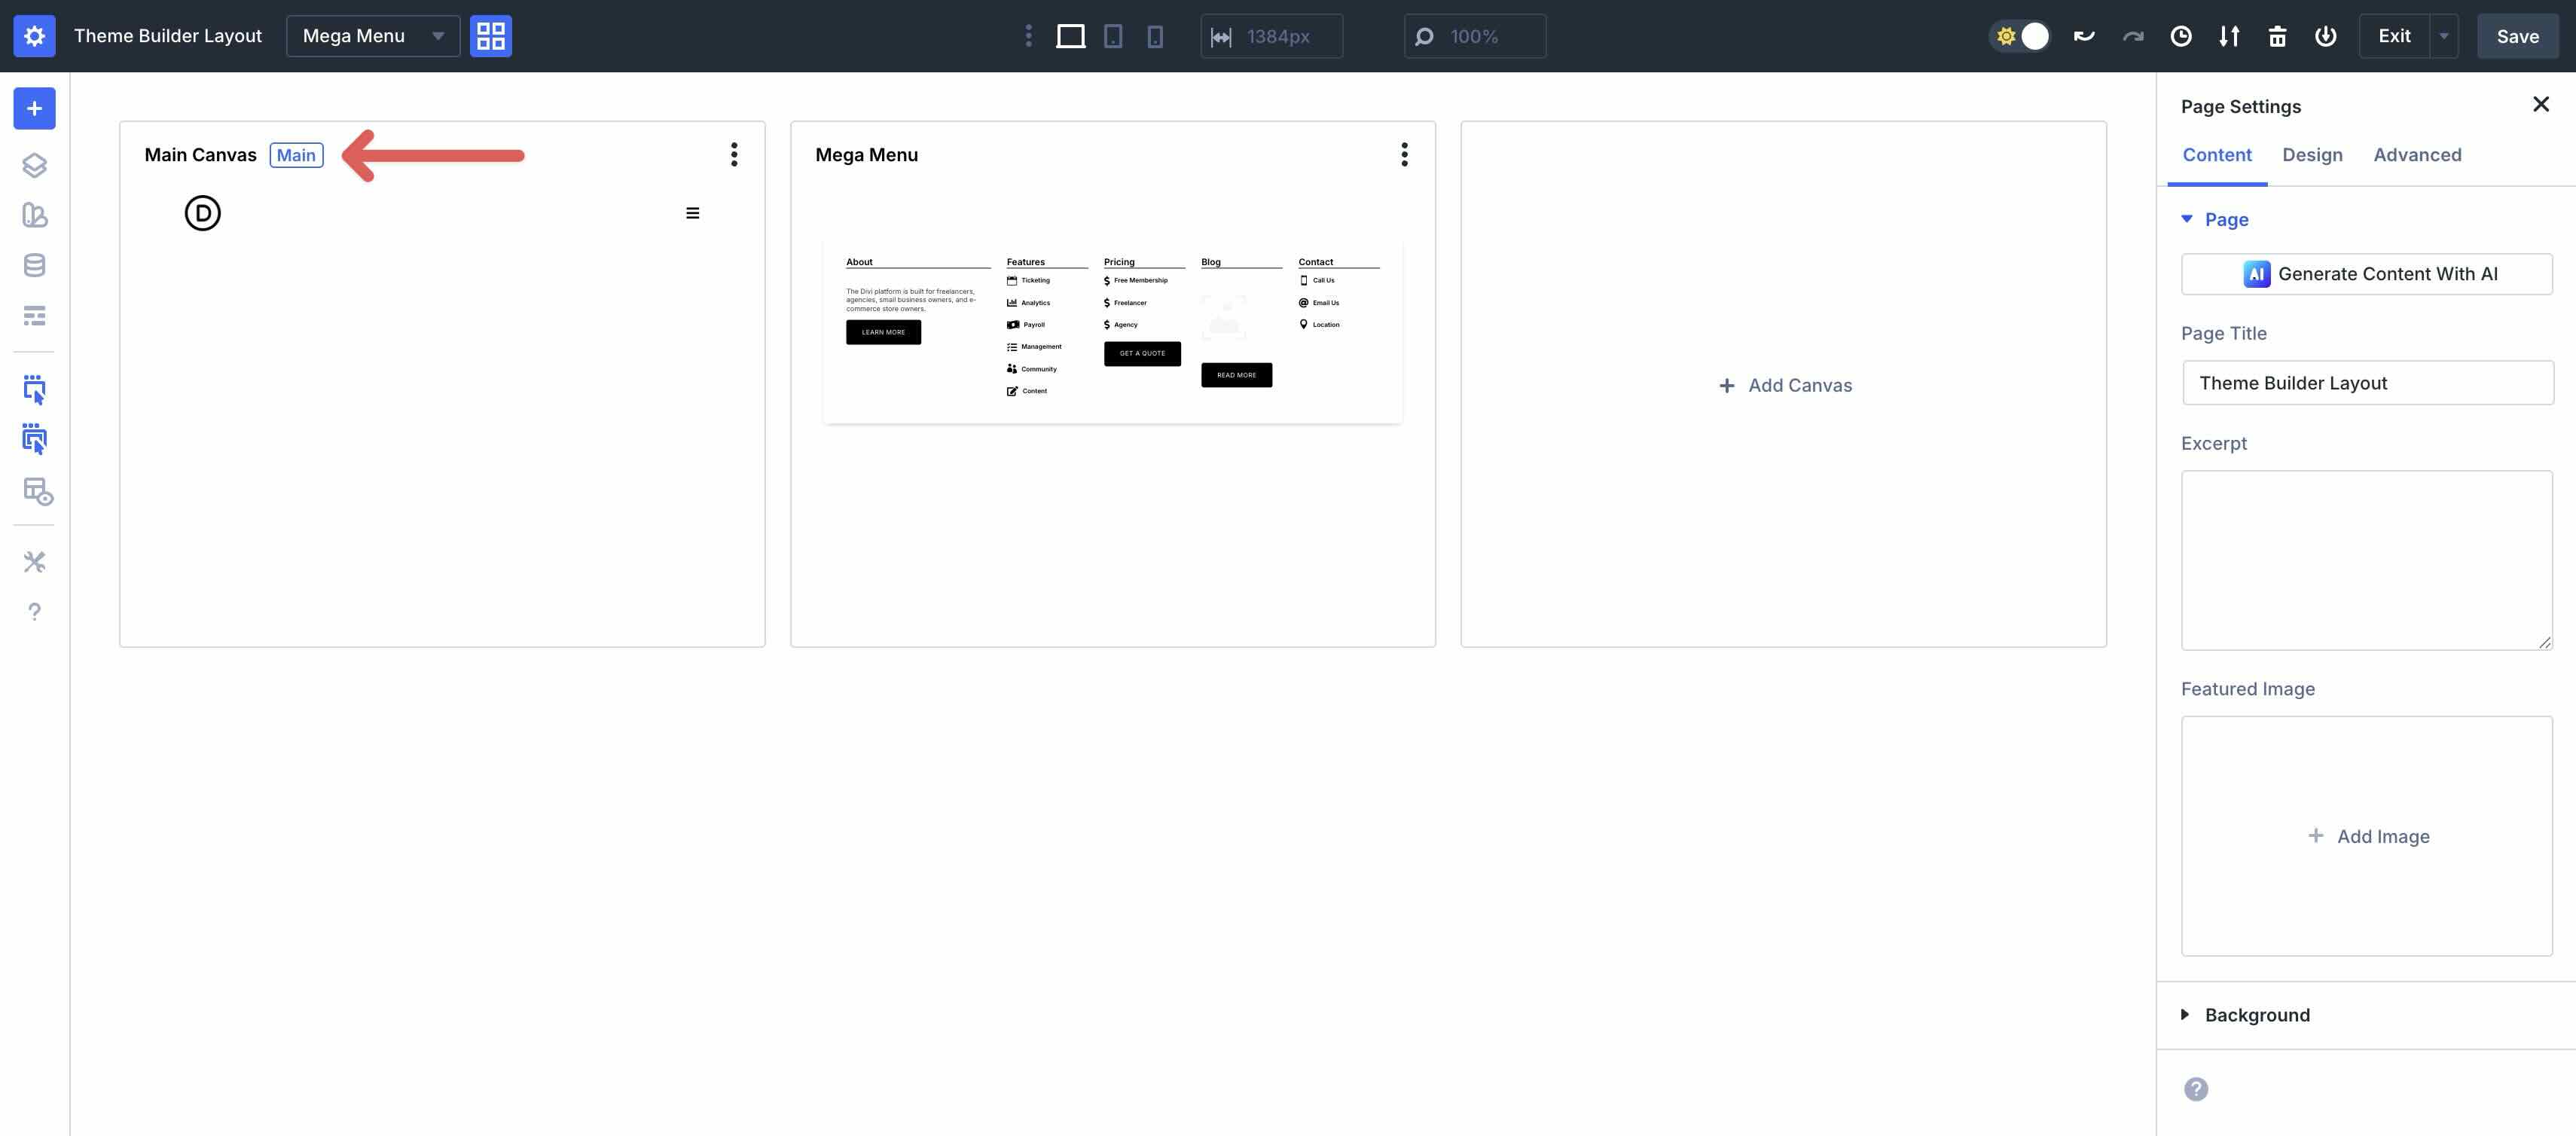
With the content in place, we can set the Interactions for the mega menu. The first Interaction we need to create is the click Interaction to launch the mega menu. While in the Mega Menu canvas, click the Canvas Grid View icon to bring up the additional Canvases.
Click anywhere on the Main Canvas to activate it.
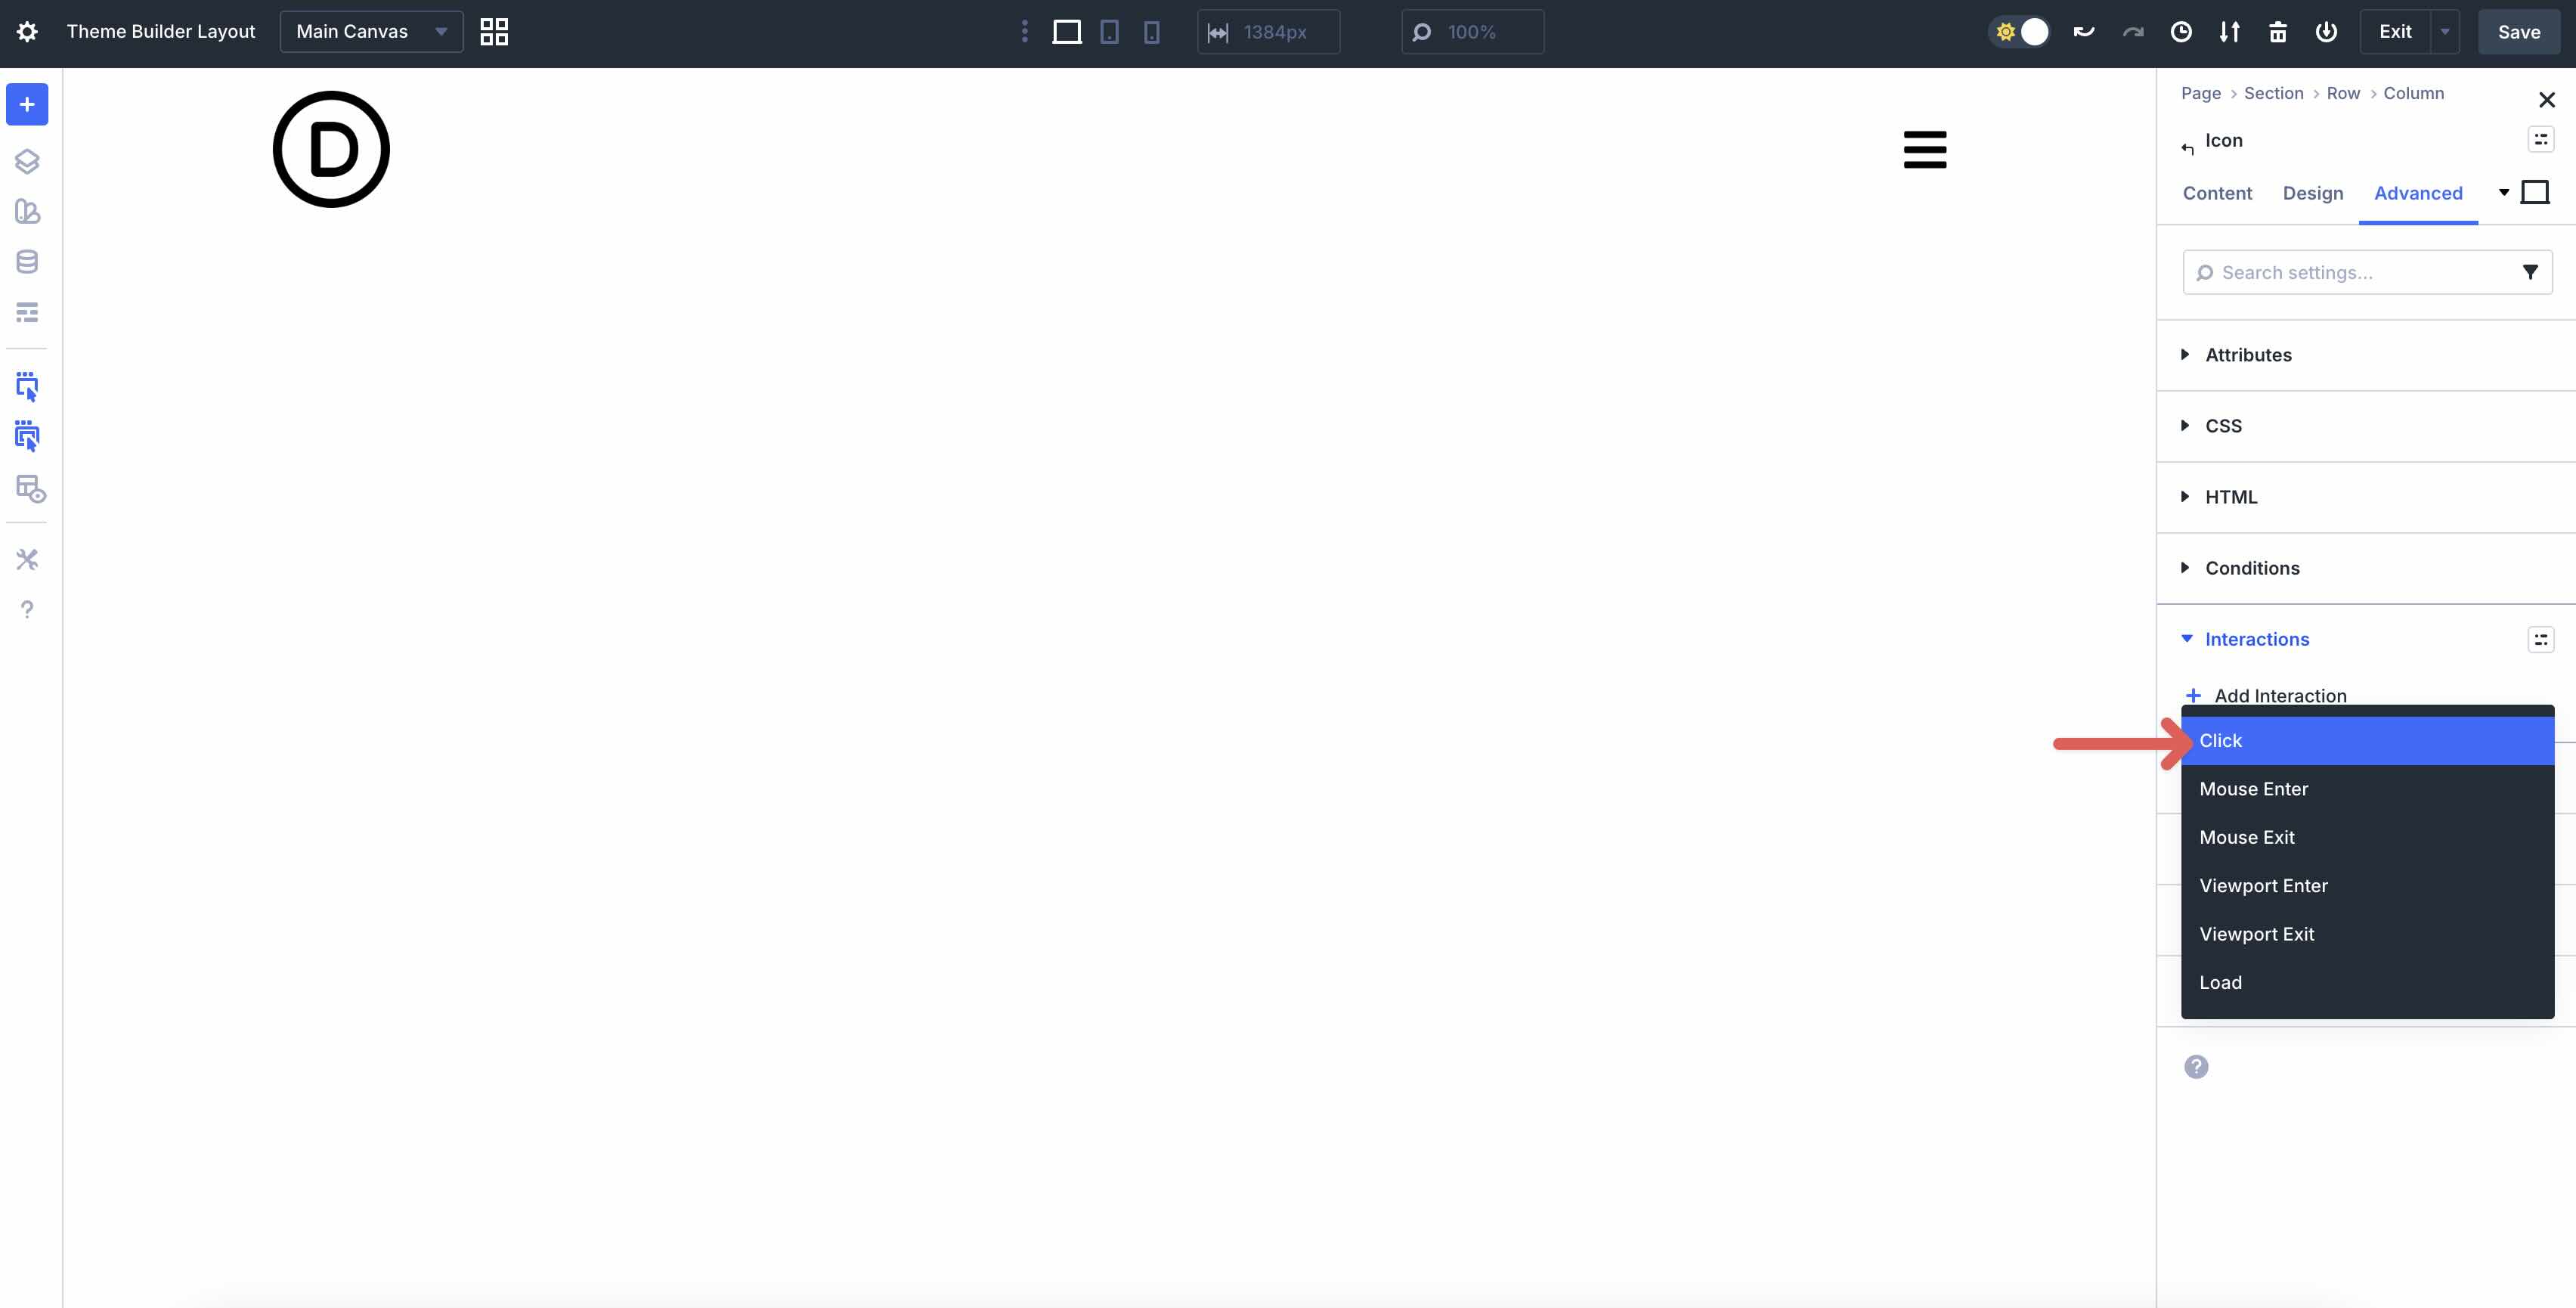
Select the Icon Module and navigate to the Advanced tab. Expand the Interactions menu and click the + Add Interaction button to add a new Interaction.
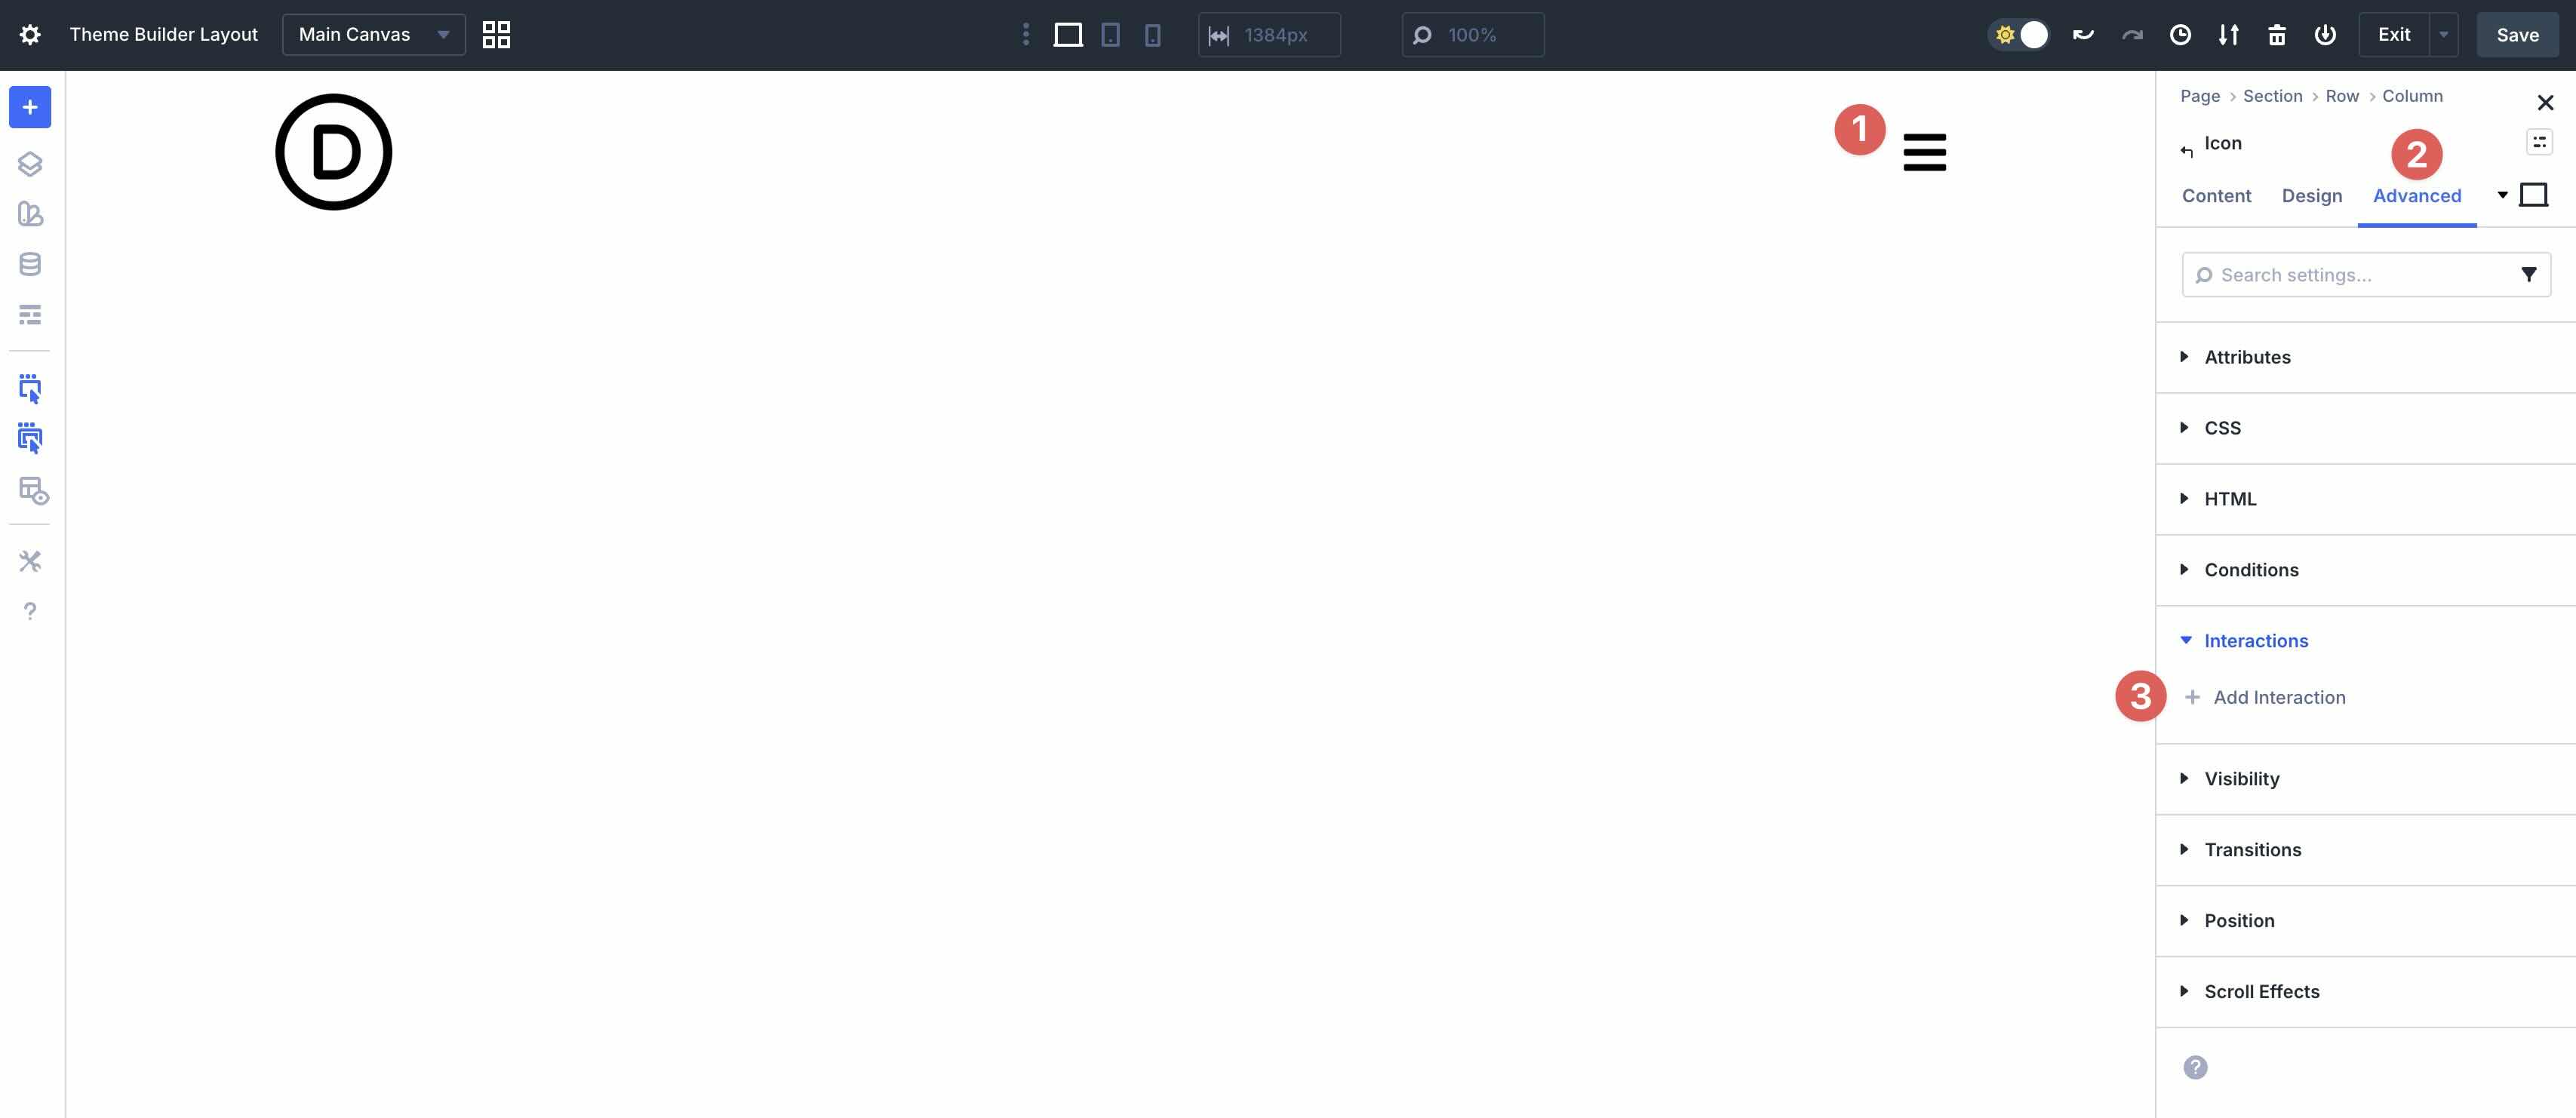
Choose Click as the action.
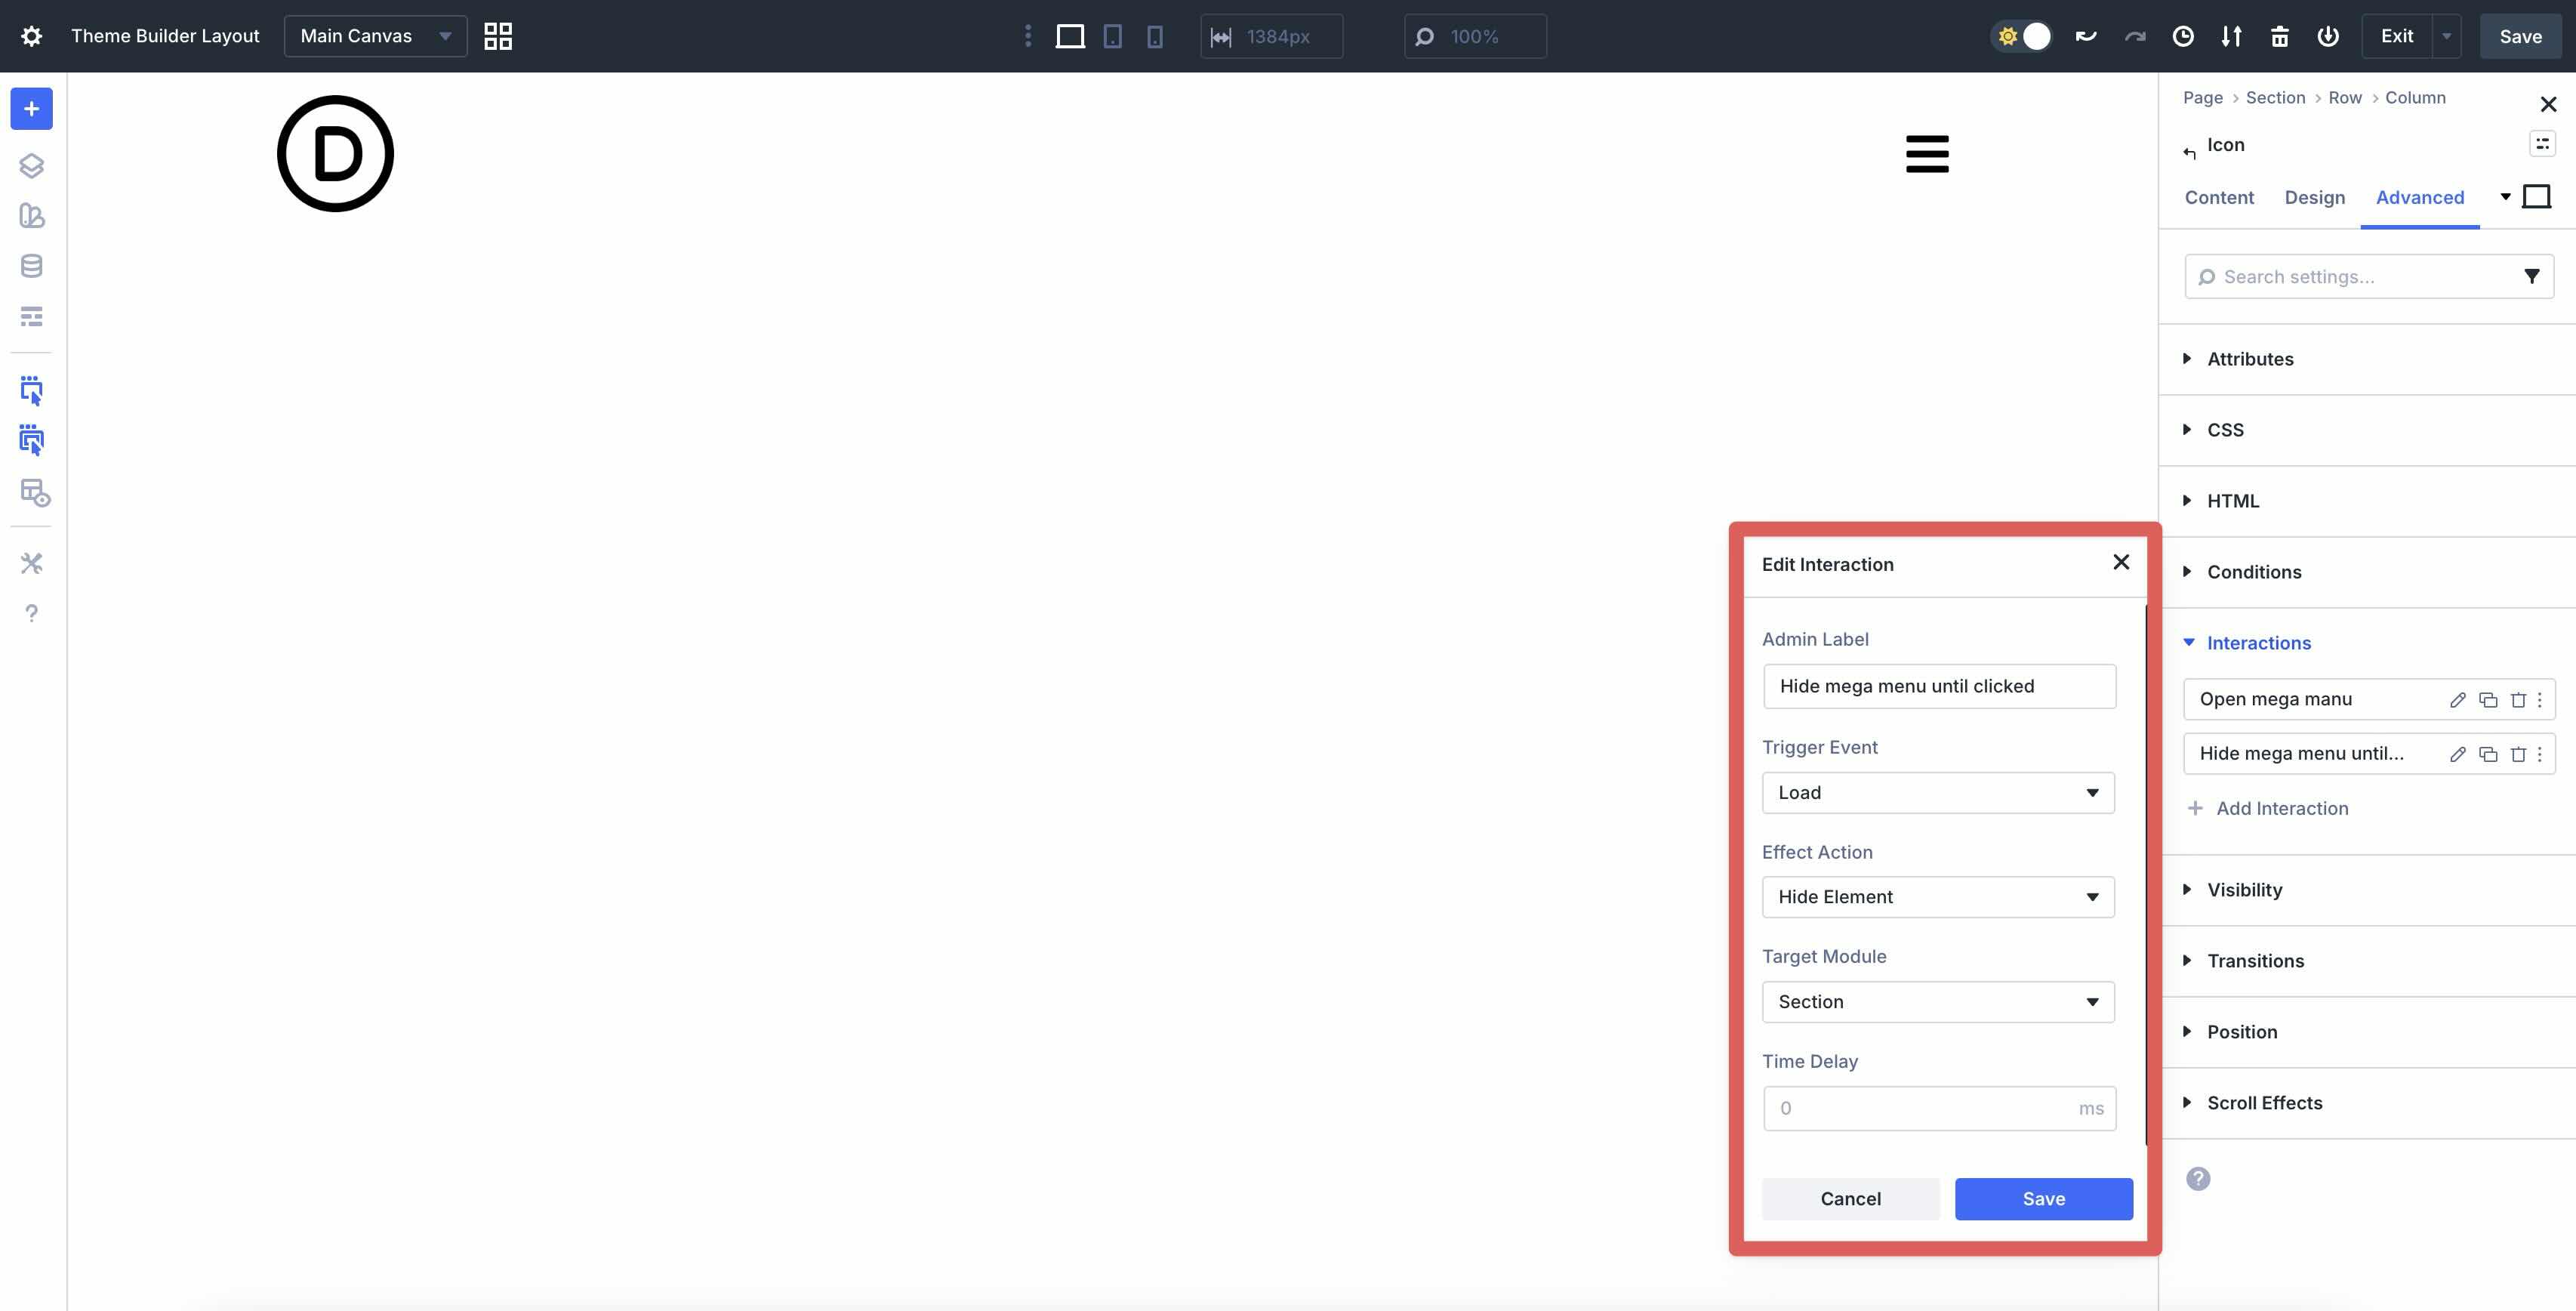
When the Edit Interaction modal appears, give the Interaction an Admin Label, set the Effect Action to Toggle Visibility, and the mega menu Section as the Target Module. When working with Canvases, Divi 5’s Interaction Builder can target elements on other canvases, allowing you to connect your header icon to the menu section stored in a separate canvas.
To prevent the mega menu from automatically appearing on the website’s pages, we’ll need to add another Interaction that hides the section until the hamburger icon is clicked. Select + Add Interaction once more. This time, choose Load from the available options. Assign an Admin Label, Load as the Trigger Event, Hide Element as the Effect Action, and the mega menu Section as the Target Module.
Save the Template and preview it on the front end. Your mega menu should appear once you click the hamburger icon.
Step 5: Make Responsive Adjustments
Once you’ve created your mega menu, use Divi 5’s responsive tools to ensure that it looks flawless on every screen size. Divi’s Customizable Responsive Breakpoints let you fine-tune your designs for 7 breakpoints. You can easily navigate each breakpoint and make changes as needed.
Alternatively, the Responsive Editor allows you to make changes per breakpoint at the module level. Adjust text sizes, change colors, add hover effects, and more, simply by clicking through each screen size’s data field.
Download The Files
Would you like to take a closer look at the menu? Fill out the form below to download the working files from this tutorial.

Divi 5‘s Canvases feature allows you to create mega menus with unmatched flexibility, precise control, and creative freedom. By using detached Canvases, powerful Interactions, and flexible responsive tools, you can build professional, reusable mega menus without relying on plugins or heavy custom code.
With Divi 5 currently in Public Beta, now is the perfect time to jump in, experiment, and elevate your designs. Download the latest Public Beta and start building with Canvases today.


Thank you for this. I’d appreciate an in-depth run down on a traditional mega menu with different canvases shown/hidden when hovering each item in the main nav. In an ideal world this would be the items of a WordPress menu but that’s not essential.
I’d also love to know how to list specific pages (for example children of a specific parent) with the loop builder. This would be really powerful!
Hi, I already tried the megamenu and it works fine! Thank you for this practice.
I still want to download the files, but where do I import them? I can’t import in the library, not in the builder, not in the canvas.. I tried again searching in this tutorial and on the video, but I can’t get it uploaded anywhere. Can you give me a hint?
Thanks already!