
Like many website hosts, GoDaddy offers a site builder that allows customers to create their own websites without having to know any code. These site builders allow users to create and modify layouts with drag-and-drop elements.
Also like other site builders, GoDaddy’s WebsiteBuilder is limited (as we outlined in our WordPress vs GoDaddy Website Builder comparison). Users quickly discover they want the flexibility of a CMS like WordPress and seek to move their sites. One problem is that site builders use various libraries that are not always transferable to other platforms. In this article, I will move a website from GoDaddy’s WebsiteBuilder platform to WordPress and show step-by-step how I made the move.
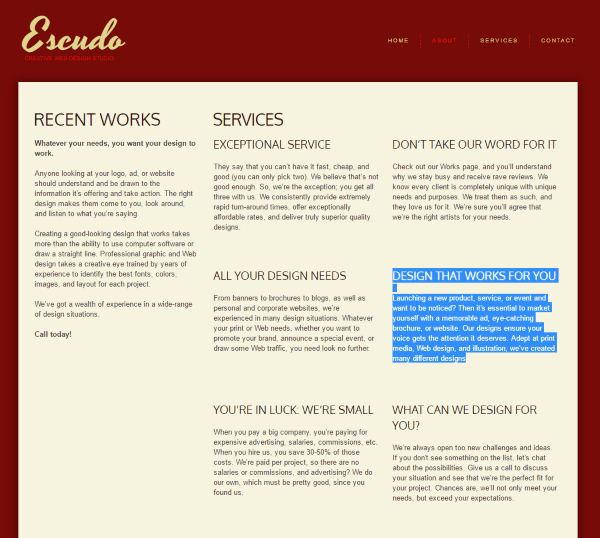
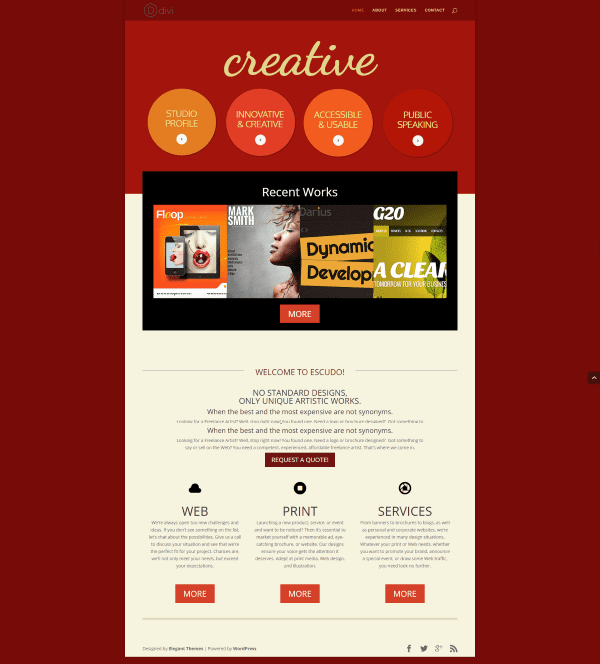
The Sample GoDaddy Website Builder Site
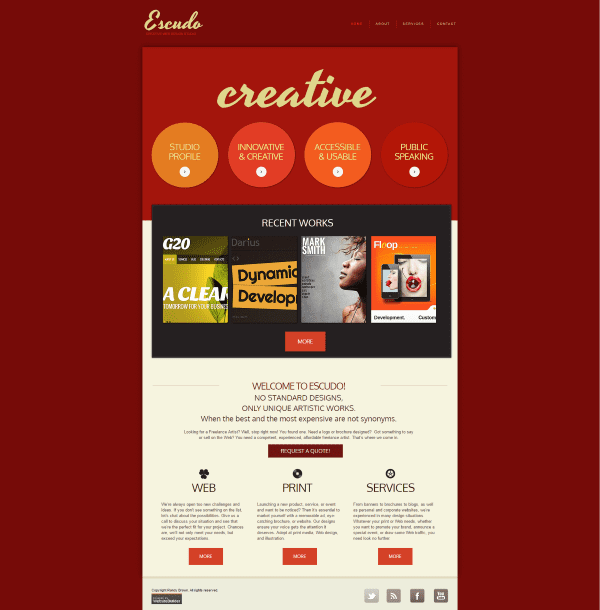
I created a website using GoDaddy’s Business Website Builder. Since I chose the business plan, I used a business theme that focuses on web development. I chose a theme called Web Design Studio. This is a portfolio theme with four pages and a portfolio on the homepage.
Step 1 – Getting Ready
Before making the switch you’ll need to gather some information about your website.
Things to make note of:
- Permalinks
- Menu structure
- Page layouts
- Font styles
- Colors
- Links
You’ll need to recreate these in your WordPress website. I recommend making a file where you can copy and paste all links.
Fonts and Colors
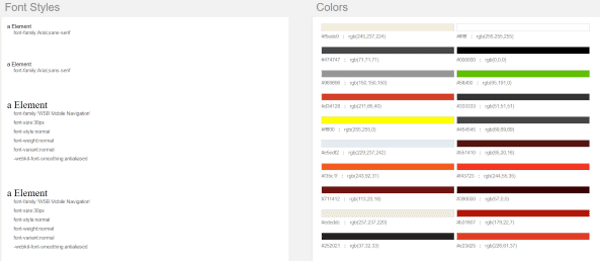
There are several ways to get information about the fonts and colors. One easy way is to paste the URL into Web Style Grabber. This will list every font and color that your GoDaddy website uses on that page. Another option if you just want to know the colors used is an eye dropper in your favorite image editing app. I performed a screen capture and pasted it into Paint.NET, and then used the eye dropper to find the hex codes for the colors I wanted.
Step 2 – Setting Up Your WordPress Website
You’ll have to create each post and page to transfer your content into. You can recreate the layouts or just use the default page layouts in WordPress. In this tutorial, I will recreate the layout.
For the site itself, you can either build the website on your own server and then move it when it’s ready, or transfer the domain to the live host and build the site while it’s live. If you’re building it live then I recommend using a maintenance mode plugin. For more information about using maintenance mode see the article 5 WordPress Tools For Creating A Maintenance Mode Or Coming Soon Page.
Creating the Layout
The theme that I chose for my GoDaddy website has some interesting page layouts. It included four pages:
- Home
- About
- Services
- Contact
The home page was the most interesting. The about page could easily be created using text modules without much effort. The services and contact pages were standard designs and the built-in Divi modules would recreate them without many changes. If you wanted a standalone WordPress contact form plugin, you could easily use a free one if you wished.
I will focus on the homepage. It includes a portfolio, blurbs, and buttons. I will have to create the layout using a drag-and-drop builder. I’m using Divi and the Divi Builder. Other systems will work as well including any theme with drag-and-drop page elements and drag-and-drop building plugins such as Visual Composer.
Homepage
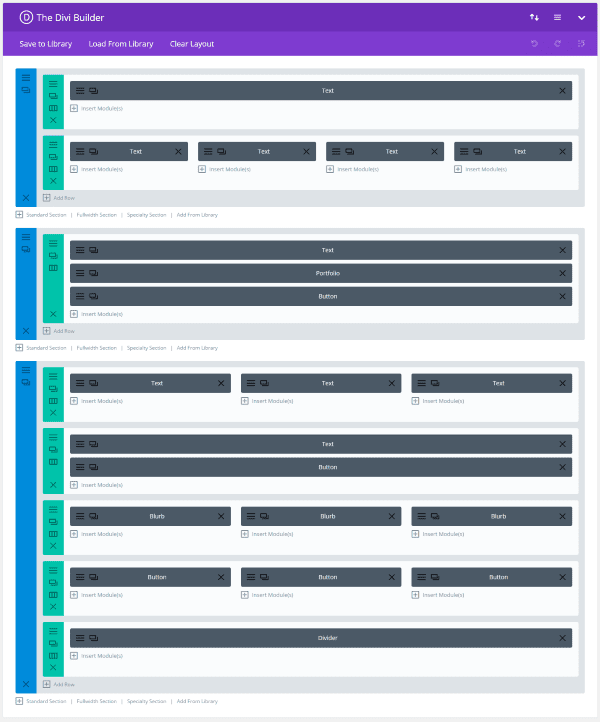
Create a new page in WordPress and select the Divi PageBuilder. I chose Portfolio Fullwidth Grid and added the features I needed. I didn’t worry about trying to get every detail the same because I wanted to take advantage of what Divi could do. For example, the portfolio on the GoDaddy site was just static images that weren’t even clickable. The Divi portfolio module created a clickable dynamic portfolio with animation.
Styles and Adjustments
Once you know your fonts and styles, you can either use the Divi Theme Customizer to make the adjustments, or adjust each section, row, or module independently.
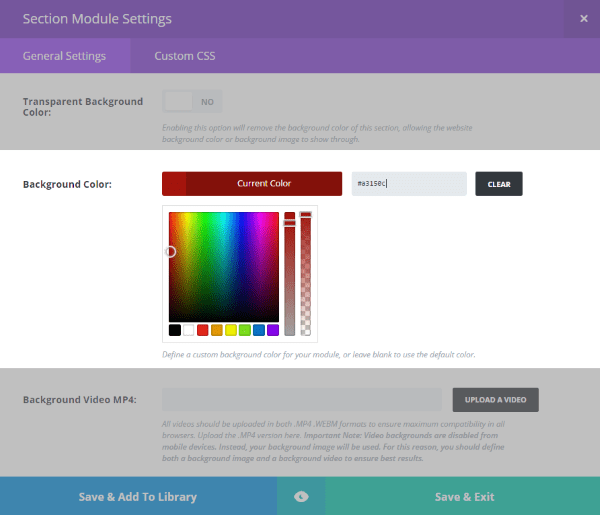
I added the colors to the background of sections as needed.
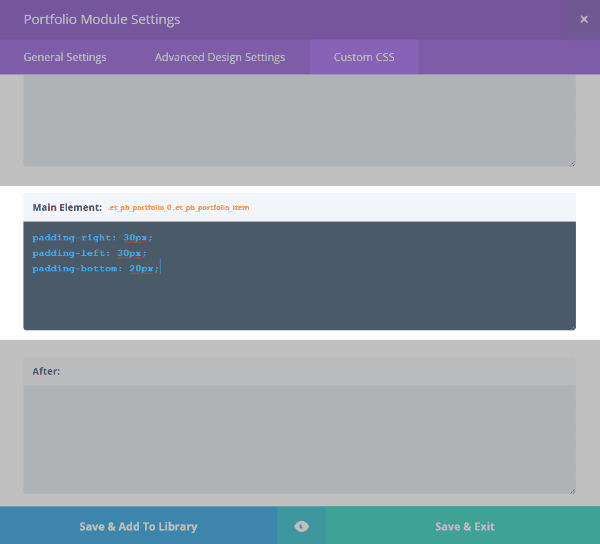
Some modules needed padding. I had to experiment to get the right amounts.
I used the same colors as the GoDaddy site, but I decided to use Divi’s default fonts for the body text and a more elegant font for the title page instead of the font used in WebsiteBuilder. The style grabber shows that font is called Yesteryear. If I wanted to install that font I could use a plugin. You can see more information about installing fonts in Divi in the article 15 Elegant & Modern Fonts for Web Design.
To create the overlap between the portfolio and the section above it I used the tutorial from Divi Nation episode 12 and changed the code to adjust the bottom instead of the top. This is easy to do with CSS and I will use this feature more often to add simple design elements that stand out.
![]()
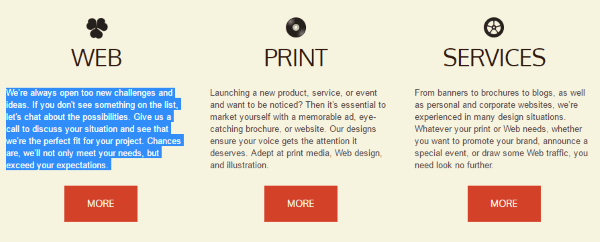
The blurb’s included a solid black icon with a large header, and separate text (more on the text later). I added Divi’s built-in icons and adjusted their size to match. I felt that GoDaddy’s icons weren’t specialized for web design, so I just used something similar rather than trying to match them exactly. If you need icons see 10 of the Best Places to Find Free Icons and Image Assets Online or search the Elegant Theme’s blog for free icons.
I placed the buttons on their own row rather than placing them under the blurbs. This kept them lined up with each other instead of adjusting their position under the text which would cause the buttons to not line-up with each other.
Step 3 – Transferring Your Content
This will take a lot of time. Here’s where I wish I could point you to a plugin or an easy-to-use service. I’ve spent hours searching and unfortunately there’s only one way to transfer the content of your GoDaddy website to WordPress. Three words: copy and paste. There is no way to do this automatically. We have to do it by hand, one page at a time.
I recommend saving your GoDaddy pages to your hard drive. You could simply copy your text files from the live site, but copying from saved and stored files ensures that you have the content you need and they’re easy to get to after you’ve disabled your GoDaddy website. This way you will have access to them.
There are two ways to do this:
- Right-click and save each page as a complete webpage.
- Use an app such as HTTrack and download all of the pages to your PC.
Even if you use a downloading tool or save your pages to your hard drive you might still need to copy and paste your images from the live site as you create the new posts. GoDaddy’s WebsiteBuilder stores templates and files on different servers and they vary from one website to another, making it difficult to download your images with the rest of the files.
Also, if you’ve placed a WebsiteBuilder website on your regular GoDaddy hosting plan and you’re planning to use that plan for your WordPress website then you’ll have to disable the WebsiteBuilder website first and you will no longer have access to the content.
Transferring Content
Copy and paste the content one component at a time.
Paste the content into their modules. If you need to, you can go into Advanced Design Settings and add padding to make the column the width you want and to make the correct space between elements that are above or below the content.
Continue to copy and paste until you have all of the content transferred to the new website. By doing this process you are recreating your pages one component at a time. This is a time-consuming process but the advantages you gain from the flexibility of WordPress are worth the effort.
You’ll also have to copy and paste your images and any other media you have on your website. Make sure to only copy your own images and not those that came with your GoDaddy template. Since the images were part of the WebsiteBuilder package it’s likely they were under license just for that package.
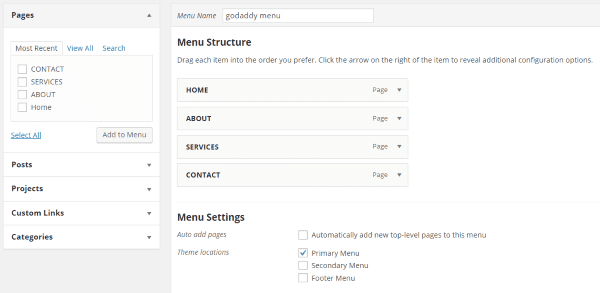
Once you’ve created your pages you can create the menu system using WordPress’s easy-to-use menu customizer. You’ll find this in the dashboard under Appearance. Select the pages you want and then drag and drop them into their proper locations. Don’t forget to set this menu as the primary menu. For more information about creating custom menus see the article How to Create Custom Menu Structures in WordPress.
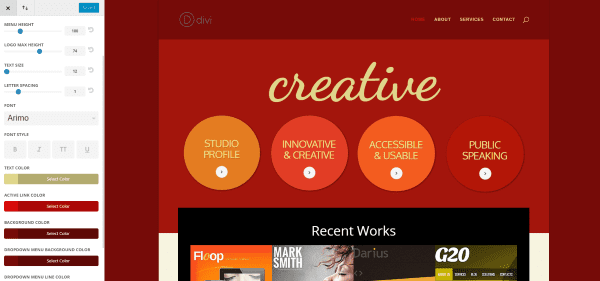
You can adjust the colors for the menu links in the Theme Customizer. Select Header & Navigation, Primary Menu Bar, and then paste in the text colors. I also adjusted the menu height to match the GoDaddy site from this menu. If you’d like to take your menu customization to the next level, here’s our list of some of the best menu plugins that you can add to your new WordPress site.
Step 5 – Setting up Redirects and Permalinks
You’ll want your links to match your GoDaddy website. This way any links to your website still work and you don’t lose traffic and SEO.
Domain
Whether you can forward the domain will depend on if you own it or not. If you got it free with your GoDaddy WebsiteBuilder plan then you might not be allowed to forward it until one year after purchase. If you bought it separately then you can forward it using your domain registrar’s forwarding service. This service might include 301 redirects. If not then you’ll want to use a plugin.
Permalinks
My link structure was: http://www.mysamplewebsite.com/samplepage.html
To match the structure in WordPress, in your dashboard go to Settings and select Permalinks. Under Common Settings choose Post Name. This will make your links match the structure of your GoDaddy website. Next, you’ll need to redirect the .html links.
301 Redirects
Your new WordPress website won’t have .html at the end of the link. Luckily there is an easy way to redirect the links. You can do this with a 301 redirect plugin. A redirect tells the search engines that the requested URL has been move to a new URL. This helps keep your SEO and authority intact.
I used a plugin called Eggplant 301 Redirects. It has both a free and a pro version. The pro version adds a 404 tracking feature and improved SEO.
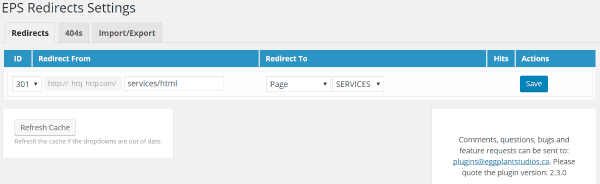
To use it, type in your pages with /html in the Redirect From field. In the Redirect To field select the post type and the post name from the drop-down boxes. Hit Save when you’re done. Leave the ID set to 301. This will make it a permanent change. Repeat this process for each URL.
To understand more about creating redirects, see the article How To Create Redirects With WordPress. For an overview of redirect plugins, see the article Turn Around: The 7 Best Redirect Plugins for WordPress.
404 Page
Be sure to create a 404 page in case there are issues with your redirects. This will ensure that your visitors are aware there is an issue and will lead them around your site. For a good article on creating an effective 404 page see Creating Custom WordPress 404 Error Pages. For a look at the best 404 plugins see the article The 7 Best 404 Plugins for WordPress.
Step 6 – Going Live
Once your site is complete it’s time to test all of your links before going live. If everything checks out then disable maintenance mode and watch your traffic. Be sure to listen for feedback and check for 404 errors so you can make adjustments as needed.
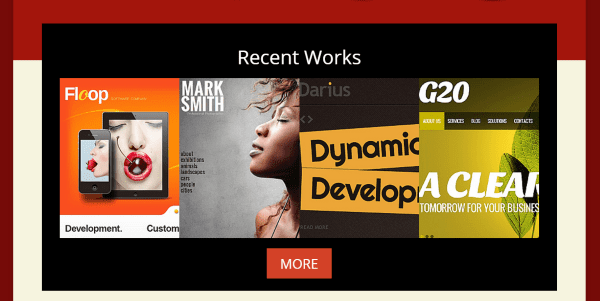
My Homepage
Here’s my Divi version of the homepage of my GoDaddy website from WebsiteBuilder. What do you think?
Final Thoughts
The extent of the work involved with this process is a great example of why it’s important to spend the time and choose the best platform for your needs to begin with. Transferring from GoDaddy’s WebsiteBuilder was the most difficult and time-consuming site transfer that I’ve done, and I’ve transferred sites from most (if not all) of the major players.
Using GoDaddy’s WebsiteBuilder for a few days was enough to make me want to stay with WordPress. If you use WebsiteBuilder I highly recommend making the switch as soon as possible. The sooner you switch the less content you’ll have to worry about. Even though making the switch is a copy-and-paste process, the flexibility and ease of using WordPress are worth the effort and will pay for themselves in the long run.
Now we’d like to hear from you!
Have you moved a website from GoDaddy’s WebsiteBuilder to WordPress? Did you use the method I discussed here? Have anything to add? Let us know in the comments!
Article thumbnail image by VSForever / shutterstock.com


hi. Randy. I’ve just purchased a developers license and loving it. The Divi theme is something special.
How is Godaddy for website speed? I’m having difficulty finding hosting that can run WordPress sites at a decent loading time. can you help?
At first, the Godaddy DIY tool looks interesting but when a website grows and require more customizations, people realize the importance of self-hosted websites.
I must say the tutorial to move Godaddy websites to WordPress will help many, looking for a solution of this problem.
Hello Mr. Randy Brown
I am really feeling glad to read this article. Exactly what i am looking for in google. Now my godaddy website running on WordPress and all is possible for your this great article.
Thank you so much 🙂 🙂
Thanks for this tutorial, very helpful for me!
I’m trying to help our church with its website. It’s currently on GoDaddy and only has a simple home page and contact page. Since there is no content, I’d like to start over in WordPress, but keep the domain name the same. Is that possible? If so, how do I go about doing so? First timer here! I appreciate any help and advice you could offer 🙂
Hi Silvia!
Yes, that is definitely possible. Basically what you need to do is to choose your hosting provider for your new WordPress website first and that will determine your next steps.
This post should help: http://www.elegantthemes.com/blog/resources/wordpress-hosting-review
After that you will want to build your church site there; on your new host. This post should help with that: http://www.elegantthemes.com/blog/tips-tricks/how-to-build-a-church-website-with-wordpress
Once you’ve created your new WordPress site you can work with your host/GoDaddy support to point your existing domain to your new website. Which should only take a few minutes.
Best,
Nathan
With a large community and lot of support I think WordPress is the best solution.
This is awesome really awesome.. thanks…
I’ve just purchased a developers license and loving it. The Divi theme is something special.
How is Godaddy for website speed? I’m having difficulty finding hosting that can run WordPress sites at a decent loading time
GoDaddy’s cPanel platform is decent. I’m on their older platform which is much slower.
Personally I’m a big fan of managed hosting for WordPress. I use WPEngine for most of my projects. If you can afford them they are the way to go for a number of reasons–good speed being only one.
A great Mac alternative to HTTrack is an app you can buy called SiteSucker. At only $3.00 it’s well worth the money and works just as well (if not better) than HTTrack. 🙂
Thanks David. I’ll add that to my list of resources.
Many webmaster recommend not use GoDaddy.
One thing to consider: GoDaddy’s Website Builder Agreement (found on their legal page) mentions that websites built with their builder aren’t to be copied and moved to another host. I would be careful not to make an exact copy of the site (if that’s even possible) in WordPress.
Also, another line of the agreement mentions that any content not provided by you (I’m thinking text and images) is considered copyright protected. If you copy content, make sure it’s your own. Website Builder can come with pages already built, so avoid taking that content. Also, some images provided within Website Builder are right protected, so you’ll not want to copy those.
Not legal advice, just something to consider.
Thanks for pointing this out Jesse!
DIVI is going to open a whole new level of quick web design.
And i guess what Jesse told would always be considered while moving a godaddy site (and any other) to DIVI.
Shouldn’t elegant themes consider giving a note on the header of the blog post? Just my humble opinion and suggestion.