")
If you’ve been working with WordPress for a while, you’ve likely posted an early draft by mistake at one point or another. Regardless of the reason, it’s certainly annoying. Depending on your blog’s setup, it could have some negative consequences – even compromising your position if you’re working on behalf of someone else.
The most elegant solution to this problem is to implement a feature that adds post publishing confirmation messages within WordPress. As you might imagine, you can do this using a plugin. In this article, we’ll teach you how to do it, and also show you a manual way. Let’s get started!
Why You Need Post Publishing Confirmation Messages

Post publishing confirmation messages are a simple feature that can improve your site’s usability.
In short, a post publishing confirmation message is simply a pop-up message that asks if you’re sure about your decision. It’s a handy way to combat misclicks and other publishing errors.
These messages are both easy to implement, and they can have a positive impact on your site too. For example:
- You can stop accidental publications. We’ve worked on hundreds of WordPress posts over the past few years, so we’re very familiar with the platform. Still, that doesn’t stop us from potentially hitting the wrong button and posting an early draft of an article.
- They can prevent automated emails and social media updates from going out. A lot of people integrate their social media and email campaigns with WordPress. So, whenever there’s a new post, your social media would update automatically, which is something you don’t want happening by mistake.
- There are no downsides to confirmation messages! Adding this feature won’t impact your site’s usability or performance. It’s just an extra click on your way to publishing a new post, so there’s little downside to it.
Of course, not every website needs to add post publishing confirmation messages. For example, if you’re running a single-author blog and you’ve never run into an issue with accidental publications, you’re probably safe. However, we do recommend this feature for WordPress sites with multiple authors, to minimize risk.
Introducing the Publish Confirm Plugin
The Publish Confirm plugin is perhaps the easiest way to enable confirmation messages for WordPress. It works with posts, pages, and even custom post types. What’s more, the message automatically stops appearing after you publish each post, so you won’t need to deal with it for simple updates. The plugin also plays nicely with Divi, so it’s easily implement on your Divi-powered site too.
Finally, the plugin’s confirmation window text can be modified to your liking if you don’t mind tweaking a few lines of code. In fact, we’ll teach you how to do it in a moment.
Key Features:
- Lets you add add post publishing confirmation messages to WordPress.
- Supports pages and custom post types as well.
- Provides customizable confirmation messages.
- Disables itself automatically for post updates.
Price: Free | More Information
How to Add Post Publishing Confirmation Messages to WordPress (In 2 Ways)
Either of the approaches below is entirely valid. If you’re looking for the fastest route to add confirmation messages to WordPress, you’ll probably want to stick with the first method.
On the other hand, if you don’t mind tweaking a couple of files and pasting a few lines of code, you can avoid adding a new plugin altogether by going with the second approach. With that out of the way, let’s get down to business!
1. Use the Publish Confirm Plugin
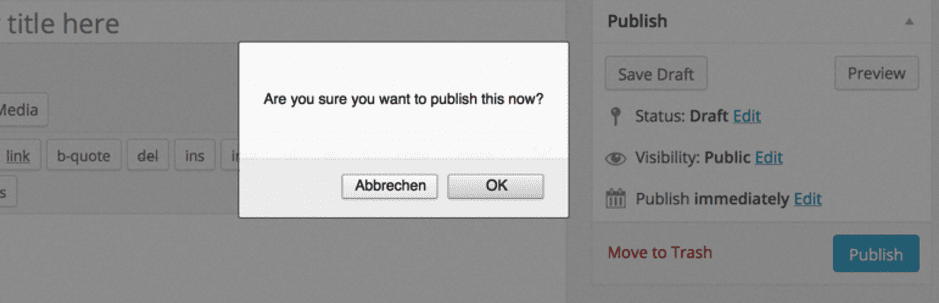
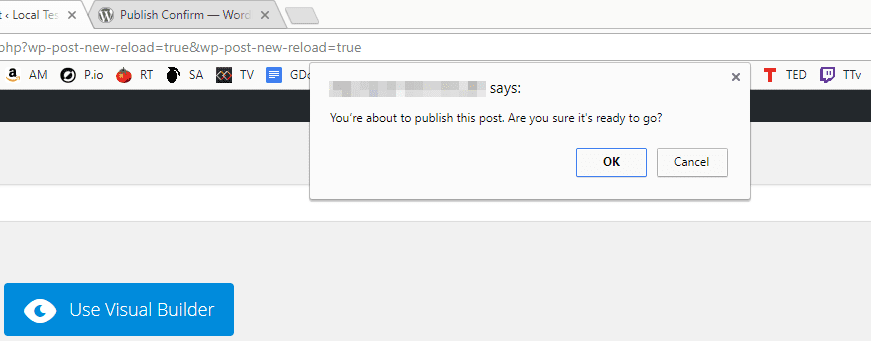
First off, you’ll want to install and activate the plugin. It’s very much a ‘plug-and-play’ solution, so it’s ready to go as soon as the activation process is complete. Simply create a new post, and when you try to publish it, a confirmation message will pop up:
As far as customization goes, we’ve already mentioned that you can change the confirmation message itself. To do so, you’ll need to use an FTP client such as FileZilla to access your site’s back end. It’s also advisable to back up your site before you begin tinkering. Finally, you should also set up a child theme, so your changes will persist when the theme is updated.
Once you’re in, make your way to your WordPress root folder, which often appears as either public_html or www. Next, access your theme’s functions.php file:
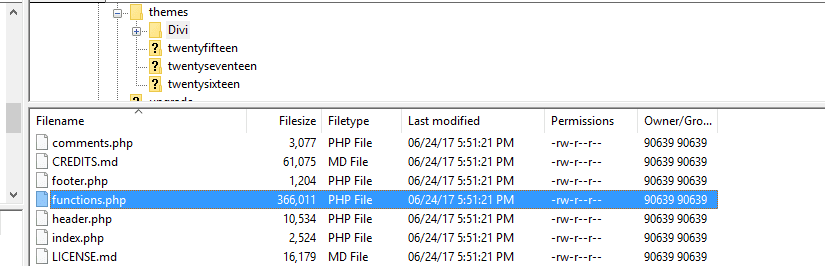
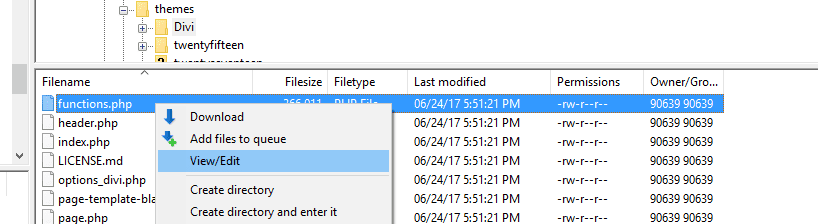
In our case, the route to that file was public_html/wp-content/themes/Divi. Once you’ve located your functions.php file, right click on it and pick the View/Edit option:
This will open the file with your default text editor. Then, just add the following code snippet to the end of the file:
add_filter(
'publish_confirm_message',
function( $msg ) {
return "You’re about to publish this post. Are you sure it's ready to go?";
}
);
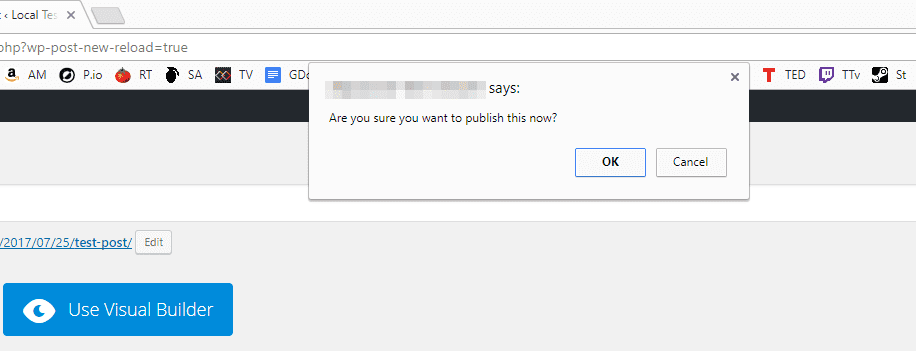
You can, of course, alter the message to your liking. When you’re ready, save your changes and close your editor. Now return to WordPress, and try to publish another post to see your changes in action:
Keep in mind that you don’t need to change the plugin’s default confirmation message if you don’t want to. However, this gives you a way to tailor the message to your particular needs.
2. Add Code to Your functions.php file
This next method should be right up your alley if you’d like to get your hands dirty with code. To get started, you’ll need to access your theme’s functions.php file, as we did in the previous section.
Once your functions.php file is open in your favorite editor, copy and paste the following code:
// Adding a WordPress post publishing confirmation message.
$c_message = ' You’re about to publish this post. Are you sure that it's ready to go?';
function confirm_publish(){
global $c_message;
echo '';
}

add_action('admin_footer', 'confirm_publish');
Finally, save your changes and close the functions.php file. The next time you’re about to publish a post, you’ll see a confirmation window much like the one created by the Publish Confirm plugin. In this case, though, it’s all your own work!
Conclusion
Adding a post publishing confirmation message to your WordPress website is a simple feature that can make it much more user-friendly. It’s the kind of functionality you’ll probably forget about until it saves you from making an embarrassing mistake. Plus, it can come in handy if you run a blog with authors who aren’t that used to WordPress.
There are two ways to implement this feature, and both are relatively straightforward:
- Use the Publish Confirm plugin.
- Add code to your functions.php file.
Do you have any questions on how to add post publishing confirmation messages to WordPress? Ask away in the comments section below!
Article thumbnail image by Jane Kelly / shutterstock.com.


Does anyone have a solution to this via custom code for 2024 and WordPress 6.4.3? I tried the custom code option here and it crashed the site. I had to restore the site from backup and ultimately installed the plugin instead, but I was hoping to avoid another 3rd party plugin if possible. I added the code that was in this article to the functions.php file in the child theme. That didn’t seem to work, so I removed it from the child theme and added the code to the end of the functions.php file in the Divi theme folder, which crashed the site (both the front end and the WordPress dashboard). Just curious if there is an update that can be made to the code to get it to work properly for the latest version of WordPress in 2024 and curious if the code should be added to the functions.php file in the child theme or the main theme. I was hoping to add it to the child theme to make sure any updates don’t overwrite the customization but when I tested a new page and blog post with the code added to the functions.php in the child theme, it didn’t seem to work and the article would publish with no confirmation pop-up message. I can stick with the plugin for now, but this is more just a word of caution to anyone trying to implement the custom code option in 2024 on WordPress 6.4.3 🙂
Will one of the solutions work in the Visual Builder? That happens all the time. For example, when you leave a page and click “Save & Exit”.
This happens all the time in Visual Builder! So annoying
Hi Nelson, thanks for your comment! We hope one of the above methods can help. 🙂
Do you see any challenges with either the use of the plugin or the direct placement of code in PHP as it relates to “scheduled posts” in WP?
Hi Tanya! You’re right that these methods are designed to work with a system where you manually publish posts. To get either working with scheduled posts, you might have to do some additional coding. 🙂
Thanks for sharing this article with me. Publishing confirmation is very important, and I’ve been struggling to correctly set up it for a long time.
Thanks!
You’re welcome! Thanks for your comment. 🙂
This is very confusing. Why should I edit function.php when I use a plugin? The message should be set in the plugins-settings!
As far as I understand you suggest to edit functions.php in both alternatives… not so clever…
You should show how to add this functionality either using divi-features or the child-theme, the plugin seems to be useless….
Hi Connie! The plugin is designed to add a confirmation message, and that’s all you’ll need if you’re happy with the default text of that message. However, you can also use the edit we suggest to add in your own custom text instead.
This is exact question that pop on my mind 🙂
Nice idea… I still say will drunk confirm a post though…..
Hi Richard, thanks for your comment! 🙂
Thanks. The second method left me with this:
Parse error: syntax error, unexpected ‘s’ (T_STRING) in /nas/content/staging/philsimondev/wp-content/themes/Message Not Received/functions.php on line 92
File:
https://drive.google.com/file/d/0B532vOLacRQ2aHlyLWhYckdvUzA/view?usp=sharing
Thanks.
Hi Phil! It’s hard to say what the exact issue is without knowing more details about your setup. We’d recommend posting in the forums (https://www.elegantthemes.com/forum/) to see if another user can help.