
Creating content for your blog is hard enough without having to worry about design. That’s why it is important for your site to have the design elements readily available (or pre-designed) so that you can be more focused on creating amazing content. Sure, a traditional WordPress child theme can handle this but, in most cases, you are stuck with a design that isn’t easily changed.
With Divi, we get more control over the design experience of a blog post. Divi’s global presets allow you to create a site-wide design (like a child theme) for elements throughout your site with the added convenience of being able to tweak the design however you want with a few clicks. Plus, if you are used to creating content in the default WordPress Block editor, you can harness the power of the Divi Layout Block to pull in those Global Preset elements on the fly within the post content. This will allow you to add brand new design elements within a blog post that matches the template and the rest of the site.
In this tutorial, we are going to show you how to use global presets with Divi Layout blocks to streamline the process of designing a blog post. To do this we’ll show you how to use Global Presets to design new blog post content quickly and efficiently. This will help to create a blogging experience that doesn’t compromise the overall branding of your site.
Let’s get started!
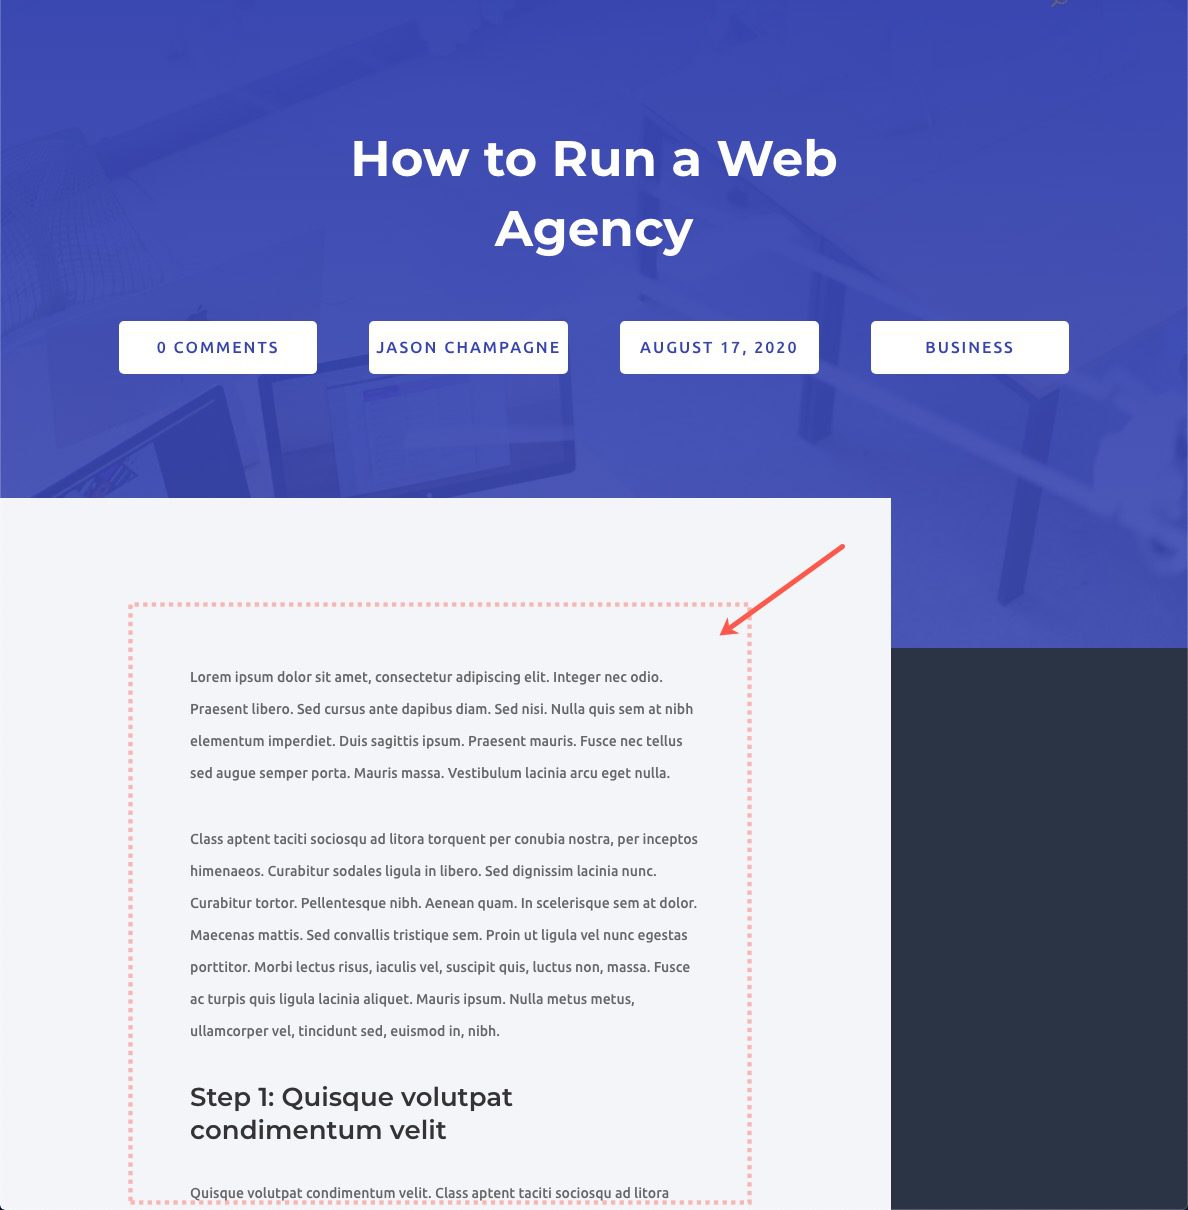
Sneak Peek
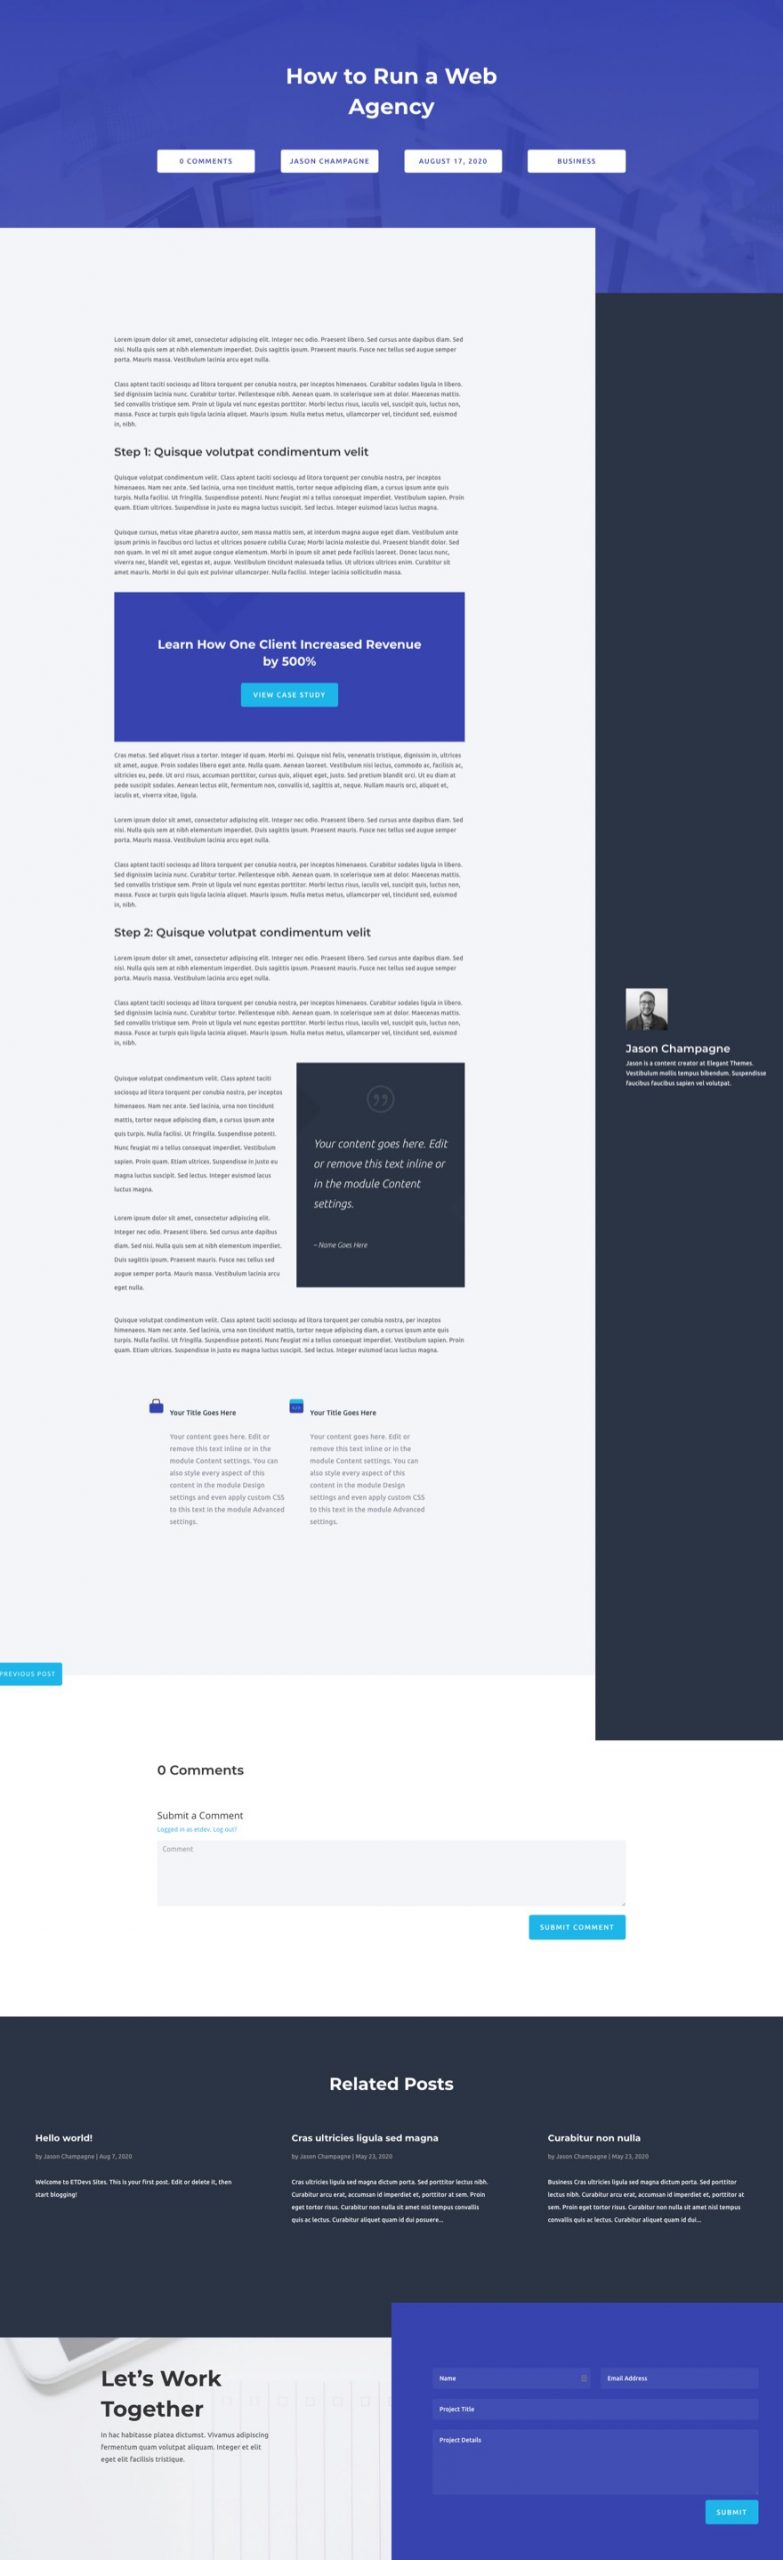
Here is a quick look at the design we’ll build in this tutorial.
A Quick Overview of Global Presets
The beauty of Divi is that it gives you full control over the design of your website using a wide range of design settings that you can use to customize the appearance of any element or module.
The new Divi Presets system allows you to design a custom appearance for a Divi element (like a button module) and save it as a preset. All of the design changes you make are saved in the preset. When you add a new module to your page, you can browse your saved presets and quickly apply them.
Once a preset has been applied, the module’s default design is controlled by the preset. If you update the style of a preset, all modules using that preset are updated as well. This allows you to control the design of your entire website using a small collection of saved presets. Plus, it saves tons of time when adding new modules to your page, since you don’t need to design each new module from scratch but instead can quickly select an appearance from your Divi Presets library.
Global Preset Style Guides
Global Preset Style Guides (like the one we are going to use in this tutorial) can be created to jump-start the design of elements while designing your website. These style guides contain a collection of modules with different presets that match the design of your site. Having the presets available at the start will streamline the design process by taking out the drudgery of updating design settings for each new module. We even have a style guide framework for those who want to build their own.
A Quick Overview of Divi Layout Blocks
The Divi Layout Block allows users to add any Divi Layout to a blog post within the Gutenberg editor. We can even convert a Divi Layout Block into a reusable block in Gutenberg just like any other WordPress block. This opens the door for streamlining some helpful Divi Layout designs into the normal flow of writing a post in Gutenberg.
How Global Presets and Layout Blocks Work Together
Because a global preset is “global”, the styles of that preset affect all instances of the preset site-wide. That means you can use global presets when designing an element in the layout block editor and those presets will also update accordingly. So, if you want to add a CTA to your blog post content using the Divi Layout Block, you can build the CTA by adding modules with Global Presets just like you would a normal page or post. This allows you to add matching design elements within your post quickly and efficiently.
Using Global Presets with Divi Layout Blocks to Streamline Blog Post Design
Uploading the Global Presets Style Guide
For this tutorial, we are going to get a jump start on creating Global Presets by using the Global Presets Style Guide Layout for the Web Agency Layout. After uploading the style guide, we will have some Global Presets available to use when adding design elements to a blog post using the Divi Layout Block.
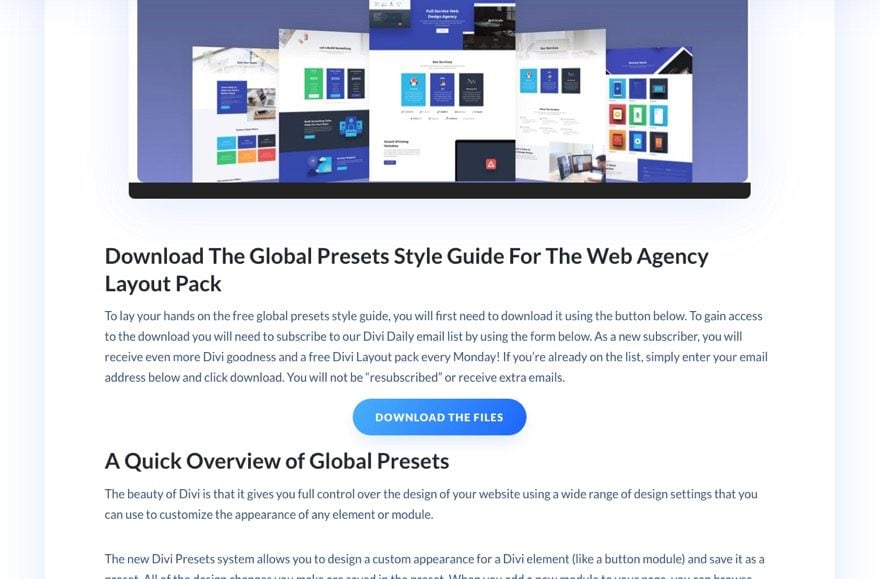
To download the Global Presets, go to the blog post. Scroll down to the section titled “Download the Global Presets Style Guide”. Then enter your email address and click to receive the download.
After you download the zip file to your computer, unzip the file and head back over to the WordPress Dashboard.
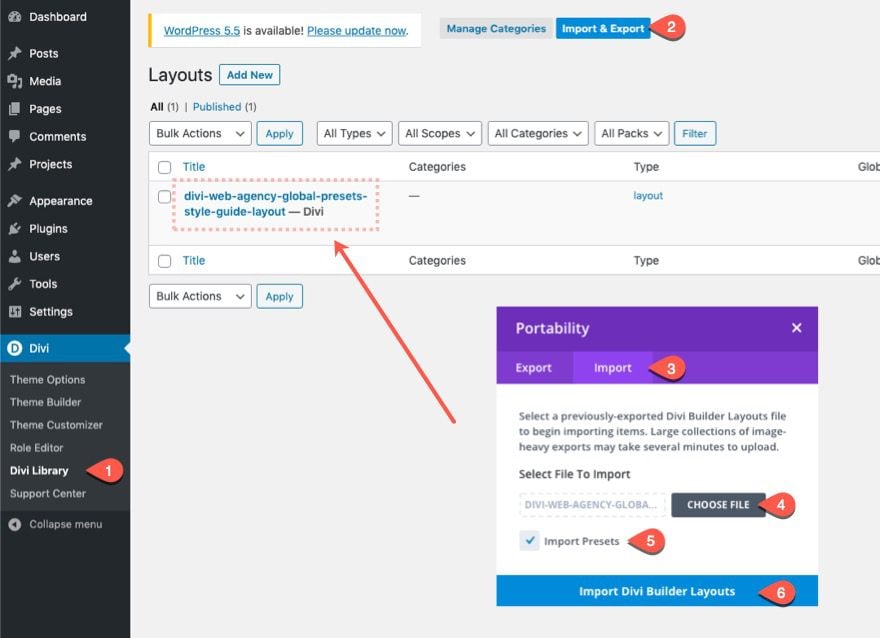
To import the style guide JSON file to the Divi Library…
- navigate to Divi > Divi Library.
- Click the Import & Export button.
- Under the Portability Popup, select the import tab.
- Choose the web agency global style guide JSON file.
- Make sure you select to Import Presets.
- Then click the import button.
Now all of those global presets are available in the Divi Builder.
Uploading the Post Template
Now that the style guide is in place, we are going to get a jump on the design of the blog post template by importing the web agency blog post template which matches the style guide elements already.
To download the template, go to the blog post, enter your email address, and click to download the files.
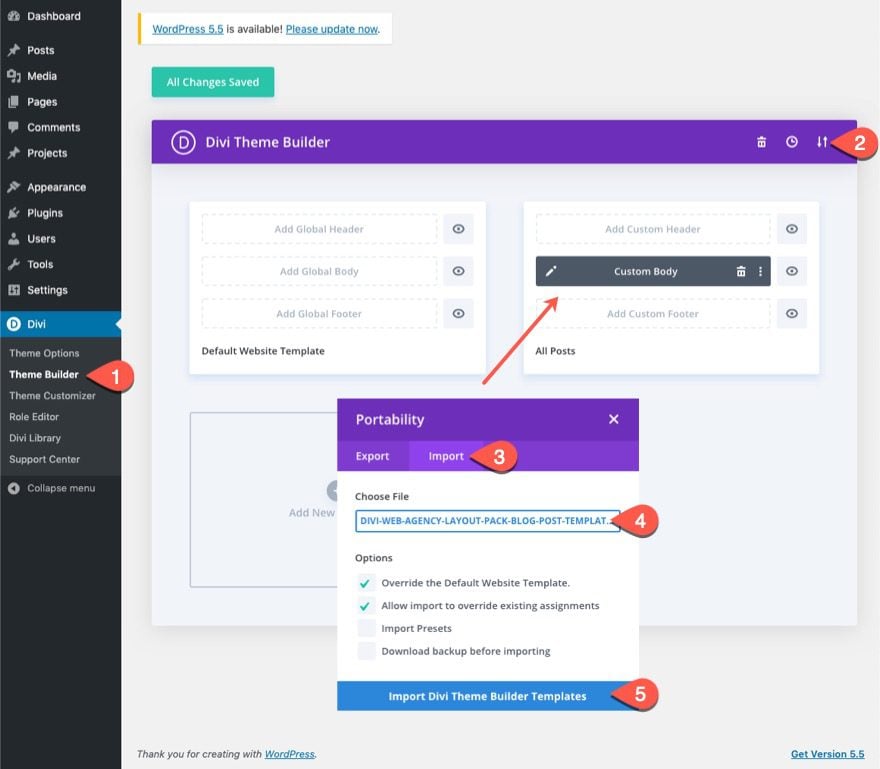
To import the post template…
- navigate to Divi > Theme Builder.
- Then click the portability icon.
- Under the portability modal, select the import tab.
- Choose the post template JSON file you downloaded.
- Then click the import button.
Using Presets to Update/Design the Post Template
Once you have the custom post template in place, click to edit the custom body template. There you can see the post template design as well and make adjustments using the global presets that are available from the imported style guide. If you were building your own post template from scratch, you could use the global presets to help match the post template design with the other elements on the web site. For example, you can use the “WALP – H1 – 1” preset on the post title as follows:

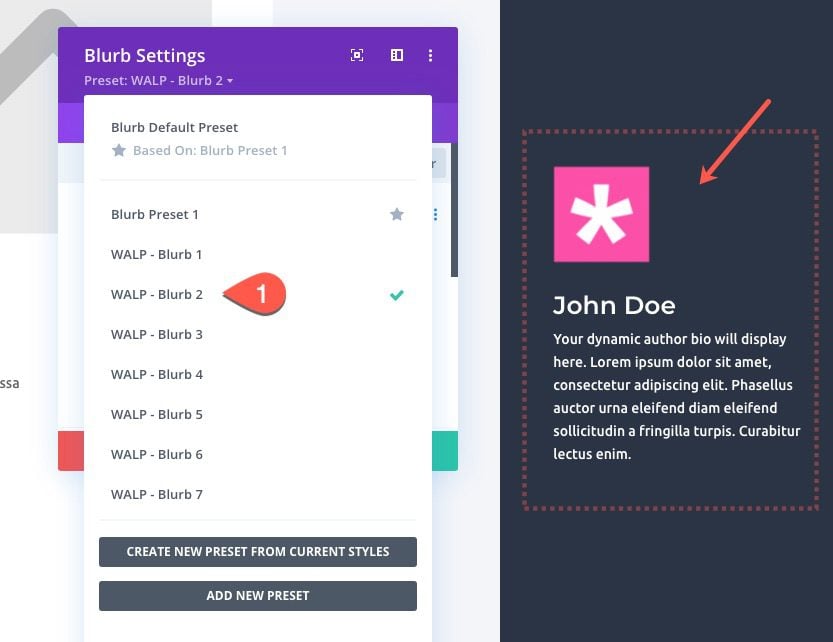
Or you can use the “WALP – Blurb 2” blurb module preset on the blurb that contains the dynamic author info.
The post content module is the area where your blog post content will be generated on the page. That is why it is important to match the design settings of the post content module with the other text elements used throughout your site.
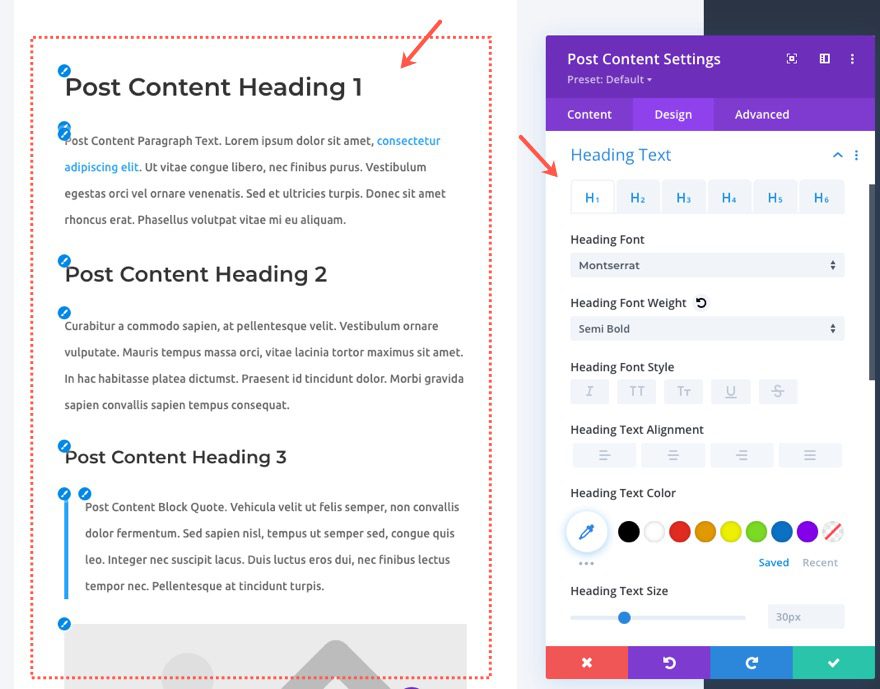
If you were building the post template from scratch, you could copy and paste text settings from various text modules through the site. Or if you have made a global preset style guide for your site beforehand, you can copy the design elements from those modules in the style guide.
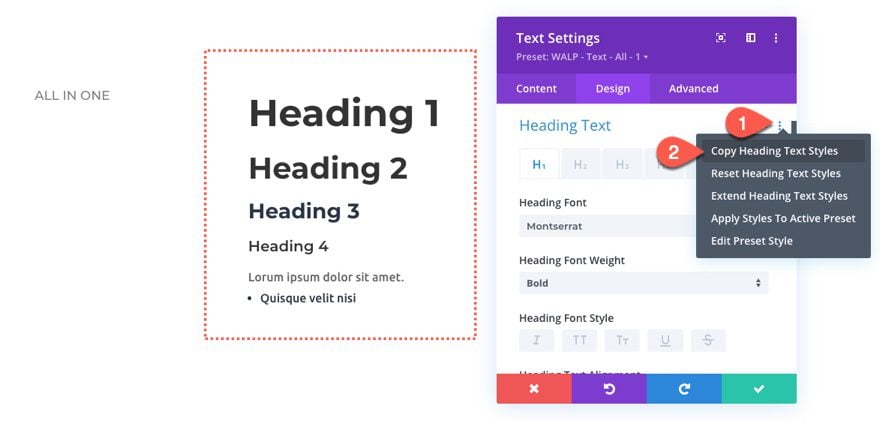
For example, you could copy the heading text styles for the global preset made for all text styles in one text module.
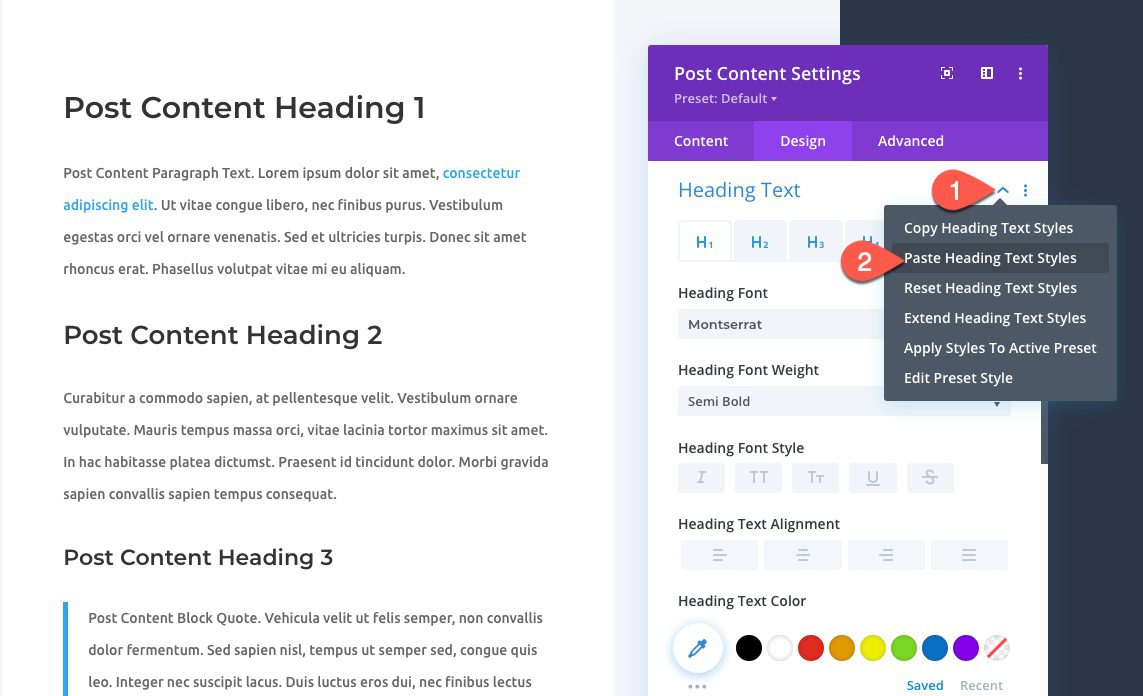
Then past those heading text styles into the post content module for the post template. That will help make sure all the heading used for your post content will match the style of the site.
The important thing here is that you have a post template that matches the style of your site. Using global presets can help that process tremendously if you are designing the template from scratch.
Using Global Presets with Divi Layout Blocks
Once the template has been designed, we are ready to start using the global presets with Divi Layout blocks to design additional post content elements using the default WordPress block editor.
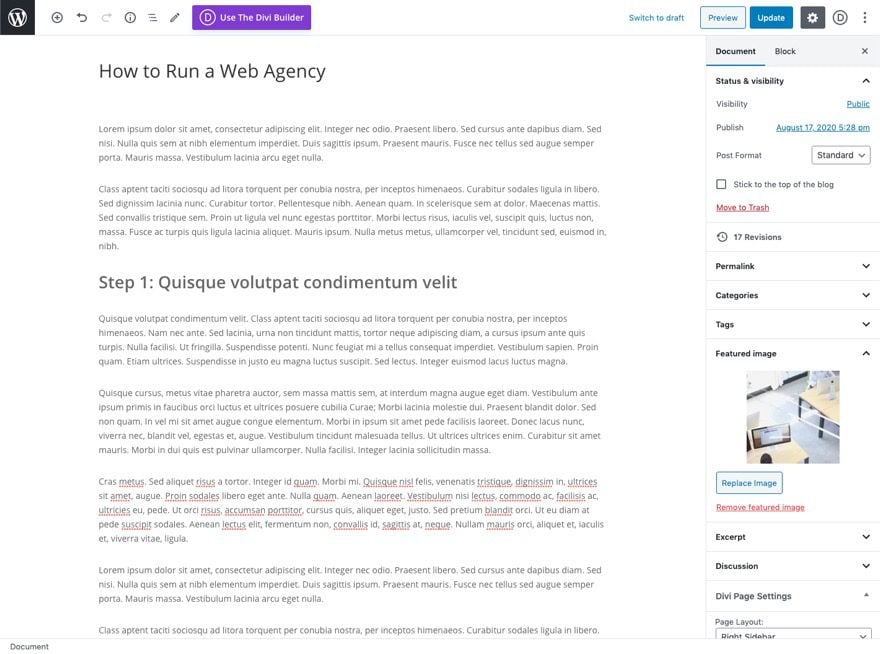
To do that, edit (or create) a blog post. Then make sure you have some mock content (like a few headings and paragraphs, and a featured image).
Right now, if you looked at the post on the front end, it will have the post content displayed within the post template and the content (headings, body text, etc…) is inheriting the style from the post content module settings.
The post content module will only handle the styling of basic textual content. If you want to add additional elements throughout your post using the default WordPress Block editor, the styling of those elements will need to be changed via custom CSS in a child theme. That is unless you use Divi Layout Blocks.
To add additional content that you want to match your post template and site, you can use Divi Layout blocks. This will allow you to add any content you want and style it using the Divi Builder. And, since we can also use global presets, we can further streamline the design of our blog post content on the fly.
Design #1: Building a Blog CTA with Global Presets and a Divi Layout Block
In this first example, let’s create a custom blog CTA that matches the post template and site design.
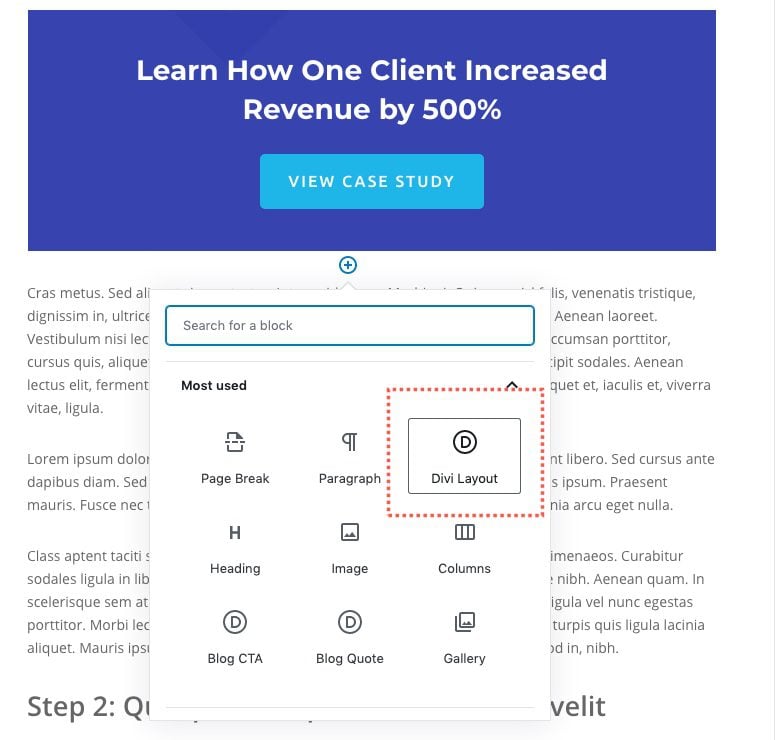
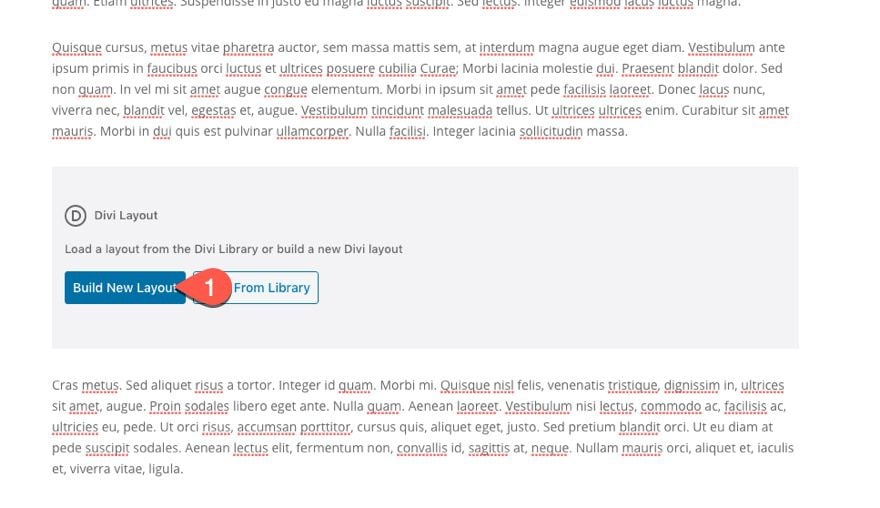
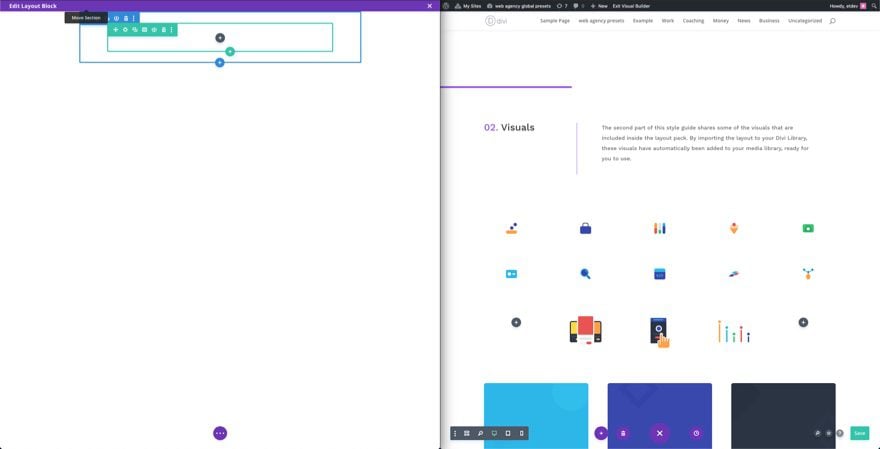
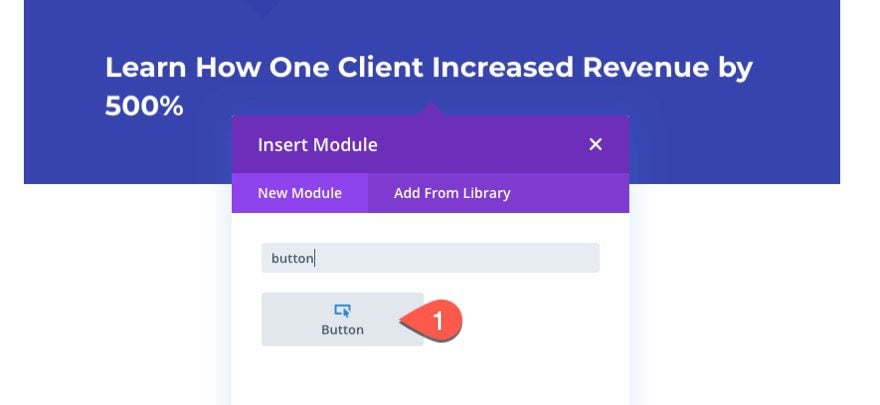
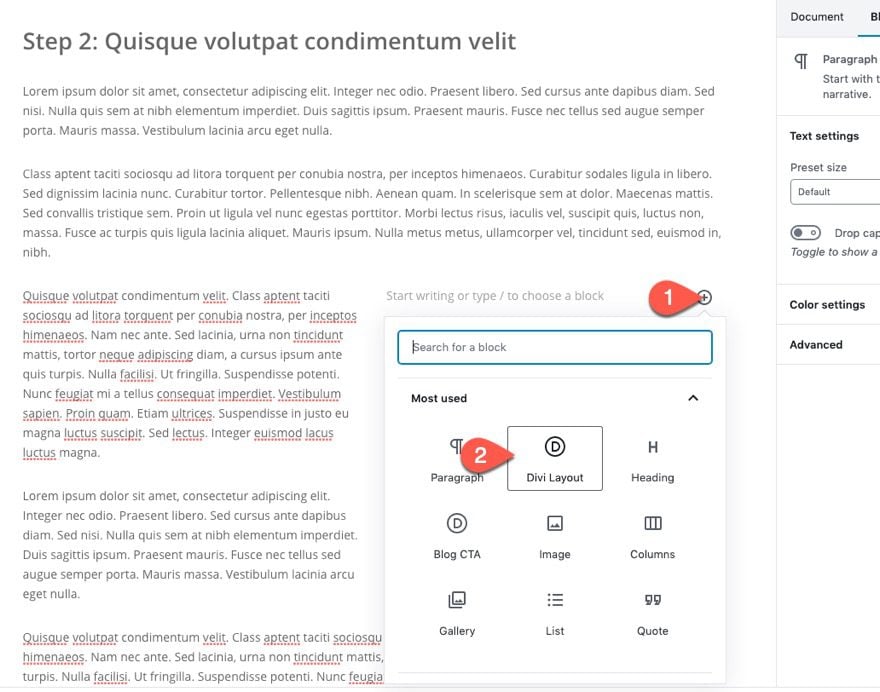
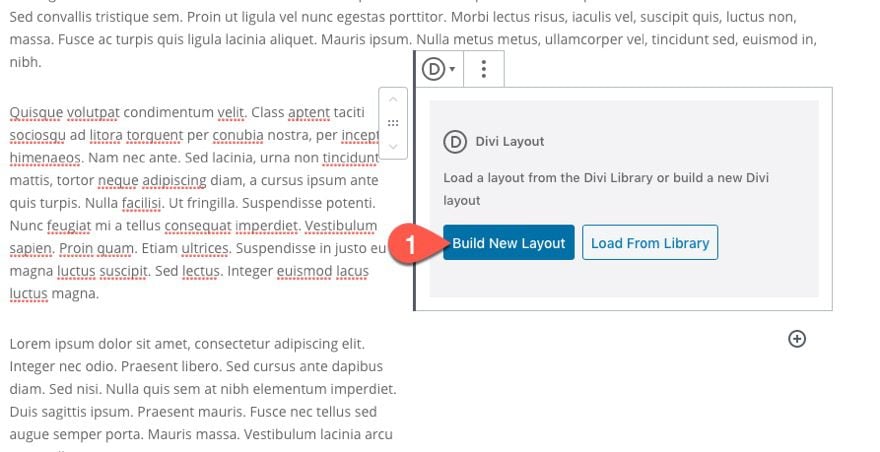
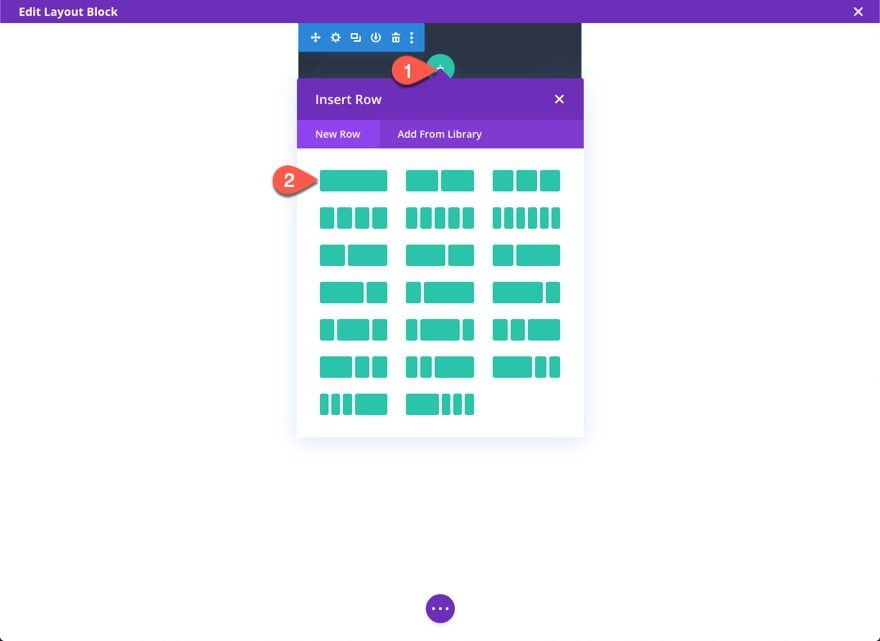
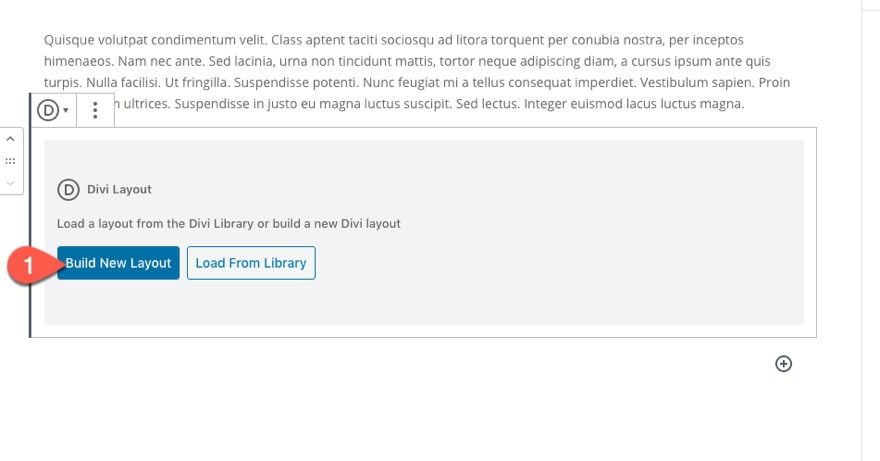
To do this, add a Divi Layout Block to the post content.
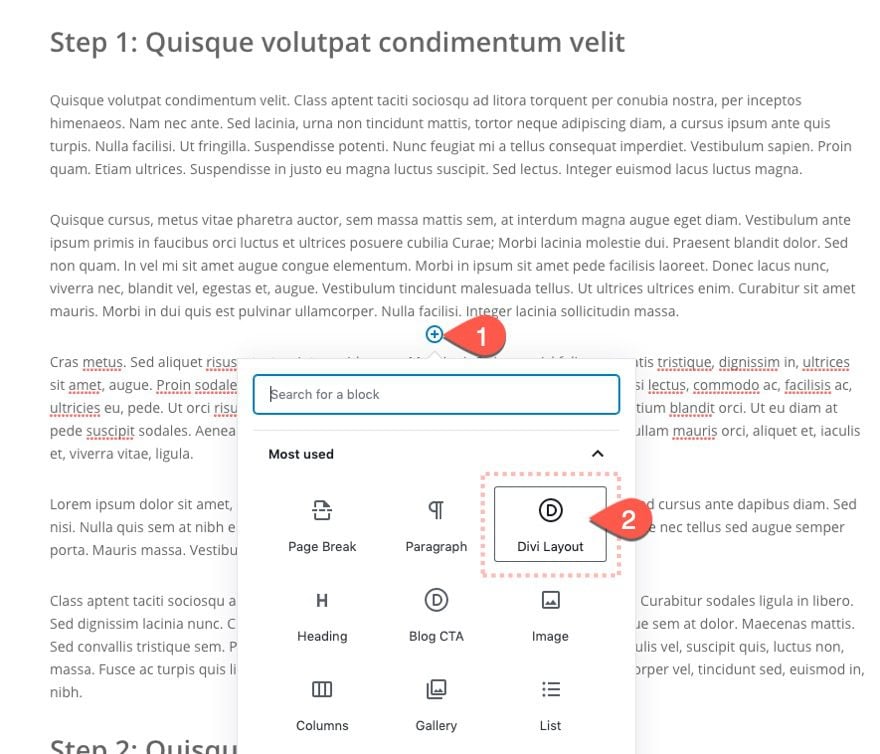
Then click Build New Layout.
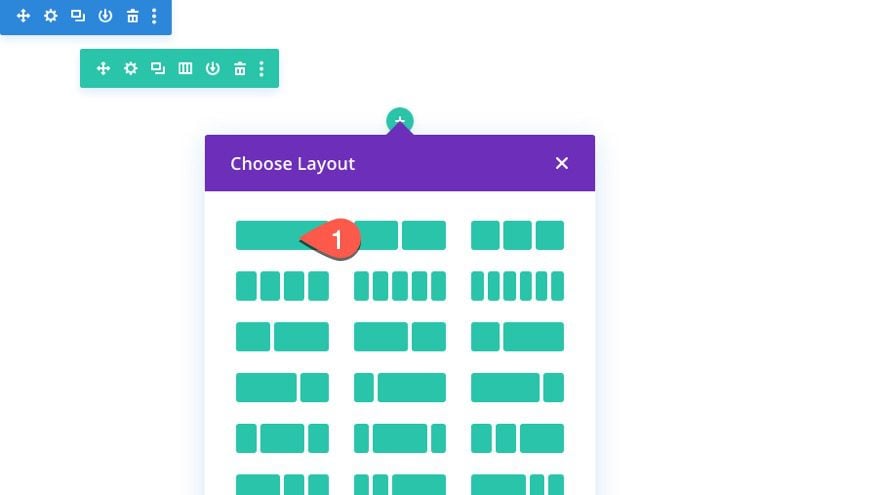
This will open the layout block editor which is basically the Divi Builder as usual. Give the default section a one-column row.
Open up your Global Presets Layout in a different browser, making sure you click to build on the front end so you can see the elements. That way you have the Layout editor open in one browser and the style guide open in the other.
If you don’t have a style guide, you can open up a layout of the page on your site so that you can access any design elements you want to bring over.
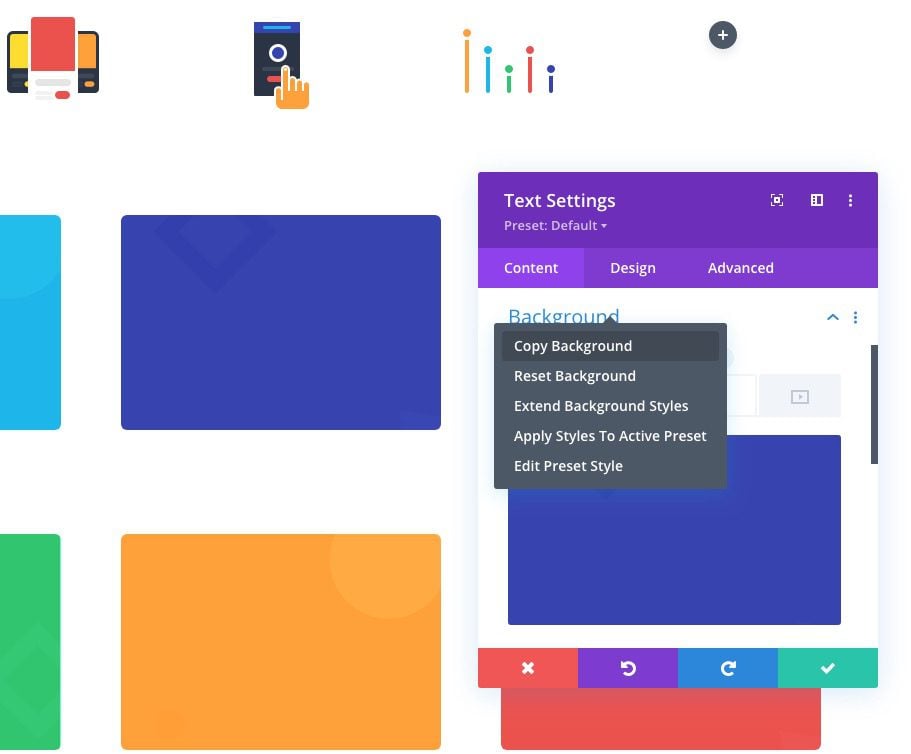
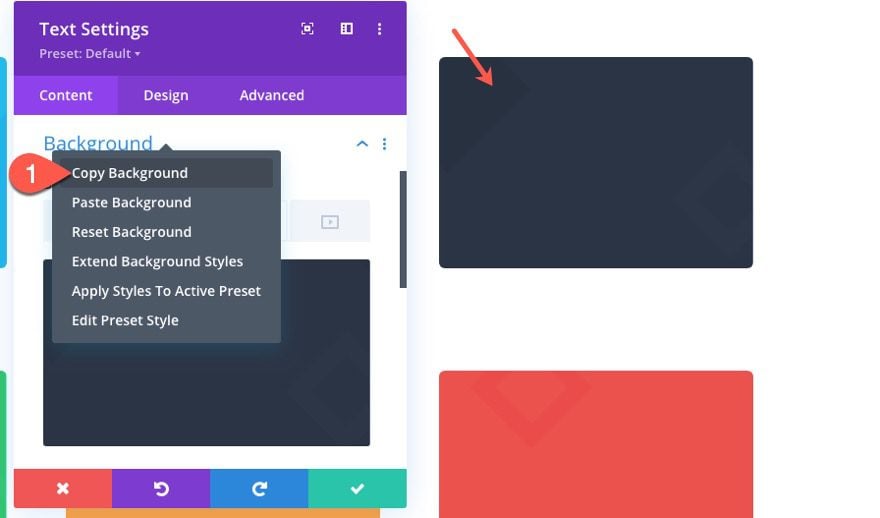
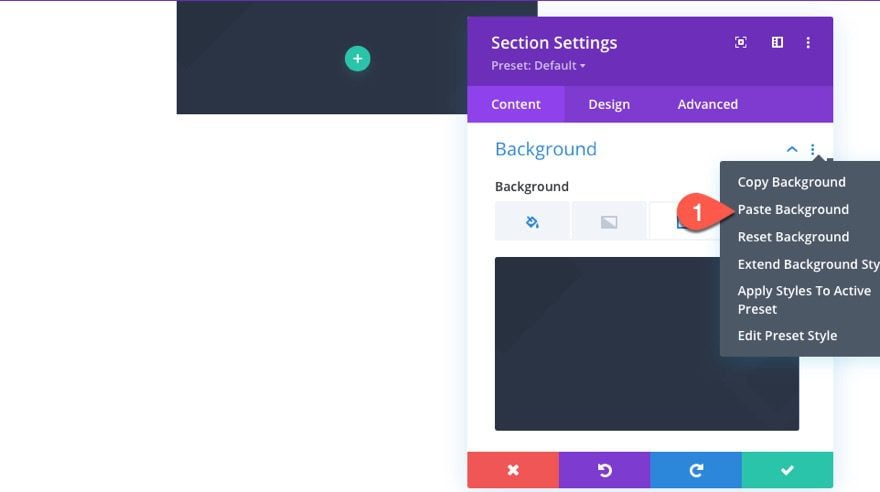
Copy Background from Style Guide
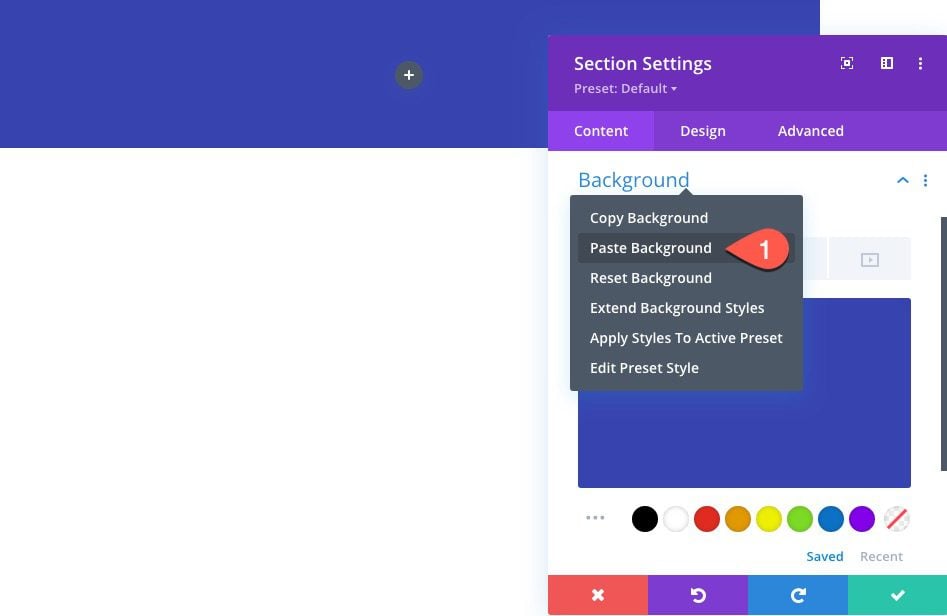
For this CTA, we are going to use the royal blue background from the style guide. Open the settings of the text module and copy the background.
Then open the settings of the section in the layout editor and past the background to the section.
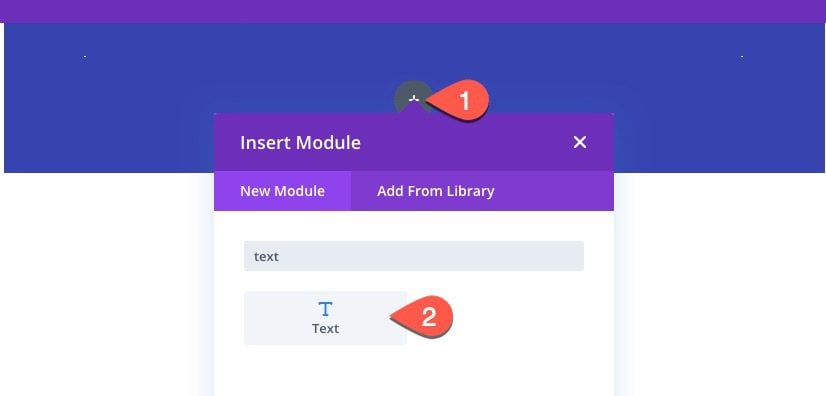
Add Text Module with H3 Preset
Next, add a new text module to the row.
Then open the settings and update the following:
Add an H3 heading for the CTA by pasting the following HTML in the body:
<h3>Learn How One Client Increased Revenue by 500%</h3>
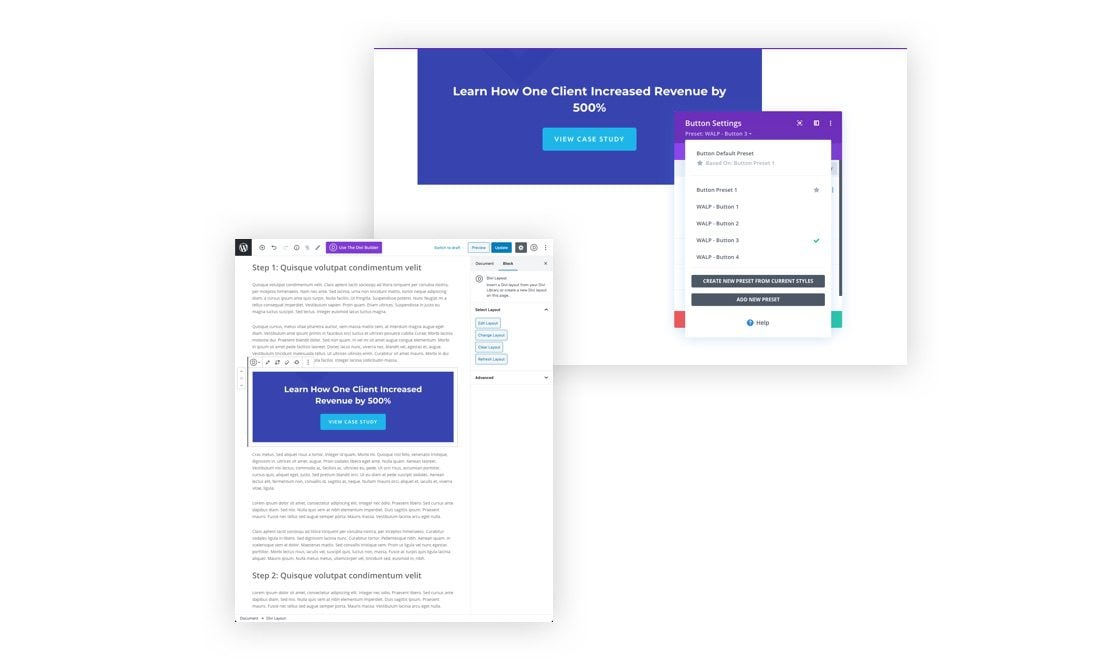
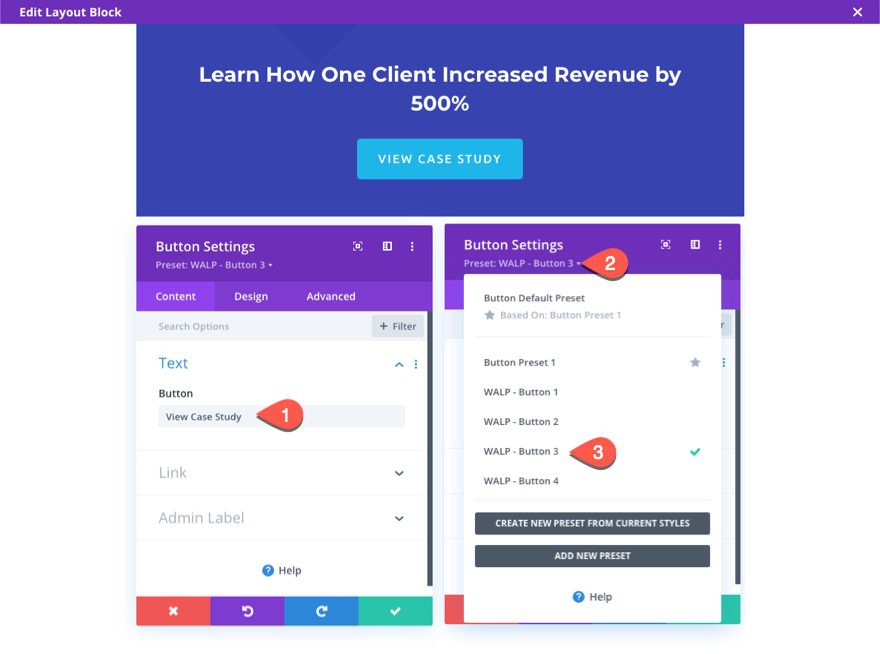
Open the Global Presents dropdown and select the preset for the H3 heading (WALP – H3 – 1)
Update Design
Then update the text color to white and center the alignment.

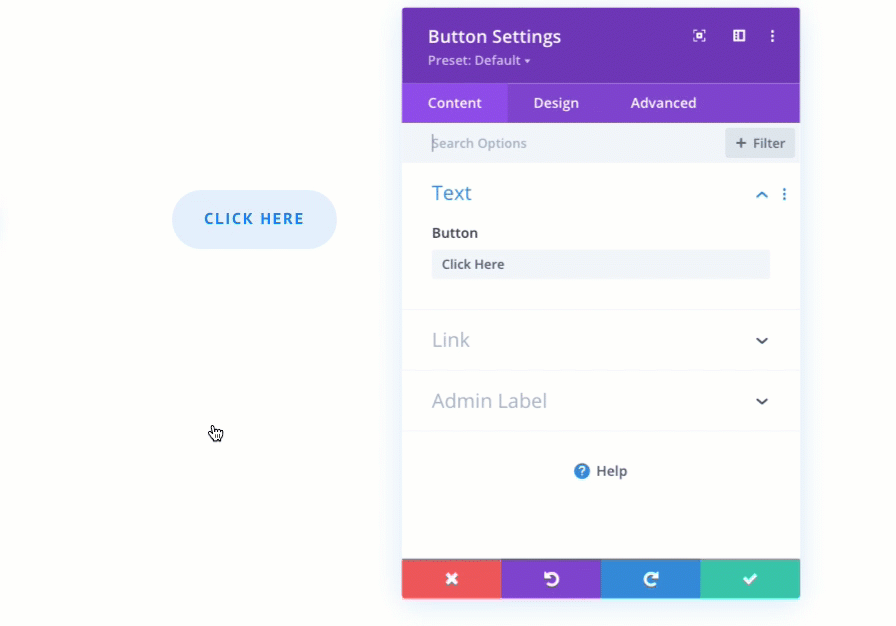
Add Button with Global Preset
Under the text module, add a new button.
Then update the button text and select one of the global preset button designs. For this example, let’s use “WALP – Button 3”.
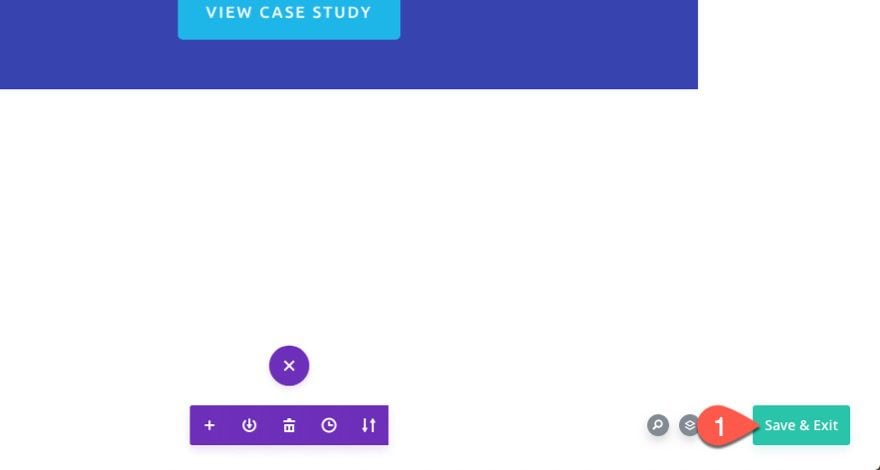
Save Changes
Once done, click Save & Exit.
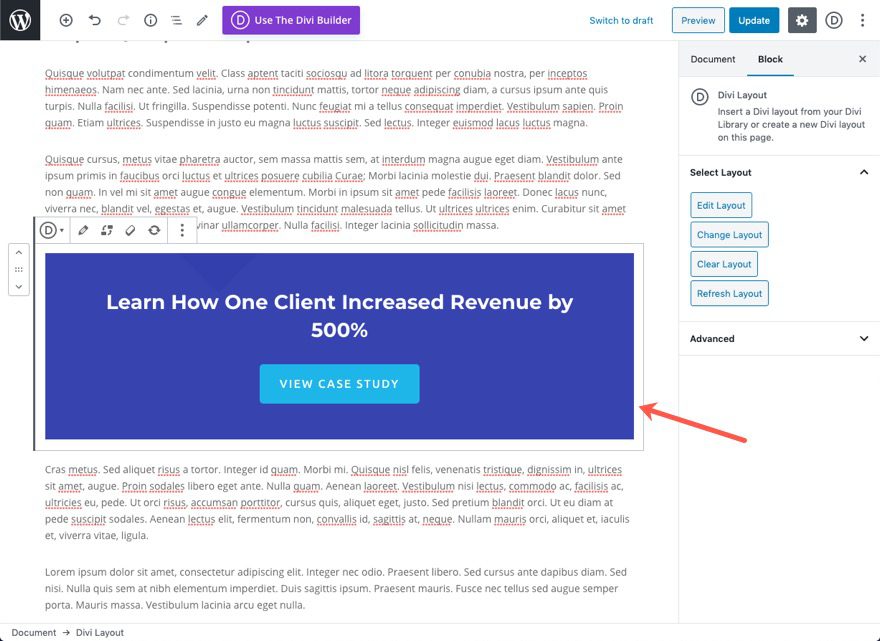
Now you can see the element displayed in the WordPress Block Editor.
Design #2: Building a Blog Quote with Global Presets and a Divi Layout Block
For this next design element, we are going to add a quote to the blog post.
Add Divi Layout Block
To get started, add Divi Layout Block where you want the quote to be displayed.
Then click Build New Layout.
Copy and Paste Background from Style Guide
Copy the dark blue background from the style guide.
Then paste it into the default section of the layout editor.
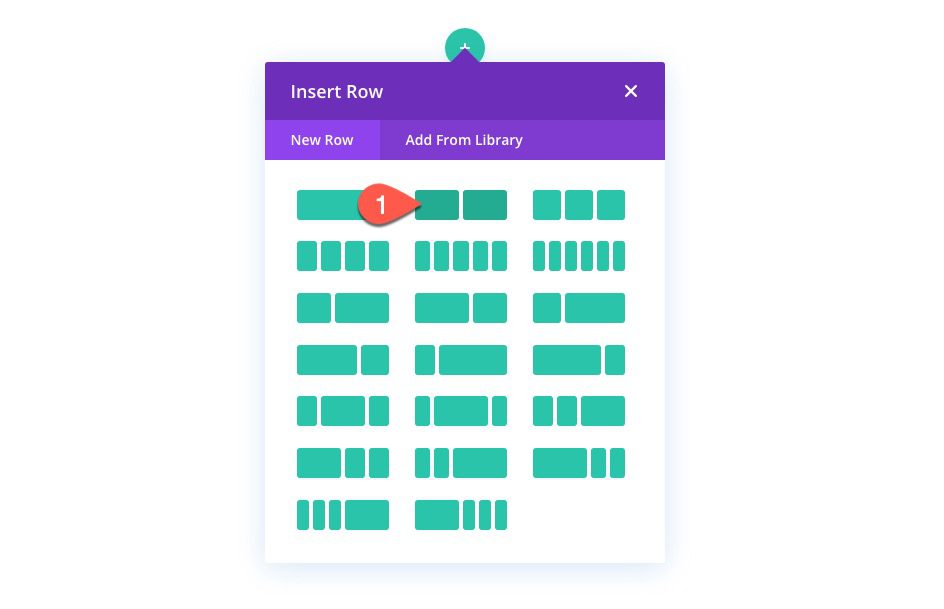
Add Row
Next, add a one-column row to the section.
Add Testimonial Module with Preset
Then add a testimonial module to the column. Then select the Global Preset “WALP – Testimonial 2”.
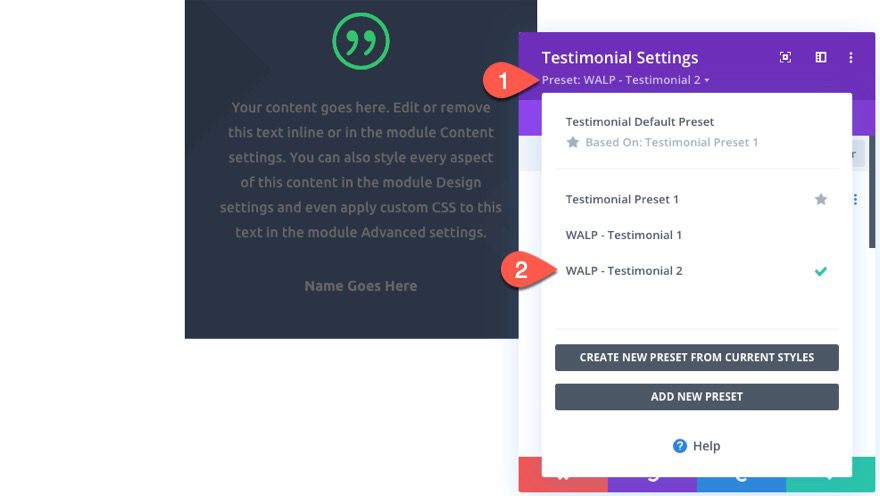
This will give you a great start on the design of the quote for the blog post.
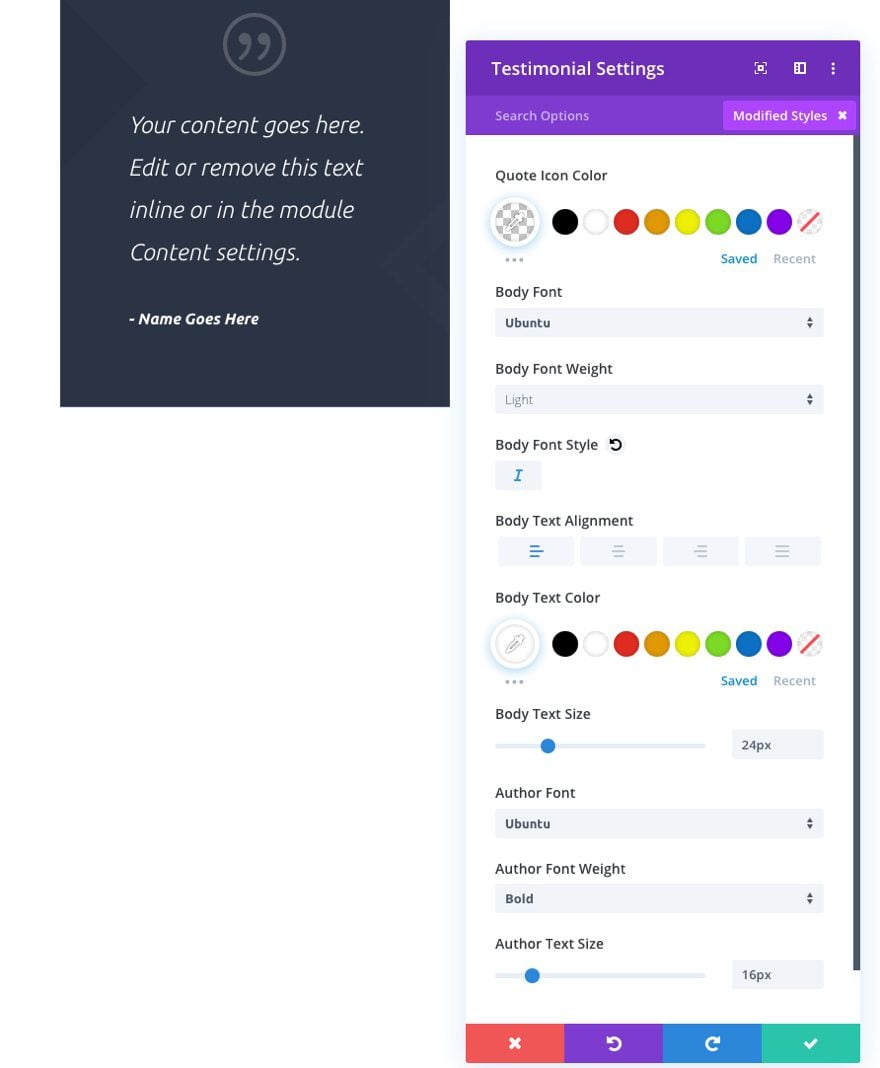
Update design
Under the design tab, adjust the design settings as follows:
- Quote Icon Color:
- Body Font Weight: Light
- Body Font Style: italic
- Body Text Alignment: left
- Body Text Color: #ffffff
- Author Font: Ubuntu
- Author Text Size: 16px
Add New Global Preset
Since we have made significant changes to this testimonial preset, it makes sense to create a new one at this point in order to be used for future post quotes.
To create a new one, click the button “Create New Preset from Current Styles”. Then give the new preset a name (“blog post quote”) and save it. The global preset is now ready to be used going forward.

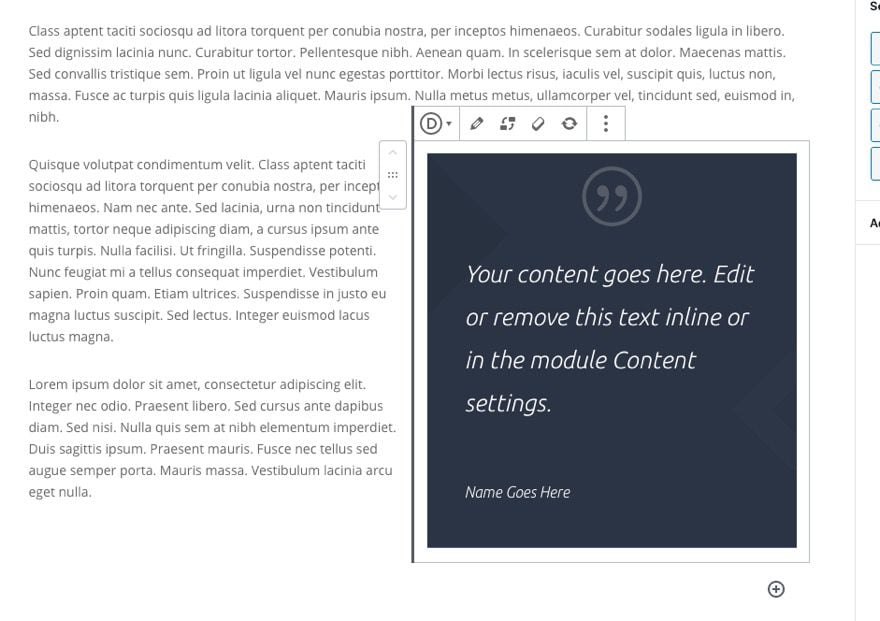
Save the layout and you will see it within the post content.
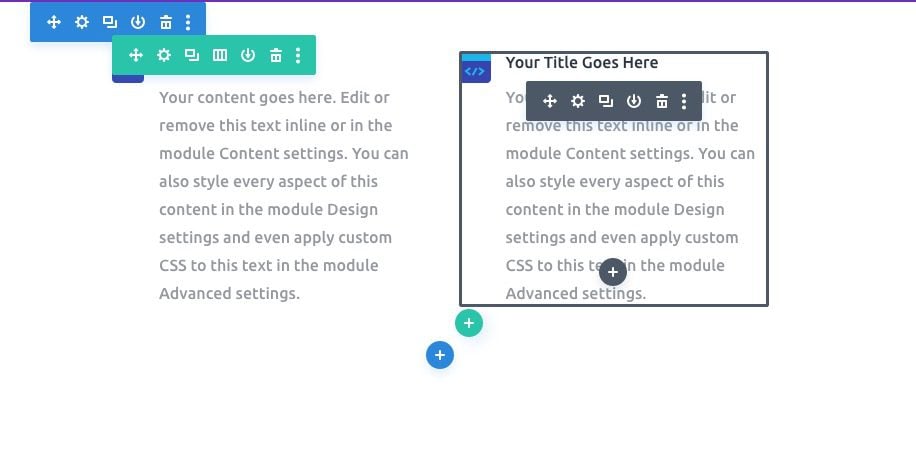
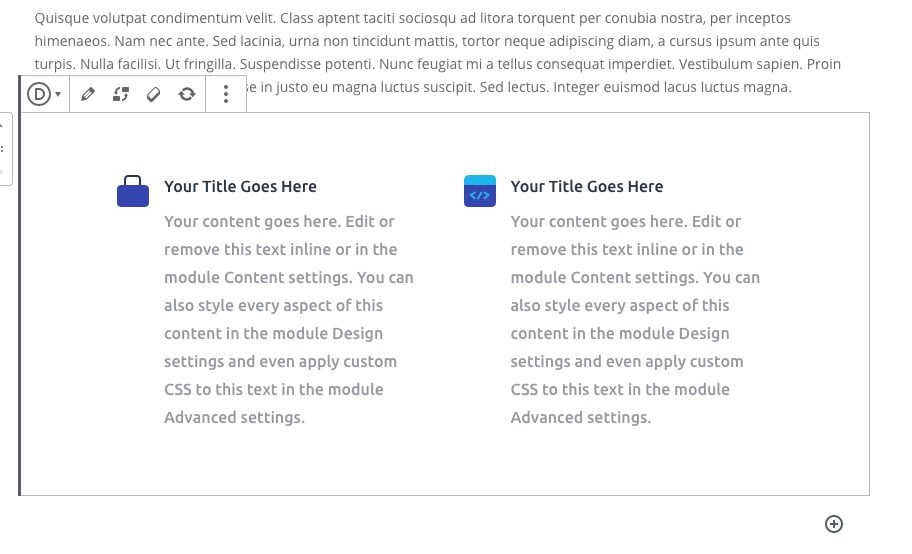
Design #1: Adding Blurbs to a Blog Post with Global Presets and a Divi Layout Block
For this next example, we are going to add a few blurbs to the post.
Add New Divi Layout Block
Add another Divi Layout Block and click the Build New Layout button.
In the Layout Editor, add a two-column row to the layout.
Add Blurb Module with Presets
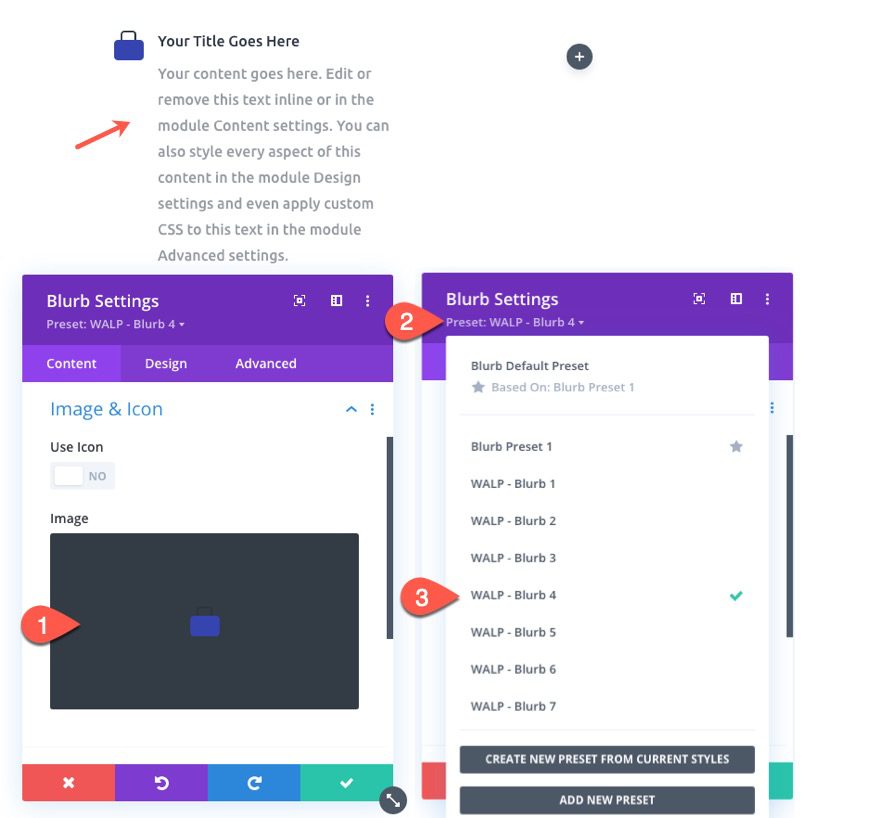
In the left column, add a blurb module.
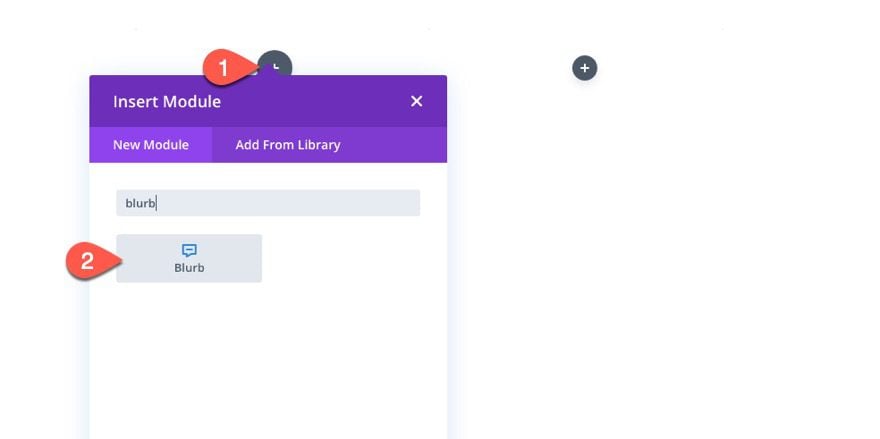
Add a new icon image to the blurb. Then open the presets dropdown and select the blurb preset “WALP – Blurb 4”.
Add Second Blurb
Then copy the blurb and paste it into column 2 and update the image.
Save the layout and you will see it in the post content.
Final Result
Now open the post on the front end to see the final result.
Reusable Blocks with Global Presets
If you want to take advantage of reusable blocks with Divi layout blocks, it is good to know that they will work with global presets. So, if you want to save the blog CTA we created earlier as a reusable block, you will have a convenient block that you can use to add CTAs when building your posts. And, since the CTA is using a button and text with a global preset, updating the global preset for that element will also update the element in the reusable block.
Final Thoughts
Global Presets is one of our most powerful design tools available in Divi. Once you take the time to add global presets to the modules you use throughout the site, you can really take advantage of a streamlined process of designing blog post templates and content using layout blocks.
I look forward to hearing from you in the comments.
Cheers!


No, no, no, no, no!
For a client writing blog posts this is not acceptable. The way to achieve this (and make sure every blog post looks the same and not open to mistakes by the authors – which there may be many) is to use custom fields which you would add and style in the template builder.
Then when the author writes a post in the default editor there will be custom fields that just need the content adding to them.
We should not be leaving ANY layout and formatting to the authors.