
Creating dynamic, engaging carousels is easy, thanks to a new module in Divi 5. The Group Carousel Module lets you build interactive sliders packed with any Divi module without relying on third-party plugins or custom code. Whether you want to display your portfolio, client testimonials, or products, the Group Carousel Module is the perfect solution for captivating your audience.
The Group Carousel Module has several features that help make your sliders more engaging. In this post, we’ll walk you through the steps to create transition effects, set their timing, and optimize your Carousel for responsiveness. By the end, you’ll be equipped to easily create user-friendly Carousels.
Let’s dive in.
What Is The Group Carousel Module?
The Group Carousel Module is a powerful tool for creating dynamic, visually engaging carousels (sliders) directly within the Visual Builder. The module allows you to combine multiple Divi elements, such as text, images, buttons, or even complex layouts (like Nested Rows), into a sliding, scrollable format.
Subscribe To Our Youtube Channel
For example, you can display recent blog posts, WooCommerce product categories, client testimonials, or an upcoming event, making it ideal for dynamic, content-rich websites.
Key Features Of The Group Carousel Module
The Group Carousel Module is packed with powerful features that make it a must-have for Divi 5 users:
- Complete Control Over Slide Content: Add any Divi module to your slides, from simple text and images to layouts including Nested Rows.
- Customizable Slide and Animation Settings: Adjust the number of slides displayed, slides to scroll at once, and animation styles to create an enhanced user experience.
- Support For Dynamic Content: Leverage the Loop Builder to create slides that automatically populate with content like products, posts, or portfolio projects, saving time and ensuring content stays fresh.
- Extensive Design Customization: The Group Carousel Module is fully customizable like any other Divi 5 module, including filters, transforms, box shadows, Interactions, and hover effects.
Applying Transition Effects To The Group Carousel Module
As previously mentioned, the Group Carousel Module’s flexibility allows you to add any Divi module to your slides, from text to images to everything in between. For a detailed guide on building custom layouts within the Group Carousel Module, check out our post on how to build a custom fullwidth slider with Divi 5. You can also download the example in this post to follow along.

Divi 5 has several animation and transition effects that we will apply to our slides to make them more dynamic. If you haven’t already, download the files above and load the Carousel before transitions JSON file into your Divi Library.
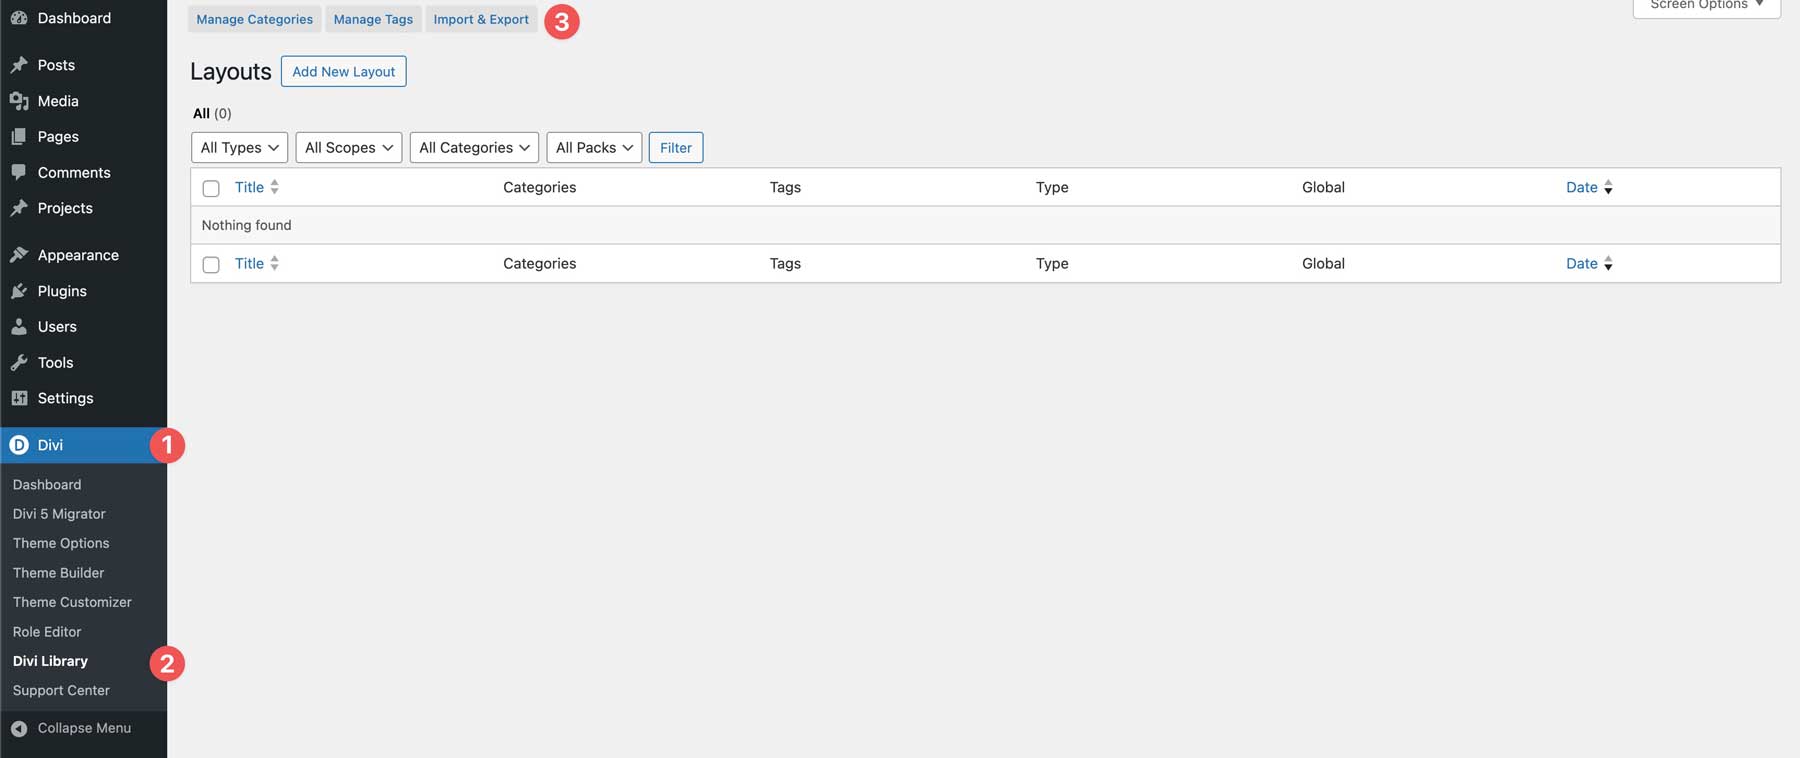
Navigate to Divi > Divi Library and click the Import & Export button to load the JSON files.
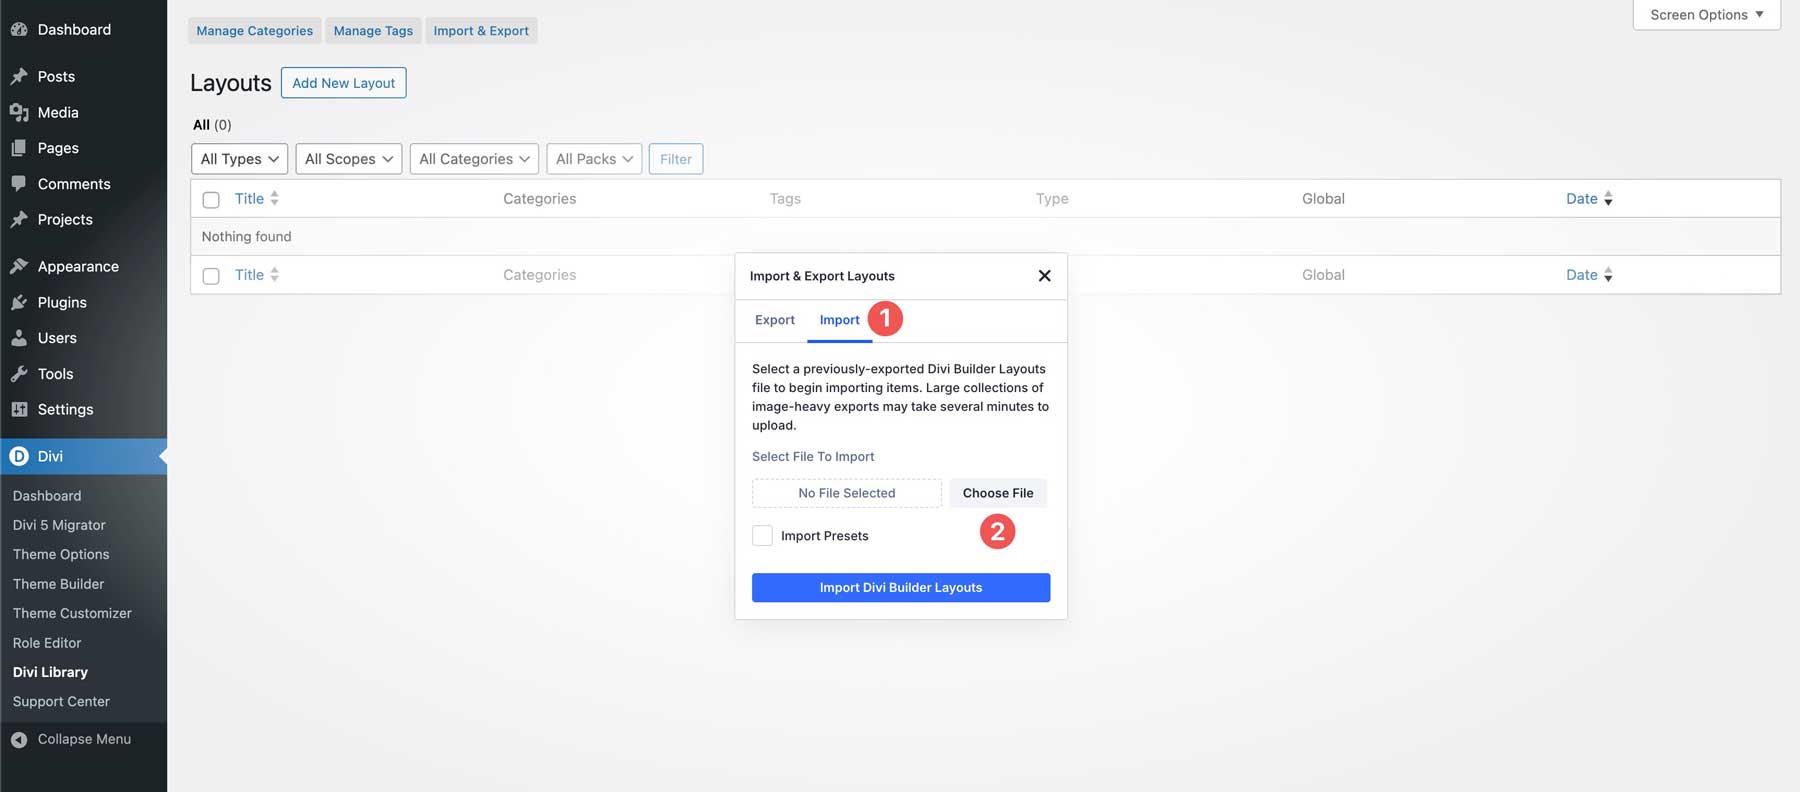
Click the Import tab and Choose File to locate the JSON file on your computer.
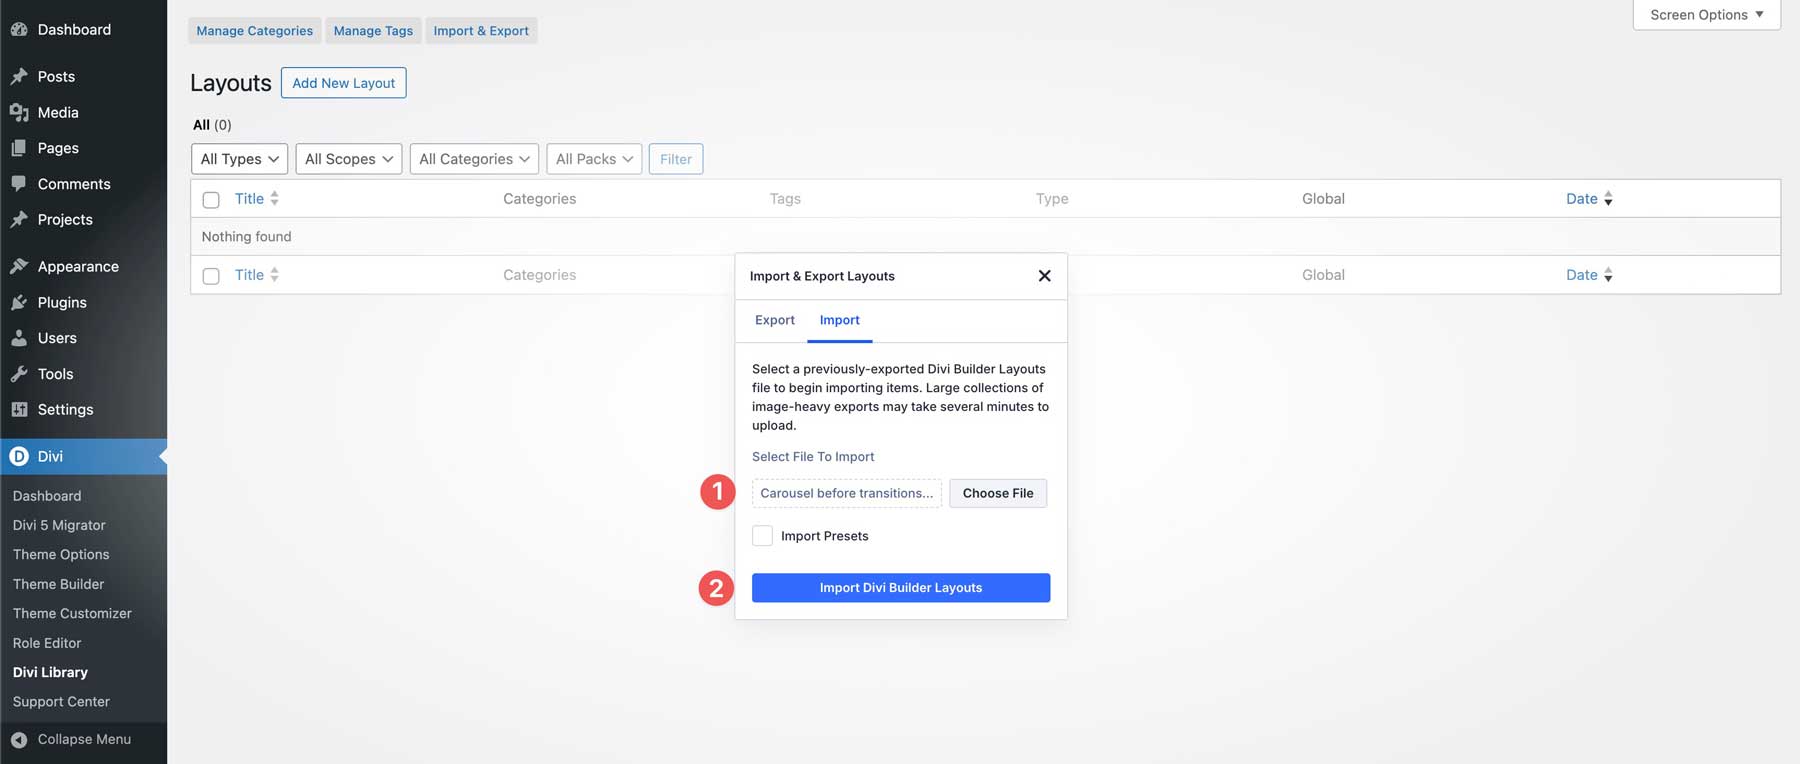
Locate the Carousel before transitions JSON file on your computer, load it, and click Import Divi Builder Layouts.
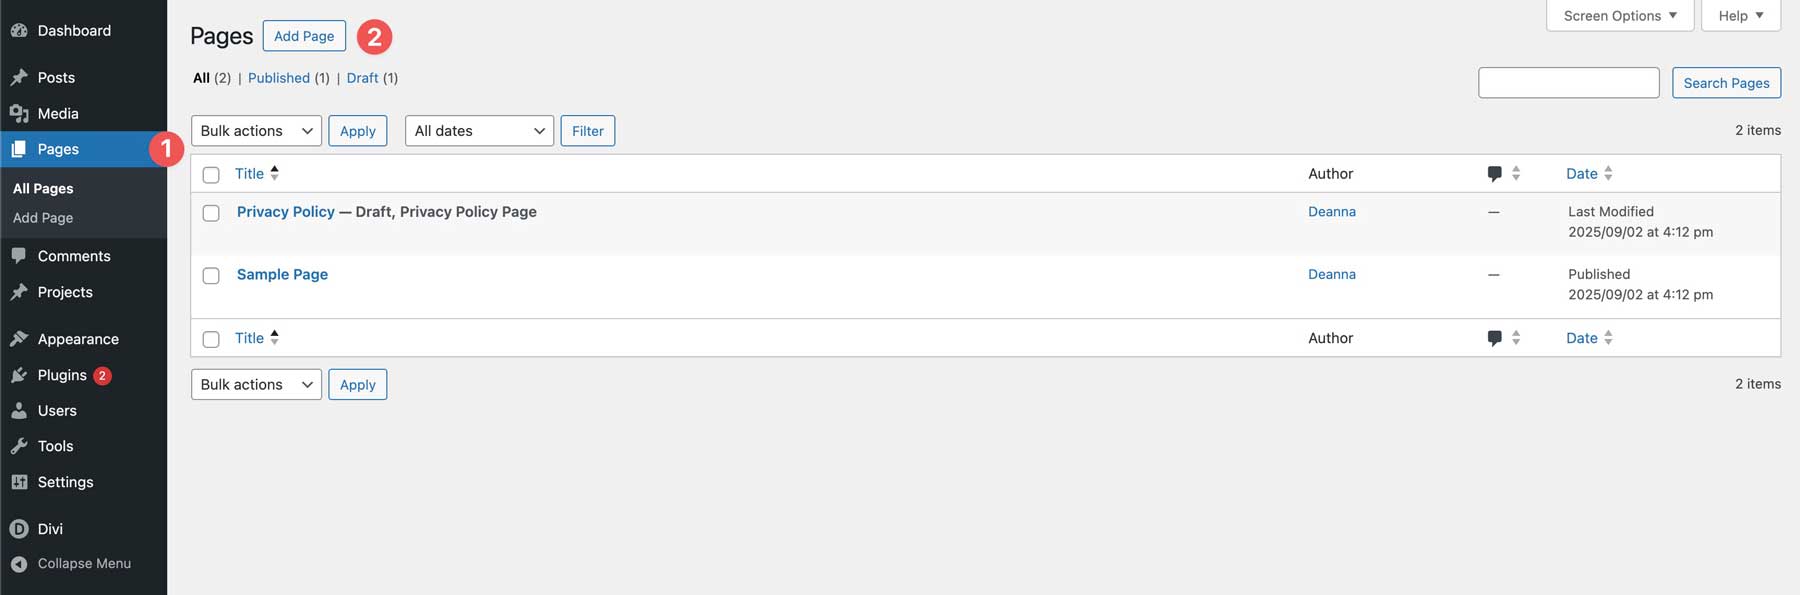
Navigate to Pages and click the Add Page button to add a new page to your Divi 5 website.
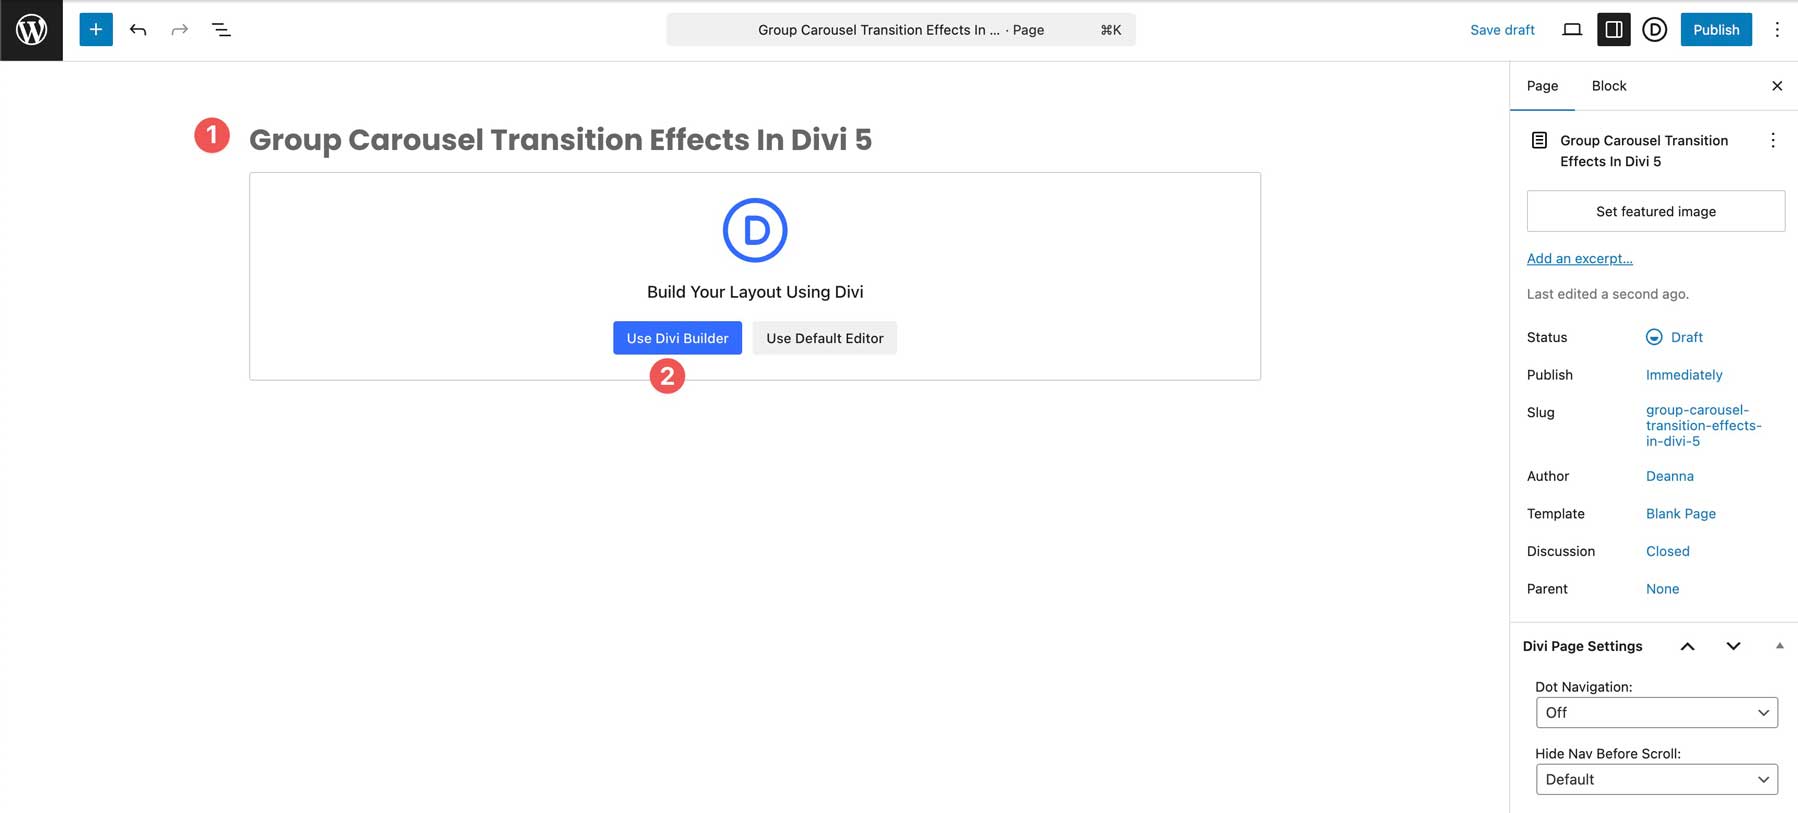
Give the page a title and click the Use Divi Builder button.
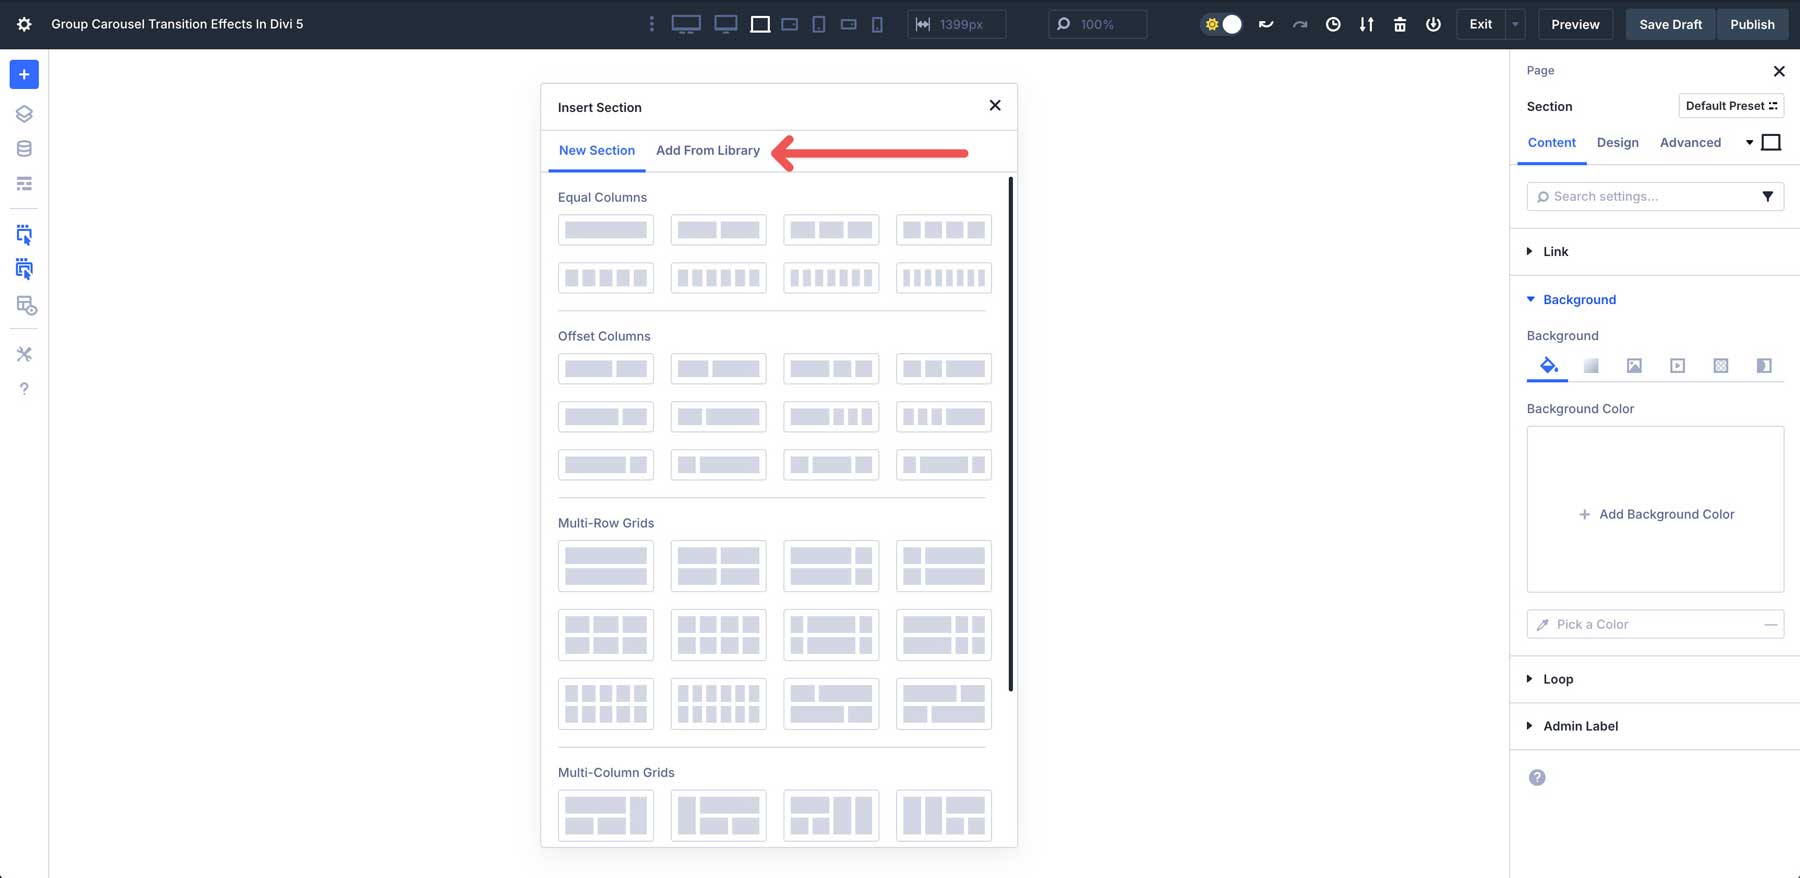
When the Visual Builder loads, click the blue + icon to add a new section.

When the Insert Section dialog box appears, click the Add From Library tab.
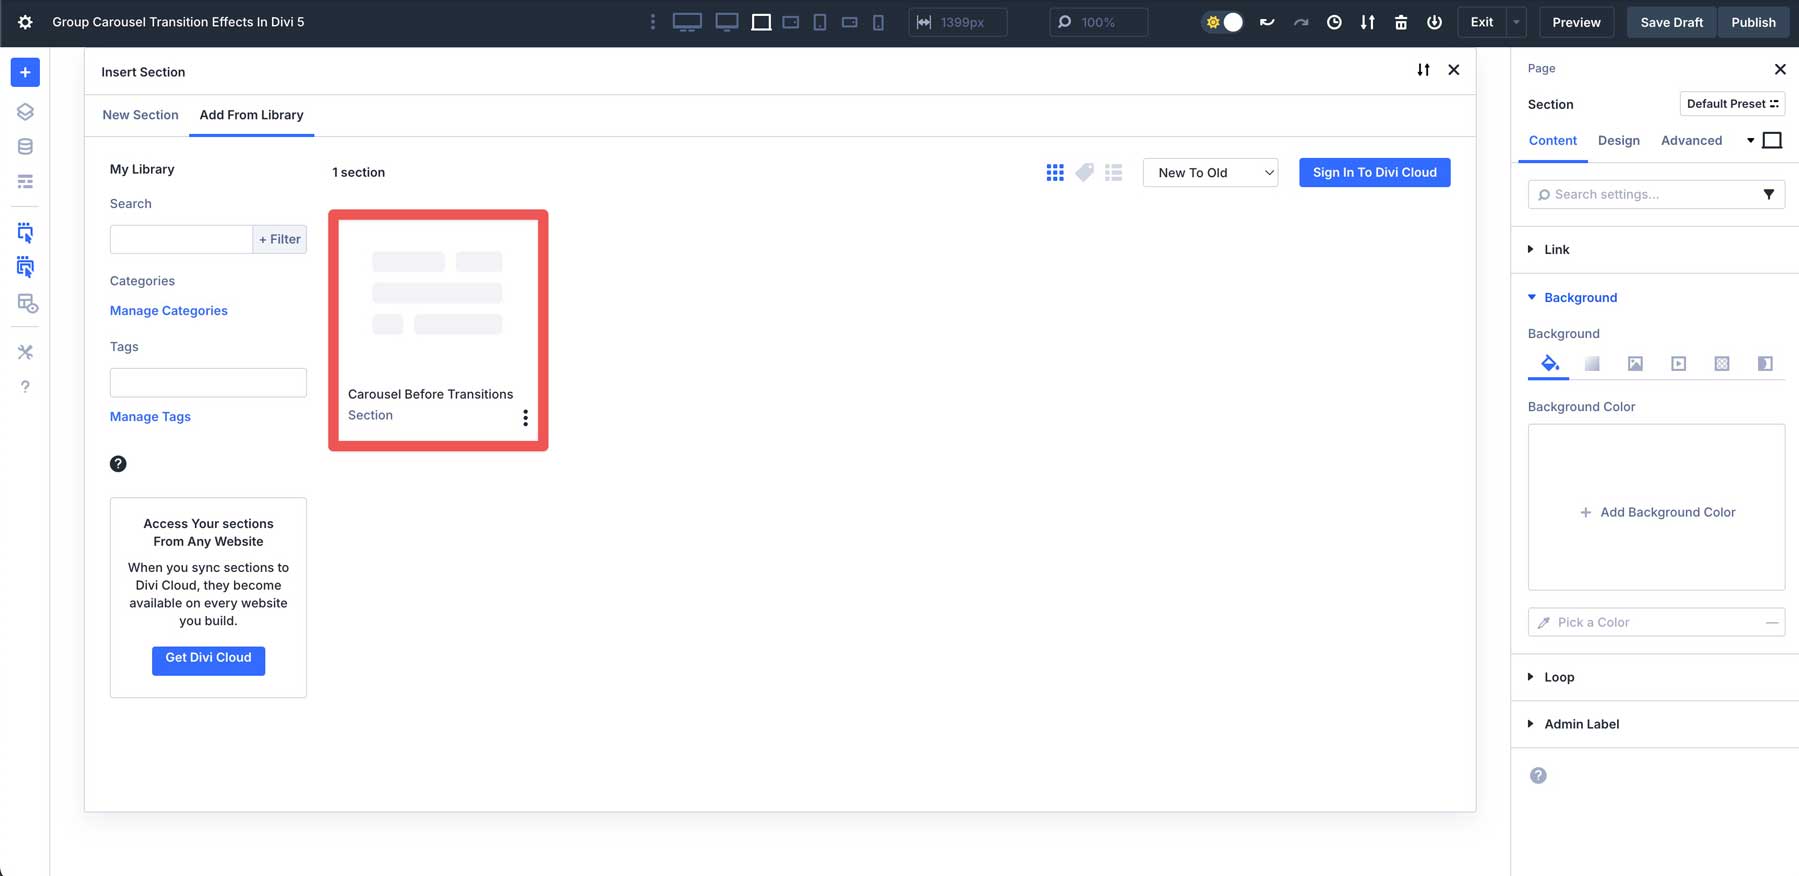
Select the Carousel Before Transitions section to load it onto the page.
Set Animations For The First Group
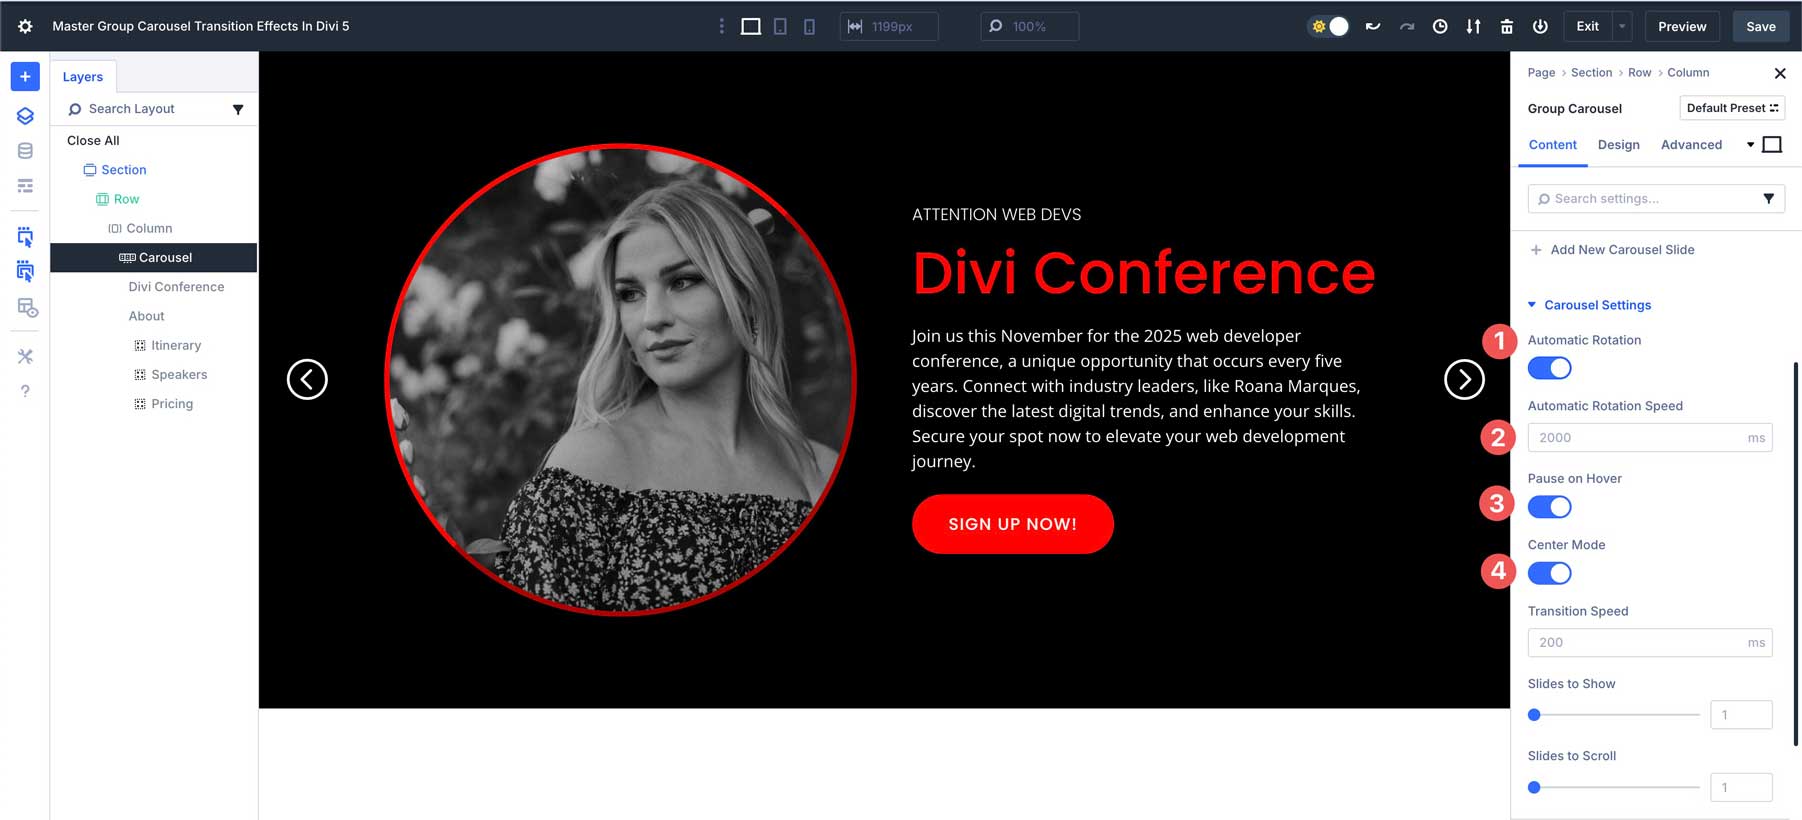
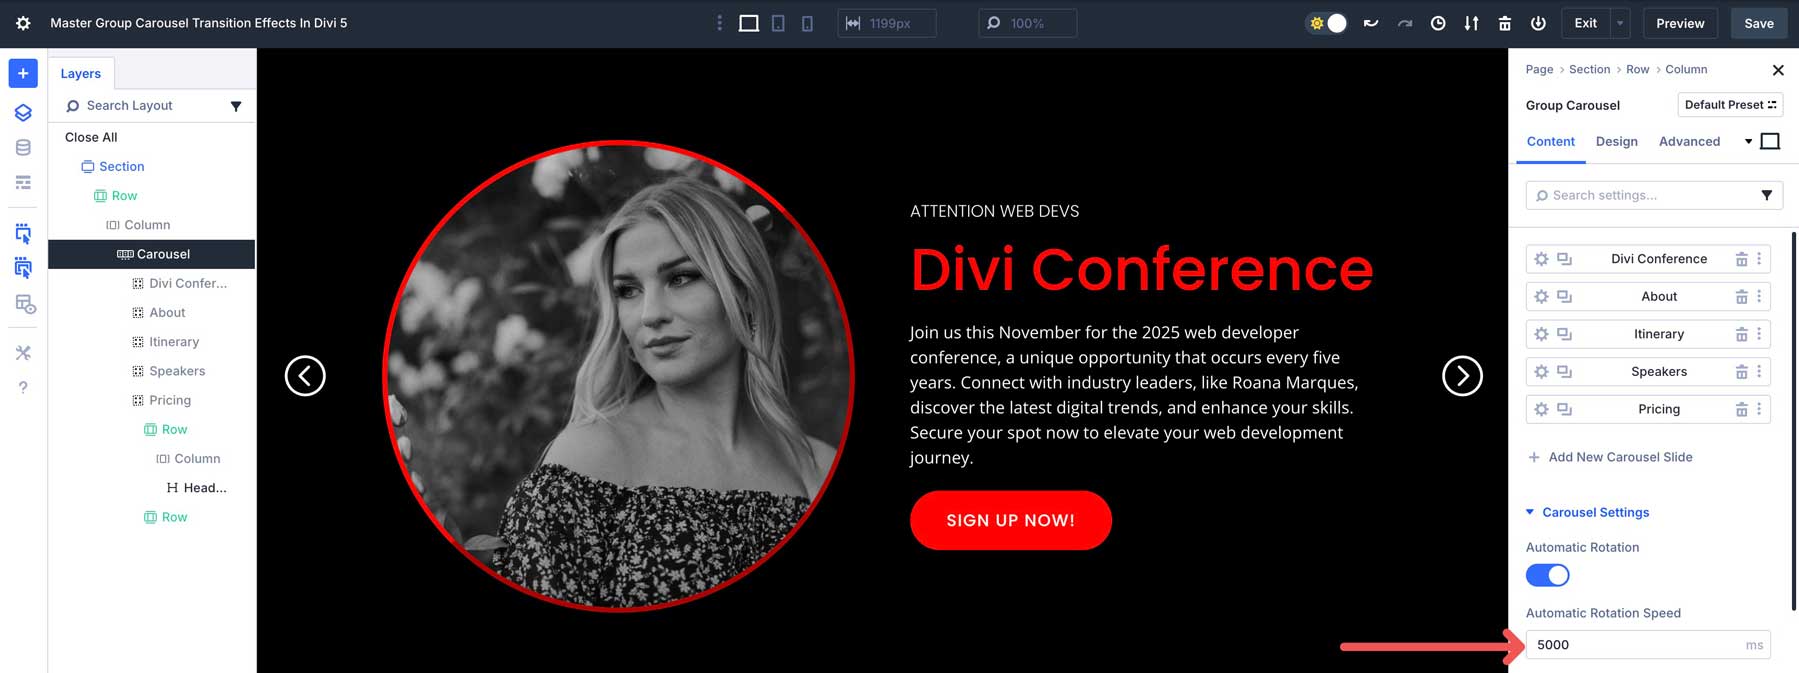
In Carousel Settings, locate the Automatic Rotation toggle and enable it. Set the Automatic Rotation Speed to 2000ms, enable Pause on Hover, and ensure that Center Mode is enabled. Leave all other settings at their default.
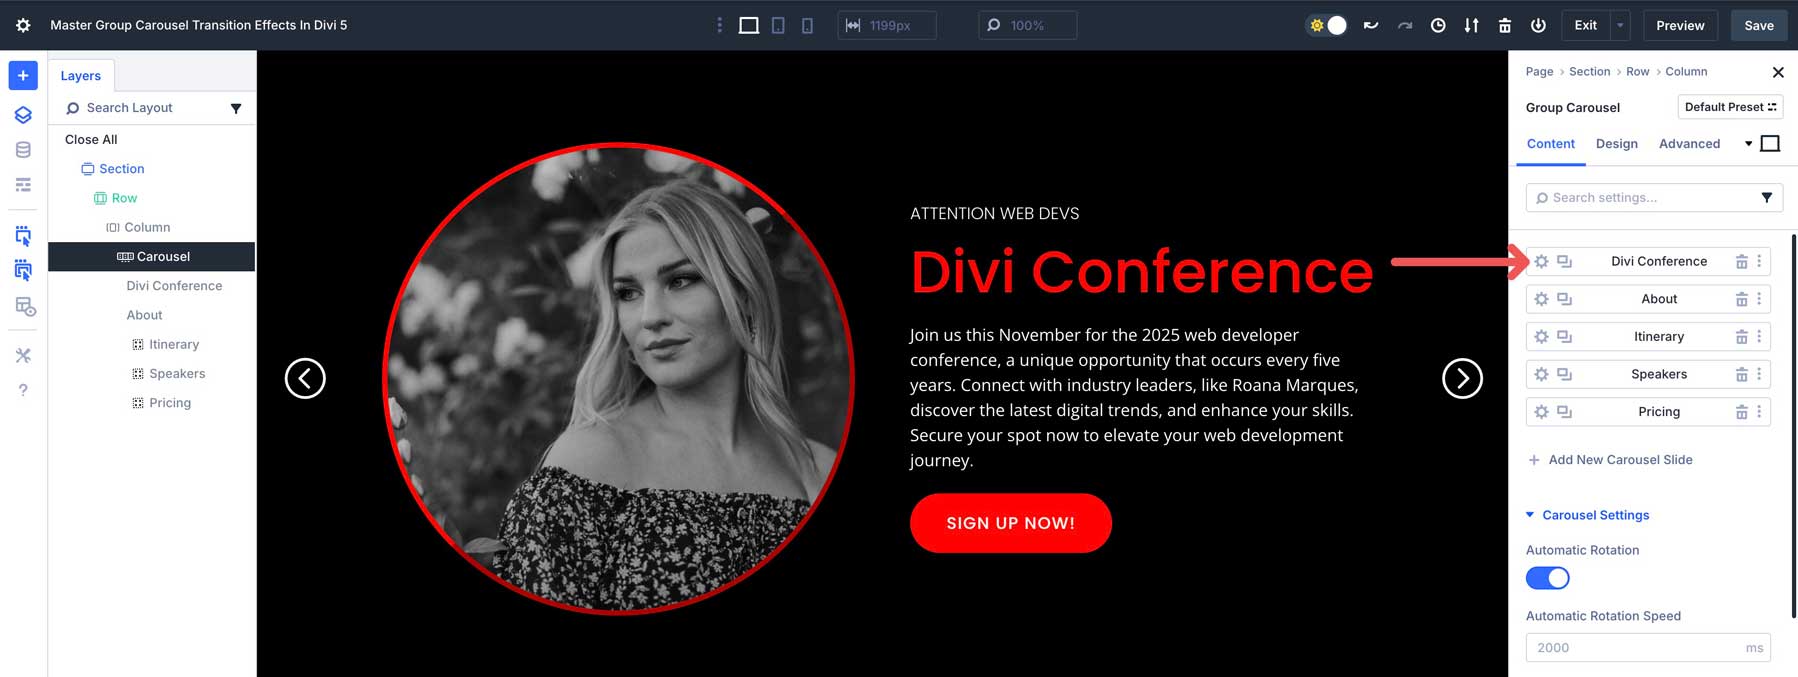
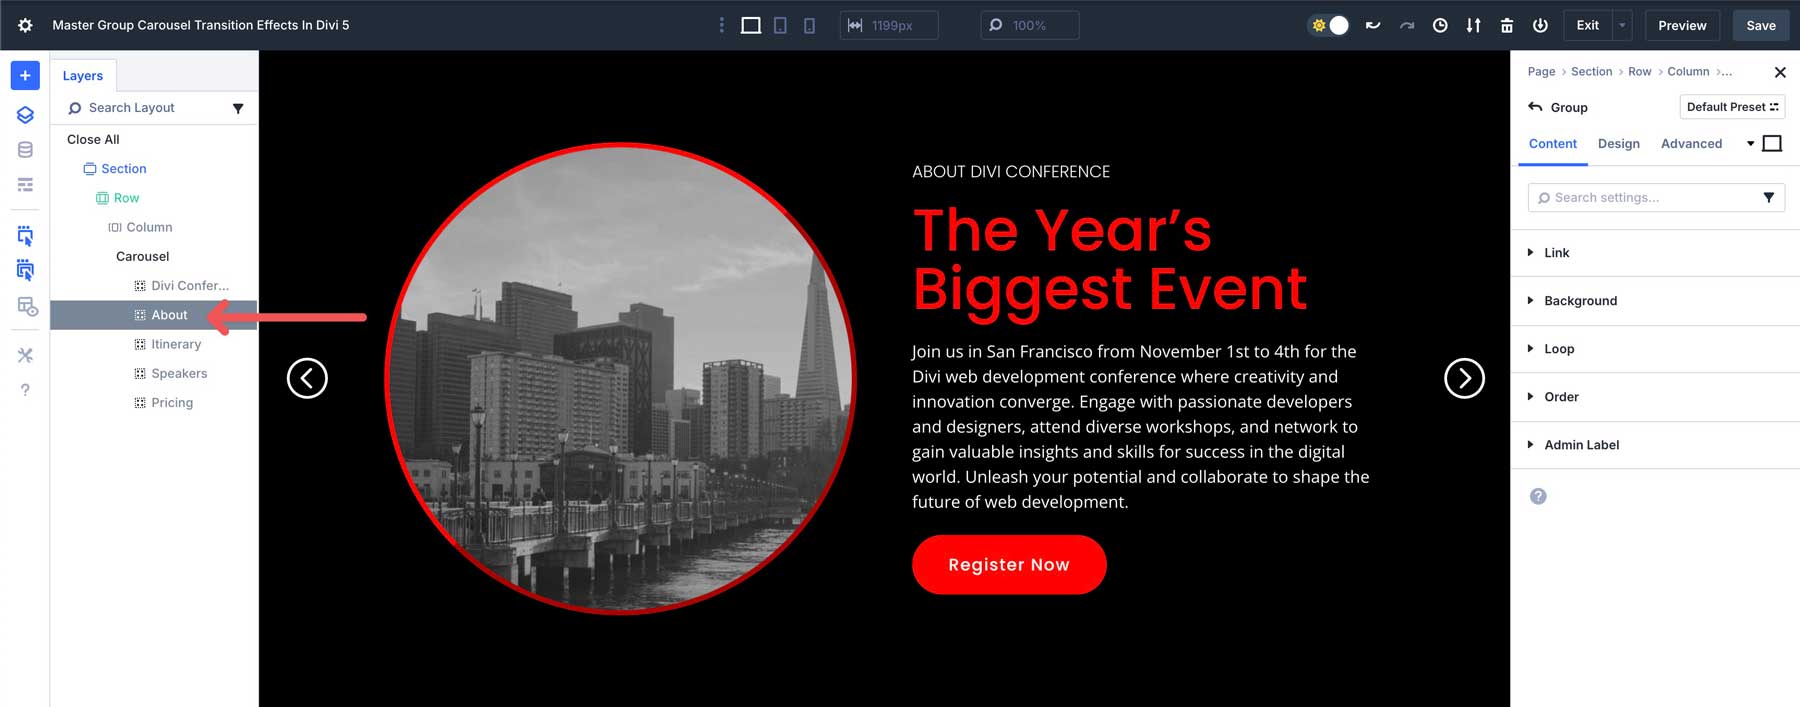
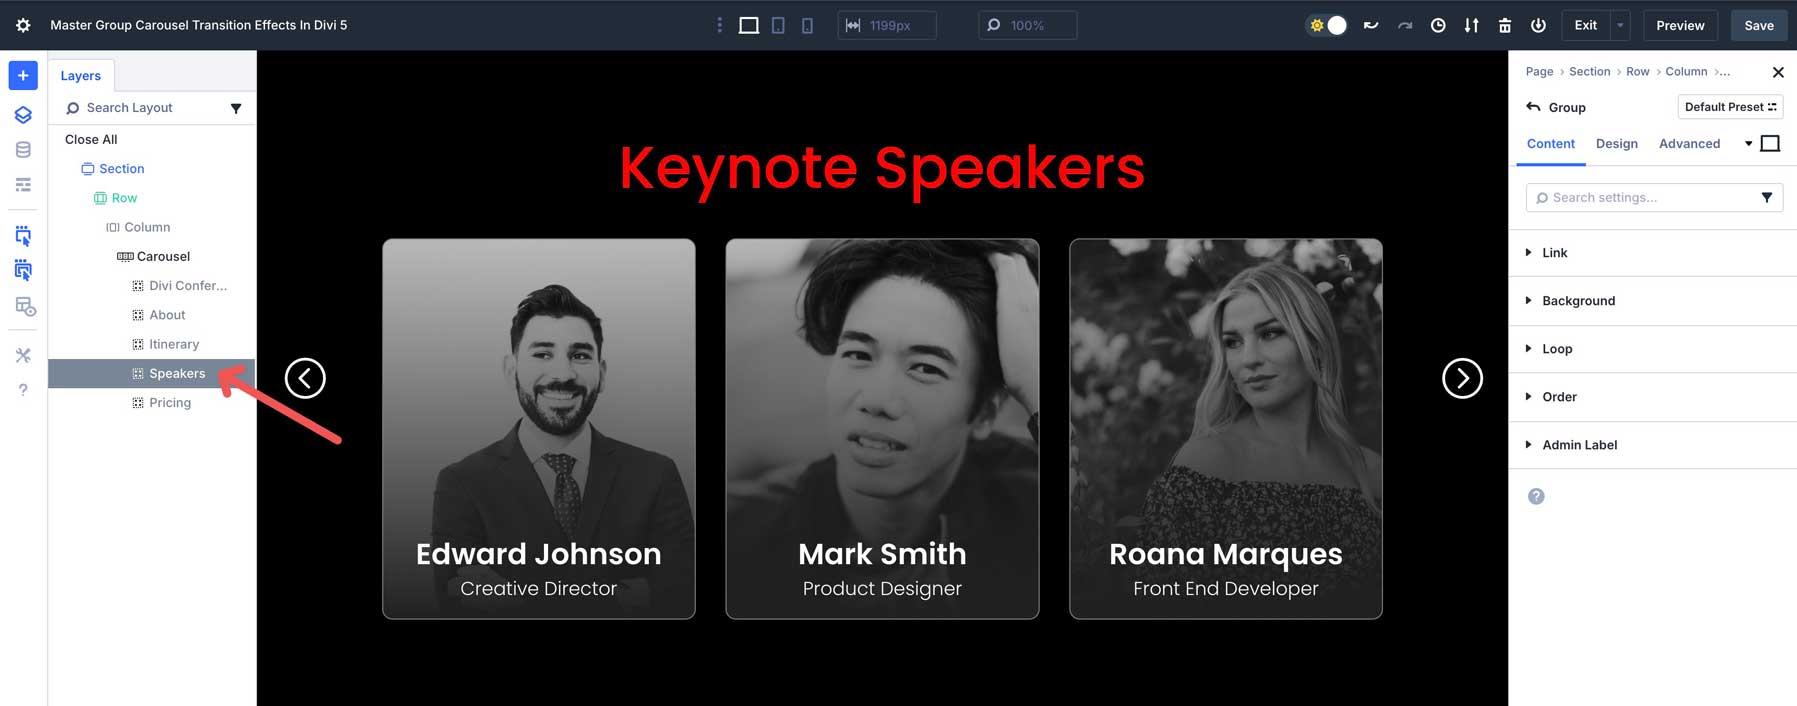
Select the first Group, titled Divi Conference, to adjust its settings.
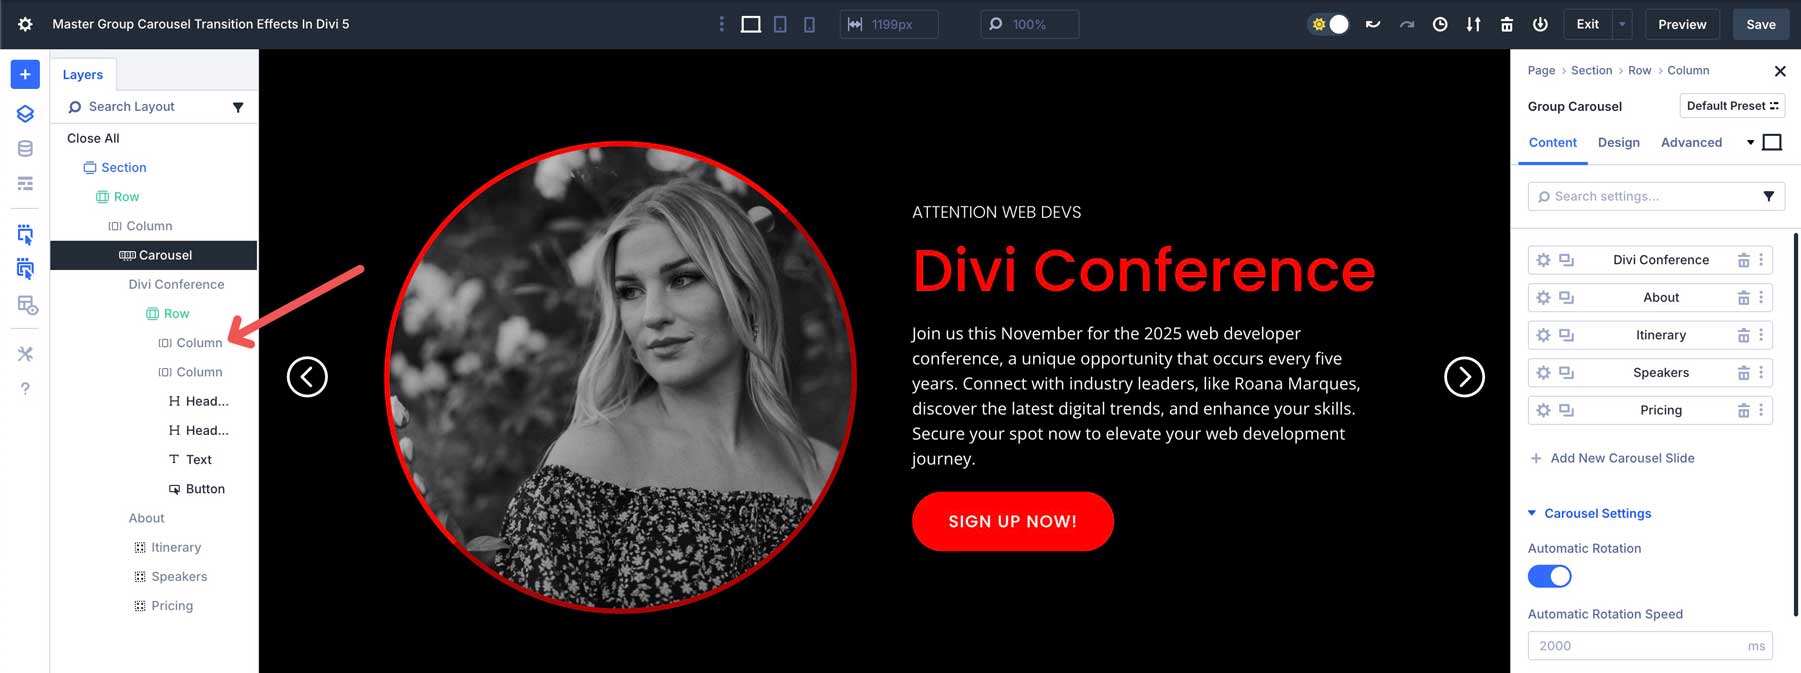
In the Layers panel, expand the first Group and select the first column.
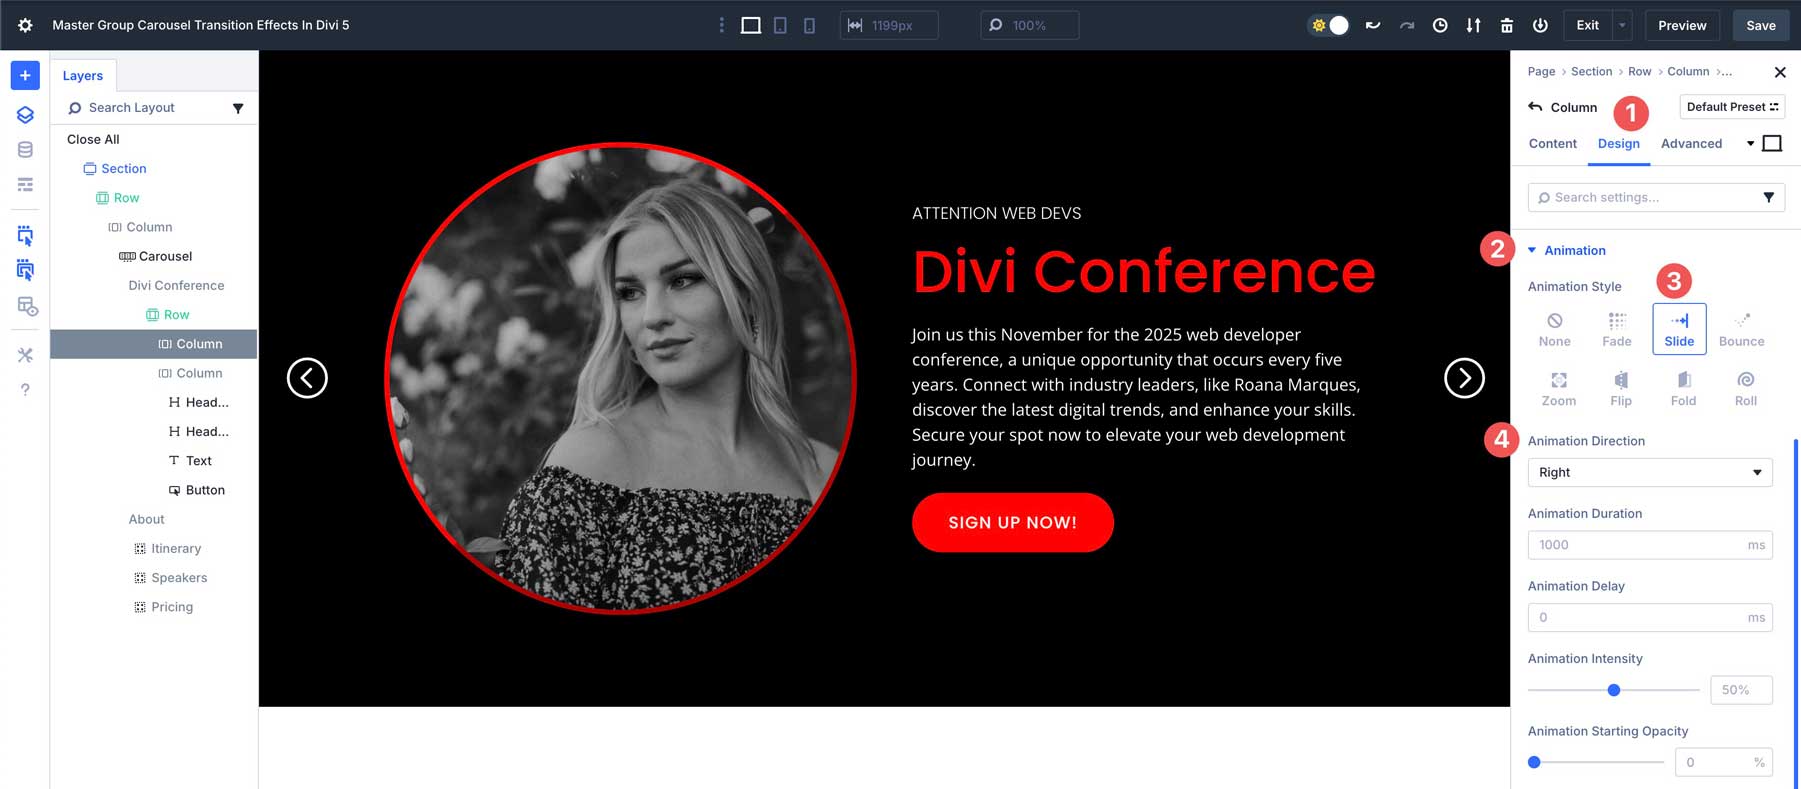
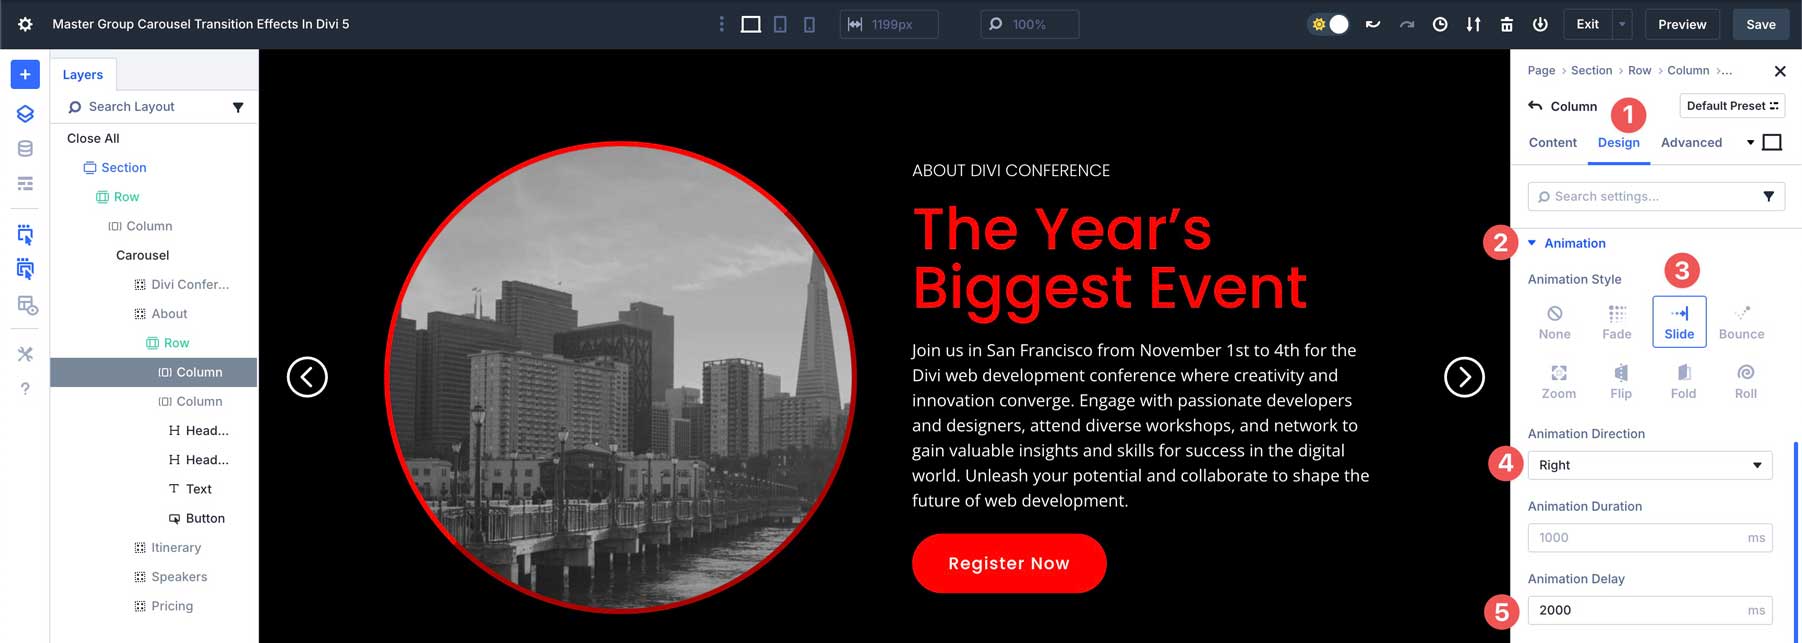
Click the Design tab and scroll down to Animation. Expand the tab and select Slide. Choose Right for the Animation Direction and leave everything else at the default setting.
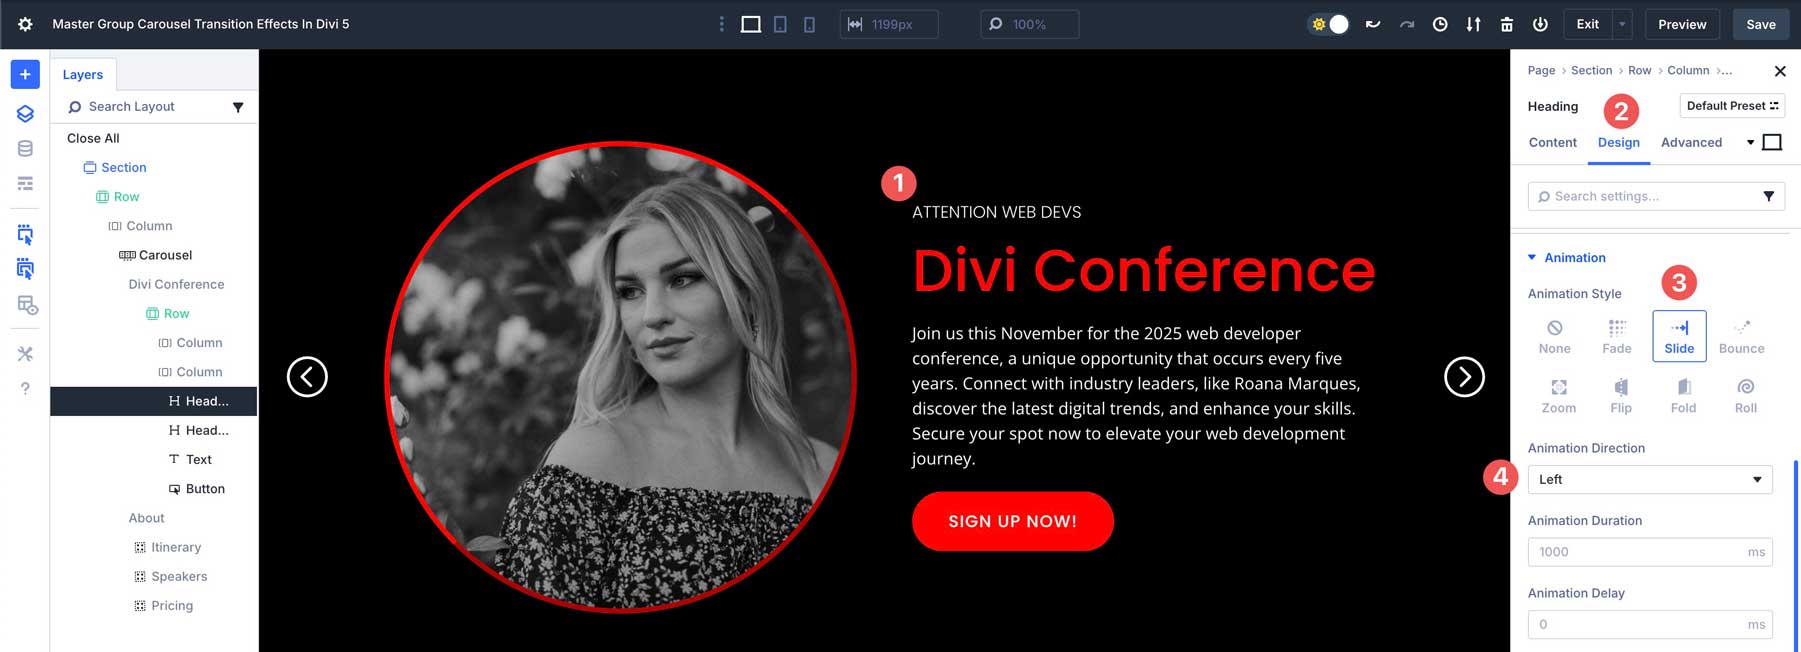
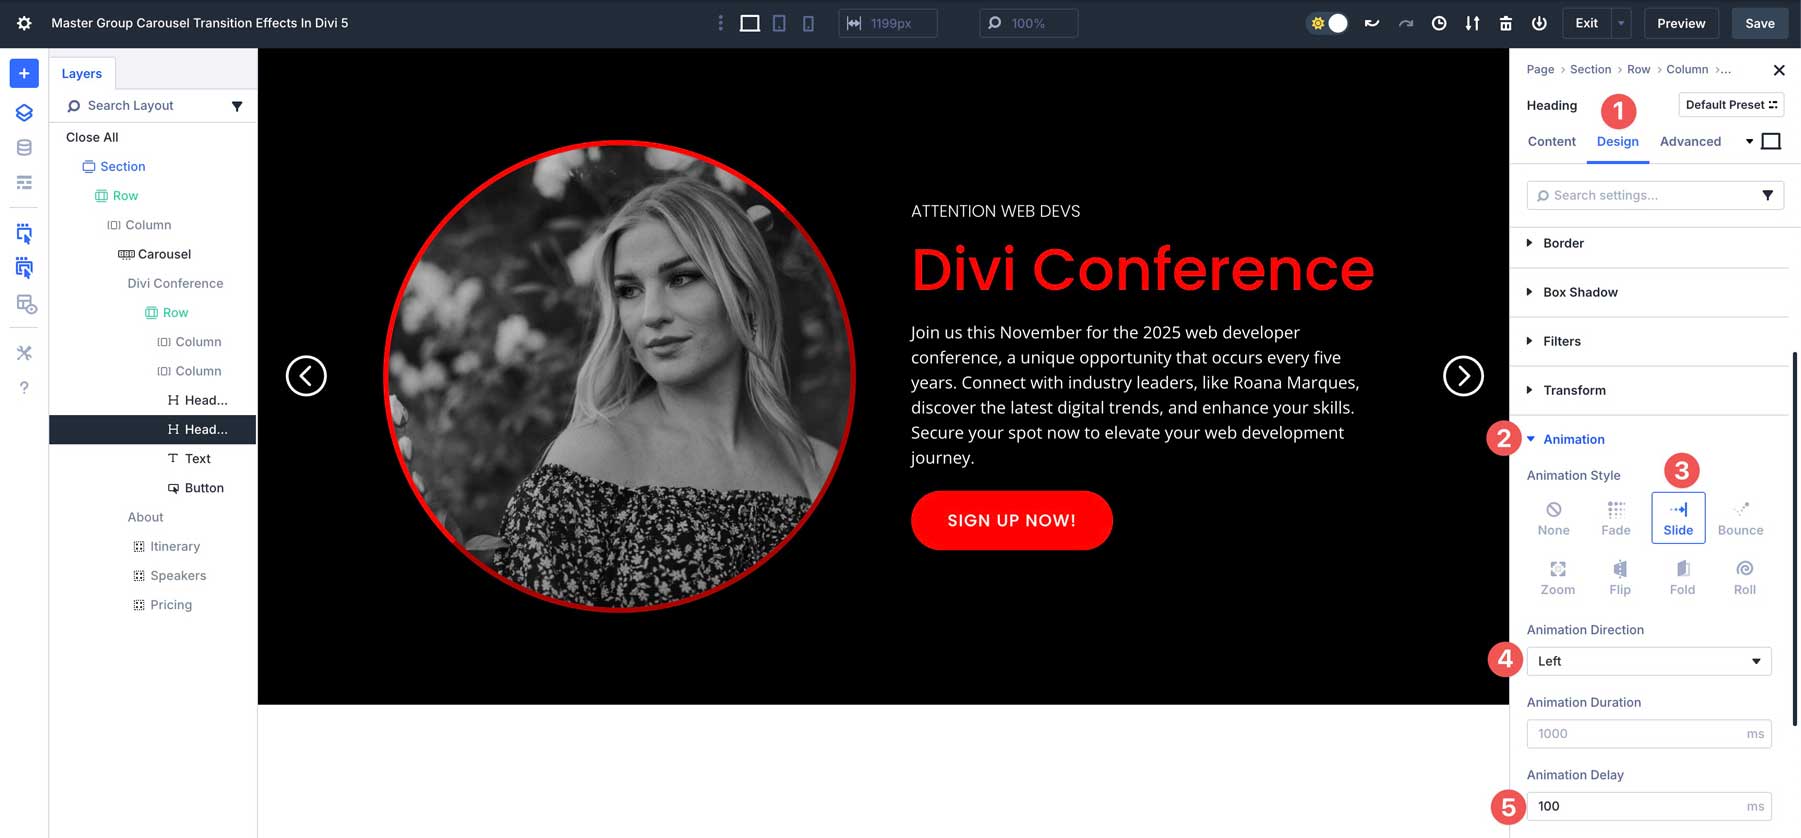
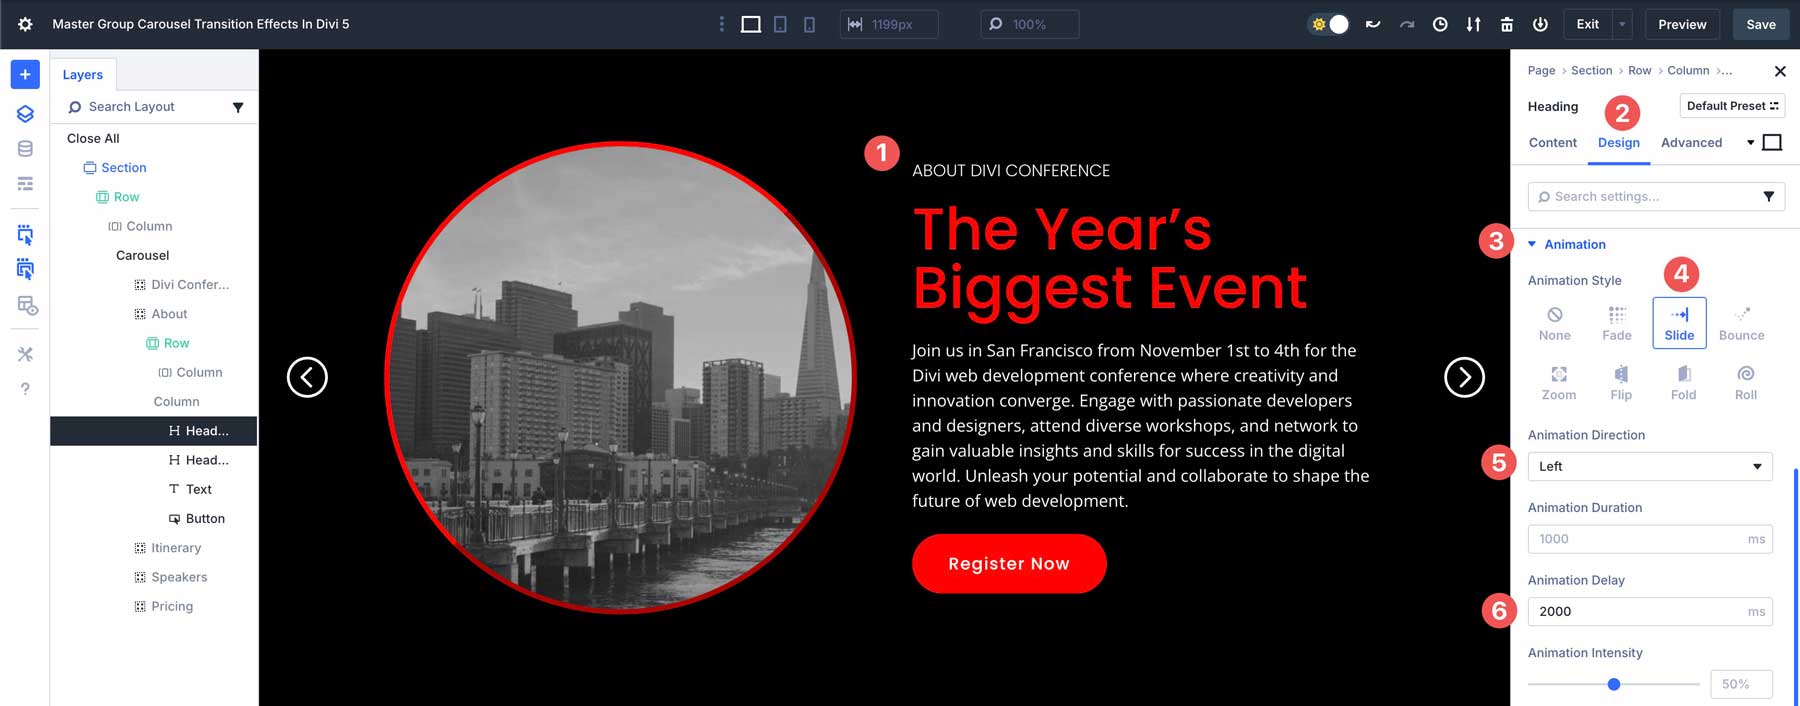
Next, select the top Heading module in the right column of the first Group. Navigate to the Design tab, expand the Animation dropdown menu, select Slide, and set the Animation Direction to Left. Leave all other settings at their defaults.
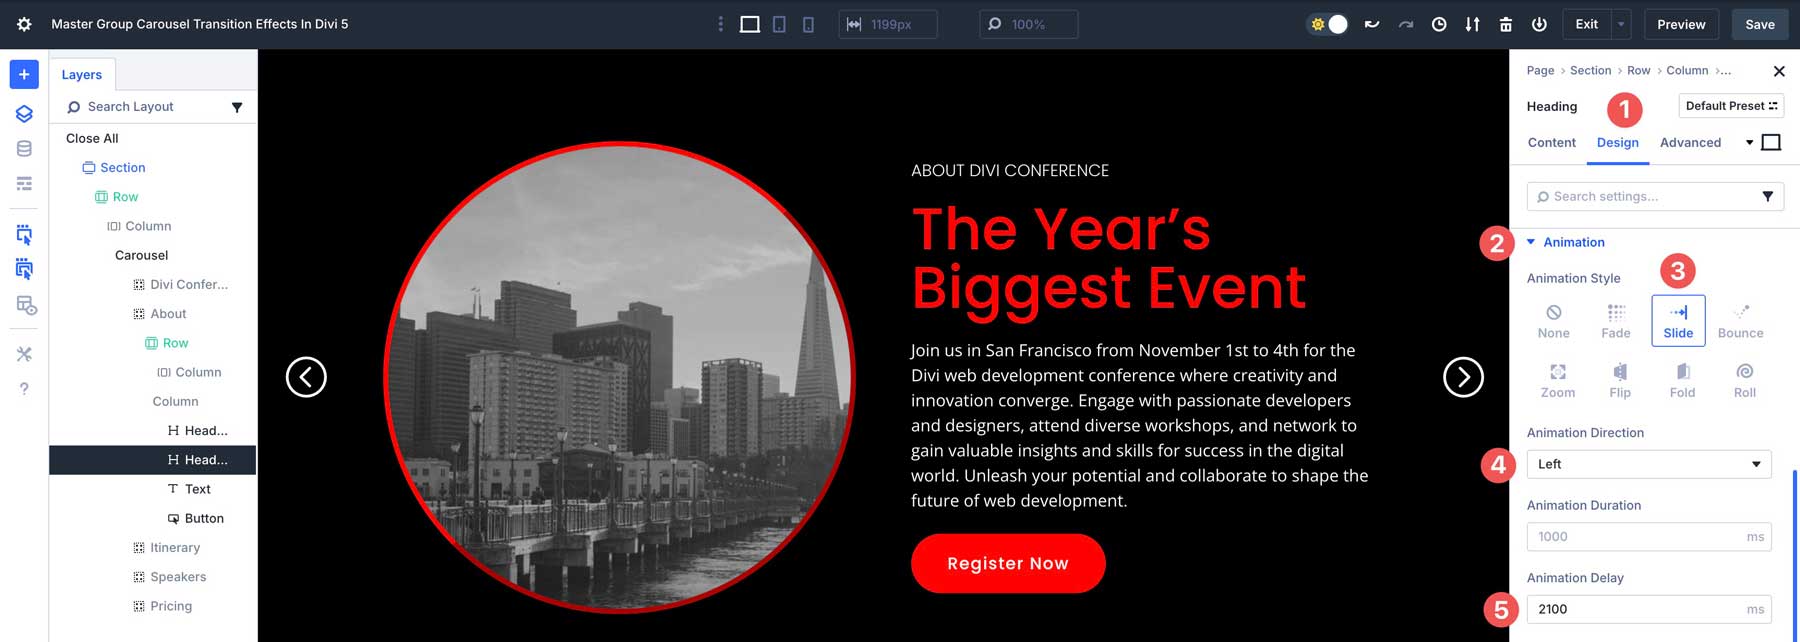
Select the larger Heading module in the 2nd column of the first Group. In the Animation settings, select Slide for the Animation Style, Left for the Animation Direction, and add 100ms in the Animation Duration field. This will allow our Headings to slide in from right to left, but stagger the animation slightly.
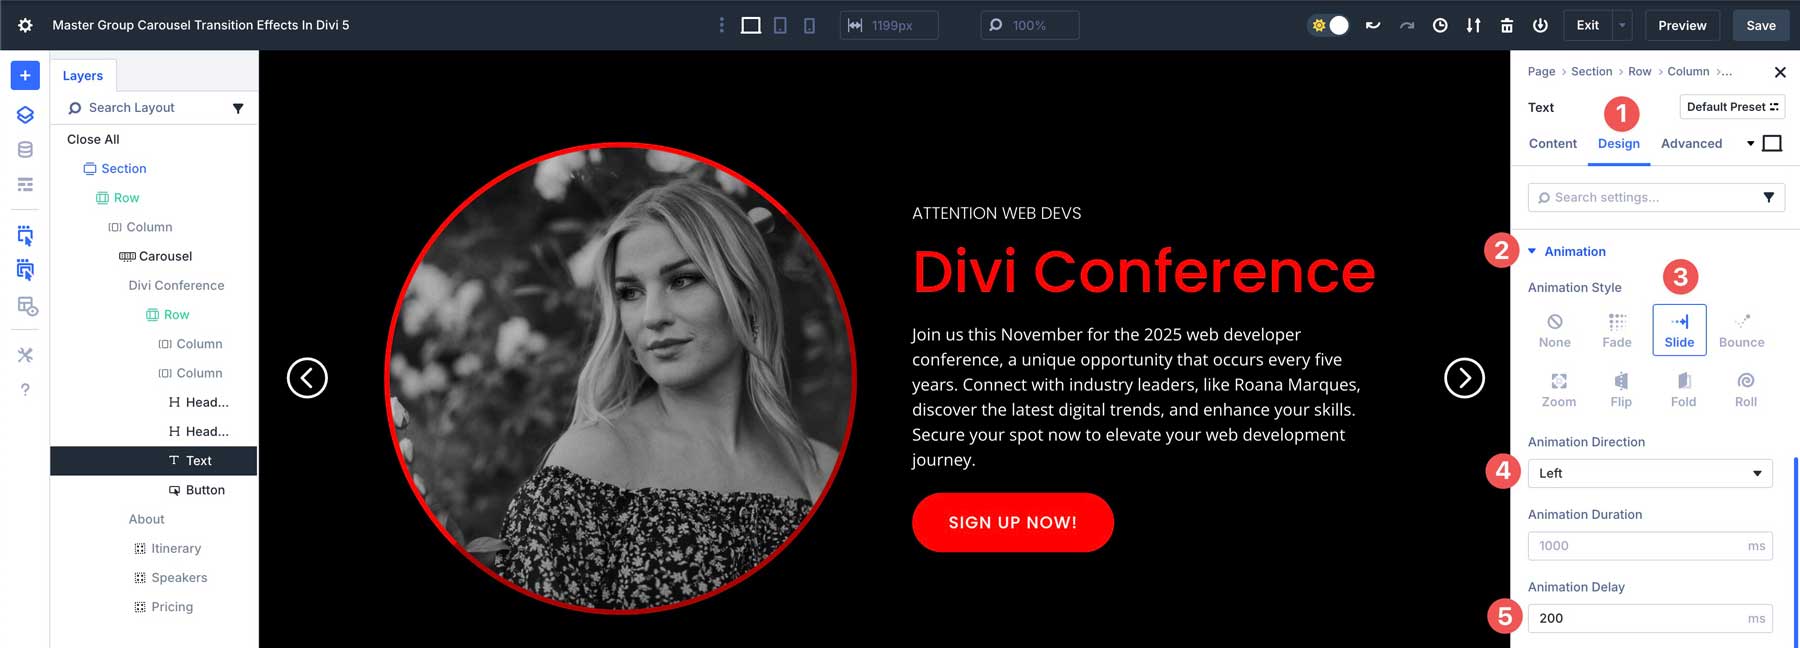
Next, select the Text module. In the Design tab, set the Animation Style to Slide, the Animation Direction to Left, and the Animation Delay to 200ms.
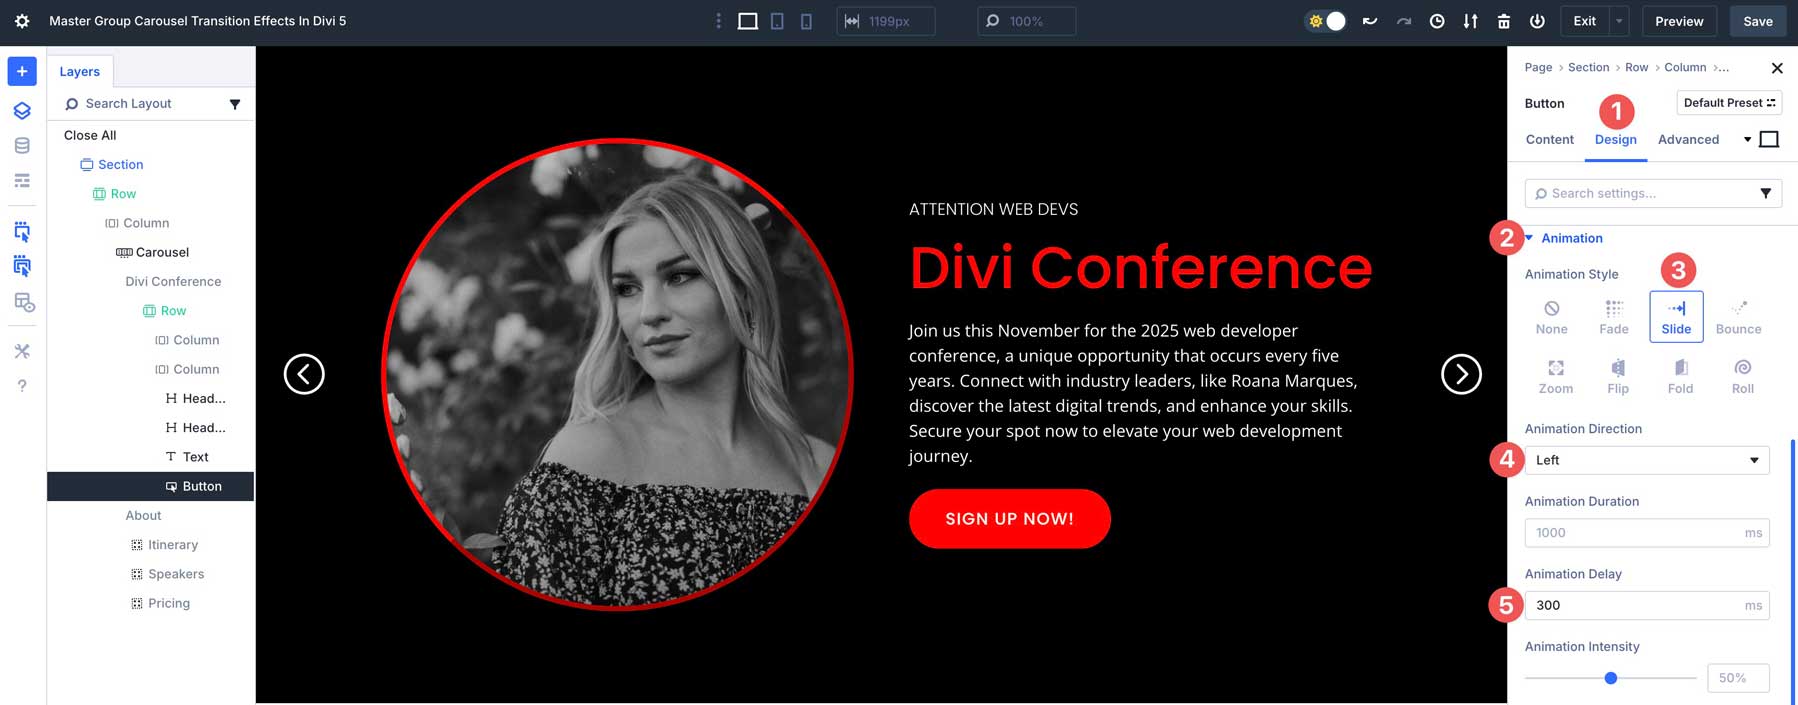
Finally, select the Button module. Apply the Slide animation under Animation Style, the Animation Direction to Left, and the Animation Delay to 300ms.
Save the page and click the Preview button to view how the animations play out in the first Group.
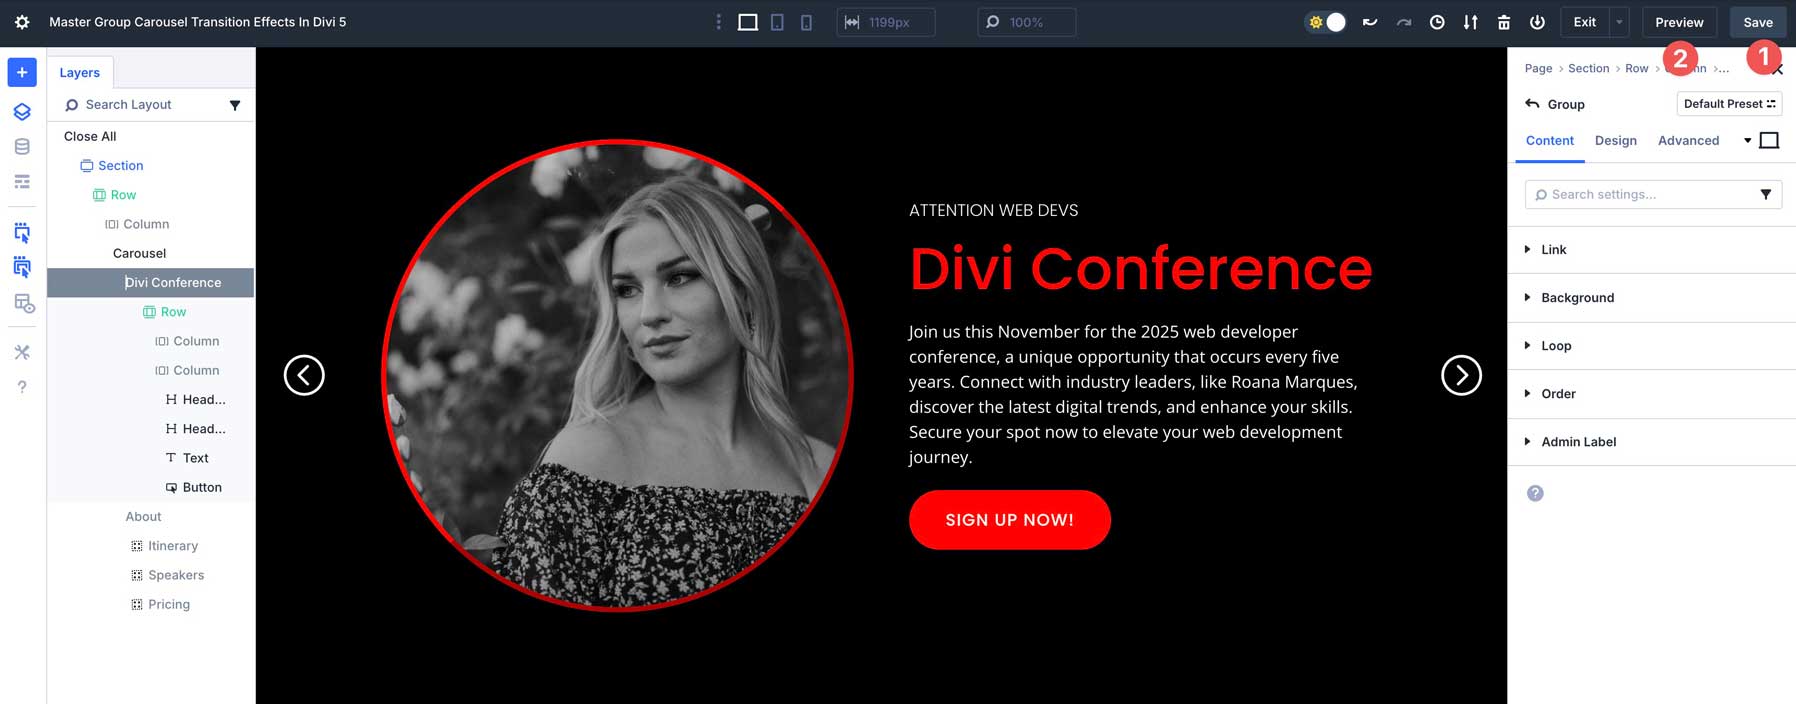
The first slide should look like this:
Set Animations For The Second Group
In the Layers panel, click to select the second Group in the Group Carousel module.
In the second Group, we’ll need to adjust the animation settings so that they load when the slide advances from the first to the second Group. Since we set the Automatic Rotation Speed to 2000ms in the Carousel Settings, we’ll need to do some math to ensure they don’t load until the second slide is displayed.
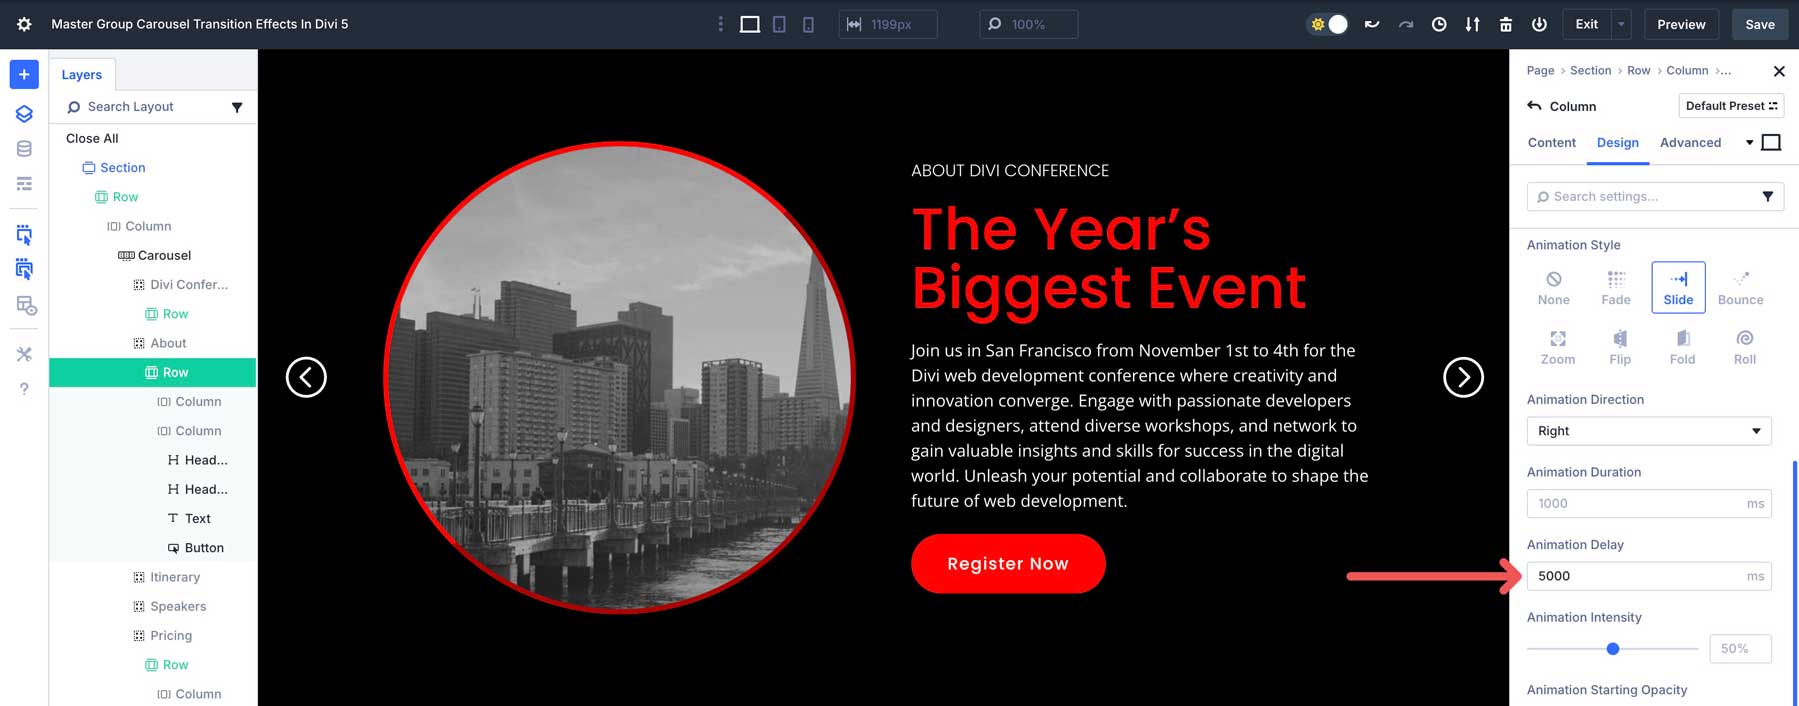
In the first column of the second Group, navigate to the Design tab. Scroll down to the Animation settings and set the Animation Style to Slide and the Animation Direction to Right. In the Animation Delay field, add 2000ms. This allows the first slide to play out and the slide transition to occur before the second slide starts its animations.
In the second column, click the first Heading module. Navigate to the Design tab, expand the Animation settings, and choose Slide as the Animation Style. Under Animation Direction, select Left. Finally, set the Animation Delay to 2000ms.
For the second Heading module in the second column, set the Animation Style to Slide, Animation Direction to Left, and the Animation Delay to 2100ms.
For the next two modules in the column, apply the same Animation Style and Direction, but adjust the Animation Delay by 100ms for each module. So, for the Text module, the Animation Delay should be 2200ms, and the Button should be set to 2300ms.
When you preview the Group Carousel Module, the second slide should flow like the first.
Set Animations For The Third Group
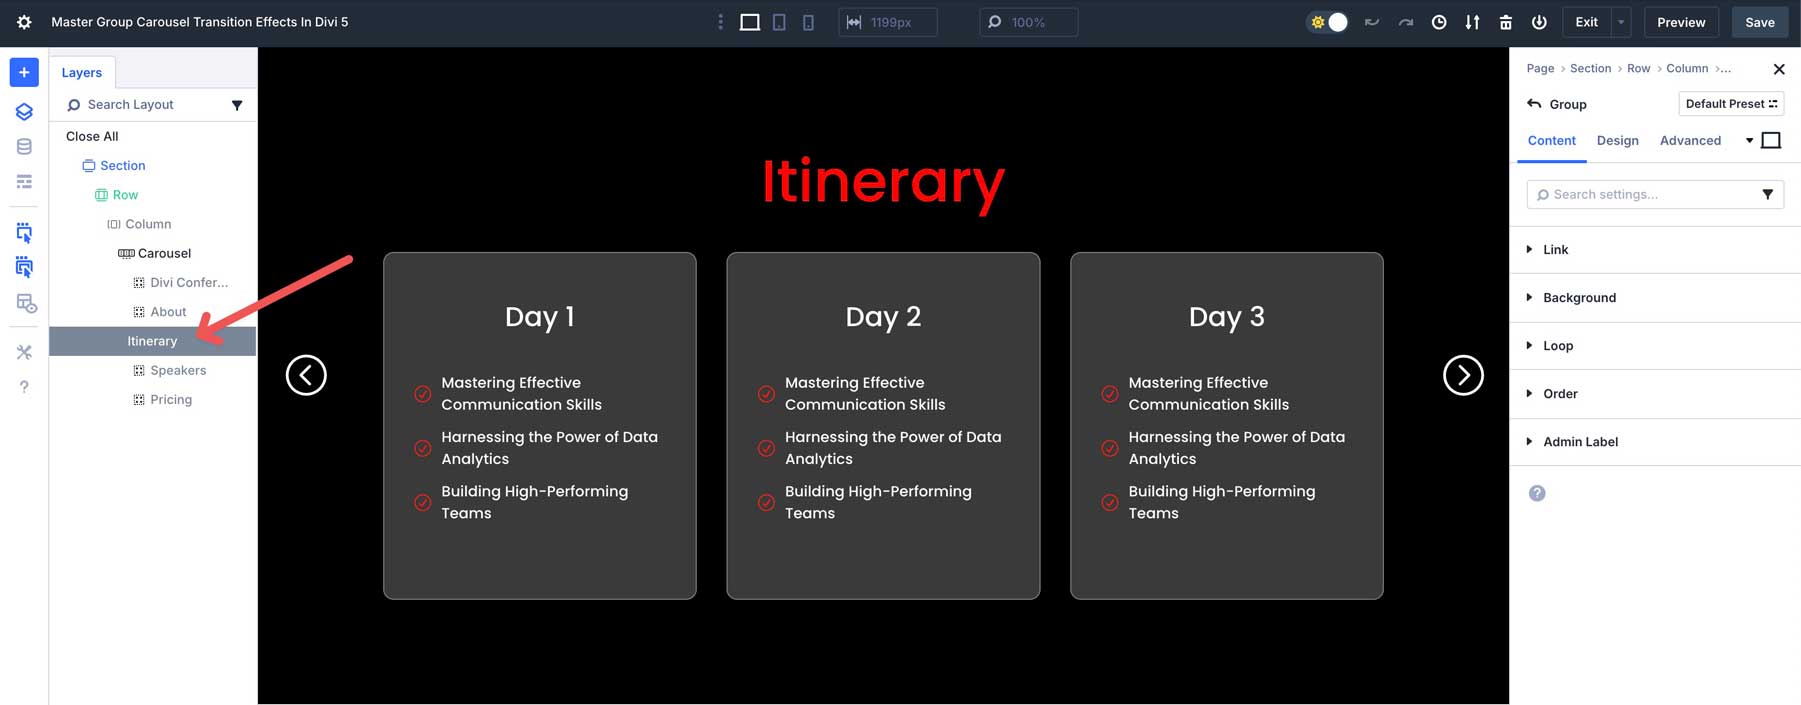
For the third Group, we’ll change things. Instead of sliding in from the right or left, the first and second rows of the third Group will slide from the top and bottom. Select the third Group in the Group Carousel Module.
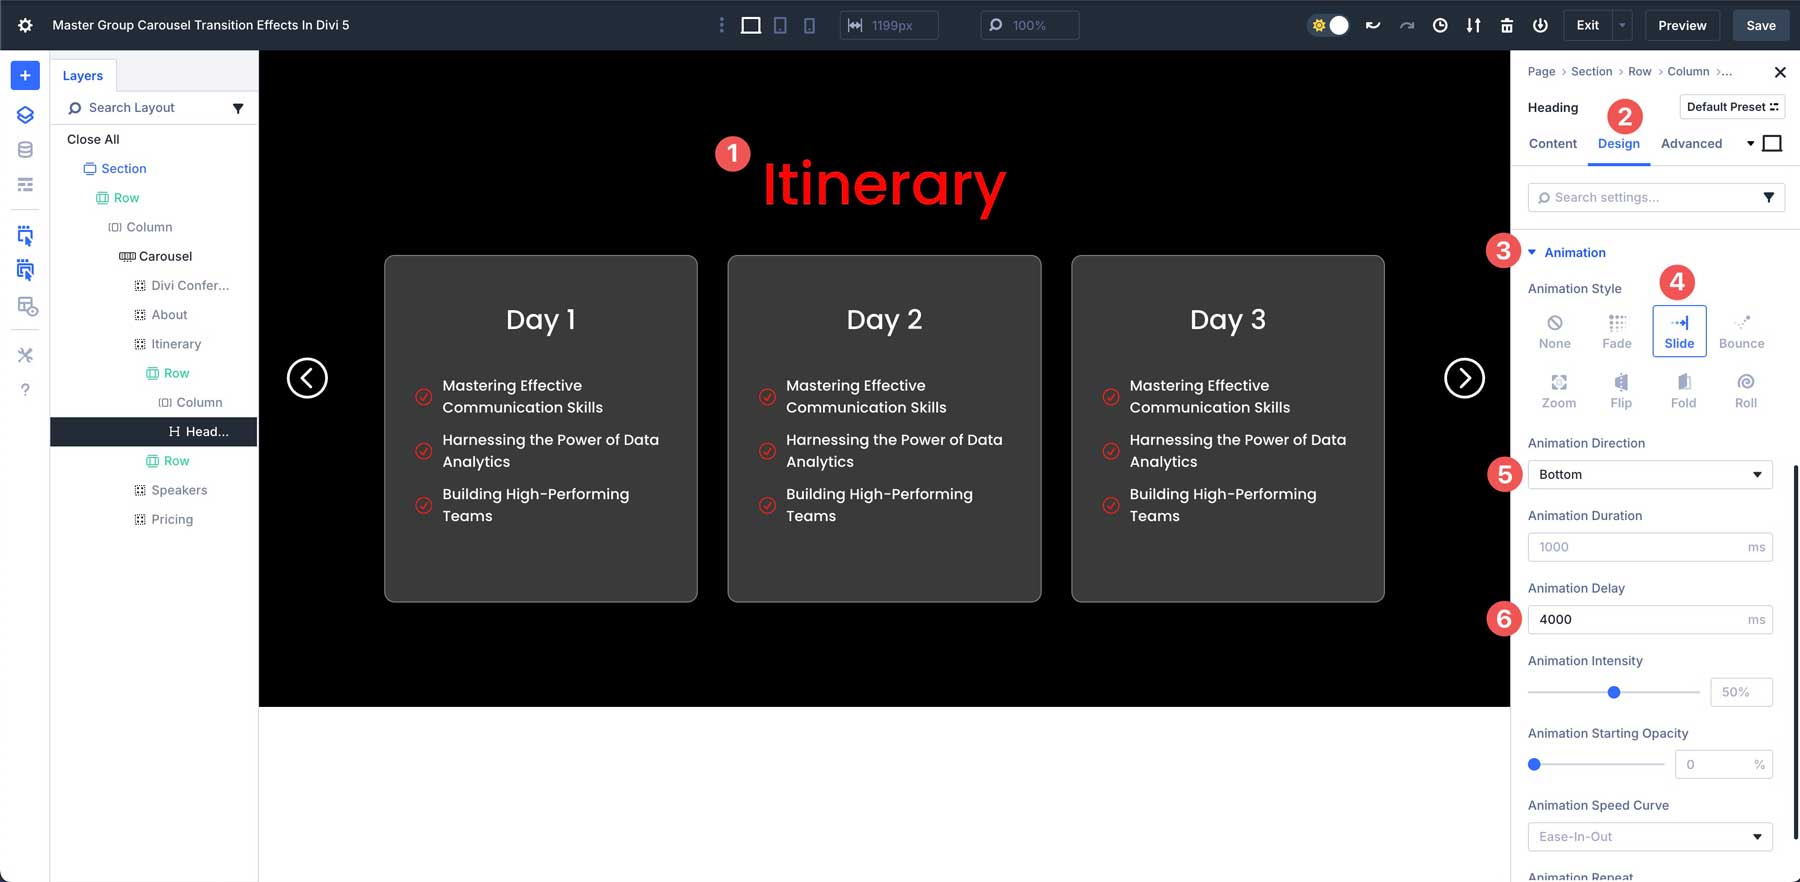
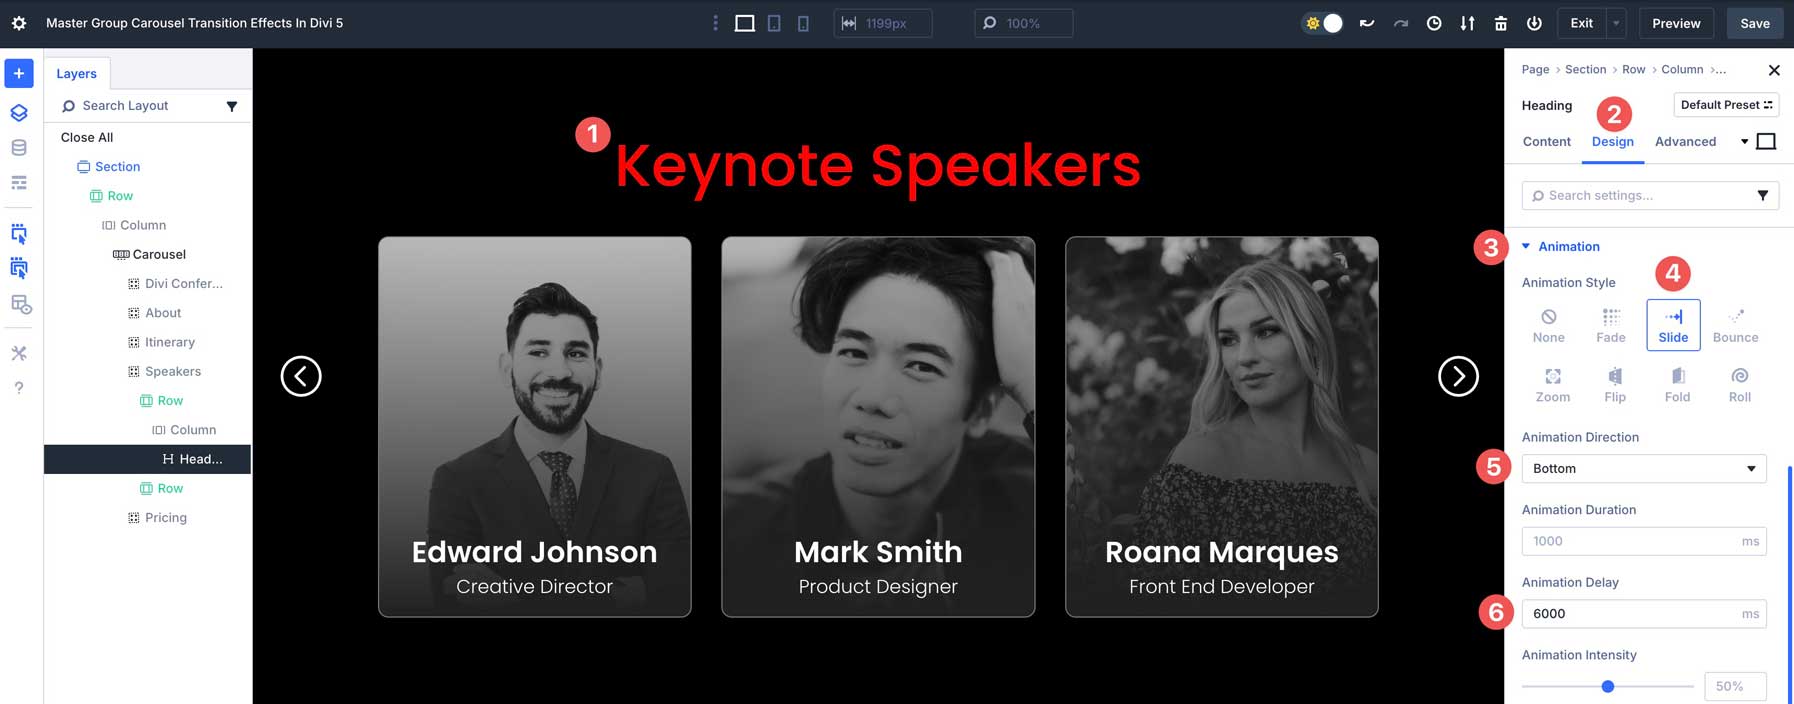
Click on the main Heading module to add animations. Navigate to the Design tab, set the Animation Style to Slide, and choose Bottom for the Animation Direction. In the Animation Delay field, enter 4000ms.
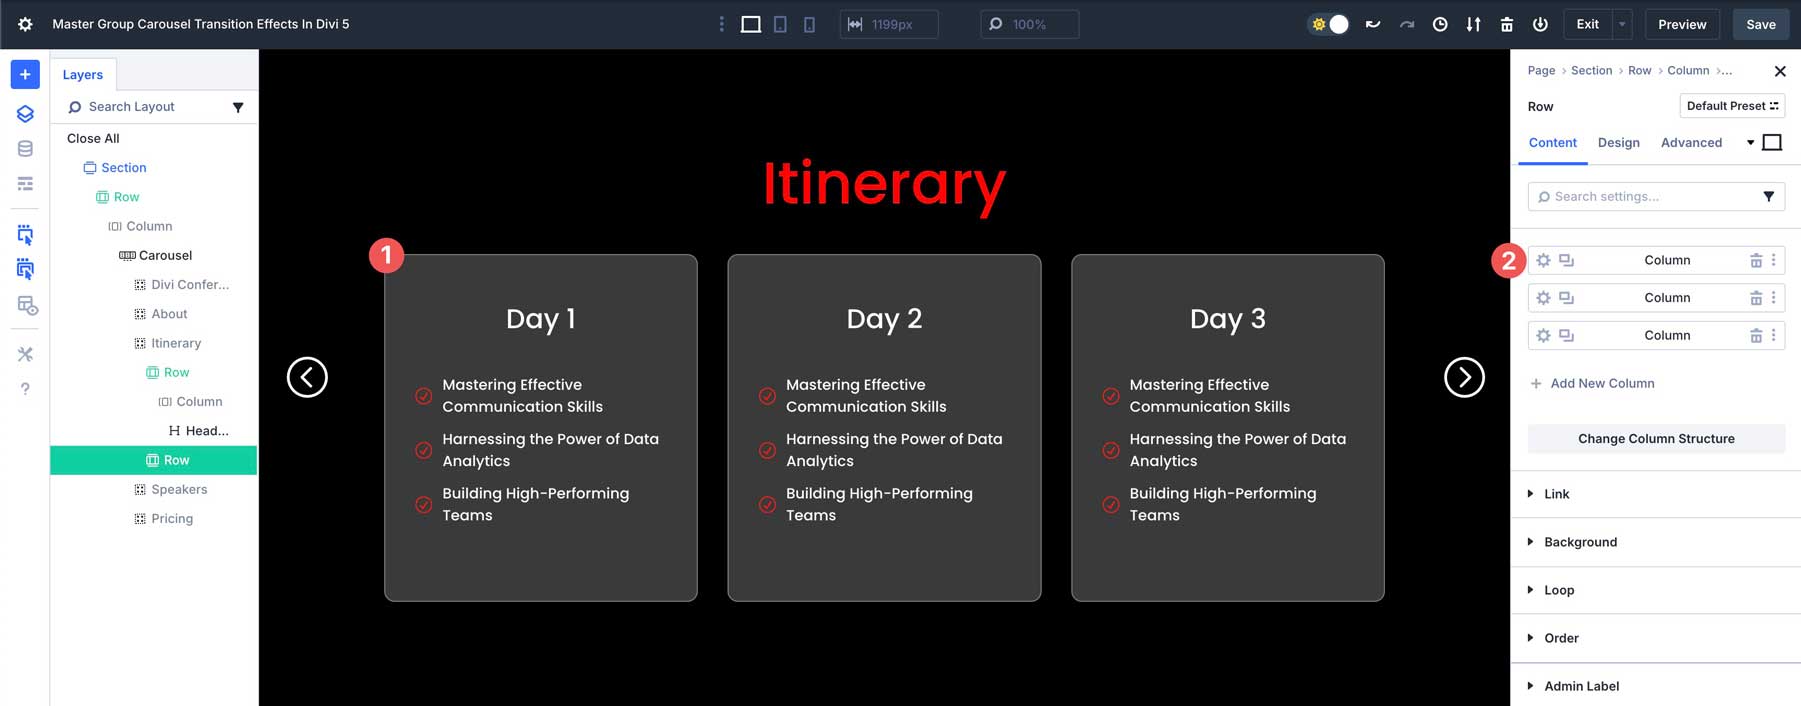
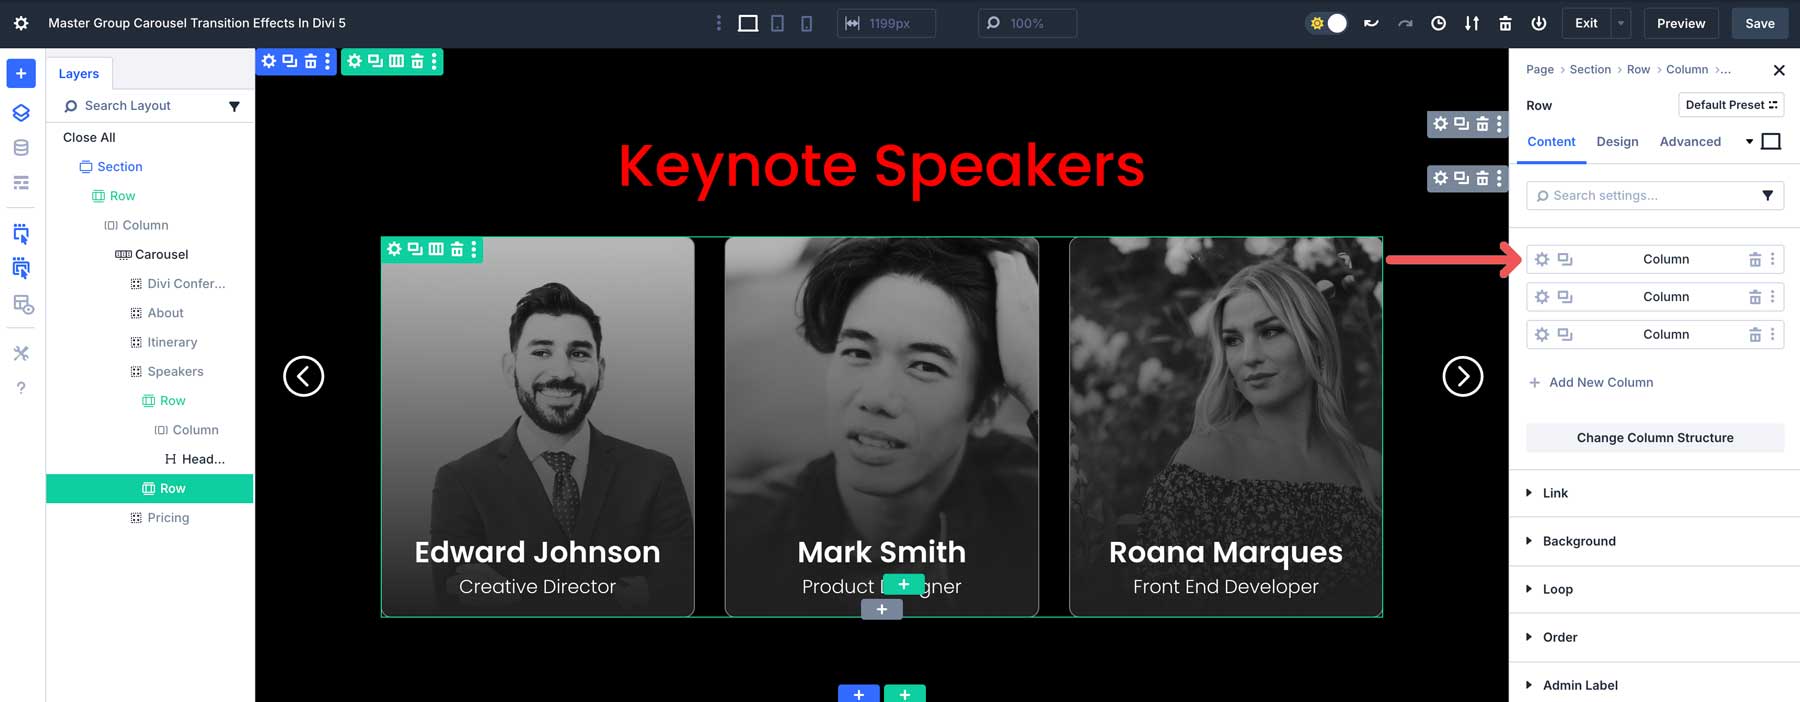
For the second row in the Group, click on the first column to open its settings.
Click the Design tab and expand the Animation dropdown menu. Select Slide for the Animation Style, Top for the Animation Direction, and set the Animation Delay to 4100ms.
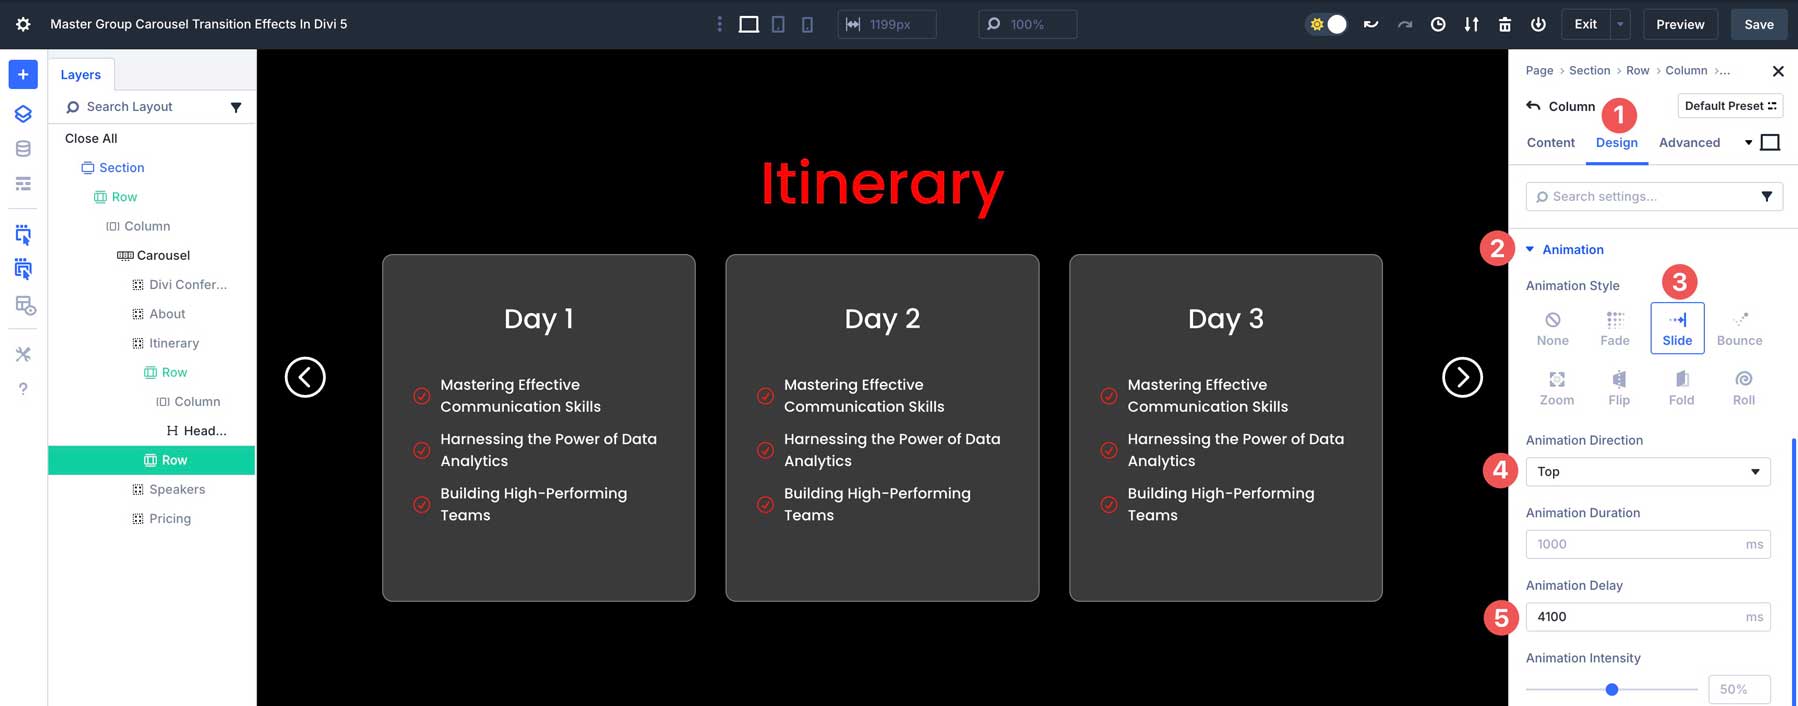
Repeat the steps for the second and third columns of the row, adjusting the Animation Delay by 100ms. So, for the second column, set the Animation Delay to 4200ms and the third column to 4300ms.
Preview the Group Carousel Module to ensure all transitions and animations work as intended.
Set Animations For The Fourth Group
Select the fourth Group in the Group Carousel module.
We’ll apply the same styles as the third Group, with the staggered Slide animation. Set the main Heading module’s Animation Delay to 6000ms.
Click to select the second row of the slide. Select the first column to open its settings.
In the Animation settings, set the Animation Style to Slide, Animation Direction to Top, and the Animation Delay to 6100ms.

Repeat the steps in the second and third columns, advancing the animation by 100ms for each.
Remember to preview the Group Carousel to ensure all animations are timed appropriately.
Set Animations For The Fifth Group
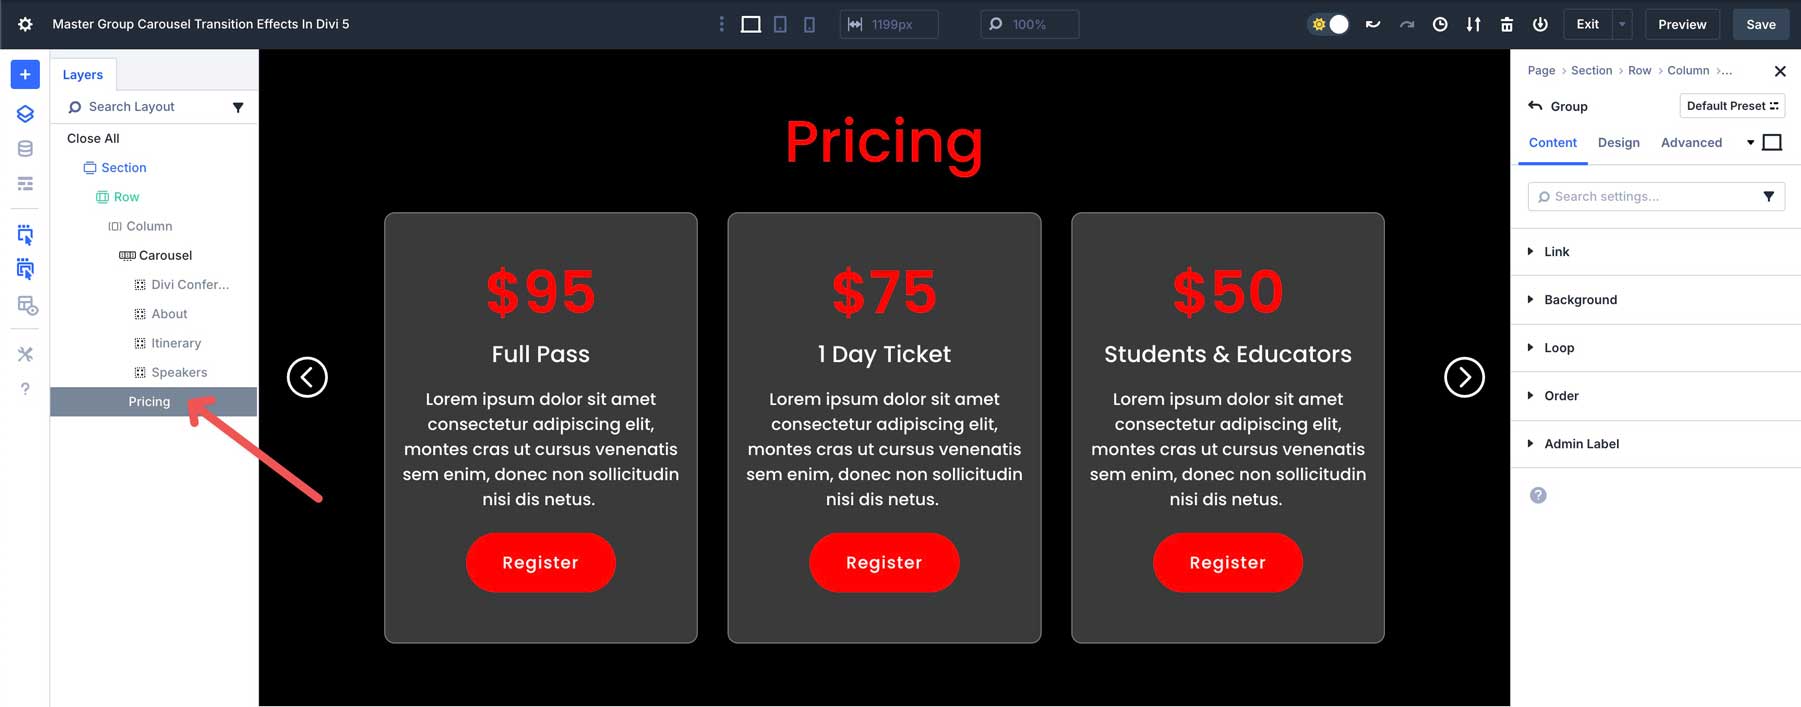
The last step is to set the animation timing for the fifth Group. Select the Group in the Layers panel to display in the Visual Builder.
Select the first Heading module of the Group and navigate to the Design tab. Expand the Animation dropdown menu. Select Slide for the Animation Style, Bottom for the Animation Direction, and add 8000ms to the Animation Delay field.
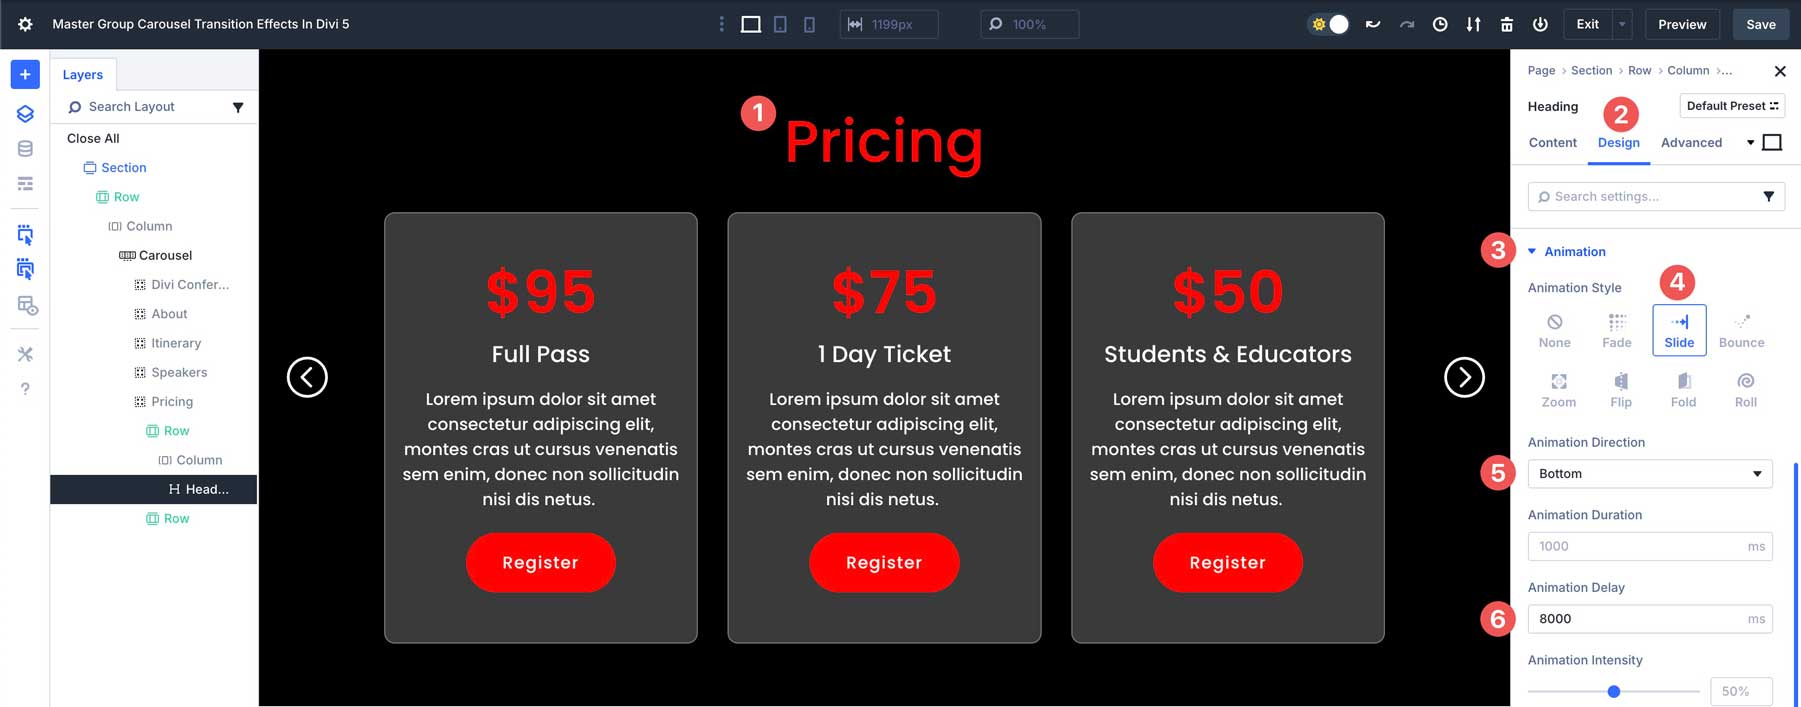
For the second row in the Group, apply 8100ms, 8200ms, and 8300ms to the first, second, and third columns. Ensure that the Animation Style is set to Slide, and the Animation Direction is set to Top.
Adjusting The Timing For The Group Carousel
Once all animation settings are in place, you may find that the Automation Rotation Speed is too fast. In that case, you’d need to adjust the timing for the Carousel itself and all of the animations within each Group. In our example, we set the Automatic Rotation Speed to 2000ms. Depending on the content in each Group, it may be necessary to extend the time.
For instance, if we set the Automatic Rotation Speed to 5000ms (5 seconds per Group), we’d need to go in and adjust all animations in all Groups, except for the first.
In the second Group’s first column, we’d adjust the Animation Delay to 5000ms.
For the second column, we’d need to adjust the Animation Delay for the modules to 5000ms, 5100ms, 5200ms, and 5300ms.
Repeat the steps for the additional Groups, adjusting each by 5000ms.
Advanced Customizations (Optional)
Advanced options are available for those ready to customize carousels further to unlock even more creative possibilities. From AI generation to integrating with other Divi 5 features, these techniques are perfect for users looking to create unique, dynamic carousels.
Using Divi AI
Divi AI, integrated into the Visual Builder, allows you to enhance the Group Carousel Module with AI-generated content and styling, saving time and boosting creativity. It can create slide content, such as headlines, descriptions, call-to-action (CTA) text for products, and more.
Divi AI can also be used to create images for your slides. It can create high-quality images simply by adding a text prompt describing your desired image. You can tailor images to your brand without sifting through hundreds of stock photos or paying a costly monthly subscription.
Divi AI can also generate custom CSS for your carousels. In a Group’s Advanced tab, locate the Custom CSS field, click the Divi AI icon, and enter a text prompt describing the effect you want.
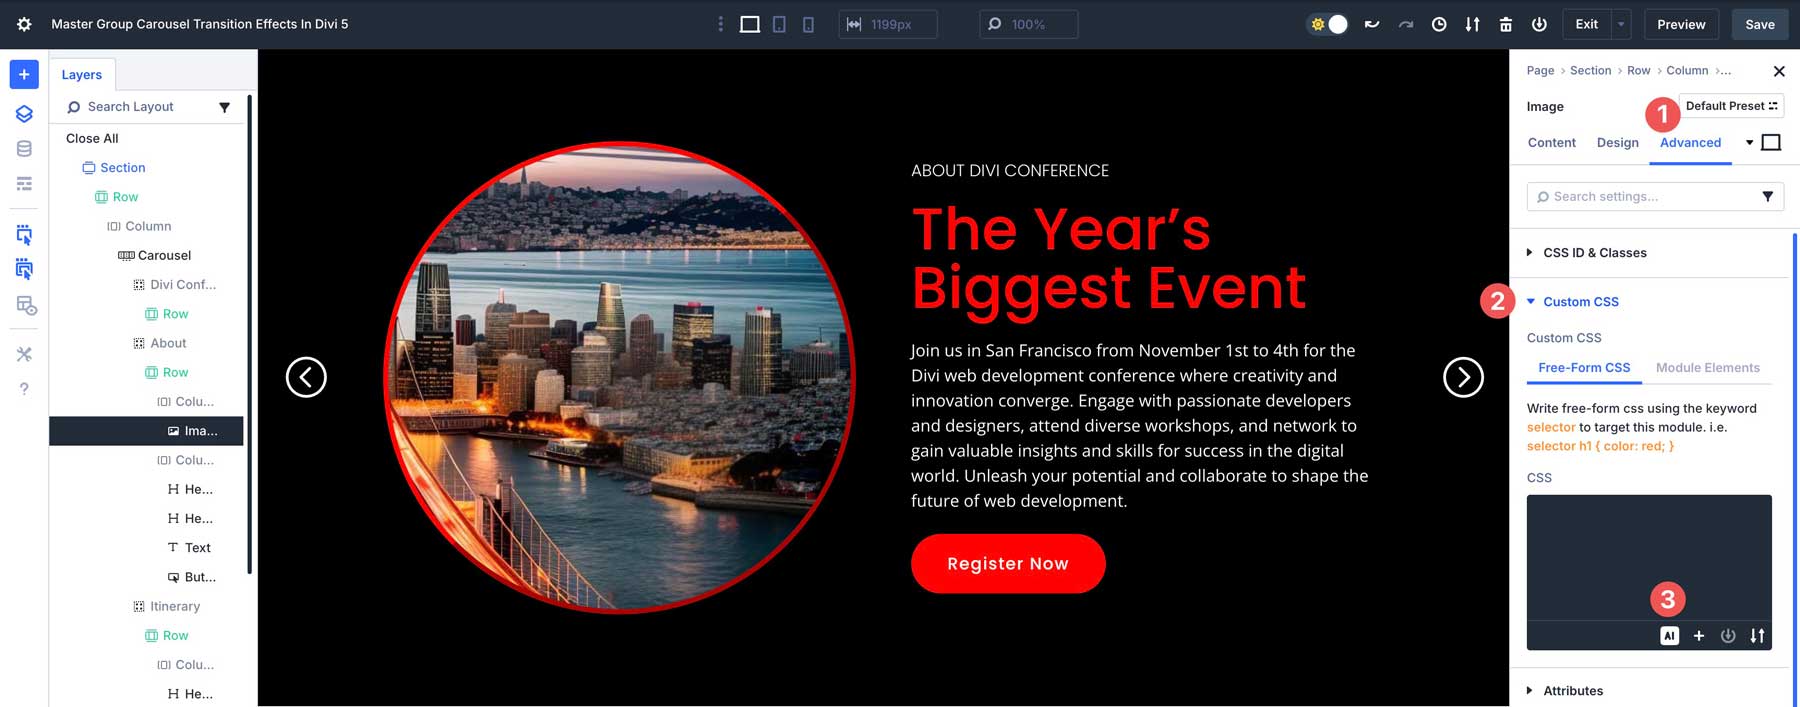
For example, it can give an image a grayscale effect without affecting its border.
Combining With Other Divi 5 Modules
To make your Carousel more interactive, pair the Group Carousel Module with other Divi 5 modules for a unique look. Add a Lottie module to create eye-catching navigation arrows or autoplay indicators. You can also add the Lottie module to a hero section carousel to highlight sale items or other important information.
Use Nested Rows to create complex layouts within your carousels to break free of Divi 5’s standard row structures.
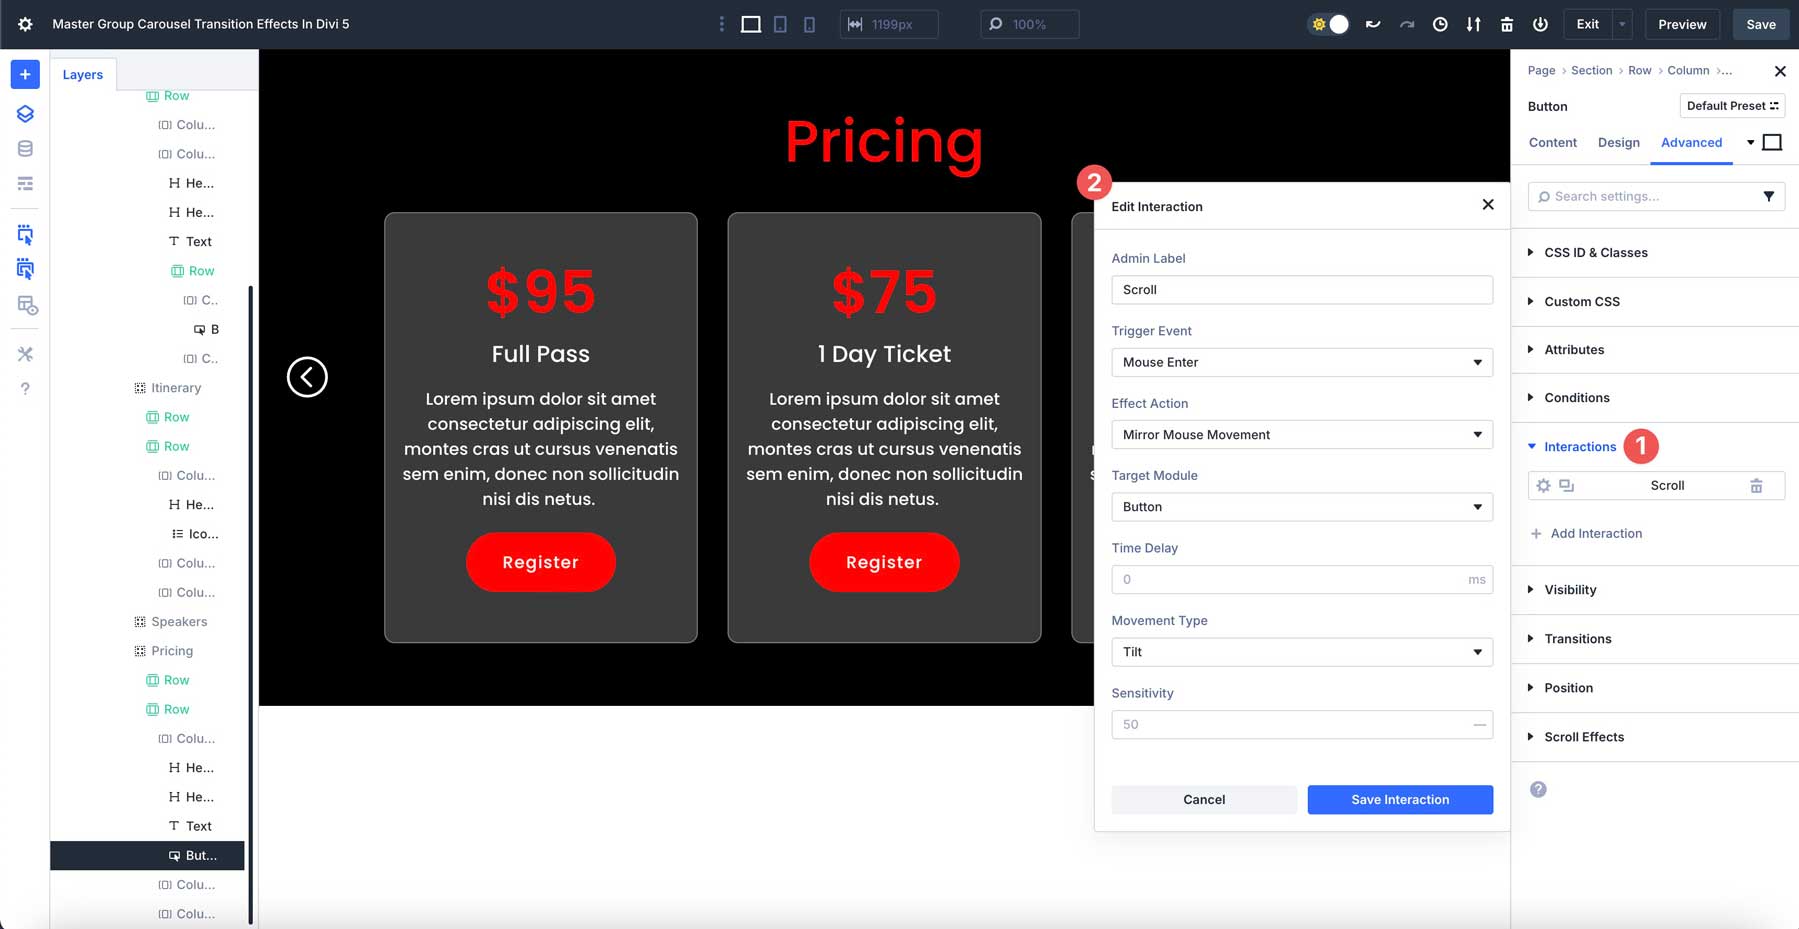
Experimenting With Interactions
Divi 5’s Interactions feature lets you add dynamic behaviors to your carousels, making it more engaging and responsive to user actions. For example, you can apply scroll effects to individual slides to create depth. Add a tilt effect on mouseover to add interest to images or headings, or use scrolling effects on slides for a modern, immersive feel.
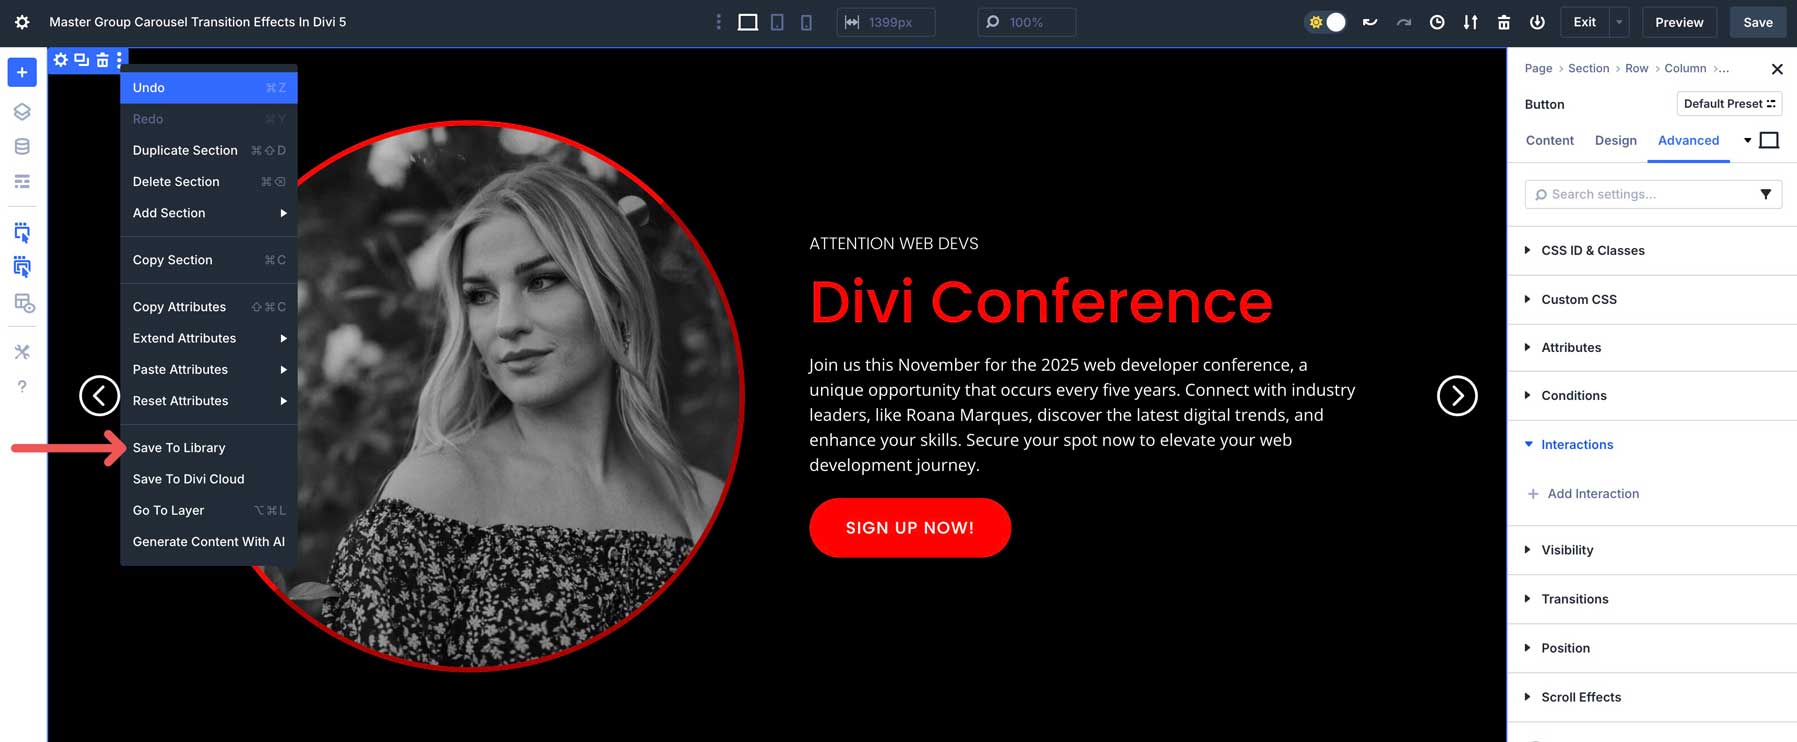
Saving The Group Carousel Module For Future Use
Once your Group Carousel is finished, you can easily add it to your Divi Library for use on other pages. Right-click on the module, select Add to Divi Library, and give it a name for easy identification later.
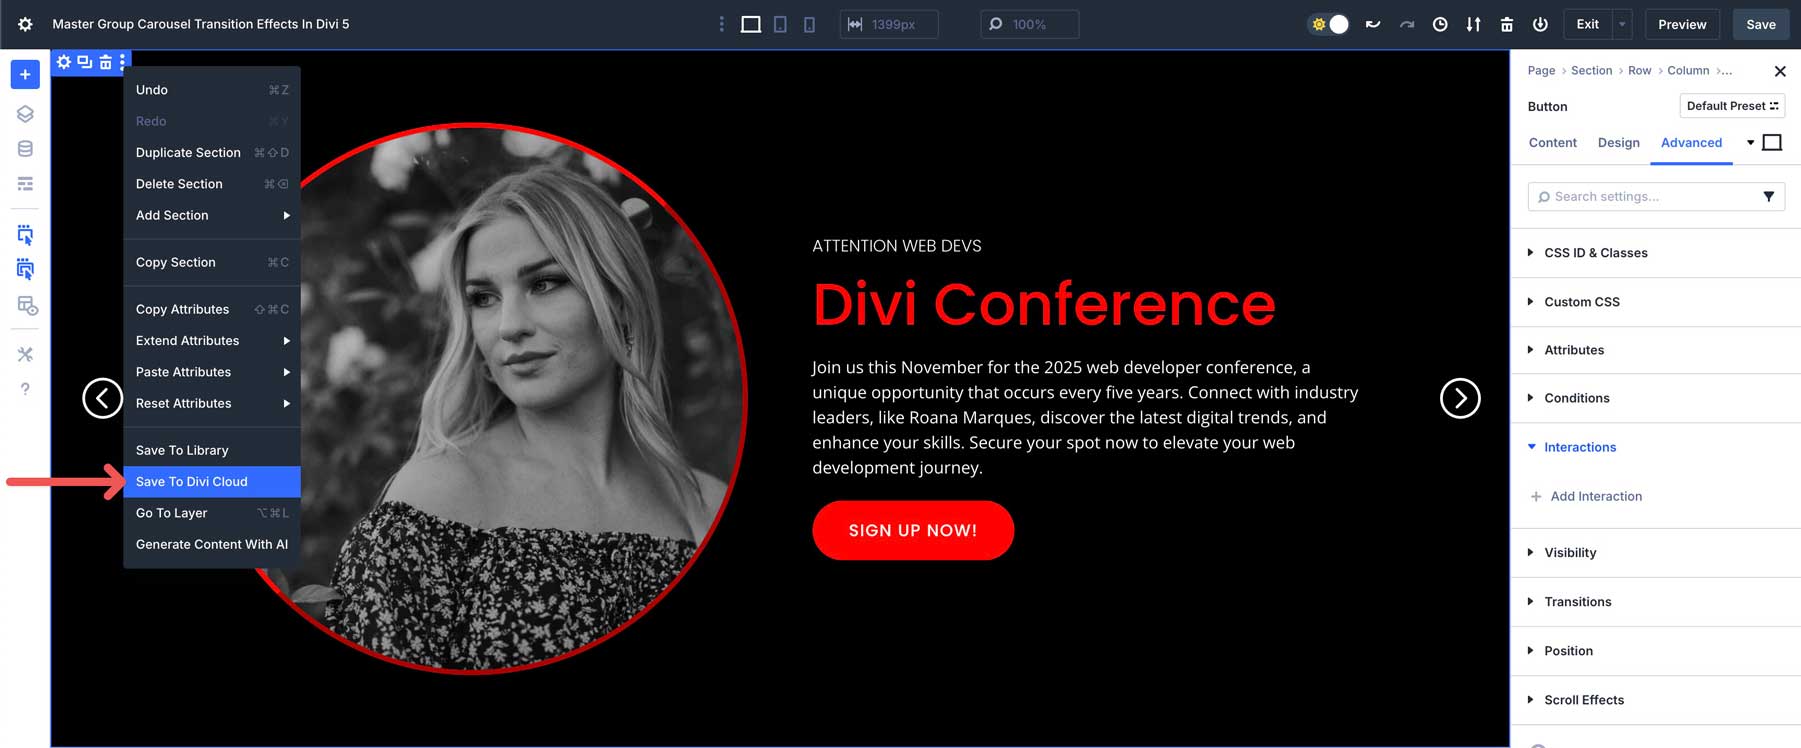
If you’d like to use Group Carousels on other Divi Projects, save it to Divi Cloud to add it to another Divi website in just a few clicks.
Build Your Own Carousels In Divi 5 Today
The Group Carousel Module in Divi 5 is a powerful tool for creating dynamic, visually stunning sliders that captivate your audience. With its flexible transition and animation effects, like fades, slides, rolls, and more, you can easily build intuitive, engaging carousels that showcase everything from events to products. You can ensure your carousels match your brand’s unique style by mastering settings like animation speed, transition effects, and advanced customizations like Divi AI and Interactions.
Are you ready to bring your ideas to life? Download the latest Divi 5 Public Alpha and start experimenting with different transition styles to create carousels that leave a lasting impression. We’d love to hear about your designs. Share your thoughts, tips, or questions in the comments below or connect with us on social media.


As usual, excellent work! It would be great if you could specify a random display option. It would be very useful when using image cards… Cheers!
Great tutorial. Makes sense once you explain it 🙂
Just wondering though, this animates slides in the carousel when they first load. Once a user has gone through each slide and gets back to the first slide there is no animation. Is there a way to make these animations work every time the slide is loaded not just the first time?