
Divi and its new background options have unlocked an exciting new world of possibilities for Divi users. The new gradient builder makes it easy to create any type of gradient we want with as many colors as we want. But that is just one layer of creativity. We can combine the Gradient Builder design with background masks and patterns to create countless unique and stunning background designs for your website.
Today we are going to show you how to combine Divi’s Background Gradient Builder with background masks and patterns to create a beautiful background design. We’ll show you how to add each of the background design elements (background gradient, masks and patterns) to a section. Plus, we’ll demonstrate how easy and fun it can be to change the design combinations with a few simple clicks.
Let’s have some fun!
Subscribe To Our Youtube Channel
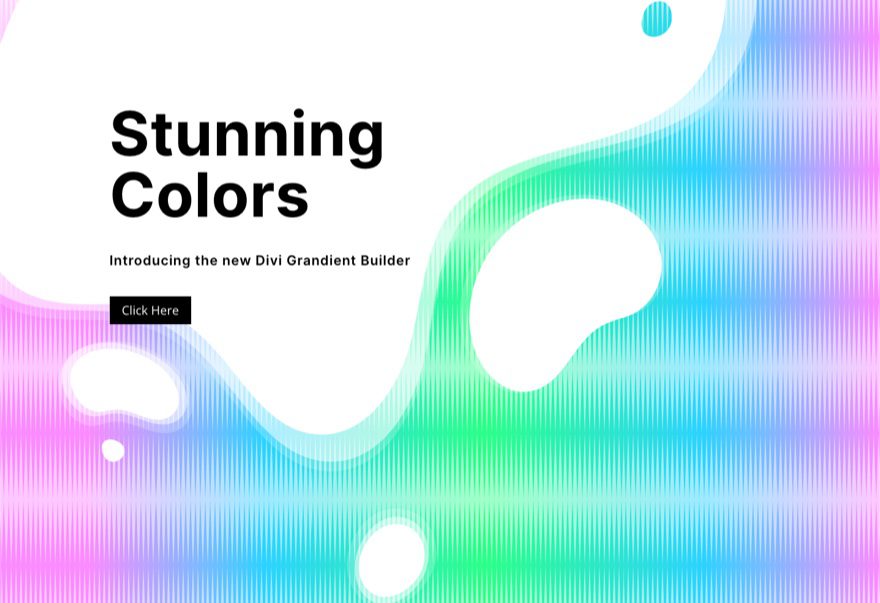
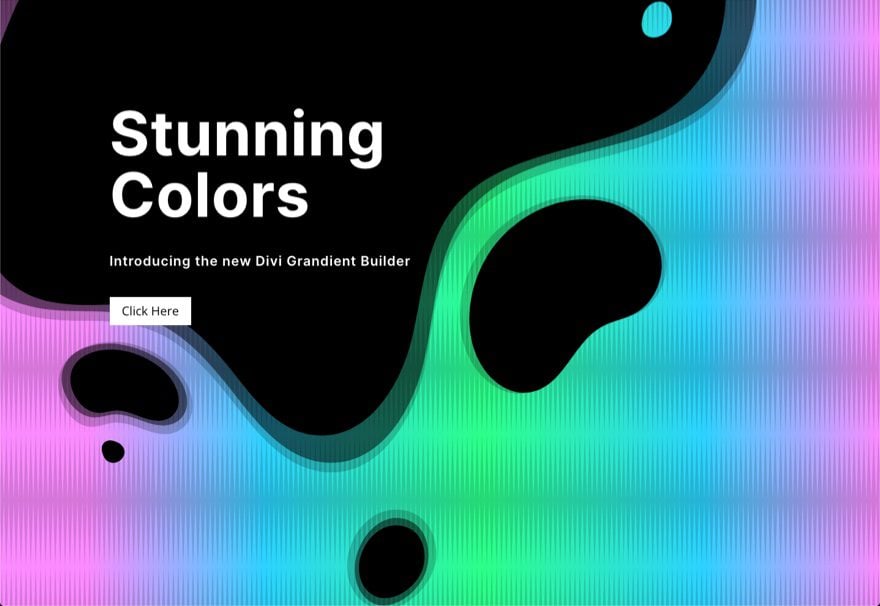
Sneak Peek
Here are a few example designs we can build using this tutorial.
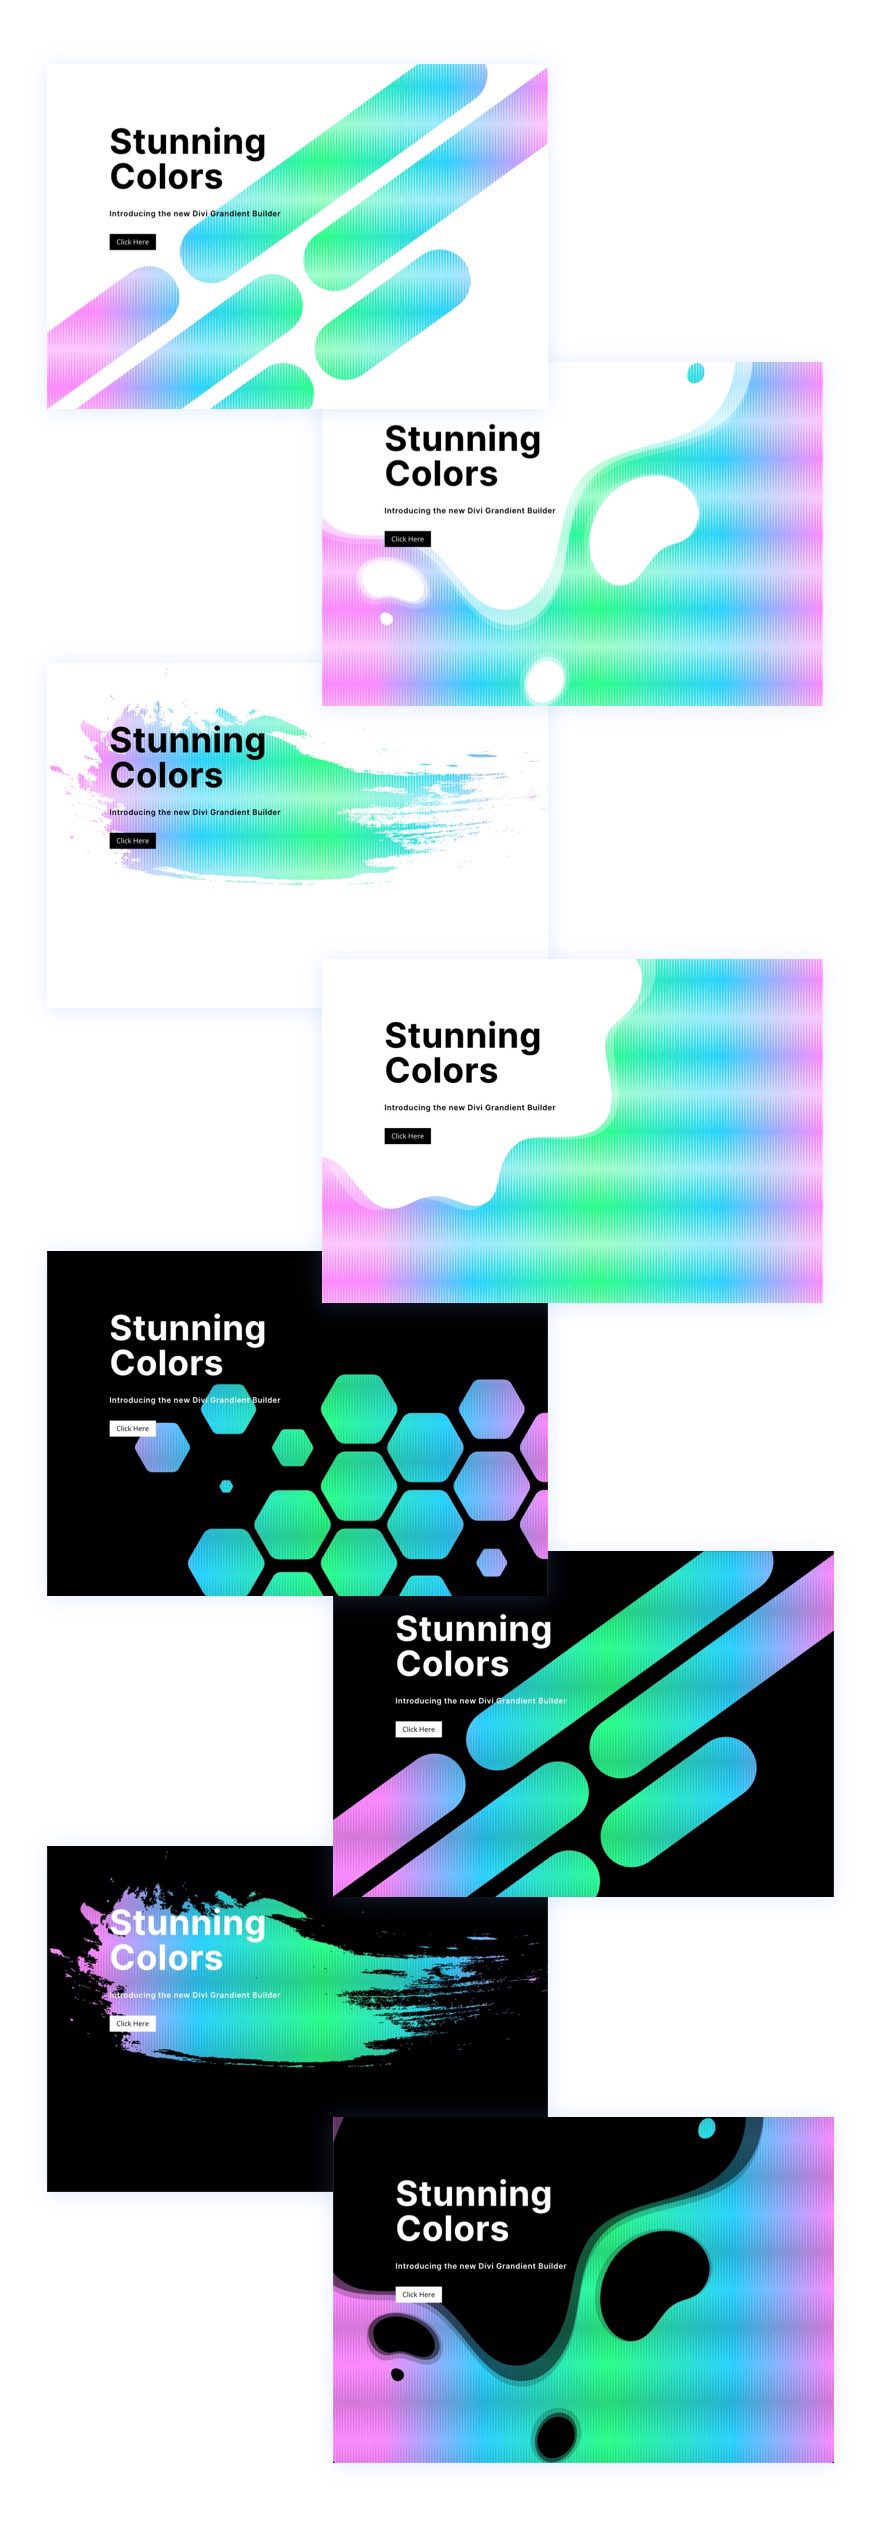
With this design in place, you can easily change patterns and masks with a few clicks!
Download the Layout for FREE
To lay your hands on the layout design from this tutorial, you will first need to download it using the button below. To gain access to the download you will need to subscribe to our newsletter by using the form below. As a new subscriber, you will receive even more Divi goodness and a free Divi Layout pack every Monday! If you’re already on the list, simply enter your email address below and click download. You will not be “resubscribed” or receive extra emails.

To import the section layout to your Divi Library, do the following:
- Navigate to the Divi Library.
- Click the Import button at the top of the page.
- In the portability popup, select the import tab
- Choose the download file from your computer (make sure to unzip the file first and use the JSON file).
- Then click the import button.

Once done, the section layout will be available in the Divi Builder.
Let’s get to the tutorial, shall we?
What You Need to Get Started
To get started, you will need to do the following:
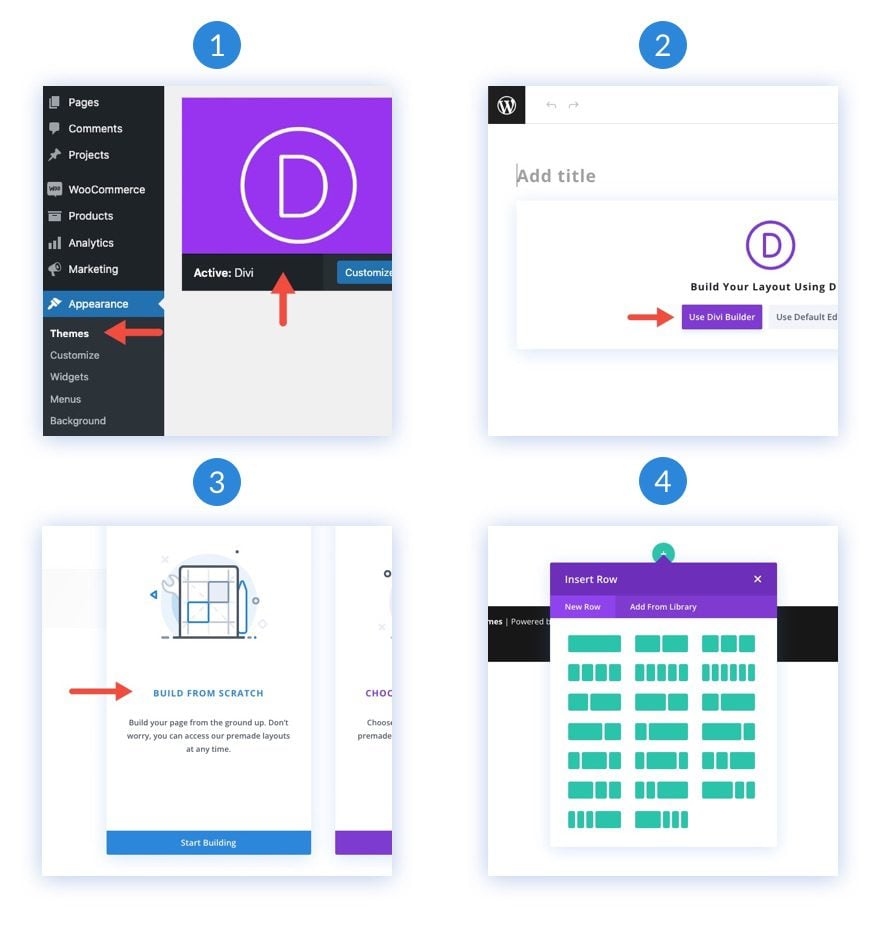
- If you haven’t yet, install and activate the Divi Theme.
- Create a new page in WordPress and use the Divi Builder to edit the page on the front end (visual builder).
- Choose the option “Build From Scratch”.
- Now have a blank canvas to start designing in Divi!
How to Use Combine Background Gradients, Masks, and Patterns in Divi
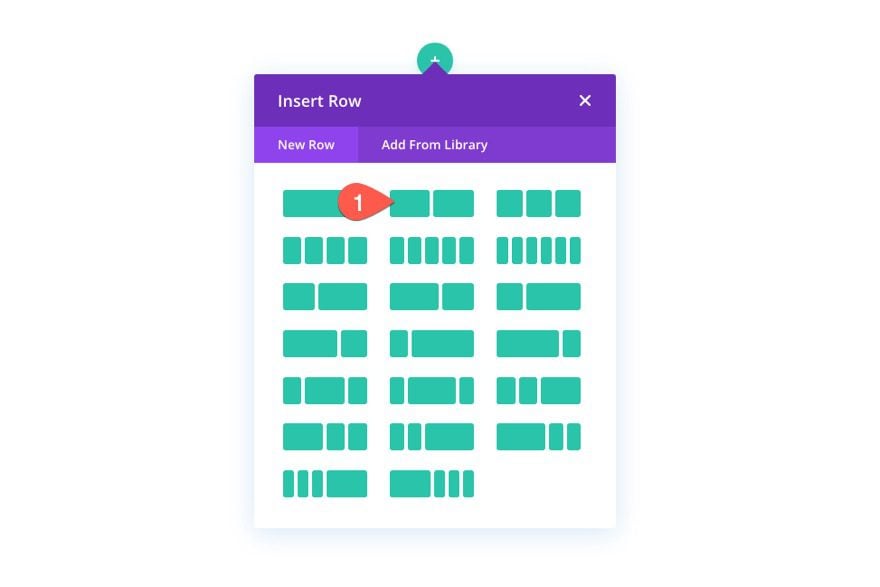
1. Create the Layout Structure
For this design, we are going to create a section with a headline and a call to action on the left. Our visual design will be created by using a combination of Divi’s background options. But before we get into that, we need to create a two-column row.
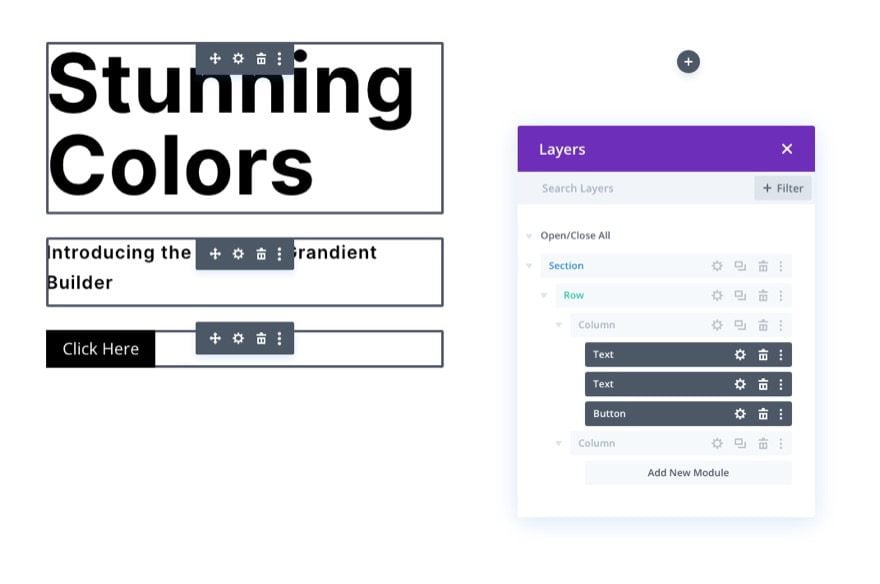
2. Add the Headline and Call to Action
In the left column (column 1), add a text module for your main heading, a text module for your subheading text, and a button module for your button.
If you want to know the specific design settings for these, feel free to download the layout and check it out for yourself at another time. For today, we are going to concentrate on the background design.
3. Add Vertical Spacing to the Section
In order for our background design to fill the browser, we need to add some vertical height to the section. An easy way to do that is to add padding to the top and bottom of the section.
Open the settings for the section. Under the design tab, update the padding as follows:
- Padding: 10vw top, 30vw bottom
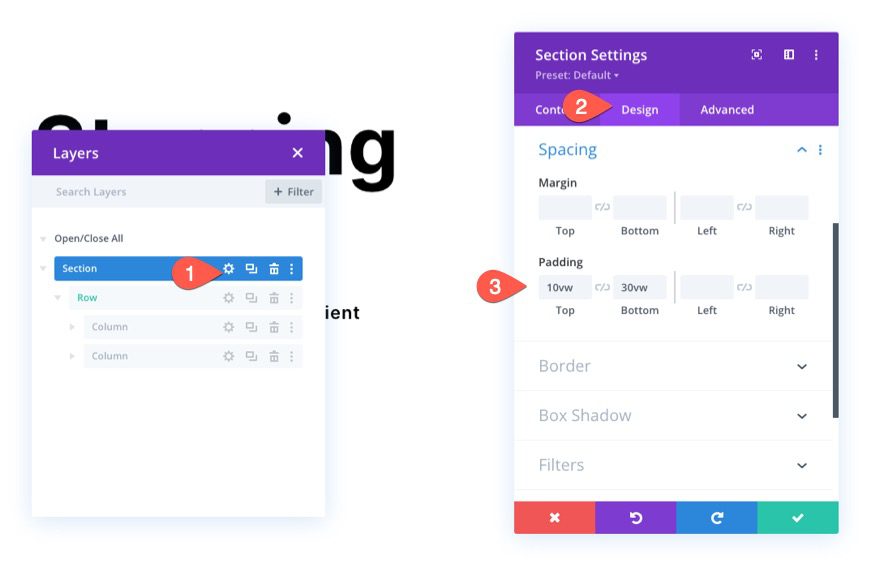
Keep in mind that you may need to adjust the padding on tablet and phone display if you want to adjust the background design once the columns stack vertically.
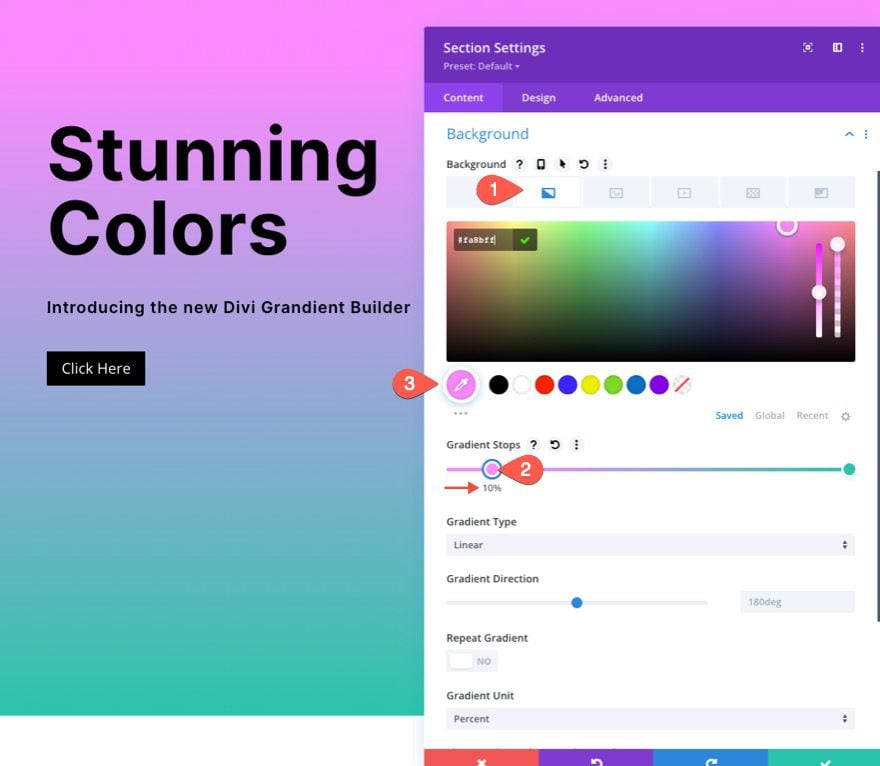
4. Add a Background Gradient Using the Gradient Builder
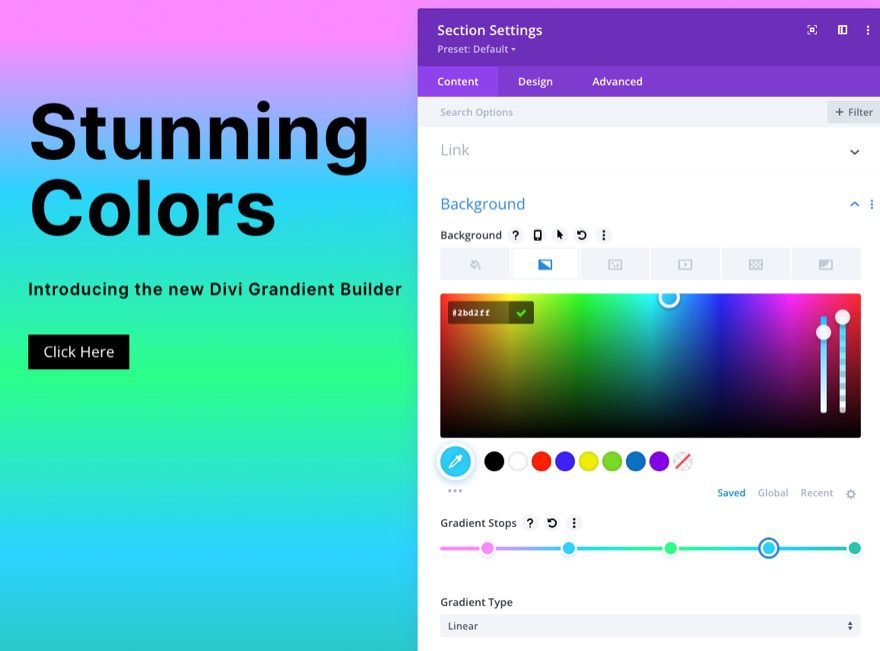
Next, we can add a custom background gradient to the section. For this gradient, we are going to add 5 gradient stops that are spaced out pretty evenly. The first and last gradient stops will have the same pink color. The second and fourth gradient stops will have the same blue color. And the third (middle) gradient stop will have a green color. These 5 colors will create a beautiful multicolored gradient for our background design.
Gradient Stop #1
To add the first gradient stop, make sure you have the section settings open under the content tab. Then select the gradient tab and click to add a new gradient. This will add two default gradient colors. Click on the first gradient on the left and update the color and position as follows:
- Gradient Stop Color: #fa8bff
- Gradient Stop Position: 10%
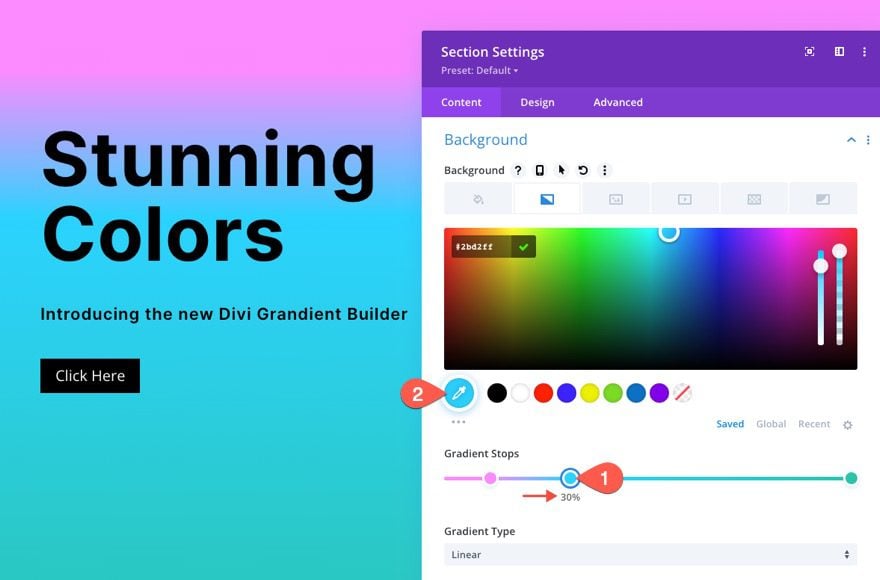
Gradient Stop #2
To add the second gradient stop, click on the gradient color line to add a new gradient stop. Then update the color and drag it into position as follows:
- Gradient Stop Color: #2bd2ff
- Gradient Stop Position: 30%
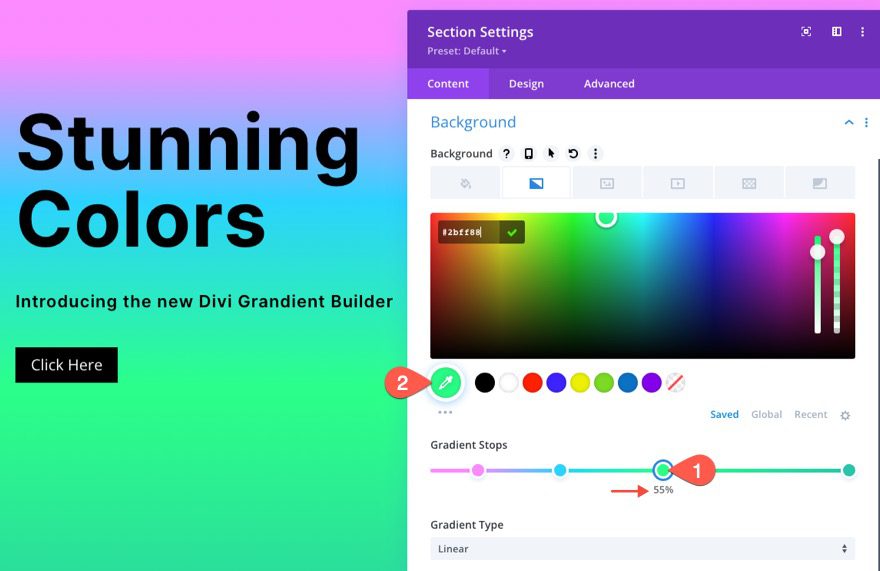
Gradient Stop #3
To add the third gradient stop, click on the gradient color line to add a new gradient stop (around the middle of the line). Then update the color and drag it into position as follows:
- Gradient Stop Color: #2bff88
- Gradient Stop Position: 55%
Gradient Stop #4
To add the second gradient stop, click on the gradient color line to add a new gradient stop. Then update the color and drag it into position as follows:
- Gradient Stop Color: #2bd2ff
- Gradient Stop Position: 80%
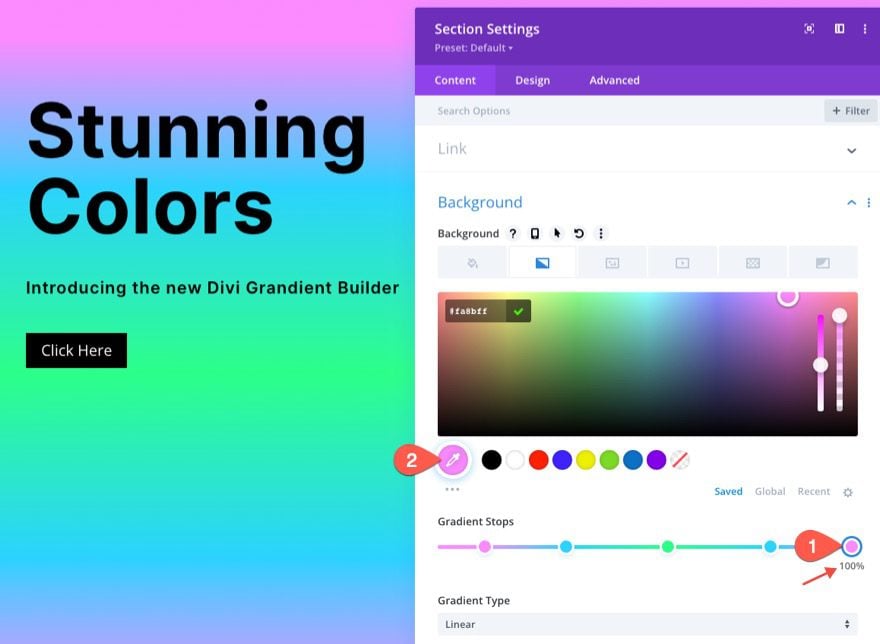
You should have the original default gradient stop left on the far right of the gradient color line. To make the last gradient stop, click on the gradient color stop and update the color as follows (you can leave it at the default position of 100%):
- Gradient Stop Color: #fa8bff
- Gradient Stop Position: 100%
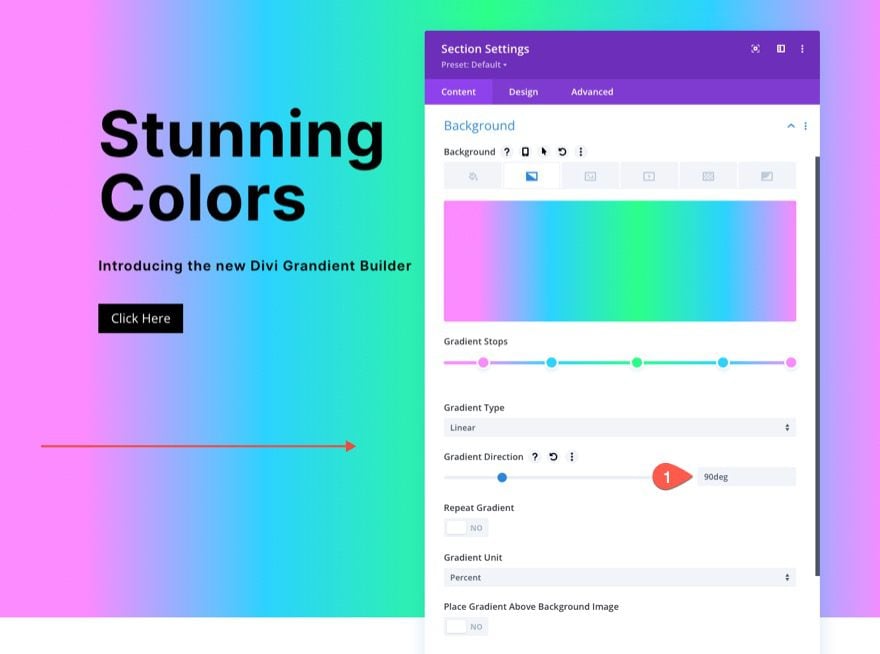
Update Gradient Direction
For this design, we are keeping the default Linear gradient type. To change the direction of the linear color pattern, update the following:
- Gradient Direction: 90deg
Now the gradient will flow from left to right.
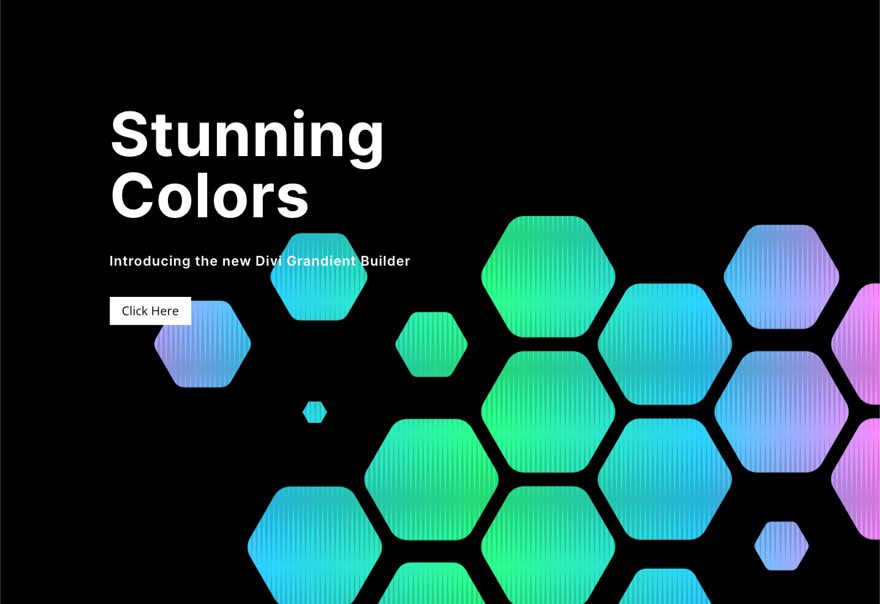
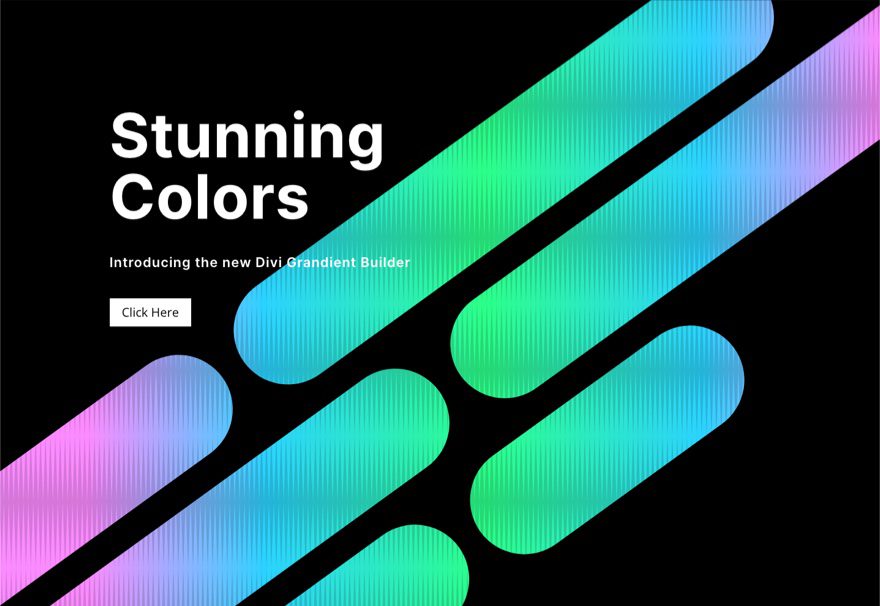
5. Create a Background Pattern for the Section
Now that our background gradient is ready, we can add a background pattern to compliment the design. In this example, we are going to create a subtle pattern using the Diamonds pattern in a unique way.
Under the patterns tab, update the following:
- Background Pattern: Diamonds
- Pattern Color: rgba(255,255,255,0.52)
- Pattern Size: Custom Size
- Pattern Width: 8px
- Pattern Height: 15vw
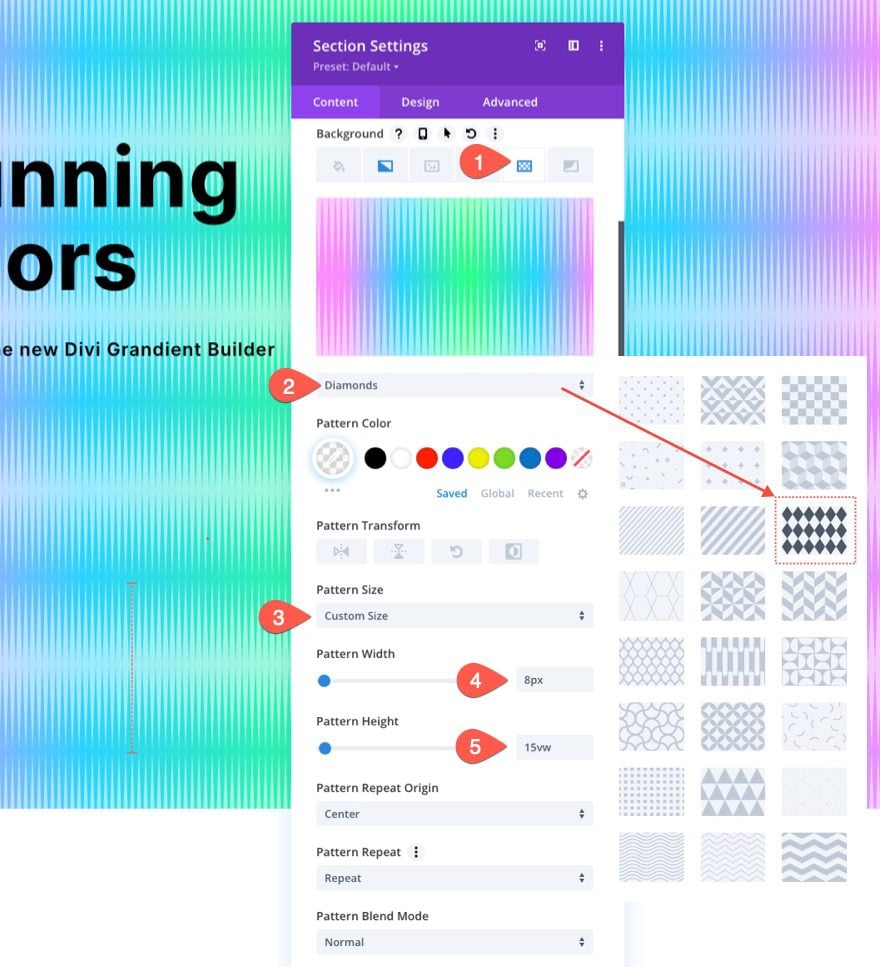
This should give you an idea of just how creative you can get with the built-in pattern. Here we used a diamonds pattern. But, because we gave the pattern a custom width and height, the diamonds are stretched vertically to give it a unique design resembling sound waves.
But, there are many more patterns to choose from that would look great with this design and they’re only a click away.
TIP: With background patterns, it is generally better to keep it subtle. Try using custom sizes for patterns that are smaller and then drop the opacity of the color. That said, don’t be afraid to think outside the box like in this example.
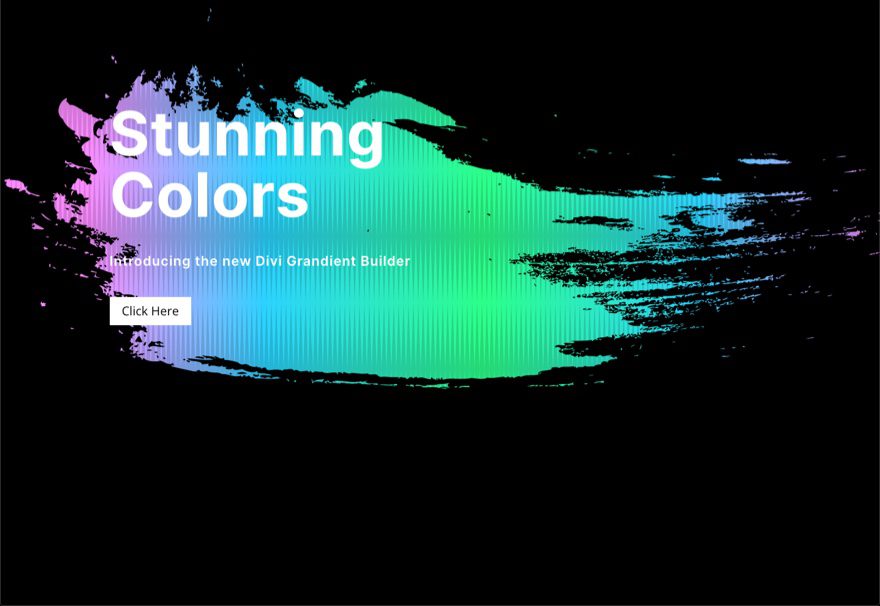
6. Create a Background Mask for the Section
With our background pattern in place, we are finally ready to add a background mask to complete our background combination design. There are a bunch of options and variations to choose from. For this example, we are going to use the Paint mask (at least to start with).
Under the masks tab, update the following:
- Mask: Paint
- Mask Color: #ffffff
- Mask Transform: Rotate
- Mask Size: Cover
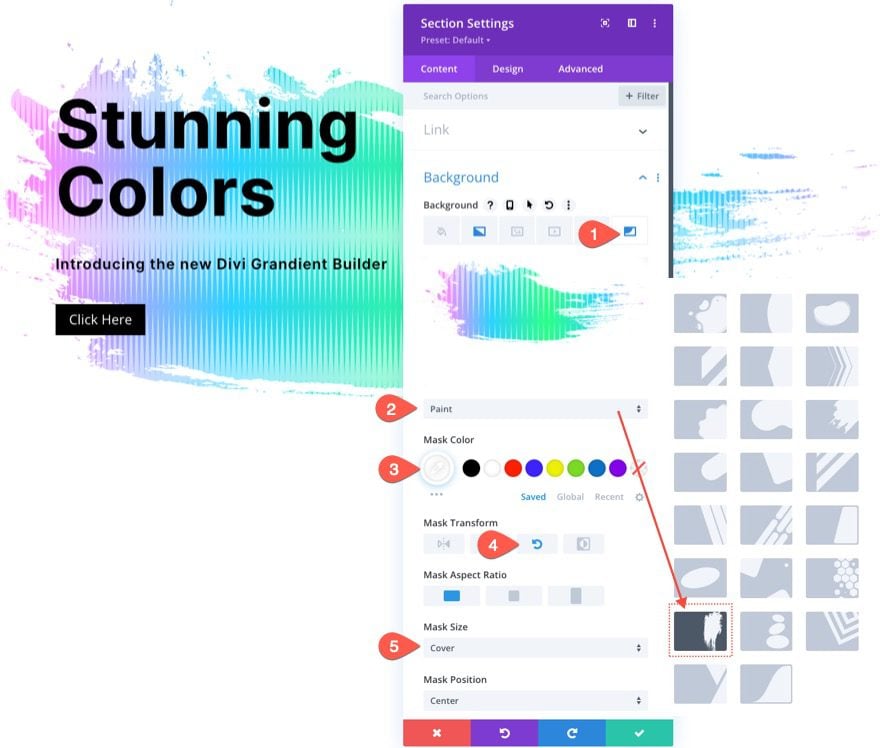
Here is the result so far…
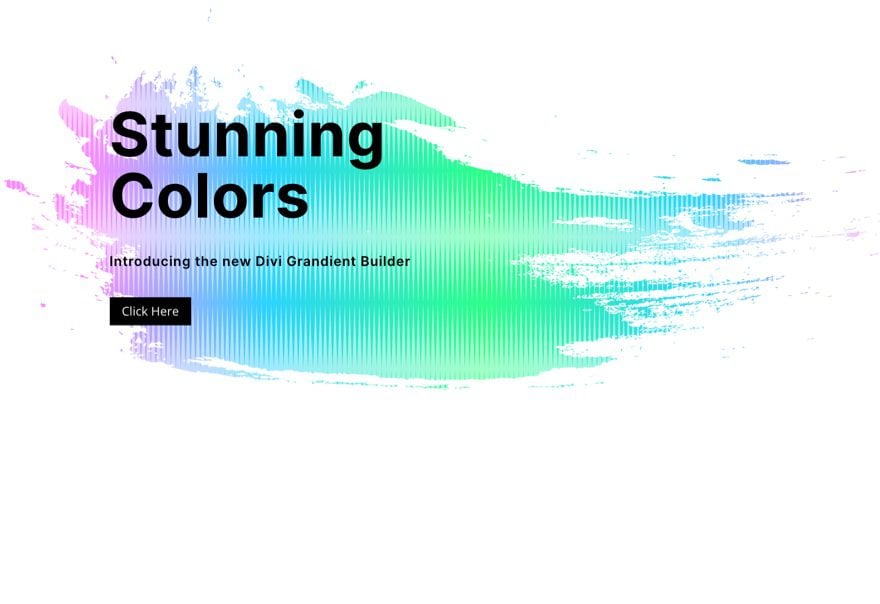
And, just like with patterns, there are many more masks to choose from that would look great with this design and they’re only a click away.
More Possibilities
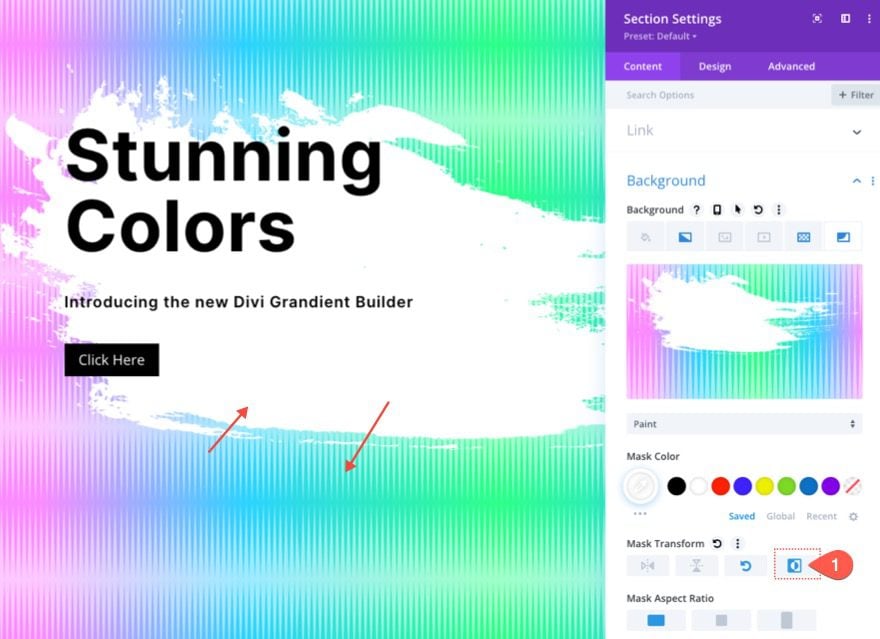
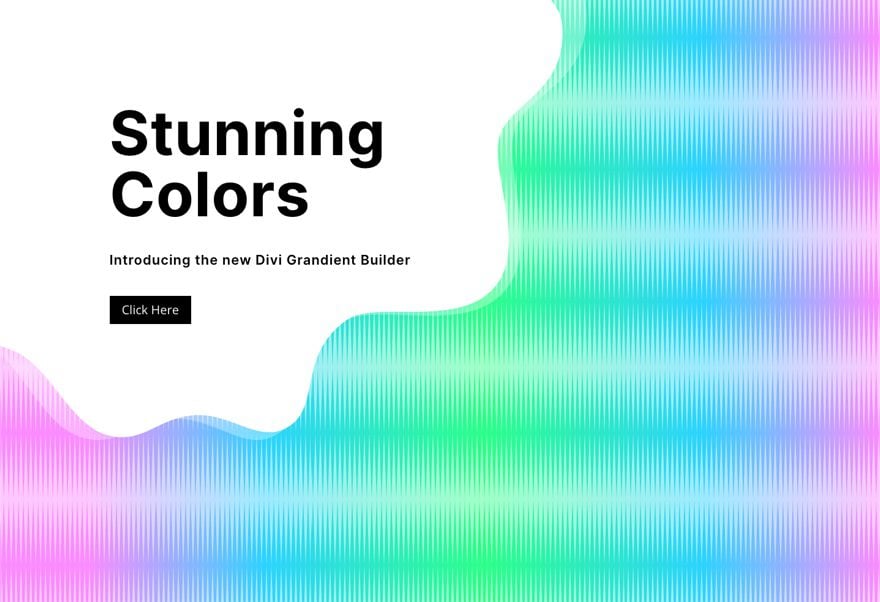
Invert the Mask
For a different look, you can invert the mask under the mask transform option. This will show more of the gradient in the background and make the text stand out a bit more.
Here are a few examples of inverted masks…
Create a Dark Version
If you want a dark version of this design, simply change the background mask color to a dark color (like black). Give the pattern color to a darker color. Then change the headline and subheader text to white. And you may want to update the button color as well.
Here is what the dark version looks like using a few different masks.
And here is an example of a dark version with an inverted mask.
Try More Gradients!
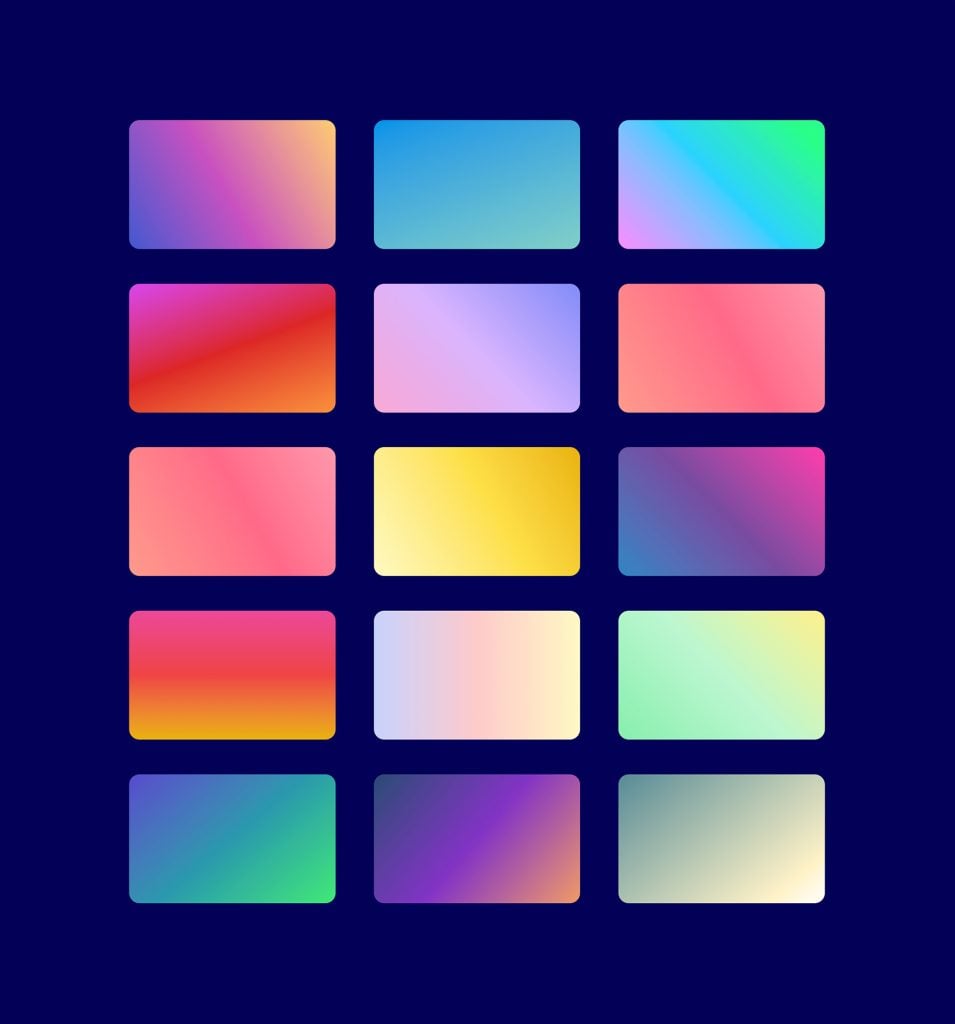
The Gradient Builder can create so many more colors and gradient types you can use to make these layered background designs stand out. You can check out our live demos of more background gradient design possibilities.
Get More Background Mask and Pattern Designs!
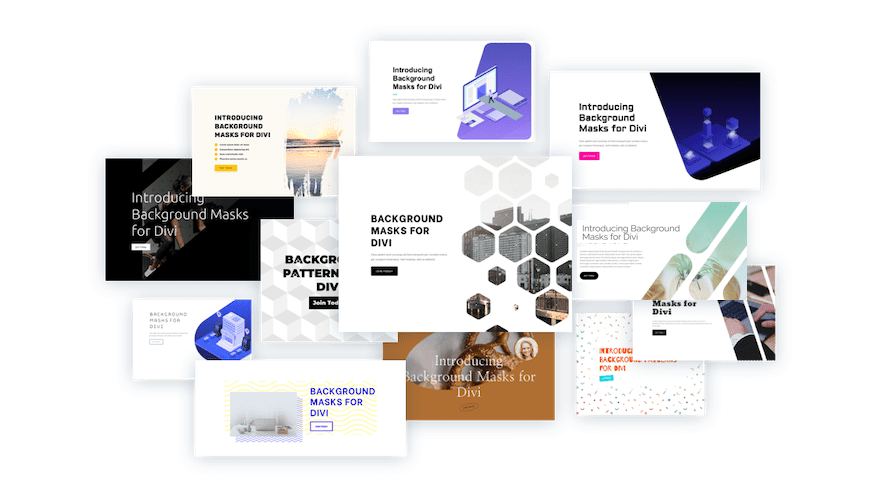
If you want more inspiration for how to use background masks and patterns, check out these 12 background mask and pattern designs free for download.
Final Results
Here is another look at the designs we can easily create using the steps above.
And don’t forget, with this design in place, you can easily change patterns and masks with a few clicks!
Final Thoughts
Combining Divi’s advanced background options is a lot of fun. And, it is amazing how easy it is to create such beautiful background designs without ever having to use third-party software like Photoshop or Illustrator. The background options are easy to tweak to get the design just right. And there are so many other options you can use (like blend modes) to create even more unique background designs. Plus, you can add masks and patterns to any Divi element, not just sections. So have fun experimenting!
For more, check out our feature release posts on the gradient builder and background masks and patterns. You may also find it helpful to know how to use masks and patterns to design a hero section.
I look forward to hearing from you in the comments.
Cheers!


You continue to surprize!
Lifetime membership is one of the best values ever.
Can not wait for the new Divi Cloud featured.
Thank You and keep surprises coming.
Can you use these with a background image?
Now I understand why our SEO consultant advised us to redesign our website with Divi. You always improve this theme.
That’s great to hear, Elham!