
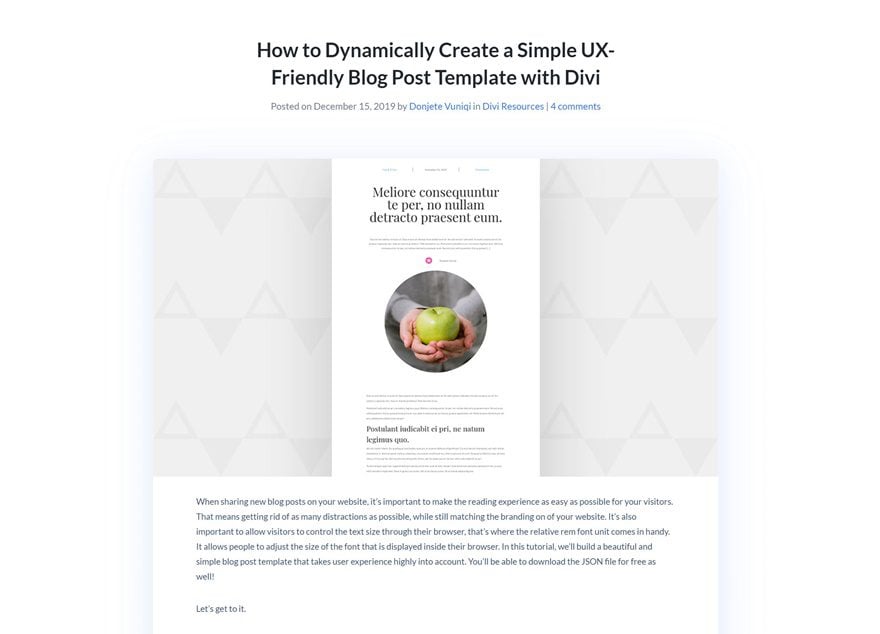
When writing a blog post, you’ll often find yourself wanting to quote someone or highlight a sentence used in a regular paragraph. Now, within the Gutenberg editor, you can add a quote block right off the bat, but it doesn’t provide you with as much design freedom as you’d potentially want. With Divi and its layout blocks, that’s not a problem anymore. You can easily build a particular block with Divi while still maintaining the Gutenberg environment elsewhere. In this tutorial, we’ll show you how to add inline highlighted quotes to your blog posts using Divi. You’ll be able to download the JSON file for free as well!
Let’s get to it.
Preview
Before we dive into the tutorial, let’s take a quick look at the outcome across different screen sizes.
Example #1
Desktop
Mobile
Example #2
Desktop
Mobile
Download The Divi-Built Highlighted Quotes Layouts for FREE
To lay your hands on the free Divi-built highlighted quotes layouts, you will first need to download them using the button below. To gain access to the download you will need to subscribe to our newsletter by using the form below. As a new subscriber, you will receive even more Divi goodness and a free Divi Layout pack every Monday! If you’re already on the list, simply enter your email address below and click download. You will not be “resubscribed” or receive extra emails.

https://youtu.be/zScpa4-I7-8
Subscribe To Our Youtube Channel
Importing The Layout Block JSON
Upload Layout to Divi Library
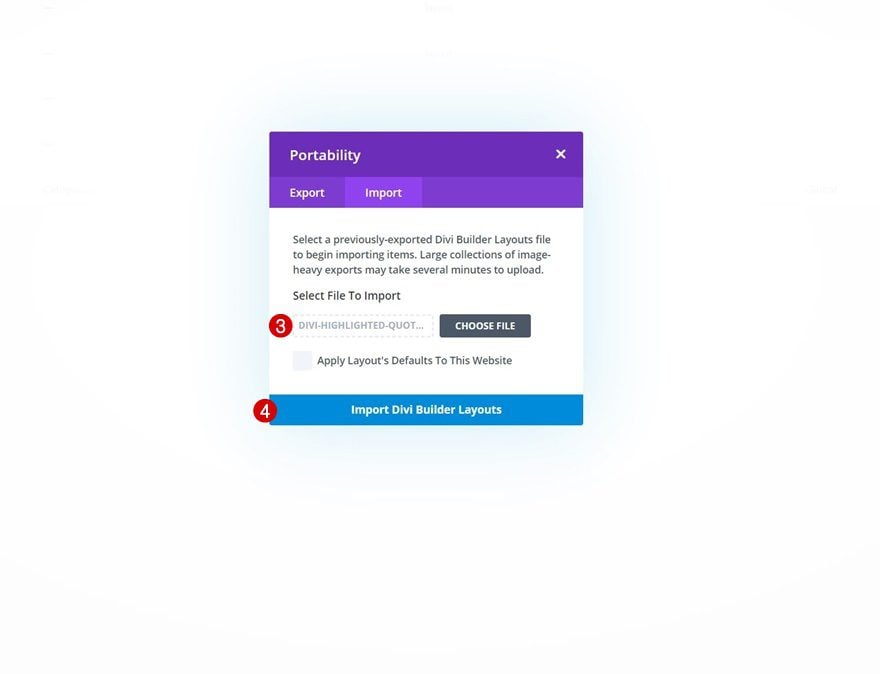
To import the JSON file you were able to download above, go to your Divi Library in the backend of your WordPress dashboard and click on ‘Import & Export’.

Then, select the JSON file inside your download folder and click on ‘Import Divi Builder Layouts’.
Add New Divi Block Block Inside Gutenberg Post
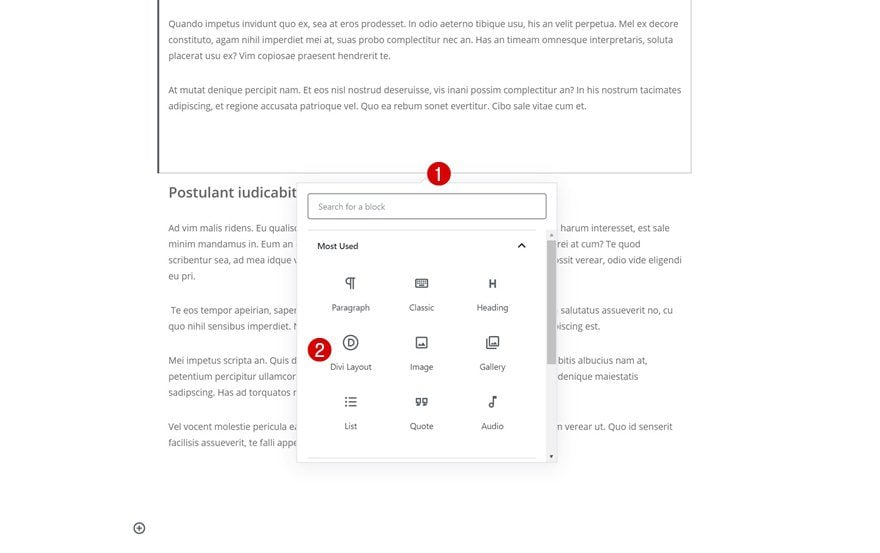
Once your layout has been imported, you can go to your Gutenberg post and add a new Divi layout block.
Import JSON File From Saved Layouts
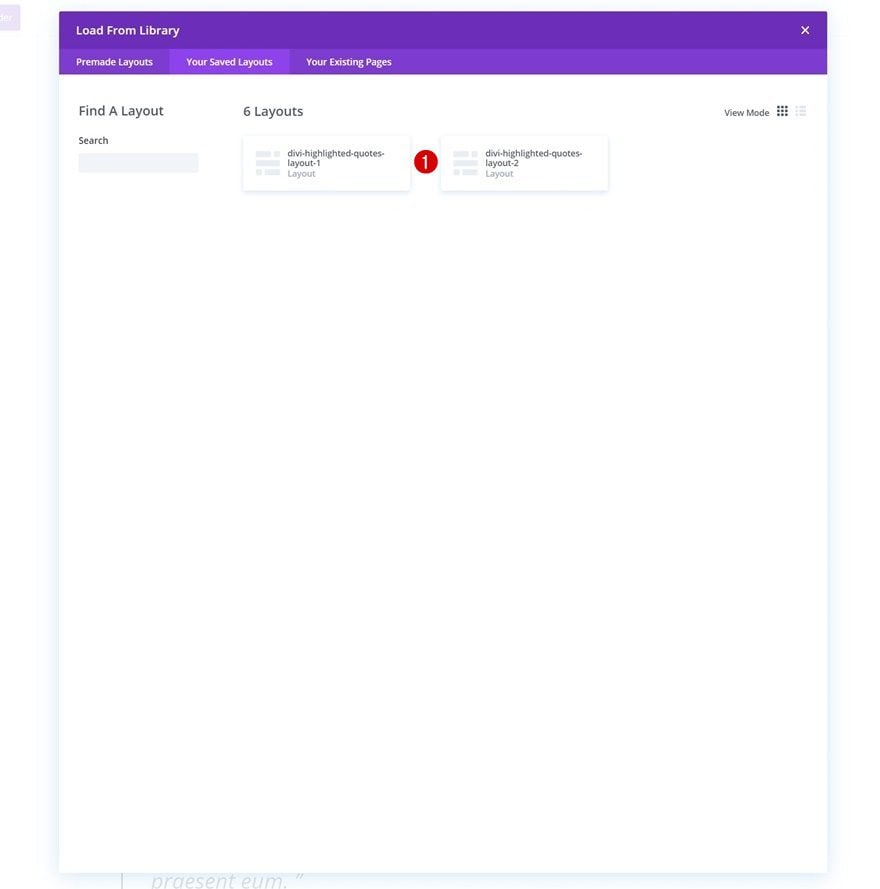
Then, click on ‘Load From Library’, navigate to ‘Your Saved Layouts’ and select the layout to import the highlighted quotes layout to your blog post. That’s it!
General Steps
Use Simple & UX-Friendly Blog Post Template
Download Template
To define the style of this tutorial, we’ll use a post template of a previous post. Go to that post and download the template.
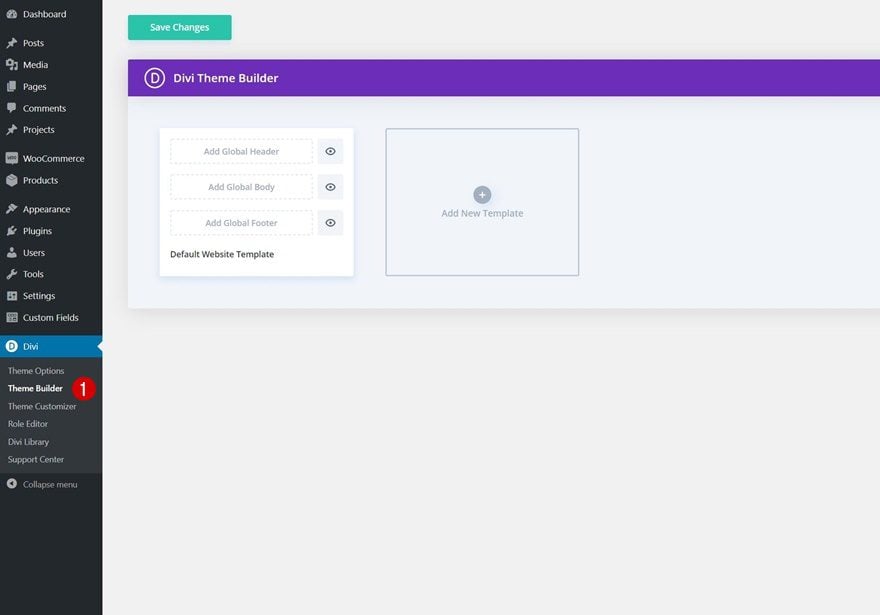
Go to Divi Theme Builder
Then, go to the Divi Theme Builder.
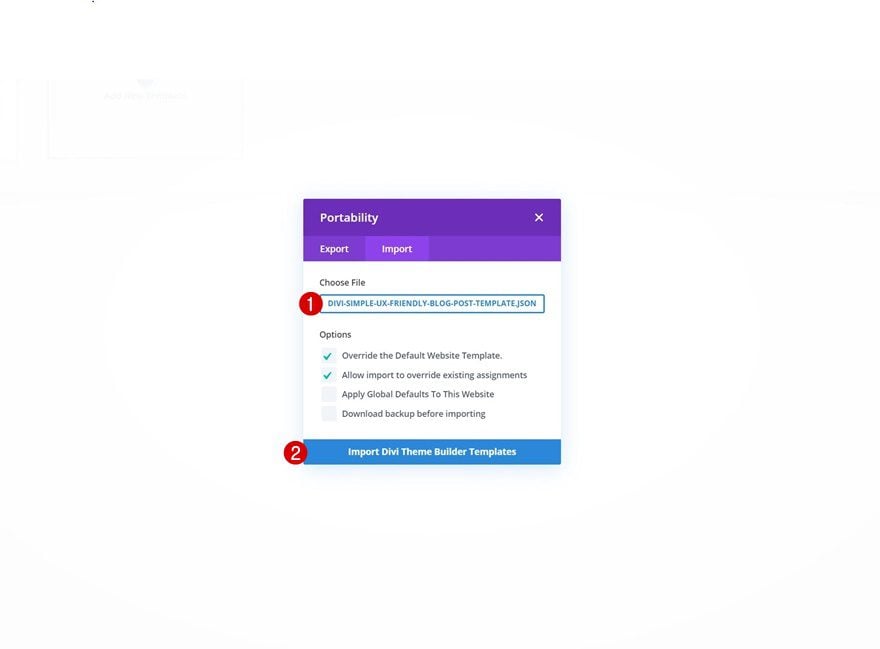
Upload Post Template
Click on the icon in the top right corner, go to the import tab and import the post template you’ve downloaded in the first step of this tutorial.
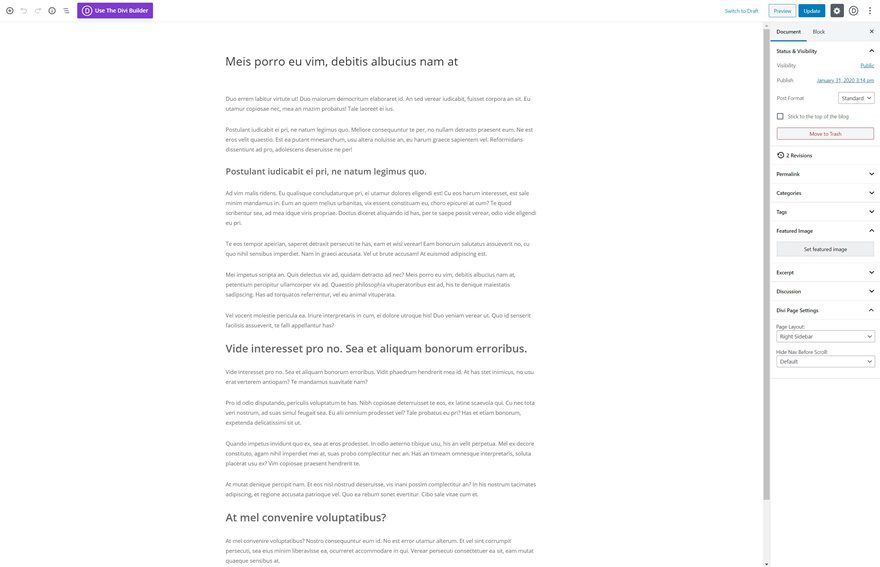
Open Existing Gutenberg Post or Create New One
Once you’ve set a post template, you can create a new Gutenberg post or open an existing one.
Add New Inline Divi Block
Add a new Divi block somewhere inside your post.
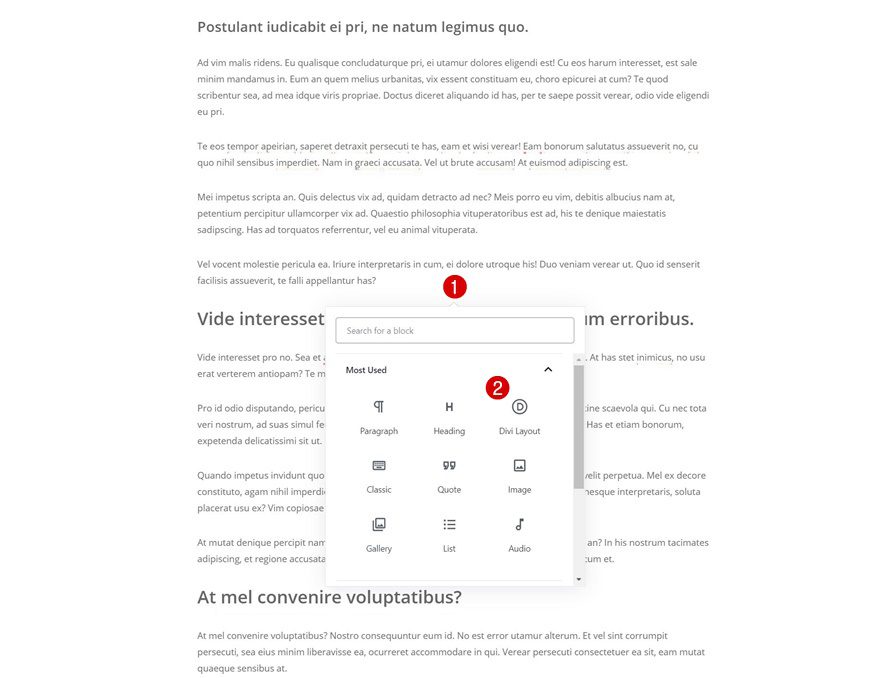
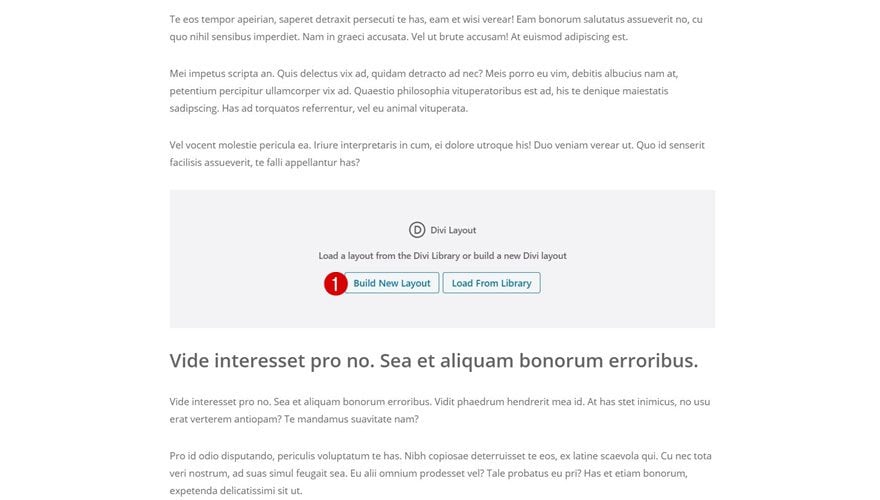
Build New Layout Inside Divi Block
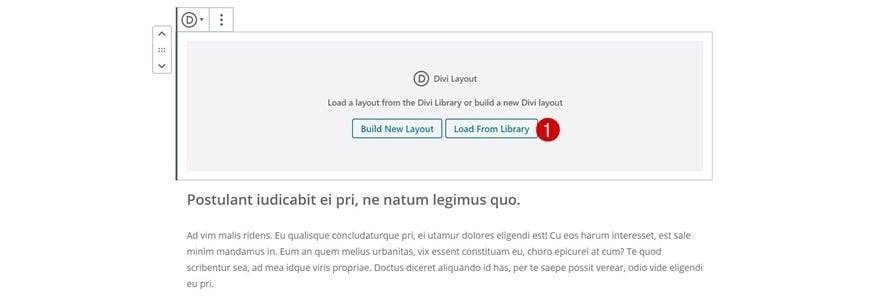
Once you’ve added the block, you’ll get two options. Pick the one that says ‘Build New Layout’.
Recreate Example #1
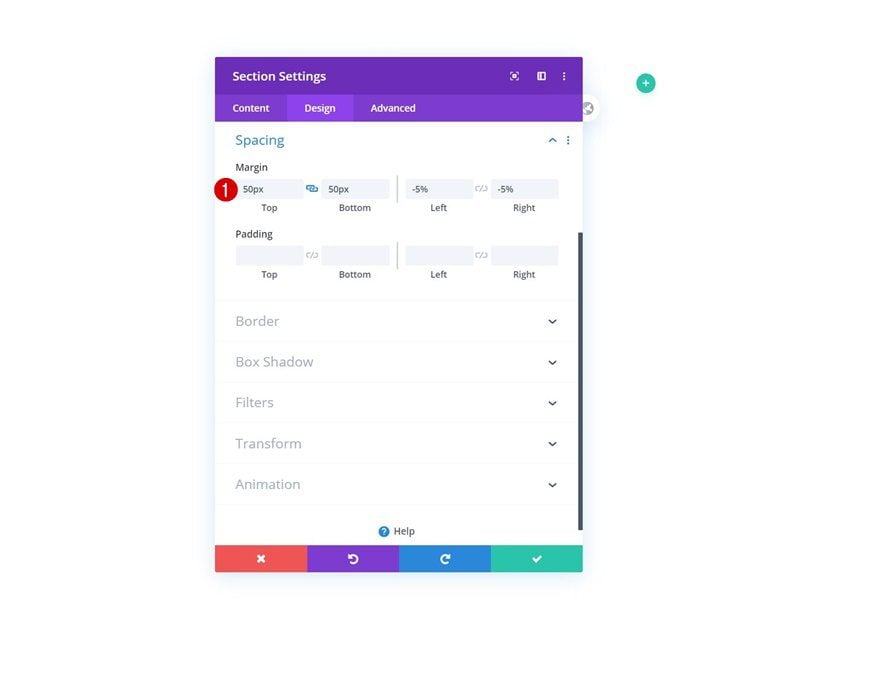
Section Settings
Spacing
Once you’re inside the Divi layout block editor, you’ll notice a section. To recreate the first example design, open the section settings and modify the margin values accordingly:
- Top Margin: 50px
- Bottom Margin: 50px
- Left Margin: -5%
- Right Margin: -5%
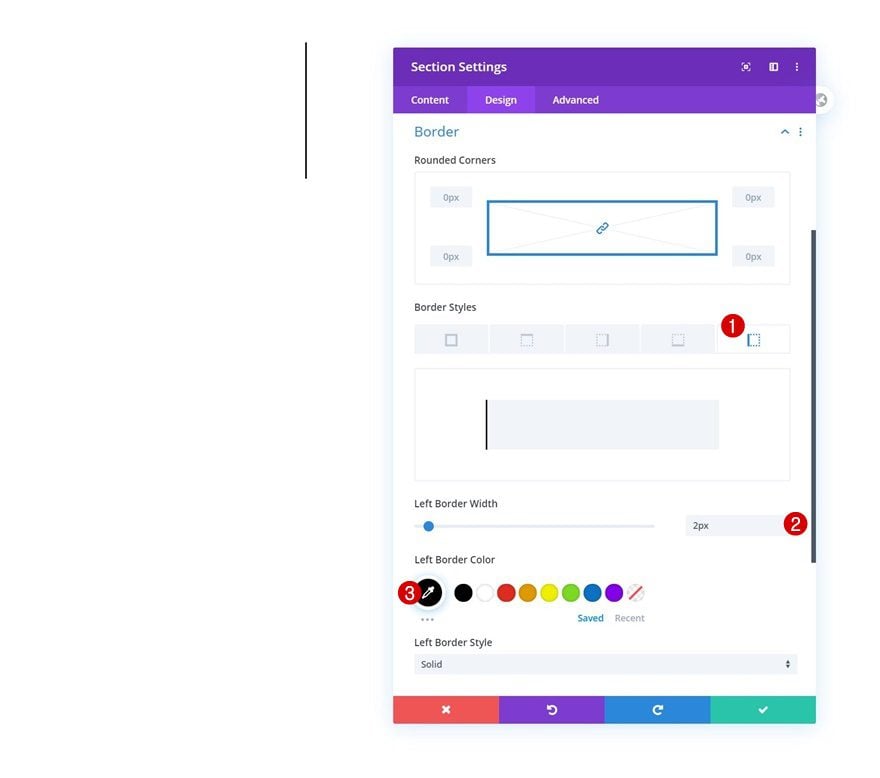
Border
Add a left border to the section next.
- Left Border Width: 2px
- Left Border Color: #000000
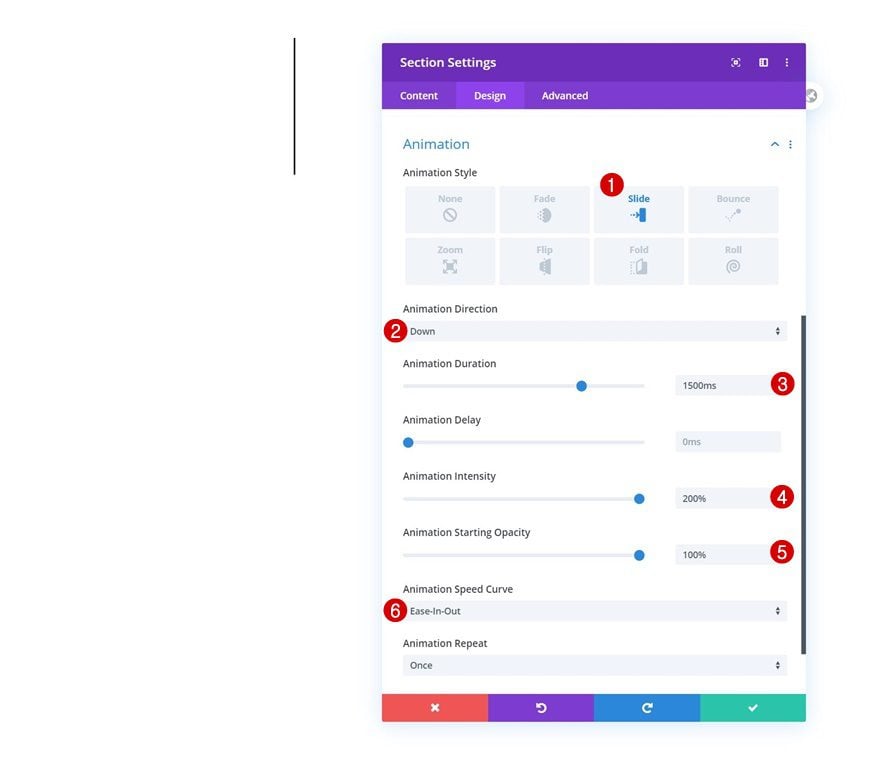
Animation
And use the following animation settings:
- Animation Style: Slide
- Animation Direction: Down
- Animation Duration: 1500ms
- Animation Intensity: 200%
- Animation Starting Opacity: 100%
- Animation Speed Curve: Ease-In-Out
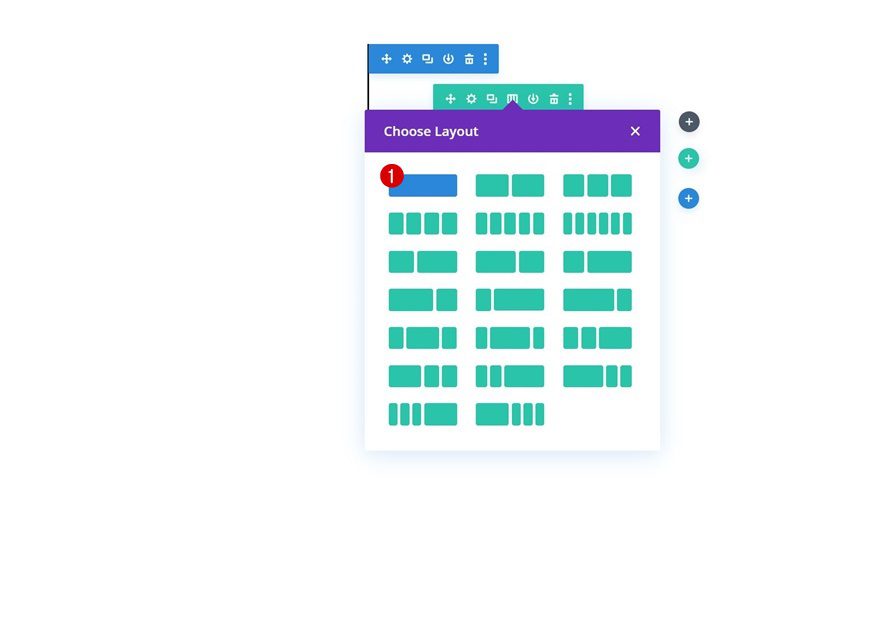
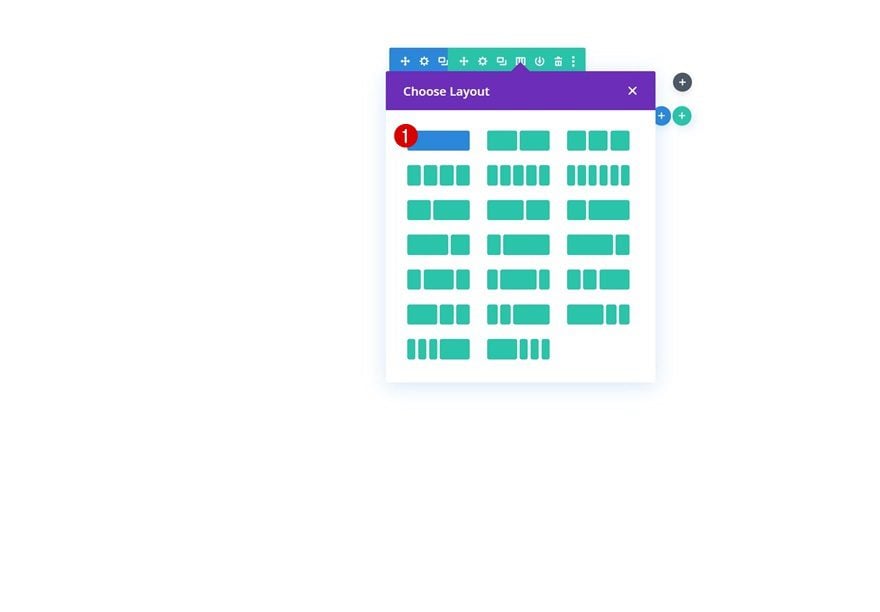
Add New Row
Column Structure
Continue by adding a new row to the section using the following column structure:
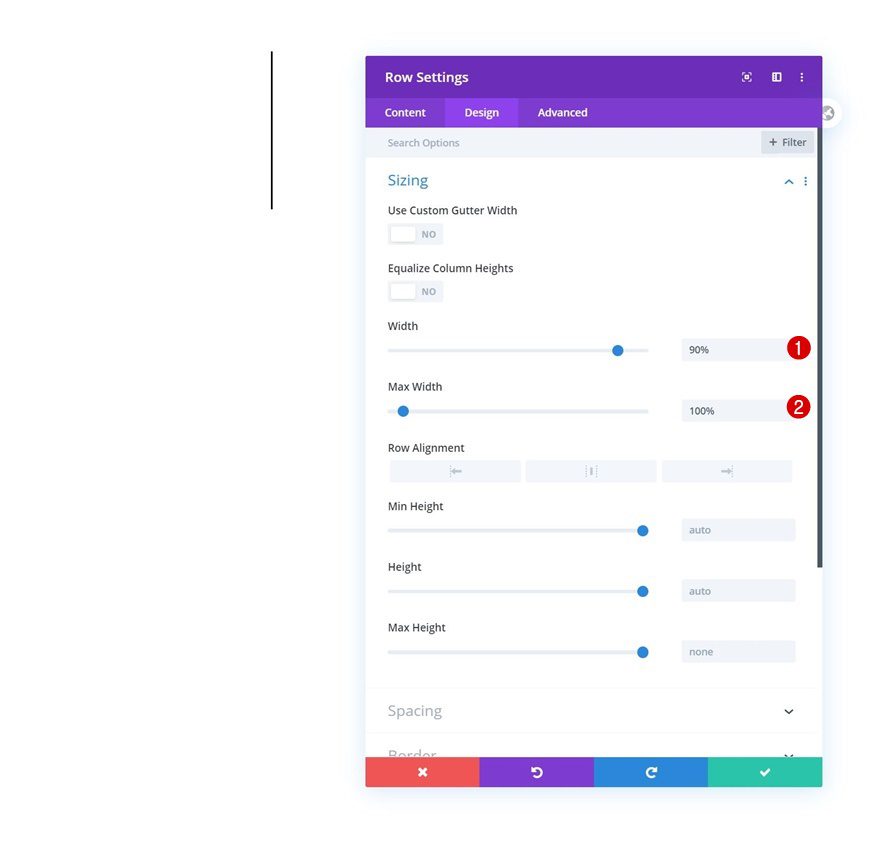
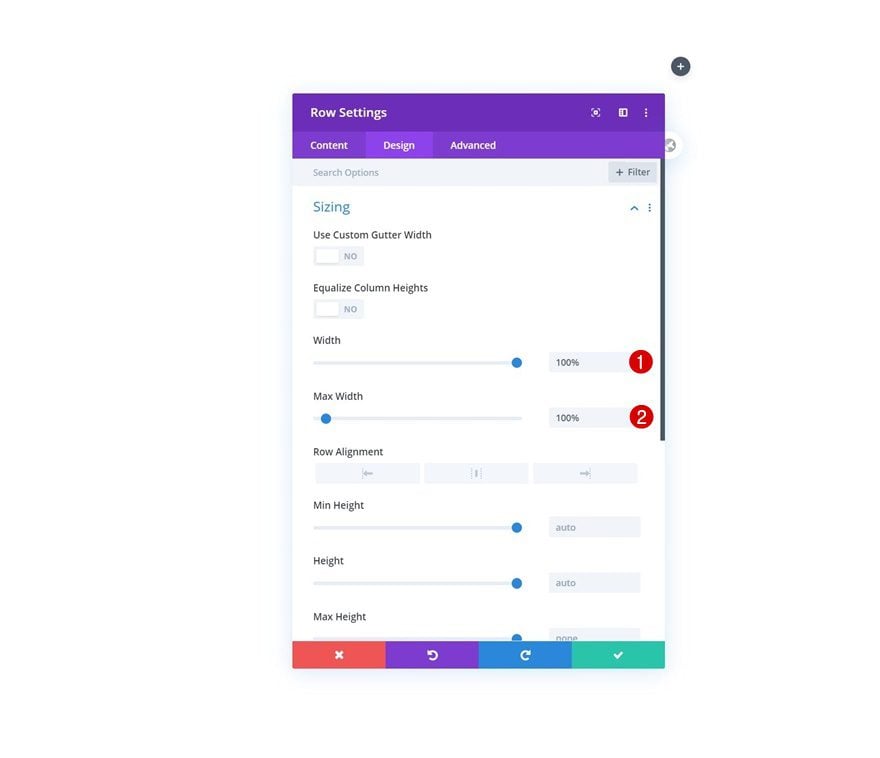
Sizing
Open the row settings and change the sizing settings accordingly:
- Width: 90%
- Max Width: 100%
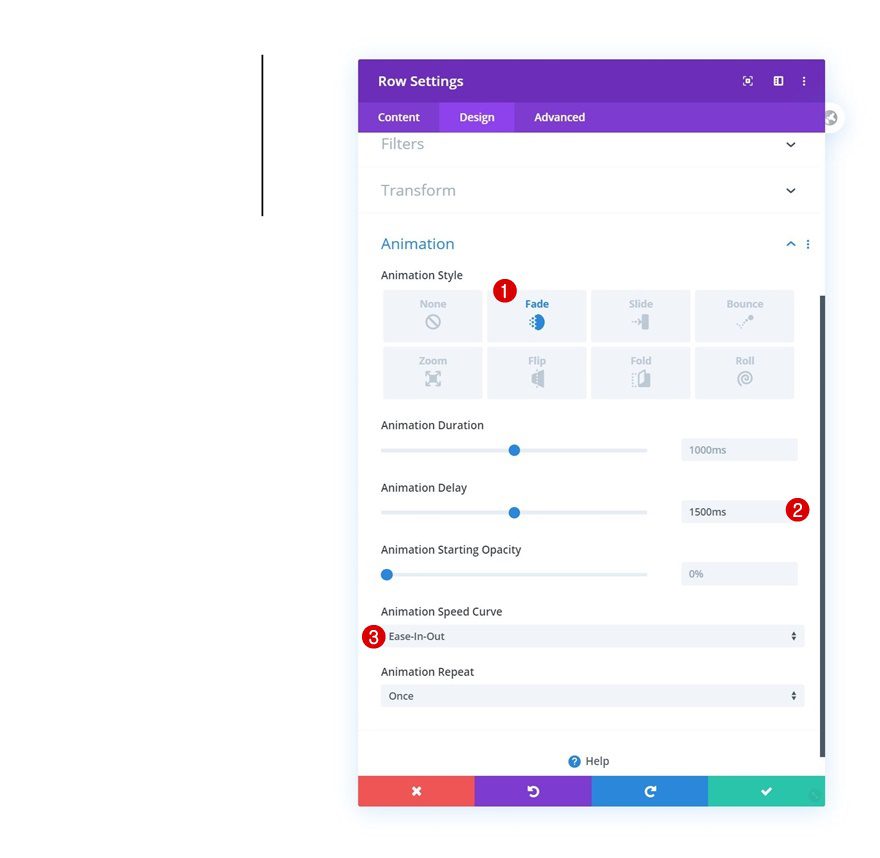
Animation
Complete the row settings by changing the animation settings as follows:
- Animation Style: Fade
- Animation Delay: 1500ms
- Animation Speed Curve: Ease-In-Out
Add Text Module to Column
Insert H3 Content
The only module we need is a Text Module. Insert the H3 highlighted quote content.
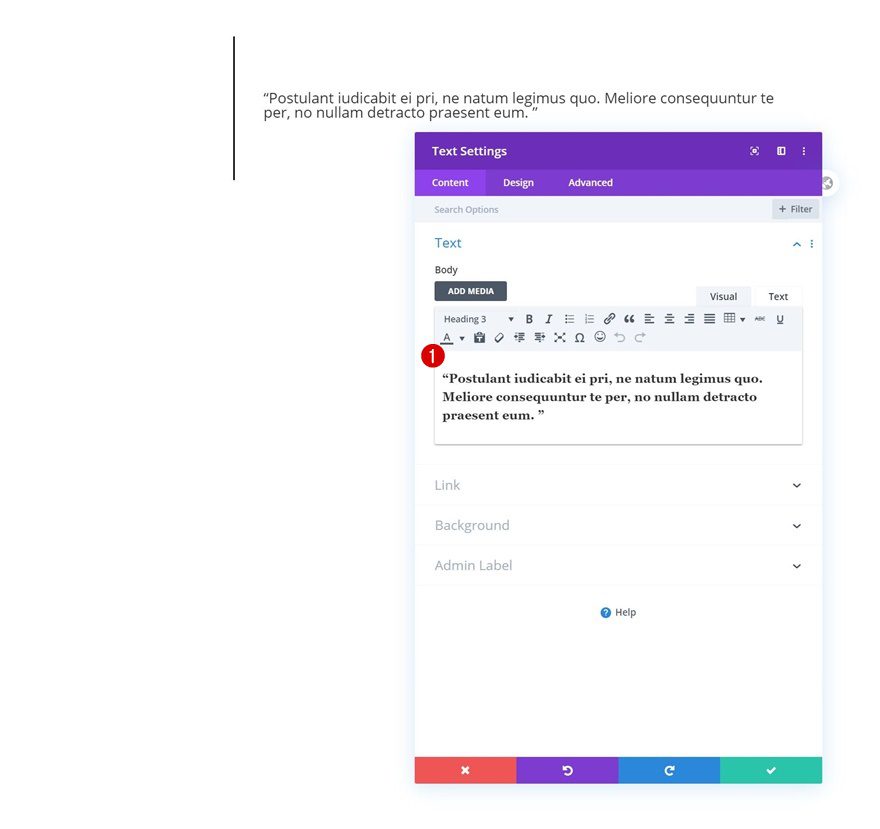
H3 Text Settings
Complete the module settings by modifying the H3 text settings as follows:
- H3 Font Style: Italic
- H3 Text Size: 2.1rem (Desktop), 1.5rem (Tablet), 1.3rem (Phone)
- H3 Line Height: 1.5em
Recreate Example #2
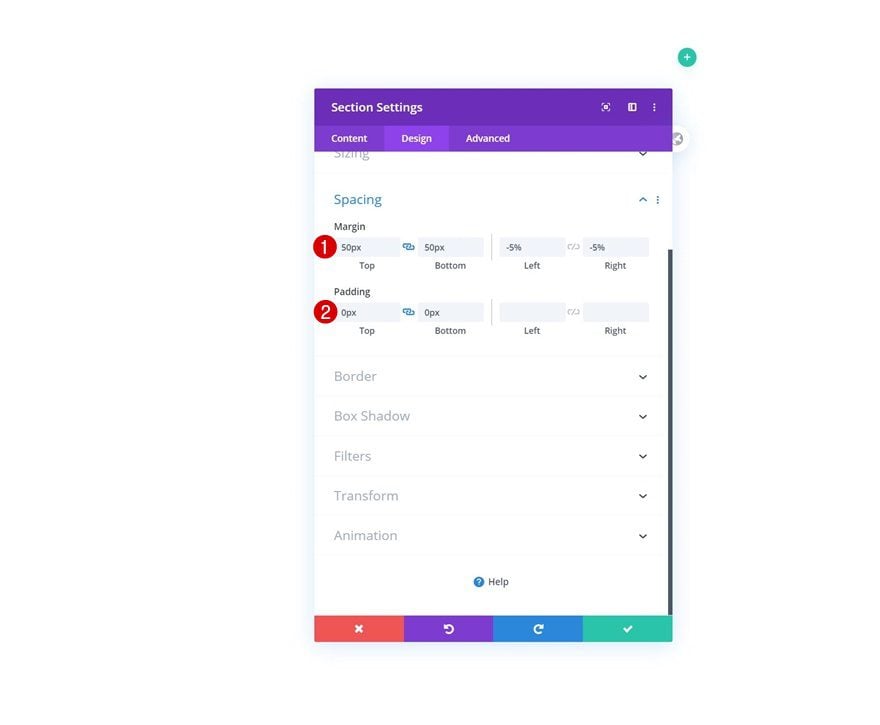
Section Settings
Spacing
Want to recreate the second design example instead? Open the section settings and modify the spacing values as follows:
- Top Margin: 50px
- Bottom Margin: 50px
- Left Margin: -5%
- Right Margin: -5%
- Top Padding: 0px
- Bottom Padding: 0px
Add New Row
Column Structure
Then, add a new row using the following column structure:
Sizing
Without adding any modules yet, open the row settings and allow the row to take up the entire section container’s width.
- Width: 100%
- Max Width: 100%
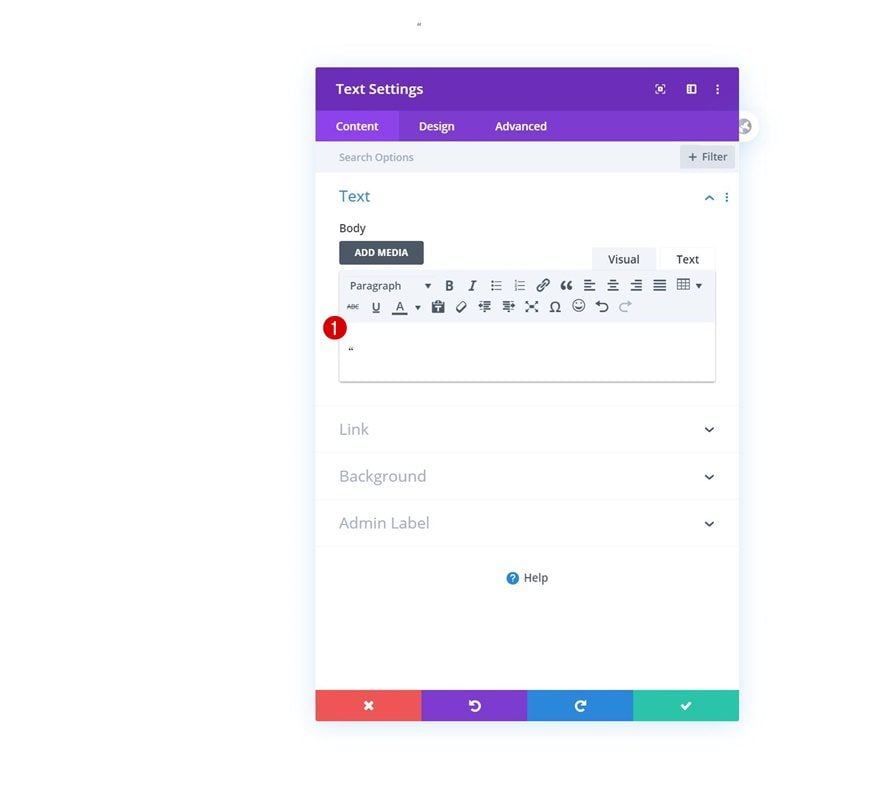
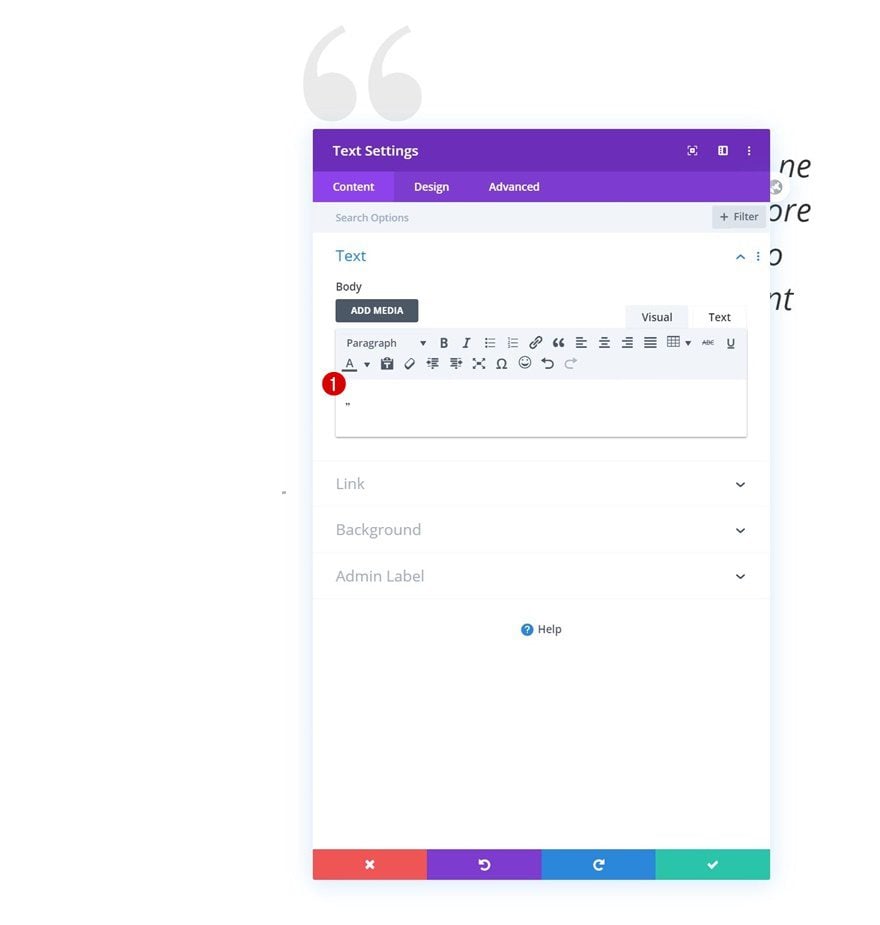
Add Text Module #1 to Column
Add Content
Time to add modules, starting with a first Text Module. Add a quote to the content box.
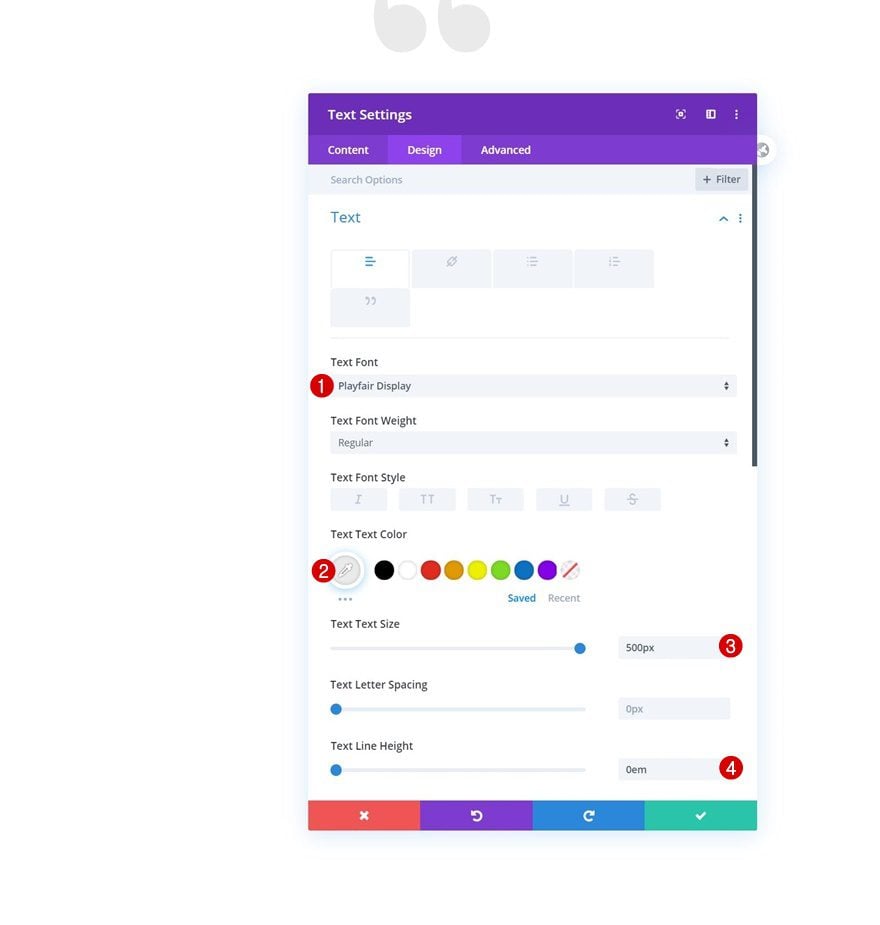
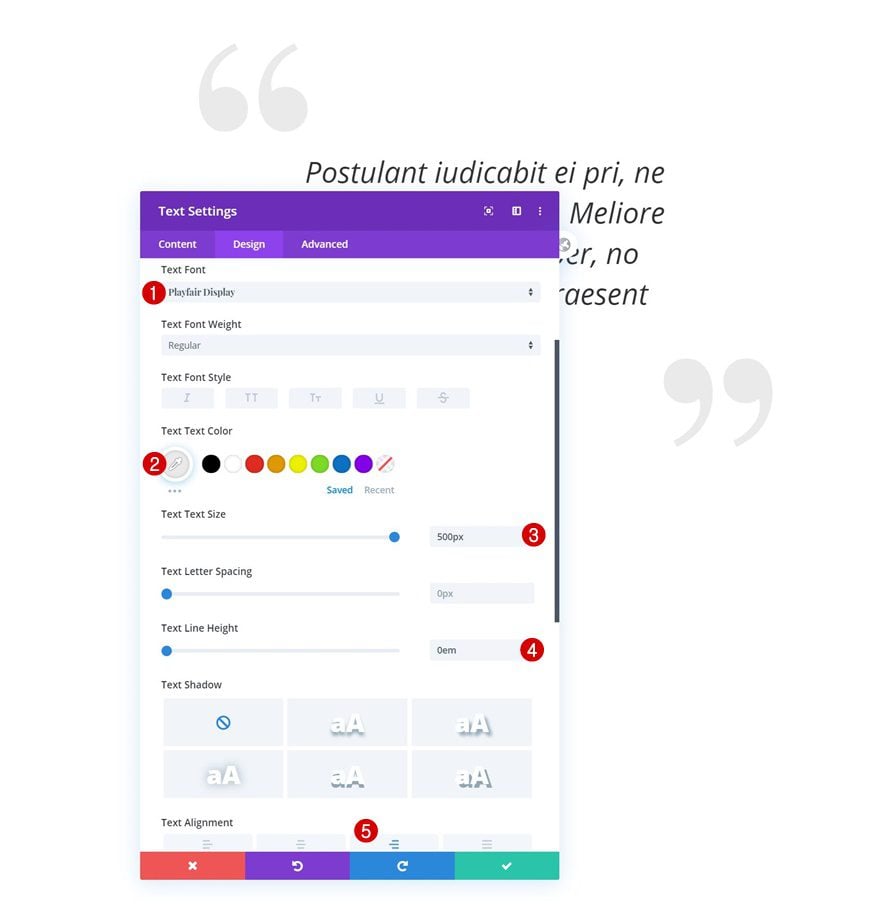
Text Settings
Move on to the design tab and change the text settings as follows:
- Text Font: Playfair Display
- Text Color: #eaeaea
- Text Size: 500px
- Text Line Height: 0em
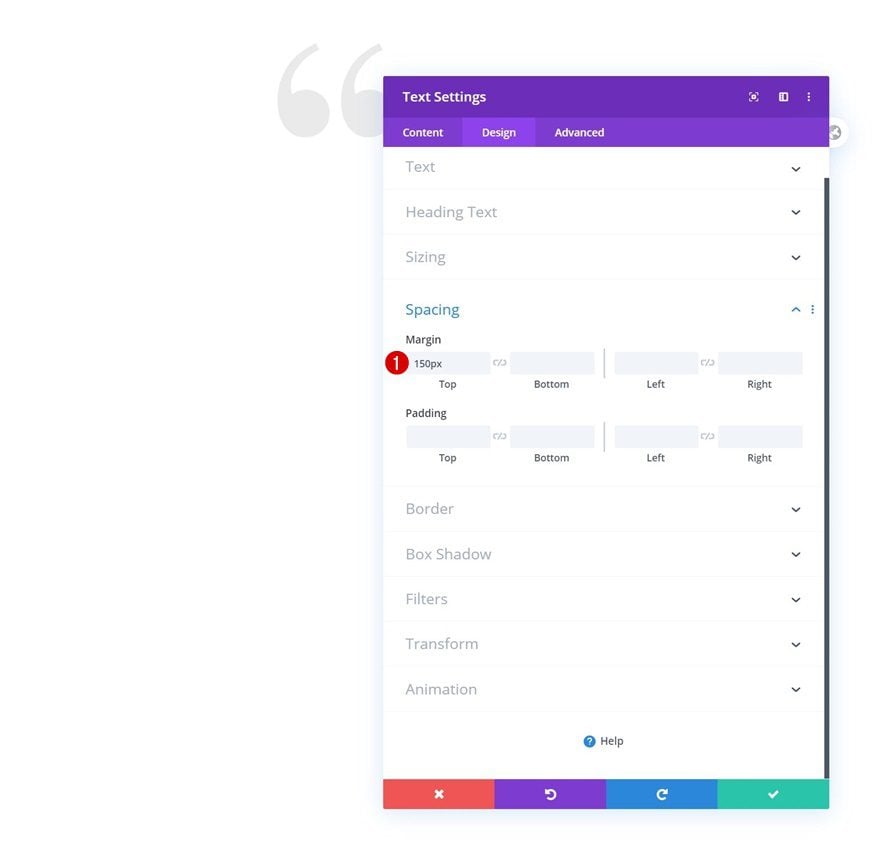
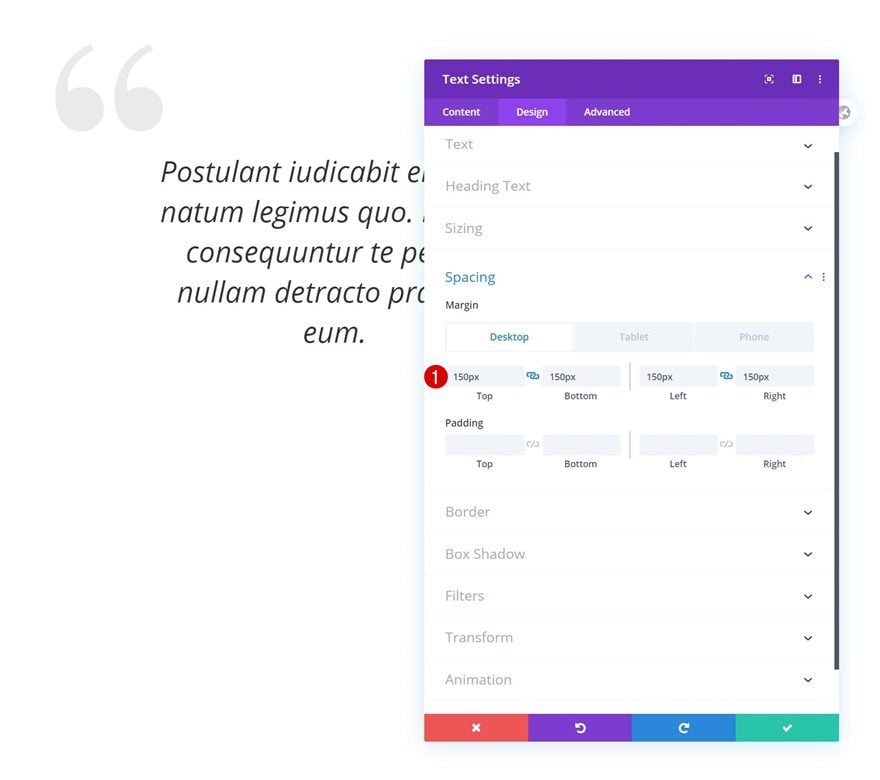
Spacing
We’re adding some top margin too.
- Top Margin: 150px
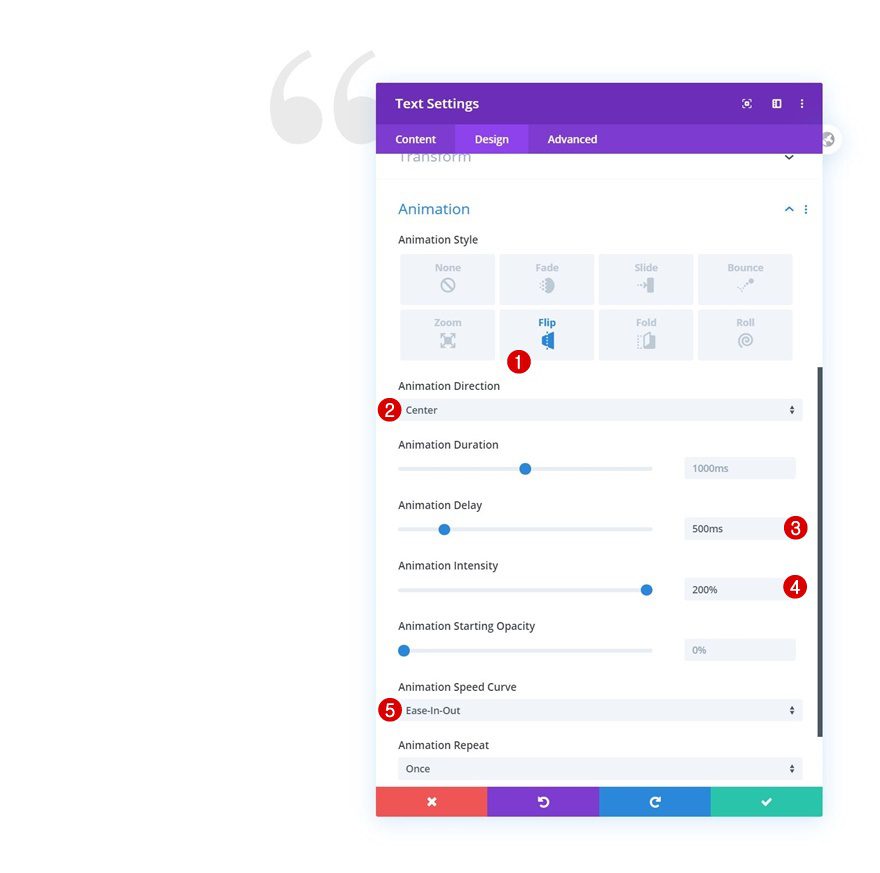
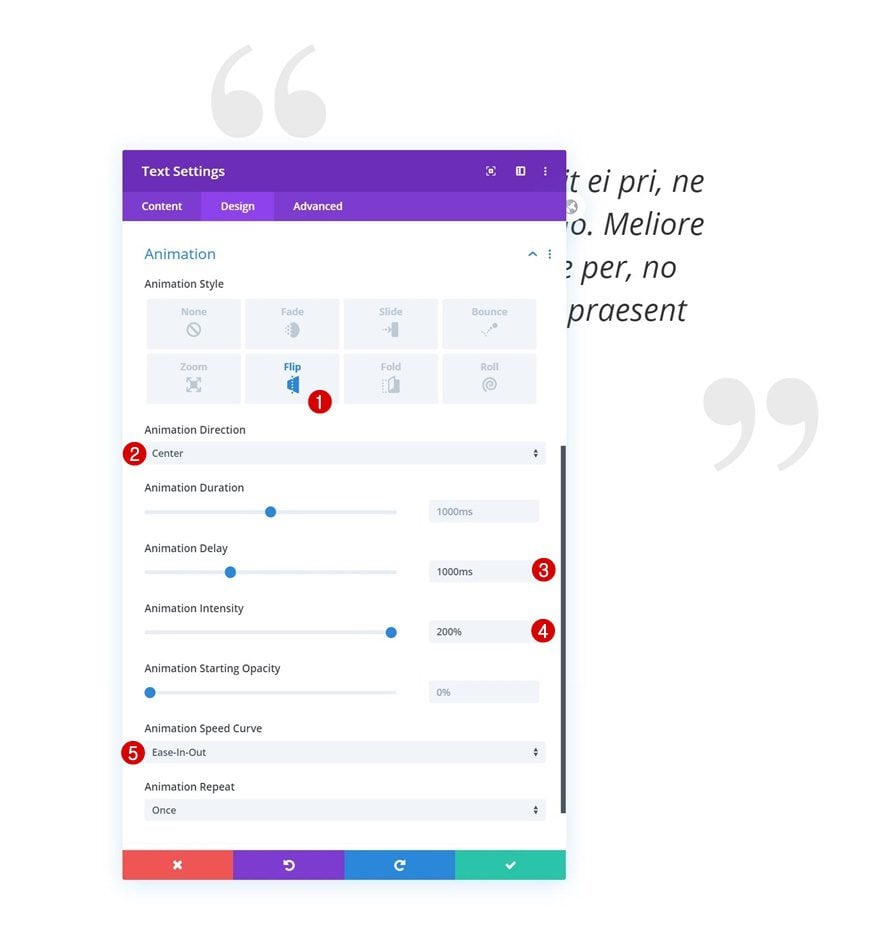
Animation
Then, we’ll change the animation settings.
- Animation Style: Flip
- Animation Direction: Center
- Animation Delay: 500ms
- Animation Intensity: 200%
- Animation Speed Curve: Ease-In-Out
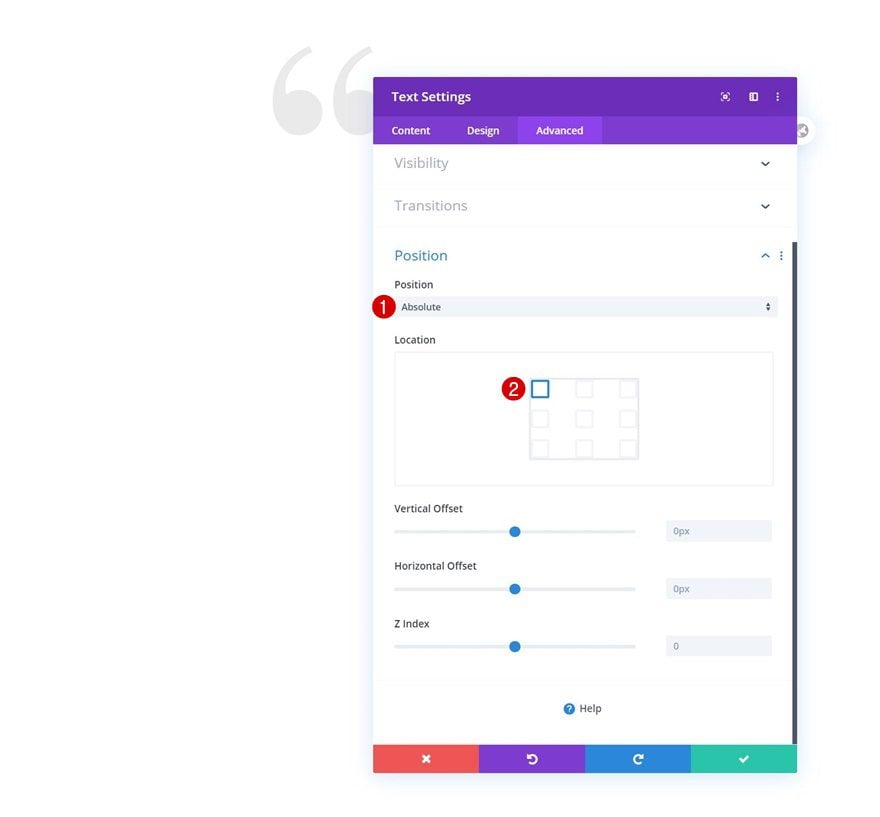
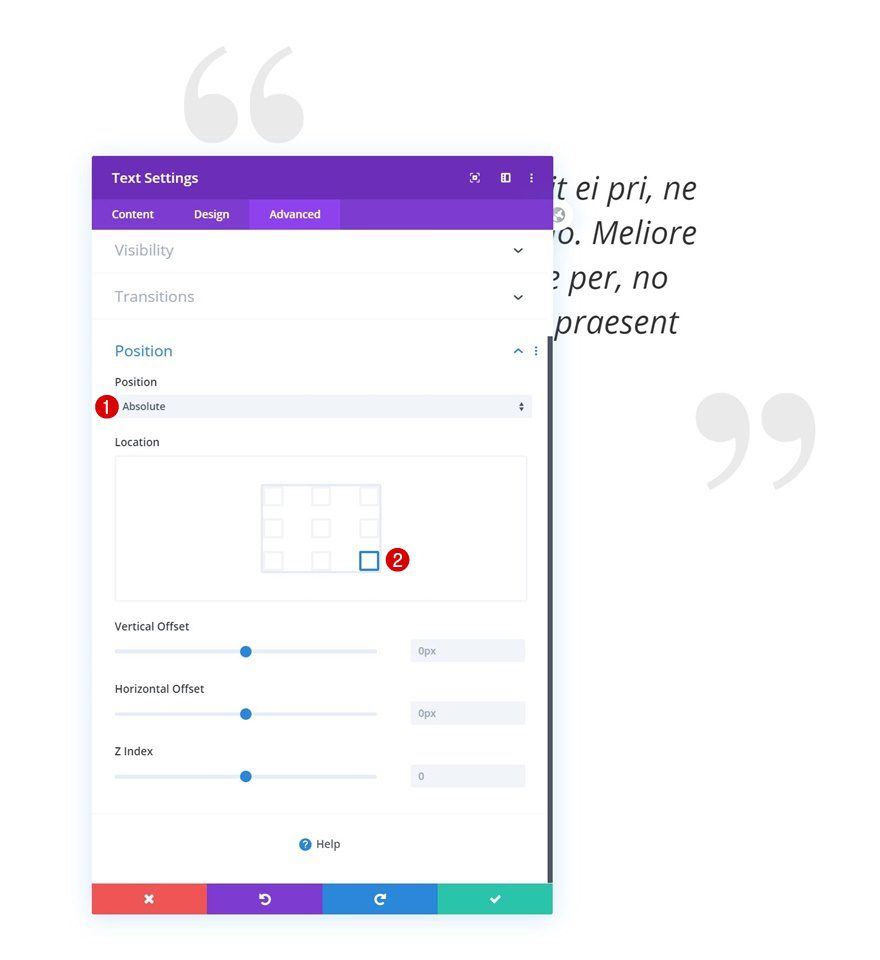
Position
We’ll make sure the quote is placed in the row container’s top left corner by modifying the position settings as well.
- Position: Absolute
- Location: Top Left
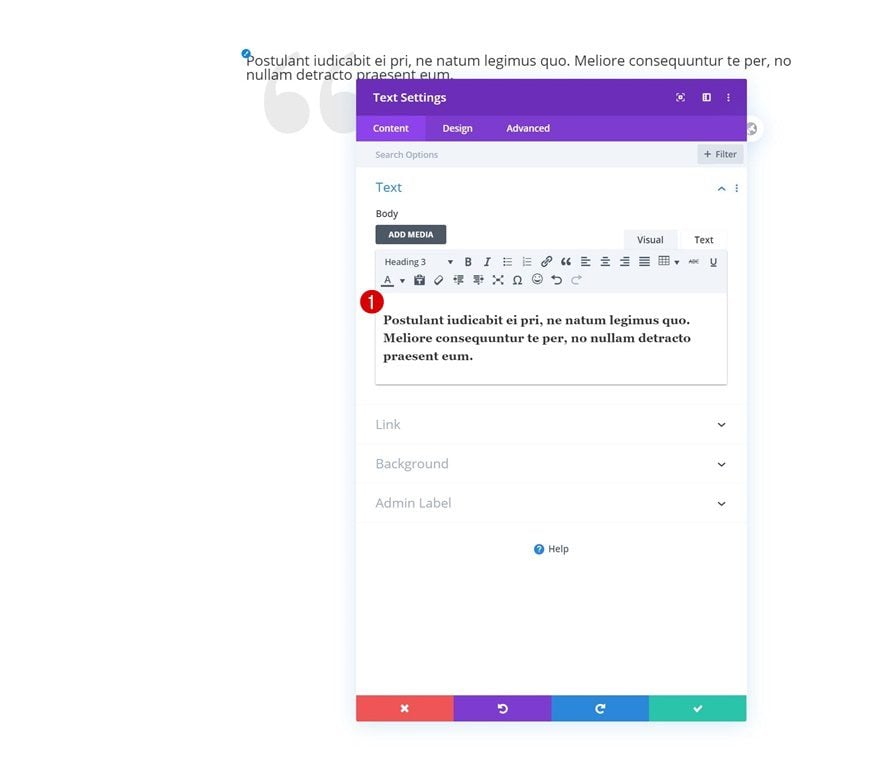
Add Text Module #2 to Column
Add H3 Content
On to the next Text Module. Add the H3 highlighted quote content to the content box.
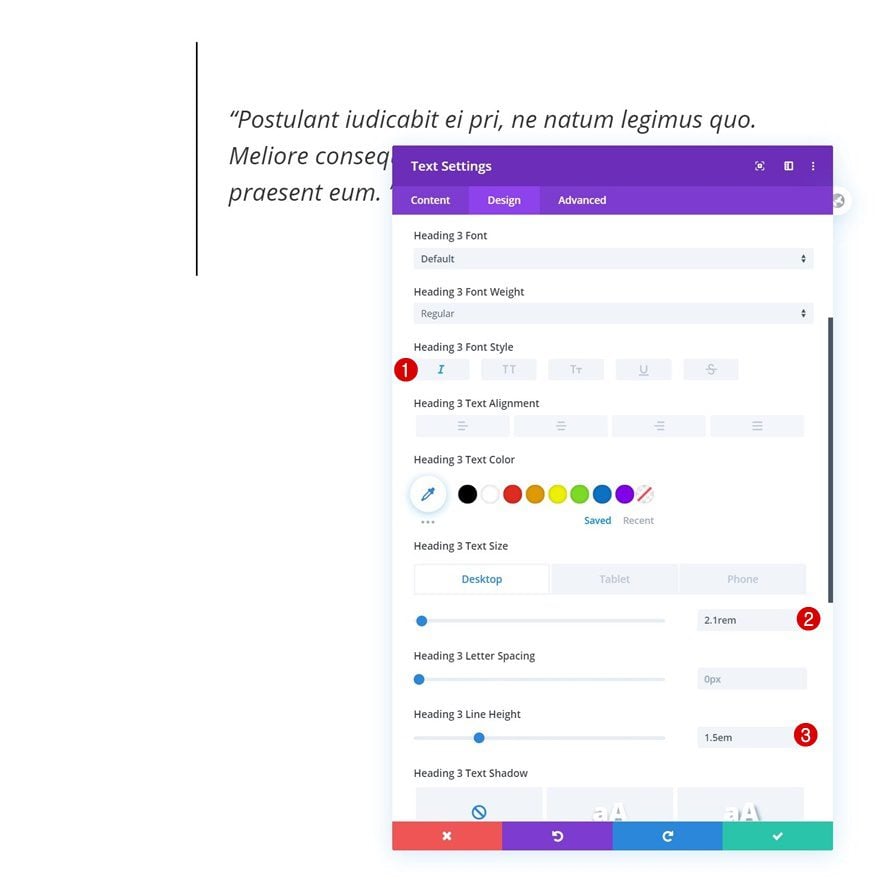
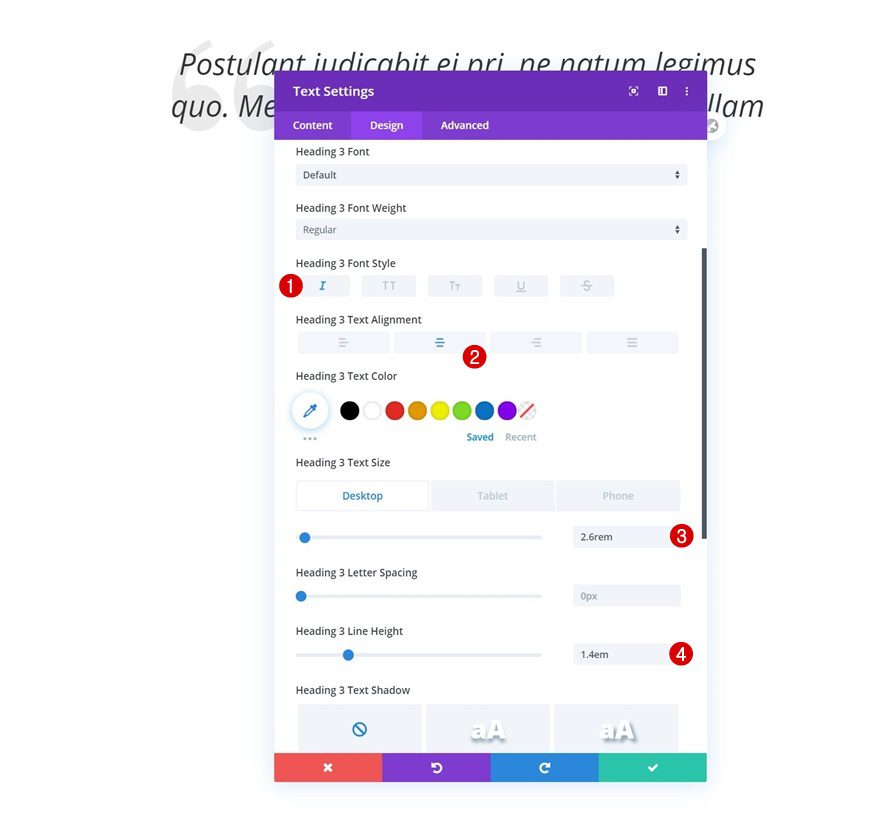
H3 Text Settings
Move on to the module’s design tab and change the H3 text settings as follows:
- Heading 3 Font Style: Italic
- Heading 3 Text Size: 2.6rem (Desktop), 1.7rem (Tablet), 1.3rem (Phone)
- Heading 3 Line Height: 1.4em
Spacing
Add some custom margin values across different screen sizes too.
- Top Margin: 150px
- Bottom Margin: 150px
- Left Margin: 150px (Desktop), 70px (Tablet), 30px (Phone)
- Right Margin: 150px (Desktop), 70px (Tablet), 30px (Phone)
Animation
And complete the module settings by changing the animation settings as follows:
- Animation Style: Fade
- Animation Delay: 2000ms
- Animation Speed Curve: Ease-In-Out

Add Text Module #3 to Column
Add Content
On to the next and last module, which is another Text Module. Add a quote symbol to the content box.
Text Settings
Move on to the module’s design tab and change the text settings.
- Text Font: Playfair Display
- Text Color: #eaeaea
- Text Size: 500px
- Text Line Height: 0em
- Text Alignment: Right
Animation
Use the following animation settings next:
- Animation Style: Flip
- Animation Direction: Center
- Animation Delay: 1000ms
- Animation Intensity: 200%
- Animation Speed Curve: Ease-In-Out
Position
And make sure the quote is placed in the row container’s bottom right corner.
- Position: Absolute
- Location: Bottom Right
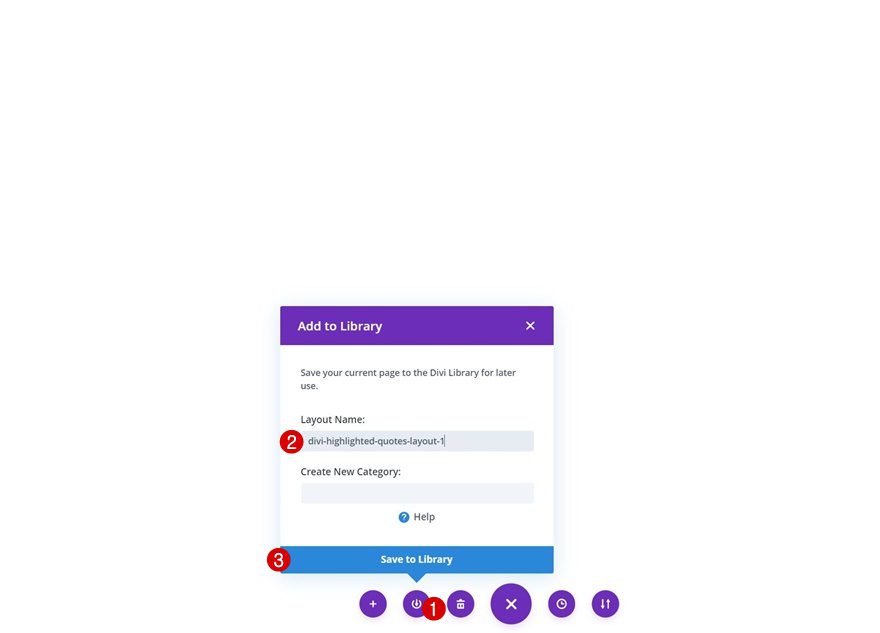
Save Quote Layouts to Divi Library for Reuse
Once you’ve completed the quote layout of your choice, make sure you save it to your Divi Library so you can use it for future posts as well!
Preview
Now that we’ve gone through all the steps, let’s take a final look at the outcome across different screen sizes.
Example #1
Desktop
Mobile
Example #2
Desktop
Mobile
Final Thoughts
In this post, we’ve shown you how to get creative with Divi’s layout blocks. More specifically, we’ve shown you how to add animated highlighted quotes throughout your Gutenberg blog post. The design possibilities are endless, but we’ve provided you with two examples you can get started with. You were able to download the JSON files for free as well! If you have any questions or suggestions, feel free to leave a comment in the comment section below.
If you’re eager to learn more about Divi and get more Divi freebies, make sure you subscribe to our email newsletter and YouTube channel so you’ll always be one of the first people to know and get benefits from this free content.


I love DIVI! I use it for one of my website and I use the quote section all the time.
I am a blogger who loves reading and sharing quotes. I will use Divi theme on my new blog. I will use highlighted quotes in blog posts.
I agree with MHB. I pay for Divi and have zero interest in another editor. Also, a hundred steps for a couple of block quotes in a free editor with an editor I pay for is one of the most ridiculous things I’ve seen in a long time.
Hmmmm,
In EXAMPLE #2, TEXT MODULE #3, how do I get the double-quote to be the close-quote, since when I type in the double-quote it displays as an open-quote?
I’m obviously missing something! 🙂
Thanks!
Lot of guttenberg stuff lately which in my world is a frankenstein thing visual designer integrated with another visuel designer makes No sense. Im missing theme builder themes we got 4 when it was launched and nothings more as I remember