")
The problem with most animation tools is that they swing from boring to chaotic with no middle ground. Either the effects aren’t visible, or a slight move of the mouse can send elements flying.
With Divi 5’s Interactions, you get fine-grained control over how elements respond. Its Sensitivity settings let you choose whether the motion is barely noticeable or dramatic, so effects stay smooth, subtle, and professional. In this post, we’ll walk through how to trigger effects using mouse movements in Divi 5.
What Are Interactions In Divi 5
Interactions are connections between what a visitor does and how the page responds. They’re built on three parts:
- Trigger: The action that starts it. This could be a click, a mouse entering or leaving an element, the moment something enters the viewport, or the page load.
- Effect: The response you want. That might be a card tilting, an image zooming, a banner fading in, or a preset swapping styles.
- Target: The element that reacts. It could be the very thing the visitor clicked on, or something completely different somewhere else on the page.
Subscribe To Our YouTube Channel
When you combine these, you get a simple cause-and-effect chain. For example, a visitor hovers over a product card (trigger), which scales slightly (effect). The card’s image module (target) is the element that responds.
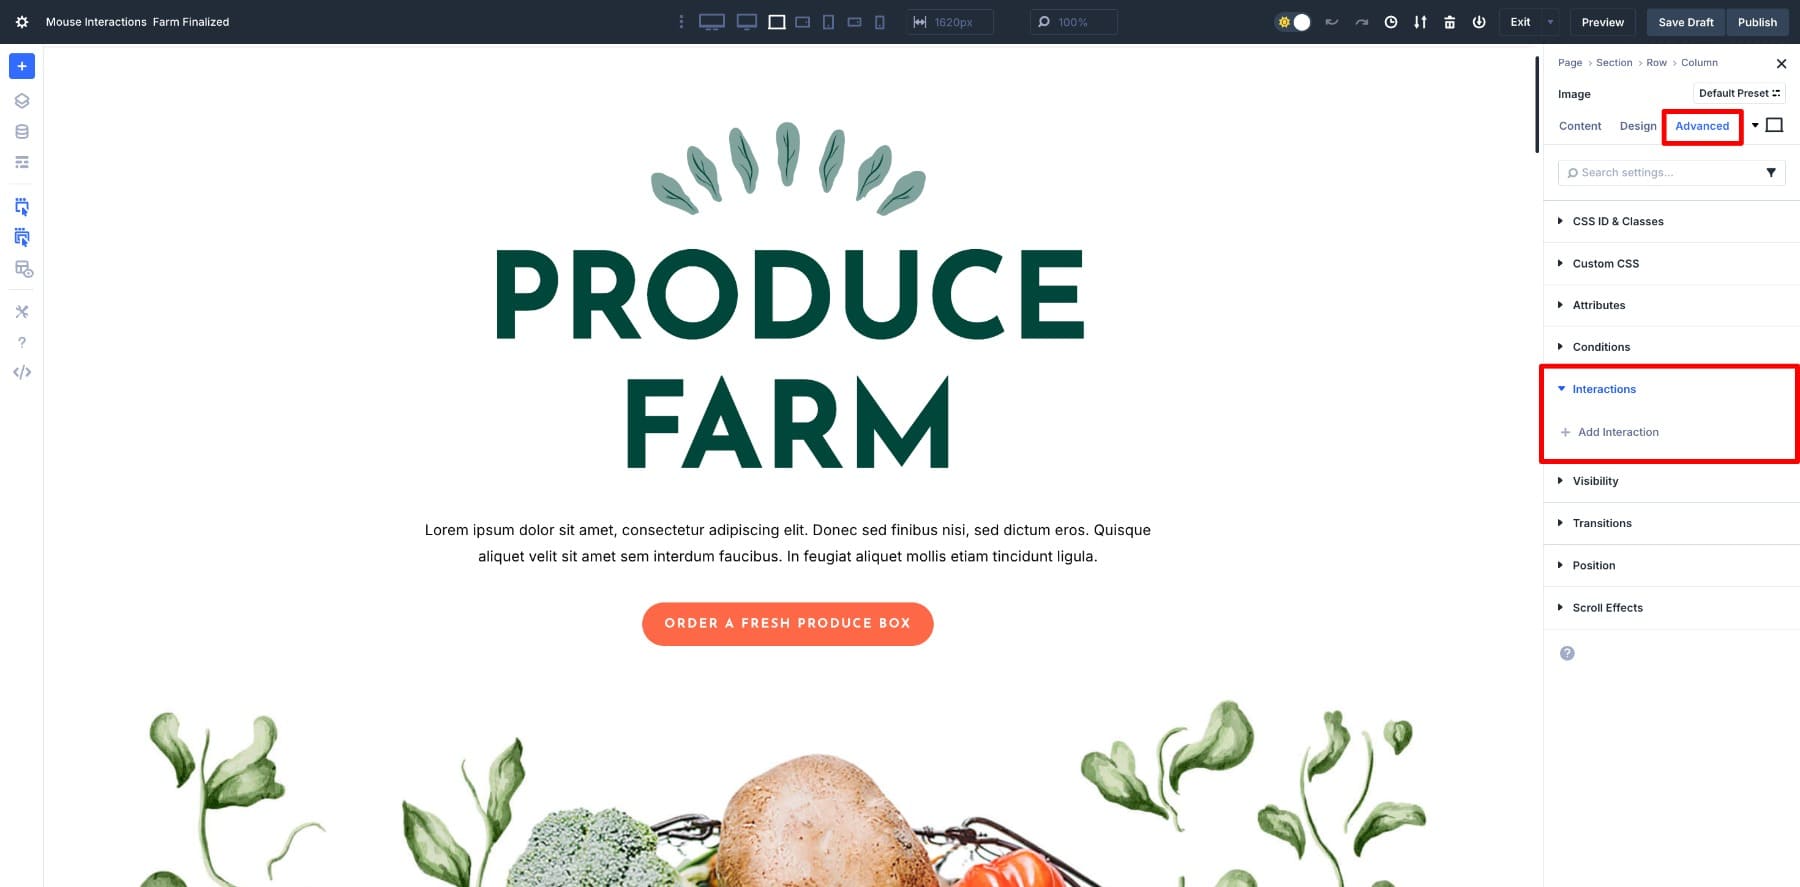
In the Divi Builder, you’ll find the option to add interactions inside the Advanced tab of any section, row, or module.
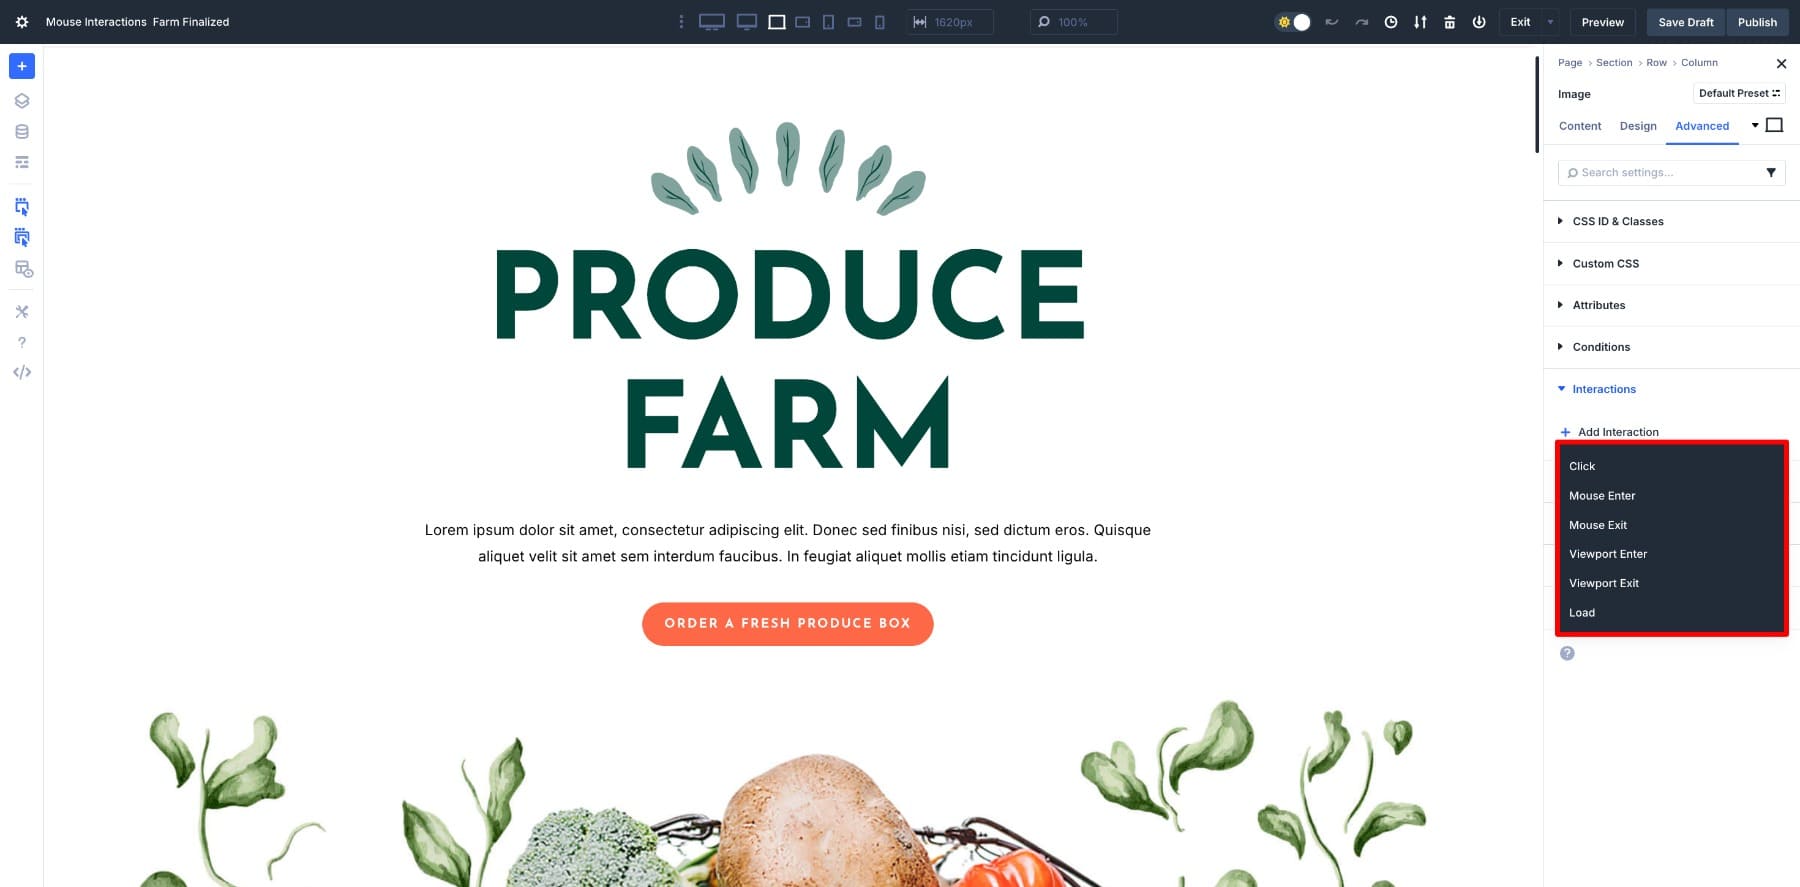
Click Add Interaction and you’ll see the list of possible triggers: Click, Mouse Enter, Mouse Exit, Viewport Enter, Viewport Exit, or Load.
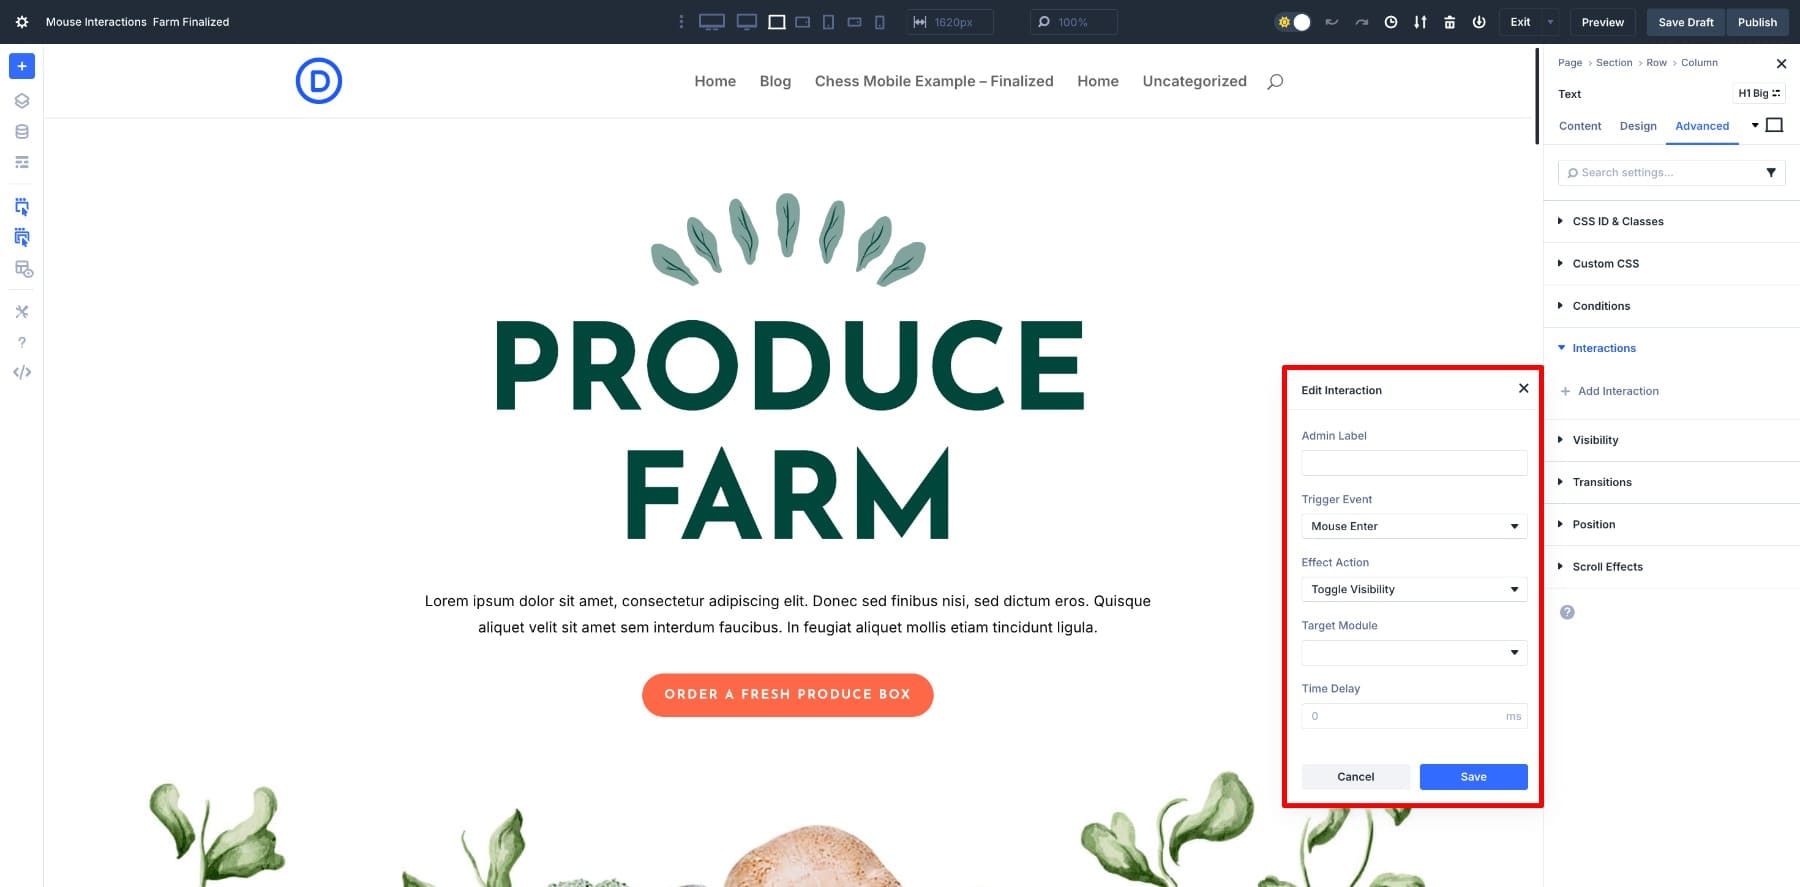
From there, the panel lets you pick the effect and target, which is where the customization really opens up.
What makes Interactions stand out is that the effects aren’t limited to simple show and hide actions. Divi 5 gives you a wide toolkit to:
- Apply or remove design presets, so a button could switch from minimal to bold styling when clicked.
- Change attributes, like making an image tilt or scale when someone moves their mouse.
- Set cookies, which means a banner dismissed by a visitor will not keep reappearing every time they load the page.
- Scroll users to a specific element on the page, useful for “back to top” buttons or navigation shortcuts.
For example, imagine you are building a product page. You might add an interaction so that when a user hovers over a product card, the image zooms slightly and a border appears. Or you could design a timed interaction that shows a “Free Shipping” banner five seconds after someone lands on the site, but only once per visit.
This means your layouts are no longer static blueprints. They can respond to the way people browse, highlight what matters most, and remember user choices. All of this and a lot more is possible with Divi 5’s Interactions. They give you an easy way to make your designs feel more personal and alive.
Learn Everything About Divi 5’s Interactions
Understanding Mouse Movements In Interactions
One of the most exciting effects inside Divi 5’s Interactions is Mirror Mouse Movement. You’ll find it under the Effect Action column.
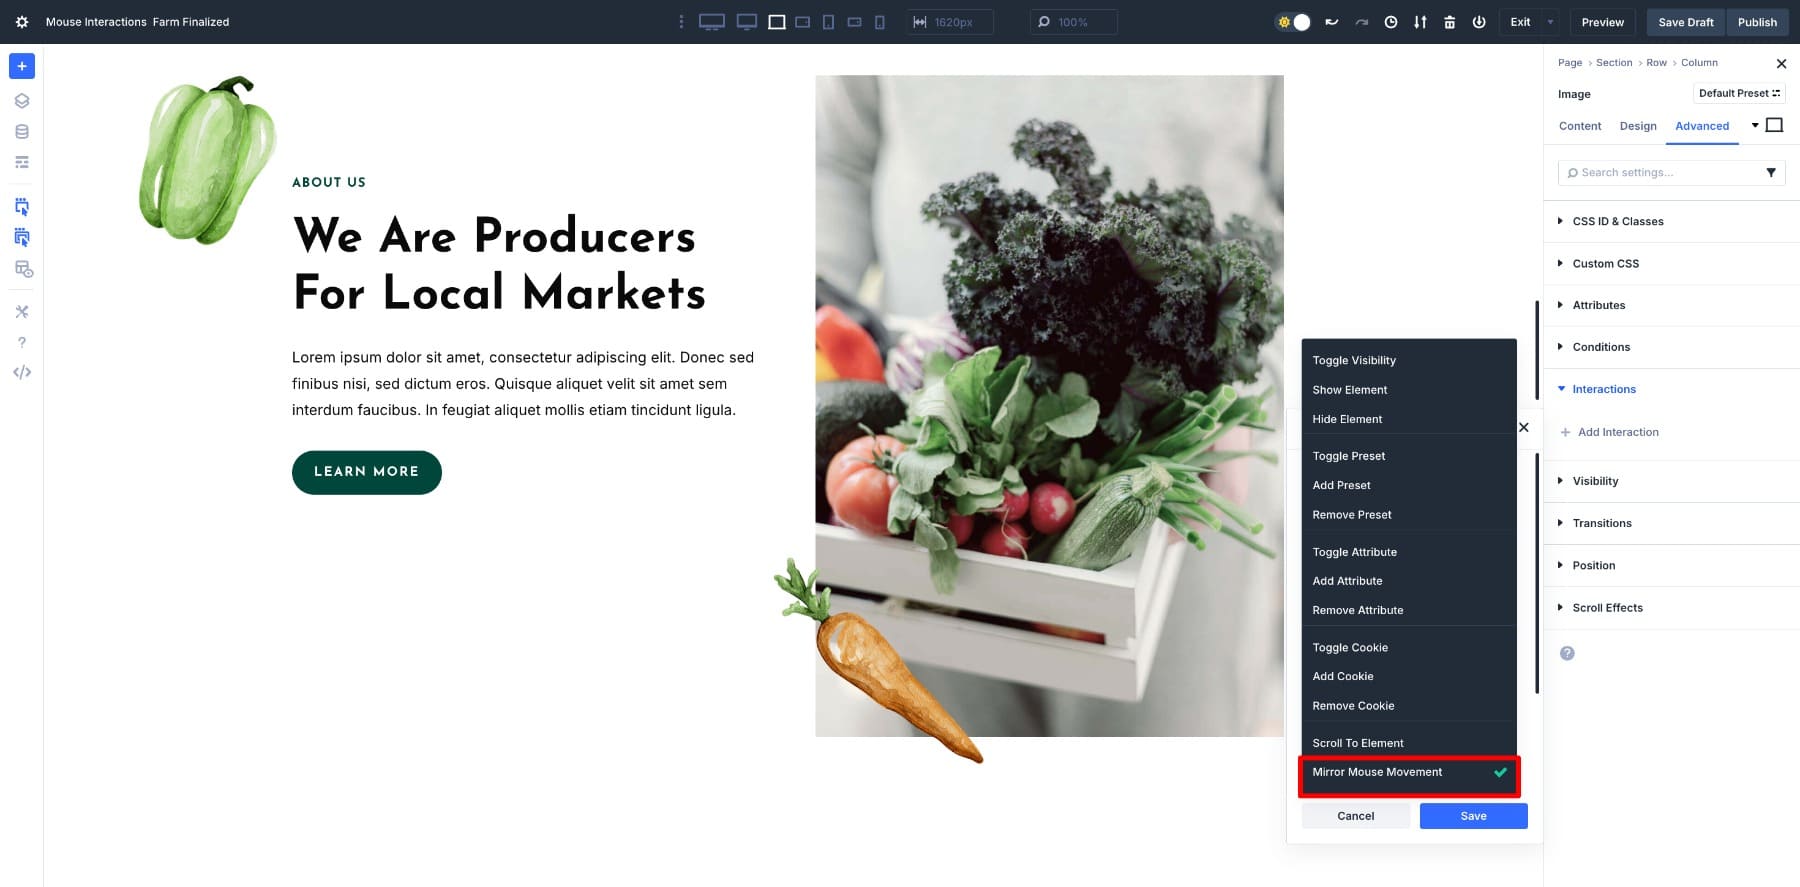
This setting lets elements respond directly to a visitor’s cursor. As the mouse moves, a module can shift position, tilt, scale, rotate, or fade.
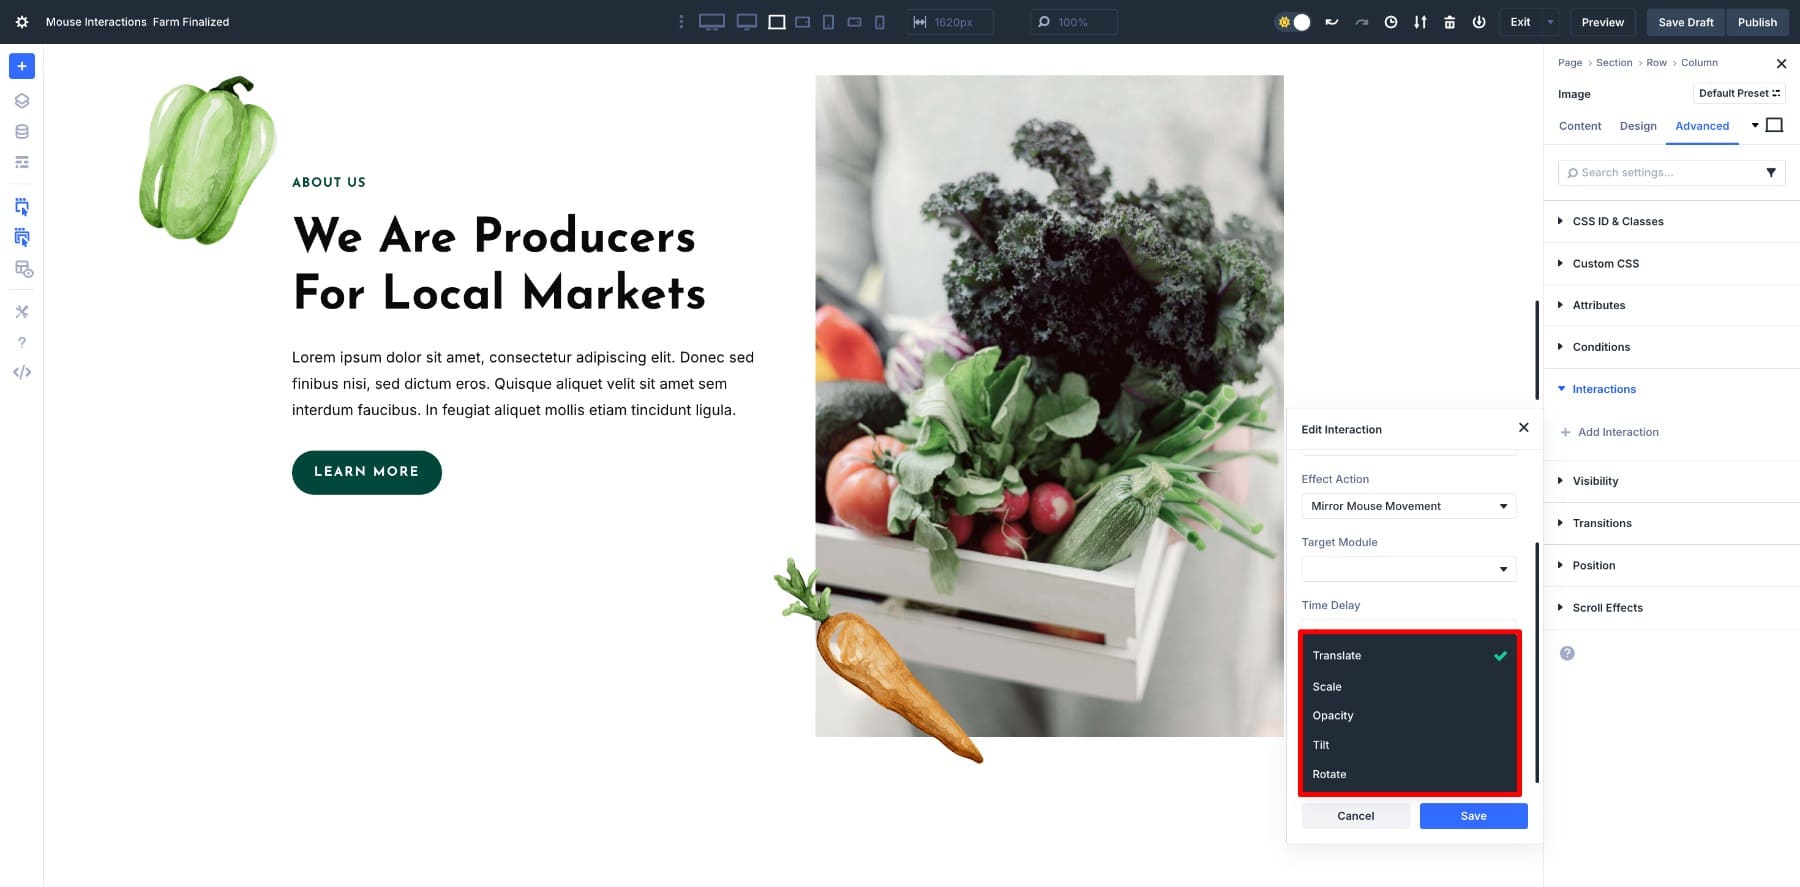
Instead of waiting for a click, the page reacts instantly, which makes it feel “alive”.
The strength of that movement comes from the Sensitivity setting:
- Lower values create soft, almost imperceptible shifts. This adds depth without distracting from the content.
- Higher values make the motion stronger and more dramatic. While this can grab attention, it works best when used sparingly.
For example, you might:
- Translate a hero image so it shifts slightly with the cursor, creating depth.
- Tilt a product card so it leans as if it has weight.
- Scale a button so it grows and shrinks gently as the user explores.
- Fade a background image in and out for a layered effect.
However, you don’t want to overdo mouse movements. For example, a subtle tilt on an image can make it feel interactive and modern, while a heavy rotation on every section could quickly feel distracting.
Mirror Mouse Movement is a way to guide attention where you want it. A button that scales with mouse movement feels more inviting to click, and a hero section that shifts with the cursor draws users into the page. These are small touches, but they add personality and responsiveness without requiring any custom code.
6 Mouse Trigger Effects You Can Generate With Divi 5
Once you understand how Mirror Mouse Movement works, you can start applying it to real design elements. Here are a few practical effects you can build directly inside Divi 5.
1. Interactive Hero Section
The hero area is one of the best places to use mouse movement effects. A subtle translate on the background or image makes the section feel dynamic without distracting from the headline or call-to-action.
This hero uses a bold heading, a short paragraph, a primary button, and four supporting images. We want to keep the text steady but responsive, and let the images create depth as the cursor moves. To achieve this, we apply a slight scale to the text and move the image layers with translate.
First, we add Scale effect to the heading, paragraph, and button. Select the heading and go to Settings > Advanced > Interactions. Click Add Interaction. Then, apply the following settings:
- Trigger Event: Mouse Enter
- Effect Action: Mirror Mouse Movement
- Target Module: Heading
- Movement Type: Scale
- Sensitivity: 2
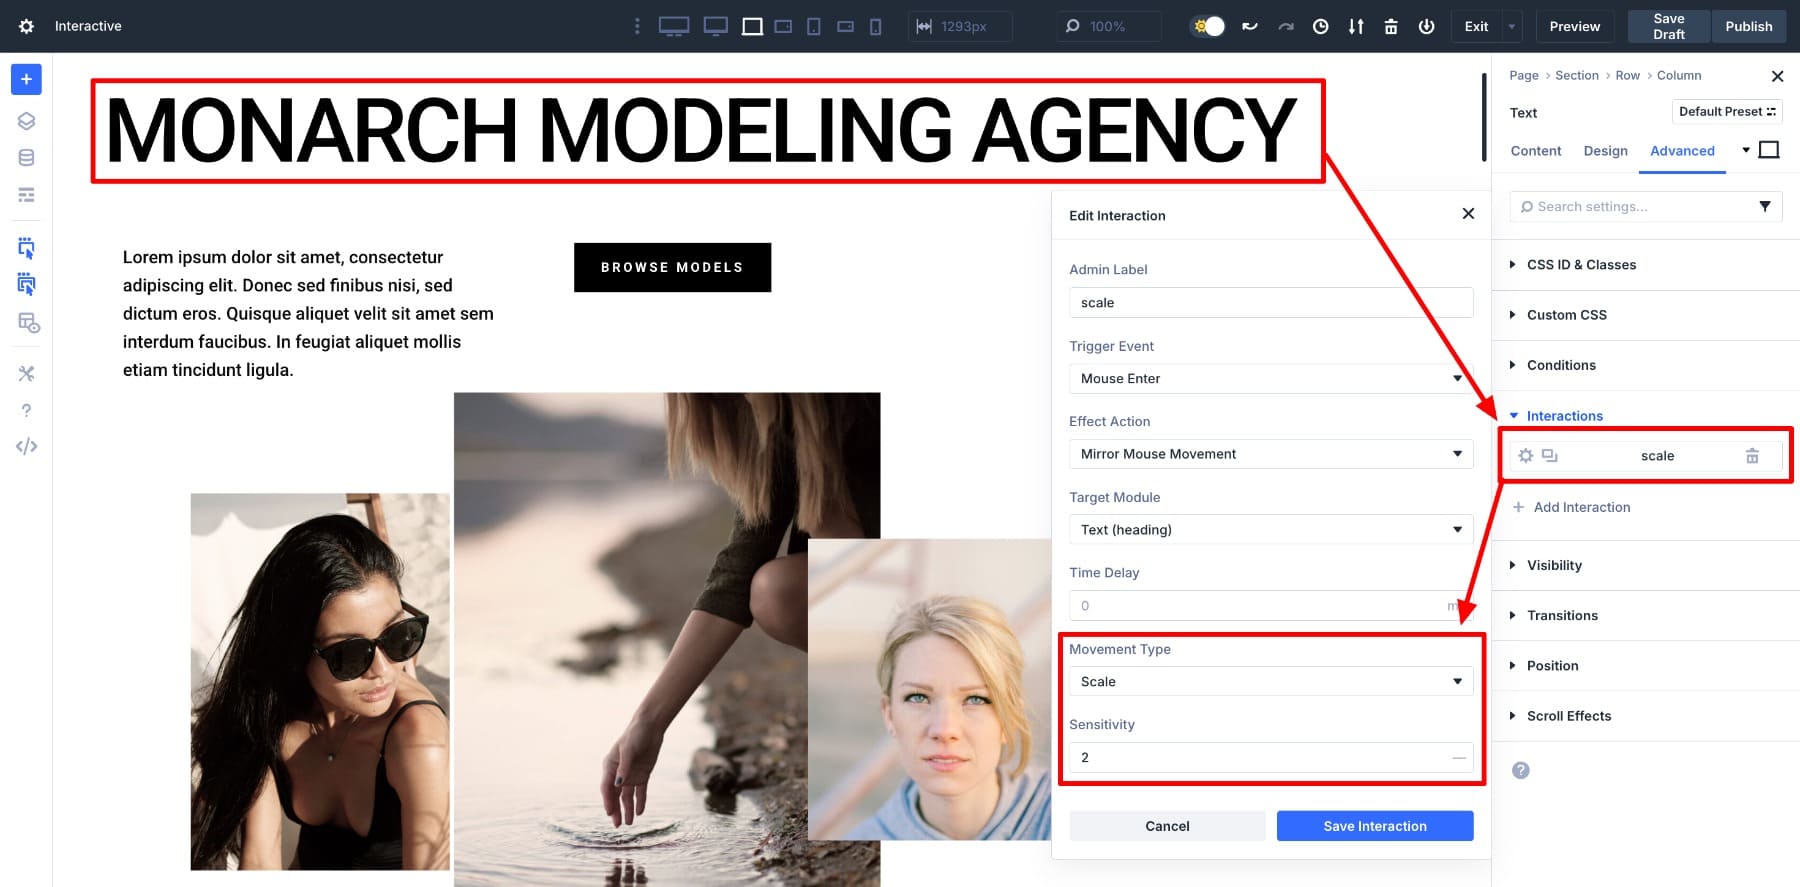
Repeat the same for the paragraph and the button. Notice that we kept the Sensitivity low to scale elements without looking like a hover gimmick. This keeps the heading readable, the paragraph anchored, and the button more inviting.
Then, we’ve used the Translate effect to add slight movement to images. Once again, open an Image module and go to its settings > Advanced > Interactions > Add Interaction.
Here, we’ve selected Translate as the Movement Type with Sensitivity level 5.
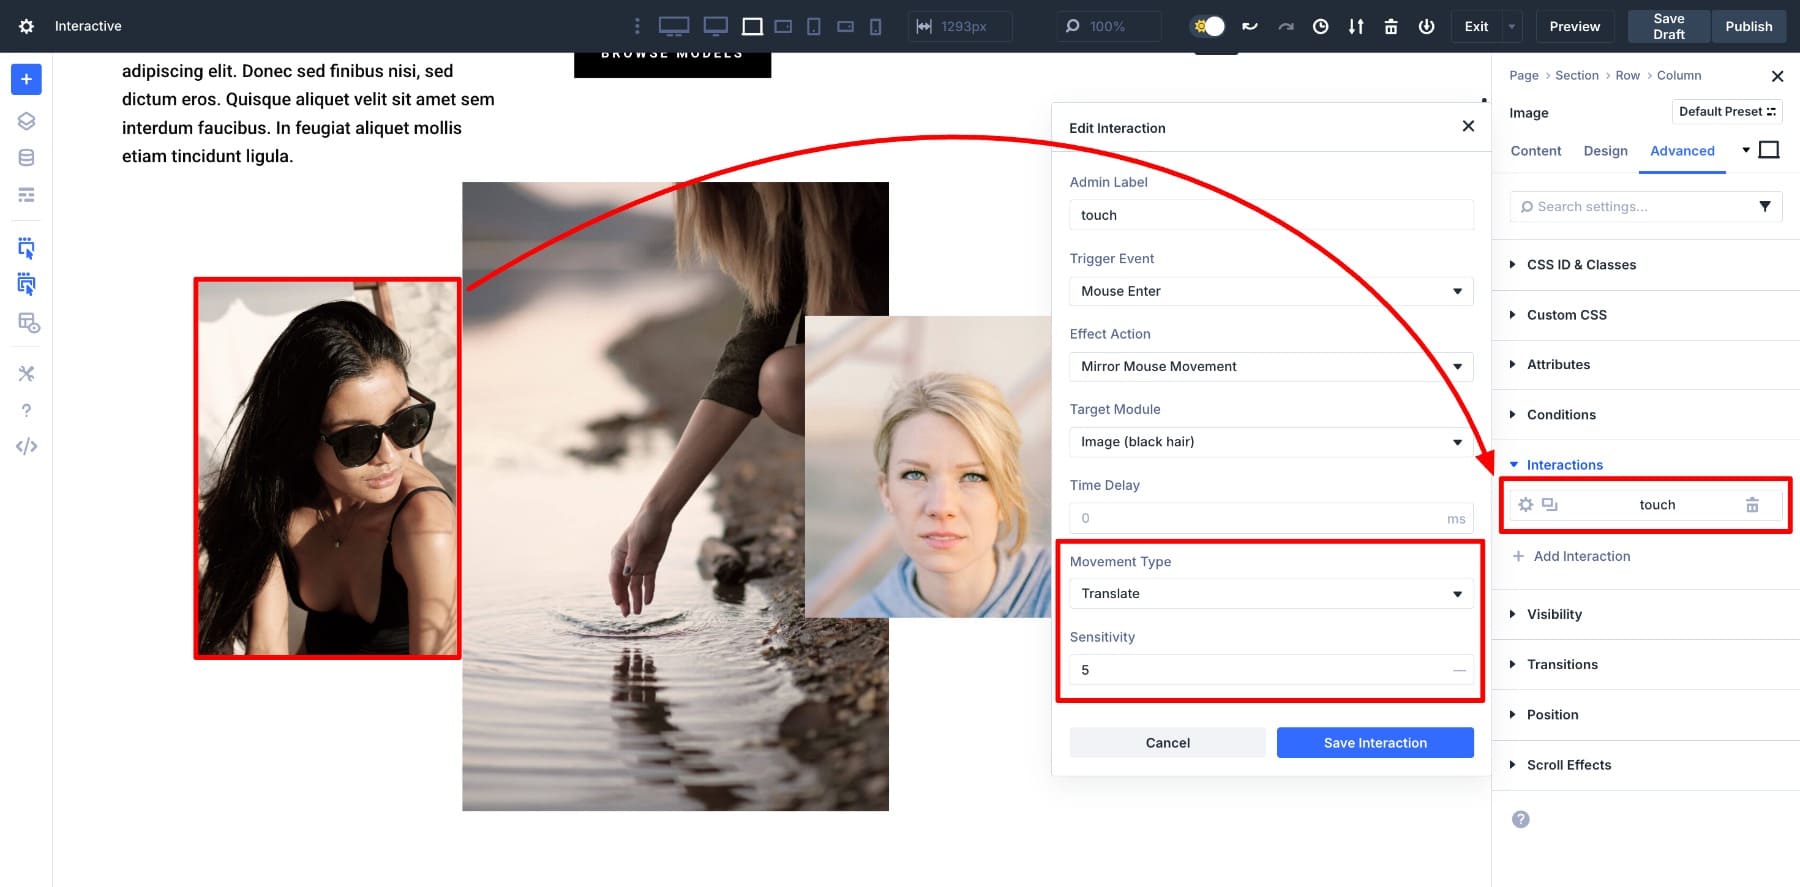
Since each image is a separate module, you can also choose different Sensitivity levels to add layering effects. For instance, you could give lower values to background images and higher values to foreground ones so they move at different speeds.
2. Make Cards Pop With Scale
Cards are a common pattern for portfolios, services, or product grids. Adding a subtle scale effect makes them feel interactive as users move their cursor over them.
To set this up, open the card column and go to Settings > Advanced > Interactions. Click Add Interaction and use the following settings:
- Trigger Event: Mouse Enter
- Effect Action: Mirror Mouse Movement
- Target Module: Card 1 column (Select the columns inside the row)
- Movement Type: Scale
- Sensitivity: 24
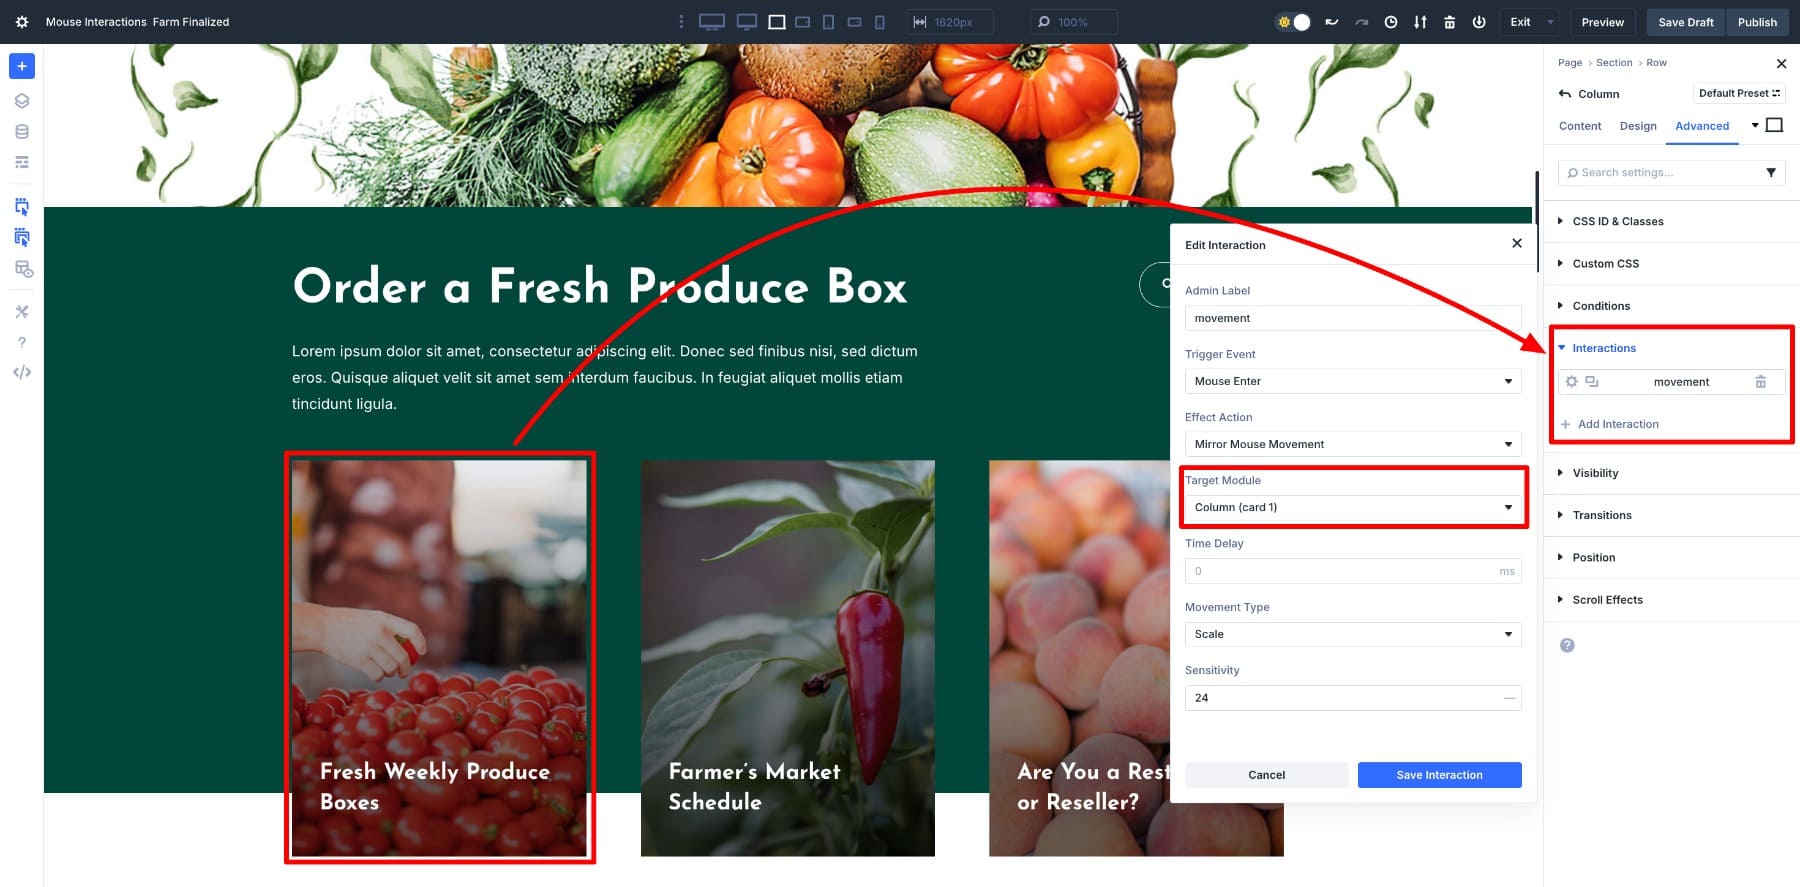
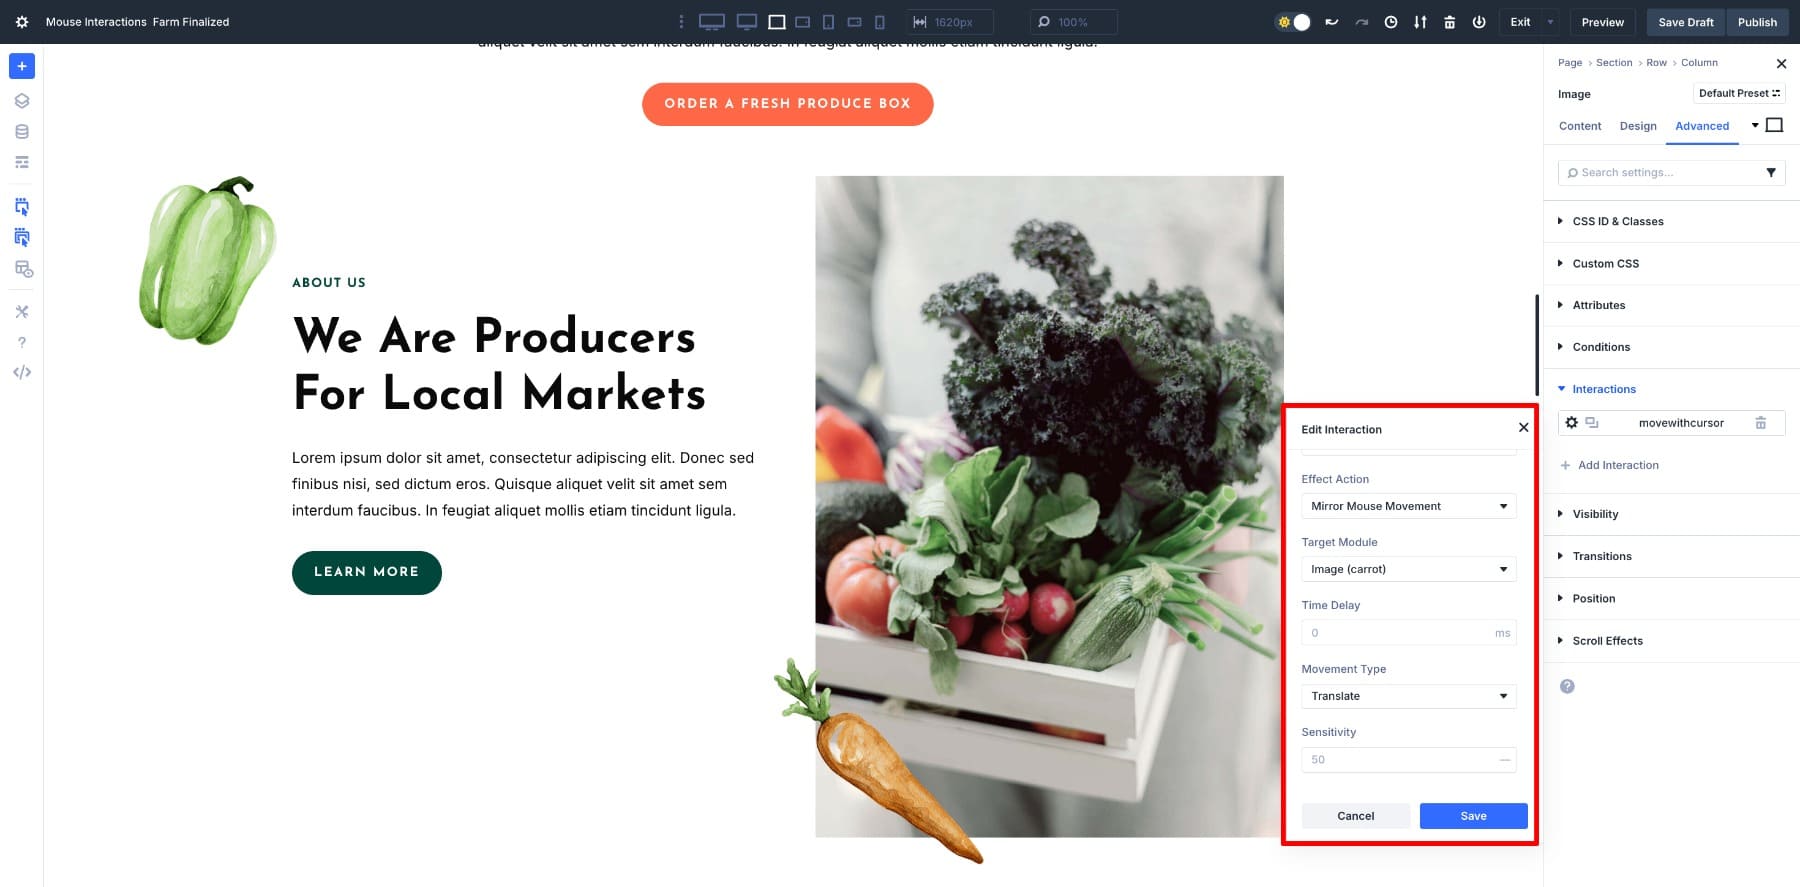
Similarly, the pepper and the carrot are image modules that have the Translate effect applied with a Sensitivity level of 50, so they track the cursor movement, creating a fun little game for users.
3. Image Hover With Scale And Border
A book or product grid is a perfect place to combine motion with styling. When the visitor moves their mouse over a book, the cover tilts with the cursor, and a white border appears to frame it. This creates focus without needing a click.
To recreate this, open the Image module for one of the book covers and go to Settings > Advanced > Interactions. Click Add Interaction and use the following settings:
- Effect Action: Mirror Mouse Movement
- Movement Type: Tilt
- Sensitivity: 25

Next, to add the white border when the mouse moves over the image, we’ll first create a preset.
Once that’s done, your saved preset will start appearing in the Interactions option. To apply it as a mouse movement effect, we’ll create another interaction for each image. Choose these settings:
- Effect Action: Add Preset
- Preset: Book Border Preset
- Replace Existing Preset: Enabled
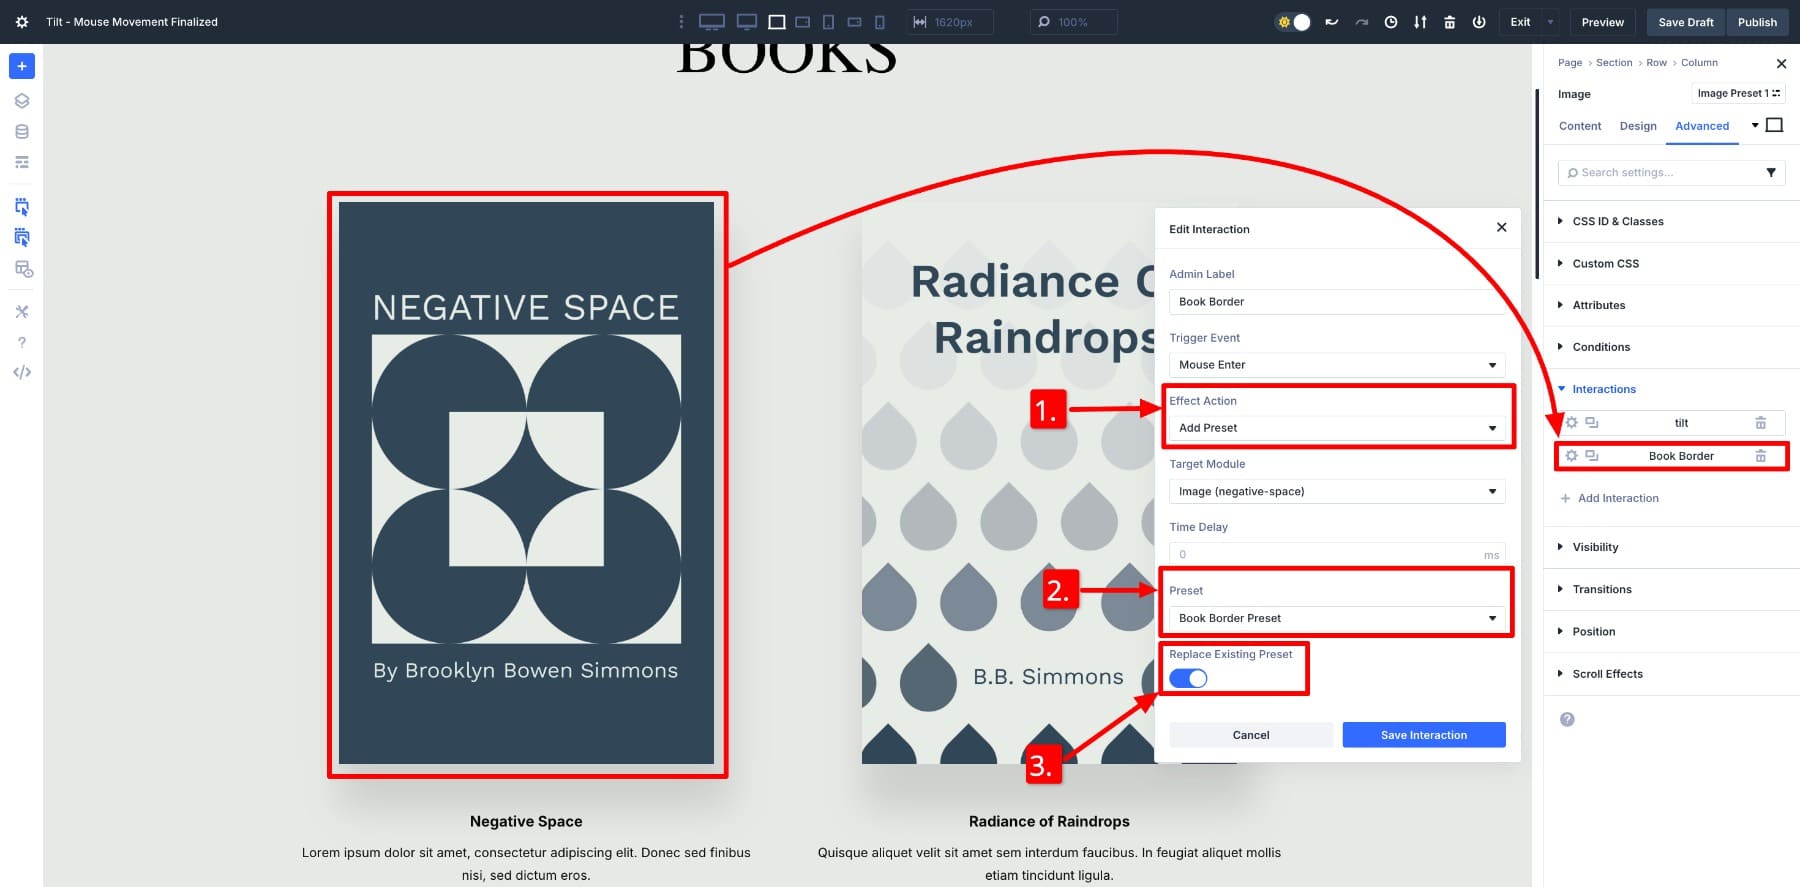
This way, Divi applies the preset and adds the white border instantly whenever the mouse moves over the book cover. It pairs well with the tilt effect, making the book stand out while staying clean and professional. Notice we enabled the Replace Existing Preset to make sure the Border preset gets applied over existing ones.
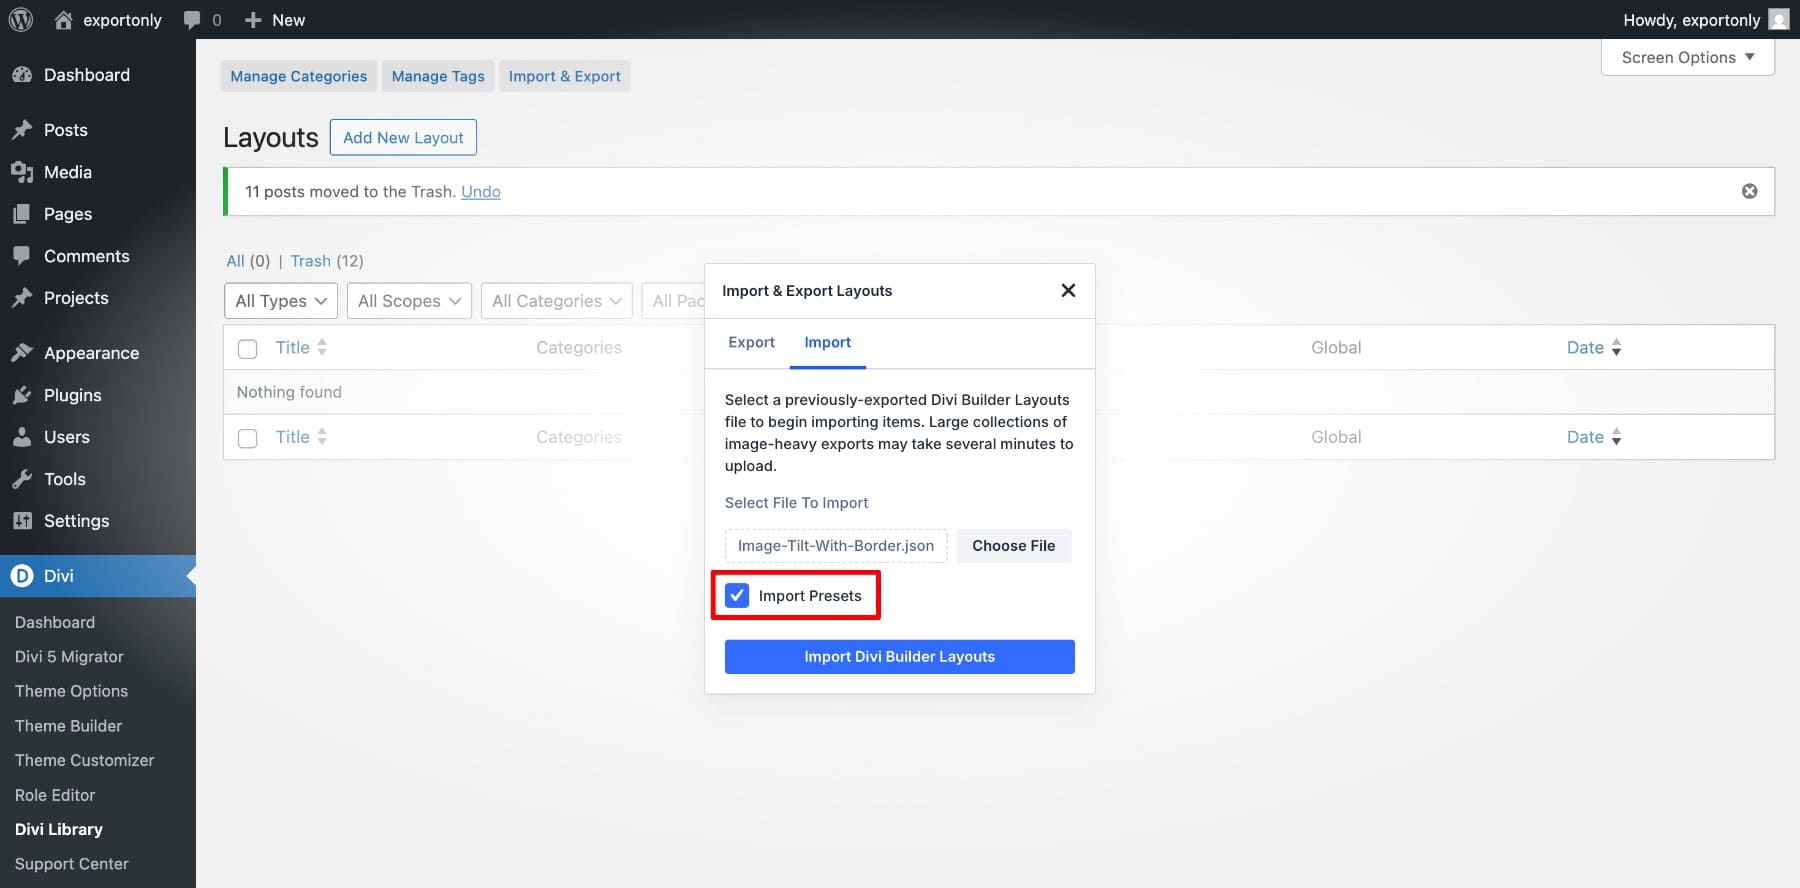
Note: When importing the layout, make sure to check the Import Presets option to import the Border preset as well.
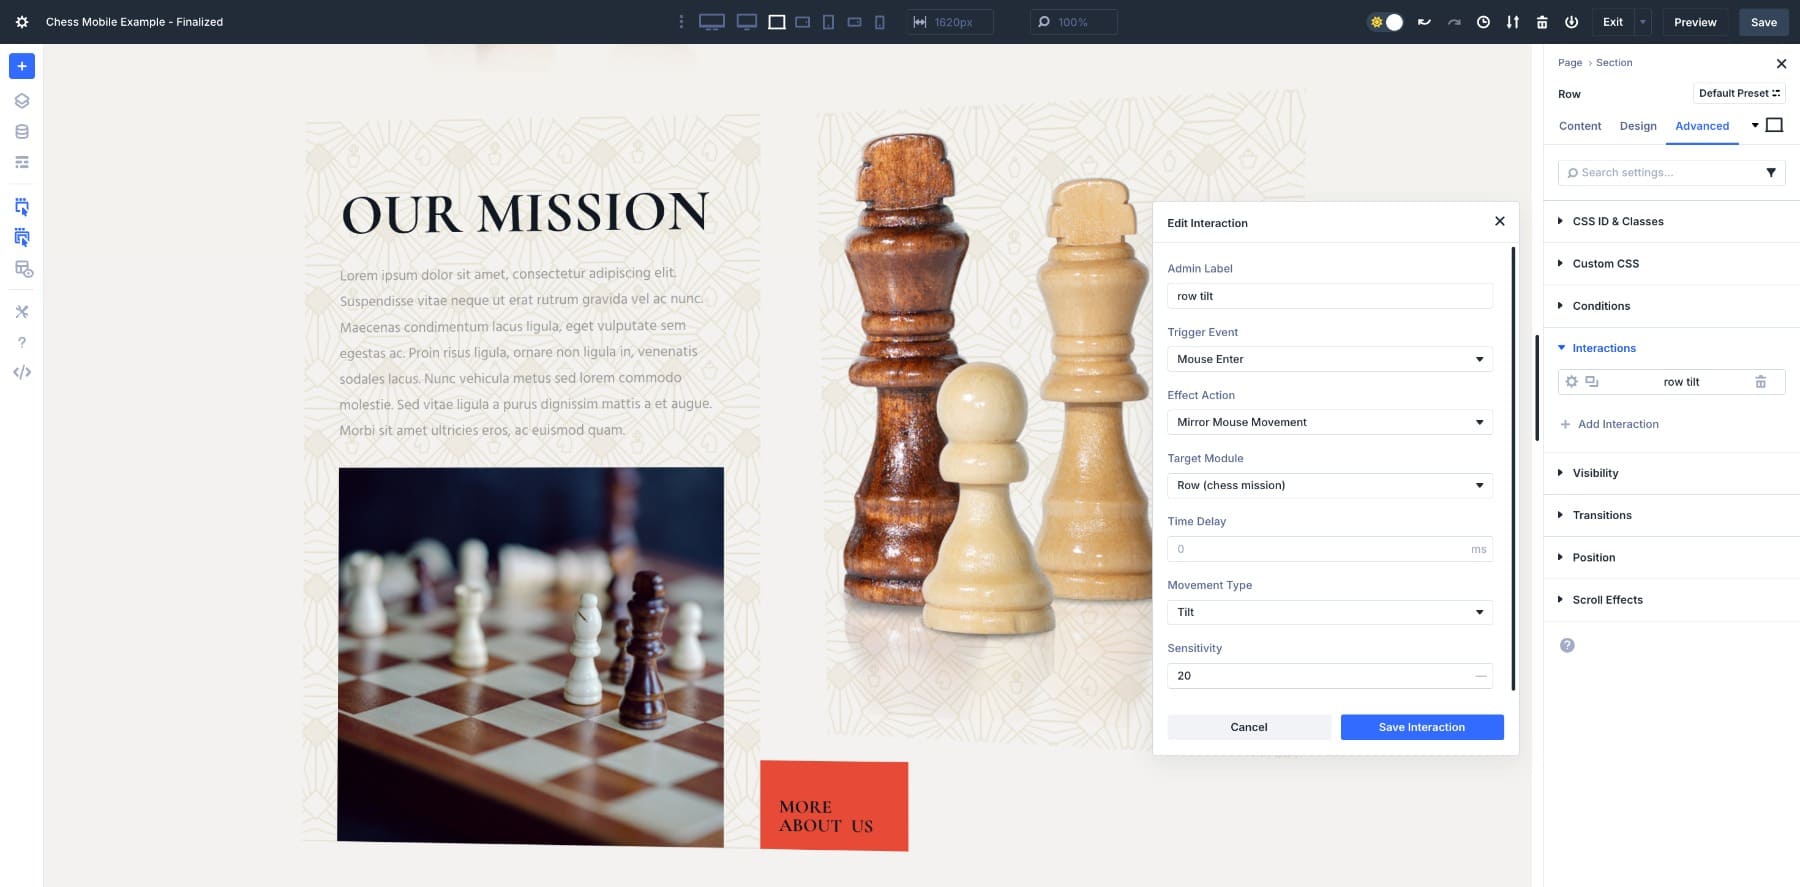
4. Layered Motion In A Column Layout
This layout combines multiple elements inside one row. By applying tilt at both the row and column level, you get layered movement, while a subtle scale on the image and button keeps the focus where it matters.
To set it up, follow these steps below:
Step 1: Add Tilt To The Row
Open the row settings and go to Advanced > Interactions > Add Interaction.
- Trigger Event: Mouse Enter
- Effect Action: Mirror Mouse Movement
- Target Module: Row
- Movement Type: Tilt
- Sensitivity: 20
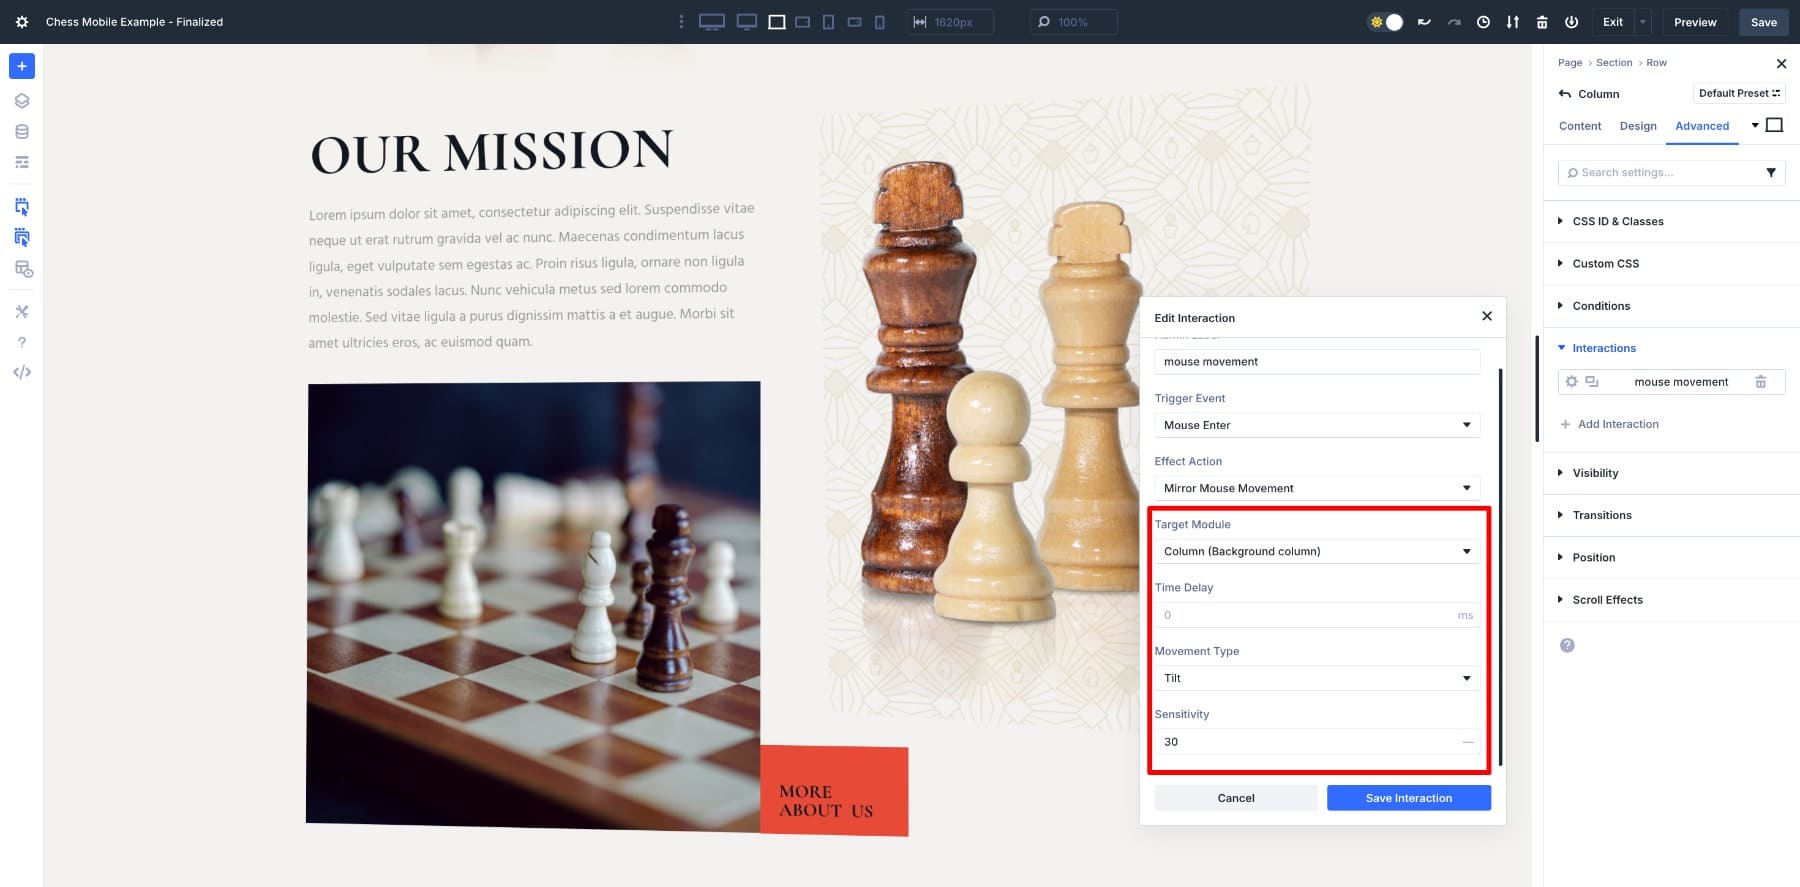
Step 2: Add Tilt To The Inside Column (With Image)
Open the column settings and repeat the same steps. Keep the Sensitivity slightly higher to separate its movement from the row.
Step 3: Add Scale To The Image
Open the image module inside the column, add the Scale effect interaction, and select Sensitivity accordingly.

Step 4: Add Scale To The Button
Repeat the same steps to add a Scale interaction to the button. Vary the Sensitivity level.
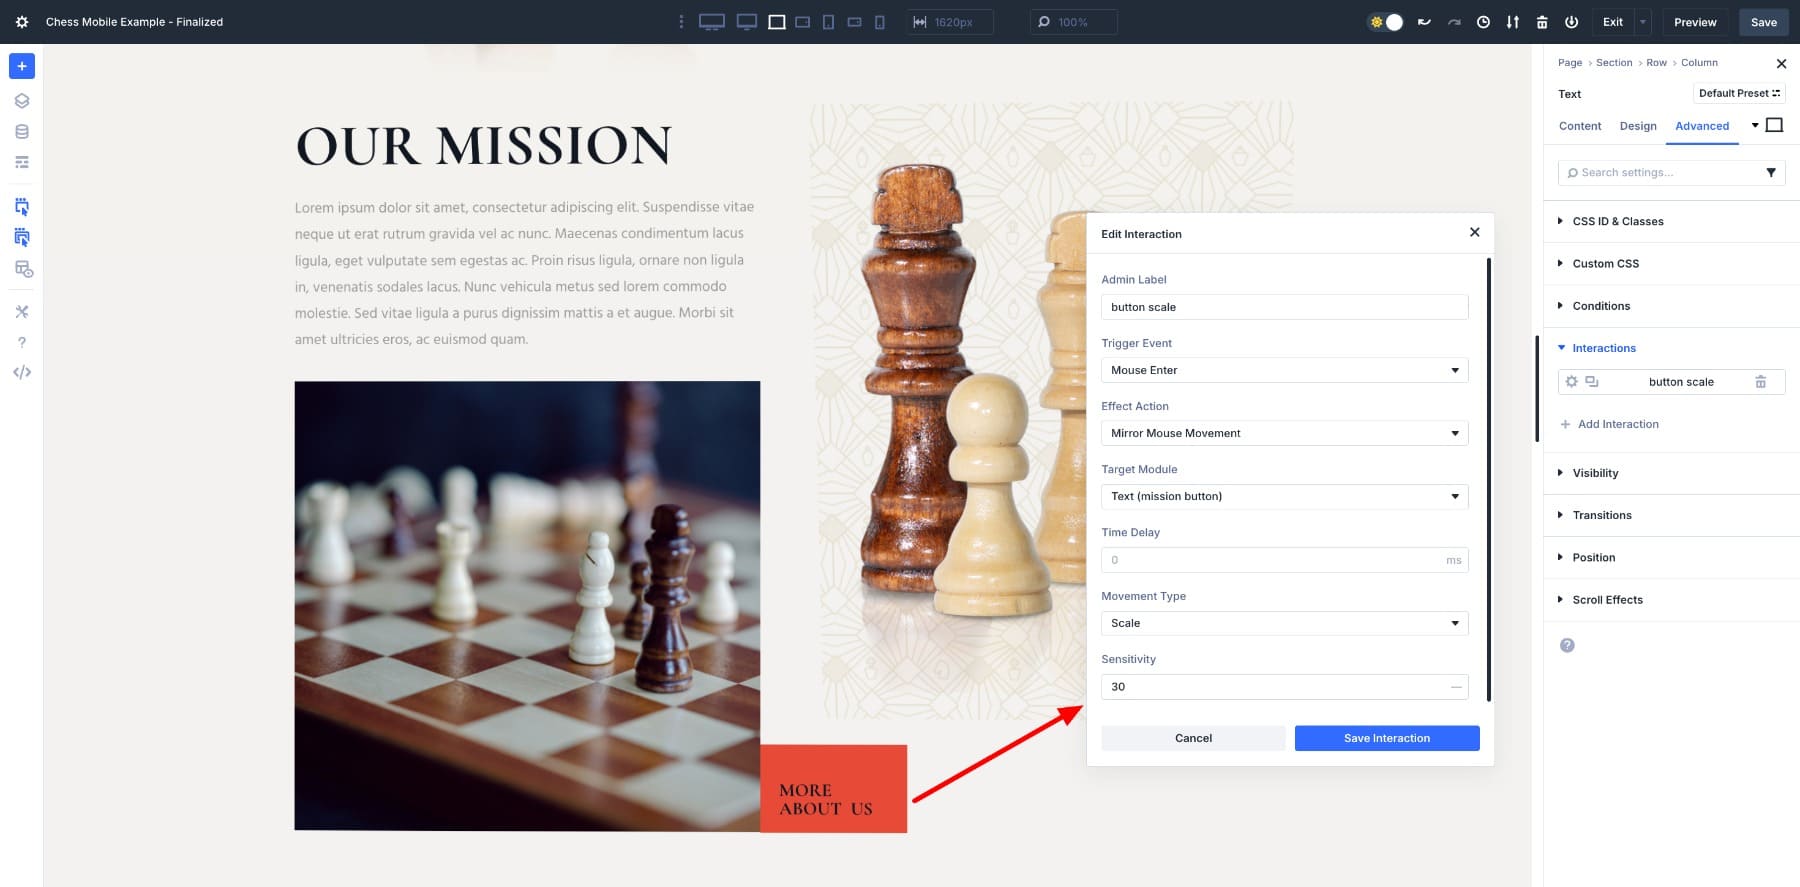
This setup creates a layered effect where the row tilts, the column adds another degree of tilt, and the content inside subtly scales. The result is a dynamic section that feels alive but still balanced.
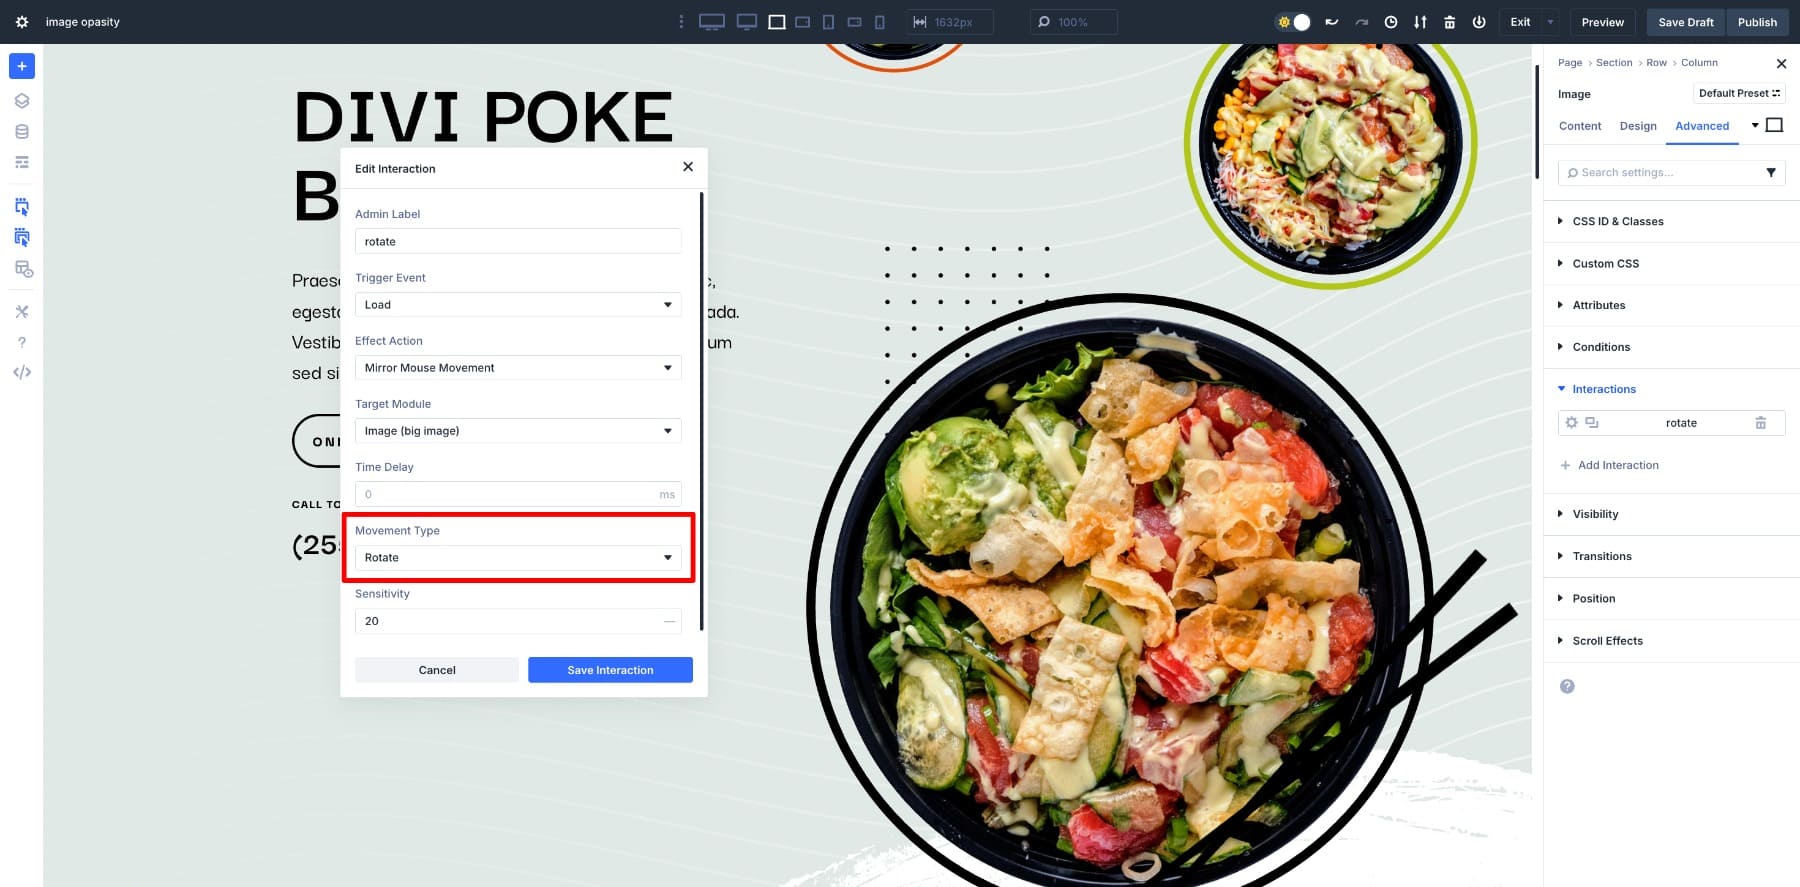
5. Add Playful Rotation To Images
You can also use mouse movement to create a subtle rotating motion on images. In this example, the food bowls rotate slightly as the cursor moves across the section, adding playful energy to the design.
To set it up, open the Image module and go to Settings > Advanced > Interactions > Add Interaction. Choose:
- Trigger Event: Mouse Enter
- Effect Action: Mirror Mouse Movement
- Target Module: Image
- Movement Type: Rotate
- Sensitivity: 20-30
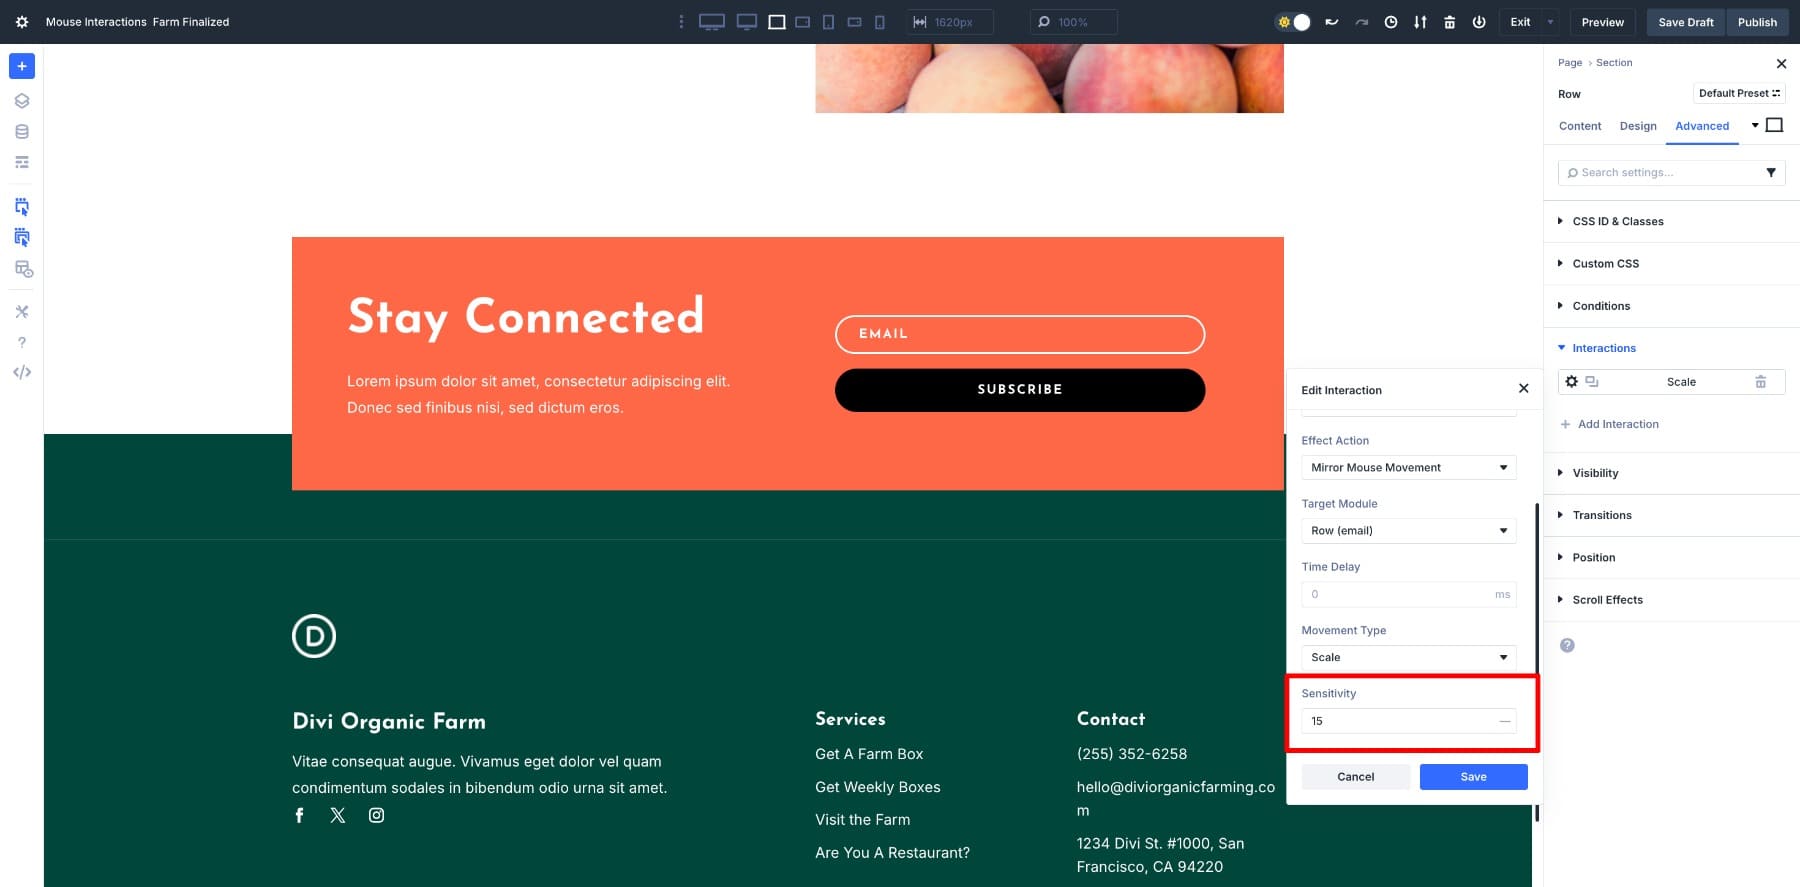
6. Pricing Table Focus With Opacity
Pricing tables are all about comparison, but you can use mouse movement to guide attention to the hovered option. In this setup, when a visitor hovers over one table, the other two fade slightly to 80% opacity.
To recreate this, open a pricing table column and go to Settings > Advanced > Interactions > Add Interaction. Choose:
- Trigger Event: Mouse Enter
- Effect Action: Mirror Mouse Movement
- Movement Type: Opacity
- Sensitivity: 80% (It’s important not to drop the opacity too far. Keeping it around 70–80% maintains usability while still drawing attention where you want it.)
To hide each table, you’ll create two interactions, choosing one Target Module at a time.
This way, the hovered table stands out as the “active” choice while the others remain visible for quick comparison.
Download The Mouse Movement Layouts
Download all mouse movement layouts for free below. Import them into your Divi Library to use on any page across your site.

Try Divi 5’s Interactions Today
Mouse movement effects in Divi 5 open up a new way to add depth and personality to your layouts. With Interactions, you can decide exactly how elements respond, from a gentle scale on text to a layered tilt across images and columns.
With Divi 5’s Interactions, you decide how far to take it. Keep movements soft for polish or push them further for emphasis. The best way to find the balance is to test them out. Try scaling text, layering images with different sensitivities, or fading backgrounds in and out. You’ll see how even simple shifts can turn a static layout into something that feels dynamic and personal without writing a line of code.


Thank you for this really comprehensive and well-explained tutorial!
Is there any benefit to using these interactions for scaling elements on hover compared to doing this with a hover effect on transform, and could it possibly provide a performance advantage?
The Hover pseudo-class (:hover) is still probably the best if you are only want to have a standard hover affect on a single item that comes and goes on mouse hover.
However, Interactions can be used to apply changes to other elements or multiple elements based on mouse enter/exit which just gives you more options.
could you make a grid tutorial right now it s seems to me that the workflow is terrible 🤔 would be nice if you recreated the grids examples you released
We have a few in the works. Stay tuned