
If you want to attract visitors with dynamic pop-ups, toggles, and scroll effects without a plugin or custom CSS, you’ll love one of the latest Divi 5 Public Alpha feature releases. Interactions in Divi 5 allow Divi users to create engaging, interactive elements inside the Visual Builder. In this post, we’ll dive into everything you need to know about Divi 5 Interactions, exploring its features, a few tips, and real-world applications to help you get familiar with the feature.
Important Note: Divi 5 is currently in Public Alpha and optimized for new websites. We don’t recommend migrating existing Divi 4 sites yet due to ongoing development and potential compatibility issues with legacy modules. Stay tuned for updates as Divi 5 nears its full release!
Let’s get to it.
What Are Divi 5 Interactions?
Divi 5 Interactions is an anything builder that allows you to create interactive elements for your website directly within the Visual Builder. Far more than just a pop-up builder, this feature lets you create a range of custom interactions, from pop-ups to scroll-triggered animations, all without touching a line of code.
Subscribe To Our Youtube Channel
Seamlessly integrated into the advanced tab of any module, column, row, or section, interactions offer unlimited flexibility to build engaging, user-focused experiences.
The Core Components Of Divi 5 Interactions
At the heart of Divi 5 Interactions are three key components that work together to bring your designs to life:
Trigger Events
Triggers are the events that initiate an interaction. Examples include user actions like clicking a button or hovering over an image, scroll-based events like reaching a specific point on a page, or time-based triggers like a delay after a page load.
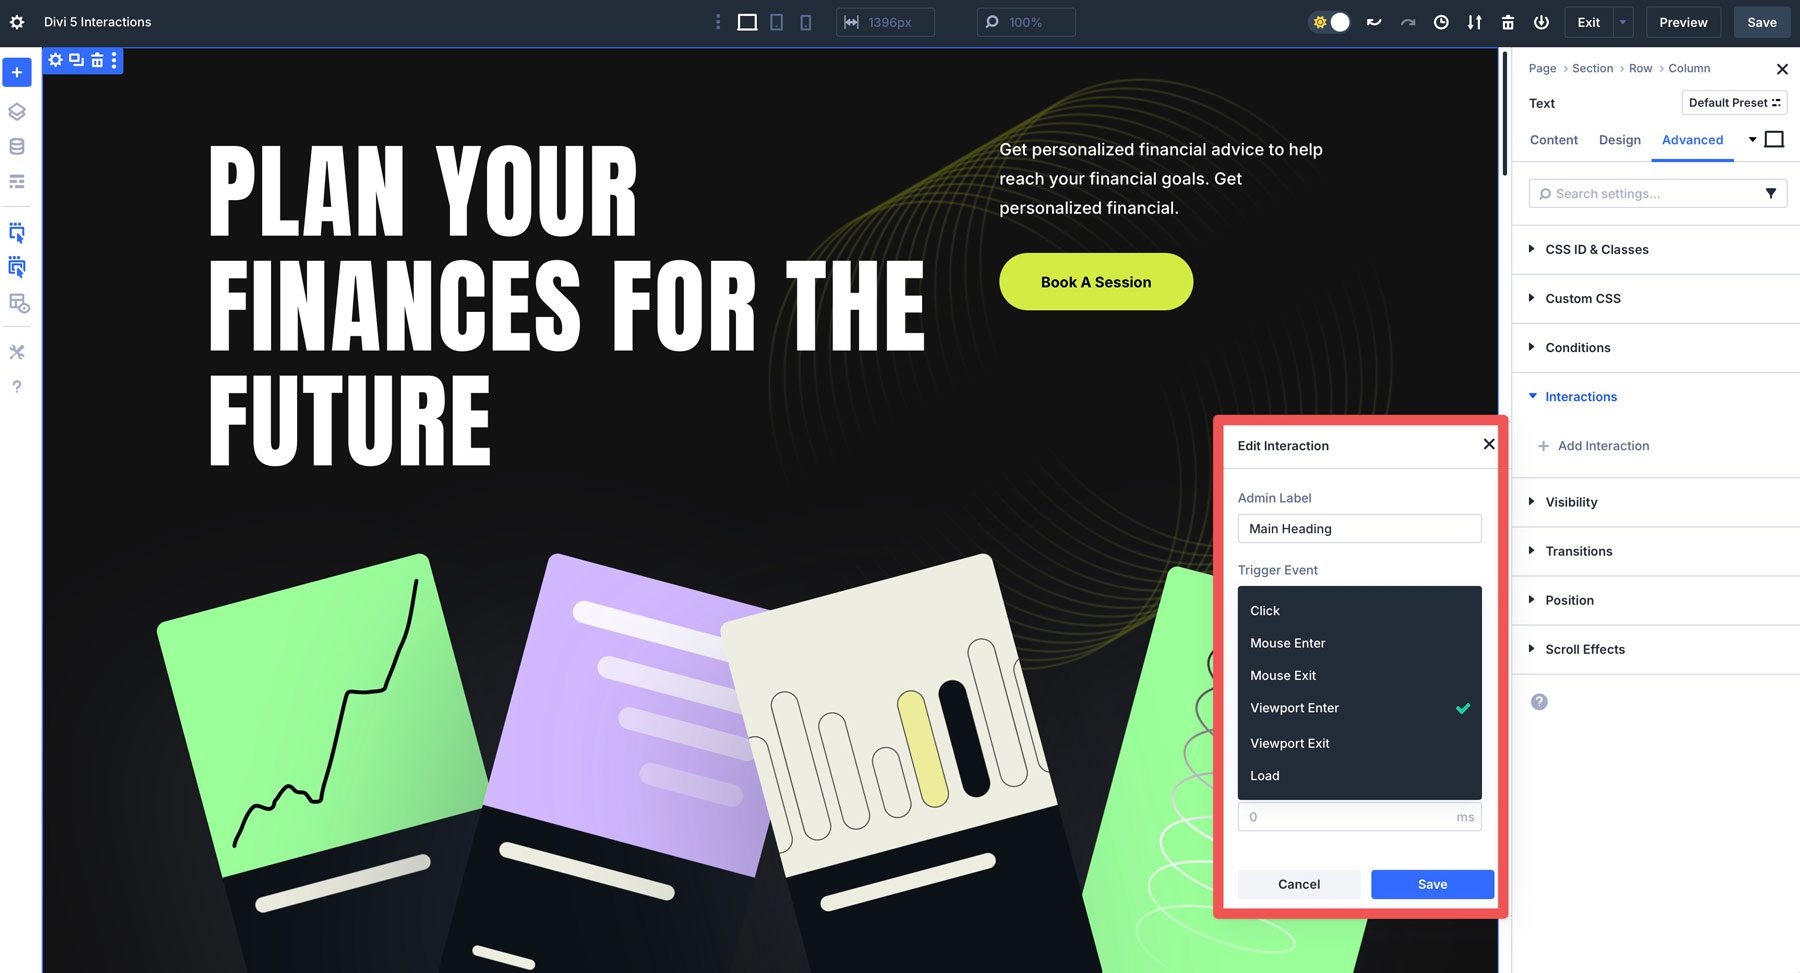
Available triggers include:
- Click: A user clicks a button, image, or other element to launch an interaction.
- Mouse Enter/Exit: A user hovers over or leaves an element.
- Viewport Enter/Exit: An element enters or exits the visible area of the screen as the user scrolls.
- Load: An interaction starts when the page loads, with an optional time delay.
For example, you could trigger a pop-up 5 seconds after a page loads or animate an element when a user scrolls.
Effect Actions
Once a trigger is activated, effects determine what happens. Options include showing or hiding elements, animating with fades, scales, rotation, or applying preset transitions for consistent styling.
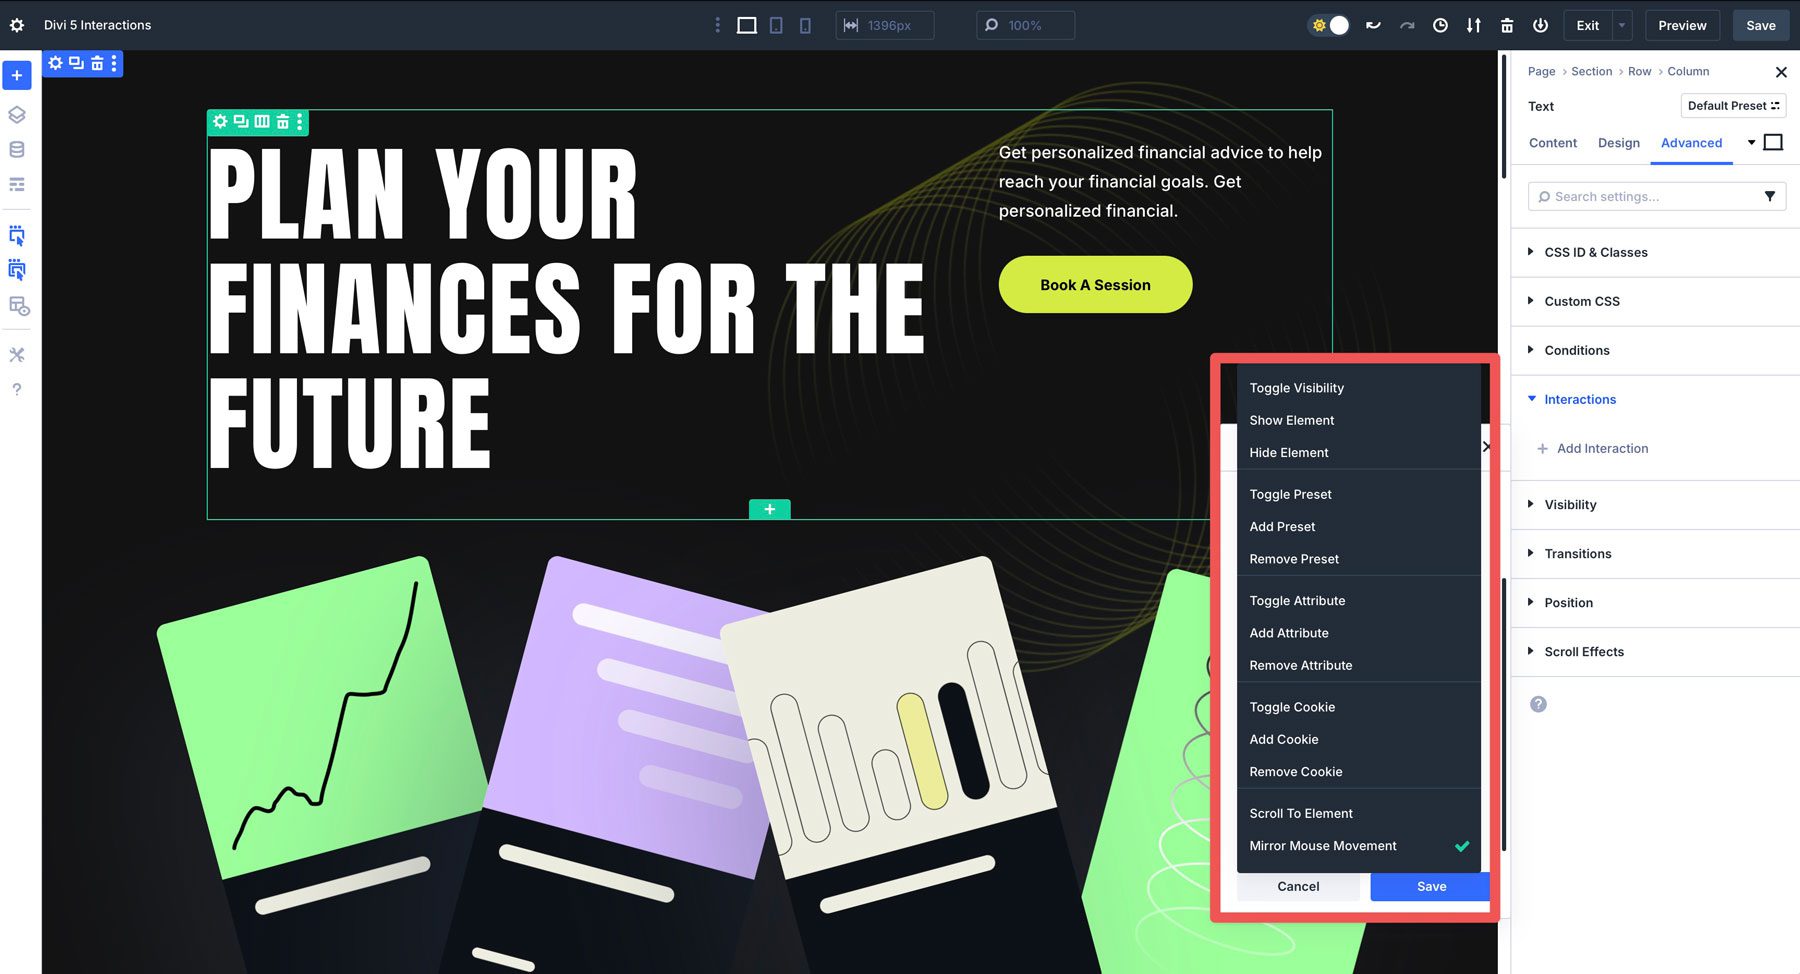
- Toggle Visibility: Switches an element between visible and hidden.
- Show/Hide Element: Makes an element visible or hidden.
- Toggle Preset: Turns a preset on or off for a design element with the ability to replace an existing preset.
- Add Preset: Used to add a preset style class to an element. You can also replace existing presets.
- Remove Preset: Use to remove a preset style from an element.
- Toggle Attribute: Adds or removes an element’s HTML attribute, like a CSS class or CSS ID.
- Add Attribute: This adds a specific HTML attribute value where one doesn’t currently exist.
- Remove Attribute: Removes any attribute applied to an element.
- Toggle Cookie: Adds or removes a cookie value. For example, you can set a cookie when a pop-up appears and set it to only appear once using Divi 5’s condition settings.
- Add Cookie: Adds a cookie value that you can define to the user’s browser.
- Remove Cookie: Removes a cookie previously specified.
- Scroll to Element: Allows the page to scroll smoothly, bringing the target element into view.
- Mirror Mouse Movement: Allows you to set movement that follows the user’s mouse movements. Options include translate, scale, opacity, tilt, or rotate. You can also adjust the sensitivity of the movement.
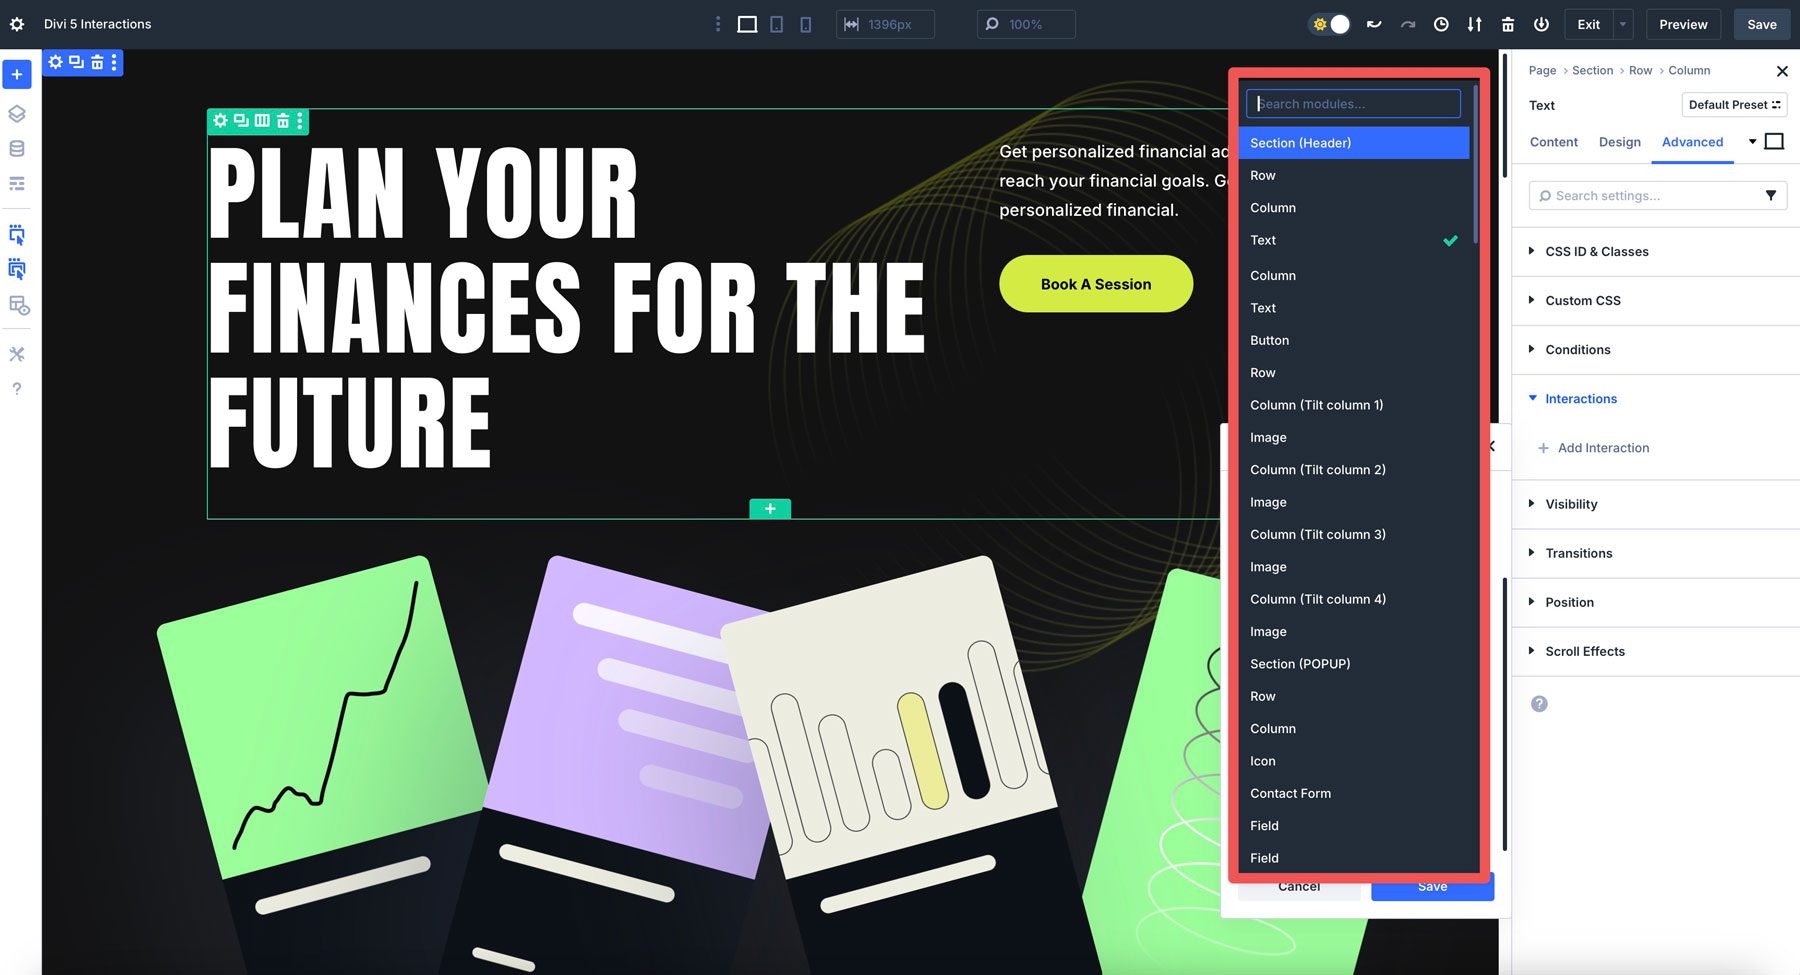
Target A Module
The target is the element that the Interaction affects, such as a module, row, column, or entire section. You can target the element itself or another element on the page, offering flexibility to create complex interactions.
Key Features Of Divi 5 Interactions
Divi 5 Interactions stands out for its user-friendly and versatile feature set:
- No Code Interface: Configure triggers, effects, and targets through an intuitive interface within the advanced tab of any element without using any CSS or JavaScript.
- Diverse Interaction Types: Create pop-ups for lead capture, toggles for FAQs, scroll-triggered fades for hero sections, or parallax-like mouse effects for portfolios.
- Lightweight Performance: Built directly into Divi 5, Interactions eliminate the need for third-party plugins, reducing site bloat and improving load times.
- Dynamic Trigger Combinations: Combine multiple triggers, like a scroll event with a time delay, for sophisticated interactions like a pop-up that appears after a user scrolls down the page.
- Responsive Design: Customize desktop, tablet, and mobile interactions using Divi 5’s Customizable Responsive Breakpoints.
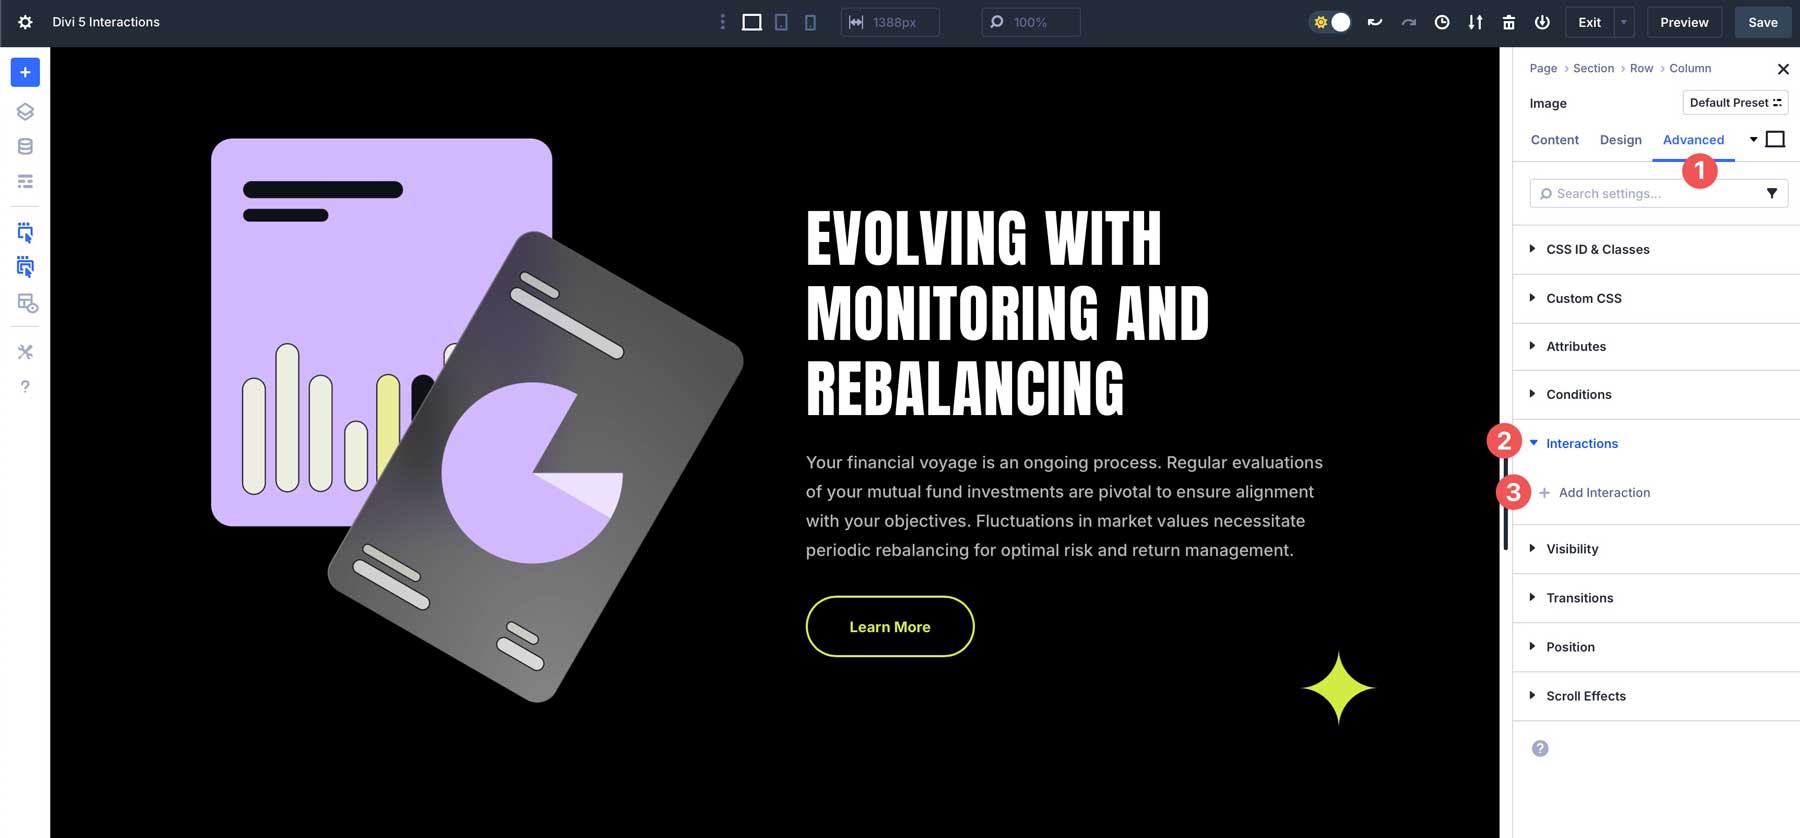
How To Access And Use Divi 5 Interactions
Creating an interaction in Divi 5 is straightforward, thanks to its integration within the Visual Builder. Follow these simple steps to get started:
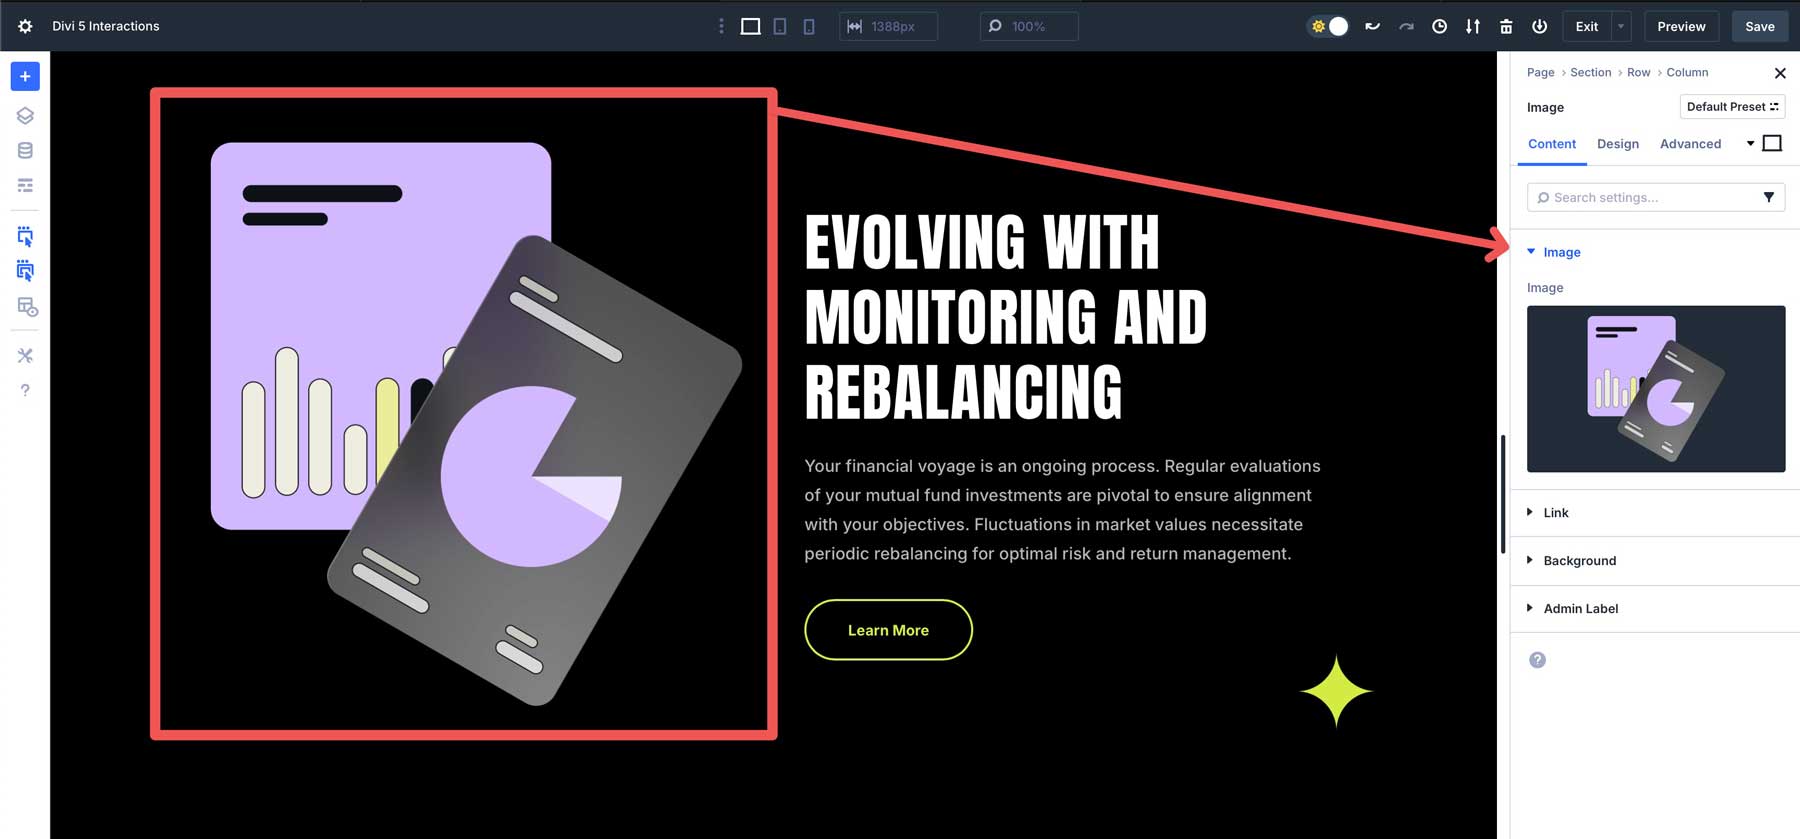
Start by opening a page in Divi 5. Choose a module, row, column, or section to which you want to add an interaction. For example, select an image module on your page.
Navigate to the Advanced Tab and click the Interactions dropdown. Click the + Add Interaction button from there.
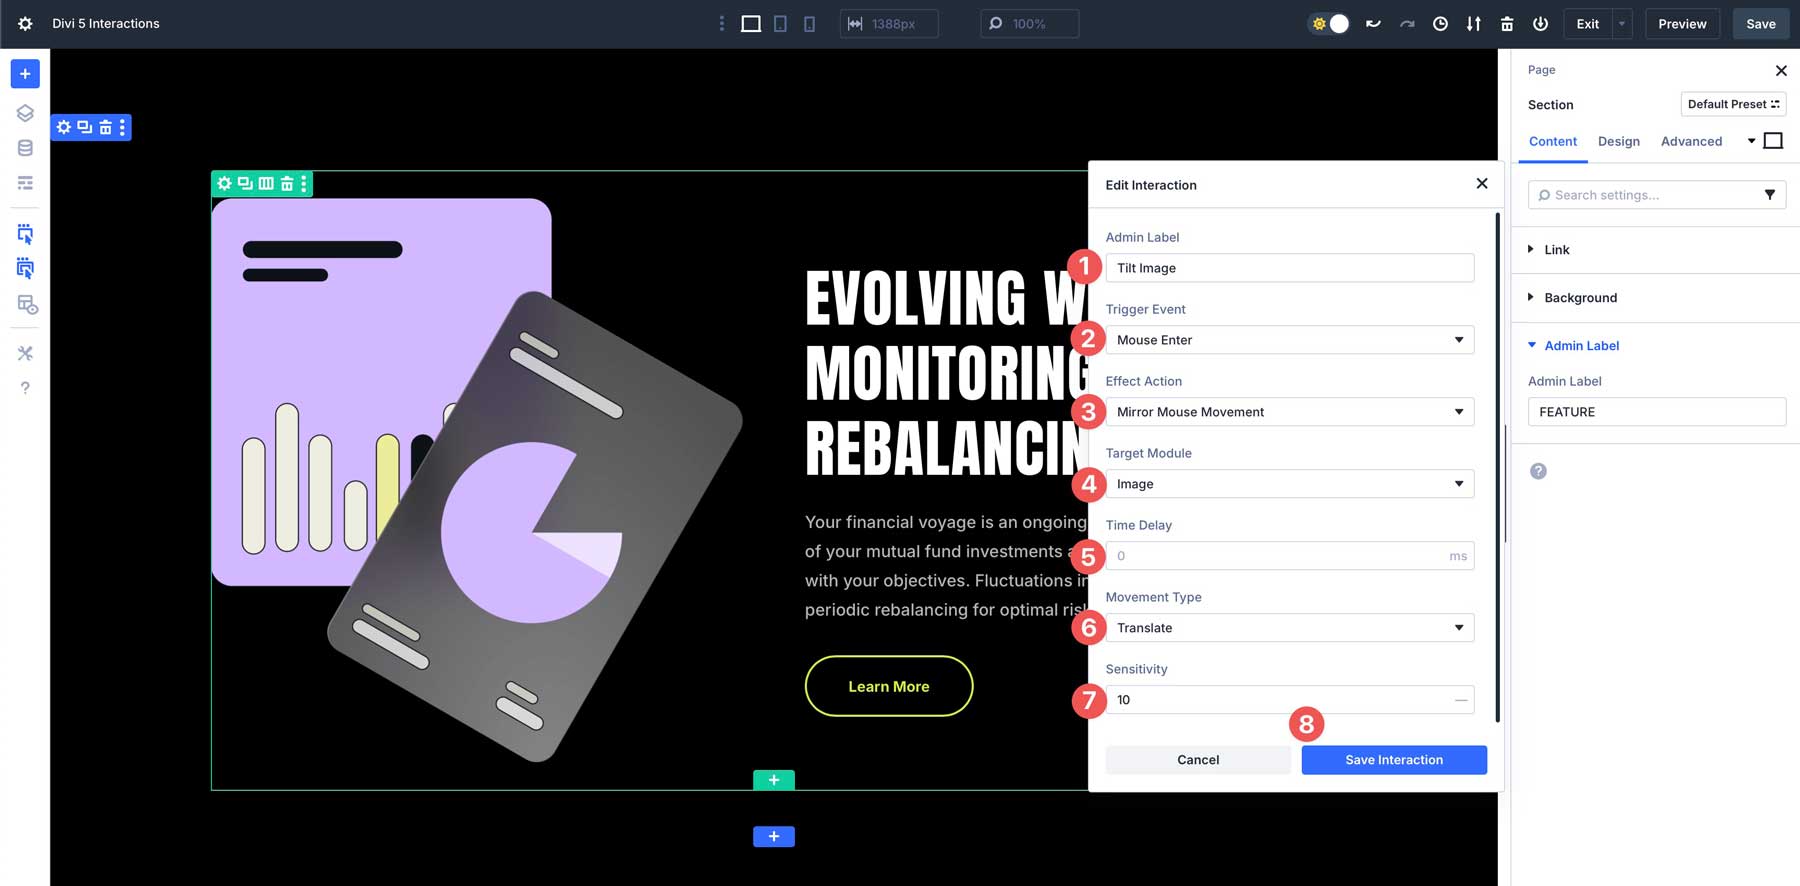
We want to create a tilt/transform mouse-over effect for our image. To do this, we will need to create two interactions — one for the image and another for the column that contains the image. Start by giving your Interaction a name in the admin label, then enter the following settings:
- Trigger Event: Mouse Enter
- Effect Action: Mirror Mouse Movement
- Target Module: Image
- Time Delay: 0
- Movement Type: Translate
- Sensitivity: 10
Once all settings are in place, click the Save Interaction button to continue.
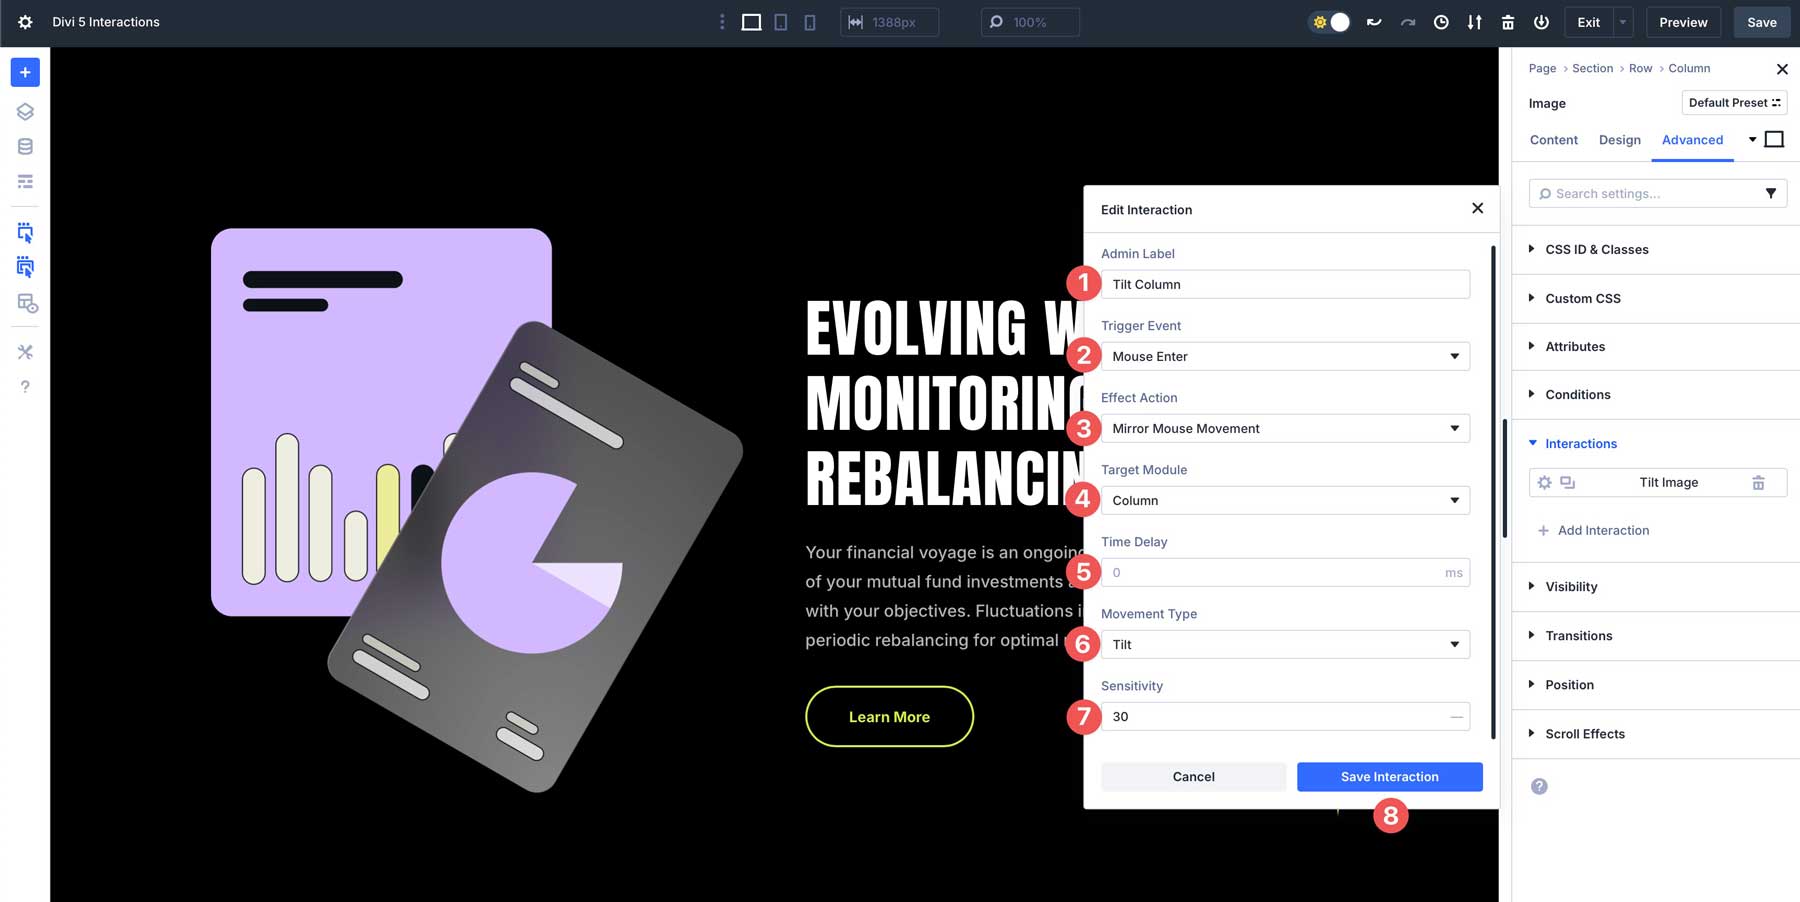
Next, we’ll create the transform interaction on the column. Click the + Add Interaction once again. Enter the following settings to create the Interaction:
- Admin Label: Tilt Column
- Trigger Event: Mouse Enter
- Effect Action: Mirror Mouse Movement
- Target Module: Column
- Time Delay: 0
- Movement Type: Tilt
- Sensitivity: 30
Once settings are entered, your Interaction should look like this:
Use the Preview button to view your Interaction.
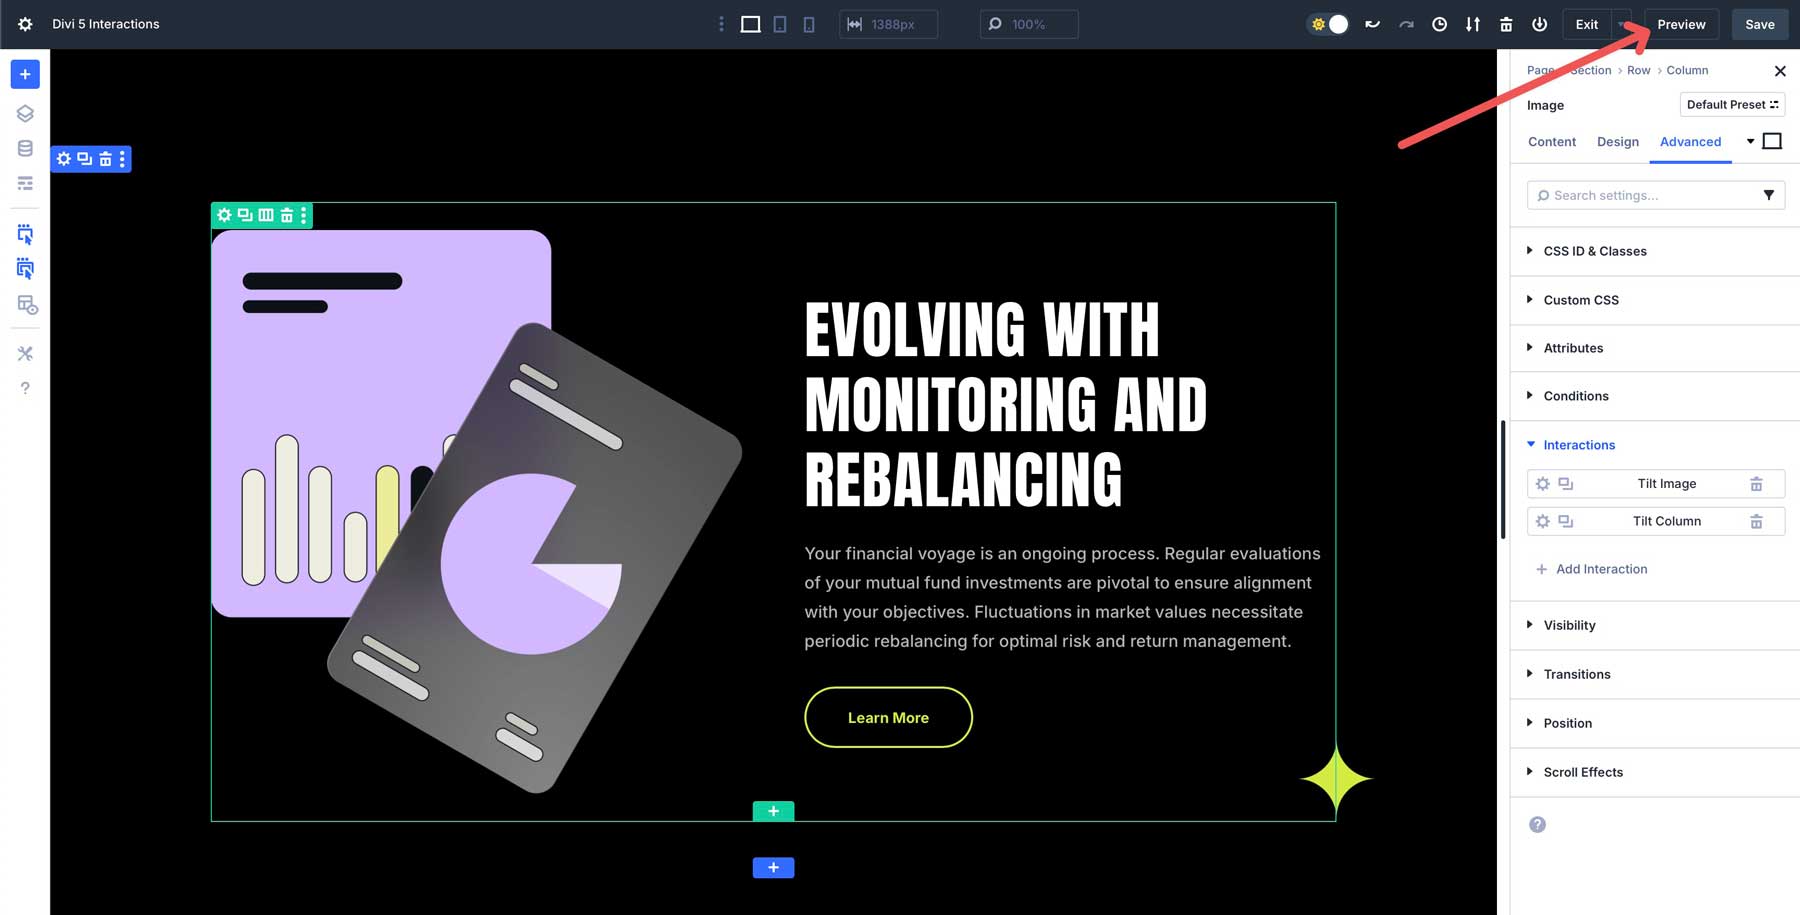
Your page will appear in a new tab, allowing you to preview and test your Interaction.
Types Of Interactions You Can Create
Here are a few practical examples to showcase the versatility of Divi 5 Interactions, complete with triggers, effects, and real-world applications.
Welcome Popup For New Visitors
Pop-ups are great for urging visitors to sign up for newsletters, promotions, or events. With Divi 5 Interactions, you can create a welcome pop-up that appears after a page loads.
To create this Interaction, you’ll need to create a section for your pop-up and assign the following settings:
- Admin Label: Popup
- Trigger Event: Load
- Effect Action: Show Element
- Target Module: Section (POP-UP) — be sure to name your section before creating the interaction
- Time Delay: 5 seconds

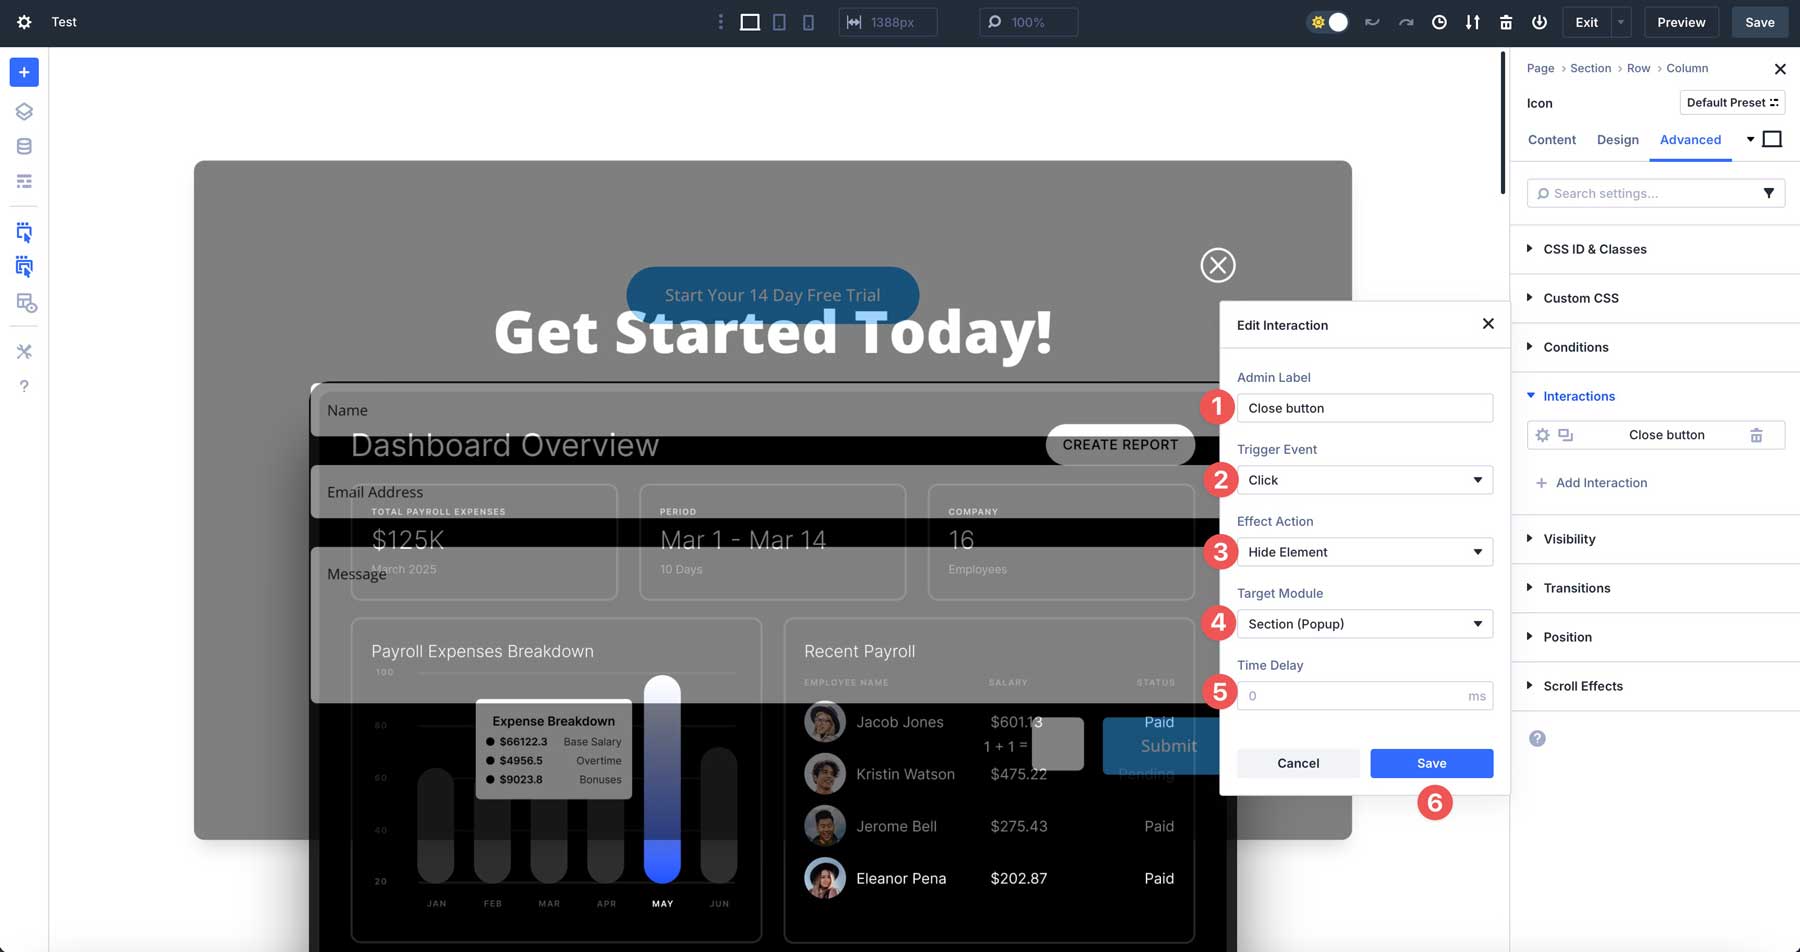
We’ll also need to create an interaction to close the pop-up. The easiest way is to add an icon module to the top right corner of the pop-up section and assign the following settings:
- Admin Label: Close Button
- Trigger Event: Click
- Effect Action: Hide Element
- Target Module: Section (popup)
- Time Delay: 0
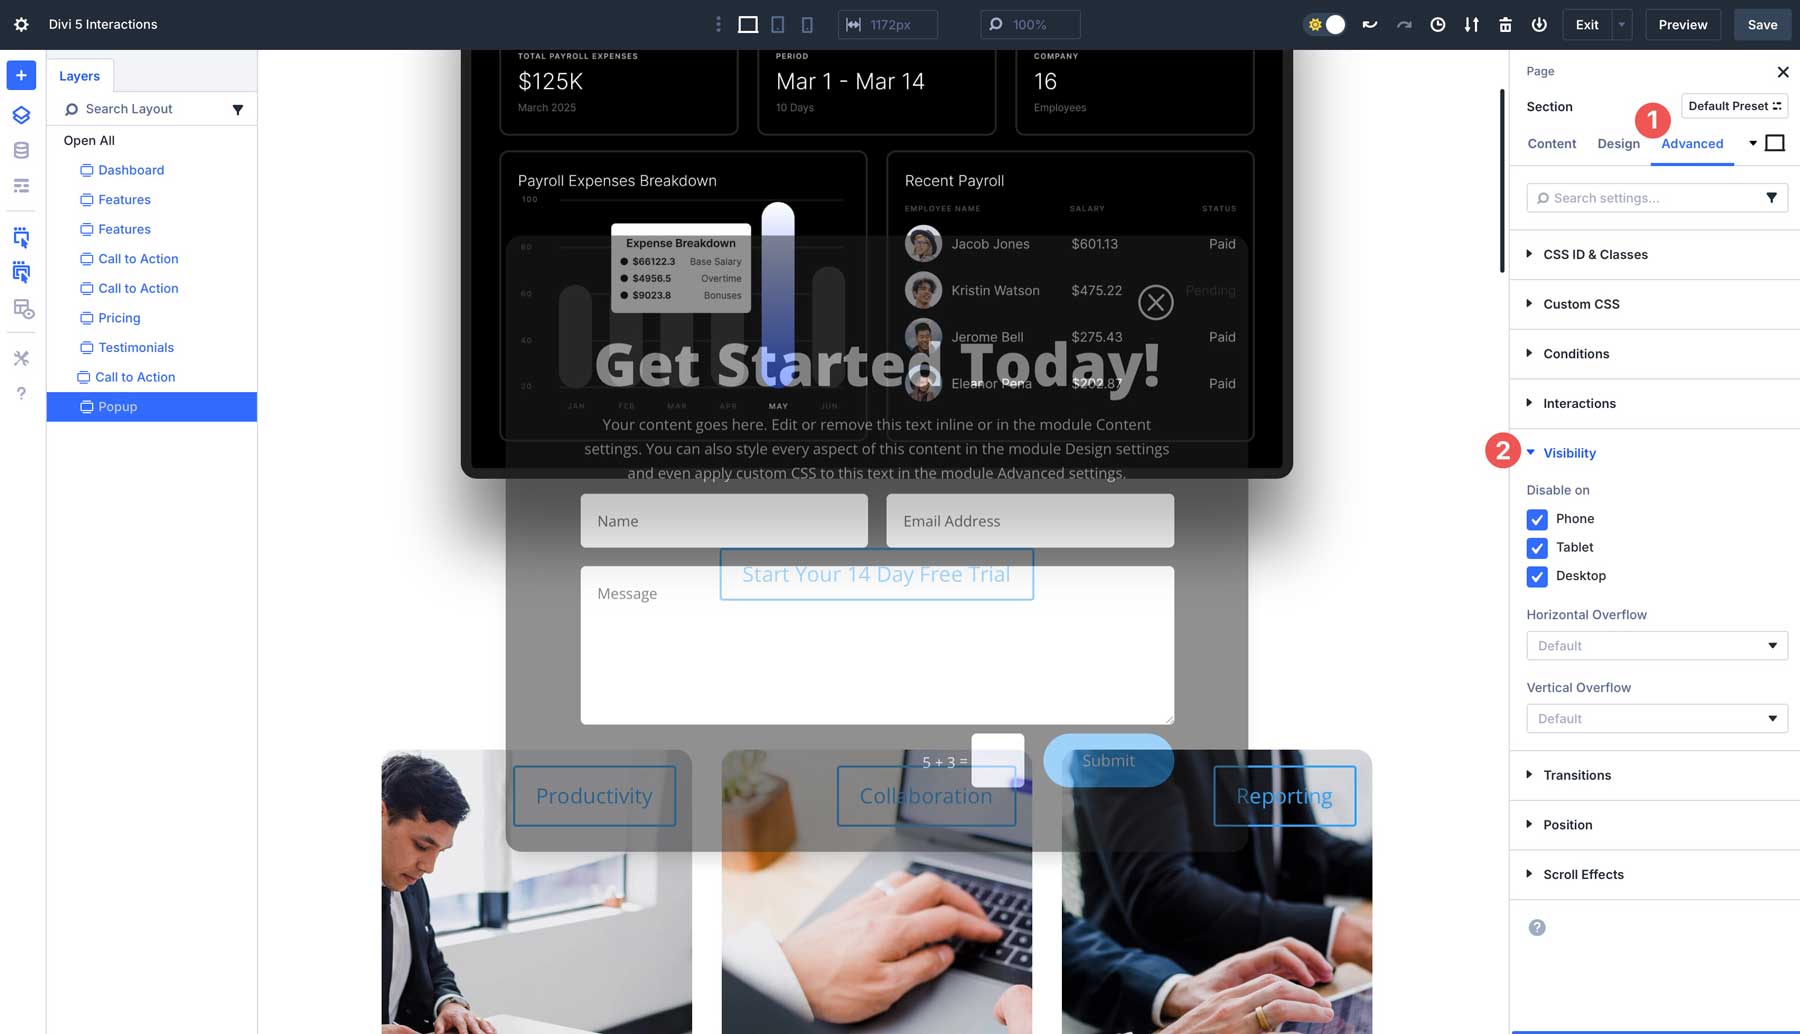
To control the placement of your popup, use Divi 5’s position settings. In the Advanced Tab, locate the Position drop-down menu and set the position to Fixed. From there, choose the location you’d like the pop-up to appear on the page. In this example, we have it set to center. It’s also a good idea to set the Z index so that the pop-up appears above everything else on the page, like 99999.

The last step is to set the pop-up’s visibility to hidden on all devices. To do this, navigate to the Advanced Tab, scroll to the Visibility drop-down menu, and toggle all options to hide the pop-up section on all devices.
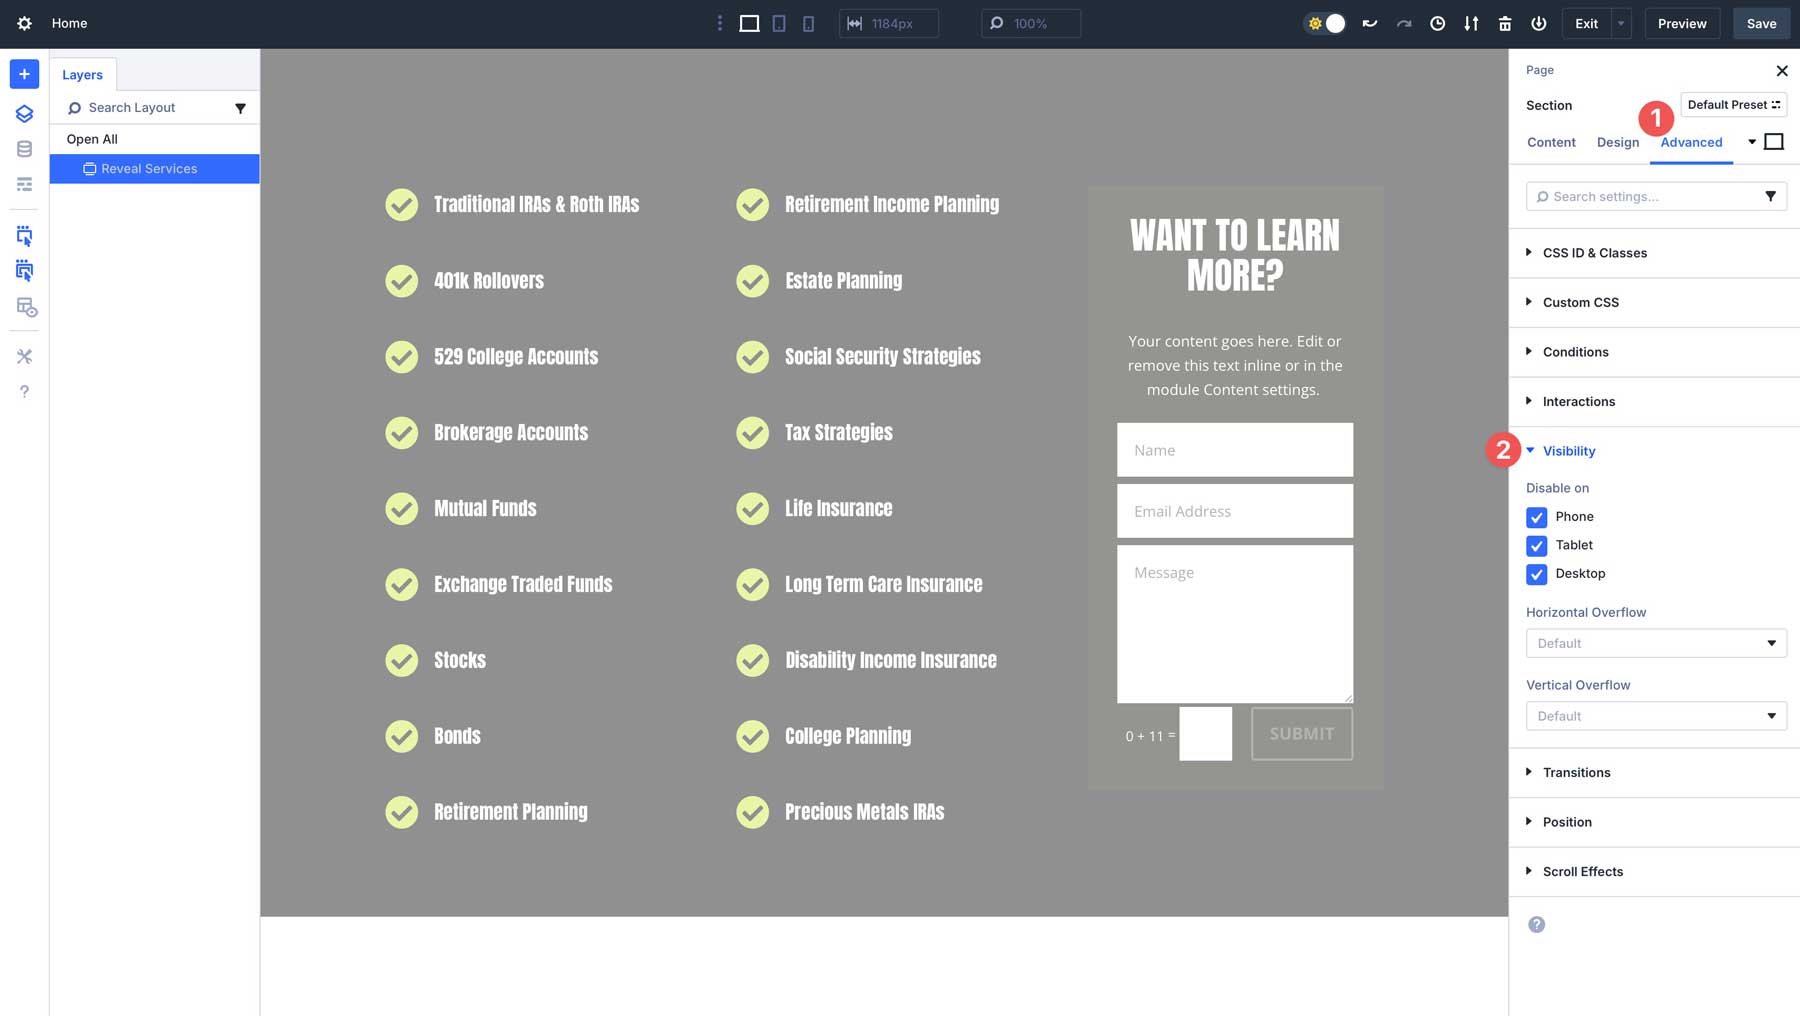
Toggle The Visibility Of An Element
Toggles are perfect for creating collapsible content sections like FAQs, accordion menus, pricing tables, or services. They allow users to expand or collapse content with a click, keeping your page clean and interactive. For example, you can reveal a complete list of services that is only visible once a button is clicked.
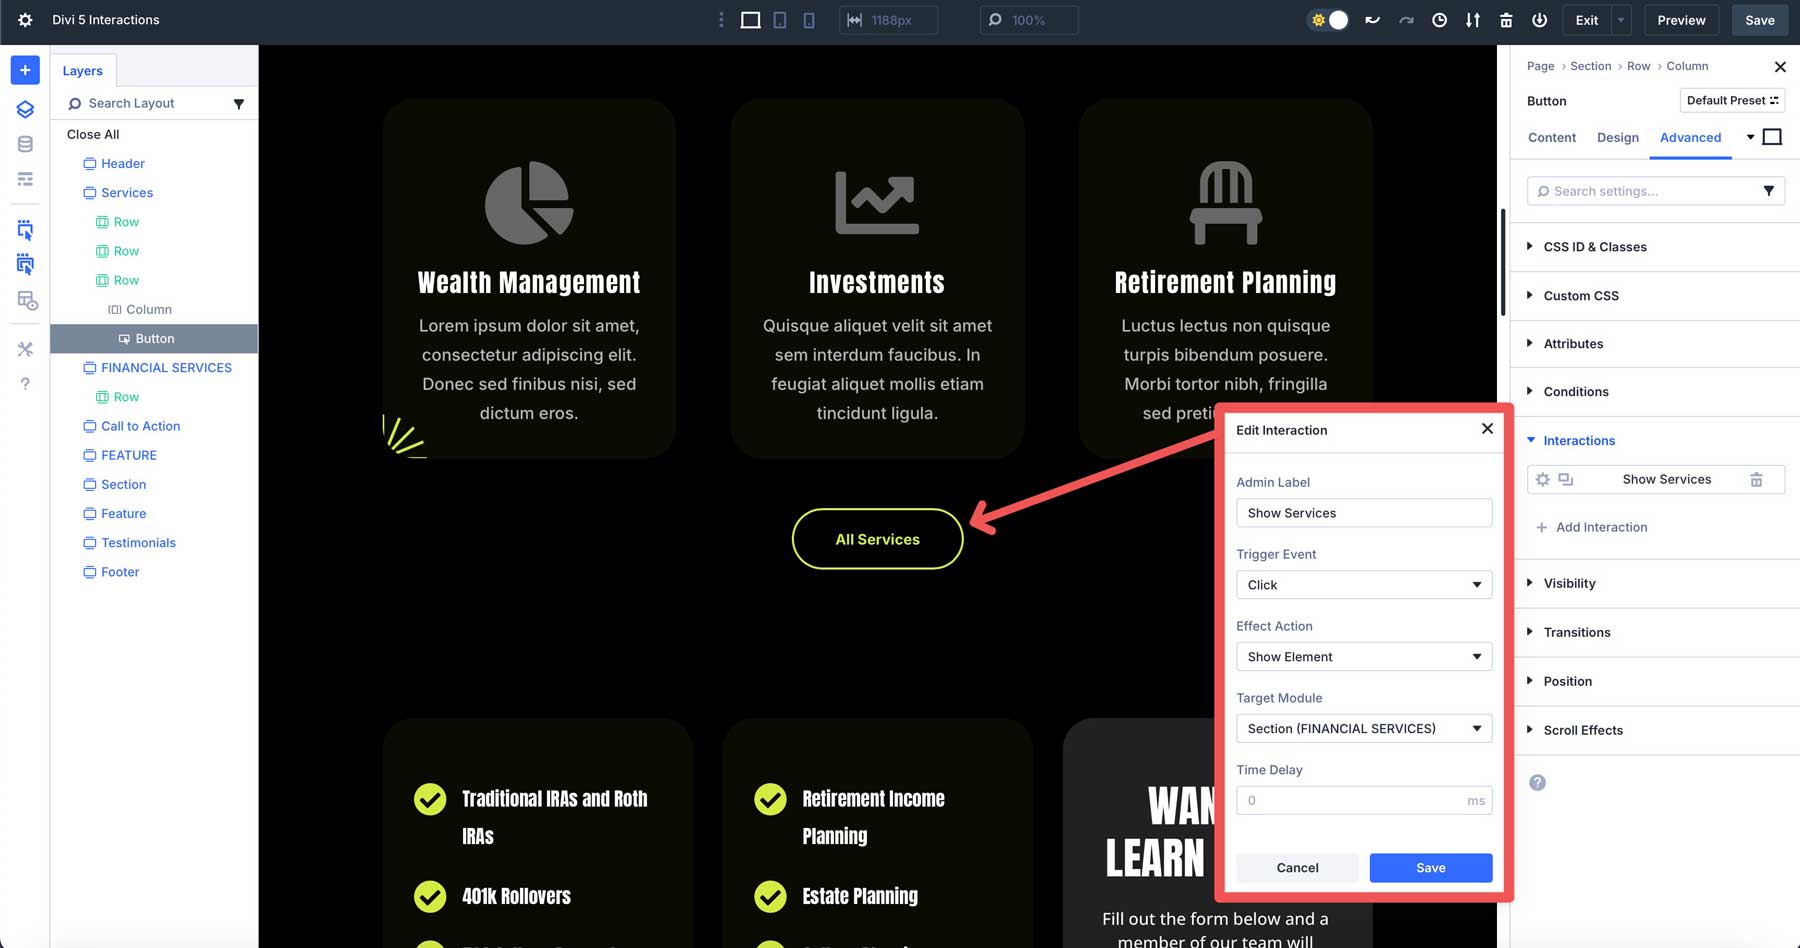
To create this effect, you’ll set an interaction on the button you wish to set as the trigger for your section. Enter the following settings for the Interaction:
- Admin Label: Show Services
- Trigger Event: Click
- Effect Action: Show Element
- Target Module: Section (Reveal Services)
- Time Delay: 0
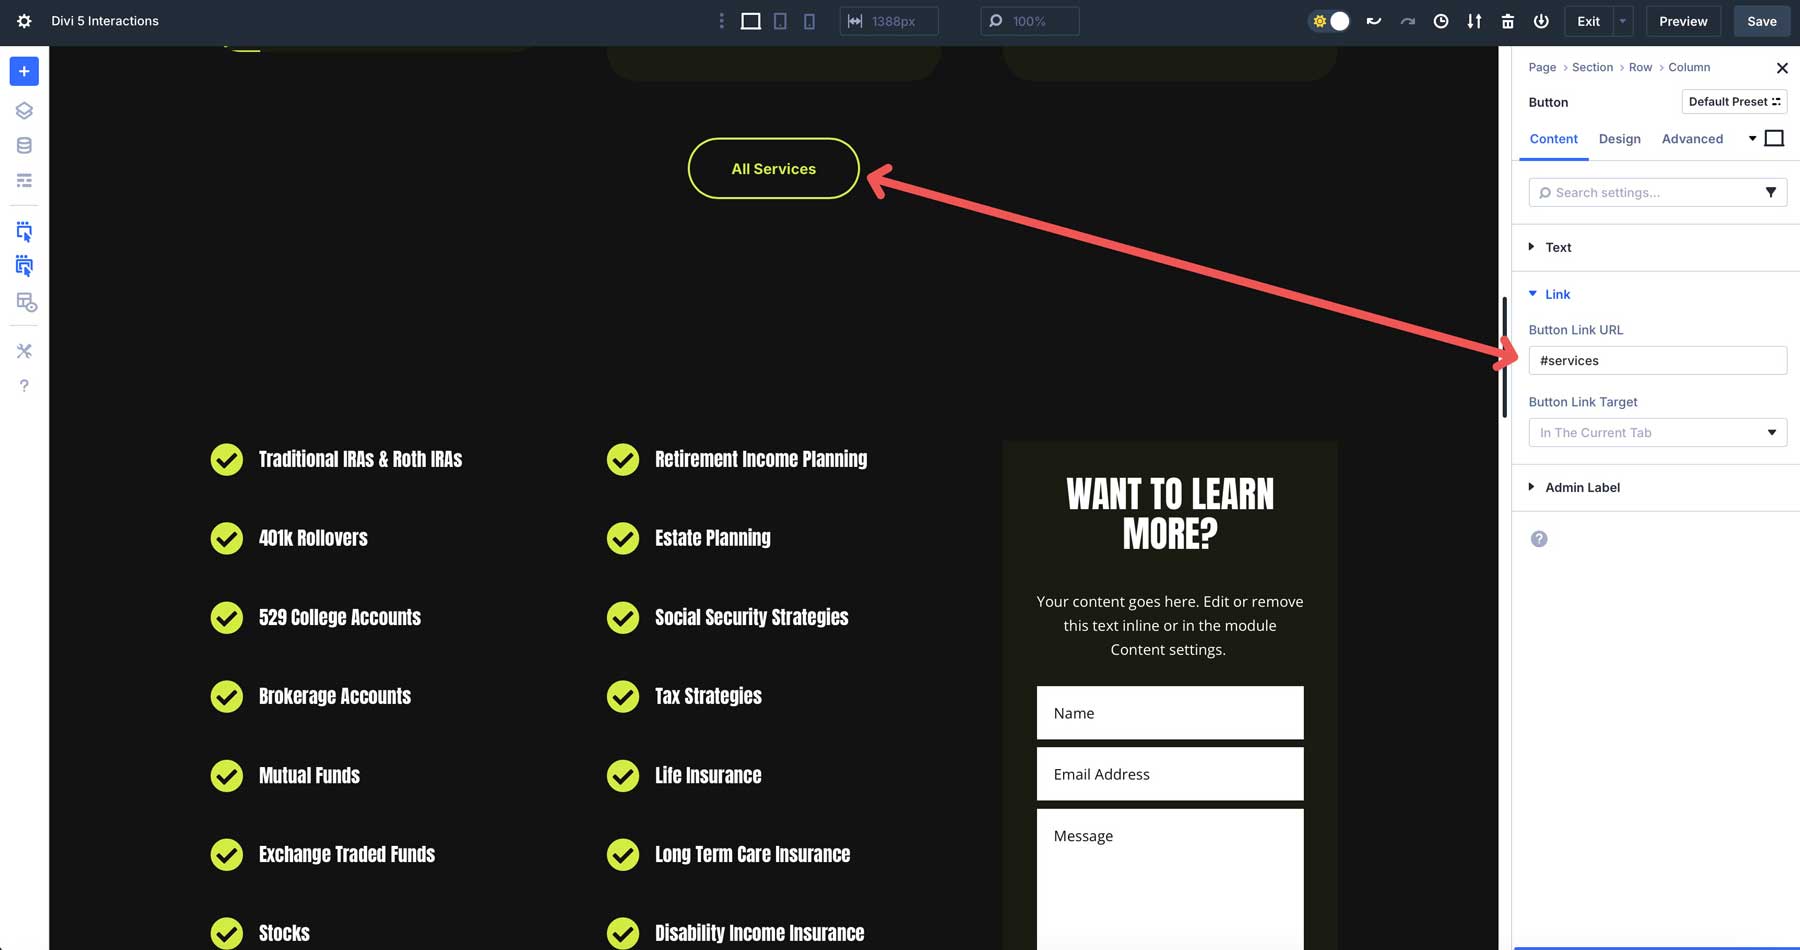
Next, set the anchor link to open the section. Open the button’s settings and enter #services into the Button Link URL field of the content tab.
Click the Features section beneath the button and navigate to the advanced tab. Set the anchor by adding services to the CSS ID field under the CSS ID & Classes menu.

While in the Advanced Tab, you’ll also need to set the section’s Visibility to hidden, like we did with our pop-up.
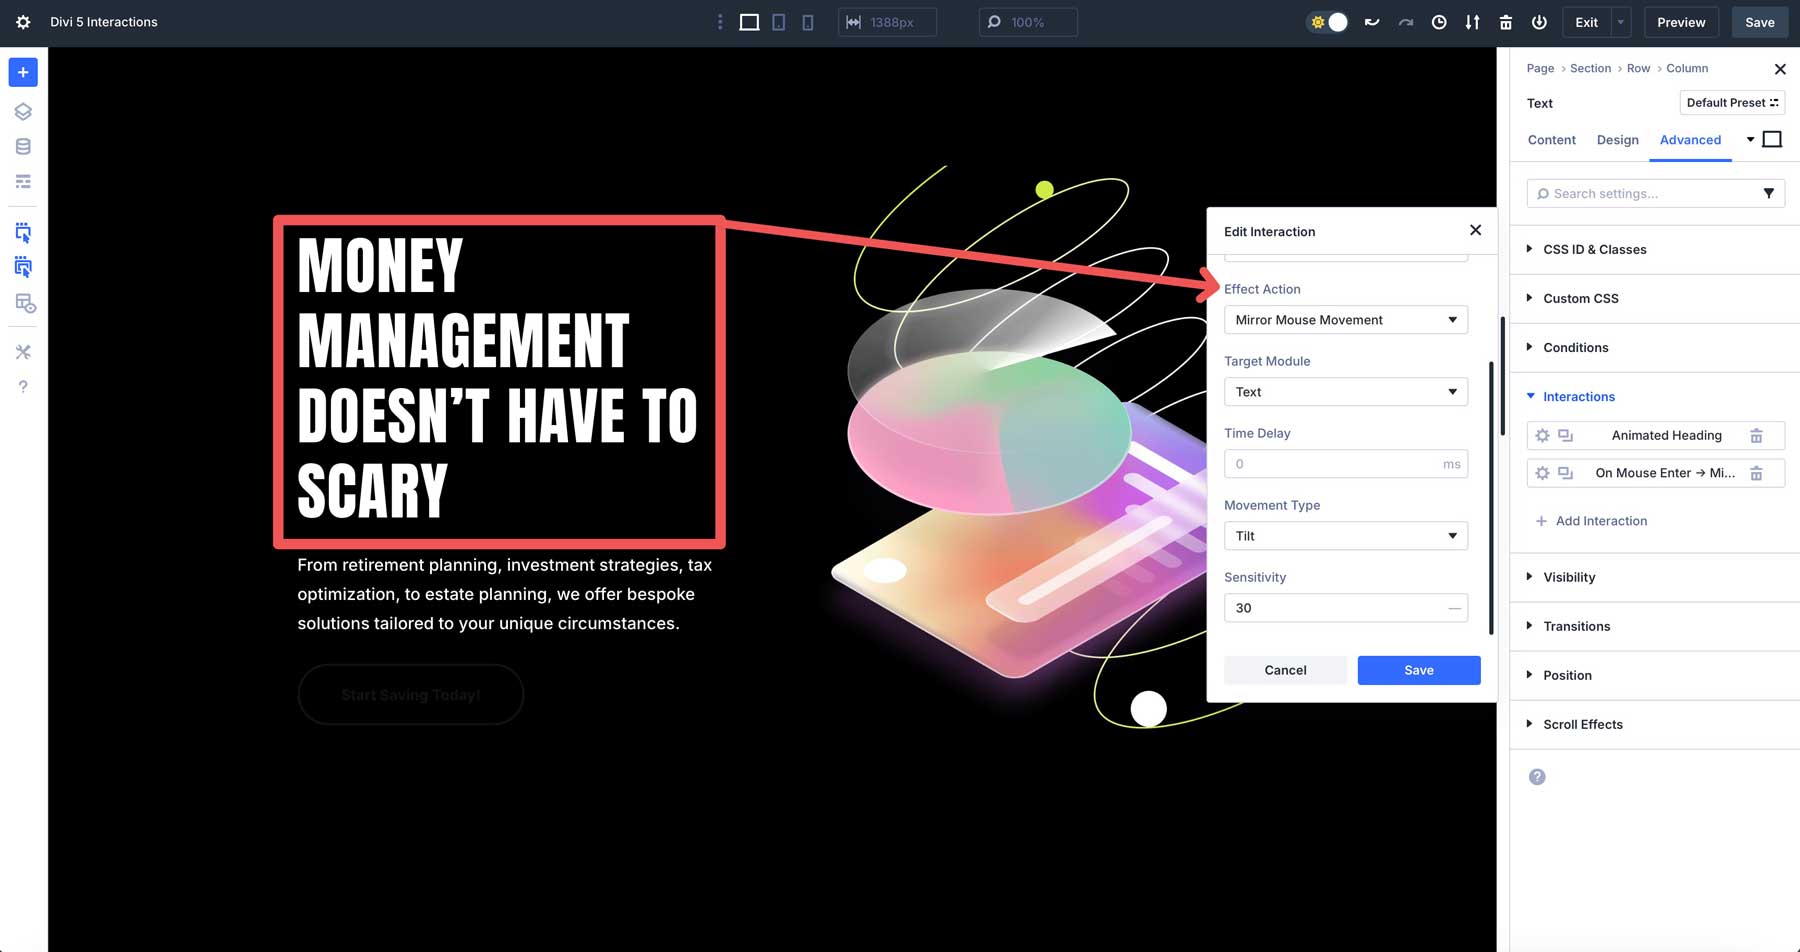
Mouse-Movement Effects
Divi 5 Interactions allows you to create dynamic mouse movement effects when a user hovers over a design element. For example, you can combine interactions to create a tilt effect on a heading and the parent column.
You’ll need to create an interaction for the heading first to accomplish this Interaction. Enter the following settings in the image’s advanced tab:
- Admin Label: Animated Heading
- Trigger Event: Mouse Enter
- Effect Action: Mirror Mouse Movement
- Target Module: Text
- Time Delay: 0
- Movement Type: Tilt
- Sensitivity: 30
When settings are entered, they should look like the screenshot below.
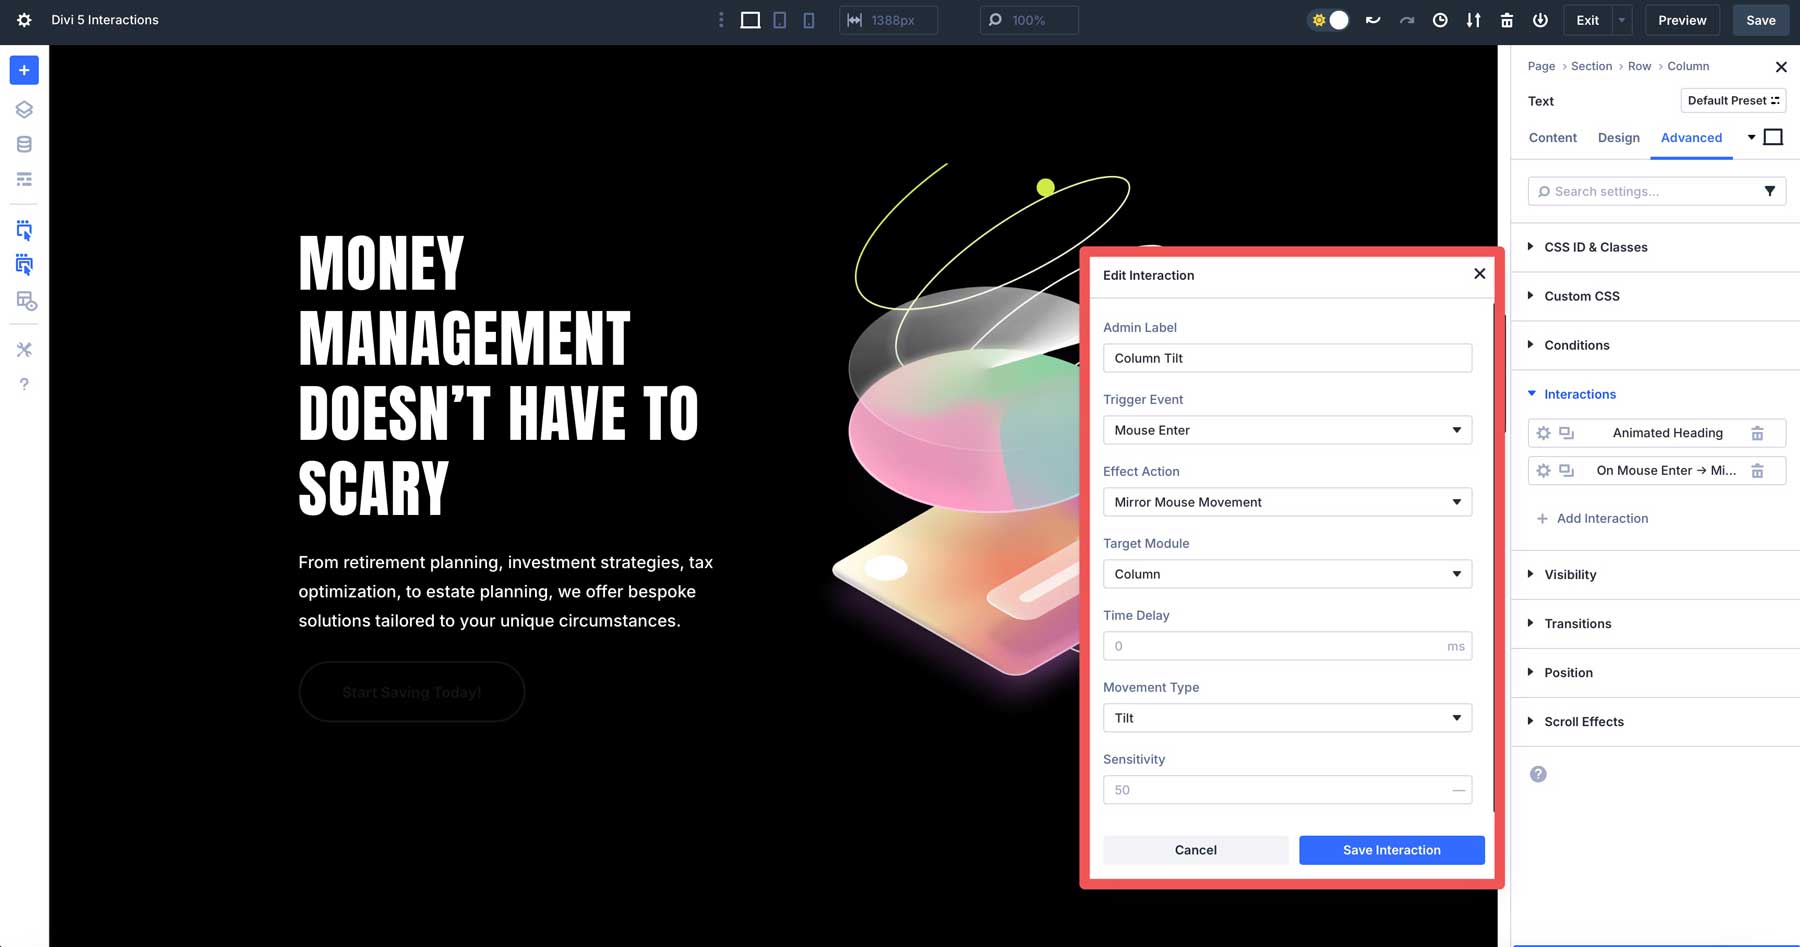
Next, set an interaction on the column containing the heading by using the following settings:
- Admin Label: Column Tilt
- Trigger Event: Mouse Enter
- Effect Action: Mirror Mouse Movement
- Target Module: Column
- Time Delay: 0
- Movement Type: Tilt
- Sensitivity: 50
Once complete, your settings should look similar to the screenshot below.
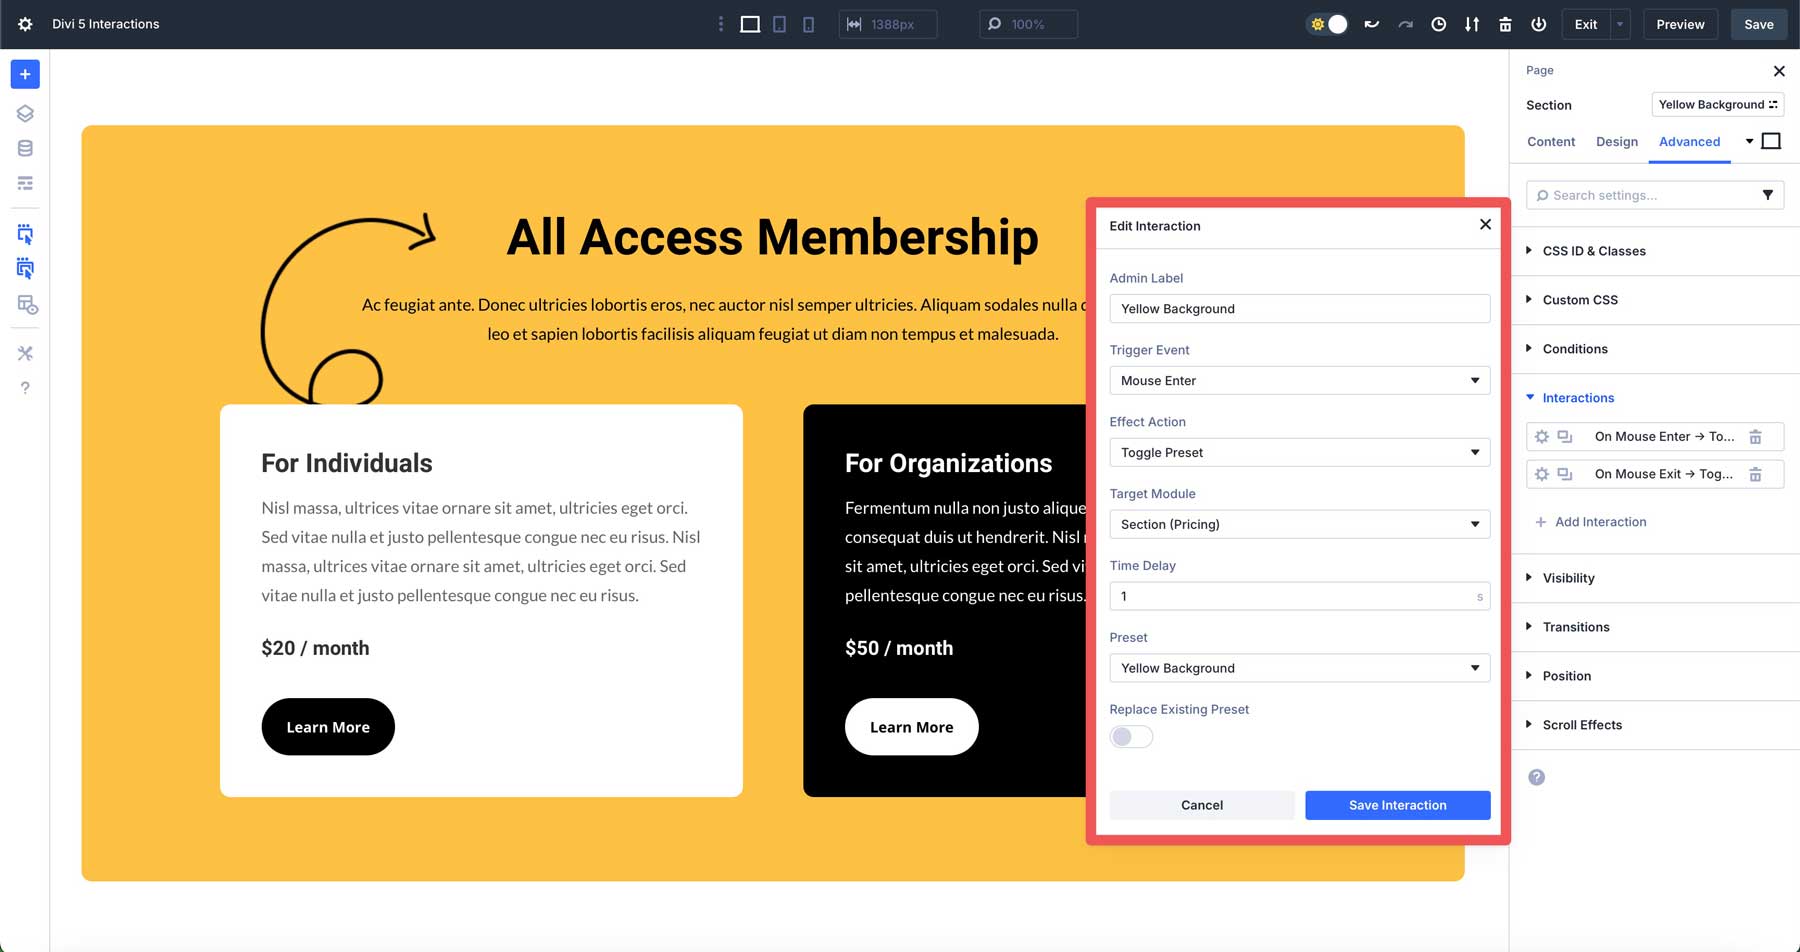
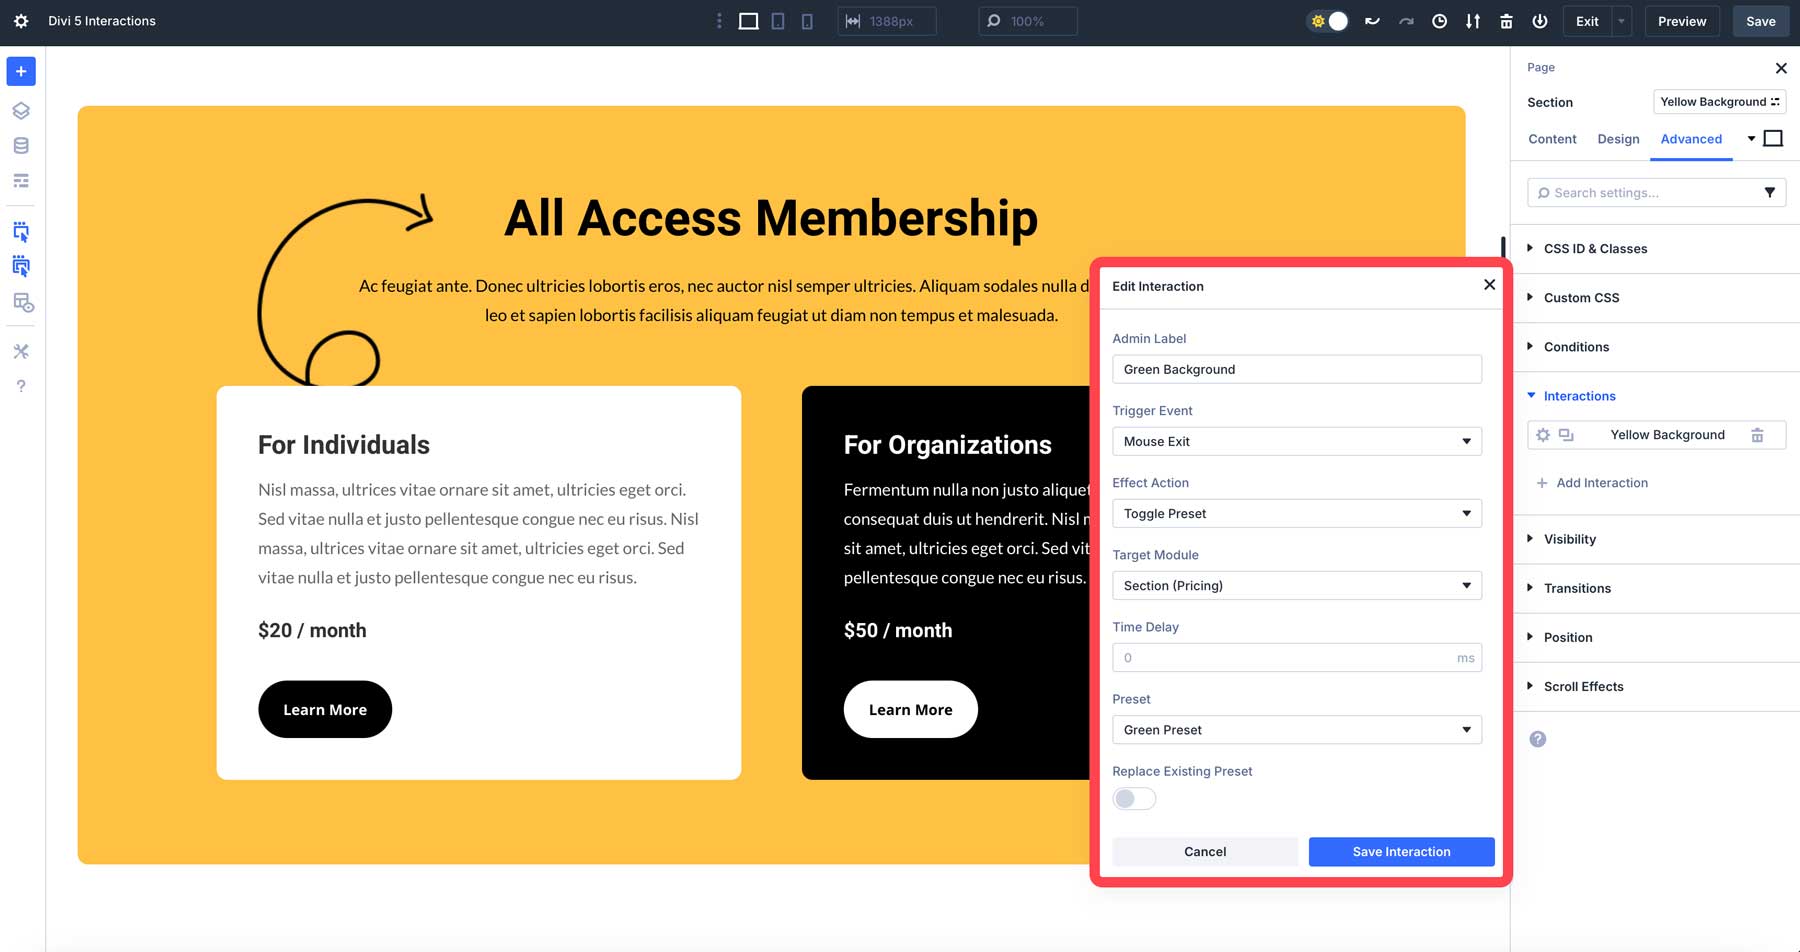
Preset-Based Interactions
You can use Divi 5 Interactions alongside presets to create effects either with mouseover or viewport enter/exit triggers. For example, if you’d like to showcase a section on your page by changing the background color or adding a border shadow style, you can use Interactions to do it. In the example below, the background color, width, and border change when a user hovers over the section.
To create this effect, you’ll first need to create a Preset to show the section before and after mouseover. In this example, we’ve created two — one with a solid yellow background and another with various effects and a green background.
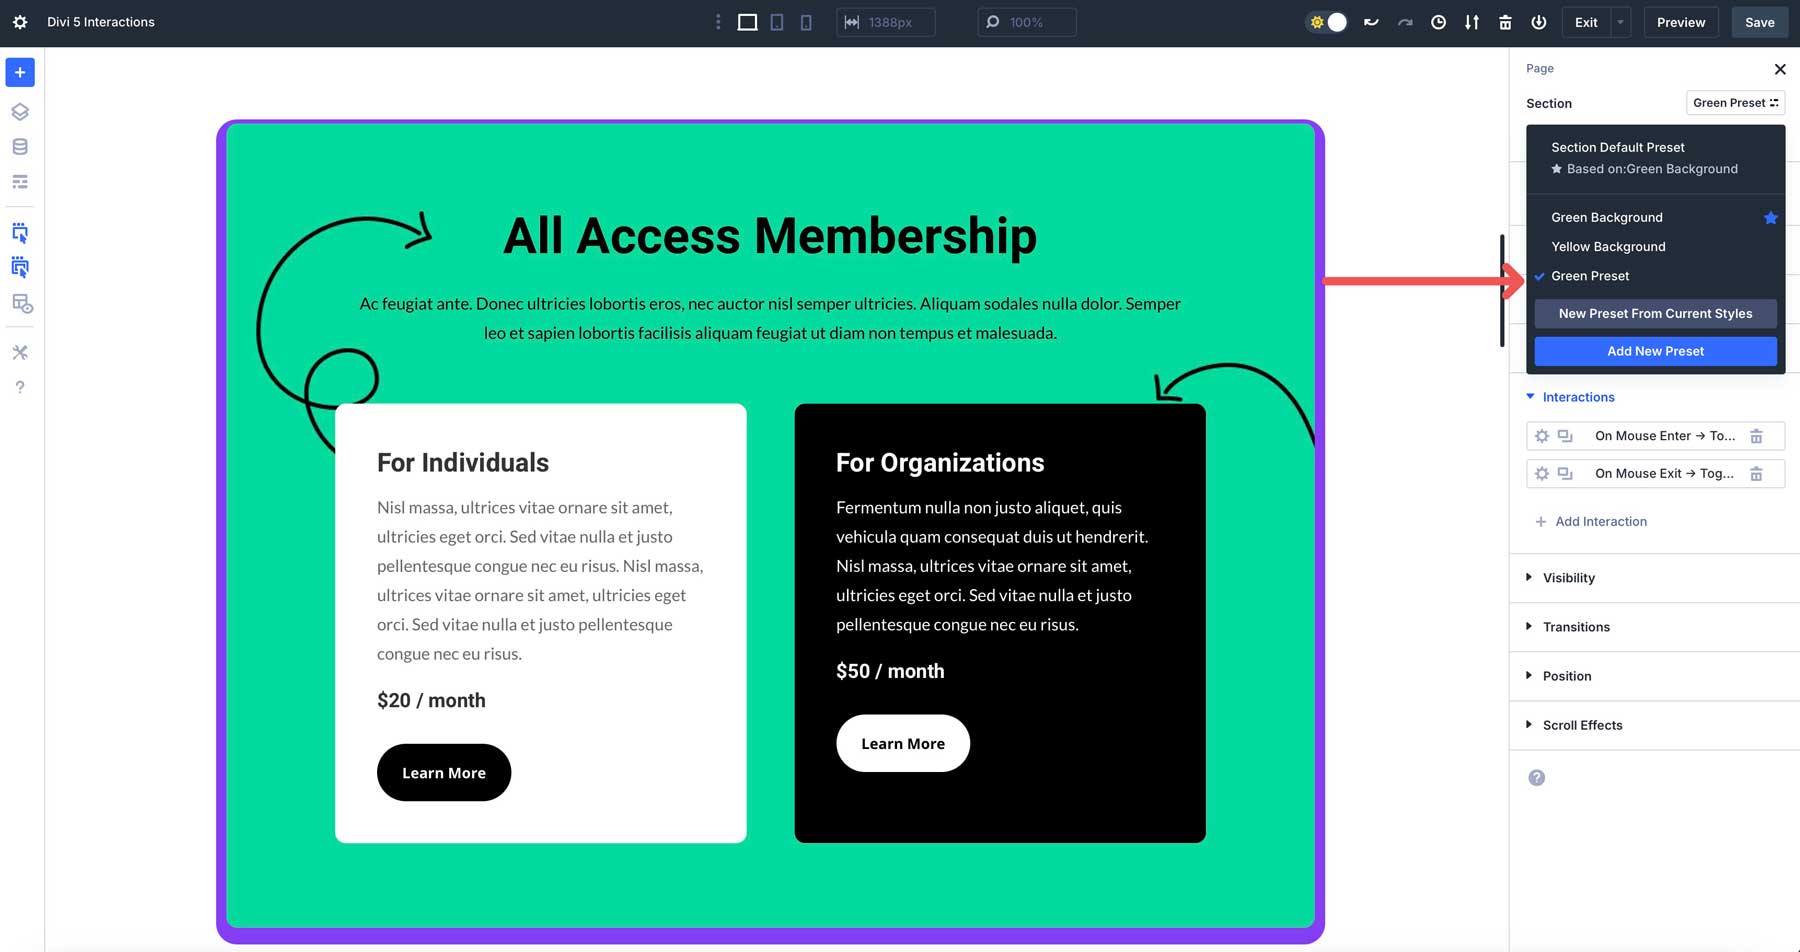
Once your presets are created, you can use Interactions to toggle the changes on hover. Start by creating the first Interaction with the following settings:
- Admin Label: Yellow Background
- Trigger Event: Mouse Enter
- Effect Action: Toggle Preset
- Target Module: Section (Pricing)
- Time Delay: 1 second
- Preset: Yellow Background
Next, create a second Interaction for the mouse-over by entering the following settings:
- Admin Label: Green Background
- Trigger Event: Mouse Exit
- Effect Action: Toggle Preset
- Target Module: Section (Pricing)
- Time Delay: 0
- Preset: Green Preset
Benefits Of Using Divi 5 Interactions
Divi 5 Interactions offers a powerful, streamlined approach to building websites, delivering a range of advantages that make it a standout feature for Divi users. Here’s a deeper look at why this feature is such a helpful addition to Divi 5:
1. No Plugins Required
Because Divi 5 Interactions are integrated into Divi’s core, it eliminates the need for third-party plugins to create pop-ups and other interactions. This native approach reduces the number of scripts running on your site, leading to faster load times and improved performance metrics.
For example, instead of relying on a pop-up plugin, Divi 5 Interactions handles everything within the Visual Builder, ensuring a leaner codebase and a smoother user experience. This also means fewer updates to manage and lower risks of plugin conflicts, making your site more reliable.
2. It’s User-Friendly
Divi 5 Interactions is designed intuitively, requiring only a few clicks to create interactions. Beginners can quickly grasp the basics, and pro developers can dive into complex combinations without writing a single line of code.
The Interactions settings are neatly organized within the Advanced Tab of any element, with clear labels and tooltips guiding you through the entire process. For example, setting up a pop-up requires a few clicks to select a trigger and effect, making it easy for anyone to use.
3. Freedom To Customize
The flexibility of Divi 5 Interactions and its vast settings — triggers, effects, and targets — allow you to create unique experiences for your site’s visitors. You can mix multiple triggers, like combining a scroll-based Viewport Enter with a time delay, to create sophisticated interactions, like a promotional banner that fades in after a user scrolls halfway down the page.
The ability to target any module, row, column, or section means you can apply effects precisely where needed, whether it’s animating a single button or transforming an entire hero section.
4. Enhanced User Engagement
Interactive elements boost user engagement by making websites more immersive and responsive. Divi 5 Interactions helps keep visitors on your site by encouraging Interaction, such as clicking toggles to reveal alternate pricing or triggering pop-ups for lead capture. For instance, a restaurant website could use a scroll-triggered animation to reveal a menu section.
Practical Tips For Getting Started
To make the most of Divi 5 Interactions, approach it strategically to ensure optimal results. Here are some tips to guide you through the process:
- Start Simple: Begin with straightforward interactions like pop-ups or toggles to familiarize yourself with the feature before tackling advanced effects like mouse-movement or multi-trigger animations.
- Use The Admin Label Field: Labeling your interactions and elements is crucial, especially on complex pages with multiple sections. Adding a name to the Admin Label field in the Content Tab of each module allows you to keep things organized and easily recognize the right target element.
- Use Presets: Divi 5’s preset system is great for saving time and maintaining consistency across interactions. Presets allow you to define reusable styles, such as a fade-in animation or color transition, and apply them to multiple elements.
- Test Thoroughly: Always preview your interactions using Divi 5’s Preview feature to catch any issues before publishing. You can also use Divi 5’s Customizable Responsive Breakpoints to test how interactions behave on all devices.
Elevate Your Website with Divi 5 Interactions
Divi 5 Interactions is the perfect feature for creating engaging, no-code interactive elements to boost your website’s user experience. From pop-ups that capture leads to scroll-triggered animations that bring your designs to life, this feature allows anyone to build dynamic, professional websites without touching a line of code. Its lightweight integration and diverse trigger options make it an essential tool for modern web design.
Ready to get started? Download the latest Divi 5 Alpha and dive into Interactions to create pop-ups, toggled content, scroll effects, and more. A quick note: Divi 5 is ready for new websites, but we don’t recommend using it on existing sites yet.
Comment below or reach out on our social media channels to share your creations with us. We’d love to see them!


I find somewhat missing with the Load event the no repeat per session feature. The user gets annoyed with the popup all the time.
I love this feature, but you could do a bit more with it..
Do you have in plan adding any transition, animations to that feature? Now the elements that is triggered just shows or hide without any kind of smooth control over it. Also, would be great to have some more features with this for example to build navigation, overlays etc.
Hey, Damian!
Divi 5 Interactions feature already includes some animation effects like fades, scales, rotations, and toggling visibility.
The Interactions feature is still evolving and, in time, more sophisticated transition and animation controls will be introduced. 👍
Great, can’t wait! I am making my own FAQ accordion right now, and I can confirm there is no way to smooth the transition. Besides animations on click, other things you can have in mind while working on interactions could be:
– Transform on click – for example my down arrow (show more) could be rotated into an up arrow on click (show less);
– The mouse cursor should change automatically to a pointer hand when hovering over the trigger element to indicate clickability. For now I added: “selector {cursor: pointer;}” to CSS.
Keep it up! I like making my own components instead of using modules, and Divi 5 seems to be just about that. 👍
At this stage is very difficult to select the right element to interact with. You should use a better naming system.
Also, an option to select the current element.
If you use the “Admin Label” for Containers and Modules, you will see those names in the Element picker. So, that power is in your hand.
Great insights on Divi 5 interactions! Excited to try these new features and see how they boost site design and user experience. Thanks for the update!