
If you’ve ever tweaked colors, padding, or fonts one module at a time, you’ve probably realized how slow, error-prone, and boring manual style changes can be.
Divi 5 introduces a smarter way to handle it. With Design Variables and Find And Replace, you can update static styles across your layout and build a reusable design system in minutes. Let’s see how.
👉 Divi 5 is ready to be used on new websites.
What Are “Static Styles”?
When you import a Divi layout or use a pre-designed section, everything, such as fonts, colors, spacing, and borders, comes already set. If a layout isn’t using presets, you’ll notice that these values are applied on an element level.
Subscribe To Our Youtube Channel
A heading might have its font size typed in manually, a button might use a specific color code, and padding or spacing might use fixed numbers. These directly applied values are called static styles.
And while they seem harmless at first, they can quickly become a problem when you want to make changes. The issue with static styles is that they take more time to manage. If you want to change the color of all your buttons or adjust spacing across sections, you have to edit each one manually. That’s slow and frustrating.
Now, imagine you’re updating a complete website brand manually or working on a complex layout full of repeated styles. Many designers have shared how frustrating this process can be. But for years, there was no reliable way to fix it. That’s why we built a smarter solution in Divi 5.
How Divi 5 Makes Replacing Static Styles Easy
One of our goals with Divi 5 is to make your design workflow faster and less repetitive. To help with that, we’ve added two powerful features: Design Variables, which let you centralize your styles, and Find And Replace, which lets you update them instantly across your layout. Let’s understand them in detail.
Design Variables Let You Define Your Global Styles
With Divi 5, you can finally build your own design framework visually and use it to modify your brand styles quickly.
Instead of manually applying the same color, font, or spacing across every module, Divi 5 now lets you save those values as Design Variables. These are reusable values you can reference throughout your site to make your design more consistent and easier to maintain.
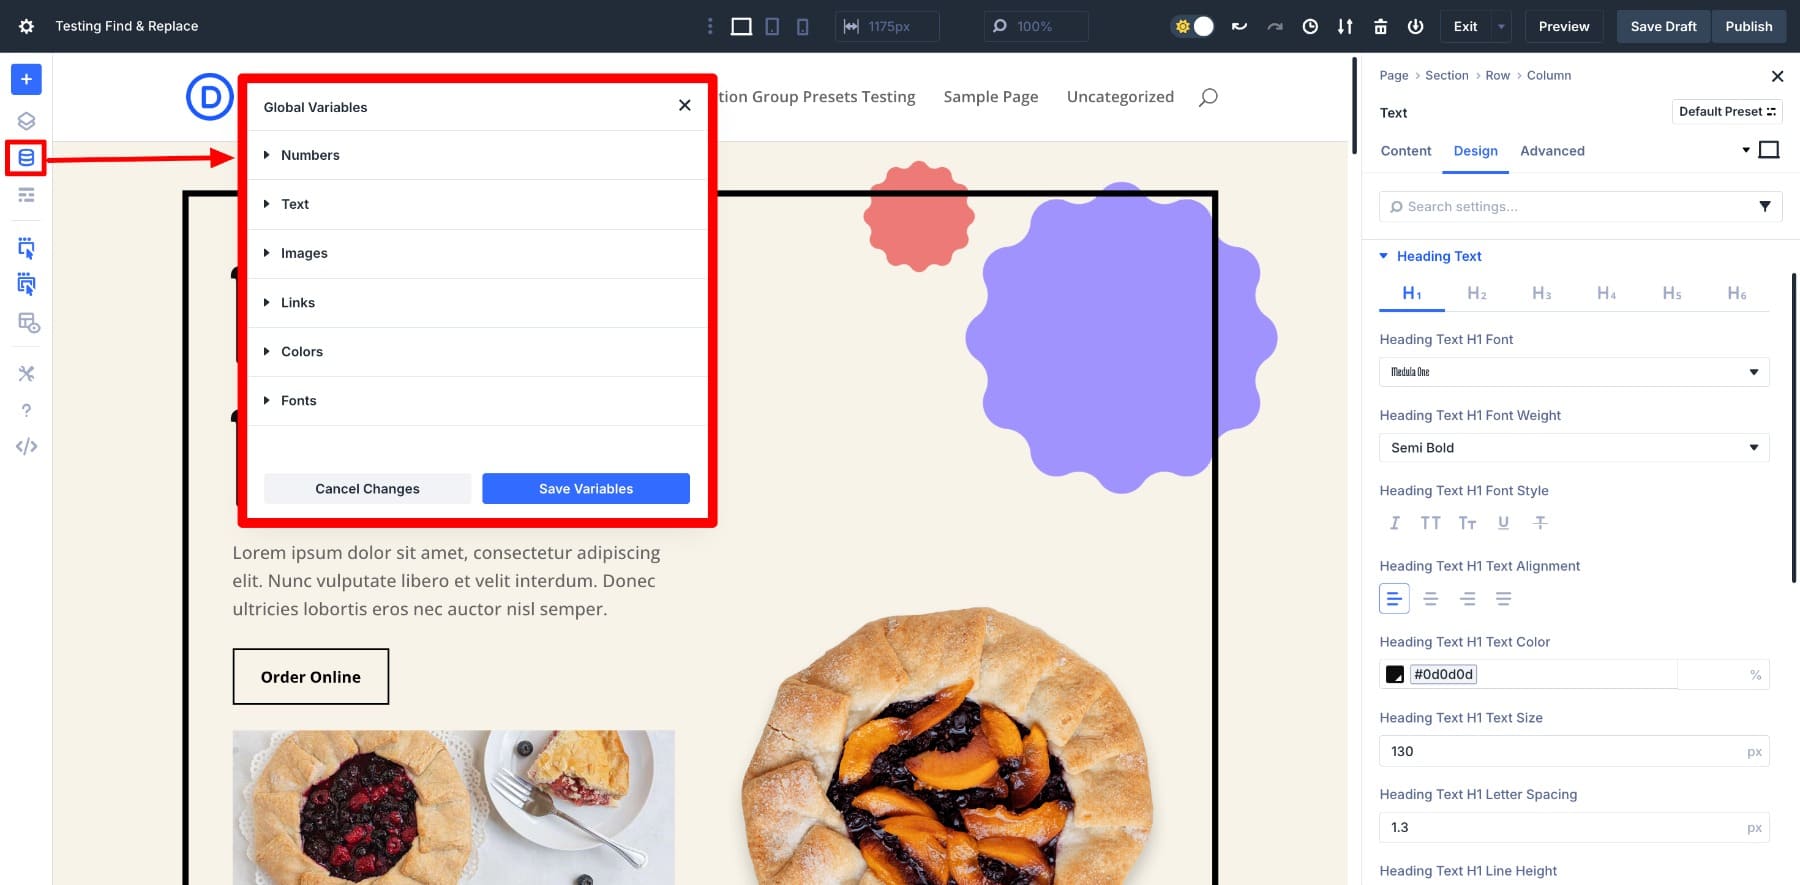
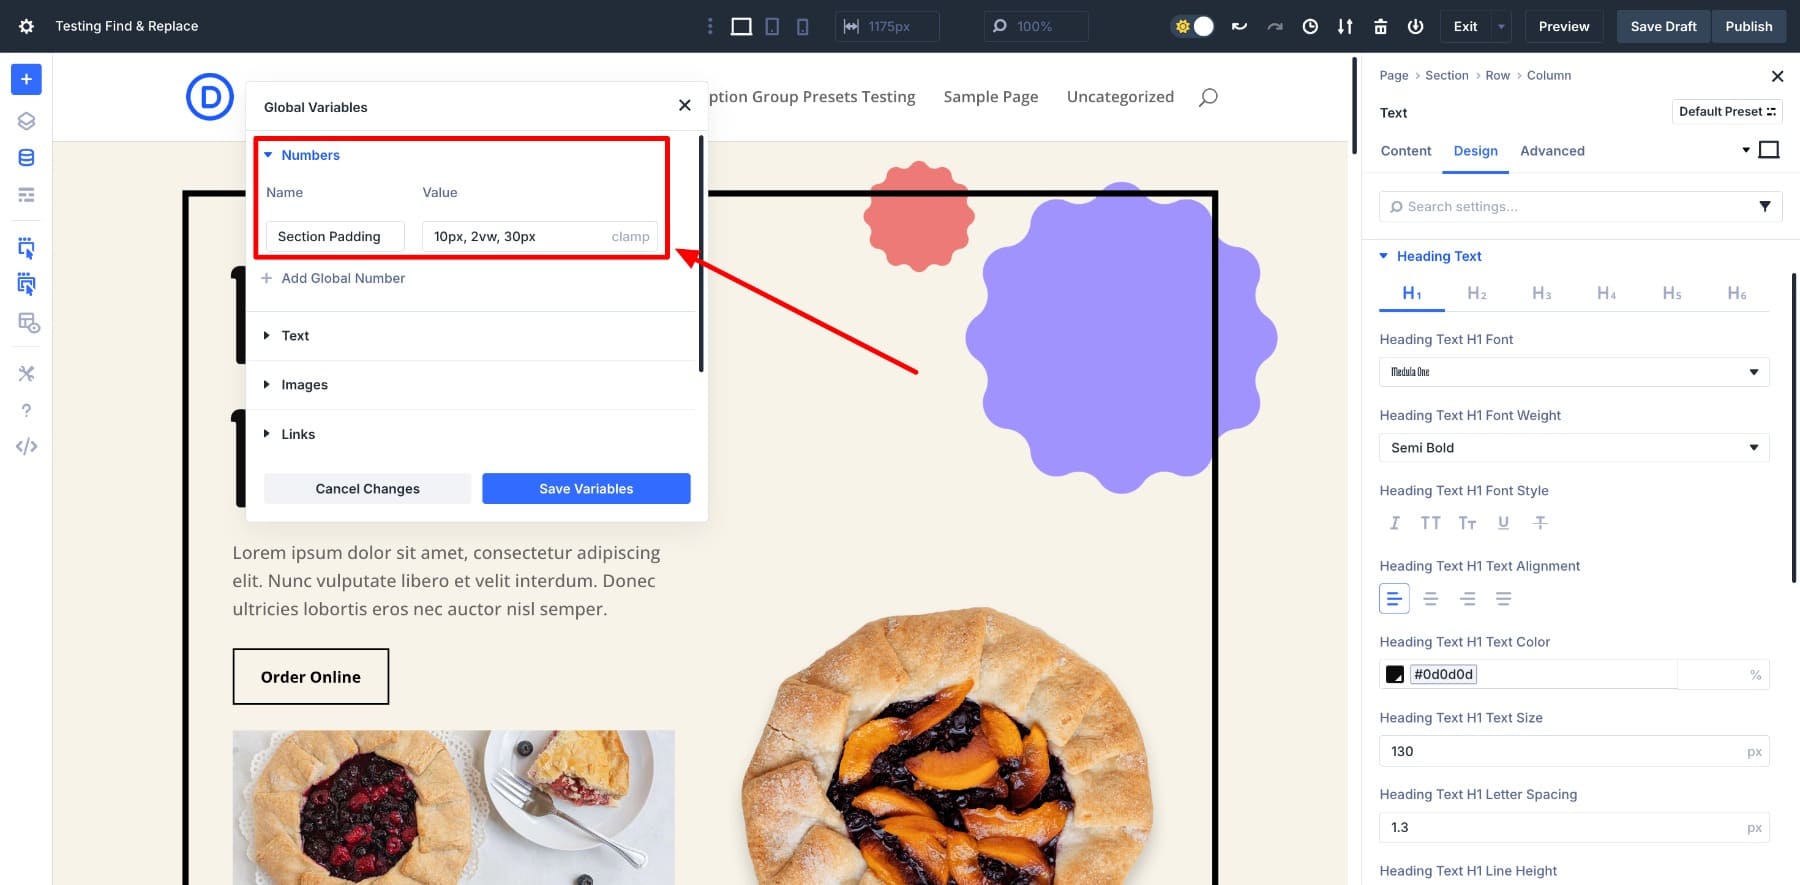
Inside the Visual Builder, the Variable Manager lets you create and organize variables in six different types: Colors, Fonts, Numbers (like spacing or sizes), Text, Images, and Links.
You can save each variable with a clear name, like Section Padding, so finding and reusing it is easier. Unlike writing CSS variables manually, Divi’s interface lets you manage these values visually without touching code.
Applying these saved variables is also easier. While customizing a module, go to settings, locate the Variable Manager icon, and choose your variable from the list.
You’ll see the real advantage when it’s time to make changes. Let’s say you want to change the padding everywhere. Instead of editing dozens of modules, you just update the values once in the Variable Manager, and it updates across your site.
Notice the values changing in real time in applied setting fields? That’s the power of a global design system.
And this isn’t limited to design styles, either. To manage repeated content effectively, you can also save text, images, and links, like an address, email, or company tagline, as a Content Variable. There is no need to copy-paste anymore, just insert it like dynamic content, and it will stay consistent across your site.
Learn Everything About Design Variables
Find And Replace Lets You Switch From Static To Global Styles
Divi 5’s Find And Replace feature lets you quickly update style values across your layout without editing each module individually. It’s designed to help you change static values like colors, fonts, spacing, or any other setting that repeats across sections from a single starting point with just a few clicks.
To use it, right-click on any style field inside the Visual Builder or hover over and click the three dots. You’ll see the Find & Replace option in the dropdown.
![]()
This opens a new Find And Replace panel. Here, you can make the desired changes and apply them in bulk.
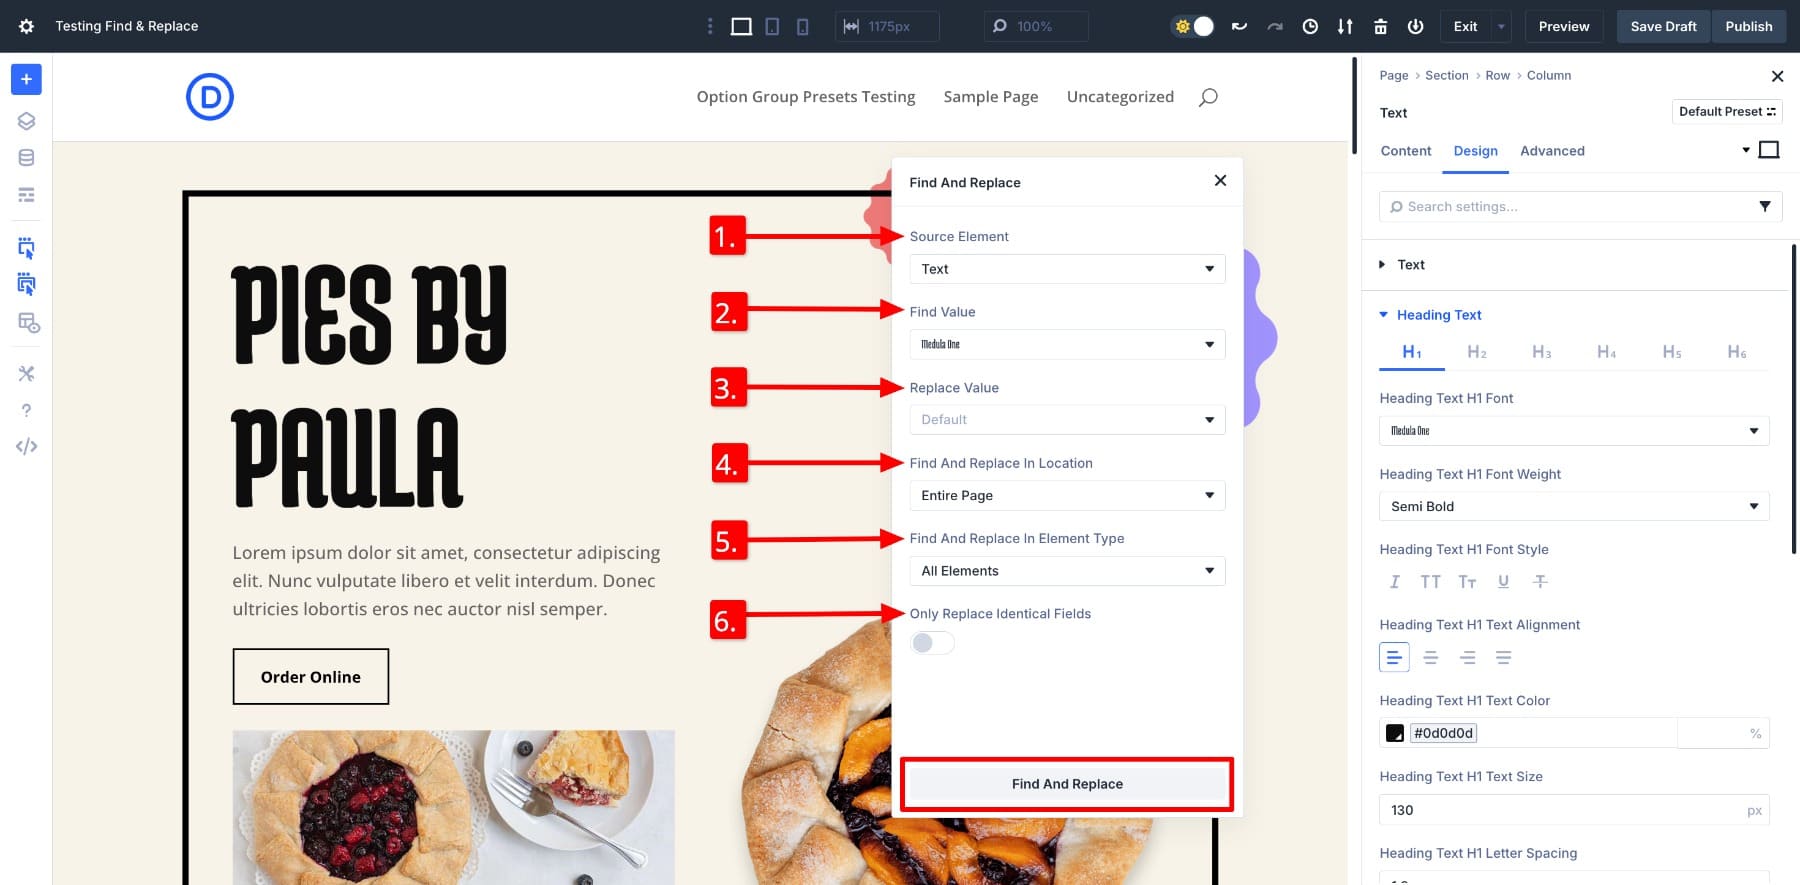
- (1.) Source Element: The setting you’re targeting (for example, Text, Color, or Spacing). Open the dropdown, and you’ll notice it’s actually the Layers hierarchy.
- (2.) Find Value: The exact value you want to replace, such as a specific font or color code.
- (3.) Replace Value: The new value or variable you want to apply instead.
- (4.) Find And Replace In Location: Choose where to apply the change. This module, the section, or the entire page.
- (5.) Find And Replace In Element Type: Decide if the change should apply to all elements or only specific module types.
- (6.) Only Replace Identical Fields: When enabled, replacements happen only if both the setting and value match exactly.
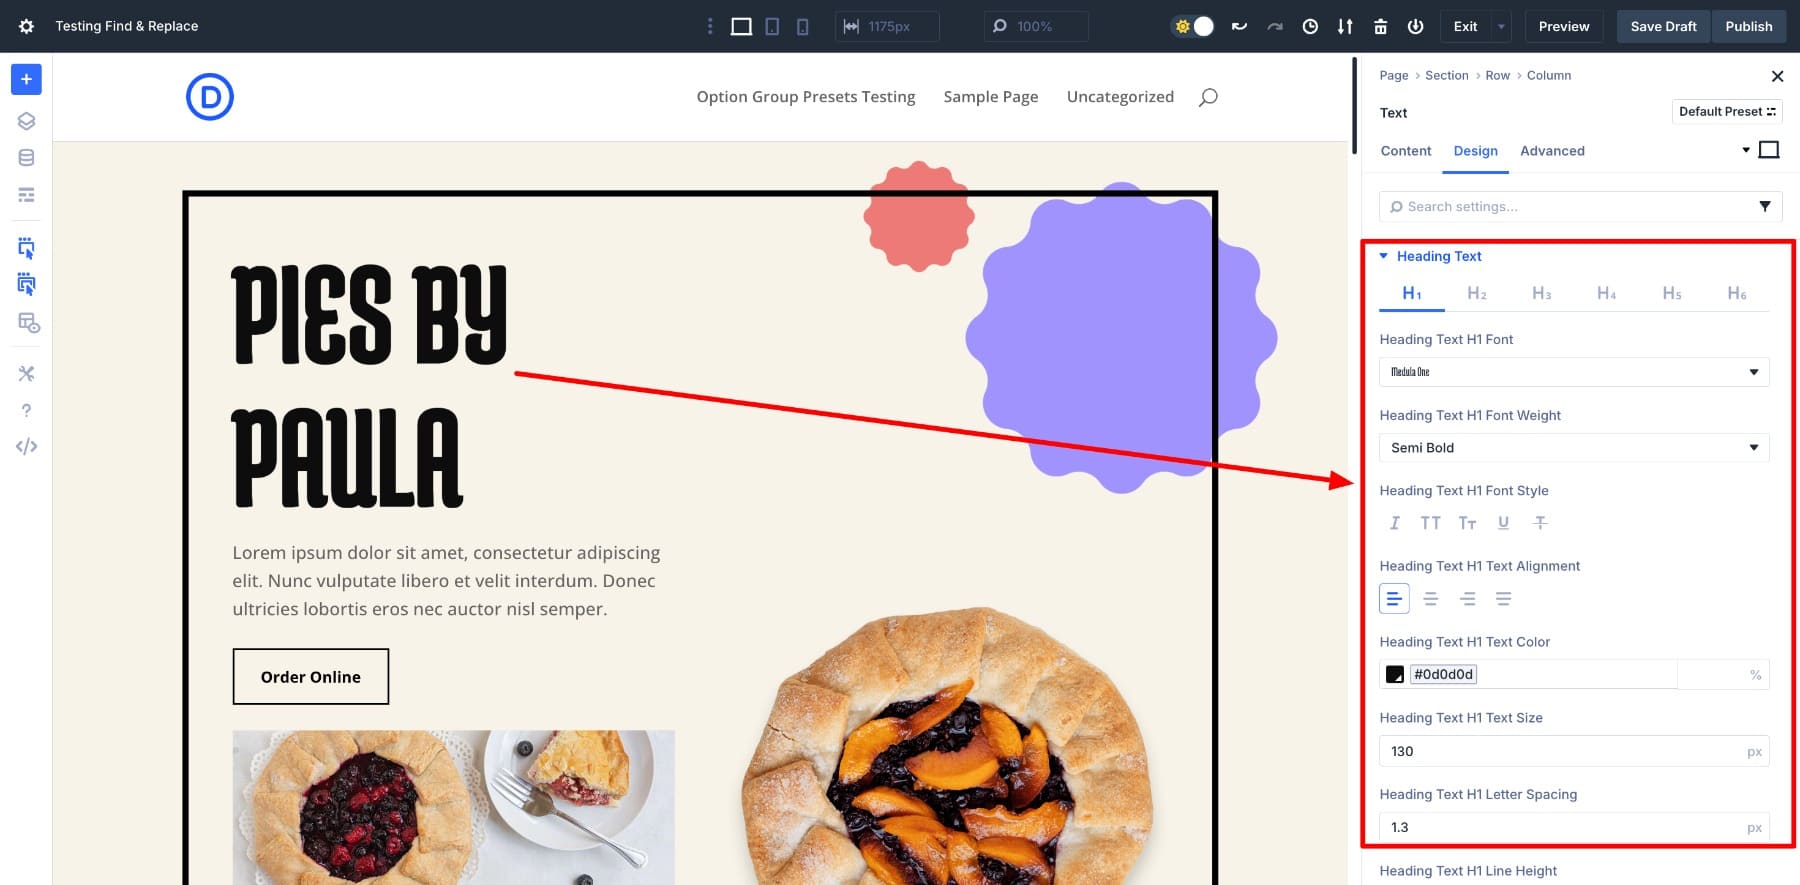
Here’s how it works. Let’s say you want to change the heading font used across the page. Instead of going module by module, we’ll use the Find And Replace panel.
When you open it from a heading’s settings, the Source Element is auto-selected, so you don’t always have to choose it manually.
(You can also click on different elements, and the panel options will adjust automatically.)
In the Find Value, enter the value to be replaced. For our example, it’s Medula One, the current applied font. In Replace Value, choose the new value you want to apply. Let’s select Aclonica.
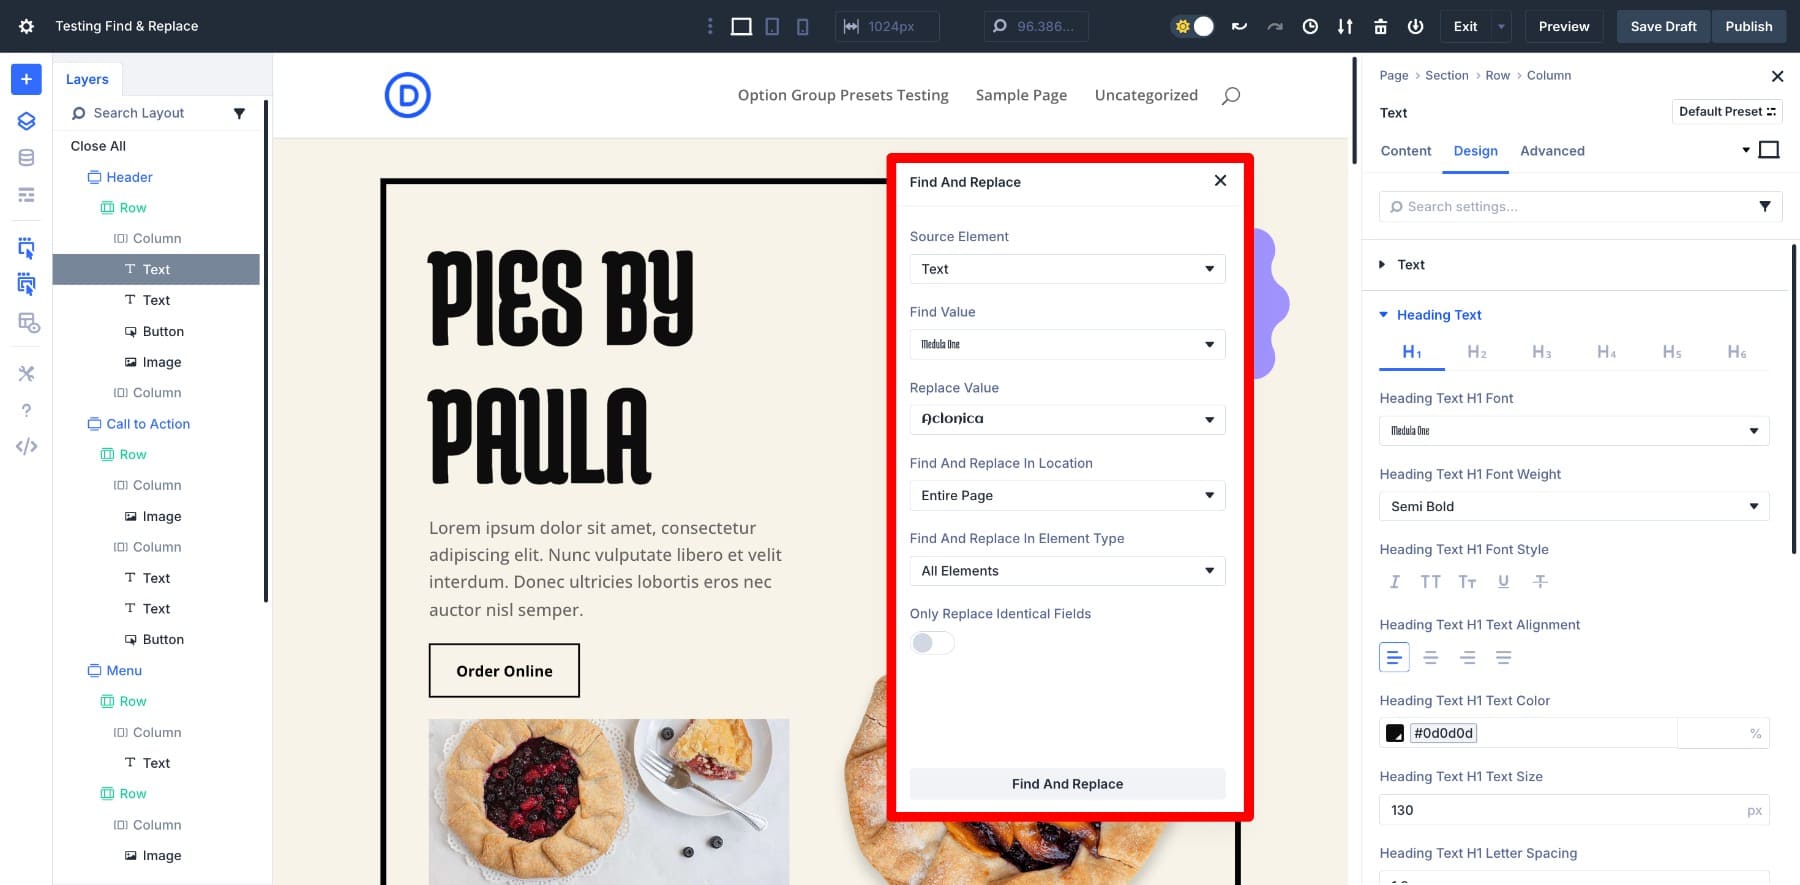
Then select whether you want to update all instances in the Entire Page or just the column, row, or section in the Find And Replace In Location. Keep the Find And Replace In Element Type as All Elements since we want to target all heading modules.
And that’s it. Just hit Find And Replace, and in seconds, 20 heading instances are updated. Notice the body text and button fonts stay untouched? That’s because they use different values. And that’s how precise the system is.
Divi only applies changes where it finds an exact match. This means you can clean up static styles confidently, without messing up designs that don’t need changing. But how do Design Variables fit here?
They’re like the icing on the cake. You can also use Design Variables in the Replace Value field. Hover over it, click the Variable Manager icon, and insert a saved variable.
This links your styles to a globally reusable system that’s much easier and more efficient to update. This is exactly how we’ll replace all our static values with Design Variables to future-proof our website for easier updates.
Learn Everything About Find And Replace
Both these features (and many more) are available inside Divi 5. The builder has been reimagined to offer faster performance, smarter workflows, and more control. Honestly, reading about them is exciting, but you’ll notice the real change when you experience these features for yourself.
How To Replace Static Styles With Saved Variables
Now that you know what tools we’ll use, it’s time to see them in action.
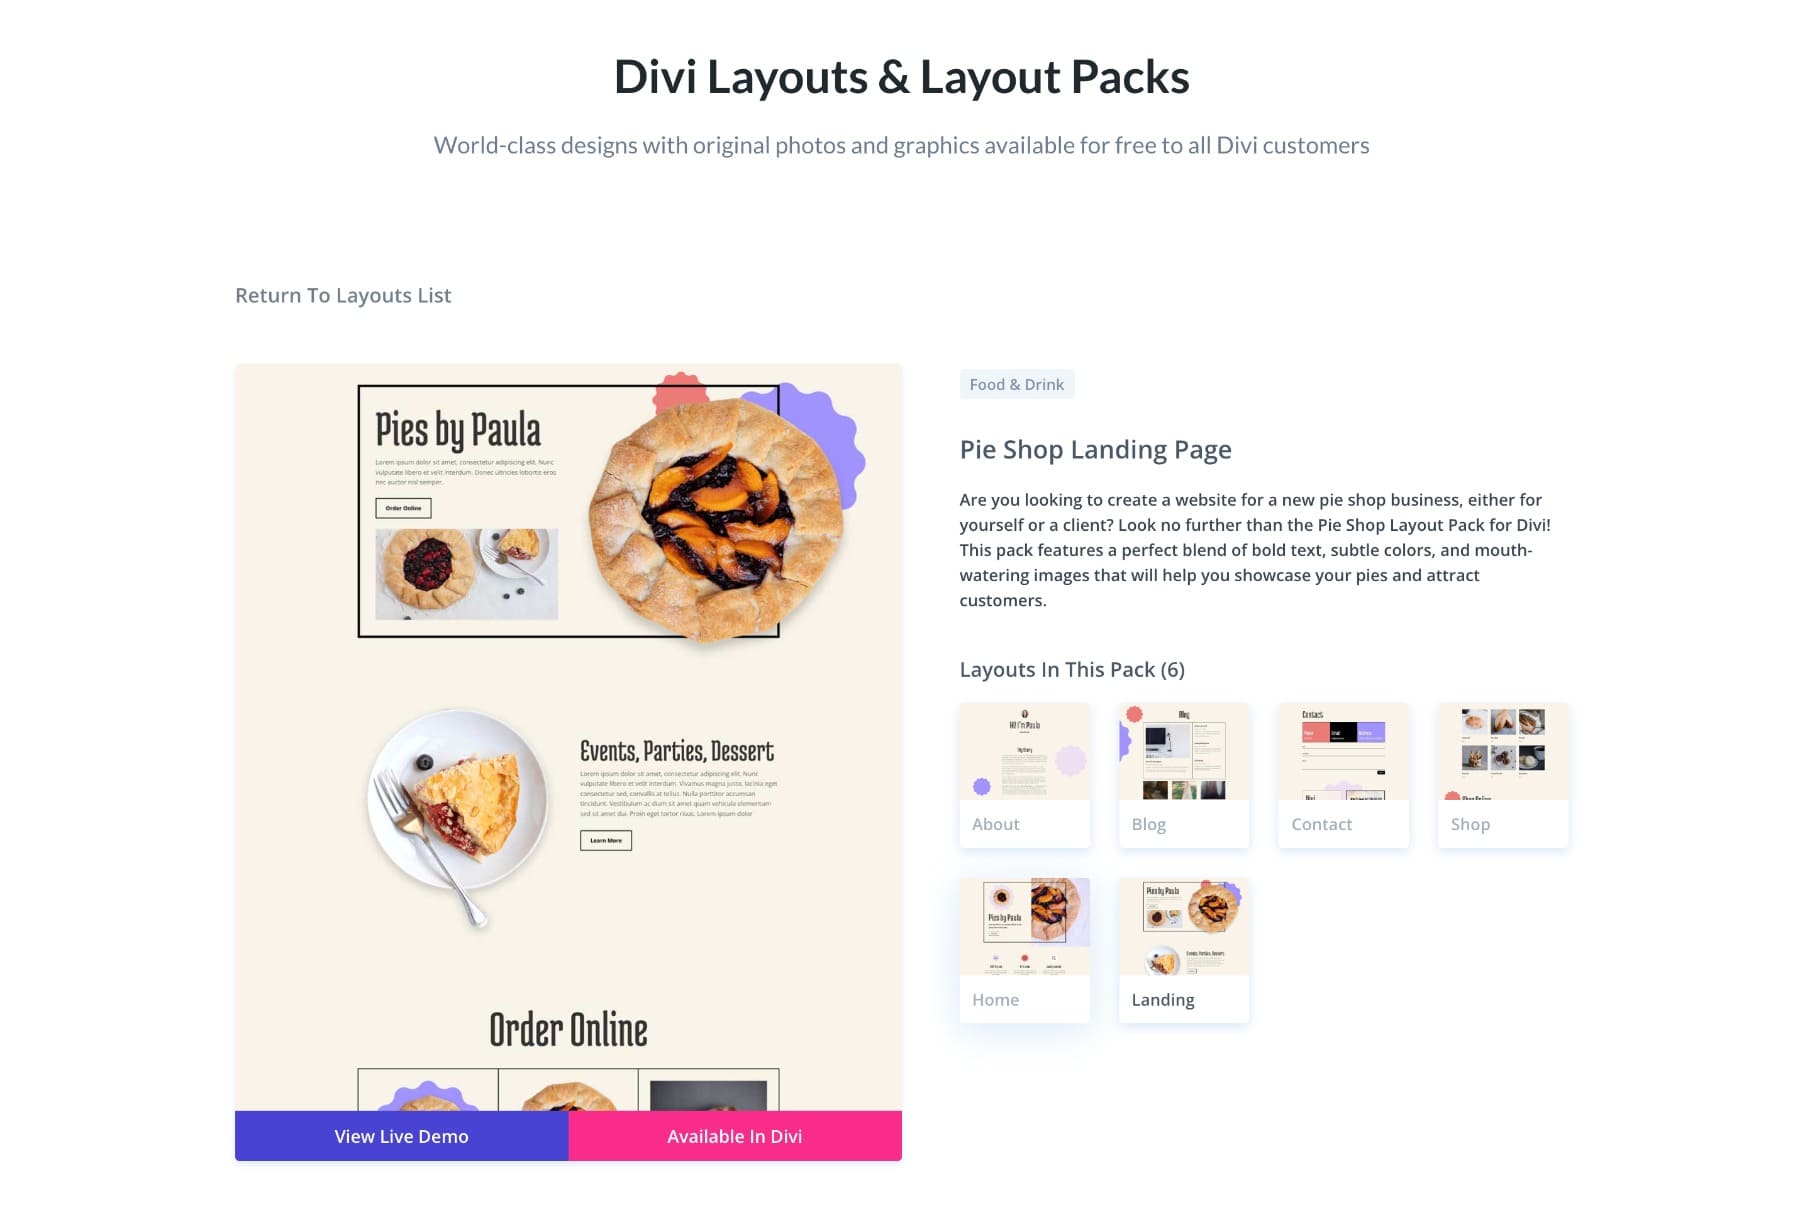
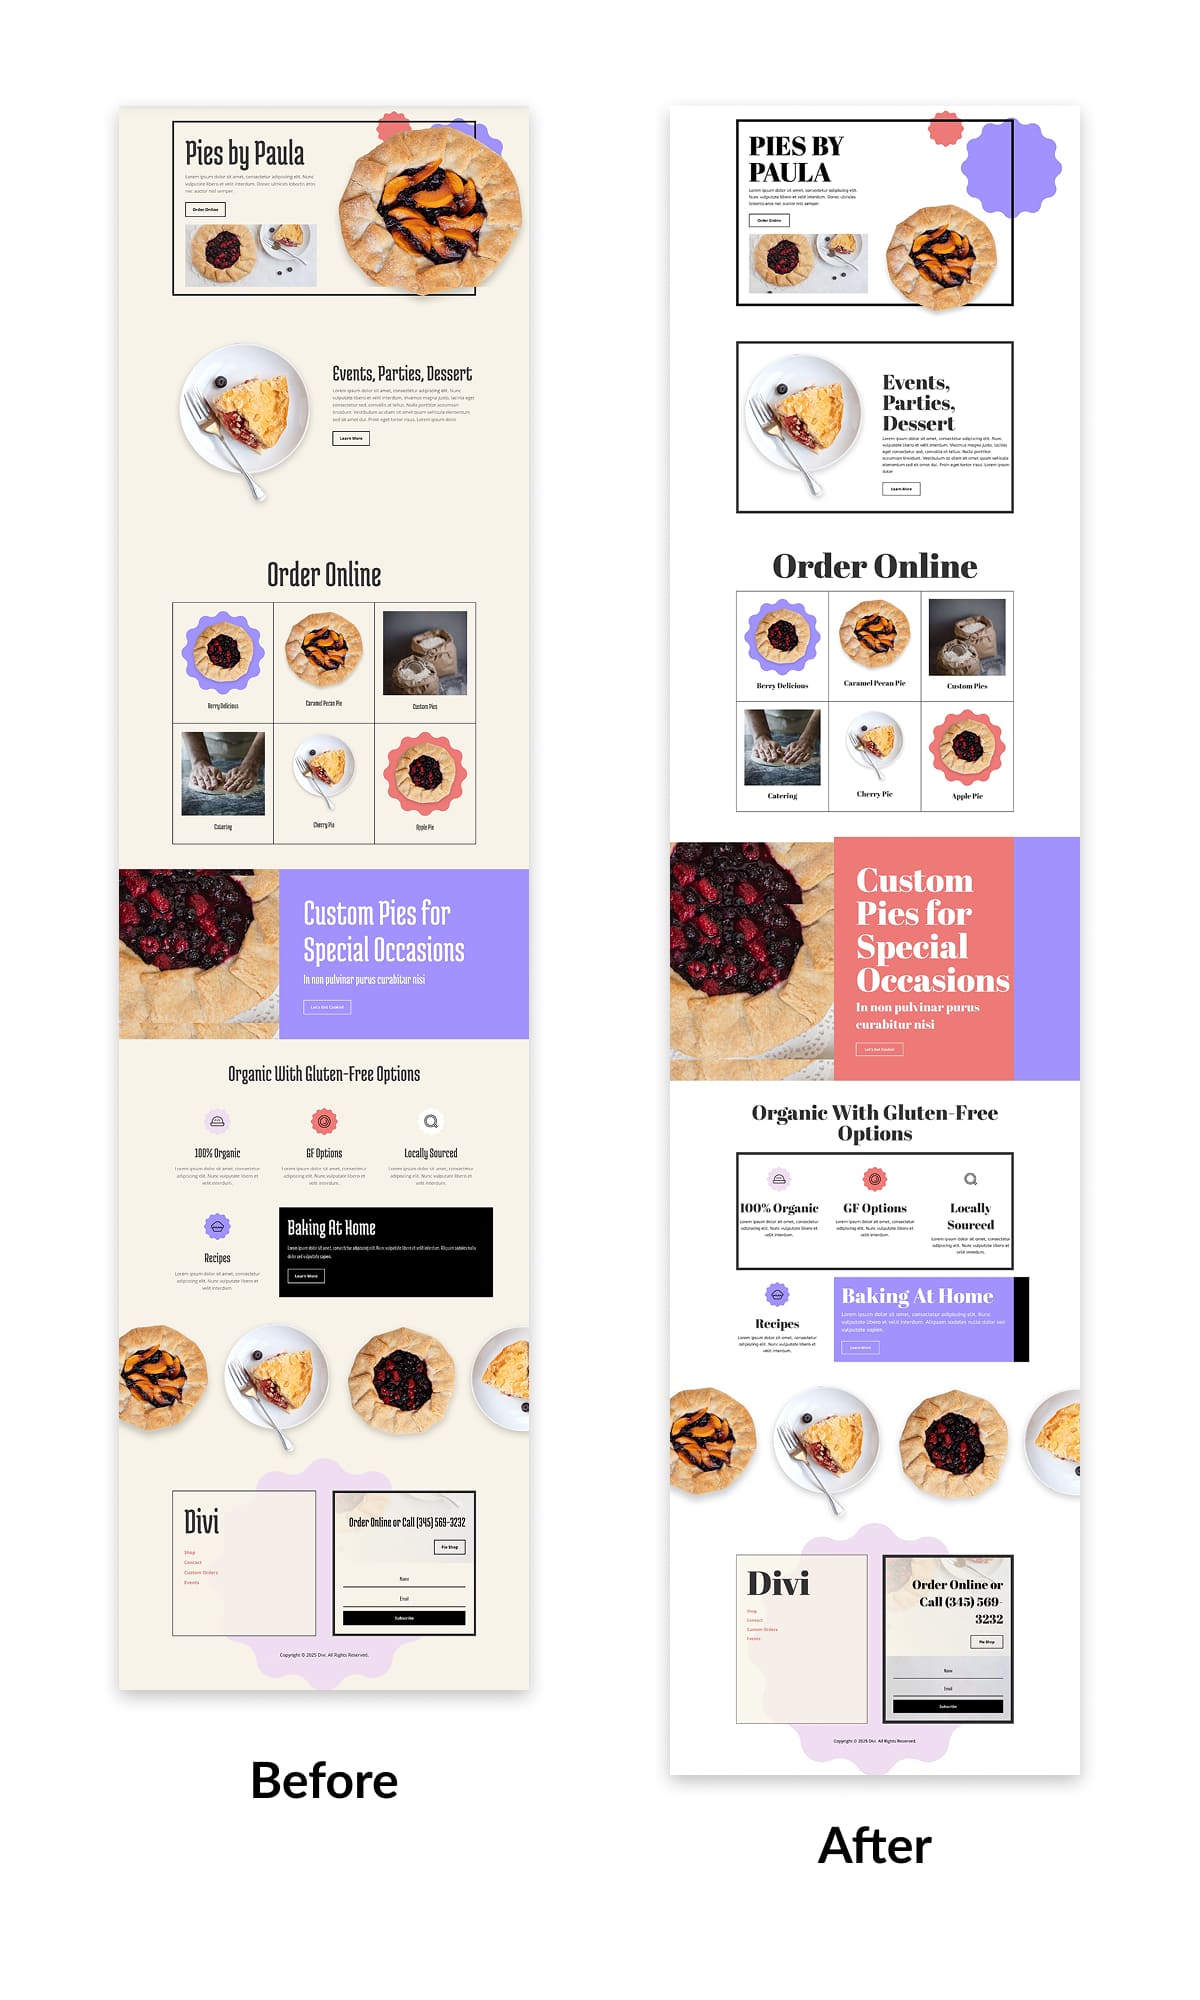
To walk you through the process, I’ve imported the Pie Shop landing page layout as an example. This layout’s design details, such as fonts, colors, and spacing, were applied as static styles. The traditional way requires you to customize it module by module. But in this tutorial, we’ll replace them step by step using the workflow we just covered.
But before you dive in, take a moment to scan your layout for patterns. Look for repeated styles, such as the same color used across buttons, similar font sizes in headings, consistent spacing between sections, or identical border settings. These repeating values are your best candidates for Design Variables, especially if you’re likely to change them later.
1. Save Your Design Variables
After analyzing the Pie Shop layout, I’ve identified a few values that appear consistently across the page and would like to update them with my preferred styles. These include:
- Row border width
- Button padding
- Heading text
- Body text
- Body text color
Right now, they’re applied as static styles. So instead of repeating the same settings manually, I will convert them into Design Variables. This gives me a simple, reusable framework to update page styles with just a few clicks.
Let’s start with the border width on rows. To create and save a variable, open the Variable Manager and choose the type. For a Row’s border width, I’ll choose Number Variable. Next, name your variable and assign it a value. Click Save Variables.
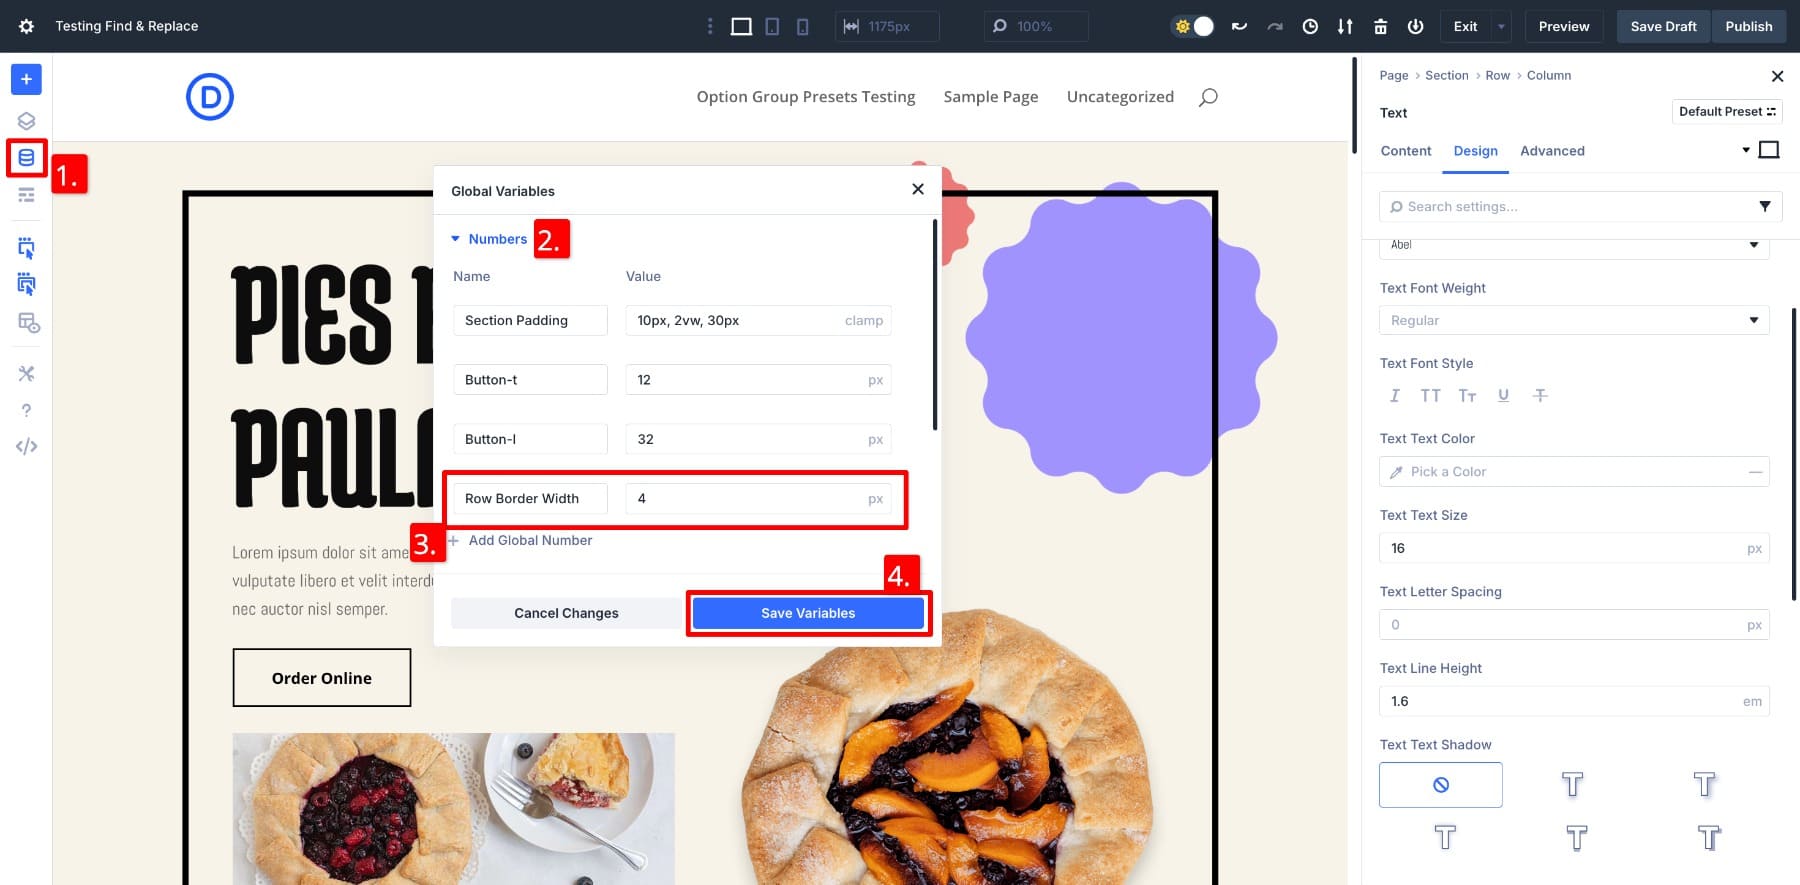
Once saved, this variable is ready to be reused with a click. It will show up anywhere the border width can be set. I’ll follow the same process for the heading text, body font, text color, and button padding. These saved variables now form the foundation of my layout’s design language. You do the same.
This way, if you decide to tweak your button spacing or change the font later, you won’t have to update every module one by one. Just update the variable, and the rest will update themselves.
2. Use Find And Replace To Switch Static Styles To Variables
With our Design Variables ready, the next step is to replace static values across the layout using Find And Replace. Let’s begin with the button padding.
Right now, each button uses manually entered padding: 6px for top and bottom, and 1px for left and right. To bring consistency and make updates easier, I’ve created two variables:
- Button-t = 12px for top and bottom padding.
- Button-l = 32px for left and right padding.
To apply these, I’ll open any button’s settings, go to Design > Spacing > Padding, right-click the padding value, and choose Find & Replace from the options.
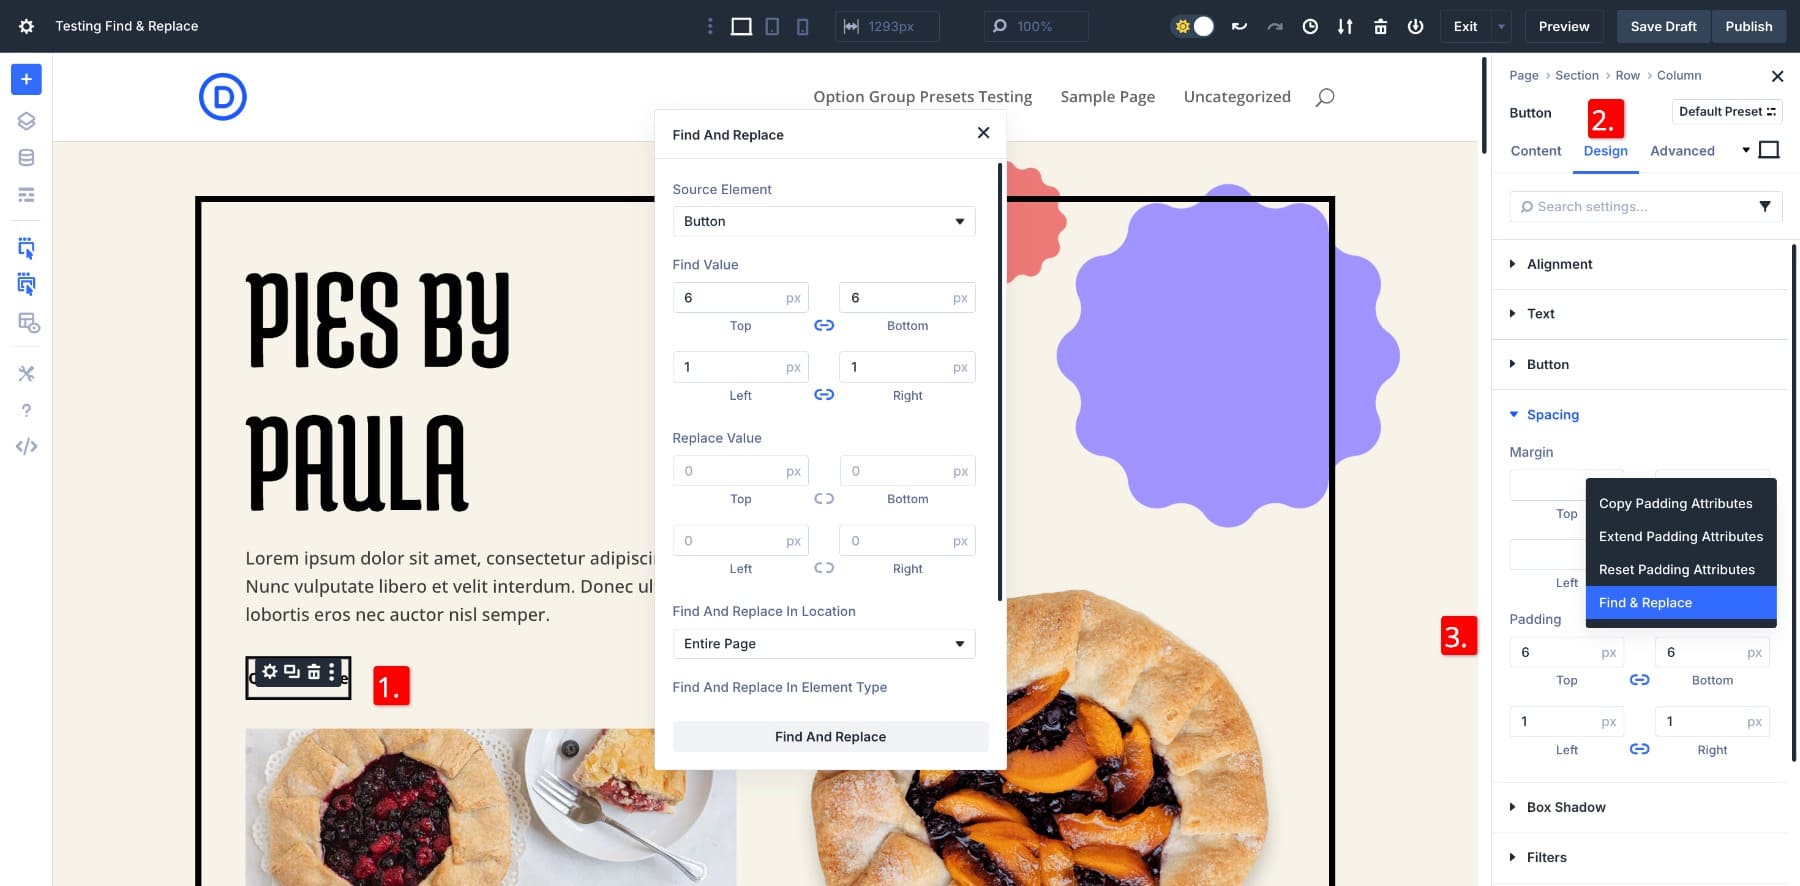
In the Find And Replace panel, I’ll replace the existing static value with the saved variable from the Variable Manager.
After clicking Find & Replace, all five button instances across the page update instantly to use the new padding values.
You can follow the same steps for any other static styles we identified earlier. Use Find And Replace to swap each one with your saved variables, and you’ll end up with a layout that’s fully connected to your global design system.
3. Convert Your Preferred Styles Into Presets (Optional)
This step is optional for the scope of this article, but it’s a powerful way to extend your design system.
Once you’ve replaced static styles with variables, you can save those modules as Option Group Presets. For example, after assigning a saved variable for border width to a row, I saved that row as a Row Border preset.
Using variables inside presets means any future updates to your design system, like changing a variable’s value, will automatically reflect across all modules using that preset. There’s no need to reapply or update anything manually.
So, not only did we update the entire page with new branding in just a few clicks, but we also created a flexible system that makes future updates faster, easier, and fully connected. How does that work in a real layout? Time to see it in action.
Updating Your Page Styles Is Easier Than Ever
The reason we switch from static styles to Design Variables is simple: They make updates easier. With Design Variables in place, editing your layout becomes incredibly simple.
If you ever want to change the heading font across your website, you don’t have to edit each module one by one. Just open the Variable Manager, update the font value you saved earlier, and the change applies everywhere that variable is used.
Your Option Group Presets will also update automatically if they’re using Design Variables. This keeps your styles connected, so you don’t have to repeat the same edits on different modules or pages.
When I customized the Pie Shop layout earlier, I didn’t manually adjust each button or heading. I simply edited my saved variables. The font, padding, and colors I defined earlier applied across the page automatically. The layout followed the system I’d already built.
Sure, tweaking padding or changing a color in one module isn’t hard. But when you’re updating dozens of styles across an entire site, the difference is massive. It’s not just faster, it’s cleaner, more reliable, and far less prone to error.
This is the real value of switching to variables: your entire design becomes easier to manage. And when your client asks for a quick branding change next month? You’ll be done before they finish their coffee.
Make Bulk Edits Easy With Find And Replace
You don’t have to start from scratch every time your design changes. With Divi 5’s system in place, updates feel less like a chore and more like a simple step forward.
This workflow isn’t just helpful during setup. It’s what makes future updates easier. Whether your client asks for a new font or you want to test a different brand color, you can make the change once and see it reflected everywhere.
Divi 5 is designed to support how real people design websites. And now, your design system can be just as flexible as your ideas.


Great work! Since you’re aiming to compete with other visual builders, I’m still wondering about the availability of dynamic data. In Elementor and Bricks, this is built-in, and I hope to avoid using plugins in order to create repeaters, dynamic galleries, and so on.
Stay tuned this week for our Loop Builder announcement. We’ve published sneak peeks about it already.