
The Cyber Monday sale is live and includes the full Divi 5 Design System, one of the most valuable and exclusive Divi 5 freebies. It gives you a ready-made styling foundation with over 430 exports, all built using global presets for buttons, headings, accordions, images, blurbs, and beyond. Everything is already connected across every page and section.
Once imported into your library, a single preset edit updates dozens of modules at once. This post walks you through how the system works, where to find the presets, and how to use them for building and restyling layouts quickly and consistently.
- 1 What Is The Divi 5 Design System?
- 2 Get The Divi 5 Design System + Up To 80% Off Divi Pro, Free Products & Exclusive Perks
- 3 How To Use The Divi 5 Design System?
- 4 How This Fits Into A Real Life Workflow (Practical Use Cases)
-
5
Best Practices To Make The Most Out Of The Design System
- 5.1 1. Start With Design Variables Before Editing Presets
- 5.2 2. Use The Premade Layouts And Templates As Starting Points
- 5.3 3. Apply Container Presets To Speed Up Layout Styling
- 5.4 4. Keep A Small Set Of Core Presets And Clone Variations When Needed
- 5.5 5. Avoid Styling Modules Directly When Presets Can Handle It
- 6 Get The Exclusive Design System Before It’s Gone!
What Is The Divi 5 Design System?
The Divi 5 Design System, exclusive to the Cyber Monday Sale, is a complete styling foundation that includes over 430 premade exports: sections, page templates, and theme builder layouts.
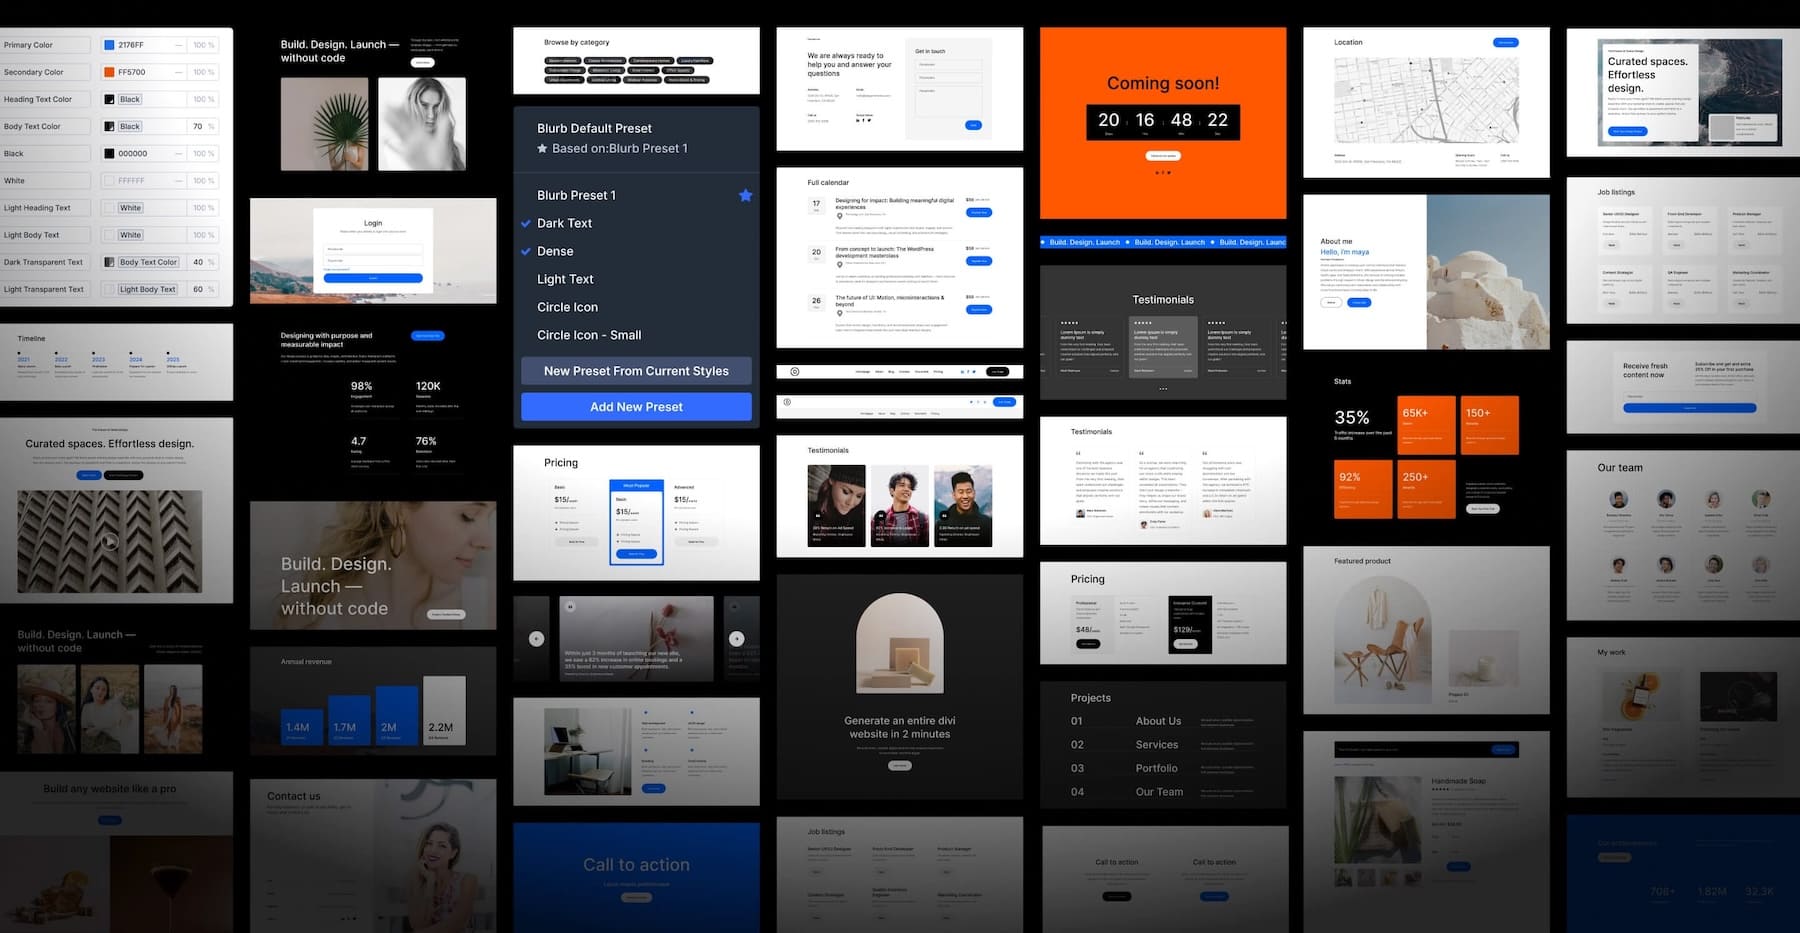
Every layout, section, and module in the system is styled using Divi’s preset system. Understanding presets is crucial for using this download effectively because once you know how to manage and work with them, updating your website becomes faster and more consistent.
When you import the design system, you get three types of presets:
- Container Presets style layout structures like sections, rows, and columns, with spacing, backgrounds, and borders already configured.
- Element Presets cover individual modules: buttons, images, accordions, blurbs, tabs, toggles, and more. Each one comes pre-styled and ready to apply.
- Option Group Presets manage repeating design elements like typography, spacing, borders, and shadows.
Everything is linked through the preset system. Edit a button preset, and every button using it updates automatically. Change a heading style, and it ripples across pages, sections, and templates. This gives you consistency without manually styling each module and lets you complete site-wide redesigns or rebranding much faster.
If you only want the presets without importing all the premade sections and pages, a separate Presets JSON file is included in the download. It imports all module presets, option group presets, and global variables, along with 8 preset demo layouts that showcase them. We’ll cover how to use that in the next section.
For details on the other freebie files included in the download, check out this guide on using the Divi 5 Black Friday freebies.
Get The Divi 5 Design System + Up To 80% Off Divi Pro, Free Products & Exclusive Perks
This year’s Cyber Monday sale celebrates the arrival of Divi 5 Beta, with all purchases including the exclusive Divi 5 Design System. These exclusive Cyber Monday deals disappear soon, so don’t miss them.
- 🎉 Get Divi Pro For 80% Off — The ultimate Divi bundle! includes access to Divi 5, Divi AI, Divi Cloud, Divi VIP, Divi Teams, Divi Dash, the full suite of DonDivi plugins, and a $50 Divi Marketplace credit. Lifetime and yearly options available, with all future Divi 5 updates included.
- 🎉 Repackage Your Membership For Up To 80% Off — Existing members can repackage their subscriptions into a Divi Pro bundle to reduce costs and unlock more features. Get Divi AI, Cloud, Teams, VIP Support, DonDivi, and a free $50 marketplace credit while reducing your subscription cost by up to 80%.
- 🎉 Get Divi AI For 70% Off — Divi AI designs, writes, and codes directly in Divi. Generate layouts, content, and images instantly.
- 🎉 Get Divi Cloud For 44% Off — Save and reuse your layouts anywhere. Cloud-sync your entire Divi Library for faster client delivery.
- 🎉 Get Divi Teams For 44% Off — Collaborate easily with shared access, roles, and permissions, perfect for agencies.
- 🎉 Get Divi VIP For 44% Off — Enjoy 24/7 priority support with 30-minute response times and 10% off all Marketplace products.
- 🎉 Save 70% On Cyber Monday Marketplace Bundles — Get curated collections of Divi modules, child themes, marketing tools, ecommerce features, and blog upgrades in five Cyber Monday-only Divi 5-ready bundles to level up your workflow.
How To Use The Divi 5 Design System?
Make sure you’re using the latest Divi 5 Beta on your site. If you haven’t updated in a while, download the latest version from your Elegant Themes membership dashboard.
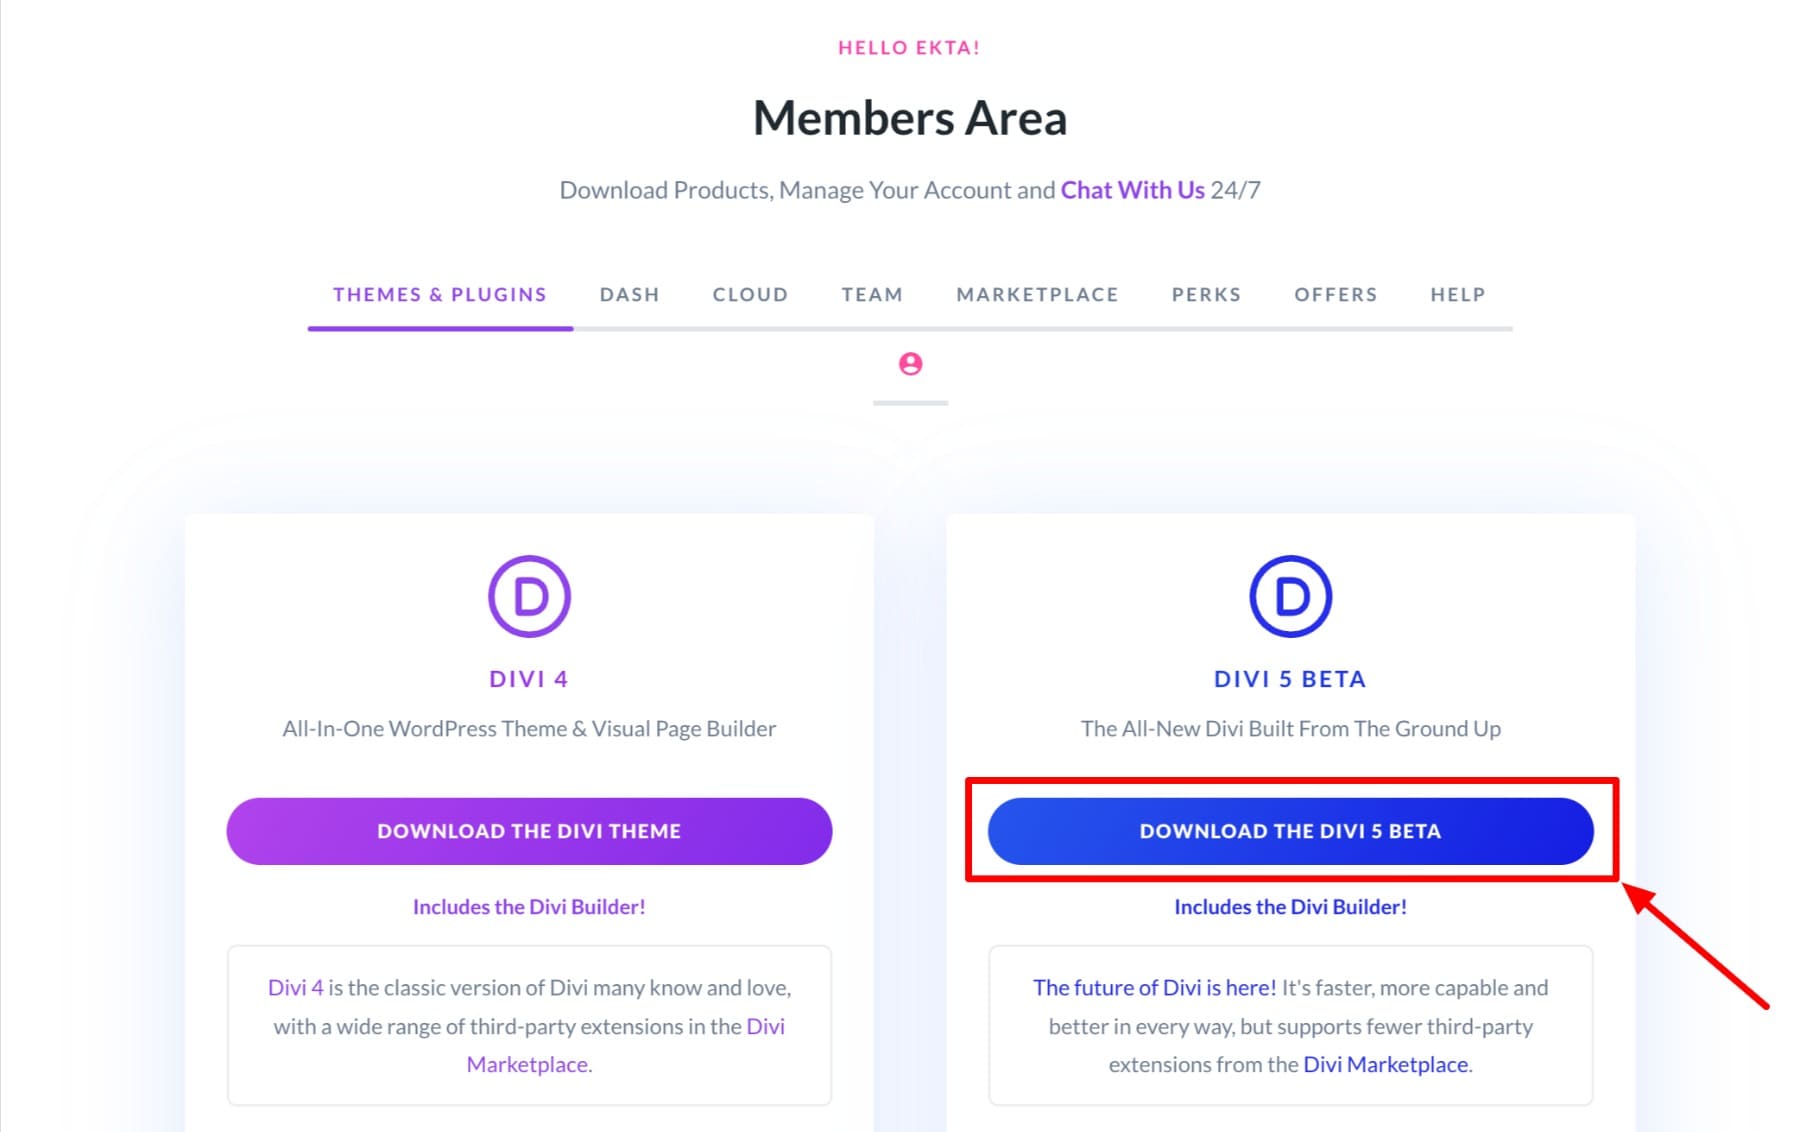
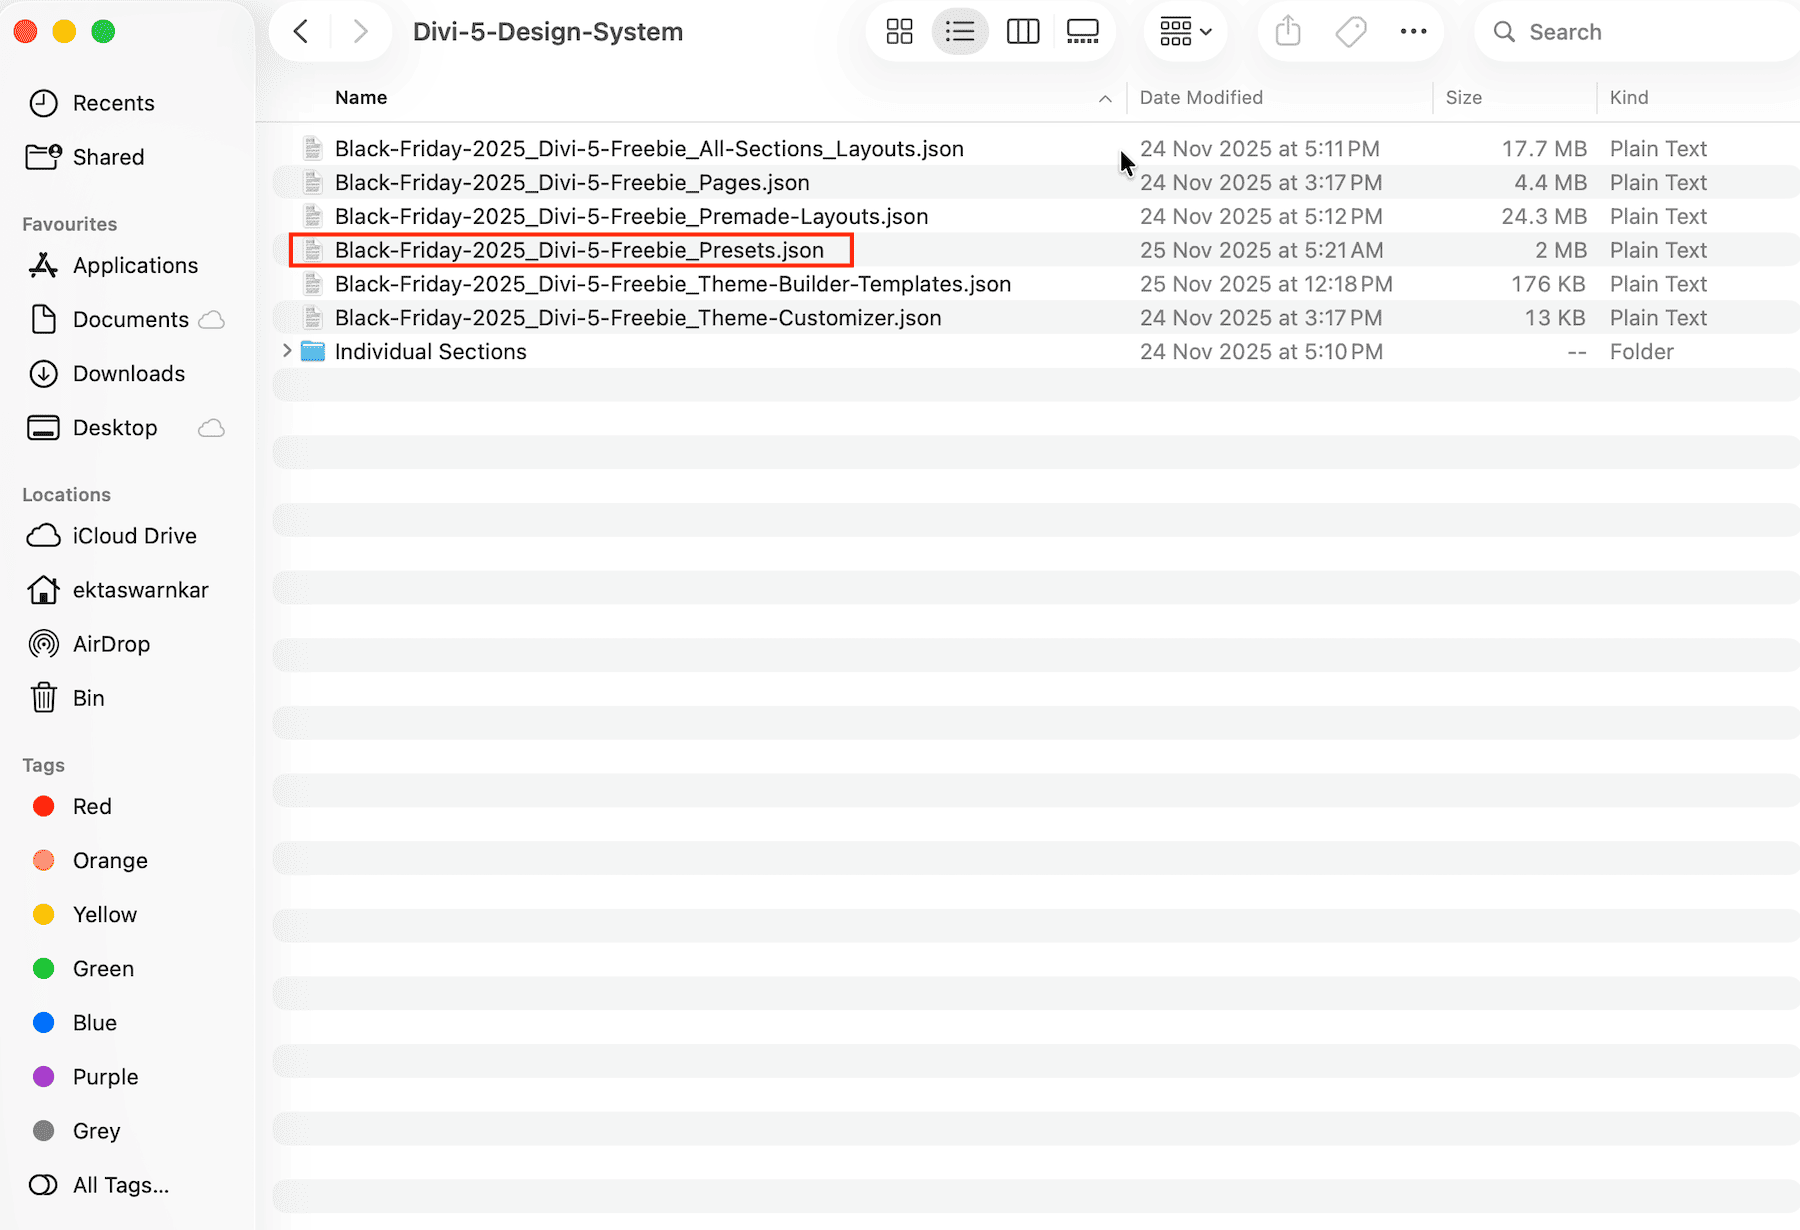
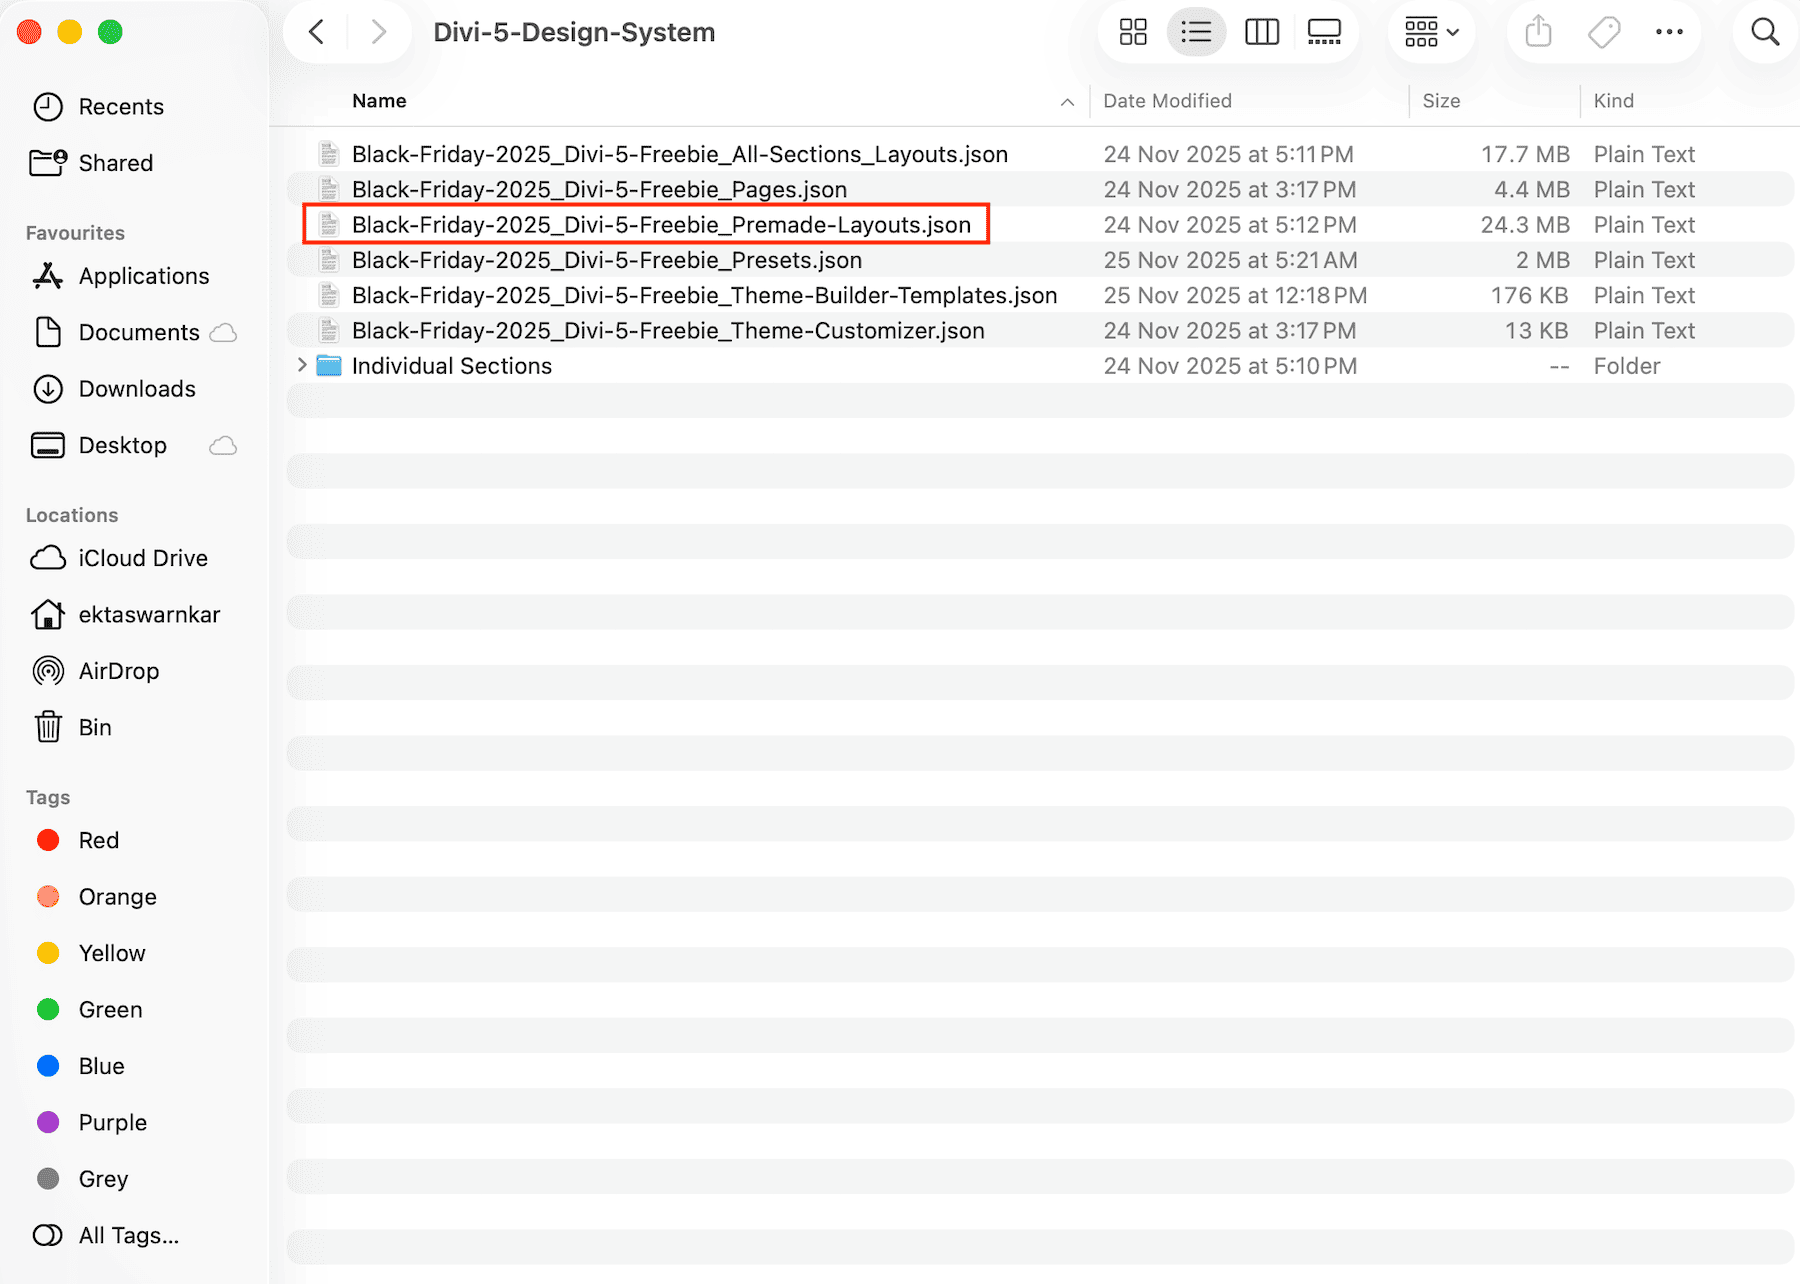
The Divi 5 Design System comes as part of the Cyber Monday freebie bundle. After purchasing or claiming the sale offer, you’ll receive a zip file containing multiple JSON files for different parts of the system.
Download and extract the zip file to your computer. Inside, you’ll find several JSON files, including the main design system file and a separate presets-only file.
If you want the complete design system in a single import (all presets, sections, and premade pages), use the main design system JSON file labeled Premade-Layouts. This works best when you’re building from scratch.
If you already have your pages set up and mainly want the presets, use the Presets JSON file instead.
It imports 8 preset layouts containing all container presets, element presets, and option group presets, plus all global variables, without bringing in the full collection of individual sections, page templates, or Theme Builder templates.
Importing The Design System (Presets)
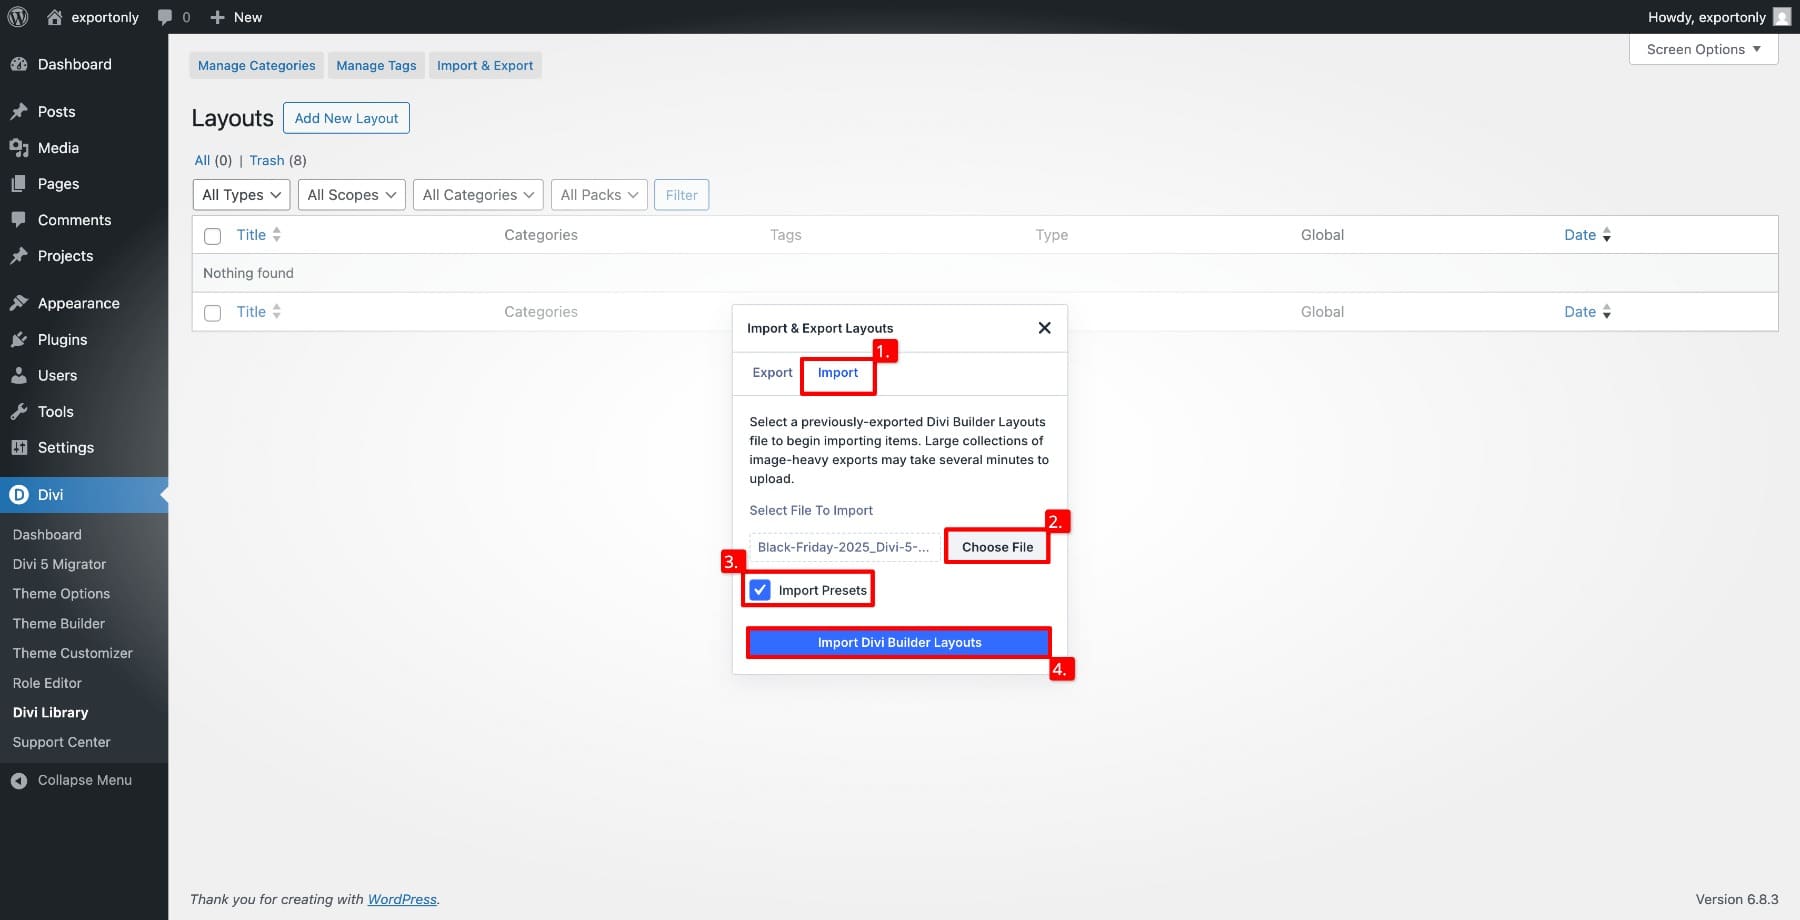
To import, go to Divi Library from your WordPress dashboard and click Import & Export.
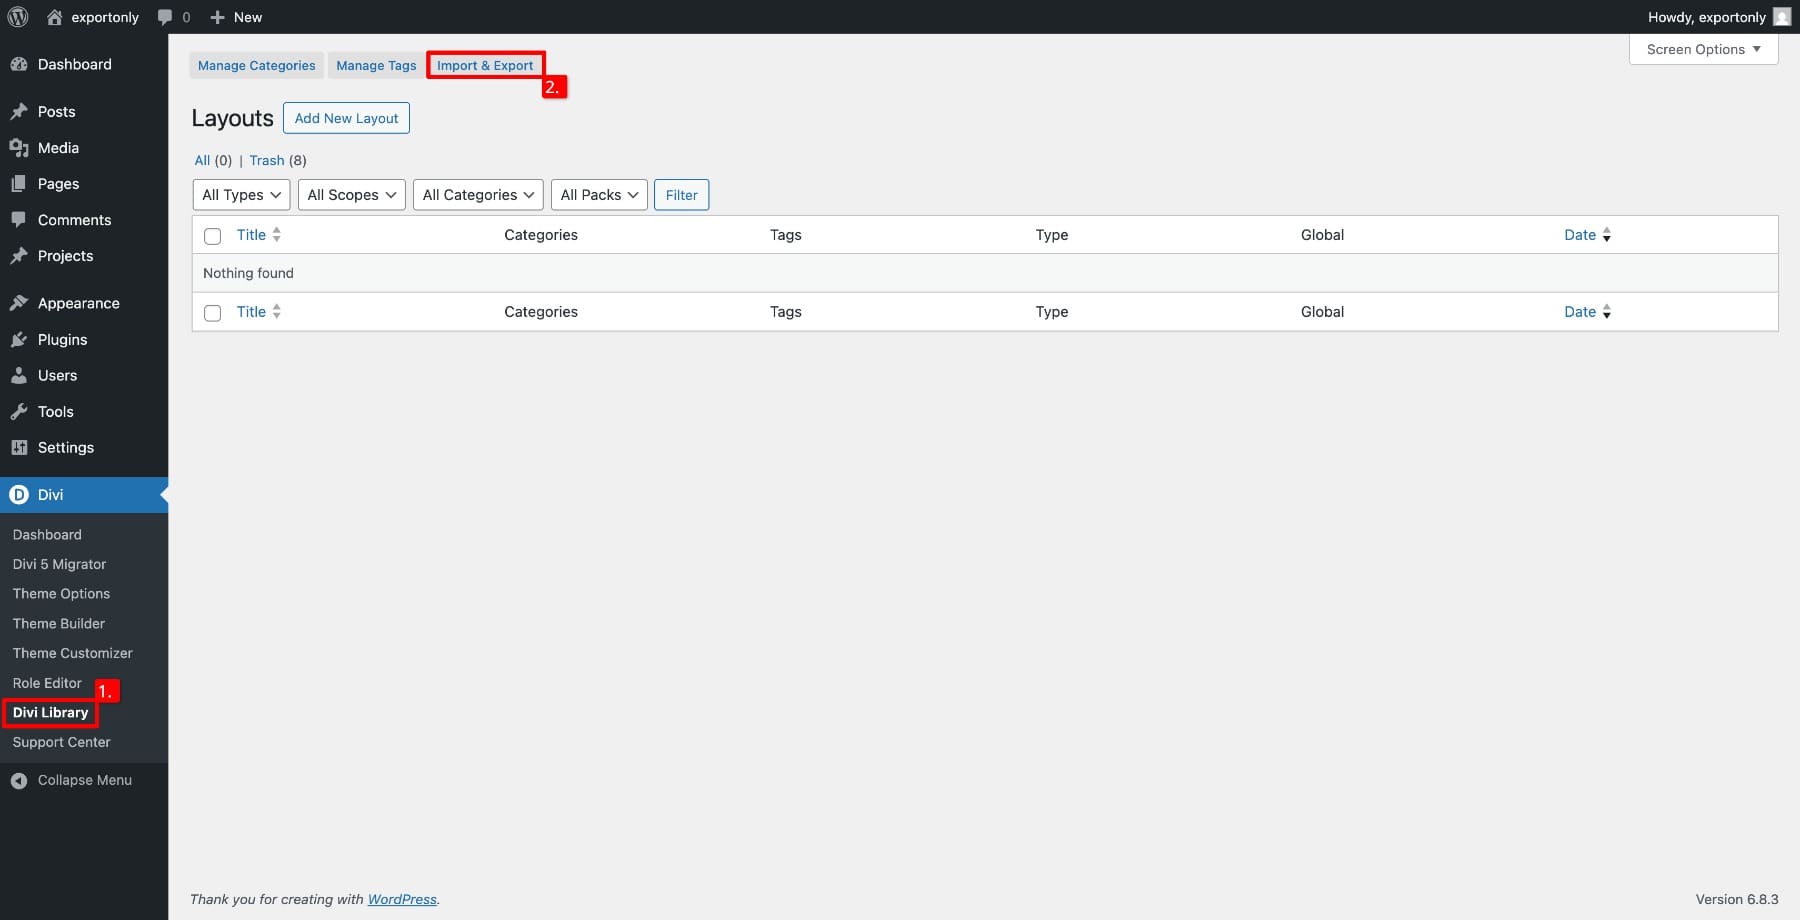
Switch to Import. Click Choose File to select your preferred file from your desktop, then enable Import Presets to bring the presets into your site.
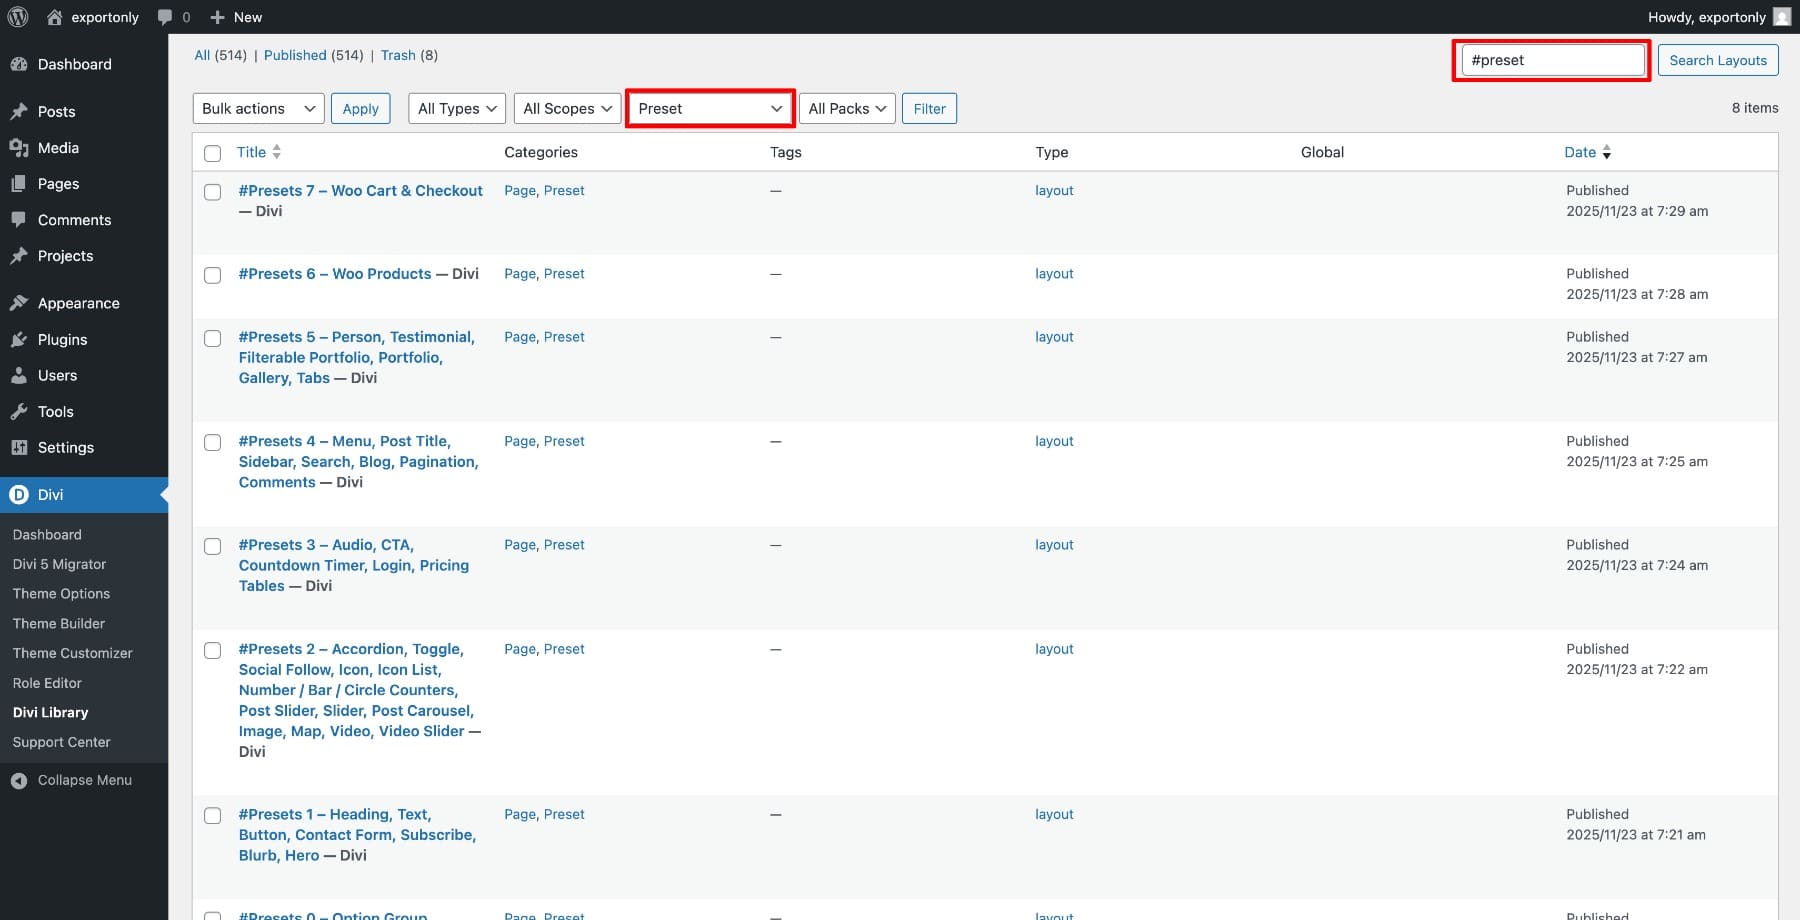
Once the import completes, you’ll see several new items added to your Divi Library. The design system includes seven preset pages, each containing presets for specific module types, plus one dedicated Option Group Preset layout.
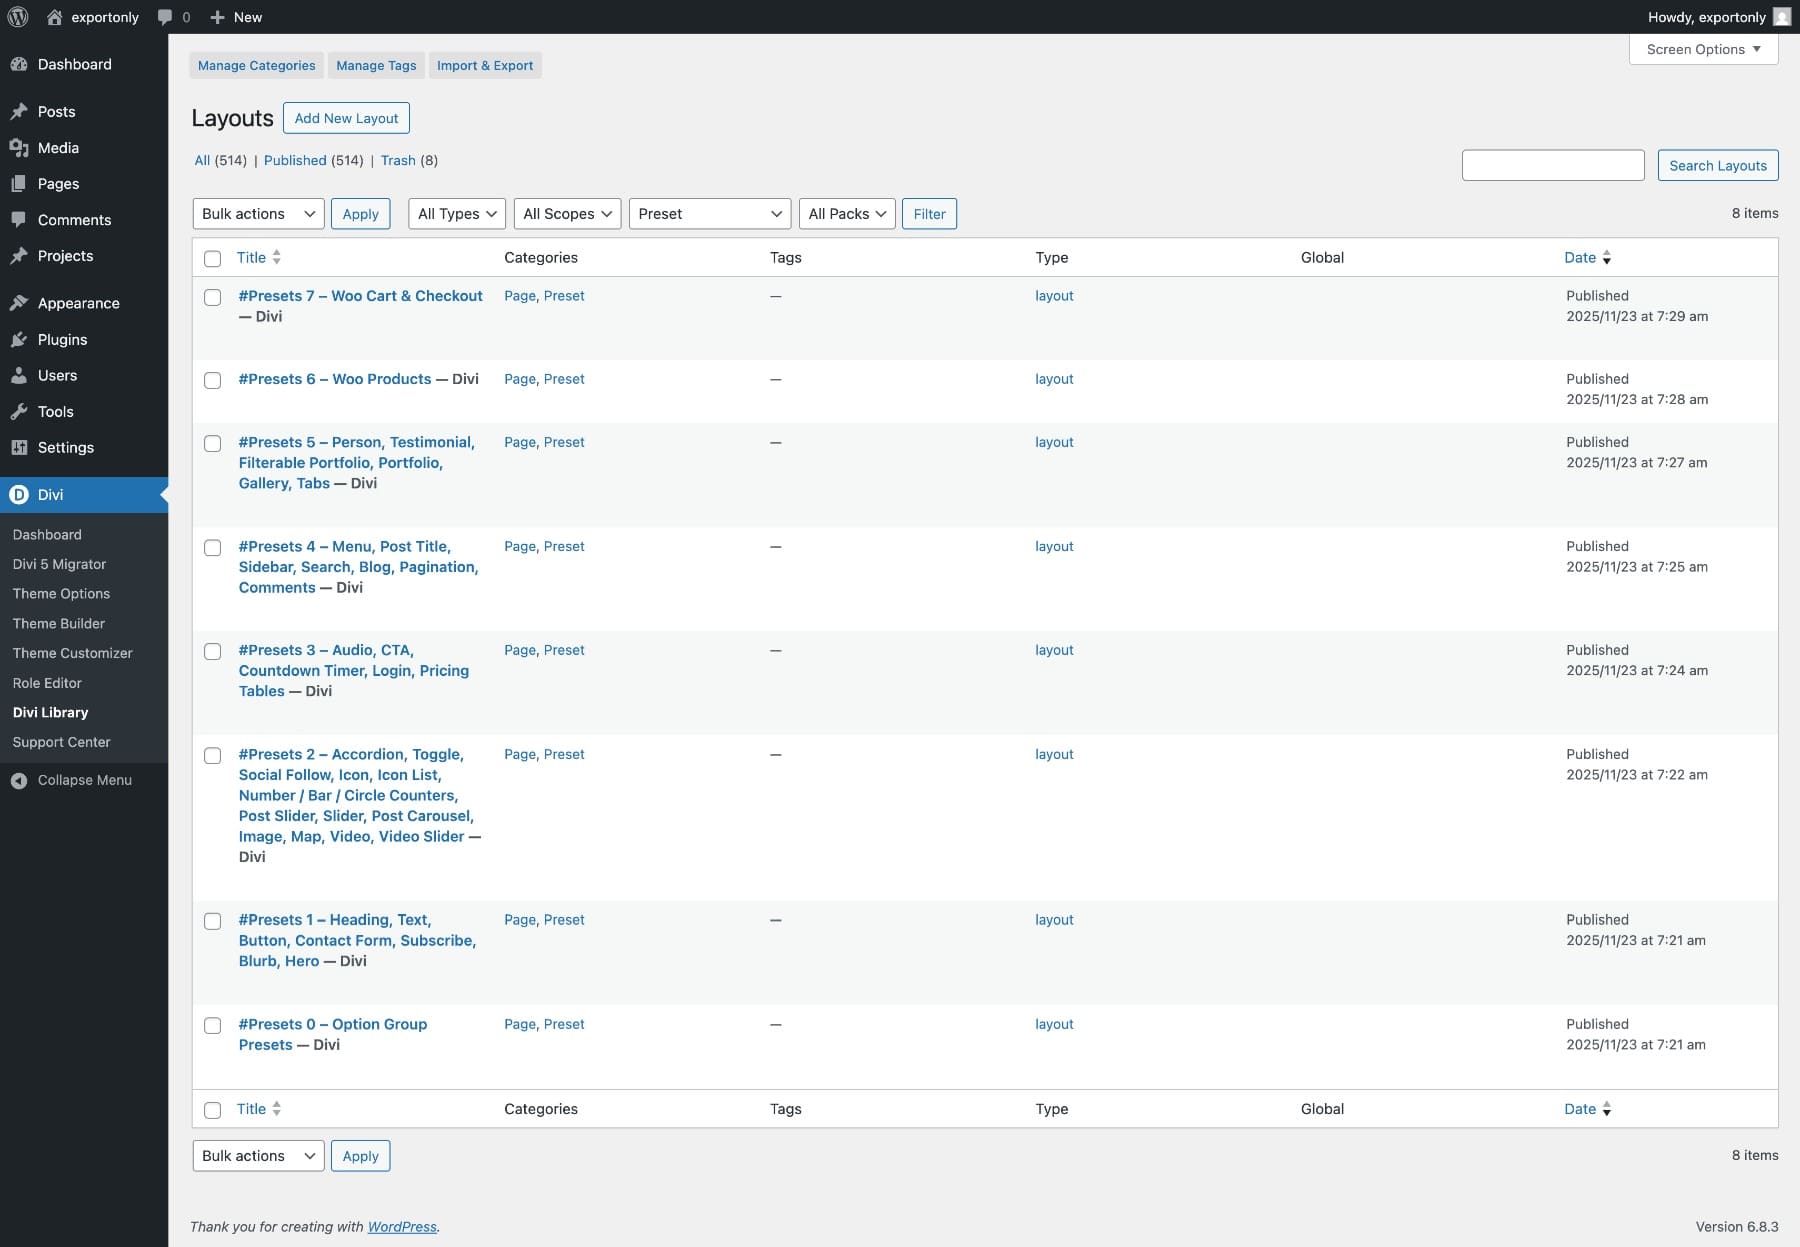
The preset pages are organized by module category and usage frequency. #Presets 1 contains your most frequently used presets: headings, text, buttons, blurbs, and hero sections. The remaining pages (2 through 7) group presets by function, covering interactive elements, media modules, conversion-focused content, blog components, portfolios and galleries, and WooCommerce layouts.
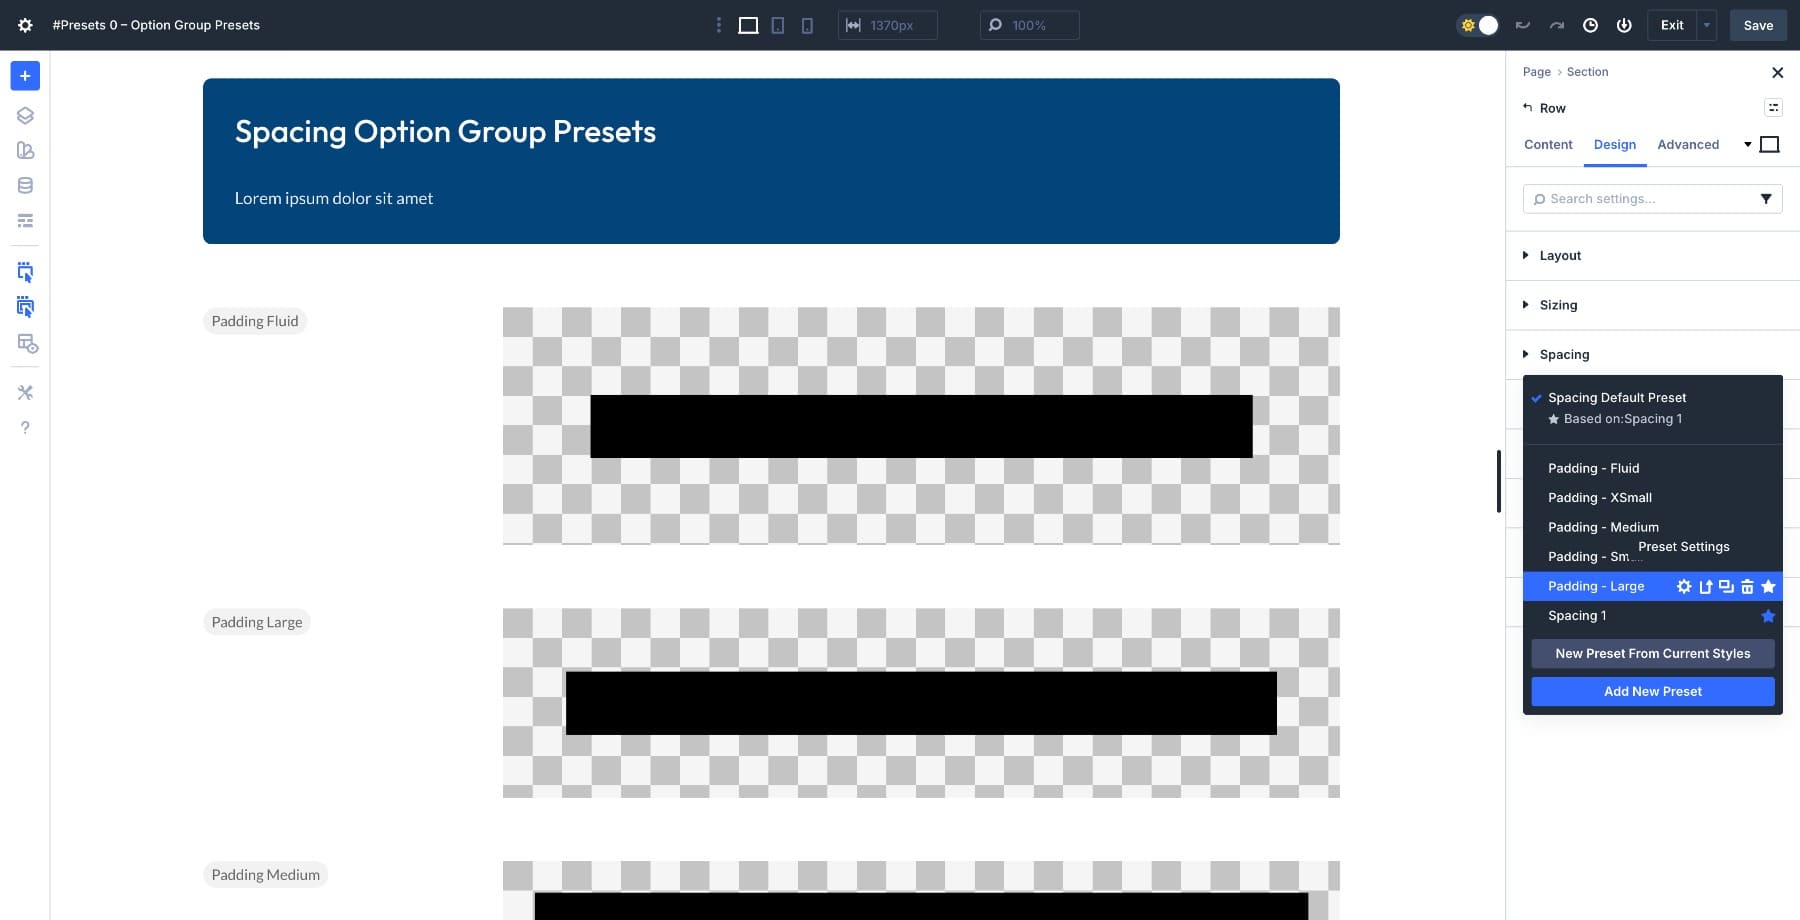
#Presets 0 – Option Group Presets is particularly useful because it shows you a visual preview of how your typography, spacing, and styling presets look when applied. Rather than guessing what Heading 1 Big will look like, you can open this page and see every Option Group Preset rendered with sample content. This makes choosing the right preset much easier when building layouts or deciding which preset to edit for global changes.
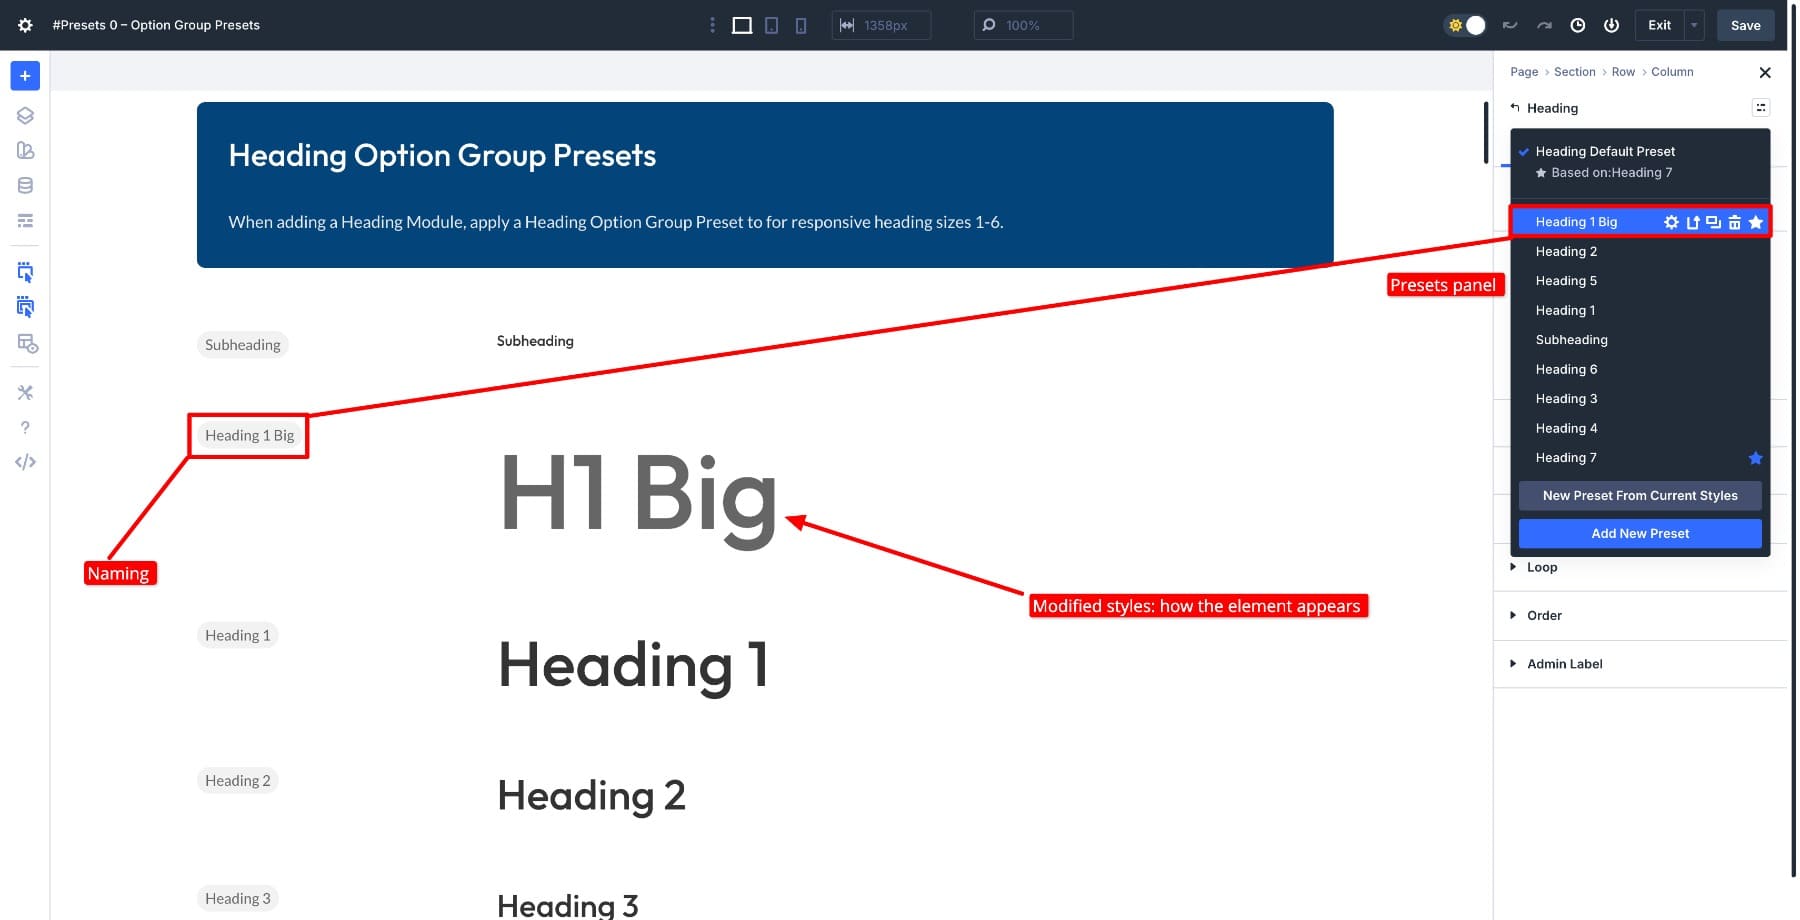
Keep this file open in parallel while designing to quickly reference how your design will appear.
Recognizing Design System’s Presets
Once imported, all presets from the design system follow a specific naming convention that makes them easy to identify and filter. Every preset name begins with #Preset, followed by the preset type and its corresponding style description. To find them, search for #Preset or use the Preset filter.
This naming system keeps the design system presets organized and separate from any custom presets you create later.
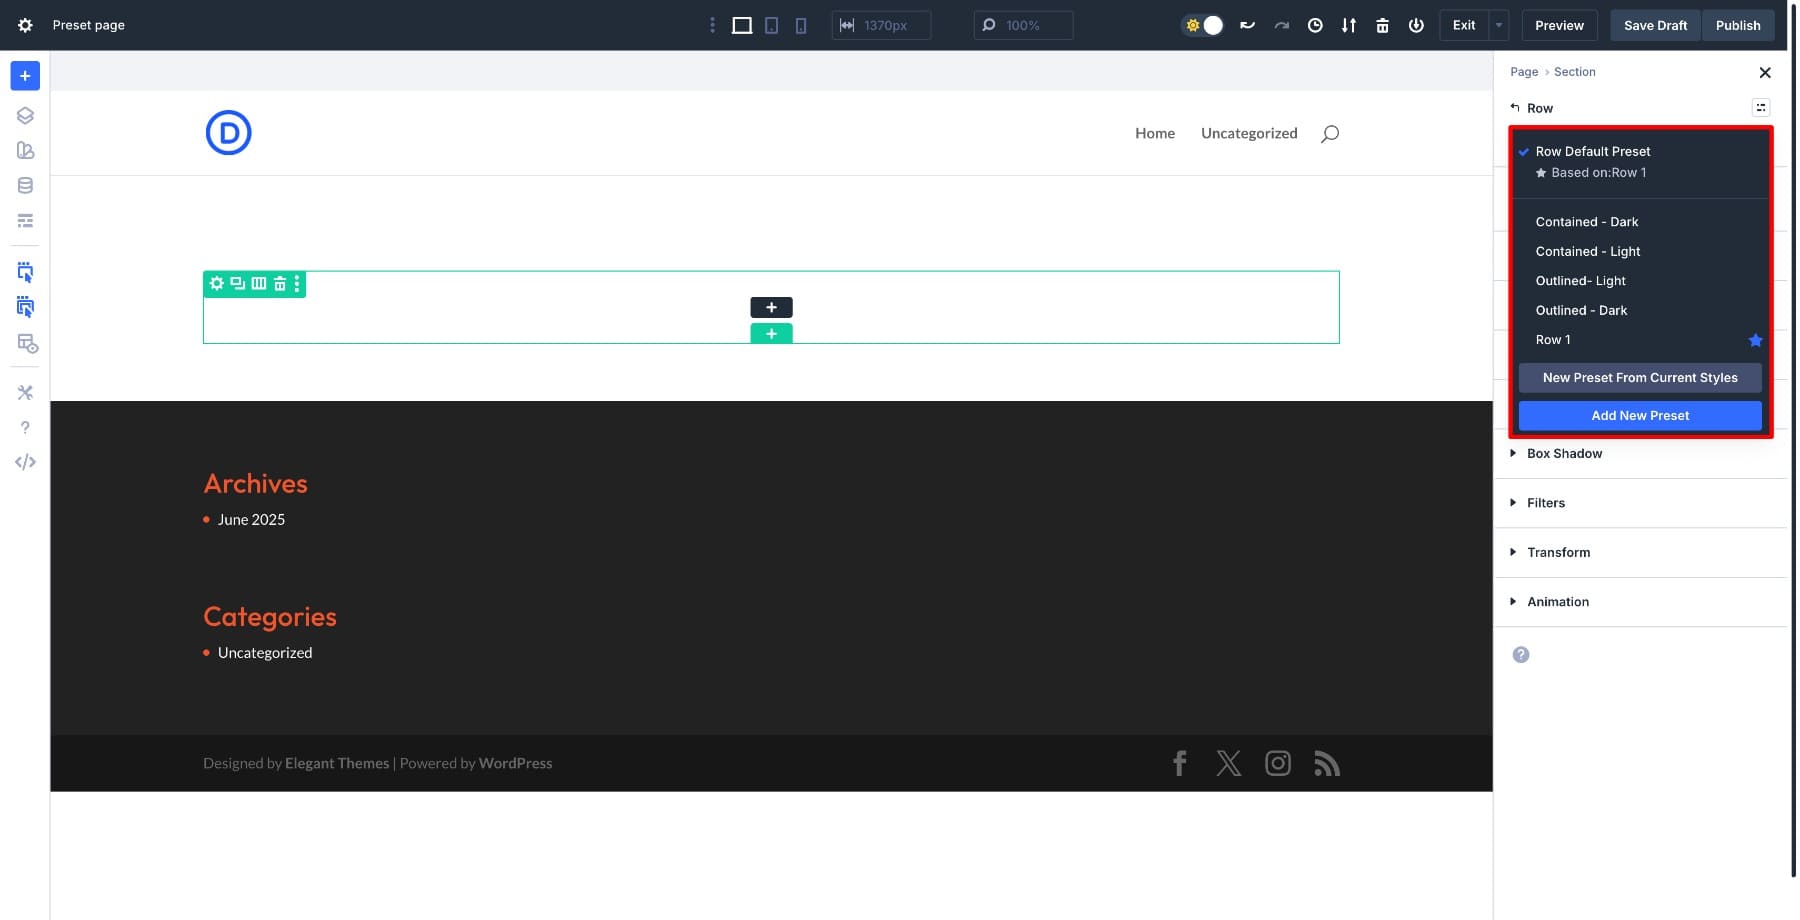
Applying Presets
Presets are applied directly from the Visual Builder through two different panels, depending on what you’re styling.
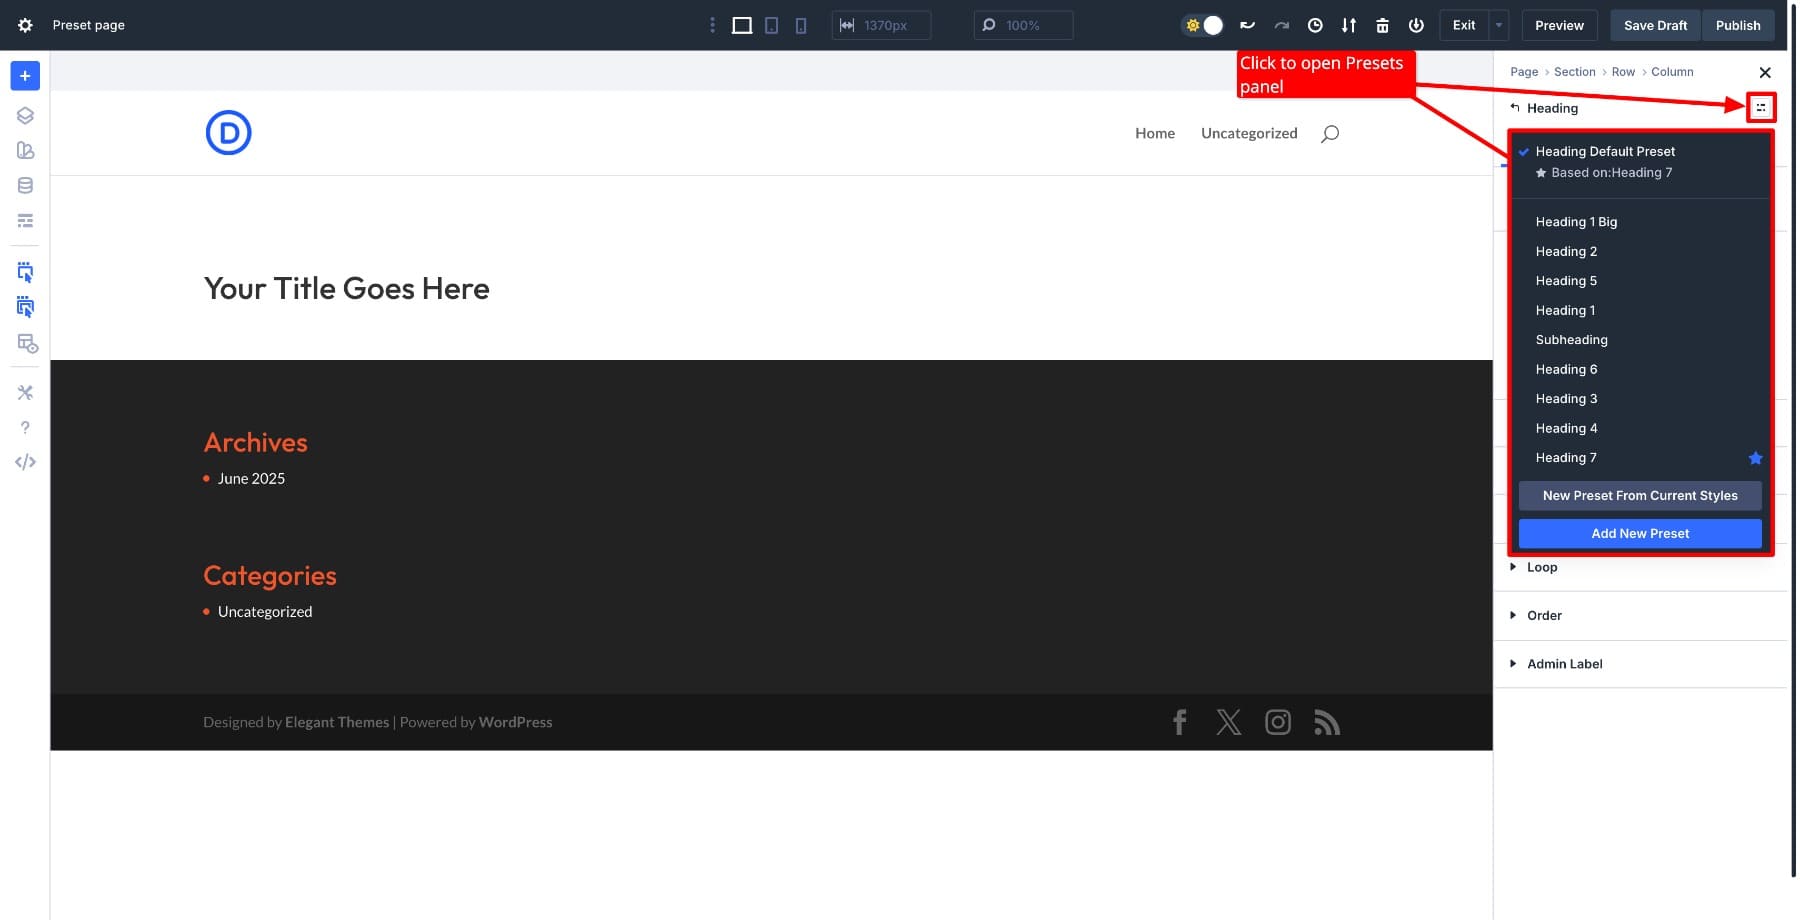
Element Presets style entire modules with all their settings configured in one click. To apply one, open any module in the Visual Builder and look for the Presets tab at the top right of the settings panel.
Option Group Presets work differently. They manage individual styling properties like typography, spacing, borders, and shadows. These appear within specific settings tabs rather than in the main Presets panel. For example, all the Spacing OGPs appear in the Spacing field.
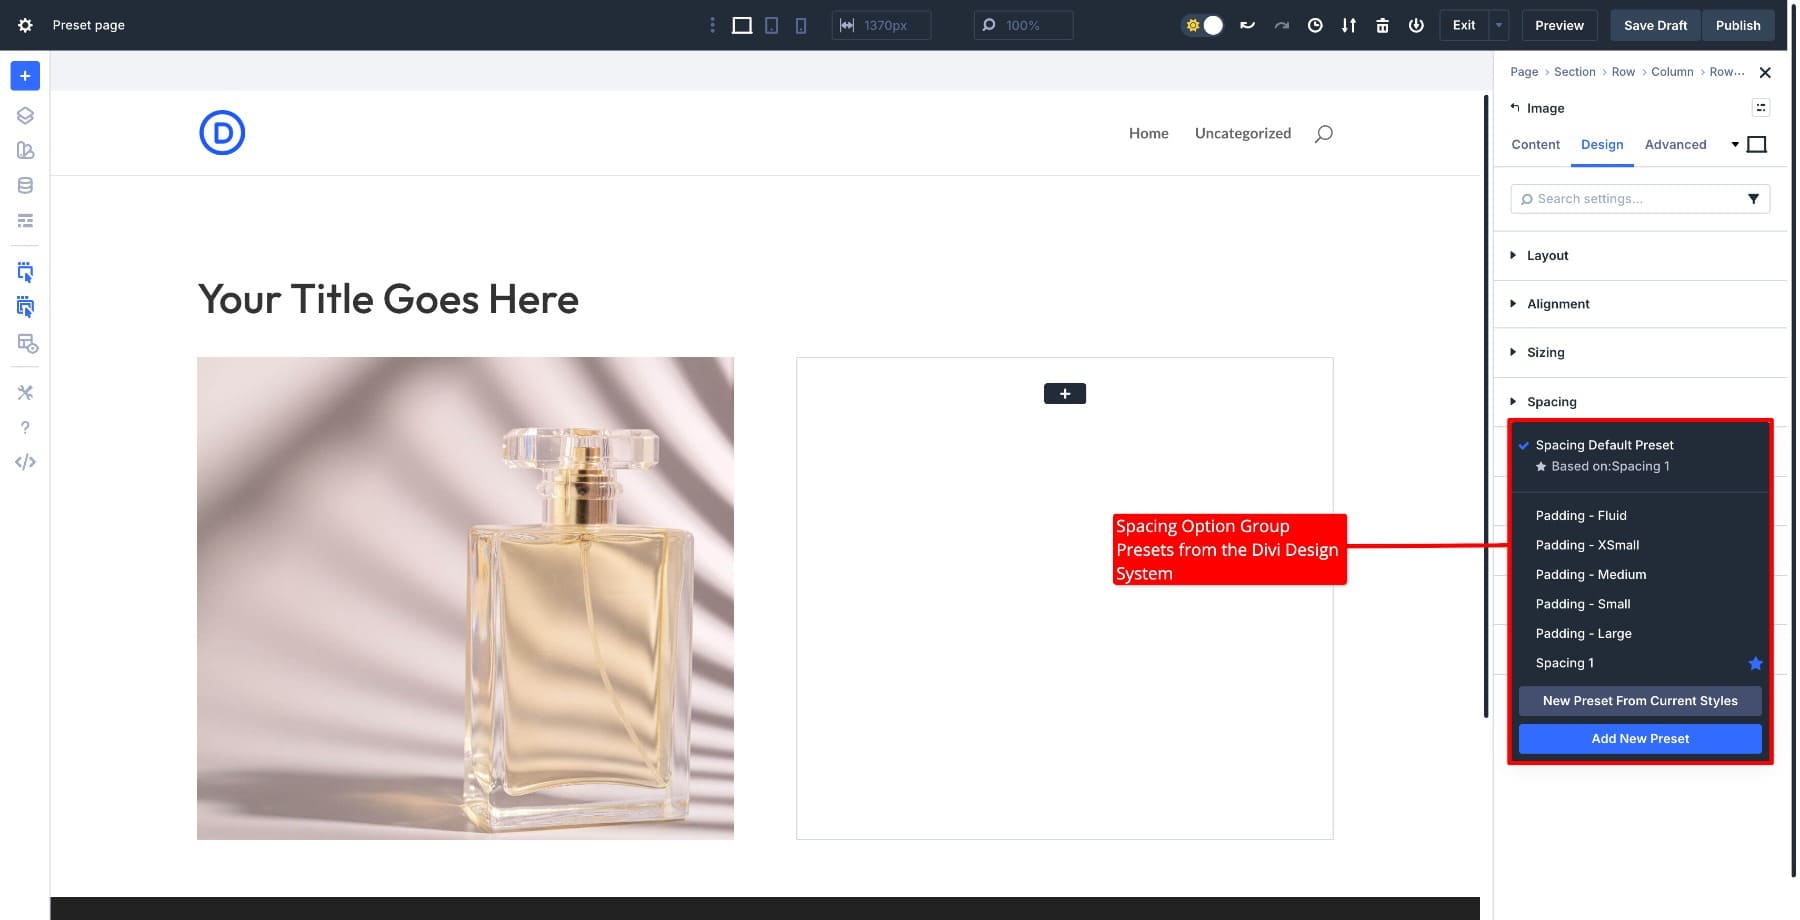
To apply presets, simply click on them. You can apply element presets and OGPs separately, giving you more granular control when you only want to adjust one aspect of a module’s appearance.
Using Presets To Build Layouts Fast
The biggest benefit of having Presets with the Divi Design System is that they let you build professional layouts without manually configuring each module. Apply a single preset for instant styling, or layer multiple presets and Option Group Presets together for more refined control. Here’s how it works in practice.
1. Building A Hero Section
Hero sections typically need a heading, some body text, a button, and a supporting media. With the design system, you can style all four in seconds. Add a section with a 2-column row row, then drop in a Heading module, Text module, and a Button module in the left column, and an Image module in the right.
Once you have the structure in place, open each element’s Presets panel and apply your desired presets:
With just a few clicks, your hero section is styled consistently with the rest of the design system. No manual font sizing, color picking, or spacing adjustments needed.
2. Creating A Testimonial Section
Another powerful example can be modifying a Testimonial module directly (or importing predesigned modules from the Design System – much faster!) and adjusting the Presets to fit your needs. Let’s say you want to display three testimonials like this:
The center testimonial should stand out from the rest, so apply the Dark Container preset to it.
The other two get the Light Container preset, creating a natural visual hierarchy that draws attention to the center testimonial.
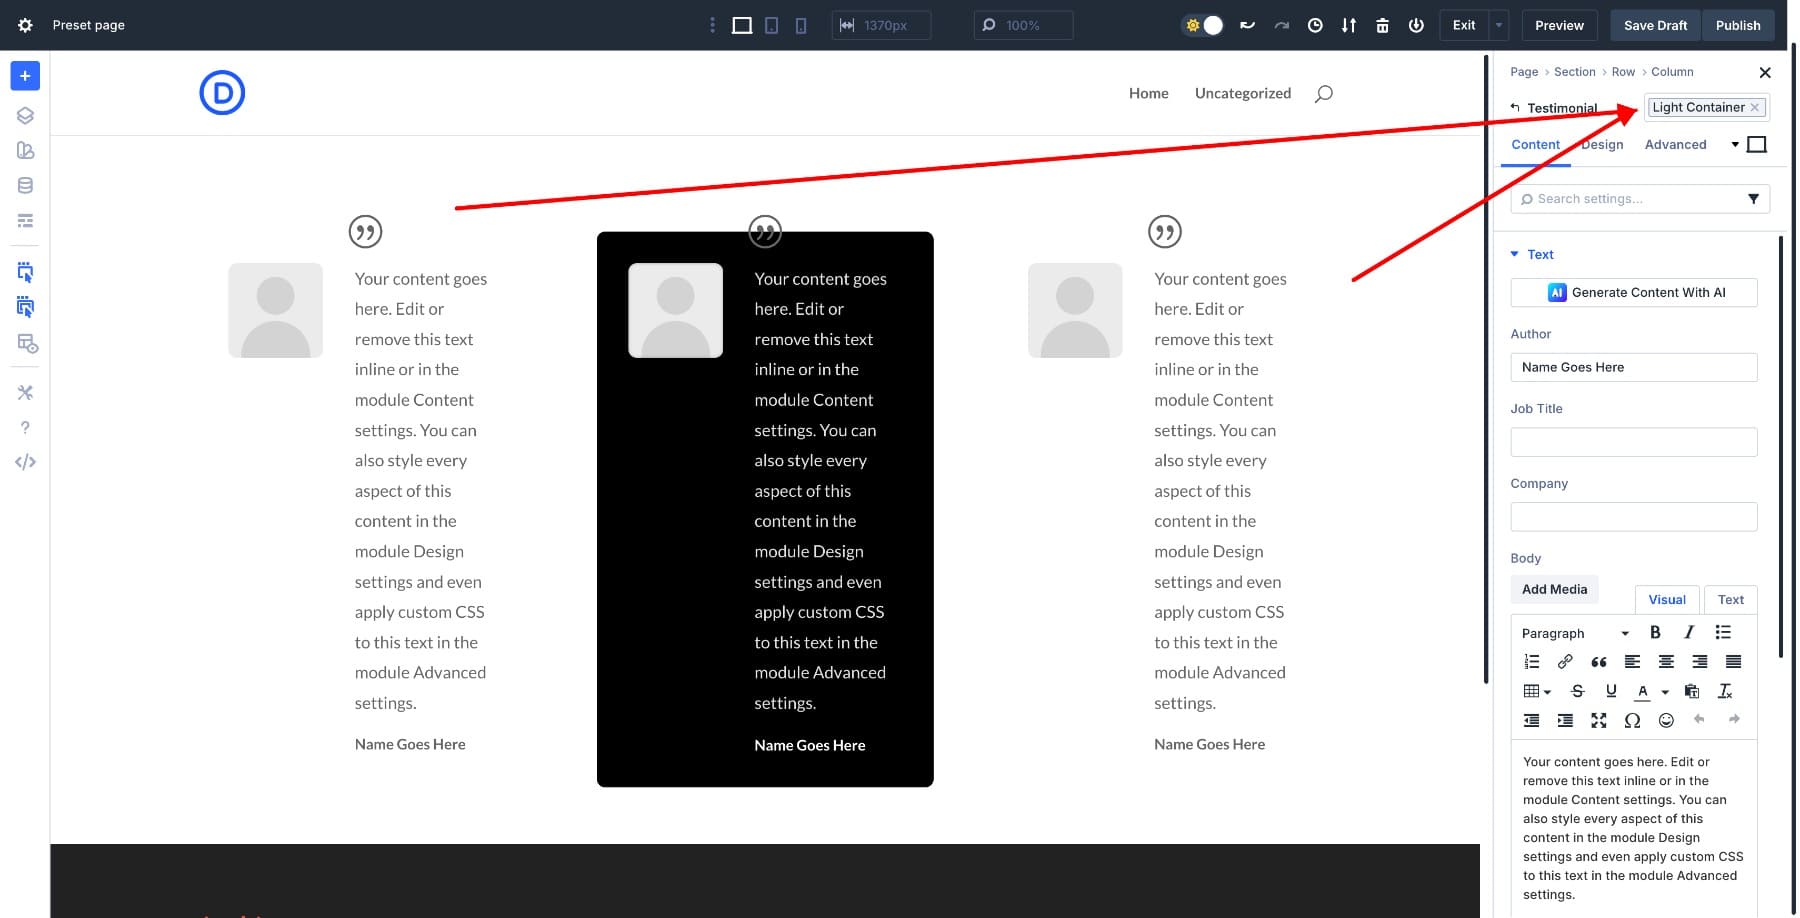
Now you only need to style the row. Add the Padding Medium Spacing OGP and apply one of the Background Presets to complete the look.
3. Building An Image Gallery
You can also stack multiple presets together to layer different styles onto your elements. For example, add the Rounded preset for curved borders and stack the Full Container Height preset so all images fit the container perfectly. Stacked presets give you the flexibility to combine styles or use them separately depending on your needs.
Start by applying a Masonry Grid Row structure.
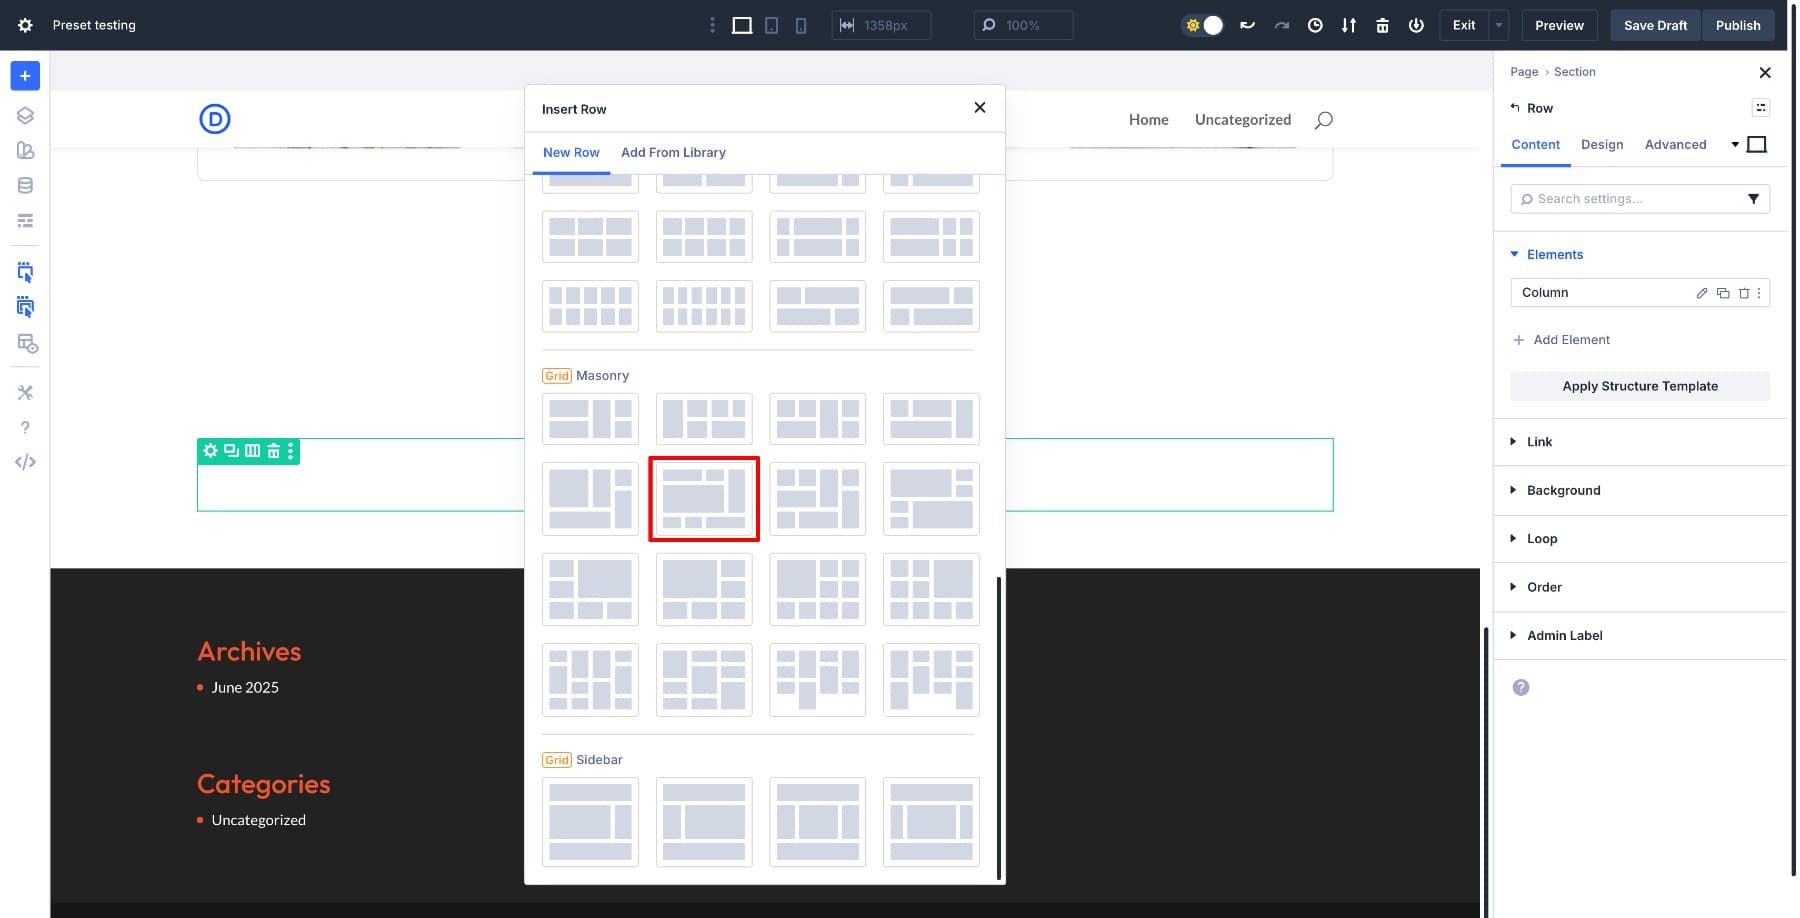
Then add an Image module to each column.
Notice how the images take their own independent sizes and don’t match the column’s height. To solve this, our design team has created a Full Container Height preset, which includes a custom CSS code. But you don’t need to worry about that, you only have to apply the preset and it works!
Suppose you want curved borders and fit images. This is where stacking presets save you from fiddling with individual image settings. Apply the Full Container Height preset, then stack the Rounded preset to add curved borders to each image.
Insert your images, and your masonry gallery is ready in a few clicks.
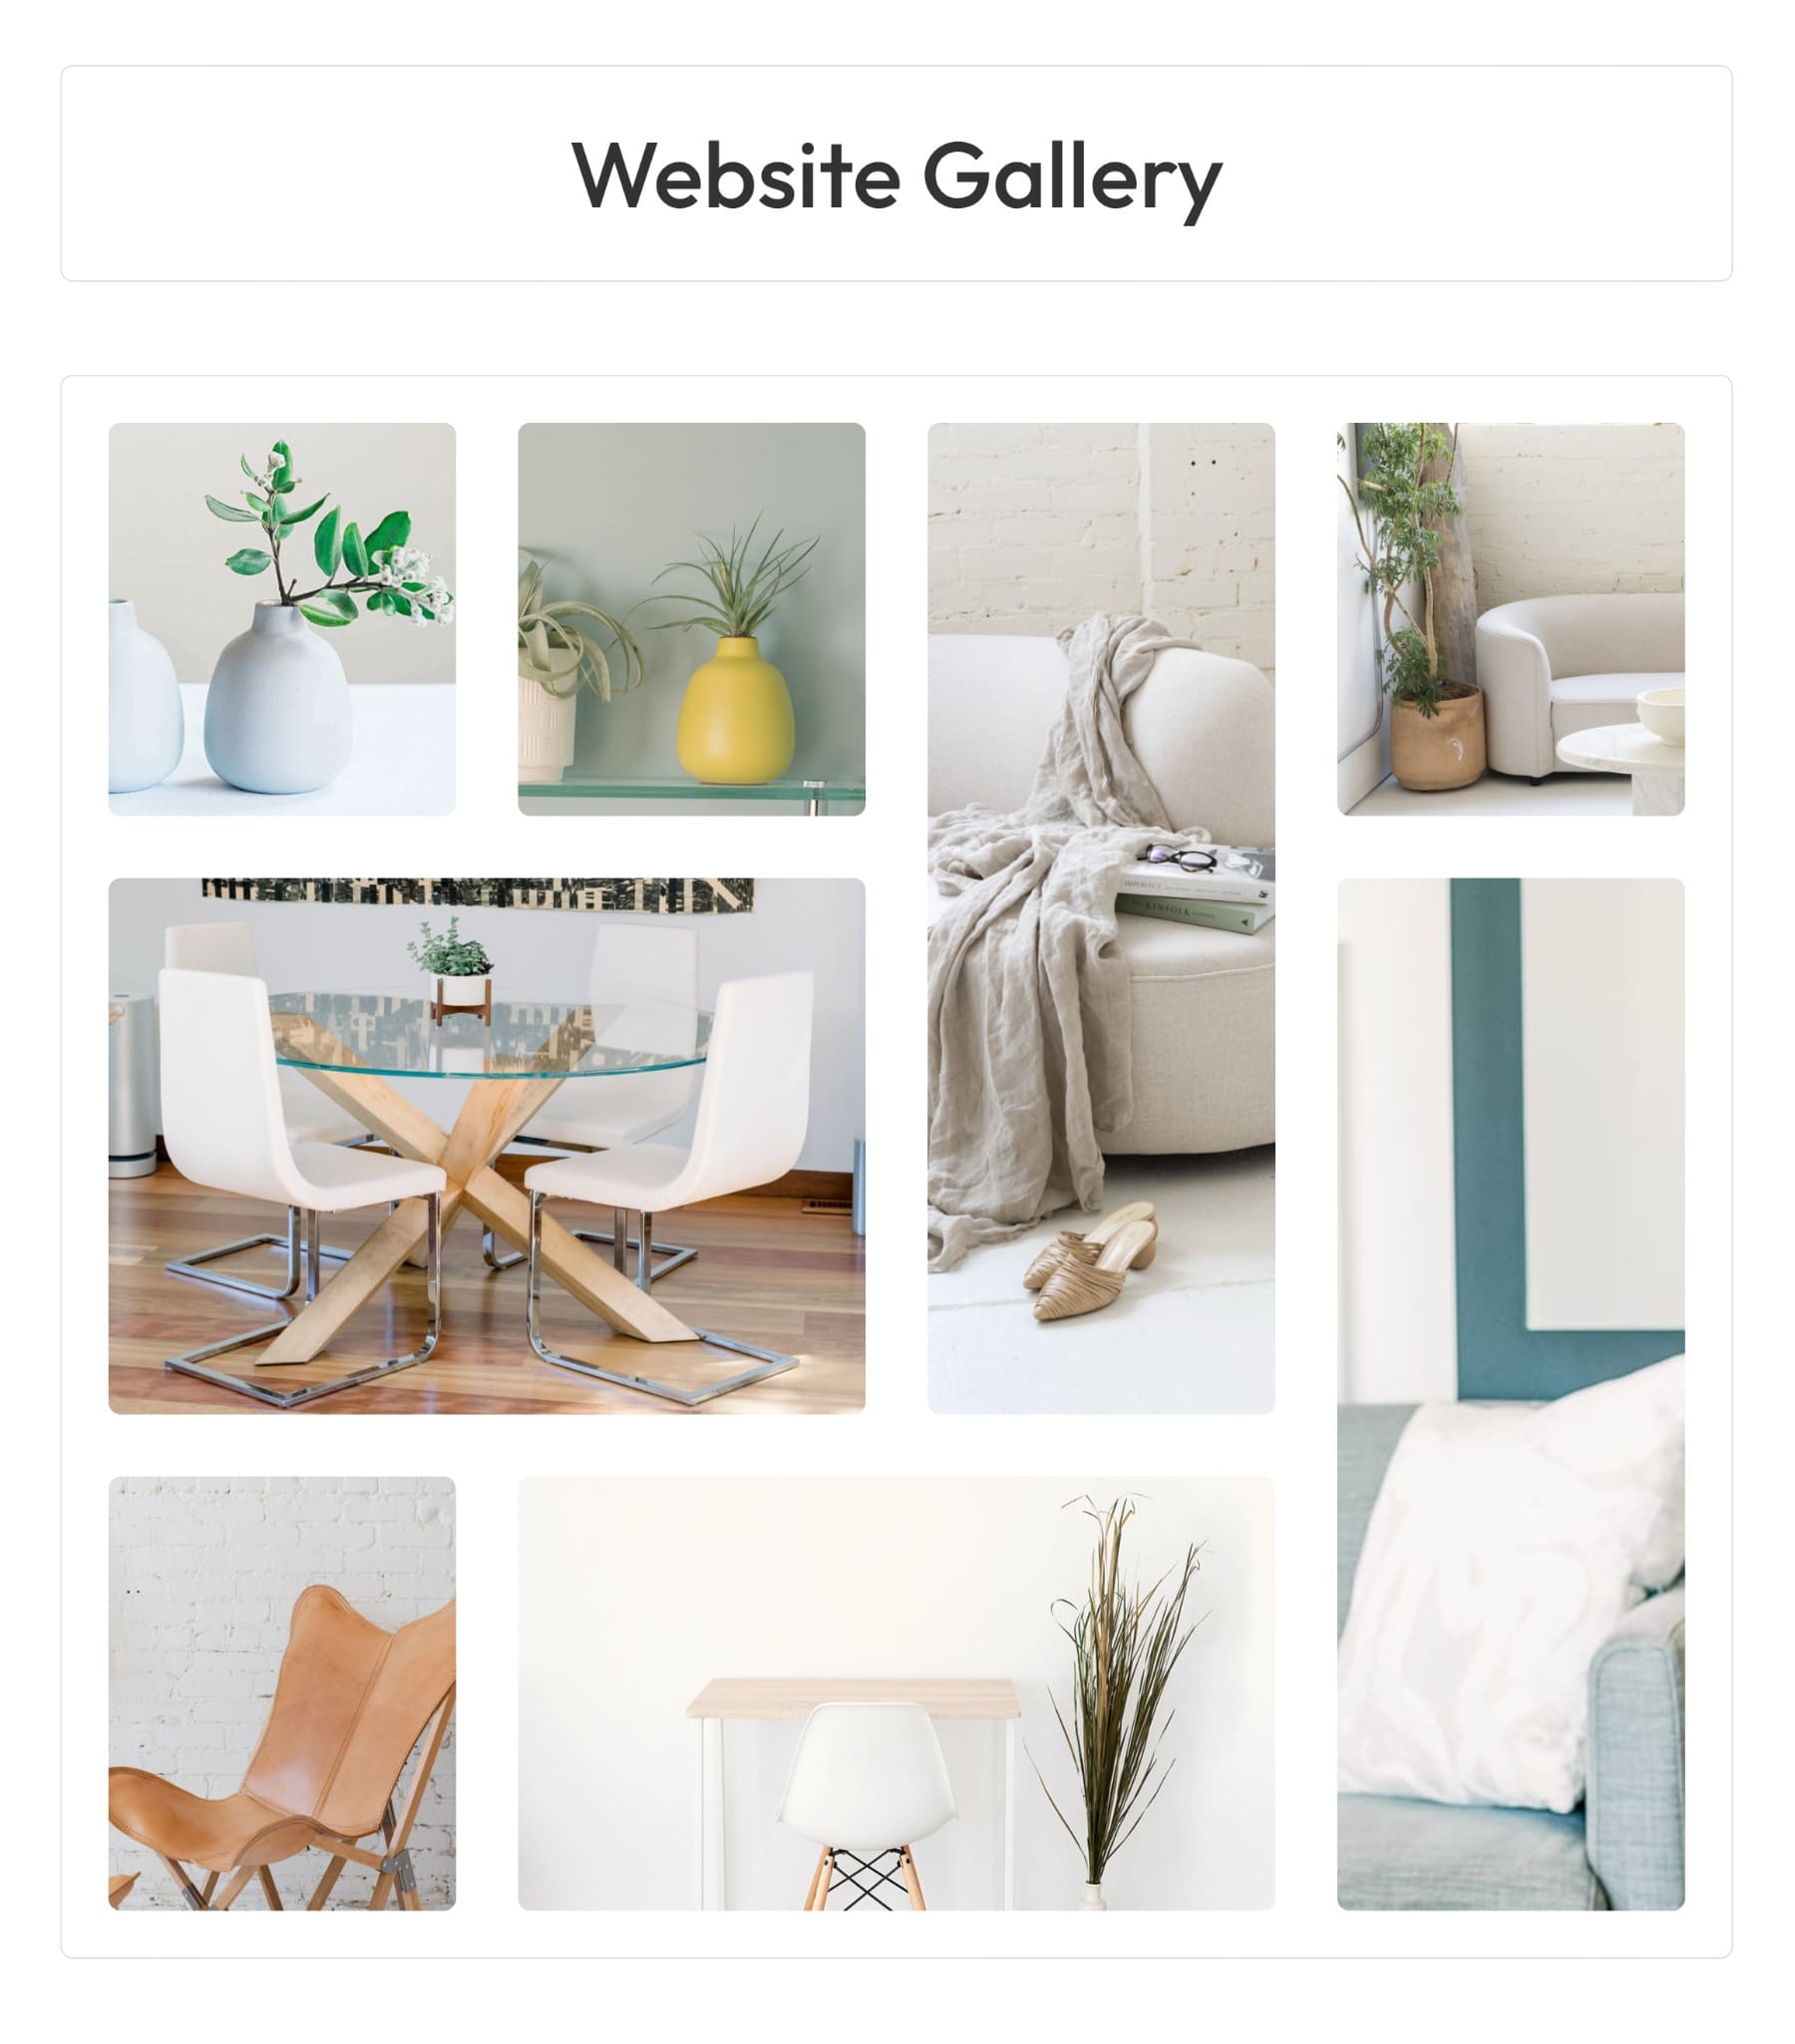
You’re not limited to the default presets in the library. The real power shows up when you combine Element Presets with Option Group Presets. Element Presets give you a complete module style, but you can refine individual properties by layering Option Group Presets on top.
Take the images above, for example. They use two stacked Element Presets for the overall look. But say you want to add shadows to only some of them. You can apply different shadow styles through the Shadow OGP panel without touching the base presets. This gives you modular control over every design property without starting from scratch.
Here we’ve added the Raised – Medium preset to one image and Raised – Small to another, letting us control the shadow intensity precisely.
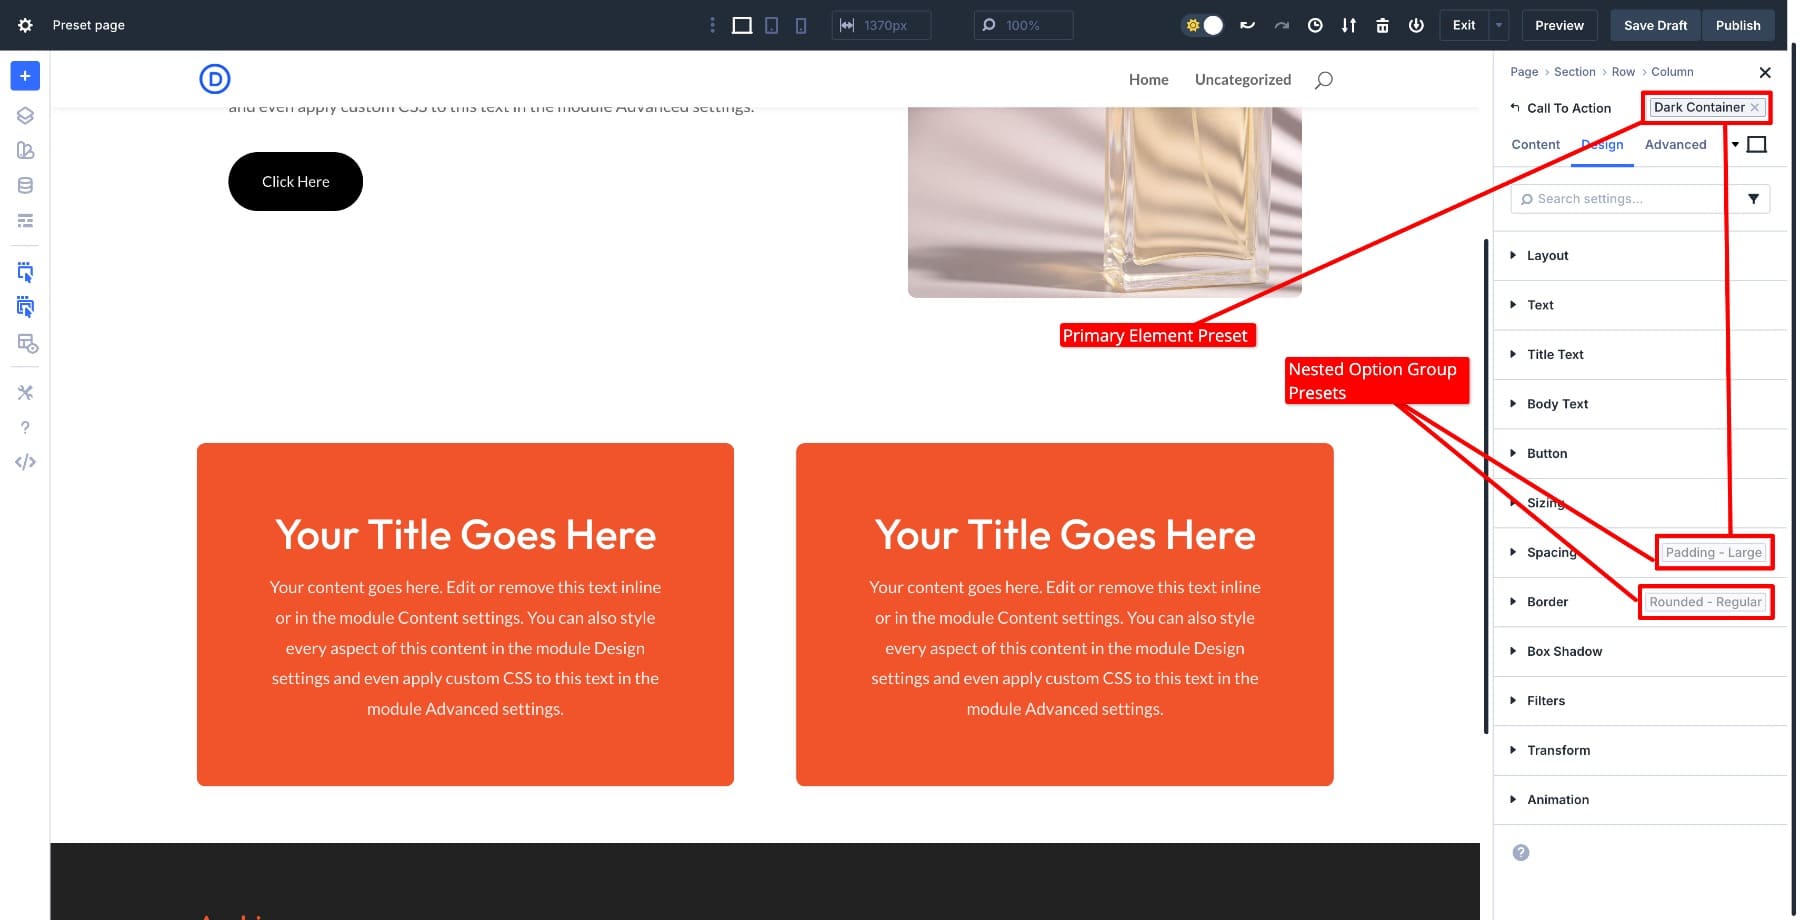
Most Element Presets in the library work this way, built by stacking settings and nesting multiple Option Group Presets together. The CTA module’s Dark Container preset, for example, combines custom settings with nested Padding-Large and Rounded-Border OGPs. This layered structure is what makes the preset system so flexible and powerful.
The combination of stacking and nesting gives you endless flexibility. Experiment with different Element Presets from the library, then layer Option Group Presets to fine-tune spacing, borders, shadows, and typography. This modular approach means you’re never locked into rigid designs. You can mix and match presets to create unique combinations that fit your specific layout needs while keeping everything connected to the design system.
The more you explore the preset library, the faster you’ll spot opportunities to combine them in ways that make building layouts feel effortless.
So far, we’ve been applying presets as the design system provides them. But presets become even more powerful when you start editing them to match your brand. A single preset edit can update dozens of modules instantly across your entire site.
Editing A Preset For Global Impact
The design system’s real power isn’t just applying presets, it’s editing them. Because everything is connected through the preset system, a single change can instantly update dozens of modules across your entire site. To demonstrate this impact, let’s modify a few styles in presets from the Design System and watch how they affect other layouts built with them.
1. Adding Borders To Icons Site-Wide
Say you want all icons across your site to have a consistent border. Since all the icons inherit their styles from the Dark – Small – Contained Icon preset, we’ll modify it in the #Presets 2 layout. Add a 2px Border Width in black and save.
The updated styles now appear everywhere the preset is used. Refresh the Home layout, and you’ll see the new icons with black borders.
Every icon using Dark – Small – Contained automatically gets the new 2px border. You didn’t touch those modules individually. The preset handled it globally.
2. Updating Global Fonts And Colors
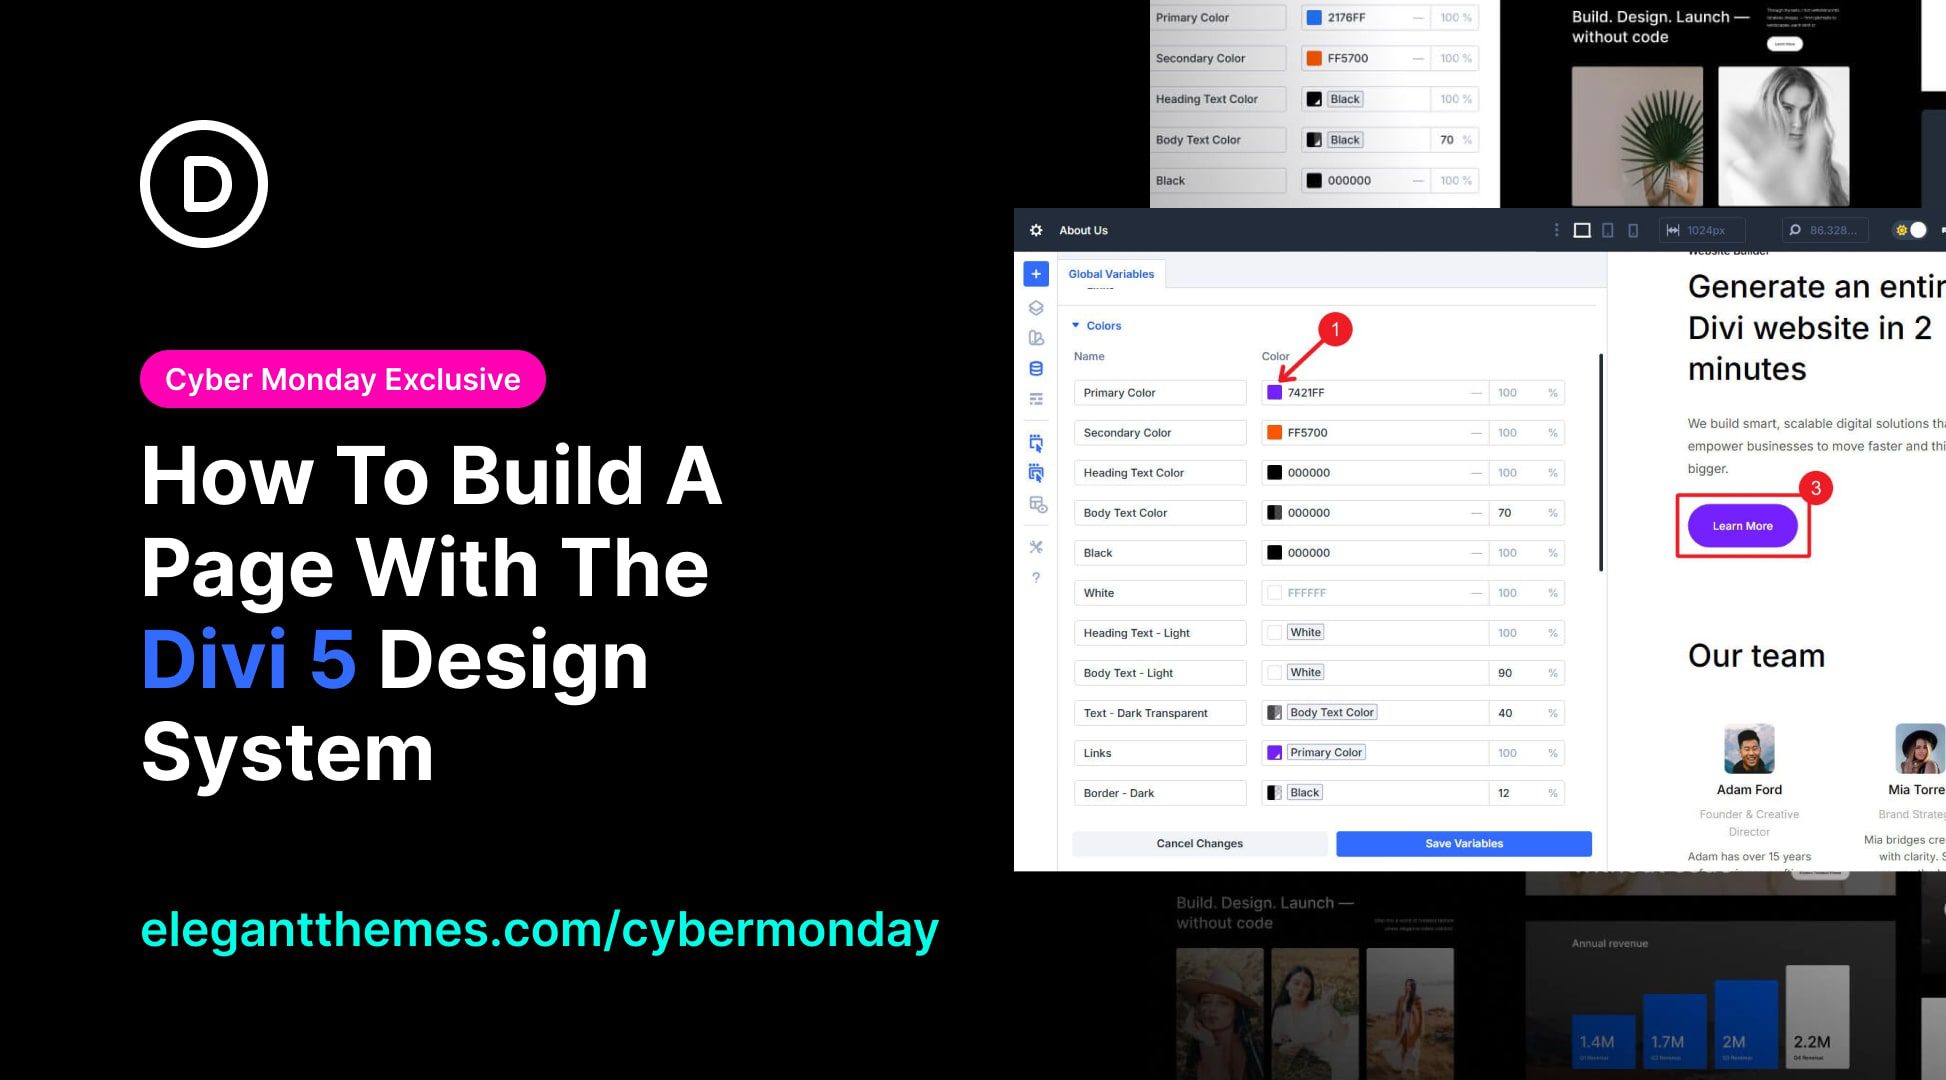
Design Variables control your site’s foundational styles: colors, fonts, and spacing. All presets in the library connect to these Design Variables, so when you edit them, the changes cascade through every preset linked to them.
Let’s change the Global colors to #f1532b (primary) and #02447b (secondary).
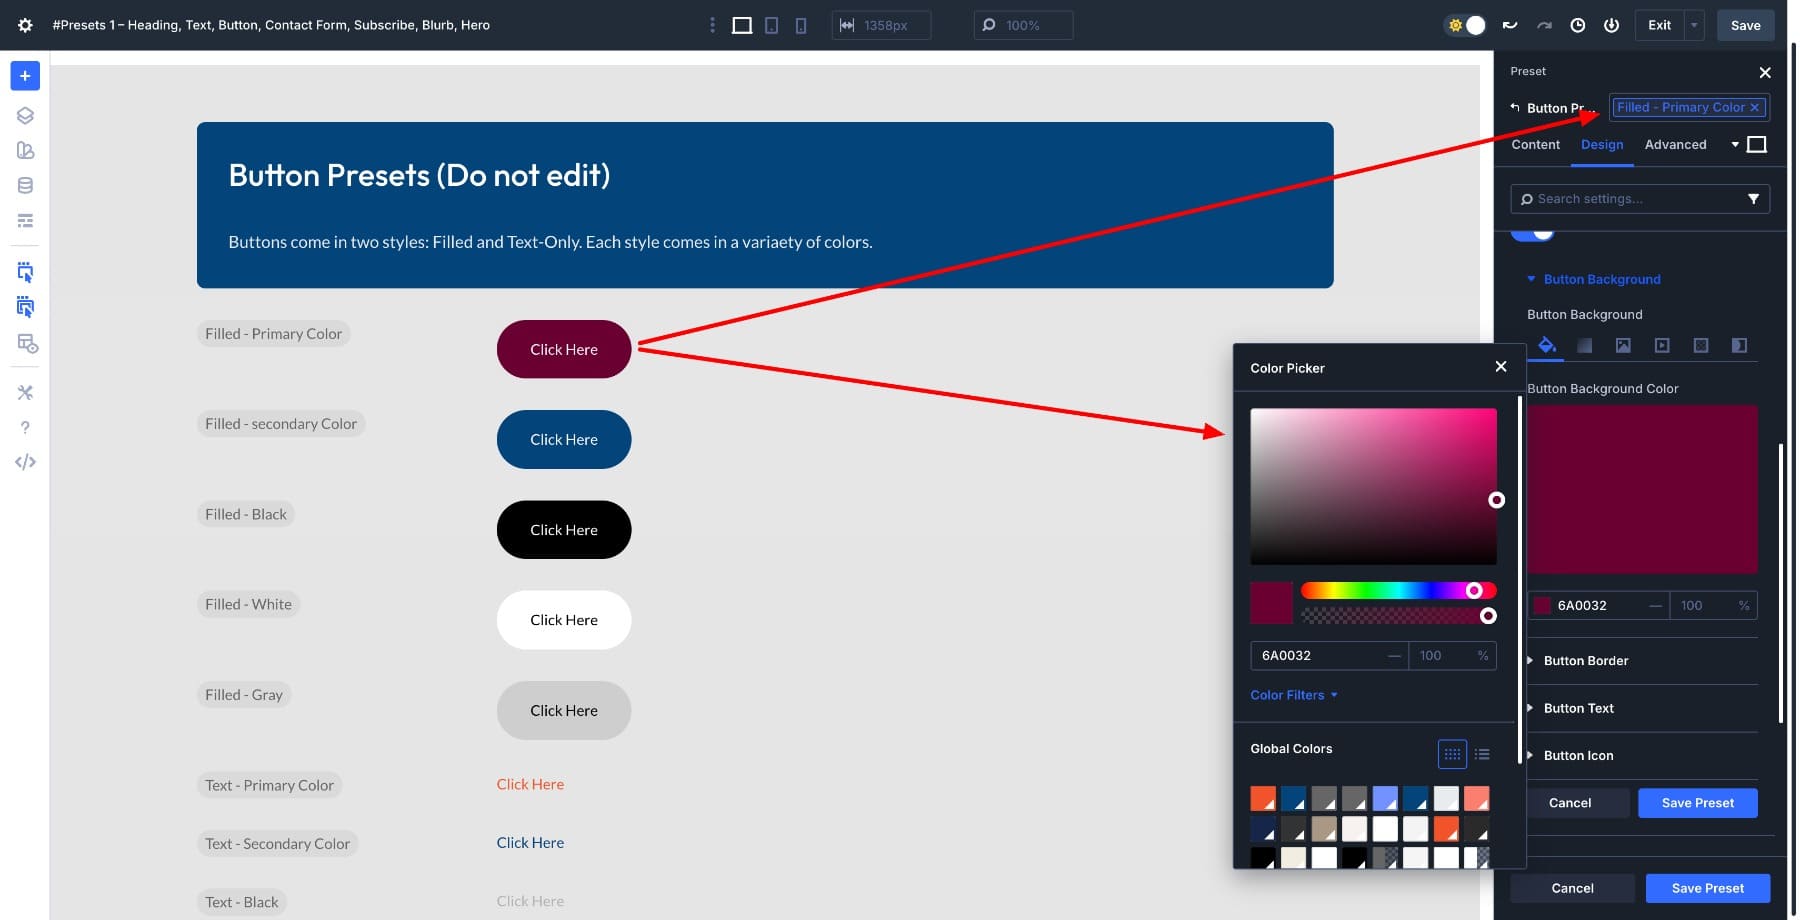
After updating, notice that all presets in the #Presets 1 layout shift to the new colors automatically. Since the Button module inherits its styles from the Filled – Primary Color preset, it now reflects the new Primary color.
The same applies to fonts. Update your Heading and Body Fonts, and all text-based presets adjust instantly.
Every preset using that color variable or font variable updates across the board. Buttons, headings, CTAs, testimonials — everything tied to that variable reflects the new style across all pages and templates. This is the kind of control that makes site-wide rebranding or seasonal style changes take minutes rather than hours.
3. Modifying Button Styles Globally
Buttons appear everywhere: hero sections, CTAs, contact forms, WooCommerce checkout. Editing a button preset updates all of them at once. Open any button module and find Filled – Primary Color in the Presets panel. Edit the preset and change its Background Color.
Every button using that preset updates immediately across your homepage, blog, shop page, and footer.
Check the home page, and you’ll see the Filled – Primary Color preset now shows the new color.
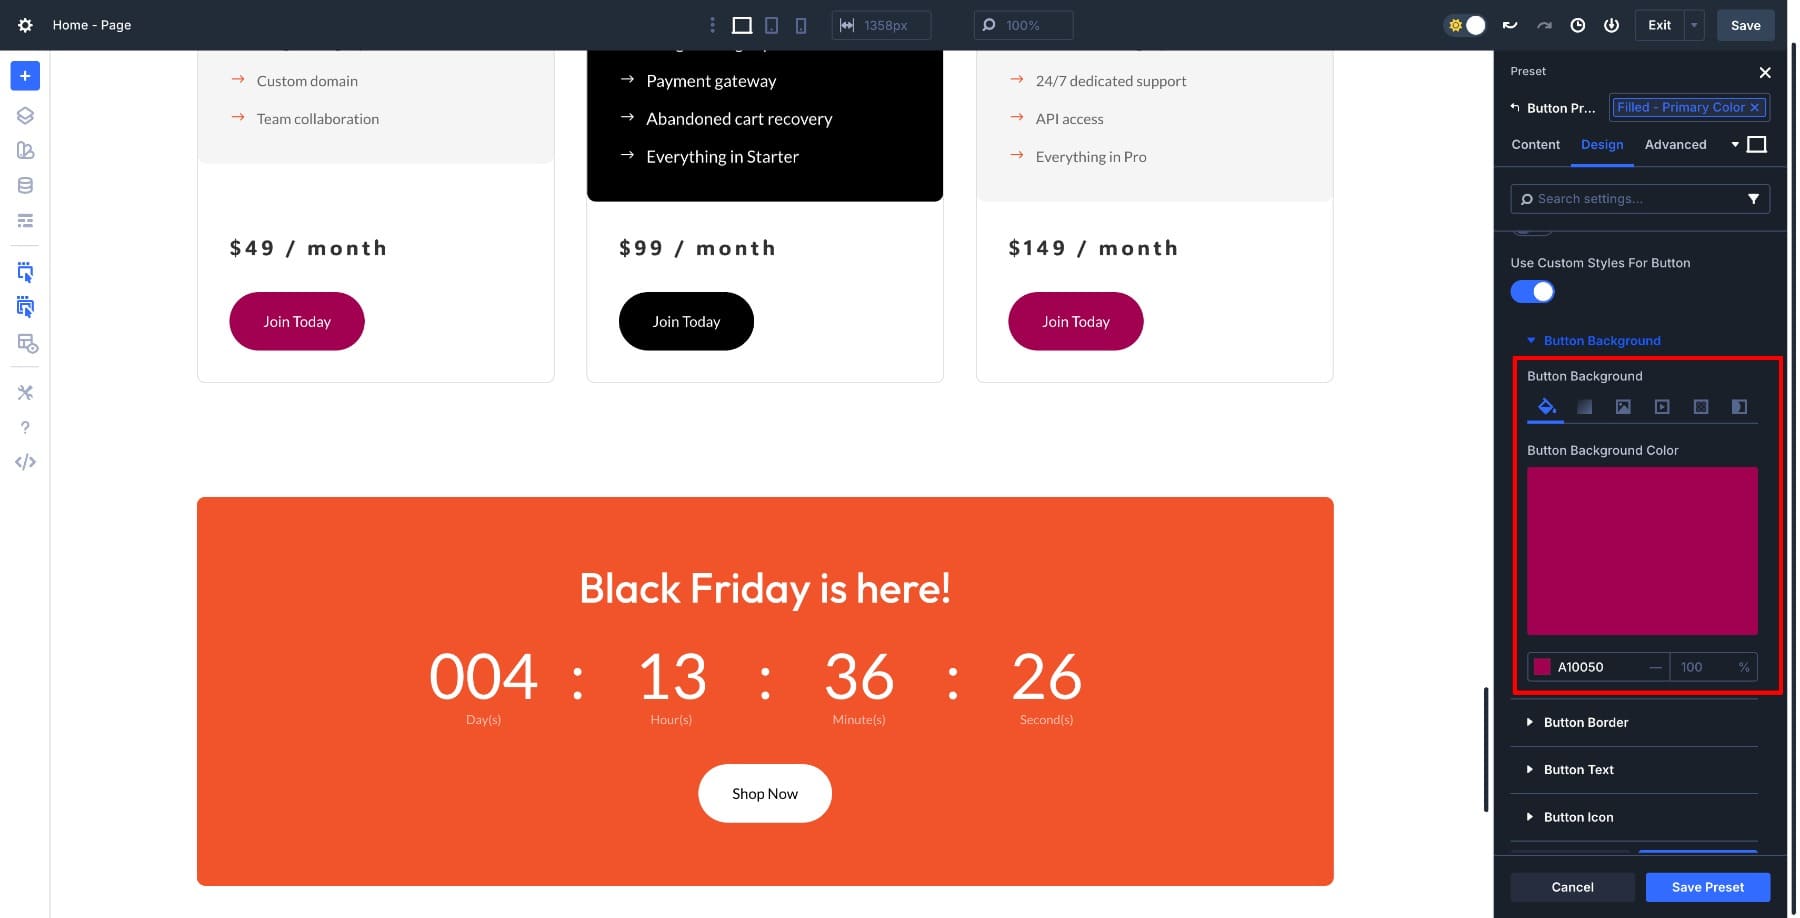
This becomes especially powerful when you need quick site-wide style updates. Change one preset, and your entire site adopts the new style without touching individual pages, and restore the original brand anytime you want.
4. Editing Nested Option Group Presets
This is where things get more sophisticated. Remember how Element Presets can contain nested Option Group Presets? When you edit a nested OGP, it updates every element preset using it, creating a powerful chain reaction across your design system.
Take the CTA module’s Dark Container preset as an example. It uses nested Padding-Large and Rounded-Border OGPs. Edit the Element preset by switching these nested OGPs, and the design updates in real time.
When you apply the preset to a new CTA module, it automatically inherits the updated styling rules.
This is how most Element Presets in the library function. They’re constructed by layering settings and nesting OGPs, so editing the nested components propagates changes to everything connected to them. You get precise control over your design system without hunting down individual modules across dozens of pages.
How This Fits Into A Real Life Workflow (Practical Use Cases)
Once you understand how presets work, they become essential tools for common design tasks. Here’s how the design system fits into real scenarios you’ll face when managing a site.
1. Adjusting Spacing Site-Wide
Your site feels cramped after adding new content, and manually updating padding across dozens of modules sounds exhausting. Open the #Presets 0 – Option Group Presets layout and click on each spacing preset to edit. Adjust the padding values in Padding-Medium and Padding-Large, save the changes, and every module using those nested presets updates automatically.
Your entire site gets more breathing room in minutes.
2. Rebranding For A Time-Sensitive Campaign
A flash sale needs your site buttons and CTAs in different colors by tomorrow. Go to Variable Manager and add a new color variable for the sale accent color.
Then open the Filled – Primary Color Button preset and swap the background to use the new variable. Every button across your homepage, product pages, checkout, and blog updates instantly. When the sale ends, switch the variable back and your site returns to normal.
3. Building New Pages Without Manual Styling
You’re launching a services page from scratch and don’t want to spend an hour styling every module. Add your sections and drop in the modules you need. Open each module’s preset panel and apply the design system presets. Your page matches the rest of your site immediately.
If you need sections with more complex layouts, import them from the design system library and swap out the content. The styling stays consistent without any manual configuration.
Best Practices To Make The Most Out Of The Design System
Use these best practices to keep your design system clean, consistent, and easy to scale.
1. Start With Design Variables Before Editing Presets
Most presets in the design system are already connected to Design Variables for colors, fonts, and spacing. Change your primary brand color or heading font at the Design Variables level, and it automatically cascades through every connected preset.
Take the Button preset example from earlier. Rather than adding a completely new color, we could have just modified the Primary Color variable, and all the other modules would have changed too.
This saves you from editing individual presets one by one. Customize specific presets only when you need styles that go beyond what the variables control.
2. Use The Premade Layouts And Templates As Starting Points
The design system includes over 430 sections, page templates, and theme builder layouts. Rather than building pages from scratch every time, import a section close to what you need and modify the content.
Hover over the section to locate the blue plus button. Click Add New Section.

Switch to Add From Library.

Use the search bar to find specific sections.

Each section type has different design variations, giving you plenty of options to choose from. For example, searching Header shows 17 sections. Click on one, select Use This Section, and wait for the design to load.
You can search for other components like hero, footer, testimonials, and add them to your design the same way.
Since the styling is already handled through presets, you’re just swapping text and images. This approach is faster and maintains your site’s visual consistency.
3. Apply Container Presets To Speed Up Layout Styling
Container presets handle spacing, backgrounds, and borders for sections, rows, and columns. When building a new page, apply container presets to your layout structure first. This establishes the visual framework before you even add modules.
Then drop in your content modules and apply element presets. Your layout comes together much faster when the foundation is already styled.
4. Keep A Small Set Of Core Presets And Clone Variations When Needed
Resist the urge to create dozens of custom presets for every slight variation. Work with the core presets from the design system and clone them only when you need a genuinely different style. Too many presets make your library cluttered and harder to manage. A lean preset library with clear naming keeps your workflow efficient.
5. Avoid Styling Modules Directly When Presets Can Handle It
It’s tempting to open a module and manually tweak the font size or padding, but this breaks the connection to the design system. When you need a change, edit the preset. Direct styling makes modules harder to update globally later. Presets keep everything connected and maintainable as your site grows.
Get The Exclusive Design System Before It’s Gone!
The Divi 5 Design System, exclusive to the Cyber Monday Sale, provides a comprehensive styling foundation built on presets that work together seamlessly. Once you understand how to apply, stack, and edit presets, you can build pages faster and maintain consistency across your entire site. A single preset edit updates dozens of modules instantly, making redesigns and rebranding happen in minutes rather than hours.
This is your chance to grab over 430 professionally designed sections, page templates, and a complete preset system that transforms how you build with Divi. Start with the premade layouts and presets, then customize them to match your brand through Design Variables and preset editing. The more you work with the system, the faster your workflow becomes.
Don’t let this limited-time offer slip away. Claim your Design System now while the Cyber Monday sale is still live.
Take Me To The Sale


Leave A Reply