")
AI image upscalers, like Gigapixel, are an excellent way to increase the size of your photos. They offer a quick, efficient, and reliable way to enhance image quality, preserve natural aesthetics, and save time compared to simply editing images in Photoshop or Lightroom. In this post, we’ll introduce you to a revolutionary AI image upscaler, walk you through its interface and settings, and show you how to upscale images with AI.
Let’s dive in.
What is an Image Upscaler?
Subscribe To Our Youtube Channel
An AI image upscaler uses artificial intelligence to increase the resolution of a photo. They work by increasing pixels, size, and even format without reducing the quality. These tools can convert low-quality images into high-definition masterpieces by adding new pixels to improve clarity and sharpness. In other words, AI Image upscales fill in the gaps in an image to build a higher-resolution version, making images appear smoother, less pixelated, and more detailed.
Some examples of good AI image upscalers include Gigapixel AI, HitPaw Photo Enhancer, and AVCLabs Photo Enhancer AI. For this tutorial, we’ll walk you through upscaling images through Gigapixel.
What is Gigapixel AI?
![]()
Gigapixel is a powerful AI image upscaler developed by Topaz Labs that can improve the quality of your images by up to 600% without reducing quality. It uses machine learning to enhance details and textures, making it ideal for prepping images for print. Gigapixel AI is especially effective for upscaling low-resolution images, especially portraits of people, focusing on enhancing facial details. With the introduction of Face Recovery AI in version 6.1, Gigapixel allows its users to achieve remarkable results when upscaling images.
How To Upscale Images with AI Using Gigapixel
Gigapixel is the perfect solution to upscale images with AI. The good news is that it’s easy to use. We’ll walk you through the process of downloading the software and the best settings to use to make your photos look incredible.
Download and Install a Free Trial of Gigapixel
The first step is to head to Gigapixel AI’s website. Scroll down the page until you find the Try it free button.
![]()
Before installing Gigapixel, ensure your computer is strong enough to run it. According to Topaz Labs, the system requirements for successfully using Gigapixel AI are as follows:
- Windows Operating System: 10 or 11 (most updated version recommended)
- CPU: Intel OR AMD with AVX2 instructions
- System Memory (RAM): 16 GB (32 GB or more recommended)
- Graphics Card (NVIDIA): NVIDIA GTX 900 series or higher, 6GB VRAM
- Graphics Card (AMD): AMD Radeon 500 series or higher, 6GB VRAM
- Graphics Card (Intel): Intel ARC A750
- CPU Release Year: 2016 or newer
Recommended Specifications:
- System Memory (RAM): 32 GB or more
- Graphics Card (NVIDIA): NVIDIA RTX 3000 or higher, 8GB VRAM
- Graphics Card (AMD): AMD Radeon RX 5000 or higher, 8GB VRAM
Upon clicking the button, the software will download to your computer. Locate the installer package on your computer and double-click it to run the installer. Be sure to accept the terms of the agreement, then click the install button (on a Mac) to install the software.
![]()
Gigapixel will go through the process of downloading all of the AI models from their server, so be prepared for it to take a few minutes or longer, depending on your computer’s setup.
Launching Gigapixel AI
After successfully installing the program on your computer, the next step is to familiarize yourself with the interface. Locate Topaz Gigapixel AI in your applications folder and double-click to launch it. A popup window will appear with a few options: activate, buy a license or free demo. Click Free Demo to try the program. The demo is a fully functional version of the software so that you can try different AI models and settings, but you won’t be able to save your work.
![]()
Upon launching the program, you’ll be prompted to upload an image. You can drag and drop an image or select the browse images button to upload a photo.
![]()
Once you’ve uploaded a photo, you can access Gigapixel’s AI tools and settings. However, as previously mentioned, if you’re using the demo version, you won’t be able to save images. To help you learn how to use Gigapixel to upscale images with AI, we’ll walk you through the settings, AI models, and tools so you can see what all the fuss is about.
![]()
- Original Image: View the original version of your image
- Upscaled Image: Before making any adjustments, the image remains the same. However, as you apply settings, you’ll be able to view the differences between the original and upscaled versions of your image
- Open Images: This allows you to open more than one image and apply the settings simultaneously, making Gigapixel an excellent option for bulk-upscaling images
- View Settings: Users can opt to view images individually, on a sliding scale, side-by-side, or zoom in and out
- Image Settings: View image information such as original size, scale, output size, the AI model used, and whether denoise, deblur, face recovery, or gamma correction was used
- Updated Preview: As you make changes, they will appear in this view
- Resize Mode: Allows you to adjust the scale (up to 6X the original), width, and height. You can also crop images
- AI Model Selector: Choose from Standard V2, High Fidelity V2, Art/CG, Low Resolution, Lines, Very Compressed, Standard V1, and Standard V2
- Settings: These options allow you to adjust noise, blur, and image compression. You can toggle the auto setting on to have Gigapixel handle these tasks for you or manually adjust them using the provided sliders
- Additional Settings: Additional tools for Face Recovery and Gamma Correction. The Face Recovery tool also has a slider that allows you to adjust the strength
Which AI Model Should You Choose?
Gigapixel’s AI models are not created equal. Each one serves a purpose for a specific type of photograph, so it’s important to understand which one you should use based on the kind of photo you’re looking to upscale. However, we suggest trying several models before committing to one. Even though Gigapixel recommends certain models for particular images, it may give you a different end result.
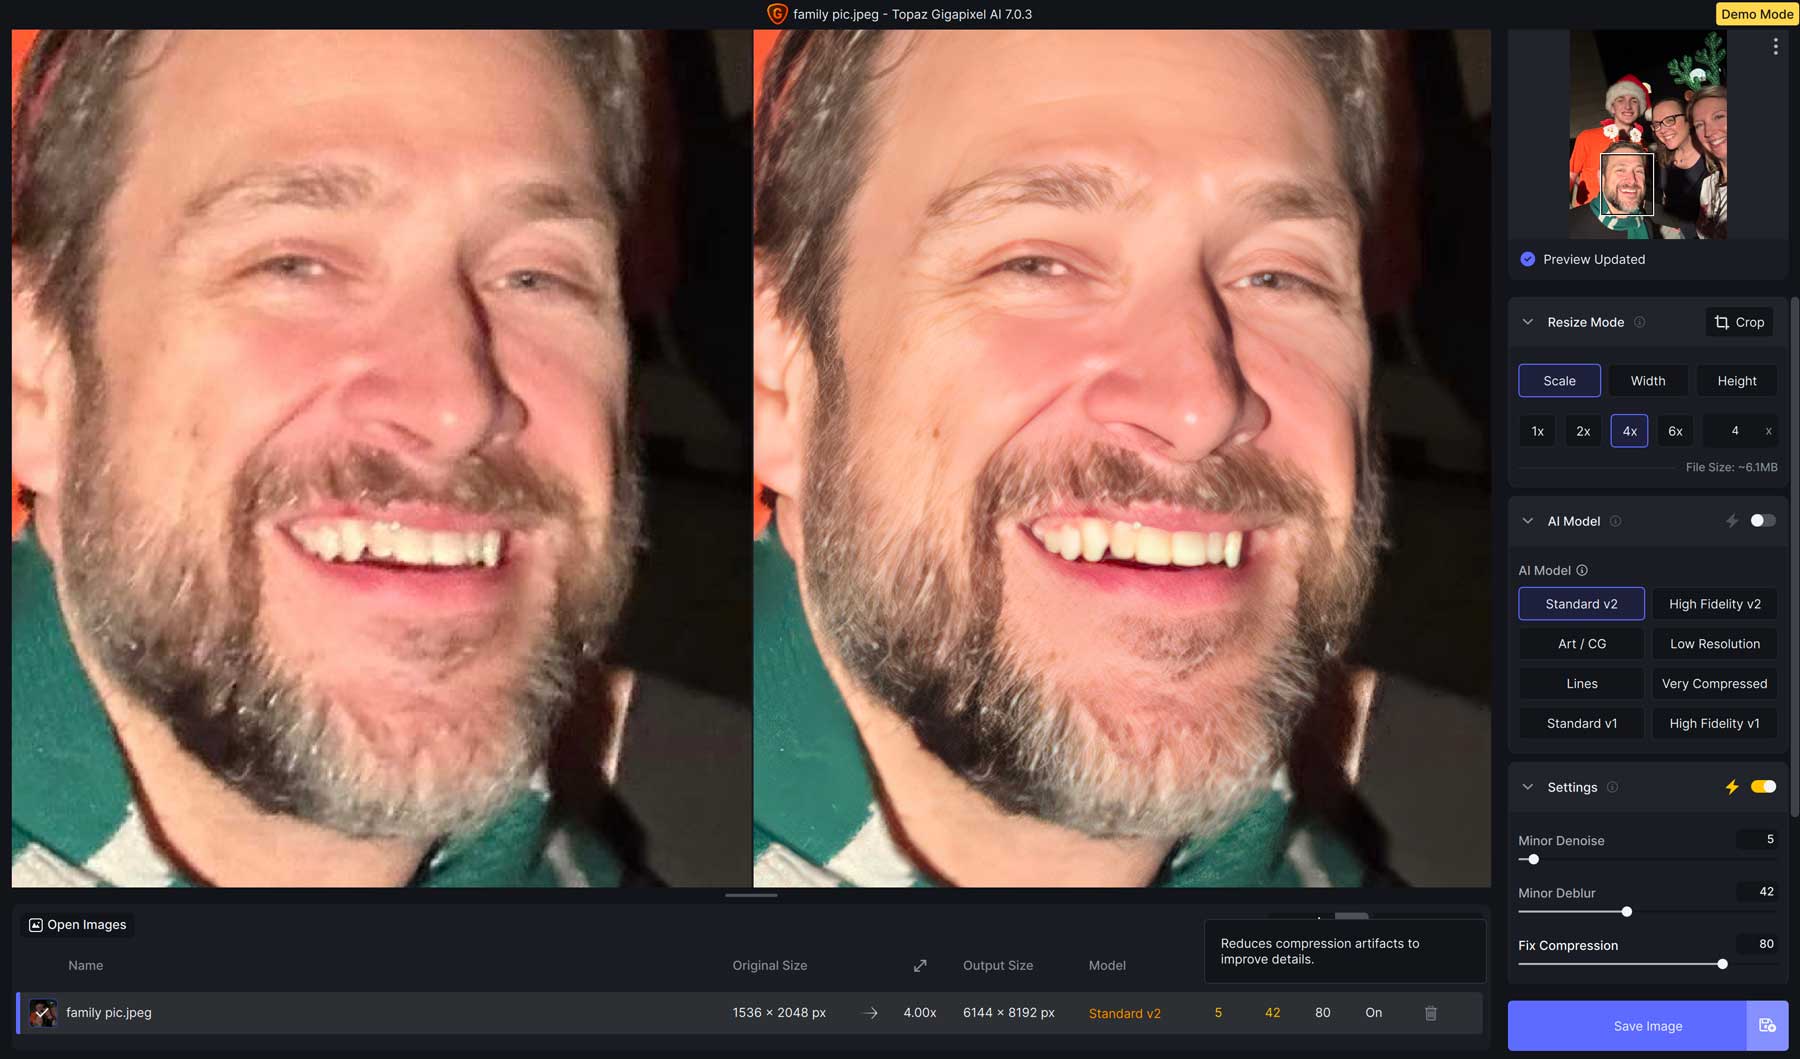
For example, this photo was taken using an iPhone 11 with a 12MP lens. The Standard V2 AI model combined with automatic noise, blur, compression, and face recovery produced a much sharper photograph with more detail.
Here’s a brief overview of each AI model so you’ll better understand which you should use in certain situations.
- Standard V1 & V2: These models are ideal for medium-quality images from older cameras or smartphones
- High Fidelity: This model is designed for use with high-end modern cameras and smartphones
- Art / CG: Designed to upscale images generated with AI
- Low Resolution: Ideal for enhancing low-quality, highly compressed images
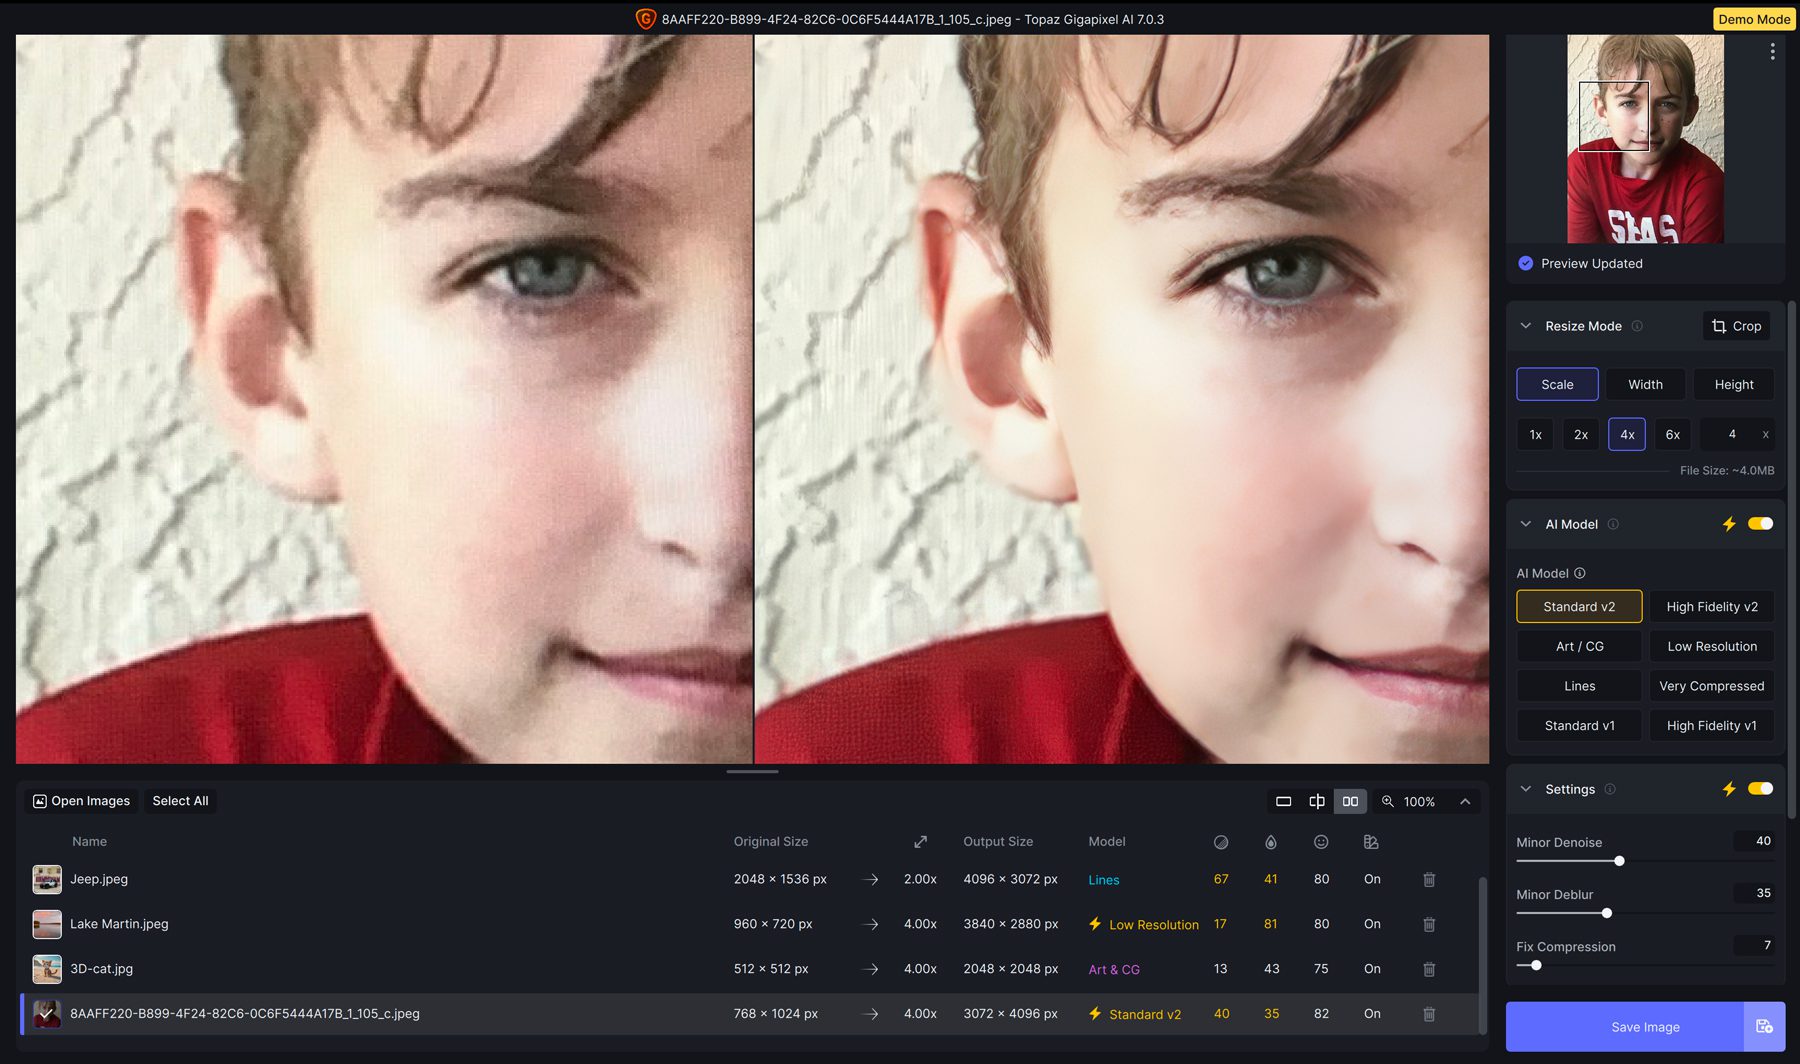
- Lines: This is a new AI model for Gigapixel 7. It is recommended for architectural photographs, cityscapes, typography, or any other image containing thick lines
- Very Compressed: Ideal for images with high compression and large amounts of artifacts. For example, scanned images and old digital photographs
Examples of Upscaled Images With AI
This section will show you the settings we used to upscale images for each of Gigapixel‘s AI models. Keep in mind that these are not one-size-fits-all settings. In all likelihood, you’ll want to vary the settings depending on the quality of the image and its type. However, these settings serve as a great jumping-off point that you can use to get the best results.
Standard V1 & V2
This photo was taken with an iPhone 6 with an 8MP camera. Using the automatic AI model selector, Gigapixel chose Standard V2 with the following settings:
- Minor Denoise: 40
- Minor Deblur: 35
- Fix Compression: 7
- Face Recovery: strength of 82
- Gamma Correction: Enabled
As you can see, the Standard V1 and V2 models have an extra setting called Fix Compression. The AI scans the photo and then determines what corrections are needed. Options vary depending on the AI model chosen.
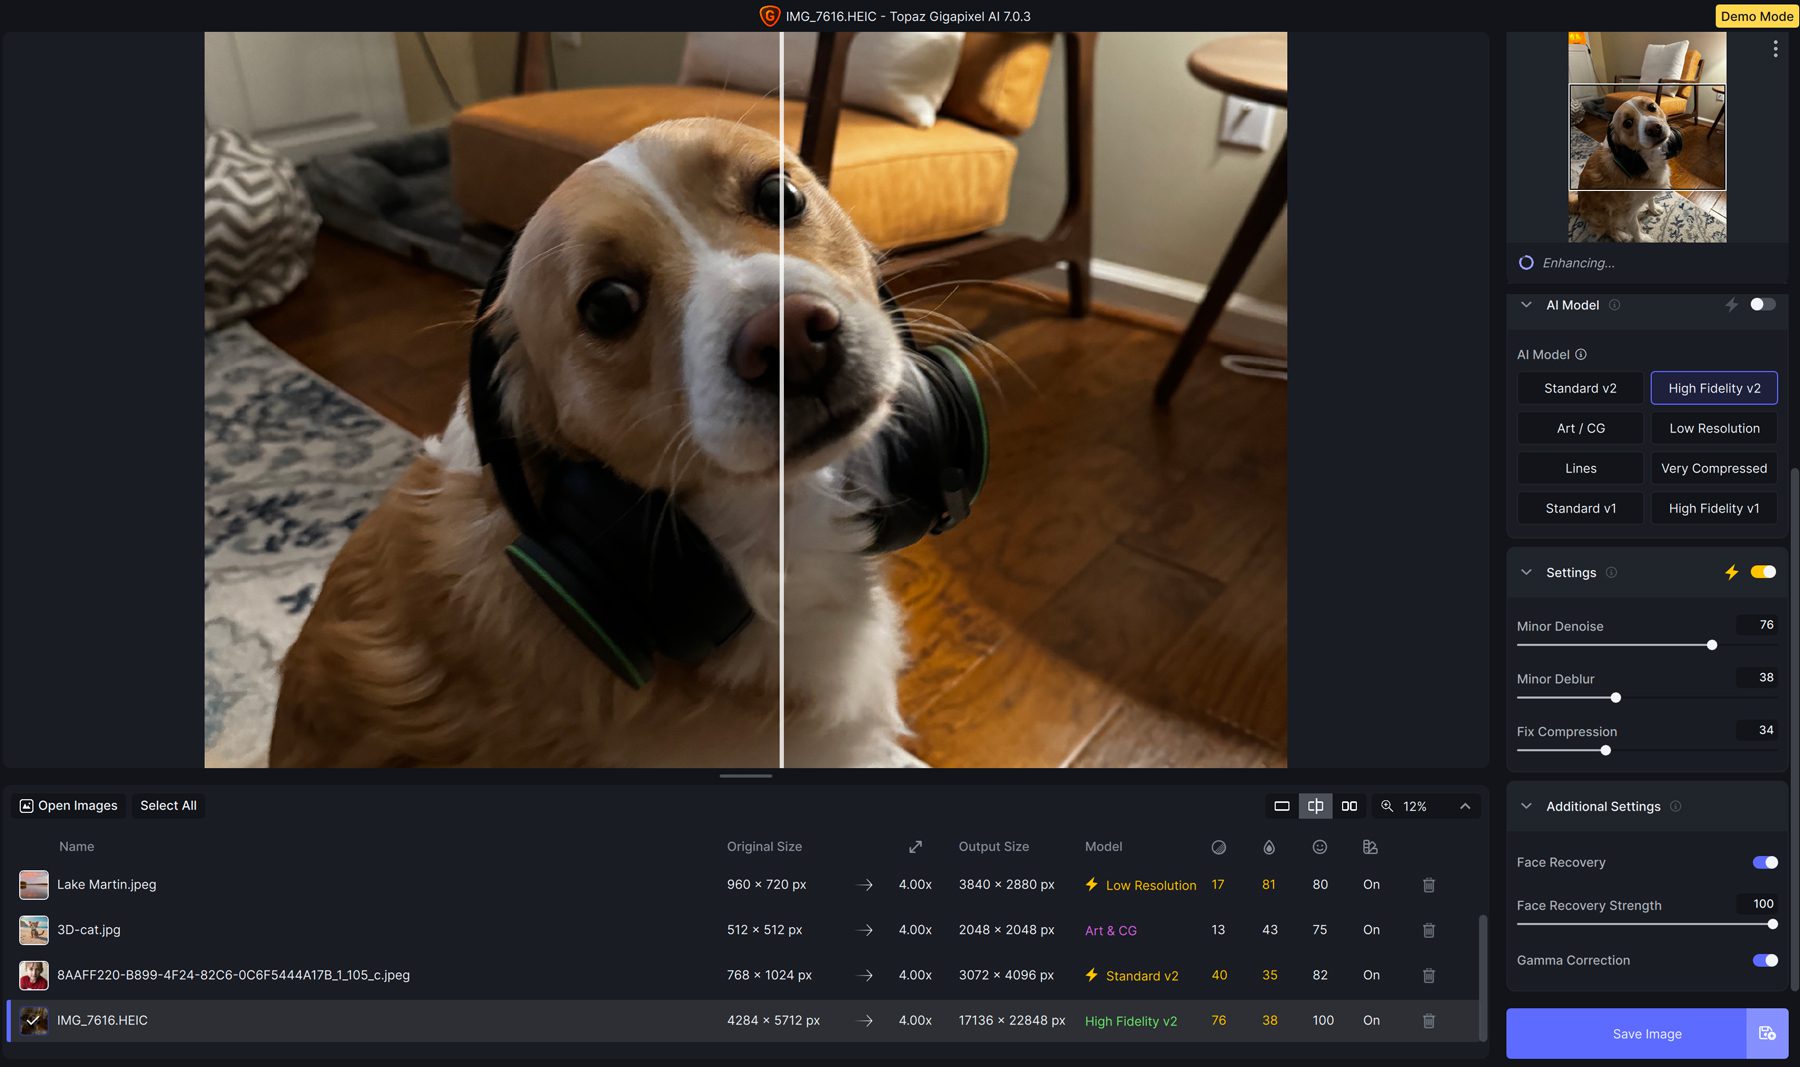
High Fidelity V1 & V2
You won’t notice much enhancement when working with images with large file sizes and taken with modern and recent smartphones. That is the point, though. This is where Gigapixel shines. Using a photo taken with an iPhone 15 Pro Max with a 48MP camera, we increased the resolution from 4284 x 5712 px to 17136 x 22848 px without losing quality. We used the High-Quality V2 AI model with the following settings:
- Minor Denoise: 76
- Minor Deblur: 38
- Fix Compression: 34
- Face Recovery: strength of 100
- Gamma Correction: Enabled
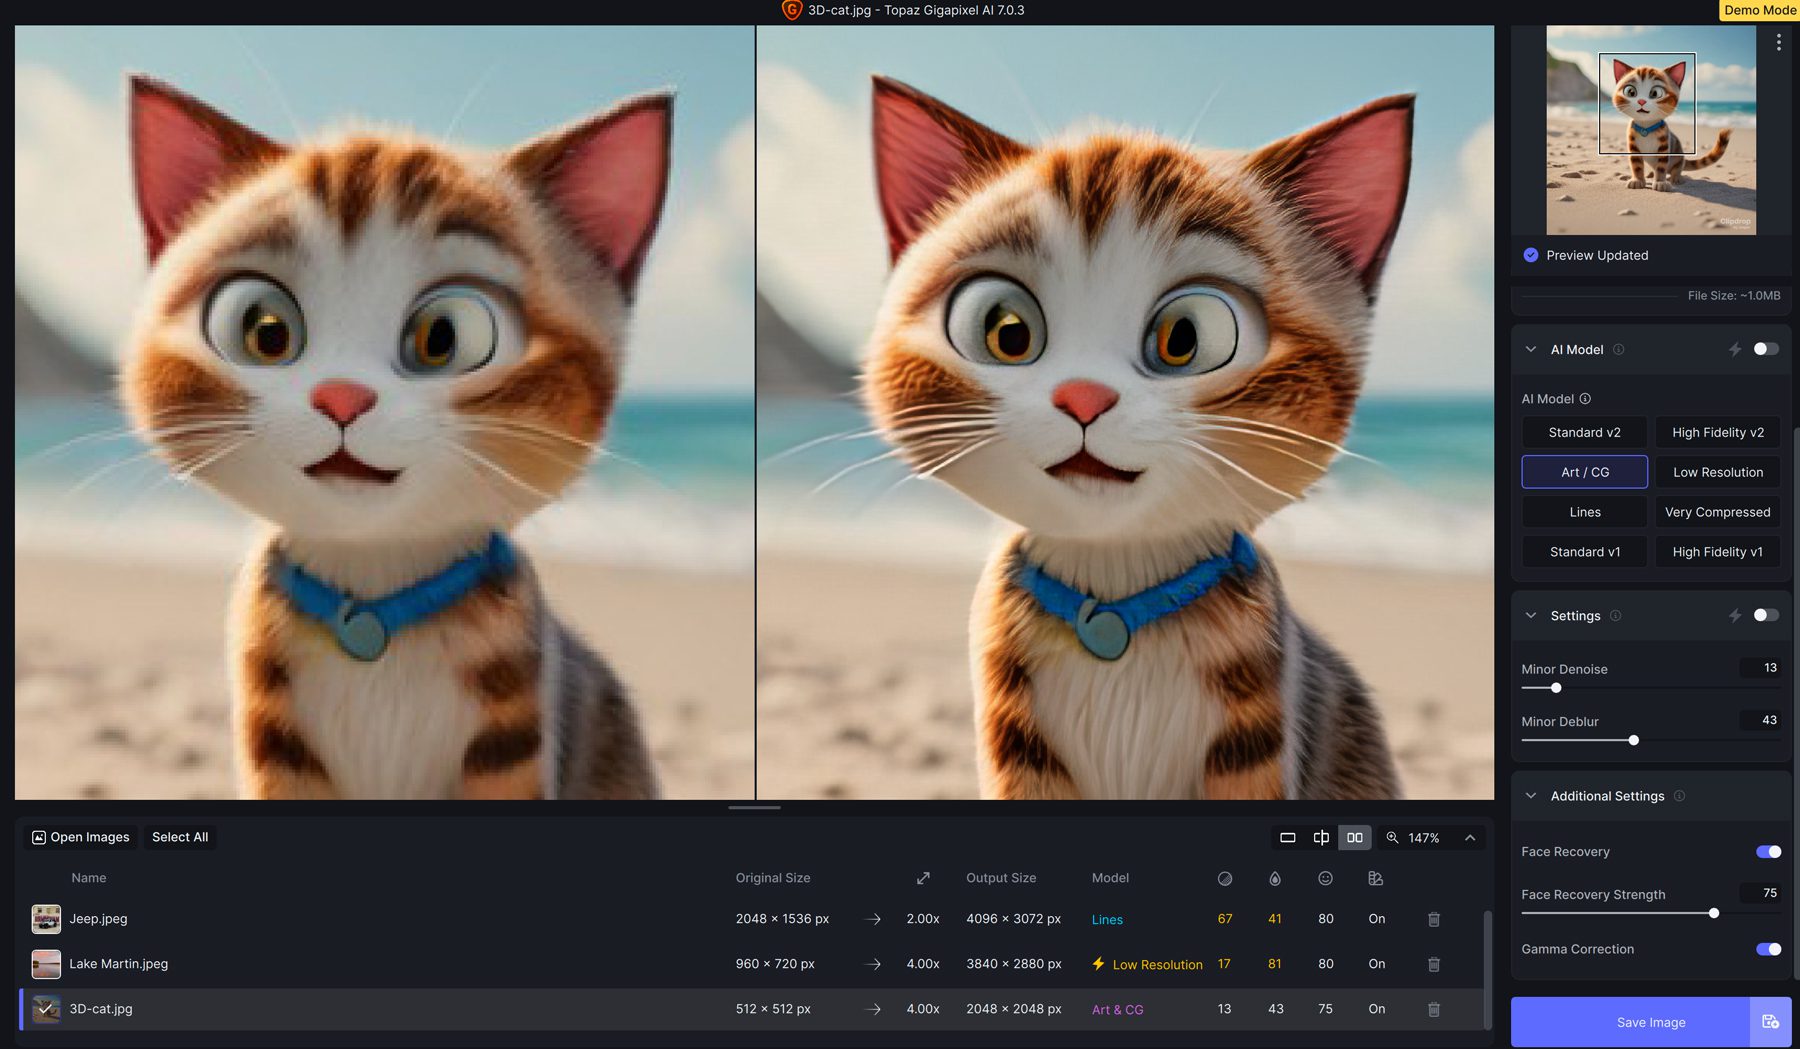
Art CG
To test the Art / CG AI model, we generated an image with Jasper Art. The original output of the photo was 512 x 512 px. Using the Art / CG AI model, we upscaled the image 4X, resulting in a 2048 x2048 px image. We used the following settings:
- Minor Denoise: 13
- Minor Deblur: 43
- Face Recovery: strength of 75
- Gamma Correction: Enabled
The differences between the original AI-generated image and our upscaled one were interesting. The AI reduced the blur quite a bit and enhanced the detail of the fur on the cat.
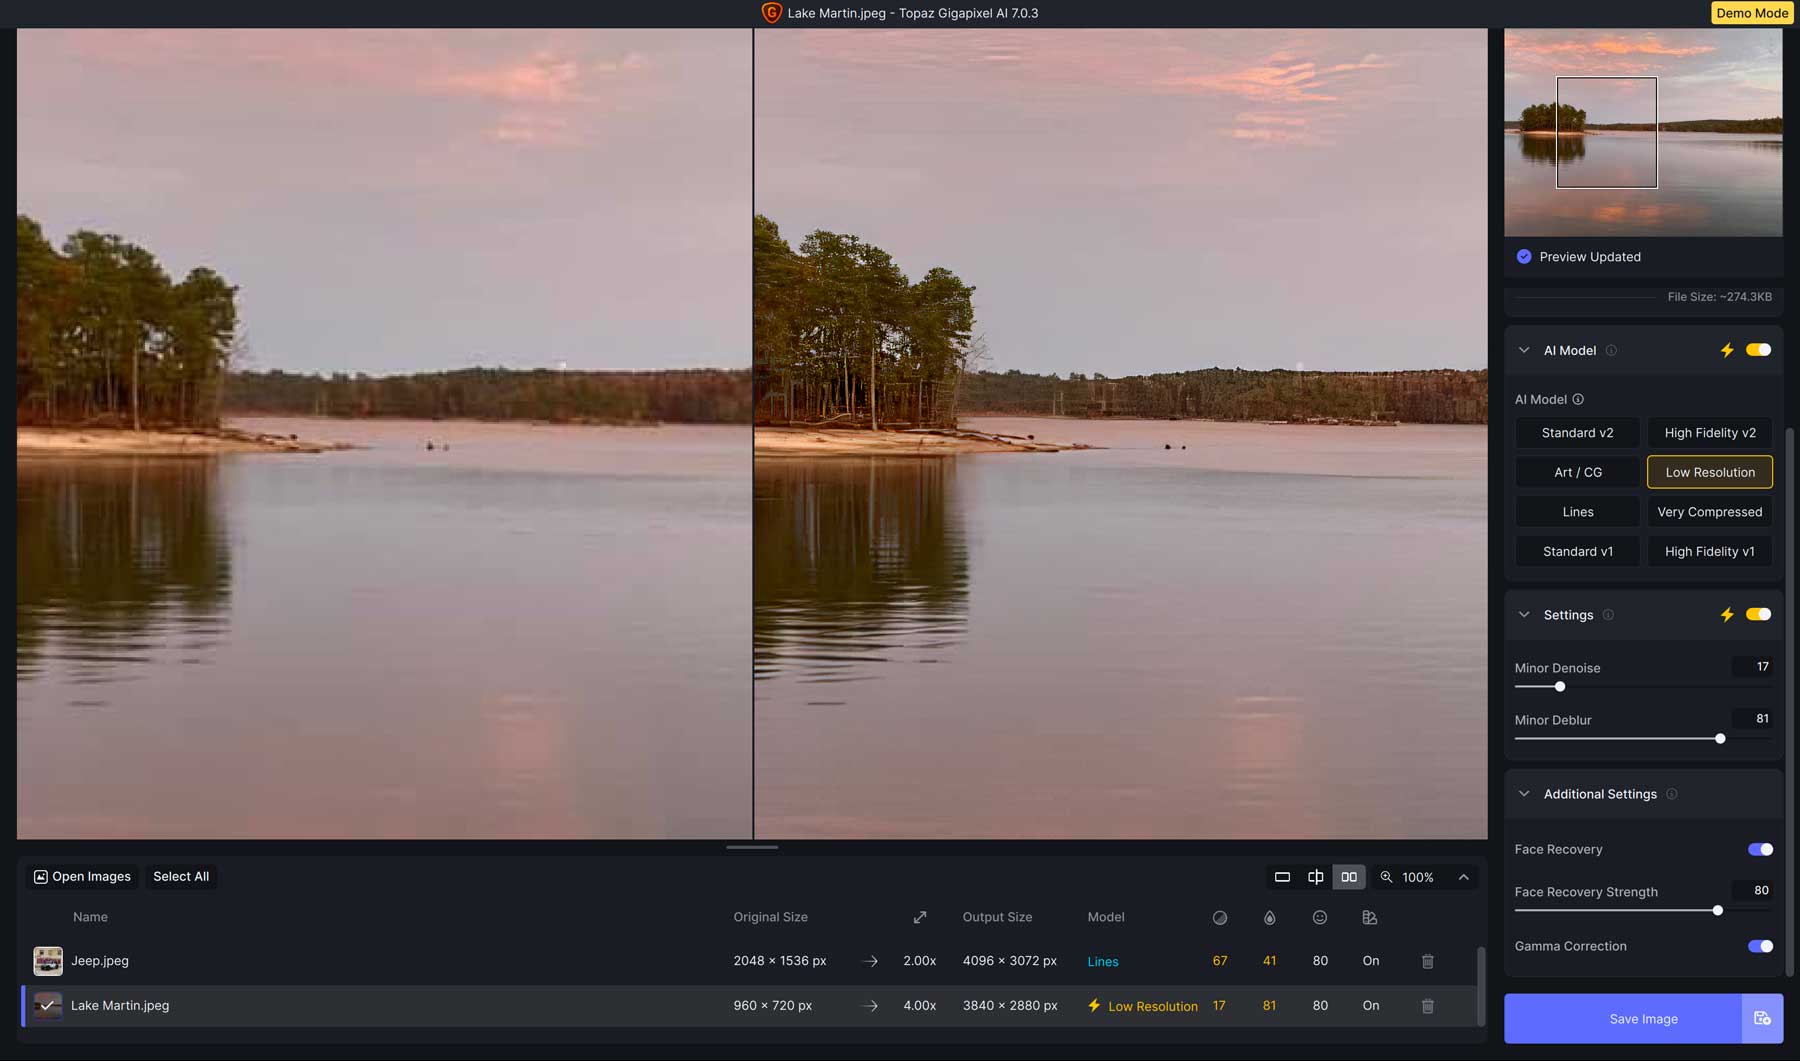
Low Resolution
For this example, we used a cover photo from a Facebook page. The original resolution was 960 x 720 px, the standard Facebook cover size. Using the Low-Resolution AI model, we upscaled the image to 3840 x 2880 px using the automatic AI model selector. It applied the following settings:
- Minor Denoise: 17
- Minor Deblur: 81
- Face Recovery: strength of 80
- Gamma Correction: Enabled
Note how it added subtle details to the photograph, including the tree line and sky.
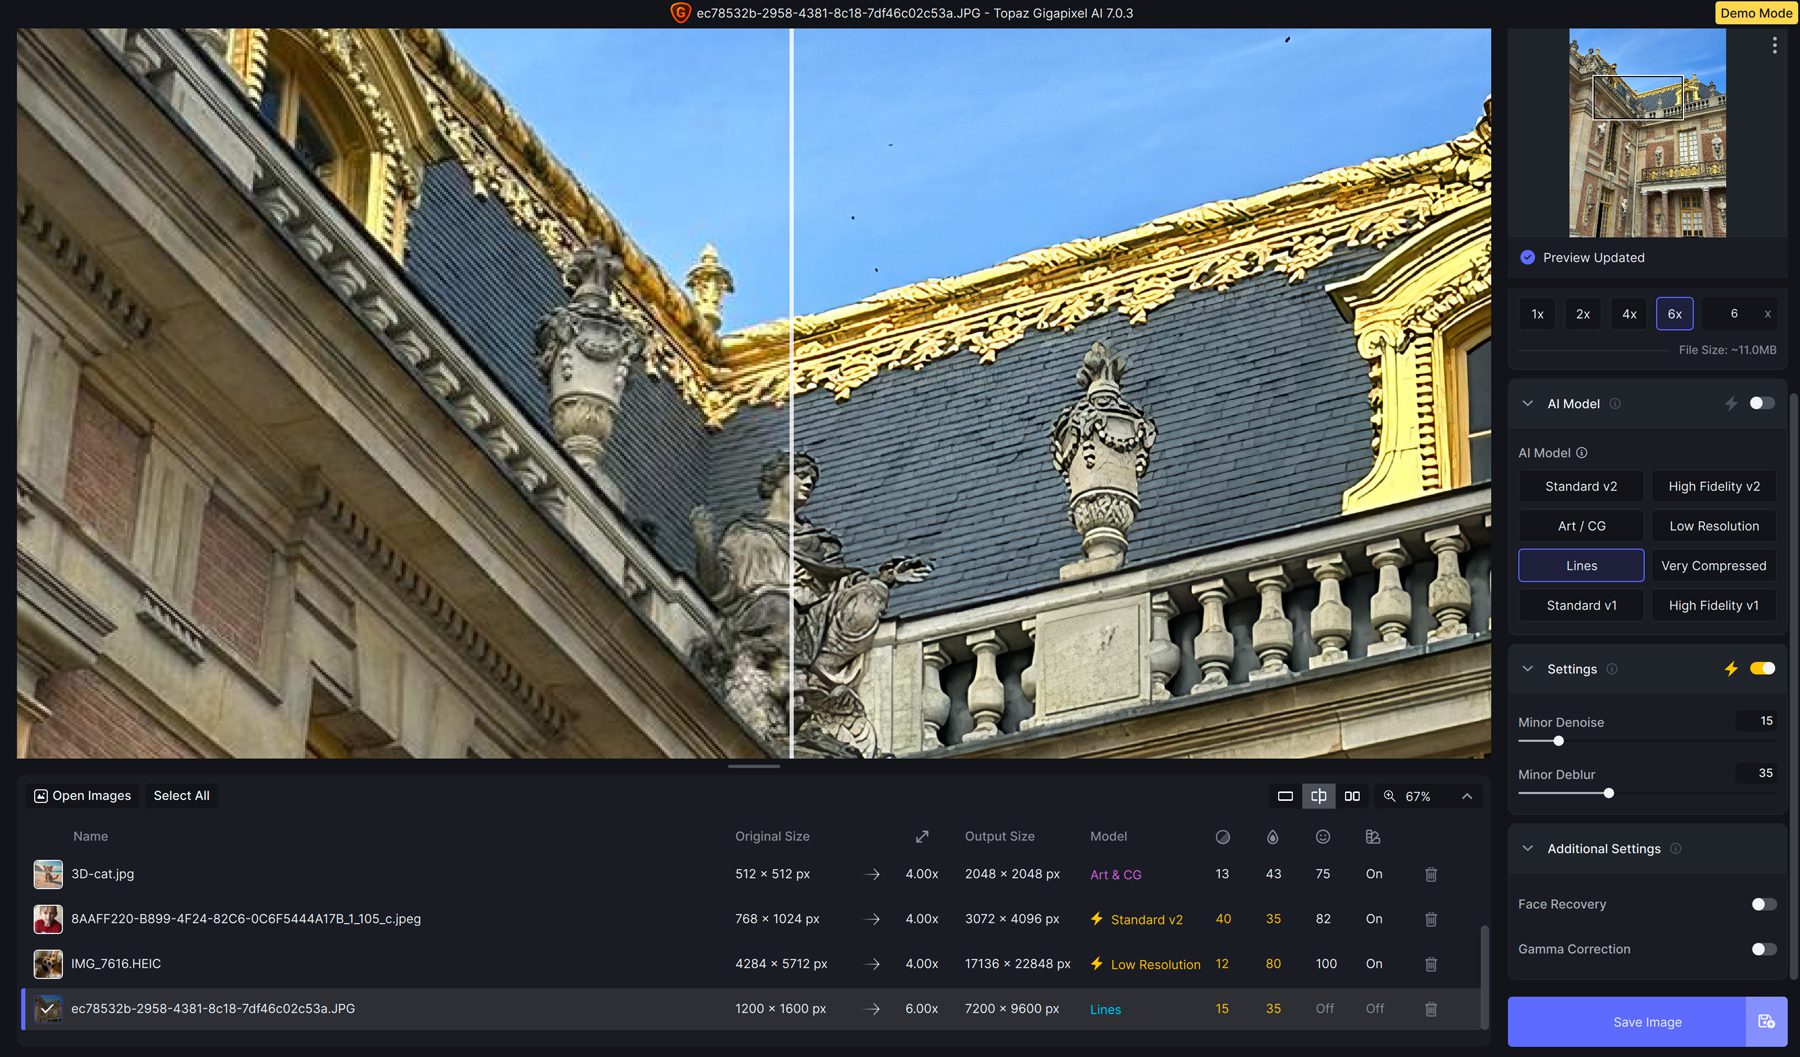
Lines
The Lines AI model is new to Gigapixel version 7, so we were eager to try it out. This model is ideal for architectural photos or images containing words. Using a photo from a recent trip to France, we used the following settings:
- Minor Denoise: 15
- Minor Deblur: 35
- Face Recovery: Disabled
- Gamma Correction: Disabled
Gigapixel AI did a great job of sharpening the phone and enhancing the details of the statues on the roof line. We took the image from 1200 x 1600 px resolution to 7200 x 9600 px and improved quality.
Very Compressed
The last AI model in Gigapixel AI is Very Compressed. It works best on photos with a lot of compression and artifacts. Some examples would be old or scanned photos. We took an image from social media that had been resized several times and applied the following settings:
- Minor Denoise: 67
- Minor Deblur: 41
- Face Recovery: 80
- Gamma Correction: Enabled
While the results are subtle, we were able to upscale this image to 4X its original size without losing much (if any) details in the photo.

Limitations of Using an AI Image Upscaler
While upscaling images with AI can enhance images significantly by increasing resolution and improving details, there are some limitations to consider. First is loss of quality. When upscaling certain photos more than 2X, there can be a noticeable reduction in quality, impacting the image’s sharpness and clarity. Another possible limitation is the tendency to have an exaggerated look. Depending on the tool you use to upscale images with AI, you take the risk of over-improving photos, which can lead to an unrealistic appearance. Finally, remember you can’t expect a miracle from a low-quality image. Quality in equals quality out, so choose images that still have some detail to get the most out of it.
Final Thoughts On Upscaling Images With AI
When looking to upscale images with AI, you won’t find a better option than Gigapixel. With six different AI models and settings for reducing noise, blur, and compression, you can turn low-resolution, grainy images and upscale them up to 600%. While they have recommended settings for different photo types, it’s always a good idea to learn the software you’re working with and experiment with different settings to get the best results.
Frequently Asked Questions
What are the system requirements for running Gigapixel AI?
Recommended Specifications:
System Memory (RAM): 32 GB or more Graphics Card (NVIDIA): NVIDIA RTX 3000 or higher, 8GB VRAM Graphics Card (AMD): AMD Radeon RX 5000 or higher, 8GB VRAM Mac Operating System (Intel): Big Sur 11.0 and higher CPU: Intel with AVX Instructions System Memory (RAM): 16GB Graphics Card: Any Video Ram: 2GB Mac Operating System (Silicon): Big Sur 11.0 and higher CPU & Graphics Card: Apple M1/M2/M3 System Memory (RAM): 8GBWhat Happens When You Upscale an Image?
How Do the Best AI Image Scalers Work?
Why is Image Upscaling Necessary?
Can AI Upscalers Fix Faces and Distorted Images?
What is included with the purchase of Gigapixel 7?
How do I upgrade to Gigapixel v7 if I already own Gigapixel AI?
Where can I use Gigapixel AI in my workflow?
How does Gigapixel AI preserve image quality when upscaling photos?
Are you looking for more AI tutorials or tools? Check out some of our AI-inspired posts to help increase productivity, incorporate new skills, or simply have fun learning a new program.


Very cool product that I will check out. If anyone is wondering, there are system requirements for the Mac on the Gigapixel website, and it runs on both Mac and Windows.
Richard,
Thanks for pointing that out! I’ve updated the FAQ section to include the Mac OS system requirements.
Deanna