
Few plugins add as many features to WordPress as WooCommerce does. With one tool, you can take this Content Management System (CMS) and add all the functionality you need to set up an online store. However, that’s only possible if you know how to configure WooCommerce settings effectively.
In this article, we’ll walk you through all of the settings WooCommerce offers, and talk about how to configure them.
Let’s get right to it!
WooCommerce General Settings
Once you install and activate WooCommerce, you can navigate to WooCommerce > Settings. You’ll land on the plugin’s General settings screen:
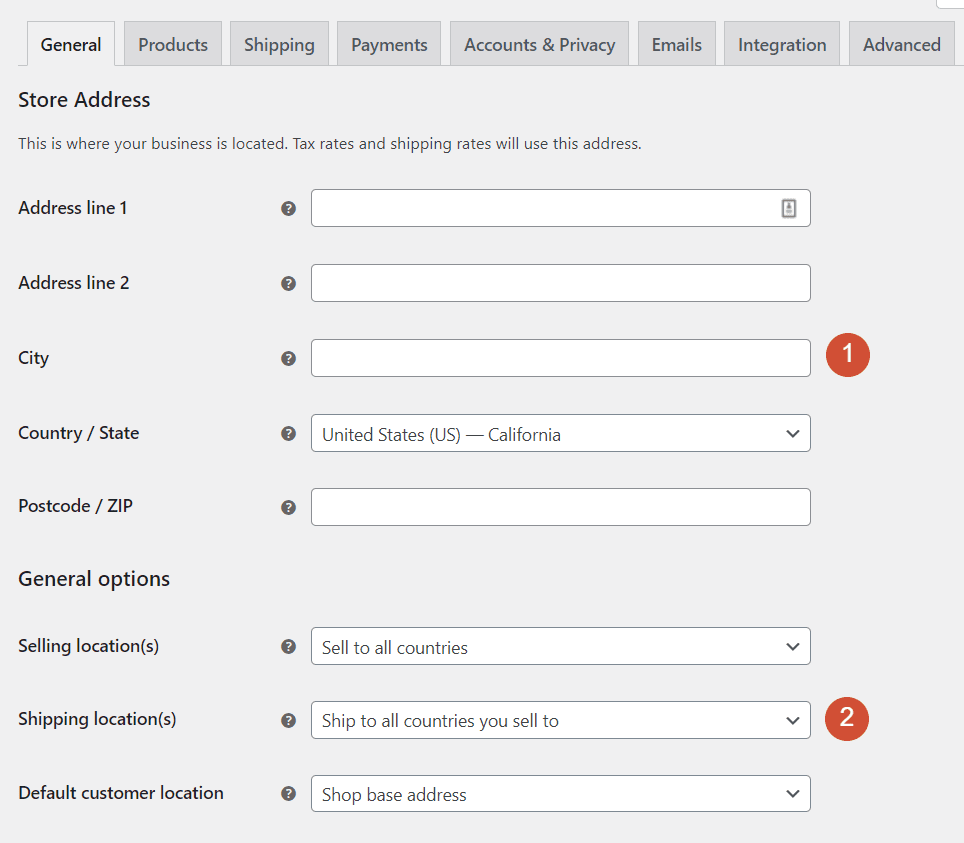
The first settings you need to configure involve your store’s location. If you want to ship products or offer receipts, you’ll need to include your store’s physical address. That means the city and country where it’s located, a full address, and a ZIP code.
Afterwards, you’ll need to decide which countries your store will sell to. If you’re shipping physical products, you need to specify where you can ship to. That way, customers outside of your store’s “range” won’t be able to make purchases.
Finally, Default customer location tells WooCommerce what location to use as the default for new users. This can be your store’s location, or you can enable geolocation for more accurate results.
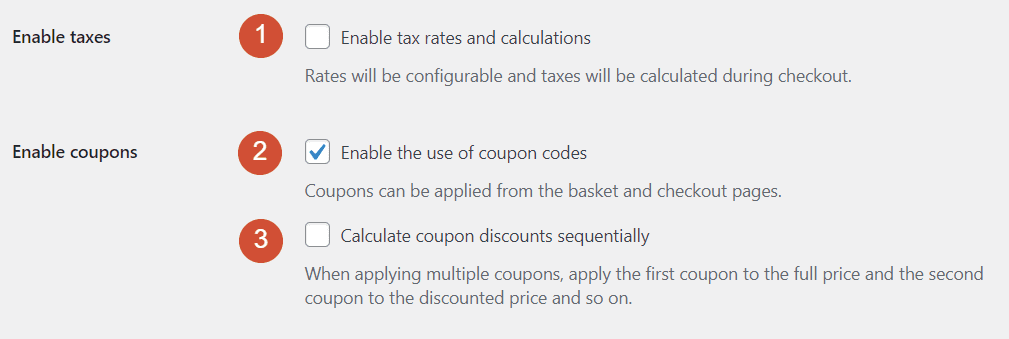
The next section in the General settings screen deals with taxes and coupons. WooCommerce doesn’t calculate sales taxes by default. However, you can choose to enable that option if you want the plugin to calculate taxes during checkout (you get to configure the rates).
WooCommerce also includes a full-featured coupon system that enables you to create discount codes that you can share with customers. The coupon system is turned on by default, and you can also enable users to add multiple codes for a single purchase. You can even set discounted rates when customers apply multiple coupons:
The last section enables you to choose the default currency for your store and change the position for that currency’s sign (right or left):
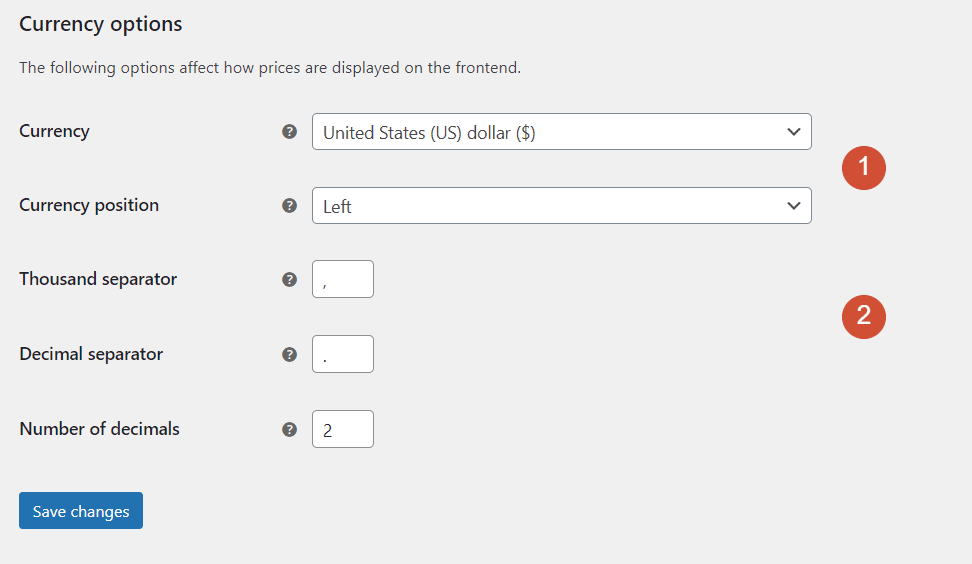
Last but not least, you can also modify the separator characters that WooCommerce uses for prices. However, the default options should work for most users.
WooCommerce Product Settings
WooCommerce’s Product settings page includes three sub-sections. Let’s start with the Products > General settings.
General Product Settings
We’ll begin by taking a look at all the options this settings page includes:
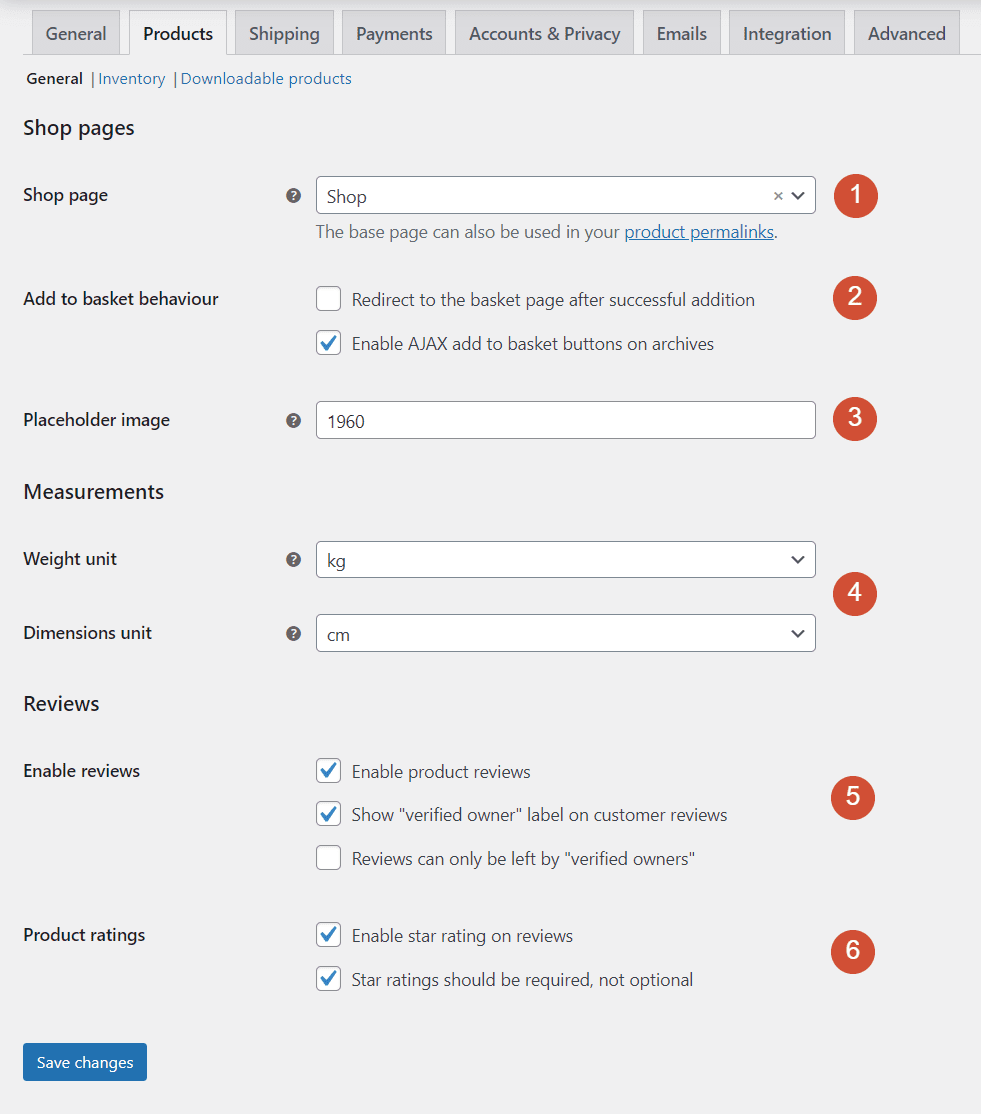
Here’s what each setting can do:
- Shop page. This menu enables you to choose which page WooCommerce will use for the main shop. By default, the plugin will create a new Shop page for your site.
- Add to basket behavior. This setting determines what happens when a customer adds a product to their cart. You can redirect them directly to their cart, or use an AJAX button that enables them to keep shopping.
- Placeholder image. This option lets you set an image as a placeholder for products that don’t have screenshots or pictures.
- Weight and dimensions unit. With this option, you can configure the measurement units your store will use for weight and dimensions.
- Enable reviews. You can enable product reviews, show which reviews are from customers who actually made a purchase, and decide whether only those buyers should be able to leave reviews.
- Product ratings. You can use this setting to add a star rating system (from one to five) to each product. There’s also an option for making product ratings required when customers leave reviews.
We recommend that you use the AJAX option when customers add products to their carts. That way, you can encourage users to keep adding products instead of jumping directly to the checkout page.
Product Inventory Settings
The Products > Inventory settings screen helps you manage stock in your store:
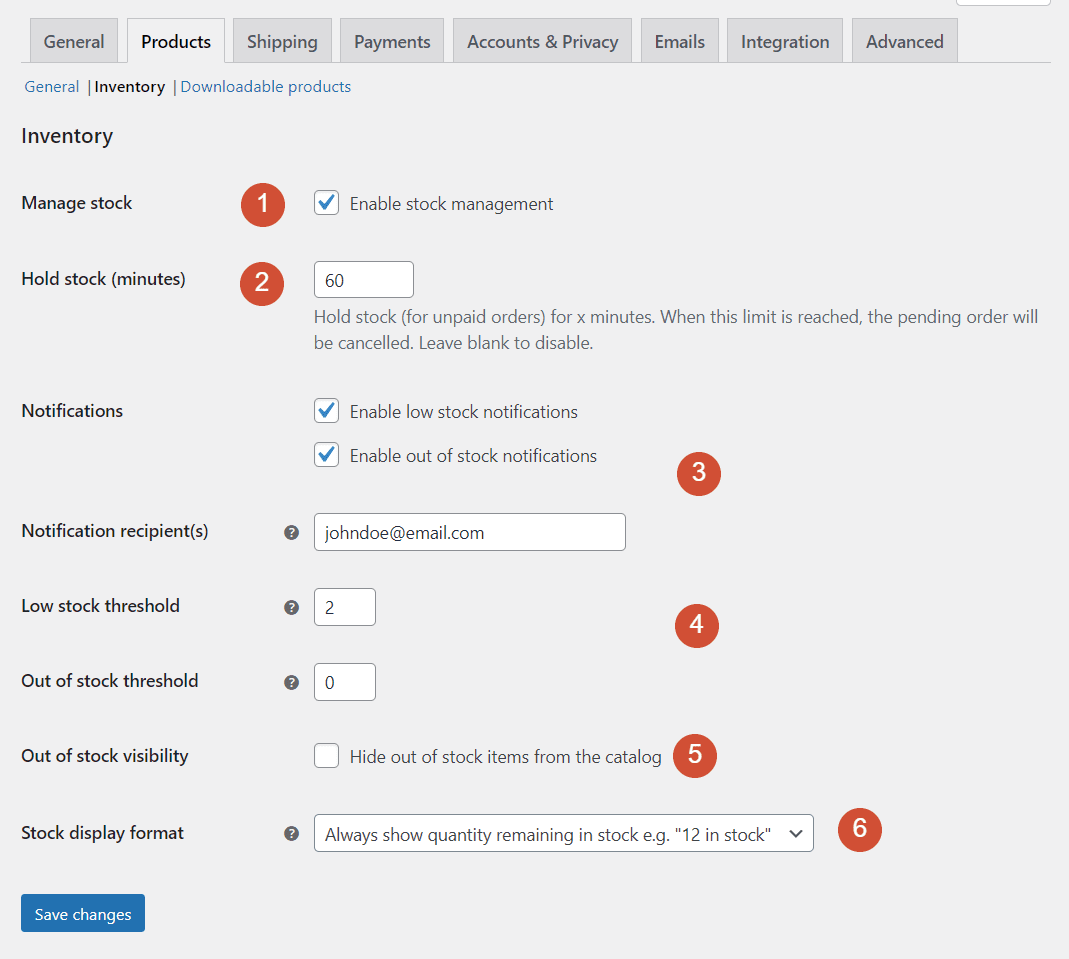
Let’s take a look at what each setting does:
- Manage stock. Turning off this option disables all stock-related settings. You should only disable this if you deal exclusively with digital products.
- Hold stock (minutes). Once a customer adds a product to their cart, this setting decides how long the store “holds” it for, in case someone else wants it.
- Notifications and notification recipients. These settings configure when WooCommerce sends notifications and to which email address(es).
- Low stock threshold settings. You can decide how many units constitute “low” stock for your store, so you get a notification about the situation. The Out of stock threshold setting should always remain at zero.
- Out of stock visibility. This setting enables you to decide whether to show products if they’re out of stock.
- Stock display format. You can configure WooCommerce to show precisely how many products you have in stock, to only show low stock notices, or to not show stock quantities at all.
We recommend that you configure WooCommerce to hold stock for customers for a reasonable time frame, such as one or two hours. Outside of that window, they’re unlikely to finish the purchase, so it’s best to free up the stock for other buyers.
Whether to display stock quantities is up to you. However, most stores don’t display exact stock numbers, and opt for low-stock warnings instead. In many cases, showing customers that you have low stock remaining may prompt them to finish their purchases right away.
Downloadable Products Settings
The WooCommerce Products > Downloadable products settings screen governs the configuration for digital items. If you only sell physical goods, you can skip this page:
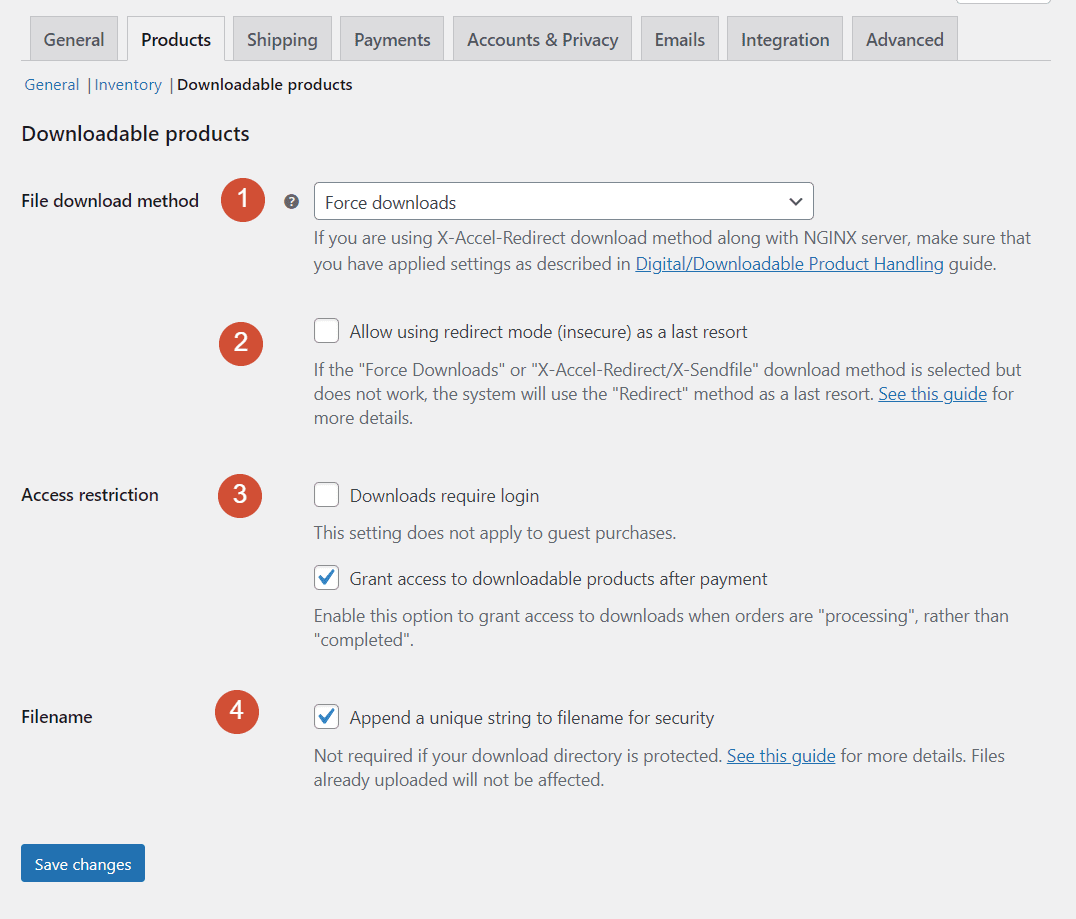
Let’s break down what each setting does and how to configure it:
- File download method. By default, WooCommerce “forces” downloads. Downloads will start automatically, and the website will hide the files’ URLs. You can also opt to use two types of redirects in case direct downloads don’t work.
- Allow using redirect mode. This setting lets you enable redirect downloads if the “force” method fails.
- Access restriction. You can decide whether guest visitors can download files or have to register before gaining access. By default, WooCommerce will grant access to downloads after payment while the order is still “processing”.
- Filename. This setting enables WooCommerce to add unique strings to each filename for security purposes.
In most cases, we recommend using the default Force downloads method with the redirect backup option enabled. Additionally, you may want to enable guests to make purchases and download files. However, prompting users to register instead will enable you to save their data for marketing purposes.
WooCommerce Shipping Settings
WooCommerce includes three different shipping configuration pages for your store. Let’s start by talking about shipping “zones”.
Shipping Zones
When configuring WooCommerce settings, you can add one or more shipping zones. These are the areas where you offer shipping. You can configure unique shipping rates and methods for each zone:
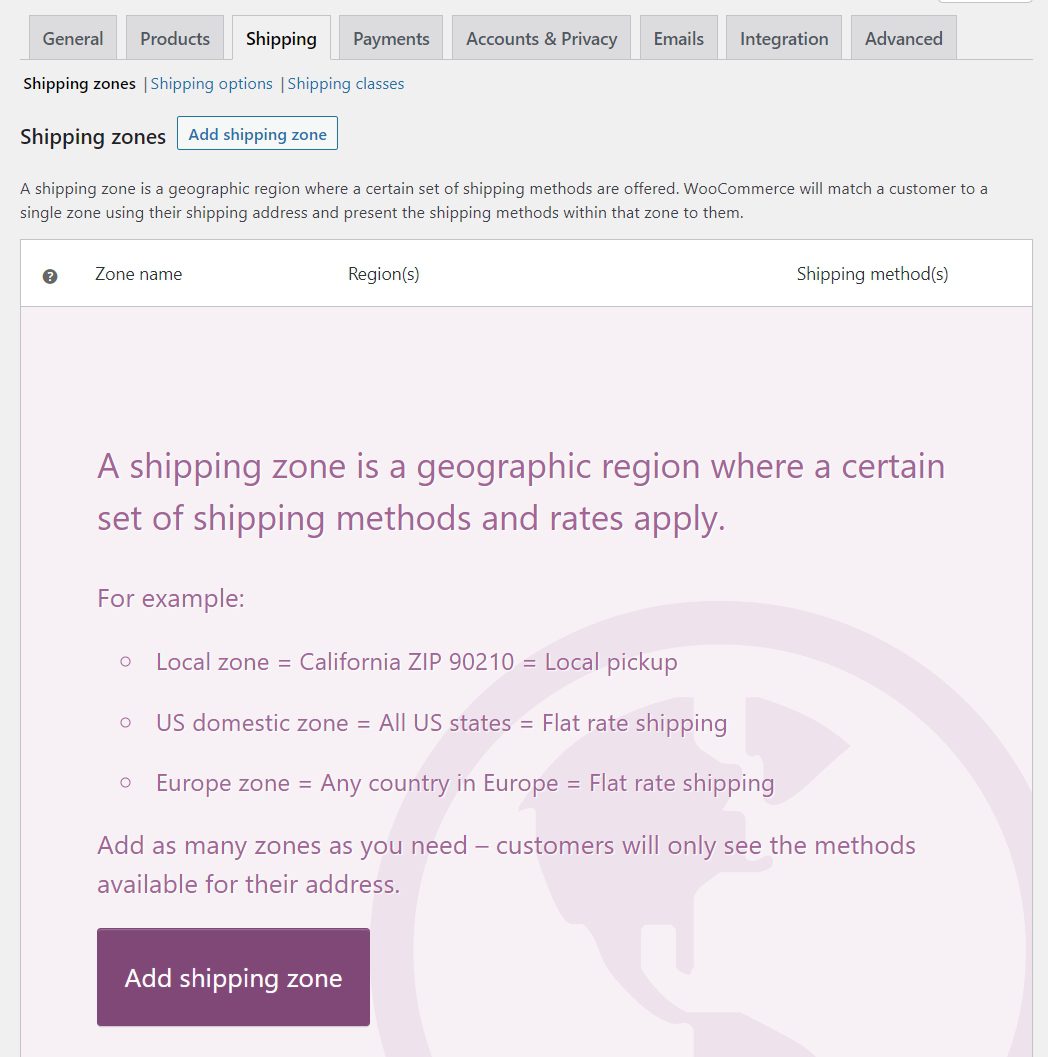
If you select the option to add a shipping zone, WooCommerce will ask you to set a name for it. You can also choose what regions the zone will include:
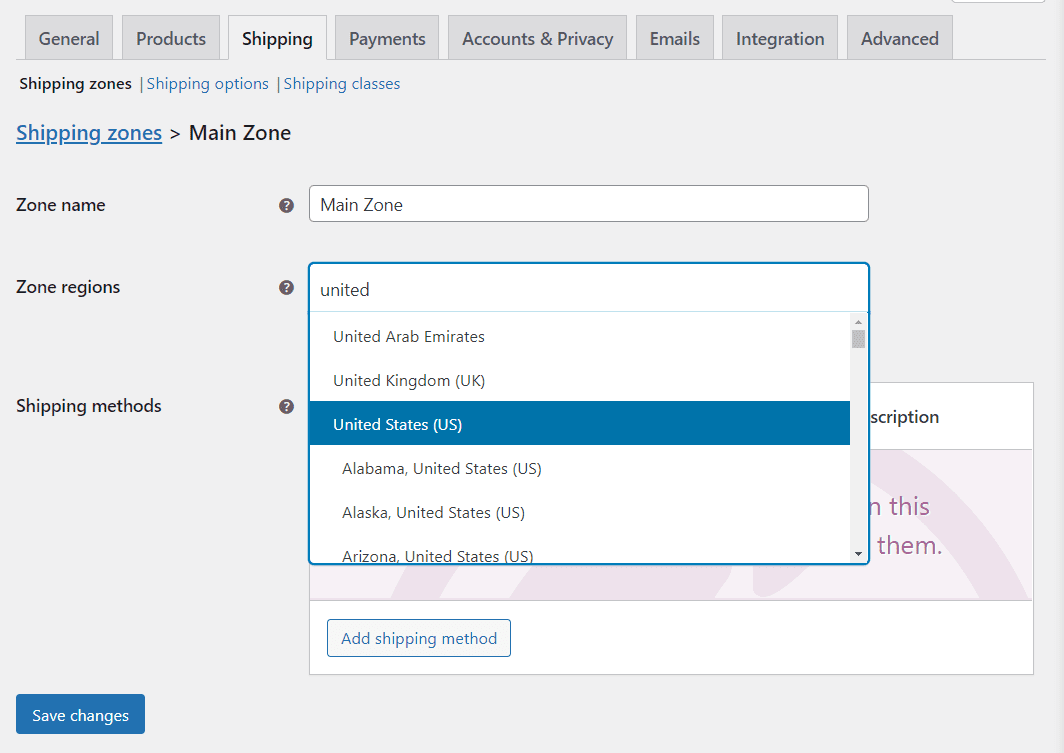
You can add as many regions as you want within a single zone. It often makes sense to group regions in close proximity.
Once you configure the zone regions, click on Add shipping method. There you can choose between flat rate and free shipping, or local pickups:
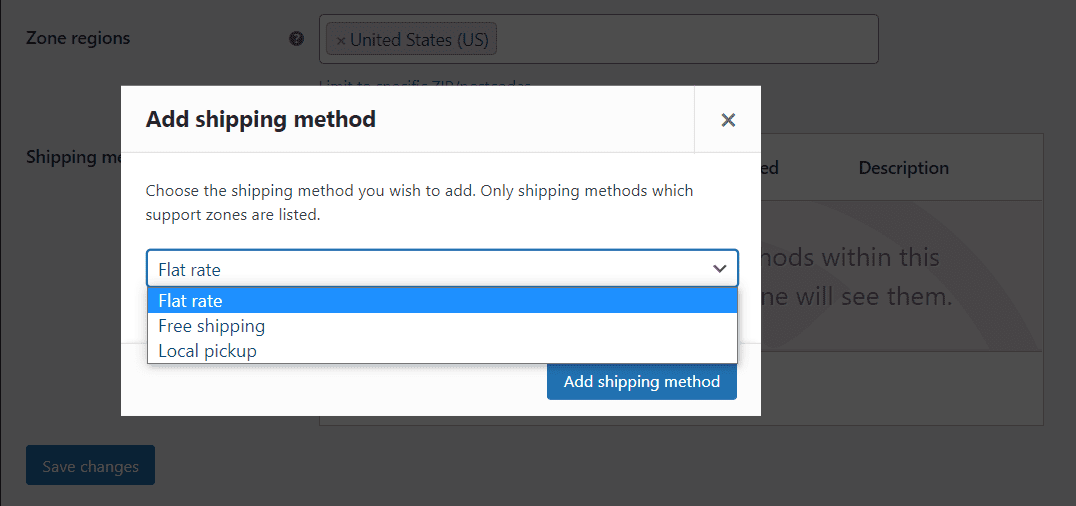
A specific zone can have more than one shipping method available, and you can configure the settings for each separately. For example, here are the options for the Flat rate shipping method:
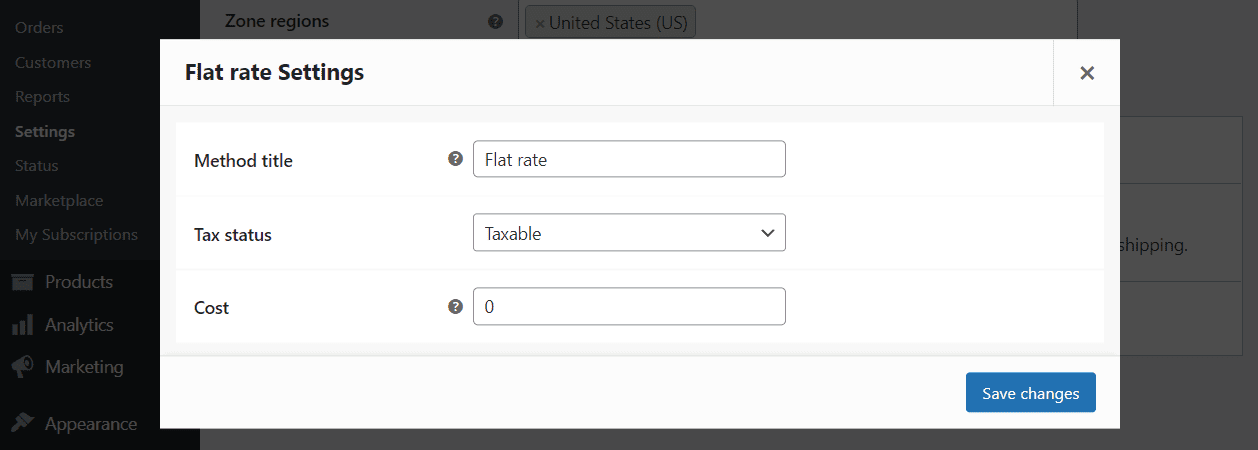
WooCommerce enables you to modify the name of the shipping method and determine whether it’s taxable. For flat rate shipping, you can set a specific price that will apply to each purchase.
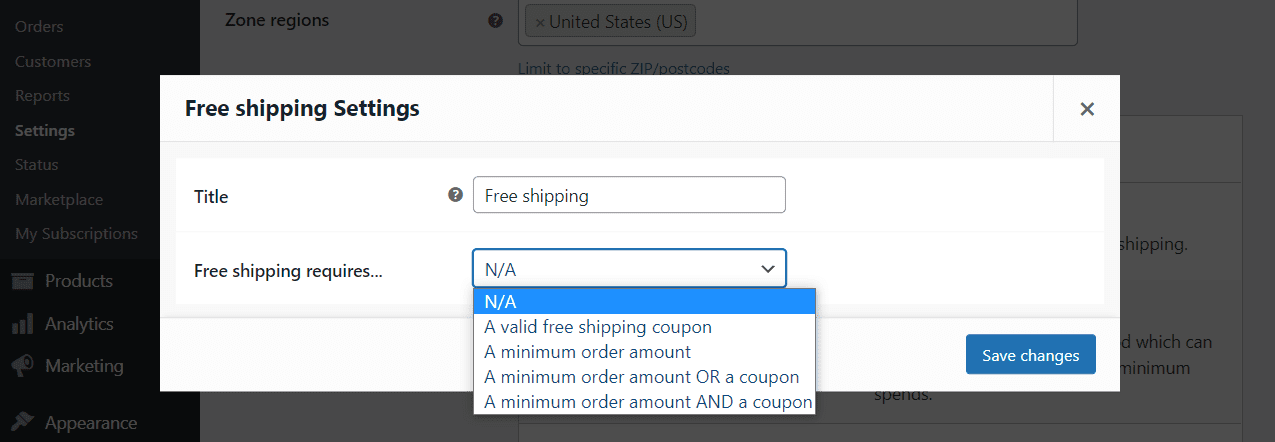
Other shipping methods, such as the free or local pickup options, don’t require you to set up any costs. Instead, you just need to determine when each option will become available:
Once you configure the zones you want to work with, it’s time to talk about the more general shipping options.
Shipping Options
Managing shipments involves more than just deciding to which zones you can send products to. You also have to consider how to show customers shipping costs, and which addresses WooCommerce should default to for new orders. Those are the settings that the Shipping > Shipping options tab covers:
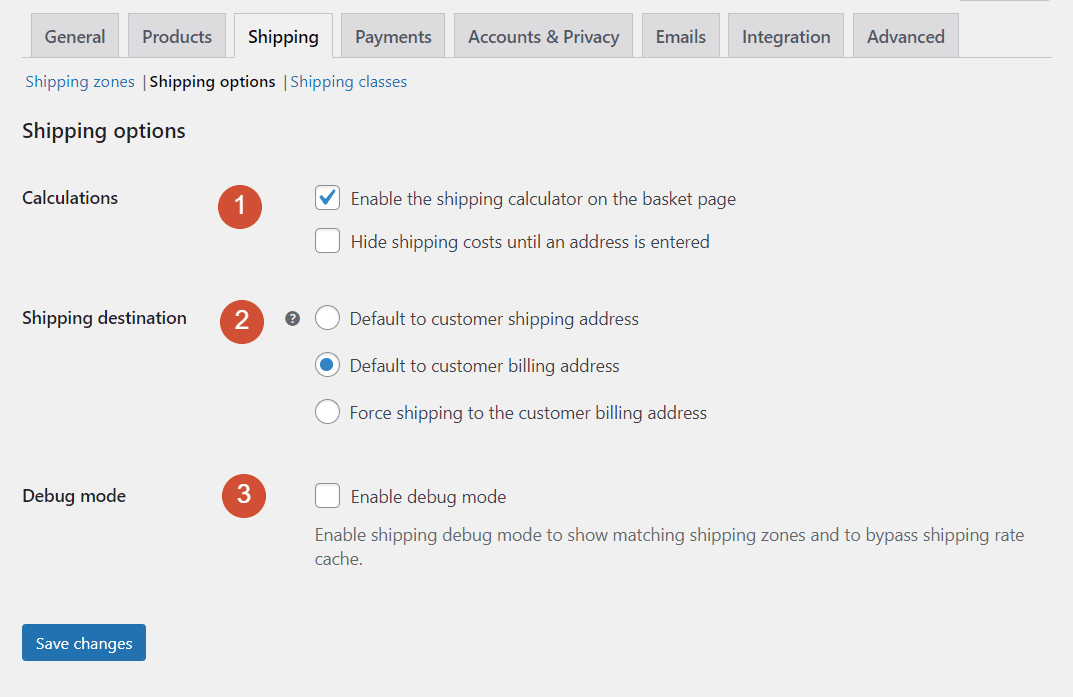
Let’s walk through what each of those settings does:
- Calculations. If you enable this option, customers will see shipping costs when they access their shopping carts
- Shipping destination. This setting enables you to decide whether the plugin should default to the shipping or billing address that registered customers have entered previously.
- Debug mode. Enabling debug mode will prevent WooCommerce from caching shipping zone data. That means the plugin will calculate shipping costs every time customers load their shopping carts.
Enabling a shipping costs calculator can improve the user experience. If you don’t show shipping costs until the customer reaches the payment stage, they might balk at the final rate and decide to cancel their purchase.
Similarly, defaulting shipping destinations to the customer’s billing address can help you prevent fraud in your store. If someone attempts to use a credit card that’s not theirs and enters a different shipping address, that setting will force them to use the card’s billing address instead (thus preventing the purchase).
Shipping Classes
WooCommerce enables you to set up shipping “classes” for grouping similar products, so they are delivered using specific methods. For example, you can have products that are only available for local pickup or for flat-rate shipping:

To create a shipping zone, click on Add shipping class. WooCommerce will ask you to set a name, slug, and description:
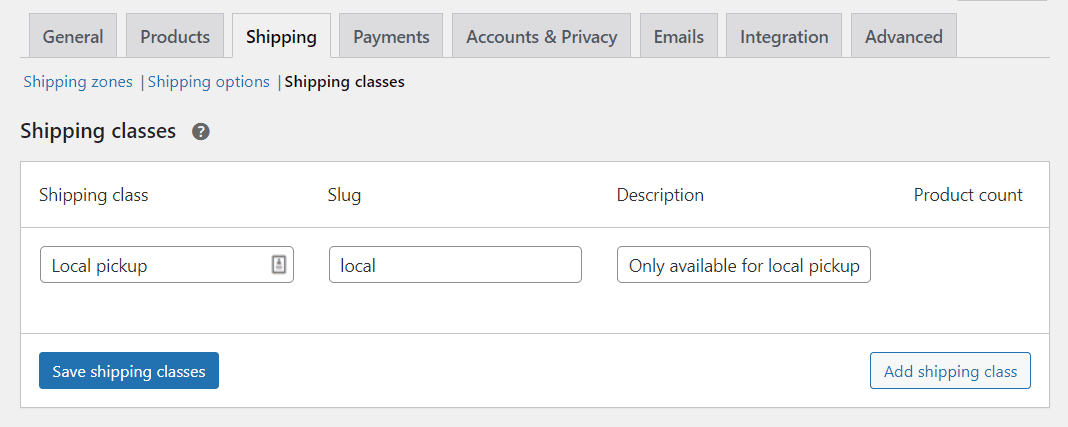
Click on Save shipping class, and that’s it. When you create or edit a product in WooCommerce, any shipping classes you create will appear under that product’s Shipping settings.
WooCommerce Payments Settings
The WooCommerce Payments tab enables you to configure which payment options are available for your store. By default, WooCommerce offers multiple options, including PayPal, cash on delivery, and bank transfers.
You can pick and choose which payment gateways to allow using the Enable column, and edit their settings by clicking on Set up next to each one:
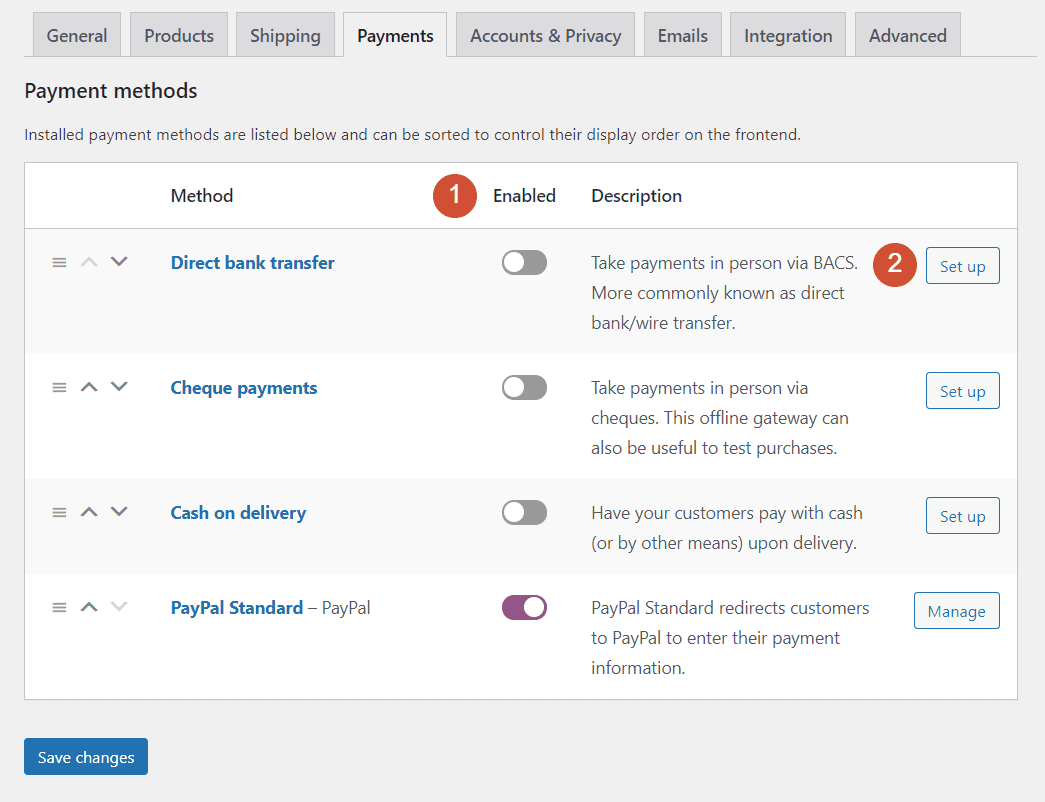
If a payment processor is already enabled, the Set up button will instead read Manage. Each payment option comes with its own unique settings. To read more about each of them, we recommend checking out WooCommerce’s documentation for its core payment options. You can also add more payment gateways to WooCommerce using extensions.
WooCommerce Accounts & Privacy Settings
The Accounts & Privacy settings let you decide whether users can create Customer accounts, what control they have over their data, and whether to enable guest checkout:
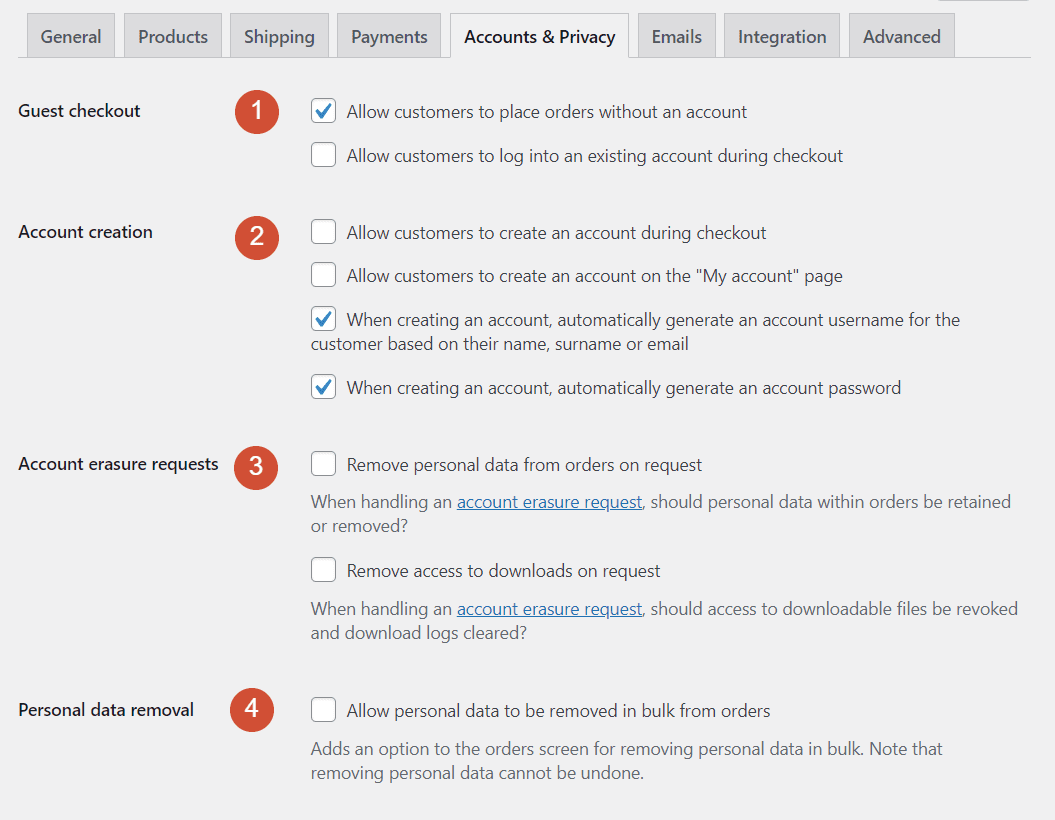
Let’s go over the first set of options on this page:
- Guest checkout. Here you can enable customers to pay without registering, and to log into their accounts during the checkout process.
- Account creation. You can enable users to create an account during the checkout process or from the My Account page (which WooCommerce sets up for you). WooCommerce also enables you to automatically generate usernames and passwords for new accounts.
- Account erasure requests. To stay in line with privacy laws, we recommend enabling users to erase their data from your database upon request.
- Personal data removal. With this option, users will be able to remove their past order data without your input.
In most cases, it’s best to let users choose their own usernames and passwords. This approach offers a more user-friendly experience.
The second half of the WooCommerce Accounts & Privacy settings enable you to set up registration and privacy policies for your website:
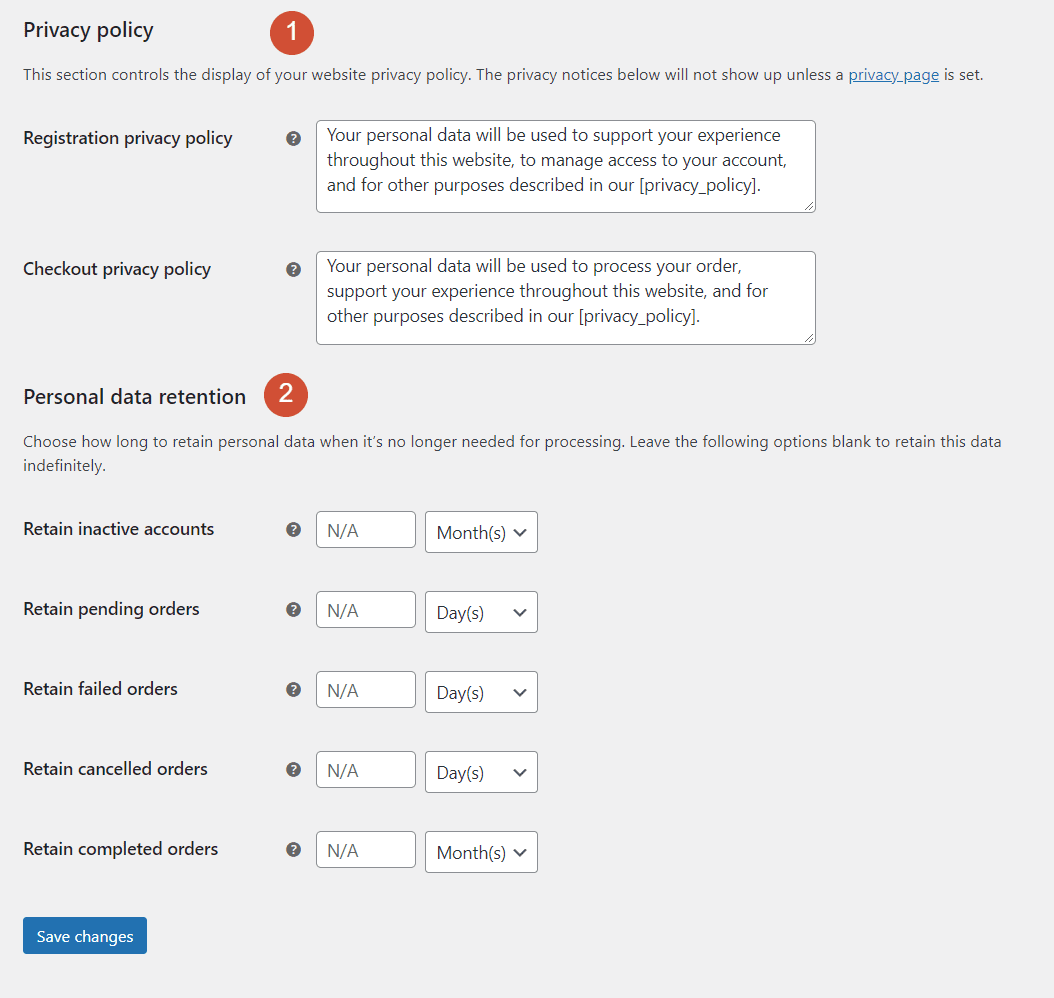
You can also determine how long your website will store user data for before deleting it from the database.
WooCommerce Emails Settings
WooCommerce automatically sets up over a dozen different automated emails that it sends when users register, make a purchase, refund an order, and so on. Here’s a quick look at the WooCommerce Emails settings screen:
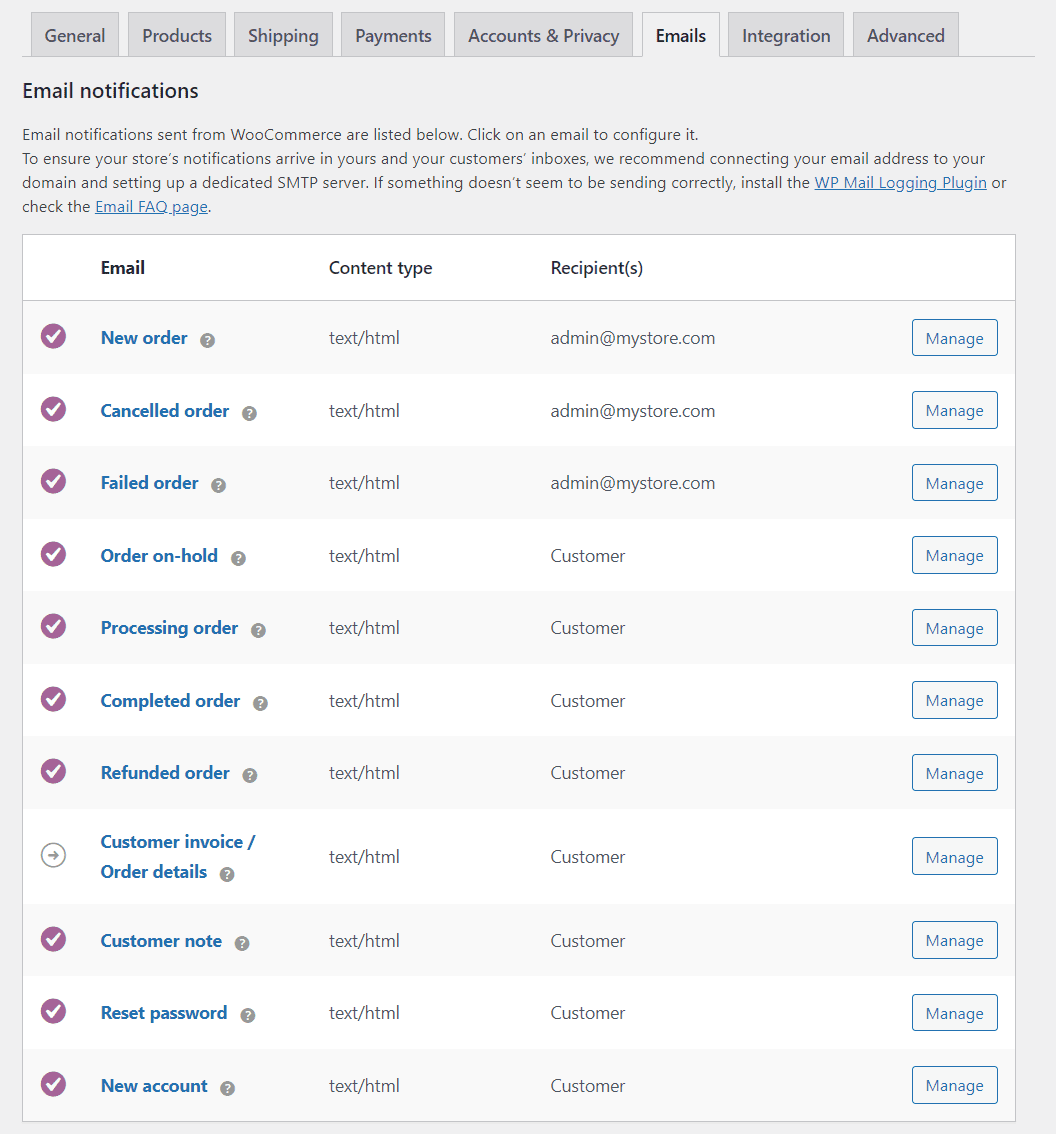
If you click on the Manage option next to any email, you’ll be able to edit the message users will receive. That includes its subject, content, and format:

WooCommerce enables you to use several placeholders when customizing emails. Those include:
- {site_title}
- {site_address}
- {site_url}
- {order_date}
- {order_number}
Once you’re happy with the contents of each email, click on Save changes.
This screen also enables you to configure the “sender” for campaigns and modify your email styles:
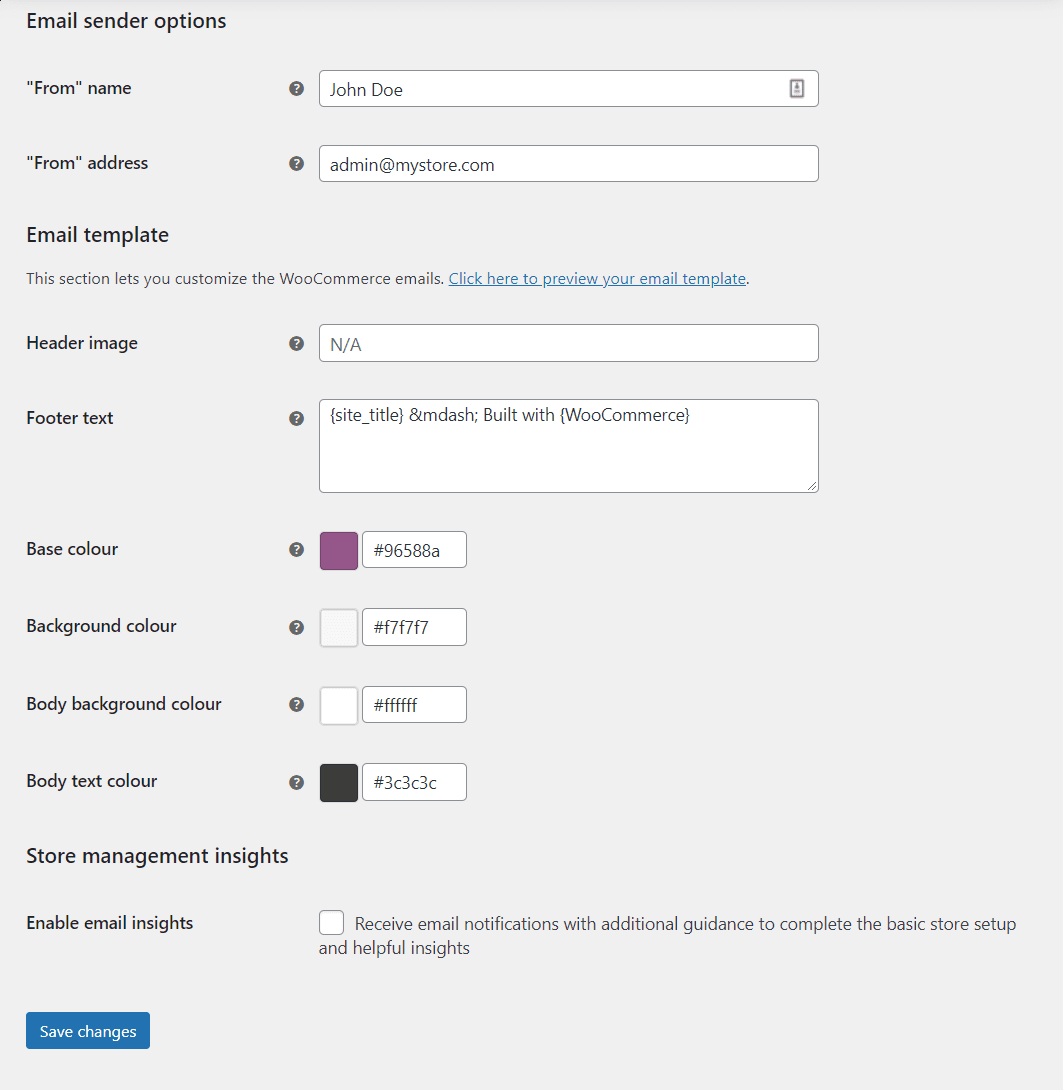
Customizing email styles is simple. WooCommerce enables you to set a header image, modify the footer text included with each message, and change the default colors. You can also turn on the Enable email insights option to receive “tutorial” emails from WooCommerce, in case you want additional guidance.
WooCommerce Advanced Settings
The Advanced settings screen includes a broad range of additional configuration options. This screen includes six sub-sections, so let’s start with the Page setup options.
Page Setup
The Page setup screen enables you to set the location for important pages in WooCommerce, such as the checkout and My account pages:
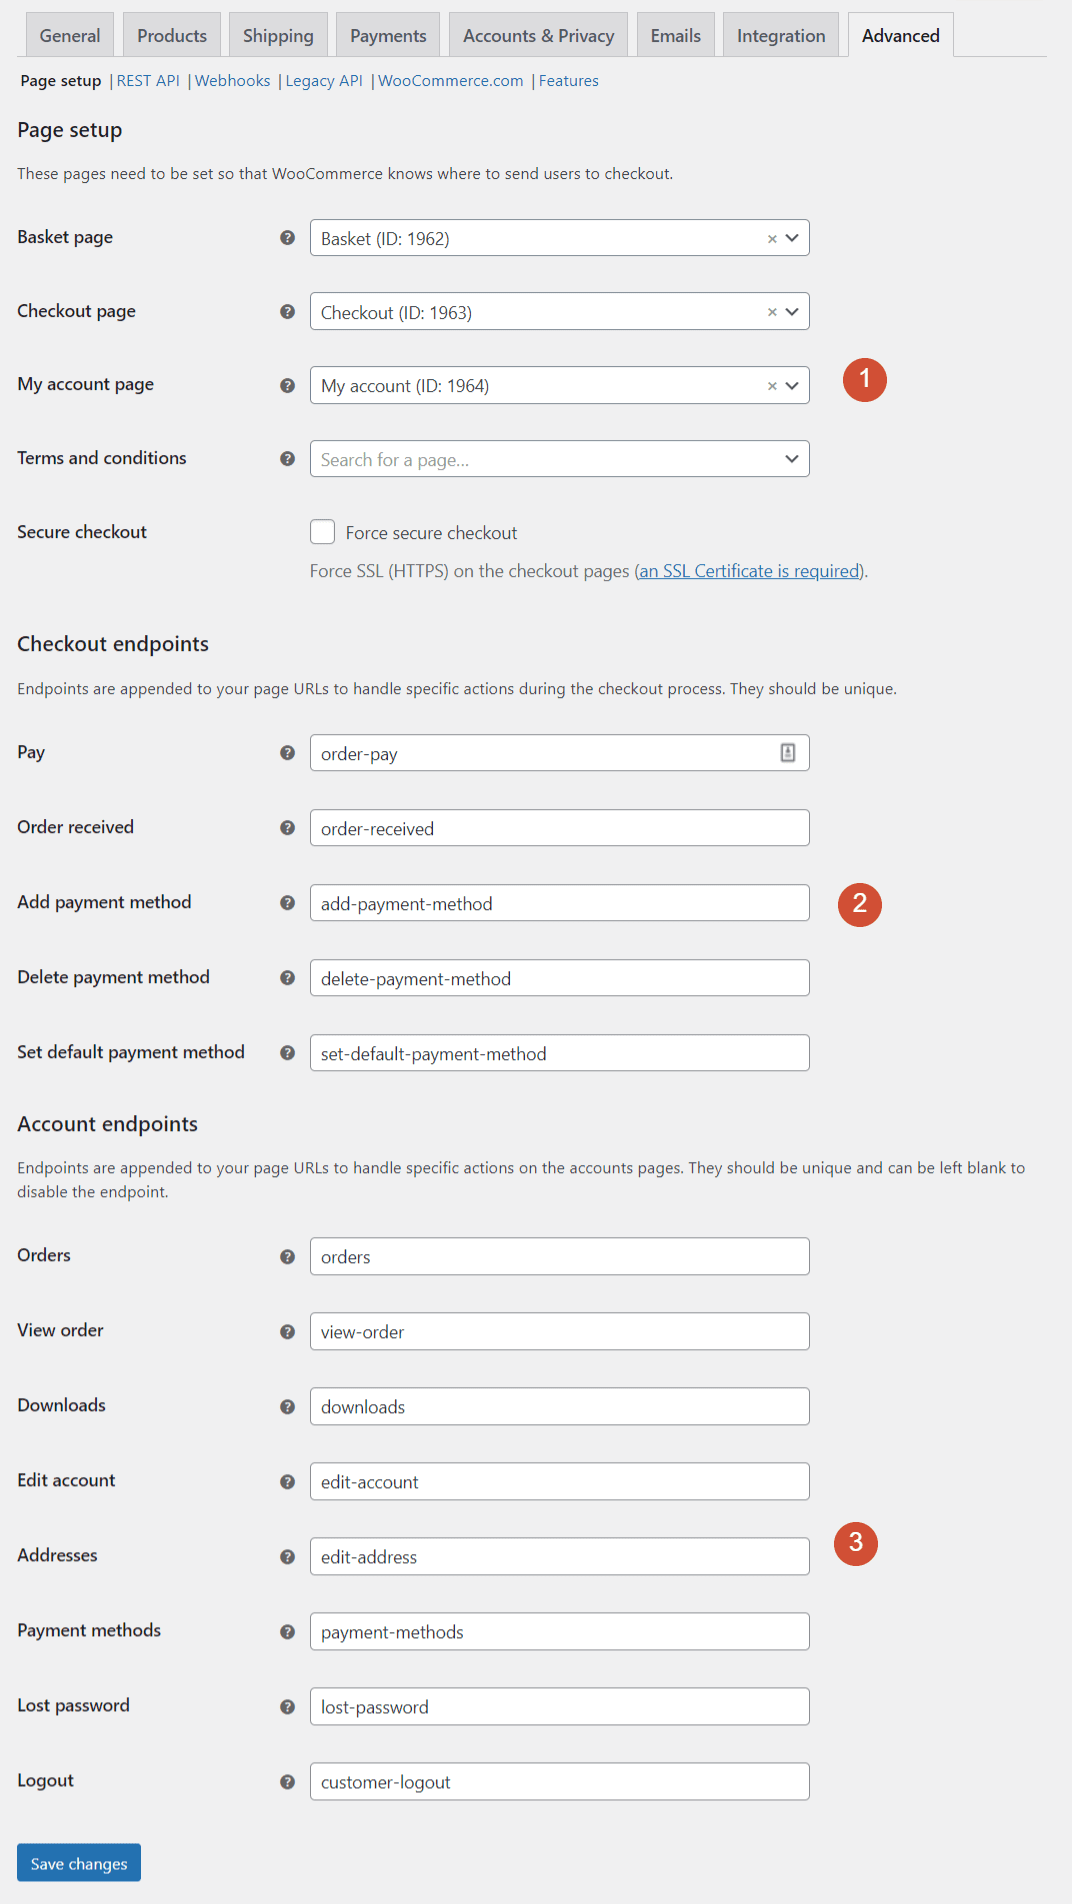
WooCommerce automatically sets up pages for these key functions. You can also designate unique URLs for Checkout and Account endpoints. The only requirement for endpoints is that each slug must be unique.
Rest API and Webhooks
The Advanced settings tab also enables you to create an API key or a new webhook for your store. Here’s a quick look at the Webhooks screen:
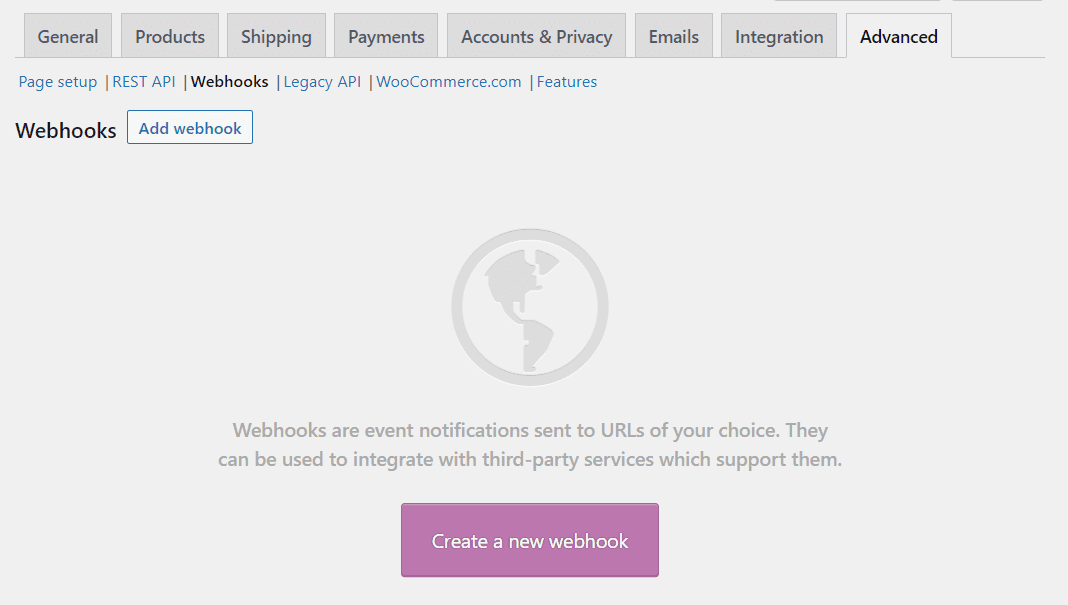
Creating webhooks and API keys is an intricate process, and it’s only necessary if you need to grant outside apps access to WooCommerce data. You can read more about how to create WooCommerce APIs and generating webhooks in the plugin’s documentation.
WooCommerce.com
The WooCommerce.com settings screen lets you enable WooCommerce.com to collect information about your store, which it will then use for development purposes:
![]()
You can also disable the Show Suggestions setting. This will stop WooCommerce from showing you extension recommendations as you configure the plugin’s other settings.
Features
Last but not least, the WooCommerce Features settings screen enables you to check out new features that are still in development. Exactly what’s available here will depend on which version of WooCommerce you’re using:
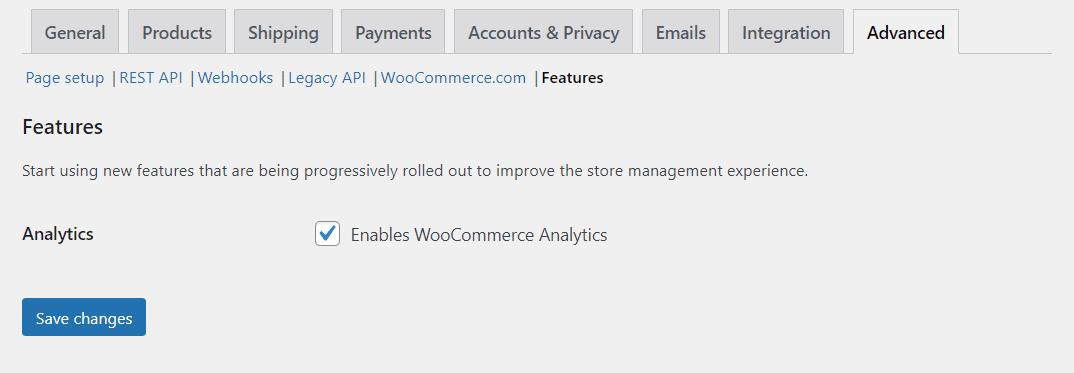
Keep in mind that testing features that are still in development may lead to bugs or errors within your website. So it’s best to try them out on a staging site first.
Conclusion
Configuring WooCommerce settings can be intimidating, because the plugin offers such a broad range of options. However, WooCommerce also provides you with plenty of guidance, making it a relatively simple process to set your store up just right.
For a new shop, you’ll need to configure product and shipping settings, as well as the payment processors you’ll use. Once you take care of those fundamentals you can move on to the more advanced settings, such as privacy options and email notifications. After that, you can get right to work selling products through your online store.
Do you have any questions about configuring WooCommerce settings? Let’s talk about them in the comments section below!
Featured Image via Makyzz / shutterstock.com


Leave A Reply