
When people talk about email marketing platforms, MailChimp is usually one of the first names to come up. Not only is it one of the most popular options around, but it also happens to be highly intuitive. Plus, it comes with a robust autoresponder functionality that can make short work of your campaigns.
MailChimp autoresponders – or ‘automations’ – can enable you to set up complex campaigns that will work for you even if you don’t have the time to micromanage them. In this article, we’ll talk about what autoresponders are, what makes them useful, and how to set them up using MailChimp in three steps. Let’s get started!
What an Autoresponder Is (And Why They’re Essential for Your Marketing Efforts)
An autoresponder is an email (or multiple emails in succession) that a user receives once they sign up to an email list or perform a certain action (such as purchasing a product). You set them up ahead of time, configure how much time should go by between each message, and then sit back and monitor your campaign’s performance.
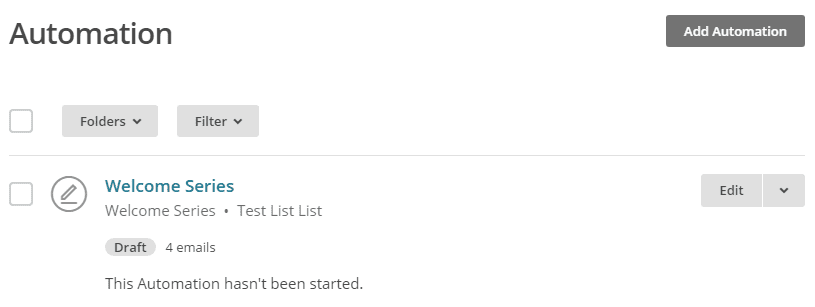
Here’s a sneak peek of MailChimp’s autoresponder section.
The key benefit of this feature is obvious: you don’t have to worry about sending out emails manually, since a tool like MailChimp takes care of it for you. Furthermore, you get to focus more on building up a relationship with your subscribers and fine-tuning your content.
Naturally, not every aspect of an email campaign can be automated, and chances are you’ll need to jump in from time to time to tweak your existing emails and create new ones. However, that doesn’t make autoresponders any less attractive from a marketing (and timesaving) standpoint.
Before showing you how to setup autoresponder emails of your own, let’s explore MailChimp in a little more detail.
An Introduction to MailChimp
Plenty of you are probably already familiar with MailChimp; we’ve both reviewed the service and included it in our latest roundup of top-notch email marketing platforms.
For those of you new to the world of email marketing, however, MailChimp enables you to create stylish email campaigns and manage your subscribers with ease. You also get access to top-notch analytics, and you can do it all starting with a free plan.
When it comes to autoresponders, MailChimp offers a suite of automations as part of its premium plans. You can set up regular autoresponders for new users and those that abandon shopping carts, among other options.
Key Features:
- Create multiple email campaigns
- Enables you to sign up and manage subscribers to your campaigns
- Customize your campaigns using dozens of pre-made templates or build new ones from the ground up
- Analyze the behavior of your subscribers using analytics
- Automate your email campaigns through autoresponders
- Target multiple scenarios using automations
Price: Free, with premium plans available | More Information
How to Set Up Autoresponders in MailChimp (In 3 Steps)
As we mentioned earlier, MailChimp autoresponders are only available to premium subscribers. If you’re using a free MailChimp account, you’ll need to upgrade it if you want to access this feature.
On the other hand, if you’re a new user, all you have to do is sign up, pick one of MailChimp’s premium plans, and pay for it. You can always change your plan later, so there’s no need to sign up for an expensive option right away.
Secondly, you’ll also need to create a list to manage your subscribers and to associate with your autoresponders. To do this, go to the Lists tab on your account and click on Create List. All you have to do is pick a name for yours, set a description for it, and specify which name and email you want to send your messages from.
Once you have a premium account and a list ready, move on to Step 1 below.
Step #1: Choose and Automation Type
Inside your MailChimp account, head to the tab that says Automation, located at the top of your screen. The first thing that will strike you is the sheer number of automation options available:
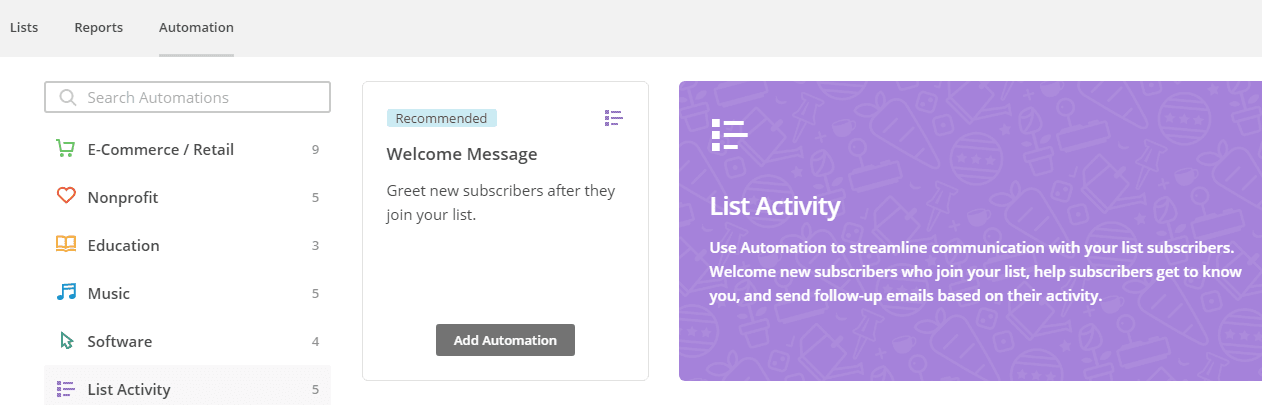
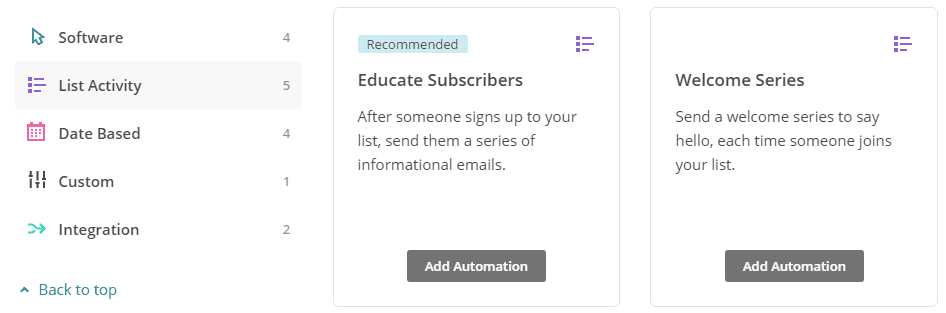
It doesn’t matter if you’re running an online store, a non-profit, or a regular website – chances are there’s a custom integration in there for you. All you need to do is check out the available categories to the left of the Automation section, and keep looking until you find a suitable option.
As far as we’re concerned, the best way to get started with MailChimp autoresponders is to set up a welcome series for your subscribers – that’s marketing lingo for a series of emails that each new subscriber will get as soon as they sign up to your list.
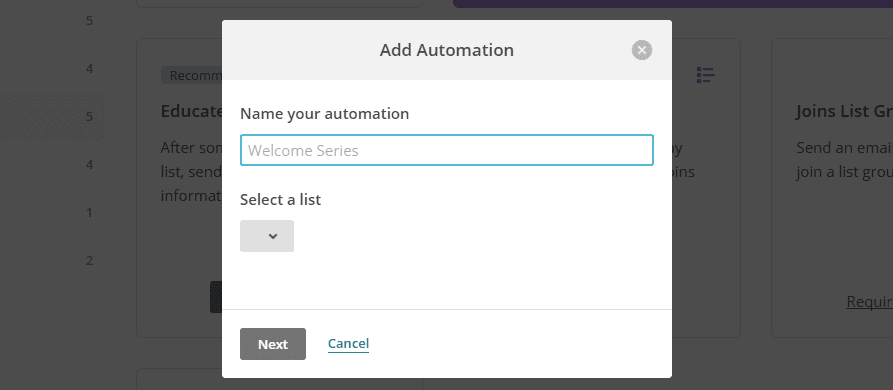
For now, click on the option that says Add automation under the Welcome Series option:
Now you’ll get the chance to name your autoresponder. We recommend you pick a name that accurately reflects the content you want to include to avoid confusion. After all, you may want to set up new autoresponders in the future. You’ll also need to pick which list of users your messages should target.
Depending on what type of autoresponder you choose, MailChimp will provide you with a few suggestions on what kind of emails to include. Let’s talk about how to use them to create your first automated email.
Step #2: Create and Schedule Your First Automated Email
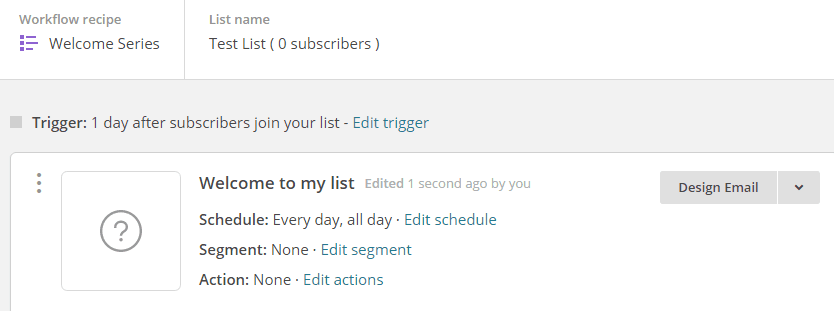
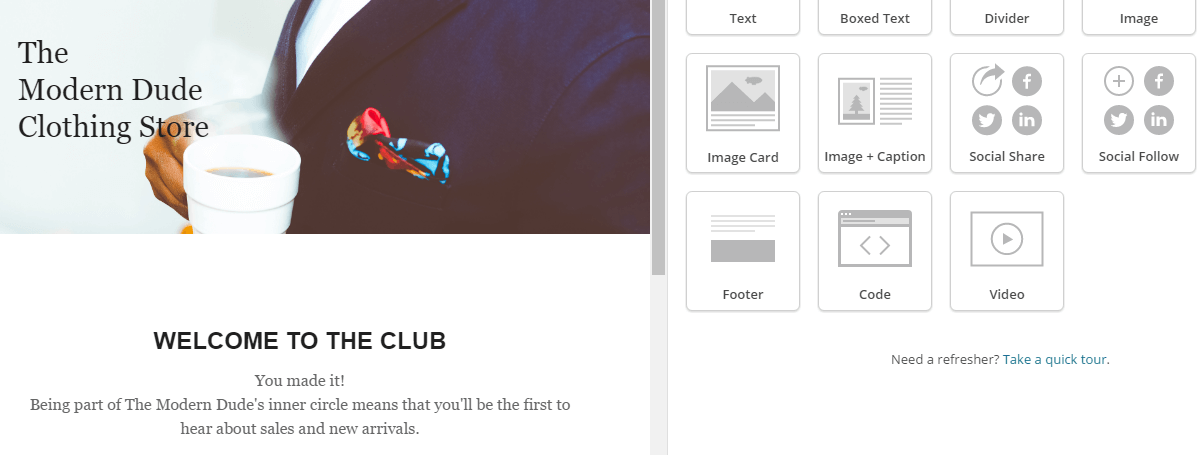
MailChimp’s Welcome Series autoresponder includes three placeholder emails by default: a Welcome to my list message and two follow-ups. Let’s take a look at that first message now and check out how to customize it. To do this, click on Design Email, to the right of the message’s name:
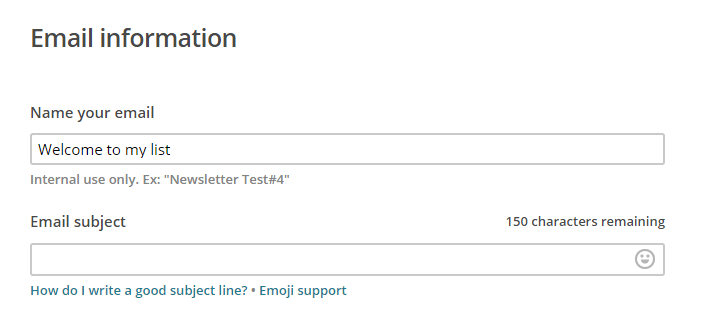
In the following screen, you’ll have to choose a subject line for your email. Welcome emails tend to have good opening rates, but you still need to make sure your subject lines are compelling. If you’re not sure how to do so, MailChimp offers a thorough guide on the subject, which you can access by clicking on the How do I write a good subject line? link below the Email Subject field:
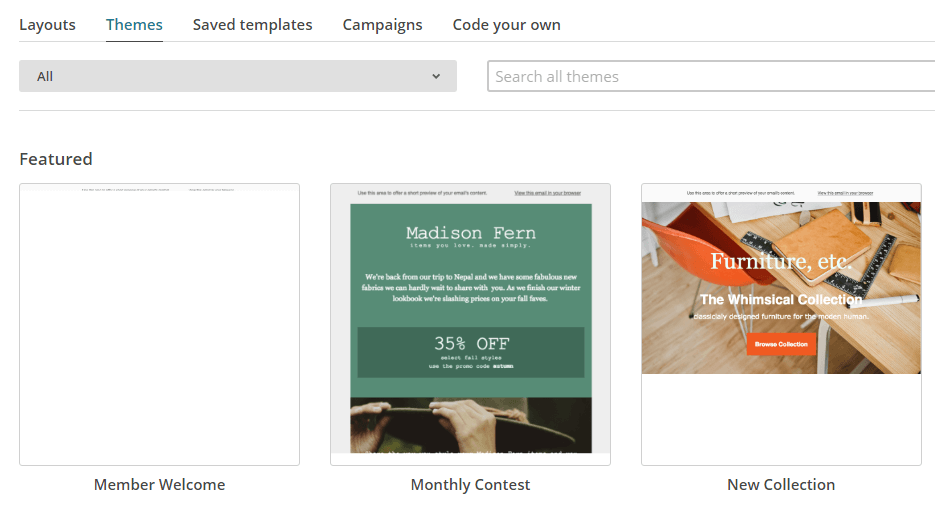
After picking a subject for your email, click on Next at the bottom of the page. Now you’ll be able to pick one of MailChimp’s templates to use for your email, or build your own.
The choice of which template to use is a personal one, so we can’t make any recommendations in that aspect. However, do make sure that you pick a design you’re comfortable with. After all, changing styles in the middle of a campaign can be quite jarring.
After choosing a layout or a theme, you’ll be able to add content to it using MailChimp’s drag-and-drop email builder, which is fairly intuitive:
Once you’re satisfied with your design and the content of your email, hit the Save and Continue button at the bottom of the page and you’re set! You’ve just created your first autoresponder email – now it’s just a matter of scheduling it.
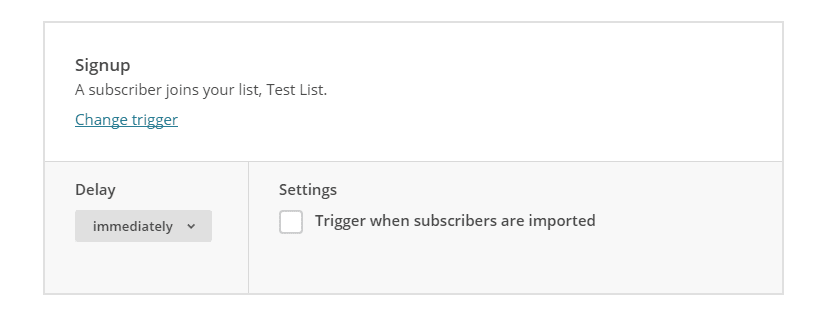
MailChimp’s Welcome Series autoresponder schedules your first email to be delivered a day after a new subscriber joins your list by default. Let’s change that to make the message send itself as soon as someone signs up.
To do this, head back to the Automations tab and pick the autoresponder you just created from the list of available ones, then locate the email we just edited. Right above its name, you’ll see a section that reads Trigger and an option to edit it. Click on it:
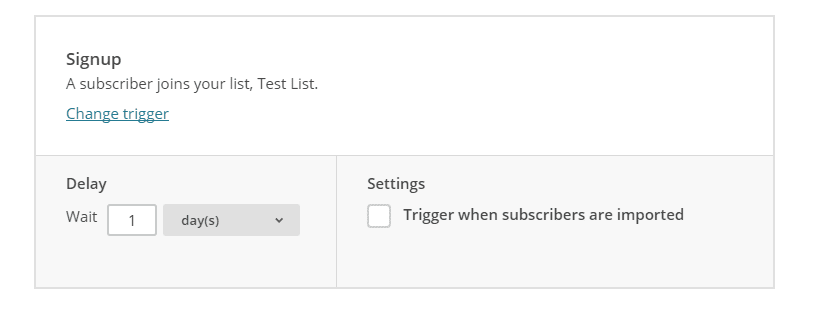
We don’t need to change the action that triggers the email in this case since it’s already configured to act when a new subscriber joins your list. All we have to do is remove the delay on the trigger by picking the option that reads Automatically:
When that’s done, save your changes and move on to step number three – we’re almost done!
Step #3: Add More Emails to Your Autoresponder and Schedule Them
It goes without saying that a single email does not make for a welcome series or a good autoresponder.
Fortunately, adding additional emails to your autoresponder campaign is simple. Just repeat the steps we covered earlier until you’re happy with the number of items in your queue.
It’s worth noting again that MailChimp provides you with a few placeholders depending on which type of automation you pick. All you have to do is return to your automation’s settings screen and hit the Design Email option for each of them:
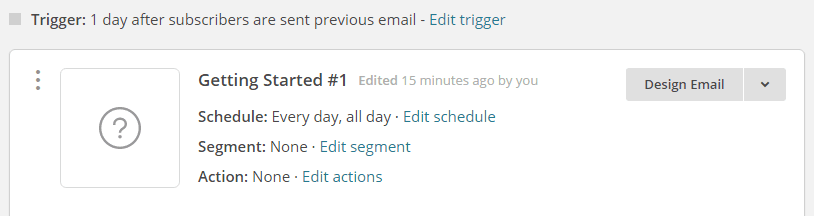
When you run out of placeholders, you can add new messages to your queue by clicking on the Add Email option near the bottom of this section.
By default, MailChimp will schedule each new email to send one day after the last one. However, you can modify this option using the Edit Trigger setting for each message.
Once you’re happy with the number of messages on your autoresponder, it’s time to call it a day! Remember, you can always come back to this section to customize your messages, add new ones to your queue, and even set up entirely new autoresponders.
Conclusion
It’s safe to say that MailChimp’s popularity is well-earned. Not only is it the platform easy to use, but it also comes with one of the most comprehensive email automation – or autoresponder – features in the business. Setting up a campaign may take a little while, but it can pay off by saving you time in the future.
After setting up a premium account, here’s what you need to do to set up MailChimp autoresponders:
- Choose a type of automation.
- Create and schedule your first automated email.
- Add more emails to your autoresponder and schedule them.
Do you have any questions about how to set up MailChimp autoresponders? Ask away in the comments section below!
Article thumbnail image by hanss / shutterstock.com


“When you create an account with MailChimp, you’ll automatically start on our no-cost Forever Free Plan. It’s ideal for beginners who want to grow their lists and create campaigns while testing out MailChimp’s powerful, built-in tools and features. You can send up to 12,000 emails per month and have up to 2,000 total subscribers.”
Autoresponder comes with a free account.
Hi Dan, thanks for pointing that out. It’s actually a recent change to MailChimp’s services, which took place after this article was written. 🙂
Hey … just switched back from AC to MC, cause implementation with PopUp Optin and Bloom is not possible (as far as I and the community found out). Would be glad to get an inclusive option to do it with AC.
Sabine
Thanks for your input, Sabine. Hopefully MailChimp works out better for you. 🙂
What a pleasant topic you’ve got denote here. very if we tend to follow of these tips whereas aiming to blogging . no
chance to be failure in blogging. i feel post a decent enticing content is best thanks to attract folks.
Thanks ..Please keep sharing such article..
You’re welcome! 🙂
I did all of the above and the auto-responder does not seem to be working. I upgraded, I set up a campaign and designed a template and linked it to a LIST. When I test it, the campaign comes to me right away. But when someone signs up to the LIST they get the autoconfirm and when they opt in they should be getting a welcome email, but they don’t get it.
Any ideas why????
Hi Matt! It’s hard to say without knowing your exact setup, so try contacting the developers to see if they can help: https://mailchimp.com/contact/support/.
Thanks for this tip. Want to know more about mail chimp
How about personalizing the email in Mailchimp and how to upload csv email to the platform?
You’re welcome! Check out these articles for more information on those topics: http://kb.mailchimp.com/merge-tags/getting-started-with-merge-tags, http://kb.mailchimp.com/lists/growth/import-subscribers-to-a-list.
Hey John,
plse make links posted in comments “target=”_blank” 🙂
Thx
Sabine
Any plans on talking about Get Response? thanks for the info
You’re welcome! We’ll keep your suggestion in mind. 🙂
This is a fantastic feature for adding new subscribers to your list. However, when a current subscriber wants to sign up for this particular automation, I’ve had the experience where it says: This email is already on the list. Any solutions?
Hi Allison! It’s hard to say without seeing your exact setup. Try contacting MailChimp’s support: https://mailchimp.com/contact/support/.
It would be amazing if you would implement a generic interface for other autoresponder systems also
This is this a hassle for me with DIVI (Which I love) as my system is not supported – where other page builder themes offer a generic interface – I guess this is not to complicated and DIVI would get even more fans in the online marketer world as well
Thx Tom
Hi Tom! If you have ideas for a future version of Divi, feel free to post them in our forums: https://www.elegantthemes.com/forum/.