
After all of that work you put into your website and its content, imagine if Google never even knew it existed? How could you expect to get many—or any—visitors? Having your sitemap in your Google Search Console account is necessary to have the best performance in search rankings. Without it, Google will have a much harder time knowing the ins and outs of your website. Or even finding it at all. Luckily, it’s easy and free to generate an XML sitemap and submit it to Google.
What is a Sitemap?
A sitemap is a file on your website that lets search engines know which pages are on your website. It’s quite literally a map of the structure of your site. With WordPress, you can have a sitemap plugin help you create your sitemap. Most commonly, your SEO plugin will create your sitemap for you. Some platforms, like Squarespace and Wix, generate sitemaps for your website without you having to do anything, so be sure to check on that before you get started in submitting to Google.
The Google Sitemaps Report
If you do opt to use Google’s Sitemaps report, it does the following:
- Lets Google know about new sitemaps for your website.
- Allows you to view your sitemap submission history.
- Shows you if Google encountered errors with your sitemaps and what those errors are.
Note that the sitemaps report can only show up to 1,000 submitted sitemaps, and they’re not necessarily shown in the order they were submitted. So if you run a massive site that has a very, very complex structure, be aware of that limit.
How to Submit a Google Search Console Sitemap
Though this process uses the word “submit,” you don’t actually upload anything to Google. Instead, you let Google know where to find the sitemap on your website. Let’s go through it step by step.
Requirements and Googlebot Access
In order to submit a sitemap to Google, you need to have one of the following:
- Owner-level (or admin-level) permissions for the website.
- If you’re not the website owner, you’ll need to point Google to the robots.txt file for your site.
Also, Googlebot has to be able to access the sitemap, which means it can’t be locked by login requirements. To check if Googlebot will have access to the sitemap, go to the sitemap URL while in incognito mode. If you can see it, then so can Google.
Generating and Posting an XML Sitemap
Your first step is to post the sitemap to your site for Google to crawl it. It has to be in an acceptable sitemap format. For the most part, you’re going to be dealing with the XML format if you’re working with sitemaps.
WordPress’ Built-In Tool
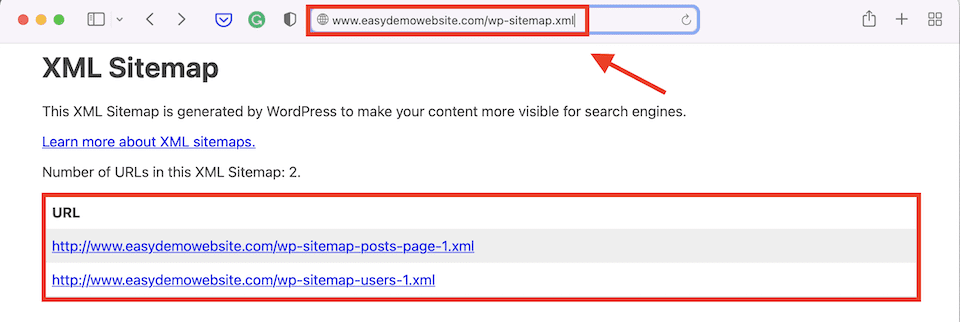
There’s a rudimentary way to generate an XML sitemap if you’re using WordPress. Simply add wp-sitemap.xml to the end of your site’s URL, and the software will generate the necessary file automatically.
In general, however, we suggest using a plugin so you have more control and get one that’s a bit better structured. The one you get by default is fine, but when it comes to generating organic search traffic, fine is nowhere near good enough.
Using a Plugin
If you’re on WordPress, we suggest that you use a plugin to generate your sitemap. Luckily, most of the top SEO plugins will have this functionality, and you probably have one of those installed already. For this walkthrough, we’ll use Yoast SEO.

Once the Yoast plugin is installed and activated, go to the SEO link in the left-hand sidebar of your dashboard. Hover over it, then click General. Click the Features tab, then scroll down to the XML Sitemaps option and toggle it On if it isn’t already. When you’re done, click Save Changes.
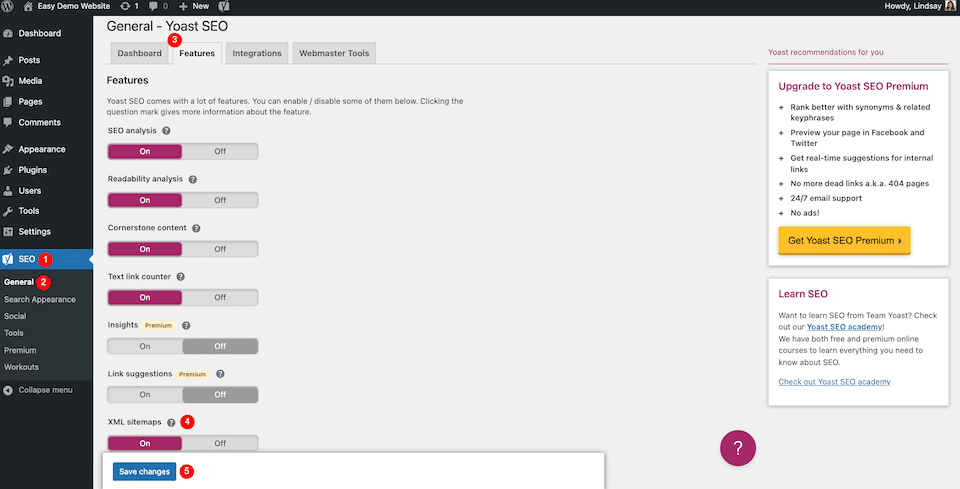
To double-check that this worked, click the Question Mark icon to the right of XML Sitemaps, and then select See the XML Sitemap.

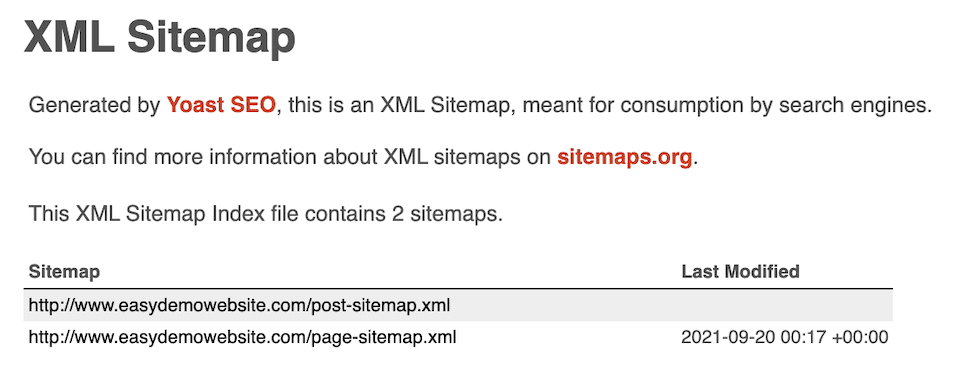
Once you have the new page open, be sure to keep it open. You will need it again soon.
Adding Your Website to the Google Search Console
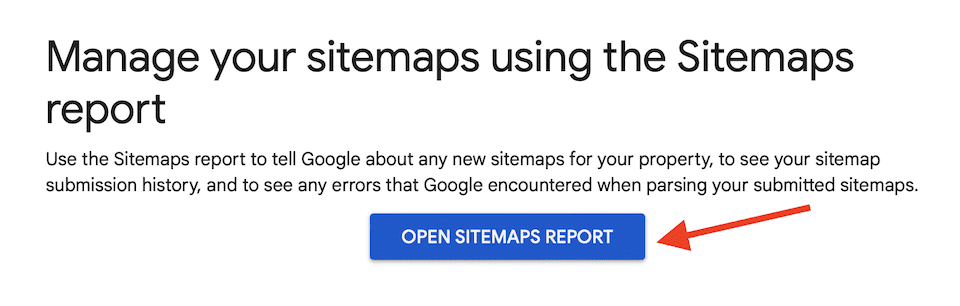
Once you’ve generated the XML sitemap, you can open the Google Sitemaps report. Go to Head to the Search Console support page and click Open Sitemaps Report. You’ll be taken to the right Google Search Console, and if you don’t have an account set up yet, you’ll have the chance to do that now.
First, you have to add your website. Click the Search Property field on the top-left and click Add Property.
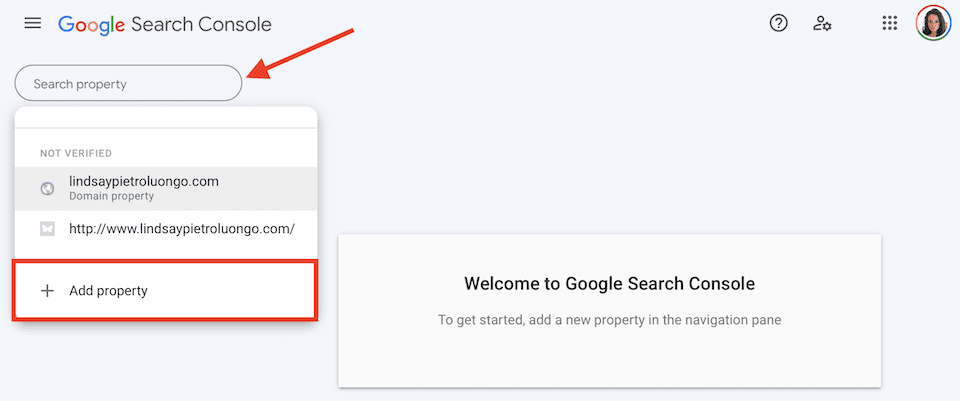
Select URL Prefix on the right.
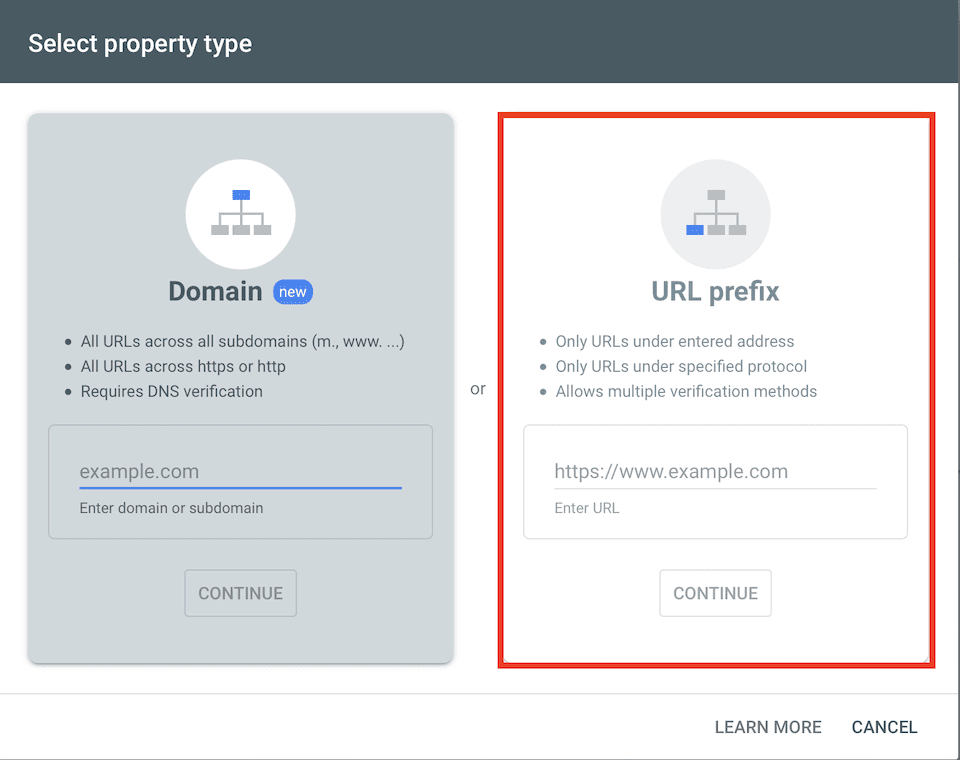
Enter your domain’s URL in the box, then click Continue. Next, you’ll see a Verify Ownership box with a few options. The default option is HTML File, but we recommend switching to HTML Tag.
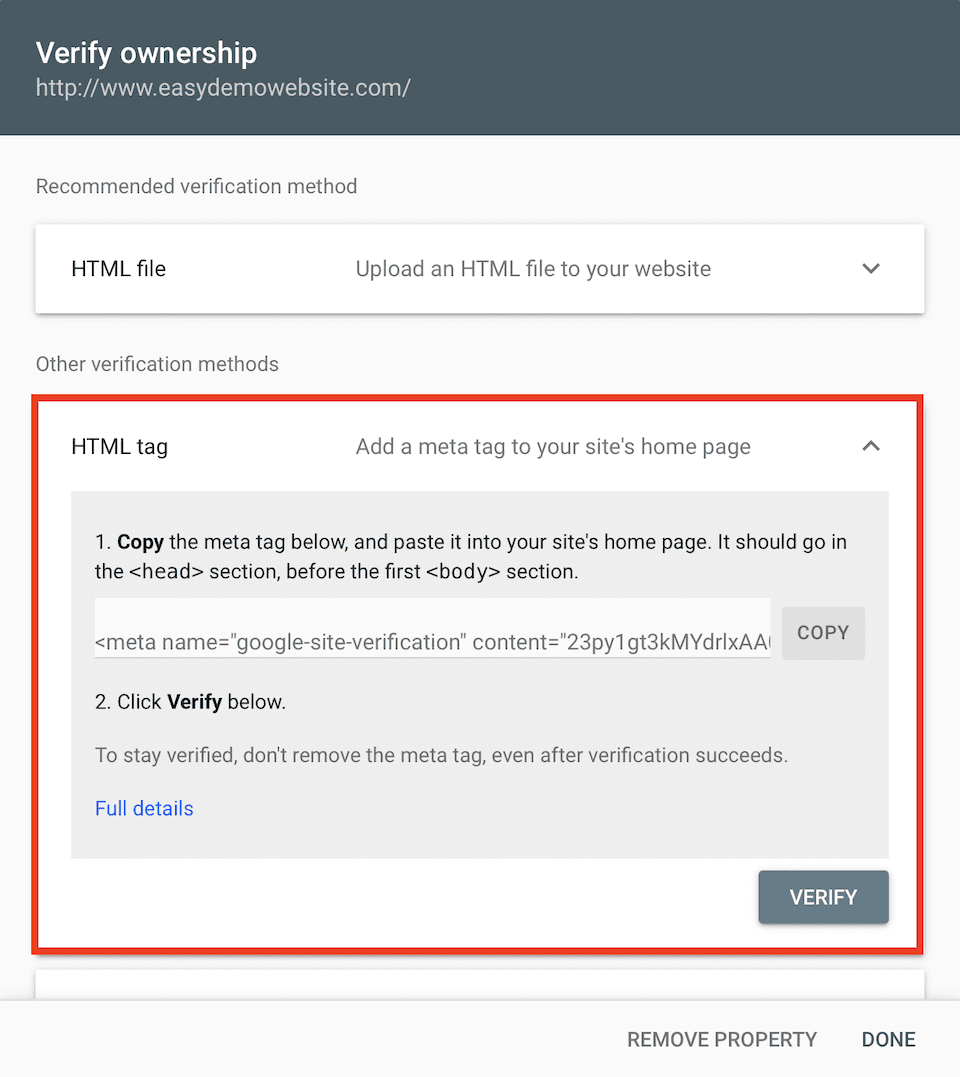
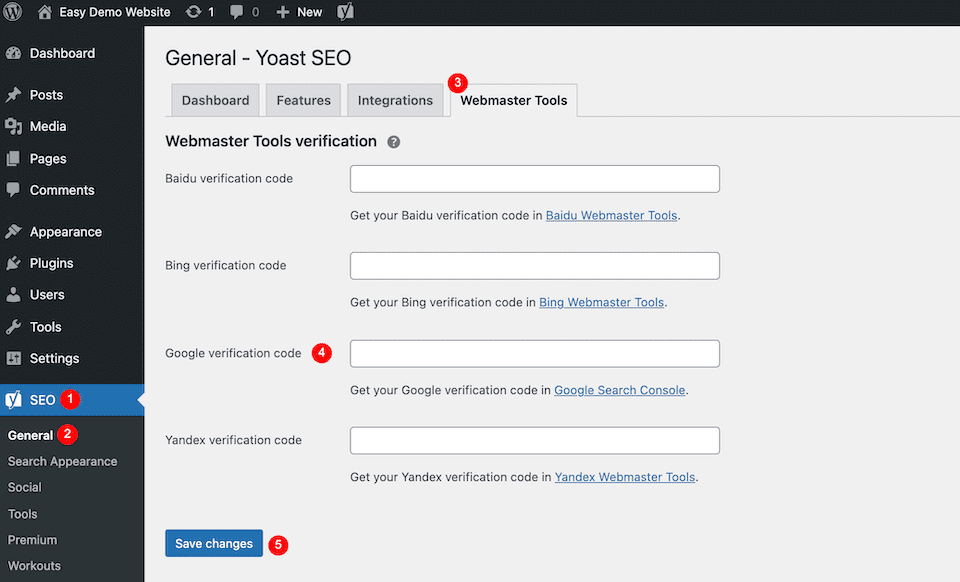
Click Copy to the right of the code, then go to your WordPress dashboard. Since we’re using Yoast, the next steps are specifically for that plugin, but your SEO plugin will likely have similar steps to follow. Click SEO > General in the left sidebar. Select the Webmaster Tools tab along the top. Paste the code into the Google Verification Code field. Click Save Changes when you’re done.
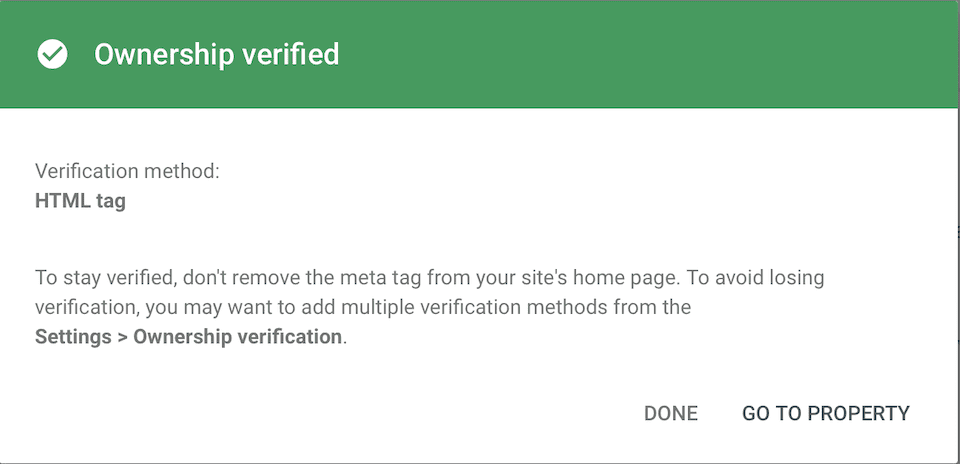
Next, go back to the Google Search Console and click Verify. If you did everything correctly, an Ownership Verified box will appear.
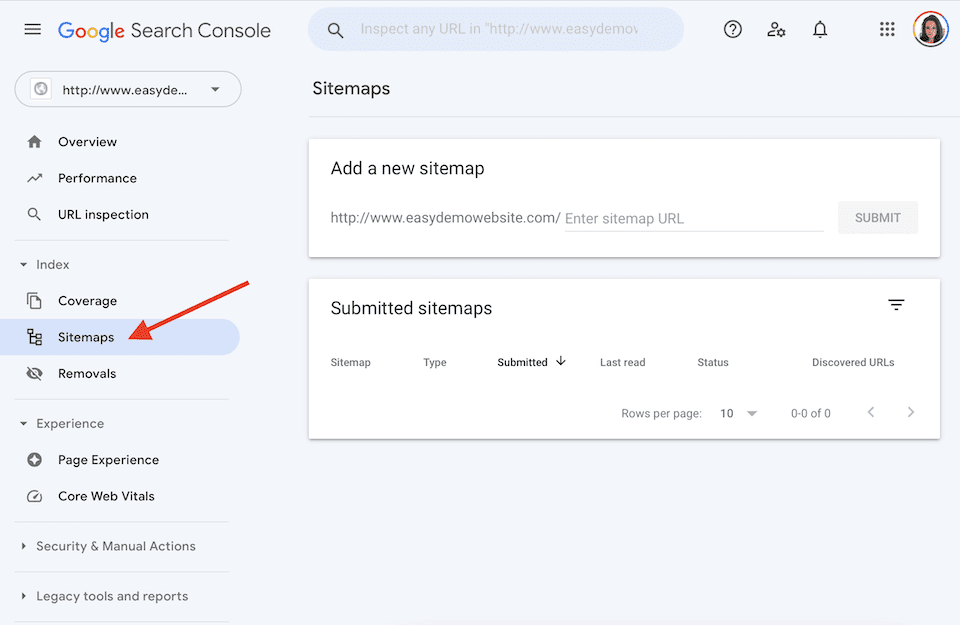
Submitting the URL for the Google Search Console Sitemap
Once your website is added, it’s time to add the XML sitemap. Click that Search Property field again and select the website you just added. Click Sitemaps on the lefthand side of the page.
Go to the sitemaps page you kept open in your WordPress admin panel, and then copy the last part of the URL. It should be something like sitemap_index.xml. Paste that into the part of the Add a New Sitemap box that says Enter Sitemap URL in the Google Search Console.
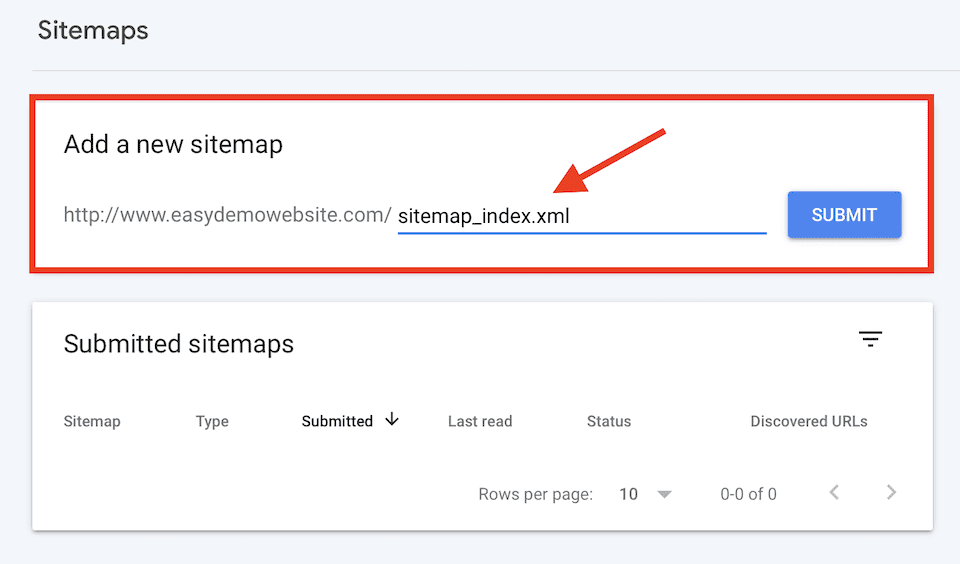
Click Submit when you’re done. You should now see a box that says Sitemap Submitted Successfully.
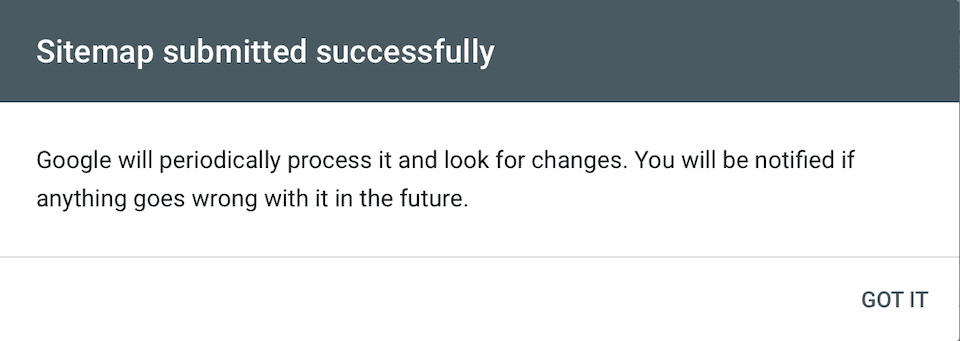
That’s it! Give Google some time to crawl your whole website. Eventually, you’ll be able to view sitemap stats in the Google Search Console.
Resubmitting and Deleting a Sitemap
Even if you change your website and sitemap, you won’t have to resubmit it to Google. The changes will be recorded the next time your site is crawled.
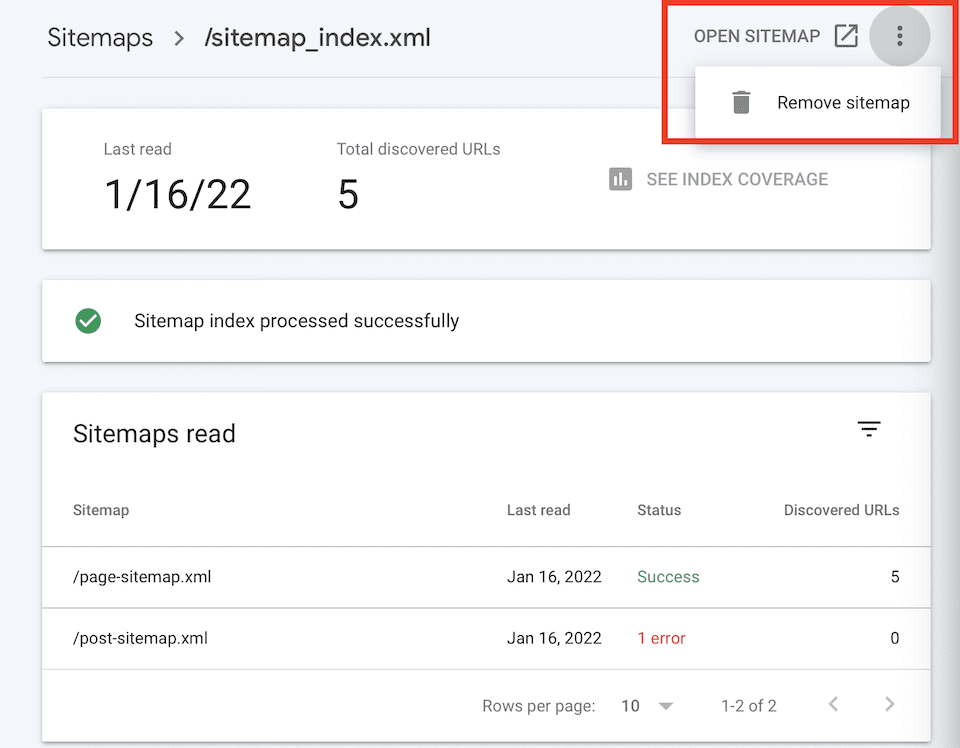
If you delete a sitemap, you’ll remove it from the Sitemaps report, but Google won’t forget the website, its structure, or its URLs. To delete a sitemap, go to the domain in the Google Search Console and click Sitemaps on the left and click the sitemap under Submitted Sitemaps to open the details page.

Click the Horizontal Three-Dot icon on the top-right, then select Remove Sitemap.
Wrapping Up
Having an XML sitemap that’s indexed by Google means that your most recent content will appear in search results. You can only improve your ranking in search results and attract traffic if your site is indexed, and this is the best way to get indexed by Google And as a bonus, having a Google Search Console account means access to so much more insight into your site. Check out our ultimate guide for Google Search Console to take advantage of everything the platform offers.
To boost your SEO even more, definitely check out our article about how internal links help SEO. We touch on the importance of sitemaps in that article as well.
And while Google is the most popular search engine out there, it’s not the only one. You definitely want to make sure that you’ve submitted your sitemaps to other places, too, such as Yandex and Bing.
What have been your experiences using Google Search Console to manage your sitemaps? Let us know in the comments!
Article featured image by Jagrutiben B Patel / shutterstock.com


Great tutorial!
Very useful content written. Your tutorial about google ownership verified is clear and hopefully all will learned too. I’ve done practically this process so I find this article very good. Thanks