")
Divi 5 rolled out three productivity features: Extend Attributes, Find And Replace, and Inspector. They all help you work faster, and at first glance, they might look like they overlap. But each one handles different situations.
In this post, we’ll walk you through what separates them and show you exactly when to use each one. Let’s get to it!
Subscribe To Our Youtube Channel
What Is Divi 5’s Inspector
The Inspector breaks down every design element in your selection. It’s a panel that collects all the colors, fonts, sizes, images, and presets used in that element and its children. The panel groups everything by type. All your colors appear together instead of scattered across different tabs and settings.
The same goes for typography, spacing, and media. You can dock the Inspector below your settings panel so it stays visible while you work.
When you select a section, the Inspector lists every color that section uses. Change one, and everything updates together. The Content tab surfaces text, media, code, and attributes.
The preset tab shows which module and group presets are active. You can swap or remove presets from here, and all instances update simultaneously.
The Inspector even shows attributes modified inside your presets, giving you control over every design layer.
How To Use Inspector
Right-click any element in the Visual Builder. Select Inspect from the menu that pops up.
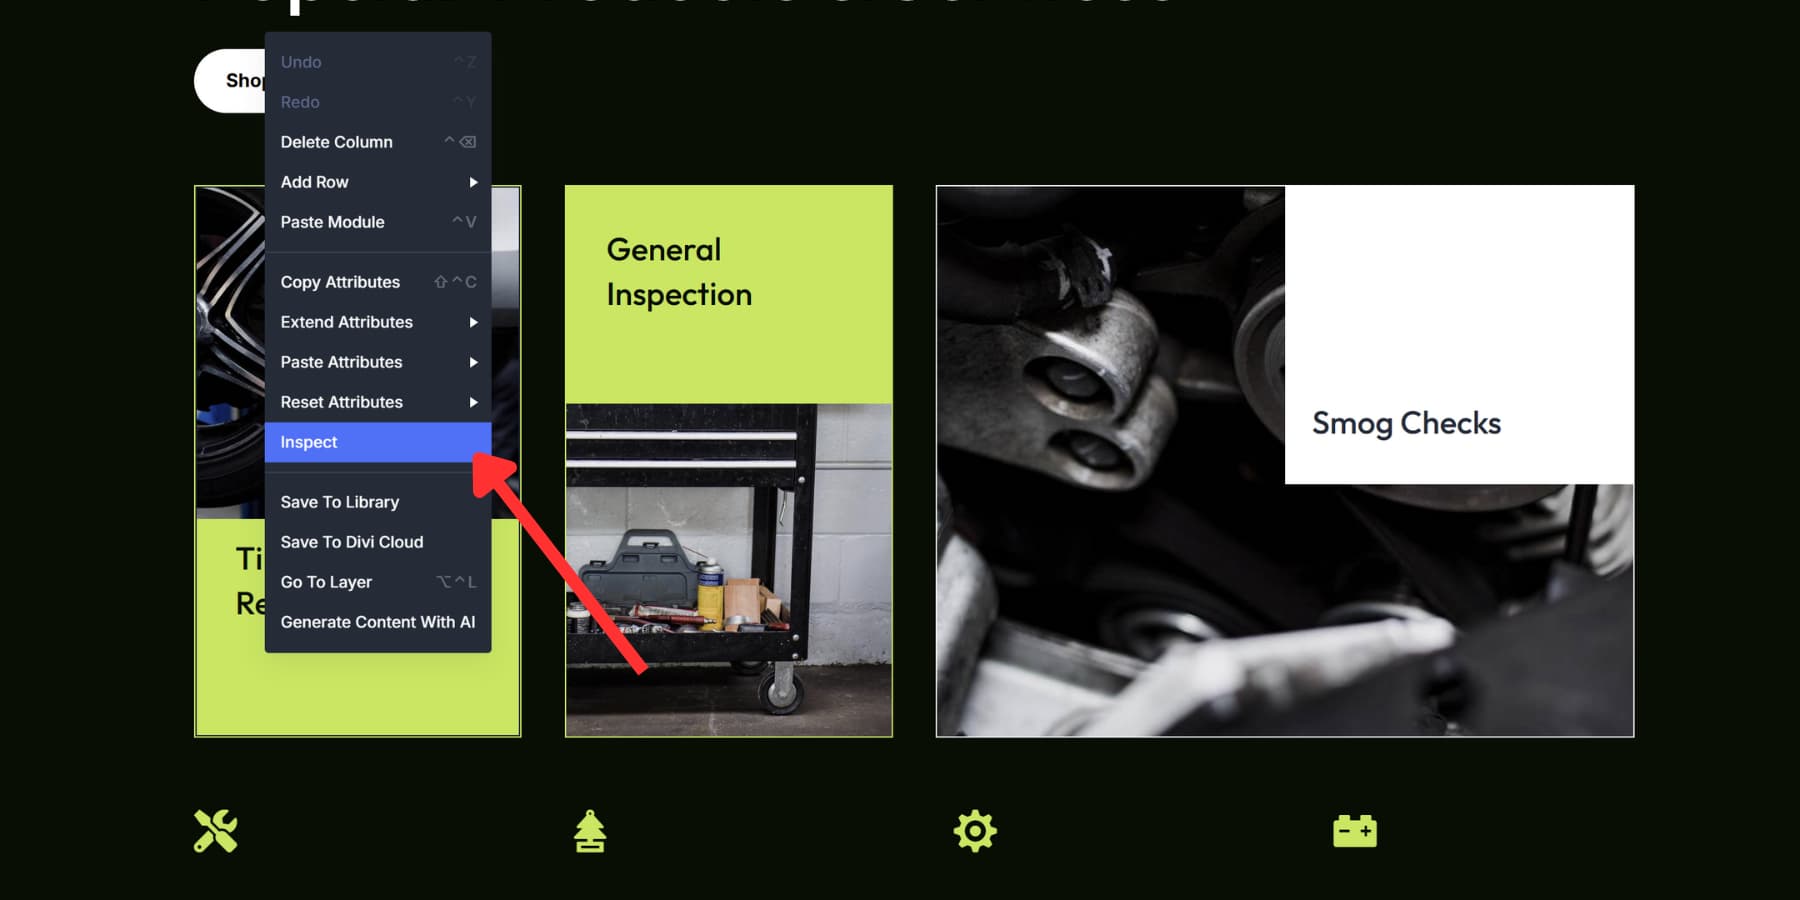
The Inspector opens and shows you everything about that element, plus all its children.
Alternatively, you can use the new Inspector option in the sidebar.
![]()
While the panel stays open, click around your page. Each click refreshes the panel with new data. You can even use the breadcrumbs in your settings panel to target a specific module.
Three tabs organize everything: Styles, Content, and Presets. Styles show colors, fonts, and spacing. Content reveals text, images, and code. Presets list which ones are active.
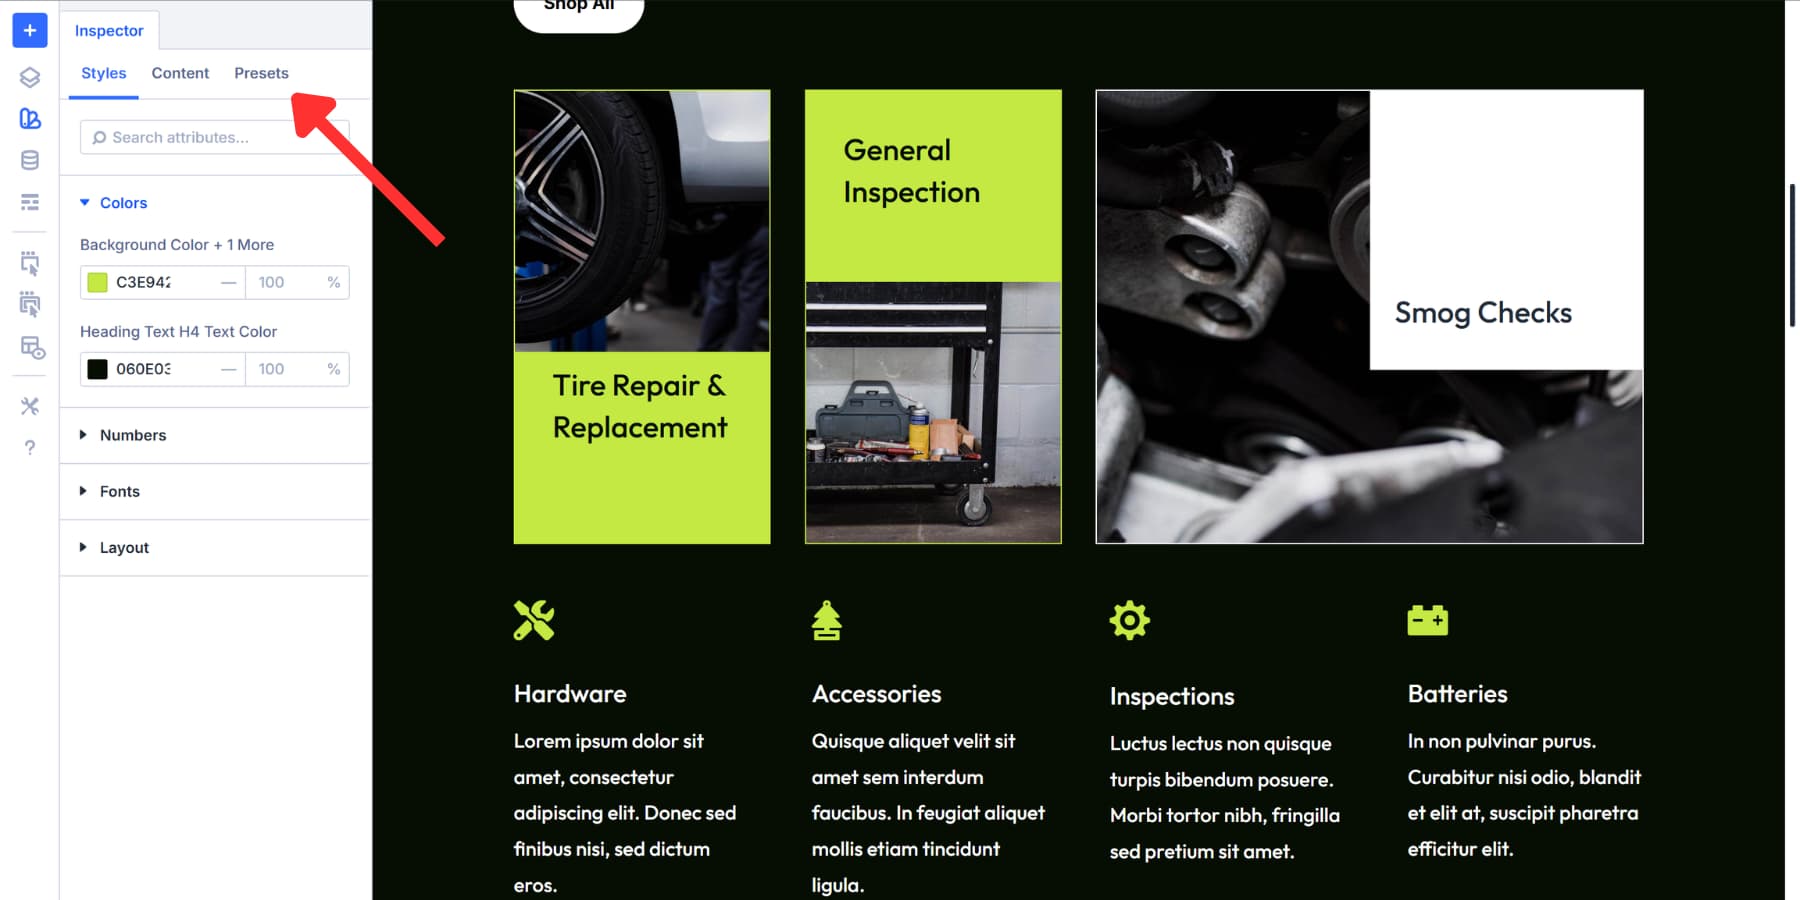
Click any value to change it. Update a color and watch every instance shift across your selection. Presets work the same way. Swap one out or delete it; all elements using it change together.
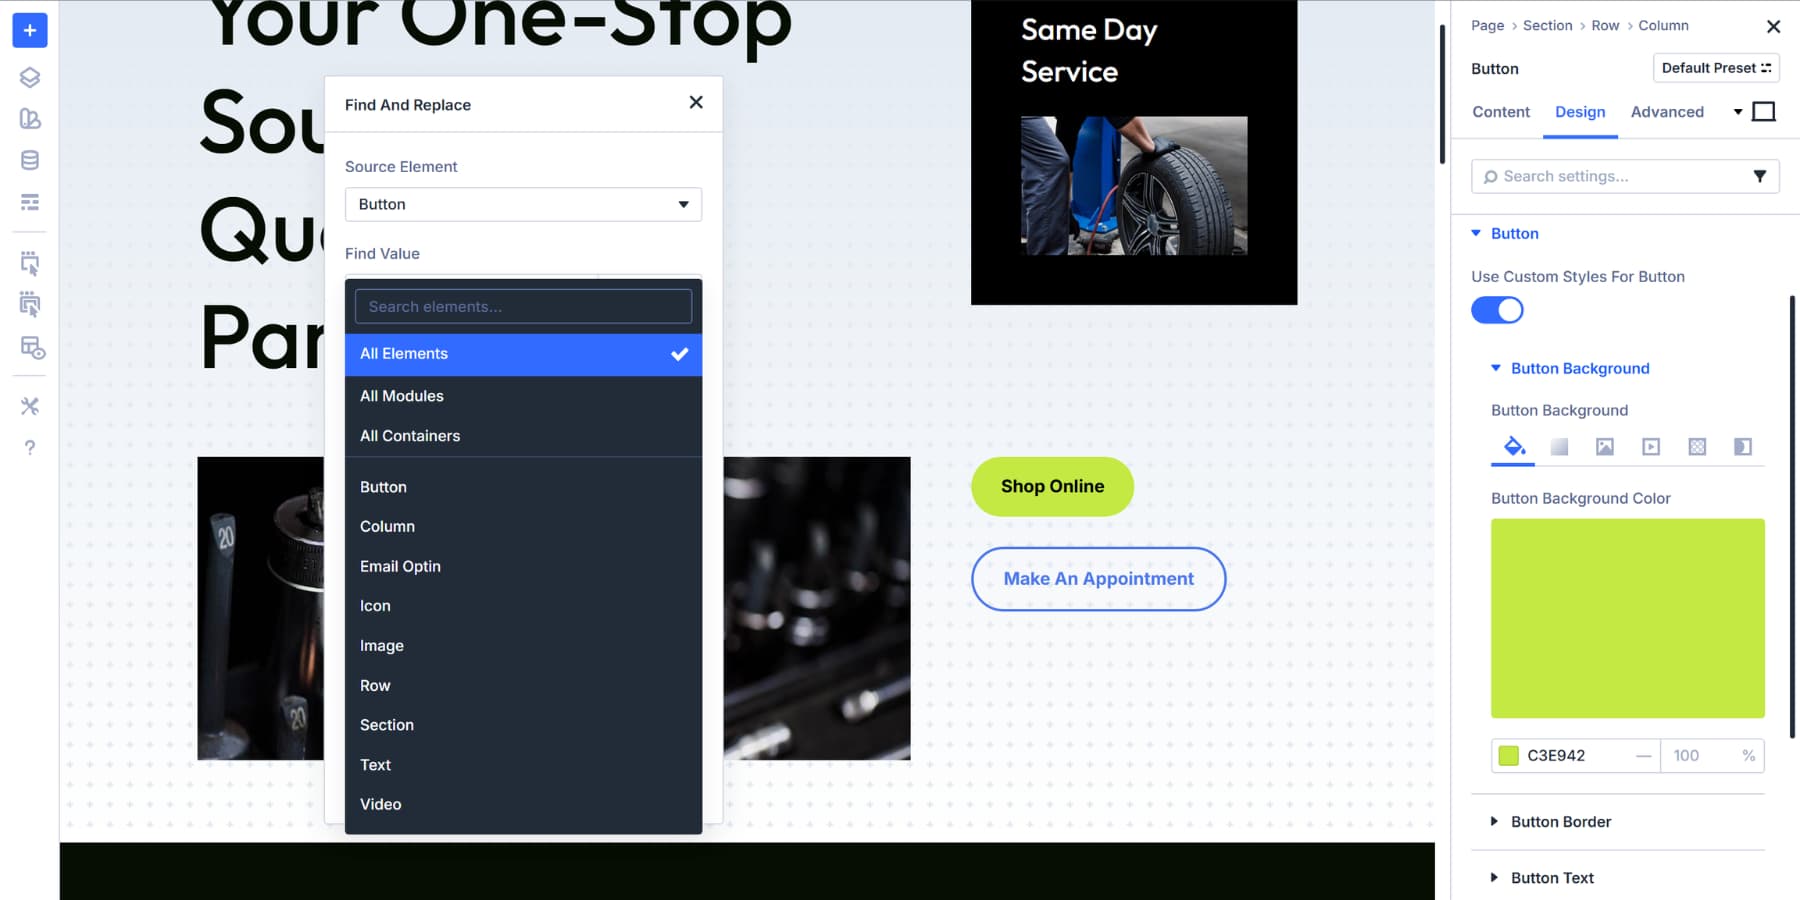
What Is Find And Replace In Divi 5
Find And Replace lets you swap design values across your page in seconds. Right-click any field in the Visual Builder, pick a new value, and watch every matching instance update together.
You can replace colors, fonts, padding, borders, and pretty much any design setting you touch. The tool works at whatever scale you need. You can change one module, update a whole section, or revise your entire page. You pick the scope.
Most page builders require you to hunt through dozens of settings panels to change repeated values, which wastes time. Find And Replace grabs everything at once. You select a color field showing #FF5733, type in #2C3E50, choose where to apply it, and click replace. Done.
This really abates the pain when you need to update a site built months ago or handle client revisions. You can target specific element types, too. Replace padding only in columns, or swap fonts only in headings. The control sits exactly where you need it.
Using Find And Replace
Open any element’s settings in the Visual Builder. Find the field you want to change. Click the three dots next to that field and select Find And Replace.
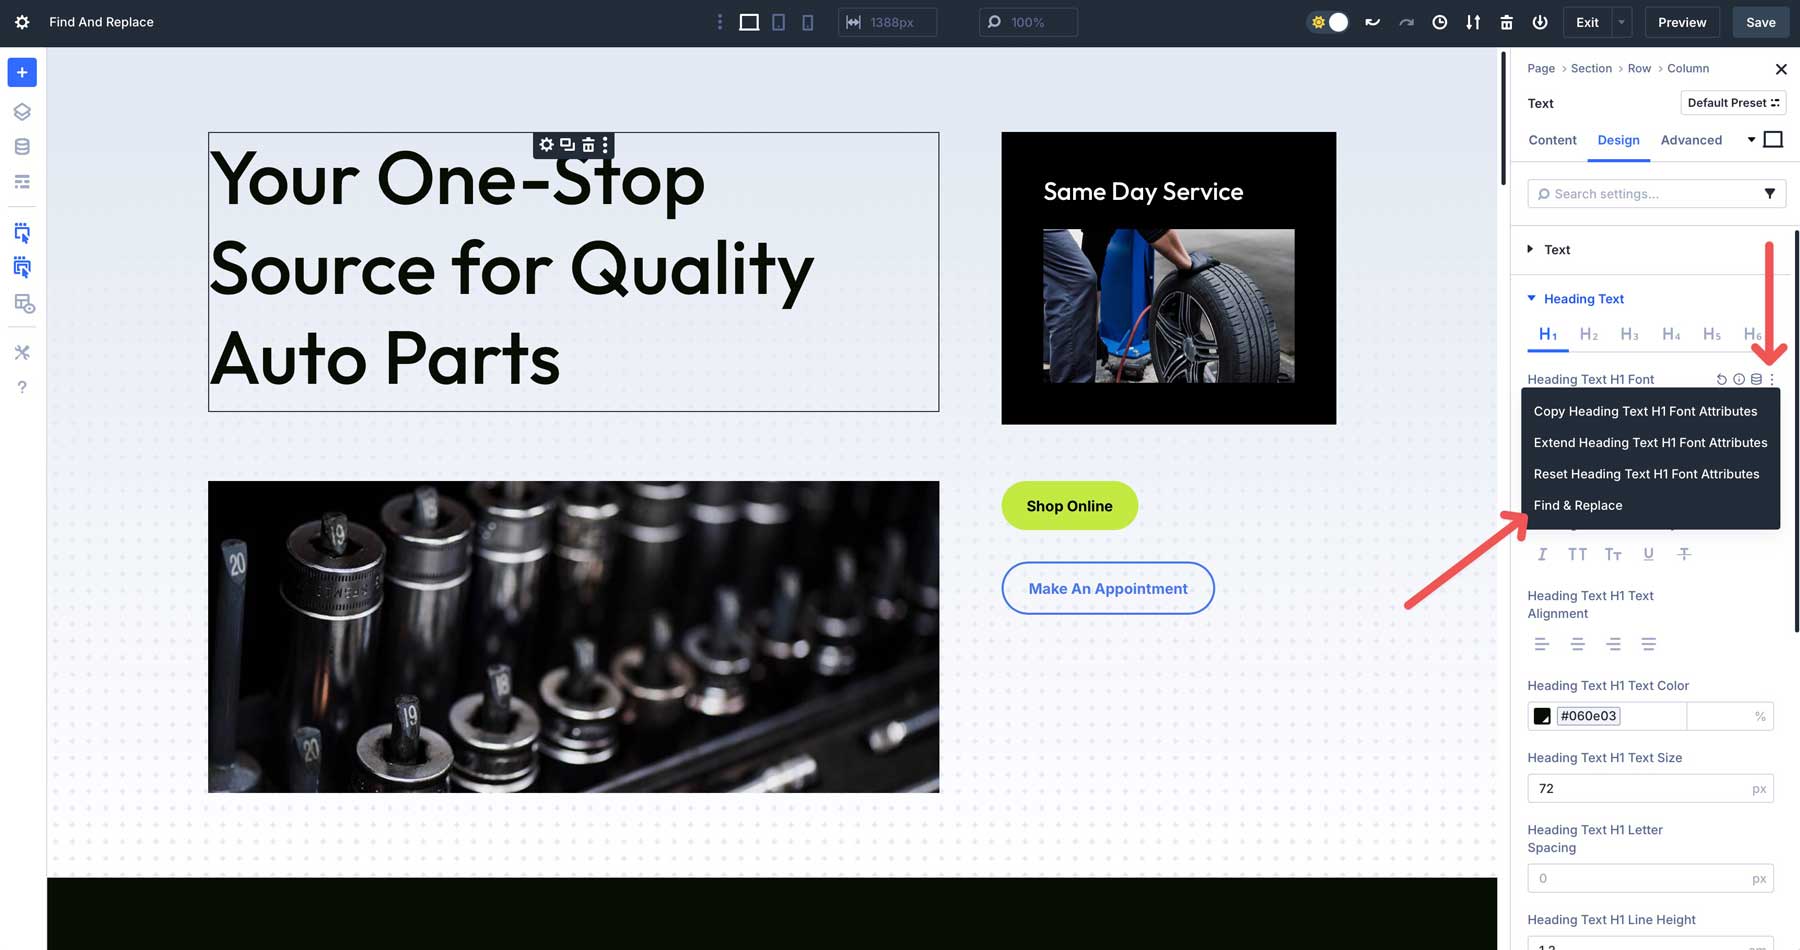
A panel opens with your current value already loaded. Type your new value in the replacement field.
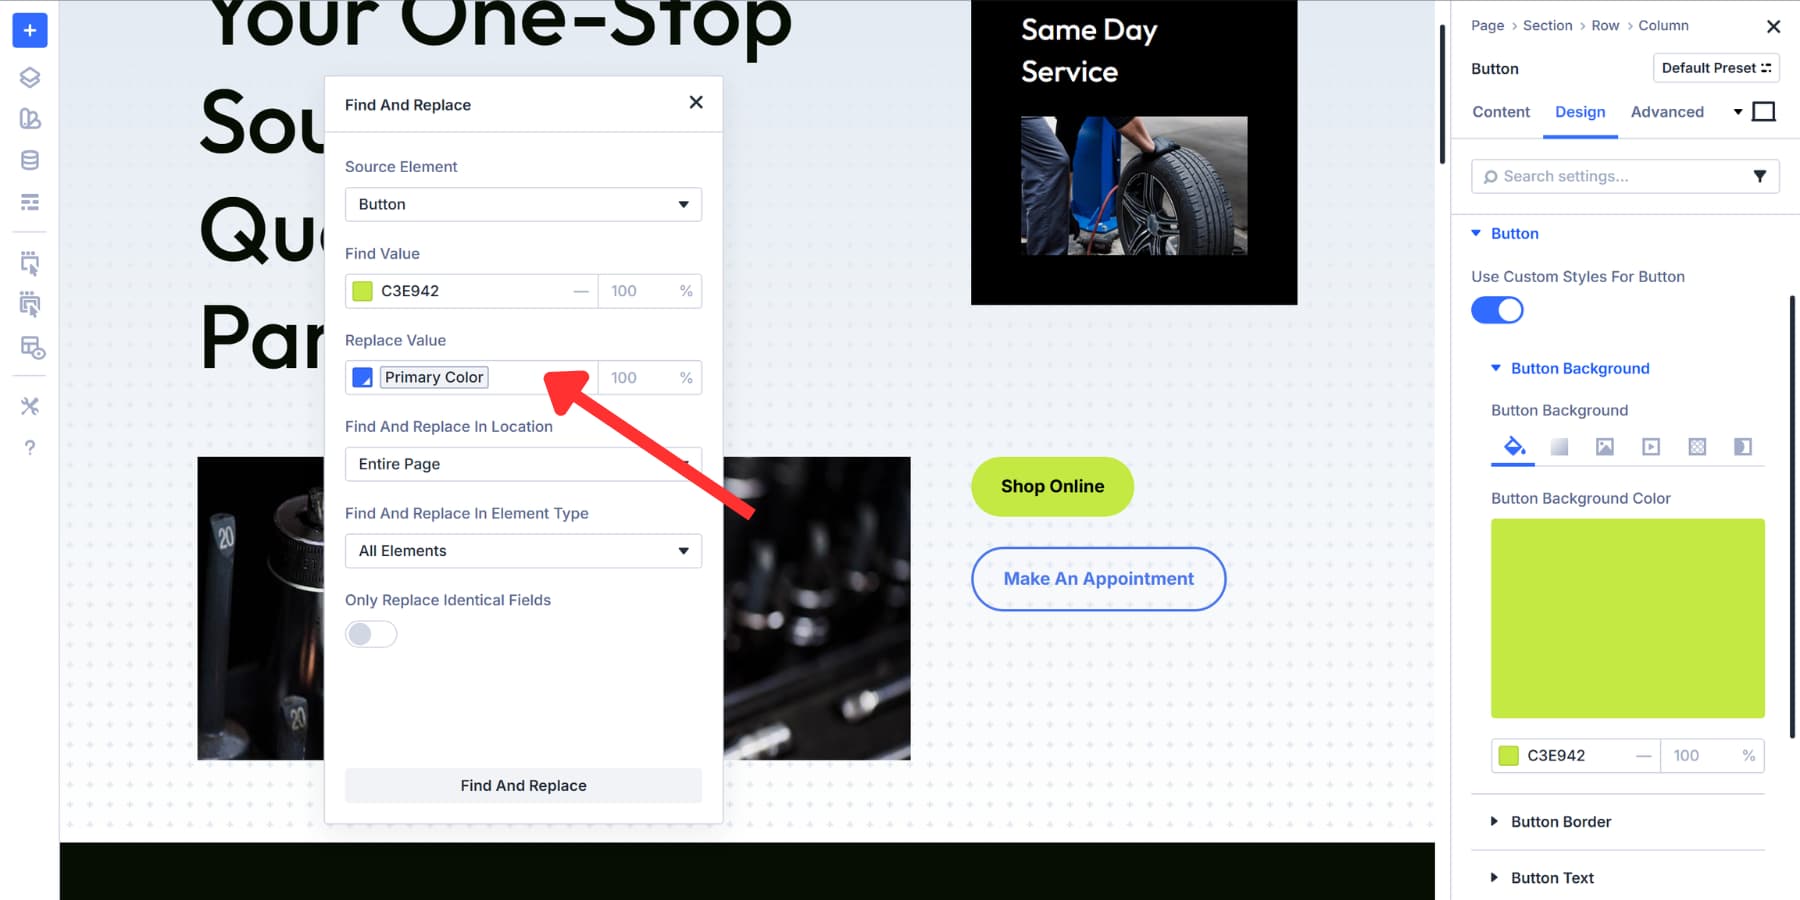
Pick your scope from the dropdown. You can replace within just this element, this element plus everything inside it, the parent container, or the whole page.
The element type selector narrows things down further. Choose all elements if you want broad changes. Pick specific modules, containers, or other element categories when you need precision.
Turn on “Only Replace Identical Fields” if you’re working with common values. This keeps a 10px border radius from accidentally replacing 10px padding. Without this option, Find And Replace touches every field using that value.
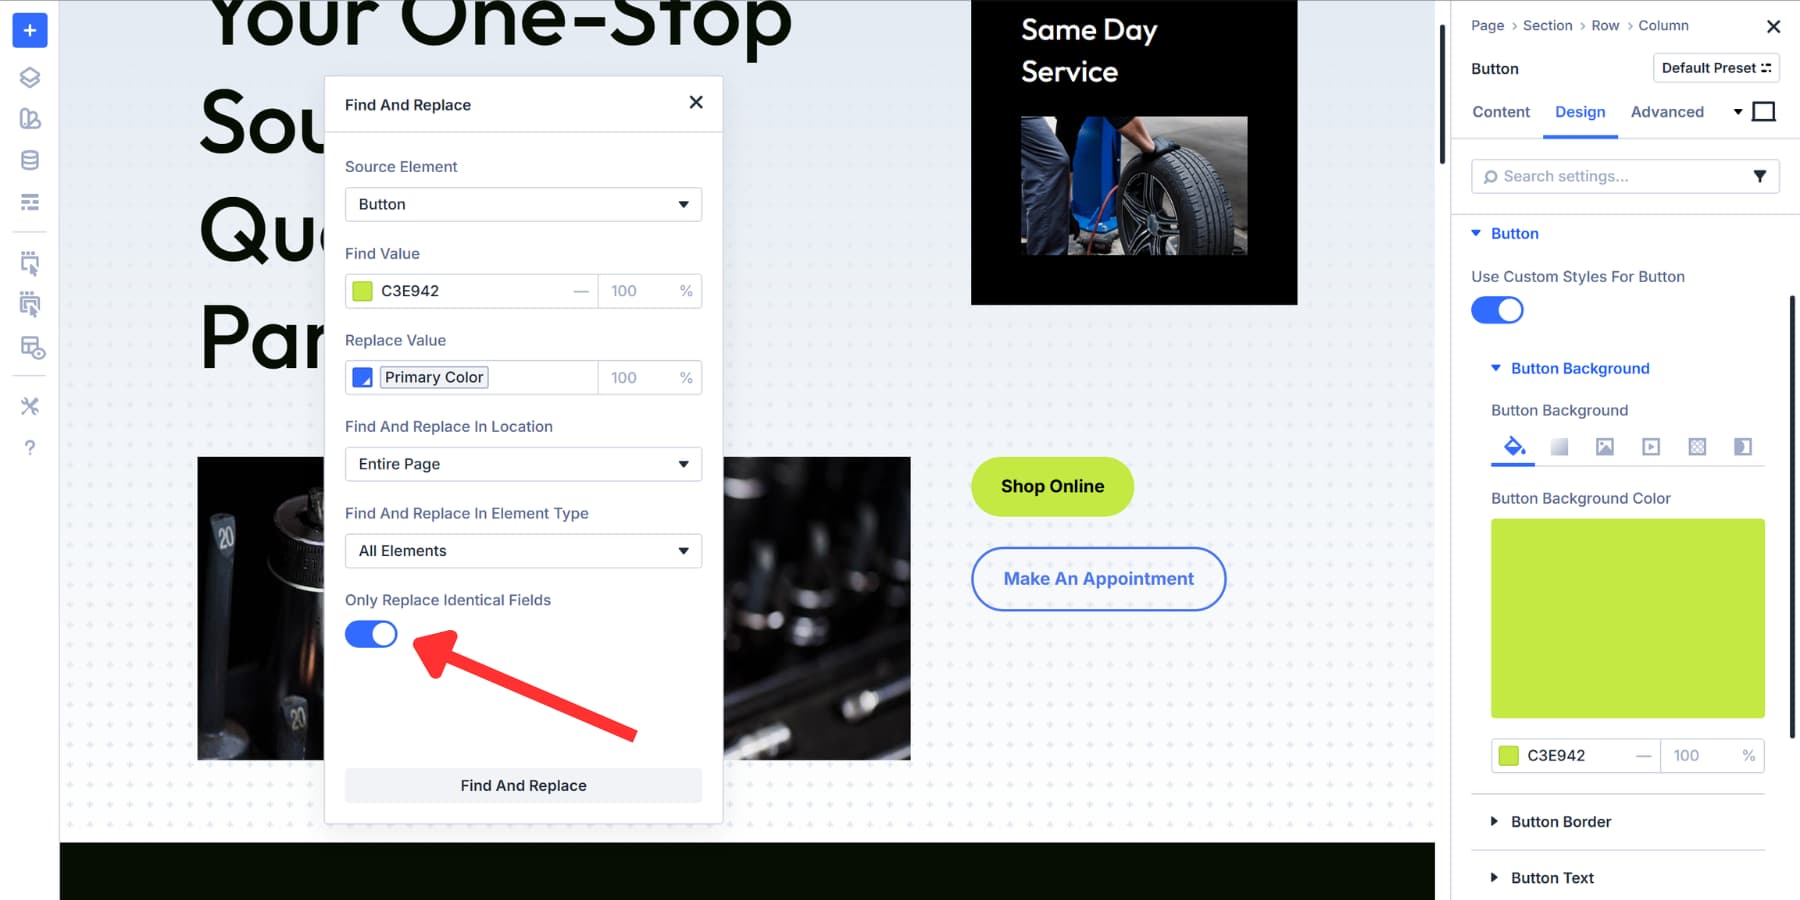
Click Find And Replace. Everything updates. Once you know where you’re headed, the whole process takes about ten seconds.
How Does Extend Attributes Work In Divi 5
Extend Attributes copies any design element from one module and applies it to others across your page. Styles, content, presets, or all three at once. You control what gets copied and where it lands.
This feature is inherited from one of the most popular Divi 4 features: Extend Styles.
The feature works between different module types, too. Add button styling from a Contact Form to every module with a button element. Or grab typography settings from one text module and spread them to specific headings across your site.
You can target individual fields within option groups. For example, you can copy just the background color from a button instead of its entire style.
Or extend spacing values from specific modules without touching anything else. The precision goes as deep as you need. This expands what Divi 4’s Extend Styles could do. That version only handled basic style copying.
Extend Attributes adds content attributes, preset management, and cross-module compatibility. Anything you modify in an element becomes extendable to other elements.
A Quick Overview Of Using This Feature
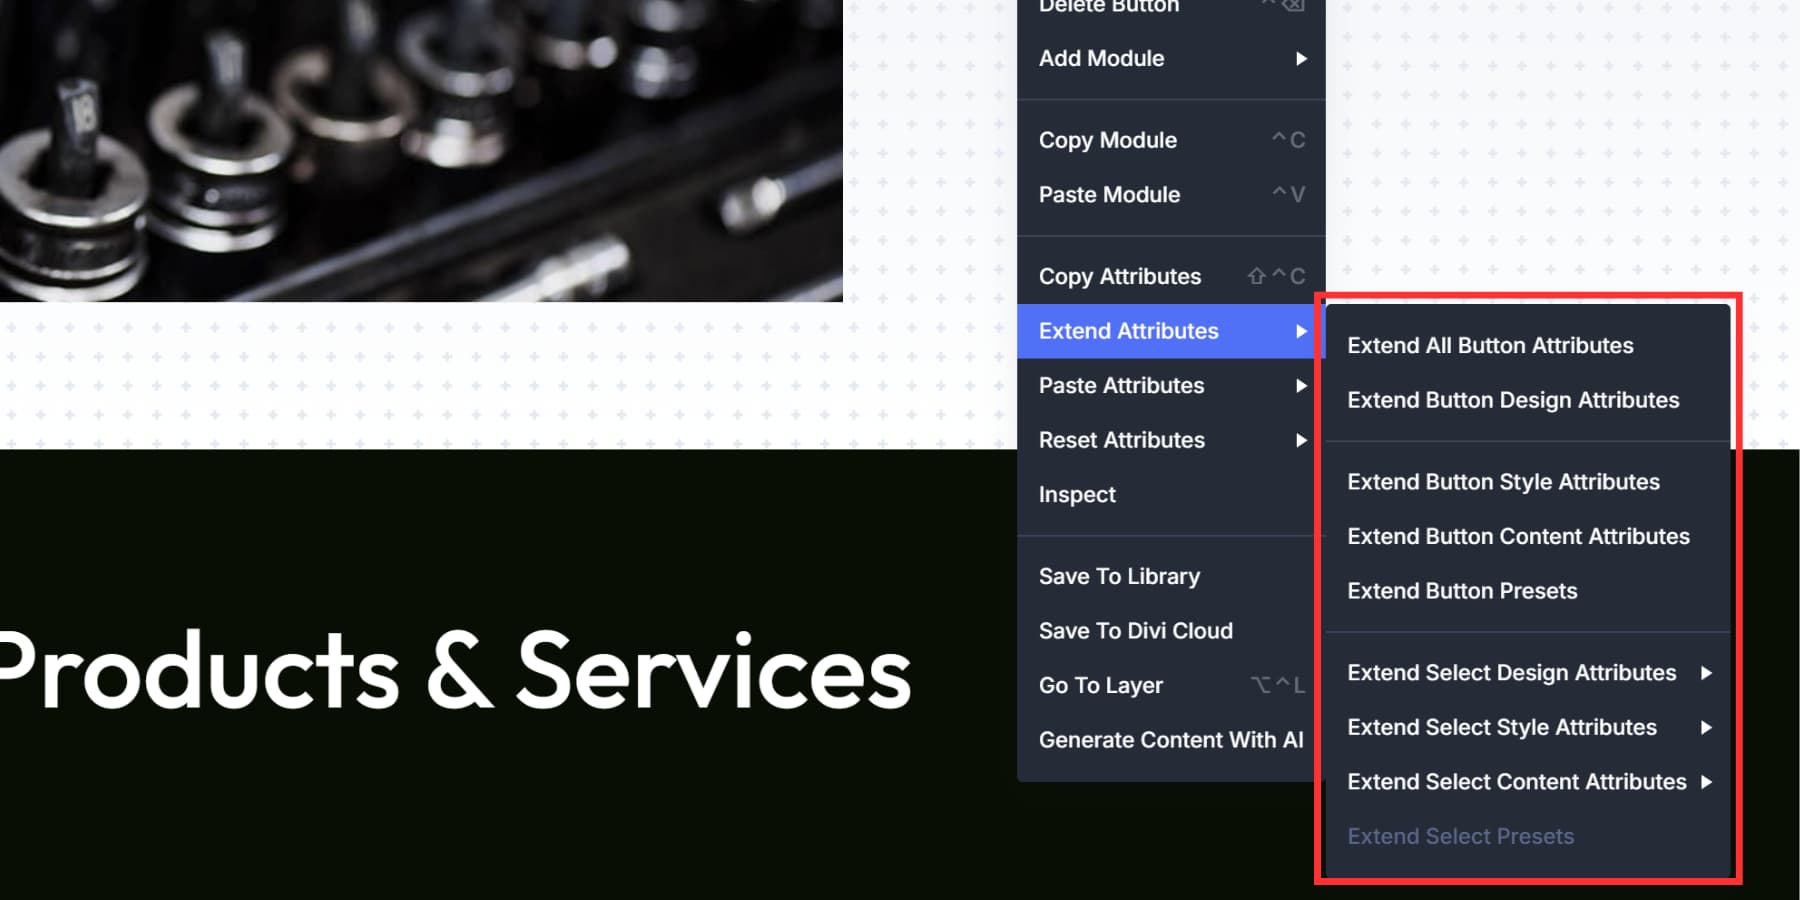
First, style the element as you like. Then, Right-click on the component and look for Extend Attributes.
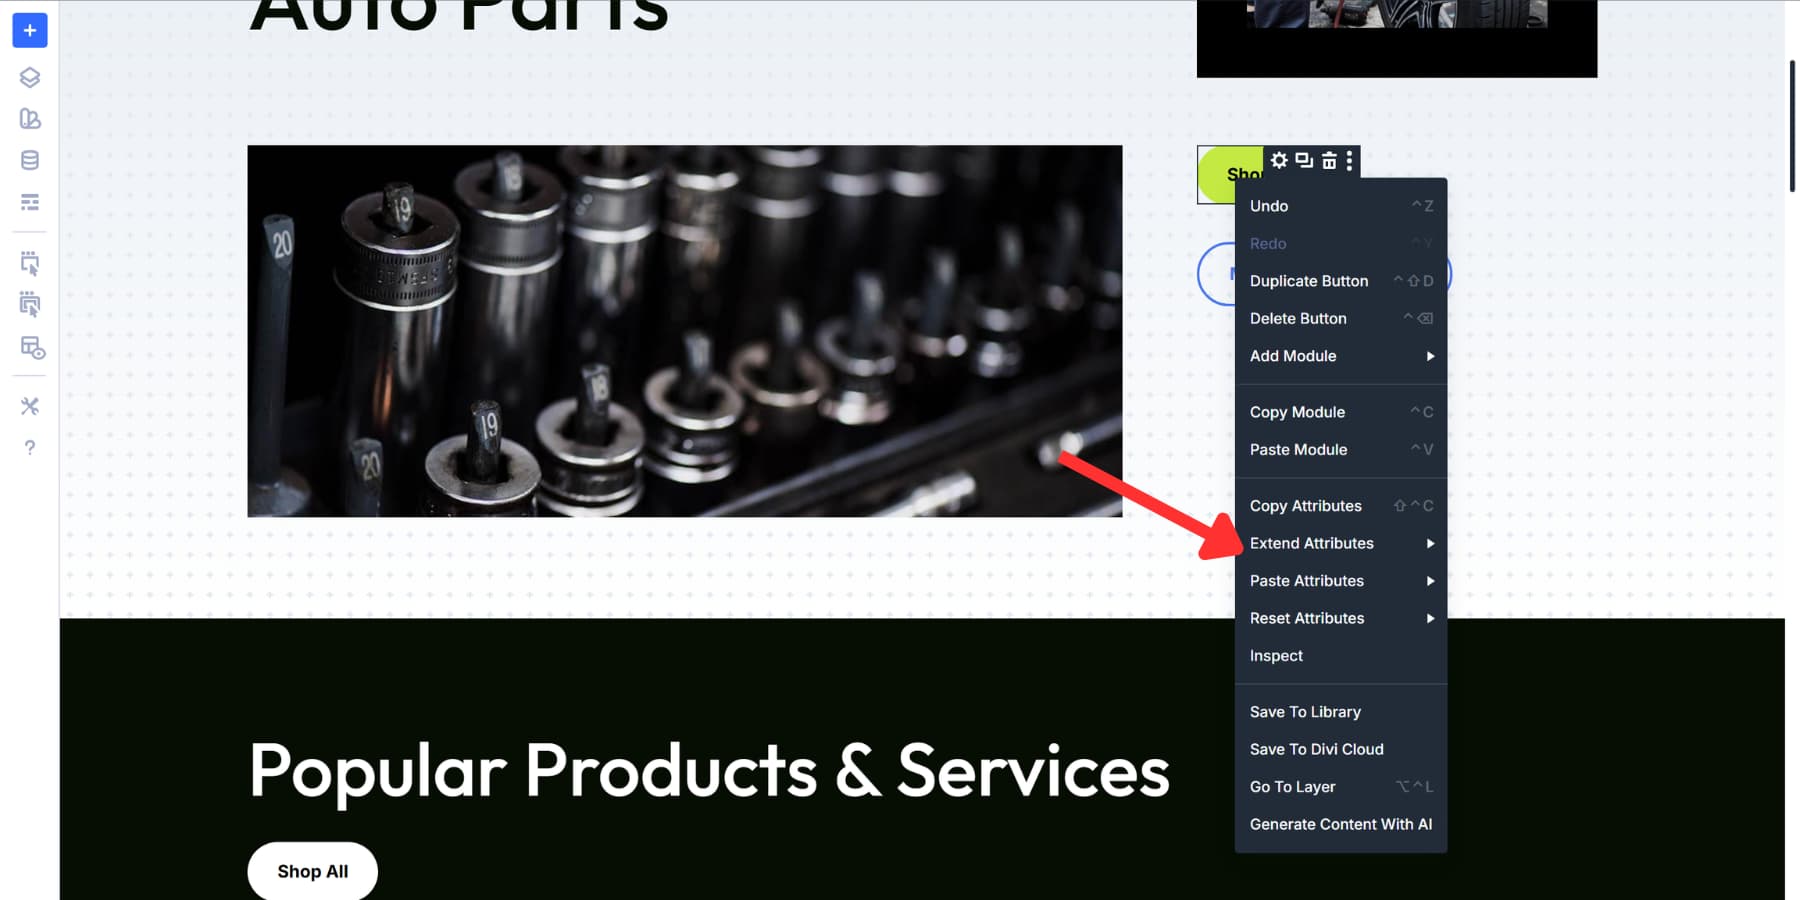
The following panel lets you control everything. If the source element is not already set, select it. Choose where to apply changes: the current column, row, section, or entire page. Select which element types get updated: all modules, specific ones, or categories like containers.
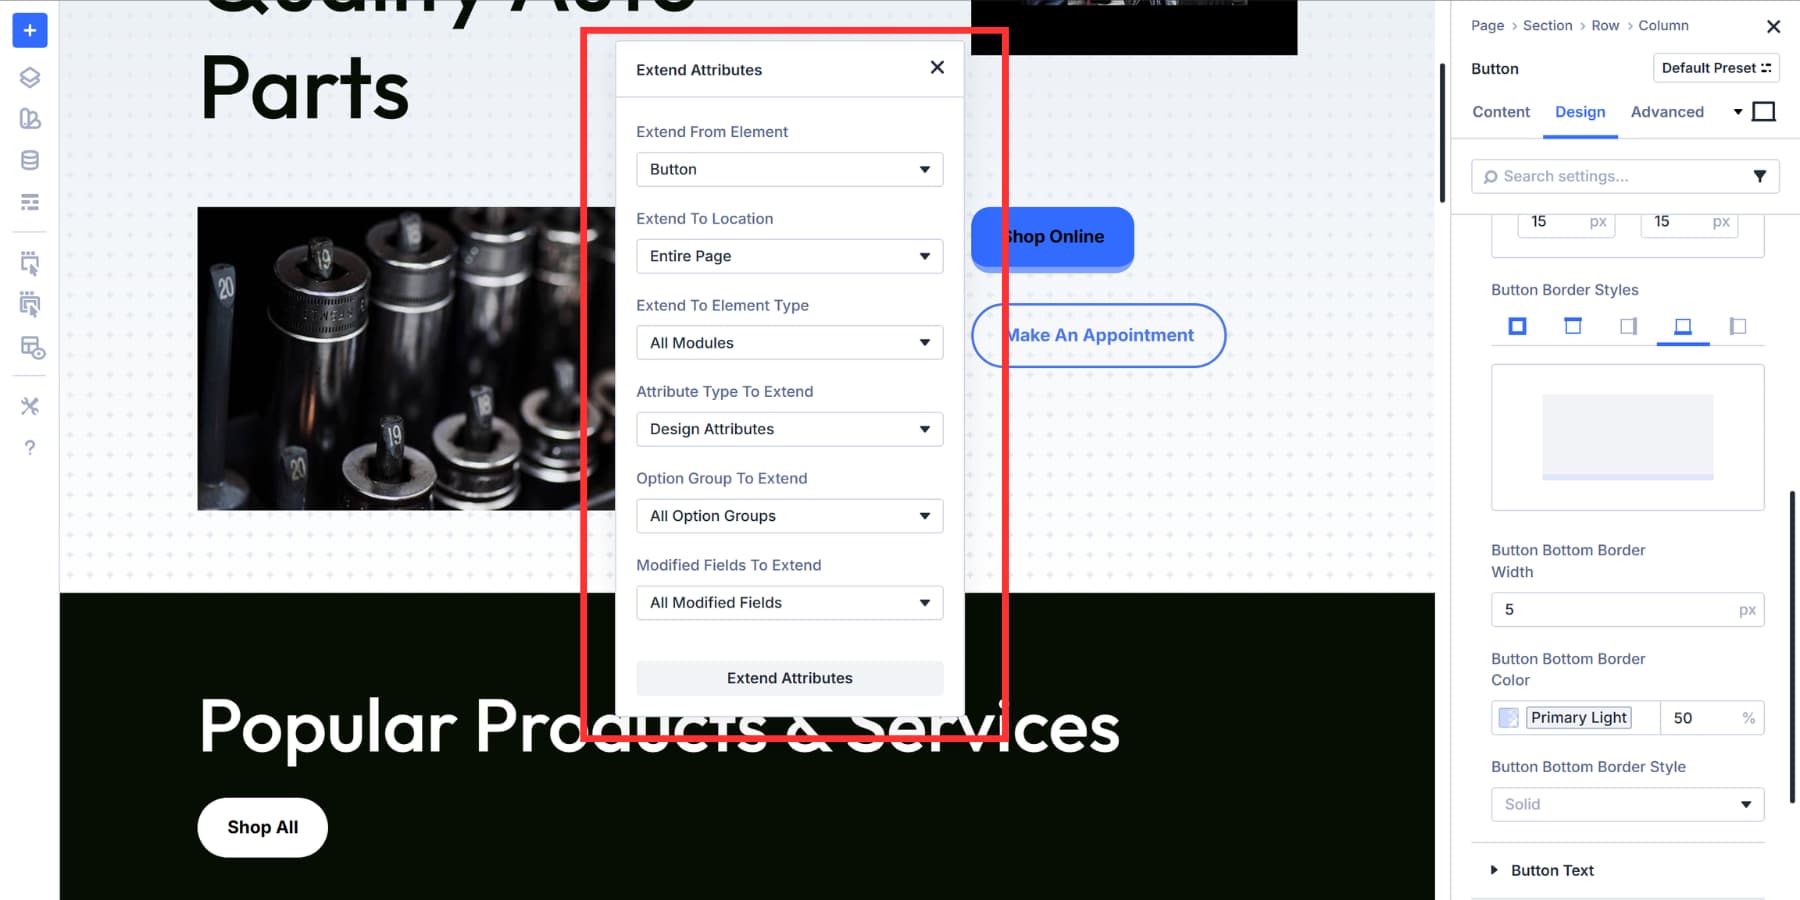
Select what you want to extend. Styles cover colors, fonts, and spacing. Content includes text, images, and code. Presets let you sync preset assignments across elements. You can extend all three categories together or pick individual option groups and fields.
To save time, you can hover over the Extend Attributes option, and you will see a list of options broken down into various attributes. These shortcuts cut down the steps when you know exactly what needs copying.
What’s The Difference Then
All three speed up your work, but they tackle different problems. The confusion might happen because they have some overlap with their scope: colors, fonts, spacing, and other design values. The difference is in how you interact with those values:
When To Use Inspector
The inspector collects and displays. Open it on any element, and you get a full inventory of everything in that selection, organized by type: all colors in one list, all fonts in another, and all presets together.
You’re not looking for anything specific; you’re seeing the whole picture. Click any value and change it. Everything using that value updates together. This works when you need to review what’s in your selection and make edits from that organized view.
For example, if someone built a page months ago and used five different, almost identical shades of gray, you might want to harmonize it. Open Inspector on that section, and you see all five listed together. Pick one and change it. This also helps when you inherit a site from another designer. You need to know what’s actually there before you start changing things.
When To Use Find And Replace
Find And Replace searches and swaps. You know exactly what value needs changing. Right-click a field, enter your replacement value, pick where to apply it, and run. The tool finds every match in your scope and changes it.
You start with a specific target in mind, like replacing fonts. You’re executing a known change, not reviewing what exists. This also works when you’re moving from static fonts to variables. Right-click the font, pick your variable, and replace. Done.
Take this as an example: A company switches from orange to teal. You could open every module and hunt through tabs, or right-click that orange once and swap every instance on the page. It takes about ten seconds.
When To Use Extend Attributes
Extend Attributes copies and applies. You’ve built something worth replicating. Pick that element as your source, choose which properties to copy, select your targets, and push those properties out.
You finish styling the first pricing card. Three more need the same look. Extend those properties to the rest. Or you’re setting up CTA buttons across a landing page. Get one right, then copy those attributes to the others. You’re not fixing things after the fact. You’re building with consistency from the start.
The Difference Illustrated
Still confused? Here’s a quick table that shows all differences side by side:
| Inspector | Find And Replace | Extend Attributes | |
|---|---|---|---|
| How It Works | Gathers everything in your selection and sorts it by type | You pick a value and swap it everywhere it appears | Grabs properties from one element and spreads them to others |
| What You Start With | Any element, no prep needed | The specific value that needs changing | An element you already styled |
| Choosing Targets | Click an element, the panel refreshes | Set filters for element types and matching fields | Select which elements get the copied properties |
| The Flow | Opens a panel, you browse and edit from there | Right-click a field, type replacement, hit go | Right-click your source, pick what to copy, choose where it goes |
| Grab It When | You inherit someone else's work and need to see what's actually there | A client asks you to change their brand color across 50 modules | You nailed the first element and the rest need to match |
The pattern becomes clear after using them a few times:
- Inspector for reviewing and bulk editing grouped values.
- Find And Replace for targeted swaps of specific values.
- Extend Attributes for copying properties from source to targets.
Streamline Your Web Design Workflow In Divi 5 Today!
These features exist because page building shouldn’t feel like a chore. Divi 5 puts them in your hands so you can build sites the way you actually want to work: faster setups, cleaner designs, and less clicking around.
The tools are already there in your Visual Builder. Right-click, pick one, and see what happens. Your workflow changes the moment you start using them. Build something today and test it yourself.


So am I correct in assuming when updating entire site, Inspector and Find and Replace will only work accurately if you have set up Variables and/or Presets (still trying to work out which is the best option to use here!)?
Where as using Extend Attributes only works on one page at a time and doesn’t rely on Variables and Presets?
Hey, Dave!
When updating an entire site, Inspector and Find and Replace can work accurately regardless of whether you have set up Variables or Presets, but their efficiency is enhanced by the use of Presets and Variables. Inspector provides a full inventory of all design values in a selection, making it easier to review and bulk edit grouped values. Find and Replace targets a specific value and swaps it across the selected scope, which is very handy for known changes. Both work across a single page and are not strictly tied to using Variables or Presets.
On the other hand, Extend Attributes copies properties from one element and applies them to others, typically within the current page (column, row, section, or page) but does not work across multiple pages. It is less reliant on Variables and Presets because it directly copies styles, content, and presets from the source to targets on the same page.
Hope this helps. 😊