
Font updates can be a headache. Change a title font, and suddenly, you’re tracking down every spot it appears. Miss a heading or two, and your design immediately feels off. Manually updating fonts invites inconsistency.
Divi 5 solves this with font variables and presets. Instead of chasing down every instance, you can set your fonts once and let the system handle the rest. Typography stays clean and unified, no matter how many modules you use. Take a look at how simple it can be.
Why Static Fonts Can Create Problems
Static font setups create a web of complications that grow worse over time. When you add fonts directly into each element, you scatter typography choices across hundreds of different places.
You build a site using Playfair Display for headings and Poppins for body text. A few months later, you want to switch to a more modern font stack. Now, you hunt through every module, every preset, every custom setting to find where those fonts live. Miss even one heading buried deep in a testimonial section, and your design can look broken.
When you manually update fonts one by one, you may accidentally use different sizes or weights. You update most headings to 32px but miss a few that stay at 28px. Your once-cohesive design now feels unbalanced.
This scattered method turns simple font changes into major projects. What should take minutes stretches into hours of tedious hunting and updating. You spend more time managing typography than actually designing with it.
What You Should Use Instead: Divi 5’s Design Variables & Presets
Design Variables store your design settings, which you can reuse anywhere. Set a font once, save it as a Design Variable, then use it across your site. Change the variable later, and all elements using it update automatically.
Divi offers six variable types: Numbers, Text, Images, Links, Colors, and Fonts. Two default font variables are ready to use: one for headings and one for body text. The Variable Manager is in the left sidebar under the database icon.
These variables work in fields that don’t support them, like number fields, font fields, and spacing settings. Click the variable icon next to any supported field to see your options.
What Option Group Presets Do
Option Group Presets save specific style groups, such as typography, borders, or spacing, not whole modules. For example, you can create a preset just for heading fonts and sizes.
When you apply an Option Group Preset, it only changes that style area. The rest of your module stays the same. You can combine different presets on one element without issues. Mix Design Variables with Option Group Presets for more flexibility. Create presets that use your variables. When you update a variable, all presets using it update too.
Step-By-Step Guide To Create A Dynamic Font System With Divi 5
Setting up font variables takes about twenty minutes. Once they work, font changes happen instantly across your whole site. Here’s how to get there:
1. Create Font Variables For Your New System
Open Variable Manager by clicking the database icon on your left sidebar. Go to the Fonts tab. You’ll see two default variables: one for headings and one for body text.
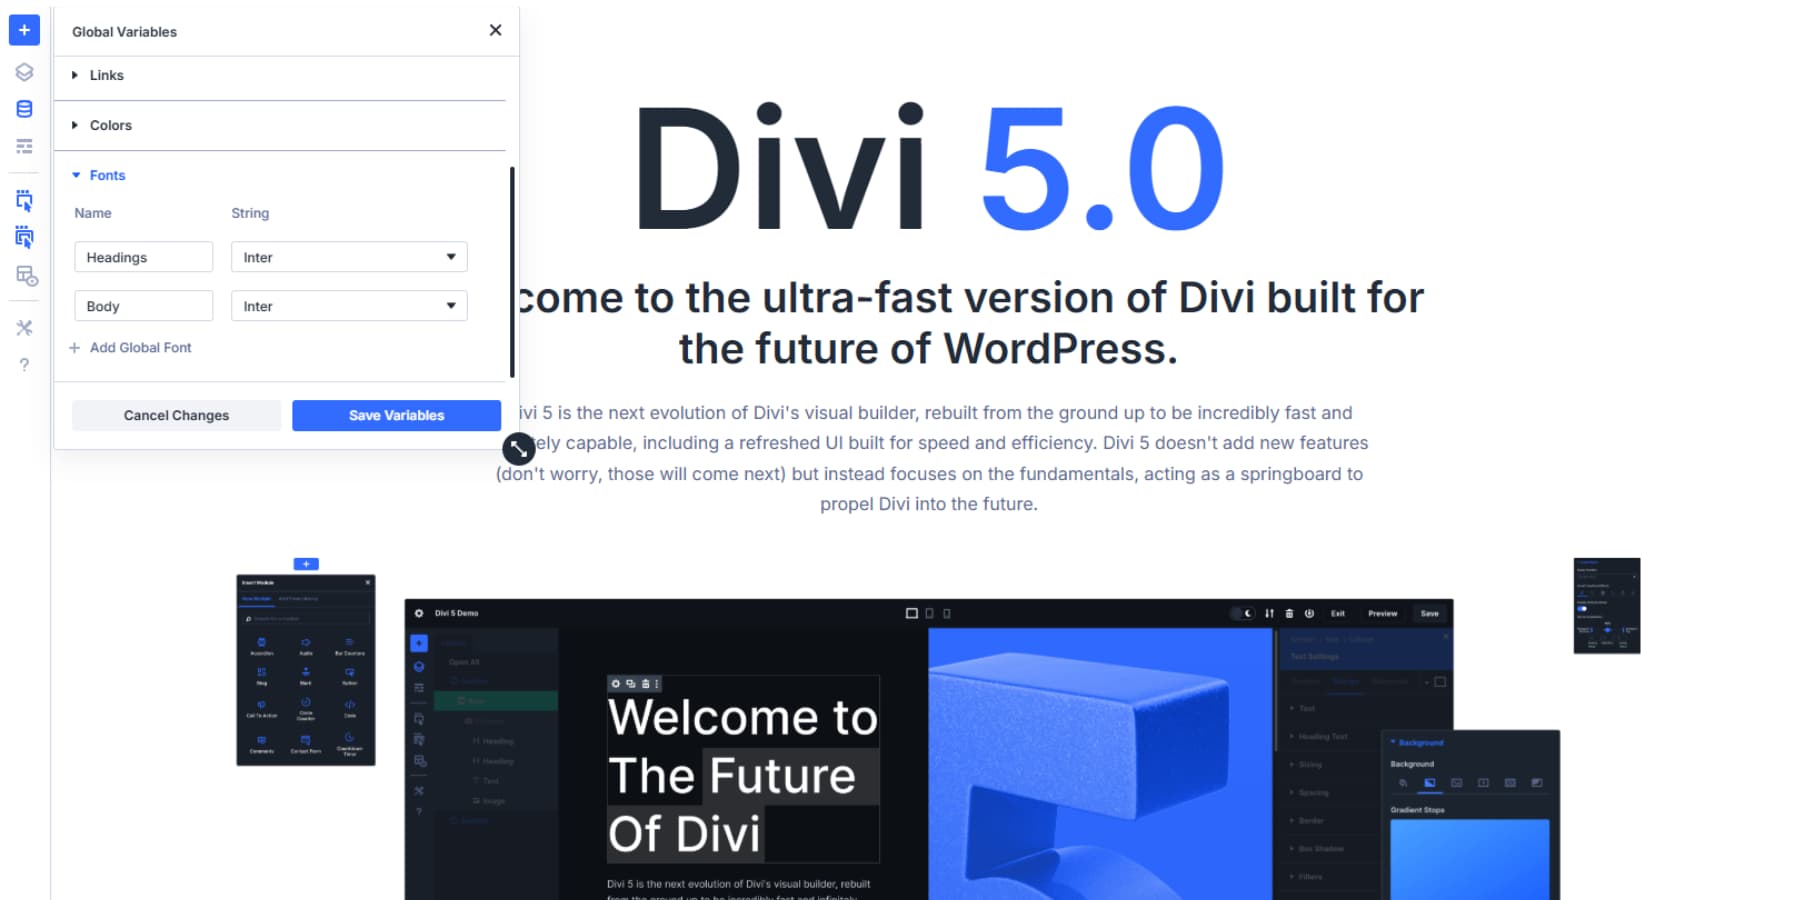
- Set up your main fonts: Click the heading variable. Pick your font family and weight, then save it. Do the same for body text, but choose something clean and easy to read.
- Add more fonts if needed: Some designs need extra fonts for quotes, testimonials, or special text. Click “Add New Variable” and give it a clear name.
- Fill in all the details: Each variable holds your font family, weight, style, and other settings. Use bold weights for headlines, regular weights for body text, and italics when you want to add emphasis.
- Keep your names simple: Instead of confusing labels, call them “Quote Font” or “Highlight Font.”
- Remember to save: Your changes won’t stick until you hit the save button.
Most websites only need heading and body fonts. Only add extra variables for special design needs, not tiny text tweaks. Fewer variables make creating new content much easier.
2. Add Number Variables For Font Sizes
Switch to the Numbers tab in Variable Manager. Here, you create size variables that work with your fonts. Think of these as your typography scale.
Start with your heading sizes. Create variables named H1, H2, H3, and so on. Set each one to a different size that makes sense for your design. You can use regular pixel values like 32px or responsive units like clamp() for sizes that adapt to other screens.
Body text needs its size variable, too. Call it something like “Body Size” and set it to a comfortable reading size, usually around 16px to 18px.
You can also create variables for special text needs. Maybe you want a “Small Text” variable for captions or a “Large Text” variable for testimonials. Name them clearly so you remember what they’re for later.
These number variables work anywhere you need consistent sizing. Use them for line heights, spacing, or any measurement that appears multiple times across your site. When you update a number variable, everything using it changes automatically.
Most websites only need heading and body fonts. Only add extra variables for special design needs, not tiny text tweaks. Fewer variables make creating new content much easier.
3. Use Find And Replace To Swap Static Fonts
Right-click any font field in your module settings to see the Find and Replace option. This opens a panel where Divi loads your current font settings automatically. You can now swap that static font with one of your Design Variables.
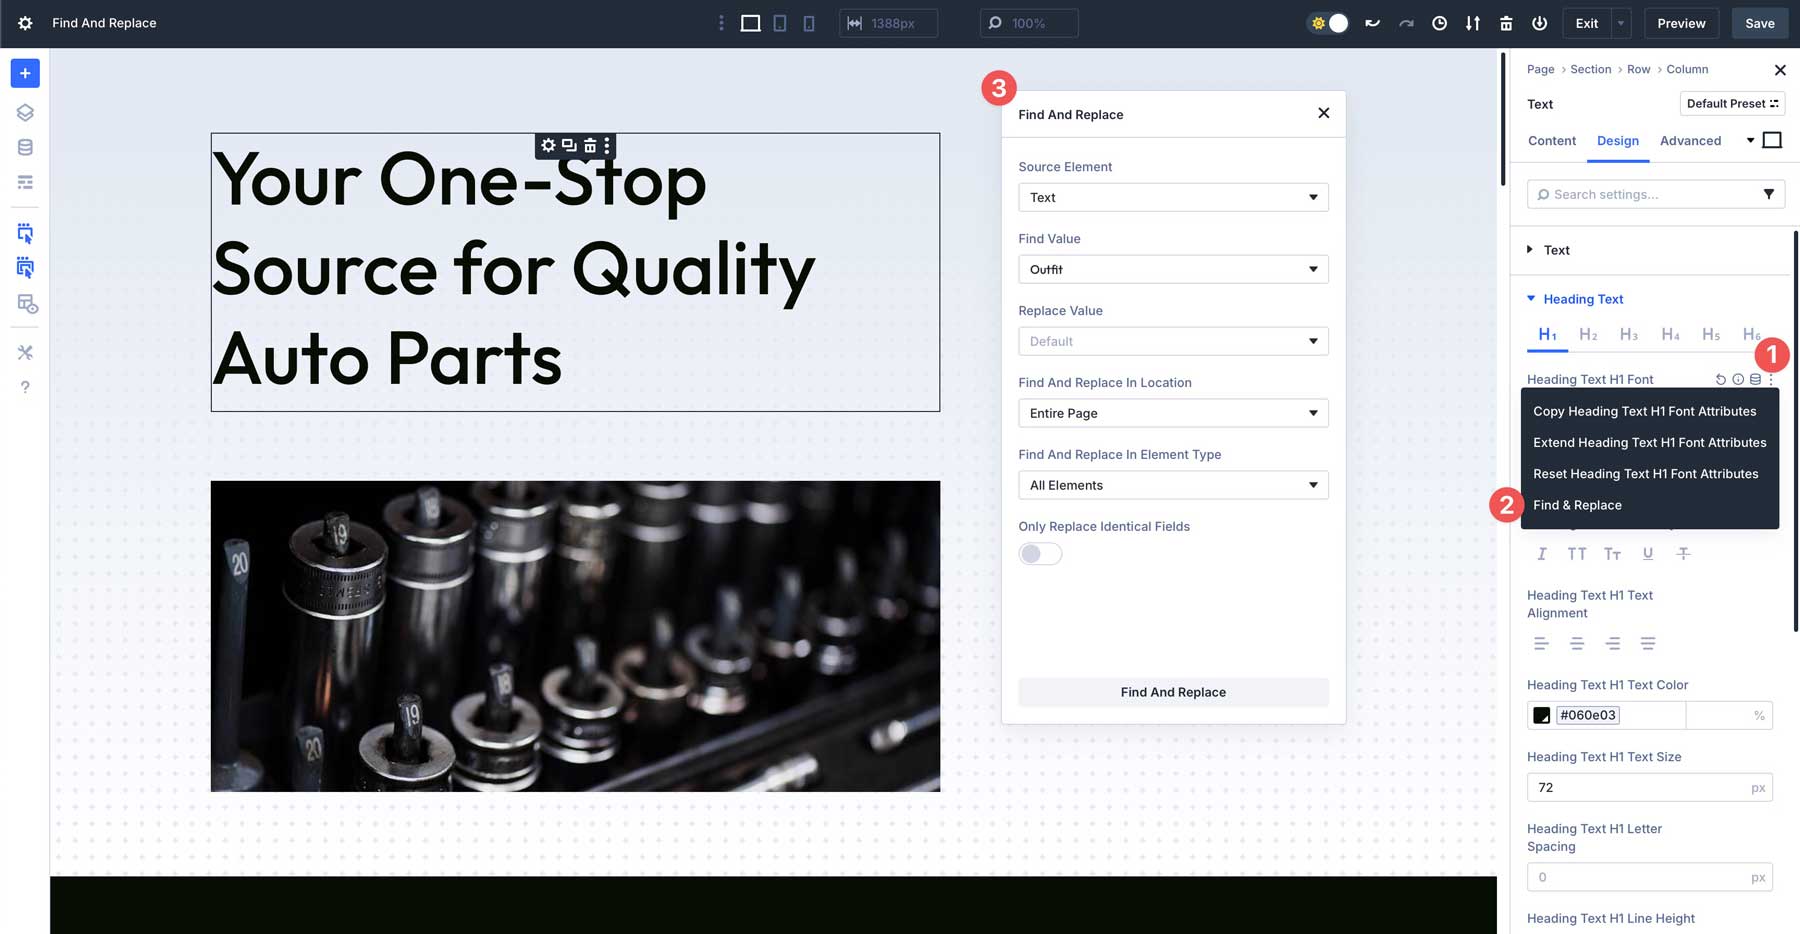
The Source Element field shows which module you started from. You can change this to pick any other element on your page as your starting point.
The Find Value displays whatever font you want to replace. Instead of picking another static font, set your Replace Value to one of your font Design Variables.
Find and Replace works for font sizes, too. Right-click on any font size field to access the same replacement panel. This lets you swap element-level sizes like 24px with your number variables.
Look for text modules where you manually set font sizes. These scattered size settings create the same problems as static fonts. When you want to adjust your typography scale, you end up hunting through every module to find each size. Replace these static sizes with your H1, H2, Body Size, or other number variables.
Set Your Replacement Boundaries
Find and Replace Location controls where changes happen. Pick “Entire Page” to update fonts across your whole layout. Choose “Current Element and Children” to limit changes to that specific section and anything nested inside it.
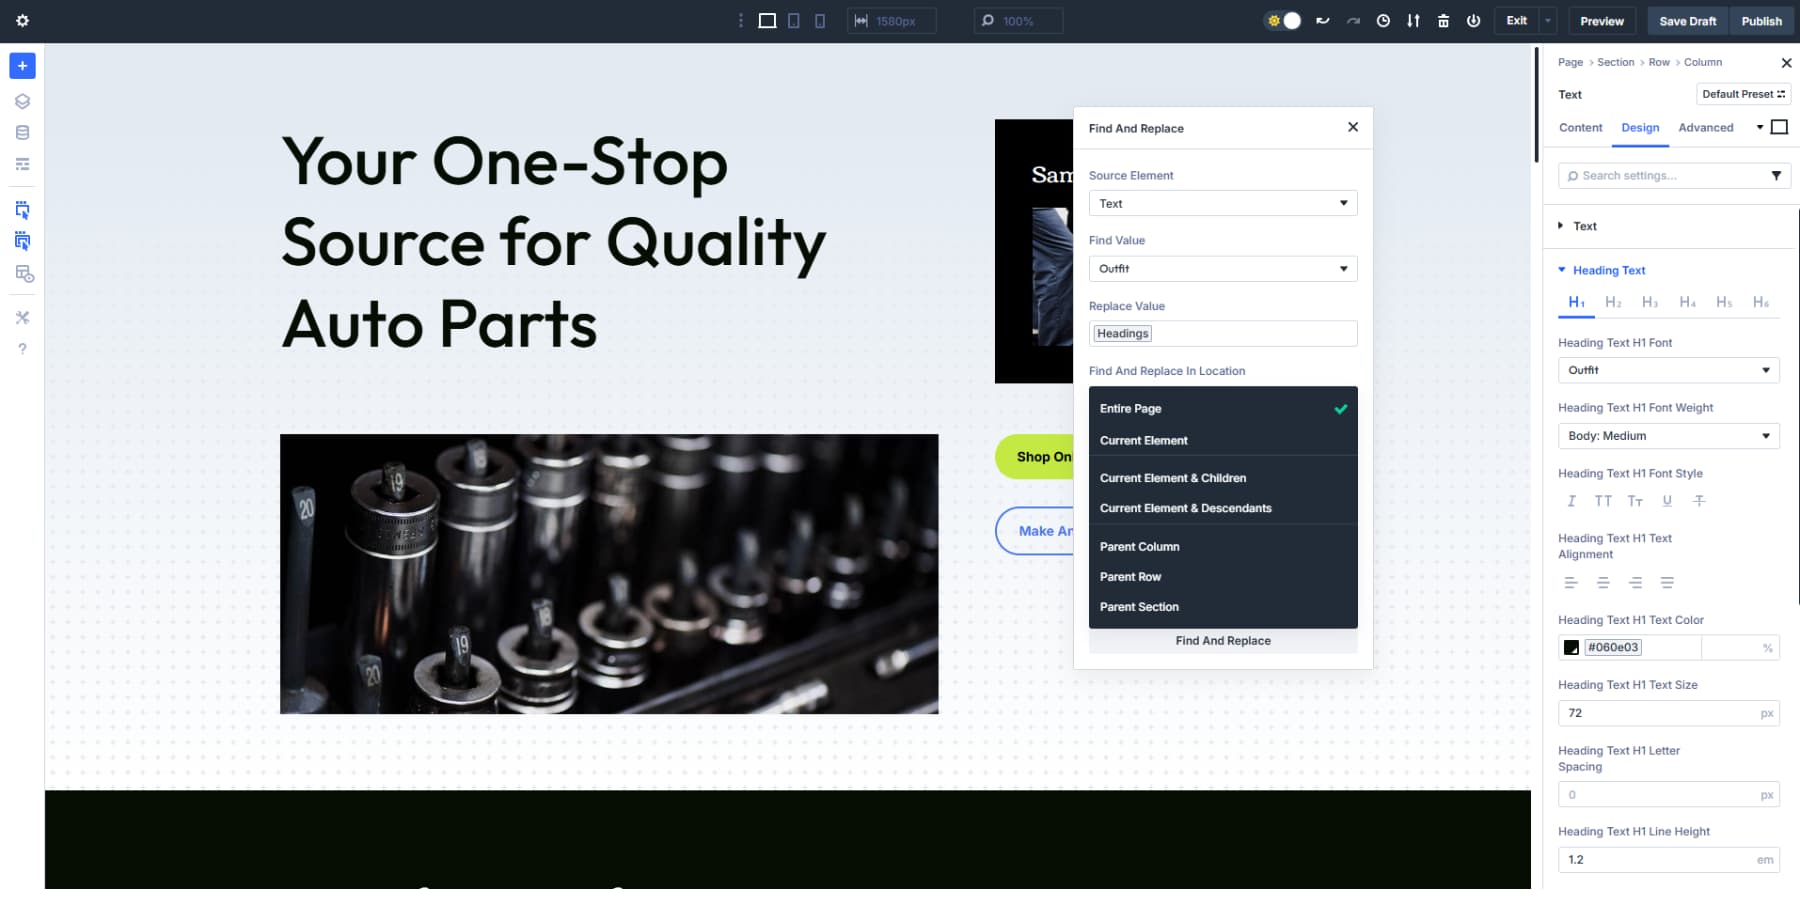
You can also target parent containers or specific page areas.
Find and Replace Element Type helps you focus on specific modules. Select “All Elements” for a complete font swap, or choose “Modules” to skip containers and structural elements. You can get even more specific by targeting only certain module types.
Avoid Accidental Replacements
The “Only Replace Identical Fields” option prevents unwanted changes. Turn this on when you want to replace fonts without affecting other settings that might share the same value.
This keeps your border radius at 10px even when you’re replacing a font that happens to be called “10px” or something similar.
Without this setting, Find and Replace looks for your target value everywhere. With it enabled, the system only changes actual font fields, leaving other design settings alone.
4. Work Through Your Font System
You’ll need separate Find and Replace operations for different font weights and styles. Your site might use the same font family in regular and bold weights. Handle each variation individually, replacing them with the appropriate Design Variables you created earlier.
Each time, the process is the same: right-click the font field, set your replacement value to a Design Variable, choose your scope, and apply the changes. Repeat this for each static font that needs updating.
5. Create Presets With Your Variables
Access any text module and navigate to the Design tab. Locate Typography and click the preset icon. Select your heading font variable from the dropdown menu. Apply your H1 number variable for sizing.
Configure line height and spacing values. Name the preset “Main Heading” and save it. Click the star icon to set this as your default. New text modules will automatically adopt these settings. All existing modules with the same heading tag and no styles will also inherit these settings.
You can repeat this process for each heading level. Each preset maintains consistency while serving different purposes.
These typography presets work with any module containing text fields. Blurb modules, accordion content, testimonials, and contact forms all accept the same presets. This cross-module compatibility eliminates repetitive styling tasks.
Option Group Presets target specific style categories only. Apply a heading preset to button text while keeping the button’s background and border settings intact.
6. Extend Your New Variables Across All Elements
Right-click any element using your new variables. Select “Extend Attributes” from the menu. Configure the source element as your recently updated module.
Set the location to “Entire Page” for complete updates. Under attribute types, choose “Styles” to focus on design elements only.
Enable “Only Replace Identical Fields” to prevent unwanted changes to padding, margins, or other numeric values that might match your font sizes. Select “All Elements” to update modules and containers, or choose “Modules” to target content elements specifically.
Process complex pages in smaller sections rather than site-wide updates. Select “Current Section” to limit changes to one area at a time. Start with your header section. Apply variable extensions, review results, and proceed to the main content areas. Complete the footer section last.
This methodical approach identifies formatting conflicts early and controls the update process.
Divi 5 Makes Typography Easier
You used to switch from Playfair Display to something modern and update most headings, but miss that testimonial on page three. Your site looked lopsided for weeks.
Divi 5‘s variables streamline your website’s typography. Change your heading variable from the database icon in the sidebar, and every text module updates instantly. That contact form footer is included.
Next time you rebrand, you’ll update two variables instead of clicking through fifty modules. The Find and Replace tool catches what you’d normally miss. Your typography stays tight, and your weekends stay yours.


Is there a way to include fonts stored locally on the web server using font variables?
I have the same question as @Klaus:
Is there a way to include fonts stored locally on the web server using font variables?
That would be really helpful.