
Divi and its built-in position options are a convenient design tool for the precise positioning of any Divi element, including buttons. Most of the time, we rely on the default static position of a button that keeps with the flow of the document (or page). However, if we know how to position buttons absolutely, we can create some unique and practical button layouts for our Divi content.
In this tutorial, we will show you how to create 4 different button layouts that will uniquely accent Divi’s Blurb module. This will come in handy when using blurbs on your website.
Let’s get started.
- 1 Sneak Peek
- 2 Download the Divi Button Layouts for FREE
- 3 Download For Free
- 4 What You Need to Get Started
- 5 Creating Button Layout #1: Dual Bottom Buttons
- 6 Creating Button Layout #2: Three Side Buttons
- 7 Creating Button Layout #3: Scattered and Scaled Buttons
- 8 Creating Button Layout #4: Pull-Tab Buttons
- 9 Final Results
- 10 Final Thoughts
Sneak Peek
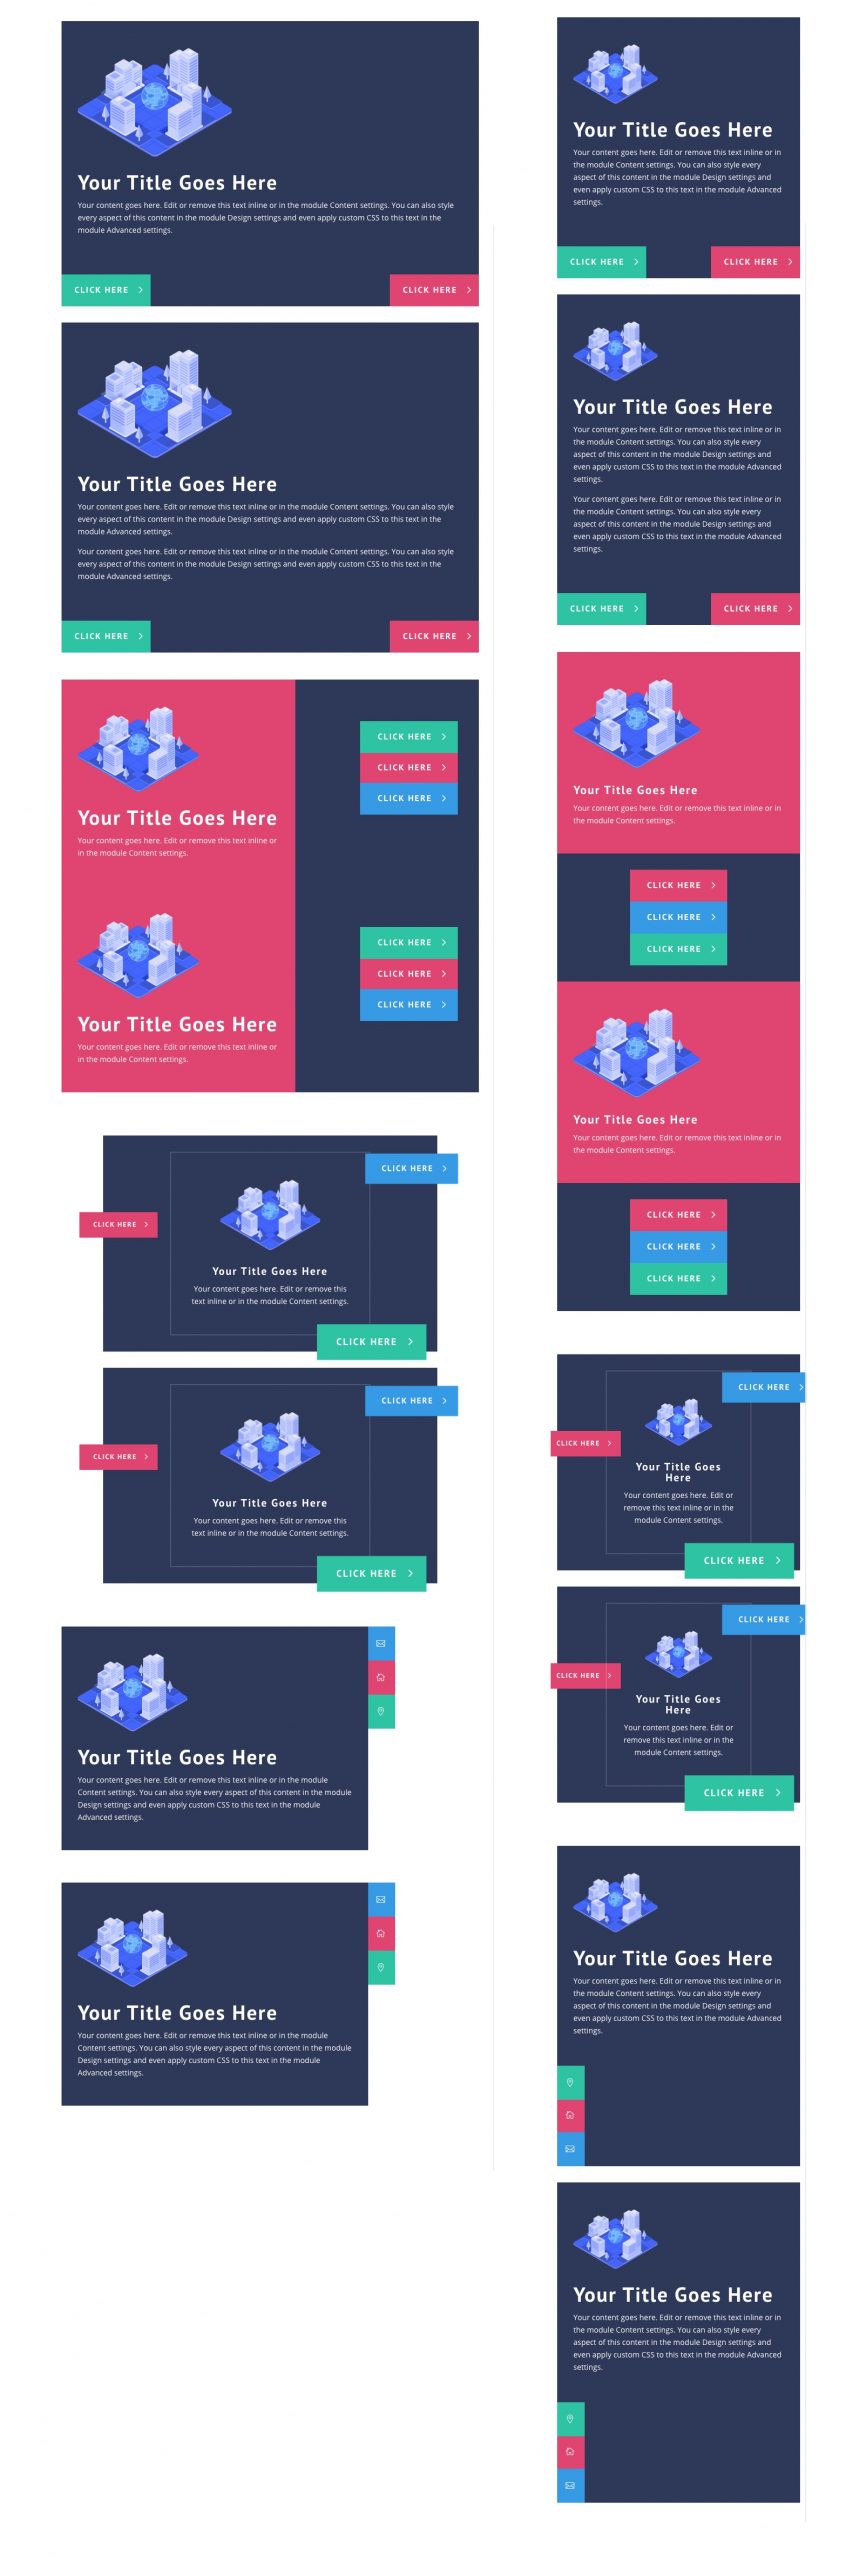
Check out this quick look at the four button layouts we will build in this tutorial.
To lay your hands on the button layout designs from this tutorial, you will first need to download it using the button below. To gain access to the download you will need to subscribe to our newsletter by using the form below. As a new subscriber, you will receive even more Divi goodness and a free Divi Layout pack every Monday! If you’re already on the list, simply enter your email address below and click download. You will not be “resubscribed” or receive extra emails.

To import the layout to your page, simply extract the zip file and drag the JSON file into the Divi Builder.
Let’s get to the tutorial, shall we?
What You Need to Get Started

To get started, you will need to do the following:
- If you haven’t yet, install and activate the Divi Theme.
- Create a new page in WordPress and use the Divi Builder to edit the page on the front end (visual builder).
- Choose the option “Build From Scratch”.
After that, you will have a blank canvas to start designing in Divi.
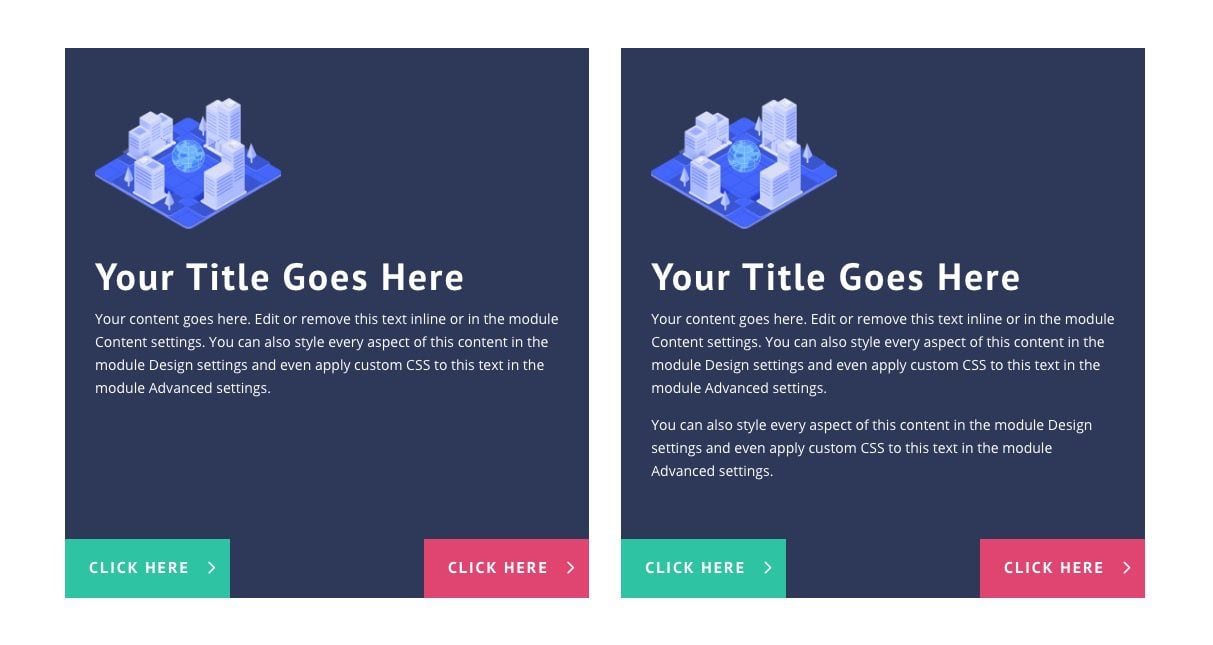
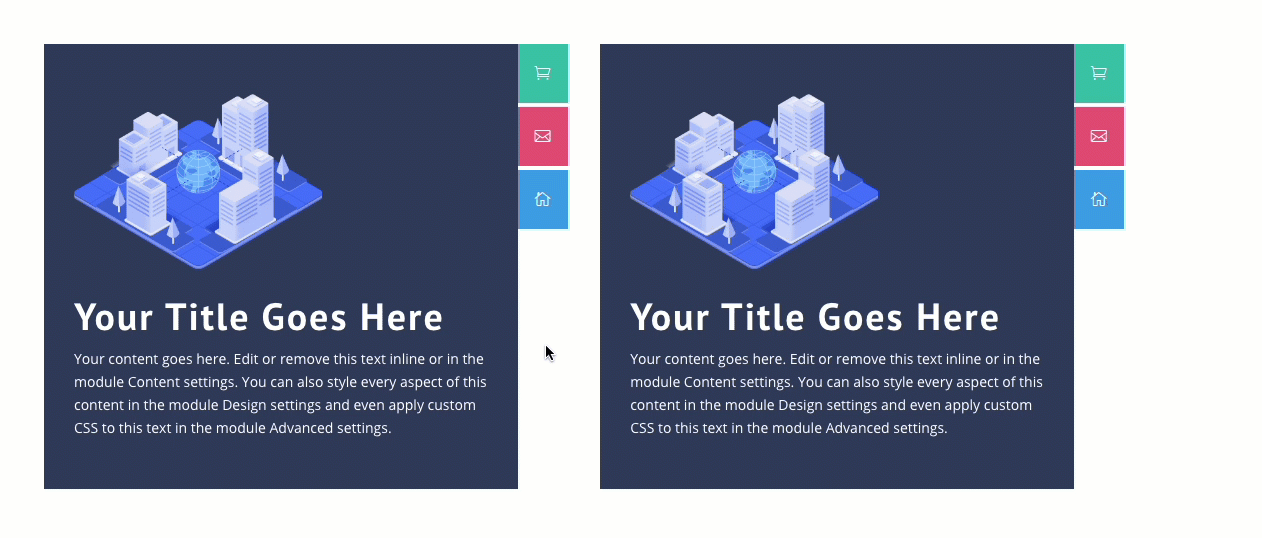
For the first of our four button layouts, we are going to create dual bottom buttons under a blurb module. This is a great option for featuring content (like services) that require two CTAs. Plus, this is a great way to keep your buttons stuck at the bottom of columns with equal heights.
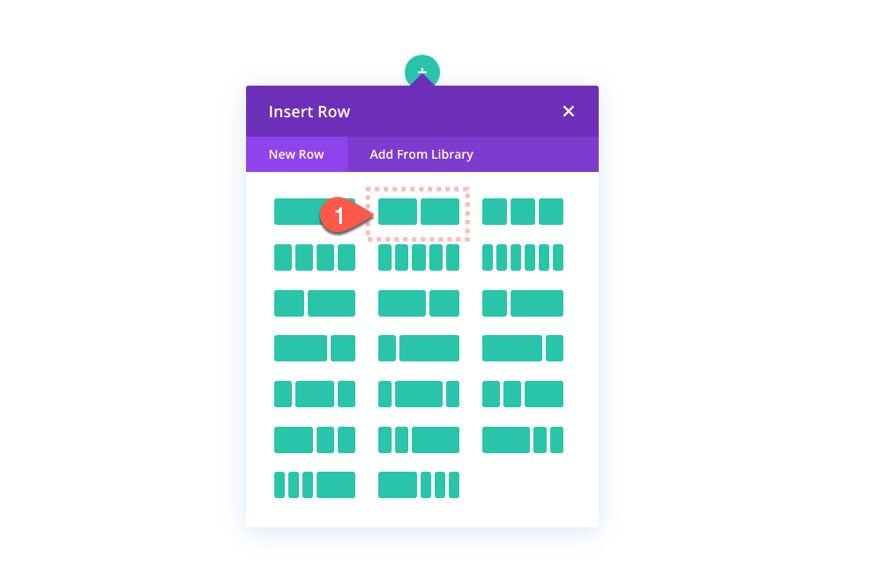
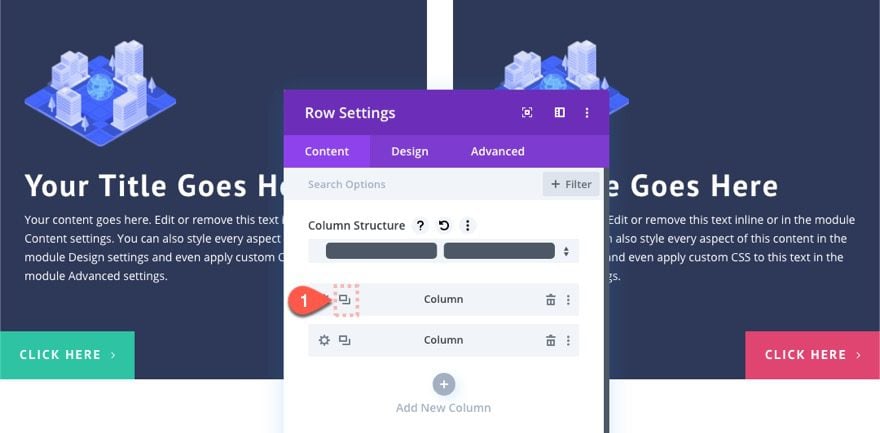
To start, add a two-column (0ne half one half) row to the section.
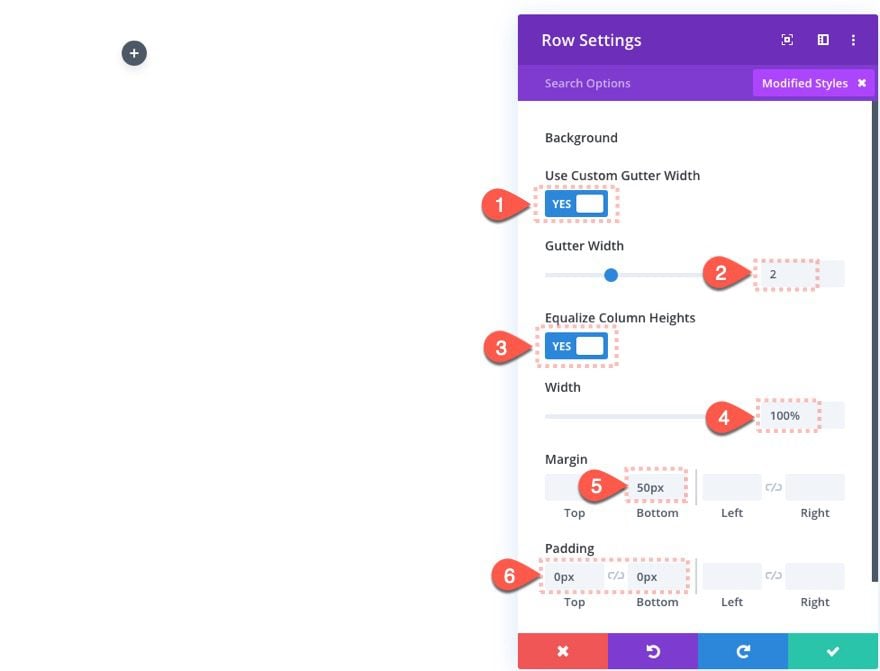
Row Settings
- Use Custom Gutter Width: YES
- Gutter Width: 2
- Equalize Column Heights: YES
- Width: 100%
- Margin: 50px bottom
- Padding: 0px top, 0px bottom
Column 1 Settings
- Background Color: #2e3858
- Padding: 50px bottom
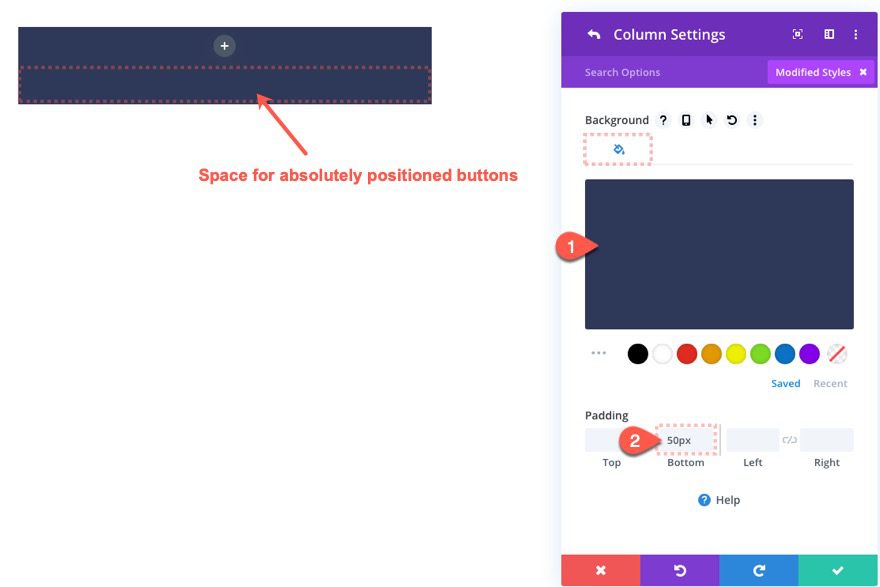
This bottom padding will create the necessary space for when we add the absolutely positioned buttons.
Blurb Module Design
Next, add a blurb module to column 1.
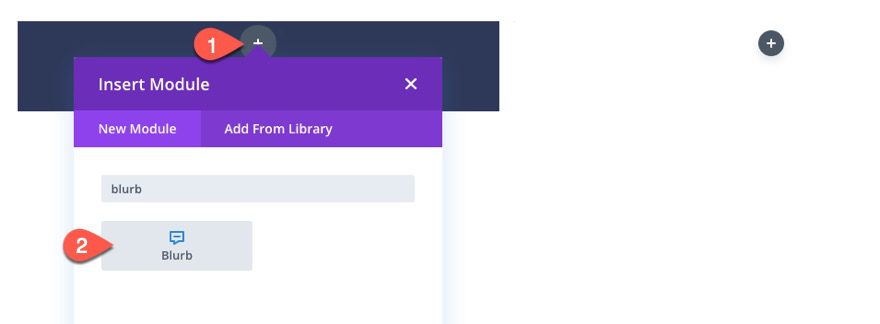
Then upload an image to the blurb module as follows:
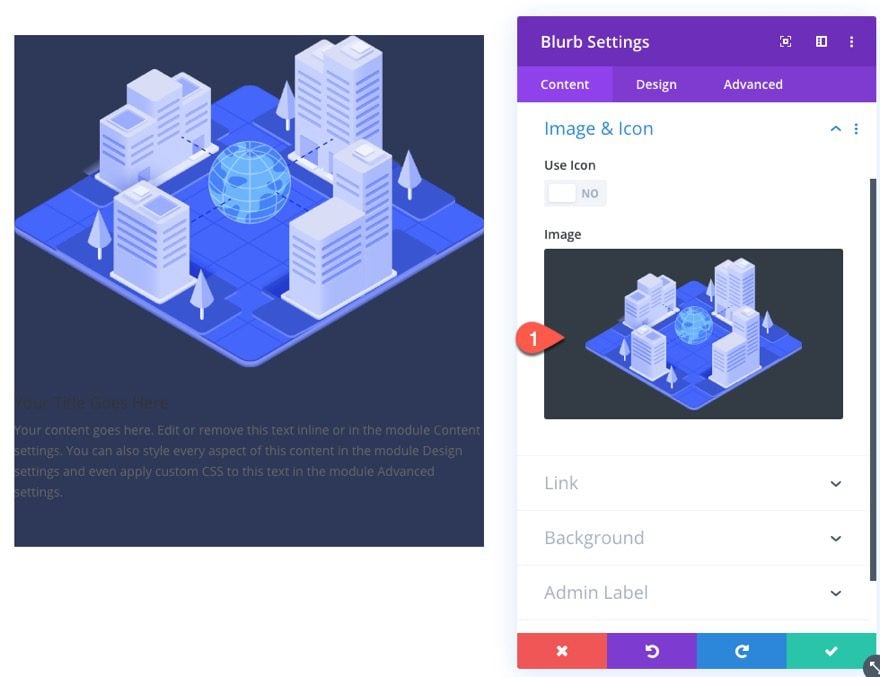
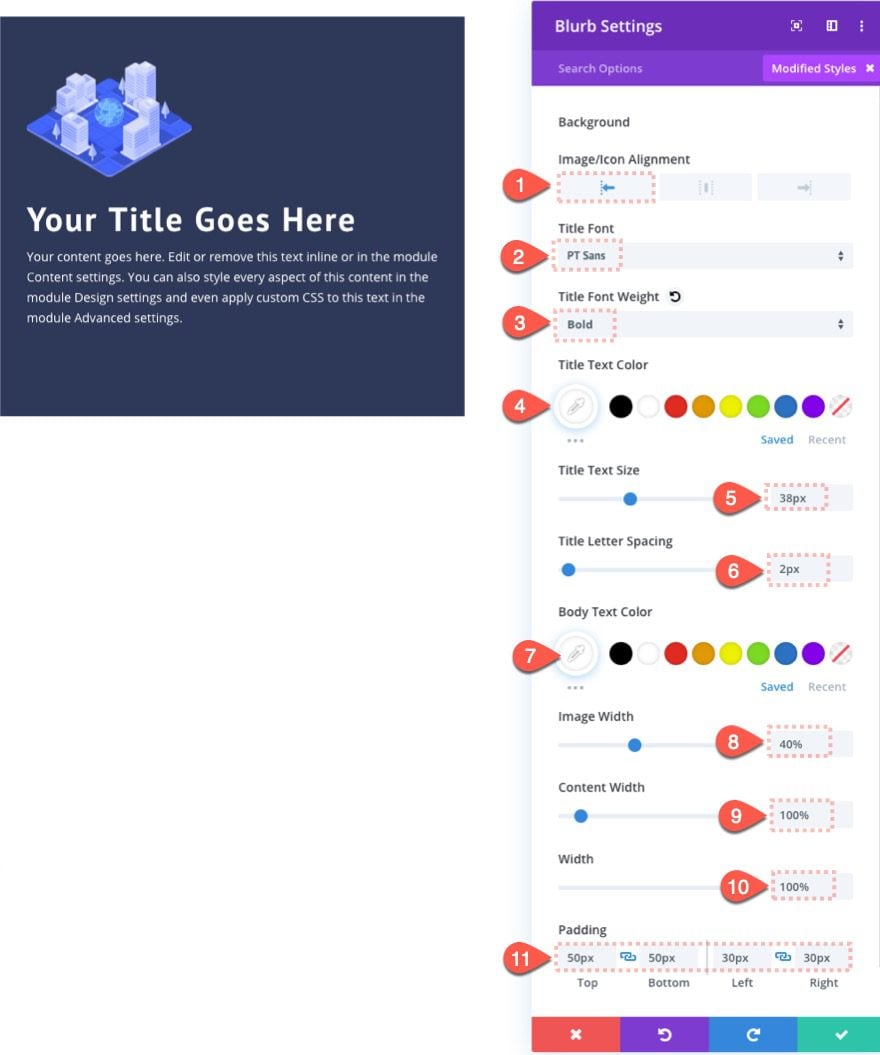
Go to the design settings and update the following:
- Image/Icon Alignment: Left
- Title Font: PT Sans
- Title Font Weight: Bold
- Title Text Color: #ffffff
- Title Text Size: 38px
- Title Letter Spacing: 2px
- Body Text Color: #ffffff
- Image Width: 40%
- Content Width: 100%
- Width: 100%
- Padding: 50px, top, 50px bottom, 30px left, 30px right
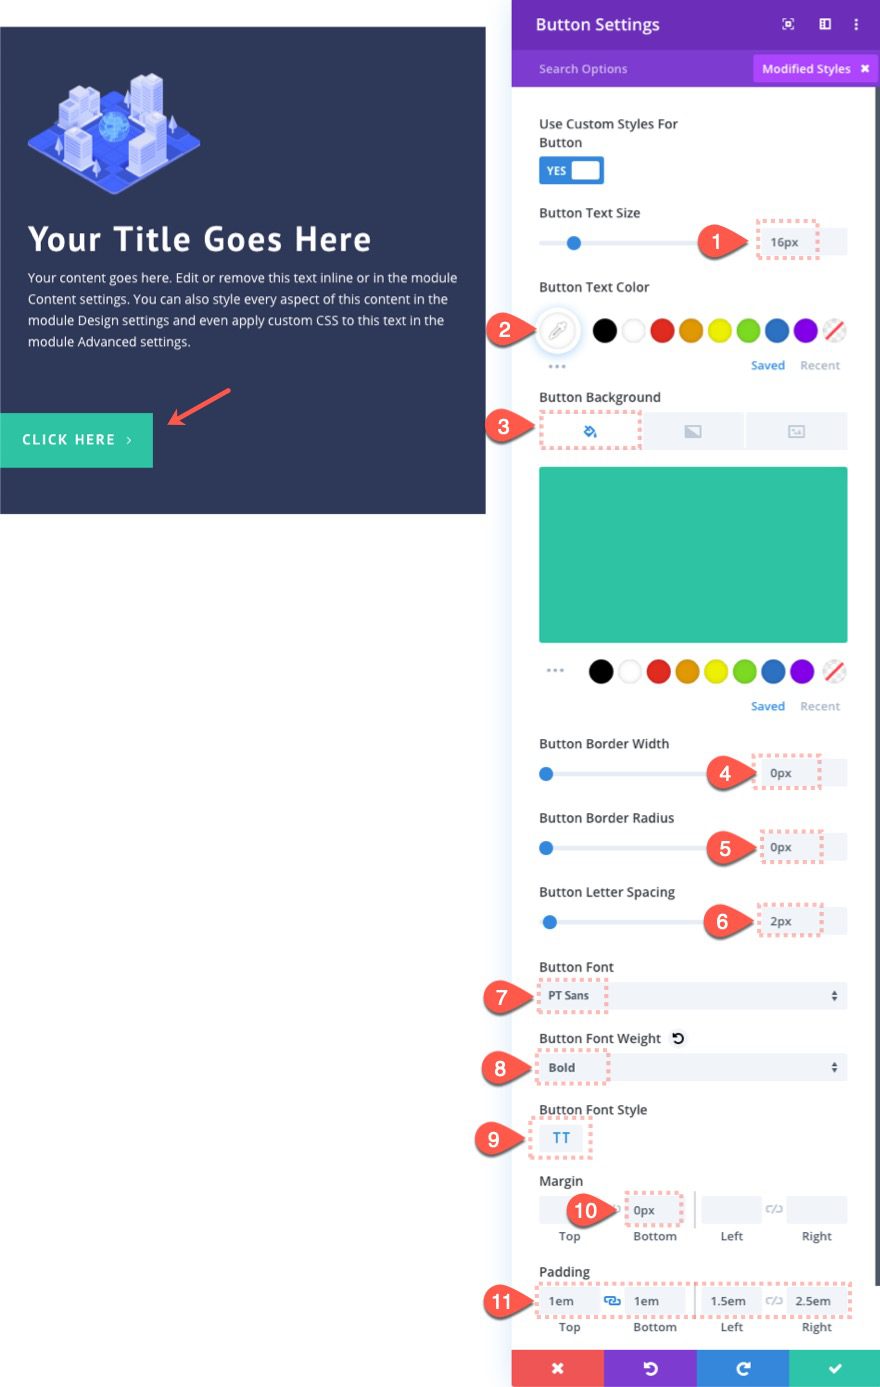
Button #1 Design
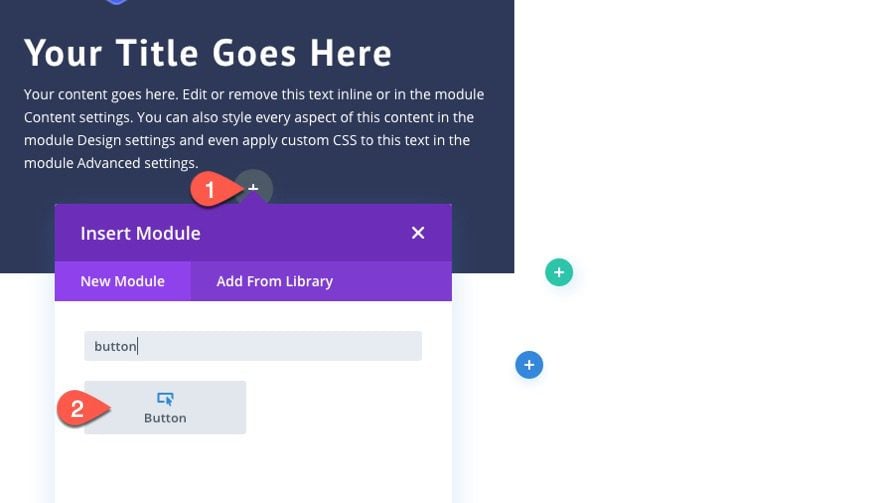
Add a new button module under the blurb module.
Then update the button settings as follows:
- Button Text Size: 16px
- Button Text Color: #ffffff
- Button Background Color: #2dc3a3
- Button Border Width: 0px
- Button Border Radius: 0px
- Button Letter Spacing: 2px
- Button Font: PT Sans
- Button Font Weight: Bold
- Button Font Style: TT
- Margin: 0px bottom
- Padding: 1em top, 1em bottom, 1.5em left, 2.5em right
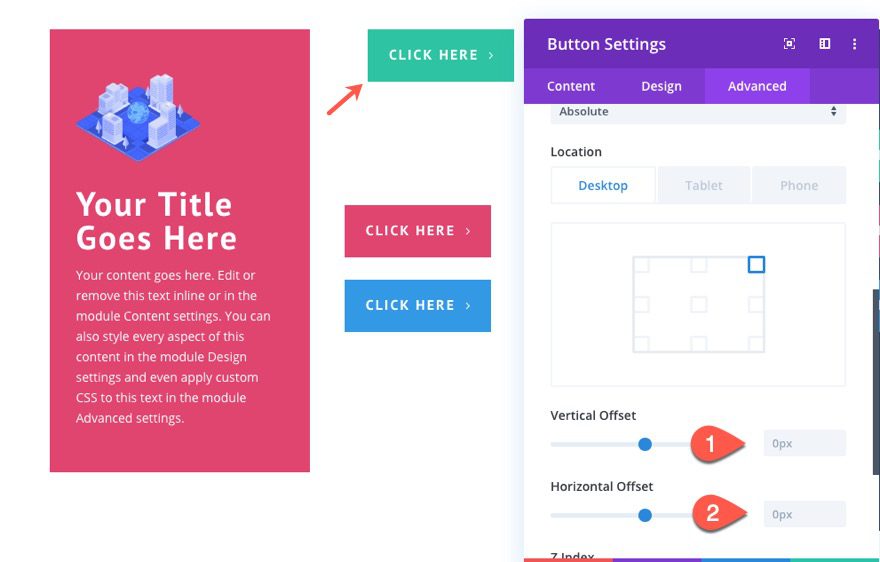
Button #1 Absolute Positioning
To position the button absolutely at the bottom left of the column, update the following:
- Position: Absolute
- Location: bottom left
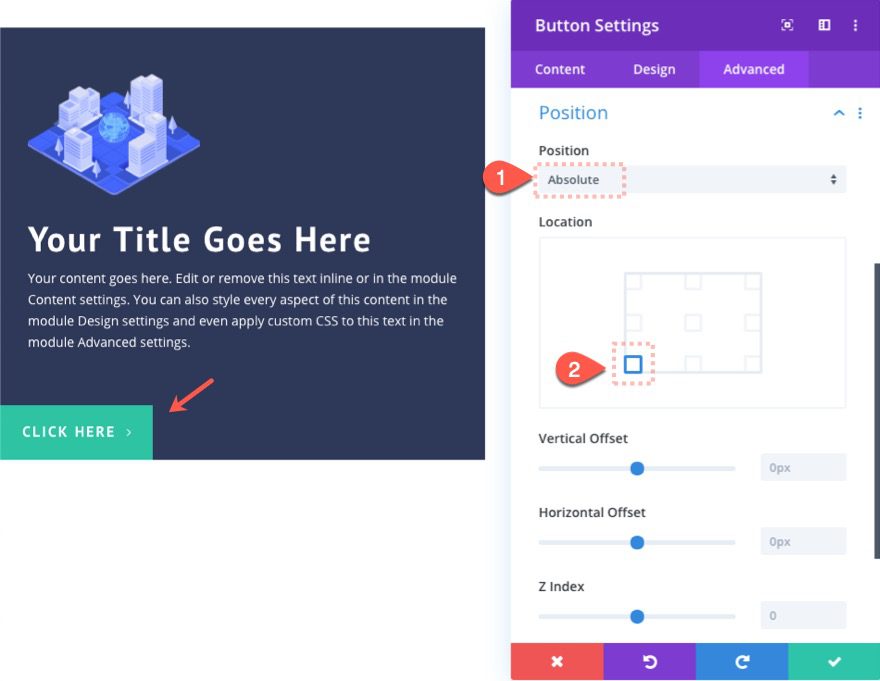
Divi makes this easy with the built-it clickable location grid. Since we want the button to sit flush at the bottom of the column, no offset values are needed.
Button #2 Design and Position
To create button #2, duplicate the previous button module.
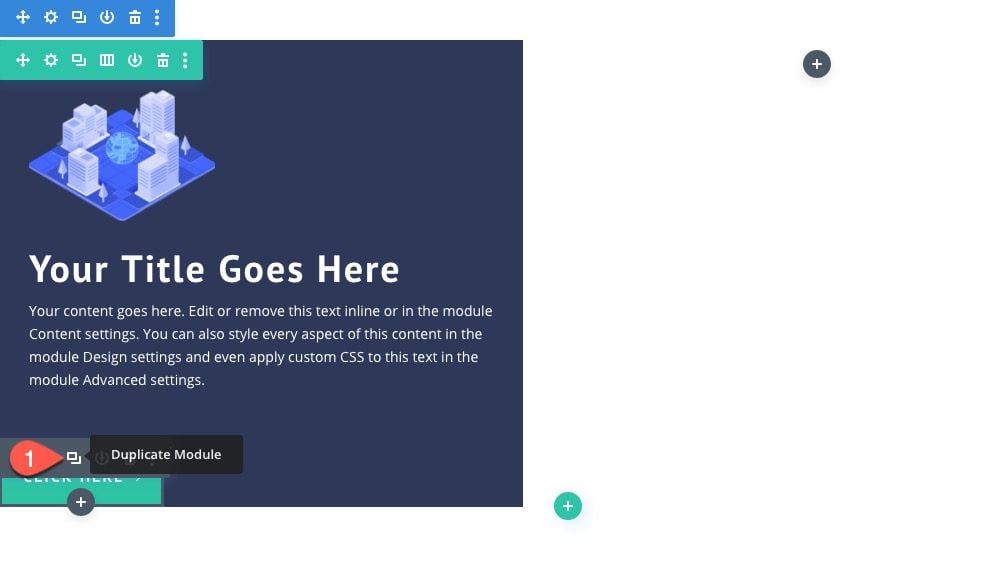
The duplicate will become stacked directly on top of the previous button so if you are using the visual builder, it may seem like nothing has happened. Click to open the settings of the button module and update the following:
- Background Color: #df4570
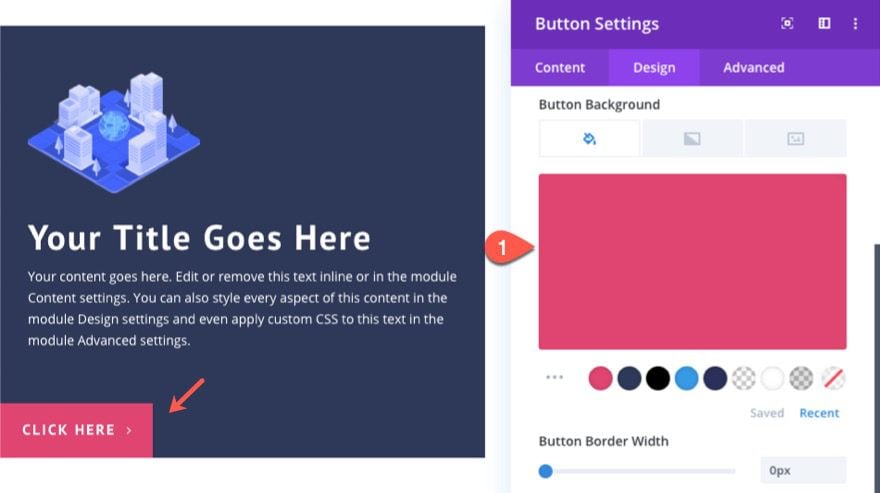
- Position Location: Bottom Right

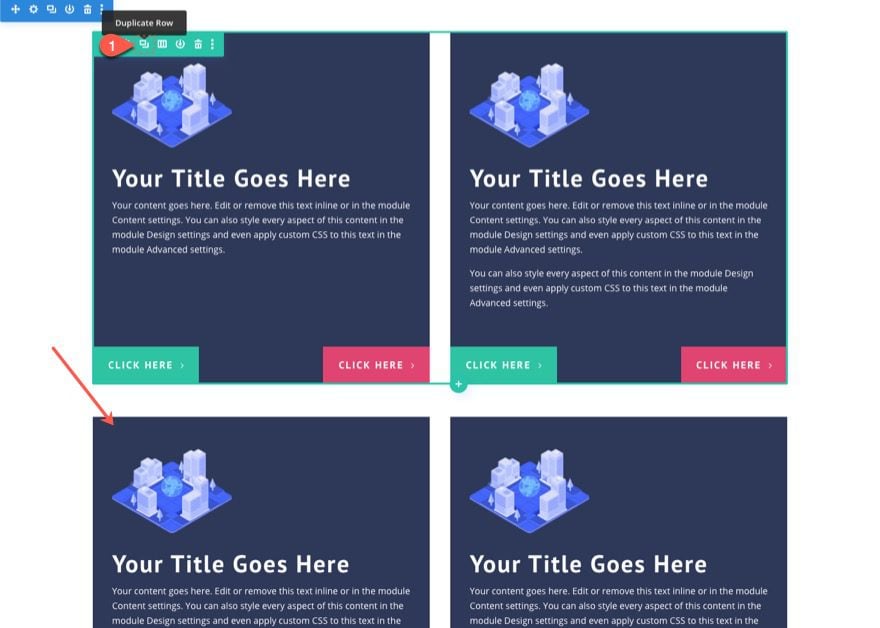
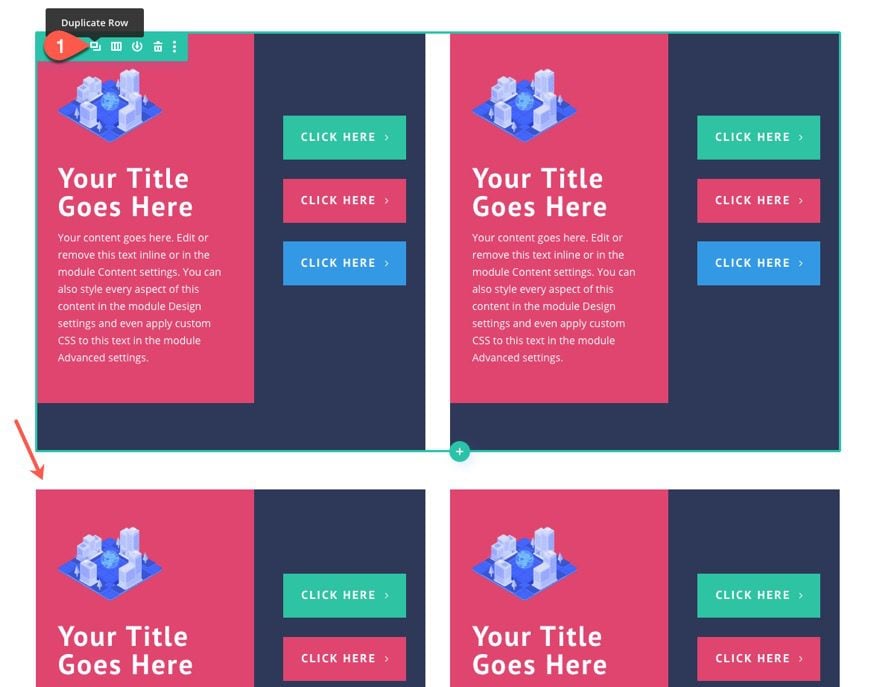
Now erase the currently empty column 2 and duplicate column 1 to get an exact duplicate design in the right column as well.
Check out the result. Notice that the content in the right column pushes the column farther down the page, but because our buttons are positioned absolutely, they continue to hug the bottom for a nice symmetrical design.
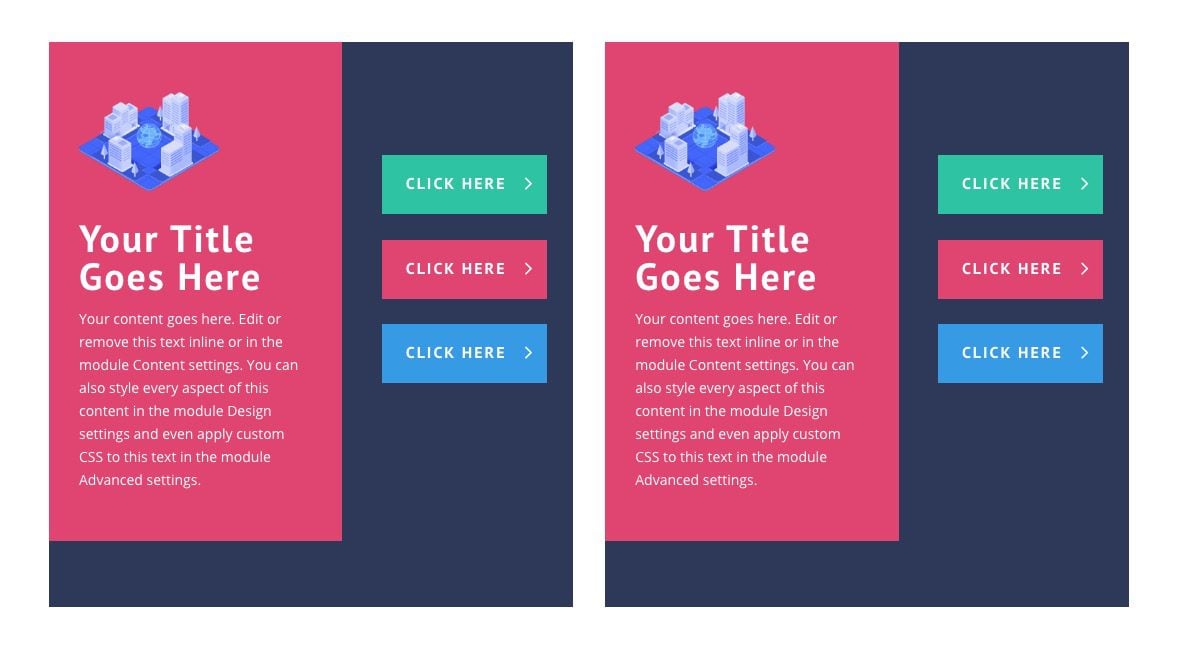
For the next button layout, we are going to position three buttons to the right of a blurb module in a single column.
To jumpstart this next button layout design, duplicate the previous row.
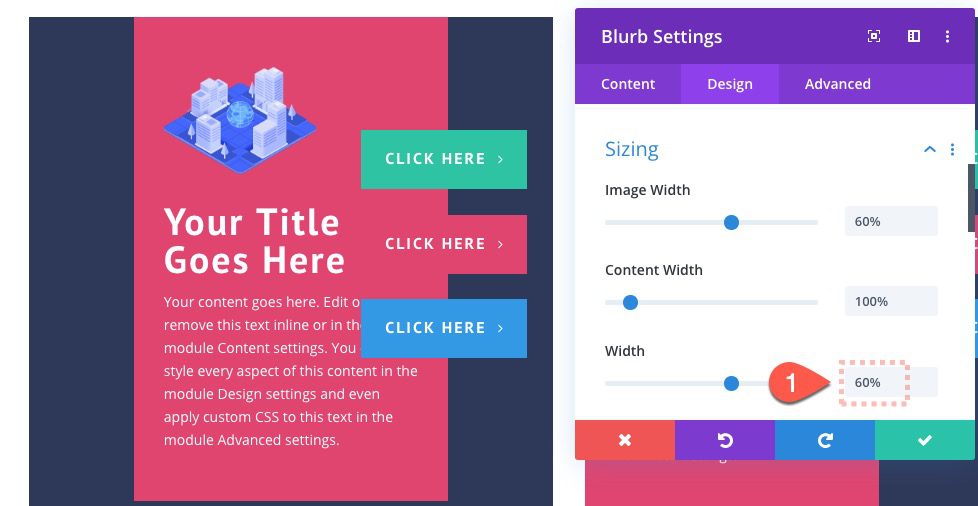
Blurb Settings
Update the blurb settings as follows:
- Background Color: #df4570
- Image Width: 60%
- Width: 56% (desktop and tablet), 100% (phone)
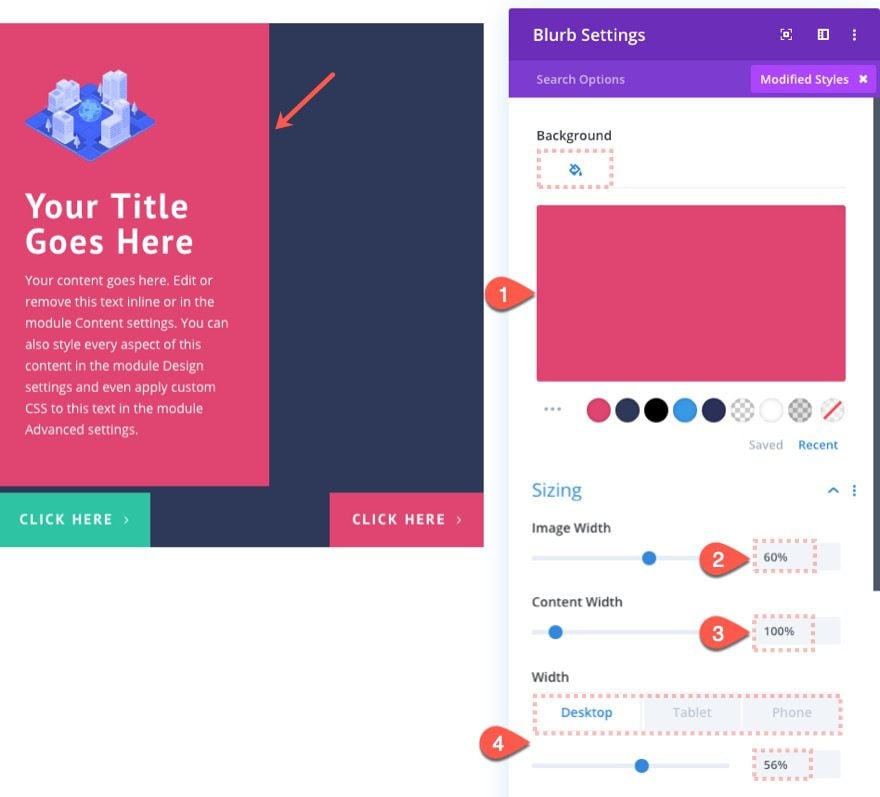
This will create the room we need to the right of the blurb to add our three-button layout.
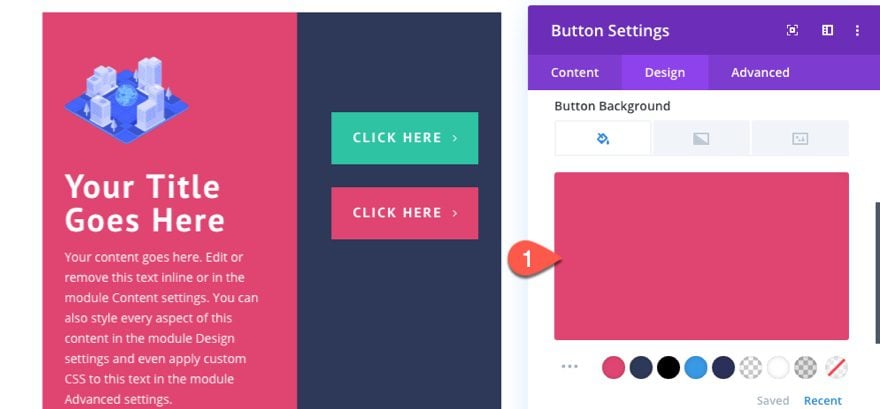
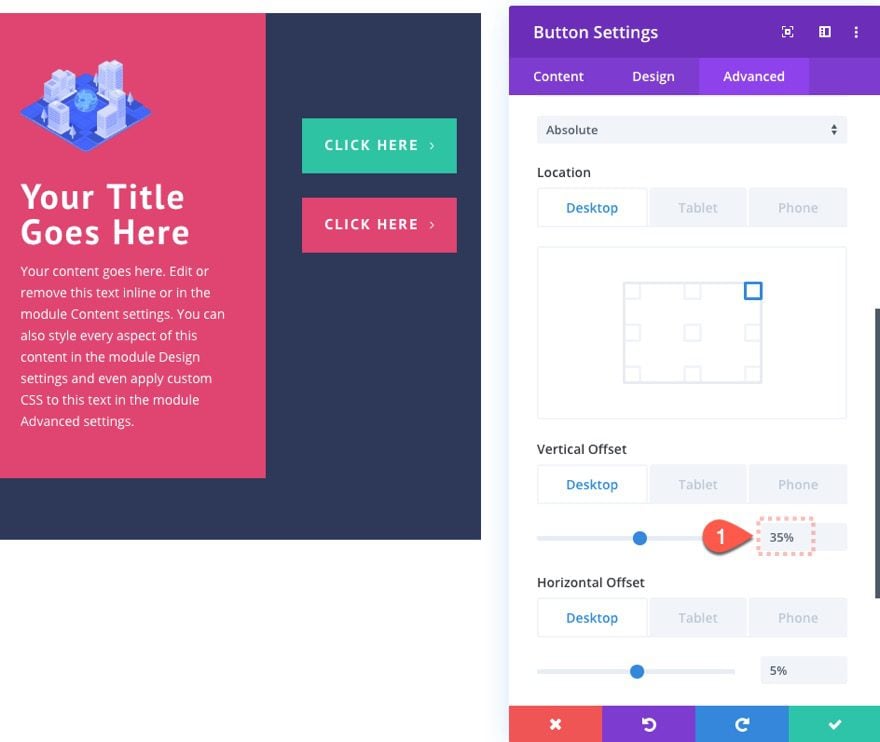
To position Button #1, open the button settings for the green button in the bottom left corner and update the following:
- Position: Absolute (desktop and tablet), Relative (phone)
- Location: Top Right
- Vertical Offset: 20% (desktop and tablet), 0% (phone)
- Horizontal Offset: 5% (desktop and tablet), 0% (phone)

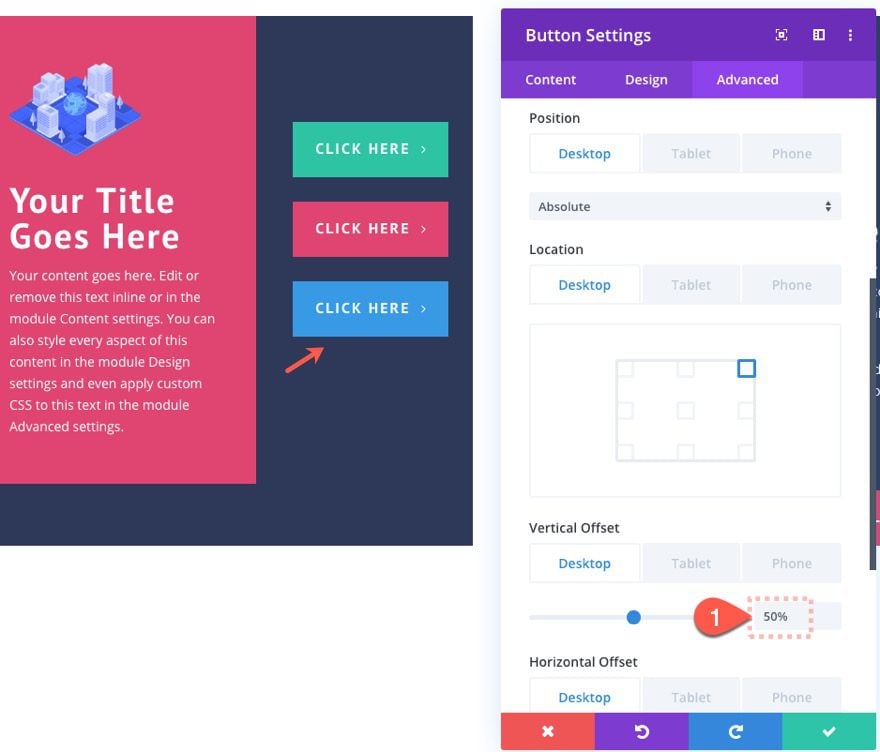
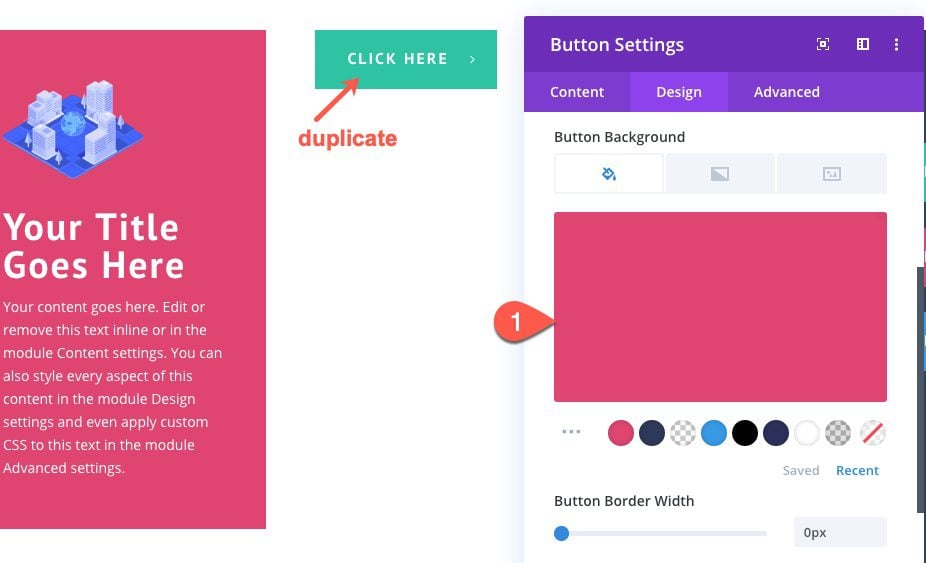
To position button #2, duplicate the button you just positioned. You can delete the red button at the bottom right because we won’t be needing it.

Then open the settings for the duplicate button and update the following:
- Background Color: #df4570
Then move the button down a bit by increases the vertical offset.
- Vertical Offset: 35%
Finally, repeat the process one more time by duplicating the previous button and updating the following:
- Background Color: #3599e5
- Vertical Offset: 50%
Check out the final result of the three-button layout.
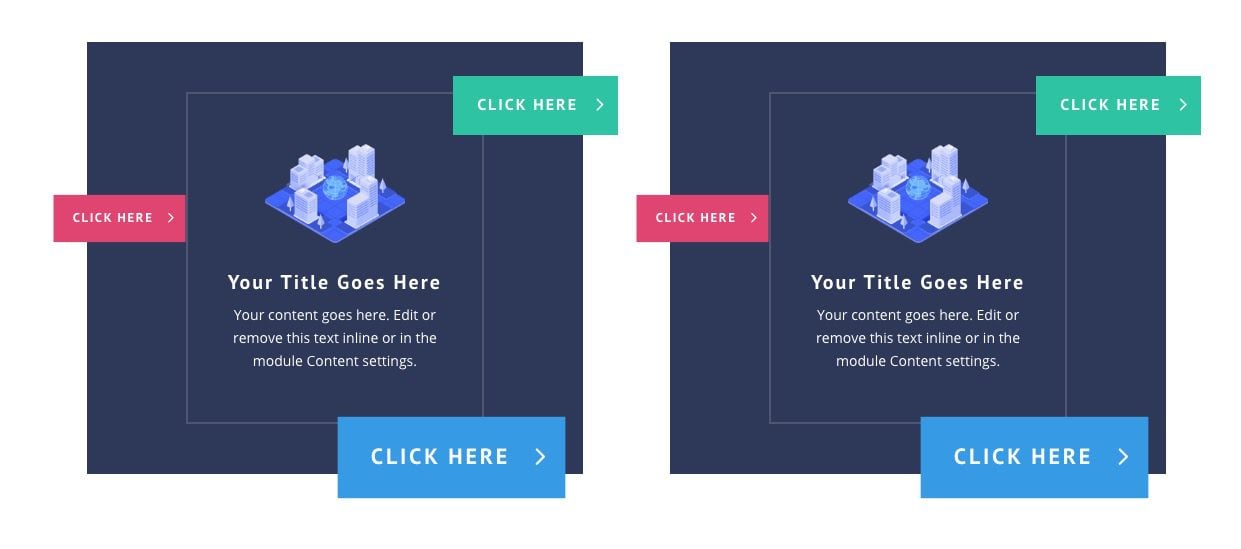
For this next layout, we are going to position the buttons a bit more sporadically and then adjust the size of a few buttons using transform scale.
To start, duplicate the previous row containing the three-button layout.
Blurb Settings
Then open the settings for the blurb module in column 1 and update the following:
- Width: 60%
- Background Color: Transparent
- Width: 60%
- Module Alignment: Center

- Text Alignment: center
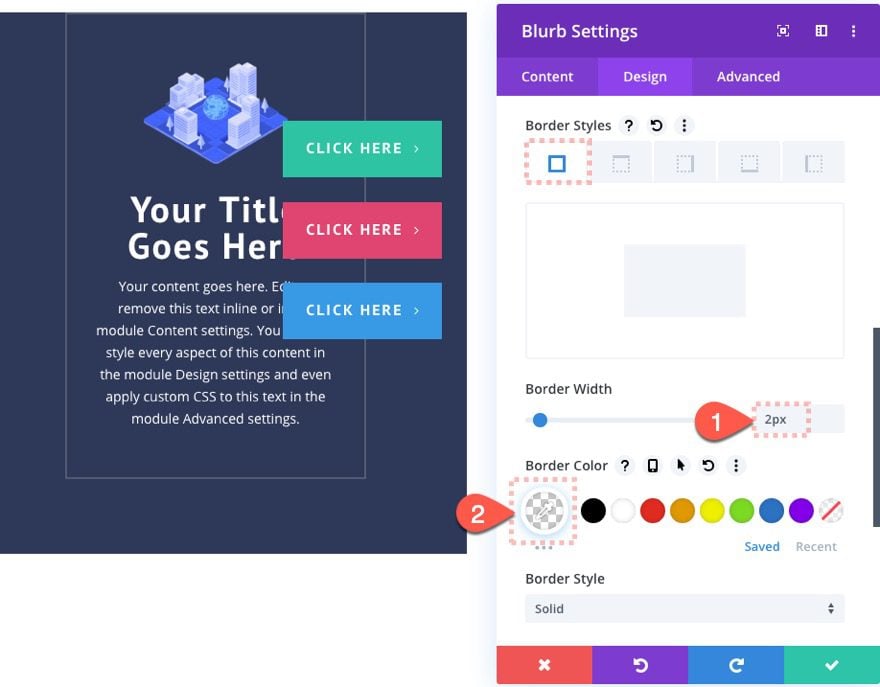
- Module Alignment: center
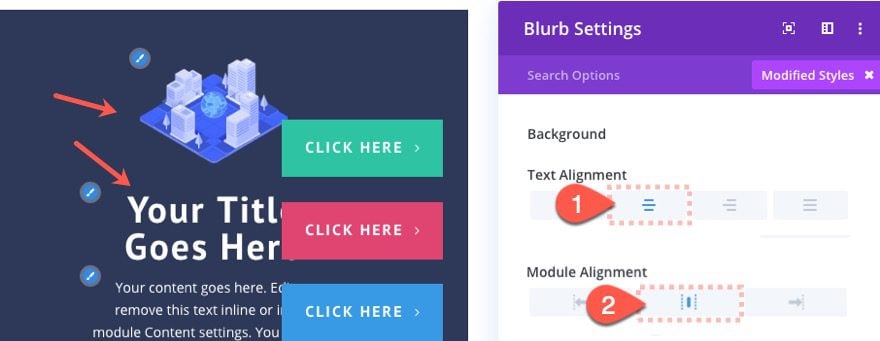
- Border Width: 2px
- Border Color: rgba(255,255,255,0.15)
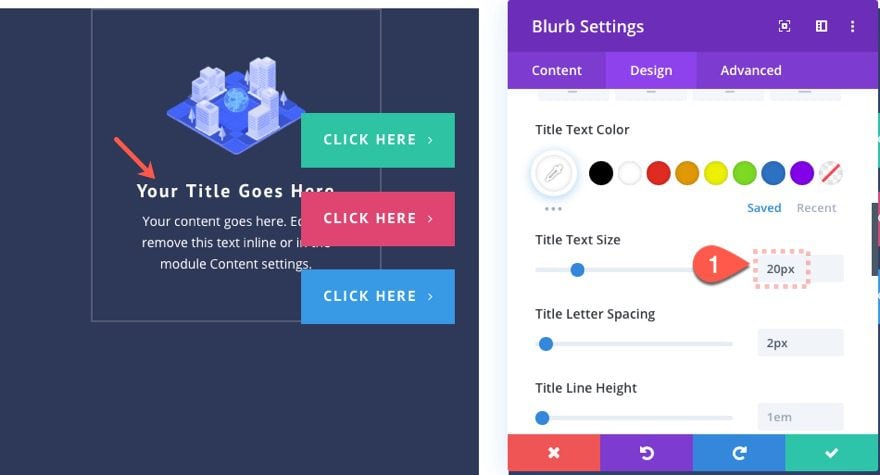
- Text Text Size: 20px
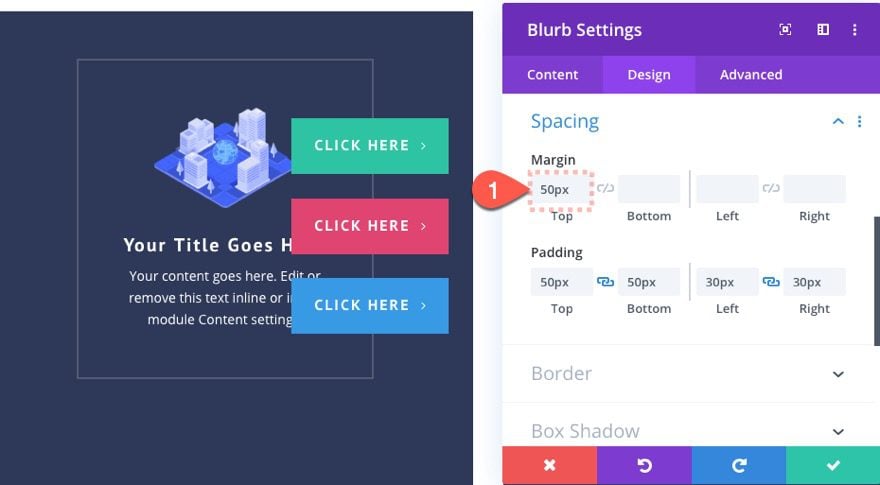
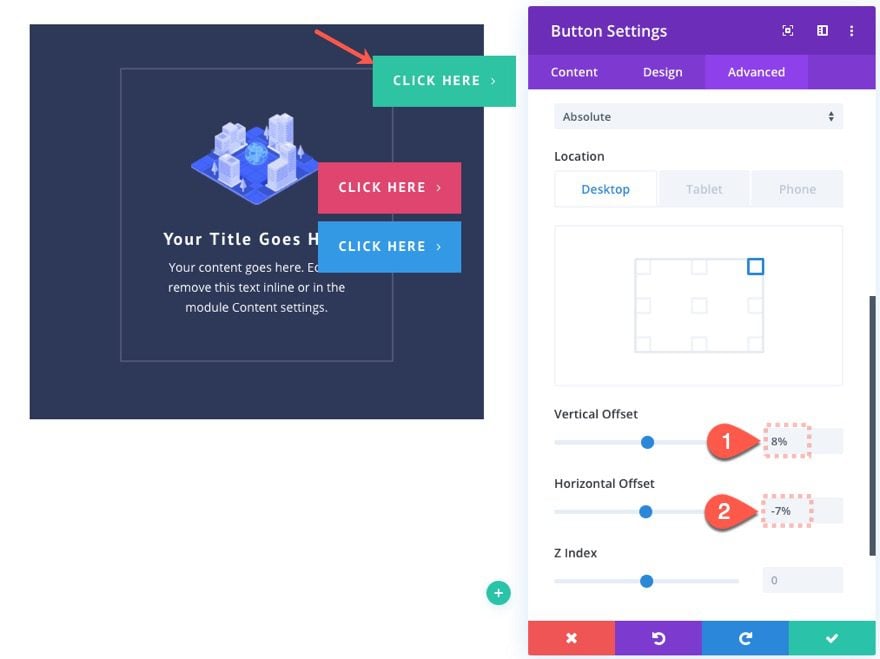
- Margin: 50px top
- Vertical Offset: 8%
- Horizontal Offset: -7%
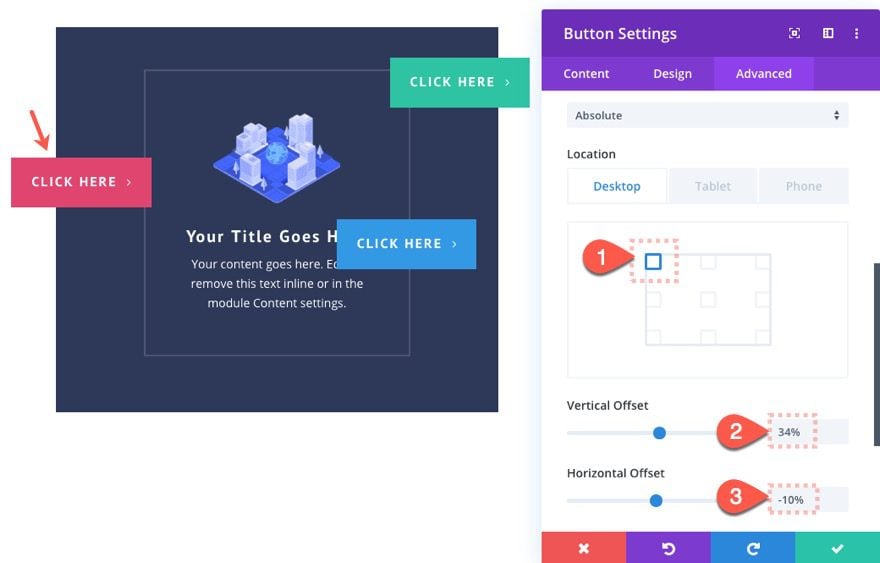
- Position Location: Top right
- Vertical Offset: 34%
- Horizontal Offset: -10%
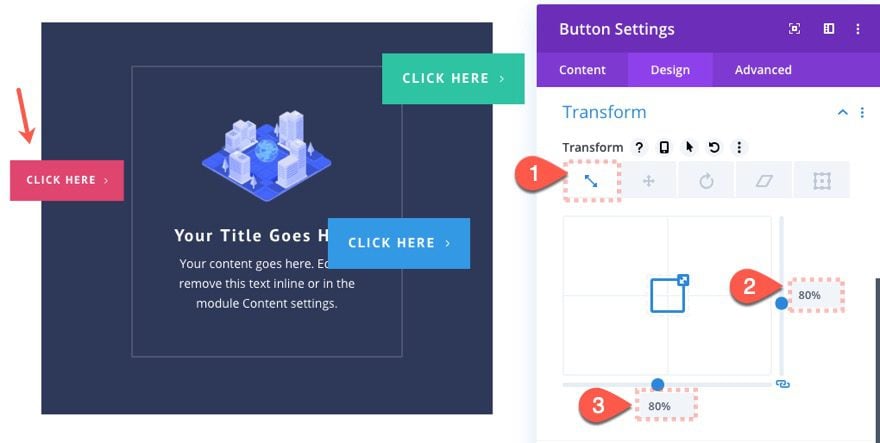
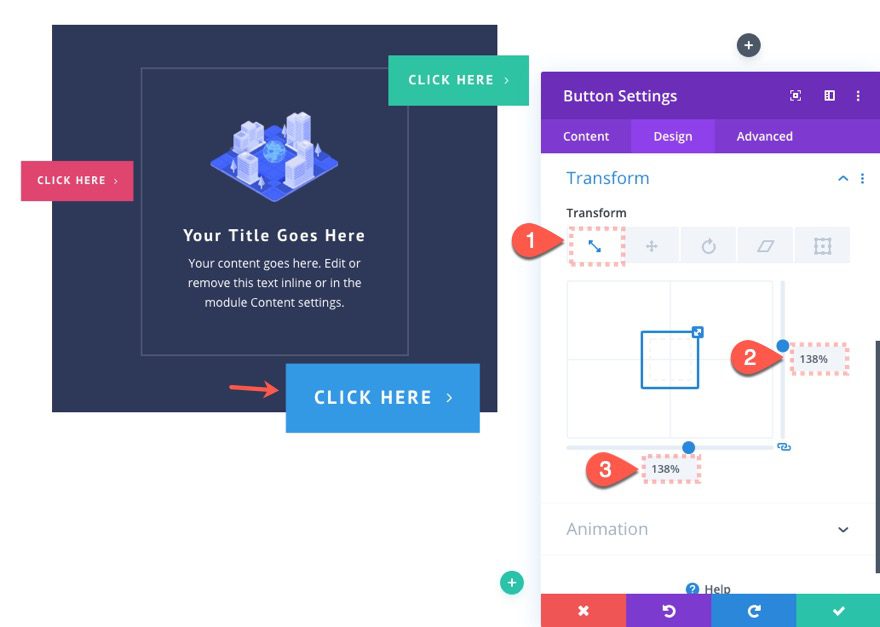
- Transform Scale: 80%
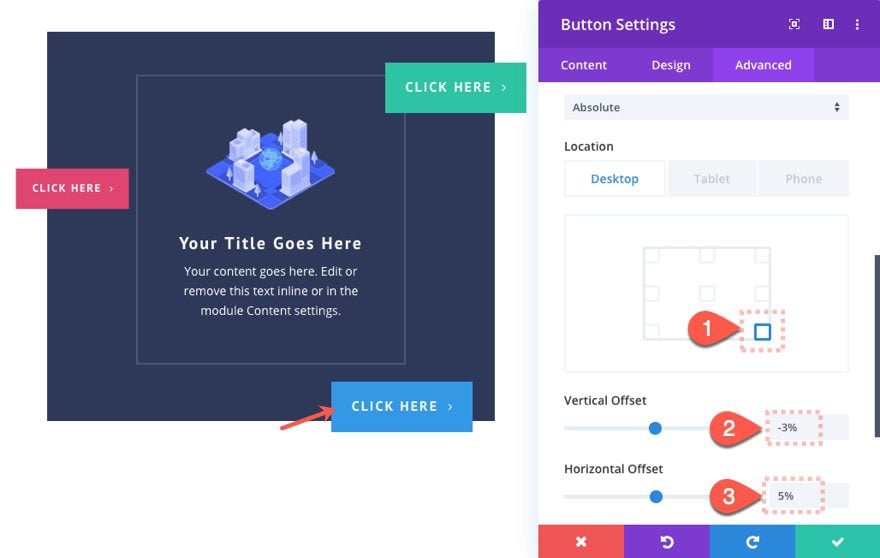
- Position Location: bottom right
- Vertical Offset: -3%
- Horizontal Offset: 5%
- Transform Scale: 138%
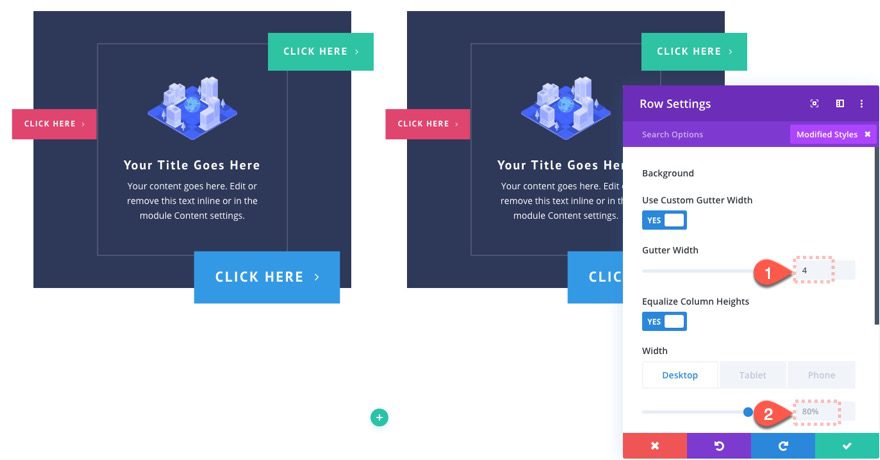
Row Settings
- Gutter Width: 4
- Width: 80% (desktop)
Check out the final result.
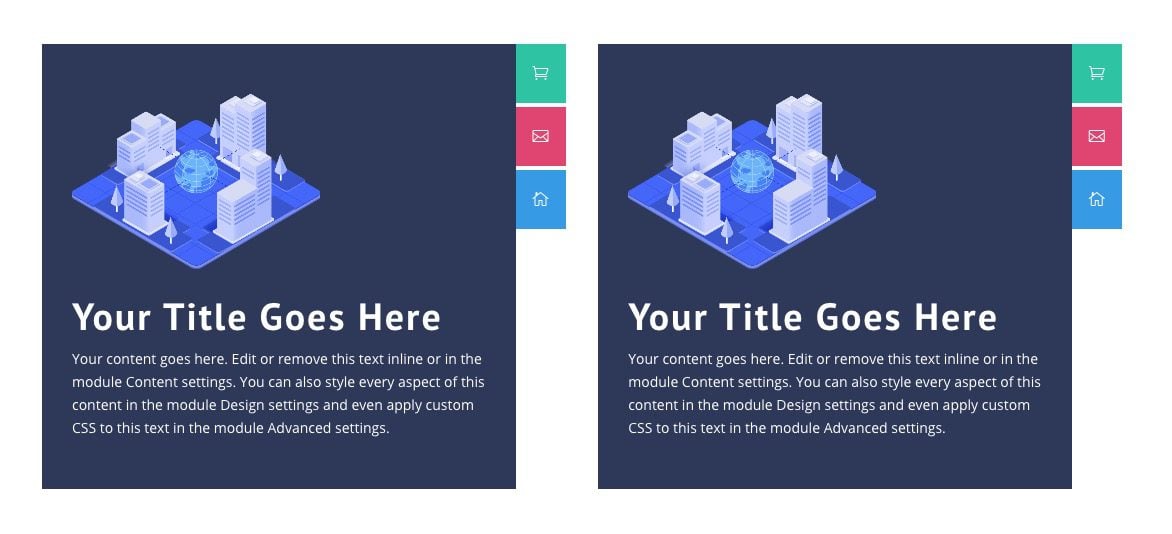
For this last button layout, we are going to create some pull-tabs on the top right of the blurb.
To jumpstart the design, duplicate the row of button layout #2.
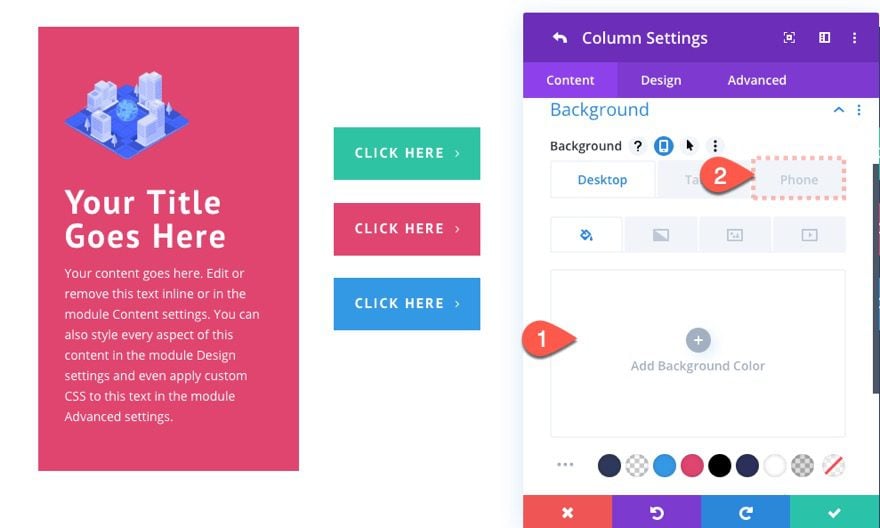
Column Settings
Next, update the background settings for column #1 as follows:
- Background Color (desktop): none (default)
- Background Color (phone): #2e3858
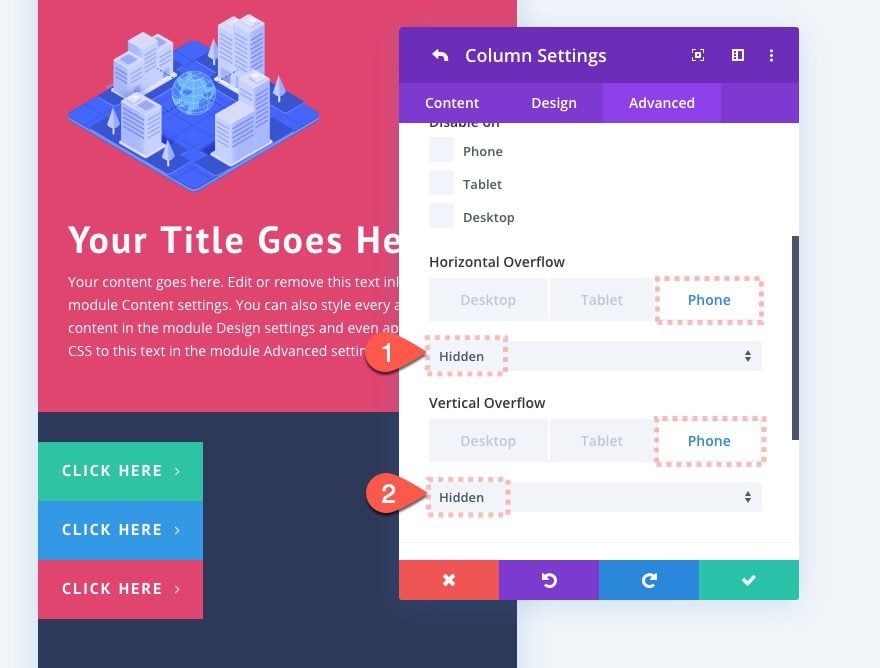
Under the Advanced tab, update the visibility option so that the overflow is hidden on phone display.
- Horizontal Overflow (phone): Hidden
- Vertical Overflow (phone): Hidden
Now we can use the three buttons currently in the column as our pull-tab buttons. Open the settings for the top button and update the following:
- Vertical Offset: 0px
- Horizontal Offset: 0px
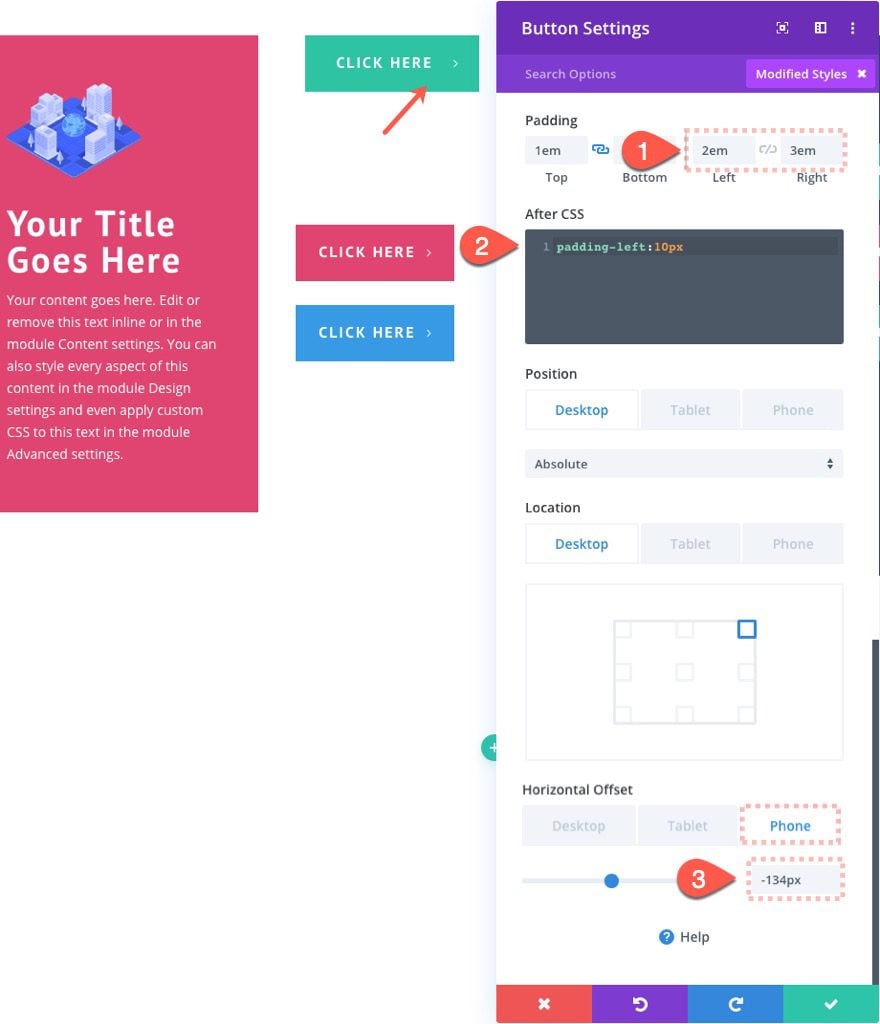
Since we are going to use the button for a tab, we need to make room for the right icon so that it looks centered whenever it sticks out from behind the blurb module. Go ahead and update the button padding as follows:
- Padding: 2em left, 3em right
Then add the following custom CSS to the After element:
padding-left: 10px;
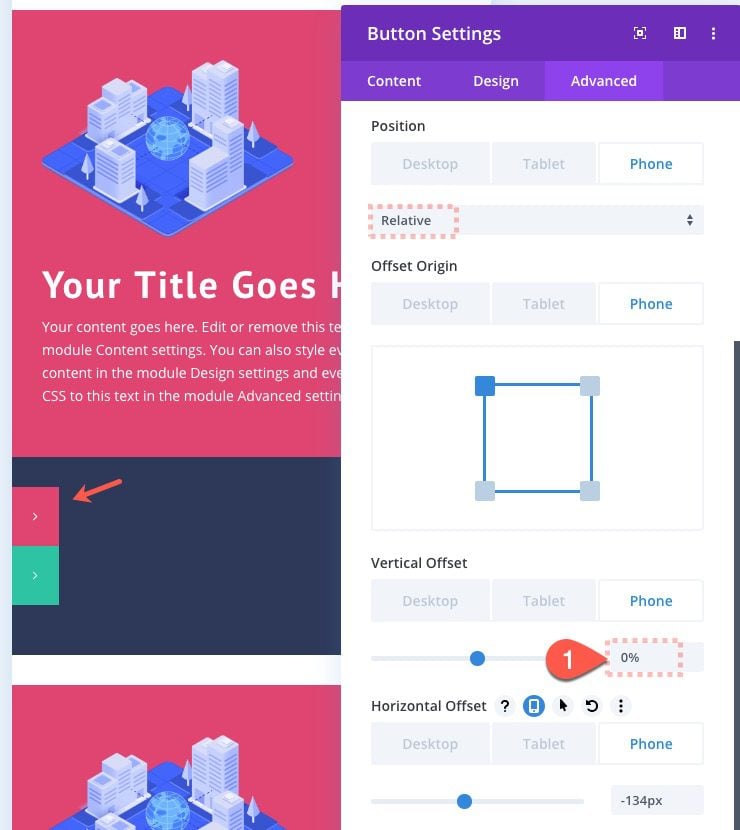
Then update the horizontal offset on phone as follows:
- Horizontal Offset (phone): -134px
This will hide the left side of the button outside of the column on phone display so that the full button will show on hover/click.
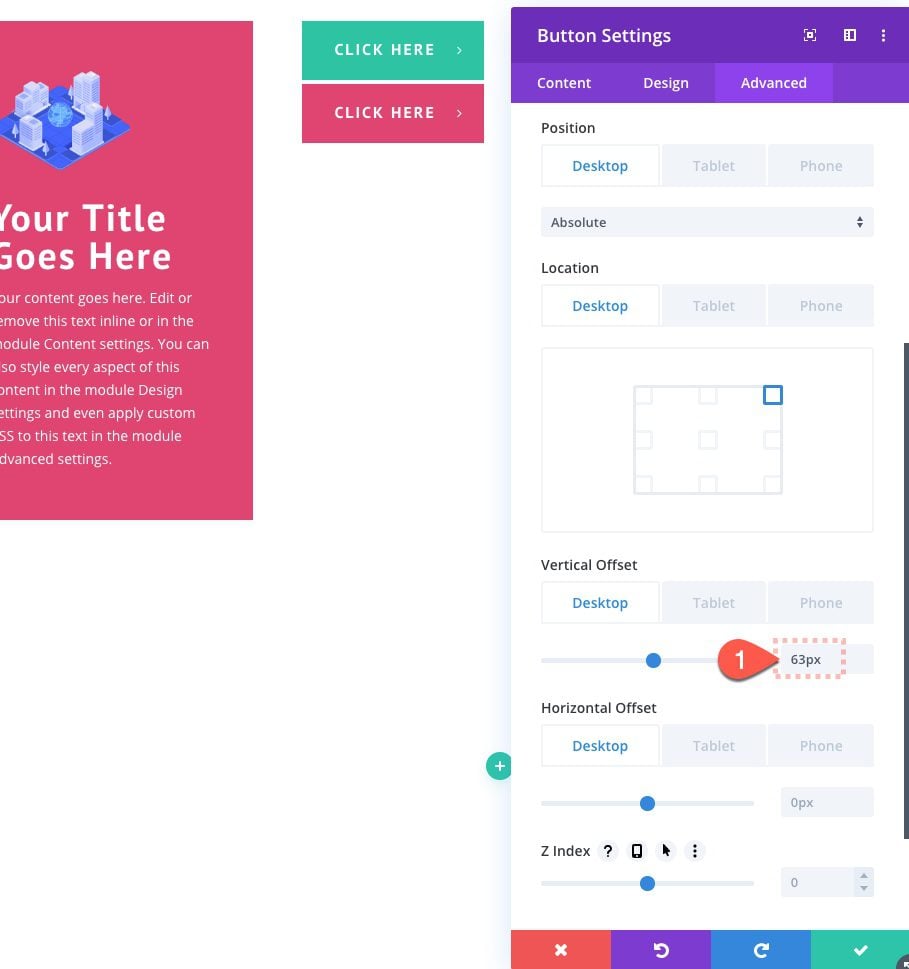
To position the second pullout button, duplicate the previous button and update the background color of the duplicate.
- Background Color: #df4570
Then, update the position as follows:
- Vertical Offset: 63px
Then update the following position options for phone display:
- Position (phone): Relative
- Vertical Offset (phone): 0%
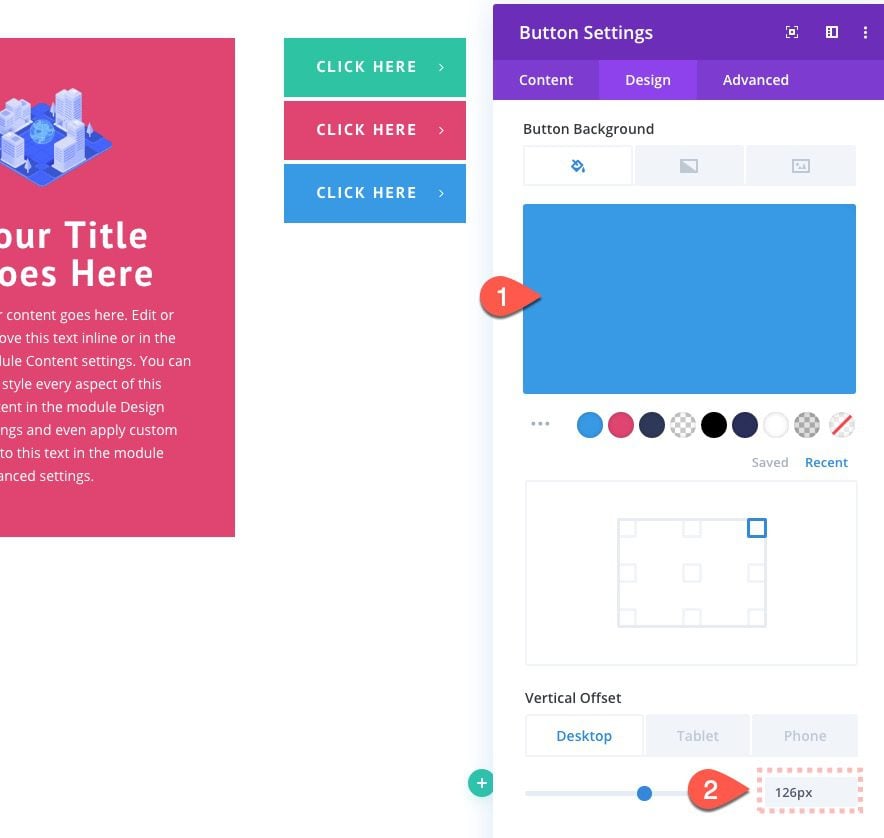
Finally, to position the third pull-tab button, duplicate the previous button module. Then open the settings for the duplicate button module and update the following:
- Background Color: #3599e5
- Vertical Offset: 126px
Once the third button is in place, use Divi’s multi-select feature by holding down Cmd (or Ctrl) and clicking each of the button modules.
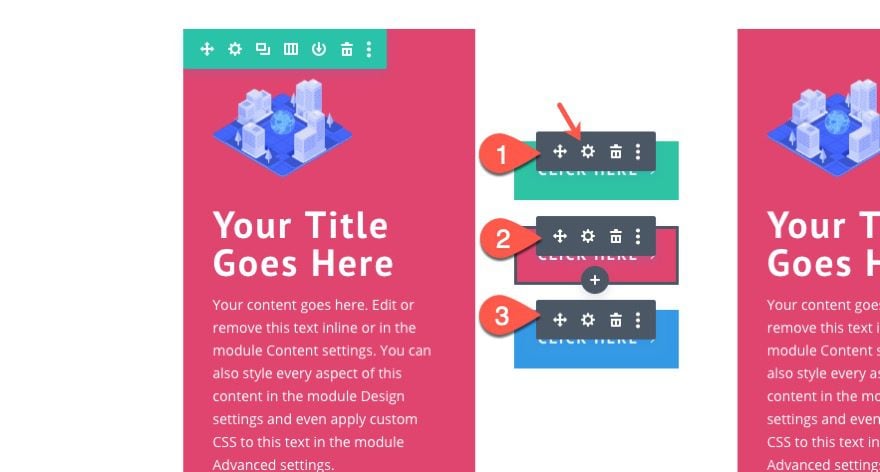
Then open the settings of one of the button modules and add the following transform translate on hover.
- Transform Translate X Axis (hover): 68%
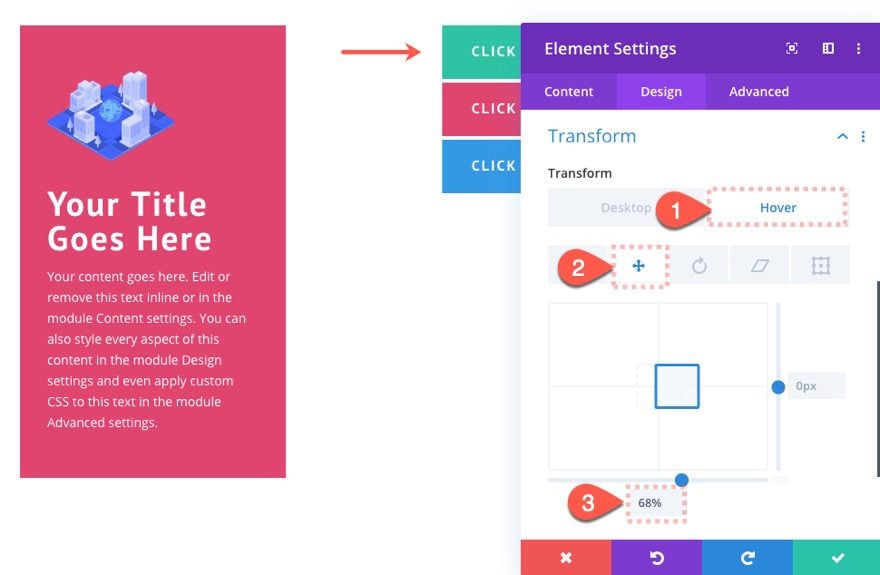
This will update all three buttons with the pull-tab functionality on hover by moving it to the right 68%.
Blurb Module Positioning
This button layout requires the blurb module to hide the three buttons partially. Therefore we will give the blurb a 100% width and then use the right margin to expose the necessary piece of the button tabs. Then all we need to do is give the blurb a high Z Index to make sure it sits above the buttons.
Open the blurb module settings and update the following:
- Width: auto
- Margin: 50px right
- Position: Relative
- Z Index: 11
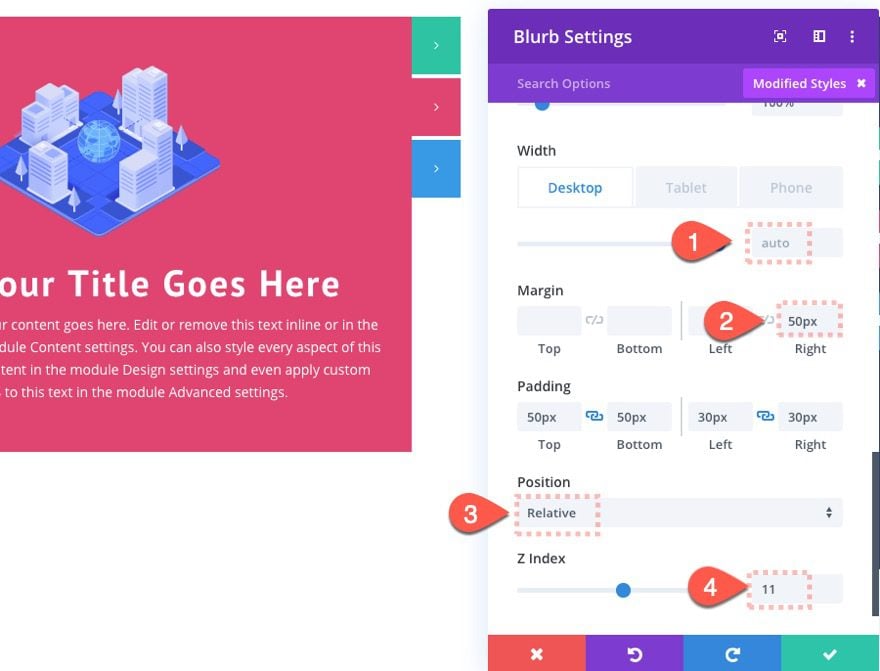
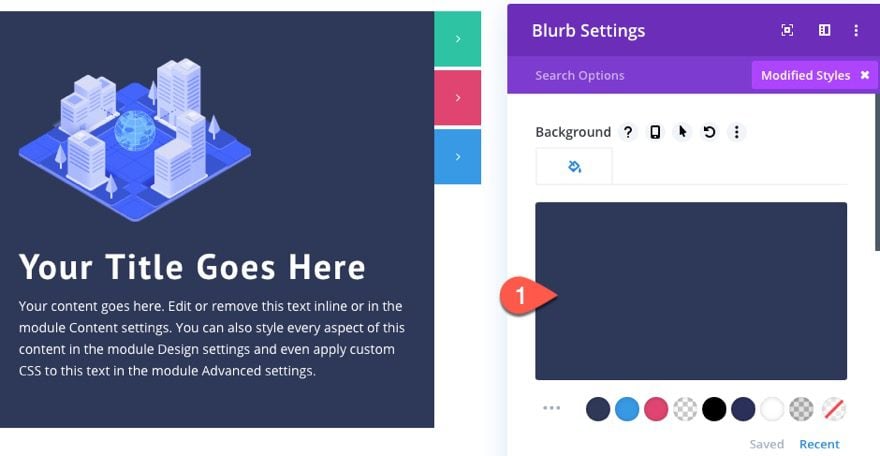
Then update the background color.
- Background Color: #2e3858
Row Settings
After the blurb and pull-tab buttons are finished, open the row settings and update the width to give those tabs some room to move.
- Width: 80%
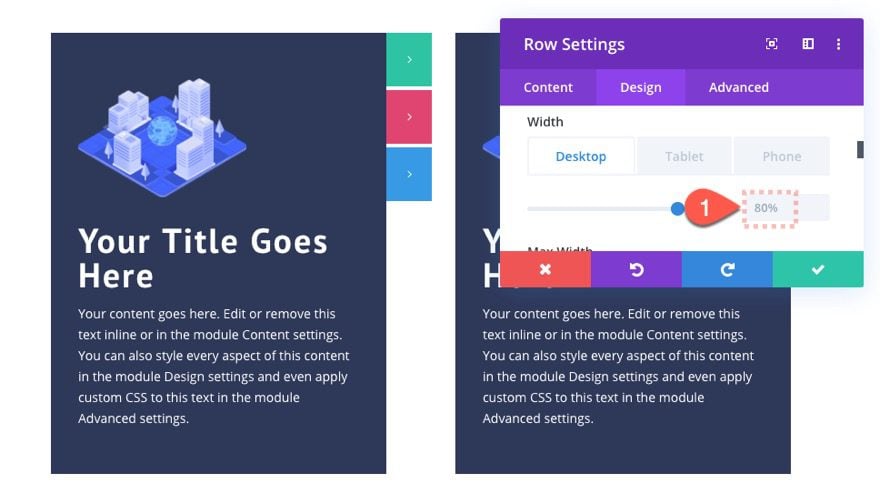
Delete column 2 and then duplicate column 1 so that you have the same design in each.
Then open the settings for column 1 and give it the following Z Index:
- Z Index: 12
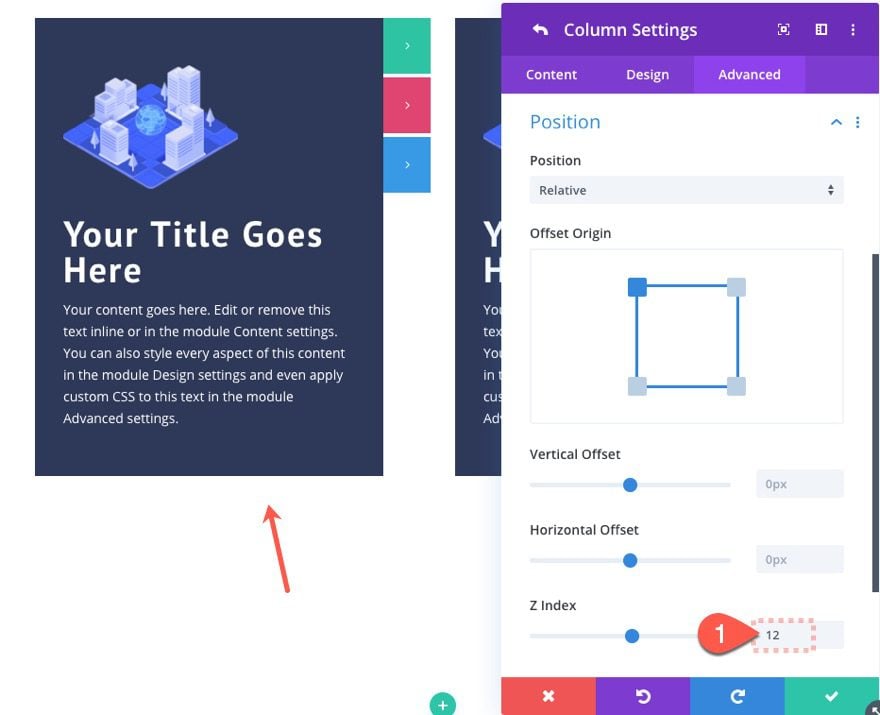
This will make sure the buttons in column one will not be hidden behind the content in column 2 on hover.
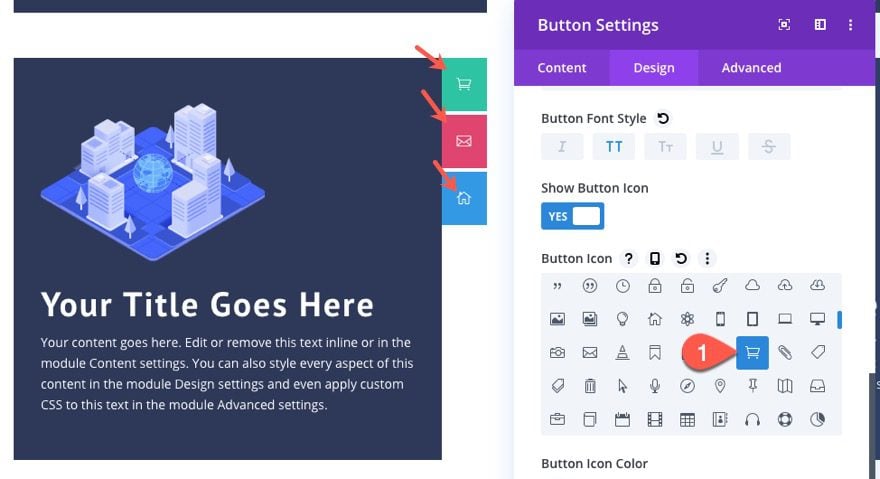
If you want, you can update the icons for each button to fit your needs.
Check out the final result of the pull-tab button layout.
Final Results
Final Thoughts
Positioning buttons absolutely does open the door for endless button layouts in Divi. Hopefully, this tutorial helps you understand how to best use the absolute position in Divi. Other useful built-in features like transform options and Z index make design absolutely positioned buttons.
I look forward to hearing from you in the comments.
Cheers!


Why is it so difficult to print out (browser funktion) such a tutorial without disturbing little windows/fields laying above the important texts?!
Very Good.
Thanks, Bazaremes. Glad you liked it.