
Elegant Themes recently changed the design of their website to include some features worth imitating. In earlier posts, I wrote about how to implement the Elegant Theme blog design and duplicate the primary menu. But, for this post, I’m going to show you how to duplicate the Elegant Themes call to action (CTA). This CTA is located at the bottom near the footer of the Elegant Themes website. What is special about this CTA is the added functionality that triggers animation once the user scrolls to the element.
Today, I’m going to show you how to duplicate not only the style of this CTA but also the animation functionality. This is accomplished using Divi’s Code Module with some custom CSS and a a few lines of JavaScript. However, you can easily extend the same animated functionality on any of Divi’s modules.
Let’s get started.
Implementing the Design With Divi
Building the Call To Action Using the Code Module
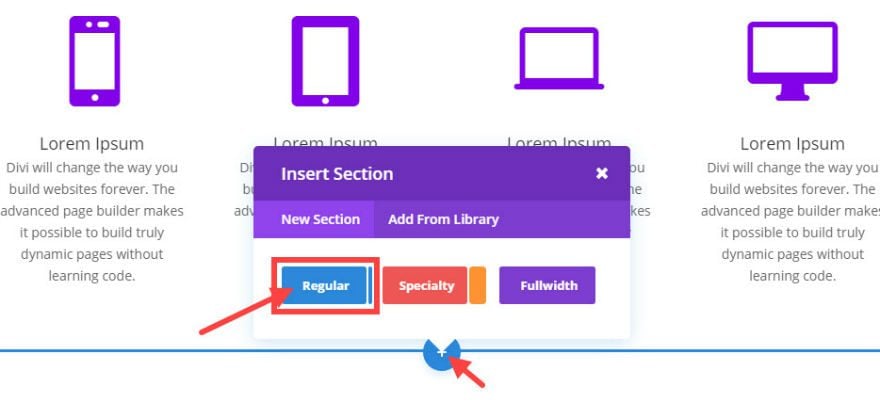
Using the Visual Builder, add a new regular section with a fullwidth row column.
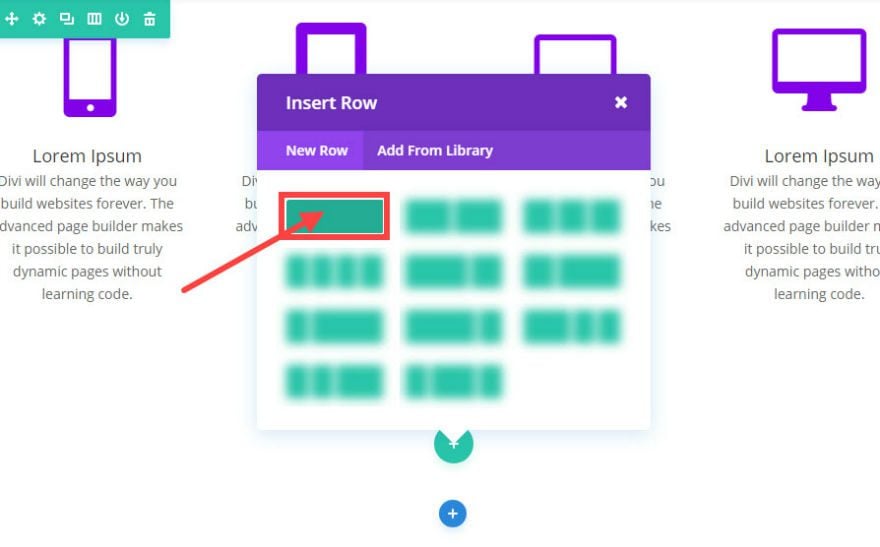
Next add the Code Module to your row.
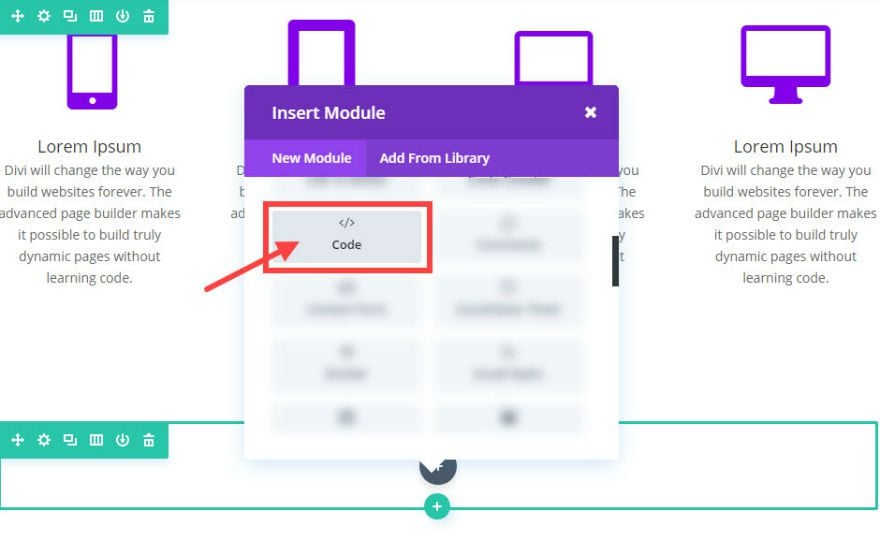
Under the General Code Settings, add the following html to the content section.
<div class="cta-info">

<h3>401,632 Customers Are Already Building Amazing Websites With Divi. Join The Most Empowered WordPress Community On The Web</h3>

<p>We offer a 30 Day Money Back Guarantee, so joining is Risk-Free!</p>

<a href="ENTER URL HERE" id="sign">Sign Up Today</a>

</div>
This html will serve as the content for your CTA. You will notice the main CTA headline is wrapped in an h3 tag. The sub-headline is wrapped in a standard p tag. And the link (soon to be button) has a CSS ID called “sign”.
Also a div with the class “cta-info” is wrapped around the content. This is important for styling purposes later on.
Save Changes
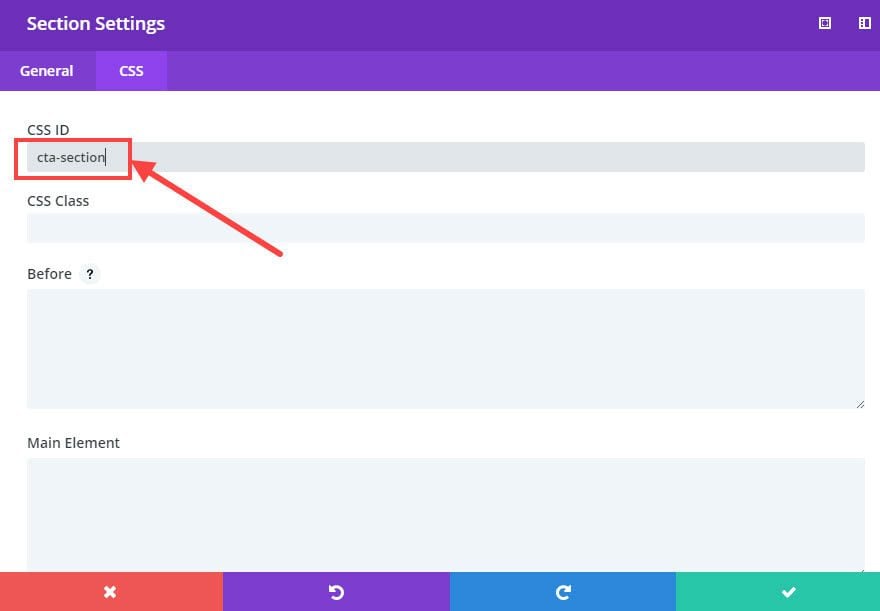
Now we need to add a new CSS ID to your new section. Click the section settings icon to open the section settings.
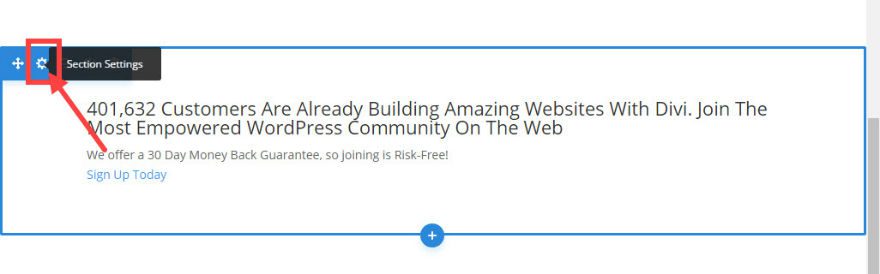
Under the CSS tab in Section Settings, add the CSS ID “cta-section” and save your changes changes.
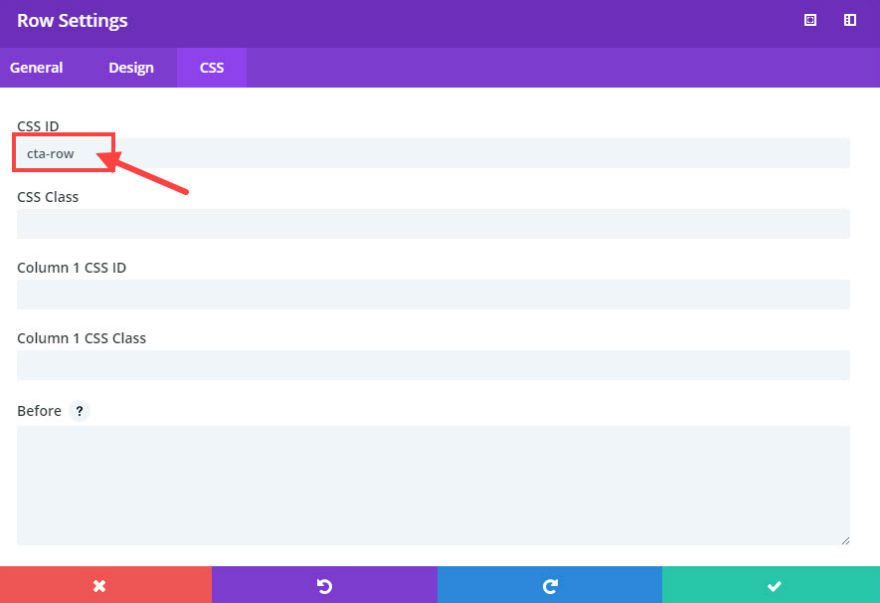
Next we need to add a CSS ID to your row. Click on the row settings icon.

Under the CSS tab, update the row settings with a new CSS ID called “cta-row”.
Save changes
That’s all we need for the layout of the CTA. With our content in place and our CSS ID’s, we are ready to add some custom CSS.
Adding the Custom CSS
Go to Divi → Theme Customizer → Additional CSS (or you can update your child theme’s style.css file directly). Inside the code box, add the following CSS:
/* Animated Call To Action */

/*** style CTA section and row when waypoint is not triggered ***/
#cta-section {
    padding: 0 80px;
    transition: all .8s ease;
    -moz-transition: all .8s ease;
    -webkit-transition: all .8s ease;
}
#cta-row {
    margin: 80px auto 0 auto;
    padding: 80px 0;
    max-width: 100%;
    background-color: #6c17dc;
    -moz-border-radius: 4px;
    -webkit-border-radius: 4px;
    border-radius: 4px;
    box-shadow: 0px 10px 50px #939fa9;
    transition: all .8s ease;
    -moz-transition: all .8s ease;
    -webkit-transition: all .8s ease;

}
/*** Style CTA section and row once waypoint toggles animate-cta class ***/
#cta-section.animate-cta {
    padding: 46px 0 66px 0;
    overflow: hidden;
}
.animate-cta #cta-row {
    margin: 0 auto 0 auto;
    -webkit-transform: scale(1.1);
    transform: scale(1.1);
    background-color: #4843d2;
    width: inherit;
}
/*** style button ***/

#sign {
    display: inline-block;
    width: 246px;
    color: #fff;
    text-transform: uppercase;
    font-size: 16px;
    font-weight: 600;
    background-color: #f92c8b;
    padding: 20px 40px;
    margin-top: 30px;
    border-radius: 60px;
    -webkit-border-radius: 60px;
    -moz-border-radius: 60px;
    transition: all .8s ease;
    -webkit-transition: all .8s ease;
    -webkit-transition: all .8s ease;
    box-shadow: 0px 5px 20px #231f92;
    -moz-box-shadow: 0px 5px 20px #231f92;
    -webkit-box-shadow: 0px 10px 50px #231f92;
}
#sign:hover {
    background-color: #2cc2e6;
    box-shadow: 0px 20px 80px #1b1867;
    -moz-box-shadow: 0px 20px 80px #1b1867;
    -webkit-box-shadow: 0px 20px 80px #1b1867;
}

/*** style content within the code module ***/

.cta-info{
    color: #fff;
    text-align: center;
    margin: 0 auto !important;
    max-width: 1080px;
    padding: 50px;
}
.cta-info h3 {
    color: #fff;
    font-size: 35px;
    line-height: 1.3em;
}
Now your CTA is starting to look the part. All that we have left to do is add a short script in order to give the CTA that eye-catching animation effect once the CTA in visible in your browser’s viewport upon scrolling.
Adding the Waypoint Script to Animate the CTA When Scrolling to the Element
One of the easiest ways to trigger a function when you scroll to an element on your page is by using the JavaScript library called Waypoints. Since Divi already comes with Waypoints installed (yay!), all we need to do is include a script that utilizes the library.
Go to Divi → Theme Options → Integration and paste the following script in the section “Add code to the head of your blog”.
<script>
jQuery(document).ready(function(){
	jQuery('#cta-section').waypoint(function() {
		jQuery('#cta-section').toggleClass('animate-cta');
	}, {offset: '80%'});
});
</script>
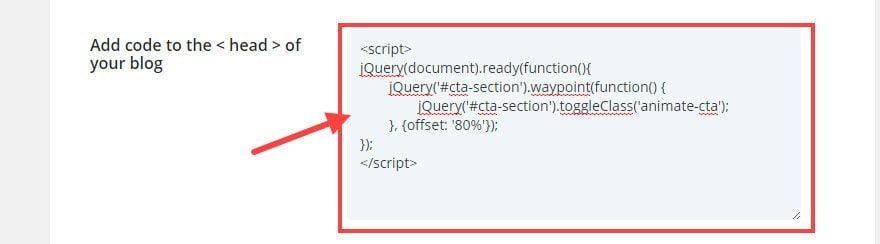
This script is adding a function that will toggle a class called “animate-cta” when you scroll to the CTA section (with the CSS ID “cta-section”). Notice the part of the code that designates the offset as 80%. This means the function will be triggered when the top of the CTA section is 80% from the top of the browser window. If you want to delay the function to trigger when the CTA reaches the middle of the page, you could change the offset value to something like 50%. However, if your CTA is going to be at the very bottom of the page, you should stick with a value closer to 80% – 90%. This is because your CTA may never reach the middle of your browser window when scrolling and, therefore, will not be triggered.
That’s it!
Now let’s take a look at the finished project.

Adding the CTA Functionality to other Modules
If you want to add this CTA functionality to other modules within the Divi Builder, this is fairly easy to do. Here are the steps to get you started:
- Create a standard section with a fullwidth (single column) row.
- In Section Settings, under CSS, add the CSS ID “cta-section”.
- In Row Settings, under CSS, add the CSS ID “cta-row” AND add the Column CSS Class “cta-column”.
- Insert the following custom CSS:
- Add any module you want to the row (ie. Call to Action Module) and style it accordingly. You may want to add transparent backgrounds to your module so that it won’t over lap the section background color of your CTA.
 .cta-column.et_pb_column:last-child {
 margin: 0 auto;
 margin-right: auto !important;
 max-width: 1080px;
 float: none;
}
Important Note: You can’t add more than one CTA with this function per page.
Final Thoughts
Duplicating Elegant Theme’s CTA is a useful feature to add to any future project. It grabs the reader’s attention without being too overbearing. Using the Code Module gives developers more flexibility to add custom html within the CTA. And, the waypoint animation functionality is not limited to the Code Module. You can also add the necessary CSS ID’s to any section, row, and column to create CTA’s with any any module using the Divi Builder.
I look forward to hearing from you in the comments below.
Cheers!


LOVE IT !!! Thanks, Guys!
Awesome tutorial as always!
beautiful. Waiting for getresponse
Hello:
I do not know what I’m doing wrong, I’ve reviewed the steps to follow times … But it does not work on PC. It only works by viewing the page on mobile or tablet.
Regards,
Hello,
Thanks for this code, works great for me except for one thing: I use the “Rock Salt” font for the headers. Under the CSS Styling for .cta-info h1 { section I have attempted:
font-family: “rock-salt”; as well as font-family: “rock salt”; yet the font won’t change for me. Would you be able to shed some light on what I’m doing wrong here?
Love this! It’s going to be a big hit on my sites, and with my clients. Thanks for sharing.
Nifty! Loved the button. Thanks for showing us how to do it!
Yes! Thank you Jason, we’ve been waiting for this post!
That’s awesome – thanks for sharing this – coding at all.
thanks for sharing your information.
HI,
Here is a design tip, make your links stand out, I found it really difficult to read your blog and have to hunt for the links you put in there. Underline might be nice, or a distinctive different colour maybe. I like your blogs and they are useful but would be soo much more useful if they are actually actionable…
While I was reading your post, I had an idea.
It would be great if the ET Dev Team could add a JS tab to the Code Module, instead of having to add all JS from the Divi Theme Options.
If the hypothetical JS tab in the Code Module could automatically load the JS in the page head, it would be awesome and would make the global site a lot more efficient because the JS code would only load in the needed pages, instead of every page 😉
You have a point but in the meantime you should be able to do that with the built in wp functions (“is_page” and “enqueue_scripts”)…
hth
Hello there, if you create a child theme, you can just create your own javascript file that contains all of your various js or jquery functions. Then, you just call that one javascript file in your head.
At one time, I was doing what all the tutorials tell you. I was putting every special js function in it’s own script tag in the head. This caused everyone to be called individually as you mentioned. Then, I just made one JS file and put everything in there.
I think you can use the code module, using tags.
Hey Enrique, The code module accepts HTML code as well which includes Javascript as long as you wrap the JS code into a tag.
HMMM.. You do have per page or per post settings though. That only allows for CSS to added. Would be a nice spot for an add JS section as well.
Thanks E.T Team . Merci beaucoup pour ce tutoriel que j’attendais 🙂
Thanks .. looking forward to implementing this. Cheers! #divirocks
This is what i was looking for, can you also let me where i can find the article about promo bar? i want a promo bar like elegant themes on my website, i would appreciate your reply.
Regrades….
Big Thanks, for the tutorials. @Jason Champagne I am awaited for this post, Let me know in the next tutorials how to add Author Box look like Elegant Themes