
Accessibility Attributes is now fully compatible with Divi 5, giving you a no-code way to add ARIA roles, labels, and other screen reader helpers right inside the builder. If you’re working with Divi 5, it’s the easiest way to build accessibility into your site without changing your workflow or design.
With the European Accessibility Act taking effect on June 28 and Google increasingly favoring accessibility best practices, now is the time to get ahead. Here’s how Accessibility Attributes works and how it helps your site meet modern accessibility standards!
Accessibility Attributes For Divi 5
Accessibility Attributes is a Divi Plugin that lets you add ARIA roles, labels, and other accessibility helpers to your web pages directly from the Divi Builder without writing any code. ARIA (Accessible Rich Internet Applications) attributes help you add meaning to elements that don’t provide enough context on their own, especially when building custom layouts in Divi 5.
For example, if you use a Text Module to visually style a heading or a Button Module to create a call-to-action, screen readers won’t automatically understand their roles. ARIA roles and labels allow you to define what each element is and how assistive technologies should interpret it, without changing the visual design. This helps ensure your Divi 5 site is both accessible and flexible.
Accessibility Attributes is now fully updated for Divi 5. The plugin creator put in a lot of thoughtful work to make sure it stays reliable and fully compatible with the new builder. What this means for you: whether you’re using Divi 5 for the first time or switching from Divi 4, everything works exactly as expected. There are no glitches, no workarounds. The plugin fits right into your workflow and doesn’t require any relearning.
After you install the plugin, it automatically adds custom input fields to your sections, rows, modules, and other Divi elements. (To access the ARIA fields, click on any element and go to its Advanced tab.)

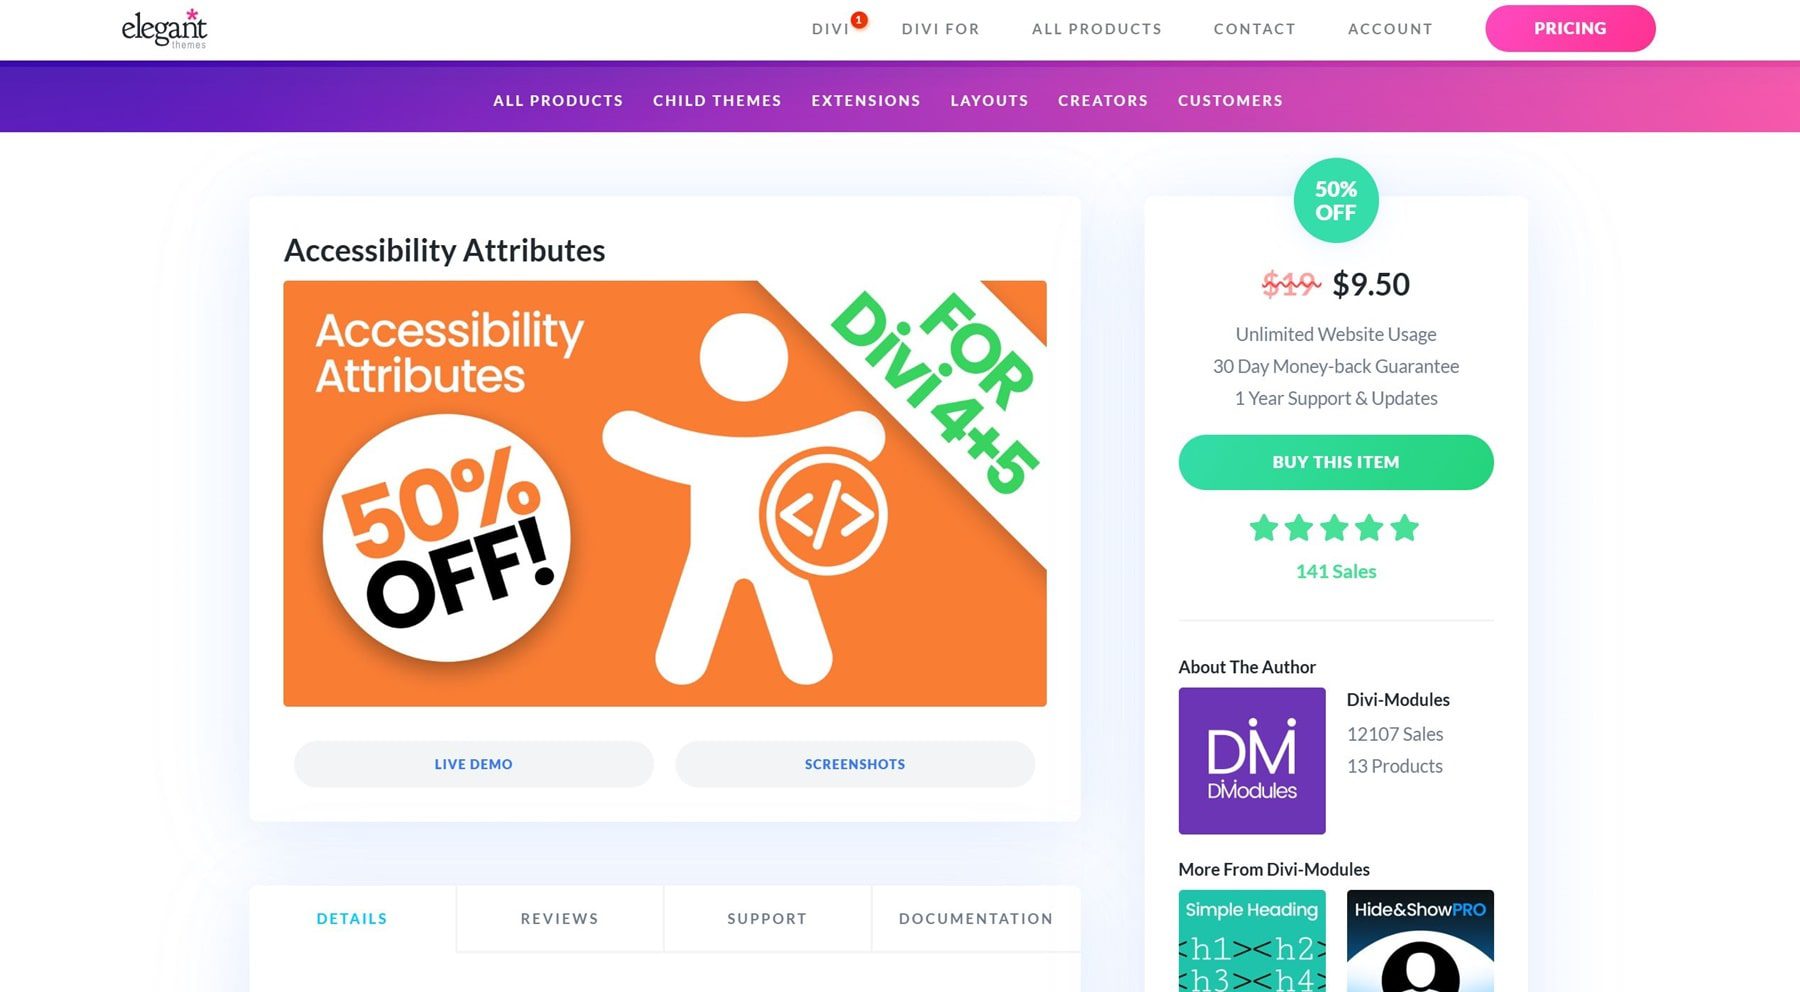
Now, you can define roles, add ARIA labels, and improve screen reader support for every element directly from the Divi Builder. Accessibility Attributes fits smoothly into your Divi workflow and costs just $19 per year. It offers you a simple, affordable way to build accessible websites.
Why Accessibility Isn’t Optional Anymore
Accessibility used to be something you could put off, but not anymore. It now impacts your legal safety, your search performance, and your users’ trust.
If your site isn’t accessible, you’re not just behind — you’re at risk. Here’s why:
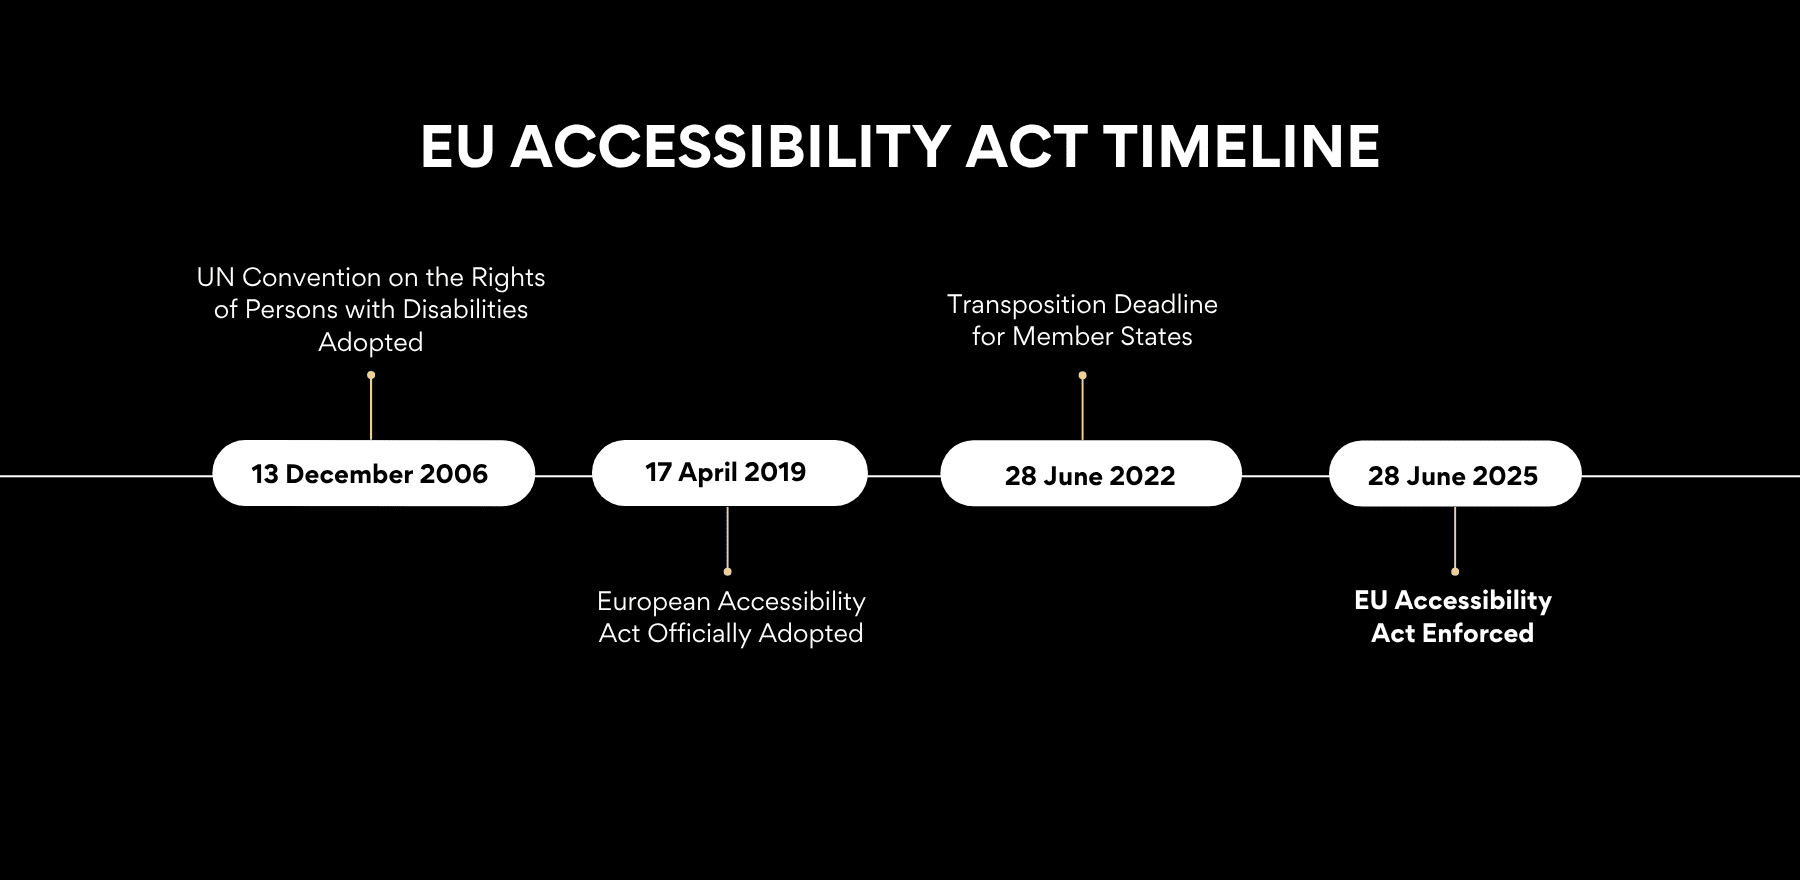
- Legal Actions Are Rising: From June 28, 2025, the European Accessibility Act will be enforced. If your website isn’t accessible and people in the EU use it, you could face fines or other penalties. The law applies to most businesses with more than 10 employees and earning over €2 million a year, but smaller ones are also encouraged to follow it because…
- Accessibility Might Affect Your Rankings: While accessibility isn’t a ranking factor, many accessible features can indirectly affect your SEO. Things like alt text, proper heading structures, and descriptive labels make your site easier for both users and search engines to understand. So if your site is hard to navigate, you could quietly fall behind in search results.
- Inaccessible Sites Drive Users Away: If your site isn’t accessible, people with disabilities may be unable to use it. When they leave quickly, it can signal a poor user experience to search engines and hurt your rankings. Changes like clear structure, readable fonts, and easy keyboard navigation make your site usable for everyone.
It’s easy to assume accessibility only matters for big businesses, but ignoring it can still hurt you even if you’re a smaller brand.
Setting Up Accessibility Attributes In Divi 5
This section walks you through installing and accessing tools in Accessibility Attributes in your Divi 5 websites.
Installing The Plugin
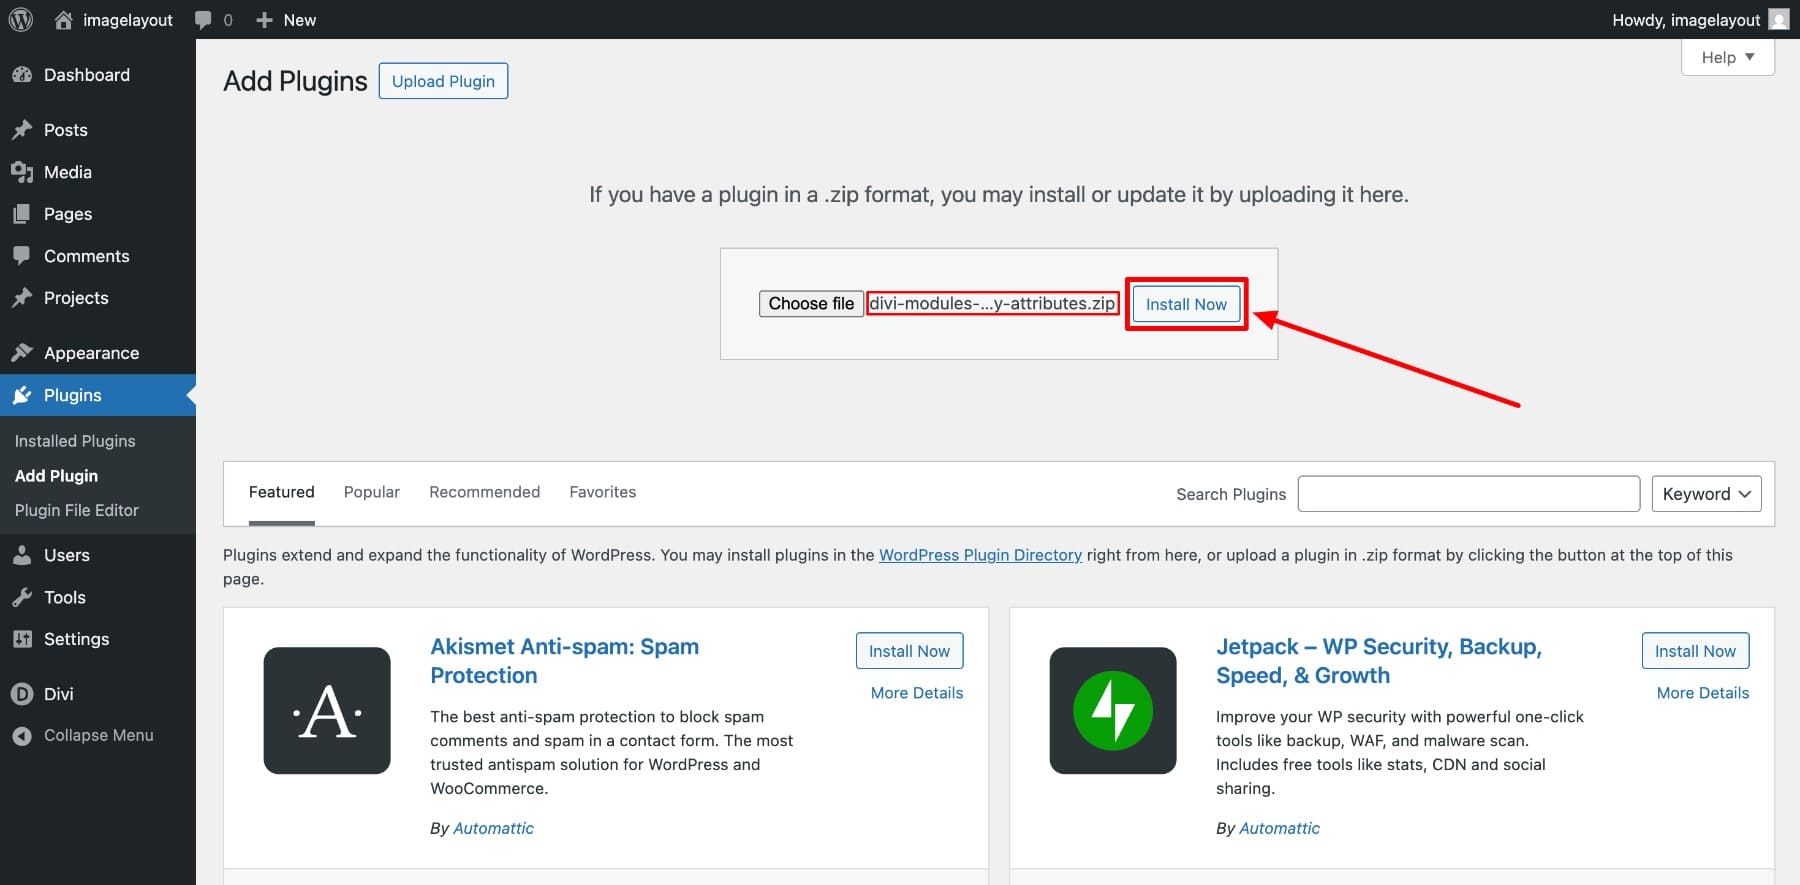
Once you purchase Accessibility Attributes, you’ll receive the plugin’s zip file. Upload it to your WordPress’s Plugins > Add Plugin > Upload Plugin.

Now, add the zip file and click Install Now.
Finally, Activate it.
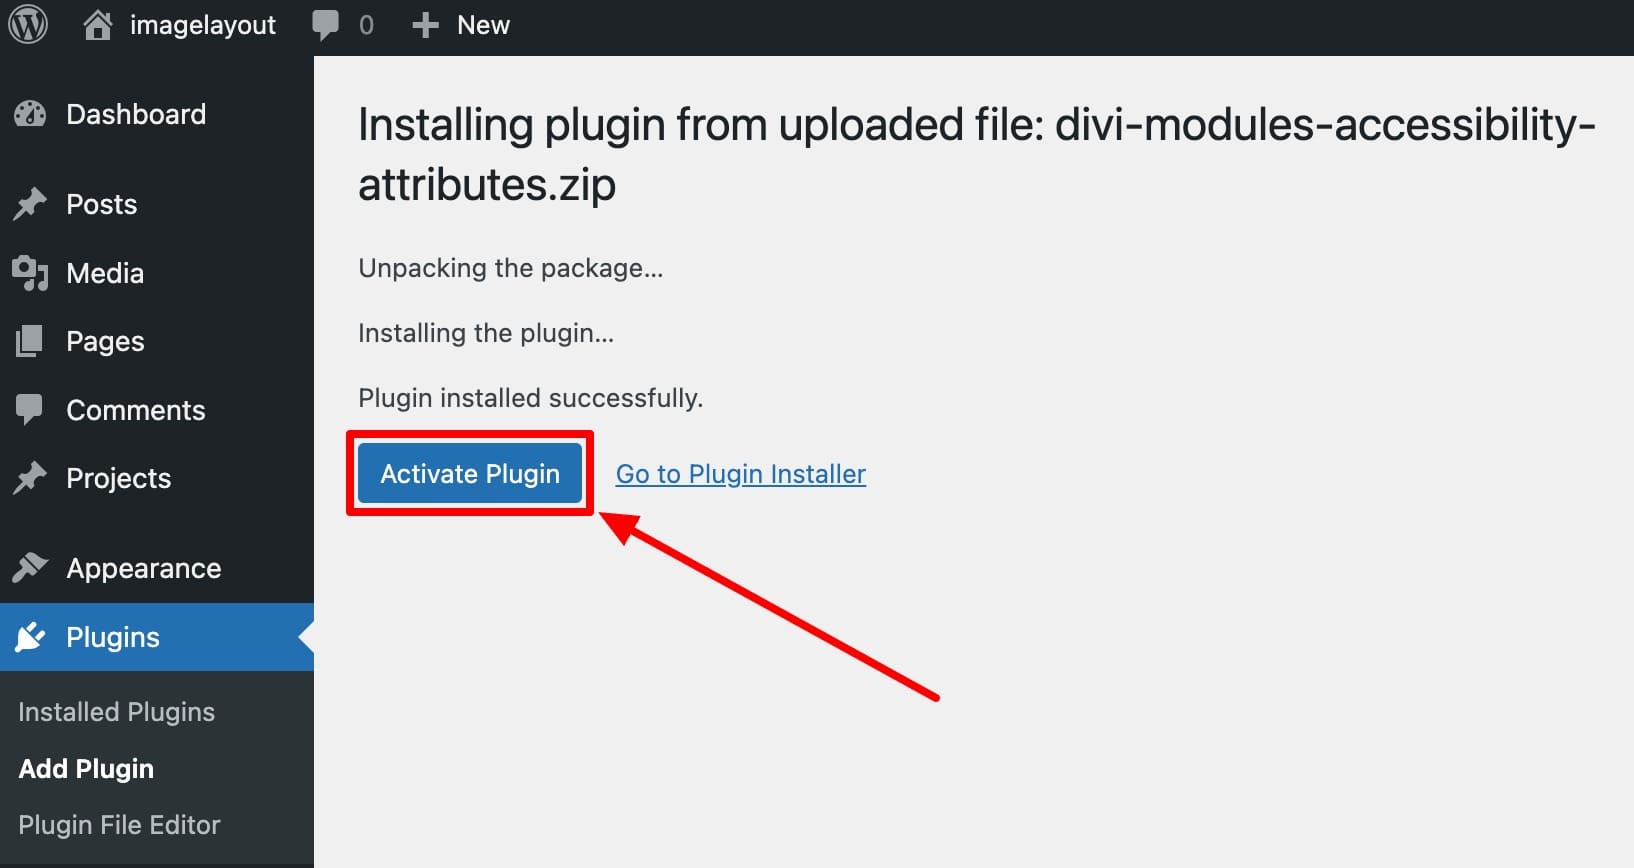
Once activated, you’ll notice the extra ARIA fields added to every element’s Advanced tab.
You can now easily add these accessibility attributes to each element on your page, directly from the Divi Builder. We’ll cover that in just a minute. Before that, let’s quickly review all the options you have available inside the Accessibility Attributes dashboard.
Accessibility Attributes Walkthrough
Once the plugin is active on your Divi site, the Accessibility tab will be added to your WordPress sidebar. Click on it to access your dashboard, which has four tabs: Admin, Modules, Elements, and Products.
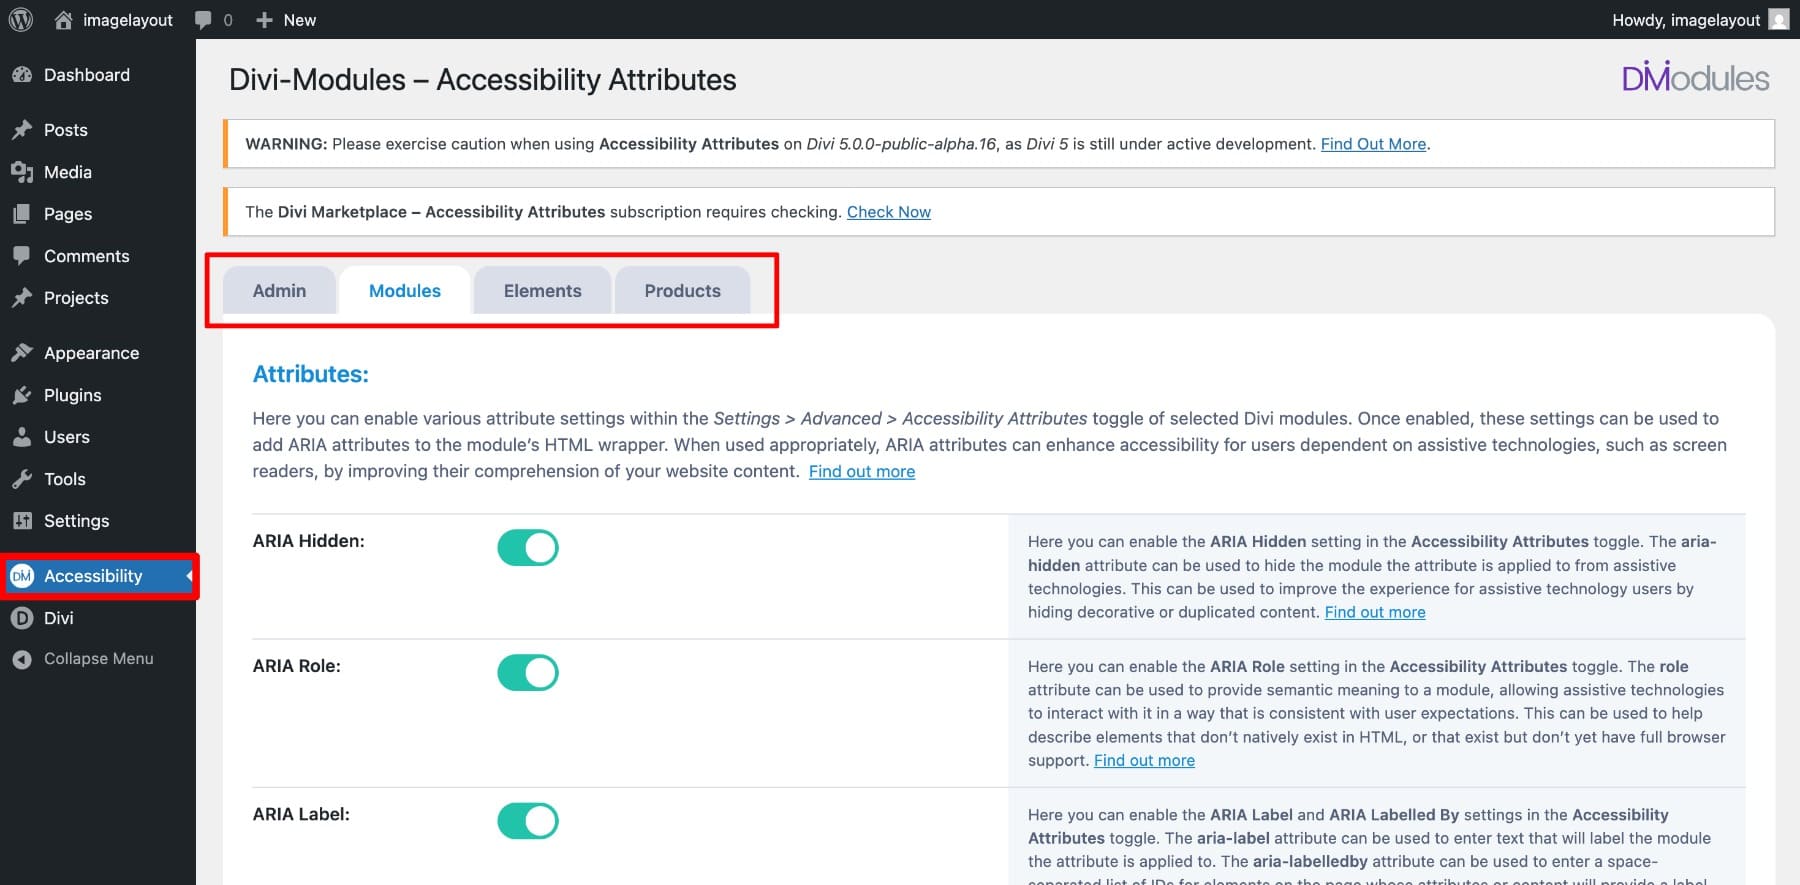
Let’s review each tab’s options:
The Admin Tab
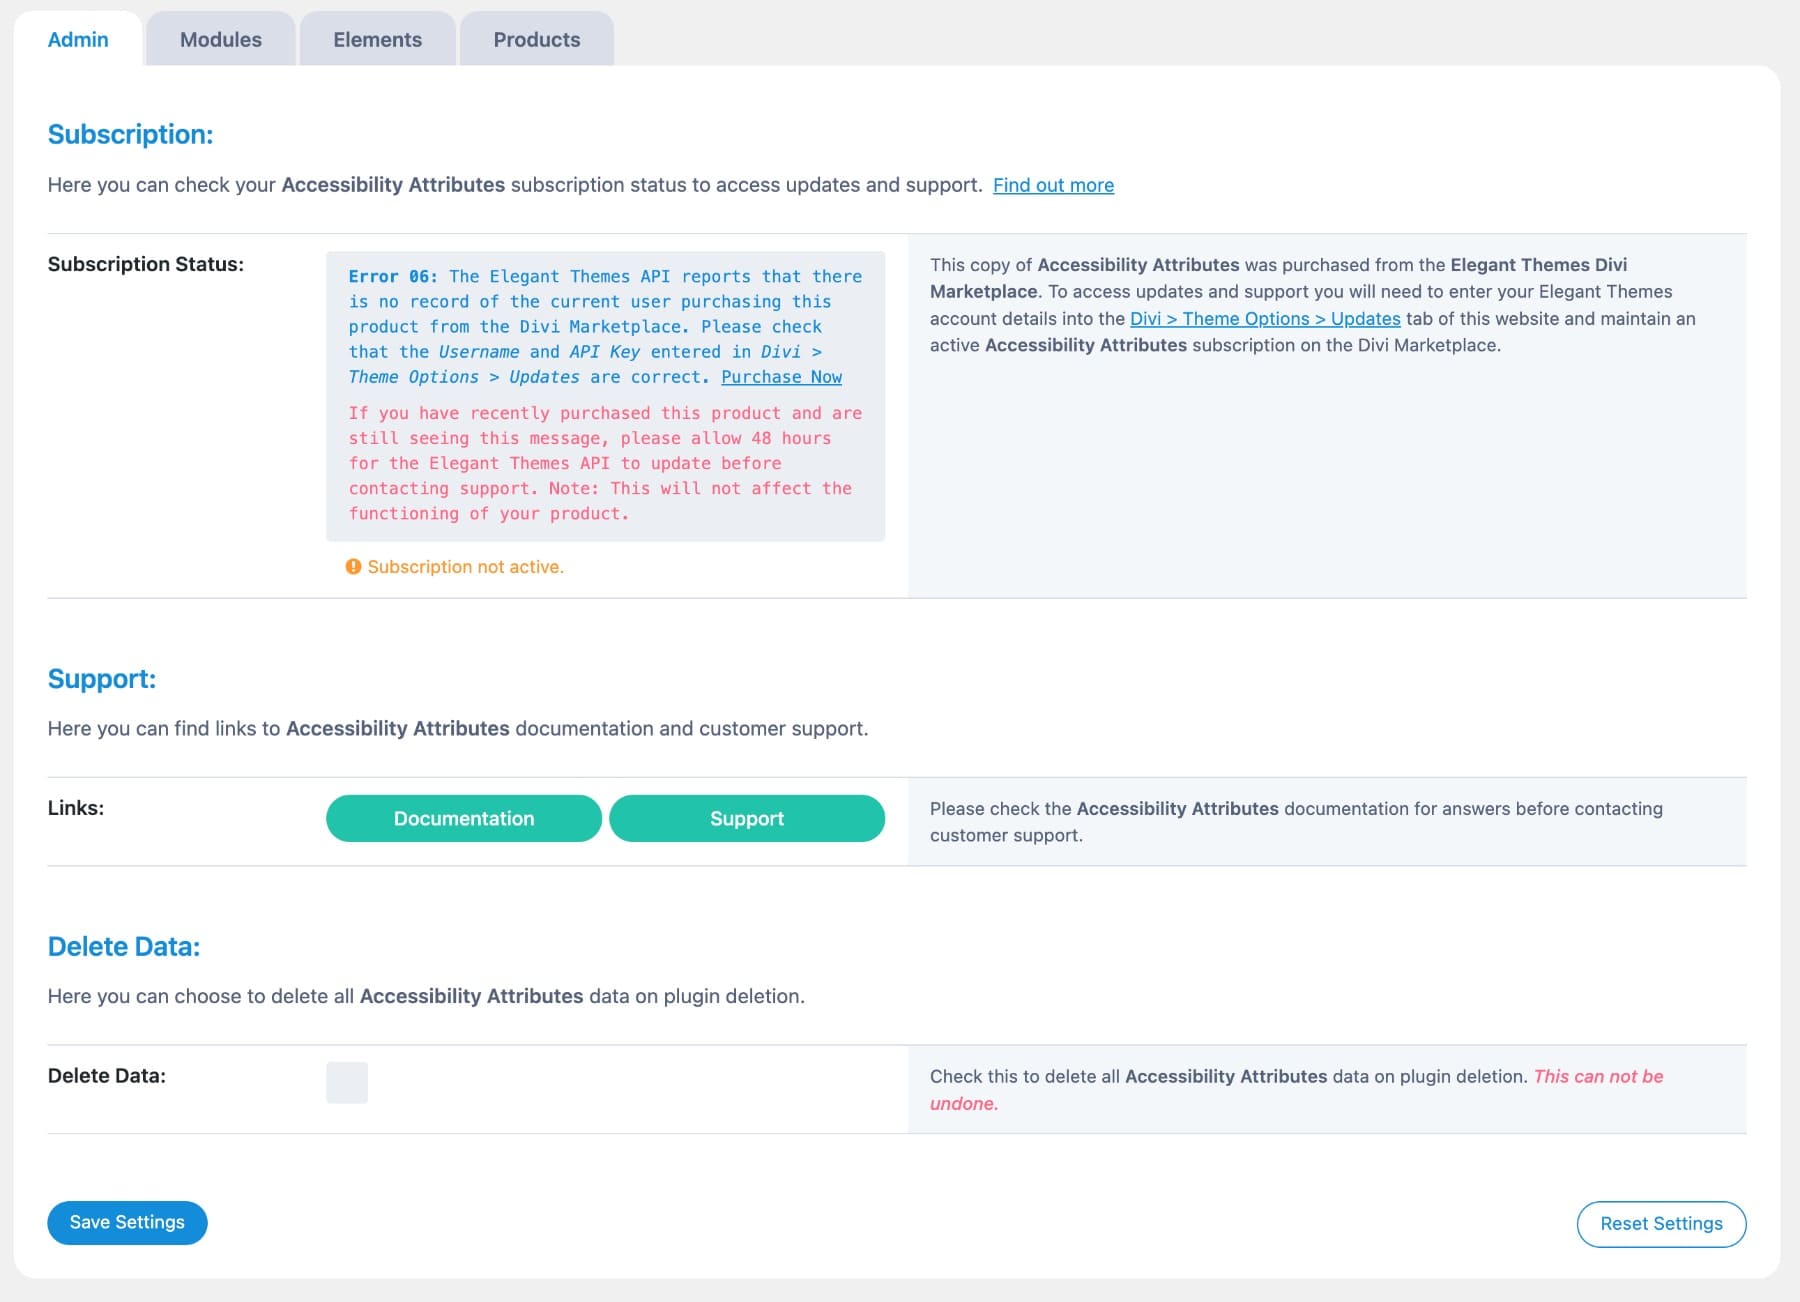
This tab gives you account-level controls like managing your subscription (which enables support), checking plugin status, choosing whether to delete data on uninstall, and resetting all settings to default.
The Modules Tab
It lets you decide which ARIA attributes to enable in your Divi modules. Only the selected options appear on the Advanced tab as fields. You might want to keep them all turned on.
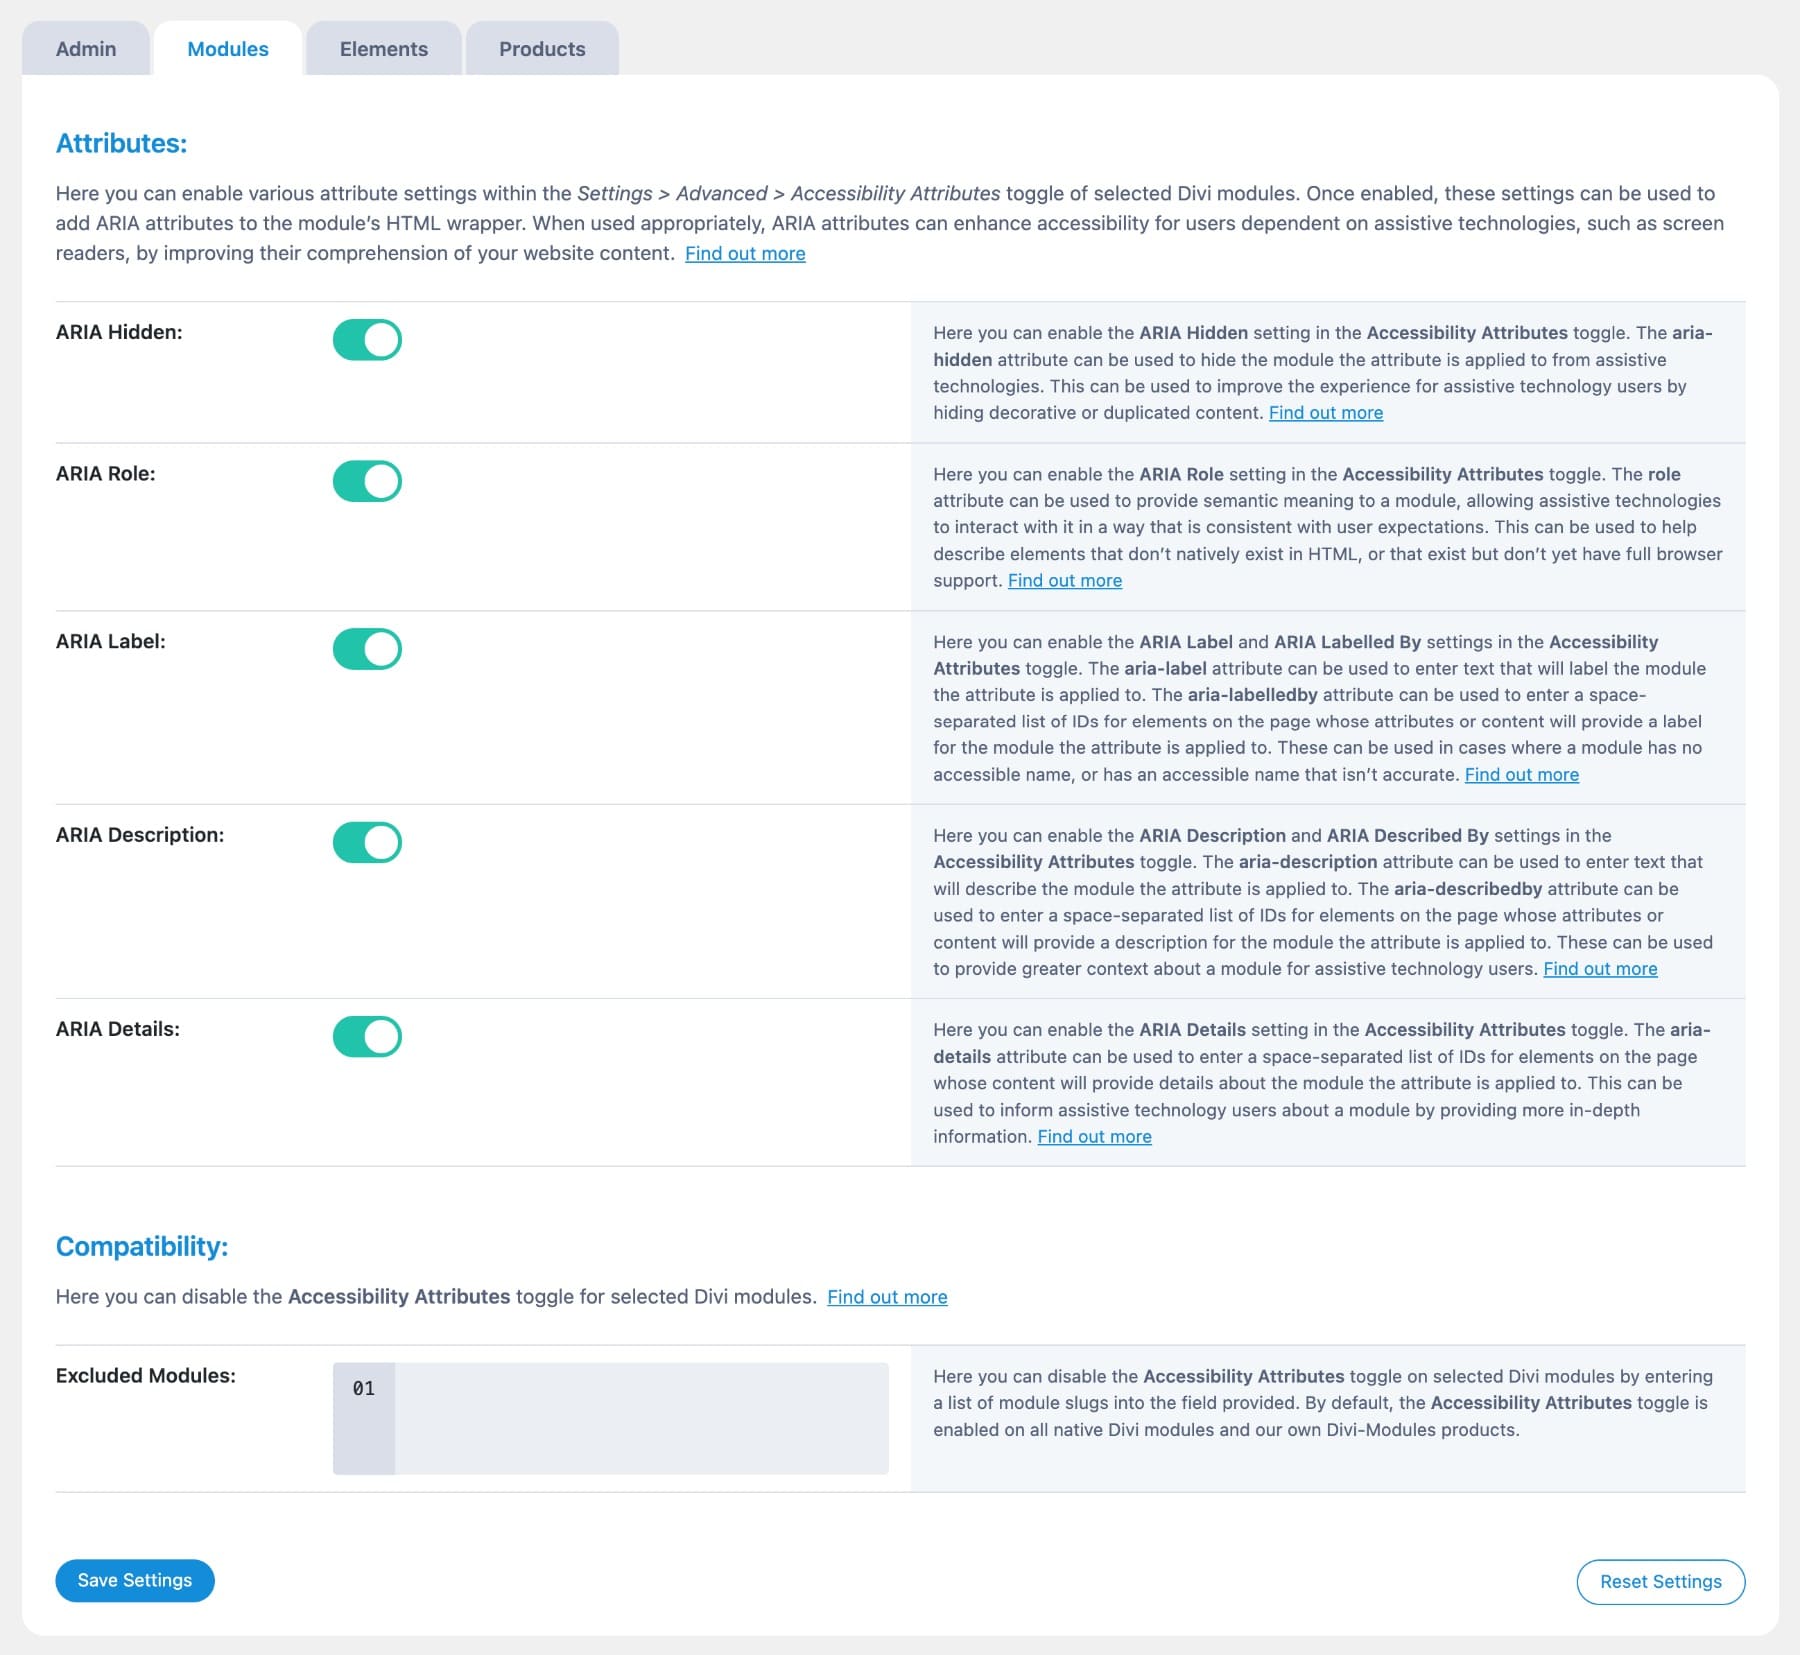
Not every module needs accessibility attributes. For instance, you can safely skip decorative elements like dividers, animated icons, or image galleries without captions or links, as they don’t add meaningful content for screen readers.
To exclude a module, enter the module slug (like et_pb_image) in the Compatibility section. This tells the plugin to skip it when adding ARIA fields and focus only on the modules that actually need accessibility support.
The Elements Tab
Some parts of your website aren’t built with Divi modules. They might come from your theme, other plugins, or plain HTML. The Elements Tab lets you add ARIA attributes to those parts of your site using CSS selectors. You might want to include global elements like menus, icons, buttons, and form fields not created inside the Divi Builder.
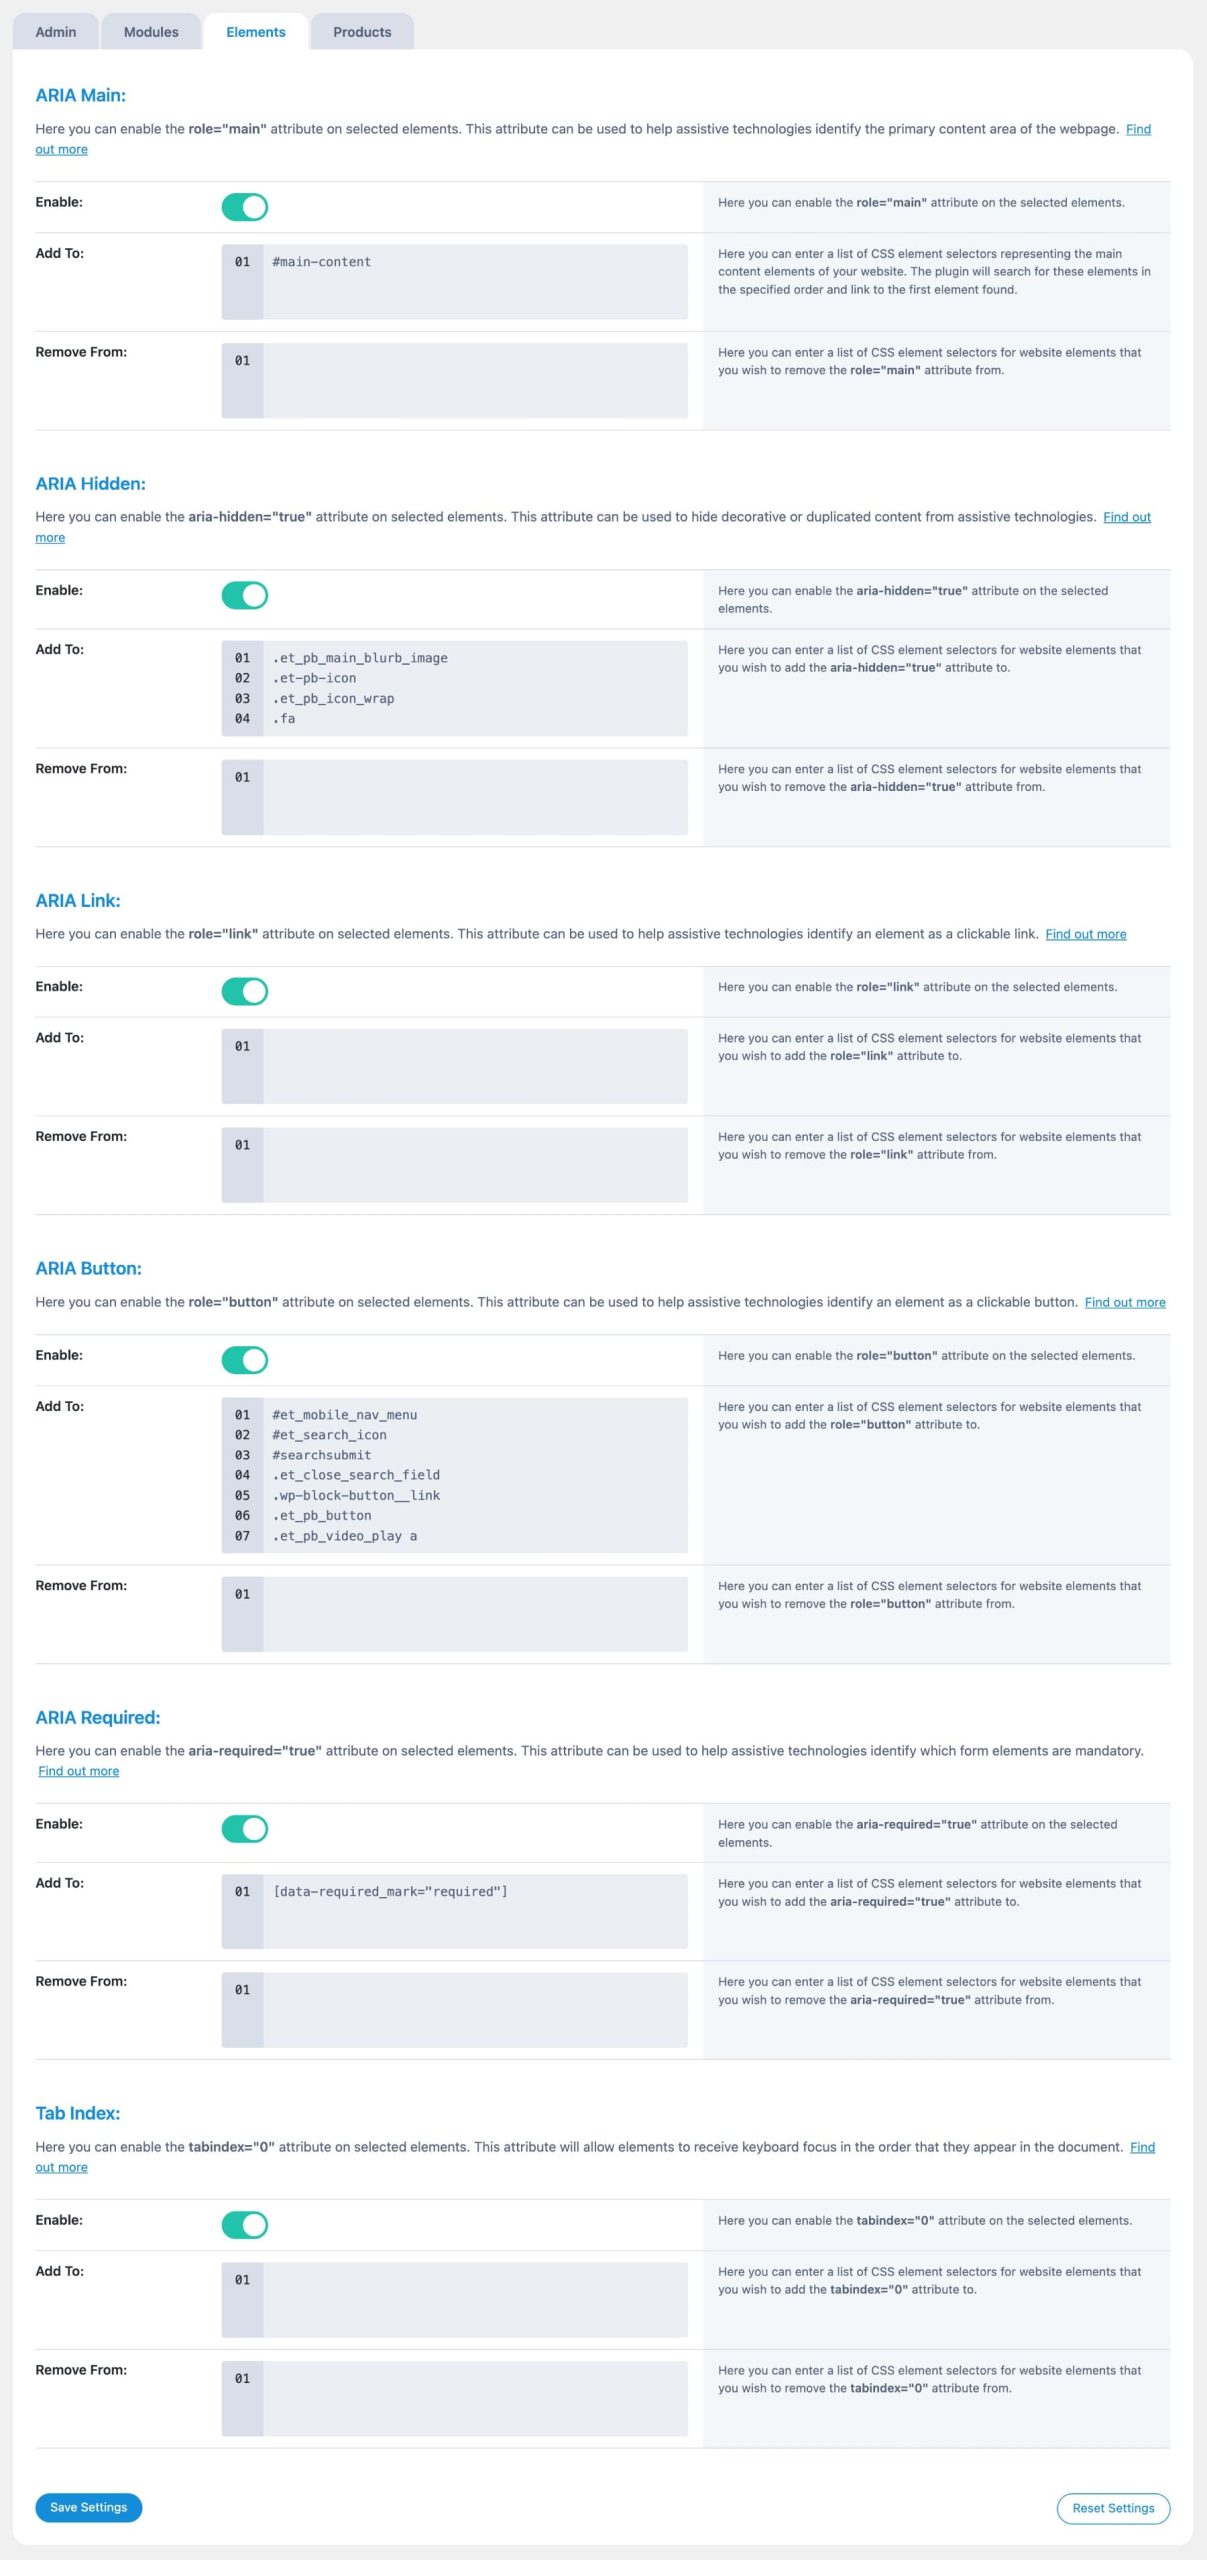
- ARIA Main: Tells screen readers where your main content begins so they can skip menus or sidebars.
- ARIA Hidden: Hides decorative elements so assistive tech doesn’t read them out loud.
- ARIA Link: Marks clickable elements that aren’t real links as links. This helps screen readers identify them correctly.
- ARIA Button: Adds button roles to toggle icons or styled text links that act like buttons.
- ARIA Required: Marks custom form fields as required, even if the HTML doesn’t say so.
- Tab Index: Makes important elements reachable using the Tab key, which is helpful for keyboard-only navigation.
Each setting lets you add or remove these roles using CSS selectors. If you’re unsure where to start, ARIA Main and ARIA Button are good first picks, they’re often missed and easy to set up.
The Products tab features other products from the same creator.
Using Accessibility Attributes Inside Divi 5
After setup, the real work happens inside the builder. Each ARIA field has a purpose. Let’s look at what it does, when to use it, and how it helps with accessibility in real layouts.
1. Assign Roles To Elements With ARIA Role
The ARIA Role field lets you assign a purpose to an element that may not be obvious in the code. For example, if you’ve used a Blurb Module to create a call-to-action, screen readers won’t automatically recognize it as a button. You need to assign the role button to it to make its function clear for users navigating with voice commands or keyboard shortcuts.
Like in this case below, this Blurb includes a button.
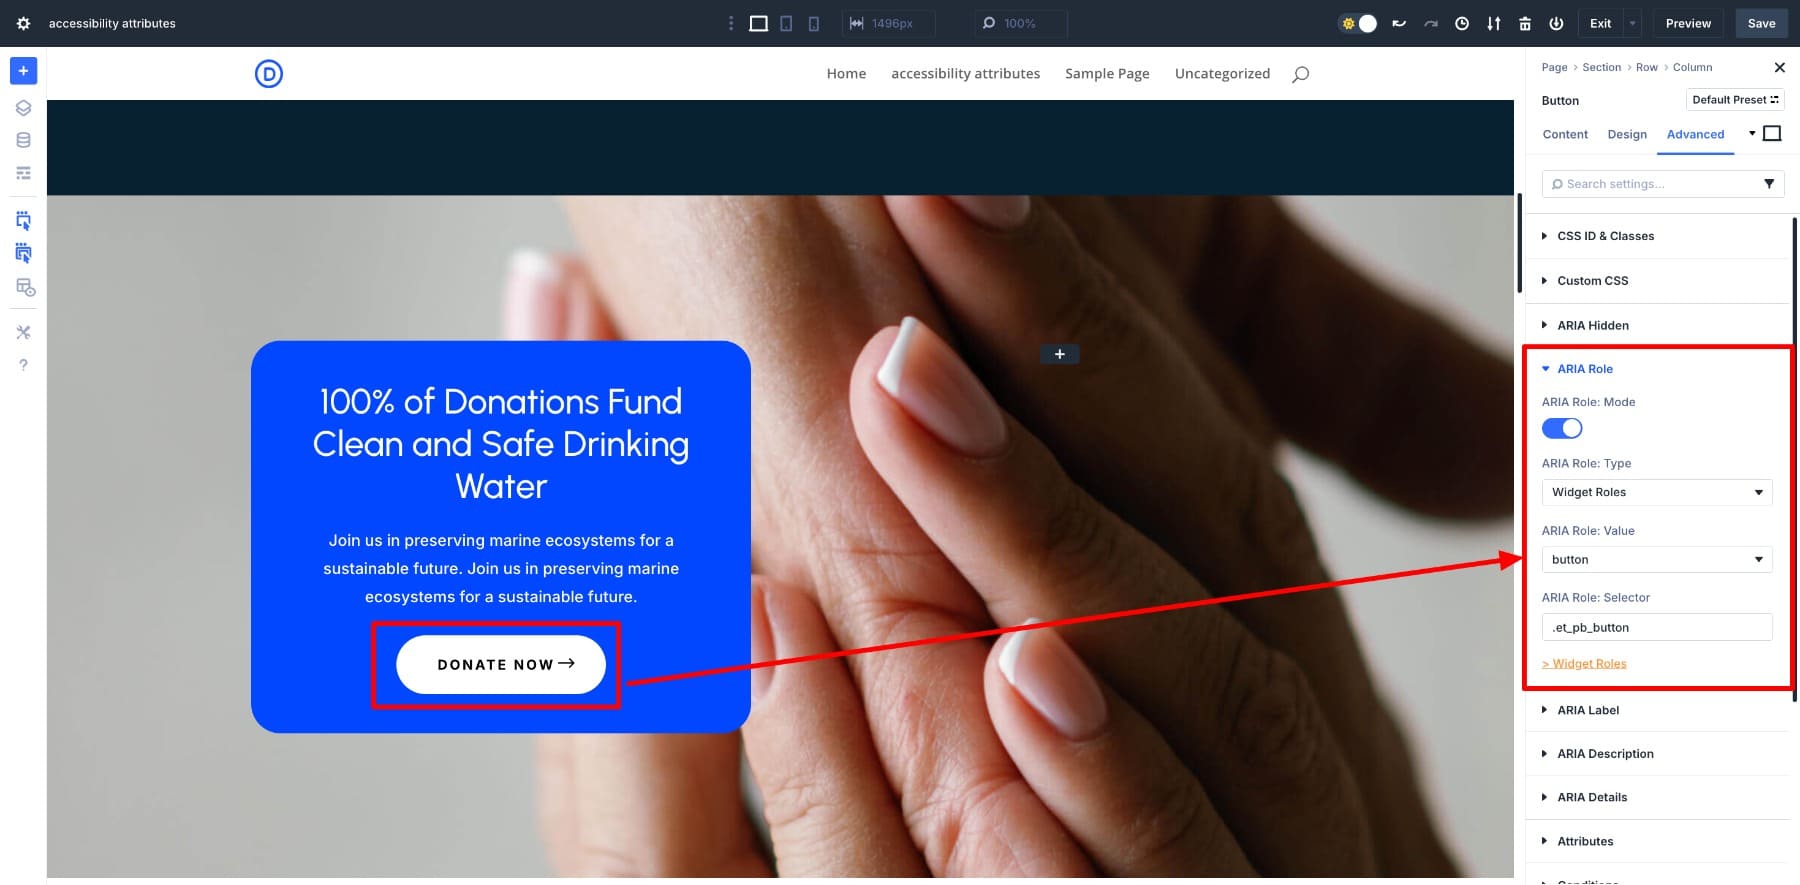
To add ARIA Role, toggle on the option and assign these values:
- ARIA Role Type as Widget Roles (this is the category where interactive elements like buttons and sliders live.)
- ARIA Role Value as button
- ARIA Role Selector as .et_pb_button (this is the class Divi uses for Button Modules.)
2. Add Clear Labels For Screen Readers With ARIA Label
While the ARIA Role tells assistive technologies what an element is, the ARIA Label explains what it does. This is especially useful when an element doesn’t have visible text, like an icon, a custom-styled button, or anything designed to look interactive but doesn’t say so out loud. Let’s break it down using the same example.
We’ve already added the role, but the button text says “Donate Now.” That’s fine for visual users, but people using screen readers might need more context, even more since the button appears multiple times.
To assign a label to this button, simply toggle on the ARIA Label and add a short label.
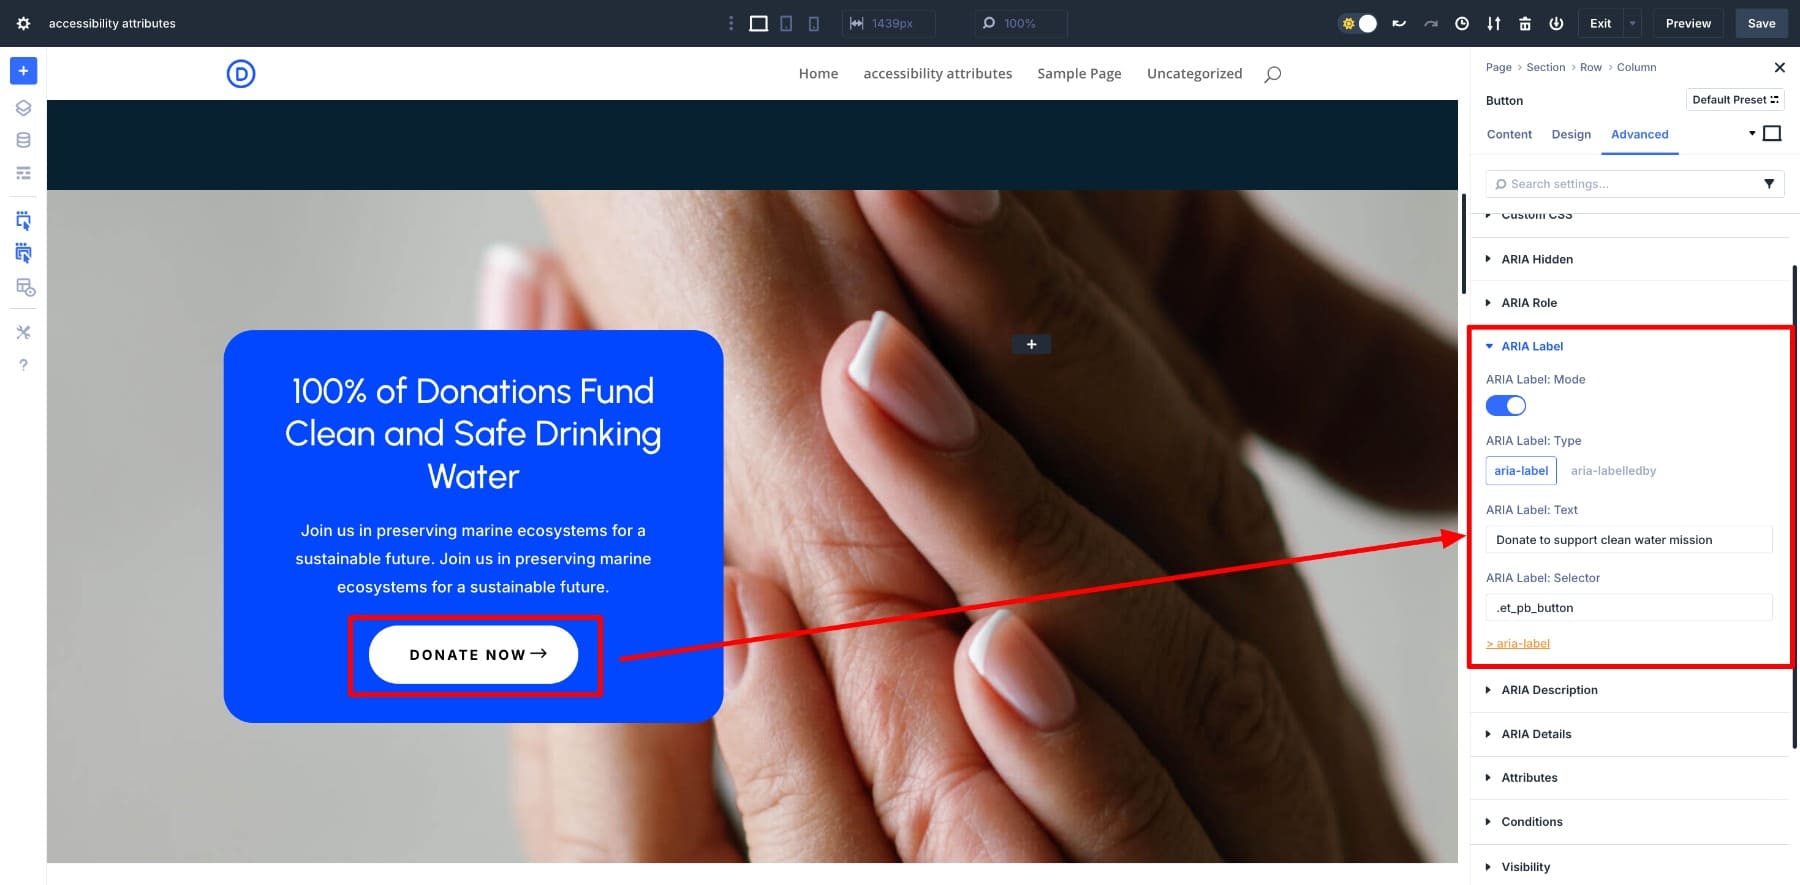
Now, the button will still say “Donate Now” on the screen, but screen readers will read the full label to help users understand exactly what the button does and where it leads.
3. Provide Extra Context With ARIA Description
ARIA Description gives screen readers more detail about an element than a label can explain. While a label tells what something is, a description explains why it matters.
For example, say you have multiple “Donate Now” buttons on one page, each placed under a different cause like Coastal Cleanup, Marine Education, or Habitat Restoration. A screen reader user might land directly on the button and miss the nearby content. This is where ARIA Description helps.
Let’s take the first card: Coastal Cleanup. To add more context, you can add a description like “This donation supports ocean cleanup and wildlife protection” as ARIA Description Text.
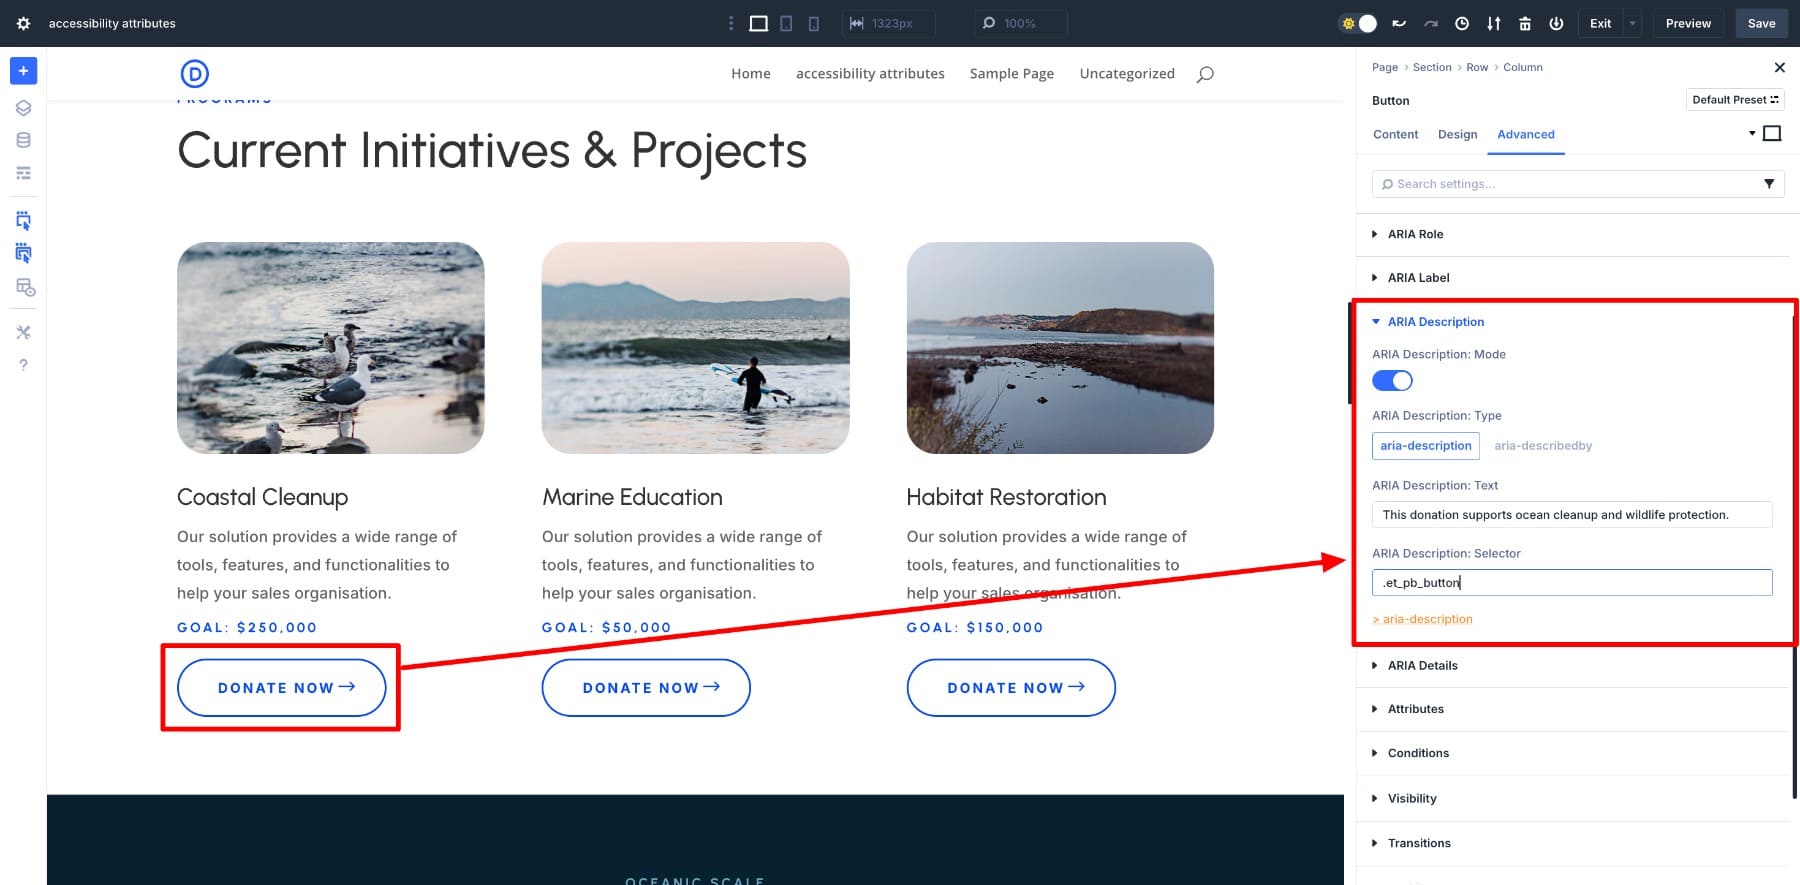
Do the same for the other buttons, such that even though they all say “Donate Now” visually, screen readers will announce different descriptions for each one. This gives users the full context without changing what they see on the screen.
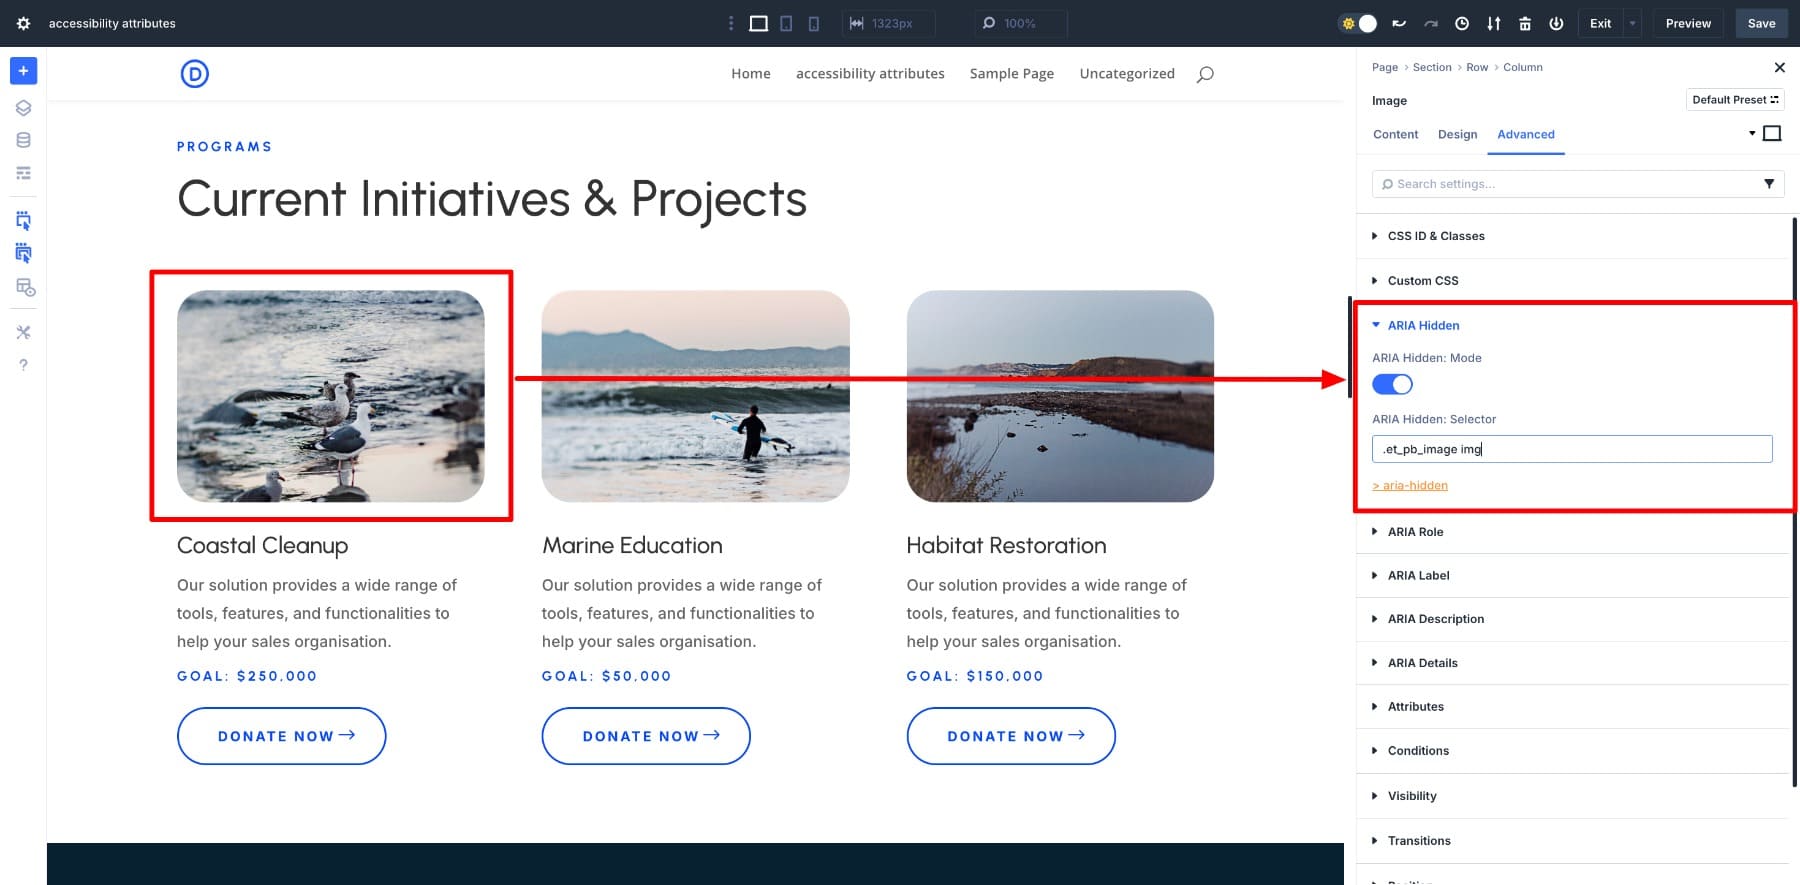
4. Hide Decorative Elements From Screen Readers
ARIA Hidden is helpful when you want to show something visually, like an icon or background image, but don’t want screen readers to announce it. This keeps the experience more focused for users relying on assistive technology.
For example, take a campaign’s preview image, like a photo of seagulls. It supports the design but doesn’t add any new information beyond what’s already in the heading or description. Here, you can use ARIA Hidden to hide it from screen readers.
5. Link To Additional Info With ARIA Details
ARIA Details lets you connect one element to another, which gives extra information. For example, you might link a button to a nearby paragraph that explains what the button is about. It’s useful when you want assistive technologies to read out more context that isn’t directly part of the clicked element.
Let’s take the Marine Education section. Suppose you want the paragraph text to describe the “Donate Now” button. You can link the button to the paragraph using ARIA Details.
First, add a unique ID to the paragraph. Click on the Text Module that contains the description and go to the Advanced > CSS ID & Classes. Enter your unique ID in the CSS ID field. Let’s enter marine-edu.
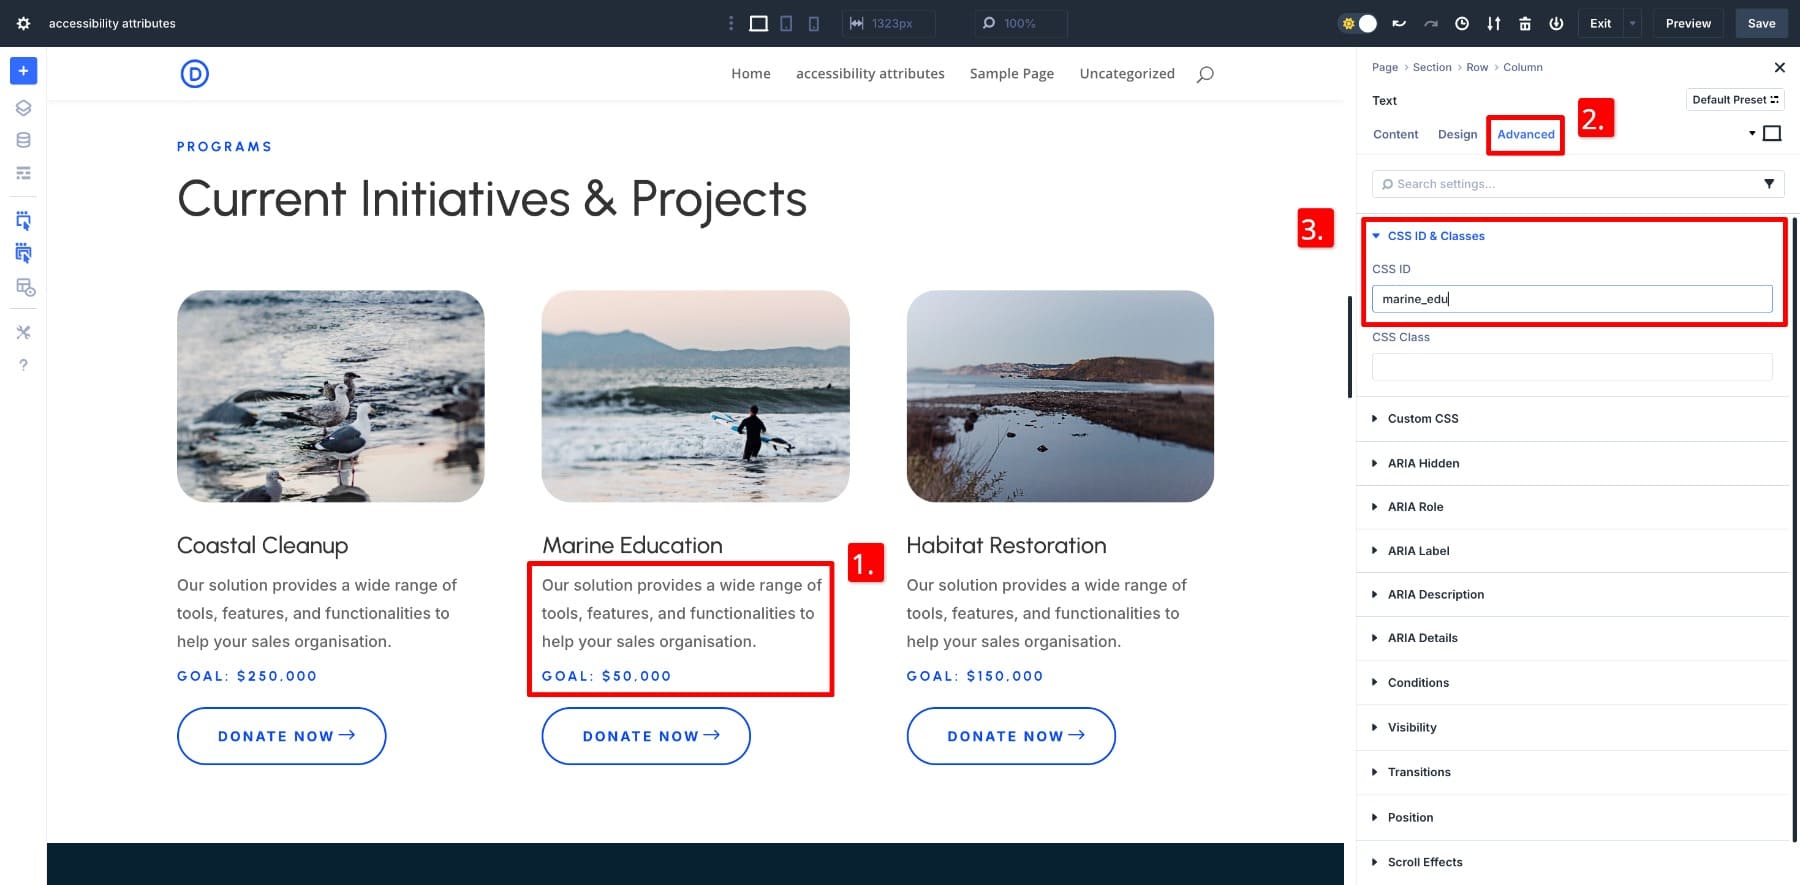
Now this text module has an ID that screen readers can reference.
Next, we add the ARIA Details attribute to the button. Click on the Button Module and go to its Advanced > ARIA Details. Enter marine-edu in the ID field.
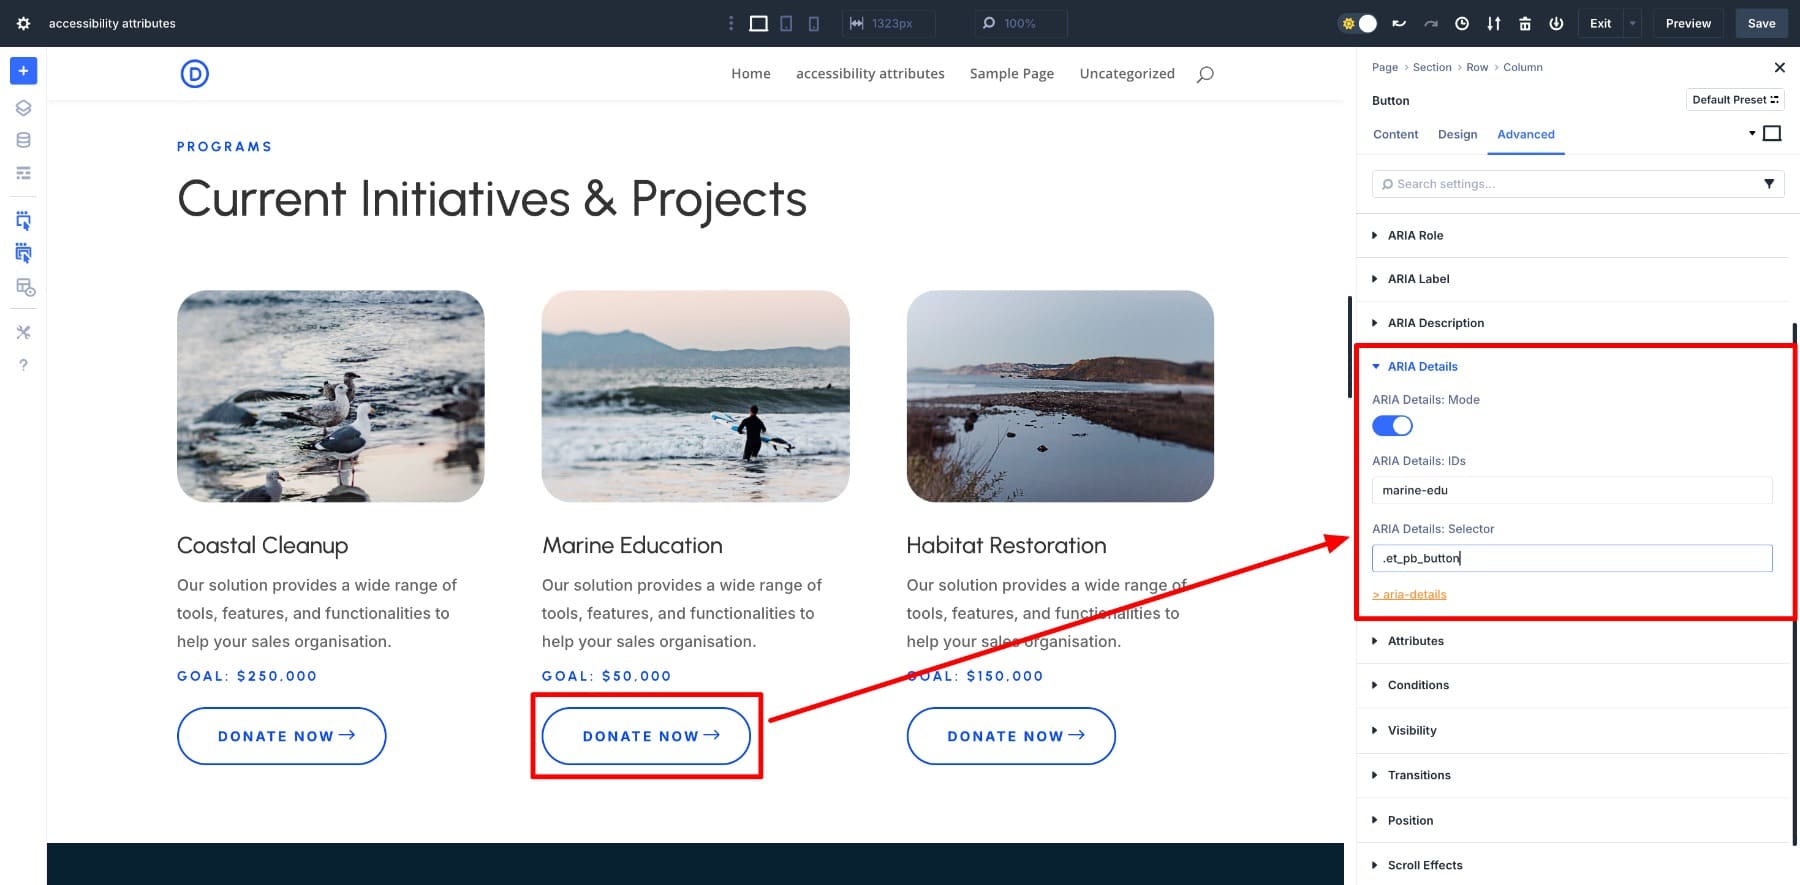
This tells assistive technologies that the button is connected to more information in the paragraph with the ID “marine-edu.” It’s also helpful when you use the same button text in different places, but each one means something different.
You might have noticed that ARIA Label, ARIA Description, and ARIA Details all add extra context in different ways, so it’s best not to use them together in the same element, as it can confuse screen readers. If you’re already explaining something on the page, consider using ARIA Details to link to that text instead of writing a new label or description.
You just saw how Accessibility Attributes makes it easy to add ARIA roles, labels, and other key accessibility features directly from the Divi Builder. It makes your website accessible without coding.
Additional Divi-Modules’ Accessibility Tools For Divi 5
Accessibility Attributes takes care of the technical side of accessibility. It also comes with add-ons (in the Accessibility Bundle) that give you extra features like keyboard navigation and visual controls to offer a more complete, inclusive solution.
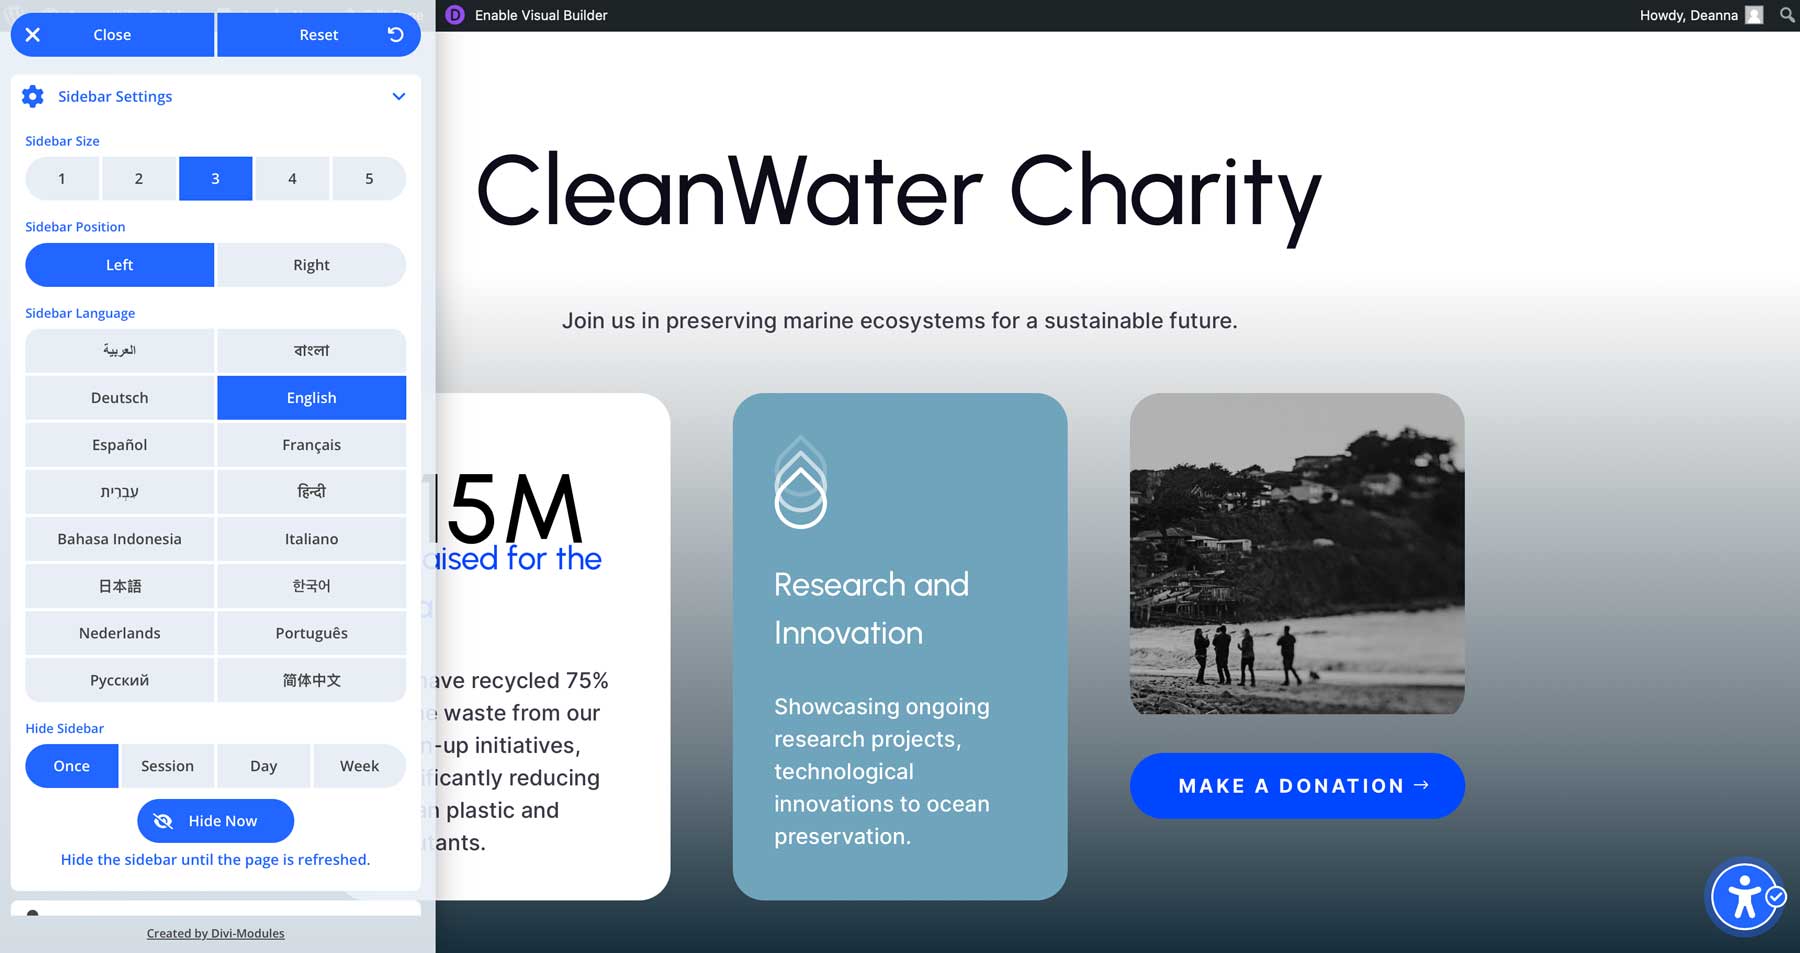
The Accessibility Sidebar adds a floating toolbar that lets users customize their browsing experience. Visitors with mobility impairments can adjust font sizes, switch to high-contrast mode, enable grayscale, and navigate using a keyboard. You can also customize it to match your site’s design.
2. Accessibility Tweaks

Accessibility Tweaks adds practical features that help users navigate your site more easily. These include skip links for better navigation, focus outlines to help keyboard users see where they are, and other subtle enhancements that improve usability without changing your site’s layout.
Note: You can also get all three tools in the Accessibility Bundle, which costs only $72 annually. Together, these tools create a strong foundation for building more inclusive, user-friendly websites in Divi. It’s a more affordable alternative to expensive tools like accessiBe (which can cost up to $490 annually). The Accessibility Bundle offers a complete solution for a fraction of the price, is fully integrated with Divi, and is easy to use even if you’re not a developer.
Right now, it’s available at 50% off, so you get everything for just $36 per year.
Check Out Accessibility Bundle
Make Your Divi 5 Websites Accessible Today
Accessibility Attributes gives you an easy, visual way to make your Divi site more inclusive. No coding, no workarounds — just the right tools built directly into the builder.
It’s fully compatible with Divi 5, actively supported, and now 50% off until June 28. As long as the offer runs, you can get the full Accessibility Bundle, including Sidebar and Tweaks, for just $36 per year. If you’re ready to make your site better for everyone, this is the simplest way to start.


Since it wasn’t mentioned here, if you are looking for a straightforward approach to accessibility, you can handle all of this automatically by enabling the accessibility settings in Divi Assistant 🙂
+1
Thank you for this introduction.
This extension is truly interesting on every level.
The complete product is also excellent, with the sidebar allowing visitors to make numerous adjustments.
Does this mean that there will be no accessibility improvements in divi5? I can’t believe you saying “If your site isn’t accessible, you’re not just behind – you’re at risk” – but then not give a native solution and recommend a paid plugin instead. I was really hoping that divi 5 as a modern builder would take more care of the important accessibility within the new foundation, too bad 🙁
Is this just for aria attributes? no data-attribute option?