")
Motion grabs attention much better than static images. Many people avoid adding animated graphics because they think it means installing lots of extra plugins, downloading big files that slow things down, or learning code.
Lottie animations are different. They stay sharp at any size, load fast, and barely occupy space. We’ll walk you through adding them straight into Divi 5 using the now built-in Lottie Module.
What Are Lottie Animations?
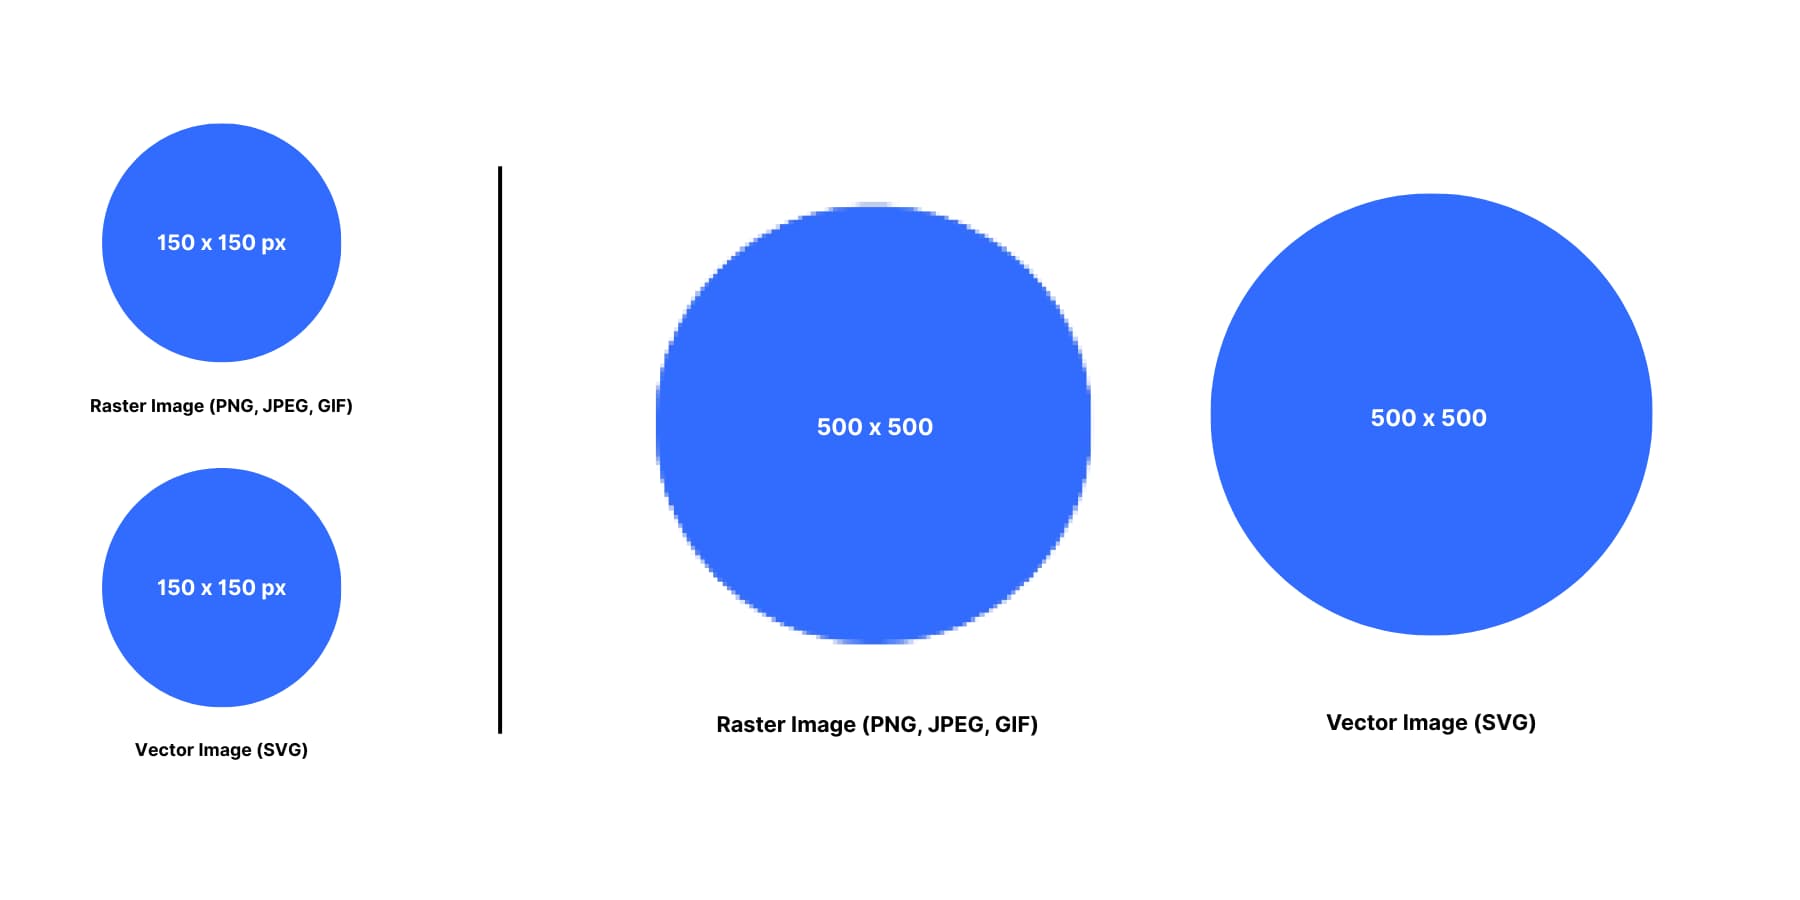
Lottie animations are JavaScript Object Notation (JSON) files that store motion graphics as code instead of pixels. They’re often many times smaller than comparable GIFs (commonly 5–10× smaller), while staying crisp. A typical GIF that might be 5MB as a video becomes 50KB as a Lottie file.
A small icon animation scales perfectly to fill your entire screen. GIFs save each frame as a separate image. Lottie files tell your browser how to draw the animation. You can also change colors, speed, and timing by editing the JSON code directly.
Since they’re vector-based instead of pixels, you can stretch them to any size without losing sharpness.
How To Add Lottie Animations To Your Divi 5 Website
Adding Lottie animations to your site using Divi 5 is extremely easy. These five steps show you how to get things set up and start adding animated graphics to your pages without any extra plugins in no time.
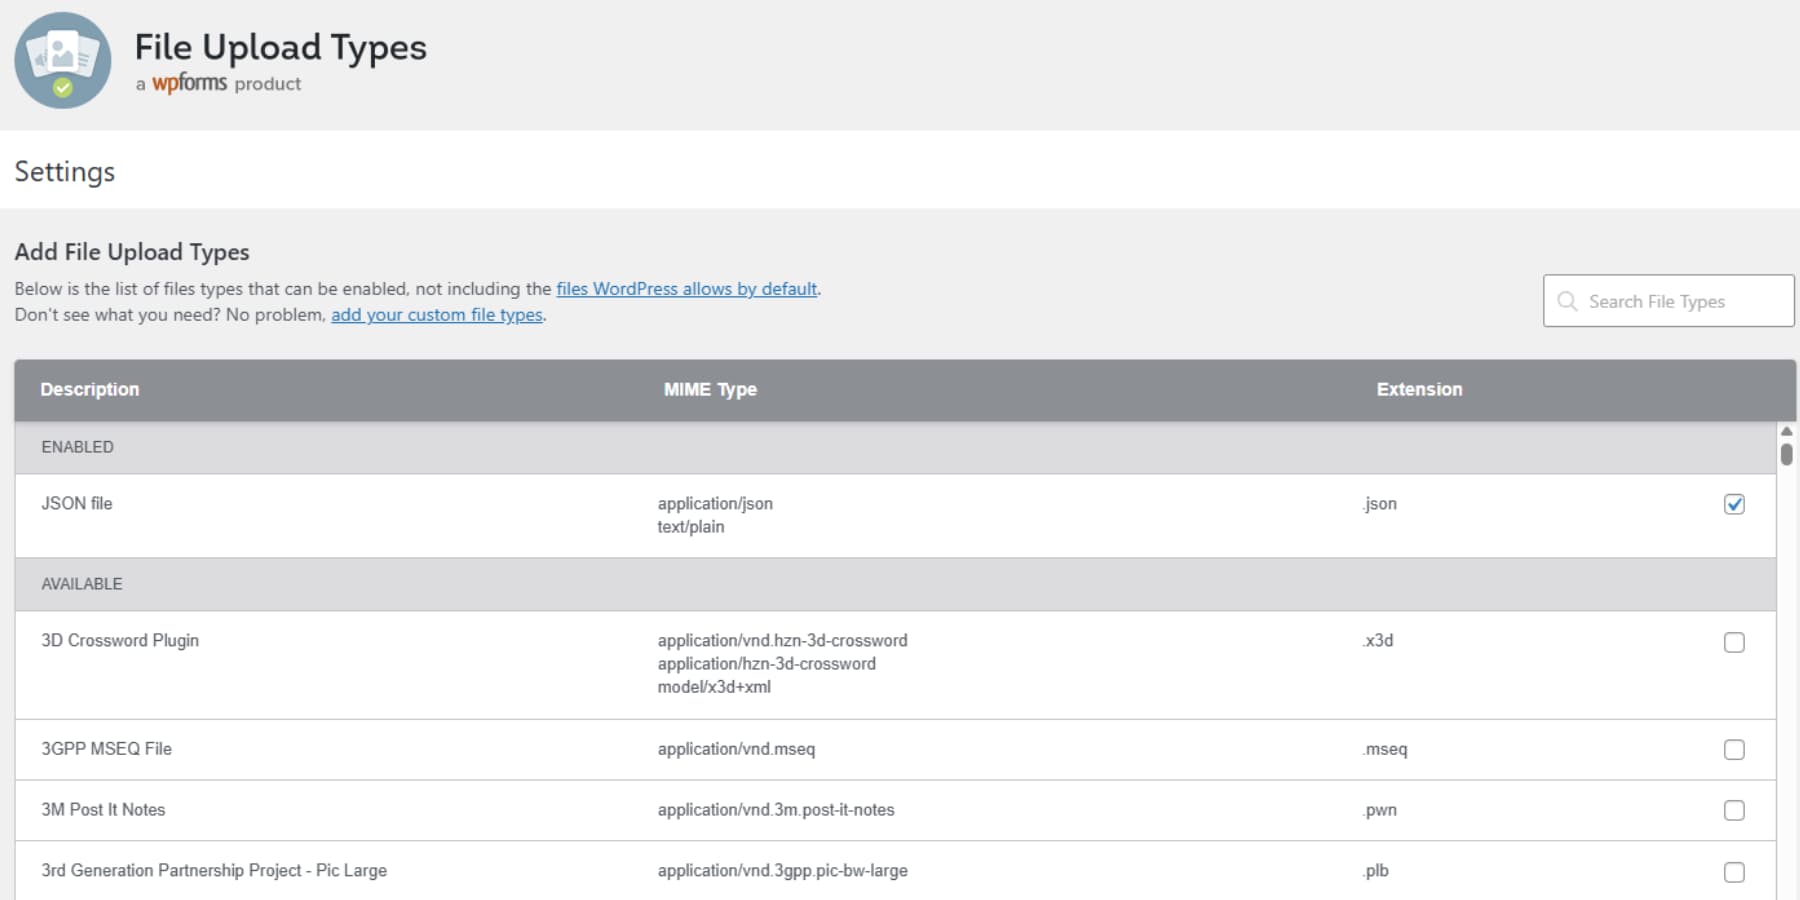
1. Enable JSON Uploads On Your Site
WordPress blocks JSON files by default because it treats them as potential security risks. JSON files can contain executable code that malicious actors might use to compromise your site. So, always upload JSON files from sources you know and trust.
The simplest method uses a plugin called File Upload Types. Install it from your WordPress dashboard, then go to Settings and find File Upload Types to unblock the JSON file type.
If you prefer not using a plugin, add this snippet to your child theme’s functions.php file instead:
function add_json_upload_support($mimes) {
$mimes['json'] = 'application/json';
return $mimes;
}
add_filter('upload_mimes', 'add_json_upload_support');
Both methods work perfectly. The plugin route takes less time and requires no technical knowledge, while the code method keeps your site lighter by avoiding another plugin installation. Always back up your site before making any changes.
2. Find Your Lottie Animation And Upload It
Start by downloading your animation file from whichever source you prefer. Most platforms give you format options when you download, so make sure you select JSON. Take time to adjust colors and sizing on the download page since Divi won’t let you change these later.
Head into your page editor and open the Visual Builder. When you click the gray plus icon to add elements, the Lottie module will appear alongside the other Divi modules. Add it to your page, and the settings panel will open automatically.

The module starts with an empty upload area waiting for your file. Click the Lottie animations tab, then upload your JSON file as if you’d add any image to your media library.
Once you select your file, the animation instantly appears in your builder with a live preview showing how visitors will see it.
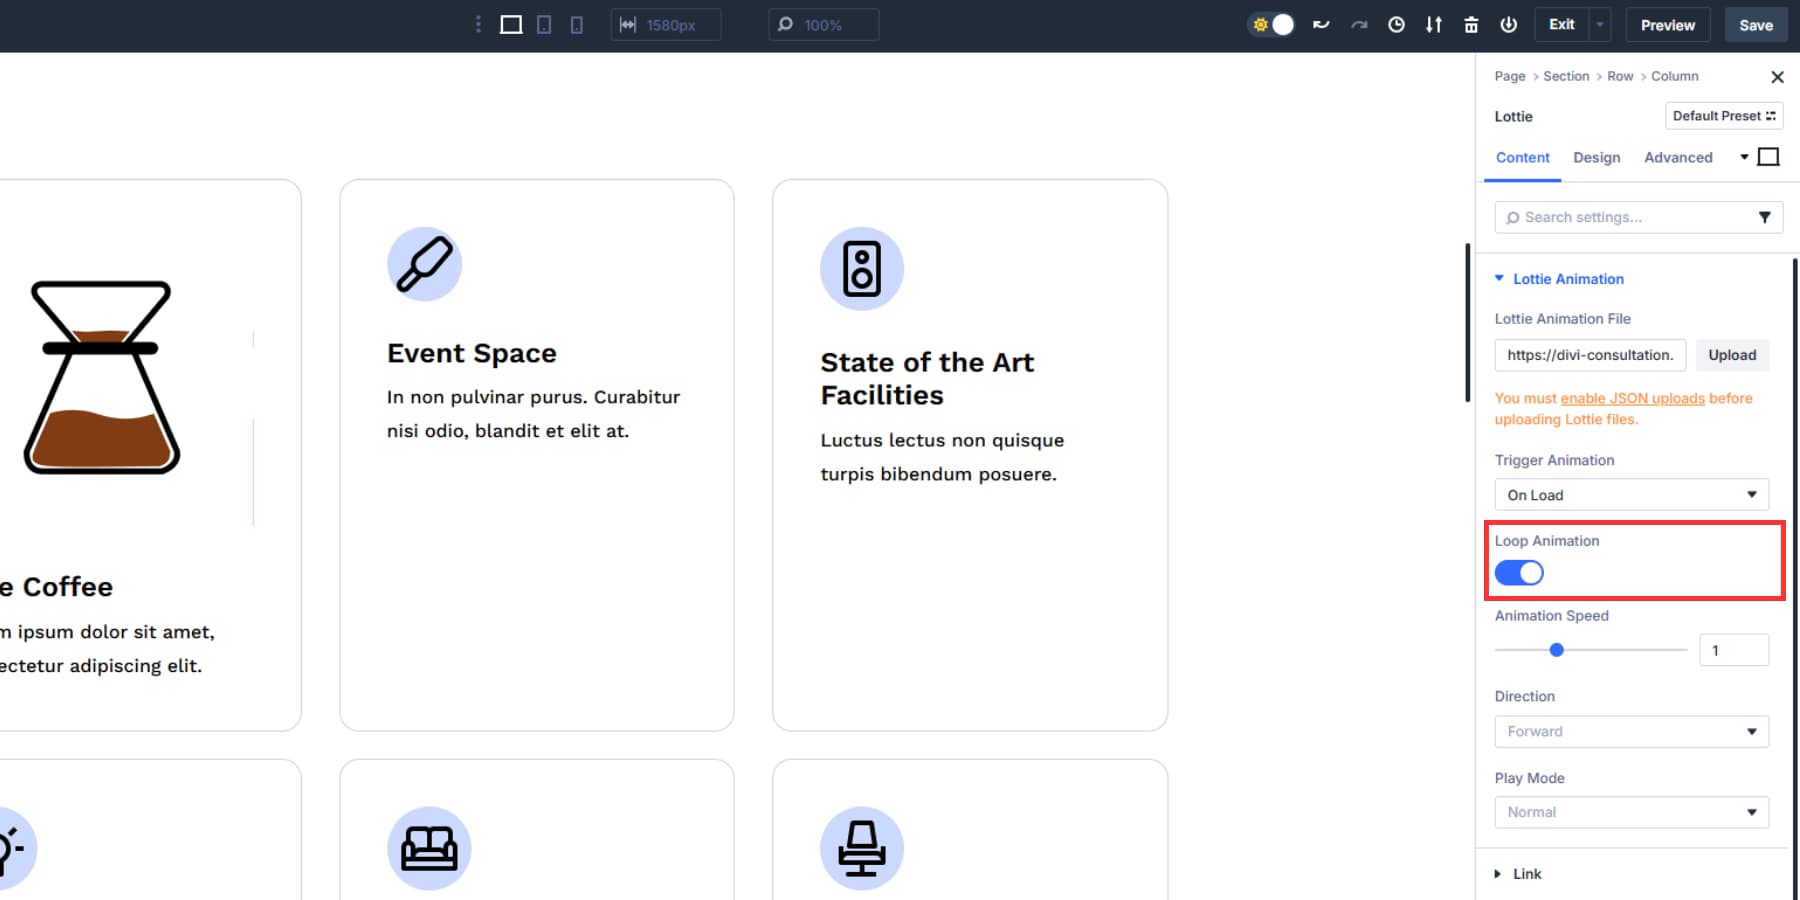
3. Configure Triggers, Loop, Direction, And Speed
Once your animation uploads, you need to set when it plays and how it looks. Divi 5 splits these controls between the Content and Design tabs.
Choose Your Animation Trigger
The Trigger Animation setting controls when your animation starts. Five options cover different user interactions:
- Load plays the animation when the page finishes loading. Good for elements that should start moving right away.
- View waits until the animation area enters the visitor’s screen. This saves processing power and creates a reveal effect as people scroll.
- Hover activates when someone moves their cursor over the animation. This works for interactive elements, but remember that mobile devices can’t hover.
- Click requires a tap or click to start. Use this when you want deliberate user action to trigger the motion.
- Scroll connects animation progress to scroll position. The animation moves forward as visitors scroll down and reverses when they scroll back up.
Loop Animation Toggle
The Loop Animation setting determines whether your animation repeats. Turn it on for decorative elements that should keep moving continuously. Loading spinners, background graphics, and ambient effects work well with looping enabled.
Disable looping for entrance animations that should play once and stop. Call-to-action reveals, text animations, and one-time effects look better when they complete and hold their final frame.
Animation Speed Control
Speed defaults to 1 for expected playback timing. You can bump this number up or down to change how fast your animation runs.
Set it to 0.5 for half speed when you want slower motion. This works well for elegant transitions or when your animation feels rushed. Crank it up to 2 for double speed when you need snappier movement. Quick speeds work great for hover effects or loading indicators.
You can use decimal values, too. Try 0.75 for slightly slower motion or 1.5 for moderately faster playback.
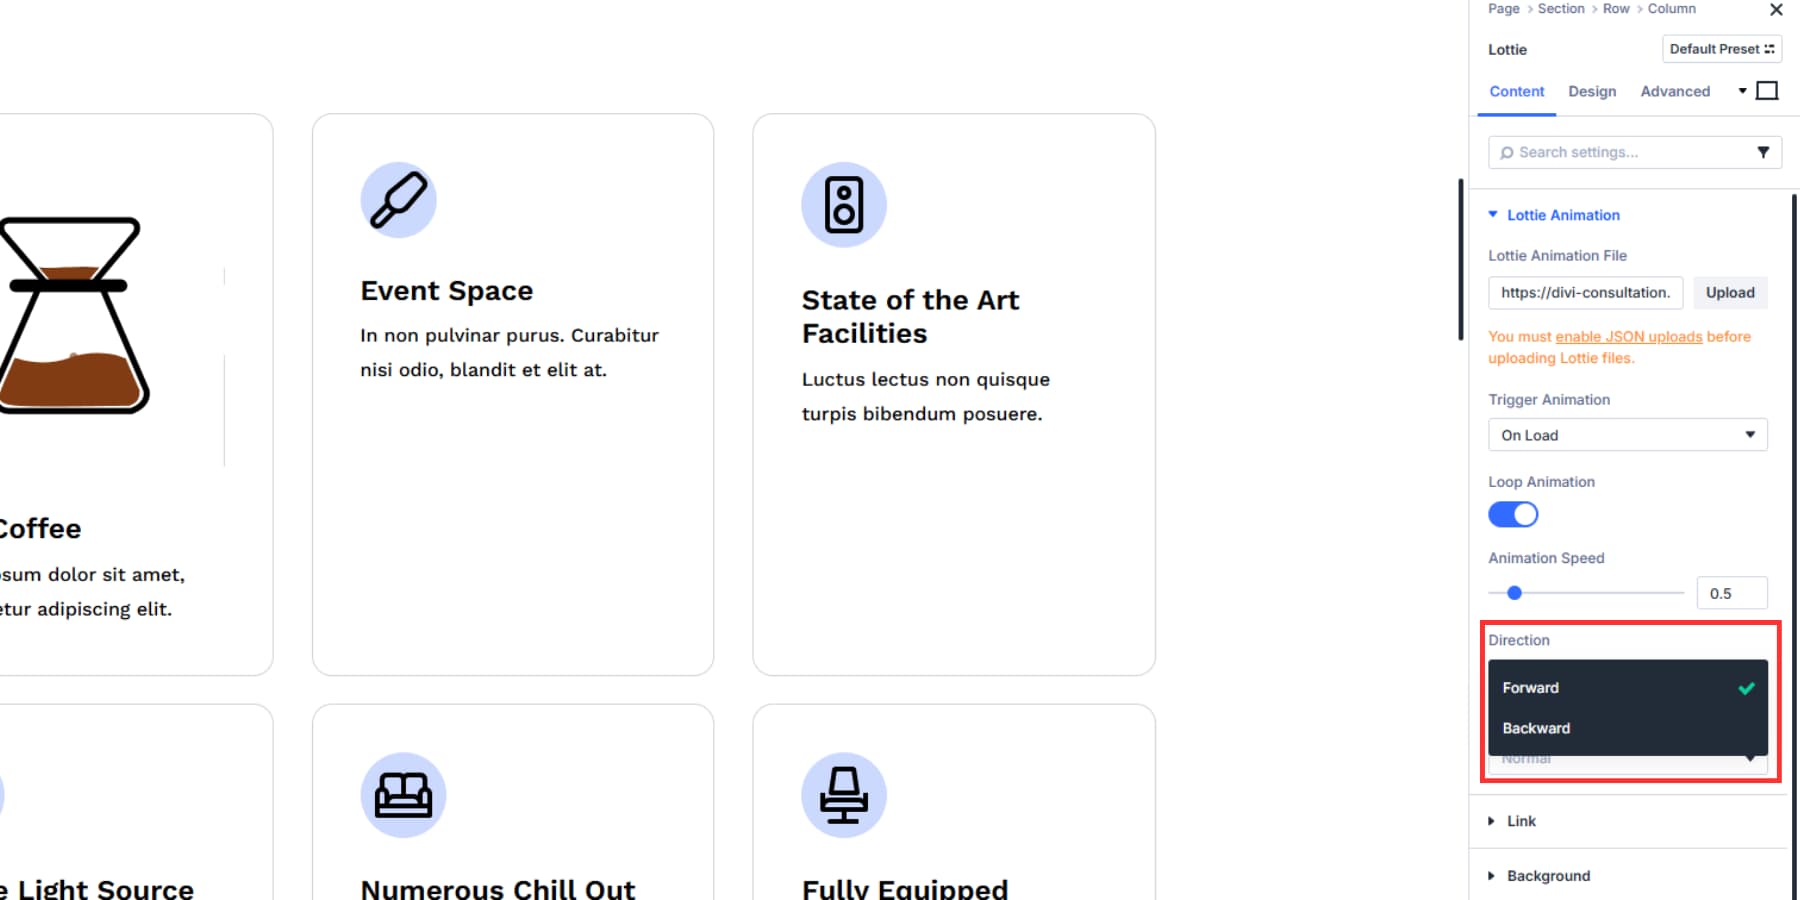
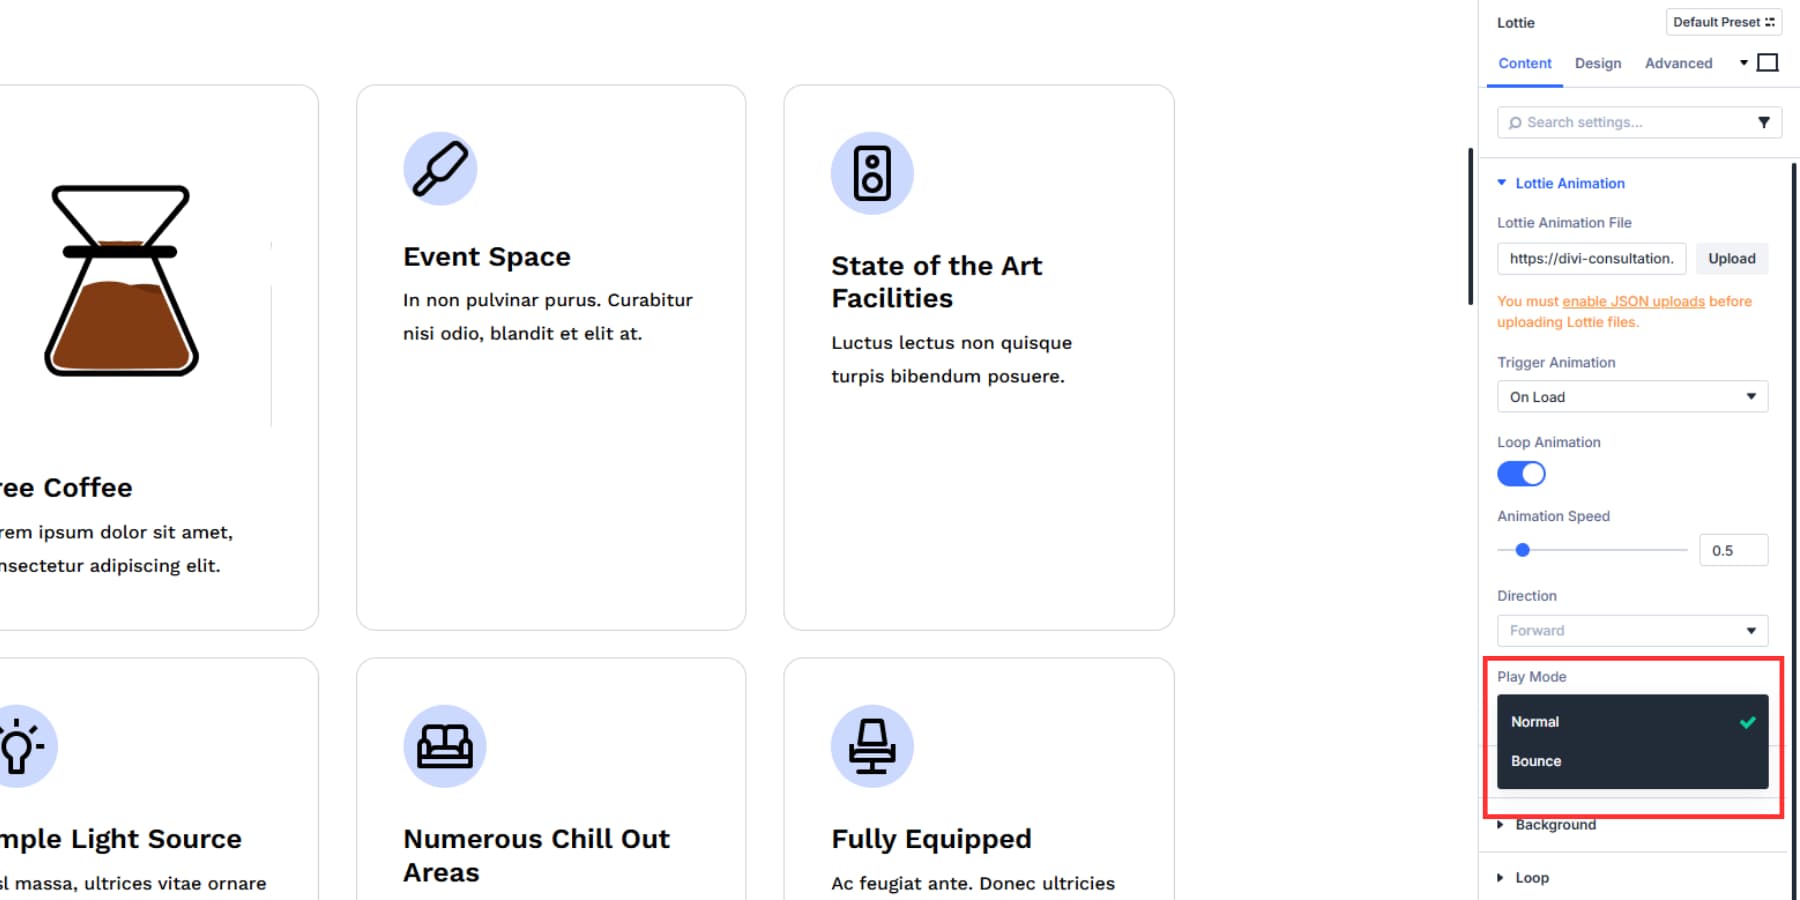
Direction And Play Mode Options
Direction controls which way your animation plays. Forward runs the animation from start to finish as designed. Backward flips the entire sequence, playing from the last frame back to the first.
Play Mode offers two behaviors. Normal plays your animation from beginning to end once (or keeps going if looped). Bounce creates a back-and-forth effect. The animation plays forward to completion, then reverses back to the starting frame. Think of a pendulum motion that works well for eye-catching elements.
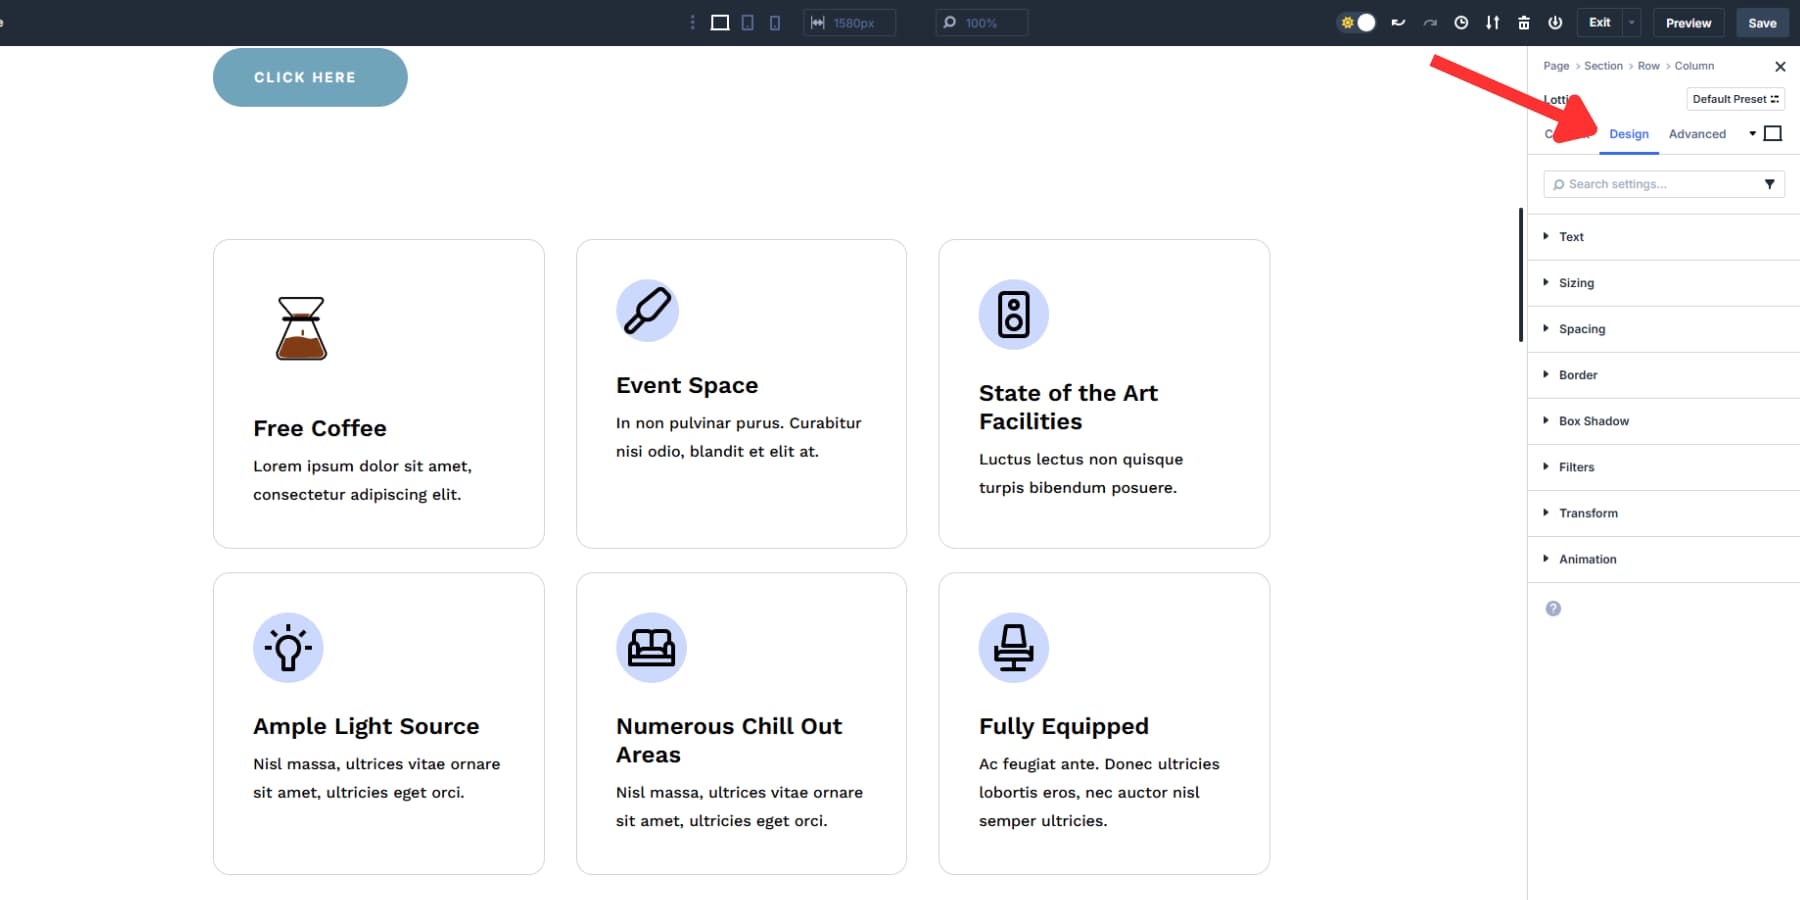
4. Adjust The Size And Design
The Design tab houses all visual adjustments. You get standard Divi controls here.
Sizing accepts advanced CSS units instead of just pixel values. Type 100vw to fill the screen width or use something like a clamp(7vw, 8rem, 10vw) for responsive scaling between minimum and maximum values.
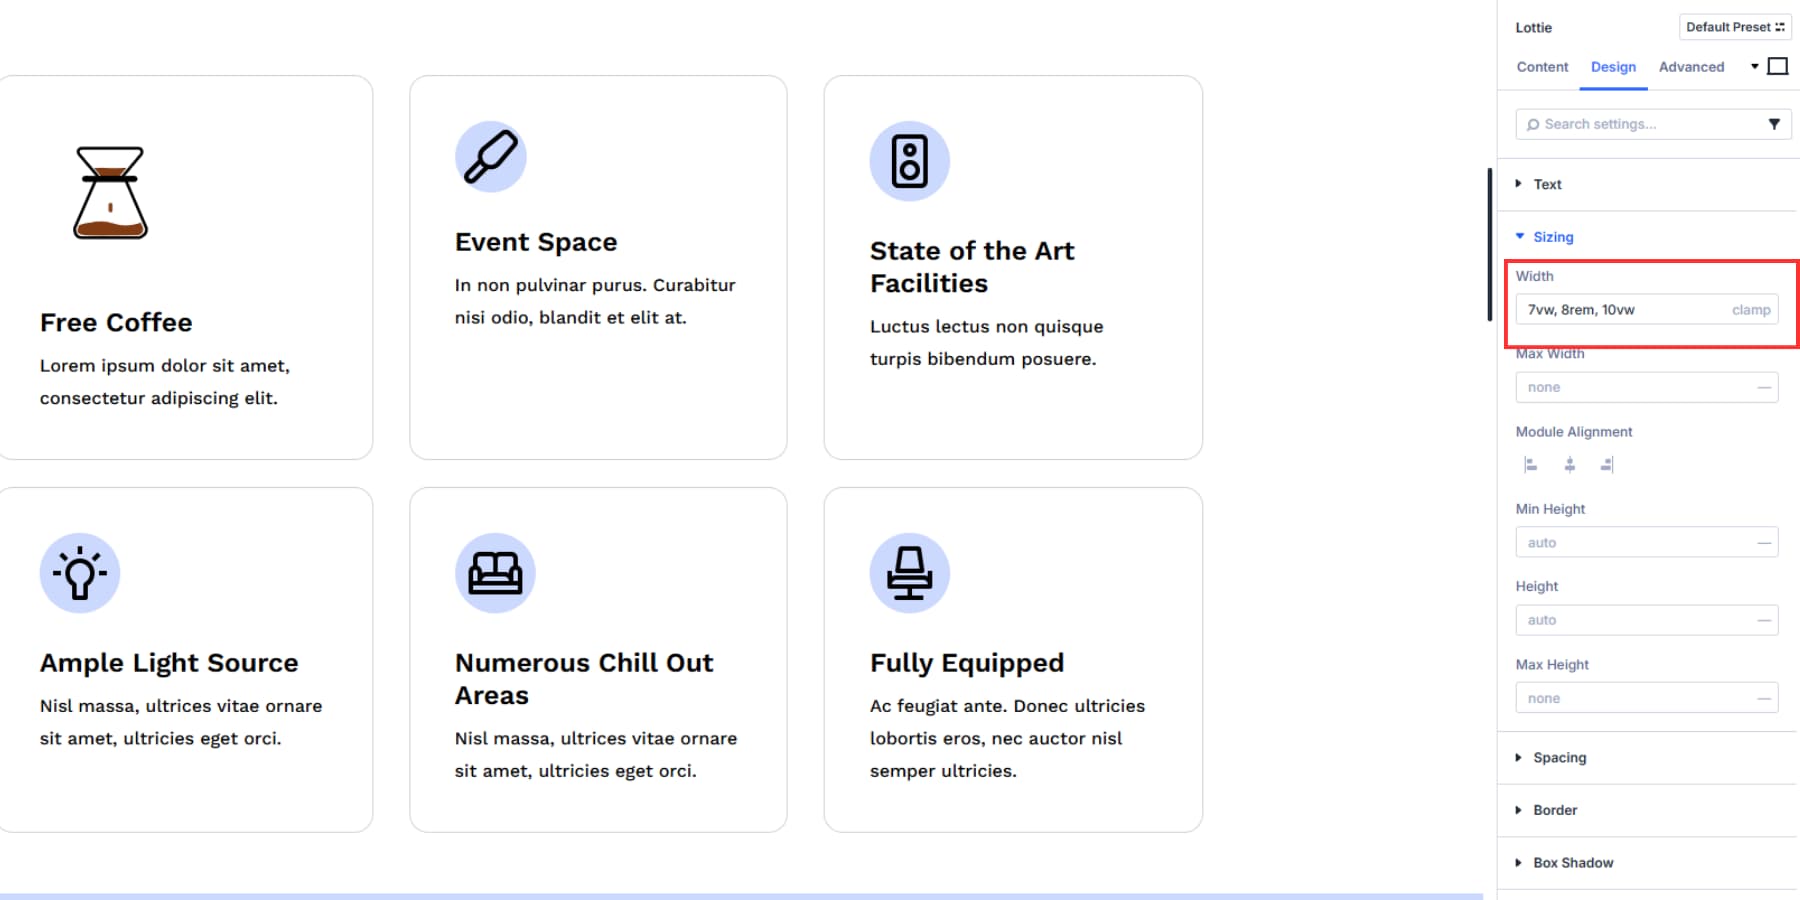
Design Variables work here too, letting you reference consistent measurements across your site.
![]()
Alignment positions the animation within its container. Pick horizontal alignment (left, center, right). Spacing controls margins and padding around the animation to prevent crowding with nearby content.

You can also add borders, transforms for rotation and scaling, filters for color and blur adjustments, and box shadows for depth if required. These layers are on top of your base animation.
5. Fine-Tune Options For Responsiveness
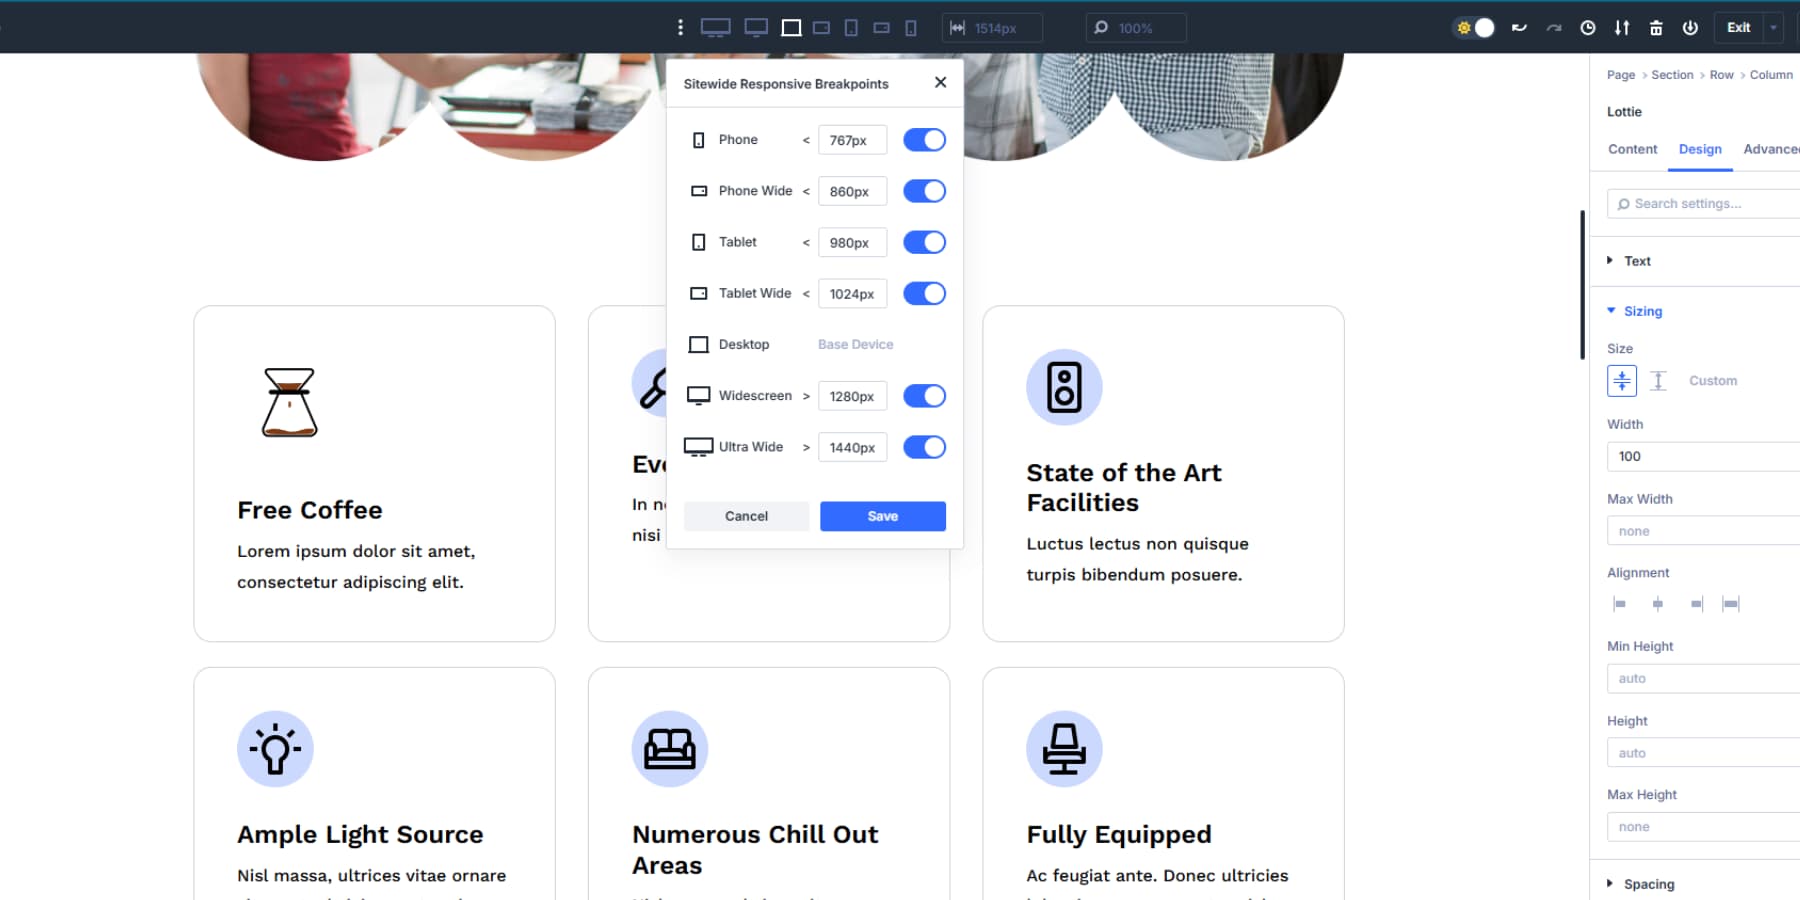
Start by setting your breakpoints, if needed. Divi 5 expands from three fixed breakpoints to seven customizable ones. You can adjust the pixel values for each breakpoint to match your design needs:
- Phone: < 767px (adjustable)
- Phone Wide: < 860px (adjustable)
- Tablet: < 980px (adjustable)
- Tablet Wide: < 1024px (adjustable)
- Desktop: > 981px (adjustable)
- Widescreen: > 1280px (adjustable)
- Ultra Wide: > 1440px (adjustable)
You can find these options by clicking on the kebab menu on the top bar. First, turn on the breakpoints you think you need, and then the size field to customize it to what you need. Then, click any breakpoint to switch your canvas to that size. The canvas scales relatively so you can design for ultra-wide monitors even on a small laptop screen.
Switching to a breakpoint opens a panel for changes that apply only to that breakpoint. This makes it easy to adapt your Lottie animations for each breakpoint.
Using The Responsive Editor
The Responsive Editor lets you modify responsive, hover, and sticky states for any setting without switching view modes. Click the responsive editor icon next to any setting to see all breakpoint values simultaneously in one panel.
The responsive editor icon turns blue when a setting has different values across breakpoints. This visual indicator shows which settings have custom responsive adjustments without opening each breakpoint individually.
You can adjust values across all breakpoints from this single interface. You can type different animation speeds for desktop, tablet, and mobile without switching between view modes. The editor updates all states instantly while you stay in your current view.
Adjusting Dimensions Across Breakpoints
Desktop animations work best with larger dimensions since there is plenty of screen space. A hero section Lottie animation can be 600px wide on the desktop, taking full advantage of that generous viewport.
Tablet breakpoints need moderate size reductions. That same icon 100px desktop animation should scale to around 90px on a tablet. This maintains visual balance without overwhelming your layout. Mobile breakpoints require significant size adjustments. Your 100px desktop animation needs to shrink to 80px or smaller on phones. Large animations will dominate mobile screens and push important content below the fold.
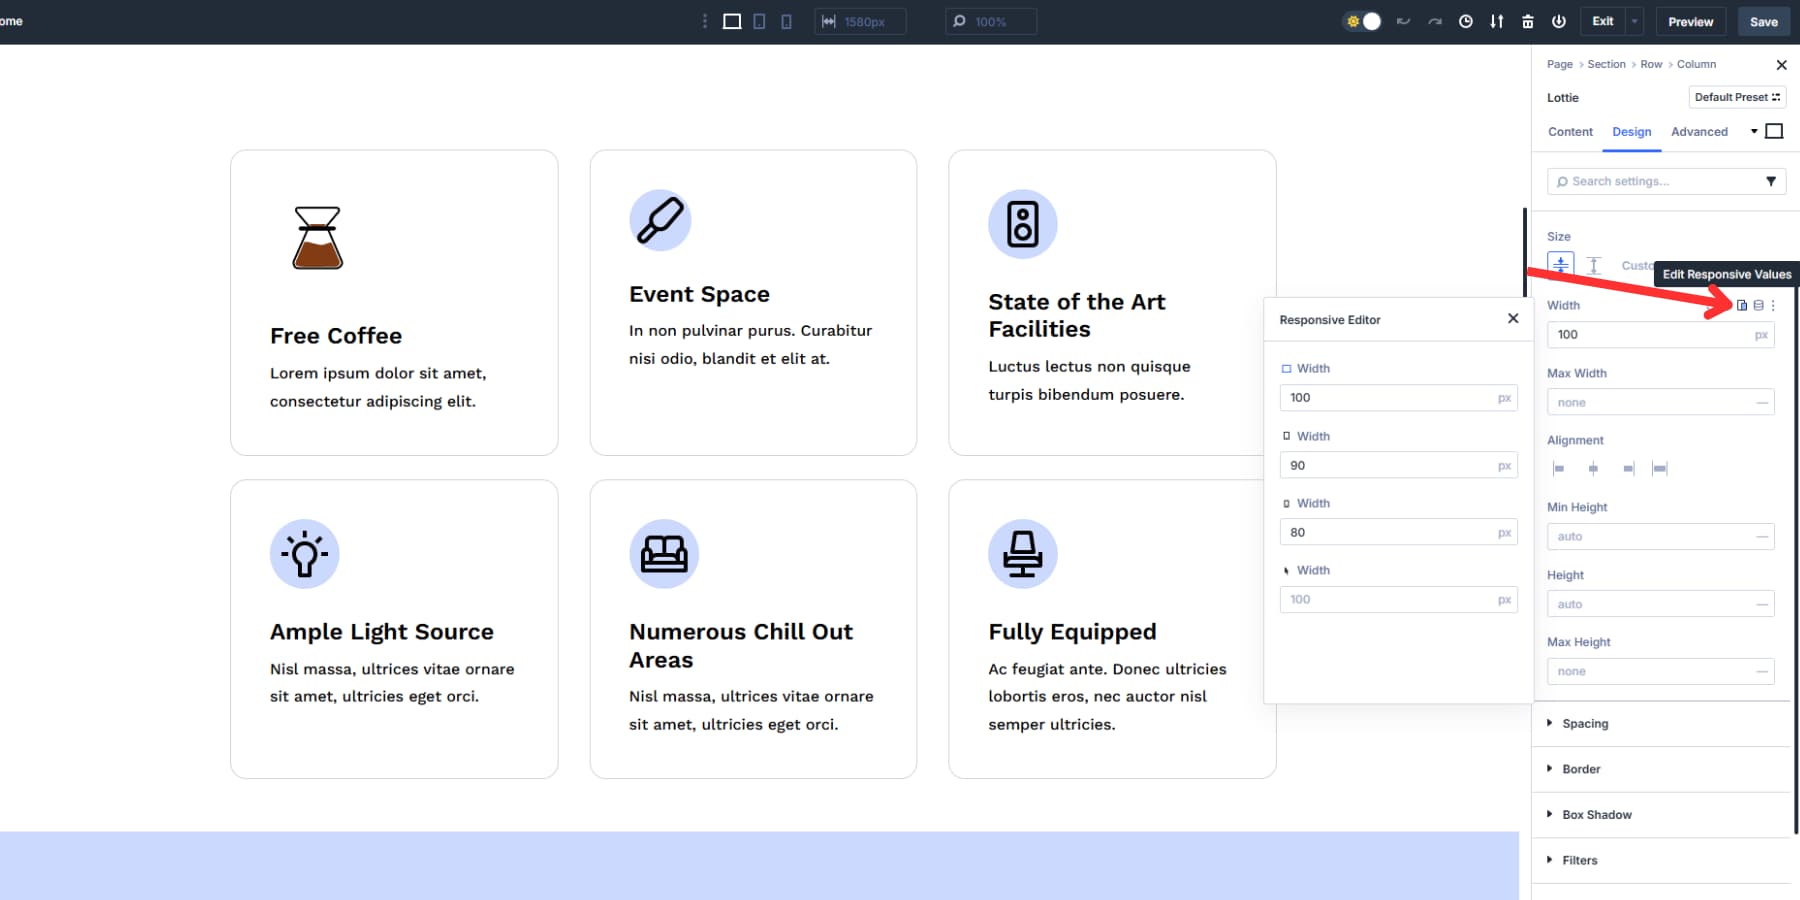
Divi lets you customize Lottie animation sizes for every breakpoint. For a more hands-off approach, consider using percentage-based or viewport-based widths to automate scaling. You can also use clamp() for better and proportionate device scaling.
Optimizing Animations For Different Devices
Mobile devices process animations differently from desktops. Touch interactions replace hover states, processing power varies, and screen space becomes limited.
Responsive Lottie animations in Divi 5 go beyond basic scaling to give you precise control across screen sizes. You can edit every setting to adapt to different breakpoints, including changing the Lottie file itself for every breakpoint.
Since hover effects don’t work on touchscreens, switch hover triggers to “View” for mobile breakpoints. The “View” trigger activates when animations scroll into the viewport.
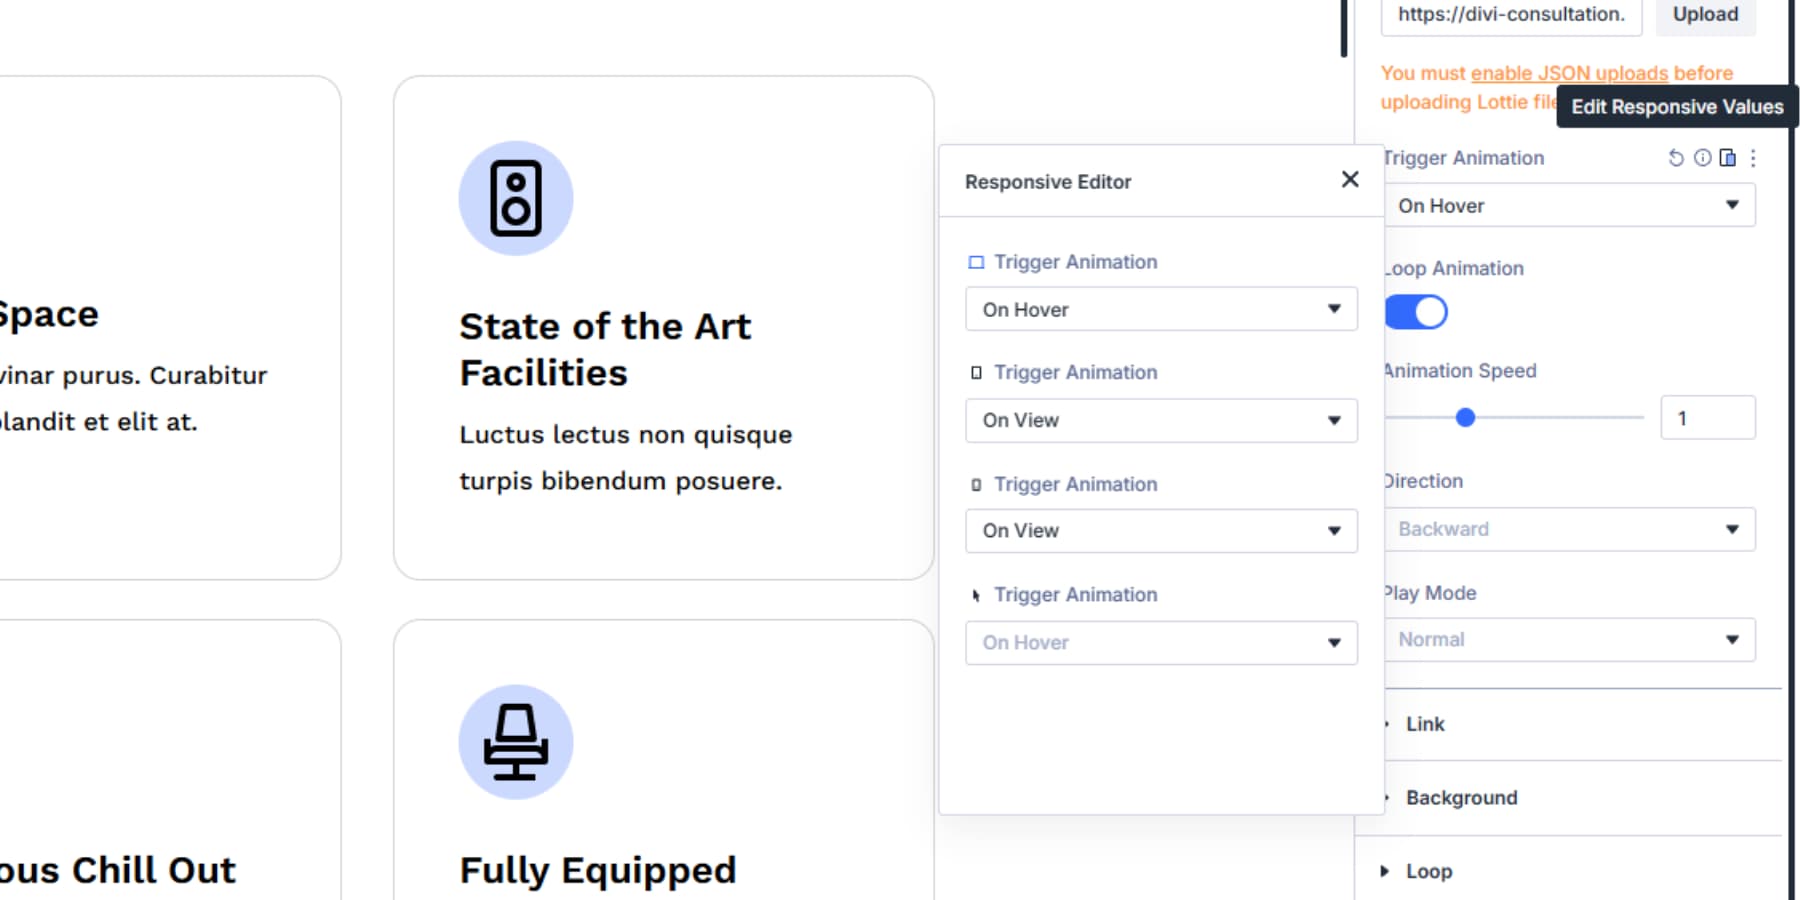
Alternatively, use “Click” triggers on mobile for deliberate user interactions, giving visitors control over timing.
Speed also needs to be adjusted between devices. Desktop animations at normal speed often run too fast on mobile. Drop speed from 1.0 to 0.75 for smoother mobile playback.
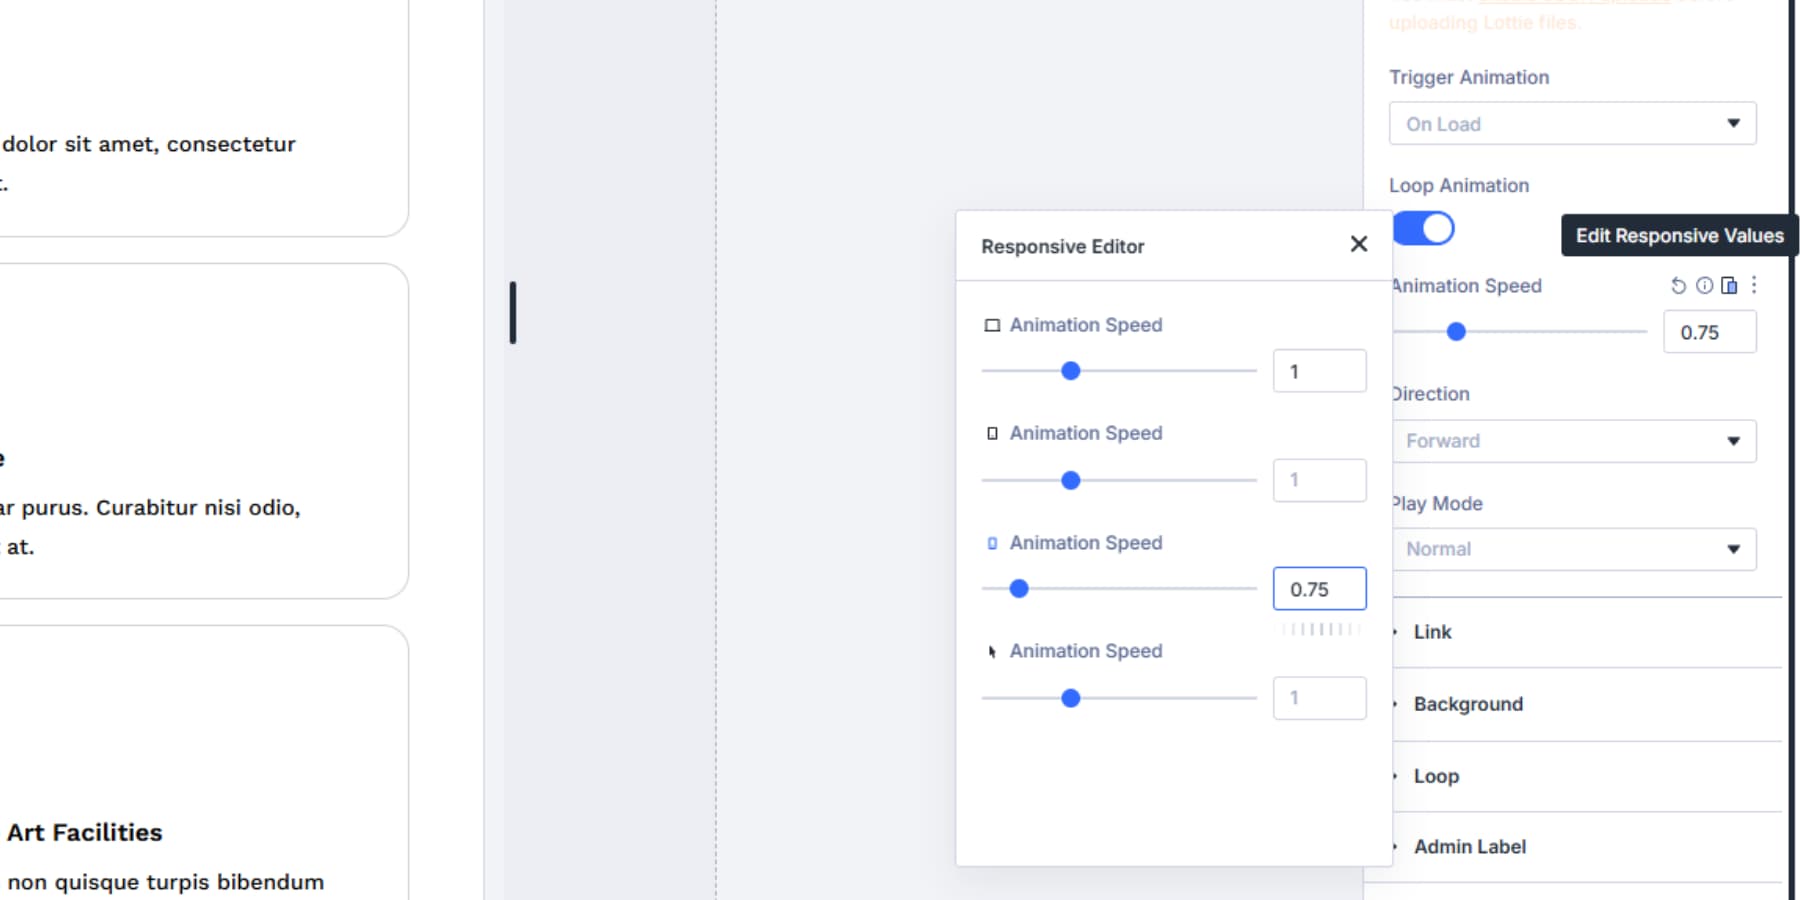
Finally, consider looping behavior. Decorative background animations work well with continuous looping on desktop, but drain mobile battery. Disable loops on mobile breakpoints for purely aesthetic animations to improve performance and battery life.
Try Lottie Animations In Divi 5 Today
You’ve now completed the entire process of adding Lottie animations to your Divi 5 site. These graphics won’t slow down page loads or force you to handle complex plugins.
Lottie files operate differently: they use vectors rather than pixel data, so you get high-quality motion graphics that are tiny in file size and scale flawlessly across all screen sizes.
Start with something simple to get used to the workflow. Once you see how well it works, you’ll likely spot other places to add small touches. Remember: the best animations feel natural and support your content, not compete with it.


Leave A Reply