
You come across screen mockups on all kinds of websites, from big ones to small ones. They help showcase previous work, services, and the like. They also contribute to the entire look and feel of your website and emphasize that your company (or your client’s company) is focused on technology. In this post, we’re going to show you 5 awesome ways to add images and videos to your screen mockups with Divi and its built-in options. This post contains two parts; the first part is about customizing your screen mockup with Photoshop. You can download the mockup we’ll be using in this post for free. And in the second part, we’ll show you how to take your mockups to the next level with Divi.
- 1 Result
- 2 5 Awesome Ways to Add Images & Videos to Your Screen Mockups with Divi
- 3 Download This Tutorial’s Free Screen Mockup
-
4
Modify Mockup File in Photoshop
- 4.1 Right Click + Merge Device Folder
- 4.2 Control/Command + Click on Screen Layer
- 4.3 Click on Device Layer + Add Layer Mask
- 4.4 Control/Command+ i to Inverse
- 4.5 Hide Screen Layer
- 4.6 Control/Command + Click on Screen Layer
- 4.7 Click on Background Layer + Add Layer Mask
- 4.8 Control/Command + i to Inverse
- 4.9 Crop Image
- 4.10 Save for Web
- 5 General Row Settings for the First Four Examples
- 6 Recreate Example #1
- 7 Recreate Example #2
- 8 Recreate Example #3
- 9 Recreate Example #4
- 10 Recreate Example #5
- 11 Final Thoughts
Result
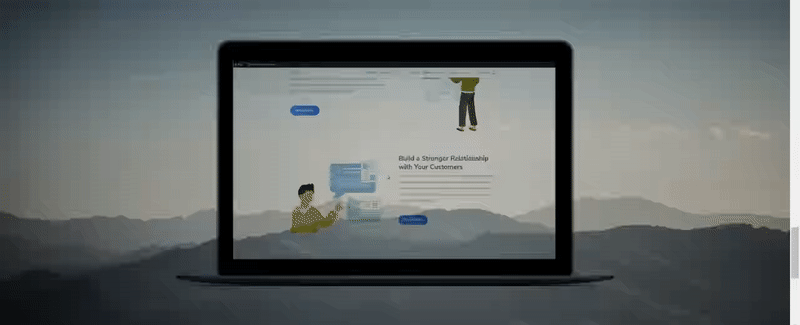
Before we dive into the tutorial, let’s take a look at the different examples we’ll show you how to recreate, step by step.
Example #1
Example #2
Example #3
Example #4
Example #5
5 Awesome Ways to Add Images & Videos to Your Screen Mockups with Divi
Subscribe To Our Youtube Channel
Download This Tutorial’s Free Screen Mockup
To help you bring this tutorial to a good end, we’re going to provide you with the mockup that is being used in this tutorial for free. Actually, we’re providing you with two device mockups and several high-quality images since the resource we’re (re)sharing is actually from our Design Agency Layout Pack. When you download the image resources below, you can unzip the folder and locate the file called MB-purefront.psd to follow along.
Download the Free Screen Mockup
Modify Mockup File in Photoshop
The mockup file we’ll be modifying will only need editing once. Afterwards, you can use the same file to obtain all of the examples in this post using nothing else than Divi and Divi’s built-in options.
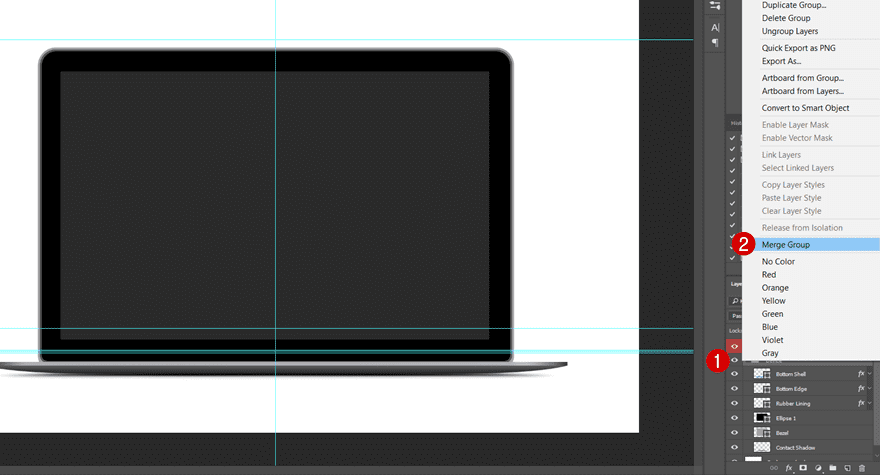
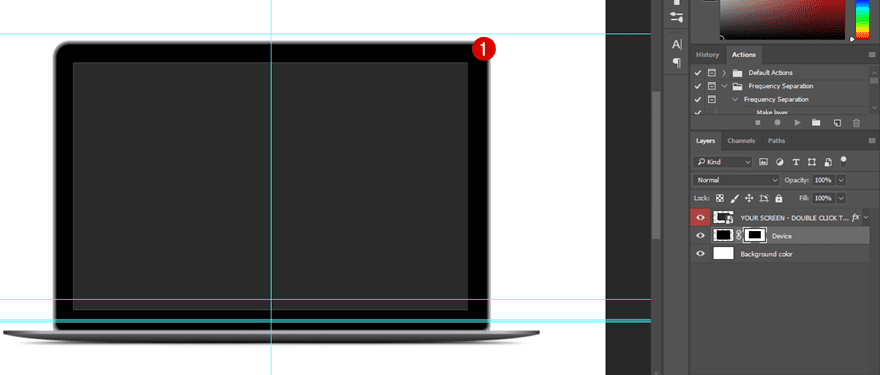
Right Click + Merge Device Folder
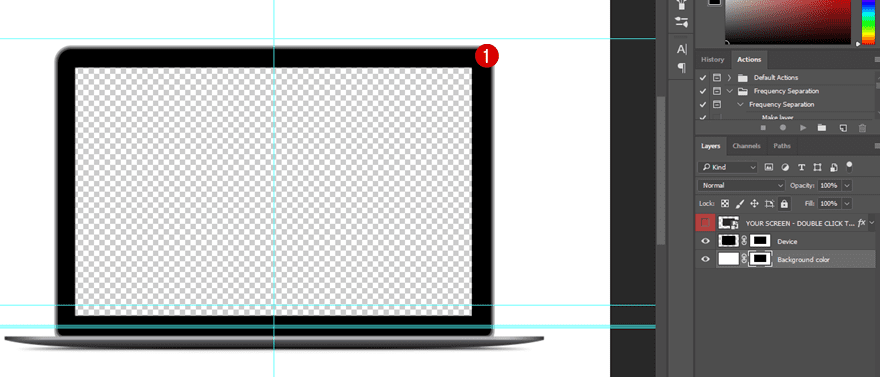
Once you open the MB-purefont.psd file, the first thing you will need to do is merge the Device folder by right-clicking on it and selecting ‘Merge Group’.
Control/Command + Click on Screen Layer
Once you’ve done that, you can press control or command and click on the screen layer. By doing this, you will select the screen part of your mockup.
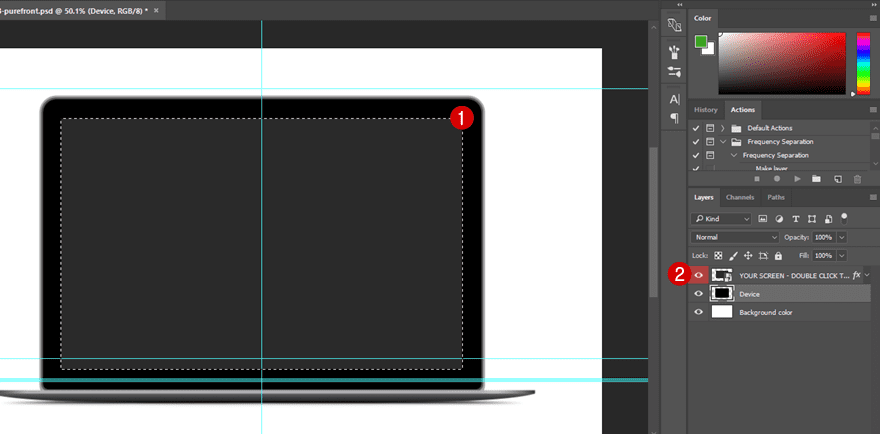
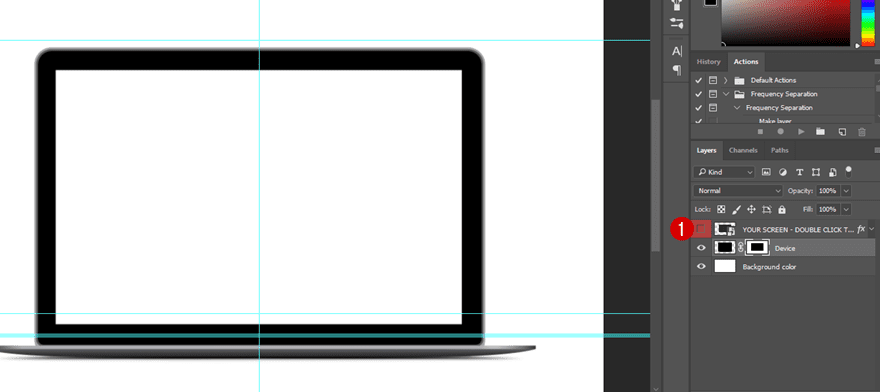
Click on Device Layer + Add Layer Mask
While having the screen selected, click on the Device layer and add a layer mask to it.
Control/Command+ i to Inverse
Immediately after adding the mask, press control or command and ‘i’ to invert.
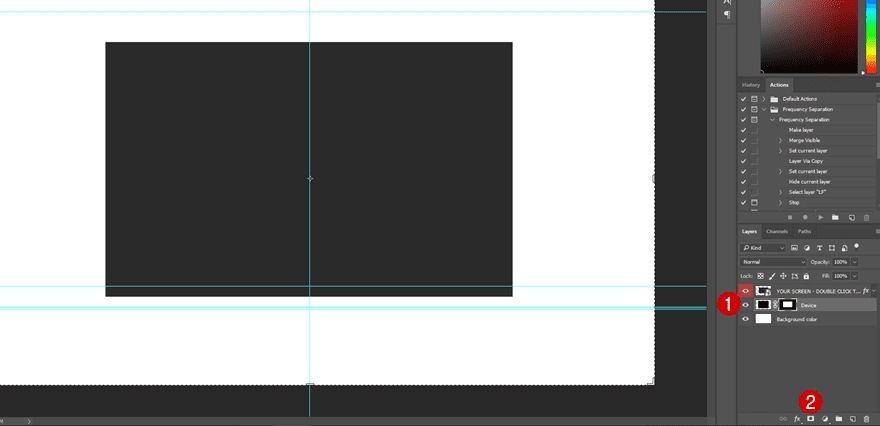
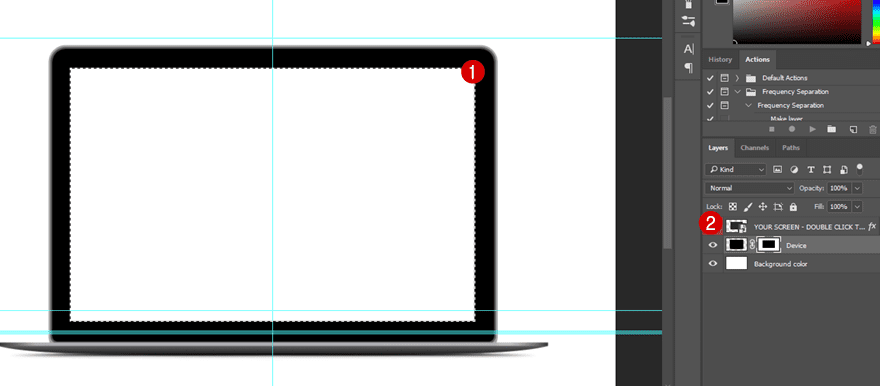
Hide Screen Layer
Next, hide the screen layer. At this point, the screen layer will be removed from your mockup. The following thing we’ll need to do is make our screen part transparent.
Control/Command + Click on Screen Layer
To make that happen, press control or command and click on your screen layer again. The screen area, will again, be selected.
Click on Background Layer + Add Layer Mask
Then, while having the screen layer selected, click on the Background layer and add a mask to it.
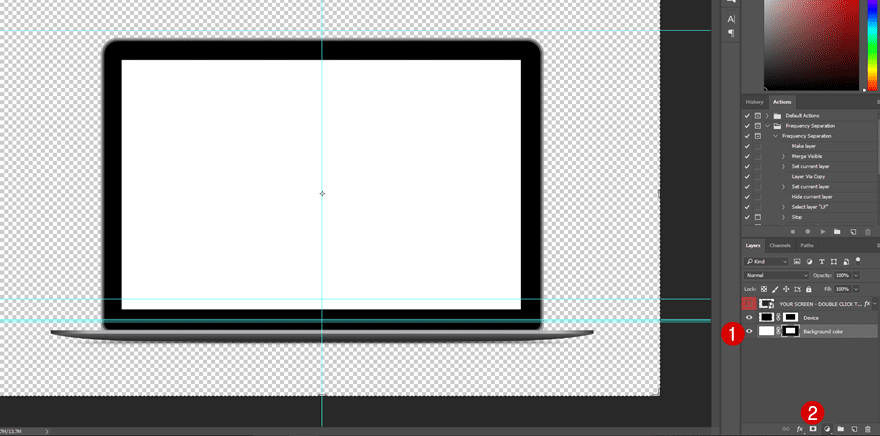
Control/Command + i to Inverse
We’ll need to invert the background layer as well so go ahead and press control or command and ‘i’. This will allow us to have a transparent screen while having the surrounding background remain white. The reason why we’re not making the whole image transparent is to make sure the image or video we’ll add within the Divi builder doesn’t appear anywhere else but on the screen.
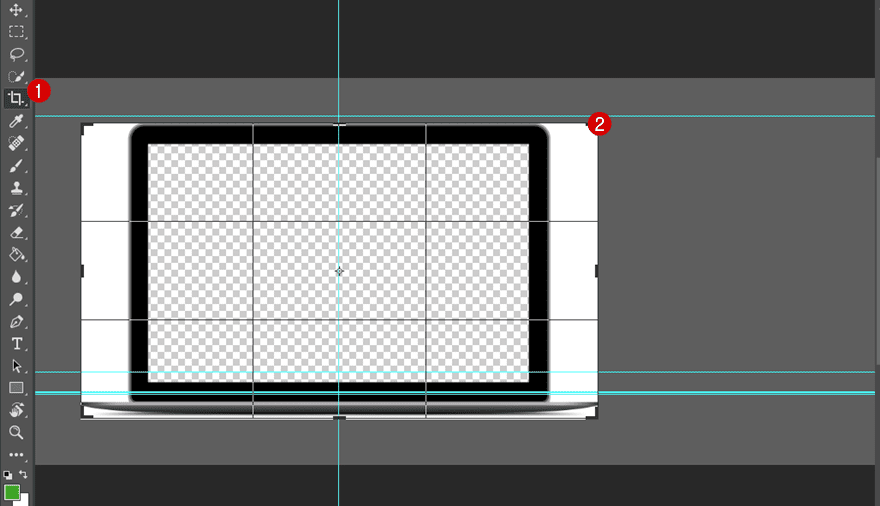
Crop Image
The last thing we’ll need to do is crop the image. Without cutting off anything from the mockup itself, try to reduce the white background as much as possible. This will help us make sure that the image or video we’ll be adding within the Divi builder doesn’t get lost in the white background.
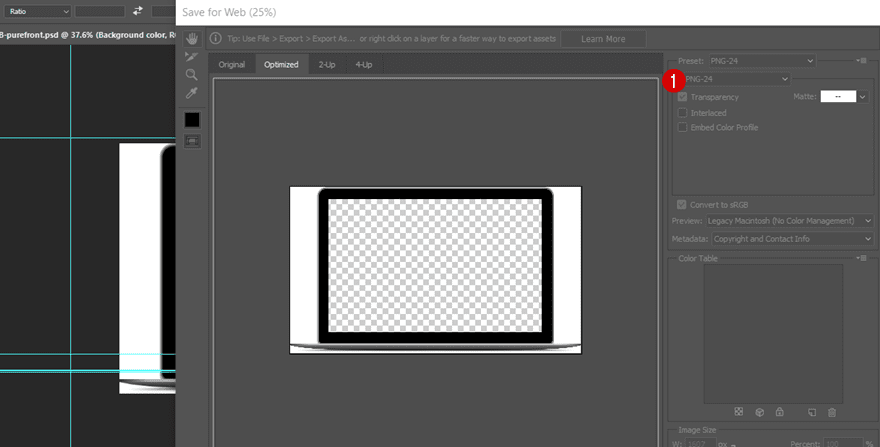
Save for Web
Now that the image is done, you can save it for web by going to Export > Save for Web. Make sure you’re exporting a PNG image so the transparent background will remain.
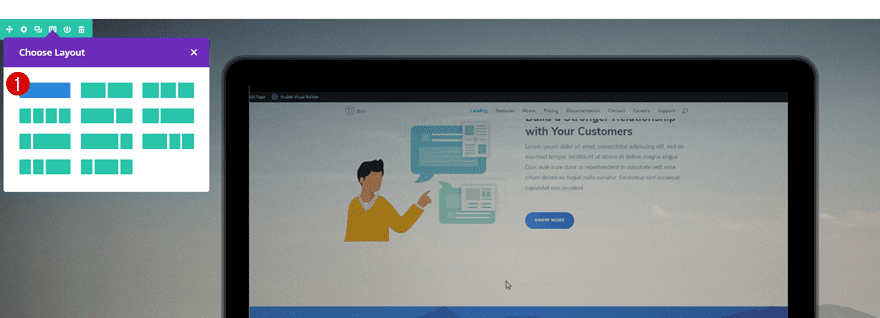
General Row Settings for the First Four Examples
To make this tutorial as easy as possible, we’re going to show you the row settings for each one of the first four examples in advance. The fifth one, however, will need other settings. We’ll handle these different settings once we come across the fifth example in this post.
Column Structure
For each one of the first four examples, we’re using a row with one column only.
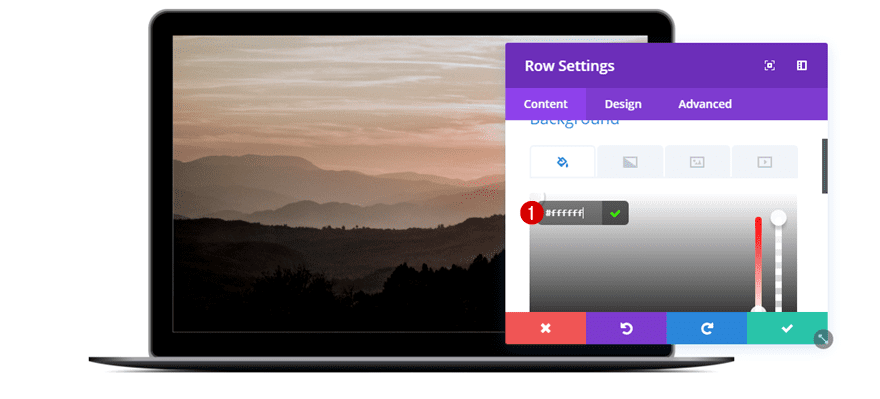
Background Color
We’re using a white background for each one of the rows as well. That’s because we’re matching it with the background color we’ve chosen for the mockup while making modifications to it in Photoshop. If you want to use another background color, you’ll have to use another background color within Photoshop as well.
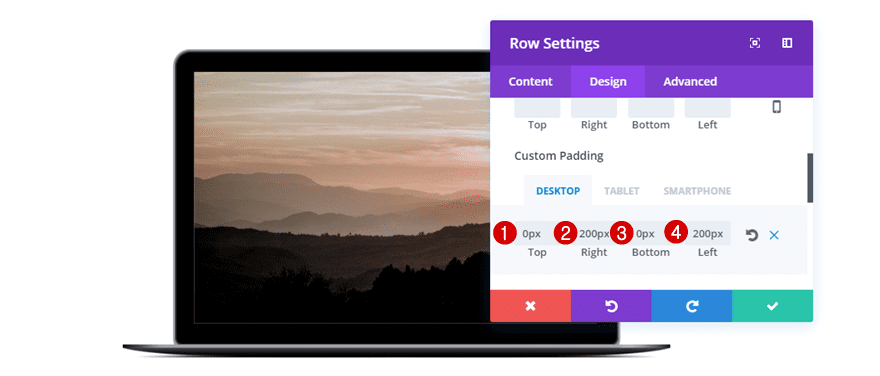
Sizing
We’re also going to apply some custom padding to our row. The reason why we’re adding the custom padding to the row and not the Image Module is to make sure the background we add to the mockup doesn’t get affected. The custom padding we’ll be using is the following one:
- Top Padding: 0px
- Right Padding: 200px (Desktop), 20px (Tablet), 10px (Phone)
- Bottom Padding: 0px
- Left Padding: 200px (Desktop), 20px (Tablet), 10px (Phone)
Recreate Example #1
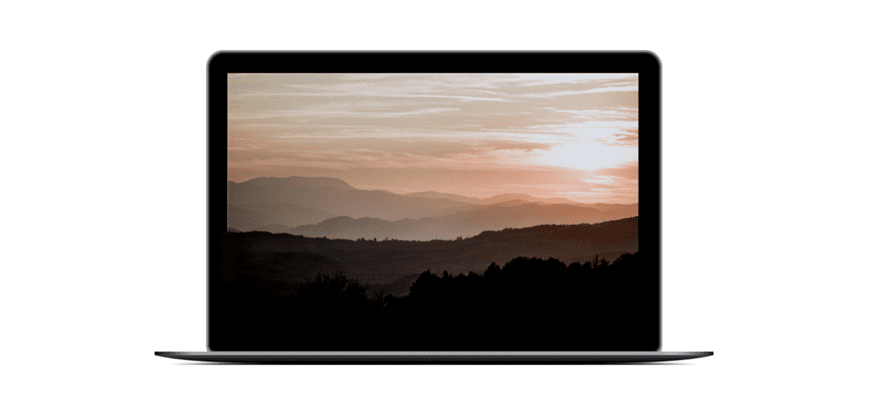
The first example we’ll show you how to recreate allows you to add any type of image to your mockup and modify its colors. You will only need the modified mockup once. From that point on, you can reuse the mockup as many times as you need to add different images or screenshots to it.
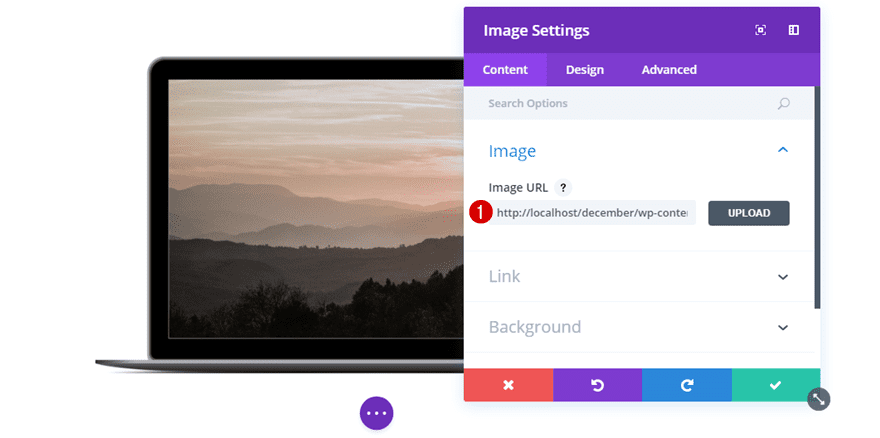
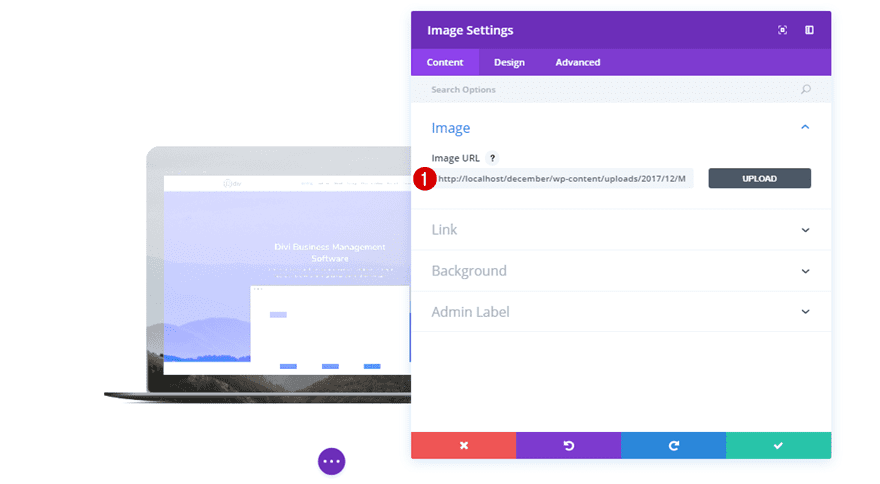
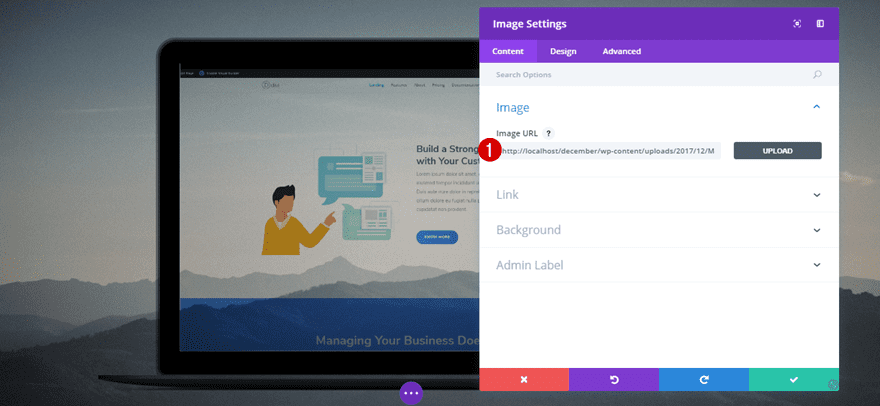
Add an Image Module & Upload Mockup
Start by adding an Image Module to your one-column row and upload your mockup image.
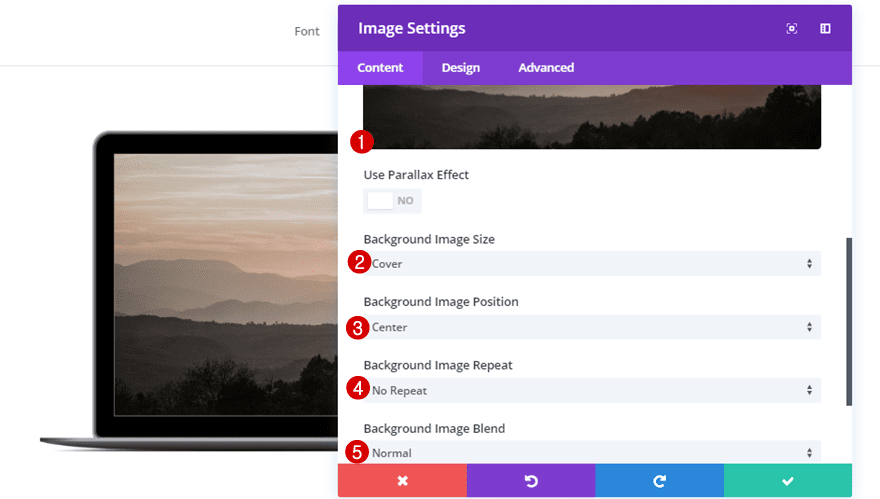
Add Background Image
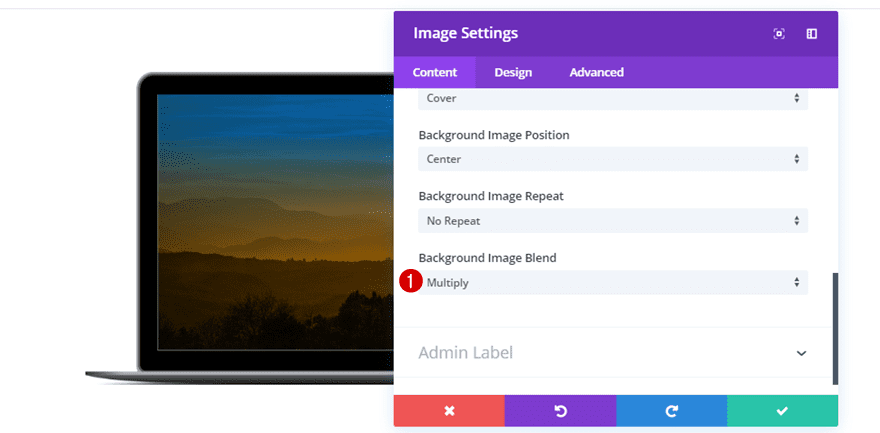
Then, open the Background subcategory within the Content tab and add a background image with the following settings:
- Background Image Size: Cover
- Background Image Position: Center
- Background Image Repeat: No Repeat
- Background Image Blend: Normal
Add Gradient Background Overlay if Needed
You can modify the colors of the image by adding a gradient background, for instance. The gradient background in the image below has the following settings:
- First Color: #0C71C3
- Second Color: #E09900
- Gradient Direction: 180deg
- Start Position: 19%
- End Position: 61%
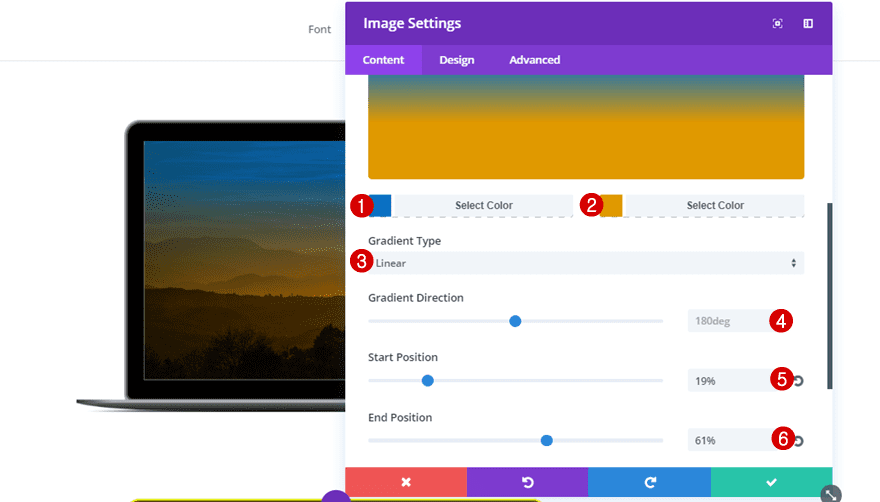
To add the gradient background to your background image, select ‘Multiply’ as your Background Image Blend.
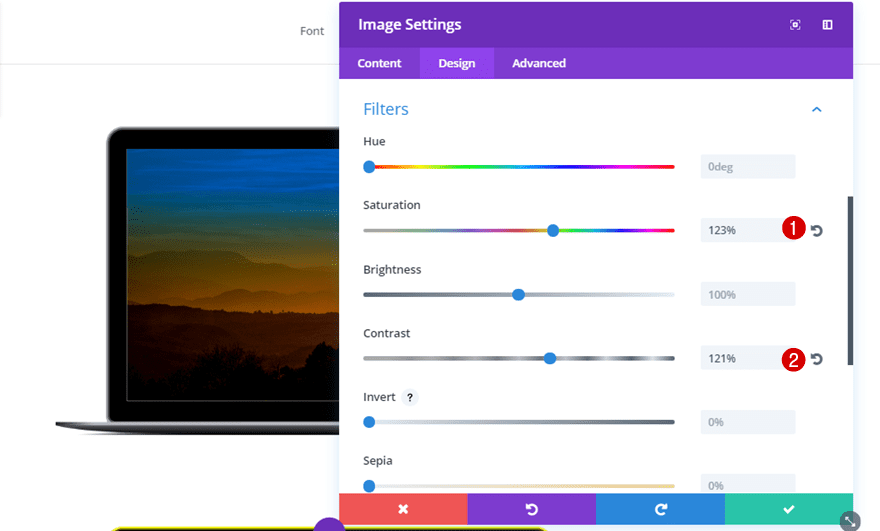
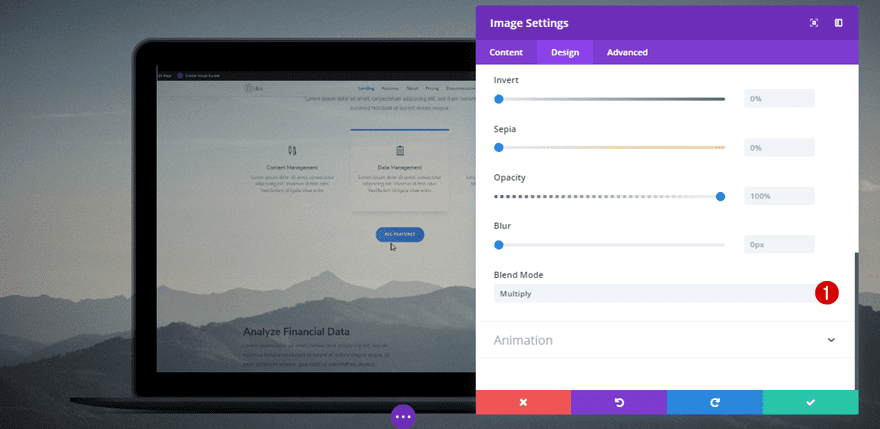
Use Filters if Needed
Another option you have is applying filters to your image by going to the Filters subcategory of the Design tab. For the example below, we’ve made the following modifications:
- Saturation: 123%
- Contrast: 121%
Recreate Example #2
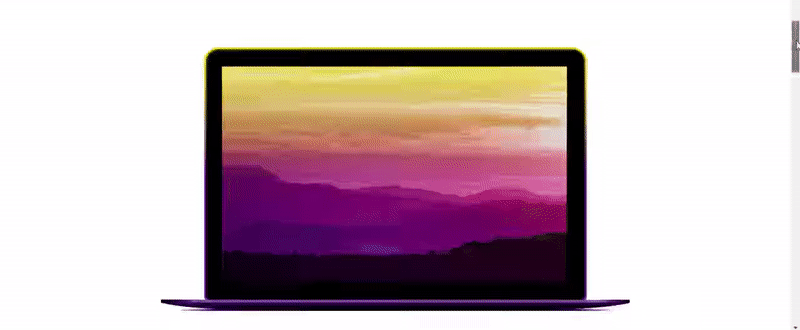
The second example we’ll show you how to recreate involves a column gradient background and a parallax background image. With the new blend modes that Divi offers, we’re able to combine both the image and the gradient background to create stunning results.
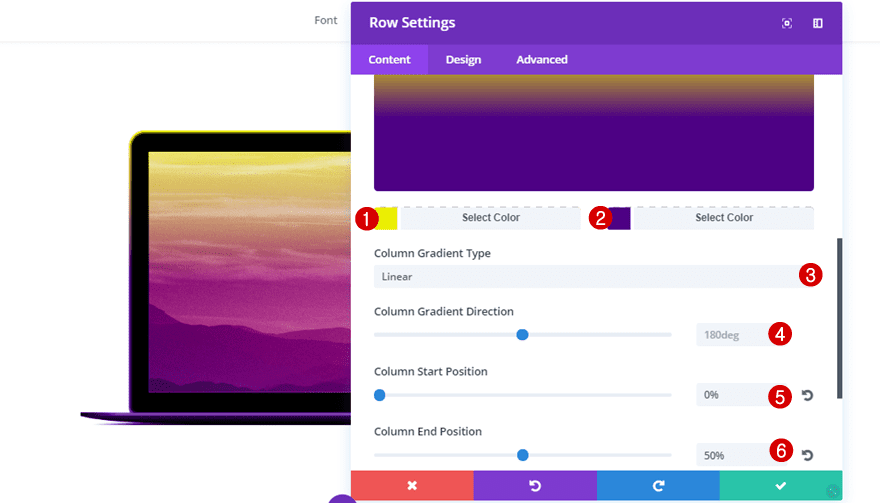
Add Gradient Background to Column 1
Start by adding the following gradient background to the column of your row:
- First Color: #EDF000
- Second Color: #4D0184
- Column Gradient Type: Linear
- Column Gradient Direction: 180deg
- Column Start Position: 0%
- Column End Position: 50%
Add an Image Module & Upload Mockup
Then, add an Image Module and select the mockup once again.
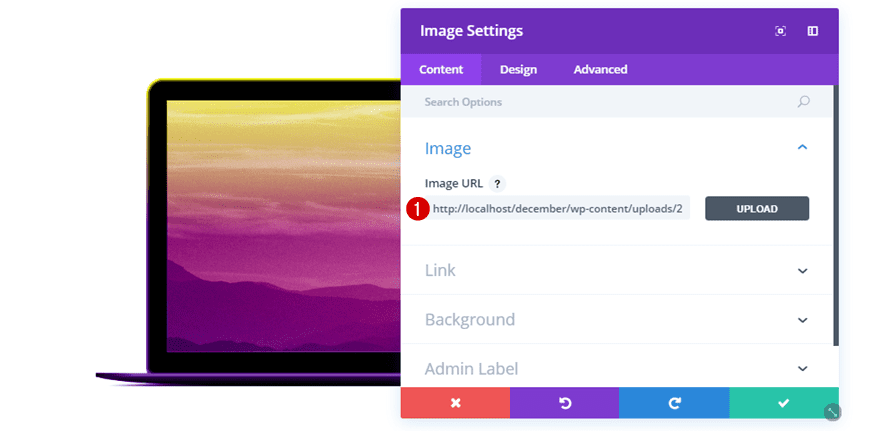
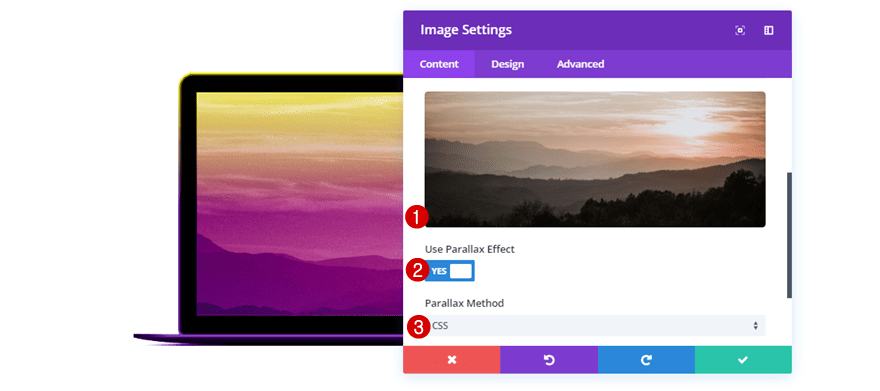
Add Background Image & Use CSS Parallax Method
Next, open the Background Subcategory, upload the background image, enable the ‘Use Parallax Effect’ option and select ‘CSS’ as the Parallax Method.
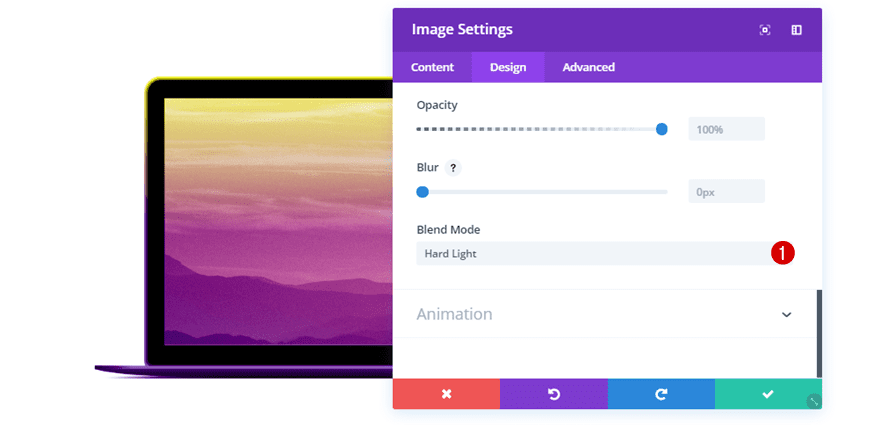
Add Blend Mode to Image Module
The last thing you’ll have to do is change the Blend Mode of the Filters subcategory into ‘Hard Light’.
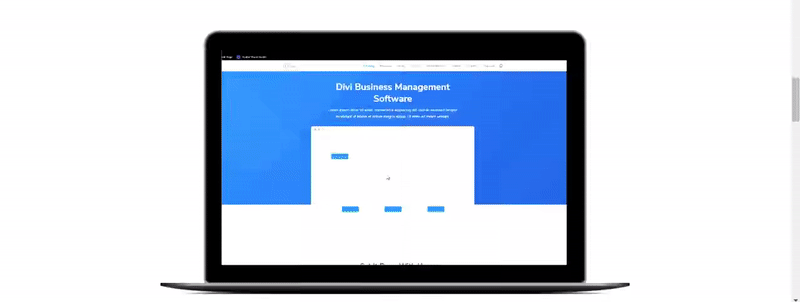
Recreate Example #3
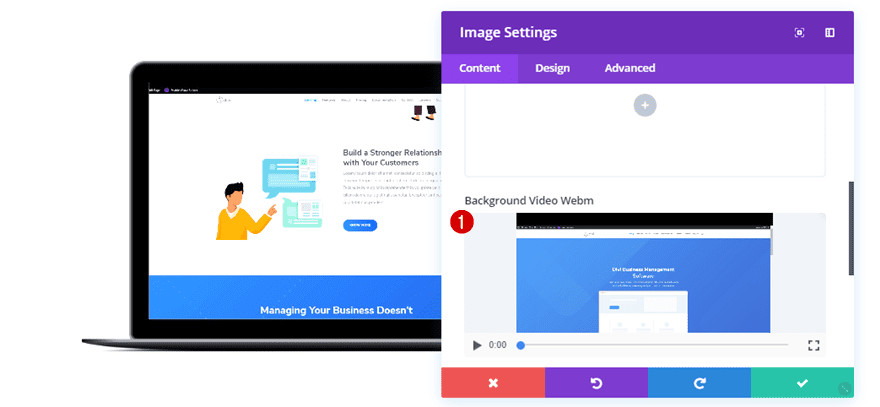
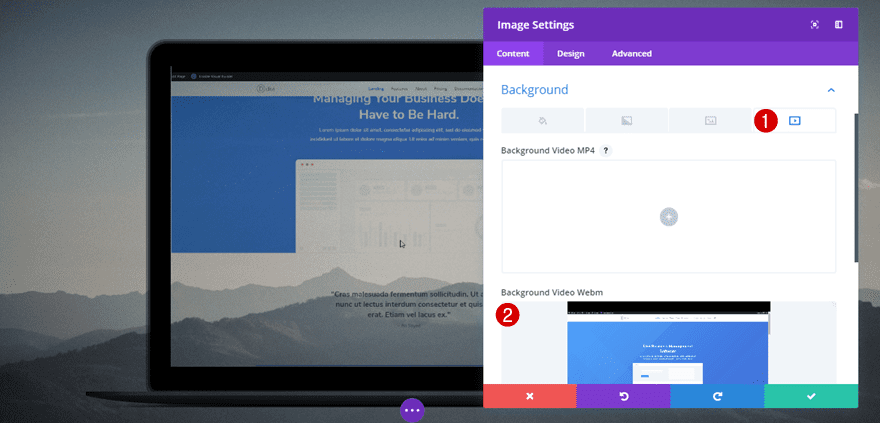
For the next example, we’re simply going to add a video to the mockup instead of an image. You can add all kinds of videos to the mockup, a screen capture being one of them.
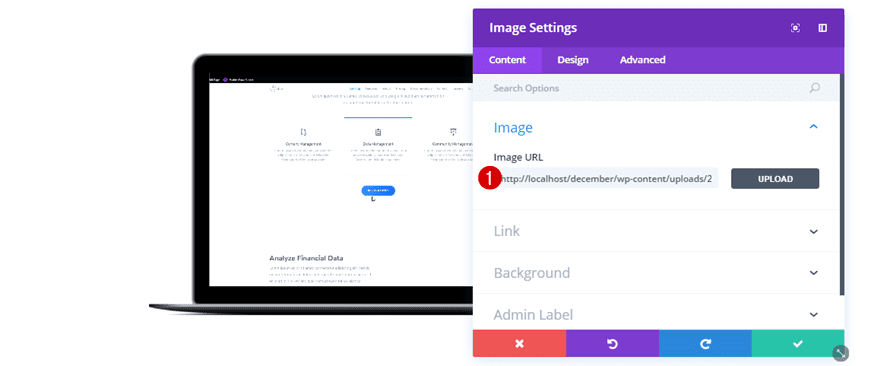
Add an Image Module & Upload Mockup
Again, start by adding an Image Module and selecting the mockup we’ve created with Photoshop.
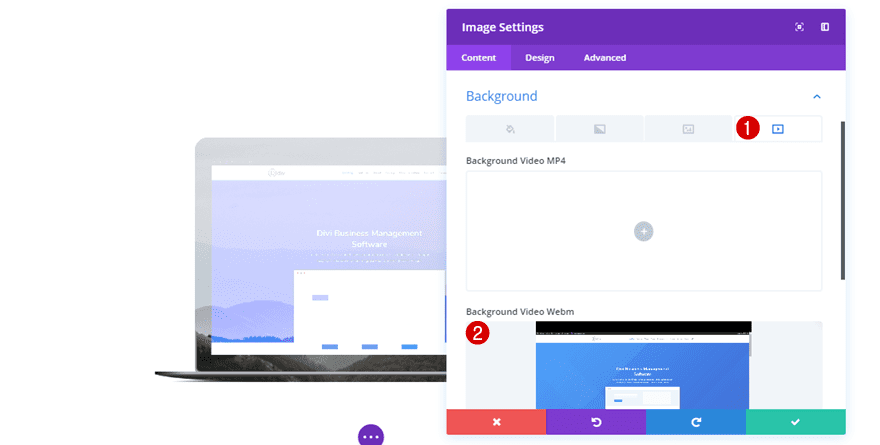
Add Background Video
Then, add a video to the Background subcategory of your Image Module and you’re done!
Recreate Example #4
The next example we’ll be recreating consists of a video background in combination with an image background that changes the look and feel of your mockup.
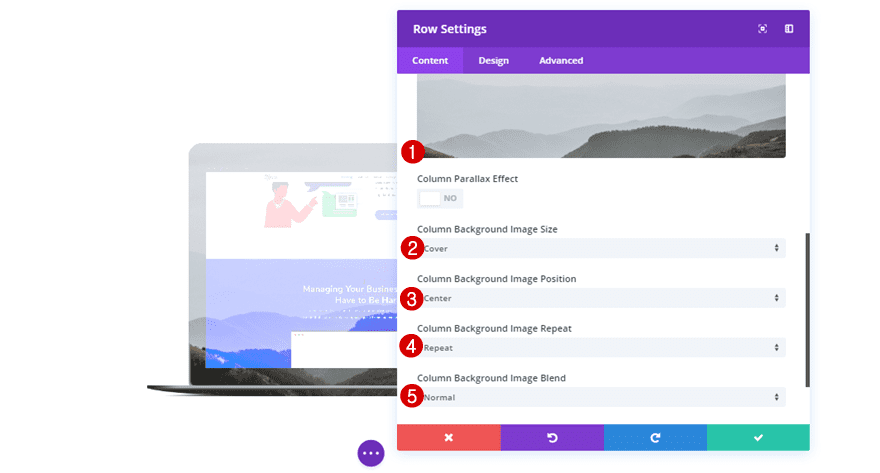
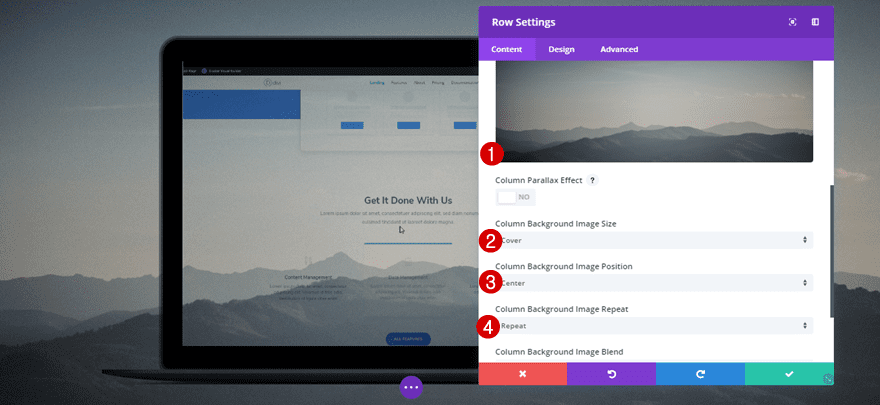
Add Background Image to Column 1
Start by opening your row settings, add a background image to the Background subcategory and use the following settings for it:
- Column Background Image Size: Cover
- Column Background Image Position: Center
- Column Background Image Repeat: Repeat
- Column Background Image Blend: Normal
Add an Image Module & Upload Mockup
Then, add an Image Module with the mockup we’ve created in the Photoshop part of this post.
Add Background Video
Next, add a video background to the Image Module.
Add Blend Mode to Image Module
And lastly, enable the ‘Lighten’ Blend Mode within the Filters subcategory of the Image Module.

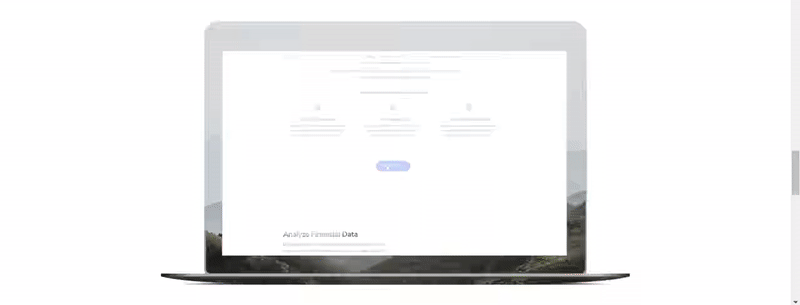
Recreate Example #5
The last example we’ll be recreating allows you to add a background image that takes up the whole width of the screen. The displayed mockup has a video background as well which blends very nicely with the image background that is being used.
Row Settings
Column Structure
The row for the last example has slightly different settings. Start by choosing a row with one column.
Column 1 Background Image
Then, add a background image to the column with the following settings:
- Column Background Image Size: Cover
- Column Background Image Position: Center
- Column Background Image Repeat: Repeat
- Column Background Image Blend: Normal
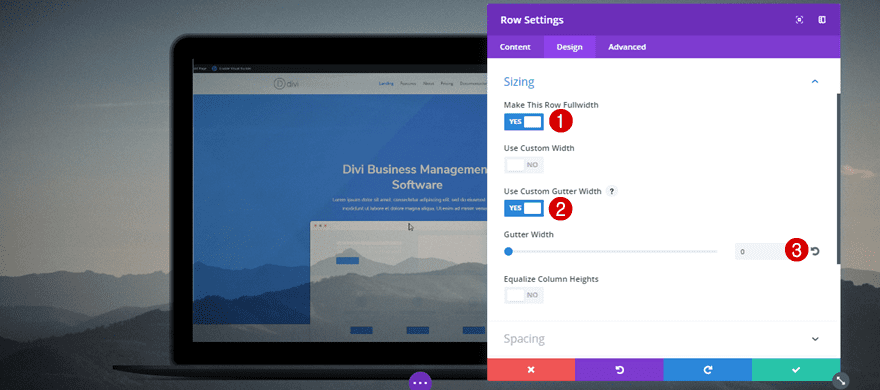
Sizing
Next, open the Sizing subcategory of your row and apply the following changes:
- Make This Row Fullwidth: Yes
- Use Custom Gutter Width: Yes
- Gutter Width: 0
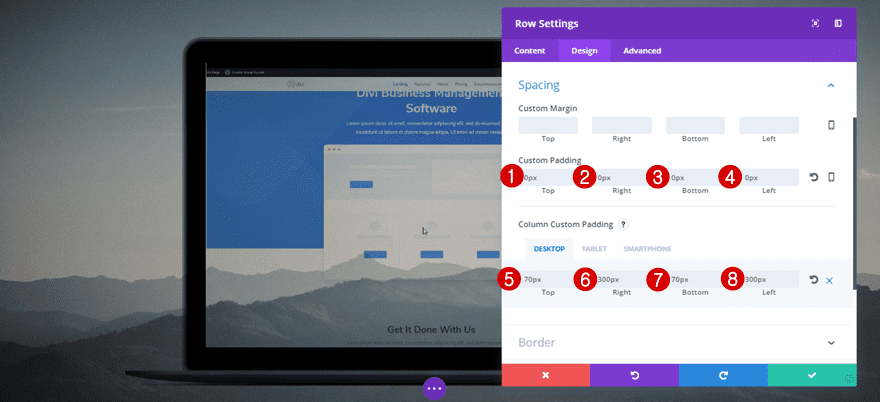
Spacing
There’s a need for some custom padding and column custom padding as well:
- Top, Right, Bottom & Left Padding: 0px
- Column Top Padding: 70px
- Column Right Padding: 300px (Desktop), 200px (Tablet), 100px (Phone)
- Column Bottom Padding: 70px
- Column Left Padding: 300px (Desktop), 200px (Tablet), 100px (Phone)
Add an Image Module & Upload Mockup
Once you’re done with the row settings, you can add an Image Module and select the mockup we’ve created in the Photoshop part of this post.
Add Background Video
Then, add a video to the Background subcategory of the Image Module.
Add Blend Mode to Image Module
Last but not least, select ‘Multiply’ as the Blend mode within the Filters subcategory of the Design tab and you’re done!
Final Thoughts
In this post, we’ve shown you 5 awesome ways to add images and videos to your screen mockups. We started off by showing you how to make some modifications in Photoshop to a mockup file which you can download for free and continued by showing you how you can modify that mockup file within the Divi builder to show all the image or video content you want to share with your visitors. If you have any questions or suggestions; make sure you leave a comment in the comment section below!


Great examples! Is it possible to add a video using by url link? I’ve attempted this but the video doesn’t play. Not sure what the problem might be. Do I need to upload the video after converting it to webm? I was hoping to use a youtube hosted video.
Thanks!
Hi!
I love #2 but it doesn‘t work on firefox and edge. No problems with crome and ie.
Any ideas?
Thanks!
Hi –
I tried to accomplish the effect in #3. However, when I upload my video background the sides f the image are cut off almost like it is zoomed in. This cuts the sides off of the design I’m trying to show in the mockup.
Any ideas how to fix this issue?
I’m having the same exact issue. The reason for this it appears is because the video gets “lost” to fit the upper left background borders of the image when it’s uploaded in Divi, almost as if it doesn’t recognize that it should be only covering the screen of the laptop, not the entire image.
I found this out because I matched the exact size of the video frame and placed it over the image of the laptop and saw that the borders match up perfectly with the image. It’s not going inside of the screen because it’s tricked into thinking the background of the image is all of the image, not the laptop screen.
If you take your video, and match it to the image, you’ll see that it aligns perfectly in the upper left corner of the image in Divi.
No idea how to solve this. I followed every step CAREFULLY in the photoshop mockup.
Any assistance would be great, thank you.
Love this idea and can’t wait to try it out on my portfolio!
Like most graphics tutorials though, it assumes we all have Photoshop. I use Gimp but should be able to get it to work.
I also don’t have photoshop. Isn’t there a way you guys just link the transparent file for us?
I love being able to search the blog and quickly find many helpful tips for getting the very most out of Divi. It’s fun seeing what new stuff I can learn to increase my creative designs. Divi rocks!
Top! I was only missing references page and #3 will be awesome for it. Thank you!
I love these effects, good tutorial, thank you!
how make own screenshot video on #5
Since the background video covers the entire background of the image, How do you get the background video to fit perfectly inside the screen area without cutting off the outer edges of the video?
I am trying to do this, but my file does not seem to be in a .psd and Photoshop won’t open it. Am I doing something wrong?
Love these! Especially #3. Will be making use of that soon.
Thanks!
#2, I mean. But #3 still good. 🙂
Yesterday I started using divi, and its simplicity is amazing.
With examples like these, even more … Great job guys!