
WordPress makes up 1/3 of websites on the internet today. But many of them don’t appear as WordPress to the users or the public. Why? Because of a practice called white labeling. White labeling is when you remove all the branding of one product in place of another. For example, your login pages and dashboard (and others) will be decorated with your own logo, company name, and media. You will still be using WordPress and gaining all its power and utility, but it won’t appear as default WP to your users or visitors. You can even have customized widgets and messaging within traditionally WordPress-labeled areas.
Subscribe To Our Youtube Channel
How to White Label WordPress
You have a few options when it comes to white labeling WordPress. You can manually alter the PHP files in your WP installation, inserting custom code in places where your site needs a new identity. A number of plugins exist, too, to give you a massive amount of white-label customization and freedom. We are going to walk you through the code required to manually white label your site, show you how to use the Branda plugin to white label WordPress, and guide you to some of the other top plugins out there so you have a solid idea of what options you have to choose from.
Manually White Label WordPress
Manually white labeling WordPress is actually pretty simple: you edit your installation’s functions.php file. You can also control specifically what you want to change, and you do so without the extra bloat from plugin code that may or may not apply to your situation. If you just want to alter the logo on the login page, you can. Change the menus in the admin panel and nothing else? You can do that, too. But you can pick-and-choose what parts of WP you white label. Altering anything in the WordPress file system can be dangerous if not done correctly, though.
That is why we highly recommend that you use a child theme to make these changes. Because you’re editing a core WordPress file (technically the core WordPress file), too many things can go wrong if you don’t.
If you do not use a child theme, any changes that you make to functions.php will be overwritten when your theme updates.
Therefore, we suggest and urge as strongly as we can that you follow our guide on creating child themes. Or, if you’re an Elegant Themes member, our ultimate guide on creating a Divi child theme specifically. If you don’t, and your theme updates (or something breaks and a backup has to be restored or one of a hundred other things), your white label code will be gone. You will be back to square one. So please use a child theme.
If you are not comfortable creating one manually through our guides, you can also use a child theme creation plugin or the WP Zone Divi child theme builder.
How to Edit Your Functions.php File
Editing your functions.php file is very easy, and you have multiple options to choose from. You can use a code editor along with an FTP program like FileZilla to download and re-upload the file. Or you could use your cPanel’s file manager or a WordPress plugin like WP File Manager handle it all right inside your dashboard. Regardless of the method you choose to edit the file, you 100% want to create a backup of both your site and the file itself to prevent any catastrophic loss of data.
With that said, you can find your functions.php file in your /public_html/example.com/wp-content/theme-name directory.
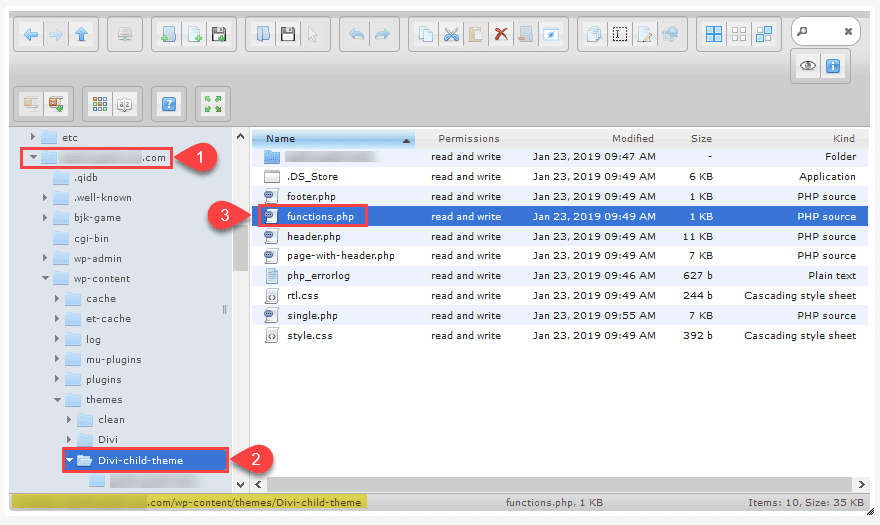
Depending on your editor and website set up, the exact structure will be different from the above example, but it will be similar. Then, download it and get to editing.
Manually White Label the WordPress Login Page
The perfect spot to start white labeling your site is the WP login page. It’s one of the most used pages on your site, so you might not want the big WP logo staring at your users or staff. It’s easy to change. Any specific instructions you need for the code snippets are included as comments within the code block itself, and you should also note that any customization regarding URLs and custom text needs to be changed from our placeholders here. Also, many thanks to Ayub on the ET dev team for these wonderful examples.
Now for the code itself:
<?php/**
 * Change WordPress login logo with your own
 */
function et_custom_login_logo() {
  $logo_url   = get_stylesheet_directory_uri() . '/images/logo.png';
  $logo_style = '.login h1 a { background-image: url(' . esc_url( $logo_url ) . '); background-size: 186px 86px; width: 186px; height: 86px; }';
  wp_add_inline_style( 'login', $logo_style );
}
add_action( 'login_enqueue_scripts', 'et_custom_login_logo' );/* Code explanation - Start Here *//**
 * Change WordPress login logo with your own
 */
function et_custom_login_logo() {
  // Path URL to your own logo. Method get_stylesheet_directory_uri() will return
  // current theme path URL.
  $logo_url   = get_stylesheet_directory_uri() . '/images/logo.png';  // Set logo background image. esc_url() method is needed to check and clean the
  // logo URL. You can resize the logo as well by adjusting the background size,
  // height, and width.
  $logo_style = '.login h1 a { background-image: url(' . esc_url( $logo_url ) . '); background-size: 186px 86px; width: 186px; height: 86px; }';  // Render custom logo style above. 'login' is the registered stylesheet for
  // default WordPress login page. By using wp_add_inline_style() method we no
  // longer need to specify <style> tag, has unique ID, and it will be fired as
  // soon as WordPress login stylesheet is loaded.
  wp_add_inline_style( 'login', $logo_style );
}
add_action( 'login_enqueue_scripts', 'et_custom_login_logo' );/* Code explanation - End Here */?>
Additionally, you may need to redirect after a user clicks on the logo itself. You will want to add this code to do that:
<?php/**
 * Change the URL of the WordPress login logo with home URL
 *
 * @return string Your custom logo URL
 */
function et_custom_login_logo_url() {
  return esc_url( home_url() );
}
add_filter( 'login_headerurl', 'et_custom_login_logo_url' );?>
And because accessibility is so important, you will want some hover/title text for the image. Here’s how to do that:
<?php/**
 * Change the hover/title text of the WordPress login logo
 *
 * @return string Your custom hover/title text
 */
function et_custom_login_logo_title() {
  return esc_html__( 'Custom Title Text Here', 'et-text-domain' );
}
add_filter( 'login_headertext', 'et_custom_login_logo_title' );/* Code explanation - Start Here *//**
 * Change the hover/title text of the WordPress login logo
 *
 * @return string Your custom hover/title text
 */
function et_custom_login_logo_title() {
  // esc_html__() method is used to support locale translation and clean the
  // translated string if it exists.
  return esc_html__( 'Custom Title Text Here', 'et-text-domain' );
}
add_filter( 'login_headertext', 'et_custom_login_logo_title' );/* Code explanation - End Here */?>
Manually White Label the WordPress Admin Dashboard
Beyond the login page, of course, is the WordPress admin. The place where all the magic happens. Or at least the work. With the last few releases of WordPress significant progress has been made on the design and UX of the notoriously ugly backend of WordPress. The following code snippets are meant to help with that.
Welcome Message
You know that little greeting in the top right-hand corner of your WordPress Admin that says, “Howdy, Your Name”? Well now you can make it say whatever you want.
<?php/**
 * Change admin bar menu greeting text
 *
 * This function will replace "Howdy" text and also regenerate display name and
 * the avatar of current user. So, the new greeting text will work for all
 * languages and can be translated.
 *
 * @see wp_admin_bar_my_account_item()
 *
 * @param object $wp_admin_bar WP_Admin_Bar instance
 */
function et_custom_admin_bar_greeting_text( $wp_admin_bar ) {
  $user_data         = wp_get_current_user();
  $user_display_name = isset( $user_data->display_name ) ? $user_data->display_name : false;
  $user_id           = isset( $user_data->ID ) ? (int) $user_data->ID : 0;
  if ( ! $user_id || ! $user_display_name ) {
    return;
  }  $user_avatar = get_avatar( $user_id, 26 );  // translators: %s: Current user's display name
  $my_account_text = sprintf(
    __( 'Hello, %s' ),
    '<span class="display-name">' . esc_html( $user_data->display_name ) . '</span>'
  );  $wp_admin_bar->add_node(
    array(
      'id'    => 'my-account',
      'title' => $my_account_text . $user_avatar,
    )
  );
}
add_action( 'admin_bar_menu', 'et_custom_admin_bar_greeting_text' );/* Code explanation - Start Here *//**
 * Change admin bar menu greeting text
 *
 * This function will replace "Howdy" text and also regenerate display name and
 * the avatar of current user. So, the new greeting text will work for all
 * languages and can be translated.
 *
 * @see wp_admin_bar_my_account_item()
 *
 * @param object $wp_admin_bar WP_Admin_Bar instance
 */
function et_custom_admin_bar_greeting_text( $wp_admin_bar ) {
  // Verify current user ID and name
  $user_data         = wp_get_current_user();
  $user_display_name = isset( $user_data->display_name ) ? $user_data->display_name : false;
  $user_id           = isset( $user_data->ID ) ? (int) $user_data->ID : 0;
  if ( ! $user_id || ! $user_display_name ) {
    return;
  }  // Get user avatar
  $user_avatar = get_avatar( $user_id, 26 );  // Set new greeting text "Hello" and regenerate menu text
  // translators: %s: Current user's display name
  $my_account_text = sprintf(
    __( 'Hello, %s' ),
    '<span class="display-name">' . esc_html( $user_data->display_name ) . '</span>'
  );  // Override existing my account text with the new one
  $wp_admin_bar->add_node(
    array(
      'id'    => 'my-account',
      'title' => $my_account_text . $user_avatar,
    )
  );
}
add_action( 'admin_bar_menu', 'et_custom_admin_bar_greeting_text' );/* Code explanation - End Here */?>
Footer Text
By default the WordPress Admin’s footer says, “Thank you for creating with WordPress”. But thanks to this little snippet it can now be changed to any message you find brand appropriate for you clients.
<?php/**
 * Change admin footer text
 *
 * @return string Your custom footer text
 */
function et_change_admin_footer_text () {
  return __( 'Powered by WordPress. Theme designed by <a href="https://www.elegantthemes.com/">Elegant Themes</a>.', 'et-text-domain' );
}
add_filter( 'admin_footer_text', 'et_change_admin_footer_text' );?>
Admin Bar Logo
If you need to change the default WordPress logo to a small image of your own, you just have to use this snippet:
<?php/**
 * Change WordPress admin top-left logo with your own
 */
function et_custom_admin_top_left_logo() {
  $logo_url   = get_stylesheet_directory_uri() . '/images/top-left-logo.png';
  $logo_style = '#wp-admin-bar-wp-logo > .ab-item { background-image: url(' . esc_url( $logo_url ) . '); background-size: 28px; background-repeat: no-repeat; background-position: center; } #wpadminbar #wp-admin-bar-wp-logo > .ab-item .ab-icon:before { content: none; }';
  wp_add_inline_style( 'admin-bar', $logo_style );
}
add_action( 'admin_enqueue_scripts', 'et_custom_admin_top_left_logo' );/* Code explanation - Start Here *//**
 * Change WordPress admin top-left logo with your own
 */
function et_custom_admin_top_left_logo() {
  // Path URL to your own logo. Method get_stylesheet_directory_uri() will return
  // current theme path URL.
  $logo_url   = get_stylesheet_directory_uri() . '/images/top-left-logo.png';  // Set admin bar logo background image. esc_url() method is needed to check and
  // clean the logo URL. You need to set background repeat as no-repeat to ensure
  // the background image will be displayed once. You can resize and reposition
  // the logo as well by adjusting the background size and position.
  $logo_style = '#wp-admin-bar-wp-logo > .ab-item { background-image: url(' . esc_url( $logo_url ) . '); background-size: 28px; background-repeat: no-repeat; background-position: center; } #wpadminbar #wp-admin-bar-wp-logo > .ab-item .ab-icon:before { content: none; }';  // Render custom logo style above. 'admin-bar' is the registered stylesheet for
  // default WordPress admin bar. By using wp_add_inline_style() method we no
  // longer need to specify <style> tag, has unique ID, and it will be fired as
  // soon as WordPress admin bar stylesheet is loaded.
  wp_add_inline_style( 'admin-bar', $logo_style );
}
add_action( 'admin_enqueue_scripts', 'et_custom_admin_top_left_logo' );/* Code explanation - End Here */?>
Contact Widget/Theme Details
Since you’re doing so much work on your site (or a client’s site), you want them to know how to contact you (or successive devs), so we’ve got some code you’ll want to use for that.
<?php/**
 * Add theme info widget into WordPress Dashboard
 */
function et_add_dashboard_widgets() {
  wp_add_dashboard_widget(
    'et_dashboard_widget_info',
    esc_html__( 'Theme Details', 'et-text-domain' ),
    'et_dashboard_widget_info_render'
  );
}
add_action( 'wp_dashboard_setup', 'et_add_dashboard_widgets' );/**
 * Render the content of theme info widget
 */
function et_dashboard_widget_info_render() {
  $content = __( '
    <ul>
      <li>
        <strong>Designed By:</strong> Elegant Themes
      </li>
      <li>
        <strong>Website:</strong> <a href="https://www.elegantthemes.com/">www.elegantthemes.com/</a>
      </li>
      <li>
        <strong>Contact:</strong> <a href="https://www.elegantthemes.com/contact/">Chat with our support</a>
      </li>
    </ul>', 'et-text-domain' );  echo wp_kses_post( $content );
}/* Code explanation - Start Here *//**
 * Add theme info widget into WordPress Dashboard
 */
function et_add_dashboard_widgets() {
  // You can replace 'et-text-domain' with your preferred one
  wp_add_dashboard_widget(
    'et_dashboard_widget_info',
    esc_html__( 'Theme Details', 'et-text-domain' ),
    'et_dashboard_widget_info_render'
  );
}
add_action( 'wp_dashboard_setup', 'et_add_dashboard_widgets' );/**
 * Render the content of theme info widget
 */
function et_dashboard_widget_info_render() {
  // The widget content is available for translation. You can replace
  // 'et-text-domain' with your preferred one.
  $content = __( '
    <ul>
      <li>
        <strong>Designed By:</strong> Elegant Themes
      </li>
      <li>
        <strong>Website:</strong> <a href="https://www.elegantthemes.com/">www.elegantthemes.com/</a>
      </li>
      <li>
        <strong>Contact:</strong> <a href="https://www.elegantthemes.com/contact/">Chat with our support</a>
      </li>
    </ul>', 'et-text-domain' );  // wp_kses_post() method is needed to clean up translated widget content
  echo wp_kses_post( $content );
}/* Code explanation - End Here */?>
Admin Panel Color Scheme
You can do this on a per-user basis in the profile editor, you can also change the default to any look that suits your brand with this code. If you’re trying to remove the “WordPress feel” of the backend, this can go a long way.
<?php/**
 * Custom WordPress admin color scheme
 */
function et_load_admin_css() {
  wp_enqueue_style( 'et-admin-css', get_template_directory_uri() . '/css/admin.css' );
}
add_action( 'admin_print_styles', 'et_load_admin_css' );?>
Now, thanks to Ayub’s comments and explanations, we’re confident that almost anyone, regardless of your coding and development experience or background. But if you’re more comfortable using a plugin to accomplish your white label goals, we’ve got some things you should see.
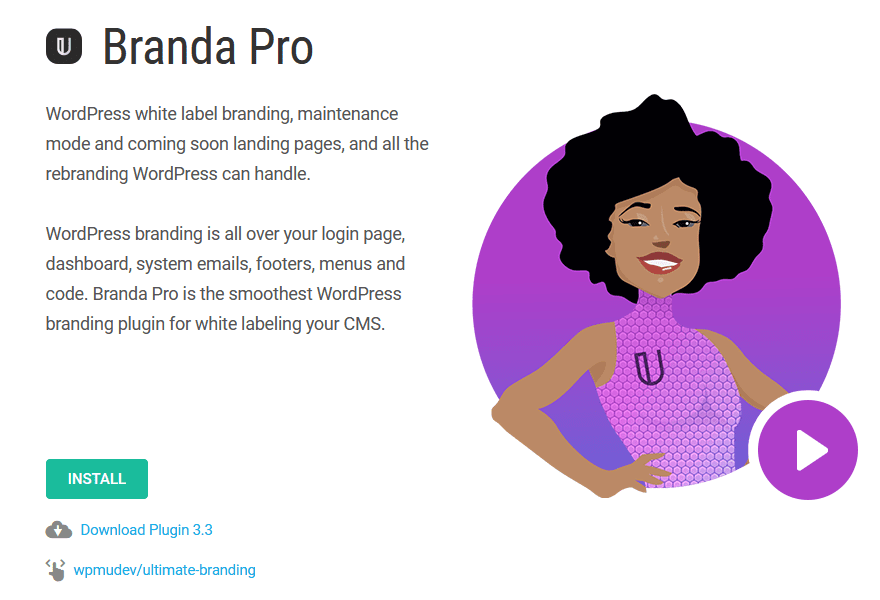
Using the WPMU DEV Branda Plugin
Probably the simplest way to handle white-labeling your WordPress installation is by using a plugin. WPMU DEV has one specifically for this: Branda, formerly known as Ultimate Branding.
Using Branda to customize your install is easy, quick, and clean. You get a ton of options that take a lot of work and tweaking when performing manually, so we think this is a great way to simplify that process.
First, you will see the new Branda Pro entry added to your WP Dashboard. Go to Dashboard, and you will see everything that you can possibly customize and white label on your site.
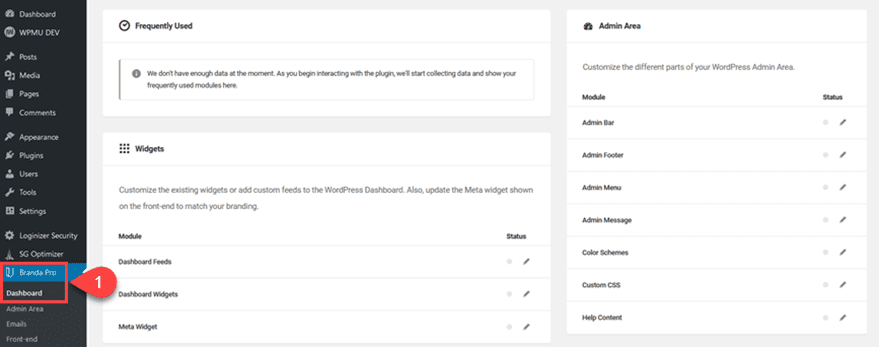
You will find a number of categories, under each of which are many sub-options that you can white label. You can use Branda to adjust as many or as few as you wish. The heading categories you see are:
- Admin Area
- Widgets
- Front-End
- Emails
- Utilities
Most of them are pretty straightforward (widgets, emails), but with Front-End come options for things like cookie notices, signup/login screens, and even the author box. Additionally, Utilities includes comment control, various images, site-wide text replacement, and even tracking codes.
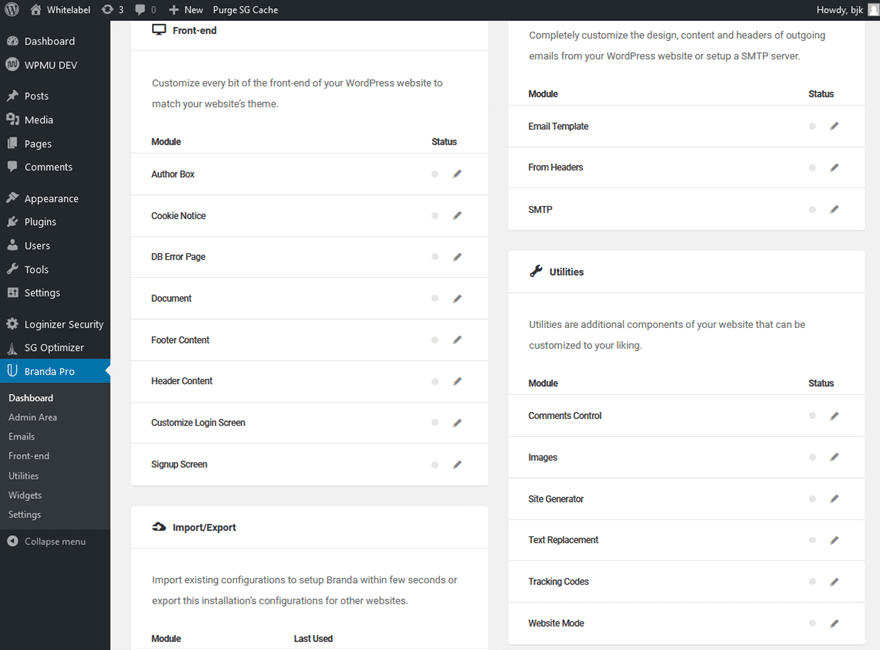
And if you have another site or set of customizations that you’re restoring, you can use the Import/Export tool for that.
White Labeling the Admin Bar
For our example, we’re going to show you how to white label the admin bar in your site’s WP dashboard.
![]()
To start with, find that option in your Branda Pro Dashboard. It should be near the top-right with the default layout.
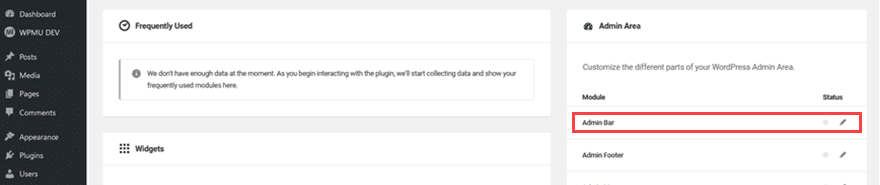
Click the pencil to go to the edit options. You should see an Admin Area heading with a series of tabs leading down the left of the screen. These take you to the other aspects of the admin white labeling, so this is the only one that affects the header.
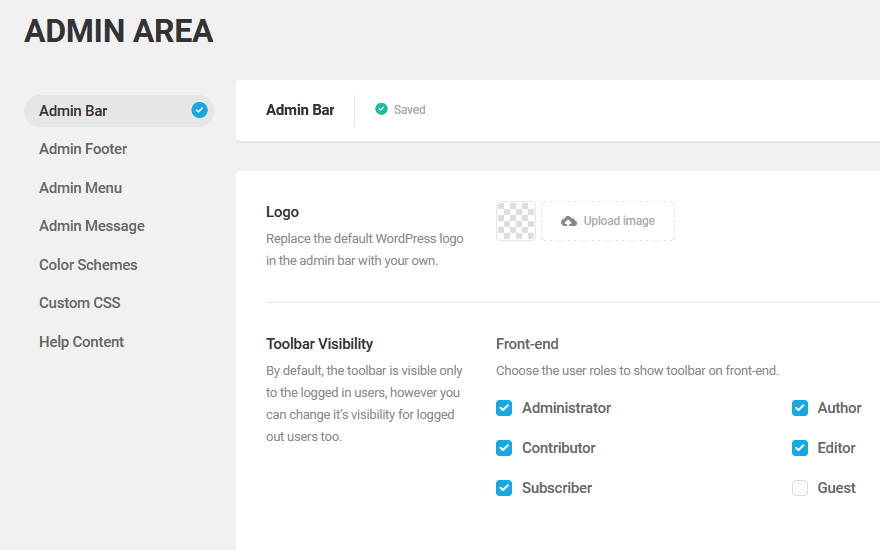
As you can see in the example above, the default WordPress admin bar shows the WP logo in the left corner. You can set that to a custom logo here. It will be incredibly small, so make sure that your image is optimized both in file size and resolution for the space. (Protip: Use an SVG.)
![]()
The next option is the Toolbar Visibility section, and this just gives you control over who actually sees the admin bar on the front-end. Nothing fancier than that. Next up are Menu Items and Custom CSS.
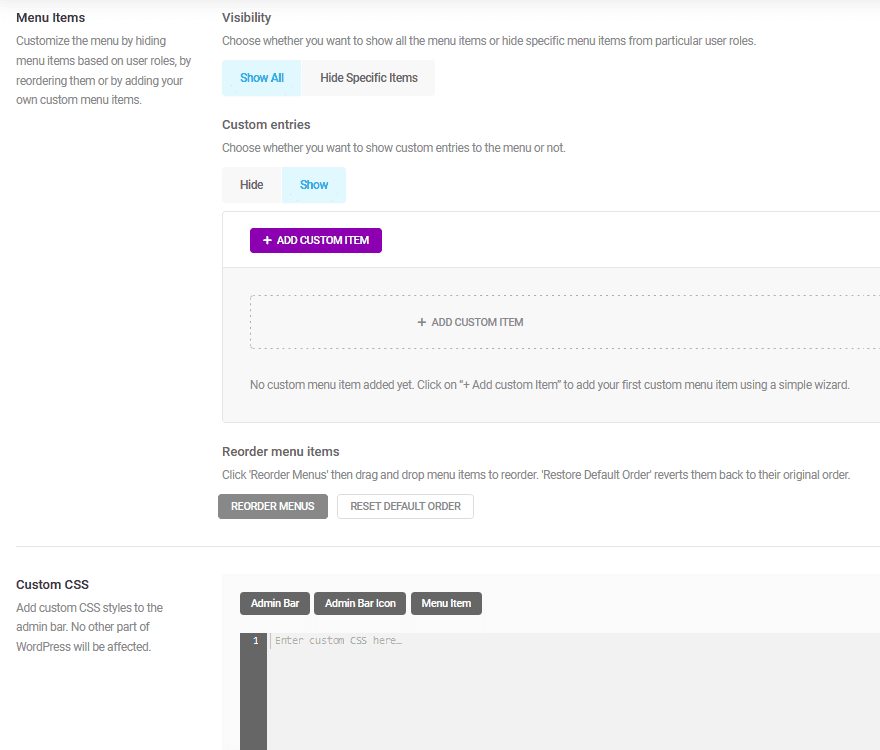
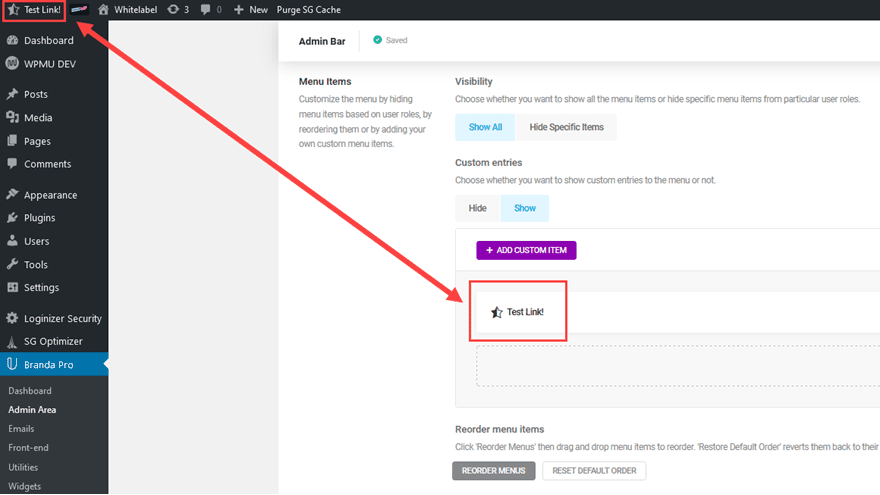
Adding a custom menu item is as simple as clicking the +Add Custom Item button, and following the steps to add your desired link. Choose icon, where it opens (new tab or same), the icon it shows, visibility, etc.
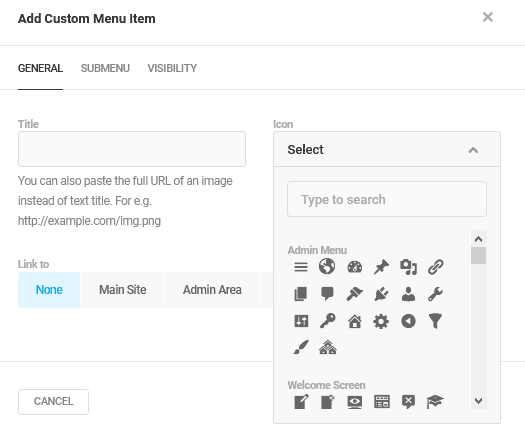
Once you save, it will appear at the top of the screen.
And finally, there is Custom CSS, which is exactly what you expect. CSS code that only applies to the admin bar.
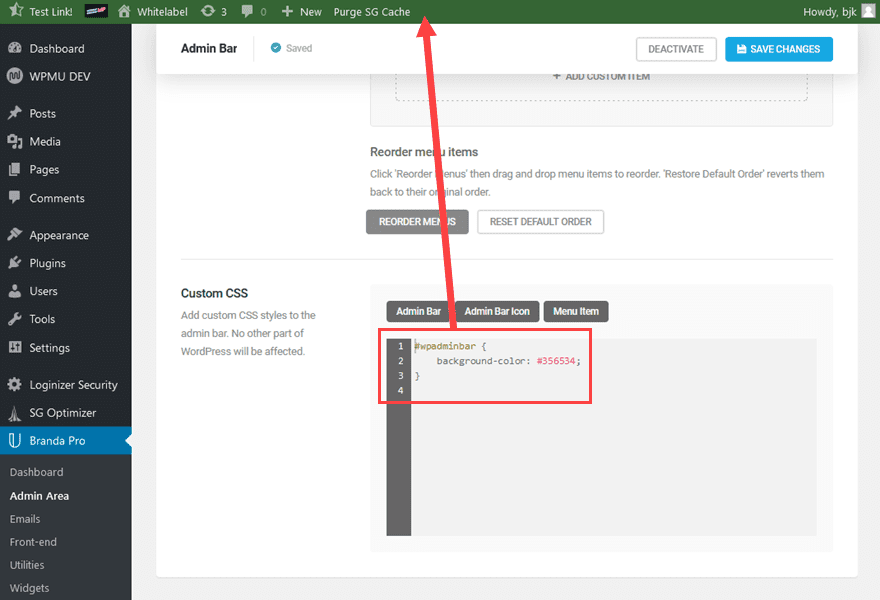
And that is that. Branda follows these same steps for all of the different white labeling options. You can add logos, custom CSS, backgrounds, and so on to any part of WordPress that you’d like. And as you can see with this particular example, it’s easy and quick. This means you just need the assets to upload, and within a few clicks, your site will be as white as the freshly driven snow. You can find out more about Branda and WPMU DEV here.
Other Top White Label Plugins for WordPress
If you’re not into Branda, that’s okay, too. We’ve got some of the other top white label plugins for WordPress for you to customize and brand your installation as you see fit. While they all accomplish the same end, each is a little different and suited for a different kind of user.
White Label CMS
If quick-and-easy is your thing, White Label CMS is absolutely something you should see. The actual work you’re going to perform with this plugin takes minutes to do. You don’t get a crazy amount of customization (like you do with Branda above, for instance), but what you lose in detail, you gain in efficiency. If you’re not planning on changing literally every little thing, but instead want a new login page, admin panel, header/footer, and so on, this might be a great plugin for you.
Absolutely Glamorous Custom Admin
We really like what Absolutely Glamorous Custom Admin offers. Not only is the UI simple and easy-to-use, but the options are straightforward and understandable. You can see what you are changing inside the plugin dashboard, and that means that you can more easily keep your messaging, colors, logos, and other customizations in line with one another. No guessing if you did X, Y, or Z — you can see it all in one place. Which we really like and think you will, too.
White Label Branding
If you want a little more control over users, White Label Branding is definitely a premium option you should consider. You get the normal options for white labeling over the site, but you also get a custom user role administration platform. From the product page:
We have added a powerful Role and Capability Manger, which will allow you to create new user Roles and assign Capabilities. You can add new capabilities for specific user Roles and you can even create a “fake” Administrator account. This can be used if you want to give your clients “admin” access, but still limit what they have access to.
The real administrator will also be hidden from the users list. This way a client with the “fake” administrator account, will never know that they don’t have full access to all features.
For $25, it does a lot right.
Admin Menu Editor comes in a free or pro version, though the free version does a lot — maybe enough for most of you. You get CSS control, front-end changes, back-end changes, and drag-and-drop editing for menus. The free version does not come with role editing or restriction, but if that isn’t a dealbreaker, AME is a freebie that can white label WordPress with the best of them.
Cusmin
Cusmin (for Custom Admin, get it?) is one of the most robust custom admin white label plugins we’ve come across. It lets you white label and customize really every last detail of your WP installation, from logos, icons, dashboards, even meta boxes and metatables. You can even work your white-label magic using JavaScript. For $36 annually (or $4 per month), we think Cusmin is worth giving a shot.
Conclusion
One way or another, we are confident that white labeling your WordPress installation is entirely within your grasp. So whether you are looking for a manual coding experience, a membership with WPMU DEV and their ecosystem of plugins, or a one-off plugin that you can use, there’s an option here for that. White labeling isn’t necessary for every site, but it can give a business or brand a bit more of a unique presence and potential credibility with users if you take the extra steps to customize your installation.
How do you feel about white labeling WordPress? Let us know your tips, tricks, and favorite strategies in the comments!
Article featured image by nelelena / shutterstock.com


White labelling WordPress backend is a big but one-time task. If you’re an agency and want to give a unique experience to your clients, it’s well worth spending some time and creating your own custom plugin or putting the code in your custom theme to so that as soon its activated, it does it’s magic!
Hi All, thanks for this.
Manual version
I know its obvious, but will mention. Don’t forget the code above is repeated. So there is a the code and the code explanation (where needed code repeats). If you paste both will not work. I know as was being lazy and did it hahaha – Easy fix.
Everything seems to be working well except the “Contact Widget/Theme Details” bit – Others work nicely.
Although weirdly, the top right icon changes in the dashboard but not on the pages (admin bar when on pages).
Thanks! Have added it to our standard child theme
Hi Elegant Themes,
The code gave a bunch of errors. Since I don’t know anything about php is is possible for you guys to double check this code?
Would love to use all of it but it keeps givin me syntax errors
Very helpfull Articel thanks for this!
Love the article! But when I try to put the code in my functions.php my website crashes..
Ive tried everything and I would love to play around with this…
Can the code be updated?
Hi I am using the elegant theme for my seo agency website and I am not a developer or coder so Can I use any third party plugin to do the white lable?
Thank you for the article! Once i have done everything by hand, nut now i use Branda and i am glad you have showcased it in your article.
Hi,
I was reading that post and two questions popped up as I finished reading: is WordPress so bad that you want to hide it from customers? And second, is it really worth it to overload your functions.php file (and possibly affect performances) just to hide the WP logo? As for the login page, if one of my customer is more interested in customizing a designing the login page than writing some new content to optimize his website’s SEO, I think at some point I will not have him as a customer (that same guy who will spend weeks on the login page wil also ask you:”hey, I don’t see my website going up in the SERP…”)
Informative article – thanks for posting it! I noticed some fragmented sentences and typos, so you may want to give it another proofing. That said, white-labeling WordPress is apparently much easier than I’d thought, so thanks again.
Jason, thanks for this awesome Tutorial.
Would you mind to recheck your pasted Code? Seems there are some issues, as it gives an Error after inserting your Code.
The only code working is the one from “Admin Panel Color Scheme”
According to you friend. The code has problems, I was testing them
I use Hide My WP which also includes modifying source code as well.
Great post and explains both the manual route or the plugin route really well! I have to add Divi Ghoster is a simple, but good plugin that can white label Divi specifically.
I’ve tried Divi Ghoster on one site and plan on trying it on another. I had to resolve an issue with the developer because there were some minor issues with deactivating the plugin and some Divi features missing. The tech support was slow at first but after I got bumped up the chain a bit we got the issue resolved. They said the issue would be fixed in the next release. All-in-all I would say it is worthwhile. BTW: the issue – when you have Digi Ghoster activated, you lose the function of (easily) cloning an existing page to build a new one. Or, at least, the function is somewhat hidden. But, I guess, that is part of the whole point of using the plugin.